pstut create a stencil banner
DESCRIPTION
How to Create a StencilBanner Text Effect inAdobe PhotoshopTRANSCRIPT

pdfcrowd.comopen in browser PRO version Are you a developer? Try out the HTML to PDF API
All Topics Find tutorials, courses, and more...
Design & Illustration Categories Learning Guides
TEXT EFFECTS
How to Create a StencilBanner Text Effect inAdobe Photoshopby Rose 1 day ago
2 Comments
49 59 7

pdfcrowd.comopen in browser PRO version Are you a developer? Try out the HTML to PDF API
What You'll Be Creating
Warping objects is a fantastic way of achieving some great, realistic effects. Thistutorial will show you how to use shape properties, smart objects, textures, layerstyles, and brushes to create a simple, stencil banner text effect. Then, you'll get touse the Warp command to make the final result look more realistic and give it some

pdfcrowd.comopen in browser PRO version Are you a developer? Try out the HTML to PDF API
more depth. Let's get started!
Tutorial Assets
The following assets were used during the production of this tutorial:
Lintsec Regular font.Cardboard texture stock by YmntleStock.Unrestricted Neutral grunge 7 by DivsM-stock.Soft Wallpaper pattern by Atle Mo.Concrete wall 3 pattern by Atle Mo.You'll also need to load a default Photoshop brush set. So go to Edit >Presets > Preset Manager, and choose Brushes from the Preset Typedropdown menu. Then click the little arrow to the right of the Preset Typedropdown menu, and click Square Brushes near the bottom of the pop-upmenu. When the dialog box appears after that, just click Append, and you’llget the Square Brushes set.
1. Creating the Background

pdfcrowd.comopen in browser PRO version Are you a developer? Try out the HTML to PDF API
Step 1Create a new 909 x 620 px document, and set the Resolution to 200.
Place the Cardboard texture stock image on top of the Background layer, resize itas needed, and merge it with the Background layer when done. Then duplicate it,and go to Filter > Convert for Smart Filters.

pdfcrowd.comopen in browser PRO version Are you a developer? Try out the HTML to PDF API
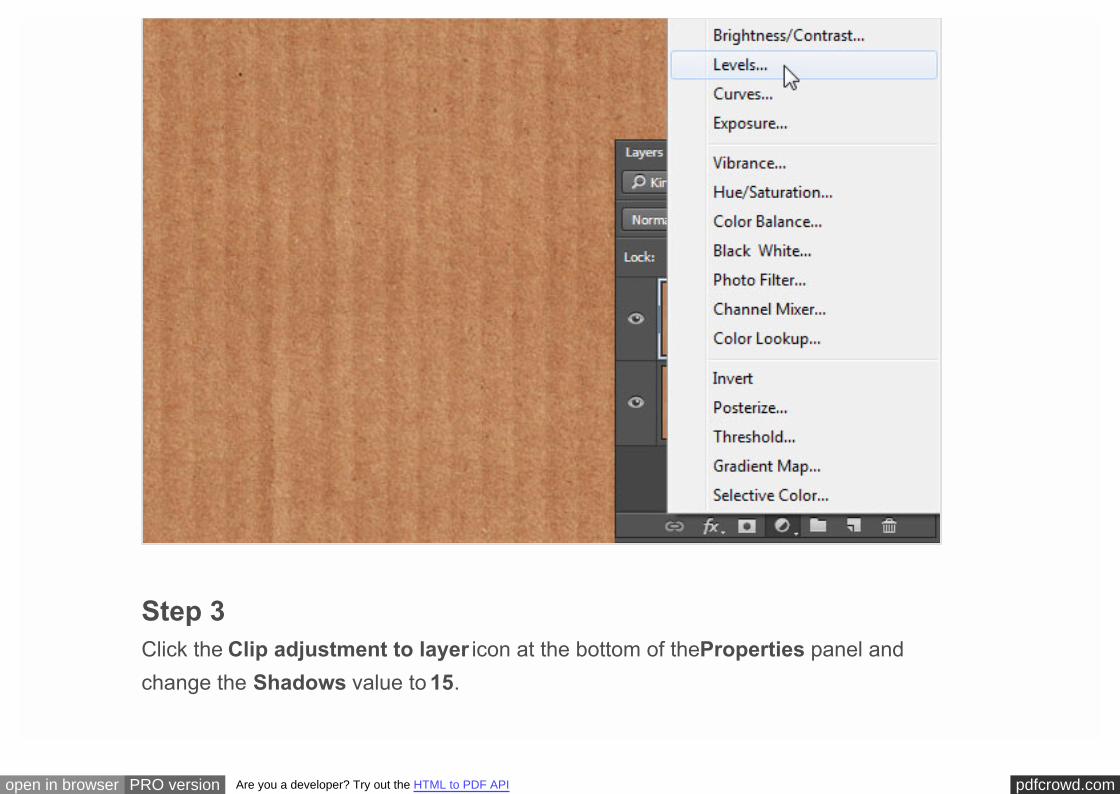
Step 2Click the Create new fill or adjustment layer icon at the bottom of the Layerspanel and choose Levels.
pdfcrowd.comopen in browser PRO version Are you a developer? Try out the HTML to PDF API
Step 3Click the Clip adjustment to layer icon at the bottom of the Properties panel andchange the Shadows value to 15.

pdfcrowd.comopen in browser PRO version Are you a developer? Try out the HTML to PDF API
Step 4Click the Create new fill or adjustment layer icon again and add a Color Balanceadjustment layer. Click the Clip adjustment to layer icon, make sure the Tonesoption is set to Midtones, and then change the values to -45, 0, and 2.

pdfcrowd.comopen in browser PRO version Are you a developer? Try out the HTML to PDF API
2. Creating and Positioning the Rectangles andthe Text
Step 1Pick the Rectangle Tool, and create a 140 x 200 px rectangle using the color

pdfcrowd.comopen in browser PRO version Are you a developer? Try out the HTML to PDF API
#edebdf .
Step 2Pick the Ellipse Tool, and choose the Subtract Front Shape option in the Optionsbar. Then click the Geometry Options icon, and set the Fixed Size's W and Hvalues to 7.

pdfcrowd.comopen in browser PRO version Are you a developer? Try out the HTML to PDF API
What you'll need to do next is click and drag slightly to create two holes at the top ofthe rectangle. You can use some guides to help you position the circles as well, butthat's not necessary.

pdfcrowd.comopen in browser PRO version Are you a developer? Try out the HTML to PDF API

pdfcrowd.comopen in browser PRO version Are you a developer? Try out the HTML to PDF API
Step 3Create the text in All Caps, each letter in a separate layer, using the font LintsecRegular, the Size 43 pt, and the color Black .

pdfcrowd.comopen in browser PRO version Are you a developer? Try out the HTML to PDF API
Step 4Place the first letter's layer below the rectangle shape's layer you created, renamethe rectangle layer to whatever letter is below it, and then select both layers.
Pick the Move Tool, and click the Align vertical centers and Align horizontalcenters icons in the Options bar.

pdfcrowd.comopen in browser PRO version Are you a developer? Try out the HTML to PDF API
Step 5Duplicate the rectangle layer, move the copy on top of another letter, and repeat therest of the steps until each letter has a rectangle.

pdfcrowd.comopen in browser PRO version Are you a developer? Try out the HTML to PDF API
3. Creating the Final Stencil Shapes and theShadow Layers
Step 1Select all the text layers you have, and go to Type > Convert to Shape (or right-click one of them and choose Convert to Shape).

pdfcrowd.comopen in browser PRO version Are you a developer? Try out the HTML to PDF API
Step 2Select each letter's layer and its rectangle layer, and go to Layer > CombineShapes > Subtract Shapes at Overlap. This will merge both layers into one, and

pdfcrowd.comopen in browser PRO version Are you a developer? Try out the HTML to PDF API
subtract the letter from the rectangle, creating the stencil shape.
Step 3Repeat that for the rest of the letters you have.

pdfcrowd.comopen in browser PRO version Are you a developer? Try out the HTML to PDF API
Step 4Duplicate each shape layer, place the copy below the original, and double-click thecopy's thumbnail to change its color to #afaba3 .

pdfcrowd.comopen in browser PRO version Are you a developer? Try out the HTML to PDF API
Once you're done, select each shape layer you have, right-click it, and chooseConvert to Smart Object. This will make the Transforming and Warping that we'llbe performing next non-destructive and editable.
pdfcrowd.comopen in browser PRO version Are you a developer? Try out the HTML to PDF API
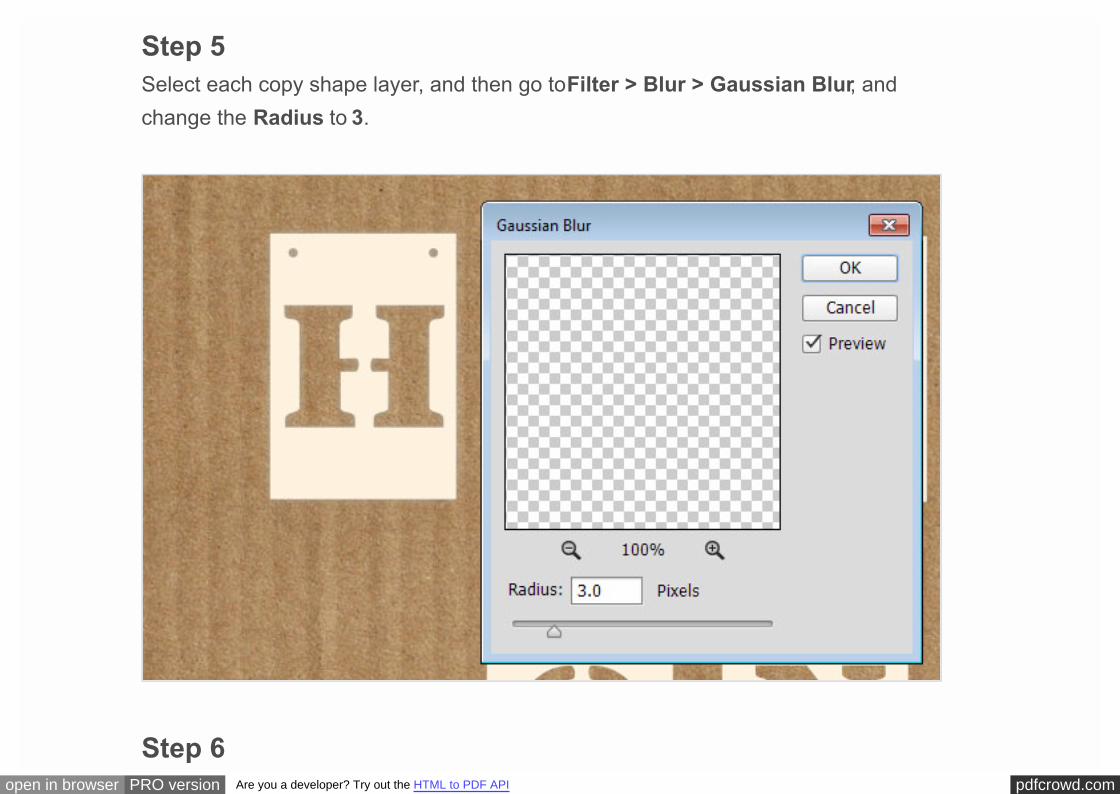
Step 5Select each copy shape layer, and then go to Filter > Blur > Gaussian Blur, andchange the Radius to 3.
Step 6

pdfcrowd.comopen in browser PRO version Are you a developer? Try out the HTML to PDF API
After you apply the Gaussian Blur, change the copy (shadow) layers' Blend Modeto Multiply, and the Opacity to 85%.
This will finish up creating the stencil and shadow layers.

pdfcrowd.comopen in browser PRO version Are you a developer? Try out the HTML to PDF API
4. Styling the Stencil Layers and Warping theShadows' Shapes

pdfcrowd.comopen in browser PRO version Are you a developer? Try out the HTML to PDF API
Step 1Double-click the first letter's stencil shape layer to add a Pattern Overlay effectusing the following values:
Blend Mode: MultiplyOpacity: 50%Pattern: Soft Wallpaper

pdfcrowd.comopen in browser PRO version Are you a developer? Try out the HTML to PDF API
Step 2Right-click the styled layer, and choose Copy Layer Style. Then select the rest ofthe stencil layers, right-click any of them, and choose Paste Layer Style. This will

pdfcrowd.comopen in browser PRO version Are you a developer? Try out the HTML to PDF API
apply the Pattern Overlay effect to the rest of the layers.
Step 3

pdfcrowd.comopen in browser PRO version Are you a developer? Try out the HTML to PDF API
Select each stencil layer with its shadow layer, and then go to Edit > FreeTransform. Rotate, move, and resize the selected layers as you like, and tap theReturn key to accept the changes. Do the same for the rest of the letters until youlike how they're placed.

pdfcrowd.comopen in browser PRO version Are you a developer? Try out the HTML to PDF API
Step 4Next, for each shadow layer, select it, and then go to Edit > Transform > Warp,

pdfcrowd.comopen in browser PRO version Are you a developer? Try out the HTML to PDF API
and play around with the shadow shape a little bit by clicking and dragging themesh areas, control points, and/or handles.

pdfcrowd.comopen in browser PRO version Are you a developer? Try out the HTML to PDF API
Step 5Take your time with this step, and don't be afraid to try different things and modifythe shape more than once until you like the result you get. Hit the Return key whendone to accept the changes.

pdfcrowd.comopen in browser PRO version Are you a developer? Try out the HTML to PDF API
Using the Warp command to create the shadows instead of the Drop Shadow effectgives us much more control over the final result, and helps us achieve a morerealistic and interesting final effect.

pdfcrowd.comopen in browser PRO version Are you a developer? Try out the HTML to PDF API
5. Adding a Gradient Overlay
Step 1This is a subtle, optional step, but it helps enhance the final lighting.

pdfcrowd.comopen in browser PRO version Are you a developer? Try out the HTML to PDF API
Double-click the first letter's stencil shape layer, and apply a Gradient Overlayeffect using a Black to White gradient fill, and change the other values as follows:
Blend Mode: Soft LightOpacity: 10%Angle: 20

pdfcrowd.comopen in browser PRO version Are you a developer? Try out the HTML to PDF API
Step 2Apply the same effect to the rest of the letters, but make sure to change the Anglevalue depending on the direction of the letter's shadow you modified earlier. You

pdfcrowd.comopen in browser PRO version Are you a developer? Try out the HTML to PDF API
can do that while you're still under the Gradient Overlay tab, by clicking anddragging the gradient fill over the letter until you like how it looks.
Once you're done applying the Gradient Overlay effect to each letter, you shouldend up with something like this:

pdfcrowd.comopen in browser PRO version Are you a developer? Try out the HTML to PDF API

pdfcrowd.comopen in browser PRO version Are you a developer? Try out the HTML to PDF API
6. Adding the Texture to the Stencil Shapes
Step 1Place the Unrestricted Neutral grunge 7 image on top of all layers, and resize itas needed.

pdfcrowd.comopen in browser PRO version Are you a developer? Try out the HTML to PDF API
Step 2Press and hold the Command and Shift keys, and click each stencil shape layer'sthumbnail to create a selection.

pdfcrowd.comopen in browser PRO version Are you a developer? Try out the HTML to PDF API
Step 3Click the Add layer mask icon at the bottom of the Layers panel. This will use the

pdfcrowd.comopen in browser PRO version Are you a developer? Try out the HTML to PDF API
selection to create a mask that applies the texture to the stencil shapes only.

pdfcrowd.comopen in browser PRO version Are you a developer? Try out the HTML to PDF API
Step 4Change the texture layer's Blend Mode to Color Burn and its Opacity to 25%.

pdfcrowd.comopen in browser PRO version Are you a developer? Try out the HTML to PDF API

pdfcrowd.comopen in browser PRO version Are you a developer? Try out the HTML to PDF API
7. Creating the Twine's Paths
Step 1Create a new layer on top of all layers and call it Twine. Pick the Pen Tool andchoose the Path option in the Options bar.
What you'll need to do next is create the paths where you want to add the twine.You can click to add corner anchor points, and click and drag to create curves.Keep in mind that the path created doesn't have to be perfect, as you can pick theDirect Selection Tool (A) at any time later to adjust the anchor points or thedirection handles.

pdfcrowd.comopen in browser PRO version Are you a developer? Try out the HTML to PDF API
Step 2The simplest way to create the paths is to click and drag where you want the pathto start, and then click and drag where you want it to end.
To separate the paths, press and hold the Command key, and click outside the pathyou've finished creating so that it won't be connected to the path you'll create after

pdfcrowd.comopen in browser PRO version Are you a developer? Try out the HTML to PDF API
you've finished creating so that it won't be connected to the path you'll create afterit.
Once you're done creating the paths, all the stencil shapes should be connected.

pdfcrowd.comopen in browser PRO version Are you a developer? Try out the HTML to PDF API
8. Modifying the Twine's Brushes and Stroking

pdfcrowd.comopen in browser PRO version Are you a developer? Try out the HTML to PDF API
the Paths
Step 1Set the Foreground color to #afaba2 , pick the Brush Tool, and open the Brushpanel (Window > Brush). Under the Brush Tip Shape tab, modify the settings asbelow:

pdfcrowd.comopen in browser PRO version Are you a developer? Try out the HTML to PDF API
Step 2

pdfcrowd.comopen in browser PRO version Are you a developer? Try out the HTML to PDF API
Hit the Return key once to stroke the path with the modified brush tip.
Alternatively, you can pick the Direct Selection Tool (A), right-click the work path,and choose Stroke Path. Then, choose Brush from the Tool drop-down menu,make sure that the Simulate Pressure box is unchecked, and click OK.

pdfcrowd.comopen in browser PRO version Are you a developer? Try out the HTML to PDF API
Step 3Under Brush Tip Shape in the Brush panel, choose the Hard Square 10 pixels

pdfcrowd.comopen in browser PRO version Are you a developer? Try out the HTML to PDF API
brush tip, and modify its settings as shown below:

pdfcrowd.comopen in browser PRO version Are you a developer? Try out the HTML to PDF API
Step 4Click the Shape Dynamics tab, change the values as shown below, and make sureto set the Angle Jitter Control value to Direction. This will make the brush tip'sangle follow the path's direction.

pdfcrowd.comopen in browser PRO version Are you a developer? Try out the HTML to PDF API
Step 5

pdfcrowd.comopen in browser PRO version Are you a developer? Try out the HTML to PDF API
Create a new layer on top of the Twine layer, call it Stripes, and stroke the pathwith the new brush tip.
Pick the Direct Selection Tool (A) and hit the Return key to get rid of the workpath.

pdfcrowd.comopen in browser PRO version Are you a developer? Try out the HTML to PDF API
Step 6Command-click the Twine layer's thumbnail to create a selection, select theStripes layer, press the Command-J keys to duplicate the selection in a new layer,

pdfcrowd.comopen in browser PRO version Are you a developer? Try out the HTML to PDF API
rename the copy layer to Stripes, and delete the original Stripes layer.

pdfcrowd.comopen in browser PRO version Are you a developer? Try out the HTML to PDF API
Step 7Change the Stripes layer's Fill value to 0, then duplicate the Twine layer, drag thecopy below the original and rename it Twine Shadow.

pdfcrowd.comopen in browser PRO version Are you a developer? Try out the HTML to PDF API
9. Styling the Twine and the Stripes Layers

pdfcrowd.comopen in browser PRO version Are you a developer? Try out the HTML to PDF API
9. Styling the Twine and the Stripes Layers
Double-click the Twine layer to apply the following layer style:
Step 1Add a Bevel and Emboss with these settings:
Size: 14

pdfcrowd.comopen in browser PRO version Are you a developer? Try out the HTML to PDF API
Step 2Add a Texture with these settings:

pdfcrowd.comopen in browser PRO version Are you a developer? Try out the HTML to PDF API
Pattern: Concrete wall 3Depth: 71%

pdfcrowd.comopen in browser PRO version Are you a developer? Try out the HTML to PDF API
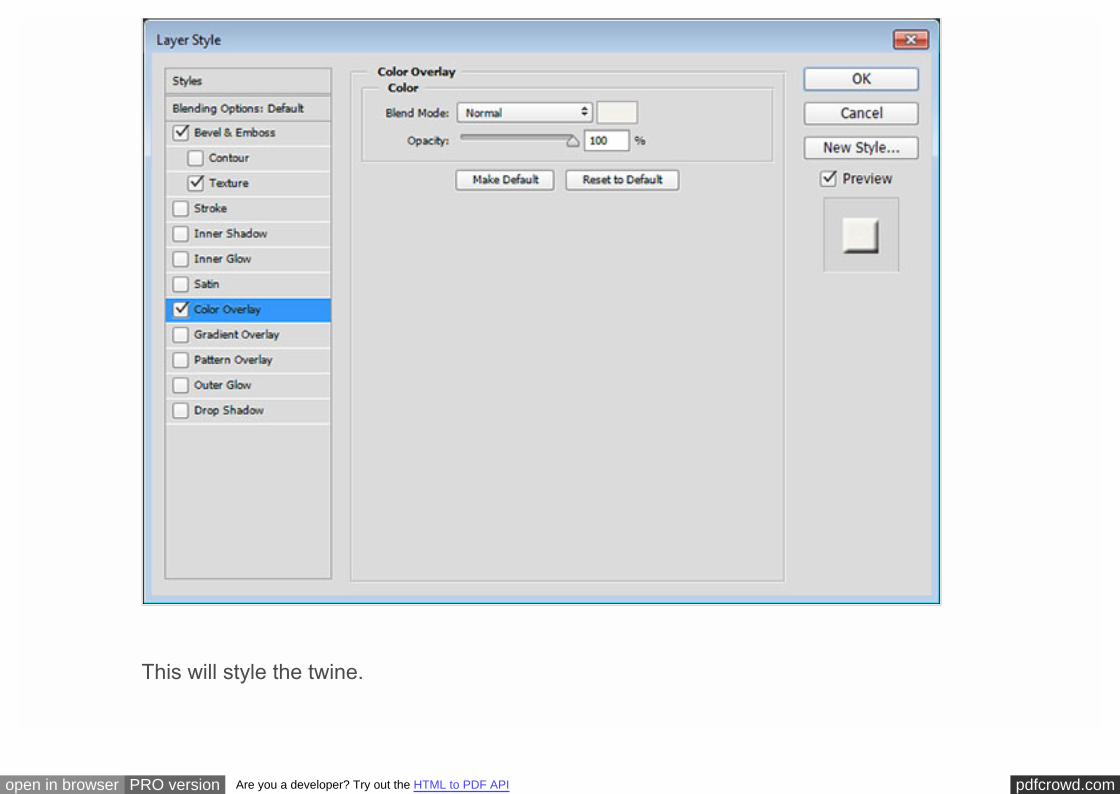
Step 3Add a Color Overlay with these settings:
Color: #f5f2ed
You can use any other color you like as well.
pdfcrowd.comopen in browser PRO version Are you a developer? Try out the HTML to PDF API
This will style the twine.

pdfcrowd.comopen in browser PRO version Are you a developer? Try out the HTML to PDF API
Step 4Double-click the Stripes layer to apply a Color Overlay effect by changing the

pdfcrowd.comopen in browser PRO version Are you a developer? Try out the HTML to PDF API
Blend Mode to Multiply, and using any color you like as well. Here, the color usedis #ea4342 .

pdfcrowd.comopen in browser PRO version Are you a developer? Try out the HTML to PDF API
This will color the stripes.

pdfcrowd.comopen in browser PRO version Are you a developer? Try out the HTML to PDF API
10. Modifying the Twine's Shadow
Step 1Select the Twine Shadow layer, and pick the Rectangular Marquee Tool. Select apiece of the twine, and go to Edit > Transform > Warp.

pdfcrowd.comopen in browser PRO version Are you a developer? Try out the HTML to PDF API
Step 2Transform the shadow using the Warp command just like you did for the originalstencil shapes' shadows. Once you're done, go to Select > Deselect (Command-D) to get rid of the selection.

pdfcrowd.comopen in browser PRO version Are you a developer? Try out the HTML to PDF API
Step 3Repeat the same steps to select and warp each piece's shadow. It is better to keepthe shadow a bit subtle for the little pieces connecting the stencil cards.

pdfcrowd.comopen in browser PRO version Are you a developer? Try out the HTML to PDF API

pdfcrowd.comopen in browser PRO version Are you a developer? Try out the HTML to PDF API
11. Adding Vignette to the Final Result
Step 1Click the Create a new fill or adjustment layer icon and choose Gradient.

pdfcrowd.comopen in browser PRO version Are you a developer? Try out the HTML to PDF API
Step 2Use a Transparent to Fill gradient with the colors #e3e1d5 to the left and#595959 to the right. Change the Style to Radial and the Scale to 450.

pdfcrowd.comopen in browser PRO version Are you a developer? Try out the HTML to PDF API
Step 3Make sure that the Gradient layer is on top of all layers, and change its BlendMode to Linear Burn.

pdfcrowd.comopen in browser PRO version Are you a developer? Try out the HTML to PDF API

pdfcrowd.comopen in browser PRO version Are you a developer? Try out the HTML to PDF API
Advertisement
Step 4Select the Background copy layer, go to Filter > Blur Gallery > Iris Blur, andchange the Blur value under the Blur Tools panel to the right to 5.
You can change the shape of the ellipse by clicking and dragging the four dots thatare connected by the line, and modify the Transition Area by clicking and draggingthe four larger dots between the center pin and the outer blur line.

pdfcrowd.comopen in browser PRO version Are you a developer? Try out the HTML to PDF API
pdfcrowd.comopen in browser PRO version Are you a developer? Try out the HTML to PDF API
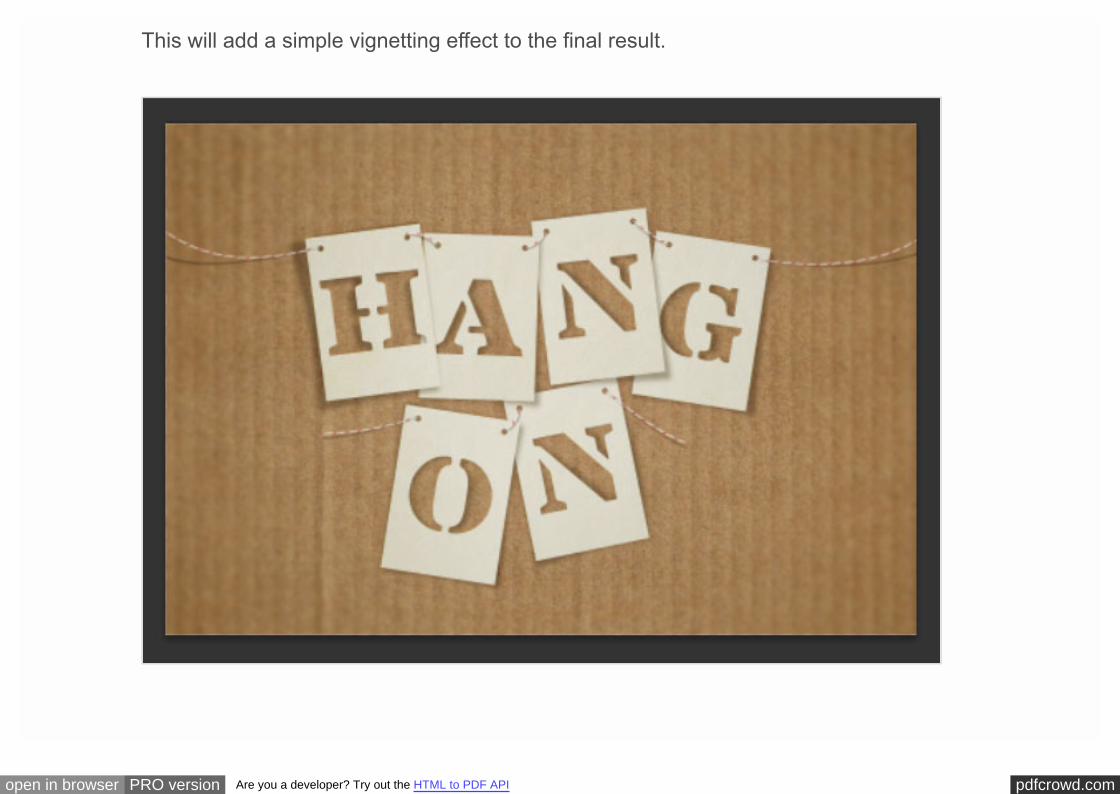
This will add a simple vignetting effect to the final result.

pdfcrowd.comopen in browser PRO version Are you a developer? Try out the HTML to PDF API
Congratulations! You're Done
In this tutorial, we used a cardboard texture for the background, and adjusted itscoloring and brightness.
Then, we used a couple of shape tools and options to create the main card shape,added the text, converted it to shapes, and merged it with the card shapes to getthe final stencil shapes. We then duplicated those shapes to create the shadows,and converted all the shape layers into Smart Objects. We styled the layers, andused the Transform and Warp commands to move them around and reshape them,before adding a simple texture.
After that, we used the Pen Tool to create the twine's path, modified a couple ofsimple brushes to stroke the paths and add the stripes, and styled the stroked partsto add texture and color. We also warped the twine's shadow to match the cards'shadow.
Finally, we used a Gradient adjustment layer and the Iris Blur filter to add somevignetting to the final result.
Please feel free to leave your comments, suggestions, and outcomes below.