proline document esort -...
TRANSCRIPT
ProLine Document eSort Workflow Guide
Instructions for Maximizing your use of Document eSort Here you will learn how to get the most out of Document eSort and how it can help maximize your overall efficiency in 1040 processing. You may encounter slight changes to your workflow, such as moving the job of scanning to the front of the process. We will address these changes and discuss how to best utilize both your staff and the Intuit products you use.
A Steps typically done by the Administrator P Steps typically done by the Preparer R Steps typically done by the Reviewer
1) Receive the client’s source documents using your current process (face to face, email, mail, etc.) 2.1) Open DMS. Open the program from the desktop icon. NOTE: If you are not currently using DMS, you will need to use your current scanning software to scan the document to a PDF file.
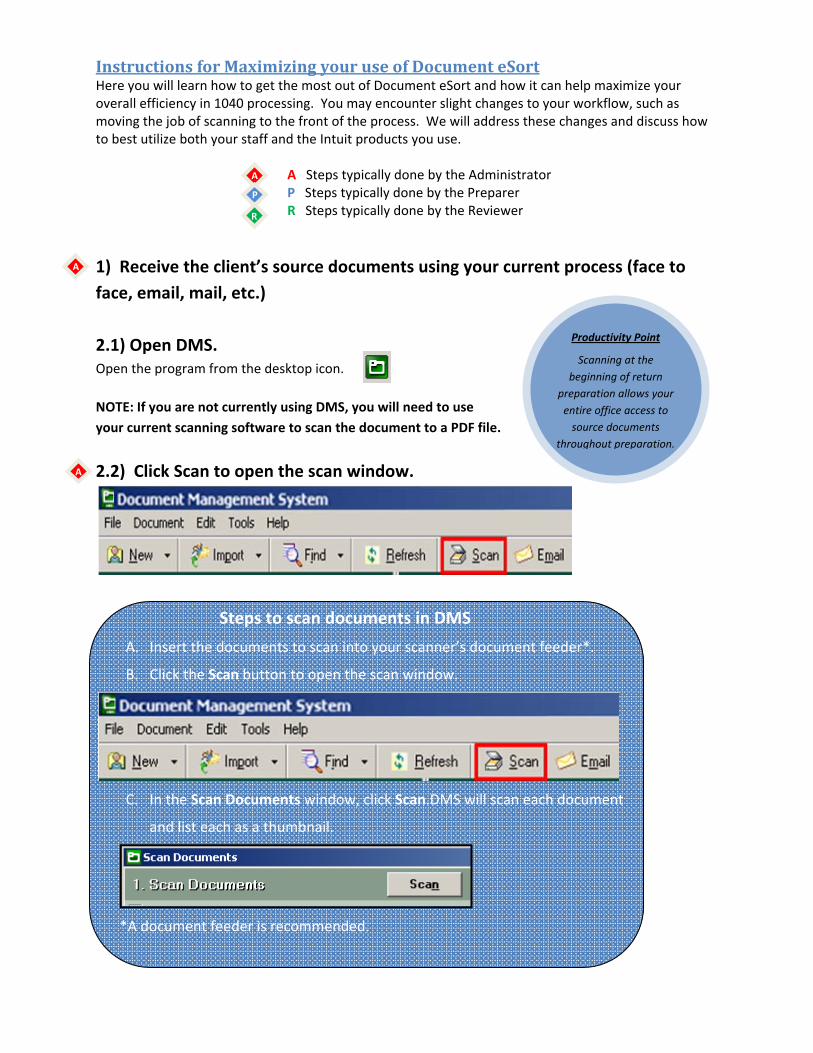
2.2) Click Scan to open the scan window.
Steps to scan documents in DMS
A. Insert the documents to scan into your scanner’s document feeder*.
B. Click the Scan button to open the scan window.
C. In the Scan Documents window, click Scan.DMS will scan each document
and list each as a thumbnail.
*A document feeder is recommended.
Productivity Point
Scanning at the beginning of return
preparation allows your entire office access to source documents
throughout preparation.
A
P
R
A
A
A
Productivity Point Adding a 3rd or 4th monitor will allow you to also view
last year’s tax return, organizers, workpapers, etc.
Recommendations for Office and System Setup There are a few set‐up items we recommend before you begin.
Scanner set‐up The best setup for an office is to have one compatible scanner at each workstation. This eliminates bottle necks at the firm’s “scanning station”. If that is not possible, try to make the scanning station easily accessible. If your scanning station is down the hall from your office, you will spend too much time walking back and forth between your computer and the scanner. Scanning at 300DPI and Black & White is required for Document eSort. Monitor set‐up Dual monitors work best for showing the source documents and tax program side by side at the same time. At least two monitors for the preparer and reviewer. The administrative person can get by with one monitor as long as they have access to a scanner. Tax Program set‐up Prior to using Document eSort, you should proforma the client file(s) into the current year’s tax program and export the client to DMS, if needed.
Other Information When to scan… You should scan the documents when you receive them from the client or the night before the return is prepared. Many accountants do not immediately begin preparation of the return upon receipt of the client’s documents, so this small change in your process can reap huge time savings. What to scan… Use original copies of the source documents rather than faxes or photocopies. This will increase the accuracy of the imported data. Do not sort or organize your documents before submitting, that is what Document eSort will do. Downloading Completed Jobs… Leave the Document eSort application open while working so that completed jobs can automatically download. Security of the transmission… The data you are sending is secure and is sent to Intuit using the highest industry standards. The data is sent using 128‐bit data encryption and never leaves the United States.
Productivity Point
You can send multiple files and while waiting for their return, work on previously
NOTE: Scanning at 300DPI and Black & White is required for Document e‐Sort.
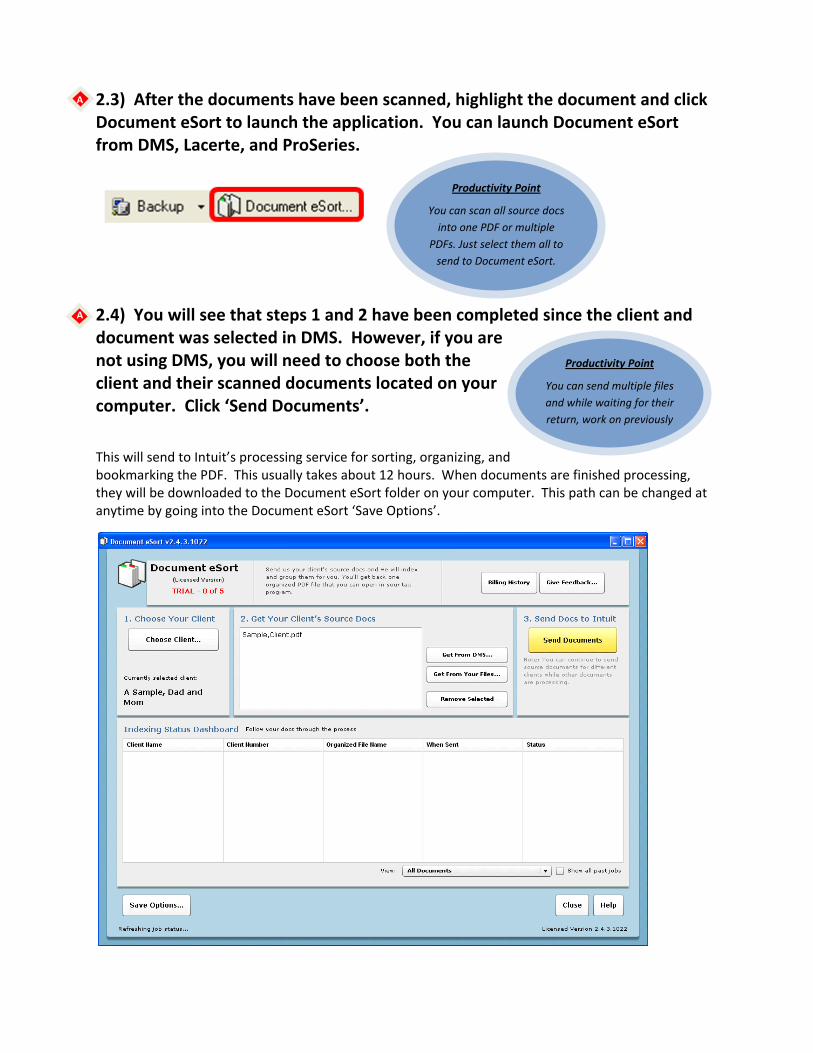
2.3) After the documents have been scanned, highlight the document and click Document eSort to launch the application. You can launch Document eSort from DMS, Lacerte, and ProSeries.
2.4) You will see that steps 1 and 2 have been completed since the client and document was selected in DMS. However, if you are not using DMS, you will need to choose both the client and their scanned documents located on your computer. Click ‘Send Documents’.
This will send to Intuit’s processing service for sorting, organizing, and bookmarking the PDF. This usually takes about 12 hours. When documents are finished processing, they will be downloaded to the Document eSort folder on your computer. This path can be changed at anytime by going into the Document eSort ‘Save Options’.
Productivity Point
You can scan all source docs into one PDF or multiple
PDFs. Just select them all to send to Document eSort.
A
A
A

Note: View the Job Status Dashboard in Document eSort to check progress of jobs. Document eSort must be open for the jobs to download.
NOTE: For clients with multiple scanned documents, select all previously scanned documents to include for Document eSort. You can select up to 10 source documents, up to 30MB in total file size, for one job. DMS:
WINDOWS EXPLORER:
Click ‘Document eSort’
A
A
A

3) Open the client file in the tax program. Files are auto‐downloaded to DMS and contained in the Document e‐Sort folder within the client. You can easily see what documents have been processed and returned in both Lacerte and ProSeries. Document eSort must be open for the jobs to download. Lacerte:
ProSeries:
4.1) Open Source Documents Locate the ‘Open Source Docs’ link in the contents screen of the tax program to review the file processes by Document e‐Sort. You can also click the image in the eSort Status column to open the associated source documents.
Lacerte: (located within the Table of Contents Screen)
ProSeries:
P
P

CASE STUDY
Actual customer setup to facilitate data entry and review process.
4.2) Use the organized bookmarked PDF file to enter the data into the tax return. For the fastest possible data entry, display the organized bookmarked PDF on your second monitor, while keeping Lacerte or ProSeries on your main monitor. Once the tax return data has been checked by the preparer, the return is now ready for review.
4.3) Side‐By‐Side Review The reviewer can use the organized, bookmarked PDF file to conduct a side‐by‐side review of the source documents and the tax return. The order of the PDF file follows both the Lacerte input screens and Form 1040, and you can use the annotations in DMS to tick and tie the source documents. The bookmarks enable you to quickly navigate to the specific document you need to research or take further action on. Subsequent processes for e‐filing, signing, and billing the client may vary, but are typically the next steps after the return is reviewed for accuracy. Continue to use the processes you have in place after review to finish out the engagement. Congratulations, you have just taken the first step in a very important journey as your firm moves to a less paper office. Remember, Intuit is here to help you through this process.
Productivity Point
Turn one monitor to portrait orientation for reviewing source docs.
P
R
R

Appendix A
Appending a Document One common question we see is what to do with additional forms that come in after the original scan. This is a pretty simple process which we have outlined below.
1. To append a PDF document in DMS, scan the additional documents in the Document Management System. This new document will be stored in the ‘Source Documents’ folder by default.
2. To add the pages to the existing document, open the PDF document that needs additional pages added. By default it will be located within the ‘Document eSort’ folder.

3. After you have opened the document to append, right‐click in the navigation panel in order to see this pop‐up menu window. Select ‘Insert Pages’.
4. When you chose to insert pages, DMS will open a window to allow you to select the document
you would like to insert. Highlighting the document and clicking ‘Add’ will include this additional document in the file you originally opened.
You will now have a complete source file…Organized, bookmarked, and linked to within the tax return.
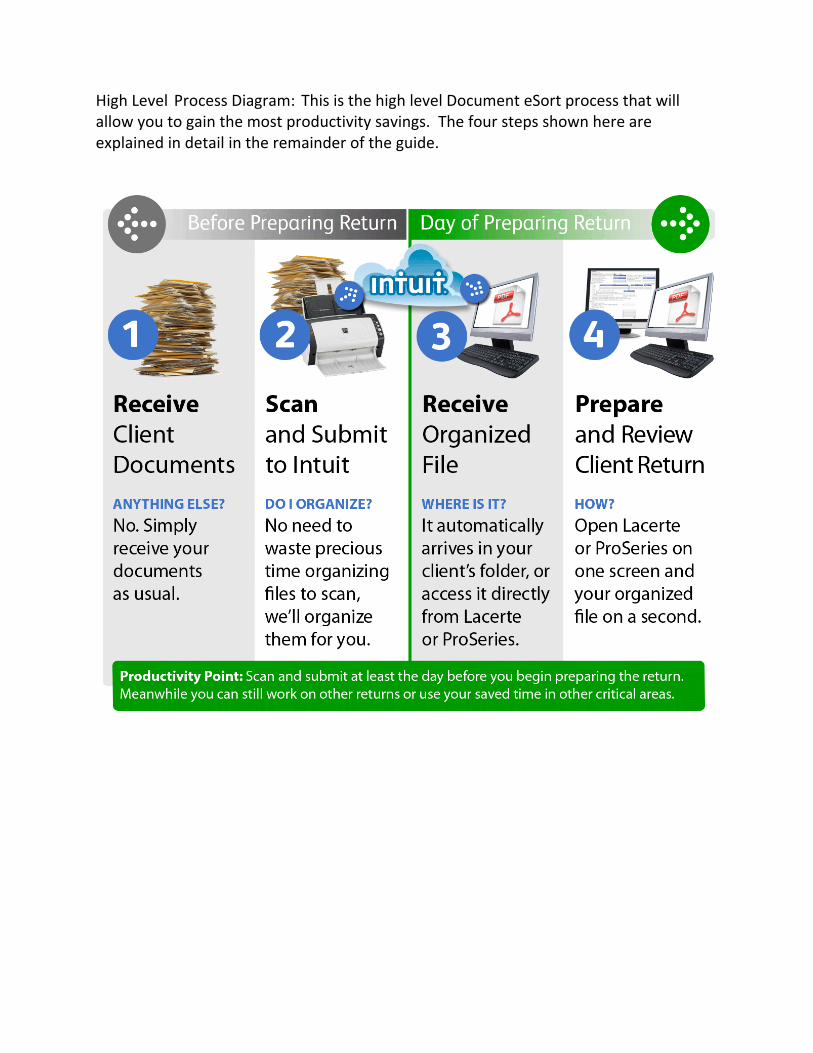
High Level Process Diagram: This is the high level Document eSort process that will allow you to gain the most productivity savings. The four steps shown here are explained in detail in the remainder of the guide.
Productivity Point
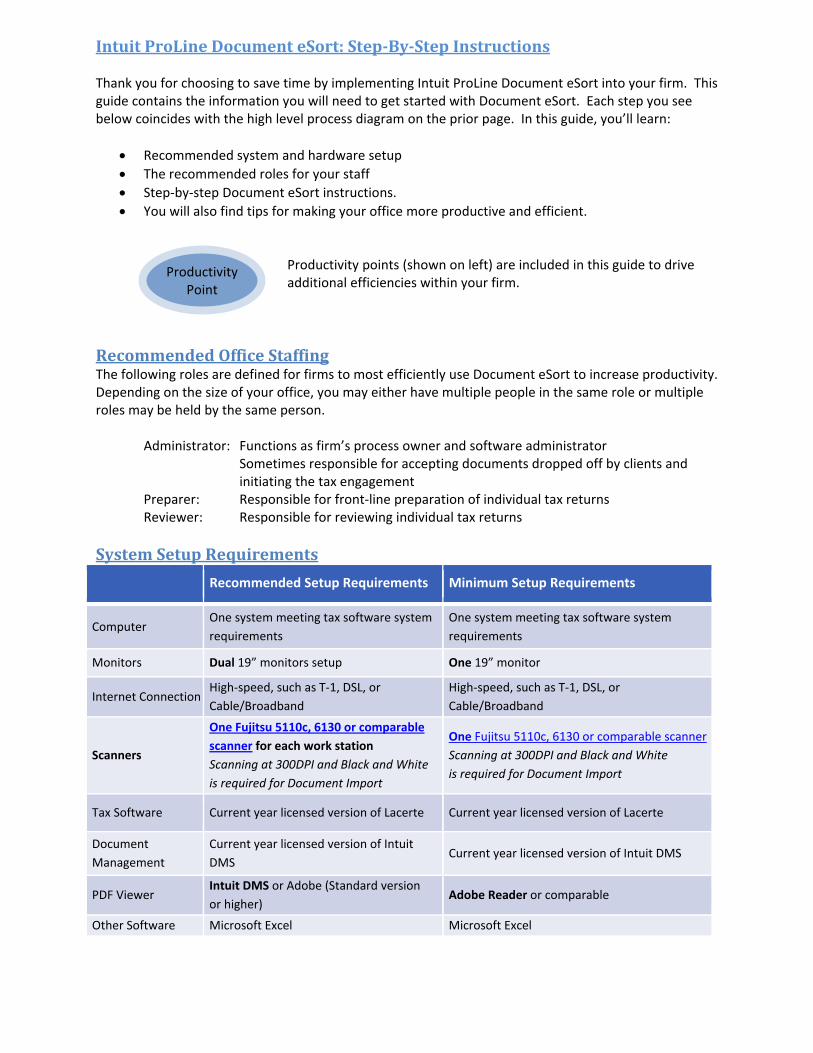
Intuit ProLine Document eSort: StepByStep Instructions Thank you for choosing to save time by implementing Intuit ProLine Document eSort into your firm. This guide contains the information you will need to get started with Document eSort. Each step you see below coincides with the high level process diagram on the prior page. In this guide, you’ll learn:
• Recommended system and hardware setup • The recommended roles for your staff • Step‐by‐step Document eSort instructions. • You will also find tips for making your office more productive and efficient.
Productivity points (shown on left) are included in this guide to drive additional efficiencies within your firm.
Recommended Office Staffing The following roles are defined for firms to most efficiently use Document eSort to increase productivity. Depending on the size of your office, you may either have multiple people in the same role or multiple roles may be held by the same person.
Administrator: Functions as firm’s process owner and software administrator Sometimes responsible for accepting documents dropped off by clients and
initiating the tax engagement Preparer: Responsible for front‐line preparation of individual tax returns Reviewer: Responsible for reviewing individual tax returns
System Setup Requirements
Recommended Setup Requirements Minimum Setup Requirements
Computer One system meeting tax software system requirements
One system meeting tax software system requirements
Monitors Dual 19” monitors setup One 19” monitor
Internet Connection High‐speed, such as T‐1, DSL, or Cable/Broadband
High‐speed, such as T‐1, DSL, or Cable/Broadband
Scanners
One Fujitsu 5110c, 6130 or comparable scanner for each work station Scanning at 300DPI and Black and White is required for Document Import
One Fujitsu 5110c, 6130 or comparable scannerScanning at 300DPI and Black and White is required for Document Import
Tax Software Current year licensed version of Lacerte Current year licensed version of Lacerte
Document Management
Current year licensed version of Intuit DMS
Current year licensed version of Intuit DMS
PDF Viewer Intuit DMS or Adobe (Standard versionor higher)
Adobe Reader or comparable
Other Software Microsoft Excel Microsoft Excel

Copyright
Copyright © 2009 Intuit Inc. Intuit Inc.
All rights reserved 5601 Headquarters Drive
Plano, TX 75024
Trademarks Intuit, the Intuit logo, QuickBooks, QuickBooks Pro, Quicken, TurboTax, ProSeries, Lacerte, and QuickZoom, among others, are registered trademarks and/or registered service marks of Intuit, Inc. or one of its subsidiaries in the United States and other countries. Other parties’ trademarks or service marks are the property of their respective owners and should be treated as such.
Notice to readers The publications distributed by Intuit Inc. are intended to assist accounting professionals in their practices by providing current and accurate information. However, no assurance is given that the information is comprehensive in its coverage or that it is suitable in dealing with a client’s particular situation. Accordingly, the information provided should not be relied upon as a substitute for independent research. Intuit Inc. does not render any accounting, legal, or other professional advice nor does it have any responsibility for updating or revising any information presented herein. Intuit Inc. cannot warrant that the material contained herein will continue to be accurate or that it is completely free of errors when published. Readers should verify statements before relying on them.