projector pa721x/pa621x/pa671w …€¢ adobe, adobe pdf ... drive list screen, thumbnail screen,...
TRANSCRIPT

Projector
PA721X/PA621X/PA671W PA621U/PA571W/PA521U PA722X/PA622X/PA672W PA622U/PA572W/PA522UUser’s Manual
Model No.NP-PA721X/NP-PA621X/NP-PA671W/NP-PA621U/NP-PA571W/NP-PA521U/NP-PA722X/NP-PA622X/NP-PA672W/NP-PA622U/NP-PA572W/NP-PA522U

Ver. 1 08/2013
• Macintosh,MacOSXandPowerBookaretrademarksofAppleInc.registeredintheU.S.andothercountries.
• Microsoft,Windows,WindowsVista, InternetExplorer, .NETFrameworkandPowerPointareeitheraregisteredtrademarkortrademarkofMicrosoftCorporationintheUnitedStatesand/orothercountries.
• MicroSaverisaregisteredtrademarkofKensingtonComputerProductsGroup,adivisionofACCOBrands.
• Adobe,AdobePDF,AdobeReader,andAcrobatareeitherregisteredtrademarksortrademarksofAdobeSystemsIncorporatedintheUnitedStatesand/orothercountries.
• VirtualRemoteToolusesWinI2C/DDClibrary,©NicomsoftLtd.
• HDMI,theHDMILogoandHigh-DefinitionMultimediaInterfacearetrademarksorregisteredtrademarksofHDMILicensingLLC.
• DisplayPortandDisplayPortComplianceLogoaretrademarksownedbytheVideoElectronicsStandardsAssocia-tion.
• TrademarkPJLinkisatrademarkappliedfortrademarkrightsinJapan,theUnitedStatesofAmericaandothercountriesandareas.
• Wi-Fi®,Wi-FiAlliance®,andWi-FiProtectedAccess(WPA,WPA2)®are registered trademarksof theWi-FiAlli-ance.
• Blu-rayisatrademarkofBlu-rayDiscAssociation
• CRESTRONandROOMVIEWareregisteredtrademarksofCrestronElectronics,Inc.intheUnitedStatesandothercountries.
• Otherproductandcompanynamesmentionedinthisuser’smanualmaybethetrademarksorregisteredtrademarksoftheirrespectiveholders.
NOTES(1)Thecontentsofthisuser’smanualmaynotbereprintedinpartorwholewithoutpermission.
(2)Thecontentsofthisuser’smanualaresubjecttochangewithoutnotice.
(3)Greatcarehasbeentakeninthepreparationofthisuser’smanual;however,shouldyounoticeanyquestionablepoints,errorsoromissions,pleasecontactus.
(4)Notwithstandingarticle(3),NECwillnotberesponsibleforanyclaimsonlossofprofitorothermattersdeemedtoresultfromusingtheProjector.

i
Important InformationSafety CautionsPrecautionsPleasereadthismanualcarefullybeforeusingyourNECprojectorandkeepthemanualhandyforfuturereference.
CAUTIONToturnoffmainpower,besuretoremovetheplugfrompoweroutlet.Thepoweroutletsocketshouldbeinstalledasneartotheequipmentaspossible,andshouldbeeasilyaccessible.
CAUTIONTOPREVENTSHOCK,DONOTOPENTHECABINET.THEREAREHIGH-VOLTAGECOMPONENTSINSIDE.REFERSERVICINGTOQUALIFIEDSERVICEPERSONNEL.
Thissymbolwarnstheuserthatuninsulatedvoltagewithintheunitmaybesufficienttocauseelectricalshock.Therefore,itisdangeroustomakeanykindofcontactwithanypartinsideoftheunit.
Thissymbolalertstheuserthatimportantinformationconcerningtheoperationandmaintenanceofthisunithasbeenprovided.Theinformationshouldbereadcarefullytoavoidproblems.
WARNING: TOPREVENTFIREORSHOCK,DONOTEXPOSETHISUNITTORAINORMOISTURE.DONOTUSETHISUNIT’SPLUGWITHANEXTENSIONCORDORINANOUTLETUNLESSALLTHEPRONGSCANBEFULLYINSERTED.
DOC Compliance Notice (for Canada only)ThisClassBdigitalapparatuscomplieswithCanadianICES-003.
Machine Noise Information Regulation - 3. GPSGV,Thehighestsoundpressurelevelislessthan70dB(A)inaccordancewithENISO7779.
CAUTIONAvoiddisplayingstationaryimagesforaprolongedperiodoftime.
DoingsocanresultintheseimagesbeingtemporarilysustainedonthesurfaceoftheLCDpanel.
Ifthisshouldhappen,continuetouseyourprojector.Thestaticbackgroundfrompreviousimageswilldisappear.
Disposing of your used productEU-widelegislationasimplementedineachMemberStaterequiresthatusedelectricalandelectronicproductscarryingthemark(left)mustbedisposedofseparatelyfromnormalhouseholdwaste.Thisin-cludesprojectorsandtheirelectricalaccessoriesorlamps.Whenyoudisposeofsuchproducts,pleasefollowtheguidanceofyourlocalauthorityand/orasktheshopwhereyoupurchasedtheproduct.Aftercollectingtheusedproducts,theyarereusedandrecycledinaproperway.Thiseffortwillhelpusreducethewastesaswellasthenegativeimpactsuchasmercurycontainedinalamptothehumanhealthandtheenvironmentattheminimumlevel.ThemarkontheelectricalandelectronicproductsonlyappliestothecurrentEuropeanUnionMemberStates.
ii
Important Information
WARNING TO CALIFORNIA RESIDENTS:Handlingthecablessuppliedwiththisproductwillexposeyoutolead,achemicalknowntotheStateofCaliforniatocausebirthdefectsorotherreproductiveharm.WASH HANDS AFTER HANDLING.
RF Interference (for USA only)
WARNINGTheFederalCommunicationsCommissiondoesnotallowanymodificationsorchangestotheunitEXCEPTthosespecifiedbyNECDisplaySolutionsofAmerica,Inc.inthismanual.Failuretocomplywiththisgovernmentregu-lationcouldvoidyourrighttooperatethisequipment.ThisequipmenthasbeentestedandfoundtocomplywiththelimitsforaClassBdigitaldevice,pursuanttoPart15oftheFCCRules.Theselimitsaredesignedtoprovidereasonableprotectionagainstharmfulinterferenceinaresidentialinstallation.Thisequipmentgenerates,uses,andcanradiateradiofrequencyenergyand,ifnotinstalledandusedinaccordancewiththeinstructions,maycauseharmfulinterferencetoradiocommunications.However,thereisnoguaranteethatinterferencewillnotoccurinaparticularinstallation.Ifthisequipmentdoescauseharmfulinterferencetoradioortelevisionreception,whichcanbedeterminedbyturningtheequipmentoffandon,theuserisencouragedtotrytocorrecttheinterferencebyoneormoreofthefollowingmeasures:
•Reorientorrelocatethereceivingantenna.
•Increasetheseparationbetweentheequipmentandreceiver.
•Connecttheequipmentintoanoutletonacircuitdifferentfromthattowhichthereceiverisconnected.
•Consultthedealeroranexperiencedradio/TVtechnicianforhelp.
ForUKonly:InUK,aBSapprovedpowercordwithmouldedplughasaBlack(fiveAmps)fuseinstalledforusewiththisequipment.Ifapowercordisnotsuppliedwiththisequipmentpleasecontactyoursupplier.
Important SafeguardsThesesafetyinstructionsaretoensurethelonglifeofyourprojectorandtopreventfireandshock.Pleasereadthemcarefullyandheedallwarnings.
Installation
•Donotplacetheprojectorinthefollowingconditions:
-onanunstablecart,stand,ortable.
-nearwater,baths,ordamprooms.
-indirectsunlight,nearheaters,orheatradiatingappliances.
-inadusty,smokyorsteamyenvironment.
-onasheetofpaperorcloth,rugsorcarpets.
•Ifyouwishtohavetheprojectorinstalledontheceiling:
-Donotattempttoinstalltheprojectoryourself.
-Theprojectormustbeinstalledbyqualifiedtechniciansinordertoensureproperoperationandreducetheriskofbodilyinjury.
-Inaddition,theceilingmustbestrongenoughtosupporttheprojectorandtheinstallationmustbeinaccordancewithanylocalbuildingcodes.
-Pleaseconsultyourdealerformoreinformation.

iii
Important Information
Fire and Shock Precautions
• Ensurethatthereissufficientventilationandthatventsareunobstructedtopreventthebuild-upofheatinsideyourprojector.Allowatleast4inches(10cm)ofspacebetweenyourprojectorandawall.
• Donottrytotouchtheventilationoutletontheleftfront(whenseenfromthefront)asitcanbecomeheatedwhiletheprojectoristurnedonandimmediatelyaftertheprojectoristurnedoff.Partsoftheprojectormaybecometem-porarilyheatediftheprojectoristurnedoffwiththePOWERbuttonoriftheACpowersupplyisdisconnectedduringnormalprojectoroperation.
Usecautionwhenpickinguptheprojector.
• Preventforeignobjectssuchaspaperclipsandbitsofpaperfromfallingintoyourprojector.Donotattempttoretrieveanyobjectsthatmightfallintoyourprojector.Donotinsertanymetalobjectssuchasawireorscrewdriverintoyourprojector.Ifsomethingshouldfallintoyourprojector,disconnectitimmediatelyandhavetheobjectremovedbyaqualifiedservicepersonnel.
• Donotplaceanyobjectsontopoftheprojector.• Donottouchthepowerplugduringathunderstorm.Doingsocancauseelectricalshockorfire.• Theprojectorisdesignedtooperateonapowersupplyof100-240VAC50/60Hz.Ensurethatyourpowersupply
fitsthisrequirementbeforeattemptingtouseyourprojector.• Donotlookintothelenswhiletheprojectorison.Seriousdamagetoyoureyescouldresult.
• Keepanyitems(magnifyingglassetc.)outofthelightpathoftheprojector.Thelightpathbeingprojectedfromthelensisextensive,thereforeanykindofabnormalobjectsthatcanredirectlightcomingoutofthelens,cancauseanunpredictableoutcomesuchasafireorinjurytotheeyes.
• Donotplaceanyobjects,whichareeasilyaffectedbyheat,infrontofaprojectorexhaustvent. Doingsocouldleadtotheobjectmeltingorgettingyourhandsburnedfromtheheatthatisemittedfromtheex-
haust.
WARNING• Donotcoverthelenswiththelenscaporequivalentwhiletheprojectorison.Doingsocanleadtomeltingof
thecapduetotheheatemittedfromthelightoutput.
• Donotplaceanyobjects,whichareeasilyaffectedbyheat,infrontoftheprojectorlens.Doingsocouldleadtotheobjectmeltingfromtheheatthatisemittedfromthelightoutput.
Donottilttheprojectortotheleftorright.Doingsomayresultinmalfunction.Thereisnolimitonthetiltangleupwardordownward.Selectanappropriateoptionfor[FANMODE]accordingtotheinstallationangle.

iv
Important Information
• Handlethepowercordcarefully.Adamagedorfrayedpowercordcancauseelectricshockorfire.- Donotuseanypowercordotherthantheonesuppliedwiththeprojector.- Donotbendortugthepowercordexcessively.- Donotplacethepowercordundertheprojector,oranyheavyobject.- Donotcoverthepowercordwithothersoftmaterialssuchasrugs.- Donotheatthepowercord.- Donothandlethepowerplugwithwethands.
• Turnofftheprojector,unplugthepowercordandhavetheprojectorservicedbyaqualifiedservicepersonnelunderthefollowingconditions:- Whenthepowercordorplugisdamagedorfrayed.- Ifliquidhasbeenspilledintotheprojector,orifithasbeenexposedtorainorwater.- Iftheprojectordoesnotoperatenormallywhenyoufollowtheinstructionsdescribedinthisuser’smanual.- Iftheprojectorhasbeendroppedorthecabinethasbeendamaged.- Iftheprojectorexhibitsadistinctchangeinperformance,indicatinganeedforservice.
• Disconnectthepowercordandanyothercablesbeforecarryingtheprojector.• Turnofftheprojectorandunplugthepowercordbeforecleaningthecabinetorreplacingthelamp.• Turnofftheprojectorandunplugthepowercordiftheprojectorisnottobeusedforanextendedperiodoftime.• WhenusingaLANcable: Forsafety,donotconnecttotheconnectorforperipheraldevicewiringthatmighthaveexcessivevoltage.
CAUTION• Donotusethetilt-footforpurposesotherthanoriginallyintended.Misusessuchasgrippingthetilt-footor
hangingonthewallcancausedamagetotheprojector.
• Donotsendtheprojectorinthesoftcasebyparceldeliveryserviceorcargoshipment.Theprojectorinsidethesoftcasecouldbedamaged.
• Select[HIGH]inFanmodeifyoucontinuetousetheprojectorforconsecutivedays.(Fromthemenu,select[SETUP]→[OPTIONS(1)]→[FANMODE]→[MODE]→[HIGH].)
• Donotmovetheprojectorbyholdingthecablecover.Doingsomayresultintheprojectorfallingorcausinginjury.
• BeforeusingDirectPowerOff,besuretoallowatleast20minutesimmediatelyafterturningontheprojectorandstartingtodisplayanimage.
• Donotunplugthepowercablefromthewalloutletorprojectorwhentheprojectorispoweredon.DoingsocancausedamagetotheACINconnectoroftheprojectorand(or)theprongplugofthepowercable.
ToturnofftheACpowersupplywhentheprojectorispoweredon,useapowerstripequippedwithaswitchandabreaker.
• DonotturnofftheACpowerfor60secondsafterthelampisturnedonandwhilethePOWERindicatorisblinkingblue.Doingsocouldcauseprematurelampfailure.
Caution on Handling the Optional LensWhenshippingtheprojectorwiththelens,removethelensbeforeshippingtheprojector.Alwaysattachthedustcaptothelenswheneveritisnotmountedontheprojector.Thelensandthelensshiftmechanismmayencounterdamagecausedbyimproperhandlingduringtransportation.Donotholdthelenspartwhencarryingtheprojector.Doingsocouldcausethefocusringtorotate,resultinginaccidentaldroppingoftheprojector.
Remote Control Precautions• Handletheremotecontrolcarefully.
• Iftheremotecontrolgetswet,wipeitdryimmediately.
• Avoidexcessiveheatandhumidity.
• Donotshort,heat,ortakeapartbatteries.

v
Important Information
• Donotthrowbatteriesintofire.
• Ifyouwillnotbeusingtheremotecontrolforalongtime,removethebatteries.
• Ensurethatyouhavethebatteries’polarity(+/−)alignedcorrectly.
• Donotusenewandoldbatteriestogether,orusedifferenttypesofbatteriestogether.
• Disposeofusedbatteriesaccordingtoyourlocalregulations.
Note for US ResidentsThelampinthisproductcontainsmercury.PleasedisposeaccordingtoLocal,StateorFederalLaws.
Lamp Replacement• Usethespecifiedlampforsafetyandperformance.
• Toreplacethelamp,followallinstructionsprovidedonpage159.
• Besuretoreplacethelampandfilterwhenthemessage[THE LAMP HAS REACHED THE END OF ITS US-ABLE LIFE. PLEASE REPLACE THE LAMP AND FILTER. USE THE SPECIFIED LAMP FOR SAFETY AND PERFORMANCE.]appears.Ifyoucontinuetousethelampafterthelamphasreachedtheendofitsusablelife,thelampbulbmayshatter,andpiecesofglassmaybescatteredinthelampcase.Donottouchthemasthepiecesofglassmaycauseinjury.
Ifthishappens,contactyourdealerforlampreplacement.
A Lamp CharacteristicTheprojectorhasahigh-pressuremercurylampasalightsource.Alamphasacharacteristicthatitsbrightnessgraduallydecreaseswithage.Alsorepeatedlyturningthelamponandoffwillincreasethepossibilityofitslowerbrightness.
CAUTION:
• DONOTTOUCHTHELAMPimmediatelyafterithasbeenused.Itwillbeextremelyhot.Turntheprojectoroffandthendisconnectthepowercord.Allowatleastonehourforthelamptocoolbeforehandling.
• Whenremovingthelampfromaceiling-mountedprojector,makesurethatnooneisundertheprojector.Glassfragmentscouldfallifthelamphasbeenburnedout.
About High Altitude mode• Set[FANMODE]to[HIGHALTITUDE]whenusingtheprojectorataltitudesapproximately5500feet/1600metersor
higher. Usingtheprojectorataltitudesapproximately5500feet/1600metersorhigherwithoutsettingto[HIGHALTITUDE]
cancausetheprojectortooverheatandtheprotectorcouldshutdown.Ifthishappens,waitacoupleminutesandturnontheprojector.
• Usingtheprojectorataltitudeslessthanapproximately5500feet/1600metersandsettingto[HIGHALTITUDE]cancausethelamptoovercool,causingtheimagetoflicker.Switch[FANMODE]to[AUTO].
• Usingtheprojectorataltitudesapproximately5500feet/1600metersorhighercanshortenthelifeofopticalcom-ponentssuchasthelamp.
About Copyright of original projected pictures:Pleasenotethatusingthisprojectorforthepurposeofcommercialgainortheattractionofpublicattentioninavenuesuchasacoffeeshoporhotelandemployingcompressionorexpansionofthescreenimagewiththefollowingfunc-tionsmayraiseconcernabouttheinfringementofcopyrightswhichareprotectedbycopyrightlaw.[ASPECTRATIO],[KEYSTONE],Magnifyingfeatureandothersimilarfeatures.
Turkish RoHS information relevant for Turkish marketEEE Yönetmeliğine Uygundur.
Thisdeviceisnotintendedforuseinthedirectfieldofviewatvisualdisplayworkplaces.Toavoidincommodingreflec-tionsatvisualdisplayworkplacesthisdevicemustnotbeplacedinthedirectfieldofview.

vi
Important Information
Health precautions to users viewing 3D images
Beforeviewing,besuretoreadhealthcareprecautionsthatmaybefoundintheuser’smanualincludedwithyourLCDshuttereyeglassesoryour3DcompatiblecontentsuchasDVDs,videogames,computer’svideofilesandthelike.Toavoidanyadversesymptoms,heedthefollowing:• DonotuseLCDshuttereyeglassesforviewinganymaterialotherthan3Dimages.• Allowadistanceof2m/7feetorgreaterbetweenthescreenandauser.Viewing3Dimagesfromtooclosea
distancecanstrainyoureyes.• Avoidviewing3Dimagesforaprolongedperiodoftime.Takeabreakof15minutesorlongeraftereveryhour
ofviewing.• Ifyouoranymemberofyourfamilyhasahistoryoflight-sensitiveseizures,consultadoctorbeforeviewing3D
images.• Whileviewing3Dimages,ifyougetsicksuchasnausea,dizziness,queasiness,headache,eyestrain,blurry
vision,convulsions,andnumbness,stopviewingthem.Ifsymptomsstillpersist,consultadoctor.• View3Dimagesfromthefrontofthescreen.Viewingfromananglemaycausefatigueoreyestrain.
Power management functionTheprojectorhaspowermanagementfunctions.Toreducepowerconsumption,thepowermanagementfunctions(1and2)arefactorypresetasshownbelow.TocontroltheprojectorfromanexternaldeviceviaaLANorserialcableconnection,usetheon-screenmenutochangethesettingsfor1and2.
1. STANDBY MODE (Factory preset: NORMAL)
To control the projector from an external device, select [NETWORK STANDBY] for [STANDBY MODE].
NOTE:• When[NORMAL]isselectedfor[STANDBYMODE],thefollowingconnectorsandfunctionswillnotwork: PCCONTROLport,MONITOROUTconnector,AUDIOOUTconnector,LANfunctions,MailAlertfunction,DDC/CI(VirtualRemote
Tool)
2. AUTO POWER OFF (Factory preset: 30 minutes)
To control the projector from an external device, select [OFF] for [AUTO POWER OFF].
NOTE:• When[0:30]isselectedfor[AUTOPOWEROFF],youcanenabletheprojectortoautomaticallyturnoffin30minutesifthereis
nosignalreceivedbyanyinputorifnooperationisperformed.

vii
Table of ContentsImportant Information ............................................................................................i
1. Introduction .......................................................................................................... 11What’sintheBox? ......................................................................................................... 1IntroductiontotheProjector .......................................................................................... 2
CongratulationsonYourPurchaseoftheProjector ................................................. 2Featuresyou’llenjoy: ............................................................................................... 2Aboutthisuser’smanual .......................................................................................... 3
PartNamesoftheProjector .......................................................................................... 4Front/Top .................................................................................................................. 4Rear ......................................................................................................................... 5ControlPanel/IndicatorSection ............................................................................... 6TerminalPanelFeatures .......................................................................................... 7
PartNamesoftheRemoteControl ............................................................................... 8BatteryInstallation ................................................................................................... 9RemoteControlPrecautions .................................................................................... 9OperatingRangeforWirelessRemoteControl ........................................................ 9
OperatingEnvironmentforSoftwareIncludedonCD-ROM ........................................ 10OperatingEnvironment .......................................................................................... 11
2. Projecting an Image (Basic Operation) .............................................. 121FlowofProjectinganImage ........................................................................................ 12ConnectingYourComputer/ConnectingthePowerCord ............................................. 13TurningontheProjector .............................................................................................. 14
NoteonStartupscreen(MenuLanguageSelectscreen) ...................................... 15SelectingaSource ...................................................................................................... 16
Selectingthecomputerorvideosource................................................................. 16AdjustingthePictureSizeandPosition ....................................................................... 17
Adjustingtheverticalpositionofaprojectedimage(Lensshift) ............................ 18Focus ..................................................................................................................... 19Applicablelens:NP11FL ........................................................................................ 20Zoom ...................................................................................................................... 21AdjustingtheTiltFeet ............................................................................................ 21
CorrectingKeystoneDistortion .................................................................................... 22OptimizingComputerSignalAutomatically ................................................................. 24
AdjustingtheImageUsingAutoAdjust .................................................................. 24TurningUporDownVolume ........................................................................................ 24TurningofftheProjector .............................................................................................. 25AfterUse...................................................................................................................... 26
3. Convenient Features ..................................................................................... 271TurningofftheImageandSound ................................................................................ 27FreezingaPicture ....................................................................................................... 27EnlargingaPicture ...................................................................................................... 27ChangingEcoMode/CheckingEnergy-SavingEffectUsingEcoMode[ECO
MODE] ................................................................................................................... 28CheckingEnergy-SavingEffect[CARBONMETER] ............................................. 29

viii
Table of Contents
UsingtheOptionalRemoteMouseReceiver(NP01MR) ............................................ 30CorrectingHorizontalandVerticalKeystoneDistortion[CORNERSTONE] ................ 32
Cornerstone ........................................................................................................... 32DisplayingTwoPicturesattheSameTime .................................................................. 35
SelectingthePIPorPICTUREBYPICTUREMode[MODE] ................................ 35[POSITION] ............................................................................................................ 36
PreventingtheUnauthorizedUseoftheProjector[SECURITY] ................................. 37ControllingtheProjectorbyUsinganHTTPBrowser ................................................. 40ProjectingYourComputer’sScreenImagefromtheProjectorviaaNetwork
[NETWORKPROJECTOR] .................................................................................... 47UsingtheProjectortoOperateYourComputerviaaNetwork[REMOTE
DESKTOP] ............................................................................................................. 51
4. Using the Viewer ............................................................................................. 56❶WhatyoucandowiththeViewer ................................................................................. 56❷Preparingpresentationmaterials ................................................................................ 59❸ProjectingimagesstoredinaUSBmemorydevice .................................................... 60
StartingtheViewer ................................................................................................. 60ExitingtheViewer .................................................................................................. 63NamesandfunctionsofViewerscreen .................................................................. 64Vieweroptionsettings ............................................................................................ 69
❹Projectingdatafromsharedfolder .............................................................................. 72Connectingtheprojectortothesharedfolder ....................................................... 72Disconnectingthesharedfolderfromtheprojector ............................................... 75
❺Projectingdatafrommediaserver............................................................................... 76Settingup“MediaSharing”inWindowsMediaPlayer11 ...................................... 76Settingup“MediaSharing”inWindowsMediaPlayer12 ...................................... 78Connectingtheprojectortothemediaserver ........................................................ 79Disconnectingtheprojectorfromthemediaserver ............................................... 80
❻Restrictionsondisplayingfiles .................................................................................... 81SomerestrictionsonPowerPointfiles .................................................................... 81SomerestrictionsonPDFfiles .............................................................................. 81
5. Using On-Screen Menu ................................................................................ 821UsingtheMenus .......................................................................................................... 82MenuElements ............................................................................................................ 83ListofMenuItems ....................................................................................................... 84MenuDescriptions&Functions[SOURCE] ................................................................ 87
COMPUTER1,2,and3 ........................................................................................ 87HDMI ...................................................................................................................... 87DisplayPort ............................................................................................................. 87VIDEO .................................................................................................................... 87VIEWER ................................................................................................................. 87NETWORK ............................................................................................................. 87ENTRYLIST .......................................................................................................... 87TESTPATTERN ..................................................................................................... 87
MenuDescriptions&Functions[ADJUST] .................................................................. 91[PICTURE] ............................................................................................................. 91

ix
Table of Contents
[IMAGEOPTIONS] ................................................................................................ 94[VIDEO] .................................................................................................................. 98
MenuDescriptions&Functions[SETUP] .................................................................. 100[BASIC] ................................................................................................................ 100[MENU] ................................................................................................................ 102[INSTALLATION(1)] .............................................................................................. 103[INSTALLATION(2)] .............................................................................................. 106[OPTIONS(1)] ...................................................................................................... 108[OPTIONS(2)] ...................................................................................................... 110
MenuDescriptions&Functions[INFO.] .................................................................... 112[USAGETIME] ..................................................................................................... 112[SOURCE(1)] ....................................................................................................... 113[SOURCE(2)] ....................................................................................................... 113[WIREDLAN] ....................................................................................................... 113[WIRELESSLAN(1)] ............................................................................................ 114[WIRELESSLAN(2)] ............................................................................................ 114[VERSION(1)] ...................................................................................................... 114[VERSION(2)] ...................................................................................................... 115[OTHERS] ............................................................................................................ 115
MenuDescriptions&Functions[RESET] .................................................................. 116ReturningtoFactoryDefault[RESET] ................................................................. 116
❾ApplicationMenu ....................................................................................................... 118IMAGEEXPRESSUTILITY ................................................................................. 118DESKTOPCONTROLUTILITY ........................................................................... 118NETWORKPROJECTOR .................................................................................... 119REMOTEDESKTOPCONNECTION .................................................................. 119NETWORKSETTINGS ........................................................................................ 120TOOLS ................................................................................................................. 136
6. Connecting to Other Equipment .......................................................... 141Mountingalens(soldseparately) .............................................................................. 141
Mountingthelens................................................................................................. 141Removingthelens ............................................................................................... 142
MakingConnections .................................................................................................. 143AnalogRGBsignalconnection ............................................................................ 143DigitalRGBsignalconnection ............................................................................. 144ConnectinganExternalMonitor .......................................................................... 146ConnectingYourDVDPlayerorOtherAVEquipment .......................................... 147ConnectingComponentInput .............................................................................. 148ConnectingHDMIInput........................................................................................ 149ConnectingtoaWiredLAN ................................................................................. 150ConnectingtoaWirelessLAN(soldseparately).................................................. 151MountingawirelessLANunit .............................................................................. 151ToremovethewirelessLANunit.......................................................................... 153ProjectingPortraitImages .................................................................................... 155
7. Maintenance .................................................................................................... 1581CleaningtheFilters.................................................................................................... 158CleaningtheLens...................................................................................................... 161CleaningtheCabinet ................................................................................................. 161

x
Table of Contents
ReplacingtheLampandtheFilters ........................................................................... 162
8. User Supportware ......................................................................................... 167InstallingSoftwareProgram ...................................................................................... 167
InstallationforWindowssoftware ......................................................................... 167InstallationforMacintoshsoftware ....................................................................... 169
OperatingtheProjectorViatheLAN(VirtualRemoteTool) ....................................... 170ProjectingYourComputer’sScreenImagefromtheProjectoroveraLAN(Image
ExpressUtilityLite) .............................................................................................. 173ProjectinganImagefromanAngle(GeometricCorrectionToolinImageExpress
UtilityLite) ............................................................................................................ 175WhatyoucandowithGCT .................................................................................. 175
UsingtheProjectortoOperateYourComputeroveraLAN(DesktopControlUtility1.0) ....................................................................................................................... 177WhatyoucandowithDesktopControlUtility1.0 ................................................ 177ConnectingtheprojectortoaLAN ....................................................................... 177Usingtheprojectortooperateyourcomputer’sdesktopscreen .......................... 178
ControllingtheProjectoroveraLAN(PCControlUtilityPro4) ................................. 186
9. Appendix ............................................................................................................. 187Throwdistanceandscreensize ................................................................................ 187
Lenstypesandthrowdistance ............................................................................ 187Tablesofscreensizesanddimensions ............................................................... 190Lensshiftingrange ............................................................................................... 191
CompatibleInputSignalList ...................................................................................... 193Specifications ............................................................................................................ 196CabinetDimensions .................................................................................................. 198Mountingthecablecover(soldseparately) ............................................................... 199PinAssignmentsofD-SubCOMPUTERInputConnector ........................................ 200Troubleshooting ......................................................................................................... 201
IndicatorMessages .............................................................................................. 201CommonProblems&Solutions ........................................................................... 203Ifthereisnopicture,orthepictureisnotdisplayedcorrectly. .............................. 205
PCControlCodesandCableConnection ................................................................. 206TroubleshootingCheckList ........................................................................................ 207

1
Projector
1. Introduction1 What’s in the Box?Makesureyourboxcontainseverythinglisted.Ifanypiecesaremissing,contactyourdealer.Pleasesavetheoriginalboxandpackingmaterialsifyoueverneedtoshipyourprojector.
Power cord(US: 7N080241)(EU: 7N080022)
Lens theft prevention screw (24V00841)This screw makes it difficult to remove the lens mounted on the projector. (→ page 142)
Straps (24J23901) (for preventing lamp and filter covers from falling) (x2)Attaching the straps to the lamp and filter covers prevents them from falling when the projector is suspended from the ceiling.
NEC Projector CD-ROMUser’s manual (PDF) and the utility software(7N951971)
For North America onlyRegistrationcardLimitedwarranty
For customers in Europe: YouwillfindourcurrentvalidGuar-anteePolicyonourWebSite:www.nec-display-solutions.com
• ImportantInfomation(ForNorthAmerica:7N8N1551) (For Other countries than North America: 7N8N1551 and 7N8N1562)
• QuickSetupGuide(ForNorthAmerica:7N8N1571) (For Other countries than North America: 7N8N1571 and 7N8N1581)
Remote control(7N900961)
AA alkaline batteries (x2)
Dust cap for lens* The projector is shipped without a
lens. For the types of lens and throw distances, see page 201.

2
1. Introduction
Introduction to the ProjectorThissectionintroducesyoutoyournewprojectoranddescribesthefeaturesandcontrols.
Congratulations on Your Purchase of the ProjectorThisprojectorisoneoftheverybestprojectorsavailabletoday.Theprojectorenablesyoutoprojectpreciseimagesupto500inchesacross(measureddiagonally)fromyourPCorMacintoshcomputer(desktopornotebook),VCR,DVDplayer,ordocumentcamera.Youcanusetheprojectoronatabletoporcart,youcanusetheprojectortoprojectimagesfrombehindthescreen,andtheprojectorcanbepermanentlymountedonaceiling*1.Theremotecontrolcanbeusedwirelessly.
*1 Donotattempttomounttheprojectoronaceilingyourself.
Theprojectormustbeinstalledbyqualifiedtechniciansinordertoensureproperoperationandreducetheriskofbodilyinjury.
Inaddition,theceilingmustbestrongenoughtosupporttheprojectorandtheinstallationmustbeinaccordancewithanylocalbuildingcodes.Pleaseconsultyourdealerformoreinformation.
Features you’ll enjoy:
• Liquidcrystaltypehighbrightness/highresolutionprojector
Model LCDpanel Resolution AspectRatioPA722X/PA721X/PA622X/
PA621X0.79"(withMLA) 1024×768dots 4:3
PA672W/PA671W/PA572W/PA571W
0.76"(withMLA) 1280×800dots 16:10
PA622U/PA621U/PA522U/PA521U
0.76"(withMLA) 1920×1200dots 16:10
ThePA722X/PA721X/PA622X/PA621X/PA672W/PA671W/PA572W/PA571WprojectorscoverinputsignalsuptoWUXGA(1920×1200dots)thankstotheAdvancedAccuBlendfunction.
• Widerangeofoptionallensesselectableaccordingtotheplaceofinstallation
Thisprojectorsupports5typesofoptionallenses,providingaselectionoflensesadaptedtoavarietyofplacesofinstallationandprojectionmethods.
Inaddition,thelensescanbemountedandremovedinonetouch.
Notethatnolensismounteduponshipmentfromthefactory.Pleasepurchaseoptionallensesseparately.
• Lensshiftfunctionforeasilyadjustingthepositionoftheprojectedimage
Thepositionoftheprojectedimageismovedbyturningthetwodialsontheprojector’sfront,onefortheverticaldirection,oneforthehorizontaldirection.
• 360°installationangle(tilt-free)
Theprojectorcanbeinstalledatanyangle(360°).
Note,however,thatthe“fanmode”settingmustbechangedaccordingtotheangleofinstallation.
Also,theprojectorcannotbeinstalledtiltedtotheleftorright.
• Widerangeofinput/outputconnectors(HDMI,DisplayPort,BNC,etc.)andbuilt-inmonauralspeaker
The projector is equipped with a variety of input/output connectors: computer (analog), 5-core BNC, HDMI,DisplayPort,etc.(Thecomputer(analog)andBNCconnectorsalsosupportcomponentinputs.)
Theprojector’sHDMIandDisplayPortinputconnectorssupportHDCP.
Theprojectorisalsoequippedwithabuilt-in10Wmonauralspeaker.
• Highpicturequalityprocessingcircuit
TheReon-VXvideoprocessorisusedtoprojecthighqualityimages.
• Energy-savingdesignwithastandbypowerconsumptionof0.2watts
Whentheon-screenmenu’sstandbymodeissetto“PowerSaving”,thepowerconsumptioninthestandbymode

3
1. Introduction
is0.2watts.
• “Ecomode”forlowpowerconsumptionand“CarbonMeter”display
Theprojector is equippedwith an“ecomode” for reducingpower consumptionduringuse.Furthermore, thepower-savingeffectwhentheecomodeissetisconvertedintotheamountofreductionsofCO2emissionsandthisisindicatedontheconfirmationmessagedisplayedwhenthepoweristurnedoffandat“Information”ontheon-screenmenu(CARBONMETER).
• Maximumlampreplacementtimeof4000hours(3000hoursinNormalmode)andnoneedtocleanthefilters
Whenusedintheecomode,thelampreplacementtime*isextendedtoamaximumof4000hours.
*Thistimeisnotguaranteed.
Furthermore,thisprojectoruseslarge2-layerfilters.Whenthesefiltersarereplacedwithnewoneswhenchangingthelamp,thereisnoneedforregularfiltercleaning.
• Seamlessswitchfunctionforsmootherscreenchangeswhenswitchingthesignal
Whentheinputconnectorisswitched,theimagedisplayedbeforeswitchingisheldsothatthatthenewimagecanbeswitchedtowithoutabreakduetoabsenceofasignal.
• Simultaneousdisplayof2images(PIP/PICTUREBYPICTURE)
Twoimagescanbeprojectedsimultaneouslywithasingleprojector.
Therearetwotypesoflayoutsforthetwoimages:“picture-in-picture”inwhichasub-pictureisdisplayedonthemainpicture,and“picture-by-picture”inwhichthemainandsubpicturesaredisplayednexttoeachother.
• Securityfunctionforpreventingunauthorizeduse
Thisprojectorisequippedwiththefollowingsecurityfunctions:
- Passwordsecurity:Whenapasswordissetintheon-screenmenu,ascreentoinputthepasswordappearswhentheprojector’spoweristurnedon.
- Theftpreventionlock:AsecuritycablecompatiblewithKensingtonlockscanbeconnectedtotheprojector.
- Securitybar:Theprojectorhasamechanismallowingaregularsecuritycable(orwire)tobeinstalled.
• Wired/wirelessLANcompatibility(wirelessLANunitsoldseparately)
TheprojectorisequippedwithaLANport(RJ-45)forconnectiontoawiredLANfortransferringimagesfromacomputertotheprojector,controllingtheprojectorfromacomputer,etc.
Furthermore, theprojectorcanbeused inawirelessLANbymountingtheseparatelysoldwirelessLANunit(NP02LM).
• Convenientutilitysoftware(UserSupportware)providedasstandard
Sevenutilitysoftwareprograms(VirtualRemoteTool,ImageExpressUtilityLite,DesktopControlUtility1.0,PCControlUtilityPro4)areprovidedontheincludedNECProjectorCD-ROM.
• LAN-compatibleviewerfunction
StillandmovingimagesinsharedfoldersonacomputerconnectedbywiredorwirelessLANcanbeprojectedwiththeprojector’sviewer.
- TheviewersupportstheWindowsMediaPlayer11’s“mediasharing”function.
• CRESTRONROOMVIEWcompatibility
TheprojectorsupportsCRESTRONROOMVIEW,allowingmultipledevicesconnectedinthenetworktobemanagedandcontrolledfromacomputer.
About this user’s manualThefastestwaytogetstartedistotakeyourtimeanddoeverythingrightthefirsttime.Takeafewminutesnowtoreviewtheuser’smanual.Thismaysaveyoutimelateron.Atthebeginningofeachsectionofthemanualyou’llfindanoverview.Ifthesectiondoesn’tapply,youcanskipit.

4
1. Introduction
Part Names of the ProjectorFront/TopThelensissoldseparately.ThedescriptionbelowisforwhentheNP13ZLlensismounted.
Control Panel(→ page 6)
Lens Shift Dial (vertical/horizontal)(→ page 18)
Lens
Remote Sensor (located on the front and the rear)(→ page 9)
Remote Sensor(→ page 9)
Zoom Lever/Zoom Ring (→ page 21)
Lens Cap(The optional lens is shipped with the lens cap.)
Focus Ring(→ page 19)
Adjustable Tilt Foot (→ page 21)
Indicator Section(→ page 6)
Lens Release Button(→ page 142)
Adjustable Tilt Foot(→ page 21)
Ventilation (outlet)Heated air is exhausted from here.
Mounting the straps1. Mount the straps to the lamp cover as shown on the diagram below.
2. Insert the knot in the strap into the hole on the bottom of the projector and pull in the direction of the arrow to fasten.
a
b
Lamp Cover (→ page 160)
Security Bar Attach an anti-theft device.
The security bar accepts security wires or chains up to 0.18 inch/4.6
mm in diameter.
Monaural Speaker (10 W)
Lamp cover strap insertion hole

5
1. Introduction
Terminal Panel(→ page 7)
RearRemote Sensor (located on the front and the rear)(→ page 9)
AC InputConnect the supplied power cord’s three-pin plug here, and plug the other end into an active wall outlet. (→ page 13)
* ThissecurityslotsupportstheMicroSaver®SecuritySystem.
Built-in Security Slot ( )*
Cable cover connection (right and left)
Screw holes and grooves for the optional cable cover
(→ page 212)
Ventilation (inlet) / Filter CoverThe wireless LAN unit’s USB (LAN)
port is located inside here.(→ page 151, 155)
Ventilation (outlet)Heated air is exhausted from here.

6
1. Introduction
Control Panel/Indicator Section
1. (POWER)Button(→page14,25)
2. POWER Indicator (→page13,14,25,214)
3. STATUS Indicator (→page214)
4. LAMPIndicator(→page159,215)
5. TEMP. Indicator (→page215)
6. SOURCEButton(→page16)
7. AUTO ADJ. Button (→page24)
8. GEOMETRIC. Button (→page32)
9. MENU Button (→page82)
10./VolumeButtons (→page24)
11. ENTER Button (→page82)
12. EXIT Button (→page82)
11 10
7
2 3 4 5 8 1
6
129

7
1. Introduction
Terminal Panel Features
1. HDMI1INConnector(TypeA) (→page144,145,149)
2. HDMI2INConnector(TypeA) (→page144,145,149)
3. DisplayPort IN Connector (→page144)
4. BNCIN[R/Cr/CV,G/Y/Y,B/Cb/C,H,V]Connec-tors(BNC×5)
(→page143,148)
5. BNC(CV)InputConnector(BNC×1) (→page143,148)
6. BNC(Y/C)InputConnector(BNC×2) (→page143,148)
7. BNCAUDIOINMiniJack(StereoMini) (→page143,148)
8. COMPUTERIN/ComponentInputConnector(MiniD-Sub15Pin)
(→page13,143,148)
9. COMPUTERAUDIOINMiniJack(StereoMini) (→page143,148)
10.Ethernet/HDBaseTPort(RJ-45) (→page150)
11.USB-APort(TypeA) (→page60) (NotavailableonPA722X/PA622X/PA672W/PA572W/
PA622U/PA522U)
12.HDMIOUTConnector(TypeA) (→page144,145,149)
13.AUDIOOUTMiniJack(StereoMini) (→page146)
14.3DSYNCConnector(MiniDIN4Pin) (→page147)
2 3112 8 910 11
7
4
5 15 1613 14 6
15.PCCONTROLPort(D-Sub9Pin) (→page219) Use this port to connect a PC or control system.
Thisenablesyoutocontroltheprojectorusingserialcommunicationprotocol.Ifyouarewritingyourownprogram,typicalPCcontrolcodesareonpage219.
16.REMOTEConnector(StereoMini) Use this connector for wired remote control of the
projectorusingtheNECoptionalremotecontrol. Connect the projector and optional remote control
usingacommerciallyavailablewiredremotecontrolcable.
NOTE:Whena remotecontrol cable isconnected to theRE-MOTE connector, infrared remote control operations cannotbeperformed.

8
1. Introduction
Part Names of the Remote Control
9. Edge Blend. Button (→pageXXX)
10.Multi.Button (→pageXXX)
11. Geometric. Button (→page32)
12. INPUT Button (→pageXXX)
13. PIP Button (→page16,35)
14.PBP/POPButton (→pageXXX)
15. AUTO ADJ. Button (→page24)
16.1(HDMI1)Button (→page16)
17.2(HDMI2)Button (→page16)
18.3(DisplayPort)Button (→page16)
19.4(BNC)Button (→pageXXX)
20.5(BNC(CV))Button (→pageXXX)
21.6(BNC(Y/C))Button (→pageXXX)
22.7(Computer)Button (→page16)
23.8(Ethernet)Button (→pageXXX)
24.9(USB-A)Button (→pageXXX)
25. ID SET Button (→page107)
26.NumericKeypadButton/CLEAR Button
(→page107)
27. MENU Button (→page82)
28. EXIT Button (→page82)
29. Button (→page82)
30.ENTERButton (→page82)
1. Infrared Transmitter (→page9)
2. POWER ON Button (→page14)
3. STANDBY Button (→page25)
4. FREEZEButton (→page27)
5. BLANKButton (→pageXXX)
6. MUTEButton (→pageXXX)
7. AV-MUTEButton (→page27)
8. TEST Button (→pageXXX)
31.L-CLICKButton* (→page31) (not available on this series of
projectors)
32.R-CLICKButton* (→page31) (not available on this series of
projectors)
33.VOL./FOCUS(+)(−)Button (→page24)
34.D-ZOOM/ZOOM(+)(−)Button (→page27) (“ZOOM”Buttondoesnotworkon
thisseriesofprojectors)
35. SHUTTER Button (not available on this series of
projectors)
36.LENSSHIFTButton (not available on this series of
projectors)
37. PICTURE Button (→page91,93)
38. DISPLAY Button (→pageXXX)
39. ASPECT Button (→page96)
40.COLORButton (→pageXXX)
41.3DSet.Button (→pageXXX)
42.SETUPButton (→pageXXX)
43.CTLButton (→pageXXX)
44.ECOButton (→page28)
45.INFOButton (→pageXXX)
46.HELPButton (→page112)
1
35489
1213
26711101514
16
1922
2523
17
27
31
33
35
30
21
28
29
20
32
2426
18
34
36
43
44
4645
374038
4241
39

9
1. Introduction
Remote Control Precautions• Handletheremotecontrolcarefully.• Iftheremotecontrolgetswet,wipeitdryimmediately.• Avoidexcessiveheatandhumidity.• Donotshort,heat,ortakeapartbatteries.• Donotthrowbatteriesintofire.• Ifyouwillnotbeusingtheremotecontrolforalongtime,removethebatteries.• Ensurethatyouhavethebatteries’polarity(+/−)alignedcorrectly.• Donotusenewandoldbatteriestogether,orusedifferenttypesofbatteriestogether.• Disposeofusedbatteriesaccordingtoyourlocalregulations.
Operating Range for Wireless Remote Control
• Theinfraredsignaloperatesbyline-of-sightuptoadistanceofabout22feet/7mandwithina60-degreeangleoftheremotesensorontheprojectorcabinet.
• Theprojectorwillnotrespondifthereareobjectsbetweentheremotecontrolandthesensor,orifstronglightfallsonthesensor.Weakbatterieswillalsopreventtheremotecontrolfromproperlyoperatingtheprojector.
Battery Installation
40 m/131.2 feet
40 m/131.2 feet
Remote controlRemote sensor on projector cabinet
1 Pressthecatchandremovethebatterycover.
2 Install new ones (AA). Ensurethatyouhavethebatteries’polar-ity(+/−)alignedcorrectly.
3 Slipthecoverbackoverthebatteriesuntilitsnapsintoplace.NOTE:Donotmixdifferent typesofbatteriesornewandoldbatteries.
1
2 12
40 m/131.2 feet
40 m/131.2 feet
20 m/65.6 feet
20 m/65.6 feet 20 m/65.6 feet
20 m/65.6 feet
15 m/49.2 feet
15 m/49.2 feet
15 m/49.2 feet
15 m/49.2 feet

10
1. Introduction
Operating Environment for Software Included on CD-ROMNamesandFeaturesofBundledSoftwarePrograms
Nameofsoftwareprogram FeaturesVirtualRemoteTool Whenthecomputerandprojectorareconnectedusinganetwork(wired/wireless
LAN),suchoperationsasturningtheprojector’spoweronandoffandswitchingthesignalcanbeperformed.Itisalsopossibletosendanimagetotheprojectorandregisteritasthebackgroundlogo.Oncetheimageisregistered,itcanbelockedtopreventthelogofrombeingoverwritten.(→page167)
ImageExpressUtilityLite • When the computer andprojector are connectedusinganetwork (wired/wirelessLAN),thecomputerscreencanbesenttotheprojectorandprojected.Thereisnoneedforacomputercable.(→page150,page170)
• ThissoftwareprogramcanbeusedtocontrolthepowerON/OFFandsourceselectionoftheprojectorfromyourcomputer.
• TheGeometricCorrectionTool(GCT)functionallowsyoutocorrectdistortionofimagesprojectedonacurvedwall.(→page172)
DesktopControlUtility1.0 • Thisisasoftwareprogramusedtooperatethedesktopscreenofapersonalcomputerataremotelocationbyusingaprojectorviawired/wirelessLAN.(→page185)
PCControlUtilityPro4 ThisisasoftwareprogramusedtooperatetheprojectorfromthecomputerwhenthecomputerandtheprojectorareconnectedwithLAN(wiredorwireless)oraserialcable.(→page194)
*AseparatelysoldwirelessLANunitisrequiredtouseawirelessLAN.
NOTE:• ImageExpressUtilityLiteandImageExpressUtilityforMacdonotsupport“MeetingMode”whichisprovidedinImageExpress
Utility2.0.
Download serviceFortheupdateinformationaboutthesesoftwareprograms,visitourwebsite:URL:http://www.nec-display.com/dl/en/index.html

11
1. Introduction
Operating EnvironmentThefollowingistheoperatingenvironmentforImageExpressUtilityLite.Fortheoperatingenvironmentofothersoft-wareprogram,refertothehelpfunctionofeachsoftwareprogram.
SupportedOS Windows7HomeBasicWindows7HomePremiumWindows7ProfessionalWindows7UltimateWindows7EnterpriseWindowsVistaHomeBasicWindowsVistaHomePremiumWindowsVistaBusinessWindowsVistaUltimateWindowsVistaEnterpriseWindowsXPHomeEditionServicePack3orlaterWindowsXPProfessionalServicePack3orlater• Only32-bitversion• Windowspower-savingfunctionisnotsupported.
Processor • Windows7/WindowsVistaPentiumM1.2GHzequivalentorhigherrequiredDualcore1.5GHzorhigherrecommended
• WindowsXPPentiumM1.0GHzequivalentorhigherrequiredDualcore1.0GHzorhigherrecommended
Memory • Windows7/WindowsVista512MBormorerequired1GBormorerecommended
• WindowsXP256MBormorerequired512MBormorerecommended*Morememorymayberequiredtorunadditionalapplicationssimultaneously.
Graphicprocessor • Windows7/WindowsVistaThe“Graphics”score3.0ormoreof“WindowsExperienceIndex”recommended.
Networkenvironment TCP/IP-compatiblewiredLANorwirelessLAN(*UseawirelessLANunitcomplyingwiththeWi-Fistandard.)
Resolution • Windows7/WindowsVistaSVGA(800×600)orhigherrequiredXGA(1024×768)recommended
• WindowsXPVGA(640×480)orhigherrequiredXGA(1024×768)recommended
1024 dots × 768 lines - 1280 dots × 800 lines recommended (PA672W/PA671W/PA572W/PA571W/PA622U/PA621U/PA522U/PA521U)
ScreenColors HighColor(15bits,16bits)TrueColor(24bits,32bits)(recommended)• 256orfewercolorsarenotsupported.

12
Thissectiondescribeshowtoturnontheprojectorandtoprojectapictureontothescreen.
1 Flow of Projecting an Image
Step 1• Connectingyourcomputer/Connectingthepowercord(→ page 13)
Step 2 • Turningontheprojector(→ page 14)
Step 3 • Selectingasource(→ page 16)
Step 4• Adjustingthepicturesizeandposition(→ page 17)
• Correctingkeystonedistortion[KEYSTONE](→ page 22)
Step 5• Adjustingapictureandsound
- Optimizing a computer signal automatically (→ page 24)
- Turning up or down volume (→ page 24)
Step 6• Makingapresentation
Step 7• Turningofftheprojector(→ page 25)
Step 8• Afteruse(→ page 26)
2. Projecting an Image (Basic Operation)

13
2. Projecting an Image (Basic Operation)
Connecting Your Computer/Connecting the Power Cord
1. Connectyourcomputertotheprojector.
This section will show you a basic connection to a computer. For information about other connections, see “(2) Making Connections” on page 143.
Connect the computer cable (VGA) between the projector’s COMPUTER IN connector and the computer’s port (mini D-Sub 15 Pin). Turn two thumb screws of both connectors to fix the computer cable (VGA).
2. Connectthesuppliedpowercordtotheprojector.
First connect the supplied power cord’s three-pin plug to the AC IN of the projector, and then connect the other plug of the supplied power cord in the wall outlet.
The projector’s power indicator will light orange* (standby mode).
The STATUS indicator will also light green*.
* This will apply for both indicators when [NORMAL] is selected for [STANDBY MODE]. See the Power Indicator section.(→ page 214)
COMPUTER IN
Make sure that the prongs are fully inserted into both the AC IN and the wall outlet.
To wall outlet
CAUTION:PartsoftheprojectormaybecometemporarilyheatediftheprojectoristurnedoffwiththePOWERbuttonoriftheACpowersupplyisdisconnectedduringnormalprojectoroperation.Usecautionwhenpickinguptheprojector.

14
2. Projecting an Image (Basic Operation)
Standby Blinking PowerOn
Steady orange light Blinking blue light Steady blue light
Turning on the Projector
1. Remove the lens cap.
2. Press the (POWER) button on the projector cabinet or the POWER ON button on the remote control.
The POWER indicator will turn to blue and the projector will become ready to use.
TIP:• Whenthemessage“PROJECTORISLOCKED!ENTERYOUR
PASSWORD.” is displayed, it means that the [SECURITY]featureisturnedon.(→page37)
• When the ECO message is displayed, it means that [ON] isselectedfor[ECOMESSAGE].(→page102)
• PressingbuttonssuchaspowerbuttonandMENUbuttonwillmakesound.Toturnoffthebeepsound,select[OFF]for[BEEP]fromthemenu.(→page109)
After you turn on your projector, ensure that the computer or video source is turned on.
NOTE:Abluescreen(bluebackground)isdisplayedwhennosignalisbeinginput(byfactorydefaultmenusettings).
(→page214)

15
2. Projecting an Image (Basic Operation)
Note on Startup screen (Menu Language Select screen)Whenyoufirstturnontheprojector,youwillgettheStartupmenu.Thismenugivesyoutheopportunitytoselectoneofthe27menulanguages.
Toselectamenulanguage,followthesesteps:
1. Use the , , or button to select one of the 27 languages from the menu.
2. Press the ENTER button to execute the selection.
After this has been done, you can proceed to the menuoperation.Ifyouwant,youcanselectthemenulanguagelater.(→[LANGUAGE]onpage85and101)
NOTE:• Turningthepowerbackondirectlyafter it isturnedoff(bydirectpoweroff)whileanimageisbeingprojectedcanresult in
malfunction.Besuretowaitatleast1secondbeforeturningthepowerbackon.• Keepthelenscapoffthelenswhiletheprojector’spowerison. Ifthelenscapison,itcouldbewarpedduetohightemperature.• Ifoneofthefollowingthingshappens,theprojectorwillnotturnon.
- Iftheinternaltemperatureoftheprojectoristoohigh,theprojectordetectsabnormalhightemperature.Inthisconditiontheprojectorwillnotturnontoprotecttheinternalsystem.Ifthishappens,waitfortheprojector’sinternalcomponentstocooldown.
- Whenthelampreachesitsendofusablelife,theprojectorwillnotturnon.Ifthishappens,replacethelamp.- IftheSTATUSindicatorlightsorangewiththepowerbuttonpressed,itmeansthatthe[CONTROLPANELLOCK]isturnedon.
Cancelthelockbyturningitoff.(→page106)- Ifthelampfailstolight,andiftheSTATUSindicatorflashesonandoffinacycleofsixtimes,waitafullminuteandthenturn
onthepower.• WhilethePOWERindicatorisblinkingblueinshortcycles,thepowercannotbeturnedoffbyusingthepowerbutton.• Immediatelyafterturningontheprojector,screenflickermayoccur.Thisisnormal.Wait3to5minutesuntilthelamplightingis
stabilized.• Whentheprojectoristurnedon,itmaytakesometimebeforethelamplightbecomesbright.• Ifyouturnontheprojectorimmediatelyafterthelampisturnedofforwhenthetemperatureishigh,thefansrunwithoutdisplay-
inganimageforsometimeandthentheprojectorwilldisplaytheimage.

16
2. Projecting an Image (Basic Operation)
Selecting a SourceSelecting the computer or video sourceNOTE:Turnonthecomputerorvideosourceequipmentconnectedtotheprojector.
Detecting the Signal AutomaticallyPresstheSOURCEbuttononce.Theprojectorwillsearchfortheavailableinputsourceanddisplayit.Theinputsourcewillchangeasfollows:
HDMI1→HDMI2→DisplayPort→BNC→BNC(CV)→BNC(Y/C)→ COMUPTER→ ...
• WiththeSOURCEscreendisplayed,youcanpresstheSOURCEbuttonafewtimestoselecttheinputsource.
TIP:Ifnoinputsignalispresent,theinputwillbeskipped.
Using the Remote ControlPressanyoneofthe1(HDMI1),2(HDMI2),3(DisplayPort),4(BNC),5(BNC(CV)),6(NBC(Y/C)),7(Computer),or8(Ethernet)buttons.
Selecting Default Source Youcansetasourceasthedefaultsourcesothatitwillbedisplayedeachtimetheprojectoristurnedon.
1. Press the MENU button.
The menu will be displayed.
2. Press the buttontwicetoselect[SETUP]andpressthe but-tonortheENTERbuttontoselect[BASIC].
3. Press the buttonfivetimestoselect[OPTIONS(2)].
4. Press the button five times to select [DEFAULT SOURCESELECT]andpresstheENTERbutton.
The [DEFAULT SOURCE SELECT] screen will be displayed.
(→ page 111)
5. Select a source as the default source, and press the ENTER but-ton.
6. Press the EXIT button a few times to close the menu.
7. Restart the projector.
The source you selected in step 5 will be projected.
NOTE:Evenwhen[AUTO]isturnedon,the[NETWORK]willnotbeautomaticallyselected.Tosetyournetworkasthedefaultsource,select[NETWORK].
TIP:• Whentheprojector is inStandbymode,applyingacomputersignal froma
computerconnectedtotheCOMPUTERINinputwillpowerontheprojectorandsimultaneouslyprojectthecomputer’simage.
([AUTOPOWERON(COMP)]→page111)• OntheWindows7keyboard,acombinationoftheWindowsandPkeysallows
youtosetupexternaldisplayeasilyandquickly.

17
2. Projecting an Image (Basic Operation)
Adjusting the Picture Size and PositionUsethelensshiftdial,theadjustabletiltfootlever,thezoomlever/zoomringandthefocusringtoadjustthepicturesizeandposition.In this chapter drawings and cables are omitted for clarity.
Adjustingtheprojectedimage’sverticalandhorizontalposition[Lensshift]
Adjustingthefocus[Focusring]
Finelyadjustingthesizeofanimage[Zoomlever/Zoomring]
Adjusting theprojected image’sheightandhorizontaltilt[Tiltfoot]*¹
Adjustingthekeystonecorrection[Keystone]
NOTE*1:Adjusttheprojectedimage’sheightusingthetiltfeetwhenyouwanttoprojecttheimageatapositionhigherthanthelensshiftadjustmentrange.
(→ page 18)
(→ page 21)
(→ page 19)
(→ page 21)
(→ page 22)

18
2. Projecting an Image (Basic Operation)
Adjusting the vertical position of a projected image (Lens shift)
CAUTION Performtheadjustmentfrombehindorfromthesideoftheprojector.Adjustingfromthefrontcouldexposeyoureyestostronglightwhichcouldinjurethem.
Turn the lens shift dials clockwise or counterclockwise.
VerticaldialTurnthisclockwiseorcounterclockwisetoadjusttheprojectionpositionintheverticaldirection.Approximateturningrange:About6turnscounterclockwise,about2turnsclockwisewhenthelensisatthecenterposition.
HorizontaldialTurnthisclockwiseorcounterclockwisetoadjusttheprojectionpositioninthehorizontaldirection.Approximateturningrange:About1 turncounterclockwise,about1 turnclockwisewhenthe lens isat thecenterposition.
NOTE:• Thedialscanbeturnedmorethanonefullturn,buttheprojectionpositioncannotbemovedmorethantherangeindicatedon
thefollowingpage.• Ifthelensisshiftedtothemaximuminthediagonaldirection,theedgesofthescreenwillbedarkorshaded.• ThelensshiftfunctioncannotbeusedwhenusingtheseparatelysoldNP11FLlens.
Downward
Upward
Lens shift dial (Horizontal)
Lens shift dial (Vertical)
RightwardLeftward

19
2. Projecting an Image (Basic Operation)
TIP:• ThediagrambelowshowsthelensshiftadjustmentrangeforthePA722X/PA721X/PA622X/PA621X(projectionmode:desktop
front).Toraisetheprojectionpositionhigherthanthis,usethetiltfeet.(→page21)• ForthePA672W/PA671W/PA572W/PA571W/PA622U/PA621U/PA522U/PA521Uandtheceilingmount/frontprojectionlensshift
adjustmentrange,seepage205,206.
1V
1H
0.5V
0.1V 0.1H 0.1H
PA600X/PA500X
0.3H 0.3H
Vertical shift range (0 to 0.5V)
Height of projected image
FocusApplicablelens:NP12ZL/NP13ZL/NP14ZL/NP15ZLUsetheFOCUSringtoobtainthebestfocus.
Focus ring

20
2. Projecting an Image (Basic Operation)
Applicable lens: NP11FLWiththeNP11FLlens,adjustthefocusandpicturedistortion.Preparations:Turnthelensshiftdials(verticalandhorizontal)ontheprojectortoreturnthelensshifttothecenter.Approximatelenscenterposition(explainedhereforthedesktopfrontprojectionmode)
Horizontaldial: Firstturnthedialtotheleftedge,thenturnitfurthersothattheknobishorizontal.Fromthisposition,turnthedial1fullturnclockwise.
Verticaldial: Firstturnthedialtothebottomedge,thenturnitfurthersothattheknobishorizontal. Fromthisposition,turnthedial2fullturnscounterclockwise.
1. Turn the distortion ring to the left edge.
2. Turn the focus lever clockwise and counterclockwise to adjust the focus at the center of the screen.
3. Use the distortion ring to correct the screen’s distortion.
(This also brings the edges of the screen into focus.)
4. Use the focus lever to adjust the screen’s overall focus.
* If the focus at the center of the screen is off, turn the distortion ring a little counterclockwise. The focus at the center of the screen can now be adjusted with the focus lever.
Distortion ring
Lens shift dials
Focus lever

21
2. Projecting an Image (Basic Operation)
Adjusting the Tilt Feet1. Turn the left and right tilt feet to adjust.
The tilt feet lengthen and shorten when turned.
The height of the projected image is adjusted by turning the left and right tilt feet.
If the projected image is tilted, turn one of the tilt feet to adjust the image so that it is level.
- If the projected image is distorted, see “2-6 Correcting Keystone Distortion” (→ page 22).
- The tilt feet can be lengthened by a maximum of 20 mm.
- The tilt feet can be used to tilt the projector by a maximum of 4º.
NOTE:• Donotlengthenthetiltfeetanymorethan20mm/0.8".Doingsowillmakethe
tiltfeet’smountsectionunstableandcouldcausethetiltfeettocomeofftheprojector.
• Donotuse the tilt feet foranypurposeother thanadjusting theprojector’sprojectionangle.
Handlingthetiltfeetimproperly,suchascarryingtheprojectorbygraspingthetiltfeetorhookingitontoawallusingthetiltfeet,coulddamagetheprojector.
ZoomTurnthezoomleverorzoomringclockwiseandcounterclockwise.- TheseparatelysoldNP11FLlensdoesnothaveazoomring.
Zoom ring
Up
Tilt foot
Down

22
2. Projecting an Image (Basic Operation)
Correcting Keystone DistortionWhentheprojectorisnotexactlyperpendiculartothescreen,keystonedistortionoccurs.Toovercomeit,youcanusethe“Keystone”function,adigitaltechnologythatcanadjustforkeystone-typedistortion,resultinginacrisp,squareimage.Thefollowingprocedureexplainshowtousethe[KEYSTONE]screenfromthemenutocorrecttrapezoidaldistor-tions.Whentheprojectorisplaceddiagonallytothescreen,Whentheprojectorissetupatanangleinrelationtothescreen,adjusttheHorizontaloptionoftheKeystonemenusothatthetopandbottomofsidesoftheprojectedimageareparallel.
1. PresstheGEOMETRIC.buttonontheremotecontrolortheprojec-tor cabinet.
The Keystone screen will be displayed on the screen.
2. Press the buttontoselect[VERTICAL]andthenusethe or so that the left and right sides of the projected image are parallel.
* Adjust the vertical keystone distortion.
3. Align the left (or right) side of the screen with the left (or right) side of the projected image.
• Usetheshortersideoftheprojectedimageasthebase.
• Intherightexample,usetheleftsideasthebase.
4. Press the buttontoselect[HORIZONTAL]andthenusethe or so that the top and bottom sides of the projected image are par-allel.
• Adjustthehorizontalkeystonedistortion.
Screen frameProjected area
Align left side

23
2. Projecting an Image (Basic Operation)
NOTE:• Iftheprojectionangleisthesameasinthelastuse,thepreviouscorrectionsettingvaluesareretainedinthememory.• WhendoingStep2,adjustthepositionofimagesothatthescreenissmallerthantheareaoftheprojectedarea.• Toresetthe3DReformcorrectionsettingvalues,pressandholdtheGEOMETRIC.buttonforaminimumof2seconds.• EachtimetheGEOMETRIC.buttonispressed,theitemwillchangeasfollows:KEYSTONE→CORNERSTONE→None→KEY-
STONE→...Forinformationon[CORNERSTONE],see“CorrectingHorizontalandVerticalKeystoneDistortion(Cornerstone)”onpage32.• TheCornerstoneadjustmentwillnotbeavailableduringtheKeystoneadjustment.ToperformtheCornerstoneadjustment,press
andholdtheGEOMETRIC.buttonforaminimumof2secondstoresettheKeystonecorrectionsettingvalues.TheKeystoneadjustmentwillnotbeavailableduringtheCornerstoneadjustment.ToperformtheKeystoneadjustment,pressandholdtheGEOMETRIC.buttonforaminimumof2secondstoresettheCornerstonecorrectionsettingvalues.
• The3DReformfeaturecancauseanimagetobeslightlyblurredbecausethecorrectionismadeelectronically.
5. Repeat steps 2 and 4 to correct keystone distortion.
6. AftercompletingKeystonecorrection,presstheEXITbutton.
The Keystone screen will disappear.
• ToperformKeystonecorrectionagain,press theGEOMETRIC.but-ton to display the Keystone screen and repeat above steps 1 to 6.

24
2. Projecting an Image (Basic Operation)
Optimizing Computer Signal AutomaticallyAdjusting the Image Using Auto AdjustOptimizingacomputerimageautomatically.(COMPUTER1/COMPUTER2/COMPUTER3)PresstheAUTOADJ.buttontooptimizeacomputerimageautomatically.Thisadjustmentmaybenecessarywhenyouconnectyourcomputerforthefirsttime.
[Poor picture]
[Normal picture]
NOTE:Somesignalsmaytaketimetodisplayormaynotbedisplayedcorrectly.• IftheAutoAdjustoperationcannotoptimizethecomputersignal,trytoadjust[HORIZONTAL],[VERTICAL],[CLOCK],and[PHASE]
manually.(→page94,95)
Turning Up or Down VolumeSoundlevelfromthespeakercanbeadjusted.
TIP:Whennomenusappear,theandbuttonsontheprojectorcabinetworkasavolumecontrol.
NOTE:• Volumecontrolisnotavailablewiththeorbuttonwhenanimageisenlarged
byusingtheD-ZOOM(+)buttonorwhenthemenuisdisplayed.• VolumecontrolisnotavailablewiththeorbuttonwhenVIEWERorNET-
WORKisused.
Increase volume
Decrease volume

25
2. Projecting an Image (Basic Operation)
Turning off the Projector
Toturnofftheprojector:1. First, press the (POWER) button on the projector
cabinet or the POWER OFF button on the remote con-trol.
The [POWER OFF / ARE YOU SURE ? / CARBON SAV-INGS- SESSION 0.000[g-CO2]] message will appear.
2. Secondly, press the ENTER button or press the (POWER) or the POWER OFF button again.
The lamp will turn off and the projector will go into standby mode. When in standby mode, the POWER indicator will light orange and the STATUS indicator will light green when [NORMAL] is selected for [STANDBY MODE].
PowerOn
Steady blue light
Standby
Steady orange lightPress twice
CAUTION:PartsoftheprojectormaybecometemporarilyheatediftheprojectoristurnedoffwiththePOWERbuttonoriftheACpowersupplyisdisconnectedduringnormalprojectoroperation.Usecautionwhenpickinguptheprojector.
NOTE:• WhilethePOWERindicatorisblinkingblueinshortcycles,thepowercannotbeturnedoff.• Youcannotturnoffthepowerfor60secondsimmediatelyafterturningitonanddisplayinganimage.• Waitatleast20minutesafterthepoweristurnedon(afterstartingtoproject)beforeturningtheACpoweroffwhileanimageis
beingprojectedorwhilethecoolingfanisrunning.• Donotunplugthepowercordfromtheprojectororfromthepoweroutletwhileanimageisbeingprojected.Doingsocould
deterioratetheprojector’sACinputconnectororthepowerplug’scontact.ToturnofftheACpowerwhileanimageisbeingprojected,usethepowerstrip’sswitch,thebreaker,etc.
• DonotdisconnecttheACpowersupplytotheprojectorwithin10secondsofmakingadjustmentorsettingchangesandclosingthemenu.Doingsocancauselossofadjustmentsandsettings.

26
2. Projecting an Image (Basic Operation)
After UsePreparation:Makesurethattheprojectoristurnedoff.
1. Unplug the power cord.
2. Disconnect any other cables.• RemovetheUSBmemoryifitisinsertedintotheprojector.
3. Mount the lens cap on the lens.
4. Before moving the projector, screw in the tilt feet if they have been lengthened.

27
1 Turning off the Image and SoundPresstheAV-MUTEbuttontoturnofftheimage,sound,beepsoundforashortperiodoftime.Pressagaintorestoretheimageandsound.
Theprojector’spower-savingfunctionwillwork10secondsaftertheimageisturnedoff.Asaresult,thelamppowerwillbereduced.
NOTE:• Torestoretheimage,evenifyoupresstheAV-MUTEbuttonimmediatelyafter
thestartofthepower-savingfunction,thelampbrightnessmaynotberestoredtoitsoriginallevel.
Freezing a PicturePress theFREEZEbutton to freezeapicture.Pressagain to resumemotion.
NOTE:Theimageisfrozenbuttheoriginalvideoisstillplayingback.
Enlarging a PictureYoucanenlargethepictureuptofourtimes.
NOTE:Themaximummagnificationmaybelessthanfourtimesdependingonthesignal.
Todoso:
1. PresstheD-ZOOM(+)buttontomagnifythepicture.
3. Convenient Features

28
3. Convenient Features
Changing Eco Mode/Checking Energy-Saving Effect Using Eco Mode [ECO MODE]Thisfeatureenablesyoutoselecttwobrightnessmodesofthelamp:OFFandONmodes.Thelamplifecanbeextendedbyturningonthe[ECOMODE].
[ECOMODE] Description
[OFF] Thisisthedefaultsetting(100%Brightness).
[ON] Lowlamppowerconsumption(approx.80%Brightness).
Toturnonthe[ECOMODE],dothefollowing:
1. PresstheECObuttonontheremotecontroltodisplay[ECOMODE]screen.
2. Use the or buttontoselect[ON].
3. Press the ENTER button.
To change from [ON] to [OFF], Go back to Step 2 and select [OFF]. Repeat Step 3.
NOTE:• The[ECOMODE]canbechangedbyusingthemenu. Select[SETUP]→[BASIC]→[ECOMODE].• Thelampliferemainingandlamphoursusedcanbecheckedin[USAGETIME].Select[INFO.]→[USAGETIME].• [ECOMODE]isalwayssetto[OFF]for1minuteimmediatelyafterthelampisturnedon.Thelampconditionwillnotbeaffected
evenwhen[ECOMODE]ischanged.• Afteralapseof1minutefromwhentheprojectordisplaysablue,blackorlogoscreen,[ECOMODE]willautomaticallyswitchto
[ON].• Iftheprojectorisoverheatedin[OFF]mode,theremaybeacasewherethe[ECOMODE]automaticallychangesto[ON]mode
toprotecttheprojector.Thisiscalled“ForcedECOMode”.WhentheprojectorisintheForcedEcoMode,thepicturebrightnessdecreasesslightlyandtheTEMP.indicatorlightsorange.AtthesametimetheThermometersymbol[ ]isdisplayedatthebottomrightofthescreen.
Whentheprojectorcomesbacktonormaltemperature,theForcedEcoModeiscancelledandthe[ECOMODE]returnsto[OFF]mode.
2. Press the button. The area of the magnified image will be moved
3. PresstheD-ZOOM(−)button.
Each time the D-ZOOM (−) button is pressed, the image is reduced.
NOTE:• Theimagewillbeenlargedorreducedatthecenterofthescreen.• Displayingthemenuwillcancelthecurrentmagnification.

29
3. Convenient Features
Checking Energy-Saving Effect [CARBON METER]Thisfeaturewillshowenergy-savingeffectintermsofCO2emissionreduction(kg)whentheprojector’s[ECOMODE]issetto[OFF],or[ON].Thisfeatureiscalledas[CARBONMETER].
Therearetwomessages:[TOTALCARBONSAVINGS]and[CARBONSAVINGS-SESSION].The[TOTALCARBONSAVINGS]messageshowsthetotalamountofCO2emissionreductionfromthetimeofshipmentuptonow.Youcanchecktheinformationon[USAGETIME]from[INFO.]ofthemenu.(→page112)
The[CARBONSAVINGS-SESSION]messageshowstheamountofCO2emissionreductionbetweenthetimeofchangingtoECOMODEimmediatelyafterthetimeofpower-onandthetimeofpower-off.The[CARBONSAVINGS-SESSION]messagewillbedisplayedinthe[POWEROFF/AREYOUSURE?]messageatthetimeofpower-off.
TIP:• TheformulaasshownbelowisusedtocalculatetheamountofCO2emissionreduction. AmountofCO2emissionreduction=(PowerconsumptioninOFFforECOMODE−PowerconsumptioninONforECOMODE)×
CO2conversionfactor.*WhentheimageisturnedoffwiththeAV-MUTEbuttontheamountofCO2emmissionreductionwillalsoincrease.
*CalculationforamountofCO2emissionreductionisbasedonanOECDpublication“CO2EmissionsfromFuelCombustion,2008Edition”.
• The[TOTALCARBONSAVINGS]iscalculatedbasedonsavingsrecordedin15minutesintervals.• Thisformulawillnotapplytothepowerconsumptionwhichisnotaffectedbywhether[ECOMODE]isturnedonoroff.

30
3. Convenient Features
Using the Optional Remote Mouse Receiver (NP01MR)Theoptionalremotemousereceiverenablesyoutooperateyourcomputer’smousefunctionsfromtheremotecontrol.Itisagreatconvenienceforclickingthroughyourcomputer-generatedpresentations.
Connecting the remote mouse receiver to your computerIfyouwishtousetheremotemousefunction,connectthemousereceiverandcomputer.Themousereceivercanbeconnecteddirectlytothecomputer’sUSBport(typeA).
NOTE:DependingonthetypeofconnectionorOSinstalledonyourcomputer,youmayhavetorestartyourcomputerorchangeyourcomputersettings.
When operating a computer via the remote mouse receiver
When connecting using the USB terminalForPC,themousereceivercanonlybeusedwithaWindowsXP*,WindowsVista,Windows7,orMacOSX10.0.0orlateroperatingsystem.
*NOTE:InSP1orolderversionofWindowsXP,ifthemousecursorwillnotmovecorrectly,dothefollowing:CleartheEnhancepointerprecisioncheckboxunderneaththemousespeedsliderintheMousePropertiesdialogbox[PointerOptionstab].
NOTE:ThePAGEandbuttonsdonotworkwithPowerPointforMacintosh.
NOTE:Waitatleast5secondsafterdisconnectingthemousereceiverbeforereconnectingitandviceversa.Thecomputermaynotidentifythemousereceiverifitisrepeatedlyconnectedanddisconnectedinrapidintervals.
Remote mouse receiver
Computer
To USB port of PC or Macintosh
Remote sensor on the remote mouse receiver
7 m/22 feet

31
3. Convenient Features
Operating your computer’s mouse from the remote controlYoucanoperateyourcomputer’smousefromtheremotecontrol.
PAGE/Button: scrollstheviewingareaofthewindowortomovetothepreviousornextslideinPowerPointonyourcomputer.
Buttons: movesthemousecursoronyourcomputer.L-CLICKButton: worksasthemouseleftbutton.R-CLICKButton: worksasthemouserightbutton.
NOTE:• Whenyouoperatethecomputerusingtheorbuttonwiththemenudisplayed,boththemenuandthemousepointer
willbeaffected.Closethemenuandperformthemouseoperation.• ThePAGEandbuttonsdonotworkwithPowerPointforMacintosh.
AboutDragMode:BypressingtheL-CLICKorR-CLICKbuttonfor2or3secondsthenreleasing,thedragmodeissetandthedragoperationcanbeperformedsimplybypressingthebutton.Todroptheitem,presstheL-CLICK(orR-CLICK)button.Tocancelit,presstheR-CLICK(orL-CLICK)button.
TIP:YoucanchangethePointerspeedontheMousePropertiesdialogboxontheWindows.Formoreinformation,seetheuserdocumentationoronlinehelpsuppliedwithyourcomputer.

32
3. Convenient Features
Correcting Horizontal and Vertical Keystone Distortion [COR-NERSTONE]
Usethe3DReformfeaturetocorrectkeystone(trapezoidal)distortiontomakethetoporbottomandtheleftorrightsideofthescreenlongerorshortersothattheprojectedimageisrectangular.
Cornerstone1. PressandholdtheGEOMETRIC.buttonforaminimumof2secondstoresetcurrentadjustments.
Current adjustments for [KEYSTONE] or [CORNERSTONE] will be cleared.
2. Project an image so that the screen is smaller than the area of the raster.
3. Pick up any one of the corners and align the corner of the image with a corner of the screen.
Projected image
The drawing shows the up-per right corner.
4. PresstheGEOMETRIC.buttontwice.
The Cornerstone adjustment screen is displayed.
5. Use the button to select one icon () which points in the direction you wish to move the projected image frame.
6. Press the ENTER button.
TIP: If you are adjusting [KEYSTONE], [CORNERSTONE] will not beavailable.Ifthishappens,pressandholdtheGEOMETRIC.buttonforaminimumof2secondstoresetthe[KEYSTONE]adjustments.
The drawing shows the upper left icon ( ) is selected.
TIP:PA722X/PA721X/PA622X/PA621X:When[WIDESCREEN]isselectedfrom[SCREENTYPE],linesthatshow“16:9”or“16:10”willbedisplayed.Clicktheoutercorners.PA672W/PA671W/PA572W/PA571W/PA622U/PA621U/PA522U/PA521U:When[4:3SCREEN]isselectedfrom[SCREENTYPE],linesthatshow“4:3”willbedisplayed.Clicktheoutercorners.

33
3. Convenient Features
8. Press the ENTER button.
10. Press the or buttontohighlightthe[OK]andpresstheENTERbutton.
ThiscompletestheCornerstonecorrection.Selecting[CANCEL]willreturntotheadjustmentscreenwithoutsavingchanges(Step3).Selecting[RESET]willreturntothefactorydefault.Selecting[UNDO]willexitwithoutsavingchanges.
NOTE:Toresetthe3DReformcorrectionsettingvalues,pressandholdtheGEOMETRIC.buttonforaminimumof2seconds.
9. Use the button to select another icon which points in the direction.
On the Cornerstone adjustment screen, select [EXIT] or press the EXIT button on the remote control.
The confirmation screen is displayed.
7. Use the button to move the projected image frame as shown on the example.

34
3. Convenient Features
Theadjustablerangesfor3DReformareasfollows:
PA722X/PA721X/PA622X/PA621X/PA672W/PA671W/PA572W/PA571W
HORIZONTAL VERTICALCORNERSTONE Max.+/−40°approx. Max.+/−30°approx.KEYSTONE
PA622U/PA621U/PA522U/PA521U
HORIZONTAL VERTICALCORNERSTONE Max.+/−35°approx. Max.+/−30°approx.KEYSTONE
* Thefollowingareconditionsunderwhichthemaximumangleisachieved:
• WhenthelensNP13ZLisused
• Whenthelensshiftissettothecenter
Whenthelensshiftisusedandyettheimageisnotdisplayedinthecenterofthescreen,theadjustablerangewillbeincreasedordecreased.
• Imageisprojectedinmaximumwidewiththezoomring
NOTE:• Evenwhentheprojectoristurnedon,thelastusedcorrectionvaluesareapplied.• IftheCornerstonescreenisunavailable(grayed),pressandholdtheGEOMETRIC.buttonforaminimumof2secondstoreset
thecurrentcorrectiondata.TheCornerstonefunctionbecomesavailable.• Turningontheprojectorwillresetthepreviouscorrectionsettingvaluesandcorrectdistortionanewiftheprojectionangleis
changedfromthelastuse. Iftheprojectionangleisthesameasinthelastuse,thepreviouscorrectionsettingvaluesareretainedinthememory.• Therangeofkeystonecorrectionisnotthemaximumtiltangleofprojector.
NOTE:Using3DReformcorrectioncancausetheimagetobeslightlyblurredbecausethecorrectionismadeelectronically.

35
3. Convenient Features
Displaying Two Pictures at the Same TimeTheprojectorhasafeaturethatallowsyoutoviewtwodifferentsignalssimultaneously.Youhavetwomodes:PIPmodeandPICTUREBYPICTUREmode.
Fromthemenuyoucanselect[SETUP]→[BASIC]→[PIP/PICTUREBYPICTURE].
The[PIP/PICTUREBYPICTURE]menuitemhasthefollowingthreeoptions:MODE,POSITION,andSOURCE.Usethe or buttontoselect[MODE],[POSITION]or[SOURCE]andpresstheENTERbutton.
Selecting the PIP or PICTURE BY PICTURE Mode [MODE]Thisoptionallowsyoutoselecttwomodes:PIPandSIDEBYSIDE.
Usethe or buttontoselect[PIP]or[PICTUREBYPICTURE]andpresstheENTERbutton.
PIP:Thisoptionallowsyoutoviewasubpictureinthemainpicture.
Main picture
Subpicture
PICTUREBYPICTURE:Thisallowsyoutoviewtwopicturessidebyside.
Main picture Sub picture
NOTE:• Themainpicturewillbedisplayedontheleftsideandthesubpictureontherightside.• ThemainpicturesignalsupportstheCOMPUTER1,COMPUTER2,andCOMPUTER3connectors. ThesubpicturesignalsupportstheVIDEOINandS-VIDEOINconnectors.• ThemainpicturesupportsanRGBsignalwitharesolutionof1280×1024pixelsorless.

36
3. Convenient Features
ViewingTwoPictures
1. Press the PIP button on the remote control.
The PIP/PICTURE BY PICTURE SOURCE screen will be displayed.
2. Use the or button to select the source and press the ENTER button.
The PIP screen or PICTURE BY PICTURE screen will be displayed, depending on which was selected in the [MODE] setting screen.
3. Press the PIP button again to return to the normal screen (single picture).
TIP:• Selectinganothersourcewillreturntothenormalscreen.• Selectingasourcenotsupportedforthemainpictureorthesubpicturewillreturntothenormalscreen.
[POSITION]Thisoptionallowsyoutoselectthepositionofasubpictureinthemainpicture.
NOTE:• Thedefaultsettingis[BOTTOM-RIGHT].
Usethe or buttontoselectthesubpicture’spositionandpresstheENTERbutton.Theoptionsare:TOP-LEFT,TOP-RIGHT,BOTTOM-LEFT,andBOTTOM-RIGHT.
Thefollowingadjustmentsandsettingsareavailableforthemainpictureonly.-Adjustingpictureandsound
-Magnifyingapicture
Thefollowingoperationsareavailableforboththemainandsubpictures.-Pictureandaudiomute
-Freezingamovingpicture

37
3. Convenient Features
Preventing the Unauthorized Use of the Projector [SECURITY]AkeywordcanbesetforyourprojectorusingtheMenutoavoidoperationbyanunauthorizeduser.Whenakeywordisset,turningontheprojectorwilldisplaytheKeywordinputscreen.Unlessthecorrectkeywordisentered,thepro-jectorcannotprojectanimage.•The[SECURITY]settingcannotbecancelledbyusingthe[RESET]ofthemenu.
ToenabletheSecurityfunction:
1. Press the MENU button.
The menu will be displayed.
2. Press the buttontwicetoselect[SETUP]andpressthebuttonortheENTERbuttontoselect[BA-SIC].
3. Press the buttontoselect[INSTALLATION(2)].
4. Press the buttonthreetimestoselect[SECURITY]andpresstheENTERbutton.
The OFF/ON menu will be displayed.
5. Press the buttontoselect[ON]andpresstheENTERbutton.
The [SECURITY KEYWORD] screen will be displayed.
6. Type in a combination of the four buttons and press the ENTER button.
NOTE:Akeywordmustbe4to10digitsinlength.
The [CONFIRM KEYWORD] screen will be displayed.
NOTE:Makeanoteofyourpasswordandstoreitinasafeplace.

38
3. Convenient Features
7. Type in the same combination of buttons and press the ENTER button.
The confirmation screen will be displayed.
8. Select[YES]andpresstheENTERbutton.
The SECURITY function has been enabled.
Toturnontheprojectorwhen[SECURITY]isenabled:
1. Press the POWER button.
The projector will be turned on and display a message to the effect that the projector is locked.
2. Press the MENU button.
3. Type in the correct keyword and press the ENTER button. The projector will display an image.
NOTE:Thesecuritydisablemodeismaintaineduntilthemainpoweristurnedofforunpluggingthepowercord.

39
3. Convenient Features
TodisabletheSECURITYfunction:
1. Press the MENU button.
The menu will be displayed.
2.Select[SETUP]→[INSTALLATION(2)]→[SECURITY]andpresstheENTERbutton.
The OFF/ON menu will be displayed.
3. Select[OFF]andpresstheENTERbutton.
The SECURITY KEYWORD screen will be displayed.
4. Type in your keyword and press the ENTER button.
When the correct keyword is entered, the SECURITY function will be disabled.
NOTE:Ifyouforgetyourkeyword,contactyourdealer.Yourdealerwillprovideyouwithyourkeywordinexchangeforyourrequestcode.YourrequestcodeisdisplayedintheKeywordConfirmationscreen.Inthisexample[NB52-YGK8-2VD6-K585-JNE6-EYA8]isarequestcode.

40
3. Convenient Features
Controlling the Projector by Using an HTTP BrowserOverviewTheHTTPServerfunctionprovidessettingsandoperationsfor:1. Settingforwired/wirelessnetwork(NETWORKSETTINGS)
To use wireless LAN connection, the optional USB Wireless LAN Unit is required. (→ page 151)
To use wired/wireless LAN connection, connect the projector to the computer with a commercially available LAN cable. (→ page 150)
2. Setting Alert Mail (ALERT MAIL)
When the projector is connected to a wired/wireless network, lamp replace time or error messages will be sent via e-mail.
3. Operating the projector
Power on/off, selecting input, volume control and picture adjustments are possible.
4. SettingPJLinkPASSWORDandAMXBEACON
TwowaysofaccesstotheHTTPserverfunctionareavailable:• StarttheWebbrowseronthecomputerviathenetworkconnectedtotheprojectorandenterthefollowing
URL :
http://<theprojector’sIPaddress>/index.html
• UseImageExpressUtilityLiteorImageExpressUtility2.0containedonthesuppliedNECProjectorCD-ROM.
TIP:ThefactorysettingIPaddressis[DHCPON].
NOTE:• Tousetheprojectorinanetwork,consultwithyournetworkadministratoraboutnetworksettings.• Thedisplay’sorbutton’sresponsecanbesloweddownoroperationmaynotbeaccepteddependingthesettingsofyournet-
work. Shouldthishappen,consultyournetworkadministrator.Theprojectormaynotrespondifitsbuttonsarerepeatedlypressedin
rapidintervals.Shouldthishappen,waitamomentandrepeat.Ifyoustillcan’tgetanyresponse,turnoffandbackontheprojec-tor.
• IfthePROJECTORNETWORKSETTINGSscreendoesnotappearinthewebbrowser,presstheCtrl+F5keystorefreshyourwebbrowser(orclearthecache).
• Thisdeviceuses“JavaScript”and“Cookies”andthebrowsershouldbesettoacceptthesefunctions.Thesettingmethodwillvarydependingontheversionofbrowser.Pleaserefertothehelpfilesandtheotherinformationprovidedinyoursoftware.
Preparation before UseConnecttheprojectortoacommerciallyavailableLANcablebeforeengaginginbrowseroperations.(→page150)Operationwithabrowserthatusesaproxyservermaynotbepossibledependingonthetypeofproxyserverandthesettingmethod.Althoughthetypeofproxyserverwillbeafactor,itispossiblethatitemsthathaveactuallybeensetwillnotbedisplayeddependingontheeffectivenessofthecache,andthecontentssetfromthebrowsermaynotbereflectedinoperation.Itisrecommendedthataproxyservernotbeusedunlessitisunavoidable.
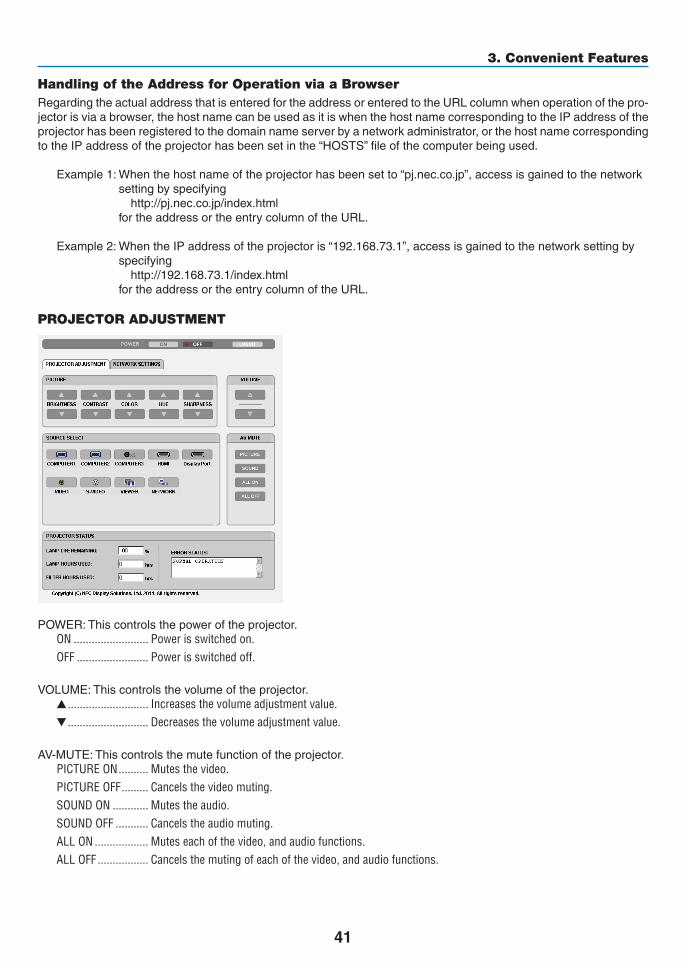
41
3. Convenient Features
Handling of the Address for Operation via a BrowserRegardingtheactualaddressthatisenteredfortheaddressorenteredtotheURLcolumnwhenoperationofthepro-jectorisviaabrowser,thehostnamecanbeusedasitiswhenthehostnamecorrespondingtotheIPaddressoftheprojectorhasbeenregisteredtothedomainnameserverbyanetworkadministrator,orthehostnamecorrespondingtotheIPaddressoftheprojectorhasbeensetinthe“HOSTS”fileofthecomputerbeingused.
Example1:Whenthehostnameoftheprojectorhasbeensetto“pj.nec.co.jp”,accessisgainedtothenetworksettingbyspecifying http://pj.nec.co.jp/index.html fortheaddressortheentrycolumnoftheURL.
Example2:WhentheIPaddressoftheprojectoris“192.168.73.1”,accessisgainedtothenetworksettingbyspecifying http://192.168.73.1/index.html fortheaddressortheentrycolumnoftheURL.
PROJECTOR ADJUSTMENT
POWER:Thiscontrolsthepoweroftheprojector.ON ������������������������� Power is switched on�OFF ������������������������ Power is switched off�
VOLUME:Thiscontrolsthevolumeoftheprojector. ��������������������������� Increases the volume adjustment value� ��������������������������� Decreases the volume adjustment value�
AV-MUTE:Thiscontrolsthemutefunctionoftheprojector.PICTURE ON ���������� Mutes the video�PICTURE OFF ��������� Cancels the video muting�SOUND ON ������������ Mutes the audio�SOUND OFF ����������� Cancels the audio muting�ALL ON ������������������ Mutes each of the video, and audio functions�ALL OFF ����������������� Cancels the muting of each of the video, and audio functions�
42
3. Convenient Features
PICTURE:Controlsthevideoadjustmentoftheprojector.BRIGHTNESS ���� Increases the brightness adjustment value�BRIGHTNESS ���� Decreases the brightness adjustment value�CONTRAST �������� Increases the contrast adjustment value�CONTRAST �������� Decreases the contrast adjustment value�COLOR �������������� Increases the color adjustment value�COLOR �������������� Decreases the color adjustment value�HUE ������������������� Increases the hue adjustment value�HUE ������������������� Decreases the hue adjustment value�SHARPNESS ����� Increases the sharpness adjustment value�SHARPNESS ����� Decreases the sharpness adjustment value�
• Thefunctionsthatcanbecontrolledwillvarydependingonthesignalbeinginputtotheprojector.(→page93)
SOURCESELECT:Thisswitchestheinputconnectoroftheprojector.COMPUTER 1 �������� Switches to the COMPUTER IN connector�COMPUTER 2 �������� Switches to the COMPUTER 2 IN connector�COMPUTER 3 �������� Switches to the COMPUTER 3 IN connector�HDMI ��������������������� Switches to the HDMI IN connector�DisplayPort ������������ Switches to the DisplayPort�VIDEO �������������������� Switches to the VIDEO IN connector�S-VIDEO ���������������� Switches to the S-VIDEO IN connector�VIEWER ����������������� Switches to the data on the USB memory device�NETWORK ������������� Switches to a LAN signal�
PROJECTORSTATUS:Thisdisplaystheconditionoftheprojector.LAMP LIFE REMAINING �����Displays the remaining life of the lamp as a percentage�LAMP HOURS USED �����������Displays how many hours the lamp has been used�FILTER HOURS USED ���������Displays how many hours the filter has been used�ERROR STATUS ������������������Displays the status of errors occurring within the projector�
LOGOFF:Loggingoffyourprojectorandreturningtotheauthenticationscreen(LOGONscreen).
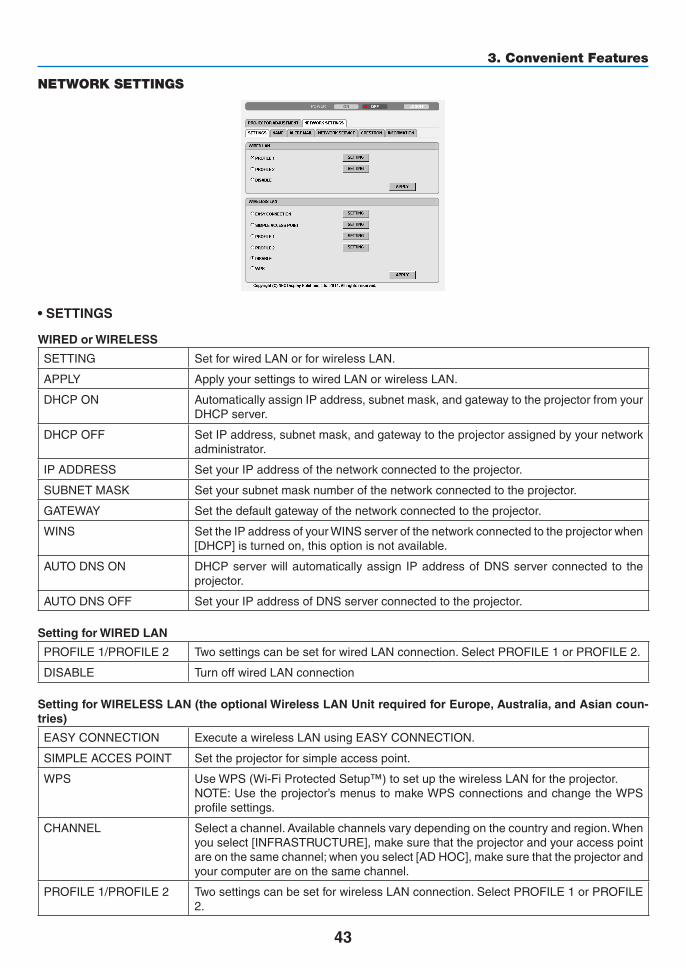
43
3. Convenient Features
NETWORK SETTINGS
•SETTINGS
WIRED or WIRELESS
SETTING SetforwiredLANorforwirelessLAN.
APPLY ApplyyoursettingstowiredLANorwirelessLAN.
DHCPON AutomaticallyassignIPaddress,subnetmask,andgatewaytotheprojectorfromyourDHCPserver.
DHCPOFF SetIPaddress,subnetmask,andgatewaytotheprojectorassignedbyyournetworkadministrator.
IPADDRESS SetyourIPaddressofthenetworkconnectedtotheprojector.
SUBNETMASK Setyoursubnetmasknumberofthenetworkconnectedtotheprojector.
GATEWAY Setthedefaultgatewayofthenetworkconnectedtotheprojector.
WINS SettheIPaddressofyourWINSserverofthenetworkconnectedtotheprojectorwhen[DHCP]isturnedon,thisoptionisnotavailable.
AUTODNSON DHCPserverwillautomaticallyassign IPaddressofDNSserverconnected to theprojector.
AUTODNSOFF SetyourIPaddressofDNSserverconnectedtotheprojector.
Setting for WIRED LAN
PROFILE1/PROFILE2 TwosettingscanbesetforwiredLANconnection.SelectPROFILE1orPROFILE2.
DISABLE TurnoffwiredLANconnection
SettingforWIRELESSLAN(theoptionalWirelessLANUnitrequiredforEurope,Australia,andAsiancoun-tries)
EASYCONNECTION ExecuteawirelessLANusingEASYCONNECTION.
SIMPLEACCESPOINT Settheprojectorforsimpleaccesspoint.
WPS UseWPS(Wi-FiProtectedSetup™)tosetupthewirelessLANfortheprojector.NOTE:Usetheprojector’smenustomakeWPSconnectionsandchangetheWPSprofilesettings.
CHANNEL Selectachannel.Availablechannelsvarydependingonthecountryandregion.Whenyouselect[INFRASTRUCTURE],makesurethattheprojectorandyouraccesspointareonthesamechannel;whenyouselect[ADHOC],makesurethattheprojectorandyourcomputerareonthesamechannel.
PROFILE1/PROFILE2 TwosettingscanbesetforwirelessLANconnection.SelectPROFILE1orPROFILE2.

44
3. Convenient Features
SSID Enteran identifier (SSID) forwirelessLAN.CommunicationcanbedoneonlywithequipmentwhoseSSIDmatchesSSIDforyourwirelessLAN.
SITESURVEY DisplaysalistofavailableSSIDsforwirelessLANonsite.SelectanSSIDwhichyoucanaccess.
NETWORKTYPE SelectcommunicationmethodwhenusingwirelessLAN.INFRASTRUCTURE:Selectthisoptionwhencommunicatingwithoneormoreequip-mentconnectedtothewirelessLANnetworkviaawirelessaccesspoint.ADHOC:SelectthisoptionwhenusingthewirelessLANtodirectlycommunicatewithacomputerinpeer-to-peermode.
SECURITYTYPE Turnonorofftheencryptionmodeforsecuretransmission.Whenturnontheencryp-tionmode,setWEPkeyorencryptedkey.
DISABLE Willnotturnontheencryptionfeature.Yourcommunicationsmaybemonitoredbysomeone.
WEP64bit Uses64-bitdatalengthforsecuretransmission.
WEP128bit Uses128-bitdatalengthforsecuretransmission.Thisoptionwillincrease privacy and security when compared to use of 64-bitdatalengthencryption.
WPA-PSKTKIP/WPA-PSKAES/WPA2-PSKTKIP/WPA2-PSKAES/WPA-EAPTKIPEAP-TLS/WPA-EAPAESEAP-TLS/WPA-EAPTKIPPEAP-MSCHAPv2/WPA-EAPAESPEAP-MSCHAPv2/WPA2-EAPTKIPEAP-TLS/WPA2-EAPAESEAP-TLS/WPA2-EAPTKIPPEAP-MSCHAPv2/WPA2-EAPAESPEAP-MSCHAPv2
TheseoptionsparovidestrongersecuritythanWEP.
NOTE:• TheWEPsettingsmustbethesameascommunicationdevicessuchasPCoraccesspointin
yourwirelessnetwork.• WhenyouuseWEP,yourimagetransmissionspeedwillslowdown.• OtherencryptionkeysthanWEP64bitandWEP128bitarenotavailablewhen[ADHOC]is
selectedfrom[NETWORKTYPE].• Toinstalladigitalcertificate,usetheprojector’smenu.(→page125)
INDEX Selectencryptionkeywhenselecting[WEP64bit]or[WEP128bit] in[SECURITYTYPE].
KEY Whenselecting[WEP64bit]or[WEP128bit]in[SECURITYTYPE]:EnterWEPkey.
Select Characters(ASCII) Hexadecimaldigit(HEX)
WEP64bit Upto5characters Upto10characters
WEP128bit Upto13characters Upto26characters
When selecting [WPA PSK-TKIP], [WPA PSK-AES], [WPA2 PSK-TKIP] or [WPA2PSK-AES]:Enterencryptionkey.Keylengthmustbe8orgreaterand63orless.
USERNAME SetausernameforWPA-EAP/WPA2-EAP.
PASSWORD SetapasswordforWPA-EAPTKIPPEAP-MSCHAPv2/WPA-EAPAESPEAP-MSCHAPv2/WPA2-EAPTKIPPEAP-MSCHAPv2/WPA2-EAPAESPEAP-MSCHAPv2.

45
3. Convenient Features
USEDIGITALCERTIFI-CATE
SelectthisifyouuseadigitalcertificateforWPA-EAPTKIPPEAP-MSCHAPv2/WPA-EAPAESPEAP-MSCHAPv2/WPA2-EAPTKIPPEAP-MSCHAPv2/WPA2-EAPAESPEAP-MSCHAPv2.
•NAME
PROJECTORNAME Enteranameforyourprojectorso thatyourcomputercan identify theprojector.Aprojectornamemustbe16charactersorless.TIP:Projectornamewillnotbeaffectedevenwhen[RESET]isdonefromthemenu.
HOSTNAME Enterthehostnameofthenetworkconnectedtotheprojector.Ahostnamemustbe15orless.
DOMAINNAME Enter thedomainnameof thenetworkconnectedtotheprojector.Adomainnamemustbe60charactersorless.
•ALERTMAIL
ALERTMAIL Thisoptionwillnotifyyourcomputeroflampreplacetimeorerrormessagesviae-mailwhenusingwirelessorwiredLAN.PlacingacheckmarkwillturnontheAlertMailfeature.ClearingacheckmarkwillturnofftheAlertMailfeature.Sampleofamessagetobesentfromtheprojector:
Thelampandfiltersareattheendofitsusablelife.Pleasereplacethelampandfilters.ProjectorName:NECProjectorLampHoursUsed:100[H]
SENDER’SADDRESS Entersender’saddress.
SMTPSERVERNAME EntertheSMTPservernametobeconnectedtotheprojector.
RECIPIENT’SADDRESS1,2,3
Enteryourrecipient’saddress.Uptothreeaddressescanbeentered.
TESTMAIL SendatestmailtocheckwhetheryoursettingsarecorrectornotNOTE:• Ifyouexecuteatest,youmaynotreceiveanAlertmail.Shouldthishappen,checkifnetwork
settingsarecorrect.• Ifyouenteredanincorrectaddressinatest,youmaynotreceiveanAlertmail.Shouldthis
happen,checkiftheRecipient’sAddressiscorrect.
SAVE Clickthisbuttontosaveyoursettingstotheprojector’smemory.

46
3. Convenient Features
•NETWORKSERVICE
PJLinkPASSWORD SetapasswordforPJLink*.Apasswordmustbe32charactersorless.Donotforgetyourpassword.However,ifyouforgetyourpassword,consultwithyourdealer.
HTTPPASSWORD SetapasswordforHTTPserver.Apasswordmustbe10charactersorless.
AMXBEACON TurnonorofffordetectionfromAMXDeviceDiscoverywhenconnectingtothenetworksupportedbyAMX’sNetLinxcontrolsystem.TIP:WhenusingadevicethatsupportsAMXDeviceDiscovery,allAMXNetLinxcontrolsystemwillrec-ognizethedeviceanddownloadtheappropriateDeviceDiscoveryModulefromanAMXserver.PlacingacheckmarkwillenabledetectingtheprojectorfromAMXDeviceDiscovery.ClearingacheckmarkwilldisabledetectingtheprojectorfromAMXDeviceDiscovery.
NOTE:Ifyouforgetyourpassword,contactyourdealer.
*WhatisPJLink?PJLinkisastandardizationofprotocolusedforcontrollingprojectorsofdifferentmanufacturers.Thisstandardproto-colisestablishedbyJapanBusinessMachineandInformationSystemIndustriesAssociation(JBMIA)in2005.TheprojectorsupportsallthecommandsofPJLinkClass1.SettingofPJLinkwillnotbeaffectedevenwhen[RESET]isdonefromthemenu.
•CRESTRON
DISABLE DisablesCRESTRONCONTROL.
ENABLE EnablesCRESTRONCONTROL.
IPADDRESS SetyourIPaddressofCRESTRONSERVER.
IPID SetyourIPIDofCRESTRONSERVER.
•INFORMATION
WIREDLAN DisplayalistofsettingsofwiredLANconnection.
WIRELESSLAN DisplayalistofsettingsofwirelessLANconnection.
UPDATE Reflectsettingswhentheyarechanged.

47
3. Convenient Features
Projecting Your Computer’s Screen Image from the Projector via a Network [NETWORK PROJECTOR]ByselectingtheprojectorconnectedtothesamenetworkasthatofyourPC,thePCscreenimagecanbeprojectedtothescreenvianetwork.Thereisnoneedofconnectionusingthecomputercable(VGA).
Operation Environment
ApplicableOS Windows7ProfessionalWindows7UltimateWindows7EnterpriseWindowsVistaHomePremiumWindowsVistaBusinessWindowsVistaUltimateWindowsVistaEnterprise
Hardwarespecifications ThespecificationsrecommendedbyMicrosoftastheoperationenvironmentforWindows7/WindowsVistashouldbesatisfied.
NetworkEnvironment WiredLANorwirelessLANenvironmentthatsupportsTCP/IPisrequired.
Screencolor HighColor(16bits)TrueColor(24bitsand32bits)*Settingwith256colorsorlessisnotavailable.
SettingtheProjectortoNetworkProjectorInputMode1. Withtheprojectorturnedon,presstheSOURCEbutton.
The input selection window appears.
Another way to display the input selection window is to press the NETWORK button on the remote control. The APPLICATION MENU screen will be displayed. Go to step 3.

48
3. Convenient Features
2. Press the or buttontoselect[NETWORK]andpresstheENTERbutton.
In the screen, the [APPLICATION MENU] menu is displayed.
3. Fromthe[APPLICATIONMENU]menu,select[NETWORKPROJECTOR].
The [PROJECTOR NAME/DISPLAY RESOLUTION/PASSWORD/URL] will be displayed.

49
3. Convenient Features
ProjectingtheImagewithNetworkProjector1. Click[Start]fromthedesktopofWindows7.
2. Click[AllPrograms].
3. Click[Accessories].
4. Click[ConnecttoaNetworkProjector].
When the [Permission Connect to a Network Projector] window appears, click [Yes.].
The “Connect to a Network Projector” window appears.
5. Click[→Searchforaprojector(recommended)].
In the “Available projectors” box, “PA600 Series” is displayed.
6. Click[PA600Series].
The message “Enter the password for the projector that you selected.” is displayed at the bottom of the window.

50
3. Convenient Features
7. Input the password to the password input box displayed by the operation at step 3 on page 44.
8. Click[Connect].
The network projector function works and the screen of Windows 7 is projected from the projector.
• Iftheresolutionofyourcomputer’sscreenisdifferentfromtheprojector’sscreenresolution,theNETWORKPROJECTOR function may not work. If this happens, change the resolution of the computer’s screen to lower resolution than the one displayed at Step 3 on page 48.
NOTE:Whenthenetworkprojectorfunctionworks,thebackgroundcolorofthedesktopchangestosolidcolor.Whenthenetworkprojectorfunctionisstopped,theoriginalbackgroundcolorisrestored.
Reference:IftheprojectorcannotbefoundatStep5,click[→Entertheprojectoraddress].Then,inputthe“Networkaddress”(Inputexample:http://10.32.97.61/lan)and“Projectorpassword”(Inputexample:82291627)displayedinthescreenprojectedfromtheprojector.
ExitingtheNetworkProjectorOperation
1. Click[Projecting:PA600Series]intheWindowsVistataskbar.
2. Click[Disconnect].
The Network Projector function is stopped.
3. PresstheSOURCEbuttonoftheprojectortoselectaninputterminalotherthan[NETWORK].
When using the remote control, press a button other than the NETWORK button.

51
3. Convenient Features
Using the Projector to Operate Your Computer via a Network [REMOTE DESKTOP]• ByselectingthePCconnectedtothesamenetworkasthatoftheprojector,thePCscreenimagecanbeprojected
tothescreenvianetwork.
Then,byoperatingthekeyboard,youcanoperateWindows7,WindowsVistaorWindowsXPonthePCconnectedwiththenetwork.
• WiththeRemoteDesktopfunction,youcanremotelyoperatethePCplacedatadistancefromtheprojector.
Meetingroom
Office
NOTE:• The[REMOTEDESKTOP]functionwillworkonthefollowingWindowseditions. Windows7Professional Windows7Ultimate Windows7Enterprise WindowsVistaBusiness WindowsVistaUltimate WindowsVistaEnterprise WindowsXPProfessionalwithServicePack3 (Note)• Inthisuser’smanualthisfeatureisdescribedusingWindows7asanexample,butWindowsVistaandWindowsXPProfessional
ServicePack2orlaterwillalsoworkwiththisfeature.• AkeyboardisrequiredtousetheRemoteDesktopfunction.• TheRemoteDesktopfunctioncanbeoperatedwithakeyboard.Usingawirelessmousewithawirelesskeyboardismoreuseful
foroperating.Useacommerciallyavailablewirelesskeyboard,awirelessmouse,andaUSBwirelessreceiver.UseacommerciallyavailableUSBkeyboardandUSBmouse.
• AUSBkeyboardwithabuilt-inUSBhubcannotbeusedwiththeprojector.• AwirelesskeyboardormousethatsupportsBluetoothcannotbeusedwiththeprojector.• WedonotwarrantthattheUSBportoftheprojectorwillsupportallUSBdevicesinthemarket.
Prepareacommerciallyavailablewirelesskeyboard(USlayoutversion).
ConnecttheUSBwirelessreceivertotheUSBport(TypeA)oftheprojector.Makeallnecessarysettingsforyourwirelesskeyboardandmouse.

52
3. Convenient Features
Setting the password to the user account of Windows 7TIP:Ifapasswordhasbeensetforanaccount,thesteps1to9canbeskipped.1. Click[Start]fromthedesktopofWindows7.
2. Click[ControlPanel].
3. Click[Addorremoveuseraccounts]displayedunder[UserAccounts].
4. Whenthe[UserAccountControl]confirmationwindowappears,click[Continue].
5. Click[Administrator].
6. Click[Createapassword].
7. Inputthepasswordtothe[Newpassword]box.
8. InputthesamepasswordasthatatStep7tothe[Confirmnewpassword]box.
9. Click[Createapassword].
The Administrator is changed to [Password Protection].
Setting the Remote Access1. Click[Start]fromthedesktopofWindows7.
2. Click[ControlPanel].
3. Click[SystemandSecurity].
4. Click[Allowremoteaccess]displayedunder[System].
5. Whenthe[UserAccountControl]confirmationwindowappears,click[Continue].
The [System Properties] window appears.
6. Click[AllowconnectionsfromcomputersrunninganyversionofRemoteDesktop(lesssecure)]intheRemoteDesktopboxandclick[OK].
CheckingtheIPaddressonWindows71. Click[Start]fromthedesktopofWindows7.
2. Click[ControlPanel].
3. Click[Viewnetworkstatusandtasks]displayedunder[NetworkandInternet].

53
3. Convenient Features
4. Click[Viewstatus]displayedinblueontherightof[LocalAreaConnection]inthewindow.
The [Local Area Connection Status] window appears.
5. Click[Details...].
Write down the value for “IPv4 IP Address” (xxx.xxx.xxx.xxx) displayed.
6. Click[Close].
7. Click[X]attheupperrightofthewindow.
The system goes back to the desktop.
StartingtheRemoteDesktop1. Withtheprojectorturnedon,presstheSOURCEbutton.
The input selection window appears.
Another way to display the input selection window is to press the NETWORK button on the remote control. The NETWORK screen will be displayed. Go to step 3.

54
3. Convenient Features
2. Press the or buttontoselect[NETWORK]andpresstheENTERbutton.
The [NETWORK] menu will be displayed.
3. Fromthe[NETWORK]menu,usethewirelesskeyboardtoselect[REMOTEDESKTOPCONNECTION].
The [REMOTE DESKTOP CONNECTION] window appears.
4. OperatethewirelesskeyboardtoinputtheIPaddressofWindows7andclick“Connect”.
The log-on screen of Windows 7 is displayed in the screen projected by the projector.
5. Operatethewirelesskeyboardtoinputtheuser’spasswordandpress“Enter”.
The remote desktop function is started.
Windows 7 desktop is displayed in the screen projected by the projector.
Log out the computer.
Use the wireless keyboard connected to the projector to operate Windows 7.
NOTE:Whentheprojectionismadewiththeremotedesktopfunction,thebackgroundcolorofthedesktopischangedtosolidcolor.

55
3. Convenient Features
ExitingtheRemoteDesktop1. Operatethewirelesskeyboardtoclick[Start]fromthedesktopscreenprojectedbytheprojector.
2. Click[X]ontherightofthestartmenu.
The remote desktop function is stopped.
3. PresstheSOURCEbuttonoftheprojectortoselectaninputterminalotherthan[NETWORK].
When using the remote control, press a button other than the NETWORK button.
TIP:Setting[OPTIONS]inREMOTEDESKTOPClicking[OPTIONS]displaysthe[PERFORMANCE]screen.Makingsettingsto[OPTIONS]willallowyoutodisplaythedesktopbackground,ortoenablethewindowanimationfunctionduringtheRemoteDesktopoperation.However,doingthiswillcausethedisplay’sormouse’sresponsetoslowdown.Ifthedisplay’sormouse’sresponseissloweddown,tryoneormoreofthefollowing:
DESKTOPBACKGROUND:Clearthecheckmarktodisplaythedesktopbackgroundinsolidcolor.MENUANDWINDOWANIMATION:Clearthecheckmarktodisablemenuandwindowanimation.THEMES:ClearthecheckmarknottouseThemes.SHOWCONTENTSOFWINDOWWHILEDRAGGING:Clearthecheckmarktoshowonlythewindowpanewhiledragging.

56
4. Using the Viewer❶ What you can do with the ViewerTheViewerfeatureallowsyoutoviewslidesormoviefilesstoredonaUSBmemoryontheprojector,orasharedfolderinacomputerconnectedtothenetwork.TheViewerhasthefollowingfeatures.
• WhenacommerciallyavailableUSBmemorythatstoresimagefilesisinsertedintotheUSBport(TypeA)oftheprojector,theViewerallowsyoutoviewtheimagefilesontheUSBmemory.
Evenifnocomputerisavailable,presentationscanbeconductedsimplywiththeprojector.
• Moviefilewithaudiocanbeplayedback.
• AMicrosoftPowerPointfileorAdobePDFfilecanbesimplyprojectedonthescreenwithoutconnectingacom-puter.
• Imageandmoviefilesstoredinasharedfolderinacomputerconnectedtoanetworkcanbeprojected.
Thecomputerwith“MediaSharing”ofWindowsMediaPlayer11turnedoncanbeusedasamediaserver.
Supported graphic formats
Format Filenameextension
JPEG .jpg,.jpe,.jpeg(CMYKisnotsupported.)
BMP .bmp(bitfieldnotsupported)
PNG .png(InterlacedPNGandαchannelPNGarenotsupported.)
GIF .gif(InterlacedGIF,transparationGIF,andanimationGIFarenotsupported.)
*ByusingPPTConverter3.0,PowerPointfileisconvertedintoindexfile(withextension“.idx”)*Ifanunsupportedimageisselected,theicon willbedisplayed.
NOTE:Maximumnumberofpixelsofimagewhichcanbedisplayedare:• BaselineJPEG:10000×10000• ProgressiveJPEG:1280×1280• GIF:1280×1280• Others:4000×4000• Somefilessupportedbytheaboverequirementsmaynotbedisplayed.
Supported movie files
Filenameextension Videocompression/expansionmethod Audiocompression/expansionmethod
.mpg,.mpeg. MPEG2 MPEGAudioLayer2
MPEGAudioLayer3
.wmv VC-1/WMV9 WMA9Standard
.mp4 H.264/AVC AAC-LC
Playbackrequirements:Resolution:320×240to1280×720Videoframerate:upto30fpsBitrate:upto15MbpsAudiosamplingrate:upto48kHzChannel:upto2chstereoAudiobitrate:upto256KbpsMax.filesize:upto2GB

57
4. Using the Viewer
NOTE:• Moviefilesconvertedbyusingthevideo/audioformatwhichisnotsupportedbythisprojectorcannotbeplayedback. Inthiscase,therewillbenoicontoshowthatplaybackisnotpossible.• FileswithDigitalRightsManagement(DRM)protectioncannotbeplayedback.• Someofthemoviefilesthatmeettheaboverequirementsmaynotbeplayedback.• WMVformatvideofilewillbedisplayedinanaspectratioof1to1independentlyofitsoriginalaspectratio.• Filesthatcanbeplayedbackonthemediaserveraregraphicsandmoviefiles. InWindowsMediaPlayer11(WindowsXP/
WindowsVista)mp4filescannotbeplayedback.
Supported PDF files
Filenameextension Supportedfileformat
.pdf AdobeAcrobatPDF
NOTE:• FontsnotembeddedinPDFmaynotbedisplayed• FunctionsaddedtoPDFfileaftercreatedwillnotworkordisplay.Functionsaddedarebookmarks,boxesinformtool,andnotes
willnotbedisplayed. AutofliporAutotransitionwillnotwork.• SomePDFfilesmaynotbedisplayed.
Supported PowerPoint files
Filenameextension Supportedfileformat
.ppt,.pptx MicrosoftPowerPoint97–2007
NOTE:• Playablefonts,colors,fontornament,placement,objectinsertionoranimationarerestricted.• SomeMicrosoftPowerPoint97–2007filesmaynotbedisplayed.
Supported USB memory devices- BesuretouseaUSBmemorydeviceformattedwiththeFAT,exFAT,FAT32orFAT16filesystem.
TheprojectordoesnotsupportNTFSformattedUSBmemory.
IftheprojectordoesnotrecognizeyourUSBmemory,checkiftheformatissupported.
ToformatyourUSBmemoryinyourcomputer,refertothedocumentorhelpfilethatcomeswithyourWin-dows.
- WedonotwarrantthattheUSBportoftheprojectorwillsupportallUSBmemoriesinthemarket.
- Waitatleast5secondsafterdisconnectingaUSBmemorydevicebeforereconnectingitandviceversa.
TheprojectormaynotidentifytheUSBmemorydeviceifitisrepeatedlyconnectedanddisconnectedinrapidintervals.
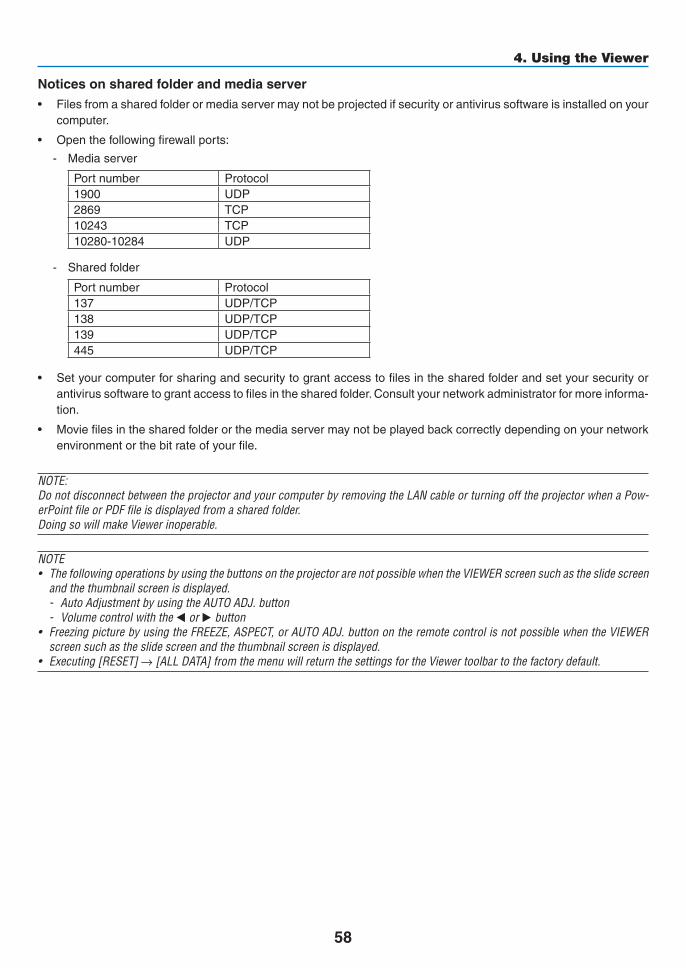
58
4. Using the Viewer
Notices on shared folder and media server• Filesfromasharedfolderormediaservermaynotbeprojectedifsecurityorantivirussoftwareisinstalledonyour
computer.
• Openthefollowingfirewallports:
- Mediaserver
Portnumber Protocol1900 UDP2869 TCP10243 TCP10280-10284 UDP
- Sharedfolder
Portnumber Protocol137 UDP/TCP138 UDP/TCP139 UDP/TCP445 UDP/TCP
• Setyourcomputerforsharingandsecuritytograntaccesstofilesinthesharedfolderandsetyoursecurityorantivirussoftwaretograntaccesstofilesinthesharedfolder.Consultyournetworkadministratorformoreinforma-tion.
• Moviefilesinthesharedfolderorthemediaservermaynotbeplayedbackcorrectlydependingonyournetworkenvironmentorthebitrateofyourfile.
NOTE:DonotdisconnectbetweentheprojectorandyourcomputerbyremovingtheLANcableorturningofftheprojectorwhenaPow-erPointfileorPDFfileisdisplayedfromasharedfolder.DoingsowillmakeViewerinoperable.
NOTE• ThefollowingoperationsbyusingthebuttonsontheprojectorarenotpossiblewhentheVIEWERscreensuchastheslidescreen
andthethumbnailscreenisdisplayed.- AutoAdjustmentbyusingtheAUTOADJ.button- Volumecontrolwiththe◀or▶button
• FreezingpicturebyusingtheFREEZE,ASPECT,orAUTOADJ.buttonontheremotecontrolisnotpossiblewhentheVIEWERscreensuchastheslidescreenandthethumbnailscreenisdisplayed.
• Executing[RESET]→[ALLDATA]fromthemenuwillreturnthesettingsfortheViewertoolbartothefactorydefault.

59
4. Using the Viewer
❷ Preparing presentation materials
1. Createyourpresentationmaterialsandsavetheminasupportedfileformattoyourcomputer.
• Seepage81 for supported file formats.
• MakesurethatPowerPointfileisdisplayedontheViewerbeforegivingyourrealpresentation.
With Viewer PPT Converter 3.0 contained the supplied CD-ROM, you can convert your PowerPoint files to index files that can be displayed on the Viewer.
• WhencreatingaPDFfile,embedyourfontsinyourPDFfile.EmbeddingfontsrequiresAdobeAcrobat.Thiscannot be done in Adobe Reader.
TIP:•UsingPrintCommandExampleforfontembeddingusingPrintCommand.SeethehelpofAdobeAcrobatformoreinformation.1. Select“Print”fromthe“File”menu.
2. Select“AdobePDF”from“Printername”andclickthe“Properties”but-ton.
3. Clickthe“Edit”buttoninthe“AdobePDFSettings”tab.
4. ClickthefonttabintheEditwindowtoselectthefontembedwindow.
5. Placeacheckmarkfor“Embedallfonts”.
Click “OK” to return to the Print window, and click “OK” to start creating a PDF file.
2. Save a file to your drive.
To save a file to your USB memory:
Use the Windows Explore to copy the file to your USB memory.
To place a file in a shared folder you create in your computer, see page 72.
To use “Media Sharing” in Windows Media Player 11, see page 76.

60
4. Using the Viewer
❸ Projecting images stored in a USB memory device
ThissectionexplainsthebasicoperationoftheViewer.TheexplanationprovidestheoperationalprocedurewhentheViewertoolbarissettothefactorydefault.
Preparation:BeforestartingtheViewer,storeimagestotheUSBmemoryusingyourcomputer.
Starting the Viewer
1. Turn on the projector. (→ page 14)
2. Insert the USB memory into the USB port of the projec-tor.
NOTE:• DonotremovetheUSBmemoryfromtheprojectorwhileit’sLED
flashes.Doingsomaycorruptthedata.
TIP:YoucanaUSBmemoryinserttheprojectorwhenthedrivelistscreenisdisplayed.
3. PresstheSOURCEbuttontoselect[VIEWER].
A press of the SOURCE button will display the source select screen.
A few more presses of the SOURCE button will display the drive list screen.
Another way to select [VIEWER] is to press the VIEWER button on the remote control.
TIP:• Formoreinformationaboutthedrivelistscreen,seepage64.• Todisplaygraphicsinasharedfolder,seepage72;todisplaystill
imagesormoviefilesinamediaserver,seepage76.

61
4. Using the Viewer
4. Press the ▶ button to select“USB1” and press theENTER button.
The “USB1” thumbnail screen will be displayed.
TIP:• Formoreinformationaboutthumbnailscreen,seepage66.
5. Use the ▲▼◀ or ▶ button to select an icon.
• The→ (arrow) symbol on the right indicates there are more pages. pressing the PAGE ▽ (page down) button will show the next page: pressing the PAGE △ (page up) will show the previous page.
6. Press the ENTER button.
Operation varies depending on the selected file.
•Stillimage
The selected slide will be displayed.
The ◀ or ▶ button can be used to select the next (right) slide or the previous (left) slide in the thumbnail screen.
• PressingtheENTERbuttonwilldisplaythecontrolbarwith which is used to select or rotate an slide.(→ page 67)

62
4. Using the Viewer
•Moviefile
The movie file will start playing.
After finishing the playback, the screen will turn to black. Press the EXIT button to return to the thumbnail screen.
• Pressing the ENTER button will display the movie’scontrol bar with which you can pause or fastforward and some other operations.
•MicrosoftPowerPointfile
The slide on the first page will be displayed.
Press ▶ to select the next slide; press ◀ to select the previ-ous slide.
• Youcanalsousethe▼ or ▲ button to select a page. To return to the thumbnail screen, press the EXIT button.
NOTE:• Files with slideshow or animation effects may not be correctly
displayedontheViewer. See“SupportedPowerPointfiles”onpage57,81.
•AdobePDFfile
The first page will be displayed.
• ThePDFfilewillfillthewidthofthescreen.
Pressing the ▼ or ▲ button will scroll the screen down or up.
The PAGE ▽ or PAGE △ button will move the screen one page down or up.
To return to the thumbnail screen, press the EXIT button.
• Whenapassowordinputwindowisdisplayed,itmeansthat the PDF file is password-protected.
Pressing the ENTER button will show the software keyboard. Use the software keyboard to enter your password.
Select [OK] and press the ENTER button. The PDF file will be displayed.
• Formoreinformationonthesoftwarekeyboard,seepage131.
NOTE:BookmarksandnotesthatwereaddedafterPDFconversionwillnotbedisplayed.IffontswerenotembeddedatthetimeofPDFconversion,thosefontswillnotbedisplayed.
TIP:Ittakessometime(about30secondstotwominutes)todisplayalargesizefileortoturnpagesofaPDFfilethathasmanypages.

63
4. Using the Viewer
•Indexfile(extension:.idx)
• Index files, which is converted by usingViewer PPTConverter 3.0, will appear in the Thumbnail screen.
Only folders and JPEG files converted by using Viewer PPT Converter 3.0 will appear in the Thumbnail screen.
• Toselectslideshowofindexfiles,openthe[PRESENTA-TION] folder in the DRIVE LIST screen.
However, index files will not appear. Only folders and JPEG files will appear.
• UptofourindexfoldersinyourUSBandsharedfolderare displayed. The four folders will be displayed in reverse chronological order
• WhenyouinserttheUSBmemorydevicestoringindexwith the Viewer in operation, the content of the index files will be displayed.
NOTE:• Theplaymode(MANUAL/AUTO)forslidesofindexfileworksin
thefollowingway: Incaseof[MANUAL]for[PLAYMODE] Whenyouselect[OPTIONS]→[SLIDESETTING]→[PLAYMODE]
→[MANUAL],indexfileswillbesetformanualplaybackinregard-lessofwhether[INTERVAL]isset.
Incaseof[AUTO]selectedfor[PLAYMODE] Whenyouselect[OPTIONS]→[SLIDESETTING]→[PLAYMODE]
→ [AUTO], index files will be set for auto playback at intervalsspecifiedbyusing[INTERVAL].
When,however,[-1]isselectedfor[INTERVAL],theplaymodewillbesetforautoplaybackaccordingtothesettingfor[OPTIONS]→[SLIDESETTING]→[INTERVAL].
7. Remove the USB memory from the projector.
Return to the drive list screen. Make sure that the LED on the USB memory is not flashing before removing the USB memory.
NOTE:IfyouremovetheUSBmemoryfromtheprojectorwithaslidedisplayed,theprojectormaynotoperatecorrectly.Ifthishappens,turnofftheprojectorandunplugthepowercord.Wait3minutes,thenconnectthepowercord,andturnontheprojector.
Exiting the Viewer1. PresstheSOURCEbuttontoselectasourceotherthan
[VIEWER].
A press of the SOURCE button will display the source select screen.
A few more presses of the SOURCE button will display another source.
• To exit theViewer using the remote control, select asource other than [VIEWER].
XXXX Motors

64
4. Using the Viewer
Names and functions of Viewer screen
TheViewerhasthreescreens:Drivelistscreen,Thumbnailscreen,andSlidescreen.
•DrivelistscreenDisplaysalistofdrivesconnectedtotheprojector.
Menu operation• Usethe▼ or ▲ button to move the cursor up or down. Select the menu item and press the ENTER button
to display the submenu.
Operation for Drive list screen1. Press the ▶ button to move the cursor to the drive list.
(Use the ◀ or ▶ button to switch between the menu and the drive list.)
Press the ▼ or ▲ button to select a type of drive; press the ◀ or ▶ button to select the drive connected to the projector.
2. Select the drive and press the ENTER button to switch to the thumbnail screen of the selected drive.
Cursor (yellow)
Cursor (yellow)
Menu Menu Scroll bar
[Drive list screen] [Thumbnail screen]
Folder icon
Path information
Drive information/File information
Menu guide Operation button guide
Control bar* The operation for still image differs from that for movie.
[Slide screen]

65
4. Using the Viewer
Functions
Name Description
REFRESH Displaysadditionalmediaserversinthedrivelistscreen.
OPTIONS OpenstheOPTIONSmenu.
SLIDESETTING Setsupslides.(→page69)
MOVIESETTING Setsupmoviefiles.(→page70)
AUTOPLAYSETTING Setsupautoplay.(→page70)
SHAREEDFOLDER Setsupasharedfolder.(→page72)
MEDIASERVER Setsupamediaserver.(→page76)
RETURN ClosestheOPTIONSmenu.
SYSTEMSETTING Switchestothesystemsettingmenu.SeewiredLAN,wirelessLAN,WPS,network information, mouse, and keyboard in “9. Application Menu”. (→ page118)
USB Displays the icon for a USB memory inserted into the USB port of theprojector.
SHAREDFOLDER DisplaysuptofourdrivesofacomputerconnectedtoaLAN(setforcon-nectingasharedfolder).*Seepage72forsettingupforconnectingasharedfoleroftheprojector.
MEDIASERVER DisplaysuptofourdrivesofacomputerconnectedtoaLAN(setforcon-nectingamediaserver).*Seepage76forsettingupforconnectingamediaserveroftheprojector
PRESENTATION DisplaystheiconwhenaUSBmemoryorsharedfolerstoresindexfiles.
Pathinformation Displaysthelocationofafolderorfile.
Driveinformation [Example]
USB1 314MBFREE/492MB
Displaysthedrive. Displaysfreespaceandcapcityofadrive.(USBonly)
Menuguide Displaysthedescriptionofaselectedmenu.
Operationbuttonguide Displaysinformationaboutoperationbuttons.
*Itisdisplayedinthree-digitnumber(roundingup)
NOTE:WhentheOPTIONSmenuisdisplayed,thedrivelistscreenorthumbnailscreenisnotdisplayed.Todisplayit,selectthe[RETURN]iconandpresstheENTERbutton.

66
4. Using the Viewer
•ThumbnailscreenDisplaysalistoffolders,thumbnails,andiconsinthedriveselectedonthedrivelistscreen.
Menu operation• Usethe▼ or ▲ button to move the cursor up or down. Select the menu item and press the ENTER button
to display the menu or setting screen.
OperationforThumbnailscreen1. Press the ▶ button to move the cursor to the thumbnail screen when the OPTIONS menu is not dis-
played.
2. Press the ▼, ▲, ◀, or ▶ button to select a file or folder.
3. Press the ENTER button to start slideshow or playback of the selected file. Selecting a folder will display its thumbnail screen.
Functions
Name Description
UP Goestooneupperlevelmenu.
THUMBNAIL Switchestwodisplaysbetweenthumbnailandicon.
SORTSETTING Rearrangesfoldersorfiles.
DRIVELIST Returnstothedrivelistscreen.
OPTIONS ChangestotheOPTIONSmenu.
SYSTEMSET-TING
Opensthesystemsettingmenu.
Scrollbar Thumbnailscreenwilldisplay12fileswith4by3.Ifthethumbnailscreenhastwelveormorefilesorfolders,thescrollbarwillbedisplayedattherightside.UsingthePAGE▽orPAGE△buttonwillscrollthewholescreendownorup.
Pathinformation Displaysthelocationofafolderorfile.
Thumbnailinformation [Example]
005.jpg 5/200 11/03/201013:25:12 502KB
Selectedfoldernameorfilename
Numbersandorderoffilesinafolder(onlywhenfolderselected)
Create/Changedate:M/D/Y/H/M/B
Displaysfilecapacity
Menuguide Displaysthedescriptionofaselectedmenu.
Operationbuttonguide Displaysinformationaboutoperationbuttons.
TIP:• Ifanunsupportedimageisselected,theicon[?]willbedisplayed,• Themaximumdisplayablenumberofimagesis300inthethumbnailscreenincludingthenumberoffolders.• Ifafilenameorpathofafolderislongerthanspecified,itwillbedisplayedwithcentercharactersorpathskipped. Example:“123456789.jpg”willbedisplayedin“123..789.jpg”.

67
4. Using the Viewer
•Slidescreen(stillimage/movie)Playsafileselectedfromalistofthumbnailsoricons.• ForoperatingaMicrosoftPowerPointfileandAdobePDFfile,seepage62.
Controlbaroperation• Thecontrolbarwillbedisplayedonlywhenastillimage(orindexfile)andamoviefileisselected.
• Thecontrolbarforstillimagesdiffersfromthatformoviefiles.
1. Pressing the ENTER button in Slide screen will display the control bar at the bottom of the screen.
2. Use the ◀ or ▶ button to select a file and press the ENTER button.
• Theselectedfunctionwillbeexecuted.
Functionsofstillimagecontrolbar
Name Description
PREV Goesbacktothepreviousimage
PLAY Playstheimage.Thisbuttonalsoisusedtostoporstartplayinganimage.
NEXT Goestothenextimage.
RIGHT Rotatestheimage90°clockwise.• Tocancel,selectanotherfolder.
LEFT Rotatestheimage90°counterclockwise.• Tocancel,selectanotherfolder.
SIZE BESTFIT Displays the imagewith itsaspect ratio in theprojector’sdisplayablemaximumresolution.
ACTUALSIZE
Displaystheimageinitsactualsize.
CLOSE Closesthecontrolbar.• YoucanalsopresstheEXITbuttontoclosethecontrolbar.
END Stops playing slides or slideshow, and closes the control bar to return to the thumbnailscreen.

68
4. Using the Viewer
Functionsofmoviecontrolbar
Name Description
PREV Goesbacktothebeginningofamoviefile.• Goesbacktothebeginningofthepreviousmoviefileifexecutedimmediatelyafterbeing
startedplaying.
FR Fast-rewindsamoviefileforabout7seconds.
PLAY/PAUSE PLAY Playsamoviefile.
PAUSE Stopsplayingamoviefile.
FF Fast-forwardsamoviefileforabout7seconds.
NEXT Goestothebeginningofanextmoviefile.
TIME Displaysanelapsedtimeforplaybackorpause.
SIZE BESTFIT Displays the imagewith itsaspect ratio in theprojector’sdisplayablemaximumresolution.
ACTUALSIZE
Displaystheimageinitsactualsize.
CLOSE Closesthecontrolbar.• YoucanalsopresstheEXITbuttontoclosethecontrolbar.
END Stopsplayingamovie,andclosesthecontrolbartoreturntothethumbnailscreen.

69
4. Using the Viewer
Viewer option settings
•SLIDESETTINGSetsstillimagesorslides.
Name Options Description
SCREENSIZE BESTFIT Displaystheimagewithitsaspectratiointheprojector’sdisplay-ablemaximumresolution.
ACTUALSIZE Displaystheimageinitsactualsize.
PLAYMODE MANUAL Selectsmanualplay.
AUTO Selectsautoplay.
INTERVAL 5-300seconds Specifies interval time when [AUTO] is selected for PLAYMODE.
REPEAT Checkmark Turnsonorofftherepeatfunction.
TIP• Toplayoneormoreslides,placethosefilesintoafolder.

70
4. Using the Viewer
•MOVIESETTINGSetsthefunctionsforamoviefile.
Name Options Description
SCREENSIZE BESTFIT Displaystheimagewithitsaspectratiointheprojector’sdisplay-ablemaximumresolution.
ACTUALSIZE Displaystheimageinitsactualsize.
REPEAT OFF Turnsonorofftherepeatfunction.
ONEREPEAT Repeatsonefileonly.
ALLREPEAT Repeatsallfilesinthecurrentfolder.
TIP• Turningon[REPEAT]willdisplayblackscreenduringintermissionbetweenmovies.
•AUTOPLAYSETTINGSetsautoplayforslideshowwhenaUSBmemorydevice is inserted into theUSBportof theprojector,orwhen[VIEWER]isselectedfor[SOURCE].
Name Options Description
AUTOPLAY OFF —
PICTURE Playsthefirststillimagefoundinadrive.
MOVIE Playsthefirstmoviefoundinadrive.
PowerPoint PlaysthefirstPowerPointfilefoundinadrive.
TIP• Autoplaybehavior isdifferentbetweenwhenaUSBmemorydeviceis insertedintotheUSBportoftheprojectorandwhen
[VIEWER]isselectedfor[SOURCE].• AutoplaystartsforthefirstfoundfilesupportingthefiletypesetupforAutoPlay.Thefilewillbesearchedinthedriverootor
lowerlevel.• When[VIEWER]isselectedfor[SOURCE],thelastselectedfilewillbeautomaticallyplayedifitisfound,orthelastselectedfolder
willbesearchedandthefirstfoundfilewillbeautomaticallyplayed. ToautomaticallyplayamoviefileinaUSBmemory,storeonemoviefileorchangeitsfilenamesothatitcanbesearchedfirst.
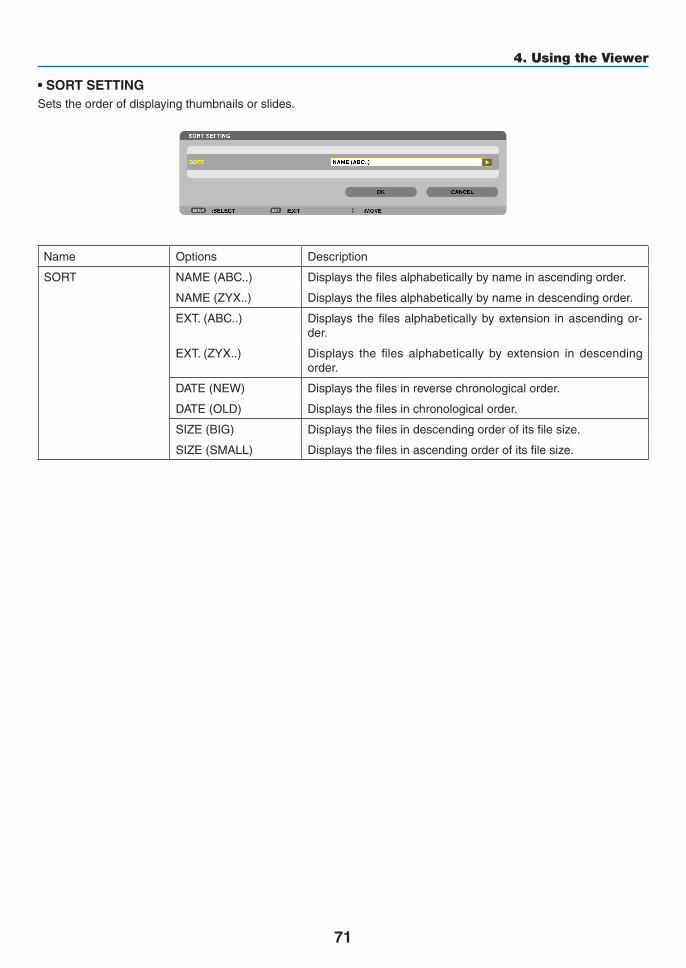
71
4. Using the Viewer
•SORTSETTINGSetstheorderofdisplayingthumbnailsorslides.
Name Options Description
SORT NAME(ABC..) Displaysthefilesalphabeticallybynameinascendingorder.
NAME(ZYX..) Displaysthefilesalphabeticallybynameindescendingorder.
EXT.(ABC..) Displays thefilesalphabeticallybyextension inascendingor-der.
EXT.(ZYX..) Displays the files alphabetically by extension in descendingorder.
DATE(NEW) Displaysthefilesinreversechronologicalorder.
DATE(OLD) Displaysthefilesinchronologicalorder.
SIZE(BIG) Displaysthefilesindescendingorderofitsfilesize.
SIZE(SMALL) Displaysthefilesinascendingorderofitsfilesize.

72
4. Using the Viewer
❹ Projecting data from shared folder
LAN
Shared folder
Wireless LAN
Projector
Shared folder
PreparationForprojector:Connecttheprojectortothenetwork.Forcomputer:Placefilestobeprojectedinasharedfolderandnotethefolder’spath.Memorizeorwritedownthepathforlateruse.
• Forsharingafolder,refertoyouruserguideorhelpfileaccompaniedwithyourWindowscomputer.
• Useakeyboardtogiveanametothesharedfolderinalphanumericcharacters.
• Toconnectthesharedfolderbeyondthesubnet,set[WINSCONFIGURATION]in[NETWORKSETTINGS]fromthemenu.
• Digitalsignature(SMBsignature)isnotsupported.
Connecting the projector to the shared folder 1. PresstheVIEWERbuttonontheremotecontrol.
The drive list window will be displayed.
• AnotherwaytostarttheVIEWERistopresstheSOURCEbuttonafewtimesontheprojectorcabinet.(→ page 16)

73
4. Using the Viewer
2. Displaysthe[OPTIONS]menu.
Press the ▼ button to select the (OPTIONS) icon and press the ENTER button.
• WhentheOPTIONSmenuisdisplayed,thedrivelistwillnotbedisplayed.
3. Displaythe[SHAREDFOLDERSETTING]screen.
Press the ▼ button to select the (SHARED FOLDER SETTING) icon and press the ENETR button.
4. Select a folder number and place to enable it.
Press the ◀ or ▶ button to a shared folder number and press the ▼ button to select [ENABLE] , and then press the ENTER button.
5. Enter the path, user name, and password for the shared folder.
Press the ▼ button to select the [SHARED FOLDER] field. The software keyboard will be displayed.
For using the software keyboard, see page 131.
• Ifyourcomputerisnotpasswordprotected,enteringapasswordisnotrequired.
• Uptofoursharedfolderscanbeadded.
• Themaximumlengthofapathofthesharedfoldermustbe15alphanumericcharactersforcomputernameand23 alphanumeric characters for folder name.

74
4. Using the Viewer
6. Exit the setting.
Press the ▼ button to select [OK] and press the ENTER button.
This will close the [SHARED FOLDER] screen.
• Ifanerrormessageappear,yoursettingsarenotcorrect.Tryagain.
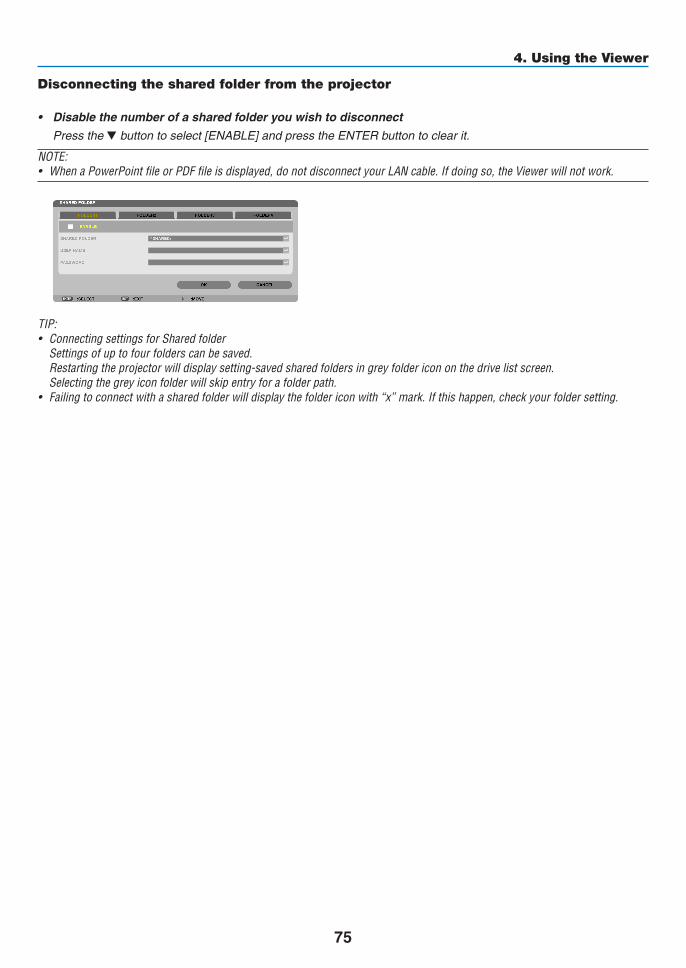
75
4. Using the Viewer
Disconnecting the shared folder from the projector
• Disablethenumberofasharedfolderyouwishtodisconnect
Press the ▼ button to select [ENABLE] and press the ENTER button to clear it.
NOTE:• WhenaPowerPointfileorPDFfileisdisplayed,donotdisconnectyourLANcable.Ifdoingso,theViewerwillnotwork.
TIP:• ConnectingsettingsforSharedfolder Settingsofuptofourfolderscanbesaved. Restartingtheprojectorwilldisplaysetting-savedsharedfoldersingreyfoldericononthedrivelistscreen. Selectingthegreyiconfolderwillskipentryforafolderpath.• Failingtoconnectwithasharedfolderwilldisplaythefoldericonwith“x”mark.Ifthishappen,checkyourfoldersetting.

76
4. Using the Viewer
❺ Projecting data from media server
LAN
Media server
Media server
Wireless LAN
Media server
Projector
PreparationForprojector:Connecttheprojectortothenetwork.Forcomputer:Prepareimagefilesormoviefilestobeprojected,andsetup“MediaSharing”inWindowsMediaPlayer11orWindowsMediaPlayer12.
NOTE:• Boththeprojectorandthemediaservermustbeonthesamesubnet.Connectingtothemediaserverbeyondthesubnetisnot
possible.• TypesofimagesandmovieswhichcanbesharedmayvarydependingonWindowsversion.
Setting up “Media Sharing” in Windows Media Player 111. Start Windows Media Player 11.
2. Select“MediaSharing”from“Library”.
The “Media Sharing” dialog box will be displayed.

77
4. Using the Viewer
3. Select“Sharemymedia”checkbox,andthenselectOK.
A list of accessible devices will be displayed.
4. Select“PA600Series”andthen“Allow”.
A check mark will be added to the “PA600 Series” icon.
• The“PA600Series”isaprojectornamespecifiedin[NETWORKSETTINGS].
5. Select“OK”.
This will make pictures and video in “Library” available from the projector.

78
4. Using the Viewer
Setting up “Media Sharing” in Windows Media Player 121. Start Windows Media Player 12.
2. Select“Stream”,andthenselect“Automaticallyallowdevicestoplaymymedia”.
The “Allow All Media Devices” windows will be displayed.
3. Select“Automaticallyallowallcomputersandmediadevices”.
Graphics and movie files in “Library” can be used from the projector.
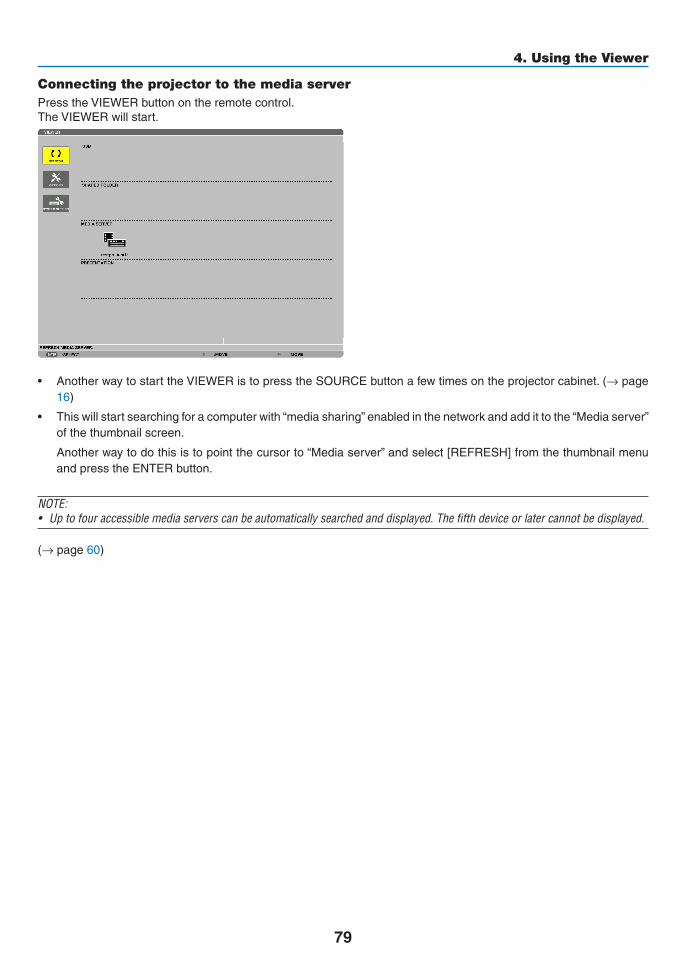
79
4. Using the Viewer
Connecting the projector to the media serverPresstheVIEWERbuttonontheremotecontrol.TheVIEWERwillstart.
• AnotherwaytostarttheVIEWERistopresstheSOURCEbuttonafewtimesontheprojectorcabinet.(→page16)
• Thiswillstartsearchingforacomputerwith“mediasharing”enabledinthenetworkandaddittothe“Mediaserver”ofthethumbnailscreen.
Anotherwaytodothisistopointthecursorto“Mediaserver”andselect[REFRESH]fromthethumbnailmenuandpresstheENTERbutton.
NOTE:• Uptofouraccessiblemediaserverscanbeautomaticallysearchedanddisplayed.Thefifthdeviceorlatercannotbedisplayed.
(→page60)

80
4. Using the Viewer
Disconnecting the projector from the media server1. Display the OPTIONS menu.
Press the ▼ button to select the [OPTIONS] icon and select the ENTER button.
2. DisplaytheMEDIASERVERsettingscreen.
Press the ▼ button to select the MEDIA SERVER icon and press the ENTER button.
3. Disable the connection.
Press the ENTER button to clear the checkmark to disable the connection.
Press the ▼ button to select [OK] and press the ENTER button to close the MEDIA SERVER setting screen.

81
4. Using the Viewer
❻ Restrictions on displaying files
TheViewerallowsyoutogiveasimplifieddisplayofaPowerPointfileorPDFfile.Duetosimplifieddisplay,however,actualdisplaymaybedifferentfromtheoneonyourcomputerapplicationpro-gram.
Some restrictions on PowerPoint files
• Fontswillbeautomaticallyconvertedtothefontsinstalledintheprojector.Fontscanvaryinsizeorwidth,causinglayoutcorruption
Somecharactersorfontsmaynotbedisplayed.
• Somefunctionsincludedinfontarenotsupported.
Example:Therearesomerestrictionsonanimation,selection,orhyperlink.
• Itmaytakelongertimetofeedpagescomparedwithacomputer
• InsomecasesMicrosoftPowerPoint97-2007formatfilesmaynotbedisplayed.
Some restrictions on PDF files
• FontsnotembeddedatthetimeofPDFcreationmaynotbedisplayed.
• Somefunctionsincludedinfontarenotsupported.
Example:Therearesomerestrictionsonannotations,selection,form,orcolorspace.
• Itmaytakelongertimetofeedpagescomparedwithacomputer
• InsomecasesAdobeAcrobatformatfilesmaynotbedisplayed.

82
5. Using On-Screen Menu1 Using the Menus
NOTE:Theon-screenmenumaynotbedisplayedcorrectlywhileinterlacedmotionvideoimageisprojected.
1. Press the MENU button on the remote control or the projector cabinet to display the menu.
NOTE:ThecommandssuchasENTER,EXIT,,inthebottomshowavailablebuttonsforyouroperation.
2. Press the buttons on the remote control or the projector cabinet to display the submenu.
3. Press the ENTER button on the remote control or the projector cabinet to highlight the top item or the first tab.
4. Use the buttons on the remote control or the projector cabinet to select the item you want to adjust or set.
You can use the buttons on the remote control or the projector cabinet to select the tab you want.
5. Press the ENTER button on the remote control or the projector cabinet to display the submenu window.
6. Adjust the level or turn the selected item on or off by using the buttons on the remote control or the projector cabinet.
Changesarestoreduntiladjustedagain.
7. Repeat steps 2 -6 to adjust an additional item, or press the EXIT button on the remote control or the projec-tor cabinet to quit the menu display.
NOTE:Whenamenuormessageisdisplayed,severallinesofinformationmaybelost,dependingonthesignalorsettings.
8. Press the MENU button to close the menu.
To return to the previous menu, press the EXIT button.

83
5. Using On-Screen Menu
Menu ElementsSlide bar
Solid triangle
Menu mode
Tab
Radio button
High Altitude symbol
ECO mode symbol
Wireless symbol
Menuwindowsordialogboxestypicallyhavethefollowingelements:
Highlight ����������������������������� Indicates the selected menu or item� Solid triangle ���������������������� Indicates further choices are available� A highlighted triangle indicates the item is active� Tab �������������������������������������� Indicates a group of features in a dialog box� Selecting on any tab brings its page to the front�Radio button �����������������������Use this round button to select an option in a dialog box�Source �������������������������������� Indicates the currently selected source�Menu mode ������������������������ Indicates the current menu mode: BASIC or ADVANCED�Off Timer remaining time ���� Indicates the remaining countdown time when the [OFF TIMER] is preset�Slide bar ����������������������������� Indicates settings or the direction of adjustment�ECO mode symbol �������������� Indicates [ECO MODE] is set�Key Lock symbol ���������������� Indicates the [CONTROL PANEL LOCK] is enabled�Thermometer symbol ��������� Indicates the [ECO MODE] is forcibly set to [ON] mode because the internal temperature is too
high�High Altitude symbol ���������� Indicates the [FAN MODE] is set to [HIGH ALTITUDE] mode�Wireless symbol ����������������� Indicate the wireless LAN connection is enabled�
Source
Available buttons
Thermometer symbol
Key Lock symbol
Off Timer remaining time
Highlight

84
5. Using On-Screen Menu
List of Menu ItemsSomemenuitemsarenotavailabledependingontheinputsource.MenuItem Default Options
SOURCE
COMPUTER1 *COMPUTER2 *COMPUTER3(BNC) *HDMI *DisplayPort *VIDEO *S-VIDEO *VIEWER *NETWORK *ENTRYLISTTESTPATTERN
ADJUST
PICTURE
MODE STANDARD STANDARD,PROFESSIONAL
PRESET * HIGH-BRIGHT,PRESENTATION,VIDEO,MOVIE,GRAPHIC,sRGB,DICOMSIM.
DETAILSETTINGS
GENERAL
REFERENCE * HIGH-BRIGHT,PRESENTATION,VIDEO,MOVIE,GRAPHIC,sRGB,DICOMSIM.
GAMMACORRECTION*1 DYNAMIC,NATURAL,BLACKDETAIL
SCREENSIZE*2 * LARGE,MEDIUM,SMALLCOLORTEMPERATURE*3 * 5000,6500,7800,8500,9300,10500
DYNAMICCONTRAST * OFF,ON
WHITEBALANCECONTRASTR 0CONTRASTG 0CONTRASTB 0BRIGHTNESSR 0BRIGHTNESSG 0BRIGHTNESSB 0
COLORCORRECTIONRED 0GREEN 0BLUE 0YELLOW 0MAGENTA 0CYAN 0
CONTRAST 50BRIGHTNESS 50SHARPNESS 10COLOR 50HUE 0RESET
IMAGEOPTIONS
CLOCK *PHASE *HORIZONTAL *VERTICAL *OVERSCAN * AUTO,0[%],5[%],10[%]
ASPECTRATIO
* (COMPUTER1/2/3)AUTO,4:3,5:4,16:9,15:9,16:10,NATIVE
* (COMPONENT/VIDEO/S-VIDEO)AUTO,4:3,LETTERBOX,WIDESCREEN,ZOOM
* (COMPONENT/VIDEO/S-VIDEO)AUTO,4:3WINDOW,LETTERBOX,WIDESCREEN,4:3FILL
RESOLUTION * –
VIDEO
NOISEREDUCTION
RANDOMNR * OFF,LOW,MEDIUM,HIGHMOSQUITONR OFF OFF,LOW,MEDIUM,HIGHBLOCKNR OFF OFF,ON
DEINTERLACE AUTO AUTO,VIDEO,FILM3DY/CSEPARATION ON OFF,ONDETAILENHANCEMENT *SIGNALTYPE RGB RGB,COMPONENTVIDEOLEVEL AUTO AUTO,NORMAL,ENHANCED
* Theasterisk(*)indicatesthatthedefaultsettingvariesdependingonthesignal.*1 The[GAMMACORRECTION]itemisavailablewhenanitemotherthan[DICOMSIM.]isselectedfor[REFERENCE].*2 The[SCREENSIZE]itemisavailablewhen[DICOMSIM.]isselectedfor[REFERENCE].*3 When[PRESENTATION]or[HIGH-BRIGHT]isselectedin[REFERENCE],the[COLORTEMPERATURE]isnotavailable.
•Basicmenuitemsareindicatedbyshadedarea.

85
5. Using On-Screen Menu
SETUP
BASIC
KEYSTONEHORIZONTAL 0VERTICAL 0
CORNERSTONE
PIP/PICTUREBYPICTURE
PIP/PBPMODE PIP PIP,PICTUREBYPICTUREPIPPOSITION BOTTOM-RIGHT TOP-LEFT,TOP-RIGHT,BOTTOM-LEFT,BOTTOM-RIGHTPIP/PBPSOURCE OFF OFF,VIDEO,S-VIDEO
WALLCOLOR OFFOFF,WHITEBOARD,BLACKBOARD,BLACKBOARD(GRAY),LIGHTYELLOW,LIGHTGREEN,LIGHTBLUE,SKYBLUE,LIGHTROSE,PINK
ECOMODE OFF OFF,ON
CLOSEDCAPTION OFF OFF,CAPTION1,CAPTION2,CAPTION3,CAPTION4,TEXT1,TEXT2,TEXT3,TEXT4
OFFTIMER OFF OFF,0:30,1:00,2:00,4:00,8:00,12:00,16:00
TOOLS ADMINISTRATORMODE,PROGRAMTIMER,TIME,MOUSE
LANGUAGE ENGLISH
ENGLISH,DEUTSCH,FRANÇAIS,ITALIANO,ESPAÑOL,SVENSKA,日本語DANSK,PORTUGUÊS,ČEŠTINA,MAGYAR,POLSKI,NEDERLANDS,SUOMINORSK,TÜRKÇE,РУССКИЙ, , Ελληνικά, 中文, 한국어ROMÂNĂ, HRVATSKA, БЪЛГАРСКИ, INDONESIA, हिन्दी, ไทย
MENU
COLORSELECT COLOR COLOR,MONOCHROMESOURCEDISPLAY ON OFF,ONMESSAGEDISPLAY ON OFF,ONIDDISPLAY ON OFF,ONECOMESSAGE OFF OFF,ONDISPLAYTIME AUTO45SEC MANUAL,AUTO5SEC,AUTO15SEC,AUTO45SECBACKGROUND BLUE BLUE,BLACK,LOGOFILTERMESSAGE OFF OFF,100[H],500[H],1000[H],2000[H]
INSTALLATION(1)
ORIENTATION DESKTOPFRONT
DESKTOPFRONT,CEILINGREAR,DESKTOPREAR,CEILINGFRONT
SCREENSCREENTYPE 4:3SCREEN 4:3SCREEN,16:9SCREEN,16:10SCREENPOSITION 0
GEOMETRICCORRECTION OFF OFF,1,2,3
MULTI-SCREENCOMP.
MODE OFF OFF,ONCONTRAST 0BRIGHTNESS 0
REF.WHITEBALANCE
CONTRASTR 0CONTRASTG 0CONTRASTB 0BRIGHTNESSR 0BRIGHTNESSG 0BRIGHTNESSB 0UNIFORMITYR 0UNIFORMITYB 0
STATICCONVERGENCE
HORIZONTALR 0HORIZONTALG 0HORIZONTALB 0VERTICALR 0VERTICALR 0VERTICALB 0
INSTALLATION(2)
NETWORKSETTINGSWIREDLAN,WIRELESSLAN,WPS,NETWORKINFORMATION,PROJECTORNAME,DOMAIN,ALERTMAIL,NETWORKSERVICE
CONTROLPANELLOCK OFF OFF,ONSECURITY OFF OFF,ONCOMMUNICATIONSPEED 38400bps 4800bps,9600bps,19200bps,38400bps,115200bpsREMOTESENSOR FRONT/BACK FRONT/BACK,FRONT,BACK
CONTROLIDCONTROLIDNUMBER 1 1–254CONTROLID OFF OFF,ON
OPTIONS(1)
AUTOADJUST NORMAL OFF,NORMAL,FINE
FANMODEAUTO MODE:AUTO,HIGH,HIGHALTITUDE
NORMAL SETTING:NORMAL,VERTICALTILTUP
SIGNALSELECT(COMP3) RGB/COMPONENT RGB/COMPONENT,VIDEO
SEAMLESSSWITCHING OFF OFF,ON
COLORSYSTEM
VIDEO AUTO AUTO,NTSC3.58,NTSC4.43,PAL,PAL-M,PAL-N,PAL60,SECAM
S-VIDEO AUTO AUTO,NTSC3.58,NTSC4.43,PAL,PAL-M,PAL-N,PAL60,SECAM
COMPUTER3(VIDEO) AUTO AUTO,NTSC3.58,NTSC4.43,PAL,PAL-M,PAL-N,PAL60,
SECAMDIGITALAUDIOSELECT
HDMI HDMI HDMI,COMPUTER2DisplayPort DisplayPort DisplayPort,COMPUTER2
BEEP ON OFF,ON
* Theasterisk(*)indicatesthatthedefaultsettingvariesdependingonthesignal.

86
5. Using On-Screen Menu
SETUP OPTIONS(2)
STANDBYMODE NORMAL NORMAL,POWER-SAVING,NETWORKSTANDBYDIRECTPOWERON OFF OFF,ONAUTOPOWERON(COMP1/3) OFF OFF,COMPUTER1,COMPUTER3AUTOPOWEROFF OFF OFF,0:05,0:10,0:20,0:30
DEFAULTSOURCESELECT LAST LAST,AUTO,COMPUTER1,COMPUTER2,COMPUTER3,HDMI,DisplayPort,VIDEO,S-VIDEO,VIEWER,NETWORK
INFO.
USAGETIME
LAMPLIFEREMAININGLAMPHOURSUSEDFILTERHOURSUSEDTOTALCARBONSAVINGS
SOURCE(1)
INPUTTERMINALRESOLUTIONHORIZONTALFREQUENCYVERTICALFREQUENCYSYNCTYPESYNCPOLARITYSCANTYPESOURCENAMEENTRYNO.
SOURCE(2)
SIGNALTYPEVIDEOTYPEBITDEPTHVIDEOLEVELLINKRATELINKLANE
WIREDLAN
IPADDRESSSUBNETMASKGATEWAYMACADDRESS
WIRELESSLAN(1)
IPADDRESSSUBNETMASKGATEWAYMACADDRESS
WIRELESSLAN(2)
SSIDNETWORKTYPEWEP/WPACHANNELSIGNALLEVEL
VERSION(1)
FIRMWAREDATAFIRMWARE2SUB-CPU
VERSION(2) FIRMWARE3
OTHERS
PROJECTORNAMEMODELNO.SERIALNUMBERLANUNITTYPECONTROLID(when[CONTROLID]isset)
RESET
CURRENTSIGNALALLDATAALLDATA(INCLUDINGENTRYLIST)CLEARLAMPHOURSCLEARFILTERHOURS

87
5. Using On-Screen Menu
Menu Descriptions & Functions [SOURCE]
COMPUTER 1, 2, and 3SelectsthecomputerconnectedtoyourCOMPUTER1,2,orCOMPUTER3inputconnectorsignal.NOTE:WhenthecomponentinputsignalisconnectedtotheCOMPUTERIN,COMPUTER2IN,orCOMPUTER3INconnector,select[COMPUTER1],[COMPUTER2]or[COMPUTER3]respectively.TheprojectorautomaticallydetermineswhethertheCOMPUTER1,2,or3inputsignalisanRGBorcomponentsignal.
HDMISelectstheHDMIcompatibleequipmentconnectedtoyourHDMIINconnector.
DisplayPortProjectstheimageofthedeviceconnectedtotheDisplayPortinputconnector.
VIDEOSelectswhatisconnectedtoyourVIDEOinput-VCR,DVDplayerordocumentcamera.
VIEWERThisfeatureenablesyoutomakepresentationsusingaUSBmemorythatcontainsslides.(→page56“4.UsingtheViewer”)
NETWORKSelectsasignalfromtheLANport(RJ-45)ortheinstalledUSBwirelessLANunit(optionalformodelsforEurope,Australia,AsiaandothercountriesthanNorthAmerica).
ENTRY LISTDisplaysalistofsignals.Seethefollowingpages.
TEST PATTERNClosesthemenuandswitchestothetestpatternscreen.ThepreviousscreenreappearswhentheEXITbuttonispressed.

88
5. Using On-Screen Menu
Using the Entry ListWhenanysourceadjustmentsaremade,theadjustmentsareautomaticallyregisteredintheEntryList.The(adjustmentvaluesof)registeredsignalscanbeloadedfromtheEntryListwhenevernecessary.However,onlyupto100patternscanberegisteredintheEntryList.When100patternshavebeenregisteredintheEntryList,anerrormessageisthendisplayedandnoadditionalpatternscanberegistered.Youshouldthusdelete(adjustmentvaluesof)signalsthatarenolongerneeded.
Displaying the Entry list1. Press the MENU button.
The menu will be displayed.
2. Press the or buttontoselect[SOURCE].
The SOURCE list will be displayed.
3. Use the , , , or toselect[ENTRYLIST]andpresstheENTERbutton.
The ENTRY LIST windows will be displayed.
If the ENTRY LIST window is not displayed, switch the menu to [ADVANCED].
To switch the menu between [ADVANCED] and [BASIC], select [APPLICATION MENU] → [TOOLS] → [ADMINISTRATOR MODE]. (→ page 136)

89
5. Using On-Screen Menu
EnteringthecurrentlyprojectedsignalintotheEntryList[STORE]
1. Press the or button to select any number.
2. Press the or buttontoselect[STORE]andpresstheENTERbutton.
Calling up a signal from the Entry List [LOAD]Pressthe or buttontoselectasignalandpresstheENTERbutton.
Editing a signal from the Entry List [EDIT]
1. Press the or button to select a signal you wish to edit.
2. Press the , , , or buttontoselect[EDIT]andpresstheENTERbutton.
The Edit window will be displayed.
SOURCENAME Enterasignalname.Upto18alphanumericcharacterscanbeused.INPUTTERMINAL Selecttheinputsource.LOCK Setso that theselectedsignalcannotbedeletedwhen [ALLDELETE] isexecuted.The
changesmadeafterLOCKexecutioncannotbesaved.SKIP Setsothattheselectedsignalwillbeskippedduringautosearch.
3. Settheaboveitemsandselect[OK]andpresstheENTERbutton.
NOTE:Theinputterminalcannotbechangedtothecurrentlyprojectedsignal.

90
5. Using On-Screen Menu
Cutting a signal from the Entry List [CUT]
1. Press the or button to select a signal you wish to delete.
2. Press the , , , or buttontoselect[CUT]andpresstheENTERbutton.
The signal will be deleted from the Entry List and the deleted signal will be displayed on the clipboard at the bottom of the Entry List.
NOTE:• Thecurrentlyprojectedsignalcannotbedeleted.• Whenthelockedsignalisselected,itwillbedisplayedingraywhichindicatesitisnotavailable.
TIP:• DataontheclipboardcanbepassedontotheEntryList.• DataontheclipboardwillnotbelostaftertheEntryListisclosed.
CopyingandpastingasignalfromtheEntryList[COPY]/[PASTE]
1. Press the or button to select a signal you wish to copy.
2. Press the , , , or buttontoselect[COPY]andpresstheENTERbutton.
The copied signal will be displayed on the clipboard at the bottom of the Entry List.
3. Press the or button to move to the list.
4. Press the or button to select a signal.
5. Press the , , , or buttontoselect[PASTE]andpresstheENTERbutton.
Data on the clipboard will be pasted to the signal.
Deleting all the signals from the Entry List [ALL DELTE]
1. Press the , , , or buttontoselect[ALLDELETE]andpresstheENTERbutton.
The confirmation message will be displayed.
2. Press the or buttontoselect[YES]andpresstheENTERbutton.
NOTE:Thelockedsignalcannotbedeleted.

91
5. Using On-Screen Menu
Menu Descriptions & Functions [ADJUST][PICTURE]
[MODE]Thisfunctionallowsyoutodeterminehowtosavesettingsfor[DETAILSETTINGS]of[PRESET]foreachinput.
STANDARD ������������ Saves settings for each item of [PRESET] (Preset 1 through 7)PROFESSIONAL ����� Saves all the settings of [PICTURE] for each input�
[PRESET]Thisfunctionallowsyoutoselectoptimizedsettingsforyourprojectedimage.Youcanadjustneutraltintforyellow,cyanormagenta.Therearesevenfactorypresetsoptimizedforvarioustypesofimages.Youcanalsouse[DETAILSETTINGS]tosetuseradjustablesettingstocustomizeeachgammaorcolor.Yoursettingscanbestoredin[PRESET1]to[PRESET7].
HIGH-BRIGHT �������� Recommended for use in a brightly lit room�PRESENTATION ����� Recommended for making a presentation using a PowerPoint file�VIDEO �������������������� Recommended for typical TV program viewing�MOVIE ������������������� Recommended for movies�GRAPHIC ��������������� Recommended for graphics�sRGB ��������������������� Standard color valuesDICOM SIM� ���������� Recommended for DICOM simulation format�
NOTE:• The[DICOMSIM.]optionisfortraining/referenceonlyandshouldnotbeusedforactualdiagnosis.• DICOMstandsforDigitalImagingandCommunicationsinMedicine.ItisastandarddevelopedbytheAmericanCollegeofRadiol-
ogy(ACR)andtheNationalElectricalManufacturersAssociation(NEMA). Thestandardspecifieshowdigitalimagedatacanbemovedfromsystemtosystem.
[DETAIL SETTINGS]

92
5. Using On-Screen Menu
[GENERAL]StoringYourCustomizedSettings[REFERENCE]Thisfunctionallowsyoutostoreyourcustomizedsettingsin[PRESET1]to[PRESET7].First,selectabasepresetmodefrom[REFERENCE],thenset[GAMMACORRECTION]and[COLORTEMPERA-TURE].
HIGH-BRIGHT �������� Recommended for use in a brightly lit room�PRESENTATION ����� Recommended for making a presentation using a PowerPoint file�VIDEO �������������������� Recommended for typical TV program viewing�MOVIE ������������������� Recommended for movies�GRAPHIC ��������������� Recommended for graphics�sRGB ��������������������� Standard color values�DICOM SIM� ���������� Recommended for DICOM simulation format�
Selecting Gamma Correction Mode [GAMMA CORRECTION]Eachmodeisrecommendedfor:
DYNAMIC �������������� Creates a high-contrast picture�NATURAL ��������������� Natural reproduction of the picture�BLACK DETAIL ������� Emphasizes detail in dark areas of the picture�
NOTE:Thisfunctionisnotavailablewhen[DICOMSIM.]isselectedfor[DETAILSETTINGS].
SelectingScreenSizeforDICOMSIM[SCREENSIZE]Thisfunctionwillperformgammacorrectionappropriateforthescreensize.
LARGE ������������������� For screen size of 150"MEDIUM ���������������� For screen size of 100"SMALL ������������������� For screen size of 50"
NOTE:Thisfunctionisavailableonlywhen[DICOMSIM.]isselectedfor[DETAILSETTINGS].
AdjustingColorTemperature[COLORTEMPERATURE]Thisoptionallowsyoutoselectthecolortemperatureofyourchoice.
NOTE:When[PRESENTATION]or[HIGH-BRIGHT]isselectedin[REFERENCE],thisfunctionisnotavailable.
AdjustingBrightnessandContrast[DYNAMICCONTRAST]Thisfunctionallowsyoutoadjustthecontrastratioopticallyusingthebuilt-iniris.Toincreasethecontrastratio,select[ON].
AdjustingWhiteBalance[WHITEBALANCE]Thisallowsyoutoadjustthewhitebalance.Contrastforeachcolor(RGB)toadjustthewhitelevelofthescreen;Brightnessforeachcolor(RGB)isusedtoadjusttheblacklevelofthescreen.

93
5. Using On-Screen Menu
[COLOR CORRECTION]Correctsthecolorforallsignals.Adjuststhetoneforthecolorsred,green,blue,yellow,magentaandcyan.
RED ����������������������� Adjusts the color in red areas, centered around the red�This can be used to adjust to a yellow- or magenta-tinged red�
GREEN ������������������� Adjusts the color in green areas, centered around the green�This can be used to adjust to a yellow- or cyan-tinged green�
BLUE ���������������������� Adjusts the color in blue areas, centered around the blue�This can be used to adjust to a violet- or cyan-tinged blue�
YELLOW ���������������� Adjusts the color in yellow areas, centered around the yellow�This can be used to adjust to a red- or green-tinged yellow�
MAGENTA �������������� Adjusts the color in magenta areas, centered around the magenta�This can be used to adjust to a red- or blue-tinged magenta�
CYAN ��������������������� Adjusts the color in cyan areas, centered around the cyan�This can be used to adjust to a green- or blue-tinged cyan�
[CONTRAST]Adjuststheintensityoftheimageaccordingtotheincomingsignal.
[BRIGHTNESS]Adjuststhebrightnesslevelorthebackrasterintensity.
[SHARPNESS]Controlsthedetailoftheimage.
[COLOR]Increasesordecreasesthecolorsaturationlevel.
[HUE]Variesthecolorlevelfrom+/−greento+/−blue.Theredlevelisusedasreference.
Inputsignal CONTRAST BRIGHTNESS SHARPNESS COLOR HUE
COMPUTER/DisplayPort/HDMI(RGB) Yes Yes Yes No No
COMPUTER/DisplayPort/HDMI(COMPONENT)
Yes Yes Yes Yes Yes
VIDEO/S-VIDEO/COMPONENT Yes Yes Yes Yes Yes
VIEWER/NETWORK Yes Yes Yes No No
Yes=Adjustable,No=Notadjustable
[RESET]Thesettingsandadjustmentsfor[PICTURE]willbereturnedtothefactorysettingswiththeexceptionofthefollowing;Presetnumbersand[REFERENCE]withinthe[PRESET]screen.Thesettingsandadjustmentsunder[DETAILSETTINGS]withinthe[PRESET]screenthatarenotcurrentlyselectedwillnotbereset.

94
5. Using On-Screen Menu
[IMAGE OPTIONS]
AdjustingClockandPhase[CLOCK/PHASE]ThisallowsyoutomanuallyadjustCLOCKandPHASE.
CLOCK ������������������� Use this item to fine tune the computer image or to remove any vertical banding that might appear� This function adjusts the clock frequencies that eliminate the horizontal banding in the image�This adjustment may be necessary when you connect your computer for the first time�
PHASE ������������������� Use this item to adjust the clock phase or to reduce video noise, dot interference or cross talk� (This is evident when part of your image appears to be shimmering�)Use [PHASE] only after the [CLOCK] is complete�
NOTE:The[CLOCK]and[PHASE]itemsareavailableforRGBsignalsonly.

95
5. Using On-Screen Menu
AdjustingHorizontal/VerticalPosition[HORIZONTAL/VERTICAL]Adjuststheimagelocationhorizontallyandvertically.
- Animagecanbedistortedduringtheadjustmentof[CLOCK]and[PHASE].Thisisnotmalfunction.
- Theadjustments for [CLOCK], [PHASE], [HORIZONTAL],and[VERTICAL]willbestored inmemoryfor thecurrentsignal.Thenexttimeyouprojectthesignalwiththesameresolution,horizontalandverticalfrequency,itsadjustmentswillbecalledupandapplied.
Todeleteadjustmentsstoredinmemory,fromthemenu,youselect[RESET]→[CURRENTSIGNAL]andresettheadjustments.
[BLANKING]Adjuststhedisplayrange(blanking)atthetop,bottom,leftandrightedgesoftheinputsignal.
SelectingOverscanPercentage[OVERSCAN]Selectoverscanpercentage(Auto,0%,5%and10%)forsignal.
Projected image
Overscaned by 10%
NOTE:• The[OVERSCAN]itemisnotavailable: -when[NATIVE]isselectedfor[ASPECTRATIO]. -when[VIEWER]or[NETWORK]isselectedfor[SOURCE]

96
5. Using On-Screen Menu
Selecting the Aspect Ratio [ASPECT RATIO]Usethisfunctiontoselectthescreen’svertical:horizontalaspectratio.Selectthescreentype(4:3screen,16:9screenor16:10screen)atthescreensettingbeforesettingtheaspectratio.(→page104)Theprojectorautomaticallyidentifiesthesignalbeinginputandsetstheoptimumaspectratio.
For Computer signal
ForComponent/Video/S-VideosignalsWhenthescreentypeissetto4:3 Whenthescreentypeissetto16:9or16:10
Resolution AspectRatioVGA 640×480 4:3SVGA 800×600 4:3XGA 1024×768 4:3WXGA 1280×768 15:9WXGA 1280×800 16:10HD(FWXGA) 1366×768 approx.16:9WXGA+ 1440×900 16:10SXGA 1280×1024 5:4SXGA+ 1400×1050 4:3WXGA+ 1600×900 16:9UXGA 1600×1200 4:3WSXGA+ 1680×1050 16:9FHD(1080P) 1920×1080 16:9WUXGA 1920×1200 16:10
Options FunctionAUTO Theprojectorwillautomaticallydeterminetheincomingsignalanddisplayitinitsaspectratio.
Theprojectormayerroneouslydeterminetheaspectratiodependingonitssignal.Ifthisoccurs,selecttheappropriateaspectratiofromthefollowing.
4:3 Theimageisdisplayedin4:3aspectratio.5:4 Theimageisdisplayedin5:4aspectratio16:9 Theimageisdisplayedin16:9aspectratio15:9 Theimageisdisplayedin15:9aspectratio16:10 Theimageisdisplayedin16:10aspectratioNATIVE Theprojectordisplaysthecurrentimageinitstrueresolutionwhentheincomingcomputersignal
hasalowerorhigherresolutionthantheprojector’snativeresolution.(→page2)Whentheincomingcomputersignalhasahigherresolutionthantheprojector'snativeresolution,thecenterofanimagewillbedisplayed.

97
5. Using On-Screen Menu
LETTERBOX Theimageofaletterboxsignal(16:9)isstretchedequallyinthehorizontalandverticaldirectionstofitthescreen.
WIDESCREEN Theimageofasqueezesignal(16:9)isstretchedleftandrightin16:9.
ZOOM Theimageofasqueezesignal(16:9)isstretchedleftandrightin4:3.Partsofthedisplayedimagearecroppedattheleftandrightedgesandthereforenotvisible.
4:3FILL Theimageofasignal(4:3)isstretchedleftandrightin16:9.
TIP:• Imagepositioncanbeadjustedverticallyusing[POSITION]whenthe[16:9],[15:9],or[16:10]aspectratiosareselected.• Theterm“letterbox”referstoamorelandscape-orientedimagewhencomparedtoa4:3image,whichisthestandardaspect
ratioforavidesource. Theletterboxsignalhasaspectratioswiththevistasize“1.85:1”orcinemascopesize“2.35:1”formoviefilm.• Theterm“squeeze”referstothecompressedimageofwhichaspectratioisconvertedfrom16:9to4:3.
[RESOLUTION]Thisfunctionsetstheresolutionofaprojectedimageifauto-detectfailstoworkwell.

98
5. Using On-Screen Menu
[VIDEO]
Using Noise Reduction [NOISE REDUCTION]Thisfunctionisusedtoreducevideonoise.
RANDOM NR ��������� Reduces flickering random noise in an image� MOSQUITO NR ������ Reduces mosquito noise that appears around the edges of an image during DVD playback�BLOCK NR ������������� Reduces block noise or mosaic-like patterns by selecting ON�
Selecting Interlaced Progressive Conversion Process Mode [DEINTERLACE]Thisfunctionallowsyoutoselectaninterlaced-to-progressiveconversionprocessforvideosignals.
AUTO ��������������������� Determines an appropriate interlaced-to-progressive conversion process automatically�VIDEO �������������������� Applies a normal interlaced-to-progressive conversion process�FILM ���������������������� Applies the automatic detection mode for telecine signals� This option is recommended for a movie pic-
ture�
NOTE:ThisfunctionisnotavailablewithRGBsignals.
TurningOnorOffthe3DDimensionalSeparation[3DY/CSEPARATION]WhenprojectinganimagefromaVIDEOinput,settoONtoprojectthehighestqualityimage.
OFF ������������������������ Turns off the 3 dimensional separation feature�ON ������������������������� Turns on the 3 dimensional separation feature�
NOTE:OnlyavailableforNTSC3.58videosignals.
[DETAIL ENHANCEMENT]Thisfunctionenhancesthecontoursoftheimagewhenprojectingcomponentsignals.
[SIGNAL TYPE]TheprojectorautomaticallyidentifieswhethertheCOMPUTER1,COMPUTER2orCOMPUTER3*inputsignalsareRGBorcomponentsignalstoprojecttheimage.Ifthecolorsareunnatural,however,tryswitchingthesetting.*ForCOMPUTER3,thecomputersignalandvideosignalcanbeselectedatSIGNALSELECT(COMP3).
RGB ����������������������� Switches to the RGB input�COMPONENT ��������� Switches to the component signal input�

99
5. Using On-Screen Menu
[VIDEOLEVEL]Thisfunctionselectsvideosignallevelwhentheprojector’sHDMIandDisplayPortinputconnectorsandanexternaldeviceareconnected.
AUTO ��������������������� The video level is switched automatically based on the information from the device outputting the signal�Depending on the connected device, this setting may not be made properly� In this case, switch to “NORMAL” or “ENHANCED” from the menu and view with the optimum setting�
NORMAL ���������������� This disables the enhanced mode�ENHANCED ������������ This improves the image’s contrast, expressing the dark and light sections more dynamically�
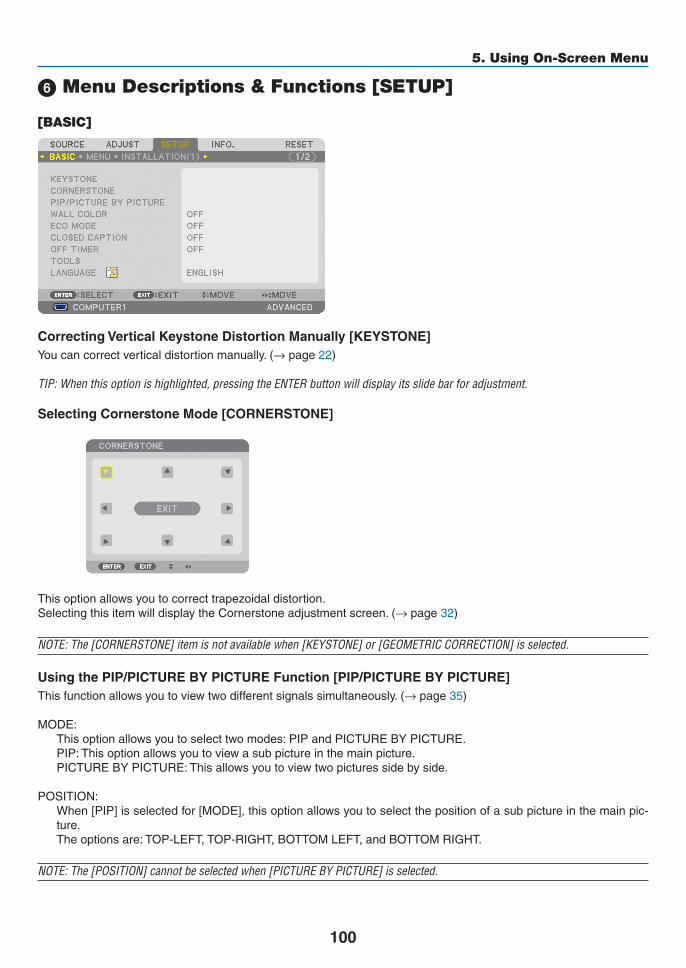
100
5. Using On-Screen Menu
Menu Descriptions & Functions [SETUP]
[BASIC]
CorrectingVerticalKeystoneDistortionManually[KEYSTONE]Youcancorrectverticaldistortionmanually.(→page22)
TIP:Whenthisoptionishighlighted,pressingtheENTERbuttonwilldisplayitsslidebarforadjustment.
Selecting Cornerstone Mode [CORNERSTONE]
Thisoptionallowsyoutocorrecttrapezoidaldistortion.SelectingthisitemwilldisplaytheCornerstoneadjustmentscreen.(→page32)
NOTE:The[CORNERSTONE]itemisnotavailablewhen[KEYSTONE]or[GEOMETRICCORRECTION]isselected.
UsingthePIP/PICTUREBYPICTUREFunction[PIP/PICTUREBYPICTURE]Thisfunctionallowsyoutoviewtwodifferentsignalssimultaneously.(→page35)
MODE:Thisoptionallowsyoutoselecttwomodes:PIPandPICTUREBYPICTURE.PIP:Thisoptionallowsyoutoviewasubpictureinthemainpicture.PICTUREBYPICTURE:Thisallowsyoutoviewtwopicturessidebyside.
POSITION:When[PIP]isselectedfor[MODE],thisoptionallowsyoutoselectthepositionofasubpictureinthemainpic-ture.Theoptionsare:TOP-LEFT,TOP-RIGHT,BOTTOMLEFT,andBOTTOMRIGHT.
NOTE:The[POSITION]cannotbeselectedwhen[PICTUREBYPICTURE]isselected.
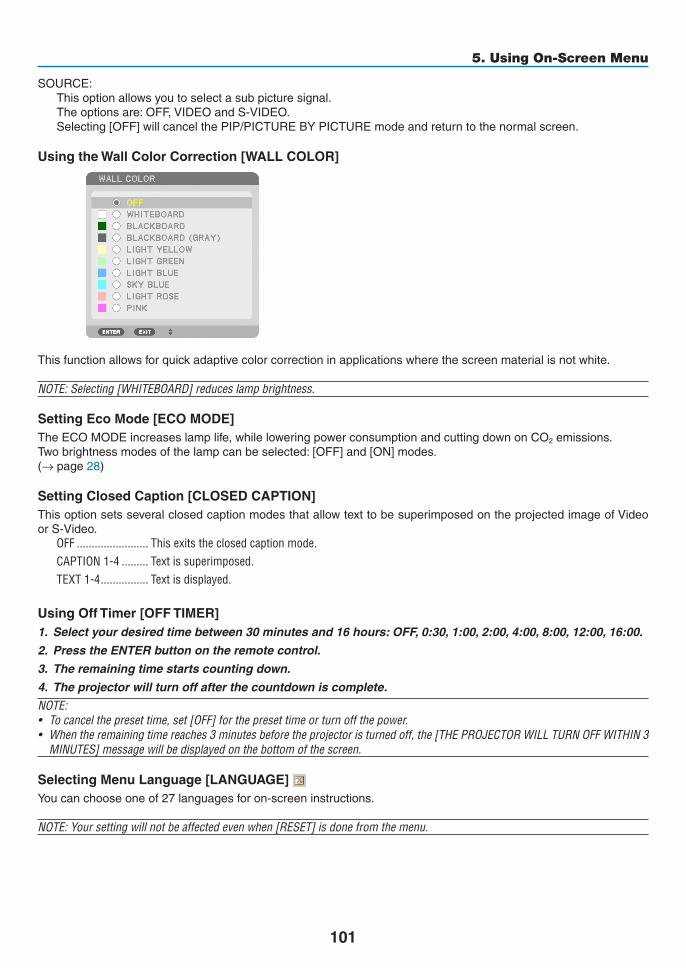
101
5. Using On-Screen Menu
SOURCE:Thisoptionallowsyoutoselectasubpicturesignal.Theoptionsare:OFF,VIDEOandS-VIDEO.Selecting[OFF]willcancelthePIP/PICTUREBYPICTUREmodeandreturntothenormalscreen.
Using the Wall Color Correction [WALL COLOR]
Thisfunctionallowsforquickadaptivecolorcorrectioninapplicationswherethescreenmaterialisnotwhite.
NOTE:Selecting[WHITEBOARD]reduceslampbrightness.
Setting Eco Mode [ECO MODE]TheECOMODEincreaseslamplife,whileloweringpowerconsumptionandcuttingdownonCO2emissions.Twobrightnessmodesofthelampcanbeselected:[OFF]and[ON]modes.(→page28)
Setting Closed Caption [CLOSED CAPTION]ThisoptionsetsseveralclosedcaptionmodesthatallowtexttobesuperimposedontheprojectedimageofVideoorS-Video.
OFF ������������������������ This exits the closed caption mode�CAPTION 1-4 ��������� Text is superimposed�TEXT 1-4 ���������������� Text is displayed�
Using Off Timer [OFF TIMER]1. Select your desired time between 30 minutes and 16 hours: OFF, 0:30, 1:00, 2:00, 4:00, 8:00, 12:00, 16:00.
2. Press the ENTER button on the remote control.
3. The remaining time starts counting down.
4. The projector will turn off after the countdown is complete.
NOTE:• Tocancelthepresettime,set[OFF]forthepresettimeorturnoffthepower.• Whentheremainingtimereaches3minutesbeforetheprojectoristurnedoff,the[THEPROJECTORWILLTURNOFFWITHIN3
MINUTES]messagewillbedisplayedonthebottomofthescreen.
Selecting Menu Language [LANGUAGE] Youcanchooseoneof27languagesforon-screeninstructions.
NOTE:Yoursettingwillnotbeaffectedevenwhen[RESET]isdonefromthemenu.

102
5. Using On-Screen Menu
[MENU]
Selecting Menu Color [COLOR SELECT]Youcanchoosebetweentwooptionsformenucolor:COLORandMONOCHROME.
TurningOn/OffSourceDisplay[SOURCEDISPLAY]ThisoptionturnsonoroffinputnamedisplaysuchasCOMPUTER1,COMPUTER2,COMPUTER3,HDMI,Display-Port,VIDEO,S-VIDEO,VIEWER,NETWORKtobedisplayedonthetoprightofthescreen.
Turning messages on and off [MESSAGE DISPLAY]Thisoptionselectswhetherornottodisplayprojectormessagesatthebottomoftheprojectedimage.Evenwhen“OFF”isselected,thesecuritylockwarningisdisplayed.Thesecuritylockwarningturnsoffwhenthesecuritylockiscanceled.
TurningON/OFFControlID[IDDISPLAY]ID DISPLAY ����������� This option turns on or off the ID number which is displayed when the ID SET button on the remote control
is pressed� (→ page 106)
TurningOn/OffEcoMessage[ECOMESSAGE]Thisoptionturnsonoroffthefollowingmessageswhentheprojectoristurnedon.
TheEcoMessagepromptstheusertosaveenergy.When[OFF]isselectedfor[ECOMODE],youwillgetamessagetopromptyoutoselect[ON]for[ECOMODE].
When[ON]isselectedfor[ECOMODE]
Toclosethemessage,pressanyoneofthebuttons.Themessagewilldisappearifnobuttonoperationisdonefor30seconds.

103
5. Using On-Screen Menu
When[OFF]isselectedfor[ECOMODE]
PressingtheENTERbuttonwilldisplaythe[ECOMODE]screen.(→page28)Toclosethemessage,presstheEXITbutton.
Selecting Menu Display Time [DISPLAY TIME]Thisoptionallowsyoutoselecthowlongtheprojectorwaitsafterthelasttouchofabuttontoturnoffthemenu.Thepresetchoicesare[MANUAL],[AUTO5SEC],[AUTO15SEC],and[AUTO45SEC].The[AUTO45SEC]isthefac-torypreset.
SelectingaColororLogoforBackground[BACKGROUND]Use this feature to display a blue/black screen or logo when no signal is available.The default background is[BLUE].
NOTE:• Evenwhenthebackgroundlogoisselected,iftwopicturesaredisplayedin[PIP/PICTUREBYPICTURE]mode,thebluebackground
isdisplayedwithoutthelogowhenthereisnosignal.
Selecting Interval Time for Filter Message [FILTER MESSAGE]Thisoptionallowsyoutoselectthetimepreferencebetweendisplayingthemessageforcleaningthefilters.Cleanthefilterwhenyougetthemessage“PLEASECLEANFILTER.”(→page155)Fiveoptionsareavailable:OFF,100[H],500[H],1000[H],2000[H]Thedefaultsettingis[OFF].
NOTE:Yoursettingwillnotbeaffectedevenwhen[RESET]isdonefromthemenu.
[INSTALLATION(1)]
SelectingProjectorOrientation[ORIENTATION]Thisreorientsyourimageforyourtypeofprojection.Theoptionsare:desktopfrontprojection,ceilingrearprojection,desktoprearprojection,andceilingfrontprojection.
Thisprojectorisafree-tiltprojectorwithwhichitispossibletoprojectimagesontheceiling(upward)orfloor(downward).Wheninstalledintheverticaldirection,setthe[FANMODE]installationorientation.(→page108)
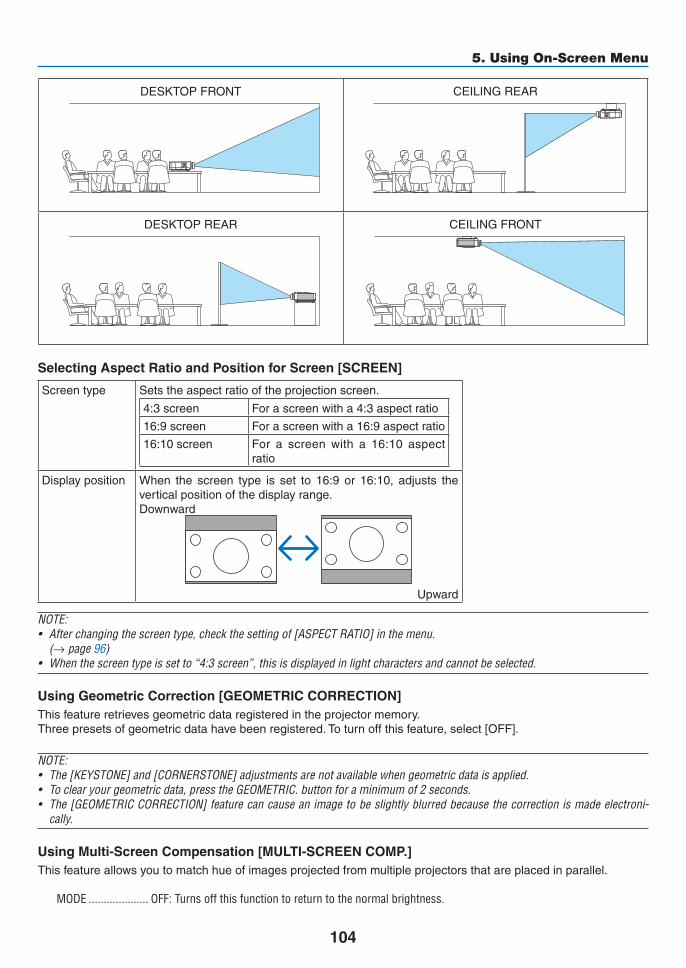
104
5. Using On-Screen Menu
DESKTOPFRONT CEILINGREAR
DESKTOPREAR CEILINGFRONT
Selecting Aspect Ratio and Position for Screen [SCREEN]
Screentype Setstheaspectratiooftheprojectionscreen.
4:3screen Forascreenwitha4:3aspectratio
16:9screen Forascreenwitha16:9aspectratio
16:10screen For a screen with a 16:10 aspectratio
Displayposition When the screen type is set to 16:9 or 16:10, adjusts theverticalpositionofthedisplayrange.Downward
Upward
NOTE:• Afterchangingthescreentype,checkthesettingof[ASPECTRATIO]inthemenu. (→page96)• Whenthescreentypeissetto“4:3screen”,thisisdisplayedinlightcharactersandcannotbeselected.
Using Geometric Correction [GEOMETRIC CORRECTION]Thisfeatureretrievesgeometricdataregisteredintheprojectormemory.Threepresetsofgeometricdatahavebeenregistered.Toturnoffthisfeature,select[OFF].
NOTE:• The[KEYSTONE]and[CORNERSTONE]adjustmentsarenotavailablewhengeometricdataisapplied.• Toclearyourgeometricdata,presstheGEOMETRIC.buttonforaminimumof2seconds.• The[GEOMETRICCORRECTION]featurecancauseanimagetobeslightlyblurredbecausethecorrectionismadeelectroni-
cally.
Using Multi-Screen Compensation [MULTI-SCREEN COMP.]Thisfeatureallowsyoutomatchhueofimagesprojectedfrommultipleprojectorsthatareplacedinparallel.
MODE �������������������� OFF: Turns off this function to return to the normal brightness�

105
5. Using On-Screen Menu
ON: Turns on this function to make the screen darker� The [BRIGHTNESS] and the [CONTRAST] can be adjusted�
CONTRAST ������������ Adjusts the bright part of the picture�BRIGHTNESS ��������� Adjusts the dark part of the picture�
Adjusting
1. Prepare black and white images so that the images can be displayed on the computer screen.
2. Display the black image on the computer screen, and project the image from the projector.
3. Select [MULTI-SCREEN COMP.] → [MODE] → [ON].
4. Adjust the dark part of the images.
Press the button to select [BRIGHTNESS] and use the or to match the black part of another projector.
5. Display the white screen on the computer screen.
Project the image from two or more projectors.
6. Adjust the bright part of the images.
Press the button to select [CONTRAST] and use the or to match the white part of another projector.
Moving the slide bar toward [+] (plus) can change the white part of the image. Should this happen, move the slide bar toward [−] (minus) to adjust the brightness.
TIP:• Whenyouusemultipleprojectors,youcanusethe[CONTROLID]functiontooperateasingleprojectororalltheprojectorsfrom
theremotecontrol.(→page106)• Yoursettingwillnotbeaffectedevenwhen[RESET]isdonefromthemenu.
[REF. WHITE BALANCE]Thisfeatureallowsyoutoadjustthewhitebalanceforallsignals.Thewhiteandblacklevelsofthesignalareadjustedforoptimumcolorreproduction.Uniformityisalsoadjustedwhentheredness(R)andblueness(B)ofthewhitecolorinthescreen’shorizontal(left/right)directionareuneven.
BRIGHTNESS R/BRIGHTNESS G/BRIGHTNESS B ������������������������������ These adjust the picture’s black color�CONTRAST R/CONTRAST G/CONTRAST B ������������������������������ These adjust the picture’s white color�UNIFORMITY R ������ The further this is set to the + side, the stronger the redness on the left side of the picture (increasing
towards the left edge) and the weaker the redness on the right side of the picture (decreasing towards the right edge)�This is reversed when set to the – side�
UNIFORMITY B ������ The further this is set to the + side, the stronger the blueness on the left side of the picture (increasing towards the left edge) and the weaker the blueness on the right side of the picture (decreasing towards the right edge)�This is reversed when set to the – side�
[STATICCONVERGENCE]Thisfeaturesallowsyoutoadjustforcolordeviationinthepicture.Thiscanbeadjustedinunitsof±1pixelinthehorizontaldirectionforHORIZONTALR,GandB,intheverticaldirec-tionforVERTICALR,GandB.

106
5. Using On-Screen Menu
[INSTALLATION(2)]
DisablingtheCabinetButtons[CONTROLPANELLOCK]ThisoptionturnsonorofftheCONTROLPANELLOCKfunction.
NOTE:• ThisCONTROLPANELLOCKdoesnotaffecttheremotecontrolfunctions.• Whenthecontrolpanelislocked,pressingandholdingtheEXITbuttonontheprojectorcabinetforabout10secondswillchange
thesettingto[OFF].
TIP:Whenthe[CONTROLPANELLOCK]isturnedon,akeylockicon[ ]willbedisplayedatthebottomrightofthemenu.
EnablingSecurity[SECURITY]ThisfeatureturnsonorofftheSECURITYfunction.Unlessthecorrectkeywordisentered,theprojectorcannotprojectanimage.(→page37)
NOTE:Yoursettingwillnotbeaffectedevenwhen[RESET]isdonefromthemenu.
Selecting Communication Speed [COMMUNICATION SPEED]ThisfeaturesetsthebaudrateofthePCControlport(D-Sub9P).Itsupportsdataratesfrom4800to115200bps.Thedefaultis38400bps.Selecttheappropriatebaudrateforyourequipmenttobeconnected(dependingontheequipment,alowerbaudratemayberecommendedforlongcableruns).
NOTE:• Select[38400bps]orlesswhenusingthesuppliedsoftwareprograms.• Yourselectedcommunicationspeedwillnotbeaffectedevenwhen[RESET]isdonefromthemenu.
Turning On or Off Remote Sensor [REMOTE SENSOR]Thisoptiondetermineswhichremotesensorontheprojectorisenabledinwirelessmode.Theoptionsare:FRONT/BACK,FRONT,andBACK.Iftheremotecontrolsystemdoesnotfunctionwhendirectsunlightorstrongilluminationstrikestheremotecontrolsensoroftheprojector,changeanotheroption.
SettingIDtotheProjector[CONTROLID]YoucanoperatemultipleprojectorsseparatelyandindependentlywiththesingleremotecontrolthathastheCONTROLIDfunction.IfyouassignthesameIDtoalltheprojectors,youcanconvenientlyoperatealltheprojectorstogetherusingthesingleremotecontrol.Todoso,youhavetoassignanIDnumbertoeachprojector.
CONTROL ID NUMBER �������Select a number from 1 to 254 you wish to assign to your projector�CONTROL ID �����������������������Select [OFF] to turn off the CONTROL ID setting and select [ON] to turn on the CONTROL ID set-
ting�

107
5. Using On-Screen Menu
NOTE:• When[ON]isselectedfor[CONTROLID],theprojectorcannotbeoperatedbyusingtheremotecontrolthatdoesnotsupport
theCONTROLIDfunction.(Inthiscasethebuttonsontheprojectorcabinetcanbeused.)• Yoursettingwillnotbeaffectedevenwhen[RESET]isdonefromthemenu.•PressingandholdingtheENTERbuttonontheprojectorcabinetfor10secondswilldisplaythemenuforcancelingtheControl
ID.
Assigning or Changing the Control ID1. Turn on the projector.
2. Press the ID SET button on the remote control.
The CONTROL ID screen will be displayed.
If the projector can be operated with the current remote control ID, the [ACTIVE] will be displayed. If the projector cannot be operated with the current remote control ID, the [INACTIVE] will be displayed. To operate the inactive projector, assign the control ID used for the projector by using the following procedure (Step 3).
3. Press one of numeric keypad buttons while pressing and holding the ID SET button on the remote control.
Example:
To assign “3”, press the “3” button on the remote control.
No ID means that all the projectors can be operated together with a single remote control. To set “No ID”, enter “000” or press the CLEAR button.
TIP:TherangeofIDsisfrom1to254.4. Release the ID SET button.
The updated CONTROL ID screen will be displayed.
NOTE:•TheIDscanbeclearedinafewdaysafterthebatteriesarerundownorremoved.•Accidentallypressinganyoneofthebuttonsoftheremotecontrolwillclearcurrentlyspecified
IDwithbatteriesremoved.

108
5. Using On-Screen Menu
[OPTIONS(1)]
SettingAutoAdjust[AUTOADJUST]ThisfeaturesetstheAutoAdjustmodesothatthecomputersignalcanbeautomaticallyormanuallyadjustedfornoiseandstability.Youcanautomaticallymakeadjustmentintwoways:[NORMAL]and[FINE].
OFF ������������������������ The computer signal will not be automatically adjusted� You can manually optimize the computer signal�NORMAL ���������������� Default setting� The computer signal will be automatically adjusted� Normally select this option�FINE ����������������������� Select this option if fine adjustment is needed� It takes more time to switch to the source than when [NOR-
MAL]is selected�
Selecting Fan Mode [FAN MODE]FanModeisusedtosetthespeedoftheinternalcoolingfan.
MODE �������������������� Select three modes for fan speed: AUTO, HIGH, and HIGH ALTITUDE�AUTO: The built-in fans automatically run at a variable speed according to the internal temperature�HIGH: The built-in fans run at high speedHIGH ALTITUDE: The built-in fans run at a high speed� Select this option when using the projector at altitudes approximately 5500 feet/1600 meters or higher� To use the projector with ECO MODE ON in other installed conditions than desktop/ceiling with +/-20°, heed the following:(1) Select [HIGH ALTITUDE] for [MODE] at altitude 3200 feet/1000 meters�(2) Select [OFF] for [ECO MODE] at altitude 6800 feet/2100 meters or higher�
SETTING ���������������� Select either [NORMAL] or [VERTICAL TILT UP] according to the installa-tion angle of the projector� Select [VERTICAL TILT UP] for angles of range from 60° to 120° indicated in gray� Select [NORMAL] for the other angle ranges�
RestrictionsforusingtheprojectorinECOMODEathighaltitudes:Theprojectorshouldnotbeinstalledinanywayotherthanthesettingdescribedinthetable,otherwiselamplifecoulddecreasedramatically.
ECO MODE OFF ONSETTING NORMAL/VERTICAL TILT UP NORMAL VERTICAL TILT UP
Orientation All orientationsDESKTOP/CEILING
+/− 20°DESKTOP/CEILING other
than +/− 20°Upward 90°(+/− 30°)
1000 m or lower 3200 ft or lower AUTO AUTO1000 to 1600 m 3200 to 5200 ft HIGH ALTITUDE1600 to 2100 m 5200 to 6800 ft HIGH ALTITUDE2100 to 2600 m 6800 to 8500 ft Not available
Whenyouwishtocooldownthetemperatureinsidetheprojectorquickly,select[HIGH].
90°120°
180°
270°
60°
0°

109
5. Using On-Screen Menu
NOTE:• When[HIGHALTITUDE]isselectedfor[FANMODE],asymbolicon willbedisplayedatthebottomofthemenu.• ItisrecommendedthatyouselectHighspeedmodeifyouusetheprojectornon-stopforconsecutivedays.•Set[FANMODE]to[HIGHALTITUDE]whenusingtheprojectorataltitudesapproximately5500feet/1600metersorhigher.• Usingtheprojectorataltitudesapproximately5500feet/1600metersorhigherwithoutsettingto[HIGHALTITUDE]cancause
theprojectortooverheatandtheprotectorcouldshutdown.Ifthishappens,waitacoupleminutesandturnontheprojector.•Usingtheprojectorataltitudeslessthanapproximately5500feet/1600metersandsettingto[HIGHALTITUDE]cancausethe
lamptoovercool,causingtheimagetoflicker.Switch[FANMODE]to[AUTO].•Usingtheprojectorataltitudesapproximately5500feet/1600metersorhighercanshortenthelifeofopticalcomponentssuch
asthelamp.• Yoursettingwillnotbeaffectedevenwhen[RESET]isdonefromthemenu.
SelectingtheSignalFormat[SIGNALSELECT(COMP3)]WhenanoutputdeviceisconnectedtotheCOMPUTER3videoinputconnectors,thissetstheinputsignal.
RGB/COMPONENT � RGB and component signals are identified automatically�VIDEO �������������������� This switches to the video signal�
NOTE:Whenavideocable(commerciallyavailable)isconnectedtotheCOMPUTER3videoinputconnectors’G/Yconnector,videosignalscanbeprojected.Inthiscase,setto“VIDEO”.
[SEAMLESS SWITCHING]Whentheinputconnectorisswitched,theimagedisplayedbeforeswitchingisheldtoswitchtothenewimagewithoutabreakduetoabsenceofasignal.
[COLOR SYSTEM]ThisfeatureallowsyoutoselecttheTVvideosignal,whichdiffersfromcountrytocountry(NTSC,PAL,etc.).Thisissetto[AUTO]byfactorydefault.Setthisiftheprojectorcannotidentifythesignalautomatically.
[DIGITAL AUDIO SELECT]Thisfeatureallowsyoutoselecttheaudioinputsfortheprojector’sHDMIandDisplayPortinputconnectors.
HDMI ��������������������� HDMI: Selects the HDMI input connector’s digital audio�COMPUTER2: Selects the COMPUTER2 audio input connector�
DisplayPort ������������ DisplayPort: Selects the DisplayPort input connector’s digital audio�COMPUTER2: Selects the COMPUTER2 audio input connector�
EnablingKeySoundandErrorSound[BEEP]This feature turnsonoroff thebuttonsoundoralarmwhenanerroroccursor the followingoperationsareper-formed.
-Displayingthemainmenu
-Switchingsources
-Resettingdatabyusing[RESET]
-PressingPOWERONorPOWEROFFbutton

110
5. Using On-Screen Menu
[OPTIONS(2)]
Selecting Power-saving in [STANDBY MODE]Theprojectorhasthreestandbymodes:[NORMAL],[POWER-SAVING]and[NETWORKSTANDBY].ThePOWER-SAVINGmodeisthemodethatallowsyoutoputtheprojector inthepower-savingconditionwhichconsumeslesspowerthantheNORMALmode.TheprojectorispresetforNORMALmodeatthefactory.
NORMAL �����������������������������Power indicator: Orange light/STATUS indicator: Green lightPOWER-SAVING �����������������Power indicator: Red light/STATUS indicator: Off
The following connectors, buttons or functions will not work during this mode�- MONITOR OUT (COMP� 1) connector, and AUDIO OUT connector- LAN and Mail Alert functions- Buttons other than POWER button on the cabinet- Buttons other than POWER ON button on the remote control- Virtual Remote Tool fucntion
NETWORK STANDBY ����������When in the standby mode, the POWER indicator will light orange and the STATUS indicator will not light� This shows that the projector’s power can be turned on by wired LAN�When in the standby mode, the following connectors, buttons or functions will not work:- MONITOR OUT (COMP� 1) connector, and AUDIO OUT mini jack- Wireless LAN Unit- [AUTO POWER ON (COMP1/3)]- Buttons other than POWER button on the cabinet- Buttons other than POWER ON button on the remote control- PC control commands for other than power-on
Important:•When[CONTROLPANELLOCK]or[CONTROLID]isturnedon,orwhen[COMPUTER1]or[COMPUTER3]isselectedfor[AUTO
POWERON(COMP1/3)],the[STANDBYMODE]settingbecomesinvalid. Thismeansthattheprojectorisinthesameconditionwhenthe[NORMAL]isselectedfor[STANDBYMODE].
NOTE:• Evenwhen[POWER-SAVING]isselectedfor[STANDBYMODE],poweronoroffcanbedonebyusingthePCCONTROLport.• ThepowerconsumptioninthestandbymodewillnotbeincludedincalculatingCO2emissionreduction.• Yoursettingwillnotbeaffectedevenwhen[RESET]isdonefromthemenu.
EnablingDirectPowerOn[DIRECTPOWERON]Turnstheprojectoronautomaticallywhenthepowercordisinsertedintoanactivepoweroutlet.ThiseliminatestheneedtoalwaysusethePOWERbuttonontheremotecontrolorprojectorcabinet.

111
5. Using On-Screen Menu
TurningOntheProjectorByApplyingComputerSignal[AUTOPOWERON(COMP1/3)]WhentheprojectorisinStandbymode,applyingacomputersignalfromacomputerconnectedtotheCOMPUTER1INorCOMPUTER3INinputwillpowerontheprojectorandsimultaneouslyprojectthecomputer’simage.ThisfunctionalityeliminatestheneedtoalwaysusethePOWERbuttonontheremotecontrolortheprojectorcabinettopowerontheprojector.Tousethisfunction,firstconnectacomputertotheprojectorandtheprojectortoanactiveACinput.
NOTE:• Disconnectingacomputersignalfromthecomputerwillnotpowerofftheprojector.Werecommendusingthisfunctionincom-
binationoftheAUTOPOWEROFFfunction.• Thisfunctionwillnotbeavailableunderthefollowingconditions:
- whenacomponentsignalisappliedtotheCOMPUTER1INorCOMPUTER3INconnector- whenaSynconGreenRGBsignalorcompositesyncsignalisapplied
• When[AUTOPOWERON(COMP1/3]isset,the[STANDBYMODE]settingbecomesinvalid. Thismeansthattheprojectorisinthesameconditionwhenthe[NORMAL]isselectedfor[STANDBYMODE].
• ToenabletheAUTOPOWERON(COMP1/3)afterturningofftheprojector,wait3secondsandinputacomputersignal. Ifacomputersignalisstillpresentwhentheprojectoristurnedoff,theAUTOPOWERON(COMP1/3)willnotworkandthe
projectorremainsinstandbymode.
EnablingPowerManagement[AUTOPOWEROFF]Whenthisoptionisselectedyoucanenabletheprojectortoautomaticallyturnoff(attheselectedtime:5min.,10min.,20min.,30min.)ifthereisnosignalreceivedbyanyinputorifnooperationisperformed.
NOTE:• The[AUTOPOWEROFF]functionwillnotworkwhen[VIEWER]or[NETWORK]isselectedfor[SOURCE].
Selecting Default Source [DEFAULT SOURCE SELECT]Youcansettheprojectortodefaulttoanyoneofitsinputseachtimetheprojectoristurnedon.
LAST ���������������������� Sets the projector to default to the previous or last active input each time the projector is turned on�AUTO ��������������������� Searches for an active source in order of COMPUTER1 → COMPUTER2 → COMPUTER3 → HDMI →
DisplayPort → VIDEO → VIEWER → COMPUTER1 and displays the first found source�COMPUTER1 ��������� Displays the computer signal from the COMPUTER IN connector every time the projector is turned on�COMPUTER2 ��������� Displays the computer signal from the COMPUTER 2 IN connector every time the projector is turned on�COMPUTER3 ��������� Displays the computer signal from the COMPUTER 3 IN connector every time the projector is turned on�HDMI ��������������������� Displays the digital source from the HDMI IN connector every time the projector is turned on� DisplayPort ������������ Displays the digital source from the DisplayPort every time the projector is turned on� VIDEO �������������������� Displays the Video source from the VIDEO IN connector every time the projector is turned on�VIEWER ����������������� Displays slides or plays back movie files from the USB memory device every time the projector is turned
on�NETWORK ������������� Displays the data sent from the computer via the LAN port (RJ-45) or the wireless LAN unit (sold separately)
mounted on the projector is projected�

112
5. Using On-Screen Menu
Menu Descriptions & Functions [INFO.]Displaysthestatusofthecurrentsignalandlampusage.Thisitemhasninepages.Theinformationincludedisasfollows:
TIP:PressingtheHELPbuttonontheremotecontrolwillshowthe[INFO.]menuitems.
[USAGE TIME]
[LAMPLIFEREMAINING](%)*[LAMPHOURSUSED](H)[FILTERHOURSUSED](H)[TOTALCARBONSAVINGS](kg-CO2)
* Theprogressindicatorshowsthepercentageofremainingbulblife.
Thevalueinformsyouoftheamountoflampusage.Whentheremaininglamptimereaches0,theLAMPLIFEREMAININGbarindicatorchangesfrom0%to100Hoursandstartscountingdown.
Iftheremaininglamptimereaches0hours,theprojectorwillnotturnon.
• ThemessagetotheeffectthatthelamporthefiltersshouldbereplacedwillbedisplayedforoneminutewhentheprojectoristurnedonandwhenthePOWERbuttonontheprojectorortheremotecontrolispressed.
Todismissthismessage,pressanybuttonontheprojectorortheremotecontrol.
Lamplife(H)
Replacement lampECO MODENORMAL
(OFF)ECO(ON)
3000 4000 NP26LP
• [TOTALCARBONSAVINGS]
Thisdisplaystheestimatedcarbonsavinginformationinkg.Thecarbonfootprintfactorinthecarbonsavingcal-culationisbasedontheOECD(2008Edition).(→page29)

113
5. Using On-Screen Menu
[SOURCE(1)]
INPUTTERMINAL RESOLUTIONHORIZONTALFREQUENCY VERTICAL FREQUENCYSYNCTYPE SYNC POLARITYSCANTYPE SOURCE NAMEENTRYNO.
[SOURCE(2)]
SIGNALTYPE VIDEOTYPEBITDEPTH VIDEOLEVELLINKRATE LINKLANE
[WIRED LAN]
IPADDRESS SUBNETMASKGATEWAY MACADDRESS

114
5. Using On-Screen Menu
[WIRELESS LAN(1)]
IPADDRESS SUBNETMASKGATEWAY MACADDRESS
[WIRELESS LAN(2)]
SSID NETWORKTYPEWEP/WPA CHANNELSIGNALLEVEL
[VERSION(1)]
FIRMWARE DATAFIRMWARE2 SUB-CPU
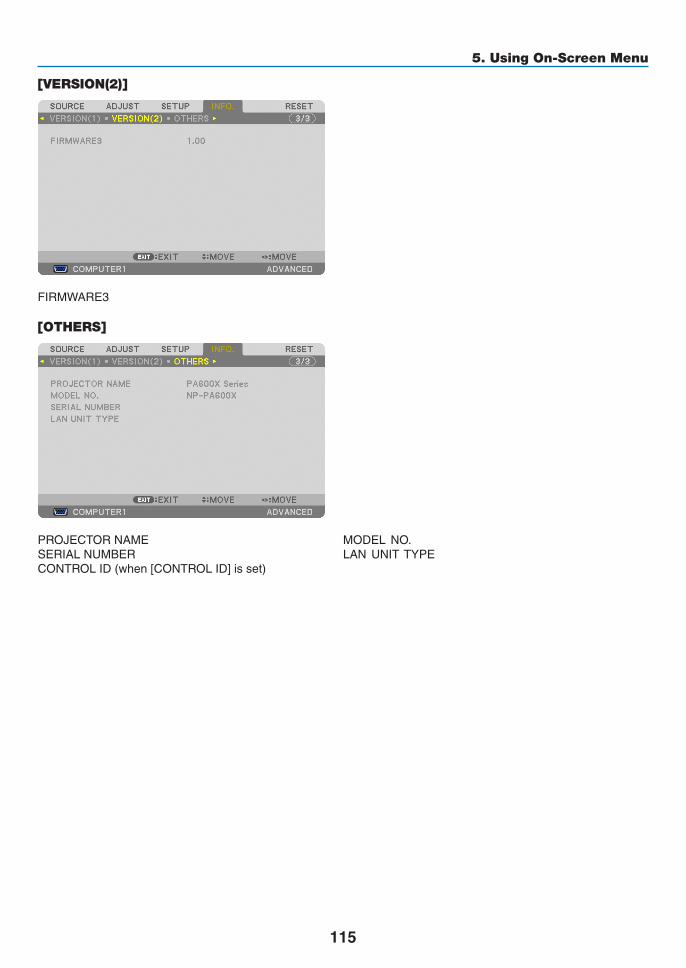
115
5. Using On-Screen Menu
[VERSION(2)]
FIRMWARE3
[OTHERS]
PROJECTORNAME MODELNO.SERIALNUMBER LANUNITTYPECONTROLID(when[CONTROLID]isset)

116
5. Using On-Screen Menu
Menu Descriptions & Functions [RESET]
Returning to Factory Default [RESET]TheRESETfeatureallowsyoutochangeadjustmentsandsettingstothefactorypresetfora(all)source(s)exceptthefollowing:
[CURRENTSIGNAL]Resetstheadjustmentsforthecurrentsignaltothefactorypresetlevels.Theitemsthatcanberesetare:[PRESET],[CONTRAST],[BRIGHTNESS],[COLOR],[HUE],[SHARPNESS],[ASPECTRATIO],[HORIZONTAL],[VERTICAL],[CLOCK],[PHASE],and[OVERSCAN].
[ALLDATA]Resetalltheadjustmentsandsettingsforallthesignalstothefactorypreset.AllitemscanberesetEXCEPT[LANGUAGE],[BACKGROUND],[FILTERMESSAGE],[SCREEN],[GEOMETRICCORRECTION], [MULTI-SCREENCOMP.], [REF.WHITEBALANCE], [STATICCONVERGENCE], [CONTROLPANELLOCK],[SECURITY],[COMMUNICATIONSPEED],[CONTROLID],[SEAMLESSSWITCHING],[STANDBYMODE], [FAN MODE], [LAMPLIFEREMAINING], [LAMPHOURSUSED], [FILTERHOURSUSED], [TOTALCARBONSAVINGS],[WIREDLAN],and[WIRELESSLAN].Toresetthelampusagetime,see“ClearingLampHourMeter[CLEARLAMPHOURS]”below.
[ALLDATA(INCLUDINGENTRYLIST)]Resetalltheadjustmentsandsettingsforallthesignalstothefactorypresetexcept[LANGUAGE],[BACKGROUND],[FILTERMESSAGE],[SCREEN],[MULTI-SCREENCOMP.],[REF.WHITEBALANCE],[STATICCONVERGENCE],[CONTROL PANEL LOCK], [SEAMLESS SWITCHING], [SECURITY SETTINGS], [COMMUNICATION SPEED],[CONTROLID],[FANMODE],[LAMPLIFEREMAINING],[LAMPHOURSUSED],[FILTERHOURSUSED],[TOTALCARBONSAVINGS],[WIREDLAN],and[WIRELESSLAN].Alsodeletesallthesignalsinthe[ENTRYLIST]andreturnstothefactorypreset.
NOTE:LockedsignalsinEntryListcannotbereset.
Clearing Lamp Hour Meter [CLEAR LAMP HOURS]Resetsthelampclockbacktozero.Selectingthisoptiondisplayssubmenuforaconfirmation.Select[YES]andpresstheENTERbutton.
NOTE:Elapsedtimeofthelampusewillnotbeaffectedevenwhen[RESET]isdonefromthemenu.
NOTE:Theprojectorwillturnoffandgointostandbymodewhenyoucontinuetousetheprojectorforanother100hoursafterthelamphasreachedtheendofitslife.Inthisconditionyoucannotclearthelamphourmeteronthemenu.Ifthishappens,presstheHELPbuttonontheremotecontrolfor10secondstoresetthelampclockbacktozero.Dothisonlyafterreplacingthelamp.

117
5. Using On-Screen Menu
Clearing the Filter Usage Hours [CLEAR FILTER HOURS]Resetsthefilterusagebacktozero.Selectingthisoptiondisplayssubmenuforaconfirmation.Select[YES]andpresstheENTERbutton.
The[OFF]itemisselectedfor[FILTERMESSAGE]atthetimeofshipment.When[OFF]isselected,youdonotneedtoclearthefilterusagehour.
NOTE:Elapsedtimeofthefilterusewillnotbeaffectedevenwhen[RESET]isdonefromthemenu.

118
5. Using On-Screen Menu
❾ Application MenuWhen[NETWORK]isselectedfromthe[SOURCE]menu,theapplicationmenu[APPLICATIONMENU]willbedis-played.TheapplicationmenuallowsyoutosetuptheUserSupportware,NetworkSettings(NETWORKSETTINGS)andTools(TOOLS).TheUserSupportwareiscontainedonthesuppliedNECProjectorCD-ROM.In[ADMINISTRATORMODE],either[ADVANCED]menuor[BASIC]menucanbeselected.(→page136)The[BASIC]menucontainsminimumessentialsofmenusandcommands.
IMAGE EXPRESS UTILITYThisshowsinformationforprojectorname,resolution,andnetwork(wired/wireless)whicharerequiredtouseImageExpressUtility.Usethisinformationtosetupforyourcomputer.
DESKTOP CONTROL UTILITYThisallowsyoutosetupforpasswordentry/deletion,computersearchingandIPaddressonnetwork(wired/wireless)whicharerequiredtouseDesktopControlUtility.

119
5. Using On-Screen Menu
NETWORK PROJECTORThisshowsinformationforprojectorname,resolution,andnetwork(wired/wireless)whicharerequiredtouseNetworkProjector.Usethisinformationtosetupforyourcomputer.
REMOTE DESKTOP CONNECTIONThisallowsyoutosetupforcomputernameentryandeffectsforRemoteDesktop.
NOTE:• AUSBkeyboardisrequiredtosetuptheRemoteDesktopConnection.

120
5. Using On-Screen Menu
NETWORK SETTINGS
Important:• Consultwithyournetworkadministratoraboutthesesettings.• WhenusingawiredLANconnection,connectaLANcable(Ethernetcable)totheLANport(RJ-45)oftheprojector.(→page
150)
TIP:Thenetworksettingsyoumakewillnotbeaffectedevenwhen[RESET]isdonefromthemenu.
Hints on How to Set Up LAN Connection
TosetuptheprojectorforaLANconnection:Select[WIREDLAN]or[WIRELESSLAN]→[PROFILES]→[PROFILE1]or[PROFILE2].TwosettingscanbesetforwiredorwirelessLAN.Nextturnonorofffor[DHCP],[IPADDRESS],[SUBNETMASK],and[GATEWAY]andselect[OK]andpresstheENTERbutton.(→page121)TorecallLANsettingsstoredintheprofilenumber:Select[PROFILE1]or[PROFILE2]forwiredorwirelessLAN,andthenselect[OK]andpresstheENTERbutton.(→page121)To connect a DHCP server:Turnon[DHCP]forwiredorwirelessLAN.Select[ON]andpresstheENTERbutton.TospecifyIPaddresswithoutusingtheDHCPserver,turnoff[DHCP].(→page122)
TosetonlyforwirelessLAN(NETWORKTYPEandWEP/WPA):Select[PROFILE1]or[PROFILE2]forwirelessLAN,andthenselect[ADVANCED]and[OK]andpresstheENTERbutton.TheAdvancedmenuwillbedisplayed.(→page123)To select an SSID:Select[ADVANCED]→[SITESURVEY]andpresstheENTERbutton.SelectanSSIDandpressthe>buttontoselect[OK]andpresstheENTERbutton.Ifyoudonotuse[SITESURVEY],typetheSSIDandselect[INFRASTRUCTURE]or[ADHOC].(→page123)To receive lamp replacement time or error messages via e-mail:Select[ALERTMAIL],andset[SENDER'SADDRESS],[SMTPSERVERNAME],and[RECIPIENT'SADDRESS].Last,select[OK]andpresstheENTERbutton.(→page134)Toexecute[EASYCONNECTION]usingImageExpressUtility2.0orImageExpressUtility2forMac:The[EASYCONNECTION]isamodethatcanabbreviatethetroublesomeLANsettingswhenusingtheImageExpressUtilityandconnectingthePCandprojectorviaawirelessLAN.TheImageExpressUtilityLite,ImageExpressUtility2.0,andImageExpressUtility2forMacarecontainedonthesuppliedNECProjectorCD-ROM.Touse[EASYCONNECTION],select[WIRELESSLAN]→[PROFILES]→[EASYCONNECTION].NOTE:The[EASYCONNECTION]functionisavailableonWindows7,WindowsVistaorWindowsXPSP3.

121
5. Using On-Screen Menu
WIREDLANorWIRELESSLAN(ADVANCEDmenuonly)
*TousethewirelessLANfunctions,connectaseparatelysoldwirelessLANunittotheprojector.(→page151)
PROFILES • UptotwosettingsfortheLANportorUSBwirelessLANunitcanbestoredinmemoryoftheprojector.Totaloffoursettingscanbestored.
Fivesettingscanbestored:twoforthebuilt-inLANport,twoforwirelessLANandoneforWPS.
• Select[PROFILE1]or[PROFILE2]andthendosettingsfor[DHCP]andtheotheroptions.
Afterdoingthis,select[OK]andpresstheENTERbutton.Thiswillstoreyoursettingsinmemory.
• Torecallthesettingsfrommemory: Afterselecting[PROFILE1]or[PROFILE2]fromthe[PRO-
FILES]list. Select[OK]andpresstheENTERbutton.• Toexecute[EASYCONNECTION]usingImageExpressUtility
2.0orImageExpressUtility2forMac,select[WIRELESSLAN]→[PROFILES]→[EASYCONNECTION].
• TostopemittingradiowavesfromtheUSBWirelessLANUnit,select[DISABLE]fromthe[PROFILES]list.
• Selecting[SIMPLEACCESSPOINT]willallowtheprojectortocreateaninfrastructurenetwork.
AnSSIDwillbeautomaticallycreated. WhentheIPaddressoftheprojectorischanged,itwillauto-
maticallytakeeffectinoneortwominutes. Select“ObtainanIPAddressAutomatically”tosettheIPad-
dressofaconnectedcomputer. Ittakesafewsecondsforachangeofyourcomputer’sIPad-
dresstocomeintoeffectinWindows7/WindowsVistawhileittakesoneortwominutesinWindowXP.
When you connect with your computer to save your profileandselect“Automaticallyconnectwhenwithinrange”fromthePropertiestabofWirelessNetworkinWindowsforyourselectedprofile,yourwirelessLANwillbeaccessedunderthefollowingconditions:• atthetimeofturningonthecomputerortheprojector• whenthenotebooktypeiswithintherangeoftheprojector’s
wirelessLANcanbeachieved. DatatransmissionbetweenwirelessLANandwiredLANisnot
possible. Whenthe[SIMPLEACCESSPOINT]modeisusedtosend
images,itisrecommendedtoconnecttoonlyonecomputer.
—

122
5. Using On-Screen Menu
• Whenselecting[WPS],thenetworkwillbeconnectedbyusingsettingsstoredautomaticallywiththeWPSfunction.
Selecting[WPS]willallowtheprojectortoaccessthenetworkbyusingthesettingstheWPSfunctionautomaticallystored.
DHCP PlaceacheckmarktoautomaticallyassignanIPaddresstotheprojectorfromyourDHCPserver.ClearthischeckboxtoregistertheIPaddressorsubnetmasknumberobtainedfromyournetworkadministrator.
—
IPADDRESS SetyourIPaddressofthenetworkconnectedtotheprojectorwhen[DHCP]isturnedoff.
Upto12numericcharacters
SUBNETMASK Setyoursubnetmasknumberofthenetworkconnectedtotheprojectorwhen[DHCP]isturnedoff.
Upto12numericcharacters
GATEWAY Setthedefaultgatewayofthenetworkconnectedtotheprojectorwhen[DHCP]isturnedoff.
Upto12numericcharacters
WNSCONFIGURA-TION
SettheIPaddressofyourWINSserverofthenetworkconnectedtotheprojectorwhen[DHCP]isturnedoff.
Upto12numericcharacters
AUTODNS PlaceacheckmarktoautomaticallyassigntheIPaddressofyourDNSserverconnectedtotheprojectorfromyourDHCPserver.ClearthischeckboxtosettheIPaddressofyourDNSserverconnectedtotheprojector.
Upto12numericcharacters
DNSCONFIGURA-TION
SettheIPaddressofyourDNSserveronthenetworkconnectedtotheprojectorwhen[AUTODNS]iscleared.
Upto12numericcharacters
ADVANCED* ThismenuallowsyoutosetvariousitemsforyourwirelessLANconnection(networktype,security).
—
RECONNECT Retrytoconnecttheprojectortoanetwork.Trythisifyouhavechanged[PROFILES].
—
*The[ADVANCED]settingscreenisavailablefor[WIRELESSLAN]only.
NOTE:• Ifyouselect[EASYCONNECTION]from[PROFILES],youcannotmakesettingstoDHCPanditsfollowingitemsexcept[CHAN-
NEL]in[ADVANCED]. AdvancedSettings(settingsonlyrequiredwhenusingaseparatelysoldwirelessLANunit)(AD-(AD-VANCEDmenuonly)

123
5. Using On-Screen Menu
SITESURVEY DisplaysalistofavailableSSIDsforwirelessLANonsite.SelectanSSIDwhichyoucanaccess.ToselectanSSID,highlight[SSID]andusethetoselect[OK]andpresstheENTERbutton.
����������������������� Wireless access point
����������������������� Ad Hoc PC
����������������������� WEP or WPA enabled
—
SECURITY Thiswillturnonorofftheencryptionmodeforsecuretransmis-sion.Touseencryption,specifyaWEPkeyorencryptionkey.Selectyoursecuritytypeappropriateforyourcomputerandthewire-lessLANunit.
DISABLE ���������������� Will not turn on the encryption feature� Your com-munications may be monitored by someone�
WEP(64bit) ������������ Uses 64-bit datalength for secure transmis-sion�
WEP(128bit) ���������� Uses 128-bit datalength for secure transmission� This option will increase privacy and security when compared to use of 64-bit datalength en-cryption�
WPA-PSK/WPA2-PSK/WPA-EAP/WPA2-EAP ������������������������������ These options provide stronger security than
WEP�
NOTE:• Thesecuritytype,WEPkey,andencryptionkeysettingsmustbethe
sameascommunicationdevicessuchasPCoraccesspointinyourwirelessnetwork.
• Whenyouuse[SECURITY],yourimagetransmissionspeedwillslowdown.
• [WPA-PSK],[WPA-EAP],[WPA2-PSK]and[WPA2-EAP]arenotavail-ablewhen[ADHOC]isselectedfrom[NETWORKTYPE].
—
SSID Enteranidentifier(SSID)forwirelessLAN.CommunicationcanbedoneonlywithequipmentwhoseSSIDmatchesSSIDforyourwirelessLAN.
Upto32alphanumericcharacters(casesensitive).
NETWORKTYPE SelectcommunicationmethodwhenusingwirelessLAN.
INFRASTRUCTURE ���Select this option when communicating with one or more equipment connected to the wire-less or wired LAN network via a wireless access point�
AD HOC ��������������������Select this option when using the wireless LAN to directly communicate with a computer in peer-to-peer mode�
—
CHANNEL Select a channel. Available channels vary depending on thecountryandregion.Whenyouselect[INFRASTRUCTURE],makesurethattheprojectorandyouraccesspointareonthesamechannel;whenyouselect[ADHOC],makesurethattheprojectorandyourcomputerareonthesamechannel.
—

124
5. Using On-Screen Menu
When[WEP(64bit)]or[WEP(128bit)]isselectedfor[SECURITYTYPE]
KEYSELECT SelectsoneWEPkeyfromthefourkeysbelow.
KEY1,KEY2,KEY3,KEY4
EnteraWEPkey.•Maximumnumberofcharacters
Option Alphanumeric(ASCII) Hexadecimal(HEX)
WEP64bit 5 10
WEP128bit 13 26
When[WPA-PSK],[WPA-EAP],[WPA2-PSK],or[WPA2-EAP]isselectedfor[SECURITYTYPE]
ENCRYPTIONTYPE Select[TKIP]or[AES].
KEY Enterencryptionkey.Keylengthmustbe8orgreaterand63orless.

125
5. Using On-Screen Menu
[AUTHENTICATION](requiredforwirelessonly)SettingisrequiredforusingWPA-EAPorWPA2-EAP.
PreparationbeforesettingSelectawirelessLANcompliantWPA-EAPorWPA2-EAPauthenticationandinstalladigitalcertificateontheprojec-tor.
1. Set[DATEANDTIME]ontheprojector.(→ page 140)
2. Use a computer to save digital certificates (files) for WPA-EAP or WPA2-EAP setting to your USB memory device.
After completing saving the file, remove the USB memory device from the computer.
Important:• ThefileformatsofdigitalcertificatethataresupportedbytheprojectorareDERandPKCS#12only.• Theprojectorcannothandleanydigitalcertificatewhosefilesizeexceeds8KB.• CRL(CertificateRelocationList)isnotsupported.• Clientcertificatechainisnotsupported. 3. Plug the USB memory device into the USB port of the projector.
Setting Procedures1. Select[NETWORKSETTINGS]→[WIRELESSSLAN].
2. SetitemssuchasPROFILES,DHCP,IPADDRESS,SUBNETMASKandothersasrequired.
• Select[PROFILE1]or[PROFILE2]for[PROFILES].If[EASYCONNECTION]isselected,WPA-PSK,WPA2-PSK, WPA-EAP, or WPA2-EAP is not available.
3. Select[ADVANCED]andpresstheENTERbutton.
The [ADVANCED] setting screen will be displayed.

126
5. Using On-Screen Menu
4. Select[SITESURVEY]andpresstheENTERbutton.
The “SSID” list will be displayed.
5. SelectaconnectingSSID,andthenselect[OK].
Finally press the ENTER button.
• SelecttheSSIDforwhichWPA-PSKorWPA2-PSKisset.
• Select[INFRASTRUCTURE( )] for [NETWORK TYPE]. WPA-PSK, WPA2-PSK, WPA-EAP, or WPA2-EAP is not available when [AD HOC ( )] is selected.
6. Selectthe[SECURITY]tab.
The [SECURITY] page will be displayed.
7. Selectthe[SECURITYTYPE]fieldandpresstheENTERbutton.
The pull-down list will be displayed.
8. Select[WPA-EAP]or[WPA2-EAP]andpresstheENTERbutton.
9. Selectthe[TKIP/AES]fieldandpresstheENTERbutton.
The pull-down list will be displayed.
10.Select[TKIP]or[AES]andpresstheENTERbutton.
Select [TKIP] or [AES] according to the setting for your access point.

127
5. Using On-Screen Menu
11.Selectthe[AUTHENTICATION]tab.
The [AUTHENTICATION] page will be displayed.
Select either [EAP-TLS] or [PEAP-MSCHAPv2] for [EAP TYPE]. The setting items vary depending on the EAP type.
See the table below.
EAPType SettingItem Note
EAP-TLS UserName 1characterormoreand32charactersorless
ClientCertificate PKCS#12formatfile
CACertificate(Certificateauthority’scertificate)
DERformatfile
PEAP-MSCHAPv2 UserName 1characterormoreand32charactersorless
Password 1characterormoreand32charactersorless
CACertificate(Certificateauthority’scertificate)
DERformatfile
① Selecting [EAP-TLS] for [EAP TYPE]: The following section explains the operation for selecting [EAP-TLS].
For selecting [PEAP-MSCHAPv2], go on to Step 12 on page 129.
12.Selectthe[USERNAME]fieldandpresstheENTERbutton.
The character entry screen (software keyboard) will be displayed. Set a user name.
• Ausernamemustbe1characterormoreand32charactersorless.
(→ page 131)

128
5. Using On-Screen Menu
13.Select[CLIENTCERTIFICATE]andpresstheENTERbutton.
A list of files (thumbnail screen) will be displayed.
• Foroperatingthethumbnailscreen,see“4.UsingtheViewer”inthe“User’sManual”(PDF).
• Toreturntothe[AUTHENTICATION]page,presstheEXITbutton.
NOTE:Installing a digital certificateYoucaninstalleachdigitalcertificate(clientcertificateandCAcertificate)for[PROFILE1(or2)]onafile-by-filebasis.• InstallarootCAcertificateforaCAcertificate.• Ifyouinstalladigitalcertificateoveryourexistingdigitalcertificate,theexistingdigitalcertificatewillbeoverwrittenwiththenew
digitalcertificate.• Onceadigitalcertificatehasbeeninstalled,itsinformationcannotbedeletedevenifyoustopsettingWPA-EAPorWPA2-EAP.
14.Onthethumbnailscreen,selectadigitalcertificate(PKCS#12formatfile)savedinyourUSBmemorydeviceand press the ENTER button.
The password screen will be displayed.
15.Select[PASSWORD]fieldandpresstheENTERbutton.
The character entry screen (software keyboard) will be displayed. Set the password of the private key. A password must be 1 character or more and 32 characters or less.
The selected digital certificate file will be installed on the projector.
• WhentherootCAcertificateisnotincludedinthefilethatwasselectedinStep14,proceedtoStep16.Whenthe root certification authority certificate is included, proceed to Step 18.
16.Select[CACERTIFICATE]andpresstheENTERbutton.
The drive list screen will be displayed.

129
5. Using On-Screen Menu
17. On the thumbnail screen, select a digital certificate (DER format file) saved in your USB memory device and press the ENTER button.
• SelectyourrootCAcertificatehere.
The selected digital certificate will be installed on the projector.
18.Aftercompletingrequiredsettings,select[OK]andpresstheENTERbutton.
The [WIRELESS] page will be returned.
19.Select[RECONNECT]andpresstheENTERbutton.
20.Select[OK]andpresstheENTERbutton.
Thiswillcompletesetting[EAP-TLS]for[EAPTYPE]in[WPA-EAP]or[WPA2-EAP].
TIP:ClearingthedigitalcertificatethatisinstalledontheprojectorToclearthedigitalcertificateinstalledontheprojector,followthestepsbelow.Bydoingthefollowingprocedure,allthedigitalcertificatesforthecurrentlydisplayedprofilewillbecleared.1. Select [CLEAR CERTIFICATES] in the bottom left of the [AD-
VANCED]settingscreenandpresstheENTERbutton.
A message for confirmation will be displayed.
2. Select[YES]andpresstheENTERbutton.
The digital certificates will be cleared.
TIP:• ThePKCS#12formatdigitalcertificateincludingaCAcertificatewillbeinstalledasarootCAcertificate.
② Selecting [PEAP-MSCHAPv2] for [EAP TYPE]:
12.Fromthe[AUTHENTICATION]page,select[EAPTYPE]fieldandpresstheENTERbutton.
The pull-down list will be displayed.
13.Select[PEAP-MSCHAPv2]andpresstheENTERbutton.
14.Select[USERNAME]fieldandpresstheENTERbutton.
The character entry screen (software keyboard) will be displayed. Set a user name.
• Ausernamemustbe32charactersorless.
(→ page 131)

130
5. Using On-Screen Menu
15.Aftercompletingsettingausername,selectthe[PASSWORD]fieldandpresstheENTERbutton.
The character entry screen (software keyboard) will be displayed. Set a password.
• Apasswordmustbe32charactersorless.
16.Aftercompletingsettingthepassword,select[CACERTIFICATE]fieldandpresstheENTERbutton.
The drive list screen will be displayed.
• Foroperatingthethumbnailscreen,see“4.UsingtheViewer”inthe“User’sManual”(PDF).
• Toreturntothe[AUTHENTICATION]page,presstheEXITbutton.
NOTE:Installing a digital certificateYoucan installeachdigitalcertificate(clientcertificateandCAcertificate) for [PROFILE1(or2)]onafile-by-filebasis.• InstallarootCAcertificateforaCAcertificate.• Ifyouinstalladigitalcertificateoveryourexistingdigitalcertificate,theexistingdigitalcertificatewillbeoverwrittenwiththenew
digitalcertificate.• Onceadigitalcertificatehasbeeninstalled,itsinformationcannotbedeletedevenifyoustopsettingWPA-EAPorWPA2-EAP.
17. On the thumbnail screen, select a digital certificate (DER format file) saved in your USB memory device and press the ENTER button.
• SelectyourrootCAcertificatehere.
The selected digital certificate will be installed on the projector.

131
5. Using On-Screen Menu
18.Aftercompletingrequiredsettings,select[OK]andpresstheENTERbutton.
The [WIRELESS] page will be returned.
19.Select[RECONNECT]andpresstheENTERbutton.
20.Select[OK]andpresstheENTERbutton.
Thiswillcompletesetting[PEAP-MSCHAPv2]for[EAPTYPE]in[WPA-EAP]or[WPA2-EAP].
TIP:ClearingthedigitalcertificatethatisinstalledontheprojectorToclearthedigitalcertificateinstalledontheprojector,followthestepsbelow.Bydoingthefollowingprocedure,allthedigitalcertificatesforthecurrentlydisplayedprofilewillbecleared.1. Select [CLEAR CERTIFICATES] in the bottom left of the [AD-
VANCED]settingscreenandpresstheENTERbutton.
A message for confirmation will be displayed.
2. Select[YES]andpresstheENTERbutton.
The digital certificates will be cleared.
TIP:EnteringWEPkeys(SwitchingbetweenAlphanumericcharactersandhexadecimal)Toenterfrom[KEY1]to[KEY4],dothefollowing:1. Selectoneof[KEY1],[KEY2],[KEY3]and[KEY4]andpresstheENTERbutton.
The character entry screen (software keyboard) will be displayed.
2. Use the ▼, ▲, ◀, or ▶ button to select a character and press the ENTER button.
• ToenteraWEPkeyorpassphrase,usealphanumericcharacters(ASCII)orhexadecimal(HEX).ToenteraPSKkey, use alphanumeric characters (ASCII).
• Pressthe[HEX]buttontochangeto[ASCII]tosetthekeyinASCIIdigit.Youcantogglethisbuttonbetween[ASCII] and [HEX].
• Enter0x(numeralandalphabetrespectively)rightinfrontofyourkeycode.
• Hexadecimaluses0to9andAtoF.
3. After entering your WEP key or passphrase, use the ▼, ▲, ◀, or ▶buttontoselect[OK]andpresstheENTERbutton.
The character entry screen (software keyboard) will be closed.

132
5. Using On-Screen Menu
WPSWhenthewirelessLANaccesspointconnectedtotheprojectorsupportsWPS(Wi-FiProtectedSetupTM),youcanusePINmethodorpushbuttonmethodtosetupthewirelessLANfortheprojector.
PINTYPE Seta4-digitor8digit-PINcodeofWPSforyouraccesspointtocompletesettingfortheSSIDsecurity.
PUSHBUTTONTYPE Pressthededicatedbuttonoftheaccesspointandtheprojector’swirelessLANunittocompletesettingfortheSSIDsecurity.
NETWORKINFORMATIONThe following informationwillbedisplayedwhen theprojector isconnected toanetwork (wiredLANorwirelessLAN).
PROJECTORNAME
HOSTNAME
DOMAIN
NETWORKINFOR-MATION(WIREDLAN/WIRELESSLAN)
CONNECTIONSTATUS,IPADDRESS,SUBNETMASK,GATEWAY,WINS,DNS,MACADDRESS,SSID,NETWORKTYPE,WEP/WPA,CHANNEL,SIGNALLEVEL,AU-THENTICATION,AUTHENTICATIONPERIOD
DISPLAYTHEINFOR-MATIONINAPPLICA-TIONMENU
Turnonoroffthedisplayofthenetworkinformation.
Themeaningsofthesestatusstatementsaredescribedbelow.
Statement Authenticationstatus
Authenticated Authenticationisdonecorrectly.
Failure Authenticationfailed.
Authenticating… Authenticationisinprocess.
Expired Thedigitalcertificateisexpired.Or[DATE,TIMEPRESET]isnotsetcorrectly.
TimeError The[DATE,TIMEPRESET]hasbeencleared.Setthecorrectdateandtime.

133
5. Using On-Screen Menu
PROJECTORNAME(ADVANCEDmenuonly)
PROJECTORNAME Setauniqueprojectorname. Upto16alphanu-mericcharactersandsymbols
DOMAIN(ADVANCEDmenuonly)Setahostnameanddomainnameoftheprojector.
HOSTNAME Setahostnameoftheprojector. Upto15alphanumericcharacters
DOMAINNAME Setadomainnameoftheprojector. Upto60alphanumericcharacters

134
5. Using On-Screen Menu
ALERTMAIL(ADVANCEDmenuonly)
ALERTMAIL Thisoptionwillnotifyyourcomputeroflampreplacetimeorerrormessagesviae-mailwhenusingwirelessorwiredLAN.
Placing a checkmark will turn on the Alert Mail feature�Clearing a checkmark will turn off the Alert Mail feature�
Sampleofamessagetobesentfromtheprojector:
Thelampandfiltersareat theendof itsusable life.Pleasereplacethelampandfilters.ProjectorName:NECProjectorLampHoursUsed:100[H]
—
HOSTNAME Typeinahostname. Upto15alphanumericcharacters
DOMAINNAME Typeinadomainnameofthenetworkconnectedtotheprojec-tor.
Upto60alphanumericcharacters
SENDER'SAD-DRESS
Specifythesender’saddress. Upto60alphanu-mericcharactersandsymbols
SMTPSERVERNAME
TypeintheSMTPservernametobeconnectedtotheprojec-tor.
Upto60alphanumericcharacters
RECIPIENT'SAD-DRESS1,2,3
Typeinyourrecipient’saddress. Upto60alphanu-mericcharactersandsymbols
TESTMAIL Sendatestmailtocheckifyoursettingsarecorrect.NOTE:• Ifyouenteredanincorrectaddressinatest,youmaynotreceivean
Alert mail. Should this happen, check if the Recipient’s Address iscorrectlyset.
• Unless any one of the [SENDER'S ADDRESS], [SMTP SERVER'SNAME]or[RECIPIENT'SADDRESS1-3]isselected,[TESTMAIL]isnotavailable.
• Besuretohighlight[OK]andpresstheENTERbuttonbeforeexecuting[TESTMAIL].
—

135
5. Using On-Screen Menu
NETWORKSERVICE(ADVANCEDmenuonly)
HTTPSERVER SetapasswordforyourHTTPserver. Upto10alphanumericcharacters
PJLink This option allows you to set a password when you use thePJLinkfeature.NOTE:• Donotforgetyourpassword.However,ifyouforgetyourpassword,
consultwithyourdealer.• WhatisPJLink? PJLinkisastandardizationofprotocolusedforcontrollingprojectors
ofdifferentmanufacturers.Thisstandardprotocol isestablishedbyJapanBusinessMachineandInformationSystemIndustriesAssocia-tion(JBMIA)in2005.
TheprojectorsupportsallthecommandsofPJLinkClass1.• SettingofPJLinkwillnotbeaffectedevenwhen[RESET]isdonefrom
themenu.
Upto32alphanumericcharacters
AMX Turnonoroff fordetection fromAMXDeviceDiscoverywhenconnectingtothenetworksupportedbyAMX’sNetLinxcontrolsystem.
TIP:WhenusingadevicethatsupportsAMXDeviceDiscovery,allAMXNetLinxcontrolsystemwillrecognizethedeviceanddownloadtheappropriateDeviceDiscoveryModulefromanAMXserver.
Placing a checkmark will enable detecting the projector from AMX Device Discovery�Clearing a checkmark will disable detecting the projector from AMX Device Discovery�
—

136
5. Using On-Screen Menu
TOOLS
ADMINISTRATOR MODEThisallowsyoutoselectMENUMODE,savesettings,andsetapasswordfortheadministratormode.
MENUMODE Selecteither[BASIC]or[ADVANCED]menu.(→page84)
—
NOTSAVESETTINGVALUES
Placing a check mark will not save your projector settings�Clear this check box to save your projector settings�
—
NEWPASSWORD/CONFIRMPASS-WORD
Assignapasswordfortheadministratormode. Upto10alphanumericcharacters
NOTE:When[LAST]isselectedfor[DEFAULTSOURCESELECT],placingacheckmarkfor[NOTSAVESETTINGVALUES]willforciblyselectNETWORKforsourceateverypower-ontime.Toavoidthis,select[AUTO]for[DEFAULTSOURCESELECT].
TIP:ToreturntotheADVANCEDmenufromtheBASICmenu,dothefollowing:1. UsetheSOURCEbuttononthecabinetorpresstheNETWORKbuttonontheremotecontroltoselect
[NETWORK]todisplaytheAPPLICATIONMENU.
2. Select[TOOLS]→[ADMINISTRATORMODE]→[MENUMODE]→[ADVANCEDMODE].

137
5. Using On-Screen Menu
PROGRAM TIMER
Thisoptionturnson/offtheprojectorandchangesvideosignals,andselectsECOmodeautomaticallyataspecifiedtime.
NOTE:• Beforeusing[PROGRAMTIMER],makesurethatthe[DATEANDTIME]featureisset.(→page140)• MakesurethattheprojectorisinthestandbyconditionwiththePOWERcordconnected.• Theprojectorhasabuilt-inclock.Theclockwillkeepworkingforabouttwoweeksafterthemainpoweristurnedoff.Ifthemain
powerisnotsuppliedtotheprojectorfortwoweeksormore,thebuilt-inclockstopsworking.• When[PROGRAMTIMER]isenabled,the[STANDBYMODE]settingbecomesinvalid. Thismeansthattheprojectorisinthesameconditionwhenthe[NORMAL]isselectedfor[STANDBYMODE].
Setting a new program timer1. On the PROGRAM TIMER screen, use the ▲ or ▼buttontoselect[SETTINGS]andpresstheENTERbut-
ton.
The [PROGRAM LIST] screen will be displayed.
2. Select a blank program number and press the ENTER button.
The [EDIT] screen will be displayed.
3. Make settings for each item as required.
ACTIVE ������������������ Place a check mark to enable the program�

138
5. Using On-Screen Menu
DAY ������������������������ Select days of the week for the program timer� To execute the program from Monday to Friday, select [MON-FRI]�To execute the program in everyday basis, select [EVERYDAY]�
TIME ���������������������� Set the time to execute the program� Enter time in 24-hour format�FUNCTION ������������� Select a function to be executed� Selecting [POWER] will allow you to turn on or off the projector by setting
[ADVANCED SETTINGS]� Selecting [SOURCE] will allow you to select a video source by setting [ADVANCED SETTINGS]� Selecting [ECO MODE] will allow you to select [ECO MODE] by setting [ADVANCED SET-TINGS]�
ADVANCED SETTINGS ������������������������������ Select power on/off, a type of video source, or ECO MODE for the selected item in [FUNCTION]�REPEAT ������������������ Place a check mark to repeat the program continuing basis� To use the program this week only, clear the
check mark�4. Select[OK]andpresstheENTERbutton.
This will complete the settings.
You will be returned to the [PROGRAM LIST] screen.
5. Select[BACK]andpresstheENTERbutton.
You will be returned to the [PROGRAM TIMER] screen.
6. Select[OK]andpresstheENTERbutton.
You will be returned to the [TOOLS] screen.
NOTE:• Upto30differenttimersettingscanbeprogrammed.• When[PROGRAMTIMER]isturnedon,the[STANDBYMODE]settingisignored.• TheProgramTimerisexecutedonasettimebasis,notinaprogrambasis.• Oncetheprogramnotmarkedwithacheckin[REPEAT]hasbeenexecuted,thecheckmarkinthe[ACTIVE]checkboxwillbe
clearedautomaticallyandtheprogramwillbedisabled.• Whentheon-timeandtheoff-timesetforthesametime,theoff-timesettingwilltakepreference.• Twodifferentsourcesaresetforthesametime,thelargerprogramnumberwilltakepreference.• Theon-timesettingwillnotbeexecutedwhilethecoolingfansarerunningoranerrorisoccurring.• Iftheoff-timesettingisexpiredundertheconditioninwhichthepoweroffisnotpossible,theoff-timersettingwillnotbeexecuted
untilthepoweroffbecomespossible.• Programsnotmarkedwithacheckmarkin[ACTIVE]ofthe[EDIT]screenwillnotbeexecutedeveniftheProgramTimeris
enabled.• Whentheprojectoristurnedonbyusingtheprogramtimerandifyouwanttoturnofftheprojector,settheoff-timeordoit
manuallysoasnottoleavetheprojectoronforalongperiodoftime.

139
5. Using On-Screen Menu
Activating the program timer
1. Select[ENABLE]onthe[PROGRAMTIMER]screenandpresstheENTERbutton.
The [ENABLE] will be activated.
2. Select[OK]andpresstheENTERbutton.
The [PROGRAM TIMER] screen will be changed to the [TOOL] screen.
NOTE:• Clearing[ENABLE]willdisabletheProgramTimerevenwhenaprogramismarkedwithacheckmarkon[PROGRAMLIST]
screen.• When[ENABLE]isselected,the[PROGRAMLIST]cannotbeedited.Toedittheprograms,select[ENABLE]toturnofftheProgram
Timer.
Changing the programmed settings
1. Onthe[PROGRAMLIST]screen,selectaprogramyouwanttoeditandpresstheENTERbutton.
2. Changethesettingsonthe[EDIT]screen.
3. Select[OK]andpresstheENTERbutton.
The programmed settings will be changed.
You will be returned to the [PROGRAM LIST] screen.
Changing the order of programs
1. Onthe[PROGRAMLIST]screen,selectaprogramwhoseorderyouwanttochangeandpressthe▶ but-ton.
2. Press the ▼ button to select ▲ or ▼.
3. Press the ENTER button a few times to select a row to which you wish to move the program.
The order of the programs will be changed.
Deleting the programs
1. Onthe[PROGRAMLIST]screen,selectaprogramnumberyouwanttodeleteandpressthe▶ button.
2. Press the ▼buttontoselect[DELETE].
3. Press the ENTER button.
The confirmation screen will be displayed.
4. Select[YES]andpresstheENTERbutton.
The program will be deleted.
This will complete deleting the program.

140
5. Using On-Screen Menu
DATE ANDTIME
Youcansetthecurrenttime,month,date,andyear.NOTE:Theprojectorhasabuilt-inclock.Theclockwillkeepworkingforabout2weeksafterthemainpoweristurnedoff.Ifthemainpowerisofffor2weeksormore,thebuilt-inclockwillcease.Ifthebuilt-inclockceases,setthedateandtimeagain.Thebuilt-inclockwillnotceasewhileinthestandbymode.
TIME ZONE SETTINGS �������������� Select your time zone�DATE AND TIME SETTINGS ������ Set your current date (MM/DD/YYYY) and time (HH:MM)� INTERNET TIME SERVER ��������� If you place a check mark, the projector’s built-in clock will be synchronized with an Internet
time server in every 24 hours and at the time of projector’s startup�UPDATE ������������������������������������ Synchronizes the projector’s built-in clock immediately� The UPDATE button is not available
unless the INTERNET TIME SERVER check box is turned on�SUMMER TIME SETTINGS ������� If you place a check mark, the clock for daylight saving will be enabled�
MOUSEThisoptionletsyoutochangeyourUSBmousesettings.ThemousesettingsfeatureisavailableforUSBmouseonly.Choosethesettingsyouwant:
MOUSE BUTTON ���������������������� [RIGHT HAND] or [LEFT HAND]MOUSE SENSITIVITY ��������������� [FAST], [MEDIUM] or [SLOW]

141
6. Connecting to Other Equipment Mounting a lens (sold separately)
Fiveseparatebayonetstylelensescanbeusedwiththisprojector.ThedescriptionsherearefortheNP13ZL(2xzoom)lens.Mountotherlensesinthesamemanner.
NOTE:• Theprojectorandlensesaremadeofprecisionparts.Donotsubjectthemtoshockorexcessiveforces.• Removetheseparatelysoldlenswhenmovingtheprojector.Ifnot,thelenscouldbesubjecttoshockwhiletheprojectorisbeing
moved,damagingthelensandthelensshiftmechanism.• Turnoffthepowerandwaitforthecoolingfantostopbeforemountingorremovingthelens.• Nevertouchthelenssurfacewhiletheprojectorisoperating.• Beverycarefulnottoletdirt,grease,etc.,onthelenssurfaceandnottoscratchthelenssurface.• Performtheseoperationsonaflatsurfaceoverapieceofcloth,etc.,topreventthelensfromgettingscratched.• Whenleavingthelensofftheprojectorforlongperiodsoftime,mountthedustcapontheprojectortopreventdustordirtfrom
gettinginside.• Ifyouhavemultipleprojectors,becarefulofthefollowing:
- WhenmountingalensdesignedexclusivelyforthisprojectorontoanotherprojectorintheNPseries,besuretoremovethelensattachmentbeforemountingthelensontheprojector.Thelenscannotbemountedifitsattachmentison.Forthetypesoflensesthatcanbemountedandinstructionsonremovingthem,seethelense’soperatinginstructions.
- Othertypesoflensescannotbemountedonthisprojector.
Mounting the lens
1. Remove the dust cap from the projector.
2. Remove the lens cap on the back of the lens.
3. Insert the lens onto the projector with the yellow-marked protrusion on the lens facing upwards.
There is a positioning slit on the projector’s lens insertion slot. Insert the lens slowly all the way in, keeping the positioning slit at the same angle.
Guiding notch
Yellow mark

142
4. Turn the lens clockwise.
Turn until a click is heard.
The lens is now fastened onto the projector.
TIP:MountingthelenstheftpreventionscrewFastenthelenstheftpreventionscrewincludedwiththeprojectortothebottomoftheprojectorsothatthelenscannotberemovedeasily.
Removing the lens
1. While pressing the lens release button on the projector’s front panel fully in, turn the lens counterclockwise.
The lens comes off.
NOTE: If the lens cannot be removed when the lens releasebuttonispressed,checkwhetherthelenstheftpreventionscrewismounted.
2. Slowly pull the lens off the projector.
- After removing the lens, mount the lens caps (front and back) included with the lens before storing the lens.
- If no lens is going to be mounted on the projector, mount the dust cap included with the projector.

143
6. Installation and Connections
COMPUTER IN
BNC IN
AUDIO IN
AUDIO IN
Computer cable (VGA) (supplied)To mini D-Sub 15-pin connector on the projector. It is recommended that you use a commercially available distribution amplifier if connecting a signal cable longer than the cable supplied.
NOTE:ForMacintosh,useacommerciallyavail-ablepinadapter(notsupplied)toconnecttoyourMac’svideoport.
Stereo mini-plug audio cable (not supplied)
RGB - to - BNC cable (not supplied)
Stereo mini-plug audio cable (not supplied)
Making ConnectionsTheprojector can be connected to a computer using the computer cable (included), aBNC cable (5-core type)(commerciallyavailable),HDMIcable(commerciallyavailable)orDisplayPortcable(commerciallyavailable).
Analog RGB signal connection
• Connecttheincludedcomputercablebetweenthecomputer’sdisplayoutputconnector(miniD-Sub15-pin)andtheprojector’sComputer1orComputer2videoinputconnector.
• Whenconnectingthecomputer’sdisplayoutputconnector(miniD-Sub15-pin)andtheprojector’sComputer3videoinputconnector,useaBNCcable(5-core)→miniD-Sub15-pinconvertercable.
• Selectthesourcenameforitsappropriateinputconnectorafterturningontheprojector.

144
6. Installation and Connections
DisplayPort INHDMI 1 IN
HDMI 2 IN
Digital RGB signal connection
• ConnectacommerciallyavailableHDMIcablebetweenthecomputer’sHDMIoutputconnectorandtheprojector’sHDMIinputconnector.
• ConnectacommerciallyavailableDisplayPortcablebetweenthecomputer’sDisplayPortoutputconnectorandtheprojector’sDisplayPortinputconnector.
• Selectthesourcenameforitsappropriateinputconnectorafterturningontheprojector.
NOTE:• Turnoffthepowerofthecomputerandprojectorbeforeconnecting.• Lowerthecomputer’svolumesettingbeforeconnectinganaudiocabletotheheadphonesconnector.Whenusingwithacomputer
connectedtotheprojector,adjustthevolumeofboththeprojectorandcomputertosettheappropriatevolumelevel.• Ifthecomputerhasamini-jacktypeaudiooutputconnector,werecommendconnectingtheaudiocabletothatconnector.• ThisprojectordoesnotsupportNECvideounit(modelISS-6020)videodecodedoutputs.• When a video deck is connected via a scan converter, etc., the display may not be correct during fast-forwarding and
rewinding.
TIP• TheComputer1andComputer2videoinputconnectorssupportWindowsPlugandPlay.TheComputer3videoinputconnector
doesnotsupportWindowsPlugandPlay.• AMacintoshsignaladapter(commerciallyavailable)mayberequiredtoconnectaMacintoshcomputer. ToconnectaMacintoshcomputerequippedwithaMiniDisplayPorttotheprojector,useacommerciallyavailableMiniDisplayPort
→DisplayPortconvertercable.
HDMI cable (not supplied)DisplayPort cable (not supplied)

145
6. Installation and Connections
CautionswhenconnectinganHDMIcable• UseacertifiedHighSpeedHDMI®Cable or HighSpeedHDMI®CablewithEthernet.
CautionswhenconnectingaDisplayPortcable• UseacertifiedDisplayPortcable.
• Dependingonthecomputer,sometimemayberequireduntiltheimageisdisplayed.
• SomeDisplayPortcables(commerciallyavailable)havelocks.
• Todisconnectthecable,pressthebuttononthetopofthecable’sconnector,thenpullthecableout.
• NopowerissuppliedfromtheDisplayPortinputconnectortotheconnecteddevice.
• WhensignalsfromadevicethatusesasignalconverteradapterareconnectedtotheDisplayPortinputconnector,insomecasestheimagemaynotbedisplayed.
• WhentheHDMIoutputofacomputerisconnectedtotheDisplayPortinputconnector,useaconverter(commerciallyavailable).
CautionswhenusingaDVIsignal• WhenthecomputerhasaDVIoutputconnector,useacommerciallyavailableconvertercabletoconnect the
computer to theprojector’sHDMI input connector (onlydigital videosignals canbe input).Also, connect thecomputer’saudiooutputtotheprojector’sComputer2audioinputconnector.Inthiscase,switchtheHDMIsettingaton-screenmenu’saudioselectionontheprojectorto[BNC].(→page109)
Toconnectthecomputer’sDVIoutputconnectortotheprojector’sDisplayPortinputconnector,useacommerciallyavailableconverter.
HDMI 1 INHDMI 2 IN
AUDIO IN
NOTE:WhenViewingaDVIDigitalSignal• UseaDVI-to-HDMIcablecompliantwithDDWG(DigitalDisplayWorkingGroup)DVI(DigitalVisualInterface)revision1.0stan-
dard.Thecableshouldbewithin197"/5mlong.• TurnofftheprojectorandthePCbeforeconnectingtheDVI-to-HDMIcable.• ToprojectaDVIdigitalsignal:Connectthecables,turntheprojectoron,thenselecttheHDMIinput.Finally,turnonyourPC. Failuretodosomaynotactivatethedigitaloutputofthegraphicscardresultinginnopicturebeingdisplayed.Shouldthishappen,
restartyourPC.• SomegraphicscardshavebothanalogRGB(15-pinD-Sub)andDVI(orDFP)outputs.Useofthe15-pinD-Subconnectormay
resultinnopicturebeingdisplayedfromthedigitaloutputofthegraphicscard.• DonotdisconnecttheDVI-to-HDMIcablewhiletheprojector isrunning.If thesignalcablehasbeendisconnectedandthen
reconnected,animagemaynotbecorrectlydisplayed.Shouldthishappen,restartyourPC.

146
6. Installation and Connections
HDMI IN AUDIO IN
HDMI OUT
AUDIO OUT
Connecting an External Monitor
Youcanconnectaseparate,externalmonitortoyourprojectortosimultaneouslyviewonamonitorthecomputeranalogimageyou’reprojecting.
NOTE:• Daisychainconnectionisnotpossible.• Whenaudioequipmentisconnected,theprojectorspeakerisdisabled.
Computer cable (VGA) (supplied)
Stereo mini-plug audio cable (not supplied)HDMI cable (not supplied)

147
6. Installation and Connections
Connecting Your DVD Player or Other AV EquipmentConnectingBNCInput
• Selectthesourcenameforitsappropriateinputconnectorafterturningontheprojector.
NOTE:TheAUDIOINLandRjacks(RCA)aresharedbetweentheVideoandS-Videoinputs.
NOTE:RefertoyourVCRowner’smanualformoreinformationaboutyourequipment’svideooutputrequirements.
NOTE:• AnimagemaynotbedisplayedcorrectlywhenaVideoorS-Videosourceisplayedbackinfast-forwardorfast-rewindviaascan
converter.• Videosignalscanbeprojectedwhenavideocable(commerciallyavailable)isconnectedtotheComputer3videoinputconnector’s
G/Yconnector. Inthiscase,settheon-screenmenu’sSETUP→OPTION(1)→SIGNALSELECT(COMP3)to[VIDEO]andselectComputer3for
theinputselection.
CV Y C
BNC(C) IN
AUDIO INBNC(CV) IN
BNC(Y) IN
Audio cable (not supplied)BNC cable (not supplied)
Audio equipment
Audio cable (not supplied)

148
6. Installation and Connections
Connecting Component Input
• Selectthesourcenameforitsappropriateinputconnectorafterturningontheprojector.
NOTE:• Normallythecomputersignalandcomponentsignalareidentifiedandswitchedautomatically.Ifthesignalcannotbeidentified,
however,selectthesignalat[ADJUST]→[VIDEO]→[SIGNALTYPE]ontheprojector’son-screenmenu.Select“COMPUTER”or“VIDEO”fortheComputer3videoinputconnectorat[SETUP]→[OPTION(1)]→[SIGNALSELECT(COMP)](→page109).
• ToconnecttoavideodevicewithaDconnector,usethesoldseparatelyDconnectorconverteradapter(modelADP-DT1E).
AUDIO INCOMPUTER IN
AUDIO IN
15-pin - to - RCA (female) × 3 cable adapter (ADP-CV1E)
RCA (female) - to - BNC (male) connector (not supplied)
Stereo mini plug - to - RCA audio cable (not supplied)
Component video RCA × 3 cable (not supplied)
DVD player Audio Equipment

149
6. Installation and Connections
HDMI 1 IN HDMI 2 IN
Connecting HDMI InputYoucanconnecttheHDMIoutputofyourDVDplayer,harddiskplayer,Blu-rayplayer,ornotebooktypePCtotheHDMIINconnectorofyourprojector.NOTE:TheHDMIINconnectorsupportsPlug&Play(DDC2B).
Audio cable (not supplied)
HDMI cable (not supplied)Use High Speed HDMI® Cable.
TIP:ForusersofaudiovideoequipmentwithanHDMIconnector:Select“Enhanced”ratherthan“Normal”ifHDMIoutputisswitchablebetween“Enhanced”and“Normal”.Thiswillprovideimprovedimagecontrastandmoredetaileddarkareas.Formoreinformationonsettings,refertotheinstructionmanualoftheaudiovideoequipmenttobeconnected.
• WhenconnectingtheHDMIINconnectoroftheprojectortotheDVDplayer,theprojector’svideolevelcanbemadesettingsinaccordancewiththeDVDplayer’svideolevel.Inthemenuselect[HDMISETTINGS]→[VIDEOLEVEL]andmakenecessarysettings.
• IftheHDMIinputsoundcannotbeheard,inthemenuselect[AUDIOSELECT]→[HDMI].
• IftheHDMIinput’ssoundisnotoutput,checkthat[OPTIONS(1)] →[DIGITALAUDIOSELECT]→[HDMI]ontheprojector’son-screenmenuissetto“HDMI”.(→page109)

150
6. Installation and Connections
Connecting to a Wired LANTheprojectorcomesstandardwithaLANport(RJ-45)whichprovidesaLANconnectionusingaLANcable.TouseaLANconnection,youarerequiredtosettheLANontheprojectormenu.Select[APPLICATIONMENU]→ [NETWORKSETTINGS]→[WIREDLAN].(→page121).
Example of LAN connectionExampleofwiredLANconnection
Server
Hub
LAN cable (not supplied)
NOTE: Use a Category 5 or higher LANcable.
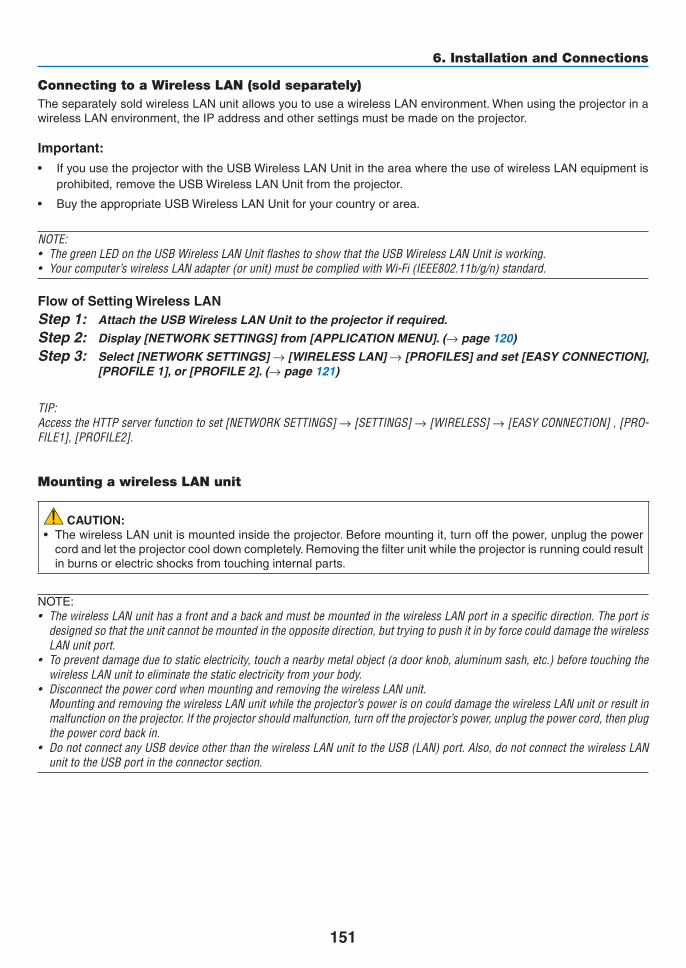
151
6. Installation and Connections
Connecting to a Wireless LAN (sold separately)TheseparatelysoldwirelessLANunitallowsyoutouseawirelessLANenvironment.WhenusingtheprojectorinawirelessLANenvironment,theIPaddressandothersettingsmustbemadeontheprojector.
Important:• IfyouusetheprojectorwiththeUSBWirelessLANUnitintheareawheretheuseofwirelessLANequipmentis
prohibited,removetheUSBWirelessLANUnitfromtheprojector.
• BuytheappropriateUSBWirelessLANUnitforyourcountryorarea.
NOTE:• ThegreenLEDontheUSBWirelessLANUnitflashestoshowthattheUSBWirelessLANUnitisworking.• Yourcomputer’swirelessLANadapter(orunit)mustbecompliedwithWi-Fi(IEEE802.11b/g/n)standard.
Flow of Setting Wireless LANStep 1: Attach the USB Wireless LAN Unit to the projector if required.
Step 2: Display[NETWORKSETTINGS]from[APPLICATIONMENU].(→ page 120)
Step 3: Select[NETWORKSETTINGS]→[WIRELESSLAN]→[PROFILES]andset[EASYCONNECTION],[PROFILE1],or[PROFILE2].(→ page 121)
TIP:AccesstheHTTPserverfunctiontoset[NETWORKSETTINGS]→[SETTINGS]→[WIRELESS]→[EASYCONNECTION],[PRO-FILE1],[PROFILE2].
Mounting a wireless LAN unit
CAUTION:• ThewirelessLANunitismountedinsidetheprojector.Beforemountingit,turnoffthepower,unplugthepower
cordandlettheprojectorcooldowncompletely.Removingthefilterunitwhiletheprojectorisrunningcouldresultinburnsorelectricshocksfromtouchinginternalparts.
NOTE:• ThewirelessLANunithasafrontandabackandmustbemountedinthewirelessLANportinaspecificdirection.Theportis
designedsothattheunitcannotbemountedintheoppositedirection,buttryingtopushitinbyforcecoulddamagethewirelessLANunitport.
• Topreventdamageduetostaticelectricity,touchanearbymetalobject(adoorknob,aluminumsash,etc.)beforetouchingthewirelessLANunittoeliminatethestaticelectricityfromyourbody.
• DisconnectthepowercordwhenmountingandremovingthewirelessLANunit. MountingandremovingthewirelessLANunitwhiletheprojector’spowerisoncoulddamagethewirelessLANunitorresultin
malfunctionontheprojector.Iftheprojectorshouldmalfunction,turnofftheprojector’spower,unplugthepowercord,thenplugthepowercordbackin.
• DonotconnectanyUSBdeviceotherthanthewirelessLANunittotheUSB(LAN)port.Also,donotconnectthewirelessLANunittotheUSBportintheconnectorsection.
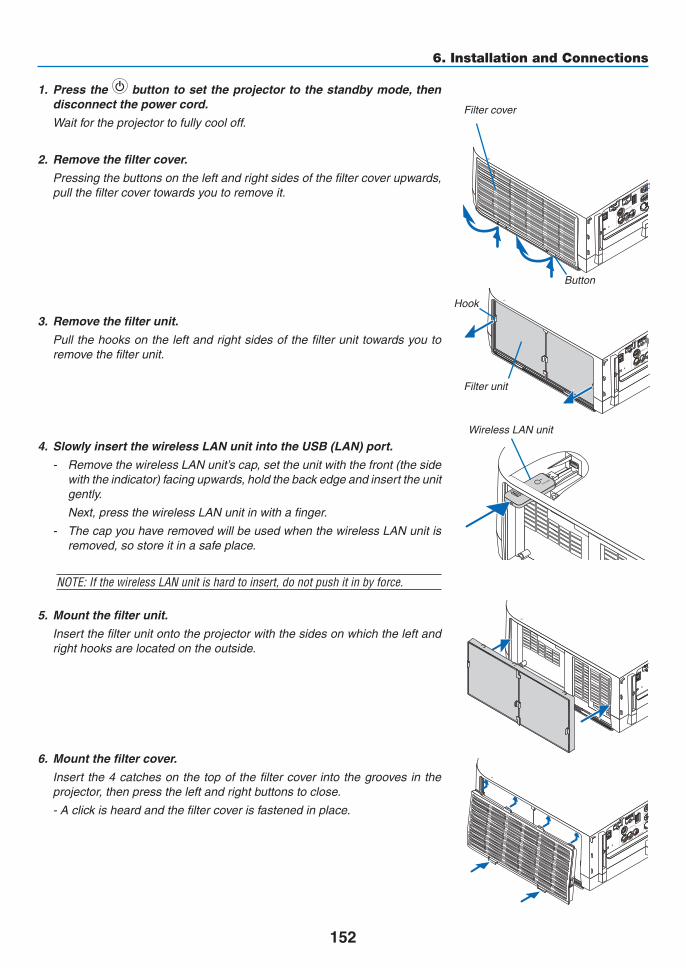
152
6. Installation and Connections
1. Press the button to set the projector to the standby mode, then disconnect the power cord.
Wait for the projector to fully cool off.
2. Remove the filter cover.
Pressing the buttons on the left and right sides of the filter cover upwards, pull the filter cover towards you to remove it.
3. Remove the filter unit.
Pull the hooks on the left and right sides of the filter unit towards you to remove the filter unit.
4. Slowly insert the wireless LAN unit into the USB (LAN) port.
- Remove the wireless LAN unit’s cap, set the unit with the front (the side with the indicator) facing upwards, hold the back edge and insert the unit gently.
Next, press the wireless LAN unit in with a finger.
- The cap you have removed will be used when the wireless LAN unit is removed, so store it in a safe place.
NOTE:IfthewirelessLANunitishardtoinsert,donotpushitinbyforce.
5. Mount the filter unit.
Insert the filter unit onto the projector with the sides on which the left and right hooks are located on the outside.
6. Mount the filter cover.
Insert the 4 catches on the top of the filter cover into the grooves in the projector, then press the left and right buttons to close.
- A click is heard and the filter cover is fastened in place.
WIRELESS
WIRELESS
Filter cover
Filter unit
Button
Hook
Wireless LAN unit

153
6. Installation and Connections
To remove the wireless LAN unit1. Remove the filter unit following steps 1 to 3 above.
2. Remove the wireless LAN unit.
If the wireless LAN unit is hard to remove, place a cloth, etc., over needle-nose pliers to grasp the wireless LAN unit and pull it out.
NOTE:DonotgraspthewirelessLANunitwithexcessiveforce.Doingsowilldamageit.
3. Mount the filter unit and filter cover as described in steps 5 and 6 above.
WIRELESS
WIRELESS

154
6. Installation and Connections
ExampleofwirelessLANconnection(NetworkType→Infrastructure)(→page123) PC with wireless
LAN card insertedPC with built-in wireless LAN function
Wired LAN
Wireless access point
USB Wireless LAN Unit
Toenabledirectcommunication(i.e.,peer-to-peer)betweencomputersandprojectors,youneedtoselecttheAdHocmode.(→page123)
PC with wireless LAN card inserted
PC with built-in wireless LAN function
ExampleofwirelessLANconnection(NetworkType→AdHoc)
USB Wireless LAN Unit

155
6. Installation and Connections
Projecting Portrait ImagesTheprojectorcanbeusedonitsleftside(whenviewedfromthefront)toprojectportraitimages.
Caution on placing in portrait orientation• Whenusingtheprojectoronitsleftside,donotblocktheintakevents.Doingsowillcausebuild-upheatinside
theprojector.
• Whenusingtheprojectoronitsleftside,attachastandsupportingtheprojector.
• Lockthelensshiftaftercompletinglensshiftadjustment.
SpecificationsofstandforprojectingportraitimagesFordesigningastandforprojectingportraitimages,consultyourdealer.1. Allow310x170mmofspacefortheintakevents.
2. Allow130mmorlongerforopeningthefiltercover(intakevent).
3. Usethe4screwsonthebottomoftheprojector.
Locationof4screws:200x250mm
Screw:M4x8mm
• Designthestandsothatitwillnotcontacttherearfeetoftheprojector.
• Designthestandinsuchawaythatitwillnotfalldowneasily.

156
6. Installation and Connections
Reference drawing
[Side View] [Front View]
4-M4 screw hole
Remove tilt foot
130 or longer
Filter cover (open)
Horizontal adjuster
[Bottom View]
Filter cover
310 mm or longer
Rear foot
LockingLensShift1. Pull and remove the lever cover.
2. Loosen the screw.
• Thescrewcannotberemoved.

157
6. Installation and Connections
3. Move the lever upward until it stops and then secure the screw.
• Whileholdingtheleverupward,tightenthescrew.
• Toadjustthelensshiftagain,loosenthescrewanddothis.
4. Put the lever cover back.
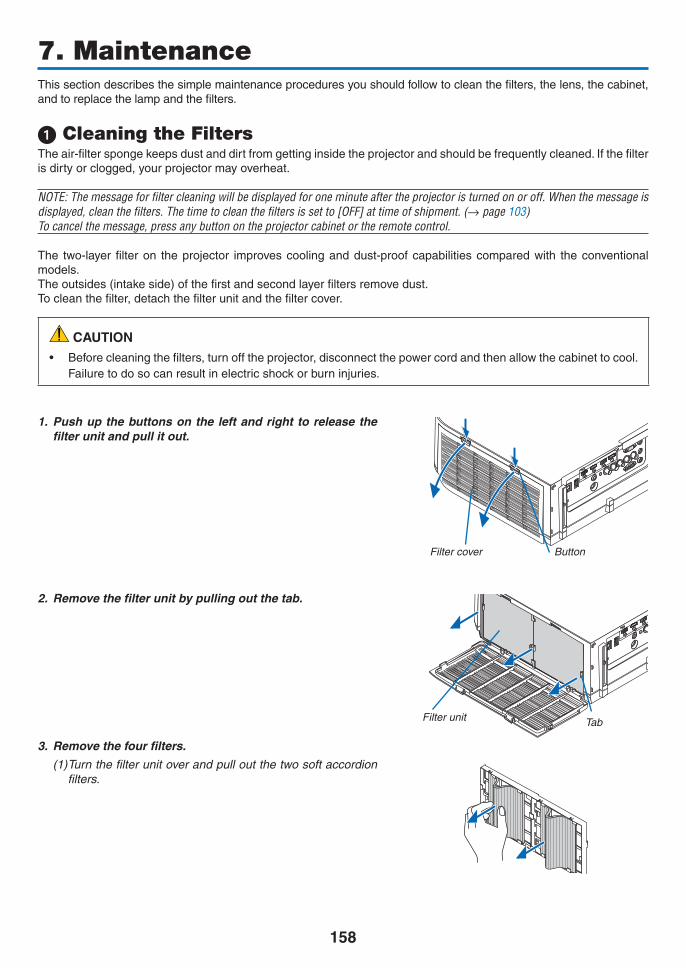
158
7. MaintenanceThissectiondescribesthesimplemaintenanceproceduresyoushouldfollowtocleanthefilters,thelens,thecabinet,andtoreplacethelampandthefilters.
1 Cleaning the FiltersTheair-filterspongekeepsdustanddirtfromgettinginsidetheprojectorandshouldbefrequentlycleaned.Ifthefilterisdirtyorclogged,yourprojectormayoverheat.
NOTE:Themessageforfiltercleaningwillbedisplayedforoneminuteaftertheprojectoristurnedonoroff.Whenthemessageisdisplayed,cleanthefilters.Thetimetocleanthefiltersissetto[OFF]attimeofshipment.(→page103)Tocancelthemessage,pressanybuttonontheprojectorcabinetortheremotecontrol.
The two-layerfilteron theprojector improvescoolinganddust-proofcapabilitiescomparedwith theconventionalmodels.Theoutsides(intakeside)ofthefirstandsecondlayerfiltersremovedust.Tocleanthefilter,detachthefilterunitandthefiltercover.
CAUTION• Beforecleaningthefilters,turnofftheprojector,disconnectthepowercordandthenallowthecabinettocool.
Failuretodosocanresultinelectricshockorburninjuries.
1. Push up the buttons on the left and right to release the filter unit and pull it out.
2. Remove the filter unit by pulling out the tab.
3. Remove the four filters.
(1) Turn the filter unit over and pull out the two soft accordion filters.
Filter cover Button
Filter unit Tab

159
7. Maintenance
(2) Push the left edges of the filters and remove the two hard honeycomb filters.
- The filters cannot be removed by pressing the left and right edges.
4. Use a vacuum cleaner to vacuum all the dust inside.
Get rid of dust in the accordion filter
NOTE:• Wheneveryouvacuumthefilter,usethesoftbrushattachmentto
vacuum.Thisistoavoiddamagetothefilter.• Donotwashthefilterwithwater.Doingsocanresultinfilterclog-
ging.
5. Remove dust from the filter unit and the filter cover.
Clean both outside and inside.
6. Attach the four filters to the filter unit.
(1) Insert the hard honeycomb filters into the tips of the flanges at the center, then bend the filters and push them in under the hooks.
- The filters cannot be inserted from the outside.
(2) Turn the filter unit over.
Mount the accordion filters under the flanges along the outer edges.
•Eachaccordionfilterhasslitsinit.Aligntheslitswiththeprotrusions on the filter unit.
7. Mount the filter unit back onto the projector cabinet.
Insert the filter unit onto the projector with the sides on which the left and right hooks are located on the outside.
Slit
Flange
Hook
Hook

160
7. Maintenance
8. Put the filter cover back to the projector cabinet.
Insert the 4 catches on the top of the filter cover into the grooves in the projector, then press the left and right buttons to close.
• Pushthefiltercoveruntilitclicksintoplace.
9. Clearthefilterusagehours.
Plug the power cord into the wall outlet, and then turn on the projector.
From the menu, select [RESET] → [CLEAR FILTER HOURS]. (→ page 117)
The interval time to clean the filters is set to [OFF] at time of shipment. When using the projector as it is, you do not clear the filter usage
Catch
Button

161
7. Maintenance
Cleaning the Lens• Turnofftheprojectorbeforecleaning.• Theprojectorhasaplasticlens.Useacommerciallyavailableplasticlenscleaner.• Donotscratchormarthelenssurfaceasaplasticlensiseasilyscratched.• Neverusealcoholorglasslenscleanerasdoingsowillcausedamagetotheplasticlenssurface.
Cleaning the CabinetTurnofftheprojector,andunplugtheprojectorbeforecleaning.• Useadrysoftclothtowipedustoffthecabinet.
Ifheavilysoiled,useamilddetergent.
• Neverusestrongdetergentsorsolventssuchasalcoholorthinner.
• Whencleaningtheventilationslitsorthespeakerusingavacuumcleaner,donotforcethebrushofthevacuumcleanerintotheslitsofthecabinet.
Vacuum the dust off the ventilation slits.
• Cloggedventilationslitsmaycauseariseintheinternaltemperatureoftheprojector,resultinginmalfunction.
• Donotscratchorhitthecabinetwithyourfingersoranyhardobjects
• Contactyourdealerforcleaningtheinsideoftheprojector.
NOTE:Donotapplyvolatileagentsuchasinsecticideonthecabinet,thelens,orthescreen.Donotleavearubberorvinylproductinprolongedcontactwithit.Otherwisethesurfacefinishwillbedeterioratedorthecoatingmaybestrippedoff.
162
7. Maintenance
Replacing the Lamp and the FiltersWhenthelampreachestheendofitslife,theLAMPindicatorinthecabinetwillblinkredandthemessage“THELAMPHASREACHEDTHEENDOFITSUSABLELIFE.PLEASEREPLACETHELAMPANDFILTER.USETHESPECIFIEDLAMPFORSAFETYANDPERFORMANCE.”willappear(*).Eventhoughthelampmaystillbeworking,replacethelamptomaintaintheoptimalprojectorperformance.Afterreplacingthelamp,besuretoclearthelamphourmeter.(→page116)
CAUTION• DONOTTOUCHTHELAMPimmediatelyafterithasbeenused.Itwillbeextremelyhot.Turntheprojector
offandthendisconnectthepowercord.Allowatleastonehourforthelamptocoolbeforehandling.
• Usethespecifiedlampforsafetyandperformance.
• DONOTREMOVEANYSCREWSexceptonelampcoverscrewandtwolamphousingscrews.Youcouldreceiveanelectricshock.
• Donotbreaktheglassonthelamphousing.
Keepfingerprintsofftheglasssurfaceonthelamphousing.Leavingfingerprintsontheglasssurfacemightcauseanunwantedshadowandpoorpicturequality.
• Theprojectorwillturnoffandgointostandbymodewhenyoucontinuetousetheprojectorforanother100hoursafterthelamphasreachedtheendofitslife.Ifthishappens,besuretoreplacethelamp.Ifyoucontinuetousethelampafterthelampreachestheendofitslife,thelampbulbmayshatter,andpiecesofglassmaybescatteredinthelampcase.Donottouchthemasthepiecesofglassmaycauseinjury.Ifthishappens,contactyourNECdealerforlampreplacement.
*NOTE:Thismessagewillbedisplayedunderthefollowingconditions:• foroneminuteaftertheprojectorhasbeenpoweredon• whenthe (POWER)buttonontheprojectorcabinetorthePOWEROFFbuttonontheremotecontrolispressed
Toturnoffthemessage,pressanybuttonontheprojectorcabinetortheremotecontrol.
Optionallampandtoolsneededforreplacement:
• Phillipsscrewdriver(plus-head)
• Replacementlamp: NP26LP
Flow of Replacing the Lamp and the Filters
Step 1. Replace the lamp
Step 2. Replace the filters (→ page 162)
Step 3. Clearthelampusagehoursandthefilterusagehours(→ page 116, 117)

163
7. Maintenance
2. Remove the lamp housing.
(1)Loosenthetwoscrewssecuringthelamphousinguntilthephillipsscrewdrivergoesintoafreewheelingcondi-tion.
•Thetwoscrewsarenotremovable.
•There isan interlockonthiscasetoprevent theriskofelectricalshock.Donotattempt tocircumvent thisinterlock.
(2)Removethelamphousingbyholdingit.
Interlock Guide hole
To replace the lamp: 1. Remove the lamp cover.
(1)Loosenthelampcoverscrew
•Thelampcoverscrewisnotremovable.
(2)Pullthebottomofthelampcovertowardsyouandremoveit.
CAUTION:
Makesurethatthelamphousingiscoolenoughtobeforeremovingit.

164
7. Maintenance
This completes the lamp replacement.Go on to the filter replacement.
NOTE:Whenyoucontinuetousetheprojectorforanother100hoursafterthelamphasreachedtheendofitslife,theprojectorcannotturnonandthemenuisnotdisplayed.Ifthishappens,presstheHELPbuttonontheremotecontrolfor10secondstoresetthelampclockbacktozero.Whenthelamptimeclockisresettozero,theLAMPindicatorgoesout.
4. Reattach the lamp cover.
(1)Insertthetopedgeofthelampcoverintothegrooveintheprojectorandclosethelampcover.
(2)Tightenthescrewtosecurethelampcover.
•Besuretotightenthescrew.
3. Install a new lamp housing.
(1)Insertanewlamphousinguntilthelamphousingispluggedintothesocket.
(2)Positionsothattheguideholeinthebottomrightofthelamphouseisovertheprotrusionontheprojectorthenpressallthewayin.
(3)Secureitinplacewiththetwoscrews.
•Besuretotightenthescrews.

165
7. Maintenance
To replace the filters:Fourfiltersarepackagedwiththereplacementlamp.Honeycombfilter(coarsemesh):Largeandsmallsizes(attachedtotheoutsideofthefilterunit)Accordionfilter(finemesh):Largeandsmallsizes(attachedtotheinsideofthefilterunit)
NOTE:• Replaceallfourfiltersatthesametime.• Beforereplacingthefilters,wipeoffdustanddirtfromtheprojectorcabinet.• Theprojectorisprecisionequipment.Keepoutdustanddirtduringfilterreplacement.• Donotwashthefilterswithsoapandwater.Soapandwaterwilldamagethefiltermembrane.• Putfiltersintoplace.Incorrectattachmentofafiltermaycausedustanddirttogetintotheinsideoftheprojector.
Beforereplacingthefilters,replacethelamp.(→page159)
1. Push up the buttons on the left and right to release the filter unit and pull it out.
2. Remove the filter unit by pulling out the tab.
3. Remove the four filters.
(1) Turn the filter unit over and pull out the two soft accordion filters (large and small).
Filter cover
Filter unit

166
7. Maintenance
(2) Push the left edges of the filters and remove the two hard honeycomb filters (large and small).
•The filters cannot be removed by pressing the left and right edges.
4. Remove dust from the filter unit and the filter cover.
Clean both outside and inside.
5. Attach four new filters to the filter unit.
(1) Insert the hard honeycomb filters into the tips of the flanges at the center, then bend the filters and push them in under the hooks.
- The filters cannot be inserted from the outside.
(2) Turn the filter unit over.
Mount the accordion filters under the flanges along the outer edges.
•Eachaccordionfilterhasslitsinit.Aligntheslitswiththeprotrusionsonthefilterunit.
6. Mount the filter unit back onto the projector cabinet.
Insert the filter unit onto the projector with the sides on which the left and right hooks are located on the outside.
7. Mount the filter cover back onto the projector cabinet.
Insert the 4 catches on the top of the filter cover into the grooves in the projector, then press the left and right buttons to close.
This completes the filter replacement.Go on to the clearing lamp and filter hour meters.
To clear the lamp usage hours and the filter usage hours:1. Place the projector where you use it.
2. Plug the power cord into the wall outlet, and then turn on the projector.
3. Clearthelampusagehoursandthefilterusagehours.
1. From the menu, select [RESET] → [CLEAR LAMP HOURS] and reset the lamp usage hours.
2. Select [CLEAR FILTER HOURS].and reset the filter usage hours. (→ page 117)

167
8. User Supportware Installing Software Program
Installation for Windows software
ThesoftwareprogramsexceptImageExpressUtility2forMacsupportWindows7,WindowsVista,andWindowsXP.
NOTE:• Toinstalloruninstalleachsoftwareprogram,theWindowsuseraccountmusthave“Administrator”privilege(Windows7,Win-
dowsVista)or“ComputerAdministrator”privilege(WindowsXP).• Exitallrunningprogramsbeforeinstallation.Ifanotherprogramisrunning,theinstallationmaynotbecompleted.• TorunVirtualRemoteToolorPCControlUtilityPro4onWindowsXPHomeEditionandWindowsXPProfessional,“Microsoft
.NETFrameworkVersion2.0orlater”isrequired.TheMicrosoft.NETFrameworkVersion2.0orlaterisavailablefromMicrosoft’swebpage.Downloadandinstallitonyourcomputer
• ImageExpressUtilityLitewillbeinstalledtothesystemdriveofyourcomputer. Ifthemessage“Thereisnotenoughfreespaceondestination”isdisplayed,freeupenoughspace(about100MB)toinstallthe
program. 1 InserttheaccompanyingNECProjectorCD-ROMintoyourCD-ROMdrive.
The menu window will be displayed.
TIP:Ifthemenuwindowwillnotbedisplayed,trythefollowingprocedure.ForWindows71. Click“start”onWindows.
2. Click“AllPrograms”→“Accessories”→“Run”.
3. Type your CD-ROM drive name (example:“Q:\”) and“LAUNCHER.EXE” in“Name”. (example: Q:\LAUNCHER.EXE)
4. Click“OK”.
the menu window will be displayed.

168
8. User Supportware
2 Clickasoftwareprogramyouwishtoinstallonthemenuwindow.
The installation will start.
• Followtheinstructionsontheinstallerscreenstocompletetheinstallation.
TIP:
Uninstalling a Software ProgramPreparation:Exitthesoftwareprogrambeforeuninstalling.Touninstallthesoftwareprogram,theWindowsuseraccountmusthave“Administrator”privilege(Windows7andWindowsVista)or“ComputerAdministrator”privilege(WindowsXP).
•ForWindows7/WindowsVista1 Click“Start”andthen“ControlPanel”.
The Control Panel window will be displayed.
2 Click“Uninstallaprogram”under“Programs”
The “Programs and Features” window will be displayed.
3 Select the software program and click it.
4 Click“Uninstall/Change”or“Uninstall”.
•Whenthe“UserAccountControl”windowsisdisplayed,click“Continue”.
Follow the instructions on the screens to complete the uninstallation.
•ForWindowsXP1 Click“Start”andthen“ControlPanel”.
The Control Panel window will be displayed.
2 Double-click“Add/RemovePrograms”.
The Add / Remove Programs window will be displayed.
3 Clickthesoftwareprogramfromthelistandthenclick“Remove”.
Follow the instructions on the screens to complete the uninstallation.

169
8. User Supportware
Installation for Macintosh softwareImageExpressUtility2forMacsupportsMacOSX.
1 InserttheaccompanyingNECProjectorCD-ROMintoyourCD-ROMdrive.
The menu window will be displayed.
2 Double-clicktheCD-ROMicon.
3 Double-clickthe“MacOSX”folder.
4 Double-click“ImageExpressUtility2(Intel).dmg”.
The “Image Express Utility 2” folder will be displayed.
• IfyourMacisPowerPC-based,double-click“ImageExpressUtility2.dmg”.
5 Movethe“ImageExpressUtility2”folderto“Applications”folderusingadrag-and-dropoperation.
TIP:
•Uninstallingasoftwareprogram1. Putthe“ImageExpressUtility2”foldertotheTrashicon.
2. Put the configuration file of Image Express Utility 2 to the Trash icon.
• TheconfigurationfileofImageExpressUtility2islocatedin“/user/yourusername/library/Preferences/jp.co.nec.nevt. ImageExpressUtility.plist”.

170
8. User Supportware
Operating the Projector Via the LAN (Virtual Remote Tool)Thiswillhelpyouperformoperationssuchasprojector’spoweronoroffandsignalselectionviaaLANconnection.Itisalsousedtosendanimagetotheprojectorandregisteritasthelogodataoftheprojector.Afterregisteringit,youcanlockthelogotopreventitfromchanging.
Control FunctionsPowerOn/Off,signalselection,picturefreeze,picturemute,audiomute,Logotransfertotheprojector,andremotecontroloperationonyourPC.
VirtualRemotescreen
RemoteControlWindow Toolbar
ThissectionprovidesanoutlineofpreparationforuseofVirtualRemoteTool.ForinformationonhowtouseVirtualRemoteTool,seeHelpofVirtualRemoteTool.(→page169)
NOTE:• Logodata(graphics)thatcanbesenttotheprojectorwithVirtualRemoteToolhasthefollowingrestrictions:
- Filesize:256KBorless- Imagesize(resolution):thenativeresolutionoftheprojector
• ThelogodatathatissentwithVirtualRemoteToolwillbedisplayedatthecenterofthescreen.Itssurroundingwillbepaintedoutinblack.
TIP:• VirtualRemoteToolcanbeusedalsowithaserialconnection.
Connect the projector to a LAN.ConnecttheprojectortotheLANbyfollowingtheinstructionsin“ConnectingtoaWiredLAN”(→page150),“Con-nectingtoaWirelessLAN(soldseparately)”(→page151)and“9ApplicationMenus-NETWORKSETTINGS”(→ page120)

171
8. User Supportware
Start Virtual Remote Tool
Start using the shortcut icon• Double-clicktheshortcuticon on the Windows Desktop.
Start from the Start menu• Click[Start]→[AllPrograms]or[Programs]→[NECProjectorUserSupportware]→[VirtualRemoteTool]
→[VirtualRemoteTool].
When Virtual Remote Tool starts for the first time, “Easy Setup” window will be displayed.
The “Easy Setup” feature is not available on this model. Click “Close Easy Setup”.
Closing the “Easy Setup” window will display the “Projector List” window.
Select your projector you wish to connect. This will display the Virtual Remote screen.
TIP:• TheVirtualRemoteToolscreen(orToolbar)canbedisplayedwithoutdisplaying“EasySetup”window. Todoso,clicktoplaceacheckmarkfor“ DonotuseEasySetupnexttime”onthescreen.
NOTE:• When[POWER-SAVING]isselectedfor[STANDBYMODE]fromthemenu,theprojectorcannotbeturnedonviathenetwork
(wiredLAN/wirelessLAN)connection.When[NETWORKSTANDBY]isselectedfor[STANDBYMODE],theprojectorcannotbeturnedonviawirelessLANconnection.

172
8. User Supportware
ExitingVirtualRemoteTool1 ClicktheVirtualRemoteToolicon on the Taskbar.
The pop-up menu will be displayed.
2 Click“Exit”.
The Virtual Remote Tool will be closed.
ViewingthehelpfileofVirtualRemoteTool•Displayingthehelpfileusingthetaskbar1 ClicktheVirtualRemoteToolicon onthetaskbarwhenVirtualRemoteToolisrunning.
The pop-up menu will be displayed.
2. Click“Help”.
The Help screen will be displayed.
•DisplayingthehelpfileusingtheStartMenu.1. Click“Start”.“Allprograms”or“Programs”.“NECProjectorUserSupportware”.“VirtualRemoteTool”.and
then“VirtualRemoteToolHelp”inthisorder.
The Help screen will be displayed.

173
8. User Supportware
Projecting Your Computer’s Screen Image from the Projector over a LAN (Image Express Utility Lite) UsingImageExpressUtilityLiteallowsyoutosendthecomputer’sscreenimagetotheprojectoroverawiredorwirelessLAN.ThissectionwillshowyouanoutlineabouthowtoconnecttheprojectortoaLANandtouseImageExpressUtilityLite.FortheoperationofImageExpressUtilityLite,seethehelpofImageExpressUtilityLite.
What you can do with Image Express Utility Lite
•Imagetransmission• Thescreenofyourcomputercanbesenttotheprojectorviaawiredorwirelessnetworkwithoutacomputercable
(VGA).
• Byusing“EASYCONNECTION”function,thecomplicatednetworksettingscanbesimplifiedandthecomputerwillautomaticallyconnecttotheprojector.
• Thescreenofyourcomputercanbesenttouptofourprojectorsatthesametime.
•GeometricCorrectionTool(GCT)See“❹ProjectinganImagefromanAngle(GeometricCorrectionToolinImageExpressUtilityLite)”.
Connect the projector to a LAN.ConnecttheprojectortotheLANbyfollowingtheinstructionsin“ConnectingtoaWiredLAN”(→page150),“Con-nectingtoaWirelessLAN(soldseparately)”(→page151)and“9ApplicationMenus-NETWORKSETTINGS”(→ page120)
Start Image Express Utility Lite.1. OnWindows,click“Start”→“Allprograms”→“NECProjectorUserSupportware”→ “Image Express Utility
Lite”→“ImageExpressUtilityLite”.
Image Express Utility Lite will start.
The select window for network connection will be displayed
2. SelectNetworkandclick“OK”.
The select window for destination will show a list of connectable projectors.
• Whenconnectingthecomputerdirectlytotheprojectorbyone-to-one,“EasyConnection”isrecommended.
• Whenoneormorenetworksfor“EASYCONNECTION”arefound,the“EasyConnectionSelectionScreen”window will be displayed.
• Tocheckforthenetworkavailableforconnectedprojectors,fromthemenu,select[INFO.]→[WIRELESSLAN]→[SSID].
3. Select“EasyConnection”networkyouwishtoconnect,andclick“Select”.
The target selection window will be displayed.
4. Placeacheckmarkforprojectorstobeconnected,andthenclick“Connect”.
• Whenoneormoreprojectorsaredisplayed,fromthemenuontheprojector,select[INFO.]→ [WIRELESS LAN] → [IP ADDRESS].

174
8. User Supportware
When connecting with the projector is establised, you can operate the control window to control the projector.
NOTE:• When[POWER-SAVING]or[NETWORKSTANDBY]isselectedfor[STANDBYMODE]fromthemenu,theprojectorthatisturned
offwillnotbedisplayedintheselectwindowfordestination
Control Window Operations(1) (2) (3) (4) (5)(6)
(1) (Source) ����� Selects an input source of the projector� (2) (Picture) ���� Turns on or off the Mute (Picture mute), Freeze (Freeze a picture), Play, and Geometric Correction Tool (GCT)
functions� (3) (Sound) ����� Turns on or off Mute (Sound mute), play the sound and turns up or down the volume�(4) (Etc) ����������� Uses “Update”, “HTTP Server”*, “Settings” and “Information”�
(5) (Exit) ���������� Exit Image Express Utility Lite� You can also turn off the projector at the same time�(6) (Help) ����������� Displays the help of Image Express Utility Lite�
TIP:
ViewingtheHelpofImageExpressUtilityLite• DisplayingtheHelpfileofImageExpressUtilityLitewhileitisrunning.
Click the [?] (help) icon on the control window.
The Help screen will be displayed.
• DisplayingtheHelpfileofGCTwhileitisrunning.
Click “Help (C)” → “Help” on the Cornerstone Edit screen.
The Help screen will be displayed.
• DisplayingthehelpfileusingtheStartMenu.
Click “Start” → “All programs” or “Programs” → “NEC Projector User Supportware” → “Image Express Utility Lite” → “Image Express Utility Lite Help”.
The Help screen will be displayed.

175
8. User Supportware
Projecting an Image from an Angle (Geometric Correction Tool in Image Express Utility Lite) TheGeometricCorrectionTool (GCT) functionallowsyou tocorrectdistortionof imagesprojectedeven fromanangle.
What you can do with GCT
• TheGCTfeatureincludesthefollowingthreefunctions
• 4-pointCorrection:Youcanfitaprojectedimagewithintheborderofthescreeneasilybyalignthefourcornersofanimagetotheonesofthescreen.
• Multi-point Correction:Youcancorrectadistortedimageonthecornerofawallorirregularshapedscreenbyusingmanyseparatedscreenstocorrecttheimageaswellas4-pointCorrection.
• Parameters Correction:Youcancorrectadistortedimagebyusingacombinationoftransformationalrulespreparedinadvance.
Thissectionwillshowanexampleforusewith4-pointCorrection.Forinformationabout“Multi-pointCorrection”and“ParametersCorrection”,seethehelpfileofImageExpressUtilityLite.(→page171)
• Yourcorrectiondatacanbestoredintheprojectororyourcomputerwhichcanberestoredwhennecessary.
• Geometriccorrectioncanbeusedwhenconnectedtothenetwork(bywiredorwirelessLAN)orbyvideocable.
Preparation:Adjusttheprojectorpositionorthezoomsothattheprojectedimagecancoverthewholescreenarea.
1. Clickthe“ ”(Picture)iconandthenthe“ ”button.
The “4-point Correction” window will be displayed.
2. Clickthe“StartCorrection”buttonandthen“Start4-pointCorrection”button.
A green frame and a mouse pointer ( ) will be displayed.
• Four[• ] marks will be appeared at four corners of the green frame

176
8. User Supportware
3. Usethemousetoclickthe[ • ]markofwhichcorneryouwishtomove.
The currently selected [ • ] mark will turn red.
(In the above example, Windows screens are omitted for clarification.)
4. Dragtheselected[ • ]marktothepointyouwishtocorrectanddropit.
• Whenyouclicksomewherewithintheprojectimagearea,thenearest[• ] mark will go to the position where the mouse cursor is.
5. Repeat Step 3 and 4 to correct the distortion of the projected image.
6. After completing, right-click the mouse.
The green frame and the mouse pointer will disappear from the projected image area. This will complete the cor-rection.
7. Clickthe“X”(close)buttononthe“4-pointCorrection”window.
The “4-point Correction” window will disappear and the 4-point correction will take effect.
8. Clickthe“ ”buttononthecontrolwindowtoexittheGCT.
TIP:• Afterperformingthe4-pointcorrection,youcansavethe4-pointcorrectiondatatotheprojectorbyclicking“File”→“Writingto
theprojector…”onthe“4-pointCorrection”window.• SeetheHelpofImageExpressUtilityLiteforoperating“4-pointCorrection”windowandotherfunctionsthanGCT.(→page
171)

177
8. User Supportware
Using the Projector to Operate Your Computer over a LAN (Desktop Control Utility 1.0)
UsingDesktopControlUtility1.0allowsyoutoremotelyoperateyourcomputerplacedatadistancefromtheprojectoroveranetwork(wiredLANorwirelessLAN).
What you can do with Desktop Control Utility 1.0
• AcommerciallyavailableUSBmouseisconnectedtotheprojectortooperatethecomputer.
• Suppose,forexample,aPowerPointfiletobepresentedinaconferenceissavedtoacomputerinyouroffice.IfthiscomputerisconnectedtotheprojectorintheconferenceroomwithLANwhentheconferenceisheld,thedesktopscreenofthecomputerinyouroffice(Windows7/WindowsVista/WindowsXP)canbeprojectedandthePower-Pointfilecanbepresentedbyoperatingtheprojector.Inotherwordsthecomputerdoesnotneedtobebroughtintotheconferenceroom.
IMPORTANT:• YoucanusetheDesktopControlUtility1.0tooperateacomputerlocatedinaseparateroomfromtheprojectoroveranetwork.
Therefore,caremustbeexercisedtopreventanythirdpartyfromviewingthescreenofyourcomputer(importantdocuments),copyingfiles,orturningoffthepower.
NECassumesnoliabilityforanylossordamagesarisingfrominformationleakorsystemfailurewhileyouareusingDesktopControlUtility1.0.
• ThiswilldisconnectLANconnectionwhenthecomputergoesinthestandbymodewhiletheDesktopControlUtility1.0isbeingused.
IntheWindows7/WindowsVista,select[ControlPanel]→[HardwareandSound]→[PowerOptions].Set[Changewhenthecomputersleeps]to[Never].
In the Windows XP, click [Control Panel] → [Performance and Maintenance] → [Power Options] → [System Standby] →[Never].
• ThescreensaverfunctionisoffwhileDesktopControlUtility1.0isrunning.
Connecting the projector to a LANConnecttheprojectortotheLANbyfollowingtheinstructionsin“ConnectingtoaWiredLAN”(→page150),“Con-nectingtoaWirelessLAN”(→page151)and“9ApplicationMenus-NETWORKSETTINGS”(→page120)

178
8. User Supportware
Using the projector to operate your computer’s desktop screen
IMPORTANT:• IncaseofWindows7/WindowsVista,disabletheuseraccountcontrolbeforeusingDesktopControlUtility1.0. WindowsVistahas“UserAccountControl”functiontoprotectthecomputer.Theuseraccountconfirmationwindowmaybe
displayed. SinceDesktopControlUtility1.0cannottransfertheuseraccountconfirmationwindow,thiswindowmakestheoperationunavail-
able.BeforeusingDesktopControlUtility1.0,itisnecessarytodisabletheuseraccountcontrolofWindows7/WindowsVista.Afterloggingonwiththeadministratoraccount,followtheprocedurebelowtochangethesetting:
[Change Procedure]<For Windows 7>1 Click[ControlPanel]fromtheStartManu.
2 Click[UserAccountsandFamilySafety].
3 Click[UserAccounts].
4 Click[ChangeUserAccountControlsettings].
5 Change[Choosewhentobenotifiedaboutchangestoyourcomputer]to[Nevernotify]andclick[OK].
• Ifrestartingisrequested,click[Restartnow].
<ForWindowsVista>1 Click[ControlPanel]fromtheStartMenu.
2 Click[UserAccountsandFamilySafety].
3 Click[UserAccount].
4 Click[Enable/DisableUserAccountControl].
5 Remove the checkmark for [Use User Account Control (UAC) to Help Computer Protection] and click[OK].
• Ifrebootingisrequested,click[RebootNow].
UponcompletionofDesktopControlUtility,itisrecommendedtoenabletheuseraccountcontrol.

179
8. User Supportware
•Operationoncomputer1 ClickWindows[Start]→[AllPrograms]→[NECProjectorUserSupportware]→[DesktopControlUtility
1.0]→[DesktopControl],inthatorder.
The “Selection Of Network Connections” window is displayed.
This displays a list of the network devices connected to the computer you are using.
2 Selectthenetworkdevicetouseandclick[OK].
The “Startup password settings” window will be displayed.
• IncaseofWindows7/WindowsVista,theUserAccountControlWindowisdisplayed.Click[OK]orinputtheadministrator password.
Screen when Desktop Control Utility 1.0 is started first time already
Screen if starting password has been set
IMPORTANT:• Besuretowritedownthestartingpasswordincaseyouforgetit.• ThestartingpasswordmustbeinputeachtimeDesktopControlUtility1.0isstarted.• Shouldyouforgetthestartingpassword,reinstalltheDesktopControlUtility1.0.AscreenliketheonebelowisdisplayedwhenthesoftwareisstartedonaPCinstalledwithWindowsXPServicePack2(SP2)(orlater).Click“Unblock”ifthisisdisplayed.

180
8. User Supportware
3 InputthestartingpasswordofDesktopControlUtility1.0,andclick[OK].
The “Current password” window will be displayed.
NOTE:ThecharacterstringdisplayedinthepasswordfieldvarieseachtimeDesktopControlUtility1.0isstarted.
4 Write down the character string displayed in the password field.
Write down “PMHN” in the screen example of step 3.
5 Click[OK].
Desktop Control Utility 1.0 will be started.
Move to the room where the projector is installed, with the paper on which you have written down the password in step 4.

181
8. User Supportware
•Operatingtheprojector(connectingcomputer)1 ConnectaUSBmousethatiscommerciallyavailabletotheprojector.
USB
2 Turn on the power to the projector.
Set the LAN setting of the projector in advance.
3 PresstheSOURCEbuttonontheprojectorunit.
The Source list will be displayed.
In case of the remote control, press the NETWORK button.
The “network menu” screen will be displayed, proceed to step 5.
4 Press the /buttonstoselect[NETWORK],andthenpresstheENTERbutton.
The “network menu” screen will be displayed.

182
8. User Supportware
5 Click[DESKTOPCONTROLUTILITY].
The “DESKTOP CONTROL UTILITY menu” screen will be displayed.
6 Click“ENTRY”.
A password input screen will be displayed.
7 Inputthepasswordyouhavewrittendowninstep4of“Operationoncomputer”.
• Clickthe[BS]buttonontherightsideofthe[PASSWORD]fieldtodeletethecharactertotheleftofthecharacterinsertion point.
8 After inputting the password, click the buttonontherightsideofthe[PASSWORD]field.
You are returned to the “DESKTOP CONTROL UTILITY” menu screen.
9 Click[COMPUTERSEARCH].
The “COMPUTER LIST” screen will be displayed.
If the connection destination has not been found as a result of a COMPUTER SEARCH, search for the connection destination by inputting the IP address of the computer at the connection destination, click “Input IP Address”.

183
8. User Supportware
10Clickthecomputerattheconnectiondestinationandthen[OK].
The desktop screen of the computer at the connection destination will be displayed.
•Operatingtheprojector(manipulatingdesktopscreen)ThedisplayeddesktopscreencanbemanipulatedbyusingtheUSBmouseconnectedtotheprojector.IftheEXITbuttonoftheprojectororremotecontrolispressedwhilethedesktopscreenisdisplayed,anauxiliaryoperationbarisdisplayedatthelowerleftofthescreen.Manipulatetheauxiliaryoperationbarbyusingthebuttonsoftheprojectororremotecontrol.

184
8. User Supportware
<1> <2> <3> <4>
<1> (cut-off icon) �������Disconnects communication with the computer�
<2> (Shift icon) ����������When the highlight is moved to this icon and the ENTER button is pressed, shift lock status is set� The shift lock is canceled if the highlight is moved to this icon and the ENTER button is pressed again�
<3> (Ctrl icon) ������������When the highlight is moved to this icon and the ENTER button is pressed, control lock status is set� The control lock is canceled if the highlight is moved to this icon and the ENTER button is pressed again�
<4> (ESC icon) �����������The same operation as when the [ESC] key of the computer is pressed is performed� This icon is used, for example, to stop a slideshow of PowerPoint�
•Operatingtheprojector(disconnectingcommunications)1 Press the EXIT button while the desktop screen is displayed.
An auxiliary operation bar will be displayed at the lower left of the screen.
2 Move the highlight to (cut-off icon) and press the ENTER button.
Communication will be disconnected and you are returned to the “DESKTOP CONTROL UTILITY” menu screen.
To resume communication, click [COMPUTER SEARCH].
After that, follow step 10 on the preceding page.
REFERENCE:Communicationcanalsobedisconnectedbyclickingtheprojectoricononthetaskbarandthenclicking“Disconnect”whilethedesktopscreenisdisplayed.
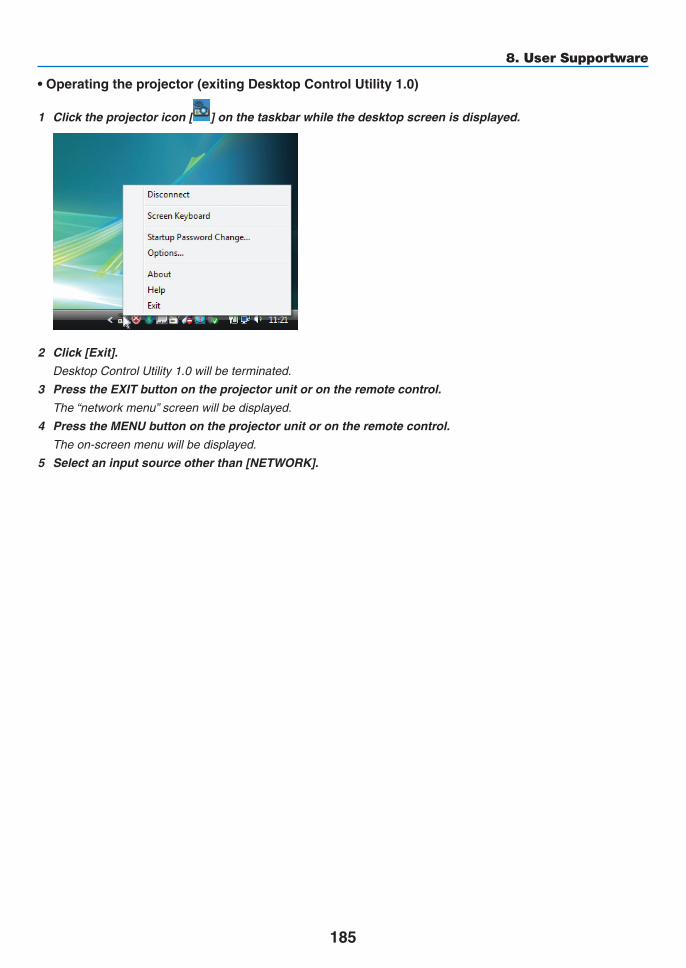
185
8. User Supportware
•Operatingtheprojector(exitingDesktopControlUtility1.0)
1 Clicktheprojectoricon[ ]onthetaskbarwhilethedesktopscreenisdisplayed.
2 Click[Exit].
Desktop Control Utility 1.0 will be terminated.
3 Press the EXIT button on the projector unit or on the remote control.
The “network menu” screen will be displayed.
4 Press the MENU button on the projector unit or on the remote control.
The on-screen menu will be displayed.
5 Selectaninputsourceotherthan[NETWORK].

186
8. User Supportware
Controlling the Projector over a LAN (PC Control Utility Pro 4)Usingtheutilitysoftware“PCControlUtilityPro4”,theprojectorcanbecontrolledfromacomputeroveraLAN.
Control FunctionsPowerOn/Off,signalselection,picturefreeze,picturemute,audiomute,adjusting,errormessagenotification,eventschedule.
ScreenofPCControlUtilityPro4
ThissectionprovidesanoutlineofpreparationforuseofPCControlUtilityPro4.ForinformationonhowtousePCControlUtilityPro4,seeHelpofPCControlUtilityPro4.
TIP:• PCControlUtilityPro4canbeusedwithaserialconnection.
Connect the projector to a LAN.ConnecttheprojectortotheLANbyfollowingtheinstructionsin“ConnectingtoaWiredLAN”(→page150),“Con-nectingtoaWirelessLAN(soldseparately)”(→page151)and“9ApplicationMenus-NETWORKSETTINGS”(→ page120)
Start PC Control Utility Pro 4Click“Start”→“Allprograms”or“Programs”→“NECProjectorUserSupportware”→“PCControlUtilityPro4”→ “PCControlUtilityPro4”.
NOTE:• FortheSchedulefunctionofthePCControlutilityPro4towork,youmusthaveyourcomputerrunningandnotinstandby/
sleepmode.Select“PowerOptions”fromthe“ControlPanel”inWindowsanddisableitsstandby/sleepmodebeforerunningthescheduler.
[Example]ForWindows7:Select“ControlPanel”→“SystemandSecurity”→“PowerOptions”→“Changewhenthecomputersleeps”→“Putthecomputertosleep”→“Never”.NOTE:• When[POWER-SAVING]isselectedfor[STANDBYMODE]fromthemenu,theprojectorcannotbeturnedonviathenetwork
(wiredLAN/wirelessLAN)connection. When[NETWORKSTANDBY]isselectedfor[STANDBYMODE],theprojectorcannotbeturnedonviawirelessLANconnection.
TIP:
ViewingtheHelpofPCControlUtilityPro4• DisplayingtheHelpfileofPCControlUtilityPro4whileitisrunning.
Click “Help (H)” → “Help (H) …” of window of PC Control Utility Pro 4 in this order.
The pop-up menu will be displayed.
• DisplayingthehelpfileusingtheStartMenu.
Click “Start” → “All programs” or “Programs” → “NEC Projector User Supportware” → “PC Control Utility Pro 4” → “PC Control Utility Pro 4 Help”.
The Help screen will be displayed.

187
9. Appendix
Throw distance and screen sizeFiveseparatebayonetstylelensescanbeusedonthisprojector.Refertotheinformationonthispageandusealenssuitedfortheinstallationenvironment(screensizeandthrowdistance).Forinstructionsonmountingthelens,seepage141.
Lens types and throw distancePA722X/PA721X/PA622X/PA621X
Screensize LensmodelnameNP11FL NP12ZL NP13ZL NP14ZL NP15ZL
30" 0.7-0.940" 0.6 0.9-1.2 1.2-2.460" 1.0 1.4-1.9 1.8 - 3.7 3.6 - 5.8 5.7 - 8.780" 1.3 1.9-2.5 2.4-4.9 4.8-7.8 7.6 - 11.6100" 1.6 2.4-3.2 3.0 - 6.1 6.0-9.7 9.6-14.6120" 2.0 2.9-3.8 3.7-7.4 7.3 - 11.7 11.5 - 17.6150" 2.5 3.7-4.8 4.6-9.2 9.1-14.7 14.4-22.0200" 4.9-6.4 6.1 - 12.3 12.2-19.6 19.3-29.4240" 5.9-7.7 7.4-14.8 14.7-23.6 23.2 - 35.3300" 7.4-9.6 9.2-18.5 18.4-29.5 29.1-44.2400" 9.8-12.8 12.3-24.7 24.6-39.4 38.8-59.0500" 12.3 - 16.0 15.4-30.8 30.7-49.2 48.6-73.8
TIPCalculationofthethrowdistancefromthescreensizeNP11FLlensthrowdistance(m)=H×0.8:0.6m(min.)to2.5m(max.)NP12ZLlensthrowdistance(m)=H×1.2toH×1.6:0.7m(min.)to16.0m(max.)NP13ZLlensthrowdistance(m)=H×1.5toH×3.0:1.2m(min.)to30.8m(max.)NP14ZLlensthrowdistance(m)=H×3.0toH×4.8:3.6m(min.)to49.2m(max.)NP15ZLlensthrowdistance(m)=H×4.7toH×7.3:5.7m(min.)to73.8m(max.)“H”(Horizontal)referstothescreenwidth.*Figuresdifferbyseveral%withthetableabovebecausethecalculationisapproximate.Ex.:Throwdistancewhenprojectingona150"screenwiththePA722X/PA721X/PA622X/PA621XusingtheNP13ZLlens:Accordingtothe“ScreenSize(forreference)”table(→page204),H(screenwidth)=304.8cm.Thethrowdistanceis304.8cm×1.5to304.8cm×3.0=457.2cmto914.4cm(becauseofthezoomlens).

188
9. Appendix
PA672W/PA671W/PA572W/PA571WScreensize Lensmodelname
NP11FL NP12ZL NP13ZL NP14ZL NP15ZL30" 0.7 - 1.040" 0.7 1.0 - 1.3 1.3 - 2.560" 1.0 1.5 - 2.0 1.9-3.8 3.8 - 6.1 5.9-9.180" 1.4 2.0 - 2.6 2.6 - 5.1 5.1 - 8.2 8.0 - 12.2100" 1.7 2.5 - 3.3 3.2-6.4 6.3 - 10.2 10.0-15.4120" 2.1 3.1-4.0 3.9-7.7 7.6 - 12.3 12.1 - 18.5150" 2.6 3.8 - 5.0 4.8-9.7 9.6-15.4 15.2 - 23.1200" 5.1 - 6.7 6.5-12.9 12.8 - 20.6 20.3-30.9240" 6.2 - 8.0 7.8 - 15.5 15.4-24.7 24.4-37.1300" 7.7 - 10.1 9.7-19.4 19.3-30.9 30.5-46.5400" 10.3-13.4 13.0-25.9 25.8-41.3 40.7-62.0500" 12.9-16.8 16.2-32.4 32.2 - 51.7 51.0 - 77.6
TIPCalculationofthethrowdistancefromthescreensizeNP11FLlensthrowdistance(m)=H×0.8:0.7m(min.)to2.6m(max.)NP12ZLlensthrowdistance(m)=H×1.2toH×1.6:0.7m(min.)to16.8m(max.)NP13ZLlensthrowdistance(m)=H×1.5toH×3.0:1.3m(min.)to32.4m(max.)NP14ZLlensthrowdistance(m)=H×3.0toH×4.8:3.8m(min.)to51.7m(max.)NP15ZLlensthrowdistance(m)=H×4.7toH×7.2:5.9m(min.)to77.6m(max.)“H”(Horizontal)referstothescreenwidth.*Figuresdifferbyseveral%withthetableabovebecausethecalculationisapproximate.Ex.:Throwdistancewhenprojectingona150"screenwiththePA672W/PA671W/PA572W/PA571WusingtheNP13ZLlens:Accordingtothe“ScreenSize(forreference)”table(→page204),H(screenwidth)=323.1cm.Thethrowdistanceis323.1cm×1.5to323.1cm×3.0=484.7cmto969.3cm(becauseofthezoomlens).
PA622U/PA621U/PA522U/PA521UScreensize Lensmodelname
NP11FL NP12ZL NP13ZL NP14ZL NP15ZL30" 0.7-0.940" 0.7 1.0 - 1.3 1.2 - 2.560" 1.0 1.5-1.9 1.9-3.8 3.7 - 6.0 5.9-9.080" 1.4 2.0 - 2.6 2.5 - 5.1 5.0 - 8.0 7.9-12.1100" 1.7 2.5 - 3.3 3.2 - 6.3 6.3 - 10.1 9.9-15.1120" 2.1 3.0-3.9 3.4-7.6 7.5 - 12.1 11.9-18.2150" 2.6 3.8-4.9 4.8-9.5 9.4-15.2 14.9-22.8200" 5.1 - 6.6 6.6 - 12.7 12.6 - 20.3 20.0 - 30.5240" 6.1-7.9 7.6 - 15.3 15.2-24.4 24.0-36.6300" 7.6-9.9 9.6-19.1 19.0-31.5 30.1-45.8400" 10.2 - 13.2 12.8 - 25.5 25.4-40.7 40.1-61.1500" 12.7 - 16.5 16.0-31.9 31.8-50.9 50.2-76.4
TIPCalculationofthethrowdistancefromthescreensizeNP11FLlensthrowdistance(m)=H×0.8:0.5m(min.)to2.6m(max.)NP12ZLlensthrowdistance(m)=H×1.2toH×1.5:0.7m(min.)to16.5m(max.)NP13ZLlensthrowdistance(m)=H×1.5toH×3.0:1.2m(min.)to31.9m(max.)NP14ZLlensthrowdistance(m)=H×2.9toH×4.7:3.7m(min.)to50.9m(max.)NP15ZLlensthrowdistance(m)=H×4.6toH×7.1:5.9m(min.)to76.4m(max.)“H”(Horizontal)referstothescreenwidth.*Figuresdifferbyseveral%withthetableabovebecausethecalculationisapproximate.Ex.:Throwdistancewhenprojectingona150"screenwiththePA622U/PA621U/PA522U/PA521UusingtheNP13ZLlens:Accordingtothe“ScreenSize(forreference)”table(→page204),H(screenwidth)=323.1cm.Thethrowdistanceis323.1cm×1.5to323.1cm×3.0=484.7cmto969.3cm(becauseofthezoomlens).

189
9. Appendix
Projectionrangeforthedifferentlenses
40-150"
30-500"
40-500" 60-500"
60-500"
60-500"
NP12ZL
NP14ZL
NP11FL
NP30ZL
PA622U/PA621U/PA522U/PA521U: 0.7–2.6 mPA672W/PA671W/PA572W/PA571W: 0.7–2.6 mPA722X/PA721X/PA622X/PA621X: 0.6–2.5 m
PA622U/PA621U/PA522U/PA521U: 1.0–11.3 mPA672W/PA671W/PA572W/PA571W: 1.0–11.3 mPA722X/PA721X/PA622X/PA621X: 1.0–10.9 m
PA622U/PA621U/PA522U/PA521U: 1.0–11.3 mPA672W/PA671W/PA572W/PA571W: 1.0–11.3 mPA722X/PA721X/PA622X/PA621X: 1.0–10.9 m
NP13ZL PA622U/PA621U/PA522U/PA521U: 1.2–31.9 mPA672W/PA671W/PA572W/PA571W: 1.2–32.1 mPA722X/PA721X/PA622X/PA621X: 1.2–30.8 m
PA622U/PA621U/PA522U/PA521U: 3.7–50.9 mPA672W/PA671W/PA572W/PA571W: 3.7–51.2 mPA722X/PA721X/PA622X/PA621X: 3.6–49.2 m
NP14ZL PA622U/PA621U/PA522U/PA521U: 5.9–76.4 mPA672W/PA671W/PA572W/PA571W: 5.9–76.9 mPA722X/PA721X/PA622X/PA621X: 5.7–73.8 m
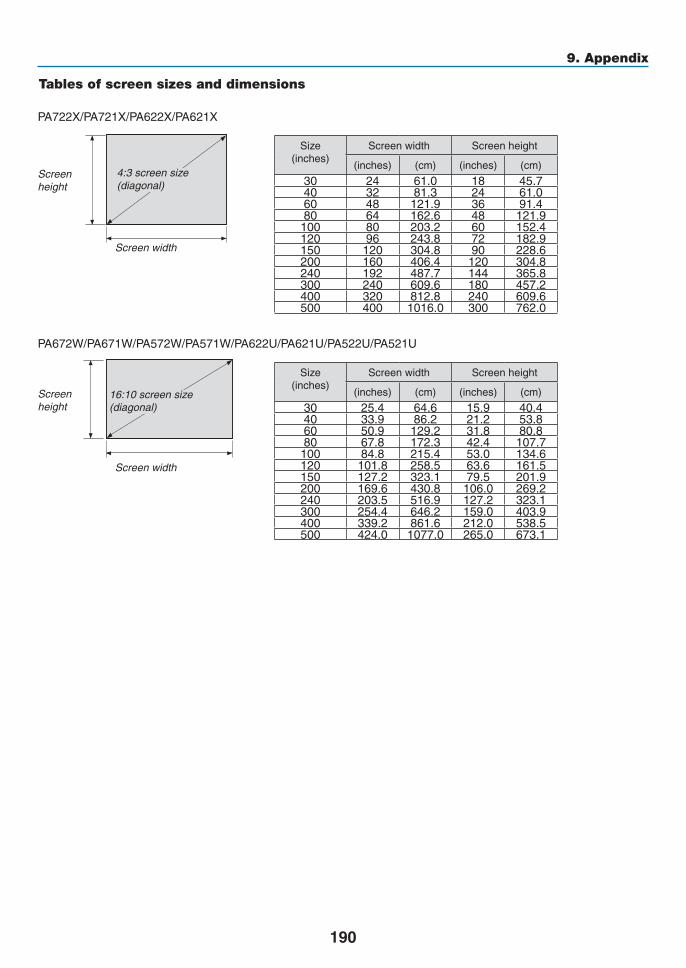
190
9. Appendix
Tables of screen sizes and dimensions
PA722X/PA721X/PA622X/PA621X
PA672W/PA671W/PA572W/PA571W/PA622U/PA621U/PA522U/PA521U
Screen height
Screen height
Screen width
Screen width
4:3 screen size (diagonal)
16:10 screen size (diagonal)
Size(inches)
Screenwidth Screenheight
(inches) (cm) (inches) (cm)
30 24 61.0 18 45.740 32 81.3 24 61.060 48 121.9 36 91.480 64 162.6 48 121.9100 80 203.2 60 152.4120 96 243.8 72 182.9150 120 304.8 90 228.6200 160 406.4 120 304.8240 192 487.7 144 365.8300 240 609.6 180 457.2400 320 812.8 240 609.6500 400 1016.0 300 762.0
Size(inches)
Screenwidth Screenheight
(inches) (cm) (inches) (cm)
30 25.4 64.6 15.9 40.440 33.9 86.2 21.2 53.860 50.9 129.2 31.8 80.880 67.8 172.3 42.4 107.7100 84.8 215.4 53.0 134.6120 101.8 258.5 63.6 161.5150 127.2 323.1 79.5 201.9200 169.6 430.8 106.0 269.2240 203.5 516.9 127.2 323.1300 254.4 646.2 159.0 403.9400 339.2 861.6 212.0 538.5500 424.0 1077.0 265.0 673.1

191
9. Appendix
Lens shifting rangeThisprojectorisequippedwithalensshiftfunctionforadjustingthepositionoftheprojectedimagebyturningthelensshiftdials.Thelenscanbeshiftedwithintherangeshownbelow.Description of symbols:V indicates vertical (height of the projected image), H indicates horizontal (width of theprojectedimage).
NOTE:ThelensshiftfunctioncannotbeusedwhenusingtheNP11FLlens.
PA722X/PA721X/PA622X/PA621X
Desk/frontprojection
1V
1H0.3H 0.3H
0.5V
0.1V 0.1H 0.1H
Ceiling/frontprojector
1V
1H0.3H0.1H 0.1H
0.3H
0.5V
0.1V
PA672W/PA671W/PA572W/PA571W
Desk/frontprojection
1V
1H0.3H 0.3H
0.6V
0.1V 0.1H 0.1H
Height of projected image
Width of projected image
Height of projected image
Width of projected image
Height of projected image
Width of projected image

192
9. Appendix
Ceiling/frontprojector
1V
1H0.3H0.1H 0.1H
0.3H
0.6V
0.1V
PA622U/PA621U/PA522U/PA521U
Desk/frontprojection
1V
1H0.3H*1
0.1H0.3H*1
0.5V
0.1V 0.1H
Ceiling/frontprojector
1V
1H0.3H*1 0.3H*1
0.1H
0.5V
0.1V 0.1H
NOTE*1:Horizontallensshiftrangeis0.15Hatmorethan150"projectedimagewiththelensNP13ZL.
Ex.:Whenprojectingona150"screenThissectionisillustratedintheexampleforPA722X/PA721X/PA622X/PA621X(4:3)•ThefollowingdescriptioncanapplytothePA672W/PA671W/PA572W/PA571W/PA622U/PA621U/PA522U/PA521U(16:10).Tocalculate, usescreensizesand themaximumvalue for the lensshift forPA672W/PA671W/PA572W/PA571W/PA622U/PA621U/PA522U/PA521U.Accordingtothetablesofscreensizesanddimensions(→page204),H=304.8cm,V=228.6cm.Adjustmentrangeintheverticaldirection:Theprojectedimagecanbemovedupwards0.5×228.6cm=114cm,downwards0.1×228.6cm=22cm(whenthelensisatthecenterposition).Foraceiling/frontinstallation,theabovefiguresareinverted.Adjustmentrangeinthehorizontaldirection:Theprojectedimagecanbemovedtotheleft0.3×304.8cm=91cm,totheright0.3×304.8cm=91cm.*Figuresdifferbyseveral%becausethecalculationisapproximate.
Height of projected image
Width of projected image
Height of projected image
Width of projected image
Height of projected image
Width of projected image

193
9. Appendix
Compatible Input Signal ListAnalog Computer Signal
Signal Resolution(dots) AspectRatio RefreshRate(Hz)VGA 640 × 480 4 : 3 60/72/75/85/iMacSVGA 800 × 600 4 : 3 56/60/72/75/85/iMacXGA 1024 × 768 *1 4 : 3 60/70/75/85/iMacXGA+ 1152 × 864 4 : 3 60/70/75/85
WXGA
1280 × 768 *2 15 : 9 601280 × 800 *2 16 : 10 601360 × 768 *5 16 : 9 *4 601366 × 768 *5 16 : 9 *4 60
Quad-VGA 1280 × 960 4 : 3 60/75/85SXGA 1280 × 1024 5 : 4 60/75/85SXGA+ 1400 × 1050 4 : 3 60/75WXGA+ 1440 × 900 16 : 10 60WXGA++ 1600 × 900 16 : 9 60UXGA 1600 × 1200 *3 4 : 3 60/65/70/75WSXGA+ 1680 × 1050 16 : 10 60WUXGA 1920 × 1200 *3 16 : 10 60(ReducedBlanking)2K 2048 × 1080 17 : 9 60FullHD 1920 × 1080 *3 16 : 9 60MAC13" 640 × 480 4 : 3 67MAC16" 832 × 624 4 : 3 75MAC19" 1024 × 768 4 : 3 75MAC21" 1152 × 870 *6 4 : 3 *4 75MAC23" 1280 × 1024 5 : 4 65
ComponentSignal Resolution(dots) AspectRatio RefreshRate(Hz)
HDTV(1080p) 1920 × 1080 16 : 9 50/60HDTV(1080i) 1920 × 1080 16 : 9 48/50/60HDTV(720p) 1280 × 720 16 : 9 50/60SDTV(480p) 720 × 480 4:3/16:9 60SDTV(576p) 720 × 576 4:3/16:9 50SDTV(480i) 720 × 480 4:3/16:9 60SDTV(576i) 720 × 576 4:3/16:9 50
CompositeVideo/S-VideoSignal AspectRatio RefreshRate(Hz)
NTSC 4 : 3 60PAL 4 : 3 50PAL60 4 : 3 60SECAM 4 : 3 50

194
9. Appendix
HDMISignal Resolution(dots) AspectRatio RefreshRate(Hz)
VGA 640 × 480 4 : 3 60SVGA 800 × 600 4 : 3 60XGA 1024 × 768 *1 4 : 3 60HD 1280 × 720 *2 16 : 9 60
WXGA1280 × 768 *2 15 : 9 601280 × 800 *2 16 : 10 601366 × 768 *5 16 : 9 *4 60
Quad-VGA 1280 × 960 4 : 3 60SXGA 1280 × 1024 5 : 4 60SXGA+ 1400 × 1050 4 : 3 60WXGA+ 1440 × 900 16 : 10 60WXGA++ 1600 × 900 16 : 9 60WSXGA+ 1680 × 1050 16 : 10 60UXGA 1600 × 1200 *3 4 : 3 60FullHD 1920 × 1080 *3 16 : 9 60WUXGA 1920 × 1200 *3 16 : 10 602K 2048 × 1080 17 : 9 60QXGA iPad9.7"
2048 × 1536 4 : 3 60
4M 2304 × 1728 4 : 3 60WQHD iMac27"
2560 × 1440 16 : 9 60
WQXGA 2560 × 1600 16 : 10 60(ReducedBlanking)
4K3840 × 2160 16 : 9 23.98/24/25/29.97/304096 × 2160 17 : 9 24
HDTV(1080p) 1920 × 1080 16 : 9 24/25/30/50/60HDTV(1080i) 1920 × 1080 16 : 9 48/50/60HDTV(720p) 1280 × 720 16 : 9 50/60SDTV(480p) 720 × 480 4:3/16:9 60SDTV(576p) 720 × 576 4:3/16:9 50SDTV(480i) 1440 × 480 4:3/16:9 60SDTV(576i) 1440 × 576 4:3/16:9 50
HDMI 3DSignalResolution(dots) RefreshRate(Hz) AspectRatio 3DFormat
1920 × 1080p
23.98/24
16 : 9
FramPakingSideBySideTopandBottom
25SideBySideTopandBottom
50SideBySideTopandBottom
59.94/60SideBySideTopandBottom
1920 × 1080i50
TopandBottomSideBySide
59.94/60TopandBottomSideBySide
1920 × 720p
50FramPakingSideBySideTopandBottom
59.94/60FramPakingSideBySideTopandBottom

195
9. Appendix
DisplayPortSignal Resolution(dots) AspectRatio RefreshRate(Hz)
VGA 640 × 480 4 : 3 60SVGA 800 × 600 4 : 3 60XGA 1024 × 768 *1 4 : 3 60HD 1280 × 720 *2 16 : 9 60
WXGA1280 × 768 *2 15 : 9 601280 × 800 *2 16 : 10 601366 × 768 *5 16 : 9 *4 60
Quad-VGA 1280 × 960 4 : 3 60SXGA 1280 × 1024 5 : 4 60SXGA+ 1400 × 1050 4 : 3 60WXGA+ 1440 × 900 16 : 10 60WXGA++ 1600 × 900 16 : 9 60WSXGA+ 1680 × 1050 16 : 10 60UXGA 1600 × 1200 *3 4 : 3 60FullHD 1920 × 1080 *3 16 : 9 60WUXGA 1920 × 1200 *3 16 : 10 60(ReducedBlanking)2K 2048 × 1080 17 : 9 60QXGA iPad9.7"
2048 × 1536 4 : 3 60
4M 2304 × 1728 4 : 3 60WQHD iMac27"
2560 × 1440 16 : 9 60
WQXGA 2560 × 1600 16 : 10 60(ReducedBlanking)
4K3840 × 2160 16 : 9 23.98/24/25/29.97/304096 × 2160 17 : 9 24
HDTV(1080p) 1920 × 1080 16 : 9 24/25/30/50/60HDTV(720p) 1280 × 720 16 : 9 50/60SDTV(480p) 720 × 480 4:3/16:9 60SDTV(576p) 720 × 576 4:3/16:9 50
DisplayPort 3DSignalResolution(dots) RefreshRate(Hz) AspectRatio 3DFormat
1920 × 1080p
23.98/24
16 : 9
FramPakingSideBySideTopandBottom
25SideBySideTopandBottom
50SideBySideTopandBottom
59.94/60SideBySideTopandBottom
100 FrameSequential120 FrameSequential
1920 × 1080i50
TopandBottomSideBySide
59.94/60TopandBottomSideBySide
1920 × 720p
50FramPakingSideBySideTopandBottom
100 FrameSequential
59.94/60FramPakingSideBySideTopandBottom
120 FrameSequential
*1 NativeresolutiononXGAmodel(PA722X/PA721X/PA622X/PA621X)*2 NativeresolutiononWXGAmodel(PA672W/PA671W/PA572W/PA571W)*3 NativeresolutiononWUXGAmodel(PA622U/PA621U/PA522U/PA521U)*4 ApproximateValue*5 Theprojectormayfailtodisplaythesesignalscorrectlywhen[AUTO]isselectedfor[ASPECTRATIO]intheon-screenmenu. Thefactorydefaultis[AUTO]for[ASPECTRATIO].Todisplaythesesignals,select[16:9]for[ASPECTRATIO].*6 Theprojectormayfailtodisplaythesesignalscorrectlywhen[AUTO]isselectedfor[ASPECTRATIO]intheon-screenmenu. Thefactorydefaultis[AUTO]for[ASPECTRATIO].Todisplaythesesignals,select[4:3]for[ASPECTRATIO].
• Signalsexceedingtheprojector’sresolutionarehandledwithAdvancedAccuBlend.• WithAdvancedAccuBlend,thesizeofcharactersandruledlinesmaybeunevenandcolorsmaybeblurred.• Uponshipment,theprojectorissetforsignalswithstandarddisplayresolutionsandfrequencies,butadjustmentsmayberequired
dependingonthetypeofcomputer.

196
9. Appendix
SpecificationsModelname PA722X/PA721X/PA622X/PA621X/PA672W/PA671W/PA572W/PA571W/PA622U/
PA621U/PA522U/PA521UMethod ThreeprimarycolorliquidcrystalshutterprojectionmethodSpecificationsofmainparts
Liquidcrystalpanel
Size PA722X/PA721X/PA622X/PA621X:0.79"(withMLA)×3(aspectratio:4:3)PA672W/PA671W/PA572W/PA571W:0.76"(withMLA)×3(aspectratio:16:10)PA622U/PA621U/PA522U/PA521U:0.76"(withMLA)×3(aspectratio:16:10)
Pixels(*1) PA722X/PA721X/PA622X/PA621X:786,432(1024dots×768lines)PA672W/PA671W/PA572W/PA571W:1,024,000(1280dots×800lines)PA622U/PA621U/PA522U/PA521U:2,304,000(1920dots×1200lines)
Projectionlenses Zoom Manual(zoomrangedependsonlens)Focus ManualLensshifting Manual
Lightsource PA722X/PA721X/PA672W/PA671W/PA622U/PA621U:355WPA622X/PA621X/PA572W/PA571W/PA522U/PA521U:330W(264WwhenEcomodeison)
Opticaldevice Opticalisolationbydichroicmirror,combiningbydichroicprismLightoutput(*2)(*3)
ECOOFF PA722X/PA721X:7200lmPA672W/PA671W/:6700lmPA622U/PA621U/PA622X/PA621X:6200lmPA572W/PA571W/PA522U/PA521U:5200lm
ECOON(80%) PA722X/PA721X:5790lmPA672W/PA671W/:5360lmPA622U/PA621U/PA622X/PA621X:4960lmPA572W/PA571W/PA522U/PA521U:4160lm
Contrastratio(*2)(allwhite/allblack) 5000:1withIris(4000:1withIrisonPA622X/PA572W/PA522U)
Screensize(throwdistance) 40"to500"(throwdistancedependsonlens)Colorreproducibility 10-bitcolorprocessing(approx.1.07billioncolors)(*4)Audiooutput Built-in10WmonauralspeakerScanningfrequency Horizontal 15to153kHzorless(24kHzorgreaterforRGBinputs),conformingtoVESA
standardsVertical 48to120Hz(50to85HzforHDMIinputs),conformingtoVESAstandards
Mainadjustmentfunctions Manualzoom,manualfocus,manuallensshift,inputsignalswitching(Computer/HDMI/DisplayPort/Video/S-Video/Viewer/Network),autoimageadjustment,pictureenlarging,picturepositionadjustment,muting(bothvideoandaudio),poweron/off,on-screendisplay/selection,etc.
Max.displayresolution(horizontal×vertical)
Analog:1920×1200(handledwithAdvancedAccuBlend)Digital:2560×1600(handledwithAdvancedAccuBlend)
InputsignalsR,G,B,H,V RGB:0.7Vp-p/75Ω
Y:1.0Vp-p/75Ω(withNegativePolaritySync)Cb,Cr(Pb,Pr):0.7Vp-p/75ΩH/VSync:4.0Vp-p/TTLCompositeSync:4.0Vp-p/TTLSynconG:1.0Vp-p/75Ω(withSync)
Compositevideo 1.0Vp-p/75ΩS-Video Y:1.0Vp-p/75Ω
C:286Vp-p/75ΩComponent Y:1.0Vp-p/75Ω(withSync)
Cb,Cr(Pb,Pr):0.7Vp-p/75ΩDTV:480i,480p,720p,1080i,1080p(60Hz) 576i,576p,720p,1080i(50Hz)DVD:Progressivesignal(50/60Hz)
Audio 0.5Vrms/22kΩorgreaterInput/outputconnectors

197
9. Appendix
Modelname PA722X/PA721X/PA622X/PA621X/PA672W/PA671W/PA572W/PA571W/PA622U/PA621U/PA522U/PA521U
Computer/Component
Videoinput MiniD-Sub15-pin×1,BNCconnector×5Videooutput MiniD-Sub15-pin×1Audioinput Stereominijack×3Audiooutput Stereominijack×1(commonforallsignals)
HDMI Videoinput HDMI®ConnectortypeA×2DeepColor(colordepth):8-/10-/12-bitcompatibleColorimetry:RGB,YcbCr444andYcbCr422compatibleLipSynccompatible,HDCPcompatible(*5)
Audioinput HDMI: Samplingfrequency–32/44.1/48kHz Samplingbits–16/20/24bits
DisplayPort Videoinput DisplayPort×1Datarate:2.7Gbps/1.62GbpsNo.lanes:1lane/2lanes/4lanesColordepth:6-bit,8-bit,10-bitColorimetry:RGB,YcbCr444andYcbCr422compatibleHDCPcompatible(*5)
Audioinput DisplayPort: Samplingfrequency–32/44.1/48kHz Samplingbits–16/20/24bits
BNC(CV) Videoinput BNC×5Audioinput RCA(RCAL/R)×1
BNC(Y/C) Videoinput BNC×2Audioinput (Commonwithvideoaudioinputconnector)
PCcontrolconnector D-Sub9-pin×1USBport USBtypeA×1USBportforwirelessLAN USBtypeA×1Ethernet/HDBaseTport RJ-45×1,10BASE-T/100BASE-TXRemoteconnector Stereominijack×1
Usageenvironment Operatingtemperature:5to40ºC(*6)Operatinghumidity:20to80%(withnocondensation)Storagetemperature:-10to50ºC(*6)Storagehumidity:20to80%(withnocondensation)
Powersupply 100-240VAC,50/60HzPowerconsumption
Ecomodeoff PA722X/PA721X/PA622X/PA621X/PA672W/PA671W/PA572W/PA571W:464W(100-130V)/443W(200-240V)PA622U/PA621U/PA522U/PA521U:477W(100-130V)/455W(200-240V)
Ecomodeon PA722X/PA721X/PA622X/PA621X/PA672W/PA671W/PA572W/PA571W:372W(100-130V)/356W(200-240V)PA622U/PA621U/PA522U/PA521U:384W(100-130V)/369W(200-240V)
Standby 16W(100-130V)/18W(200-240V)(6WinNetworkstandbymode)
Power-savingmode 0.2WRatedinputcurrent PA722X/PA721X/PA672W/PA671W/PA622U/PA621U:5.5-2.2A
PA622X/PA621X/PA522U/PA521U/PA572W/PA571W:5.1-2.1AExternaldimensions 19.7"(width)×5.7"(height)×14.1"(depth)/499(width)×144(height)×359(depth)
mm(notincludingprotrudingparts)Weight 18.3lbs/8.3kg
(notincludinglens)
*1 Effectivepixelsaremorethan99.99%.*2 Thisisthelightoutputvalue(lumens)whenthe[PRESET]modeissetto[HIGH-BRIGHT].Ifanyothermodeisselectedasthe
[PRESET]mode,thelightoutputvaluemaydropslightly.*3 CompliancewithISO21118-2005*4 Fullcolor(approx.16.77millioncolorsorgreater)whentheHDMI,DisplayPort,viewerornetworkinputconnectorisselected.*5 HDMI®(DeepColor,LipSync)withHDCP WhatisHDCP/HDCPtechnology? HDCPisanacronymforHigh-bandwidthDigitalContentProtection.HighbandwidthDigitalContentProtection(HDCP)isasystem
forpreventingillegalcopyingofvideodatasentoveraHigh-DefinitionMultimediaInterface(HDMI). IfyouareunabletoviewmaterialviatheHDMIinput,thisdoesnotnecessarilymeantheprojectorisnotfunctioningproperly.With
theimplementationofHDCP,theremaybecasesinwhichcertaincontentisprotectedwithHDCPandmightnotbedisplayedduetothedecision/intentionoftheHDCPcommunity(DigitalContentProtection,LLC).
Video:DeepColor;8/10/12-bit,LipSync Audio:LPCM;upto2ch,samplerate32/44.1/48KHz,samplebit;16/20/24-bit*6 35to40ºC–“Forcedecomode”
- Thesespecificationsandtheproduct’sdesignaresubjecttochangewithoutnotice.

198
9. Appendix
250 (9.8)
162
(6.4
)
359
(14.
1)
368.
1 (1
4.5)
78.5
(3.1
)14
2 (5
.6)
200
(7.9
)
499 (19.6)
Cabinet Dimensions
Lens center
Lens center
Holes for ceiling mount
Unit:mm(inch)
Unit:mm(inch)

199
9. Appendix
Mounting the cable cover (sold separately)
Mounting the separately sold cable cover on the projector allows you hide the cables for a cleanerappearance.
CAUTION• Aftermountingthecablecover,besuretofastenusingthescrewsprovided.Ifnot,thecablecovercouldfall,
damagingthecablecoverandpossiblyresultingininjury.
• Donotbundlethepowercordandplaceitunderthecablecover.Doingsocouldleadtofire.
• Donotapplyexcessive forceto thecablecover.Doingsocoulddamagethecablecover, resulting in theprojectorfallingorcausinginjury.
MountingPreparations:
1. Connect the power cord and cables to the projector (the connection cords are omitted from the diagrams).
2. Prepare a Phillips screwdriver.
1. Insert the two round protrusions on the left and right edges of the cable cover into the grooves in the bottom of the projector to line it up.
NOTE:Becarefulnottoletthepowercordandcablesgetpinchedbythecablecover.
2. Turn the cable cover screw clockwise.
- Tighten the screw securely.
Removing1. Turn the cable cover screw counterclockwise until it turns
loosely.
- Hold the cable cover while doing this to prevent it from falling.
- The screw does not come completely off.
2. Remove the cable cover.
- Turn the cable cover a little, then lift it off.
1
2
1
2

200
9. Appendix
Pin Assignments of D-Sub COMPUTER Input ConnectorMini D-Sub 15 Pin Connector
SignalLevelVideosignal:0.7Vp-p(Analog)Syncsignal:TTLlevel
51 42 310
11 12 13 14 156 97 8
Pin No. RGBSignal(Analog) YCbCrSignal1 Red Cr2 GreenorSynconGreen Y3 Blue Cb4 Ground5 Ground6 RedGround CrGround7 GreenGround YGround8 BlueGround CbGround9 NoConnection10 SyncSignalGround11 NoConnection12 Bi-directionalDATA(SDA)13 HorizontalSyncorComposite
Sync14 VerticalSync15 DataClock

201
9. Appendix
TroubleshootingThissectionhelpsyouresolveproblemsyoumayencounterwhilesettinguporusingtheprojector.
Indicator Messages
Power Indicator
Indicatordisplay Projectorstatus ProcedureOff Powerisoff. –Flashing Blue(shortflashes) Preparingtoturnpoweron Waitawhile.
Blue(longflashes) Offtimer(enabled)Programtimer(offtimeenabled)
–
Orange(shortflashes)
Projectorcooling Waitawhile.
Orange(longflashes) Programtimer(ontimeenabled)Lit Blue Poweron –
Red Standbymode(NORMAL) –Orange Standbymode(NETWORKSTANDBY) –
Status Indicator
Indicatordisplay Projectorstatus ProcedureOff Noproblem,or
standbymode(POWER-SAVINGor NETWORKSTAND-BY)
–
Flashing Red(cyclesof1)
Coverproblem Thelampcoverisnotproperlymounted.Mountitproperly.(→ Page161)
Red(cyclesof4)
Fanproblem Thecoolingfanhasstoppedturning.ContactanNECprojectorcustomersupportcenterforrepairs.
Red(cyclesof9)
Iriserror The iris is not operating properly. Contact an NEC projectorcustomersupportcenterforrepairs.
Flashing Orange Networkconflict It is not possible to connect the projector’s built-in LAN andwirelessLANsimultaneouslytothesamenetwork.Toconnecttheprojector’sbuilt-inLANandwirelessLANsimultaneously,connectthemtodifferentnetworks.
Lit Green Standbymode(NORMAL)
–
Orange Buttonhasbeenpressedwhileprojectorisinkeylockmode
Theprojector’skeysarelocked.Thesettingmustbecanceledtooperatetheprojector.(→Page106)
Projector’sIDnumberandremotecontrol’sIDnumberdonotmatch
CheckthecontrolIDs.(→Pages106and107)
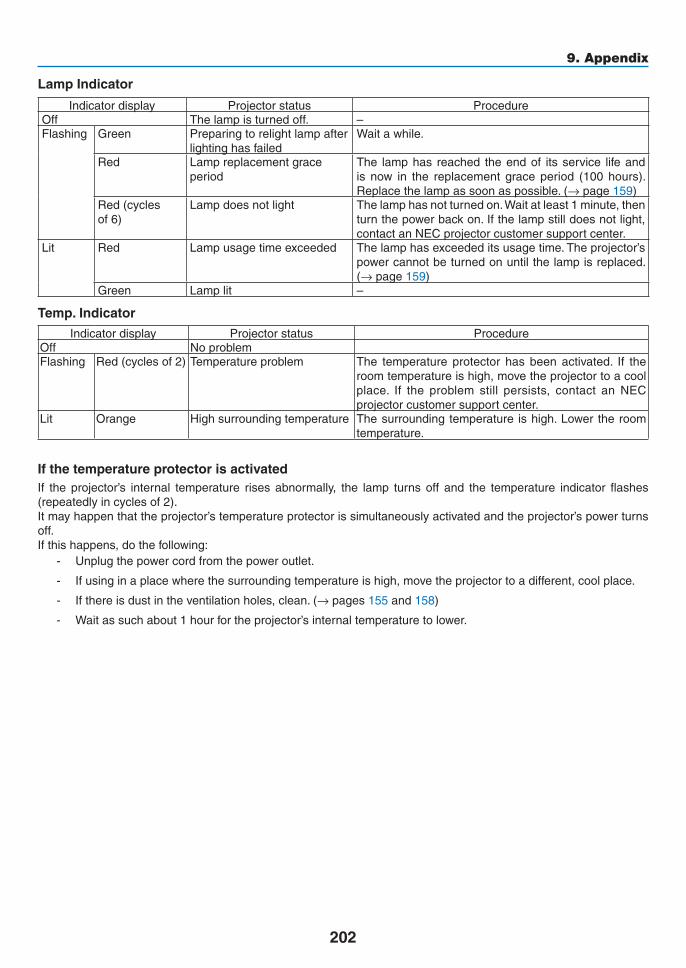
202
9. Appendix
Lamp Indicator
Indicatordisplay Projectorstatus ProcedureOff Thelampisturnedoff. –Flashing Green Preparingtorelightlampafter
lightinghasfailedWaitawhile.
Red Lampreplacementgraceperiod
The lamphas reached theendof itsservice lifeandis now in the replacement grace period (100 hours).Replacethelampassoonaspossible.(→page159)
Red(cyclesof6)
Lampdoesnotlight Thelamphasnotturnedon.Waitatleast1minute,thenturnthepowerbackon.Ifthelampstilldoesnotlight,contactanNECprojectorcustomersupportcenter.
Lit Red Lampusagetimeexceeded Thelamphasexceededitsusagetime.Theprojector’spowercannotbeturnedonuntilthelampisreplaced.(→page159)
Green Lamplit –
Temp. Indicator
Indicatordisplay Projectorstatus ProcedureOff NoproblemFlashing Red(cyclesof2) Temperatureproblem The temperature protector has been activated. If the
roomtemperatureishigh,movetheprojectortoacoolplace. If the problem still persists, contact an NECprojectorcustomersupportcenter.
Lit Orange Highsurroundingtemperature Thesurroundingtemperature ishigh.Lower theroomtemperature.
If the temperature protector is activatedIf the projector’s internal temperature rises abnormally, the lamp turns off and the temperature indicator flashes(repeatedlyincyclesof2).Itmayhappenthattheprojector’stemperatureprotectorissimultaneouslyactivatedandtheprojector’spowerturnsoff.Ifthishappens,dothefollowing:
- Unplugthepowercordfromthepoweroutlet.
- Ifusinginaplacewherethesurroundingtemperatureishigh,movetheprojectortoadifferent,coolplace.
- Ifthereisdustintheventilationholes,clean.(→ pages 155and158)
- Waitassuchabout1hourfortheprojector’sinternaltemperaturetolower.

203
9. Appendix
Common Problems & Solutions(→“Power/Status/LampIndicator”onpage214.)
Problem CheckTheseItems
Does not turn onor shut down
• Checkthatthepowercordispluggedinandthatthepowerbuttonontheprojectorcabinetortheremotecontrol is on� (→ pages 13, 14)
• Ensurethatthelampcoverisinstalledcorrectly.(→ page 161)• Checktoseeiftheprojectorhasoverheated.Ifthereisinsufficientventilationaroundtheprojectororifthe
room where you are presenting is particularly warm, move the projector to a cooler location�• Checktoseeifyoucontinuetousetheprojectorforanother100hoursafterthelamphasreachedtheend
of its life� If so, replace the lamp� After replacing the lamp, reset the lamp hours used� (→ page 116)• Thelampmayfailtolight.Waitafullminuteandthenturnonthepoweragain.• Set[FANMODE]to[HIGHALTITUDE]whenusingtheprojectorataltitudesapproximately5500feet/1600
meters or higher� Using the projector at altitudes approximately 5500 feet/1600 meters or higher without setting to [HIGH ALTITUDE] can cause the projector to overheat and the projector could shut down� If this happens, wait a couple minutes and turn on the projector� (→ page 108)
If you turn on the projector immediately after the lamp is turned off, the fans run without displaying an image for some time and then the projector will display the image� Wait for a moment�
Will turn off • Ensurethatthe[OFFTIMER],[AUTOPOWEROFF]or[PROGRAMTIMER]isoff.(→ page 101, 111)
No picture • Check if the appropriate input is selected� (→ page 16) If there is still no picture, press the SOURCE button or one of the input buttons again�
• Ensureyourcablesareconnectedproperly.• Usemenustoadjustthebrightnessandcontrast.(→ page 93)• Ensurethatthelenscoverisopen.(→ page 14)• Resetthesettingsoradjustmentstofactorypresetlevelsusingthe[RESET]intheMenu.(→ page 116)• EnteryourregisteredkeywordiftheSecurityfunctionisenabled.(→ page 37)• If the HDMI input or the DisplayPort signal cannot be displayed, try the following�
- Reinstall your driver for the graphics card built in your computer, or use the updated driver� For reinstalling or updating your driver, refer to the user guide accompanied with your computer or graphics
card, or contact the support center for your computer manufacturer�Install the updated driver or OS on your own responsibility�We are not liable for any trouble and failure caused by this installation�
• BesuretoconnecttheprojectorandnotebookPCwhiletheprojectorisinstandbymodeandbeforeturningon the power to the notebook PC�
In most cases the output signal from the notebook PC is not turned on unless connected to the projector before being powered up�* If the screen goes blank while using your remote control, it may be the result of the computer’s screen-saver
or power management software�• Seealsothepage218�
Picture suddenly becomes dark
• CheckiftheprojectorisintheForcedECOmodebecauseoftoohighambienttemperature.Ifthisisthecase,lower the internal temperature of the projector by selecting [HIGH] for [FAN MODE]� (→ page 108)
Color tone or hue is unusual
• Checkifanappropriatecolor isselectedin[WALLCOLOR].Ifso,selectanappropriateoption.(→ page 101)
• Adjust[HUE]in[PICTURE].(→ page 93)
Image isn’t square to the screen
• Repositiontheprojectortoimproveitsangletothescreen.(→ page 17)• UsetheKeystonecorrectionfunctiontocorrectthetrapezoiddistortion.(→ page 22)
Picture is blurred • Adjustthefocus.(→ page 19)• Repositiontheprojectortoimproveitsangletothescreen.(→ page 17)• Ensure that the distance between the projector and screen is within the adjustment range of the lens.
(→ page 201)• Has the lens been shifted by an amount exceeding the guaranteed range? (→ page 205)• Condensationmayformonthelensiftheprojectoriscold,broughtintoawarmplaceandisthenturnedon.
Should this happen, let the projector stand until there is no condensation on the lens�

204
9. Appendix
Flicker appears on screen
• Set [FAN MODE] to other than [HIGH ALTITUDE] mode when using the projector at altitudes approximately 5500 feet/1600 meters or lower� Using the projector at altitudes less than approximately 5500 feet/1600 meters and setting to [HIGH ALTITUDE] can cause the lamp to overcool, causing the image to flicker� Switch [FAN MODE] to [AUTO]� (→ page 108)
Image is scrolling vertically, horizontally or both
• Checkthecomputer’sresolutionandfrequency.Makesurethattheresolutionyouaretryingtodisplayissupported by the projector� (→ page 207)
• AdjustthecomputerimagemanuallywiththeHorizontal/Verticalinthe[IMAGEOPTIONS].(→ page 95)
Remote control does not work
• Installnewbatteries.(→ page 9)• Makesuretherearenoobstaclesbetweenyouandtheprojector.• Standwithin22feet(7m)oftheprojector.(→ page 9)• To perform computer mouse operations using the projector’s remote control, connect the optional mouse
receiver to the computer� (→ page 30)
Indicator is lit or blinking
• SeethePOWER/STATUS/LAMPIndicator.(→ page 214)
Cross color in RGB mode
• PresstheAUTOADJ.buttonontheprojectorcabinetortheremotecontrol.(→ page 24)• Adjust thecomputer imagemanuallywith [CLOCK]/[PHASE] in [IMAGEOPTIONS] in themenu. (→ page
94)
Formoreinformationcontactyourdealer.

205
9. Appendix
If there is no picture, or the picture is not displayed correctly.
• PoweronprocessfortheprojectorandthePC.
BesuretoconnecttheprojectorandnotebookPCwhiletheprojectorisinstandbymodeandbeforeturningonthepowertothenotebookPC.
InmostcasestheoutputsignalfromthenotebookPCisnotturnedonunlessconnectedtotheprojectorbeforebeingpoweredup.
NOTE:Youcancheckthehorizontalfrequencyofthecurrentsignalintheprojector’smenuunderInformation.Ifitreads“0kHz”,thismeansthereisnosignalbeingoutputfromthecomputer.(→page113orgotonextstep)
• Enablingthecomputer’sexternaldisplay.
DisplayinganimageonthenotebookPC’sscreendoesnotnecessarilymeanitoutputsasignaltotheprojector.WhenusingaPCcompatiblelaptop,acombinationoffunctionkeyswillenable/disabletheexternaldisplay.Usu-ally,thecombinationofthe“Fn”keyalongwithoneofthe12functionkeysgetstheexternaldisplaytocomeonoroff.Forexample,NEClaptopsuseFn+F3,whileDelllaptopsuseFn+F8keycombinationstotogglethroughexternaldisplayselections.
• Non-standardsignaloutputfromthecomputer
IftheoutputsignalfromanotebookPCisnotanindustrystandard,theprojectedimagemaynotbedisplayedcorrectly.Shouldthishappen,deactivatethenotebookPC’sLCDscreenwhentheprojectordisplayisinuse.EachnotebookPChasadifferentwayofdeactivate/reactivatethelocalLCDscreensasdescribedinthepreviousstep.Refertoyourcomputer’sdocumentationfordetailedinformation.
• ImagedisplayedisincorrectwhenusingaMacintosh
WhenusingaMacintoshwiththeprojector,settheDIPswitchoftheMacadapter(notsuppliedwiththeprojector)accordingtoyourresolution.Aftersetting,restartyourMacintoshforthechangestotakeaffect.
ForsettingdisplaymodesotherthanthosesupportedbyyourMacintoshandtheprojector,changingtheDIPswitchonaMacadaptermaybounceanimageslightlyormaydisplaynothing.Shouldthishappen,settheDIPswitchtothe13"fixedmodeandthenrestartyourMacintosh.Afterthat,restoretheDIPswitchestoadisplayablemodeandthenrestarttheMacintoshagain.
NOTE:AVideoAdaptercablemanufacturedbyAppleComputerisneededforaPowerBookwhichdoesnothaveaminiD-Sub15-pinconnector.
• MirroringonaPowerBook
* WhenusingtheprojectorwithaMacintoshPowerBook,outputmaynotbesetto1024×768unless“mirroring”isoffonyourPowerBook.Refertoowner’smanualsuppliedwithyourMacintoshcomputerformirroring.
• FoldersoriconsarehiddenontheMacintoshscreen
Foldersoriconsmaynotbeseenonthescreen.Shouldthishappen,select[View]→[Arrange]fromtheApplemenuandarrangeicons.

206
9. Appendix
NOTE:ContactyourlocaldealerforafulllistofthePCControlCodesifneeded.
Cable ConnectionCommunicationProtocol
Baud rate �����������������������������������������38400 bpsData length ��������������������������������������8 bitsParity �����������������������������������������������No parityStop bit ��������������������������������������������One bitX on/off ��������������������������������������������NoneCommunications procedure �������������Full duplex
NOTE:Dependingontheequipment,alowerbaudratemayberecommendedforlongcableruns.
PC Control Connector (D-SUB 9P)
PC Control Codes and Cable ConnectionPC Control Codes
Function Code Data
POWER ON 02H 00H 00H 00H 00H 02H
POWER OFF 02H 01H 00H 00H 00H 03H
INPUT SELECT COMPUTER 1 02H 03H 00H 00H 02H 01H 01H 09H
INPUT SELECT COMPUTER 2 02H 03H 00H 00H 02H 01H 02H 0AH
INPUT SELECT COMPUTER 3 02H 03H 00H 00H 02H 01H 03H 0BH
INPUT SELECT HDMI 02H 03H 00H 00H 02H 01H 1AH 22H
INPUT SELECT DisplayPort 02H 03H 00H 00H 02H 01H 1BH 23H
INPUT SELECT VIDEO 02H 03H 00H 00H 02H 01H 06H 0EH
INPUT SELECT S-VIDEO 02H 03H 00H 00H 02H 01H 0BH 13H
INPUT SELECT VIEWER 02H 03H 00H 00H 02H 01H 1FH 27H
INPUT SELECT NETWORK 02H 03H 00H 00H 02H 01H 20H 28H
PICTURE MUTE ON 02H 10H 00H 00H 00H 12H
PICTURE MUTE OFF 02H 11H 00H 00H 00H 13H
SOUND MUTE ON 02H 12H 00H 00H 00H 14H
SOUND MUTE OFF 02H 13H 00H 00H 00H 15H
NOTE1:Pins1,4,6and9arenoused.
NOTE2:Jumper“RequesttoSend”and“CleartoSend”togetheronbothendsofthecabletosimplifycableconnection.
NOTE3:Forlongcablerunsitisrecommendedtosetcommunicationspeedwithinprojectormenusto9600bps.
1 52 43
6 7 98
To GND of PC
To RxD of PC
To TxD of PC
To RTS of PC
To CTS of PC

207
9. Appendix
Troubleshooting Check ListBeforecontactingyourdealerorservicepersonnel,checkthefollowinglisttobesurerepairsareneededalsobyreferringtothe“Troubleshooting”sectioninyouruser’smanual.Thischecklistbelowwillhelpussolveyourproblemmoreefficiently.*Printthispageandthenextpageforyourcheck.
Frequency of occurrence always sometimes (How often?_____________________) other (__________________)
No image is displayed from your PC or video equipment to the projector�
Still no image even though you connect the projector to the PC first, then start the PC�Enabling your notebook PC’s signal output to the projector�• Acombinationoffunctionkeyswillenable/disabletheexter-
naldisplay.Usually,thecombinationofthe“Fn”keyalongwithoneofthe12functionkeysturnstheexternaldisplayonoroff.
No image (blue or black background, no display)�Still no image even though you press the AUTO ADJUST button�Still no image even though you carry out [RESET] in the projector’s menu�Signal cable’s plug is fully inserted into the input connectorA message appears on the screen�( _____________________________________________ )The source connected to the projector is active and available�Still no image even though you adjust the brightness and/or the contrast�Input source’s resolution and frequency are supported by the projector�
PowerNo power (POWER indicator does not light blue) See also “Status Indicator (STATUS)”�
Power cord’s plug is fully inserted into the wall outlet�Lamp cover is installed correctly�Lamp Hours Used (lamp operation hours) was cleared after lamp replacement�No power even though you press and hold the POWER but-ton�
Shut down during operation�Power cord’s plug is fully inserted into the wall outlet�Lamp cover is installed correctly�[AUTO POWER OFF] is turned off (only models with the [AUTO POWER OFF] function)�[OFF TIMER] is turned off (only models with the [OFF TIMER] function)�
Video and Audio
Image is too dark�Remains unchanged even though you adjust the brightness and/or the contrast�
Image is distorted�Image appears to be trapezoidal (unchanged even though you carry out the [KEYSTONE] adjustment)�
Parts of the image are lost�Still unchanged even though you press the AUTO ADJUST button�Still unchanged even though you carry out [RESET] in the projector’s menu�
Image is shifted in the vertical or horizontal direction�Horizontal and vertical positions are correctly adjusted on a computer signal�Input source’s resolution and frequency are supported by the projector�Some pixels are lost�
Image is flickering�Still unchanged even though you press the AUTO ADJUST button�Still unchanged even though you carry out [RESET] in the projector’s menu�Image shows flickering or color drift on a computer signal�Still unchanged even though you change [FAN MODE] from [HIGH ALTITUDE] to [AUTO]�
Image appears blurry or out of focus�Still unchanged even though you checked the signal’s resolution on PC and changed it to projector’s native resolution�Still unchanged even though you adjusted the focus�
No sound�Audio cable is correctly connected to the audio input of the projector�Still unchanged even though you adjusted the volume level�AUDIO OUT is connected to your audio equipment (only models with the AUDIO OUT connector)�
OtherRemote control does not work�
No obstacles between the sensor of the projector and the remote control�Projector is placed near a fluorescent light that can disturb the infrared remote controls�Batteries are new and are not reversed in installation�
Buttons on the projector cabinet do not work (only models with the [CONTROL PANEL LOCK] function)
[CONTROL PANEL LOCK] is not turned on or is disabled in the menu�Still unchanged even though you press and hold the EXIT button for a minimum of 10 seconds�

208
9. Appendix
In the space below please describe your problem in detail.
Information on application and environment where your projector is used
Projector
Model number:Serial No�:Date of purchase:Lamp operating time (hours):Eco Mode: OFF ONInformation on input signal:
Horizontal synch frequency [ ] kHzVertical synch frequency [ ] HzSynch polarity H (+) (−) V (+) (−)Synch type Separate Composite
Sync on GreenSTATUS Indicator:
Steady light Orange GreenFlashing light [ ] cycles
Remote control model number:
Signalcable
NEC standard or other manufacturer’s cable?Model number: Length: inch/m
Distribution amplifierModel number:
SwitcherModel number:
AdapterModel number:
Projector PC
DVD player
Installation environment
Screen size: inchScreen type: White matte Beads Polarization Wide angle High contrast Throw distance: feet/inch/m Orientation: Ceiling mount DesktopPower outlet connection:
Connected directly to wall outlet Connected to power cord extender or other (the
number of connected equipment______________) Connected to a power cord reel or other (the number
of connected equipment______________)
Computer
Manufacturer:
Model number:
Notebook PC / Desktop
Native resolution:
Refresh rate:
Video adapter:
Other:
Videoequipment
VCR, DVD player, Video camera, Video game or other
Manufacturer:
Model number:

©NECDisplaySolutions,Ltd.2013 7N951971