project.billing.cost.plus
TRANSCRIPT

Epicor ERPProject Billing - Cost Plus Course9.05.607

Disclaimer
This document is for informational purposes only and is subject to change without notice. This document and itscontents, including the viewpoints, dates and functional content expressed herein are believed to be accurate as of itsdate of publication. However, Epicor Software Corporation makes no guarantee, representations or warranties withregard to the enclosed information and specifically disclaims any applicable implied warranties, such as fitness for aparticular purpose, merchantability, satisfactory quality or reasonable skill and care. As each user of Epicor software islikely to be unique in their requirements in the use of such software and their business processes, users of this documentare always advised to discuss the content of this document with their Epicor account manager. All information containedherein is subject to change without notice and changes to this document since printing and other important informationabout the software product are made or published in release notes, and you are urged to obtain the current releasenotes for the software product. We welcome user comments and reserve the right to revise this publication and/ormake improvements or changes to the products or programs described in this publication at any time, without notice.The usage of any Epicor software shall be pursuant to an Epicor end user license agreement and the performance ofany consulting services by Epicor personnel shall be pursuant to Epicor's standard services terms and conditions. Usageof the solution(s) described in this document with other Epicor software or third party products may require the purchaseof licenses for such other products. Where any software is expressed to be compliant with local laws or requirementsin this document, such compliance is not a warranty and is based solely on Epicor's current understanding of such lawsand requirements. All laws and requirements are subject to varying interpretations as well as to change and accordinglyEpicor cannot guarantee that the software will be compliant and up to date with such changes. All statements ofplatform and product compatibility in this document shall be considered individually in relation to the products referredto in the relevant statement, i.e., where any Epicor software is stated to be compatible with one product and alsostated to be compatible with another product, it should not be interpreted that such Epicor software is compatiblewith both of the products running at the same time on the same platform or environment. Additionally platform orproduct compatibility may require the application of Epicor or third-party updates, patches and/or service packs andEpicor has no responsibility for compatibility issues which may be caused by updates, patches and/or service packsreleased by third parties after the date of publication of this document. Epicor® is a registered trademark and/ortrademark of Epicor Software Corporation in the United States, certain other countries and/or the EU. All othertrademarks mentioned are the property of their respective owners. Copyright © Epicor Software Corporation 2011.All rights reserved. No part of this publication may be reproduced in any form without the prior written consent ofEpicor Software Corporation.
ED500905
90521-905-1603-583607
9.05.607
Revision: September 06, 2011 6:35 p.m.
Total pages: 35
course.ditaval

Contents
Project Billing - Cost Plus Course...........................................................................................4Before You Begin....................................................................................................................5
Audience.........................................................................................................................................................5
Prerequisites....................................................................................................................................................5
Environment Setup..........................................................................................................................................6
Overview.................................................................................................................................8Application Setup...................................................................................................................9
Company Configuration..................................................................................................................................9
Update Company Configuration.............................................................................................................10
Plant Configuration Control...........................................................................................................................11
Update Plant Configurations...................................................................................................................11
Maintenance Programs..................................................................................................................................12
Role Code Maintenance..........................................................................................................................12
Employee Maintenance...........................................................................................................................13
Workshop - Create a Project Manager.............................................................................................13
Time Type Maintenance..........................................................................................................................15
Burden Code Maintenance.....................................................................................................................15
Workshop - Create Burden Codes...................................................................................................16
Create a Project Burden Code..................................................................................................16
Burden Set Maintenance.........................................................................................................................17
Create a Burden Set........................................................................................................................17
Project Billing Invoicing........................................................................................................20Project Activity Billing.....................................................................................................................................20
Workshop - Create a Cost Plus Project....................................................................................................21
Create a Project...............................................................................................................................21
Create WBS Phase - Design Part......................................................................................................21
Create WBS Phase - Build Prototype................................................................................................22
Create the Project Sales Order.........................................................................................................24
Define Project Contract Details........................................................................................................25
Attach the Sales Order.....................................................................................................................25
Add Job Materials - WBS Phase 200................................................................................................26
Create PO for Project Materials........................................................................................................27
Enter Time Against WBS Phase - 100...............................................................................................28
Enter Time Against WBS Phase - 200...............................................................................................29
Perform the Invoice Preparation Process...........................................................................................30
Review and Approve the Cost Plus Invoice.......................................................................................31
Create and AR Invoice.....................................................................................................................31
Build Project Analysis.......................................................................................................................32
Reports..................................................................................................................................33Conclusion.............................................................................................................................34
3Epicor ERP | 9.05.607
ContentsProject Billing - Cost Plus Course

Project Billing - Cost Plus Course
This course reviews the Project Billing - Cost Plus functionality including the concepts and reporting tools inthe Project Management module. Topics of discussion include maintenance program setup, project billingprocesses, and how to recognize the impact these processes have on a project. Throughout the course, hands-onworkshops guide you through these topics.
Upon successful completion of this course, you will be able to:
• Identify key maintenance program configurations used to set up Project Billing.
• Recognize the relationship between Project Management and Project Billing.
• Identify the functionality and different uses of Project Billing invoice options.
• Create a project using the Cost Plus Project Billing invoice method.
• Generate and analyze invoices based on different invoice options.
Epicor ERP | 9.05.6074
Project Billing - Cost Plus CourseProject Billing - Cost Plus Course
Before You Begin
Read this topic for information you should know in order to successfully complete this course.
Audience
Specific audiences will benefit from this course.
• CFO/Controller
• AR Clerk
• COO/Operations Manager
• Shop Floor Manager
• Scheduler
• Production Manager
• Engineer
• Sales Manager
• Order Entry Staff
• Account Manager
Prerequisites
In order to complete the workshops in this course, all necessary modules must be licensed and operating in yourtraining environment. For more information on the modules available, contact your Epicor Customer AccountManager at [email protected]. It is also important you understand the prerequisite knowledge containedin other valuable courses.
• Navigation Course - This course introduces navigational aspects of the Epicor application's user interface.Designed for a hands-on environment, general navigation principles and techniques are available at each ofthe interface levels in the Epicor application - system, module, and program. Workshops focus on each ofthese levels and guide you through each navigational principle introduced.
• System Flow Course - This course introduces a basic quote to cash scenario that includes the process fromthe initial customer quote to final cash receipts and payment of supplier invoices. This course emphasizes theseries of processes that make up the quote to cash process by using a simple scenario to highlight varioustransactions. Your organization may have more complex processing routines than those described in thiscourse.
• Project Management Course - This course covers how to accomplish a specific goal through a series ofinterrelated tasks and effective utilization of resources, such as people, time, and money.
• Sales Order Management Course - This course discusses the Order Management module and how itfacilitates the flow of manufactured items from inventory or jobs to the customer. A shipping transaction isperformed whether items are shipped from stock or from work in process (WIP). All shipping transactions arecaptured during invoicing in the Accounts Receivable (AR) module, creating financial transactions that postto the general ledger (GL). Order entry and shipping are directly affected by the nature of the product andthe process, specifically whether the items are built-to-order or shipped from stock.
5Epicor ERP | 9.05.607
Before You BeginProject Billing - Cost Plus Course
• Purchase Management Course - This course focuses on the Purchase Management process. This processincludes the creation and approval of purchase orders (POs) and requisitions, managing suppliers and theirprice lists, working with purchase order suggestions, and monitoring the purchase order process using relatedreports and trackers. The advanced functionality in the Supplier Relationship Management and PurchaseContract modules also aids in managing purchase orders.
• Job Management Course - This course describes the features and functionality of the Job Managementmodule. Job Management provides a comprehensive manufacturing control system designed for routing,scheduling, costing, and tracking custom or repetitive parts produced for inventory or shipped to the customerfrom the plant floor.
• Time and Expense Management Course - This course reviews the Time Management and ExpenseManagement modules used to enter and manage employee labor hours and expense.
• Accounts Payable Course - This course is designed to review the concepts and reporting tools available inthe Accounts Payable (AP) module. Topics of discussion include maintenance program setup and the creationand payment processes for various invoice types. This course also describes how AP invoices and paymentsimpact the general ledger (GL).
• Accounts Receivable Course - This course reviews the Accounts Receivable (AR) module's concepts andreporting tools. Topics of discussion include maintenance program setup, various AR processes, and how torecognize the impact these processes have on the general ledger (GL). Throughout the course, hands-onworkshops guide you through these topics.
Environment Setup
The environment setup steps and potential workshop constraints must be reviewed in order to successfullycomplete the workshops in this course.
Your Epicor training environment, in which the Epicor demonstration database is found, enables you to experienceEpicor functionality in action but does not affect data in your live, production environment.
The following steps must be taken to successfully complete the workshops in this course.
1. Verify the following or ask your system administrator to verify for you:
• Your Epicor training icon (or web address if you are using Epicor Web Access) points to yourEpicor training environment with the Epicor demonstration database installed. Do not completethe course workshops in your live, production environment.
Note It is recommended that multiple Epicor demonstration databases are installed. ContactSupport or Systems Consulting for billable assistance.
• The Epicor demonstration database is at the same service pack and patch as the Epicorapplication. Epicor's education team updates the Epicor demonstration database for each service packand patch. If your system administrator upgrades your Epicor application to a new service pack or patch,he or she must also download the corresponding Epicor demonstration database from EPICweb > Support> Epicor > Downloads and install it. If this is not performed, unexpected results can occur when completingthe course workshops.
• Your system administrator restored (refreshed) the Epicor demonstration database prior tostarting this course. The Epicor demonstration database comes standard with parts, customers, salesorders, and so on, already defined. If the Epicor demonstration database is shared with multiple users(that is, the database is located on a server and users access the same data, much like your live, productionenvironment) and is not periodically refreshed, unexpected results can occur. For example, if a courseworkshop requires you to ship a sales order that came standard in the Epicor demonstration database,but a different user already completed this workshop and the Epicor demonstration database was notrestored (refreshed), then you will not be able to ship the sales order. Epicor's education team has written
Epicor ERP | 9.05.6076
Project Billing - Cost Plus CourseBefore You Begin

the course workshops to minimize situations like this from occurring, but Epicor cannot prevent usersfrom manipulating the data in your installation of the Epicor demonstration database.
2. Log in to the training environment using the credentials manager/manager. If you are logged in to yourtraining environment as a different user, from the Options menu, select Change User.
3. From the Main menu, select the company Epicor Education (EPIC06).
4. From the Main menu, select the Main Plant.
7Epicor ERP | 9.05.607
Before You BeginProject Billing - Cost Plus Course

Overview
The Project Management module provides accuracy for tracking costs and managing project phases. Use thisfunctionality to gain more oversight over the progress of each project.
Project Billing is functionality within the Project Management module that allows for the creation, tracking, andinvoicing of non-manufacturing projects.
As project details are entered in Project Entry, contract parameters are entered to set the invoice method. Theinvoice method is the project billing method. Invoice options include:
• Fixed Fee
• Time and Materials
• Cost Plus
• Progress Payments
Each Project WBS phase contains features that improve accuracy and simplify time entry:
• You can define multiple activities against each WBS phase. These activities have resource requirements andestimated time costs for each resource assigned to the phase.
• The interface is simplified so users can quickly enter the project number and the WBS phase. The Epicorapplication then automatically assigns the job number, and this job automatically records the labor placedagainst this phase of the project. Users select the operation they need to record time against, and the laborexpense is automatically placed against the job that contains the operation.
When you run the Project Analysis, you can also increase the revision level of a project. The current project andits data is then archived into history. You can then view historical information in the Project Tracker.
The enhanced Project Management module also allows material costs to be further broken down into OtherDirect Costs (ODC). These material costs are entered as miscellaneous charges. For job costing purposes, theseseparate direct costs are totaled within the overall material cost for the job; however, within the ProjectManagement module, these costs are separated into Material and ODC categories.
Epicor ERP | 9.05.6078
Project Billing - Cost Plus CourseOverview

Application Setup
Project Billing requires the configuration of certain options within the Epicor application. This section of the coursereviews the company and plant configurations as well as the setup of maintenance programs that relate to ProjectBilling.
Note For more information on Project Billing configuration, refer to the Application Help.
Company Configuration
Use Company Configuration to define options for companies in the Epicor application. Use these options tocustomize the application to best fit each company within your organization. This section of the course reviewsthe configurations and tables specific to Project Billing.
Use Company Configuration to configure how Project Billing operates within your company. You can set thedefault invoice method, as well as the defaults for role codes, revenue recognition, rates, and tax category settings.Each section below provides options to establish your project billing needs.
Contract
Use the Contract section to set the default invoicing method you want to use for Project Billing.
Role Codes
Use the Role Code section to determine how Role Codes are used for Project Billing. Establish the followingsettings:
• Default Validate Employee Role to Operation Role - If you select this check box, an employee enteringtime against a job must use a role code assigned to the particular operation.
• Allow Validate Role Code to be Changed per Project - If you select this check box, the application reviewsand validates the role code assigned to the project against the role code of the employee entering informationagainst that particular project.
• Default Location for Role Code in Labor Booking - This option identifies the location of the default rolecode. The available options are Operation or Employee.
Revenue Recognition
The Revenue Recognition section includes the following settings:
• Default Revenue Recognition Method - This setting determines the default revenue recognition methodfor Project Billing. The choices include:
• Labor Booking Recognition
• Manual Recognition
• Actual Burden Recognition
• Allow Revenue Recognition Method to be Changed per Project - If you select this check box, you canchange the revenue recognition method during project entry.
• Revenue Recognition Journal Reversal - Two options are available for journal reversal: Reverse on ProjectClose (default) or Reverse in Following Month.
9Epicor ERP | 9.05.607
Application SetupProject Billing - Cost Plus Course

When this option is set to Reverse in Following Month, the journal you create is marked as a reversing journal.
Rates
The Rates section includes settings that establish where the project billing rates derive from and if you can allowany override the determined rates at the project level.
Tax Categories
Each field populates with all Tax Product Categories. The value selected is the default in Project Entry.
If the selected Tax Category is changed, existing projects are not updated. The new values default in for newprojects with the applicable Invoicing Method. Tax categories include:
• Material
• Labor
• Other Direct Cost
• Burden
• Subcontract
• Fees
Menu Path
Navigate to this program from the Main Menu:
• System Management > Company Maintenance > Company
Important This program is not available in the Epicor Web Access™ interface. You can launch this programfrom an Epicor Smart Client (Windows
®) interface.
Update Company Configuration
Review and update Company Configuration fields and settings.
Navigate to Company Configuration.
Menu Path: System Management > Company Maintenance > Company
Important This program is not available in the Epicor Web Access™ interface. You can launch this programfrom an Epicor Smart Client (Windows
®) interface.
1. Navigate to the Modules > Services > Project Billing sheet.
2. In the Default Invoicing Method field, verify Customer Shipment displays.
3. Enter or verify the following information:
DataField
ClearDefault Validate Employee Role to Operation Role check box
ClearAllow Validate Role to be Changed per Project check box
SelectAllow Revenue Recognition Method to be Changed per Project check box
4. In the Tax Categories pane, change all fields to Products.
Epicor ERP | 9.05.60710
Project Billing - Cost Plus CourseApplication Setup

5. Click Save and exit Company Configuration.
Plant Configuration Control
Use Plant Configuration Control to set up how each plant interacts with various functions such as the InventoryManagement, Production Management, Shipping/Receiving, Time Management, and Expense Managementmodules.
Project Billing utilizes both the Time and Expense functionality of the Epicor application. In order to post timeand enter project expenses, you must first configure the Time and Expense sheets in Plant Configuration Control.
The Time and Expense settings determine whether labor hours and/or incurred expenses employees enter requireapproval by other authorized employees. If approval is required, you must define approver rights to change ordelete transactions, the methods to use to approve time entries and expense entries, and the default workflowgroups to use for time entries and expense entries when they are unspecified for employees.
Menu Path
Navigate to this program from the Main Menu:
• System Management > Company Maintenance > Plant Configuration Control
Important This program is not available in the Epicor Web Access™ interface. You can launch this programfrom an Epicor Smart Client (Windows
®) interface.
Update Plant Configurations
In this workshop task, update Plant Configuration Control to allow automatic approval of time entries and expenseentries.
Navigate to Plant Configuration Control.
Menu Path: System Management > Company Maintenance > Plant Configuration Control
Important This program is not available in the Epicor Web Access™ interface. You can launch this programfrom an Epicor Smart Client (Windows
®) interface.
1. In the Plant field, search for and select Main Plant.
2. Navigate to the Modules > Time and Expense > Time sheet.
3. Clear or verify the Approval Required check box is cleared.
All time entries are now set to automatic approval.
4. Click Save.
5. Navigate to the Modules > Time and Expense > Expense sheet.
6. Clear or verify the Approval Required check box is cleared.
All expense entries are now set to automatic approval.
7. Click Save and exit Plant Configuration Control.
11Epicor ERP | 9.05.607
Application SetupProject Billing - Cost Plus Course

Maintenance Programs
This section of the course reviews the most significant maintenance programs applicable to Project Billing. Inmany cases, not all fields in a program are discussed. If you are interested in learning more about a specificprogram, refer to the Application Help.
Note Please note that each of the project billing methods explore different functionality within theapplication. This does not mean that if functionality is not utilized within a billing method that the feature(s)do not apply. To learn about different ways of establishing projects and available functions review otherbilling method sections, courses, or Application Help topics.
Role Code Maintenance
Use Role Code Maintenance to create role codes. Assign role codes to employees, customer servicerepresentatives or sales representatives. Role codes are useful when you want to track each resource's assignedcapabilities.
Role codes are used when creating a customer account and are associated with customer contacts and workforce members.
Roles define the position of the contact within this customer's organization. Each contact record established ateither the sold to or ship to level can be further detailed by assigning them to a predefined role.
Work force members are also assigned a role.
Roles are optional within the Epicor application, but you can use them for internal reference.
Role codes are used in Time and Expense to define an employee role. For example:
• Time and Expense Approval Role
• Project Manager Approval Role
• Supervisor Role
• Employee Submit Role
Note If you select more than one approver role option, tasks are created for all individuals who matchthat role criteria.
Menu Path
Navigate to this program from the Main Menu:
• Financial Management > Accounts Receivable > Setup > Role Code
• Production Management > Engineering > Setup > Role Code
• Sales Management > Customer Relationship Management > Setup > Role Code
• Sales Management > Order Management > Setup > Role Code
• Sales Management > Quote Management > Setup > Role Code
• Service Management > Expense Management > Setup > Role Code
• Service Management > Project Management > Setup > Role Code
• Service Management > Time Management > Setup > Role Code
For CRM users, the Main Menu appears as:
• Customer Relationship Management > Sales and Marketing Management > Setup > Role Code
Epicor ERP | 9.05.60712
Project Billing - Cost Plus CourseApplication Setup

• Customer Relationship Management > Order Management > Setup > Role Code
• Customer Relationship Management > Quote Management > Setup > Role Code
Employee MaintenanceEmployee Maintenance > Role Codes > Detail
Use Employee Maintenance to enter employee records. Before entering a project in Project Entry, in EmployeeMaintenance use the Role Codes > Detail and Role Codes > Role Rates > Detail sheets to set role codes andrates to a specific employee.
Role codes provide project billing with the role rates to be invoiced. A role code (and accompanying role rate)can be assigned to a specific operation to limit the amount of employees that are authorized for time entry basedon the role code tied to an operation.
You can create multiple role rates to reflect multiple currencies and time types. If you do not define a time type,the charge rate becomes the default rate for all time types.
Role rates are entered with an effective date and end date. This setup allows for future rate changes or forexception rates to be applied for a specific period of time.
Menu Path
Navigate to this program from the Main Menu:
• Material Management > Inventory Management > Setup > Employee
• Production Management > Job Management > Setup > Employee
• Service Management > Expense Management > Setup > Employee
• Service Management > Field Service > Setup > Employee
• Service Management > Project Management > Setup > Employee
• Service Management > Time Management > Setup > Employee
Workshop - Create a Project Manager
In this workshop, create a project manager who will manage the project process.
Navigate to Employee Maintenance.
Menu Path: Service Management > Project Management > Setup > Employee
1. From the New menu, select New ID.
2. In the ID field, enter XXX (where XXX are your initials).
3. In the Name field, enter your name.
4. Navigate to the Production Info sheet.
5. Enter the following information:
DataField
MorningShift
On Site InstallationExpense
Professional ServicesDepartment
13Epicor ERP | 9.05.607
Application SetupProject Billing - Cost Plus Course

DataField
25.00Labor Rate
System ManagerUser Name
Project ManagersResource Group
PM0001Resource
SelectAllowed to book to direct jobs check box
6. Accept all other defaults and click Save.
7. From the New menu, select New Role Code.
The Roles Codes > Detail sheet displays.
8. Enter the following information:
DataField
Project ManagerRole Code
Project ManagerPrimary check box
Note Multiple role codes can be assigned to an employee, but only one role code can be selected asthe primary role.
9. Click Save.
10. From the New menu, select New Role Rate.
The Role Codes > Role Rates > Detail sheet displays.
11. Enter the following information:
DataField
First day of the current yearEffective Date
United States DollarCurrency
225.00Charge Rate
Note If rates are not selected here at the employee level, the role rates in Role Code Maintenancedefault.
12. Click Save.
Epicor ERP | 9.05.60714
Project Billing - Cost Plus CourseApplication Setup

Time Type Maintenance
Use Time Type Maintenance to create and maintain codes used with Project Billing. These codes are used toestablish different charge rates for labor hours.
For example, you may want to define a time type for overtime or for labor performed on weekends which havea higher rate. You can use time types in Time Entry to enter time for project labor and apply a different chargerate to the hours worked instead of the charge rate associated with the employee’s project role code.
Time Types are used within the application as follows:
• Project Role Maintenance - Establish different charge rates for work outside regular hours.
• Employee Maintenance - Override normal rates or use multiple rates for different time periods.
• Project Contract - Override rates at the contract level for a Project Role or use multiple rates for differenttime periods.
• Labor Entry, Start Production and Start Set Up - When entering time on a project job that uses ProjectRole codes, the Project Role assigned to the operation is the default. You can override the Project Role ordefine a different Time Type during time entry. These changes affect the charge rate used during the invoicingprocess.
Note Time Types are only required for time transactions outside normal charge rates. The normal chargerate is used when no Time Type is defined.
Menu Path
Navigate to this program from the Main Menu:
• Financial Management > Accounts Receivable > Setup > Role Code
• Production Management > Engineering > Setup > Role Code
• Sales Management > Customer Relationship Management > Setup > Role Code
• Sales Management > Order Management > Setup > Role Code
• Sales Management > Quote Management > Setup > Role Code
• Service Management > Expense Management > Setup > Role Code
• Service Management > Project Management > Setup > Role Code
• Service Management > Time Management > Setup > Role Code
For CRM users, the Main Menu appears as:
• Customer Relationship Management > Sales and Marketing Management > Setup > Role Code
• Customer Relationship Management > Order Management > Setup > Role Code
• Customer Relationship Management > Quote Management > Setup > Role Code
Burden Code Maintenance
Use Burden Code Maintenance to set up Burden codes. Assign Burden codes used in Burden Set Maintenanceto track burden details within your project.
Define burden codes you use to track the burden during project invoicing. For example:
• Project Management
• Direct Manufacturing Overheads
• Cost of Money
15Epicor ERP | 9.05.607
Application SetupProject Billing - Cost Plus Course

You can further refine burden categories to calculate burden for labor, materials, contract labor, subcontract,and other direct costs.
Menu Path
Navigate to this program from the Main Menu:
• Financial Management > Accounts Receivable > Setup > Role Code
• Production Management > Engineering > Setup > Role Code
• Sales Management > Customer Relationship Management > Setup > Role Code
• Sales Management > Order Management > Setup > Role Code
• Sales Management > Quote Management > Setup > Role Code
• Service Management > Expense Management > Setup > Role Code
• Service Management > Project Management > Setup > Role Code
• Service Management > Time Management > Setup > Role Code
For CRM users, the Main Menu appears as:
• Customer Relationship Management > Sales and Marketing Management > Setup > Role Code
• Customer Relationship Management > Order Management > Setup > Role Code
• Customer Relationship Management > Quote Management > Setup > Role Code
Workshop - Create Burden Codes
In this workshop, create a burden code.
Navigate to Burden Code Maintenance.
Menu Path: Service Management > Project Management > Setup > Burden Code
1. Click New.
2. In the Burden Code field, enter XXX FRINGE (where XXX are your initials).
3. In the Description field, enter XXX Fringe (where XXX are your initials).
4. Navigate to the Project Roles sheet.
5. Select the Use All Project Role Codes check box.
6. Click Save.
7. Exit Burden Code Maintenance.
Create a Project Burden Code
In this workshop task, create a burden code for the cost plus project.
Navigate to Burden Code Maintenance.
Menu Path: Service Management > Project Management > Setup > Burden Code
1. Click New.
2. In the Burden Code field, enter XXX-MFG O/H (where XXX are your initials).
Epicor ERP | 9.05.60716
Project Billing - Cost Plus CourseApplication Setup

3. In the Description field, enter XXX Manufacture O/H (where XXX are your initials).
4. Click Save.
5. Navigate to the Project Roles sheet.
6. Select the Use All Project Role Codes check box.
7. Click Save and exit Burden Code Maintenance.
Burden Set Maintenance
Use Burden Set Maintenance to define burden sets. Define burden calculation rules using burden codes totrack all burden details within your project.
The Burden set controls the provisional percentages used during the Invoice Preparation process.
Burden sets allow you to update actual percentages you use at the end of a project to realign the project withthe actual burden amount. The actual percentages are maintained in Burden Actual Percentage Maintenance.
Use burden sets to define any number of burden codes to report on in an invoice. Examples of burden codesinclude:
• Fringe
• Project Management
• Cost of Money
• Direct Manufacturing Overheads
Each of the above categories can be set to calculate the burden on:
• Labor
• Material
• Subcontract
• Contract Labor
• Other Direct Costs
Within the process, it is possible to define the following information:
• Unique ID.
• Burden Set Description.
• Burden codes that relate to this burden set. These codes can be entered on a one to many relationship
• Provisional burden rate percentage with an effective date.
• Processing rules for how to calculate the burden for each burden code and in which sequence to process theburden codes.
Menu Path
Navigate to this program from the Main Menu:
• Service Management > Project Management > Setup > Burden Set
Create a Burden Set
In this workshop task, create a burden set for the cost plus Prototype project.
17Epicor ERP | 9.05.607
Application SetupProject Billing - Cost Plus Course

Navigate to Burden Set Maintenance.
Menu Path: Service Management > Project Management > Setup > Burden Set
1. From the New menu, select New Burden Set.
2. In the Burden Set field, enter XXX (where XXX are your initials).
3. In the Description field, enter XXX Prototype Set (where XXX are your initials).
4. Click Save.
5. From the New menu, select New Burden Code.
The Burden Codes > Detail sheet displays.
6. In the Burden Code field, select XXX Fringe (where XXX are your initials).
7. Select the following check boxes:
• Labor
• Contract Labor
• Materials
• Subcontract
• Other Direct Costs
8. Click Save.
9. From the New menu, select New Effective Date.
The Burden Codes > Effective Dates sheet displays.
10. In the Effective Date field, select or verify today's date displays.
11. In the Provisional Percent field, enter 10.
12. Click Save.
13. Repeat steps 5 through 12 to add additional codes to the project burden set:
XXX-MFG O/H
DataField
XXX Manufacture O/H (where XXX are your initials)Burden Code
SelectLabor
SelectContract Labor
SelectMaterials
SelectSubcontract
SelectOther Direct Costs
XXX Fringe (where XXX are your initials) - Move toSelected Burden Codes pane
Available Burden Codes pane
Epicor ERP | 9.05.60718
Project Billing - Cost Plus CourseApplication Setup
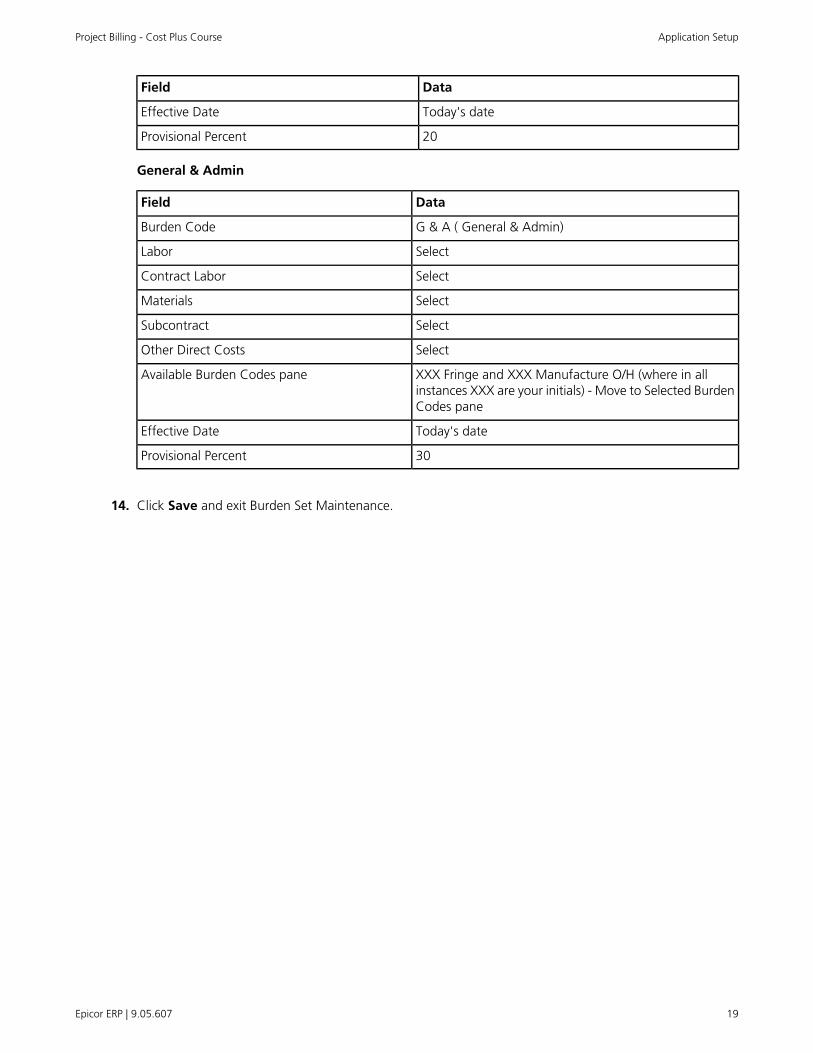
DataField
Today's dateEffective Date
20Provisional Percent
General & Admin
DataField
G & A ( General & Admin)Burden Code
SelectLabor
SelectContract Labor
SelectMaterials
SelectSubcontract
SelectOther Direct Costs
XXX Fringe and XXX Manufacture O/H (where in allinstances XXX are your initials) - Move to Selected BurdenCodes pane
Available Burden Codes pane
Today's dateEffective Date
30Provisional Percent
14. Click Save and exit Burden Set Maintenance.
19Epicor ERP | 9.05.607
Application SetupProject Billing - Cost Plus Course

Project Billing Invoicing
Within Project Management, the Epicor application offers various Project Billing invoicing methods. As projectsare entered, users select the appropriate project billing invoice method which include:
• Time and Materials - This method is used when you use the rates for each role assigned to the project tocalculate the total cost on the project.
• Cost Plus - This method uses the defined rates for labor and burden as the base value for all costs. You canadd a series of markup percentages to the labor, burden, and material costs to calculate the total invoiceamount.
• Fixed Fee - This method defines costs that occur during each milestone level within the project. Use thismethod to divide the costs between each milestone.
• Progress Payments - Use this method to invoice a customer for a percentage of the labor, material, andburden costs during a specific time period. You typically use this method when product quantities are shippedbefore a contract is formally negotiated. The shipment is sent first and then the final price is agreed uponwithin the contract. You can then invoice the difference between the amounts on the progress payments andthe final negotiated contract amount. The costs created for each invoice depend on a percentage defined onthe Contract > Invoicing > Progress Payments sheet.
Manufacturing projects continue to have the invoicing method options of Customer Shipment and MilestoneBilling.
Project Activity Billing
Project Activity Billing controls two of the four billing methods in the Epicor application. Use the Contract >Invoicing > Project Activity Billing sheets to define the settings used for projects invoiced on a Cost Plus orTime and Material basis. Use these sheets to control any overrides used for project roles, employee ceilings,supplier ceilings, and markup percentages.
Ceilings can be held against an individual supplier, an individual employee, or both. If selecting ceilings for RoleCodes, only ceilings for suppliers can be selected in addition to Role Codes.
On the Contract > Detail sheet, the Invoicing Method field selection determines available fields on subsequentsheets.
If the project does not require the use of Ceilings, Fees, or Burden Sets, leave these fields at 0, or blank, to preventtheir use.
Role Codes
If a different Role Code charge rate is applied to a project, these charge rate exceptions are set on the ProjectActivity Billing > Role Codes sheet.
Employee Ceilings
Set the maximum amount an employee can bill to a project on the Project Activity Billing > Employee Ceilingssheet.
Supplier Ceilings
Set the maximum amount a supplier can bill to a project on the Project Activity Billing > Supplier Ceilingssheet.
Epicor ERP | 9.05.60720
Project Billing - Cost Plus CourseProject Billing Invoicing

Fees
Set fixed project fees on the Project Activity Billing > Fees sheet.
Workshop - Create a Cost Plus Project
In this workshop, use the Cost Plus billing method to create a project.
In the following workshop, create a project for the development of a prototype for Addison Incorporated. Thisprototype requires two main jobs, one job phase for the design process and one job phase for the productionof the product. Schedule this project to be billed monthly for two months using the Cost Plus billing method.
Important
For the purpose of this course and time consideration, you will follow this project through the first monthof time entry and invoicing. This project will take you through all major pieces of a cost plus project setup,time entry, invoicing, and project analysis of the project costs for the first billing month. It is optional tocomplete the project and view the total project roll-up.
Create a Project
In this workshop task, create a project plan for Addison Incorporated's prototype.
Navigate to Project Entry.
Menu Path: Service Management > Project Management > General Operations > Project Entry
1. From the New menu, select New Project.
2. In the Project ID field, enter XXX.Prototype.Cost.Plus (where XXX are your initials).
3. In the Description field, enter XXX Prototype Cost Plus Proj (where XXX are your initials).
4. In the Start Date field, enter today's date.
5. In the End Date field, select the date two months from the Start Date.
6. Select the Create Project Job check box.
7. Click Save.
8. Record the job number ________.
Create WBS Phase - Design Part
In this workshop task, create the first WBS Phase for the design process of the prototype.
1. From the New menu, select New WBS Phase.
The WBS Phases > Detail sheet displays.
2. Enter the following information:
DataField
100WBS Phase ID
100 - Design PhaseDescription
21Epicor ERP | 9.05.607
Project Billing InvoicingProject Billing - Cost Plus Course

DataField
Today's DateStart Date
17 days from the Start DateDue Date
140.00 HoursDuration
3. Click Save.
4. From the New menu, select New WBS Phase Operation.
5. In the WBS Phase Job Operations grid enter the following information:
DataField
10Sequence
Mechanical EngineeringOperation
Production Engineer Grade 1Role Code
40Hours
6. Click Save.
7. From the New menu, select New WBS Phase Operation.
8. In the WBS Phase Job Operations grid enter the following information:
DataField
20Sequence
Design PartOperation
DesignerRole Code
100Hours
9. Select the Create WBS Phase Job check box.
10. Click Save.
11. Record the job number ________.
Create WBS Phase - Build Prototype
In this workshop task, create the second WBS Phase for building the prototype.
1. From the New menu, select New WBS Phase.
2. Enter the following information:
DataField
200WBS Phase ID
Epicor ERP | 9.05.60722
Project Billing - Cost Plus CourseProject Billing Invoicing

DataField
200 - Build PrototypeDescription
18 days from today's dateStart Date
Two months from todayDue Date
350.00 HoursDuration
3. Click Save.
4. From the New menu, select New WBS Phase Operation.
5. In the WBS Phase Job Operations grid enter the following information:
DataField
10Sequence
Mechanical EngineeringOperation
Production Engineer Grade 1Role Code
100Hours
6. Click Save.
7. Repeat steps 4 through 6 to add additional WBS Phase Operations.
Electronic Engineering
DataField
20Sequence
Electronic EngineeringOperation
Product Engineer Grade 2Role Code
120Hours
Electrical Engineering
DataField
30Sequence
Electrical EngineeringOperation
Product Engineer Grade 3Role Code
80Hours
Assembly
DataField
40Sequence
AssemblyOperation
23Epicor ERP | 9.05.607
Project Billing InvoicingProject Billing - Cost Plus Course

DataField
Sub 1Role Code
10Hours
Inspection
DataField
50Sequence
InspectionOperation
QA InspectRole Code
40Hours
8. Select the Create WBS Phase Job check box.
9. Click Save.
10. Record the job number ________.
11. Minimize Project Entry.
Create the Project Sales Order
In this workshop task, create the cost plus project sales order.
Navigate to Sales Order Entry.
Menu Path: Sales Management > Order Management > General Operations > Order Entry
Tip The CRM menu path is: Customer Relationship Management > Order Management > GeneralOperations > Order Entry
1. From the New menu, select New Order.
The Header > Detail sheet displays.
2. In the Customer field, enter ADDISON and press Tab.
3. In the Order Date field, select or verify today's date displays.
4. In the Need By field, select the date two months from today.
5. In the Ship By field, select the date two days before the Need By date.
6. In the FOB field, select FOB Shipping Point.
7. Click Save.
8. Navigate to the Lines > Detail sheet to add prototype (part) details.
9. From the New menu, select New Line.
10. In the Part/Rev field, enter XXX-Prototype (where XXX are your initials).
Epicor ERP | 9.05.60724
Project Billing - Cost Plus CourseProject Billing Invoicing

11. In the Description field, enter XXX-Prototype, Addison (where XXX are your initials).
12. In the Unit Price field, enter 78,000.00.
13. In the Project ID field, search for and select your cost plus Project ID.
14. Click Save.
15. Record the sales order number ________.
16. Exit Sales Order Entry.
If the Order has make direct releases without a job link, return to order message displays, click No.
Define Project Contract Details
In this workshop task, define the cost plus project details for Addison's prototype.
Maximize Project Entry.
1. Navigate to the Contract > Detail sheet.
2. In the Invoicing Method field, select Cost Plus.
3. In the Customer field, verify or enter ADDISON.
4. Define the contract details by entering the following information:
DataField
XXX-Prototype CP (where XXX are your initials)Contract Reference
78,000.00Total Contract Value
Today's dateContract Start Date
Two months from the Contract Start DateContract End Date
XXX (where XXX are your manager's initials)Project Manager
LaborHours To Be Used For Invoicing
You cannot save the contract details at this point until the sales order is linked to the project.
Attach the Sales Order
In this workshop task, attach Addison's sales order to the project.
1. Navigate to the Contract > Invoicing > Project Activity Billing > Details sheet.
2. In the Order Number field, search for and select the sales order for Addison's prototype.
3. In the Line field, search for and select Order Line 1.
4. In the Cost Markup field, enter GEN (General Default Markup) and press Tab.
The General Default Markup is set at 30%.
25Epicor ERP | 9.05.607
Project Billing InvoicingProject Billing - Cost Plus Course

5. Click Save.
6. From the New menu, select New Activity Billing Burden Set.
7. In the Burden Sets grid, in the Burden Set field, enter XXX (where XXX are your initials) and press Tab.
The XXX Prototype set description displays (where XXX are your initials).
8. Click Save and minimize Project Entry.
Add Job Materials - WBS Phase 200
In this workshop task, add two job materials to fulfill WBS Phase 200 in order to develop the prototype forAddison.
Navigate to Job Entry.
Menu Path: Production Management > Job Management > General Operations > Job Entry
1. In the Job field, search for and select the job number for the cost plus project WBS Phase 200.
Note
In the Job Search window, it is helpful to filter your search by using the following fields:
DataField
Project IDSort By
ProjectJob Type
2. In the tree view, select Materials, right-click and select Add Materials.
The Job Details > Materials > Detail sheet displays.
3. In the Part/Rev field, enter STEEL100.
4. In the Desc field, enter Steel 100.
5. In the Operation field, search for and select 10 (Mechanical Engineering).
6. In the Qty/Parent field, enter 52 EA.
7. In the Material field, enter 3.85.
8. In the Supplier ID field, search for and select A-Z Metals.
9. Click Save.
10. Repeat steps 2 through 8 to add additional materials:
DataField
FIXTURE200Part/Rev
Fixture 200Desc
20 (Electronic Engineering)Operation
Epicor ERP | 9.05.60726
Project Billing - Cost Plus CourseProject Billing Invoicing

DataField
150Qty/Parent
12.52Material
A-Z MetalsSupplier ID
11. Click Save and exit Job Entry.
Create PO for Project Materials
In this workshop task, create a purchase order (PO) for WBS Phase - 200 job materials.
Navigate to Purchase Order Entry.
Menu Path: Material Management > Purchase Management > General Operations > Purchase Order Entry
1. From the New menu, select New PO.
2. In the Supplier field, search for and select A-Z Metals.
3. Navigate to the Lines > Detail sheet.
4. From the New menu, select New Line.
5. In the Buy For pane, select the Job Material option.
6. In the Job field, search for and select the cost plus project job for WBS Phase - 200.
7. In the Mtl field, select 10 (Steel 100).
8. Verify in the Our Qty field 52 displays.
9. Verify in the Unit Price field 3.85 displays.
10. Click Save.
11. Repeat steps 4 through 9 to add an additional PO line:
DataField
Job MaterialsBuy For pane
WBS Phase - 200Job
20 (Fixture 200)Mtl
150Our Qty
12.52Unit Price
12. Navigate to the Summary sheet.
13. Record the PO Number ________.
14. Select the Unapproved check box.
27Epicor ERP | 9.05.607
Project Billing InvoicingProject Billing - Cost Plus Course

The Approved status displays.
15. Click Save and exit Purchase Order Entry.
Enter Time Against WBS Phase - 100
In this workshop task, enter time against the first WBS Phase of the cost plus project for the first month.
Note
Time for employees is usually entered daily or weekly, however, for the purpose of this course you willenter multiple employee's time for labor against the project for the month.
Navigate to Time and Expense Entry.
Menu Path: Service Management > Project Management > General Operations > Time and Expense Entry
1. In the Employee ID field, enter PE100 (David L. Brown) and press Tab.
2. From the New menu, select New Time Detail.
The Time > Daily Time > Detail > Detail sheet displays.
3. In the Labor Type field, select Project.
4. Enter the following information:
DataField
XXX.Prototype.Cost.Plus (where XXX are your initials)Project
100 - Design PhaseWBS Phase
10Operation
15Labor Hrs
Engineering DepartmentDepartment
5. Click the Submit button.
The Approved status displays.
6. From the Standard toolbar, click Clear.
7. Repeat steps 1 through 6 to enter the monthly time for the following employees for the first WBS Phase.
James B. Carville
DataField
100Employee ID
XXX.Prototype.Cost.Plus (where XXX are your initials)Project
100 - Design PhaseWBS Phase
10Operation
10Labor Hrs
Epicor ERP | 9.05.60728
Project Billing - Cost Plus CourseProject Billing Invoicing

DataField
Engineering DepartmentDepartment
Lisa V. Ford
DataField
104Employee ID
XXX.Prototype.Cost.Plus (where XXX are your initials)Project
100 - Design PhaseWBS Phase
10Operation
10Labor Hrs
Engineering DepartmentDepartment
Enter Time Against WBS Phase - 200
In this workshop task, enter time against the second WBS Phase of the cost plus project for the first month.
Note
Time for employees is usually entered daily or weekly, however, for the purpose of this course you willenter multiple employee's time for labor against the project for the month.
1. In the Employee ID field, enter 100 (James B. Carville) and press Tab.
2. From the New menu, select New Time Detail.
The Time > Daily Time > Detail > Detail sheet displays.
3. In the Labor Type field, select Project.
4. Enter the following information:
DataField
XXX.Prototype.Cost.Plus (where XXX are your initials)Project
200 - Build PrototypeWBS Phase
10Operation
50Labor Hrs
Engineering DepartmentDepartment
5. Click the Submit button.
The Approved status displays.
6. From the Standard toolbar, click Clear.
7. Repeat steps 1 through 6 to enter the monthly time for the following employees for the first WBS Phase.
Mark R. Kimball
29Epicor ERP | 9.05.607
Project Billing InvoicingProject Billing - Cost Plus Course

DataField
PE200Employee ID
XXX.Prototype.Cost.Plus (where XXX are your initials)Project
200 - Build PrototypeWBS Phase
20Operation
40Labor Hrs
Engineering DepartmentDepartment
David L. Brown
DataField
PE100Employee ID
XXX.Prototype.Cost.Plus (where XXX are your initials)Project
200 - Build PrototypeWBS Phase
20Operation
20Labor Hrs
Engineering DepartmentDepartment
Jenna M. Benyon
DataField
PE300Employee ID
XXX.Prototype.Cost.Plus (where XXX are your initials)Project
200 - Build PrototypeWBS Phase
30Operation
50Labor Hrs
Engineering DepartmentDepartment
8. Exit Time and Expense Entry.
Perform the Invoice Preparation Process
In this workshop task, perform the analysis of the project by processing the project invoice preparation processfor the first month.
Maximize Project Entry.
1. From the Actions menu, select Project Invoice Preparation.
The Project Invoice Preparation Process window displays.
2. In the Period End Date field, verify today's date displays.
3. In the Invoice Type pane, verify the Cost Plus check box is selected.
Epicor ERP | 9.05.60730
Project Billing - Cost Plus CourseProject Billing Invoicing

4. Accept all other defaults.
5. Click Submit.
6. Close the Project Invoice Preparation Process window.
7. Minimize Project Entry.
Review and Approve the Cost Plus Invoice
This process allows the preparation of project invoices for a specified period and provides the invoice date usedfor posting. These detailed audit records are used in the invoicing data on the actual invoice document. In thisworkshop task, review the cost plus invoice for the first month of the project.
Navigate to Cost Plus Invoice Review.
Menu Path: Service Management > Project Management > General Operations > Cost Plus Invoice Review
1. In the Project field, search for and select the XXX.Prototype.Cost.Plus (where XXX are your initials) project.
Invoice information displays.
2. Review the invoice details.
3. In the Invoice Details grid, in the Markup % field, verify 30 displays for all entries.
4. Navigate to the Lines sheet.
5. In the tree view, select each line and review details.
6. From the Actions menu, select Approve Invoice.
7. To the Do you want to Approve the Invoice message, click Yes.
The Approved status displays.
8. Exit Cost Plus Invoice Review.
Create and AR Invoice
In this workshop task, create the Accounts Receivable (AR) invoice for the first billing month of the cost plusproject.
Navigate to AR Invoice Entry.
Menu Path: Financial Management > Accounts Receivable > General Operations > Invoice Entry
1. From the New menu, select New Group.
2. In the Group field, enter XXX-CP1 (where XXX are your initials).
3. Click Save.
4. From the Actions menu, select Get > Project Billing.
The Get Project Billing Invoices window displays.
5. Click the Manual Selection button.
31Epicor ERP | 9.05.607
Project Billing InvoicingProject Billing - Cost Plus Course

The Project Billing Browser window displays.
6. From the Project Billing grid, select the cost plus project and click OK.
7. To the Are you sure message, click Yes.
8. To the Invoices created message, click OK.
The cost plus invoice displays.
9. From the Invoices grid, select the cost plus prototype project invoice.
10. Navigate to the Summary sheet.
11. Review the invoice details for the first billing month of the cost plus project.
12. In the Invoice Lines grid, in the Unit Price field review the values.
13. Exit AR Invoice Entry.
Build Project Analysis
In this workshop task, review the project cost roll up for the first completed phase.
Maximize Project Entry.
1. Navigate to the Project Costs sheet.
2. From the Actions menu, select Build Project Analysis.
The Build Project Analysis window displays.
3. Click Submit.
4. Close the Build Project Analysis window.
5. Click Refresh.
6. Review the Project Analysis for the first billing month.
7. Exit Project Entry.
Epicor ERP | 9.05.60732
Project Billing - Cost Plus CourseProject Billing Invoicing

Reports
The following reports are available for Project Billing.
Inventory/WIP Reconciliation Report
Use the Inventory/WIP Reconciliation Report to reconcile the General Ledger (GL) with costs from Inventoryand work-in-process (WIP). As inventory transactions are generated, the costs accumulate in WIP and Inventory.You can summarize the costs in this report and review the GL accounts used for each transaction. Most costamounts in the Epicor application, including Cost of Sales and WIP, are calculated using the base unit of measure(UOM) assigned to the part for which the specific cost is being calculated.
Menu Path: Service Management > Project Management > Reports > Inventory/WIP Reconciliation
Project Billing Project Status Report
Use the Project Billing Project Status Report to create a summary of a project contract and the cost activitythat took place against it. This report also displays the values for a specified period, prior year values, and yearto date values.
Note This report is only available for projects that use the project billing invoicing types.
Menu Path: Service Management > Project Management > Reports > Project Status Report
33Epicor ERP | 9.05.607
ReportsProject Billing - Cost Plus Course

Conclusion
Congratulations! You have completed the Project Billing course.
Please take a moment to let Epicor University know how to serve you better by completing an evaluation at http://www.keysurvey.com/survey/379199/e92f/. Your feedback provides the guidelines for the future direction ofEpicor University offerings.
Epicor ERP | 9.05.60734
Project Billing - Cost Plus CourseConclusion

Additional information is available at the Education andDocumentation areas of the EPICweb Customer Portal. To access
this site, you need a Site ID and an EPICweb account. To create anaccount, go to http://support.epicor.com.