project planner version 2.5 user's manual - peritum.net · project planner version 2.5...
TRANSCRIPT

Project Planner version 2.5
User's Manual
Strona 1 z 60

Contents1.Introduction....................................................................................................................................... 42.The standard user interface elements................................................................................................ 5
2.1.Window of the list type..............................................................................................................52.2.Window of the edition of the element (project / task) .............................................................. 7
2.2.1. Mode of the preview......................................................................................................... 72.2.2. Edit mode.......................................................................................................................... 8
2.3.Window of the edition of the text box ...................................................................................... 92.4.Window of the edition of the number field .............................................................................102.5.Window of the edition of the data field................................................................................... 112.6.Window of the edition of the field in progress type................................................................ 122.7.Window of the edition of the notebook type field .................................................................. 132.8.Window of the edition of calculation field ............................................................................. 142.9.Window of the edition of logical field (BOOL field).............................................................. 15
3.After starting ...................................................................................................................................164.Projects............................................................................................................................................ 17
4.1.Project list................................................................................................................................ 174.2.Sorting the list of projects .......................................................................................................184.3.Edition of the project ............................................................................................................. 19
5.Tasks................................................................................................................................................ 215.1.Task list.................................................................................................................................... 215.2.Sorting the list of tasks ............................................................................................................235.3.Edition of the task ................................................................................................................... 24
5.3.1. Normal tasks................................................................................................................... 245.3.2. Summary......................................................................................................................... 255.3.3. Milestone.........................................................................................................................26
6.Dependencies...................................................................................................................................276.1.List of the dependencies ......................................................................................................... 276.2.Edition of the dependencies.....................................................................................................28
7.Allocations.......................................................................................................................................297.1.List of the allocations...............................................................................................................297.2.Editing of the allocation...........................................................................................................30
8.Active tasks .................................................................................................................................... 318.1.List of active tasks .................................................................................................................. 318.2.Sorting the list of active tasks ................................................................................................. 32
9.Gantt chart ...................................................................................................................................... 339.1.List of projects for showing on the chart ................................................................................ 339.2.Chart.........................................................................................................................................34
10.Resources.......................................................................................................................................3610.1.List of resources.....................................................................................................................3610.2.Editing of the resource...........................................................................................................3710.3.The list of the allocations of the resource.............................................................................. 3710.4.Editing of the allocation of the resource................................................................................3910.5.Resource chart........................................................................................................................40
11.Export............................................................................................................................................ 4211.1.Selection of projects for the export .......................................................................................4211.2.Window of the export of files ............................................................................................... 4311.3.File transfer through the email ..............................................................................................4511.4.File transfer through WiFi .....................................................................................................46
Strona 2 z 60

12.Import............................................................................................................................................ 4813.Preferences.................................................................................................................................... 50
13.1.Main window of preferences ................................................................................................ 5013.2.Window „About”................................................................................................................... 5113.3.PIN settings............................................................................................................................5213.4.Default calendar.....................................................................................................................53
13.4.1.Defining the calendar .................................................................................................... 5313.4.2.Adding holidays ............................................................................................................ 54
13.5.Configuration of the PDF export .......................................................................................... 5513.6.Configuration of the image (PNG) export............................................................................. 5613.7.Roles...................................................................................................................................... 57
13.7.1.Roles list ........................................................................................................................5713.7.2.Editing of the role.......................................................................................................... 58
14.List of the illustrations...................................................................................................................59
Strona 3 z 60

1. IntroductionProject Planner is an application to manage projects and tasks.
Project Planner lets you manage multiple projects simultaneously. In each project you can create multiple tasks grouped into phases and ended with milestones.The project can be viewed as a Gantt chart, vertically and horizontally, across days, weeks and months.
Main functions:
• managing multiple tasks • viewing tasks in a list and Gantt chart • simultaneous viewing of many projects in the Gantt chart • editing tasks directly from the Gantt chart • editing available in vertical and horizontal mode • editing tasks to control the progress of implementation • creating dependencies between tasks• data export in .gan format (supported by the Project Gantt software available on OSX,
Windows and Linux) • export the report in PDF format • export of Gantt chart as an image in PNG format • exporting available through the mail and Wi-Fi network (Bonjour) • Importing projects in the . gan format (with some limitations: Project Planner does not
import resources and all the dependencies are imported as 'hard' links with 'end-to-start' type)
• projects copying • defining their own calendars for projects • sorting tasks by name, start and end dates, and field order • sorting projects by name and the dates of beginning and end • easy searching of tasks and projects• PIN for security of applications
Strona 4 z 60

2. The standard user interface elements
Chapter discusses the standard, found in most of the windows, user interface elements.
2.1. Window of the list type
Window of the list type is an essential way of showing the bulk of elements, so as projects, tasks or relations. Passing the editable chosen element is taking place after single hitting in it with the finger.
Strona 5 z 60
Picture 1: Window of the list type
Return to the previous window
Inserting the window into the edit mode: enables removing poems as well as the change of the order in the window of tasks
Searching for elements on the list
Go settings list, you can set the sort
Adding the new element e.g. the project
Element of the list, after choosing him going editable is taking place

Strona 6 z 60
Picture 2: List in the edit mode
Return from the edit mode to the mode of the inspection
Getting hold of this element enables the change of the order of elements on the list and the Gantt graph
Button of removing the element, pressing him is removing the element irreparable
Hitting this element causes his turnover and the appearance of the Delete button

2.2. Window of the edition of the element (project / task)
The window of the edition works under two procedures:
– mode of the preview
– edit mode
2.2.1. Mode of the preview
In the preview mode it is not possible to change the contents of each field. To edit the form, press the 'Edit' button.
In this mode, there are additional options on the bottom bar (toolbar) that allow the induction of additional features available in your window.
Strona 7 z 60
Picture 3: Window of the edition of the project in the mode of the preview
Return to the window of the list
Details of the item (the project)
Entering the edit mode
Toolbar - contains additional functions of the window

2.2.2. Edit mode
In the edit mode, in fields, of which content it is possible to edit, an arrow appears, pointing out to the possibility of passing the content editable appears.
In Edit mode, the action of buttons on the bottom bar (toolbar) is blocked and you can not use the options available in it.
Return to modes of the preview is taking place after pressing the button „ Done”.
Strona 8 z 60
Picture 4: Project window in edit mode
Entering the mode of the preview
Toolbar - in edit mode is offline
The arrow indicates the ability to edit the field, its absence means that the field is only to read (information)

2.3. Window of the edition of the text box
Window of the edition of the text box is used to edit fields in which information is presented as a line of characters, such as customer name. Later in the manual, in the description of fields, the name text box is used, which means that its content is edited using such window. In this window, for editing the field, alphanumeric keyboard is available.
In the window are two buttons - Cancel, closing window and returning to the previous one, without saving changes and Save, closing window and returning to the previous with saving the changes.
Strona 9 z 60
Approval of the changes and return to previous window
Back to the previous window without the approval of amendments
Picture 5: Window of the edition of the text box
The name of the edited field
Edited field

2.4. Window of the edition of the number field
Window of the edition of the number field is used to edit all the numbers available for editing in the program. The window contains a field with the edited value and numeric keypad.
In the window are two buttons - Cancel, closing window and returning to the previous one, without saving changes and Save, closing window and returning to the previous with saving the changes.
Strona 10 z 60
Picture 6: Window of the edition of the number field
The name of the edited field
Back to the previous window without the approval of amendments
Edited field
Approval of the changes and return to previous window
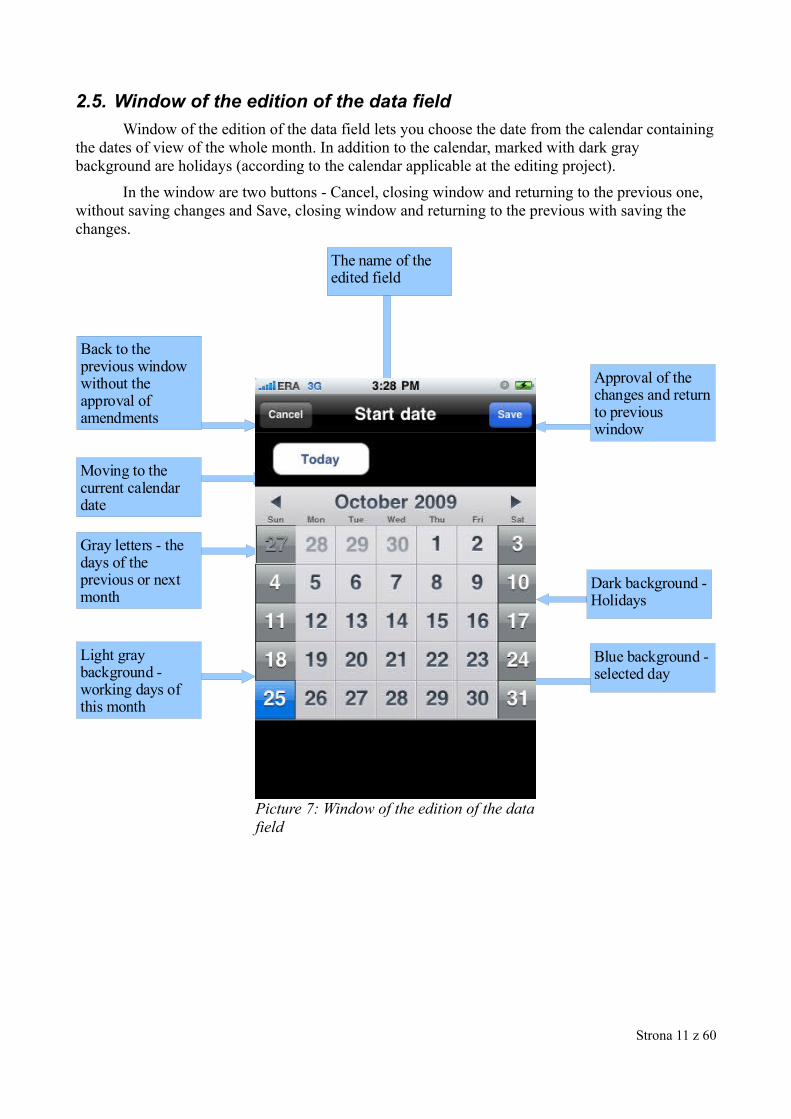
2.5. Window of the edition of the data field
Window of the edition of the data field lets you choose the date from the calendar containing the dates of view of the whole month. In addition to the calendar, marked with dark gray background are holidays (according to the calendar applicable at the editing project).
In the window are two buttons - Cancel, closing window and returning to the previous one, without saving changes and Save, closing window and returning to the previous with saving the changes.
Strona 11 z 60
The name of the edited field
Picture 7: Window of the edition of the data field
Back to the previous window without the approval of amendments
Approval of the changes and return to previous window
Moving to the current calendar date
Gray letters - the days of the previous or next month
Light gray background - working days of this month
Dark background - Holidays
Blue background - selected day

2.6. Window of the edition of the field in progress type
Edit the task progress is possible in two ways:
– by giving progress in figures to the percentage value
– by moving the slider of progress of the task
In the window are two buttons - Cancel, closing window and returning to the previous one, without saving changes and Save closing the window and returning to the previous with saving the changes.
Strona 12 z 60
Picture 8: Window of the edition of the field in progress type
The name of the edited field
Approval of the changes and return to previous window
Back to the previous window without the approval of amendments
The percentage of progress - editing is possible by using the numeric keypad
Progress slider, its position corresponds to the task progress

2.7. Window of the edition of the notebook type field
Window of the edition of the notebook type field contains large text box, allowing you to enter a long, multi-line (unlimited length) note.
In the window are two buttons - Cancel, closing window and returning to the previous one, without saving changes and Save the closing window and returning to the previous with saving the changes.
Strona 13 z 60
Picture 9: Window of the edition of the notebook type field
The name of the edited field
Approval of the changes and return to previous window
Back to the previous window without the approval of amendments

2.8. Window of the edition of calculation field
Window of the edition of calculation field allows you to select field values from a specified list. These fields are used for both, selection of enumeration types and tasks when connecting them together.
In the window are two buttons - Cancel, closing window and returning to the previous one, without saving changes and Save the closing window and returning to the previous with saving the changes.
Strona 14 z 60
Picture 10: Window of the edition of calculation field
The name of the edited field
Approval of the changes and return to previous window
Back to the previous window without the approval of amendments
Selection List

2.9. Window of the edition of logical field (BOOL field)
Window of the edition of BOOL field allows you to set value for logical field Yes/No (On/Off).
In the window are two buttons - Cancel, closing window and returning to the previous one, without saving changes and Save the closing window and returning to the previous with saving the changes.
Strona 15 z 60
Picture 11: Window of the edition of logical field
The name of the edited field
Back to the previous window without the approval of amendments
Approval of the changes and return to previous window
Yes/No switch
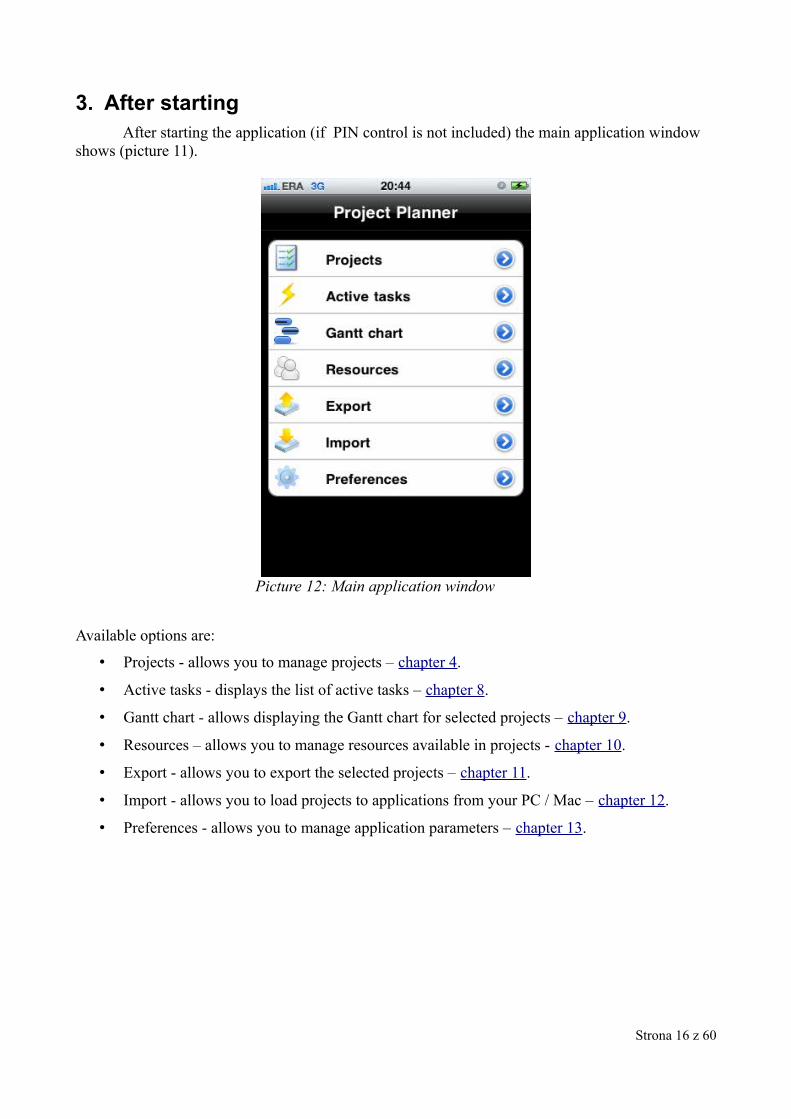
3. After starting After starting the application (if PIN control is not included) the main application window
shows (picture 11).
Available options are:
• Projects - allows you to manage projects – chapter 4.
• Active tasks - displays the list of active tasks – chapter 8.
• Gantt chart - allows displaying the Gantt chart for selected projects – chapter 9.
• Resources – allows you to manage resources available in projects - chapter 10.
• Export - allows you to export the selected projects – chapter 11.
• Import - allows you to load projects to applications from your PC / Mac – chapter 12.
• Preferences - allows you to manage application parameters – chapter 13.
Strona 16 z 60
Picture 12: Main application window

4. Projects
4.1. Project list
When you select Projects from the main application menu, you will go to the project management screen (picture 13).For each project listed, shows its:
– name– client– start and end dates
After pressing the button „ + ” we can add the new project, choosing the existing project causes undergoing this project editable.
On the list of projects searching after writing the text down in the front for searching is possible. The application is searching this text in fields: Name, Manager, Client and Notebook.
Strona 17 z 60
Picture 13: Project management

4.2. Sorting the list of projects
It is possible to sort the list of projects according to the following fields:
– project name
– start date
– end date
For every field it is possible to adjust the mode of sorting: ascending and descendingg.
After the approval, settings of sorting are remembered and used until the next change with the help of this window.
Strona 18 z 60
Picture 14: Window of sorting the list of projects

4.3. Edition of the project
For every project it is possible to determine:
– name of the project, text box
– manager of project, text box
– customer's name, text box
– starting date of the project, data field
– project end date, data field
– notes concerning the project, notebook type field
– Calendar: a new project initially uses the default calendar of application (in the box the information 'Default' is displayed), but you can create a separate calendar for the selected project. Calendar is created as a copy of the default project. After its creation in the box information 'Own' is displayed
Available buttons on the toolbar allows you:
– button "Tasks" passage to the list of tasks
– button "Copy" is creating the copy of the current project
– Gantt – is showing the Gantt chart for the current plan
Strona 19 z 60
Picture 15: Window of details and the edition of the project

– GAN - create an email containing the exported project in the .gan format (read out by the program Gantt Project available on platforms of the X Wasps, Windows and the Linux)
– PDF - create an email containing a draft report in PDF format
Strona 20 z 60
5. Tasks
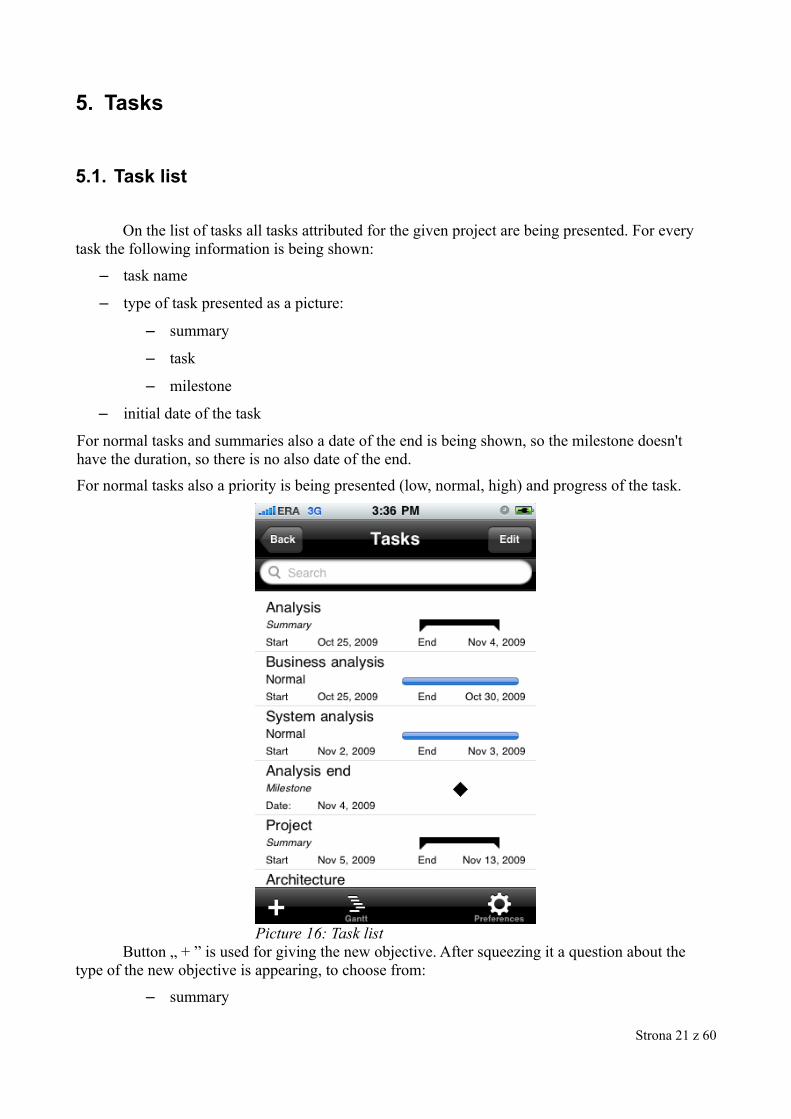
5.1. Task list
On the list of tasks all tasks attributed for the given project are being presented. For every task the following information is being shown:
– task name
– type of task presented as a picture:
– summary
– task
– milestone
– initial date of the task
For normal tasks and summaries also a date of the end is being shown, so the milestone doesn't have the duration, so there is no also date of the end.
For normal tasks also a priority is being presented (low, normal, high) and progress of the task.
Button „ + ” is used for giving the new objective. After squeezing it a question about the type of the new objective is appearing, to choose from:
– summary
Strona 21 z 60
Picture 16: Task list

– task
– milestone
Strona 22 z 60
Picture 17: Adding the new objective

5.2. Sorting the list of tasks
It is possible to sort the list of tasks according to the following fields:
– order – field appointing the order on the list as well as on the Gantt chart. Change of the order is possible to make by rescheduling tasks on the list of tasks
– task name
– date of the beginning of the task
For every field it is possible to adjust the mode of sorting: ascending and descending.
After approving, sorting settings are remembered and used until the next change with the help of this window.
Attention: on the list of tasks a change of the order of tasks option is available. Its using is possible only with setting sorting over field Order with the option of ascending sorting.
Strona 23 z 60
Picture 18: Window of sorting the list of tasks

5.3. Edition of the task
Because of the fact that different types of tasks have different lists of fields, they are discussed each of them individually.
5.3.1. Normal tasks
The task constitutes the basic component in the process of managing a project.
For each task you can specify:– task name, text box
– starting date of the task, data field
– duration of the task determined on days, number field
– priority of the task, calculated field with values: low, normal, high
– progress of the task, progress type of field
– dependent tasks – chapter 6
– allocations – chapter 7
– notes concerning the task, field of the type notebook
Additionally, on the window, are being shown in information purposes
– date of termination, estimated according to the start date and the duration based on the current calendar.
Strona 24 z 60
Picture 19: Window of the edition of the task

5.3.2. Summary
Suming up in the Gantt notation constitutes reflecting the stage in the project. They are being put above storage tasks and usually finishing with milestone.
For each summary, you can specify:– name of summary, text box
– start date of summary, data field
– cduration of the task determined on days, number field
– dependent tasks – chapter 6
– allocations – chapter 7
– notes concerning the summary, field of the type notebook
Additionally, on the window, are being shown in information purposes
– end date, estimated according to the start date and the duration based on the current calendar.
Strona 25 z 60
Picture 20: Window of the edition of the summary

5.3.3. Milestone
The milestone in the Gantt notation is a final point which is suming up the determined worksheet, or the given stage of the project. It is indicating the certain essential, disposable event which is possible to define in explicit way [definition behind wikipedia.pl].
For each summary, you can specify:– name of the milestone, text box
– date of the riot of the stone, data field
– dependent tasks – chapter 6
– allocations – chapter 7
– notes concerning the summary, field of the type notebook
Strona 26 z 60
Picture 21: Window of the edition of the task in milestone type

6. DependenciesDependencies in the application are symbolizing connections between tasks, arranging them
in the logical sequence of tasks. They enable also an identification of critical paths. It is possible to combine every task with the any number of other tasks.
Connecting the task with other task means that the beginning of this task will be automatically listed based on the end of tasks link (a maximum date is being chosen) enlarged for delaying of the task.
Attention: Project Planner handles only end-to-start link, so tying the end of one task with the beginning of the next task.
6.1. List of the dependencies
The list presents all the dependencies attached to the task. For every dependency are presented:
– Name of the connected task
– Delaying the beginning of the task tied together in relation to the end of the task, in the context of which we are working
Strona 27 z 60
Picture 22: List of the dependencies of the task

6.2. Edition of the dependencies
The window of the edition of dependencies allows to add the new dependency to the current task.
For each dependency must be determined:
– related task, choice from the list
– delay of start date of the task, a numeric field
Strona 28 z 60
Picture 23: Edition of the dependencies
7. AllocationsAllocations in the application are symbolizing assignation of recource to task. Each task can
allocate multiple resources, to each of the resources, you can specify different load, to each task you can also specify one or many responsibles (called coordinator).
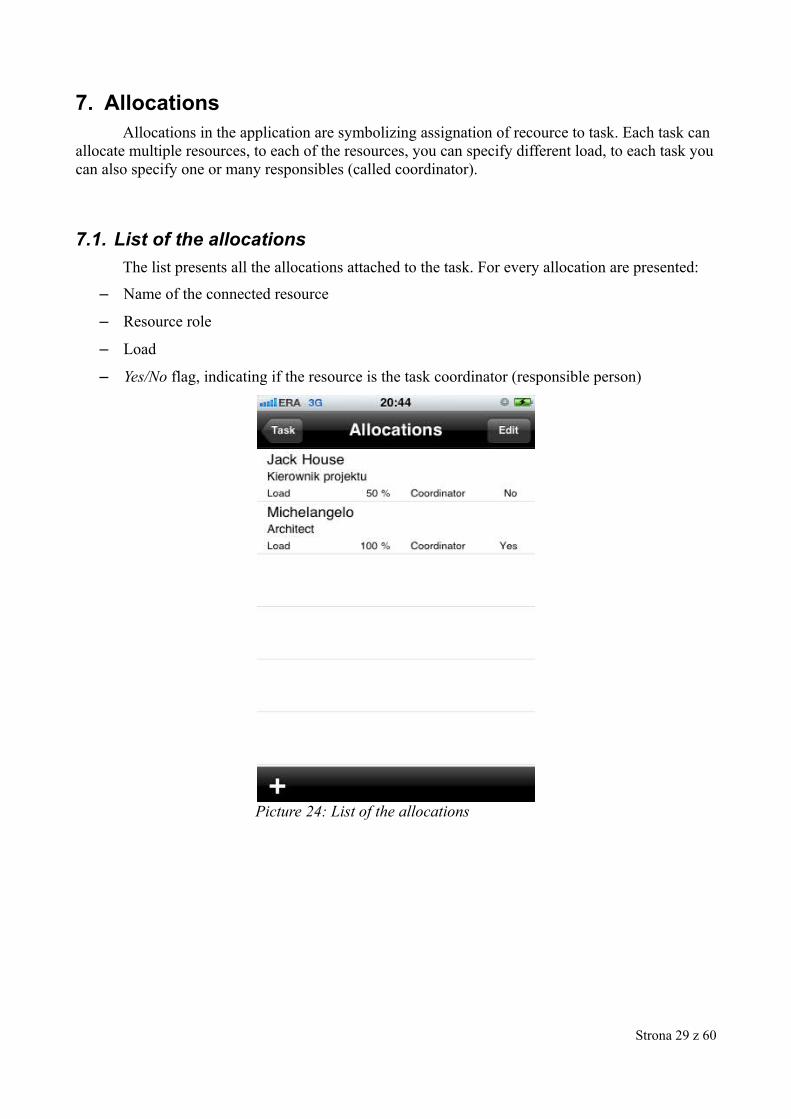
7.1. List of the allocations
The list presents all the allocations attached to the task. For every allocation are presented:
– Name of the connected resource
– Resource role
– Load
– Yes/No flag, indicating if the resource is the task coordinator (responsible person)
Strona 29 z 60
Picture 24: List of the allocations

7.2. Editing of the allocation
The window of the edition of allocation allows to add the new allocation to the current task.
For each allocation must be determined:
– resource, choice from the list
– role, choice from the list
– load, progress field
– Yes/No flag, indicating if the resource is the task coordinator (responsible person) – BOOL field
Available resources are created in Resources window – chapter 10
Available roles are created in Roles window – chapter 13.7
Strona 30 z 60
Picture 25: Edition of the allocation

8. Active tasks
8.1. List of active tasks
List of active tasks shows all tasks, all projects, that have not yet been completed and their start date passed, or is passing at the opening of the list.
Highlighted in red are the tasks which completion date has expired and they are not finished.
Directly from the list of active tasks you can go to edition of the selected task (like from the list of tasks).
Strona 31 z 60
Picture 26: List of active tasks
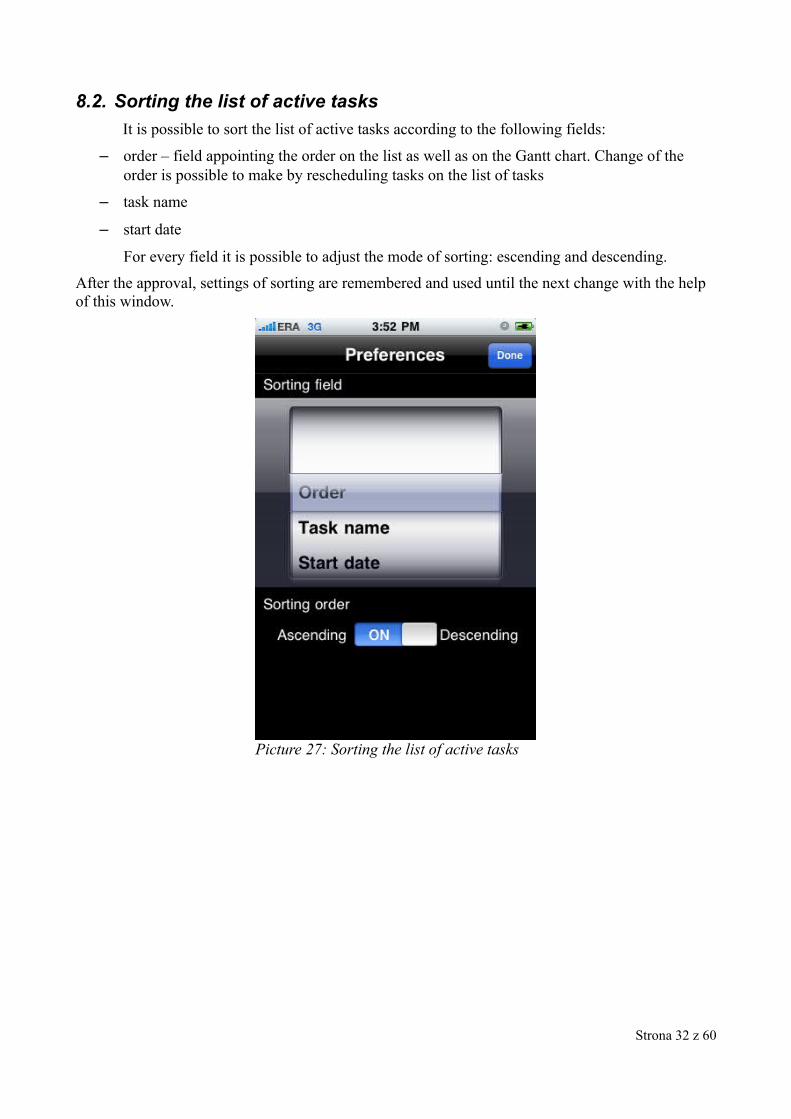
8.2. Sorting the list of active tasks
It is possible to sort the list of active tasks according to the following fields:
– order – field appointing the order on the list as well as on the Gantt chart. Change of the order is possible to make by rescheduling tasks on the list of tasks
– task name
– start date
For every field it is possible to adjust the mode of sorting: escending and descending.
After the approval, settings of sorting are remembered and used until the next change with the help of this window.
Strona 32 z 60
Picture 27: Sorting the list of active tasks

9. Gantt chart A Gantt chart is a graph applied mainly in the project management. In it a division of the
project into individual tasks is included, and laying them out in the time are being taken into account. It is, at present, standard way of presenting dividing tasks in the project.
9.1. List of projects for showing on the chart
On the list of projects all plans which we can show on the chart are being presented. The list enables choosing (marking) a few of projects which will be shown on the chart. This allows the compilation of the tasks of different projects on one timeline.
The transition to the Gantt chart is coming after choosing an option Chart. The transition to the chart is possible only after emphasizing at least one project.
Strona 33 z 60
Picture 28: Choice about tasks for showing on the chart
Transition to Gantt graph
Choosen (marked) projects

9.2. Chart
The Gantt chart is presenting the list of tasks from selected projects on the pivot of the time. Watching the graph in the division of the pivot of the time into days, weeks and months is possible.
Directly from the chart adding new tasks and the edition of existing tasks is possible. In order to add the new task you should press the button „ + ”, it is only approachable when the chart is presenting only one project.
The edition of the task is possible after tapping either into the name of the task, or into its picture on the chart. After this operation a standard window of the edition of task of chosen type is opening. After closing the edition of the task, a return to the chart is taking place, and changes in the task are being reflected on the chart.
Strona 34 z 60
Picture 29: Gantt chart in the landscape mode
Adding the new task. Button visible only, when the graph is presenting one project
Change of the type of the pivot of the time
Name of the project
List of tasks
Task
Summary (stage)
Milestone
Dependencies between the tasks

Chart, as well as the entire application, can work in landscape mode and portrait mode.
Strona 35 z 60
Picture 30: Gantt chart in the portrait mode

10. Resources
10.1. List of resources
When you select Resources from the main application menu, you will go to the resources management window.For each resource listed, shows its:
– name
After pressing the button „ + ” we can add the new resource, choosing the existing resource causes undergoing this object editable.
After pressing „Resource chart” button you will go to the chart of the resource load (chapter 10.5).
Strona 36 z 60
Picture 31: List of resources

10.2. Editing of the resource
The window of the edition of resource allows to add the new resource to the current task. For each resource must be determined:
– name, text field
– contact, text field
– phone, text field
In addition you can go to edit the list of tasks (allocations) allocated to the resource.
10.3. The list of the allocations of the resource
When you select Tasks option from the previous window (chapter 10.2), you will go to the list of the allocations of the resources.For each allocations listed, shows its:
– task name– project, to which belongs task– resource load in task– Yes/No flag, indicating if the resource is the task coordinator (responsible person)
Strona 37 z 60
Picture 32: Editing of the resource

Choosing the existing allocation causes undergoing this object editable.
Strona 38 z 60
Picture 33: List of the allocations of the resource

10.4. Editing of the allocation of the resource
To each allocation you can specify:
– role, choice from the list
– load, progress field
– Yes/No flag, indicating if the resource is the task coordinator (responsible person) – BOOL field
Strona 39 z 60
Picture 34: Window of the edition of the allocations of the resource

10.5. Resource chart
Resource chart is presenting resources load in time. Window contains list of resources definied in the application, and chart of the daily load of the resource. Loads greater than 100% is indicated in red, loads lesser or equal 100% is indicated in green.
The edition of the resource is possible after tapping into the name of the resource. After tapping in load application shows window of the edition of the allocations of the resource (chapter 10.4).
Strona 40 z 60
Picture 35: Resource chart in the landscape mode
List of resources
Day with load 100%
Day with load more then 100%

Strona 41 z 60
Picture 36: Resource chart in the portrait mode

11.ExportThe Project Planner application enables to conduct the export of data in a few chosen
formats. They are:
– PDF – a report containing the Gantt chart and comparison of tasks in the tabular form is being generated; it is possible to configure this export in preferences of the application,
– GAN – data file to the Gantt Project program working on OSX/Mac/Linux operating systems. This program enables the edition of the project on a computer. Sending the project to iPhone is also possible (option Import)
– PNG – the program enables to export the Gantt chart in the daily arrangement as the .png picture
11.1. Selection of projects for the export
On the window of the selection of projects all plans, which we can export, are being presented. The list enables simultaneous choosing (marking) of a few projects. Above the list of projects are switches which enable to determine formats, in which we want to conduct the export.
The transition to the window of the export is coming after choosing an Export option. The transition to the export window is possible only after emphasizing at least one project.
Strona 42 z 60
Projects to choose from
Passage to the window of the export
Formats in which the export is possible
Picture 37: Window of selection of projects for export
11.2. Window of the export of files
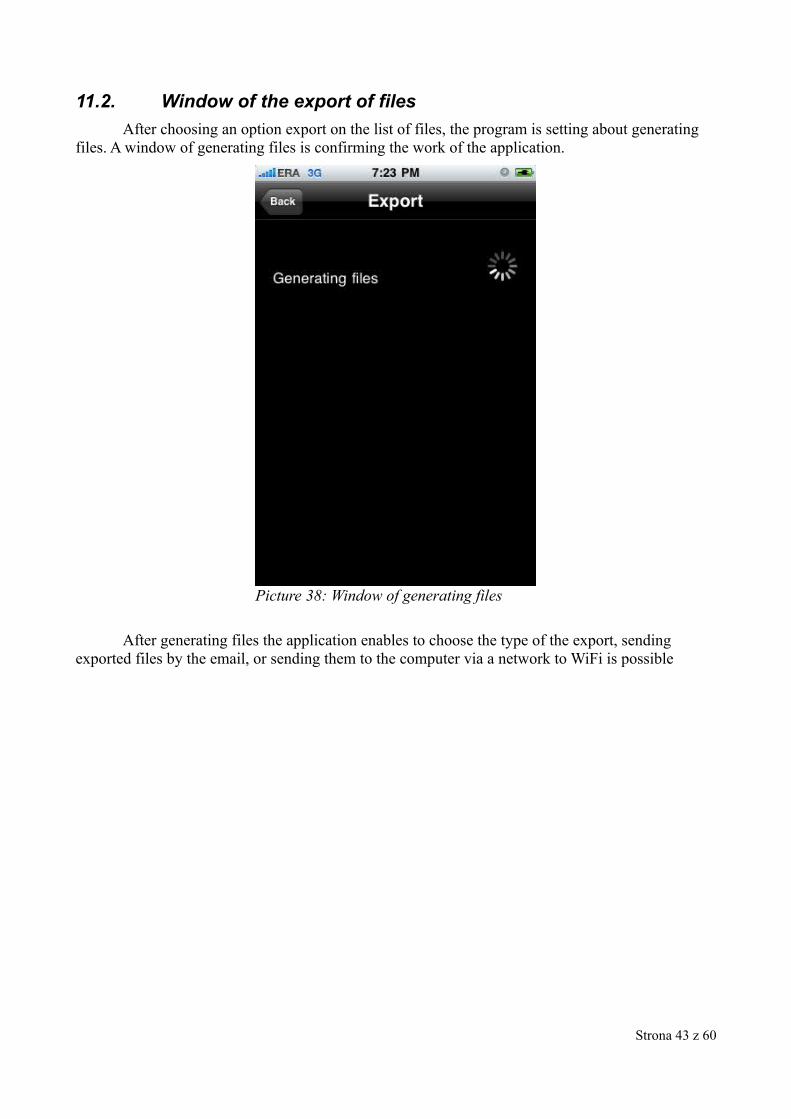
After choosing an option export on the list of files, the program is setting about generating files. A window of generating files is confirming the work of the application.
After generating files the application enables to choose the type of the export, sending exported files by the email, or sending them to the computer via a network to WiFi is possible
Strona 43 z 60
Picture 38: Window of generating files

Strona 44 z 60
Picture 39: Window of choice about the way of sending a file
11.3. File transfer through the email
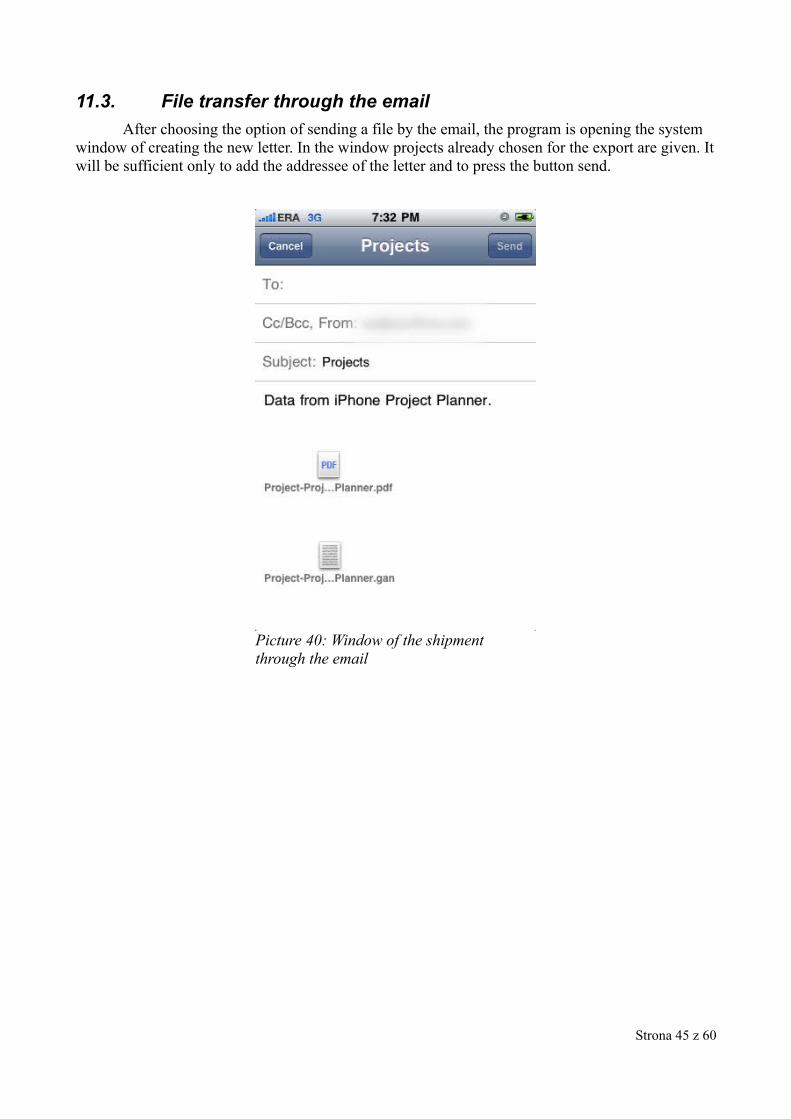
After choosing the option of sending a file by the email, the program is opening the system window of creating the new letter. In the window projects already chosen for the export are given. It will be sufficient only to add the addressee of the letter and to press the button send.
Strona 45 z 60
Picture 40: Window of the shipment through the email

11.4. File transfer through WiFi
After choosing the option of sending files through WiFi a window of the WiFi connection is opening (attention, this window will only be started if in iPhone a WiFi service was included and connecting WiFi to the mains took place).
After opening a window the application is showing two addresses, under which exported data are accessible. The first address is an address in the Bonjour standard, it is possible to connect to it from the any computer with the OSX system, from Windows systems the connection is only possible if a customer of the Bonjour network of the Apple company was installed (available on the website http://apple.com). The other address has the IP form and it is possible to connect to them from any computer.
To the connection we are using the any Web browser, writing one of above addresses down in the belt of the address. After the connection the viewer will show the straight web page containing the list of exported files. We can download files by clicking on their link.
Strona 46 z 60
Picture 41: Window of the WiFi connection

Strona 47 z 60
Picture 42: List of files in the web browser

12. ImportThe Project Planner application enables to import projects in the .gan format from the Gantt
Project program (we are recommending using of the 2.0.10 version of this program).
It is possible to transfer the project, created and written on a computer, to iPhone through WiFi, into the similar manner how an export is acting through WiFi
After choosing the option of the import, a window of the WiFi connection is openin (attention, this window will only be started if in iPhone a WiFi service was included and connecting WiFi to the mains took place).
After opening a window the application is showing two addresses, under which exported data are accessible. The first address is an address in the Bonjour standard, it is possible to connect to it from the any computer with the OSX system, from Windows systems the connection is only possible if a customer of the Bonjour network of the Apple company was installed (available on the website http://apple.com). The other address has the IP form and it is possible to connect to them from any computer.
To the connection we are using the any Web browser, writing one of above addresses down in the belt of the address. After the connection the viewer will show the straight web page containing Chose a file button enabling choosing the file for loading and Send button enabling to send the chosen earlier file to iPhone.
Files are being sent to iPhone after pressing the Send button on the website, however loading them into the Project Planner program is taking place only after triggering the option „ Stop and import ” on the window of the import of files.
Strona 48 z 60
Picture 43: Window of the import of files

Attention: the import of the big file can take even several dozen seconds, in case of the simultaneous import of a few files the application can not match even a few minutes. It is normal action of the programme and you should not turn it off in the process of loading projects, because it can lead for implementing mistakes in data of the program.
Strona 49 z 60
Picture 44: Web page of the import of files

13. Preferences
13.1. Main window of preferences
The main window of preferences enables to open windows of defining detailed parameters as:
– window „ About ” - showing general information about the application
– window of PIN defining
– window of defining the default calendar
– window of the configuration of the PDF export
– window of the configuration of the image (PNG) export
– window of the edition of roles dictionary
Strona 50 z 60
Picture 45: Main window of preferences
13.2. Window „About”
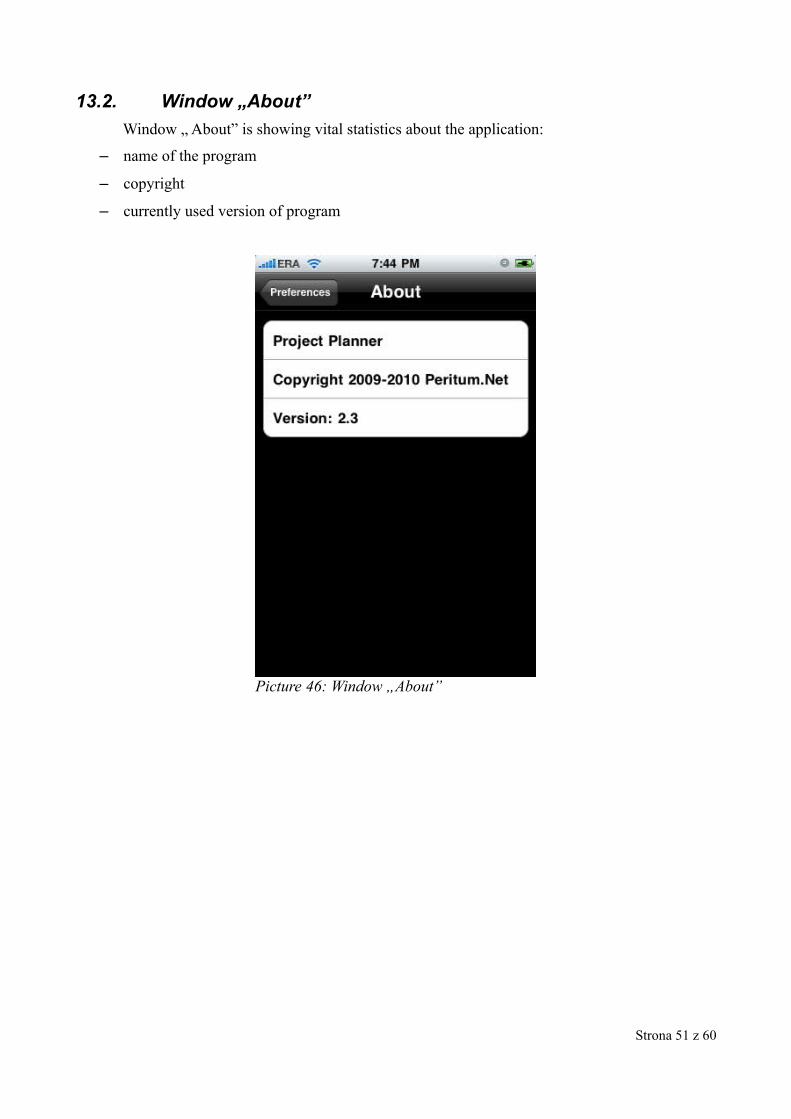
Window „ About” is showing vital statistics about the application:
– name of the program
– copyright
– currently used version of program
Strona 51 z 60
Picture 46: Window „About”

13.3. PIN settings
The window of PIN defining enables to turn on / off PIN which protects the application against the use by the unauthorized person.
On the window a switch Check PIN is available,
– to enable verification of the PIN, you must include the above-mentioned switch, then enter the PIN twice (takes control of correctness - the compatibility of the two numbers entered) and press the Set button.
– to disable the PIN check, turn off the switch mentioned above, and then press the Set button.
PIN verification takes place during startup. Launching application is not possible without giving the proper PIN.
Attention: in case of forgetting PIN you don't have the possibility of regaining him, or any other way of getting to the program. The only way of running a program, after forgetting PIN, is removing the program and its new installing.
Strona 52 z 60
Picture 47: Defining PIN

13.4. Default calendar
The window enables to define the default calendar of application. The analogous window enables to define own calendars of projects.
13.4.1. Defining the calendar
The definition of the calendar consists by definition of the labour week (in the top of the window), and lists of holidays (in the lower part of the window)
Defining for every day we determine, whether it is the holiday, or a labour day (the hook means that the day is a labour day).
Adding holidays is held in a similar way to action of all windows of the list type.
Strona 53 z 60
Picture 48: Window of defining the calendar

13.4.2. Adding holidays
In the window of adding holidays for every holiday we determine:
– holiday name, text box
– date of the holiday, data field
Strona 54 z 60
Picture 49: Window of adding the holiday

13.5. Configuration of the PDF export
The window of the configuration of the PDF export enables defining which from given elements are supposed to be placed in the report generated by the program.
The user can determine appearing of the following elements:
– Title page
– Gantt chart – picture containing the chart on the daily pivot of the time
– Project description– table containing comparing all information about the project
– Descriptions of tasks– set of tables containing a summary of all information on all tasks in the project.
– Type of the Gantt chart – choose from the list of layouts: day, week, month
Strona 55 z 60
Picture 50: Window of PDF configuring
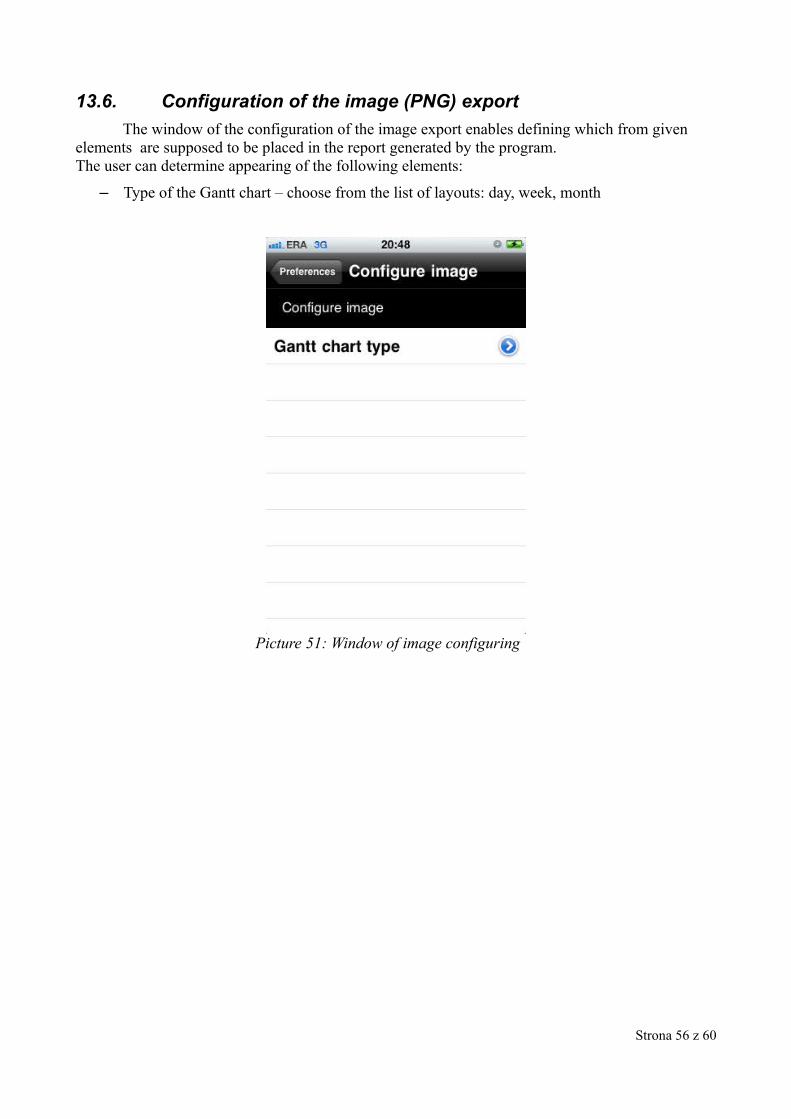
13.6. Configuration of the image (PNG) export
The window of the configuration of the image export enables defining which from given elements are supposed to be placed in the report generated by the program. The user can determine appearing of the following elements:
– Type of the Gantt chart – choose from the list of layouts: day, week, month
Strona 56 z 60
Picture 51: Window of image configuring

13.7. Roles
13.7.1. Roles list
When you select Roles from the Preferences menu, you will go to the roles management screen.For each role listed, shows its:
– name
After pressing the button „ + ” we can add the new role, choosing the existing role causes undergoing this object editable.
Strona 57 z 60
Picture 52: Roles list

13.7.2. Editing of the role
For each role is possible to determine:
– name of the project, text field
Strona 58 z 60
Picture 53: Editing of the role

14. List of the illustrations
List of the illustrationsPicture 1: Window of the list type........................................................................................................ 5Picture 2: List in the edit mode ............................................................................................................6Picture 3: Window of the edition of the project in the mode of the preview .......................................7Picture 4: Project window in edit mode............................................................................................... 8Picture 5: Window of the edition of the text box..................................................................................9Picture 6: Window of the edition of the number field ....................................................................... 10Picture 7: Window of the edition of the data field..............................................................................11Picture 8: Window of the edition of the field in progress type...........................................................12Picture 9: Window of the edition of the notebook type field.............................................................13Picture 10: Window of the edition of calculation field.......................................................................14Picture 11: Window of the edition of logical field............................................................................. 15Picture 12: Main application window.................................................................................................16Picture 13: Project management.........................................................................................................17Picture 14: Window of sorting the list of projects ............................................................................. 18Picture 15: Window of details and the edition of the project ............................................................ 19Picture 16: Task list............................................................................................................................ 21Picture 17: Adding the new objective ................................................................................................22Picture 18: Window of sorting the list of tasks ..................................................................................23Picture 19: Window of the edition of the task ................................................................................... 24Picture 20: Window of the edition of the summary ...........................................................................25Picture 21: Window of the edition of the task in milestone type........................................................26Picture 22: List of the dependencies of the task ................................................................................ 27Picture 23: Edition of the dependencies............................................................................................. 28Picture 24: List of the allocations.......................................................................................................29Picture 25: Edition of the allocation...................................................................................................30Picture 26: List of active tasks............................................................................................................31Picture 27: Sorting the list of active tasks.......................................................................................... 32Picture 28: Choice about tasks for showing on the chart .................................................................. 33Picture 29: Gantt chart in the landscape mode .................................................................................. 34Picture 30: Gantt chart in the portrait mode....................................................................................... 35Picture 31: List of resources............................................................................................................... 36Picture 32: Editing of the resource..................................................................................................... 37Picture 33: List of the allocations of the resource.............................................................................. 38Picture 34: Window of the edition of the allocations of the resource................................................39Picture 35: Resource chart in the landscape mode ............................................................................ 40Picture 36: Resource chart in the portrait mode................................................................................ 41Picture 37: Window of selection of projects for export......................................................................42Picture 38: Window of generating files ............................................................................................. 43Picture 39: Window of choice about the way of sending a file ......................................................... 44Picture 40: Window of the shipment through the email .................................................................... 45Picture 41: Window of the WiFi connection ..................................................................................... 46Picture 42: List of files in the web browser .......................................................................................47Picture 43: Window of the import of files ......................................................................................... 48Picture 44: Web page of the import of files .......................................................................................49
Strona 59 z 60

Picture 45: Main window of preferences............................................................................................50Picture 46: Window „About”..............................................................................................................51Picture 47: Defining PIN.................................................................................................................... 52Picture 48: Window of defining the calendar .................................................................................... 53Picture 49: Window of adding the holiday ........................................................................................ 54Picture 50: Window of PDF configuring ...........................................................................................55Picture 51: Window of image configuring ........................................................................................ 56Picture 52: Roles list .........................................................................................................................57Picture 53: Editing of the role ........................................................................................................... 58
Strona 60 z 60