project plan formatting – fundamentals lesson 6. skills matrix skillsmatrix skill format a gantt...
TRANSCRIPT

Project Plan Formatting Project Plan Formatting –– Fundamentals Fundamentals
Lesson 6

Skills MatrixSkills Matrix
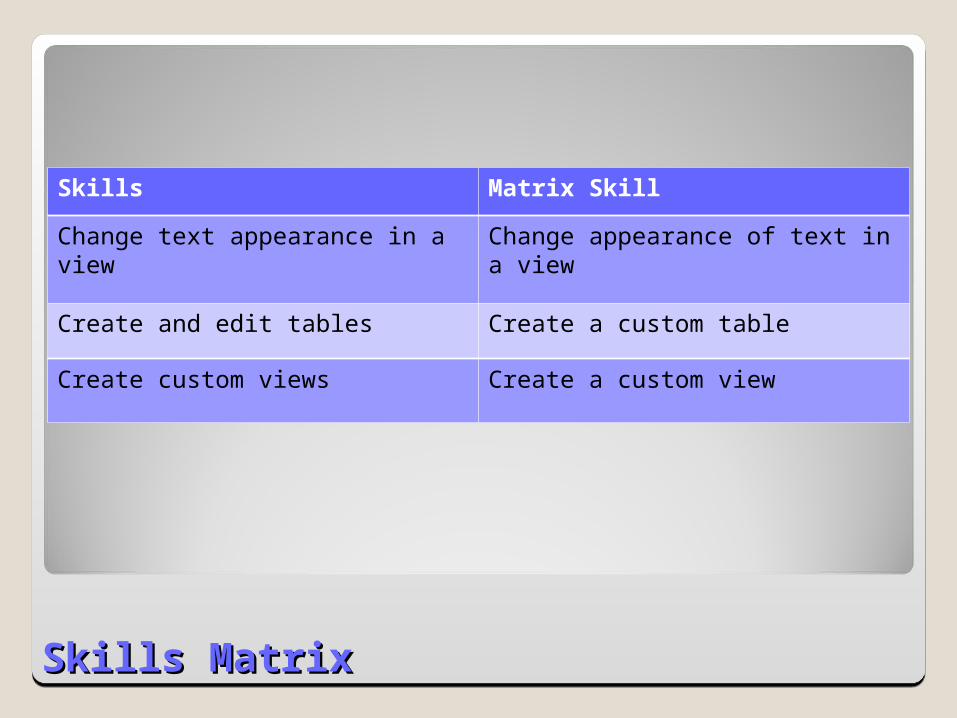
Skills Matrix Skill
Format a Gantt Chart Modify the Gantt Chart using the Bar Styles dialog boxModify the Gantt Chart using the Gantt Chart Wizard
Draw in a Gantt Chart Add a text box to a Gantt Chart
Skills MatrixSkills Matrix
Skills Matrix Skill
Change text appearance in a view Change appearance of text in a view
Create and edit tables Create a custom table
Create custom views Create a custom view

Software OrientationSoftware Orientation
Used to change the appearance of Gantt Chart items
Task bars and summary bars
o Types, Colors, Patterns, Shapes, Splits
Milestones
Text
Microsoft Project’s Bar Styles Dialog Box

Software OrientationSoftware Orientation
Use to reformat
bars on the Gantt Chart (can format beginning,
middle, and end of each
bar)
Use to reformat
text on the Gantt Chart
Items that can be
reformatted
Current appearance
of item
Task types for which bar or shape will
appear
Microsoft Project’s Bar Styles Dialog Box (cont.)

Gantt Chart FormattingGantt Chart Formatting
On the menu bar, click FormatOn the menu bar, click Format
Click Bar StylesClick Bar Styles
The Bar Styles dialog box appears
Modify the Gantt Chart Using the Bar Styles Dialog Box
Gantt Chart FormattingGantt Chart Formatting
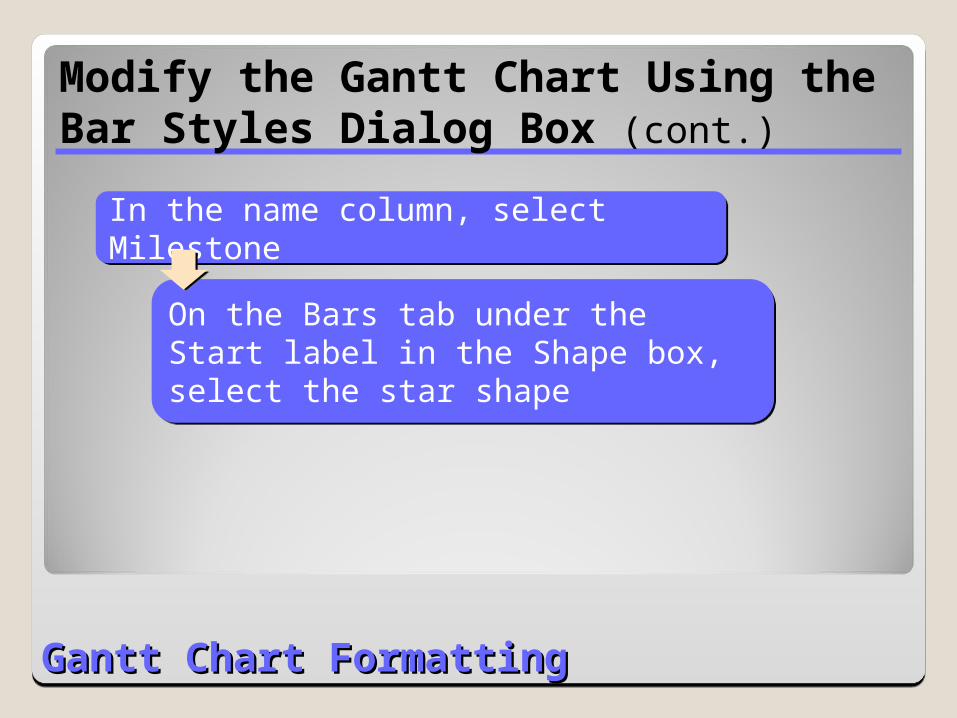
On the Bars tab under the Start label in the Shape box, select the star shape
On the Bars tab under the Start label in the Shape box, select the star shape
In the name column, select MilestoneIn the name column, select Milestone
Modify the Gantt Chart Using the Bar Styles Dialog Box (cont.)

Gantt Chart FormattingGantt Chart Formatting
Select Milestone
Star shape selected
Modify the Gantt Chart Using the Bar Styles Dialog Box (cont.)

Gantt Chart FormattingGantt Chart Formatting
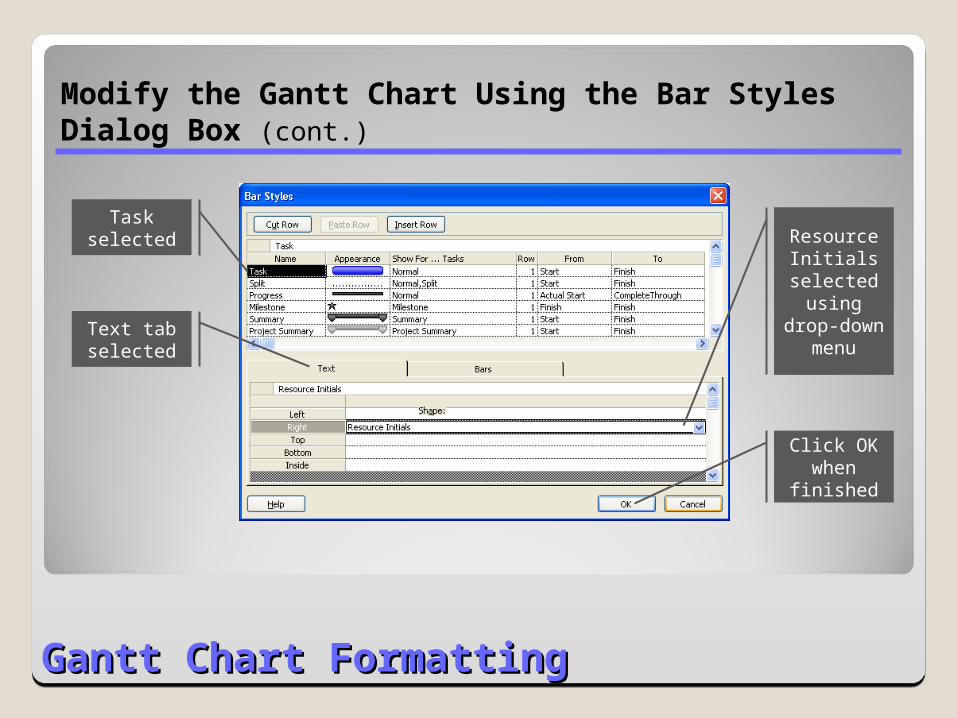
In the name column at the top of the dialog box, select TaskIn the name column at the top of the dialog box, select Task
Click the Text tabClick the Text tab
In the Text tab in the Right box, select Resource nameIn the Text tab in the Right box, select Resource name
Click the down arrow, and then select Resource InitialsClick the down arrow, and then select Resource Initials
Modify the Gantt Chart Using the Bar Styles Dialog Box (cont.)
Gantt Chart FormattingGantt Chart Formatting
Task selected
Text tab selected
Resource Initials
selected using
drop-down menu
Click OK when
finished
Modify the Gantt Chart Using the Bar Styles Dialog Box (cont.)

Gantt Chart FormattingGantt Chart Formatting
Scroll to task 26 to view the reformatted milestone and resource initials
Reformatted milestone and
resource initials
Modify the Gantt Chart Using the Bar Styles Dialog Box (cont.)
Gantt Chart FormattingGantt Chart Formatting
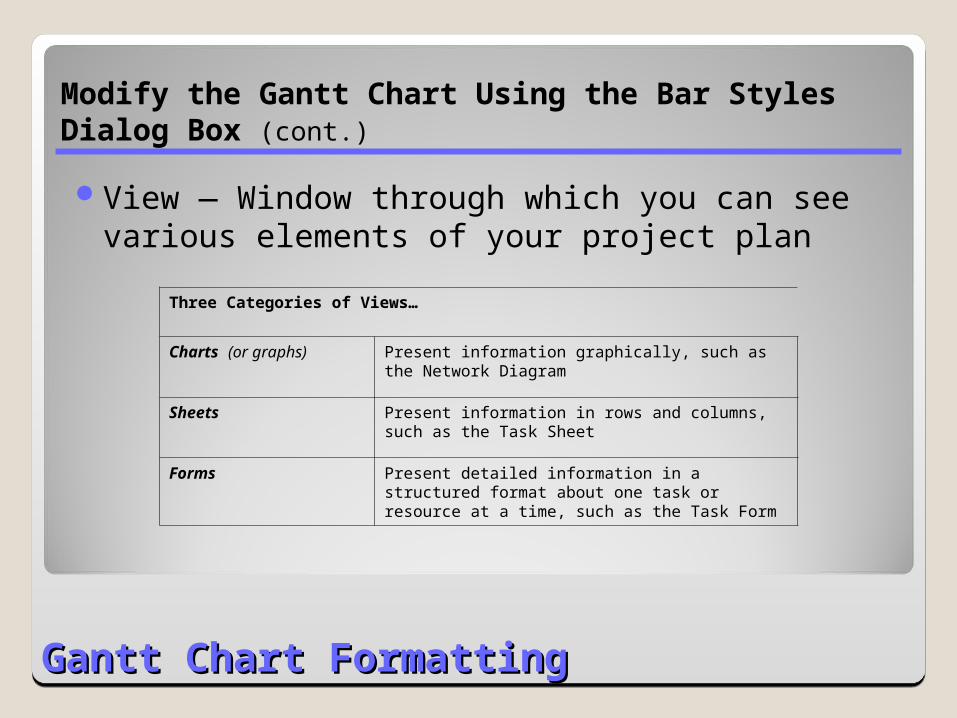
View — Window through which you can see various elements of your project plan
Three Categories of Views…
Charts (or graphs) Present information graphically, such as the Network Diagram
Sheets Present information in rows and columns, such as the Task Sheet
Forms Present detailed information in a structured format about one task or resource at a time, such as the Task Form
Modify the Gantt Chart Using the Bar Styles Dialog Box (cont.)
Gantt Chart FormattingGantt Chart Formatting
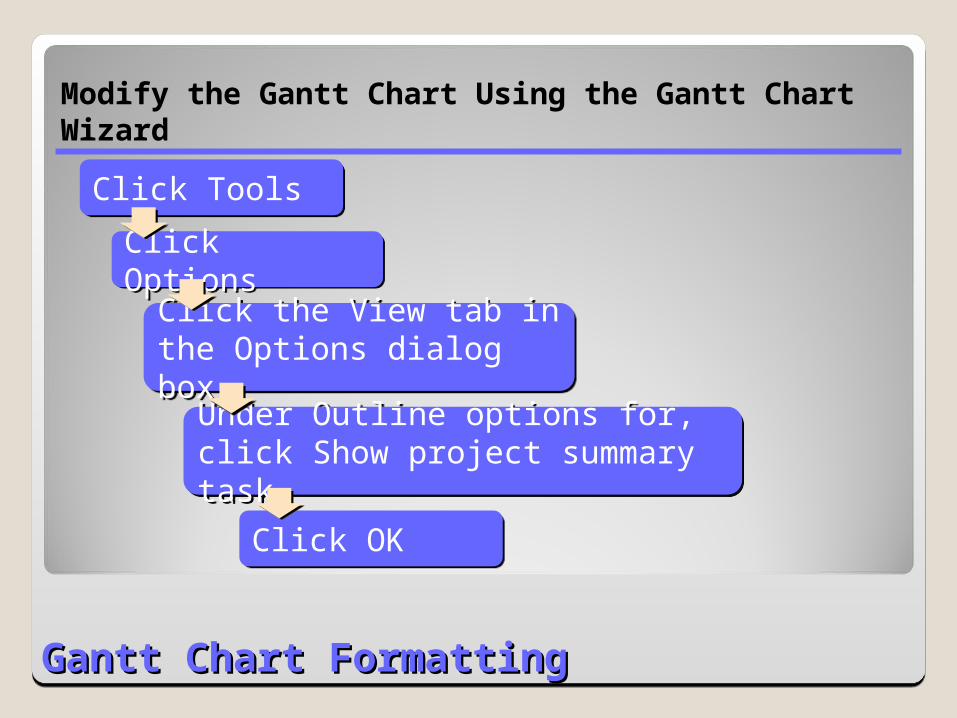
Click OptionsClick Options
Click ToolsClick Tools
Click the View tab in the Options dialog boxClick the View tab in the Options dialog box
Under Outline options for, click Show project summary taskUnder Outline options for, click Show project summary task
Click OKClick OK
Modify the Gantt Chart Using the Gantt Chart Wizard

Gantt Chart FormattingGantt Chart Formatting
Adjust the Gantt Chart so that the Duration and Start columns are visible
Expand the column width to see full values
Modify the Gantt Chart Using the Gantt Chart Wizard (cont.)
Gantt Chart FormattingGantt Chart Formatting
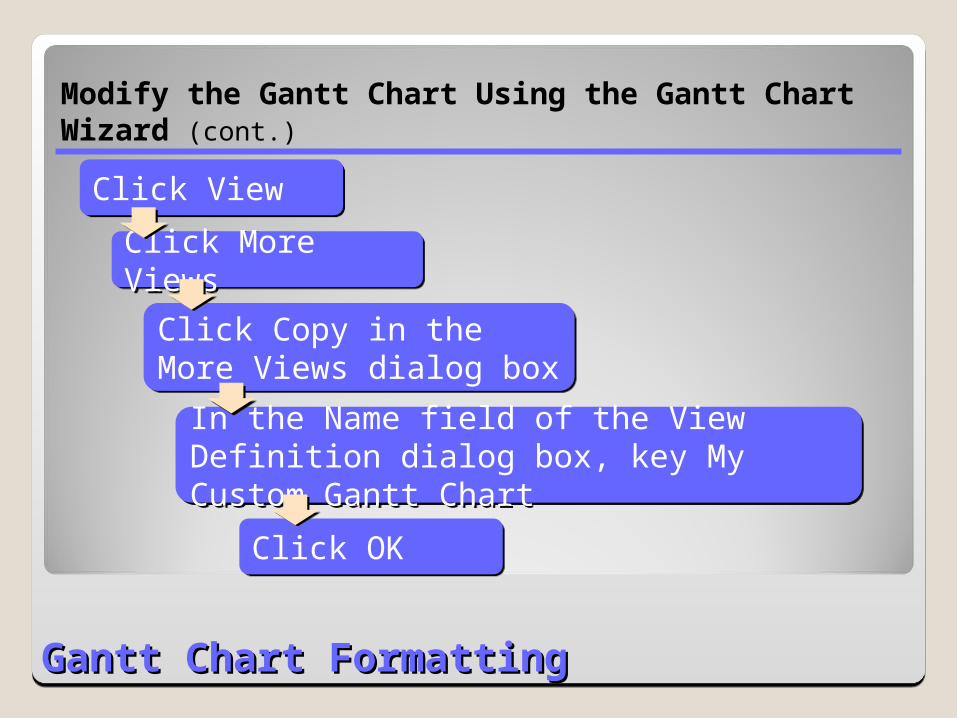
Click More ViewsClick More Views
Click ViewClick View
Click Copy in the More Views dialog boxClick Copy in the More Views dialog box
In the Name field of the View Definition dialog box, key My Custom Gantt ChartIn the Name field of the View Definition dialog box, key My Custom Gantt Chart
Click OKClick OK
Modify the Gantt Chart Using the Gantt Chart Wizard (cont.)

Gantt Chart FormattingGantt Chart Formatting
More Views dialog box shows newly
created view
Click Apply to activate the new view
Modify the Gantt Chart Using the Gantt Chart Wizard (cont.)
Gantt Chart FormattingGantt Chart Formatting
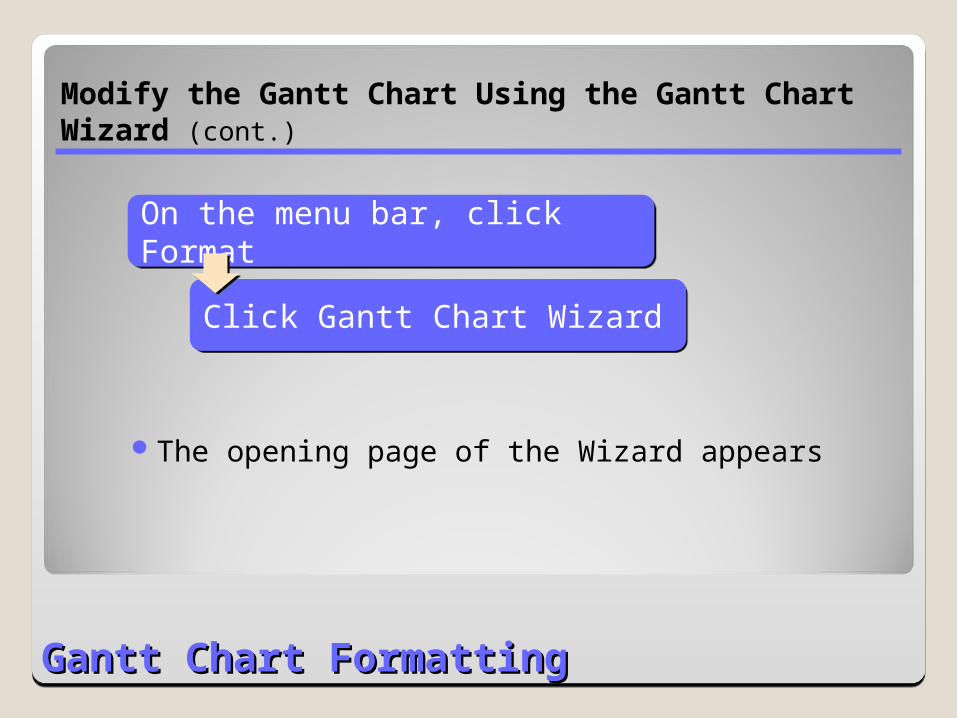
On the menu bar, click FormatOn the menu bar, click Format
Click Gantt Chart WizardClick Gantt Chart Wizard
The opening page of the Wizard appears
Modify the Gantt Chart Using the Gantt Chart Wizard (cont.)
Gantt Chart FormattingGantt Chart Formatting
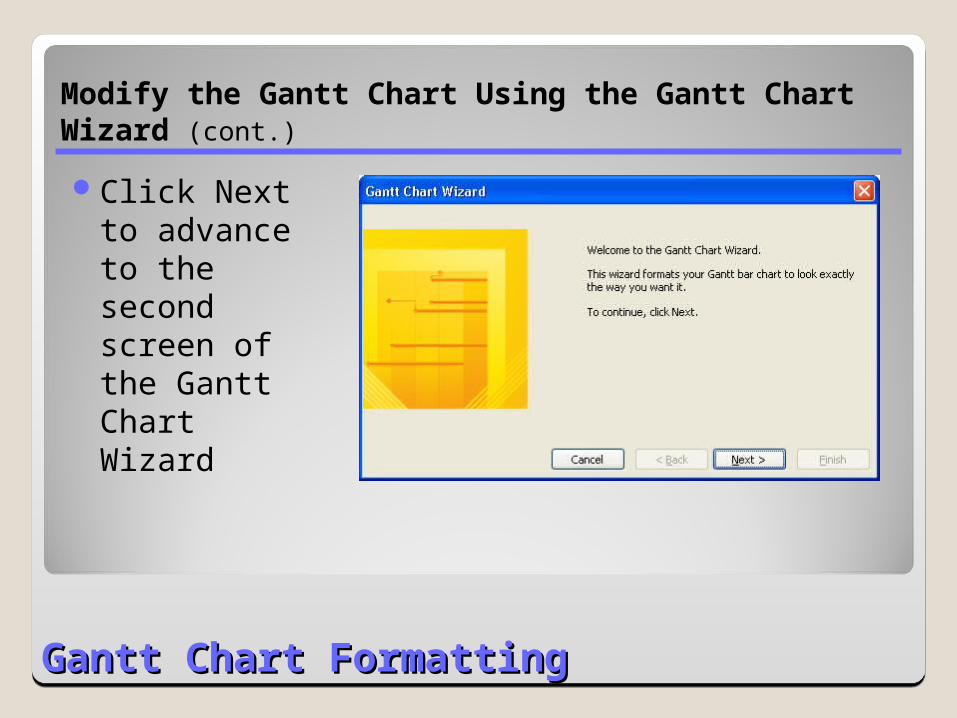
Click Next to advance to the second screen of the Gantt Chart Wizard
Modify the Gantt Chart Using the Gantt Chart Wizard (cont.)
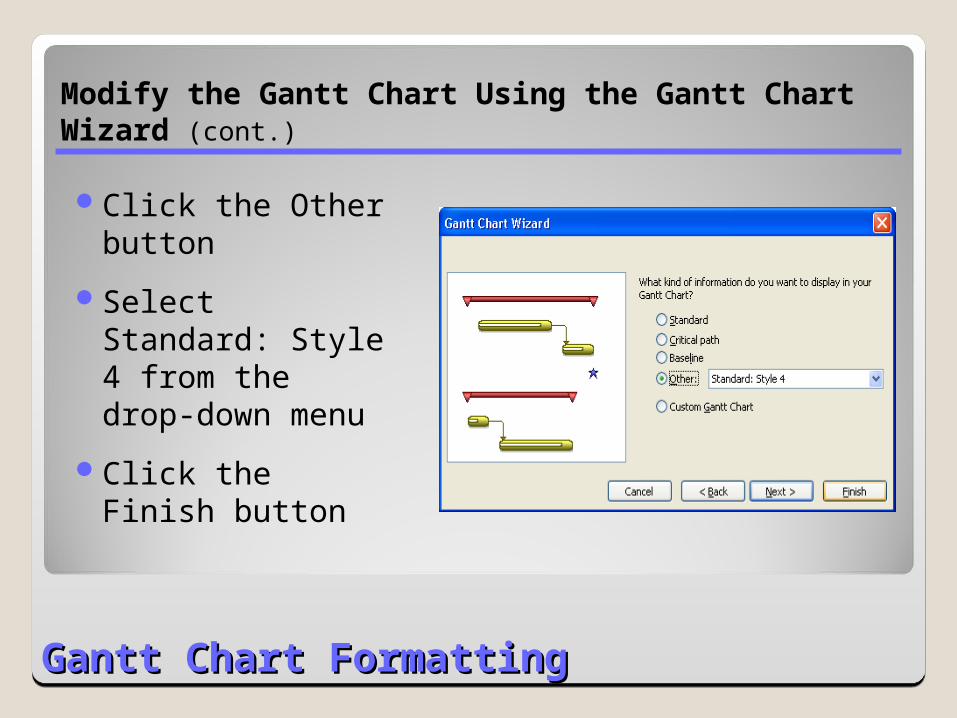
Gantt Chart FormattingGantt Chart Formatting
Click the Other button
Select Standard: Style 4 from the drop-down menu
Click the Finish button
Modify the Gantt Chart Using the Gantt Chart Wizard (cont.)
Gantt Chart FormattingGantt Chart Formatting
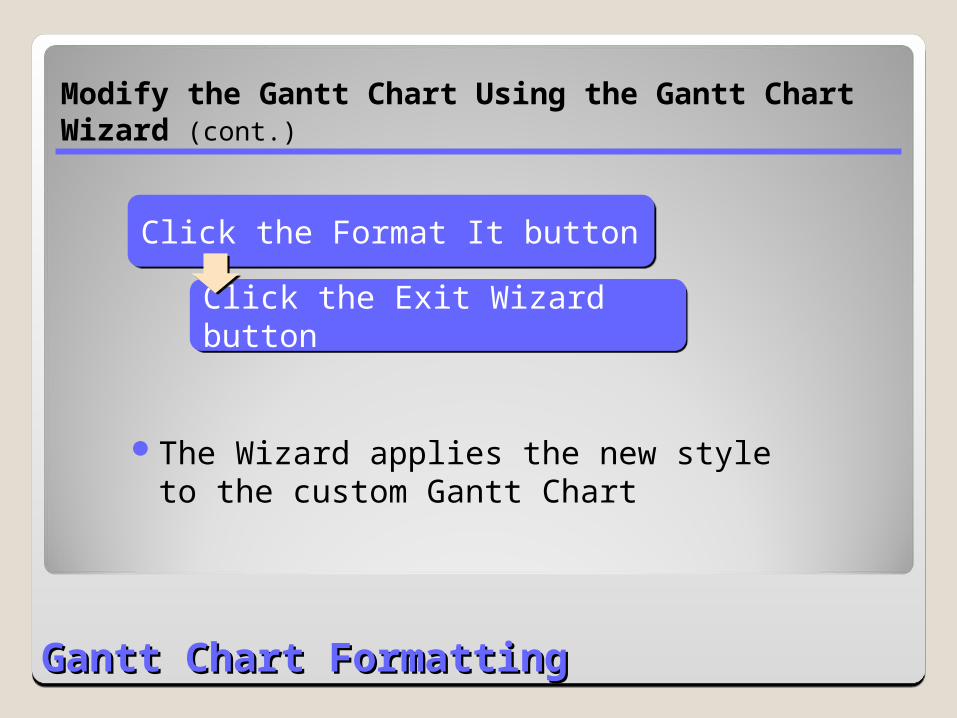
Click the Format It buttonClick the Format It button
Click the Exit Wizard buttonClick the Exit Wizard button
The Wizard applies the new style to the custom Gantt Chart
Modify the Gantt Chart Using the Gantt Chart Wizard (cont.)
Gantt Chart FormattingGantt Chart Formatting
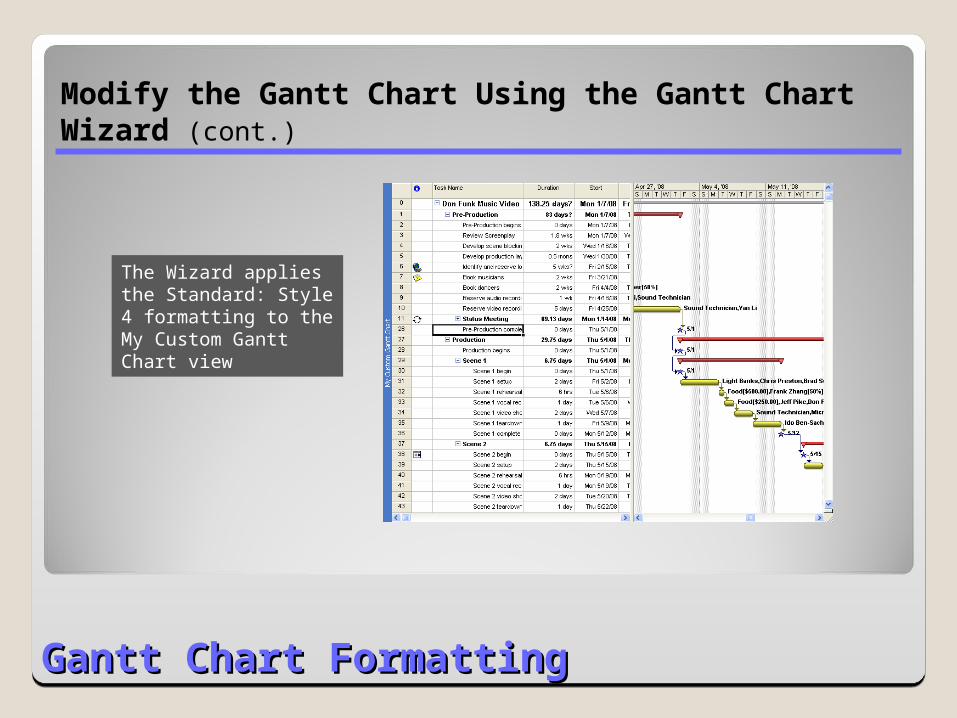
The Wizard applies the Standard: Style 4 formatting to the My Custom Gantt Chart view
Modify the Gantt Chart Using the Gantt Chart Wizard (cont.)
Gantt Chart FormattingGantt Chart Formatting
The Gantt Chart Wizard has fewer choices than the bar styles command
None of the data in the project plan has changed, only the way it is formatted
The formatting changes affect only the current view; all other views are unaffected
Modify the Gantt Chart Using the Gantt Chart Wizard (cont.)
Drawing in a Gantt ChartDrawing in a Gantt Chart
Add a Text Box to the Gantt Chart
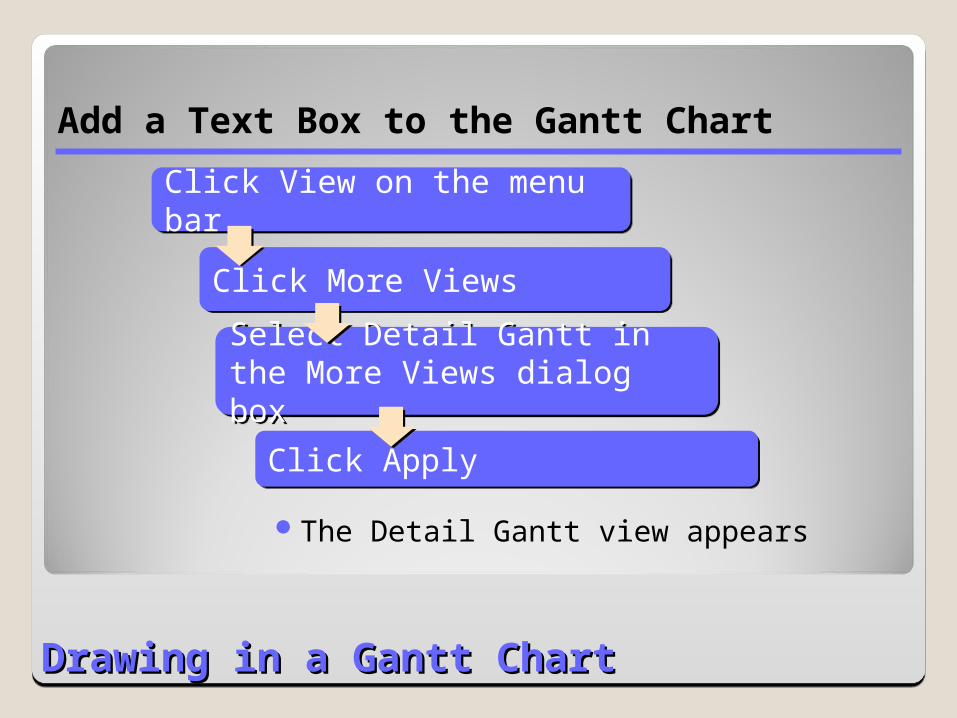
Click ApplyClick Apply
Click View on the menu barClick View on the menu bar
Click More ViewsClick More Views
Select Detail Gantt in the More Views dialog boxSelect Detail Gantt in the More Views dialog box
The Detail Gantt view appears
Drawing in a Gantt ChartDrawing in a Gantt Chart
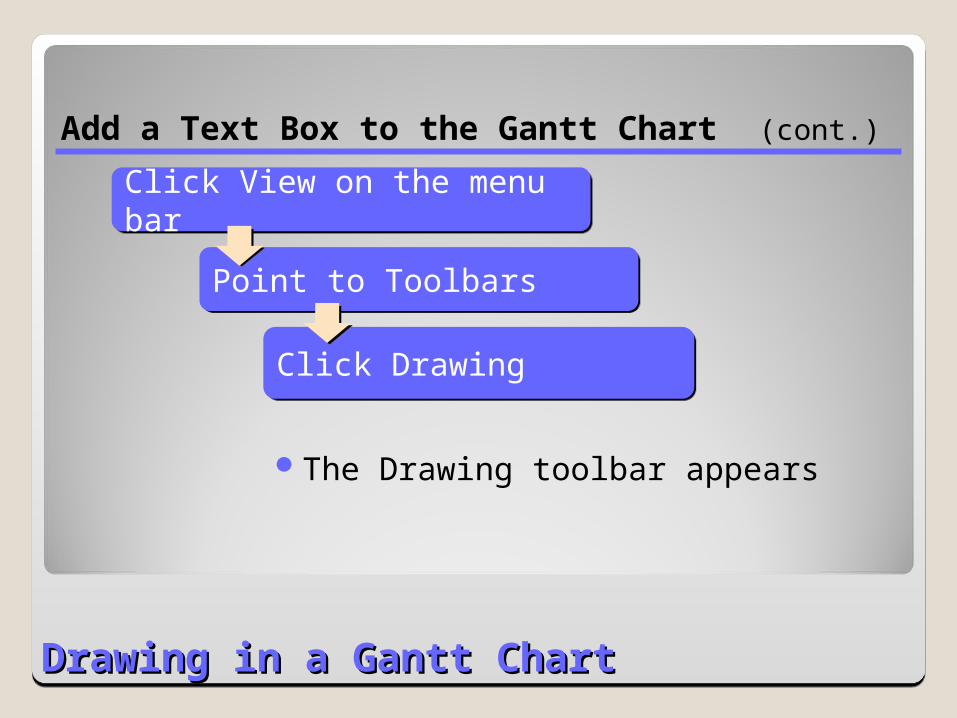
Click View on the menu barClick View on the menu bar
Point to ToolbarsPoint to Toolbars
Click DrawingClick Drawing
The Drawing toolbar appears
Add a Text Box to the Gantt Chart (cont.)

Drawing in a Gantt ChartDrawing in a Gantt Chart
Click the Text Box button on the drawing toolbarClick the Text Box button on the drawing toolbar
Draw a small square on the chart portion of the viewDraw a small square on the chart portion of the view
Key CMT Music Awards May 31 – June 1 in the boxKey CMT Music Awards May 31 – June 1 in the box
Add a Text Box to the Gantt Chart (cont.)

Drawing in a Gantt ChartDrawing in a Gantt Chart
Click Format on the menu barClick Format on the menu bar
Point to DrawingPoint to Drawing
Click PropertiesClick Properties
The Format Drawing dialog box appears
Add a Text Box to the Gantt Chart (cont.)
Drawing in a Gantt ChartDrawing in a Gantt Chart
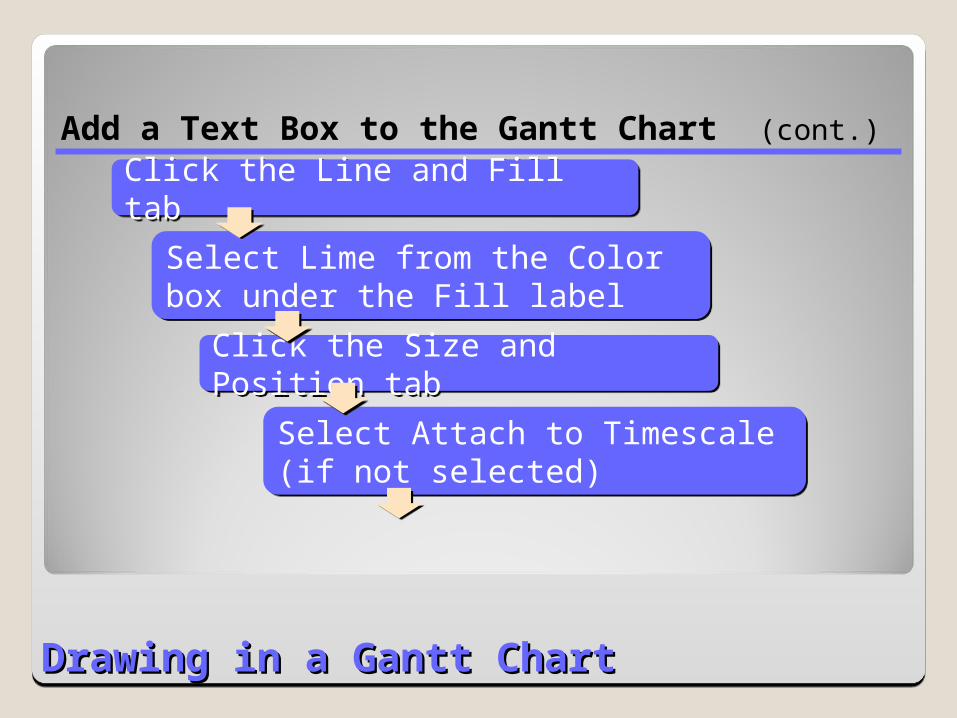
Click the Line and Fill tabClick the Line and Fill tab
Select Lime from the Color box under the Fill labelSelect Lime from the Color box under the Fill label
Click the Size and Position tabClick the Size and Position tab
Select Attach to Timescale (if not selected)Select Attach to Timescale (if not selected)
Add a Text Box to the Gantt Chart (cont.)
Drawing in a Gantt ChartDrawing in a Gantt Chart
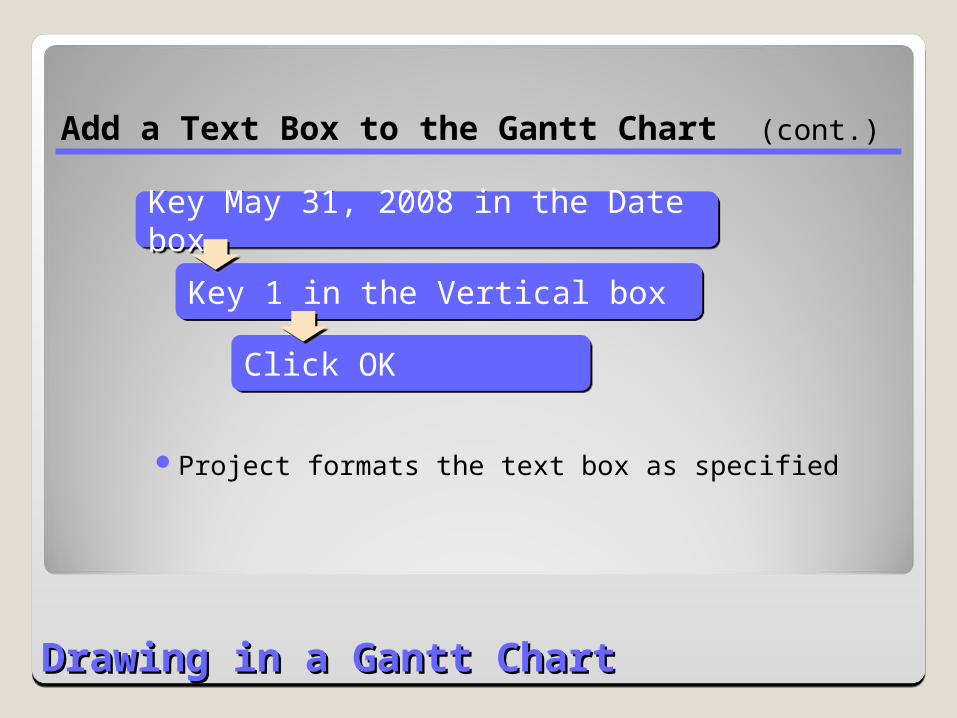
Key May 31, 2008 in the Date boxKey May 31, 2008 in the Date box
Key 1 in the Vertical boxKey 1 in the Vertical box
Click OKClick OK
Project formats the text box as specified
Add a Text Box to the Gantt Chart (cont.)
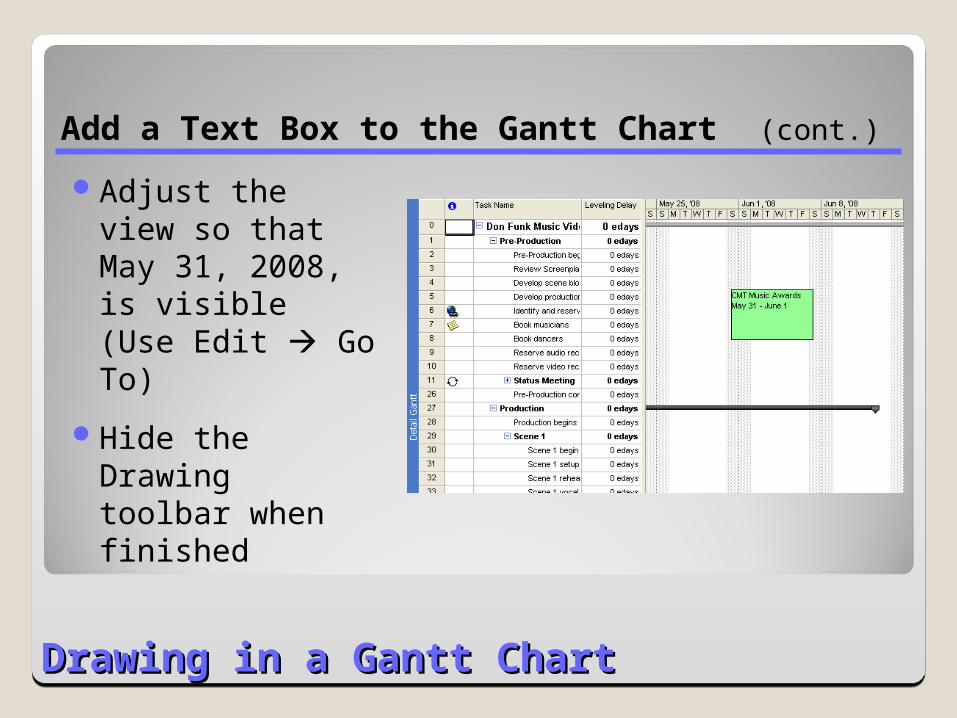
Drawing in a Gantt ChartDrawing in a Gantt Chart
Adjust the view so that May 31, 2008, is visible (Use Edit Go To)
Hide the Drawing toolbar when finished
Add a Text Box to the Gantt Chart (cont.)

Drawing in a Gantt ChartDrawing in a Gantt Chart
When you link drawing objects to the Gantt chart, keep in mind
If the object being added is task specific, link the object to the Gantt bar
If the object being added is date specific, link the object to a date
Add a Text Box to the Gantt Chart (cont.)
Changing Text Appearance in a ViewChanging Text Appearance in a View
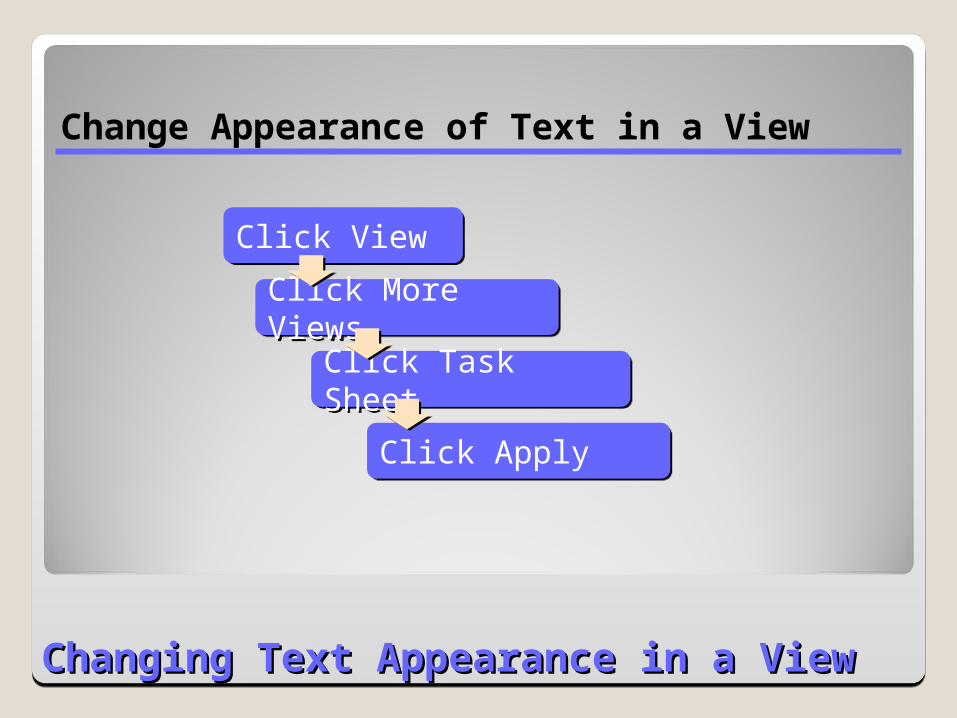
Click More ViewsClick More Views
Click ViewClick View
Click Task SheetClick Task Sheet
Click ApplyClick Apply
Change Appearance of Text in a View
Changing Text Appearance in a ViewChanging Text Appearance in a View
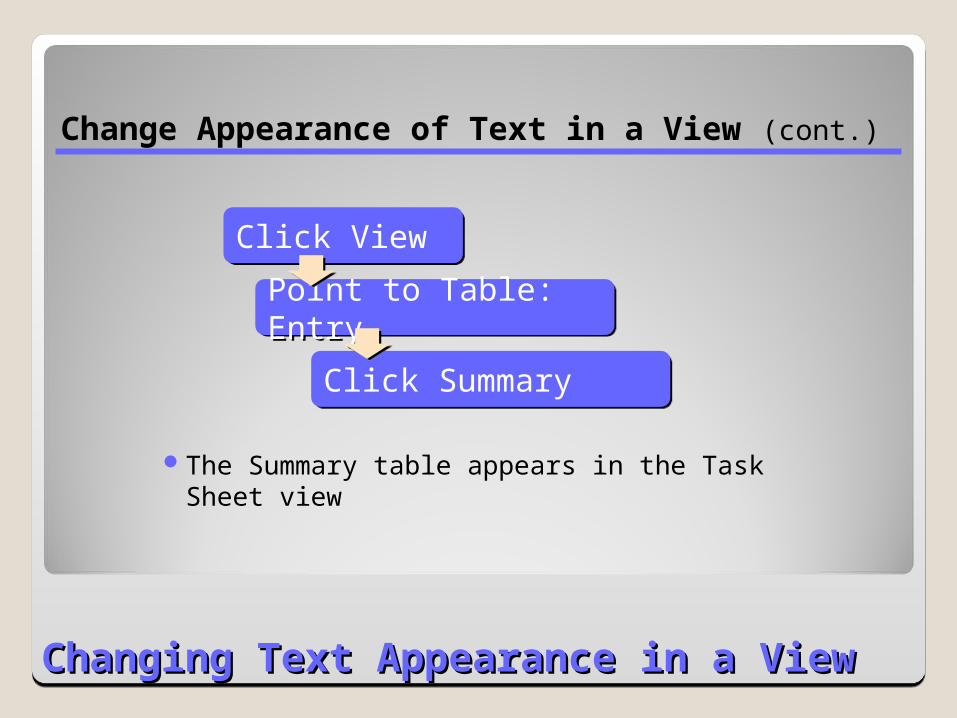
Point to Table: EntryPoint to Table: Entry
Click ViewClick View
Click SummaryClick Summary
The Summary table appears in the Task Sheet view
Change Appearance of Text in a View (cont.)

Changing Text Appearance in a ViewChanging Text Appearance in a View
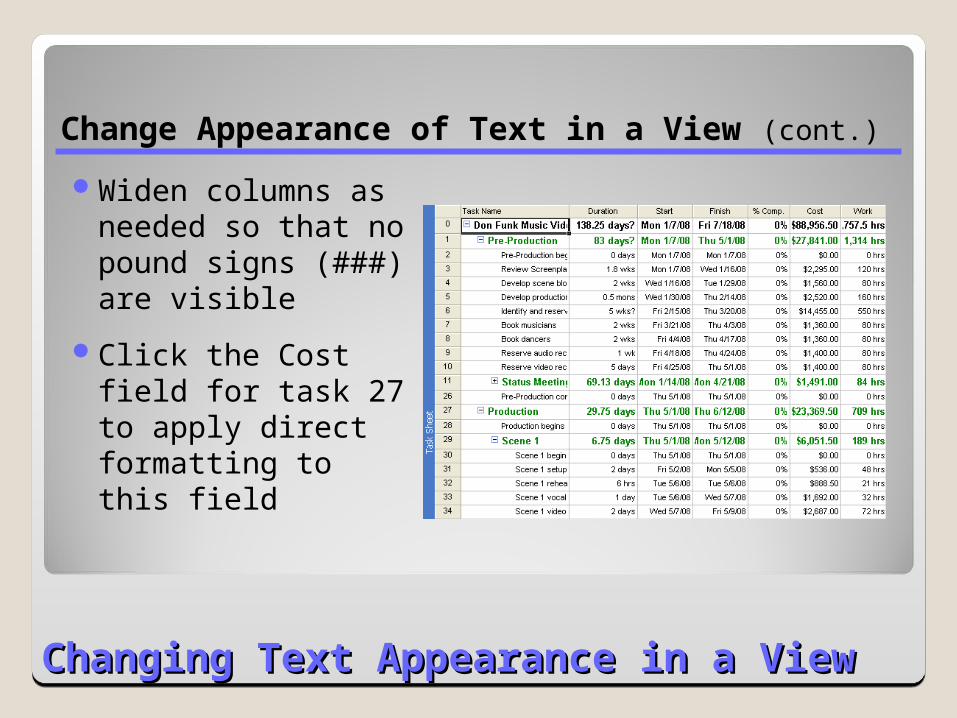
The Task Sheet view showing the Summary table
You will be looking closely
at the Cost column
Change Appearance of Text in a View (cont.)
Changing Text Appearance in a ViewChanging Text Appearance in a View
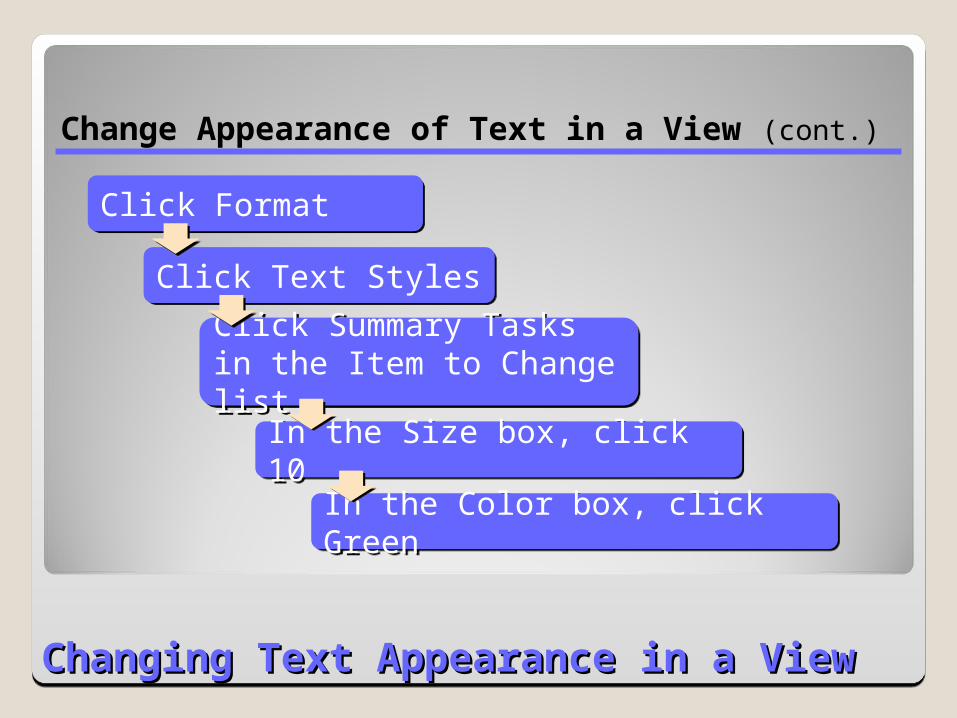
Click Summary Tasks in the Item to Change listClick Summary Tasks in the Item to Change list
In the Size box, click 10In the Size box, click 10
In the Color box, click GreenIn the Color box, click Green
Click Text StylesClick Text Styles
Click FormatClick Format
Change Appearance of Text in a View (cont.)
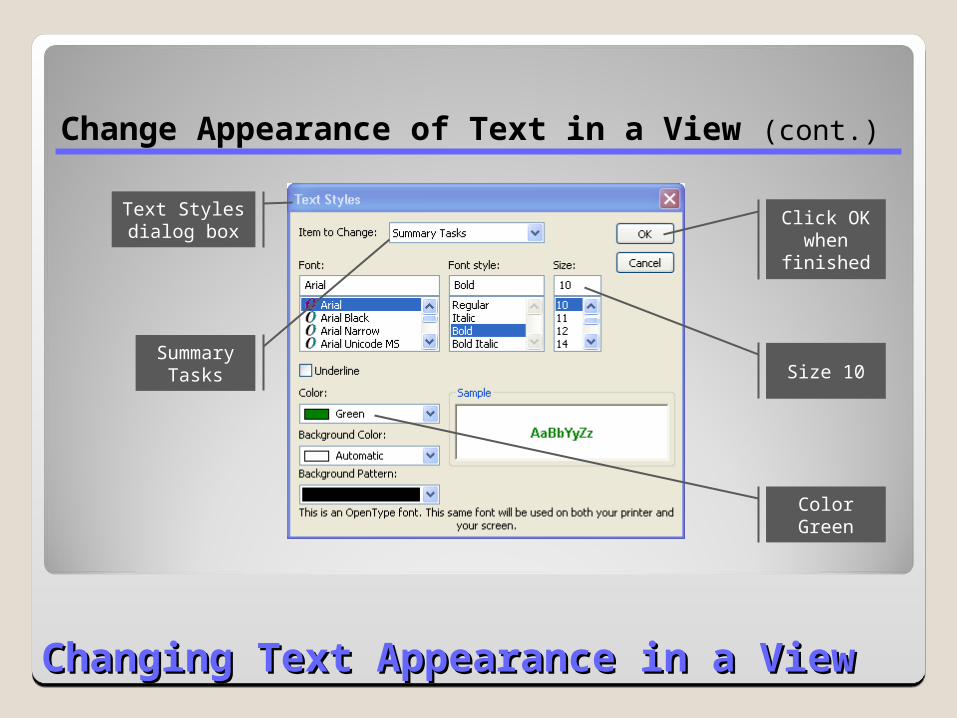
Changing Text Appearance in a ViewChanging Text Appearance in a View
Summary Tasks Size 10
Text Styles dialog box
Color Green
Click OK when
finished
Change Appearance of Text in a View (cont.)
Changing Text Appearance in a ViewChanging Text Appearance in a View
Widen columns as needed so that no pound signs (###) are visible
Click the Cost field for task 27 to apply direct formatting to this field
Change Appearance of Text in a View (cont.)
Changing Text Appearance in a ViewChanging Text Appearance in a View
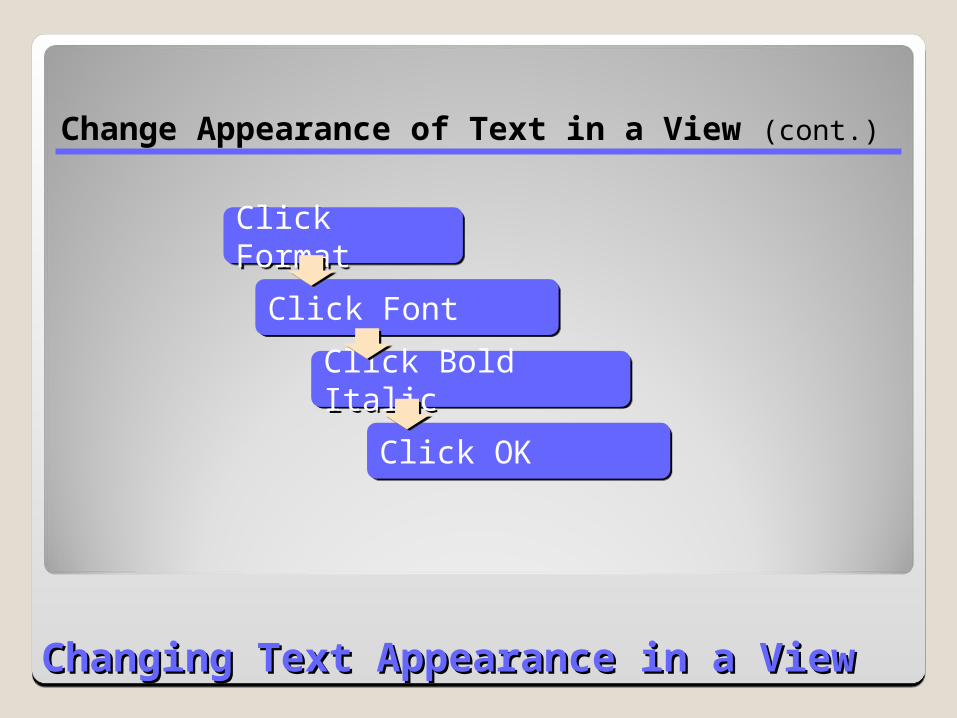
Click FontClick Font
Click FormatClick Format
Click Bold ItalicClick Bold Italic
Click OKClick OK
Change Appearance of Text in a View (cont.)

Changing Text Appearance in a ViewChanging Text Appearance in a View
Bold Italic formatting applied to
Cost column for task 27
Change Appearance of Text in a View (cont.)
Changing Text Appearance in a ViewChanging Text Appearance in a View
Table — Spreadsheet-like presentation of data, with rows and columns
Each column represents a field in Project
Each row represents a single resource or task
The intersection of a row and column is a field
Represents the lowest-level information about a task, resource, or assignment
Change Appearance of Text in a View (cont.)
Changing Text Appearance in a ViewChanging Text Appearance in a View
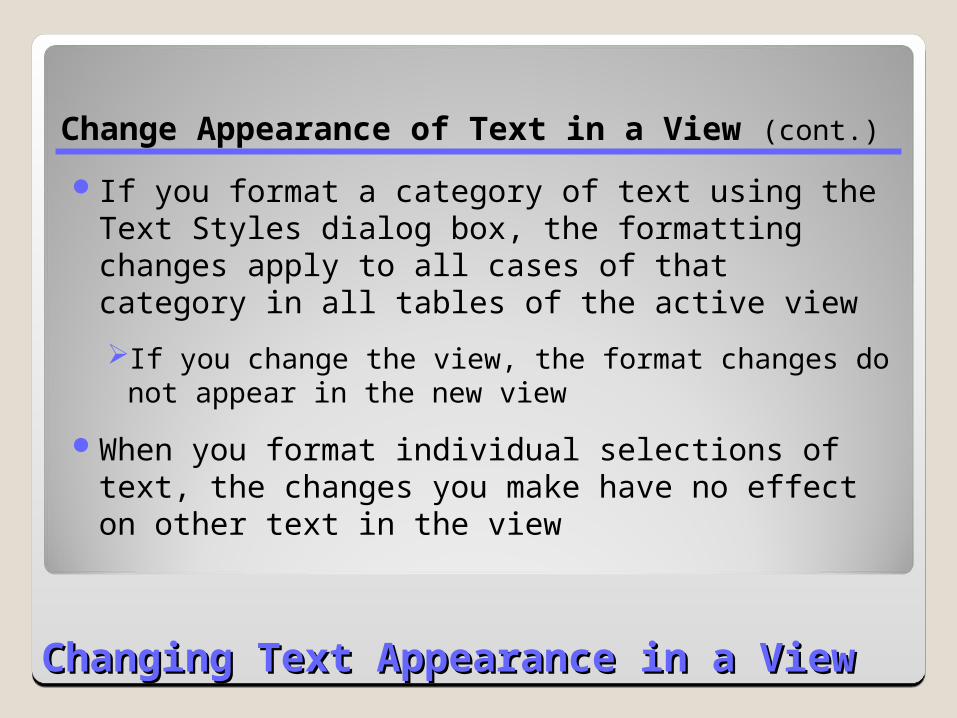
If you format a category of text using the Text Styles dialog box, the formatting changes apply to all cases of that category in all tables of the active view
If you change the view, the format changes do not appear in the new view
When you format individual selections of text, the changes you make have no effect on other text in the view
Change Appearance of Text in a View (cont.)
Creating and Editing TablesCreating and Editing Tables
Create a Custom Table
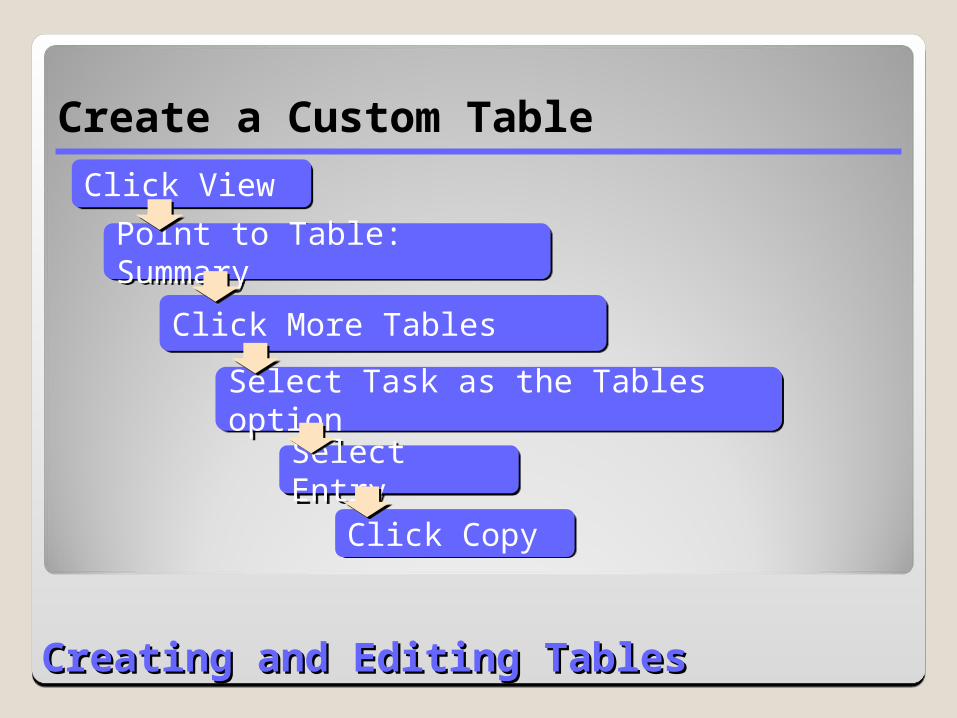
Point to Table: SummaryPoint to Table: Summary
Click ViewClick View
Click More TablesClick More Tables
Select Task as the Tables optionSelect Task as the Tables option
Select EntrySelect Entry
Click CopyClick Copy
Creating and Editing TablesCreating and Editing Tables
Create a Custom Table (cont.)
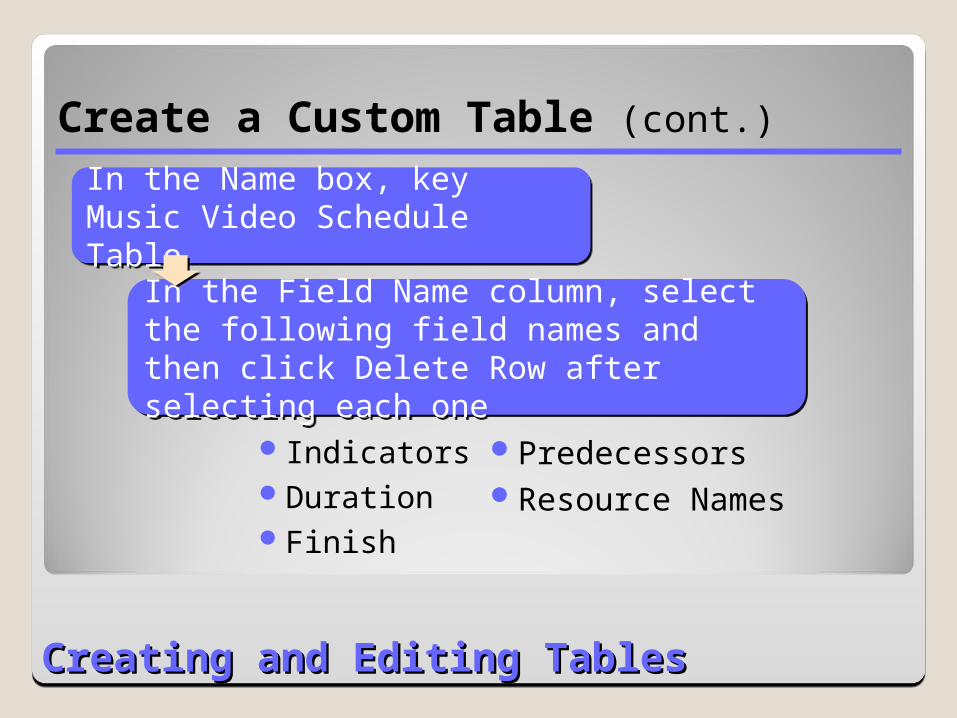
In the Field Name column, select the following field names and then click Delete Row after selecting each one
In the Field Name column, select the following field names and then click Delete Row after selecting each one
In the Name box, key Music Video Schedule TableIn the Name box, key Music Video Schedule Table
IndicatorsDurationFinish
PredecessorsResource Names
Creating and Editing TablesCreating and Editing Tables
Create a Custom Table (cont.)
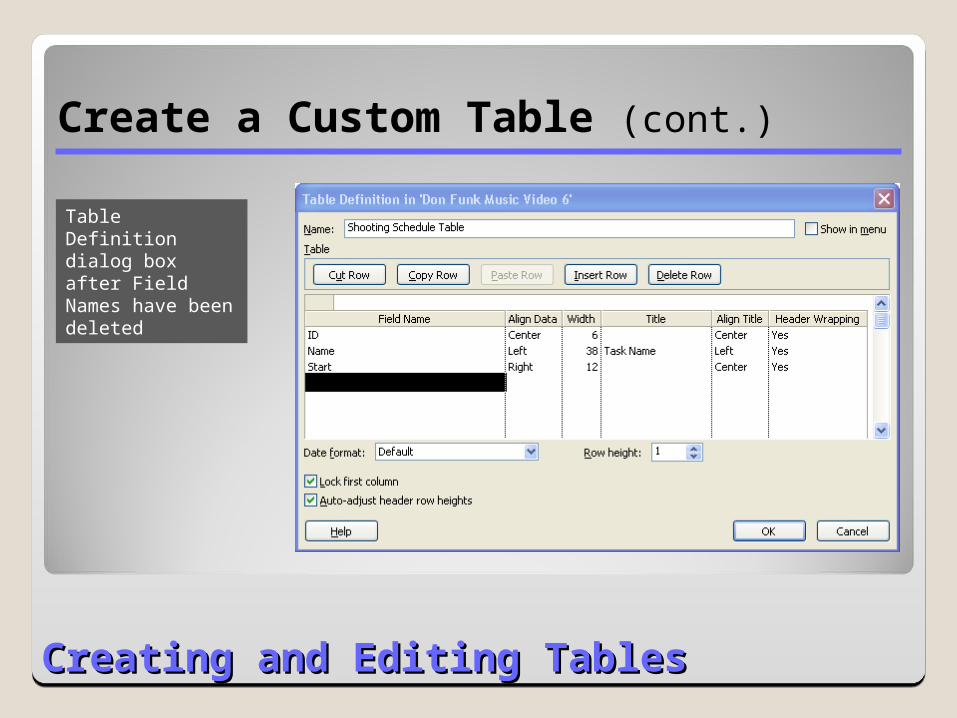
Table Definition dialog box after Field Names have been deleted

Creating and Editing TablesCreating and Editing Tables
Create a Custom Table (cont.)
In the Field Name column in the next empty row, select Cast (Text 1) from the drop-down list
In the Field Name column in the next empty row, select Cast (Text 1) from the drop-down list
In the Align Data column in the same row, select LeftIn the Align Data column in the same row, select Left
In the Width column, key 30In the Width column, key 30

Creating and Editing TablesCreating and Editing Tables
Create a Custom Table (cont.)
In the Field Name column in the next empty row, select Location (Text 2) from the drop-down list
In the Field Name column in the next empty row, select Location (Text 2) from the drop-down list
In the Align Data column in the same row, select LeftIn the Align Data column in the same row, select Left
Press EnterPress Enter
Creating and Editing TablesCreating and Editing Tables
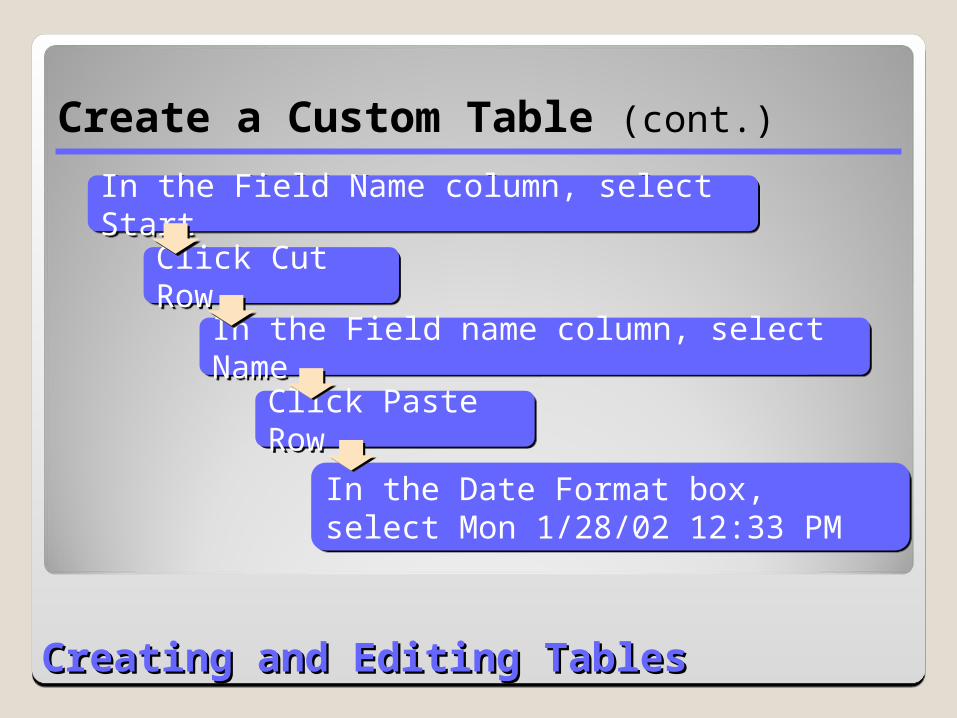
Create a Custom Table (cont.)
In the Field name column, select NameIn the Field name column, select Name
Click Paste RowClick Paste Row
In the Date Format box, select Mon 1/28/02 12:33 PMIn the Date Format box, select Mon 1/28/02 12:33 PM
Click Cut RowClick Cut Row
In the Field Name column, select StartIn the Field Name column, select Start
Creating and Editing TablesCreating and Editing Tables
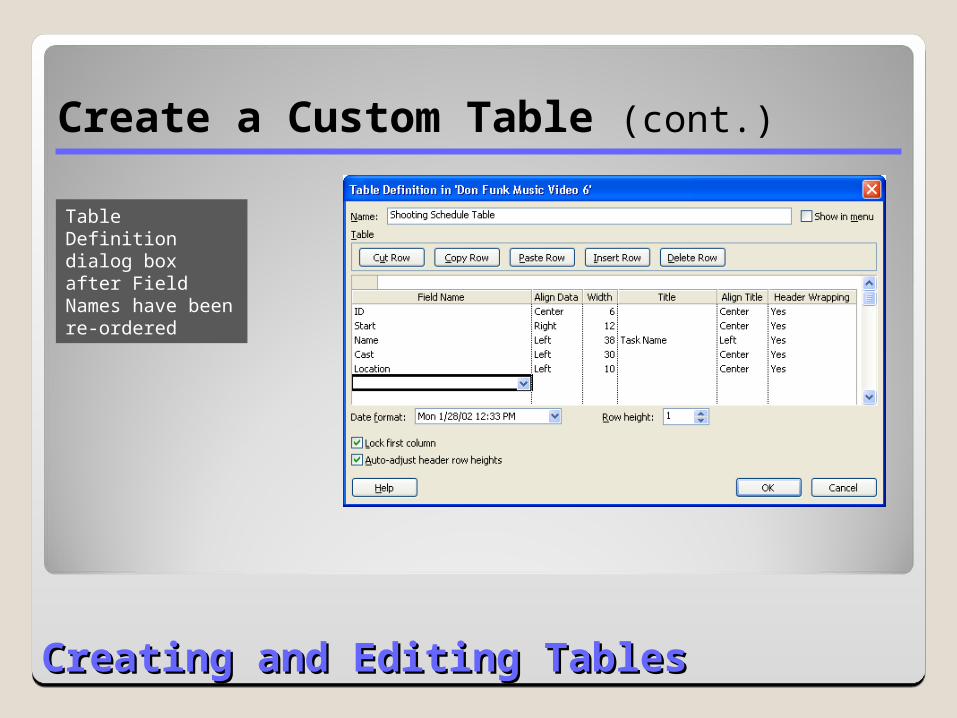
Create a Custom Table (cont.)
Table Definition dialog box after Field Names have been re-ordered

Creating and Editing TablesCreating and Editing Tables
Create a Custom Table (cont.)
Click ApplyClick Apply
Click OKClick OK
Widen columns as needed so that no pound signs (###) are visible
Creating and Editing TablesCreating and Editing Tables
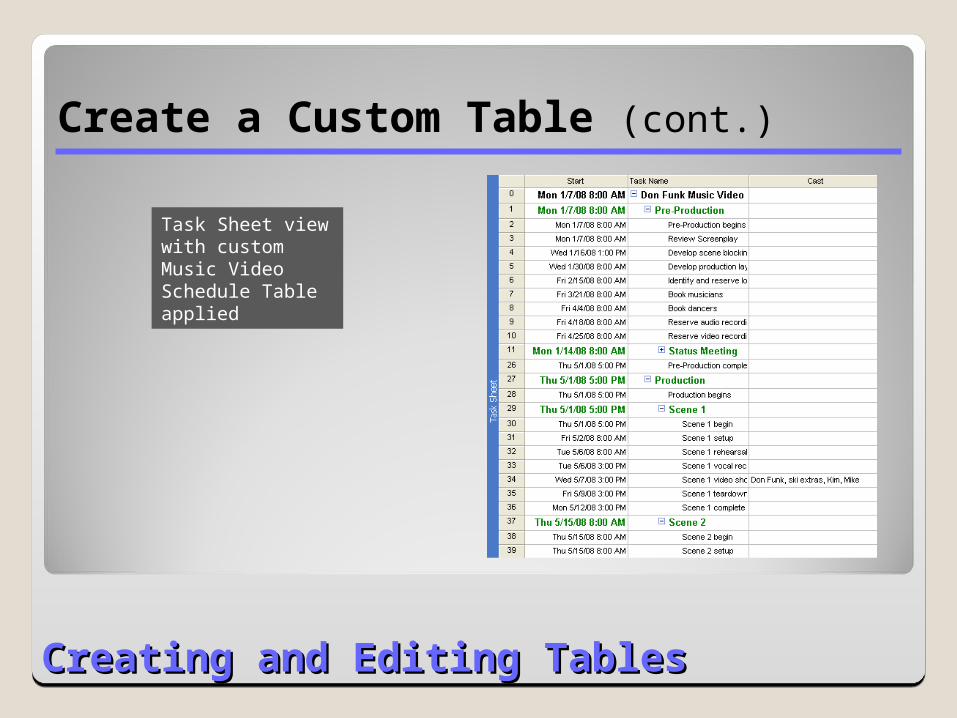
Create a Custom Table (cont.)
Task Sheet view with custom Music Video Schedule Table applied

Creating and Editing TablesCreating and Editing Tables
Create a Custom Table (cont.)
Three options when setting up tables
Create a new table
Redefine an existing table
Copy and modify an existing table

Creating Custom ViewsCreating Custom Views
Create a Custom View
Click More ViewsClick More Views
Click ViewClick View
Click NewClick New
Make sure Single View is selectedMake sure Single View is selected
Click OKClick OK
Creating Custom ViewsCreating Custom Views
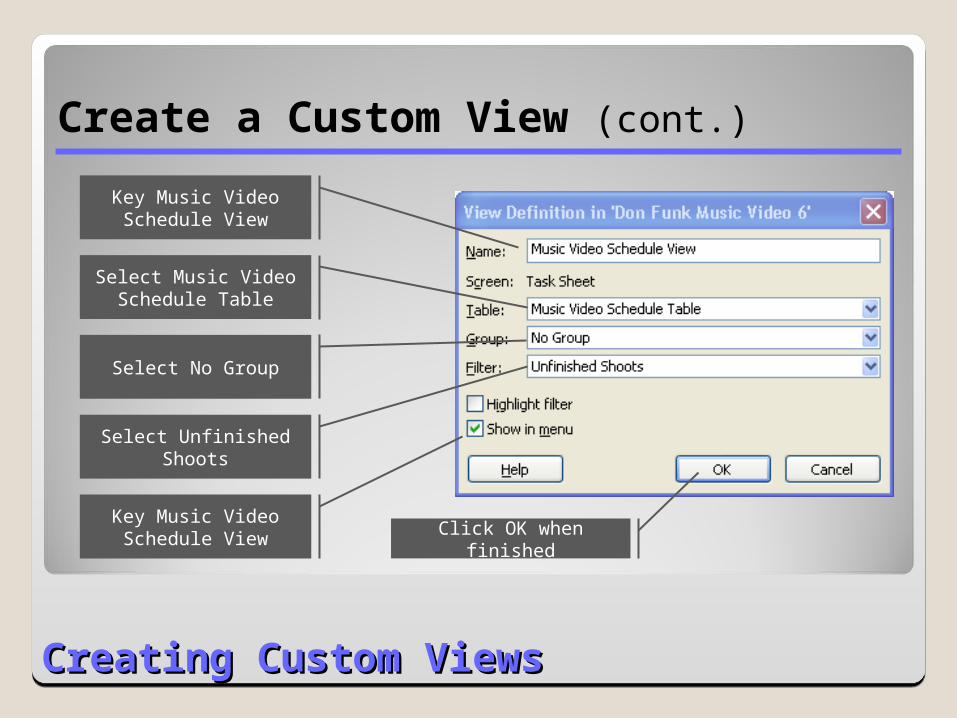
Create a Custom View (cont.)
Key Music Video Schedule View
Select Music Video Schedule Table
Select No Group
Select Unfinished Shoots
Key Music Video Schedule View Click OK when finished
Creating Custom ViewsCreating Custom Views
Create a Custom View (cont.)
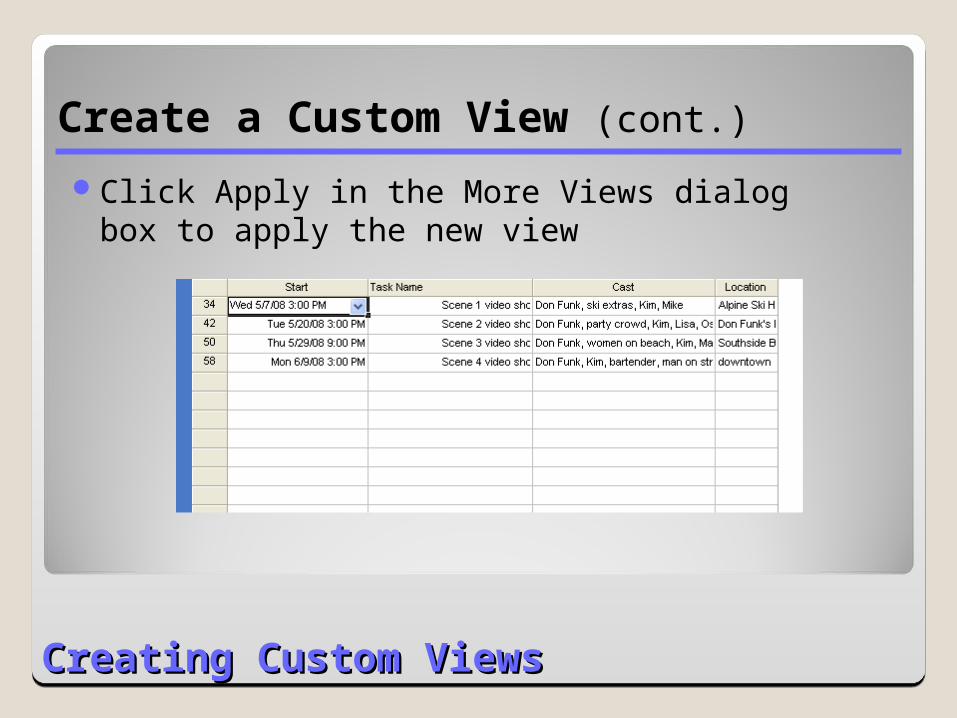
Click Apply in the More Views dialog box to apply the new view
Creating Custom ViewsCreating Custom Views
Create a Custom View (cont.)
A view can contain tables, groups, or filters
You can combine these with other elements to create almost limitless custom views
SummarySummary
Format a Gantt Chart
Draw in a Gantt Chart
Change text appearance in a view
You Learned How to
SummarySummary
You Learned How to (cont.)
Create and edit tables
Create custom views