project handbook - scryptions international€¦ · web viewthe document management drop down...
TRANSCRIPT


Medical Transcription Management System
Client User ManualVersion: 1.1, Apr 2006
2610 W. Horizon Ridge Pkwy., Suite 103Henderson, Nevada 89052Toll Free: 877-2-SCRYPT

Scryptions International MTMS User Manual
TABLE OF CONTENTS
1 UPLOADING INSTRUCTIONS....................................................................................4
1.1 UPLOADING DICTATIONS FROM DIGITAL VOICE RECORDER................................41.2 RE-UPLOADING FILES FROM PC..............................................................................6
2 WHAT IS THIS MANUAL ABOUT?............................................................................8
3 SYSTEM REQUIREMENTS.........................................................................................8
4 GETTING STARTED.....................................................................................................8
5 MTMS APPLICATION AREAS AND THERE USAGE:...........................................8
5.1 GAINING ACCESS.......................................................................................................95.1.1 Login..................................................................................................................95.1.2 Forget Password................................................................................................9
5.2 GENERIC GUIDELINES WHILE USING APPLICATION..............................................95.2.1 Application Interface.........................................................................................95.2.2 Generic Buttons and Icons in Application.....................................................105.2.3 Sorting..............................................................................................................115.2.4 Searching.........................................................................................................12
5.3 WELCOME SCREEN (HOME PAGE).........................................................................125.4 DOCUMENT MANAGEMENT....................................................................................12
5.4.1 Daily Summary................................................................................................135.4.2 Document Browse...........................................................................................145.4.3 E-signature (Doctors Only).............................................................................16
5.5 USER MAINTENANCE..............................................................................................175.5.1 Browse Users...................................................................................................185.5.2 View User.........................................................................................................185.5.3 Edit User..........................................................................................................205.5.4 Create User......................................................................................................215.5.5 Assign Privileges.............................................................................................21
5.6 How to Quit the Application.................................................................................22
Page 3 Oct , 2004

Scryptions International MTMS User Manual
Figure 1 Scryptions Toolbar with Uploading Icon highlighted.................................................4Figure 2 File download screen...................................................................................................5Figure 3 Voice File Status Dialog Box......................................................................................5Figure 4 Upload Voice Files Screen..........................................................................................6Figure 5 Scryptions Toolbar with File Selection Icon highlighted............................................6Figure 6 Upload voice files Screen............................................................................................7Figure 7 Login Screen................................................................................................................8Figure 8 MTMS Top Menu Bar.................................................................................................9Figure 9 Client Information.....................................................................................................10Figure 10 Menu Quick Launch Bar..........................................................................................10Figure 11 Sorting Bar...............................................................................................................12Figure 12 Search Bar................................................................................................................12Figure 13 Welcome Screen......................................................................................................12Figure 14 Document Management Sub Menus........................................................................13Figure 15 Daily Summary Screen............................................................................................13Figure 16 Document Browse Screen........................................................................................14Figure 17 Document Editor Screen..........................................................................................15Figure 18 Electronic Signature Browse...................................................................................16Figure 19 Electronic Signature Signing Screen.......................................................................16Figure 20 User Maintenance screen.........................................................................................18Figure 21 Browse Users Screen...............................................................................................18Figure 22 User ID Pop-up Screen............................................................................................19Figure 23 View User Screen....................................................................................................19Figure 24 Edit User Screen......................................................................................................20Figure 25 Create User Screen...................................................................................................21Figure 26 Assign Privileges Screen.........................................................................................22
1 Uploading Instructions
1.1 Uploading Dictations from Digital Voice Recorder
Make sure the recorder NOT in the hold position (or is on) by flipping the hold switch away or (down) from the hold arrow
Doc the voice recorder securely in the cradle. The screen will say “REMOTE.” If it does not say remote, re-doc the recorder (ensuring the pins on the cradle are aligned straight and not leaning a side.) If the screen does not say remote, reboot the PC and try again.
Start the Scryptions program by clicking the Scryptions icon on the desktop. Select the first icon on the tool bar “Download and Send Files from Dictaphone.”
Figure 1 Scryptions Toolbar with Uploading Icon highlighted
A Screen with the contents of the voice recorder will be displayed.
Page 4 Oct , 2004

Scryptions International MTMS User Manual
Select the files, which you wish to upload by checking the box next to the file, or by selecting the “Select All Files” check box at the bottom left of the screen.
Choose the doctor from the doctor list which owns the files you selected above. You are now ready to upload the voice files. Click the button that says “Download Files.”
Figure 2 File download screen.
After the download is complete you will see the following dialog box.
Figure 3 Voice File Status Dialog Box
The above screen says that 5 of 5 selected files were sent successfully.
Page 5 Oct , 2004

Scryptions International MTMS User Manual
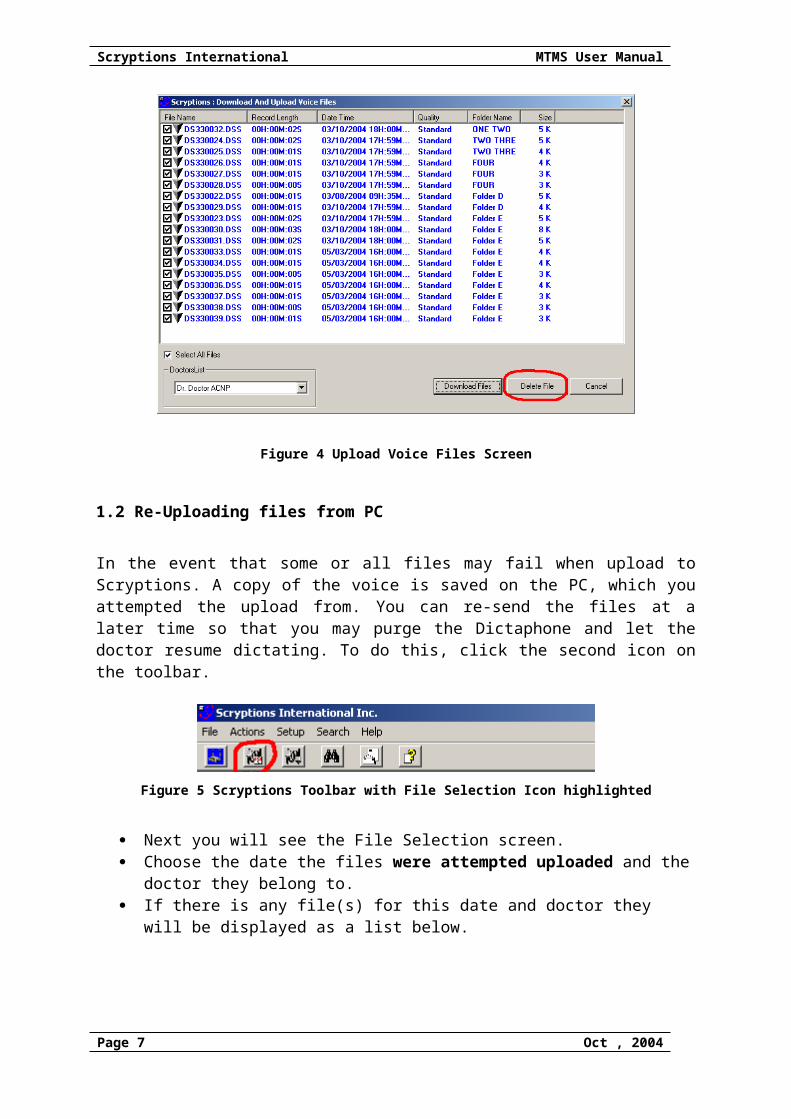
After this is done click OK. The next screen will ask you to delete the files from the Dictaphone. Choose the “Delete File” button to purge the recorder of the selected files. After
purging is complete, click the “Cancel” button, the downloading has been completed
Figure 4 Upload Voice Files Screen
1.2 Re-Uploading files from PC
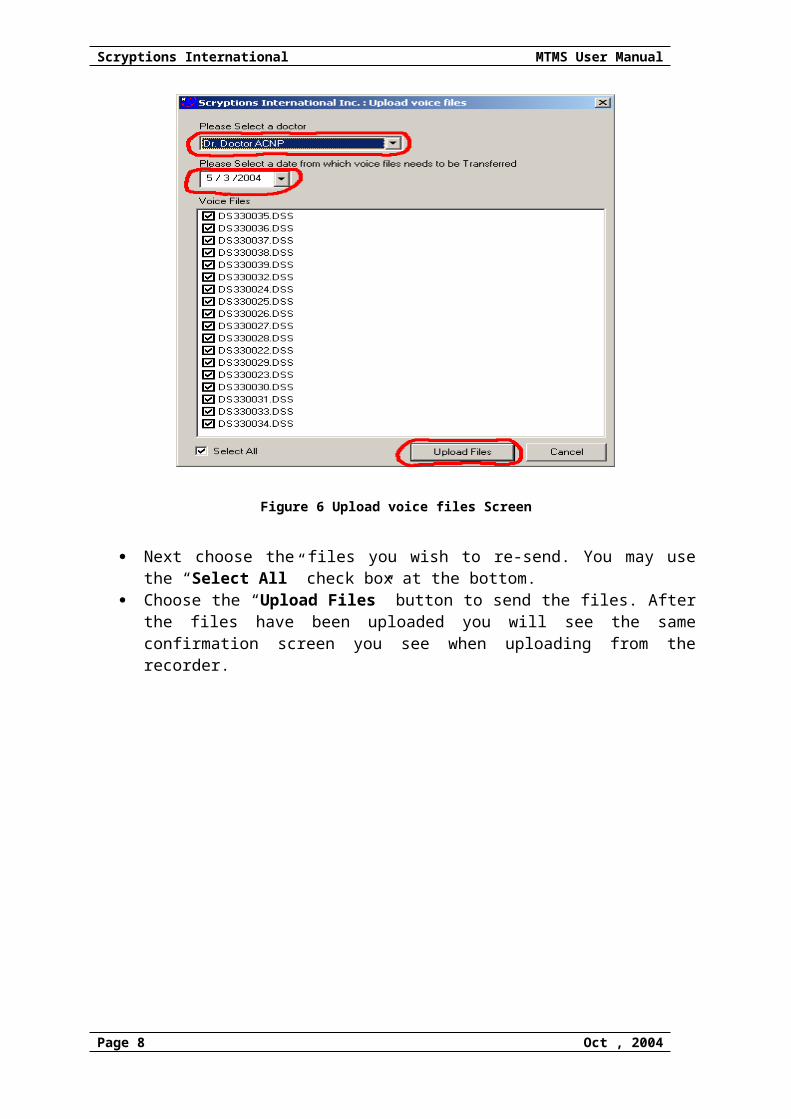
In the event that some or all files may fail when upload to Scryptions. A copy of the voice is saved on the PC, which you attempted the upload from. You can re-send the files at a later time so that you may purge the Dictaphone and let the doctor resume dictating. To do this, click the second icon on the toolbar.
Figure 5 Scryptions Toolbar with File Selection Icon highlighted
Next you will see the File Selection screen. Choose the date the files were attempted uploaded and the doctor they belong to. If there is any file(s) for this date and doctor they will be displayed as a list below.
Page 6 Oct , 2004
Scryptions International MTMS User Manual
Figure 6 Upload voice files Screen
Next choose the files you wish to re-send. You may use the “Select All” check box at the bottom.
Choose the “Upload Files” button to send the files. After the files have been uploaded you will see the same confirmation screen you see when uploading from the recorder.
Page 7 Oct , 2004
Scryptions International MTMS User Manual
2 What is this manual about?
This user manual is about understanding and using Scryptions International’s ‘Medical Transcription Management Software’. The software is accessible through the web address or through Scryptions desktop software 6.0.
Tip: The best way to use this manual is to print it and keep it nearby when using the website.
3 System Requirements
To use the Scryptions Application you must have the following:
1. IBM PC or compatible.2. Microsoft Windows 2000/XP.3. All critical updates must be done prior to software installation.4. Internet Explorer 6.0 or higher.5. High Speed Internet connectivity.6. Scryptions Software 6.0 or higher
4 Getting Started
1. Run the Scryptions Application by clicking on the icon located on the desktop.
Upon opening the application you will be presented with a login screen.
Figure 7 Login Screen
5 MTMS application areas and there usage:
Page 8 Oct , 2004

Scryptions International MTMS User Manual
5.1 Gaining Access
5.1.1 Login
Every user of the system needs to authenticate using a username and password allocated to him/her at software installation time by Scryptions or via your practice administrator.
After entering user id and password press enter or click on button. User will be authenticated by the application and you will be presented with your home page.
NOTE: If your user id or password does not match you will get an error message “Wrong password.”
5.1.2 Forget Password
This functionality should be used in case user has forgotten his/her current password.
To generate new password enter user id and click on Forget Password link. A confirmation dialog box is shown to the user. To proceed with generation of new password click on ‘ok’ button. A new auto generated password will be send to Scryptions admin or user email address depending upon choice. A confirmation message is also displayed at the end.
Auto generated password is temporary password and must be changed on first login. Please note that forget password functionality does not work for locked accounts.
5.2 Generic Guidelines While Using Application
This section will inform the user about features and guidelines which are relevant for entire application e.g. search facility.
5.2.1 Application Interface
Application interface screen is divided into following generic areas, which appears throughout application.
Top portion of interface displays Scryptions logo and main menu options. Currently there are two main options in the top menu
Document Management User Maintenance
Figure 8 MTMS Top Menu Bar
Page 9 Oct , 2004

Scryptions International MTMS User Manual
The 2nd section will display information such as the client organization name or user name etc. This section is informative and no user interaction is required in this section.
Figure 9 Client Information
Next section is a Menu Quick Launch Bar through which a user can quickly choose other related menu options from the current screen.
Figure 10 Menu Quick Launch Bar
5.2.2 Generic Buttons and Icons in Application
Usage of Symbols / Buttons
Page 10 Oct , 2004

Scryptions International MTMS User Manual
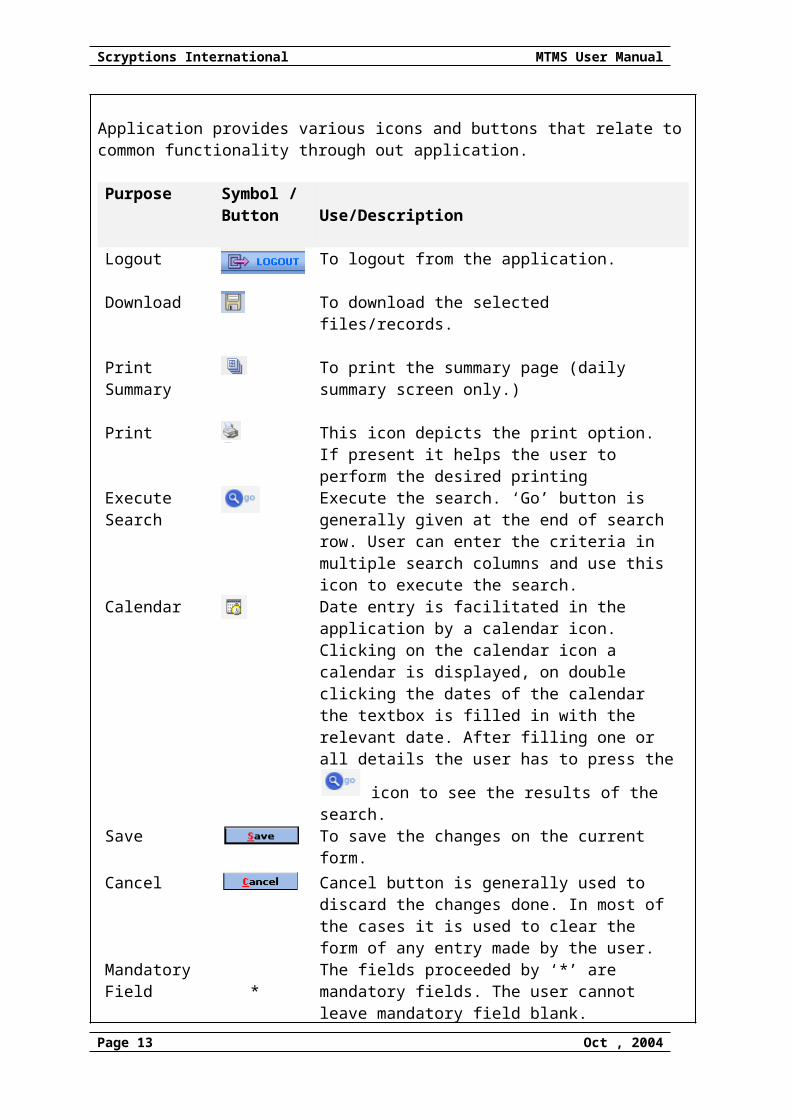
Application provides various icons and buttons that relate to common functionality through out application.
Purpose Symbol / Button
Use/Description
Logout To logout from the application.
Download To download the selected files/records.
Print Summary To print the summary page (daily summary screen only.)
Print This icon depicts the print option. If present it helps the user to perform the desired printing
Execute Search
Execute the search. ‘Go’ button is generally given at the end of search row. User can enter the criteria in multiple search columns and use this icon to execute the search.
Calendar
Date entry is facilitated in the application by a calendar icon. Clicking on the calendar icon a calendar is displayed, on double clicking the dates of the calendar the textbox is filled in with the relevant date. After
filling one or all details the user has to press the icon to see the results of the search.
Save To save the changes on the current form.
Cancel Cancel button is generally used to discard the changes done. In most of the cases it is used to clear the form of any entry made by the user.
Mandatory Field *
The fields proceeded by ‘*’ are mandatory fields. The user cannot leave mandatory field blank.
Table 1. Icon/Symbol Descriptions
5.2.3 Sorting
In the browse screen any column may be sorted by clicking on the column header e.g.” Patient name”. The data will toggle from ascending to descending with each click of the same column header.
Figure 11 Sorting Bar
Page 11 Oct , 2004

Scryptions International MTMS User Manual
5.2.4 Searching
The Document Browse screen provides extensive search capabilities that are easy to use. To search on a particular column simply enter the search criteria in the text box above that column and press ‘Go’ button or hit (enter). The screen will refresh with new page displaying only the data matching the search criteria. You can search on multiple columns as well. Each text field works on an “AND” basis. If you are returned to many records matching your criteria you can add some other information in the other text fields to narrow your search further.
NOTE: Some fields have been pre filled with available options in the form of a select combo box. Simply choose an option in one of the combo boxes and the data will be filtered based on your selection.
Figure 12 Search Bar
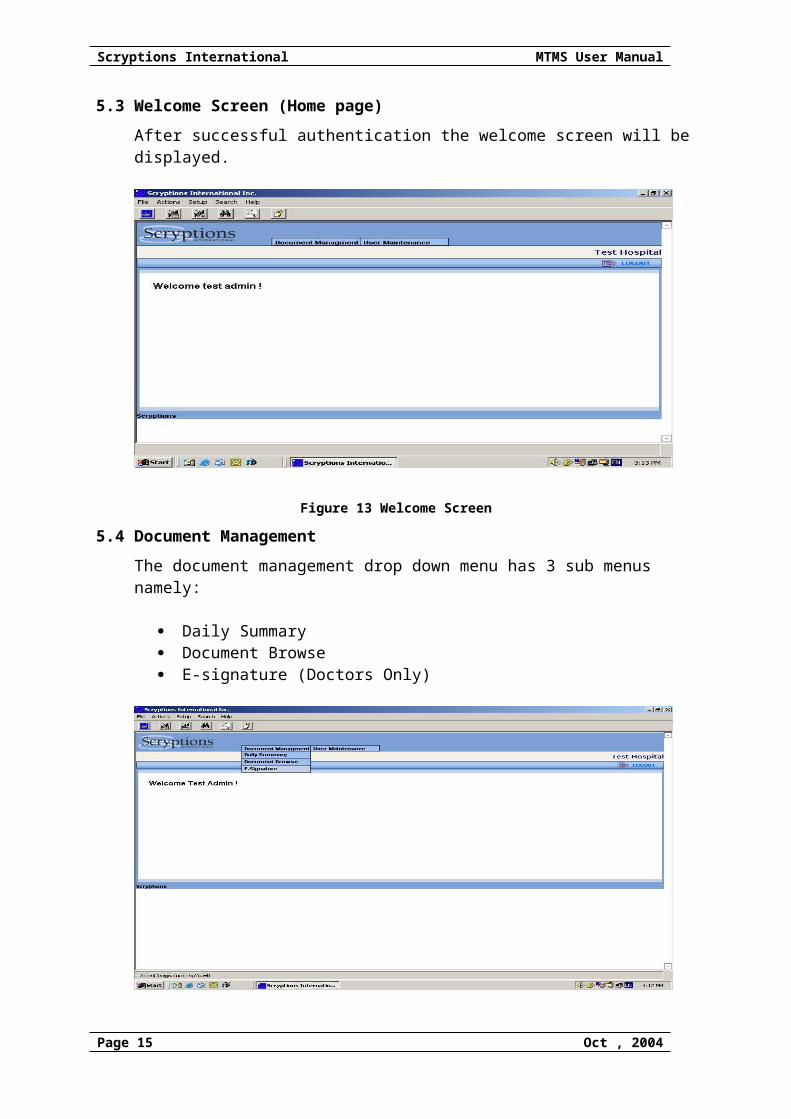
5.3 Welcome Screen (Home page)
After successful authentication the welcome screen will be displayed.
Figure 13 Welcome Screen
5.4 Document Management
The document management drop down menu has 3 sub menus namely:
Daily Summary Document Browse E-signature (Doctors Only)
Page 12 Oct , 2004
Scryptions International MTMS User Manual
Figure 14 Document Management Sub Menus
5.4.1 Daily Summary
The Daily summary displays summary information of day by day account of each doctor’s dictation and transcription file counts. It is also where the daily function of printing occurs. Each doctor’s batch is represented by a print icon which will print all the transcription for a doctor for a day. Additionally you can choose to download the files to disk or to your local PC b clicking on the disk icon.
NOTE: By using the “Totals” line set of icons, this will act on the whole day printing each doctor’s summary then reports.
Figure 15 Daily Summary Screen
The various functionalities offered by this screen are:
Print All
Page 13 Oct , 2004

Scryptions International MTMS User Manual
To print all the documents given on a line click on this option e.g. if the dictated file count is 14 and Print All icon is pressed all 14 transcripts are sent to the default printer.
Print Summary Only
This option prints the summary page for transcripts on that line.
Download All
‘Download all’ option downloads all selected documents displayed to the PC.
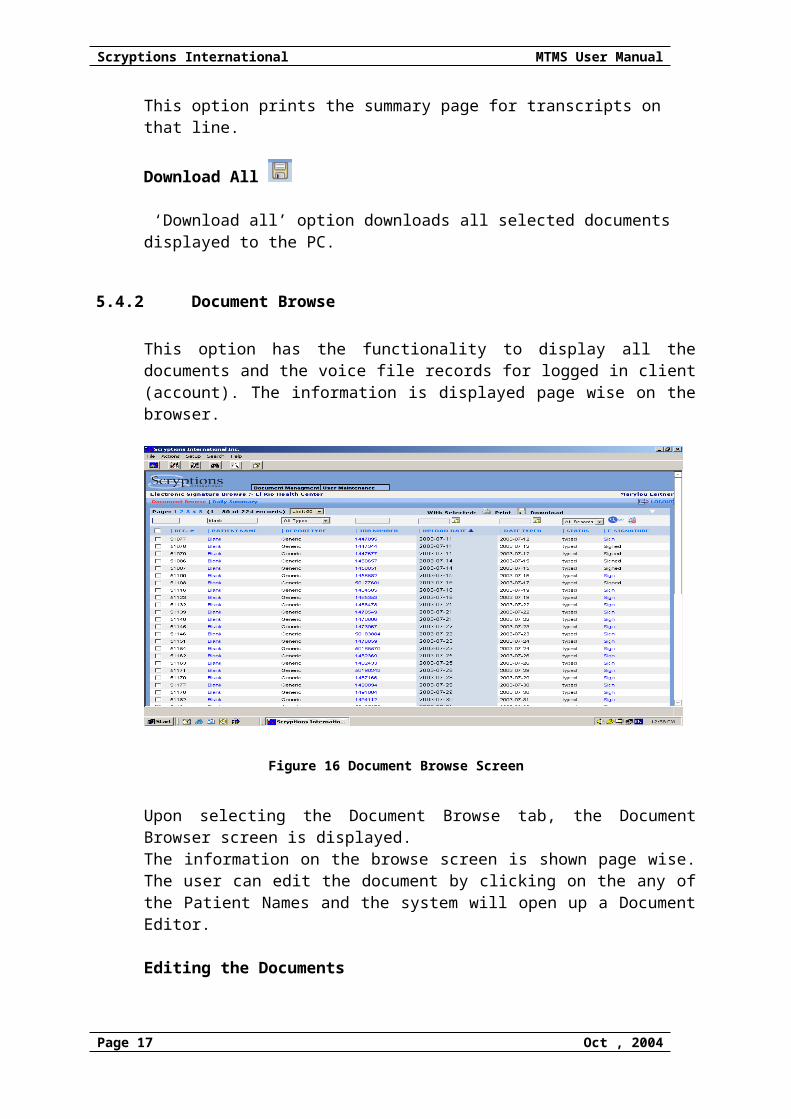
5.4.2 Document Browse
This option has the functionality to display all the documents and the voice file records for logged in client (account). The information is displayed page wise on the browser.
Figure 16 Document Browse Screen
Upon selecting the Document Browse tab, the Document Browser screen is displayed. The information on the browse screen is shown page wise. The user can edit the document by clicking on the any of the Patient Names and the system will open up a Document Editor.
Editing the Documents
The Document Edit allows for “online” editing of patient records. Edit the document just as you would be using Microsoft word for editing and then click the
button when finished. You can also print the document using
Page 14 Oct , 2004
Scryptions International MTMS User Manual
button. The button shows/hides the toolbar on the top. Refer Figure 17 Document Editor Screen.
The user can also see the history of the document on the bottom left hand corner which displays details like the user Last Edited On, Last Edited By, Last time edited.
Note: The user can’t edit the signed documents.
Figure 17 Document Editor Screen
The various functionalities offered by this screen are:
By default first 50 records are listed on the screen. However user has the option to increase or decrease the number of records displayed by selecting the drop down
combo box meant for this purpose.
Clicking on the “Job Number” plays the voice file.
Clicking on the “Patient Name” opens up the transcript in the Document Editor
Note: By using the above two options the user can compare the voice file with the corresponding transcript document.
To select a record click on the check box in front of each row.
Checking top box on check box column select/unselect all the check boxes.
To print the selected records use the printer icon on the top.
Page 15 Oct , 2004

Scryptions International MTMS User Manual
Download
To download all the selected transcripts to your PC press download icon.
5.4.3 E-signature (Doctors Only)
This screen is used only by the doctors to electronically sign the transcripts. This screen lists all the documents and their status to the doctors. Only those documents that have not been previously signed by the doctors can be signed by the doctor. All documents which have been previously signed can not be signed again and their status appears as Signed. The doctor has to click on the “E-signature” column to open up the electronic signature selection screen and sign the document.
NOTE: Once a document has been signed it cannot be edited.
Figure 18 Electronic Signature Browse
Figure 19 Electronic Signature Signing Screen
Page 16 Oct , 2004
Scryptions International MTMS User Manual
The above screen is used for signing documents. The password field appears on the left hand side. When the doctor has correctly input the password in the password field the “Sign Document” will become available and document can now be signed.
NOTE: The E-signature password is created by the doctor after creation of the ‘DOCTOR’ account has been created by using the “User Maintenance > Edit User” menu option.
To print the selected records use the printer icon on the top.
Download
To download all the selected transcripts to your PC press download icon.
5.5 User Maintenance
User Maintenance module is used to create and maintain various application users. In general the privileges to use this module should exist with Administrator of the system only.
The User Maintenance drop down menu has following menu choices
Browse Users View User Edit User Assign Privileges Create User
Page 17 Oct , 2004

Scryptions International MTMS User Manual
Figure 20 User Maintenance screen
5.5.1 Browse Users
Browse User displays all the users for a particular client. The information is displayed in five fields:
User id User name Type of user Creation date Account locked
Figure 21 Browse Users Screen
5.5.2 View User
View user displays the user details and privileges assigned for a user based on the User Id entered on the User-Id Pop-up screen. Refer Figure 22 User ID Pop-up Screen.
Figure 22 User ID Pop-up Screen
The following details of the user are displayed on the View user screen. Refer information is displayed on the View User Screen. Refer Figure 23 View User Screen
Page 18 Oct , 2004
Scryptions International MTMS User Manual
User name Access area Account code Account name User id User type Account lock E-mail Remark Privileges assigned
Figure 23 View User Screen
5.5.3 Edit User
This screen is used to edit the user details. Enter user id and click icon beside the text box of user id, the form gets filled with the information of that user. All the fields are editable except the user id field. After editing the desired fields click “Save Button” to save the information. To discard the changes click “Cancel button”.
In case the user type is “DOCTOR” , the edit user screen has an additional field
namely Verify E-sign in password this field is for security reason, so that one user cannot edit records of another user.
Page 19 Oct , 2004

Scryptions International MTMS User Manual
Figure 24 Edit User Screen
Changing Password:
User can change password by clicking on Change Password link. Upon click a new screen as given in Figure 24.1 is displayed. To change your password it is required that user enters old password. New password should be entered in New Password box. This password should also be entered in verify password box to confirm the entry. Click on Save button to change password or click on cancel to redo the entries.
Figure 24.1 Change password Screen
5.5.4 Create User
This screen is used to create new users. It allows the user to create two types of user. One is “NORMAL” and the other is “ADMIN”. The form has ten fields:
User name Access area User id (unique) User type (admin/normal/doctor) Password Verify Password E-mail address
Page 20 Oct , 2004

Scryptions International MTMS User Manual
Account locked (check box) Account Name Remarks
Figure 25 Create User Screen
After entering the new user details click “Save Button” to create a new user. To discard the changes click “Cancel button”.
5.5.5 Assign Privileges
This option is used to Assign Privileges for a particular user. The administrators generally use this screen. On choosing this option a pop-screen is displayed. Refer Figure 22 User ID Pop-up Screen. Enter the User Id for which the privileges needs to be assigned/modified and click “Ok”.
The system displays the Assign Privileges screen with the existing privileges. To assign/revoke a privilege select/unselect the checkbox against the module name.
Page 21 Oct , 2004

Scryptions International MTMS User Manual
Figure 26 Assign Privileges Screen
5.6 How to Quit the Application
To log out from the MTMS web application click on button, this appears on the top portion of every MTMS screen. Once this button is pressed user session is cancelled and Login screen (Refer Figure 7 Login Screen) appears again with a logout message.
Note: It is advisable that all users should quit the application using the button rather than simply closing the MTMS window.
Page 22 Oct , 2004