project and portfolio management center...my tasks portlet 186 my requests portlet 187 personal load...
TRANSCRIPT

Software Version: 9.51
Project and Portfolio Management Center
Resource Management User Guide
Go to HELP CENTER ONLINEhttp://admhelp.microfocus.com/ppm/
Document Release Date: November 2018 | Software Release Date: November 2018

Legal Notices
DisclaimerCertain versions of software and/or documents (“Material”) accessible here may contain branding from Hewlett-Packard
Company (now HP Inc.) and Hewlett Packard Enterprise Company. As of September 1, 2017, the Material is now offered by
Micro Focus, a separately owned and operated company. Any reference to the HP and Hewlett Packard Enterprise/HPE marks
is historical in nature, and the HP and Hewlett Packard Enterprise/HPE marks are the property of their respective owners.
WarrantyThe only warranties for products and services of Micro Focus and its affiliates and licensors (“Micro Focus”) are set forth in
the express warranty statements accompanying such products and services. Nothing herein should be construed as
constituting an additional warranty. Micro Focus shall not be liable for technical or editorial errors or omissions contained
herein. The information contained herein is subject to change without notice.
Restricted Rights LegendContains Confidential Information. Except as specifically indicated otherwise, a valid license is required for possession, use or
copying. Consistent with FAR 12.211 and 12.212, Commercial Computer Software, Computer Software Documentation, and
Technical Data for Commercial Items are licensed to the U.S. Government under vendor's standard commercial license.
Copyright Notice© Copyright 1997-2018 Micro Focus or one of its affiliates.
Trademark NoticesAdobe™ is a trademark of Adobe Systems Incorporated.
Microsoft® and Windows® are U.S. registered trademarks of Microsoft Corporation.
UNIX® is a registered trademark of The Open Group.
Oracle and Java are registered trademarks of Oracle and/or its affiliates.
Resource Management User GuideProject and Portfolio Management Center
Project and Portfolio Management Center (9.51) Page 2 of 215

Contents
Project and Portfolio Management Center 1
Chapter 1: Getting Started with Resource Management 9Introduction to Resource Management 9
Chapter 2: Setting Up Resource Management 10Overview of Setting Up Resource Management 10
Setting Up Resource Management Validations 10
Hierarchical Selection for the Auto Complete List Validation 12
Upgrade Considerations 12
Enabling Hierarchical Selection 12
Hierarchical Display Tab Query Example 13
Using Hierarchical Selection 15
Setting Default Time Period Views 15
Setting Up Roles 16
Creating a New Role 17
Modifying Existing Roles 17
Deleting Roles 17
Setting Up Skills 18
Creating a New Skill 18
Modifying Existing Skills 18
Deleting Skills 19
Setting Up a Regional Calendar 19
Specifying System Default Regional Calendar 19
Setting Up Regions 20
Setting Up Request Work Item Fields 20
Setting Up Resource Pools 22
Setting Up Default Notifications for Staffing Profiles and Resource Pools 22
Default Staffing Profile Notifications 23
Default Resource Pool Notifications 23
Modifying Default Notifications 23
Setting Notification Parameters 24
Setting Up Notification Service 24
Chapter 3: Modeling Your Organization 26Overview of Modeling Your Organization 26
Setting Up a Resource 26
Setting Resource Attributes 27
Resource Management User GuideProject and Portfolio Management Center
Project and Portfolio Management Center (9.51) Page 3 of 215

Setting Up the Resource Calendar 29
Modifying Multiple Resources 29
Resource Security 30
Modeling Organization Units 31
Creating an Organization Unit 32
Building the Organization Model 34
Linking Organization Units to Security Groups 35
Converting Organization Unit Type 37
Deleting an Organization Unit 38
Chapter 4: Using Resource Management for Capacity Planning 39Overview of Using Resource Management for Capacity Planning 39
Planning Capacity with Resource Pools 40
Using Resource Pools: General Walkthrough 41
Creating a Resource Pool 42
Viewing Resource Pools 43
Disabling and Enabling Resource Pools 44
Modifying Resource Pool Notifications 44
Disabling Notification to a Resource 45
Exporting Resource Pool Data to Excel 46
Adjusting Resource Participation Within Resource Pools 46
Viewing Forecasted Demand 48
Managing Allocation 50
Viewing Resource Load 50
Resource Pool Security 51
Resource Pool Access Grants 51
Resource Pool Configure Access Page 52
Using Configure Access Page 53
Rolling Up Resource Pool Information 53
Tracking Demand with Staffing Profiles 54
Using Staffing Profiles: General Walkthrough 55
Staffing Profile Views 56
New UI 56
Gantt View and Table View of Staffing Profile New UI 65
Specifying Editable View of Staffing Profile New UI 65
Legacy UI 67
Creating a Staffing Profile 74
Creating a Staffing Profile for a Project 76
Viewing and Configuring Gantt Chart on Staffing Profile Page 78
Configuring Gantt Chart on Staffing Profile Page 79
Adding Positions 81
Resource Management User GuideProject and Portfolio Management Center
Project and Portfolio Management Center (9.51) Page 4 of 215

Adding Positions in the New UI 81
Adding Positions in the Legacy UI 83
Importing Positions into a Staffing Profile 86
Synchronizing Positions from Work Plan Tasks 87
Filtering Positions on Staffing Profile page 88
Filtering Positions in the New UI 88
Filtering Positions in the Legacy UI 90
Adding/Removing Columns on Staffing Profile Page 91
Viewing Staffing Profiles 92
Using Search Box 92
Using Search Staffing Profiles Page 93
Modifying Staffing Profile Notifications 93
Sending Resource Requests from a Staffing Profile 94
Staffing Profile Security 96
Staffing Profile Access Grants 96
Staffing Profile Configure Access Page 97
Using Configure Access Page 98
Clearing Future Forecast and Assignments 99
Deleting Staffing Profiles 99
Using Other Staffing Profile Features 100
Staffing Profiles and Portfolio Management 100
Default Resource Pools for Staffing Profiles 100
Hiding Staffing Profile User Data Field Name 100
Special Command for Baseline Staffing Profile 100
Calculating Forecasted Labor Costs from Staffing Profiles 101
Entering Actuals Directly 101
Allocation Time Period Adjustment 102
Promised Allocations 102
Forecast Planning 103
Configuring Forecast Planning Page 103
Configuring Access Grants 104
Accessing the Forecast Planning Page 104
Using the Forecast Planning Page 105
Changing Forecast Data 105
Saving Forecast Data Changes 106
Adding a Position 106
Removing a Position 107
Sending a Resource Request 107
Viewing Information about a Staffing Profile or Position 108
Filtering and Sorting 109
Changing the Display Options 111
Assigning Resource Pool Resources 111
Resource Management User GuideProject and Portfolio Management Center
Project and Portfolio Management Center (9.51) Page 5 of 215

Collecting Resource Requests 112
Making Assignments 113
Rejecting and Forwarding Demand 115
Assigning Promised Allocations 117
Analyzing Resource Pools 118
Comparing Resource Pools to Staffing Profiles 118
Analyze Resource Pools Breakdown Table 120
Analyzing Staffing Profiles Associated with Projects 123
Automatic Tracking of Actuals for Staffing Profiles 123
Automatic Tracking of Actuals with Time Management 124
Comparing a Project's Assignments to its Staffing Profile 126
Analyzing Staffing Profiles Associated with Assets 127
Rolling up Time of an Asset to a Staffing Profile 127
Viewing Actuals 127
Analyze Assignment Load Portlet 127
Managing Resource Allocation 127
Accessing Resource Allocation Management Page 128
Understanding Resource Allocation Management Views 128
Managing Resource Requests from Resource Allocation Management Page 128
Best Practice of Resource Allocation Management Page 129
Parameters Controlling Resource Allocation Management Page 129
Gantt View of Resource Allocation Management Page 131
Table View of Resource Allocation Management Page 133
Filtering and Sorting Resource Allocation Management Page 135
Quick Filters 135
Advanced Filter 136
Time Period Filter 139
Sorting by Staffing Profile and Staffing Profile Position 139
Assigning a Resource to a Resource Request from Resource Allocation Management Page 140
Assigning a Resource to a Promised Allocation from Resource Allocation Management Page 142
Getting Resources Recommendation from Resource Allocation Management Page 143
Using RMO to Get Resource Recommendations 143
Saving Scenarios for RMO 146
Parameters Controlling Resource Management Optimization 147
Forwarding a Resource Request from Resource Allocation Management Page 149
Promising Allocations from Resource Allocation Management Page 150
Rejecting a Resource Request from Resource Allocation Management Page 150
Creating or Adjusting Resource's Assignment from Resource Allocation Management Page 151
Removing an Assigned Resource or Changing its Status 152
Removing a Promised Allocation 153
Viewing Projected Resource Pool Utilization from Resource Allocation Management Page 154
Resource Management User GuideProject and Portfolio Management Center
Project and Portfolio Management Center (9.51) Page 6 of 215

Chapter 5: Using Resource Management for Work Plan and Request Execution 156Overview of Using Resource Management for Work Plan and Request Execution 156
Configuring Requests for Resource Management 157
Assigning Requests 158
Assigning Tasks 159
Associating Roles with Tasks 159
Assigning Resources to Tasks 160
Booking Multiple Resources on a Task 160
Comparing Project Capacity to Work Plan Load 161
Compare to Work Plan for Project 161
Work Plan Resource Usage View 163
Using the Resource Finder 163
Searching for a Resource 166
Utilizing Resource User Data Fields for Resource Searching 167
Modifying Skill Criteria for Resource Searching 170
Viewing Resource Load 170
Comparing Skills 172
Scalable Resource Finder 174
Column Refresh 175
Required Skill and Preferred Skill 176
Scalable Resource Results 177
Resource Finder Calculations 178
Suitability Score Calculation 178
Calculating Availability Score 179
Calculating Skill Score 182
Calculating Projected Utilization 182
Overriding Scheduled and Actual Values 185
Scheduled Value Field Relationships 185
Actual Value Field Relationships 186
Viewing Work Items 186
My Tasks Portlet 186
My Requests Portlet 187
Personal Load and Capacity Visualizations 187
Visualizing Assignments 188
Resource Load Breakdown Table 191
Adjusting Resource Calendars 193
Appendix A: Typical Usage 194
Appendix B: Unmet Demand Calculation Sample Scenarios 196Sample Data 196
Resource Management User GuideProject and Portfolio Management Center
Project and Portfolio Management Center (9.51) Page 7 of 215

Scenario 1: Unmet demand calculation when forecast demands and assignments use the same
calendar 197
Scenario 2: Unmet demand calculation when forecast demands and assignments use different
calendars 199
Scenario 3: Unmet Demand Calculation when Assigned Resources are Partially Allocated 200
Scenario 4: Unmet Demand Calculation when Unmet Demand is Forwarded to Another Pool 202
Scenario 5: Unmet Demand Calculation when Forecasted Demand is Viewed on the Resource Pool Page203
Appendix C: Tracing PPM Data 205Calculating Unmet Demand 205
Calculating Estimated Remaining Effort 205
Configuring Project Health 205
Calculating Financial Management Data 207
Calculating Data in Financial Summary 209
Calculating Data in Scenario Comparison 213
Appendix D: Enhanced Export to Excel Functionality 214
Send Us Feedback 215
Resource Management User GuideProject and Portfolio Management Center
Project and Portfolio Management Center (9.51) Page 8 of 215
Chapter 1: Getting Started with Resource ManagementIntroduction to Resource ManagementResource Management, which is part of Project and Portfolio Management Center (PPM), provides an array of tools for managing personnel related to IT initiatives.
l Role and skill modeling capabilities unlock the potential of resources, while regional calendars make it easier to accurately determine available working hours as well as holidays and vacations. See "Setting Up Resource Management" on page 10 for more information on the setup work that should be completed before using Resource Management.
l Organizational modeling capabilities keep track of where resources are located and who they report to. See "Modeling Your Organization" on page 26 for more information on modeling your organization at the individual and group level using Resource Management.
l As resources are assigned to tasks and requests, executives and managers have full visibility into the capacity of their teams and the load placed on them, in terms of both current execution and capacity planning for the future.
l To support future demand and project planning, resource forecasting capability is achieved with staffing profiles and resource pools. High-level visualizations help program and resource managers with assessing project feasibility and timing, and with making advance staffing decisions and allocations. See "Using Resource Management for Capacity Planning" on page 39 for more information on using resource pools and staffing profiles to model and plan for resource allocations.
l To support current demand and project planning, Resource Management delivers a set of visualizations and related tools that managers and individual resources can use to communicate each others' needs and capabilities. These include work calendars, standard planning fields on tasks and requests, and resource load and capacity histograms. See "Using Resource Management for Work Plan and Request Execution" on page 156 for more detailed information on using Resource Management visualizations to assess current resource usage and optimize operational capacity.
Resource Management User GuideChapter 1: Getting Started with Resource Management
Project and Portfolio Management Center (9.51) Page 9 of 215
Chapter 2: Setting Up Resource Management l "Overview of Setting Up Resource Management" below
l "Setting Up Resource Management Validations" below
l "Setting Default Time Period Views" on page 15
l "Setting Up Roles" on page 16
l "Setting Up Skills" on page 18
l "Setting Up a Regional Calendar" on page 19
l "Setting Up Request Work Item Fields" on page 20
l "Setting Up Resource Pools" on page 22
l "Setting Up Default Notifications for Staffing Profiles and Resource Pools" on page 22
Overview of Setting Up Resource ManagementThis section discusses a number of settings and entities that should be configured prior to using Resource Management. This setup work includes:
l Setting values for Resource Management-specific fields by altering the fields' validations
l Setting default time period views for staffing profiles and resource pools
l Creating and modifying roles that will be assigned to resources
l Creating and modifying skills that will be assigned to resources
l Setting up regional calendars that will determine holidays
l Determining request types that will count as workload, if any
l Creating resource pools
l Setting default notifications for staffing profiles and resource pools
Setting Up Resource Management ValidationsResource Management employs several fields whose values should be configured prior to using it, described in "Table 2-1. PPM Resource Management validations" below. These field values can be altered by making changes to their validations.
Validation Description
PPM - Department - Enabled
All resources have an optional Department field that can be used to assist resource searches. Micro Focus-supplied values are provided for this validation, but may not match your company's terminology.
Table 2-1. PPM Resource Management validations
Resource Management User GuideChapter 2: Setting Up Resource Management
Project and Portfolio Management Center (9.51) Page 10 of 215

Validation Description
RSC - Resource Category
All resources have an optional Category field that can be used to assist resource searches. Micro Focus-supplied values are provided for this validation, but may not match your company's terminology.
RSC - Location
All resources have an optional Location field that can be used to assist resource searches. Micro Focus-supplied values are not provided for this validation.
RSC - Org Unit Type
All organization units have an optional Type field that can be used to assist organization unit searches. Micro Focus-supplied values are provided for this validation.
RSC - Skill Category
All skills have an optional Category field that can be used to assist skill searches. Micro Focus-supplied values are not provided for this validation.
RSC - Skill Proficiency
All skills can be assigned to a resource with a certain skill proficiency level. Micro Focus-supplied values are provided for this validation.
RSC - Workload Category
All work items have an optional Workload Category field that can be used to divide work items into major reporting categories for analysis purposes. Micro Focus-supplied values are provided for this validation, but may not match your company's terminology.
RSC - Resource Title
All resources have an optional Resource Title field that can be used to assist resource searches. Micro Focus-supplied values are provided for this validation, but may not match your company's terminology.
Table 2-1. PPM Resource Management validations, continued
To modify the values for these field validations:
Note: If the validation's definition language differs from your session language, you cannot modify the validation. You can only modify a validation in its definition language. Select File > Language Options and see the Multilingual User Interface Guide for more information.
1. Log on to PPM.
2. From the menu bar, select Open > Administration > Open Workbench.
The PPM Workbench opens.
3. From the shortcut bar, select Configuration > Validations.
The Validation Workbench window opens.
4. Type rsc into the Validation Name field and click List.
The Results tab opens with all of the system Resource Management validations listed.
5. Modify the validations listed in "Table 2-1. PPM Resource Management validations" on the previous page to conform to your business model.
Resource Management User GuideChapter 2: Setting Up Resource Management
Project and Portfolio Management Center (9.51) Page 11 of 215
6. Add, modify, or delete values for these validations as you see fit.
For more information about modifying values for list validations, see the Commands, Tokens, and Validations Guide and Reference.
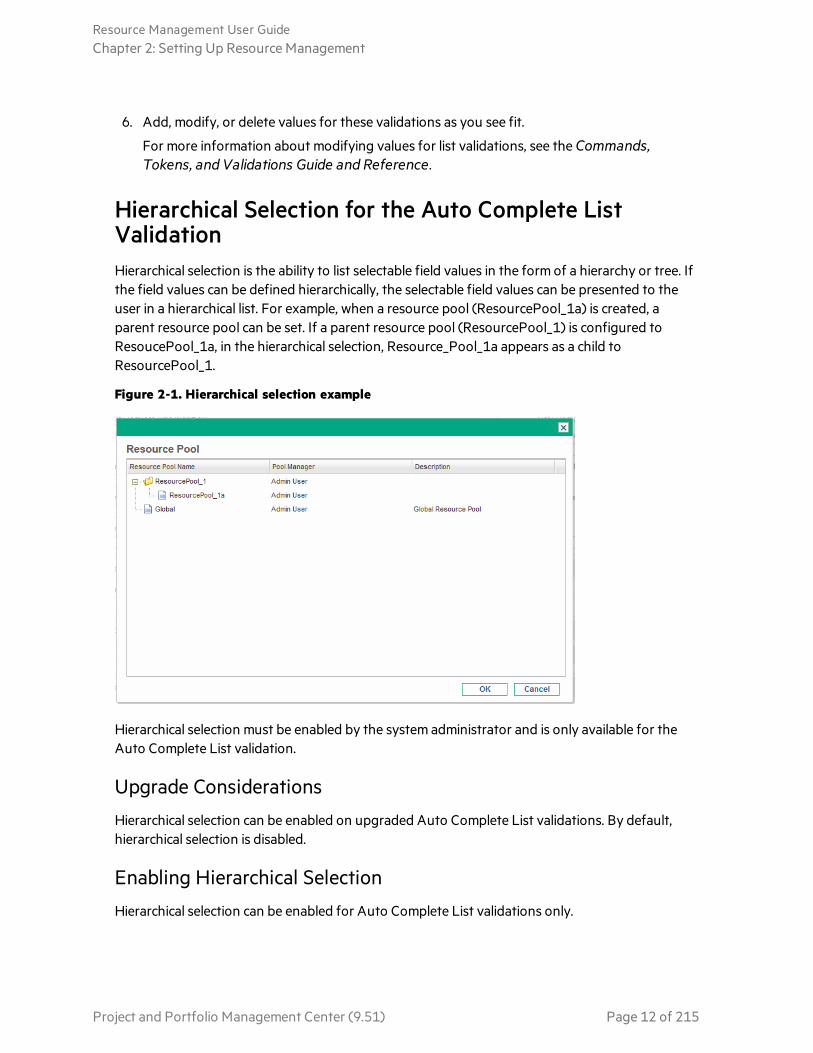
Hierarchical Selection for the Auto Complete List ValidationHierarchical selection is the ability to list selectable field values in the form of a hierarchy or tree. If the field values can be defined hierarchically, the selectable field values can be presented to the user in a hierarchical list. For example, when a resource pool (ResourcePool_1a) is created, a parent resource pool can be set. If a parent resource pool (ResourcePool_1) is configured to ResoucePool_1a, in the hierarchical selection, Resource_Pool_1a appears as a child to ResourcePool_1.
Figure 2-1. Hierarchical selection example
Hierarchical selection must be enabled by the system administrator and is only available for the Auto Complete List validation.
Upgrade Considerations
Hierarchical selection can be enabled on upgraded Auto Complete List validations. By default, hierarchical selection is disabled.
Enabling Hierarchical Selection
Hierarchical selection can be enabled for Auto Complete List validations only.
Resource Management User GuideChapter 2: Setting Up Resource Management
Project and Portfolio Management Center (9.51) Page 12 of 215

To enable hierarchical selection:
1. Log on to PPM.
2. From the menu bar, select Open > Administration > Open Workbench.
The PPM Workbench opens.
3. On the shortcut bar, click Configuration > Validations.
4. From the Validations Workbench,
If you are creating a new validation, click New Validation. Enter the required fields (Name and Reference Code). For Component Type, select Auto Complete List. For Validation By, select SQL - Custom.
If you are updating a validation, click List, and then find and double-click on the validation.
5. Select the Enable Hierarchical Selection? checkbox. The Hierarchical Display tab is enabled.
Note: If you cannot select the Enable Hierarchical Selection? checkbox, hierarchical selection cannot be enabled for the validation.
6. From the Hierarchical Display tab, set the following fields:
Field Description
Is folder selectable?
In a hierarchical selection, a parent node may be a container for selectable values or the parent node may be a selectable value.
Enable this checkbox if the parent node is a selectable value. Selecting this checkbox allows the parent node value to be selected as the field value.
Disable this checkbox if the parent node is only a container or folder. Disabling this checkbox does not allow the parent node value to be selected as a field value.
SQL Provide the Select statement that queries the database information. An ending semicolon is not necessary. See "Hierarchical Display Tab Query Example" below for more information.
7. Enter any other information for the validation.
8. Select OK.
If a field uses this validation, the hierarchical selection icon ( ) appears next to the field.
Hierarchical Display Tab Query Example
A basic SQL query used in the Hierarchical Display tab consists of the following:
Select <PrimaryIDColumn> id, <ParentIDColumn> parentId,<FolderDefinition> isFolder,<BusinessKeyColumn> name,<DisplayInfo_1>, <DisplayInfo_2>, ... , <DisplayInfo_n>
Resource Management User GuideChapter 2: Setting Up Resource Management
Project and Portfolio Management Center (9.51) Page 13 of 215

from <Table_1>, <Table_2>, ... , <Table_n>where <Condition_1> and <Condition_2> and ... and <Condition_n> and NVL(<ParentIDColumn>,0) = :parentId
where
<PrimaryIDColumn> Required. Column name whose data type is numeric. Identifies the object that is displayed in the hierarchical selection list, such as a resource pool (rpl.resource_pool_id) or skill (sk.skill_id).
<ParentIDColumn> Required. Column name whose data type is numeric and is a parent. Identifies the parent of the selected object such as a parent resource pool (rpl.parent_resource_pool_id) or parent skill (sk.parent_skill_id). For detailed steps on how to create skills with hierarchical selection, see "Hierarchical Display Tab Query Example" on the previous page.
<FolderDefinition> Required. A column name (such as a flag) or sub-query that determines if the object is a folder. The value or result must be either ̀ Y' or ̀ N.'
An example of a column name is: sk.is_skill_folder_flag
An example of a sub-query is: decode(sign((select count(rpl2.resource_pool_id) from RSC_RESOURCE_POOLS rpl2 where rpl2.enabled_flag='Y' and rpl2.parent_resource_pool_id= rpl.resource_pool_id)),1,'Y','N')
<BusinessKeyColumn> Required. The user-defined name of the object that is displayed in the hierarchical selection list.
<DisplayInfo_1>, ... , <DisplayInfo_n>
Optional. Additional information about the object to be displayed in the hierarchical selection list.
<Table_1>, ... , <Table_n>
Required. The name of the table from which to query. For example, RSC_RESOURCE_POOLS or RSC_SKILLS.
<Condition_1> and ... and <Condition_n>
Conditions to be met in order for the object to be selected to display in the hierarchical selection list.
At a minimum, you must include the following condition: NVL(<ParentIDColumn>,0) = :parentId
The following is an example of a hierarchical display query that could be used for a resource pool validation:
select rpl.resource_pool_id id,
rpl.parent_resource_pool_id parentId,
Resource Management User GuideChapter 2: Setting Up Resource Management
Project and Portfolio Management Center (9.51) Page 14 of 215

decode(sign((select count(rpl2.resource_pool_id) from RSC_RESOURCE_POOLS rpl2 where rpl2.enabled_flag='Y' and rpl2.parent_resource_pool_id=rpl.resource_pool_id)),1,'Y','N') isFolder,
rpl.resource_pool_name name,
krsc_utils.get_pool_managers_list(rpl.resource_pool_id), rpl.description
from RSC_RESOURCE_POOLS rpl
where rpl.enabled_flag='Y' and NVL(rpl.parent_resource_pool_id, 0) = :parentId
Create Skills with Hierarchical Selection
To create skills with hierarchical selection:
1. Open createSkills Web service to create a parent skill and set folder to true.
2. Create some sub-skills and set parent name to the name of the parent skill you created.
Note: When a skill is created by the createSkills web service, whatever it is defined a folder or not, you cannot change it by the upddateSkills web service.
Currently, creating skills with hierarchical selection from the standard interface is not supported. To create those skills, you must use the Web service. For more information about Web Services, see Web Services Programmer Guide.
Using Hierarchical Selection
Hierarchical selection is enabled for a field when the hierarchical selection icon ( ) appears next to the field. Clicking the hierarchical selection icon opens a list of selectable field values in the form of a hierarchy or tree.
If the field allows only one value to be entered, you can choose only one value from the hierarchical selection. If a value exists in the field, the selected value replaces the existing value.
If the field allows more than one value to be entered, you can choose one or more values from the hierarchical selection. If a value exists in the field, the selected values are appended to the existing value.
Setting Default Time Period ViewsStaffing profiles and resource pools allow you to choose how you view the following information:
l Time periods
l Years
l Quarters
Resource Management User GuideChapter 2: Setting Up Resource Management
Project and Portfolio Management Center (9.51) Page 15 of 215

l Months
l Weeks
l Totals per resource
l Hours
l Full time equivalents (FTEs)
l Person days
You can configure system-wide default settings for these options by altering the appropriate parameters in the server.conf file on the PPM Server. "Table 2-2. server.conf parameters for default time period views" below lists the parameters in the server.conf file that determine these default values.
Parameter DescriptionDefault Value
RM_DEFAULT_PERIOD_TYPE
Determines the default period type displayed in staffing profiles and resource pools.
Possible values: quarter, month, week, year
month
RM_DEFAULT_EFFORT_TYPE
Determines the default effort type displayed in staffing profiles and resource pools.
Possible values: fte, hours, person_days
fte
RM_ALLOWED_EFFORT_TYPES
Lists the possible effort types displayed in staffing profiles and resource pools.
Possible values: fte, hours, person_days
fte, person_days
Table 2-2. server.conf parameters for default time period views
For more detailed information on configuring the server.conf file, see the Installation and Administration Guide.
Setting Up RolesResource Management allows you to define roles and associate them with resources. Roles are associated with staffing profile positions as well as tasks on work plans, and help to clearly describe resource requirements. These roles can drive cost rates used when computing labor costs for tasks or staffing profile positions. (For information about staffing profile positions, see "Tracking Demand with Staffing Profiles" on page 54.)
Note: Only users with the Resource Mgmt: Edit All Roles access grant can add or modify roles.
Resource Management User GuideChapter 2: Setting Up Resource Management
Project and Portfolio Management Center (9.51) Page 16 of 215

Creating a New Role 1. Log on to PPM.
2. Select Create > Administrative > Role from the menu bar.
The Create a New Role page opens.
3. Type a Role Name and complete any optional fields you want.
4. Click Create.
The role is created and the Browse Roles page opens.
You can now add this role to any resource.
Note: The definition language of the role is set to your session language. The role can only be modified in its definition language. See the Installation and Administration Guide for more information.
Modifying Existing Roles
Note: If the role's definition language differs from your session language, you cannot modify the role. Click Why? in the header and see the Multilingual User Interface Guide for more information.
To modify an existing role:
1. Log on to PPM.
2. Select Search > Administrative > Roles from the menu bar.
3. From the Browse Roles page, click on a role Name to open its Modify Role page.
4. Make any necessary changes and click Save.
Deleting RolesTo delete a role:
Resource Management User GuideChapter 2: Setting Up Resource Management
Project and Portfolio Management Center (9.51) Page 17 of 215

1. Log on to PPM.
2. Select Search > Administrative > Roles from the menu bar.
3. From the Browse Roles page, click on a role Name to open its Modify Role page.
4. Click Delete.
The role is deleted. Roles possessed by resources or used in historical work items cannot be deleted. These roles can be disabled.
Setting Up SkillsResource Management allows you to define skills and associate them with resources. To better describe resource requirements, skills are associated with staffing profile positions as well as work plan tasks. (For information about staffing profile positions, see "Tracking Demand with Staffing Profiles" on page 54.)
Note: Only users with the Resource Mgmt: Edit All Skills access grant can add or modify skills. Therefore, a user cannot add to or modify his or her own skills unless that user has the Edit All Skills access grant.
Creating a New Skill 1. Log on to PPM.
2. Select Create > Administrative > Skill from the menu bar.
The Create a New Skill page opens.
3. Type a skill name and complete any optional fields you want.
4. Click Create. The skill is created and The Browse Skills page opens.
You can now add this skill to any resource.
Note: The definition language of the skill is set to your session language. The skill can only be modified in its definition language. See the Multilingual User Interface Guide for more information.
Modifying Existing Skills 1. Log on to PPM.
2. Select Search > Administrative > Skills from the menu bar. The Browse Skills page opens.
3. Click on a skill Name to open its Modify Skill page.
Note: If the skill's definition language differs from your session language, you cannot modify the skill. Click Why? in the header and see the Multilingual User Interface Guide
Resource Management User GuideChapter 2: Setting Up Resource Management
Project and Portfolio Management Center (9.51) Page 18 of 215

for more information.
4. Make any necessary changes and click Save.
Deleting Skills 1. Log on to PPM.
2. Select Search > Administrative > Skills from the menu bar.
3. From the Browse Skills page, click on a skill Name to open its Modify Skill page.
4. Click Delete Skill.
The skill is deleted. Skills possessed by resources or used in historical work items cannot be deleted. These skills can be disabled.
Setting Up a Regional CalendarA regional calendar sets the default working and nonworking days for an organization unit, resource, or project. Individual resources' work schedules can be set using individual resource calendars.
To set up a regional calendar:
1. Log on to PPM.
2. Select Search > Administrative > Regional Calendars from the menu bar.
The Manage Regional Calendars page opens.
You can expand or narrow down the list of regional calendars by providing search criteria into the filter fields and clicking Search.
3. Click the name of the regional calendar you wish to modify.
The Modify Regional Calendar <Name> page opens.
4. Select a day or range of days by using Shift + click or Ctrl + click.
5. Click the Non-Working day option to mark those days as non-working.
Optionally, select a Reason and type a Description.
6. Click Save.
The regional calendar is set. Non-working days will appear as non-working days for resources and organization units using the regional calendar.
Specifying System Default Regional CalendarThe System Default Regional Calendar is used for the scheduling of request work items. All other entities must select a region or inherit one, and thus use the regional calendar set for that region.
Resource Management User GuideChapter 2: Setting Up Resource Management
Project and Portfolio Management Center (9.51) Page 19 of 215

There can be only one System Default Regional Calendar, which is set during installation or upgrade of the PPM. This setting can be changed if needed.
To set the System Default Regional Calendar:
1. Log on to PPM.
2. Select Open > Administration > Regions > Set System Default Regional Calendar from the menu bar.
The Set System Default Regional Calendar page opens, displaying all enabled regional calendars. The current System Default Regional Calendar is selected.
3. Select the desired regional calendar and click Done.
Setting Up RegionsBesides setting regional calendars for resources, regions also govern currency display settings. For details on creating and modifying regions, see the Financial Management User Guide.
Setting Up Request Work Item FieldsIf you have licenses for Demand Management, and you wish to include requests as work items to be tracked using Resource Management, associate work item fields with your request types. Work item fields include the following (for a list of all request work item fields, see "Table 5-1. Request work item fields" on page 157):
l Scheduled Start Date
l Scheduled Finish Date
l Scheduled Duration
l Scheduled Effort
To insert work item fields into a request type, you must associate the work item field group with the request header type being used by the request type. "Figure 2-2. Work item field group in a request type" below illustrates the relationship between the work item field group, a request header type, and a request type.
Figure 2-2. Work item field group in a request type
Resource Management User GuideChapter 2: Setting Up Resource Management
Project and Portfolio Management Center (9.51) Page 20 of 215

Note: To avoid associating work item fields with a request you don't want to track, use a one-to-one mapping between the request header type and the request type.
When Field Groups are associated with existing request types (through the request header type definition), tables in the PPM database are updated to handle this new configuration. Because of the scope of database changes, you should re-run the Database Statistics on your database. Instructions for this are included in the Installation and Administration Guide. Contact your system administrator for help with this procedure.
To associate work item fields with a request type:
1. Log on to PPM.
2. From the menu bar, select Open > Administration > Open Workbench. The PPM Workbench opens.
3. From the shortcut bar, select Demand Mgmt > Request Header Types.
The Request Header Type Workbench opens.
4. Click New Request Header Type.
The Request Header Type window opens to the Fields tab.
5. Click Field Groups.
The Field Groups window opens.
Note: Depending on the PPM products your site has licensed, the Field Groups window may display a different set of options.
6. Select the Enabled checkbox for the Work Item Fields option and click OK.
The work item fields are now associated with the request header type.
7. Provide any other required or optional information.
8. (Optional) Modify other existing request header type fields or create new ones as you see fit.
Resource Management User GuideChapter 2: Setting Up Resource Management
Project and Portfolio Management Center (9.51) Page 21 of 215

See the Demand Management Configuration Guide for more detailed information on modifying request header type fields.
9. Save the request header type.
10. Click the Request Types screen and open the request type in which you wish to include work item fields.
11. In the Request Header Type field, specify the request header type containing the work item fields.
12. (Optional) Modify the request type as you see fit, including setting field logic and security.
See the Demand Management Configuration Guide for more detailed information on modifying request type fields.
13. Save the request type.
The request type now has work item fields associated with it and can be tracked using Resource Management.
Note: Certain request work item fields are interdependent, meaning one field might be updated when another field's value is changed. Demand Management field-level security allows you to make request fields invisible to certain users or sets of users.
Resource Management for requests may not work correctly if you make an interdependent request work item field invisible to a user. Any user who will be making use of request work item fields must have at least View access to all of them. Edit access to all work item fields is not necessary unless the user will be changing work item field values.
Setting Up Resource PoolsResource pools enable resource planners to designate future resource capacity, arranged by role or organization unit. For a more detailed discussion of resource pools and their role in Resource Management, see "Using Resource Management for Capacity Planning" on page 39.
We recommend that you set up resource pools before creating any staffing profiles. For detailed instructions on setting up resource pools, see "Planning Capacity with Resource Pools" on page 40.
Setting Up Default Notifications for Staffing Profiles and Resource PoolsNotifications allow resource pool managers, staffing profile managers, and resources to be notified (by email) when certain events occur, such as when resource requests are sent,
Resource Management User GuideChapter 2: Setting Up Resource Management
Project and Portfolio Management Center (9.51) Page 22 of 215

forwarded, or rejected, and resources are allocated. Default notifications are the notifications that are automatically set up when a staffing profile or resource pool is created.
You must set parameters in server.conf and set up the notification service to successfully send email notifications. See "Setting Notification Parameters" on the next page and "Setting Up Notification Service" on the next page for more details.
Note: If the resource pool manager and the staffing profile manager are the same person, notifications are not sent. If a resource pool manager is one of a group of staffing profile managers, only the other staffing profile managers receive notifications.
Default Staffing Profile NotificationsDefault staffing profile notifications are set to notify a staffing profile manager when a resource request is rejected, a resource is committed, a committed resource changes to soft-booked or is removed, and when the start date, end date or FTEs of a committed resource is adjusted. Optionally, you can also set the default staffing profile notifications to notify a staffing profile manager when a resource request message is forwarded, or when soft-booked resource allocations are affected.
You can modify the default notifications or you can modify the notifications of a specific staffing profile. Modifying default notifications does not affect the notifications of existing staffing profiles.
Default Resource Pool NotificationsDefault resource pool notifications are set to notify the resource pool manager when resource requests are sent or forwarded to this resource pool. Optionally, you can also set default resource pool notifications to notify the resources when the forecast demand is changed, or when their committed or soft-booked allocations are affected, or to notify resource manager when a resource's committed allocation is changed.
You can modify the default notifications or you can modify the notifications of a specific resource pool (see "Modifying Resource Pool Notifications" on page 44 for more information). Modifying default notifications does not affect the notifications of existing resource pools.
You can temporarily disable notification to a resource when you make an assignment. See "Disabling Notification to a Resource" on page 45 for more information.
Modifying Default NotificationsYou must have Edit All Staffing Profiles or Edit All Resource Pools access grants in order to modify default notifications.
To modify default notifications for staffing profiles and resource pools:
Resource Management User GuideChapter 2: Setting Up Resource Management
Project and Portfolio Management Center (9.51) Page 23 of 215

1. Log on to PPM.
2. From the menu bar, select Open > Administration > Resource Management > Configure Notification Defaults.
3. Select or deselect the checkbox for the level of notification you desire.
4. Click Save.
Setting Notification ParametersThe following parameters in the server.conf file must be configured in order to send notifications:
Parameter DescriptionDefault and Valid Values
EMAIL_NOTIFICATION_SENDER
Email address of the default sender of email notifications.
Example
SMTP_SERVER Host name of the SMTP-compliant mail server that acts as the gateway for email notifications.
Example
mailserver.mydomain.com
Table 2-3. server.conf parameters for notifications
For more detailed information on configuring the server.conf file, see the Installation and Administration Guide.
Setting Up Notification ServiceThe notification service for resource pools and staffing profiles is governed by the RM Notification Service on the PPM Server. "Table 2-4. Notification service for resource pools and staffing profiles" below describes this service.
Service Description Default Values
RM Notification Service
Determines if notifications are sent and how often they are sent. If Schedule is set to 1 minute, notifications are sent immediately. If Schedule is set to an interval greater than 1 minute, notifications sent to the same recipient during that interval are grouped into a single email.
Status: Disabled
Schedule Type: Simple
Schedule: 1 hour
Table 2-4. Notification service for resource pools and staffing profiles
To modify the service, do the following:
Resource Management User GuideChapter 2: Setting Up Resource Management
Project and Portfolio Management Center (9.51) Page 24 of 215

1. From the menu bar in the standard interface, select Open > Administration > Schedule Services.
2. Click on the RM Notification Service.
3. Edit the Status, Schedule Type, and Schedule. See the online help for more information about the Schedule Type.
4. Click Save.
Resource Management User GuideChapter 2: Setting Up Resource Management
Project and Portfolio Management Center (9.51) Page 25 of 215
Chapter 3: Modeling Your Organization l "Overview of Modeling Your Organization" below
l "Setting Up a Resource" below
l "Modeling Organization Units" on page 31
Overview of Modeling Your OrganizationThis section discusses the various attributes of resources and organization units, and discusses how to set them up, among them:
l Configuring information for individual resources
l Resource attributes like name, phone number, email address
l Calendar information for each resource, including planned vacation days
l Resource security settings that determine what the resource can view and edit
l Setting up organization units
l Placing resources inside organization units
l Setting organization units' relationships to each other
l Determining whether an organization unit's membership is linked to a particular security group
l Determining whether an organization unit is primary or matrixed
Setting Up a ResourceIn order to use Resource Management, you must first define your resources. Resources can have many attributes, including:
l First and last name
l Phone number
l Email address
l Direct manager
l Department
l Role
l Skills
l Region
l Time sheet approver
"Table 3-1. Key resource attributes" on the next page describes resource attributes that are especially useful. To take full advantage of Resource Management functionality, these attributes should be defined for every resource.
Resource Management User GuideChapter 3: Modeling Your Organization
Project and Portfolio Management Center (9.51) Page 26 of 215

Attribute Utilization
Role Used in resource booking and to build staffing profiles and resource pools (see "Using Resource Management for Capacity Planning" on page 39). Roles can be user responsibilities that help to describe resource requirements.
See "Setting Up Roles" on page 16 for more detailed information.
Skills Used to further describe resource requirements for tasks and staffing profile positions beyond the role description such as an ability or area of knowledge.
See "Setting Up Skills" on page 18 for more detailed information.
Region Used to determine the resource's regional calendar and currency settings. A resource can inherit their region setting from their primary organization unit, or a region can be specified directly.
For more information on regions and regional calendars, see "Setting Up a Regional Calendar" on page 19.
For more information on currency settings, see the Financial Management User Guide.
Table 3-1. Key resource attributes
Resources map to PPM users on a one-to-one basis.
Note: A new resource cannot be created from scratch. A new user must be defined, and then his or her resource attributes subsequently configured.
The system takes into account users' start and end dates in resource capacity calculations and visualizations. For example, a user who is set to leave the company at a certain date cannot be assigned to a task or staffing profile afterward. Likewise, users starting work in the future can be selected for relevant entities scheduled to be active in the future.
The system also takes into account a resource's participation in a resource pool for resource capacity calculations and visualizations. If the resource belongs to one or more resource pools, the capacity is non-zero.
While users are created and maintained from the PPM Workbench, resource information is set in the standard interface.
Setting Resource AttributesGeneral resource attributes are set in the standard interface.
Note: Resource cost rates are set using cost rate rules. See the Financial Management User Guide for more detailed information on cost rate rules and their configuration.
Resource Management User GuideChapter 3: Modeling Your Organization
Project and Portfolio Management Center (9.51) Page 27 of 215

To configure attributes for a resource:
1. Log on to PPM.
2. Select Search > Administrative > Resources from the menu bar.
The Search Resources page opens.
3. Specify any search criteria in the Search for Resources section and click Search.
The Search Resources page displays the results of your search.
Note: Click Export to Excel if you want to export resources on this page to a Microsoft Excel spreadsheet. You can configure the parameter EXCEL_EXPORT_RESOURCES_LIMIT in the Administration Console to specify the maximum number of resources that can be exported. By default, the value is 3000. Consider the performance objectives when you configure the parameter.
4. Click on a resource's Username to open their Modify Resource page.
The Modify Resource page opens to the General tab.
5. Provide data for any desired resource attributes.
When the financial summary settings are set to calculate forecasted labor costs from the staffing profile, the cost category is used to categorize costs of work allocations.
The primary organization unit the resource belongs to appears in the Organization Information section.
To add a role and skills, click the Role/Skill tab.
Note: If a resource is assigned to a position and you change the resource’s full name, the change is reflected in the Staffing Profile page, but not reflected in the Resource Forecast Cost chart of the Cost tab on the Project Overview page.
6. Click Save to save all changes to the resource.
7. (Optional) If you would like to take a look at the history of changes made to the resource, you can click the View Audit Trail button in the upper-right corner of the page.
The Resource Audit Trail tracks changes to the following cost-related attributes of a resource:
l Resource category
l Org unit
l Department
l Region
l Role
Note: The resource will use the regional calendar and currency configured for its selected region.
Resource Management User GuideChapter 3: Modeling Your Organization
Project and Portfolio Management Center (9.51) Page 28 of 215

Setting Up the Resource CalendarA resource's calendar, which specifies working and non-working days for that particular resource, is configured in the standard interface. Resources that are part of a security group with the Edit My Calendar access grant can edit their own calendars.
To set a resource's calendar:
1. Open the resource's Modify Resource page as described in "Setting Resource Attributes" on page 27.
2. Open the resource's calendar by clicking the Calendar tab of the Modify Resource page.
3. Select a day or range of days by using Shift + click or Ctrl+ click.
4. Choose the Non-Working day option to mark those days as non-working.
Optionally, select a Reason and type a Description.
5. Click Save.
The resource's calendar is set and will be used to calculate that resource's capacity in Resource Management visualizations.
Note: By default, the resource calendar will inherit all the non-working days set in the regional calendar the resource uses.
Modifying Multiple ResourcesYou can modify attributes for multiple resources simultaneously. For example, you may want to associate a particular role or region with multiple resources without having to update each resource individually.
To modify attributes for multiple resources simultaneously:
1. Log on to PPM.
2. Select Search > Administrative > Resources from the menu bar.
The Search Resources page opens.
3. Specify any search criteria in the Search for Resources section and click Search.
The Search Resources page changes to display the results of your search.
4. Select the checkboxes next to the Username of each resource you want to modify and click Modify Checked Resources.
The Resource Mass Update page opens.
5. Provide data for any desired resource attributes.
6. Click Save to save all changes to the resources.
Resource Management User GuideChapter 3: Modeling Your Organization
Project and Portfolio Management Center (9.51) Page 29 of 215

Resource SecurityResource information can have various layers of security applied to it. Depending on the access grants a user has, that user can view his own resource information, view information on other resources, edit information for resources he manages, or edit all resources in the system. These access grants are also needed to use the Analyze Assignment Load visualizations. "Table 3-2. Resource information access grants" below describes these access grants in more detail.
Access Grant Description
View my own personal resource info only The user can only view his own resource information.
View all resources b The user can only view information for all resources in the system.
Edit only resources that I manage The user can view and edit information for resources that list them as Direct Manager.
Edit all resources The user can view and edit information for all resources in the system.
Edit My Calendar The user can edit his own resource calendar.
Promise Unspecified Resources The user can add, assign, modify and remove promised allocations. The ENABLE_PROMISE_RESOURCE_ALLOCATION parameter must be enabled to view promised allocations.
View Only Resources That I Manage in My Resource Poola
The user can view the resource profiles for resources in the resource pools (including child pools) that he or she manages. When the user opens the View Resource page, all information is read-only.
Table 3-2. Resource information access grants
Resource Management User GuideChapter 3: Modeling Your Organization
Project and Portfolio Management Center (9.51) Page 30 of 215

Access Grant Description
View Only Resources That I Manage as a Direct Managera
The user can view the resource profiles for resources that he or she directly manages.When the user opens the View Resource page, all information is read-only.
a. Provides only the view access to resource profiles. Designed for a scenario where the resource information is imported from an external system. By creating users (resource pool mangers and direct managers) with these access grants, you can maintain the data integrity between PPM Center the source of the resource information.
b. You must have the view all resources access grant when using the following RESTful Web service:http://<PPM_Server_IP>:<port>/itg/rest/tm/user?name=<usename>Otherwise, you can only view the information of yourself.
Table 3-2. Resource information access grants, continued
Access grants are linked to a user through their security group membership. For more information on user security, see the Security Model Guide and Reference.
Modeling Organization UnitsResources can be members of organization units, which can stand on their own or be arranged in relation to one another to form an organization model. "Figure 3-1. Sample organization model" below illustrates a sample organization model.
The organization model is visible at all times from the View Organization Model page. To open this page, select Open > Resource Management > Organization Model > Browse the Org Model from the menu bar.
Figure 3-1. Sample organization model
The Expand All and Collapse All buttons, used to expand and collapse all organization units on this page, are available. If your organization is large, selecting these buttons causes slow performance. If you want to hide these buttons, set the RM_ENABLE_ORG_VIEW_EXPAND_ALL server.conf parameter to false. For more information, see Installation and Administration Guide.
Resource Management User GuideChapter 3: Modeling Your Organization
Project and Portfolio Management Center (9.51) Page 31 of 215

There are two kinds of organization units:
l Primary. Resources can only belong to one primary organization unit. If set to inherit their region setting from their parent organization unit, a resource will inherit their primary organization unit's region. Only primary organization units can be linked to resource pools (see "Planning Capacity with Resource Pools" on page 40 for more information).
l Matrix. Made up of members from primary organization units, matrix organization units do not determine region settings for their resources.
An organization unit of one type can be converted into the other. See "Converting Organization Unit Type" on page 37 for more information.
Note: Every resource needs to be a member of one and only one primary organization unit. Resources that are not assigned to a primary organization unit become part of a default "Unspecified" organization unit and inherit the region assigned to it.
You can show the assignment load for all resources in an organization unit with the Analyze Assignment Load portlet. "Figure 3-2. Analyze Assignment Load portlet" below shows the Analyze Assignment Load portlet for an organization unit whose members are currently underutilized. The total capacity for the organization unit is calculated from each resource's calendar and workload capacity.
Figure 3-2. Analyze Assignment Load portlet
Creating an Organization UnitTo create an organization unit:
Resource Management User GuideChapter 3: Modeling Your Organization
Project and Portfolio Management Center (9.51) Page 32 of 215
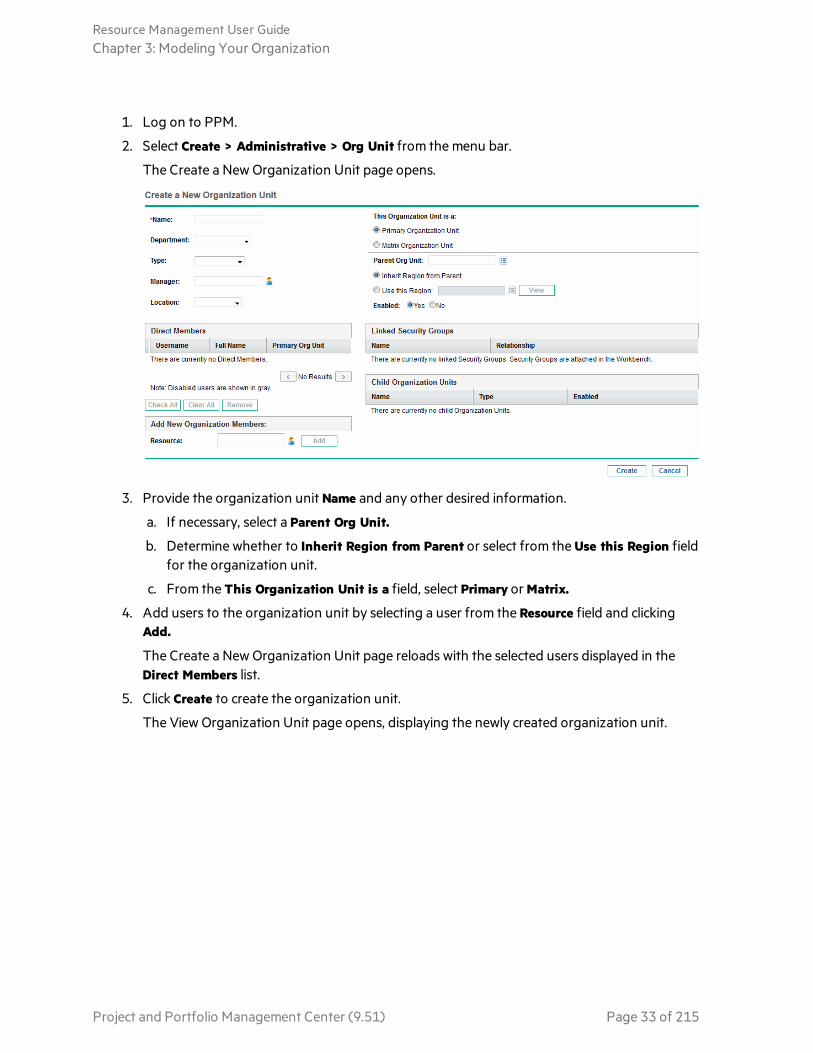
1. Log on to PPM.
2. Select Create > Administrative > Org Unit from the menu bar.
The Create a New Organization Unit page opens.
3. Provide the organization unit Name and any other desired information.
a. If necessary, select a Parent Org Unit.
b. Determine whether to Inherit Region from Parent or select from the Use this Region field for the organization unit.
c. From the This Organization Unit is a field, select Primary or Matrix.
4. Add users to the organization unit by selecting a user from the Resource field and clicking Add.
The Create a New Organization Unit page reloads with the selected users displayed in the Direct Members list.
5. Click Create to create the organization unit.
The View Organization Unit page opens, displaying the newly created organization unit.
Resource Management User GuideChapter 3: Modeling Your Organization
Project and Portfolio Management Center (9.51) Page 33 of 215
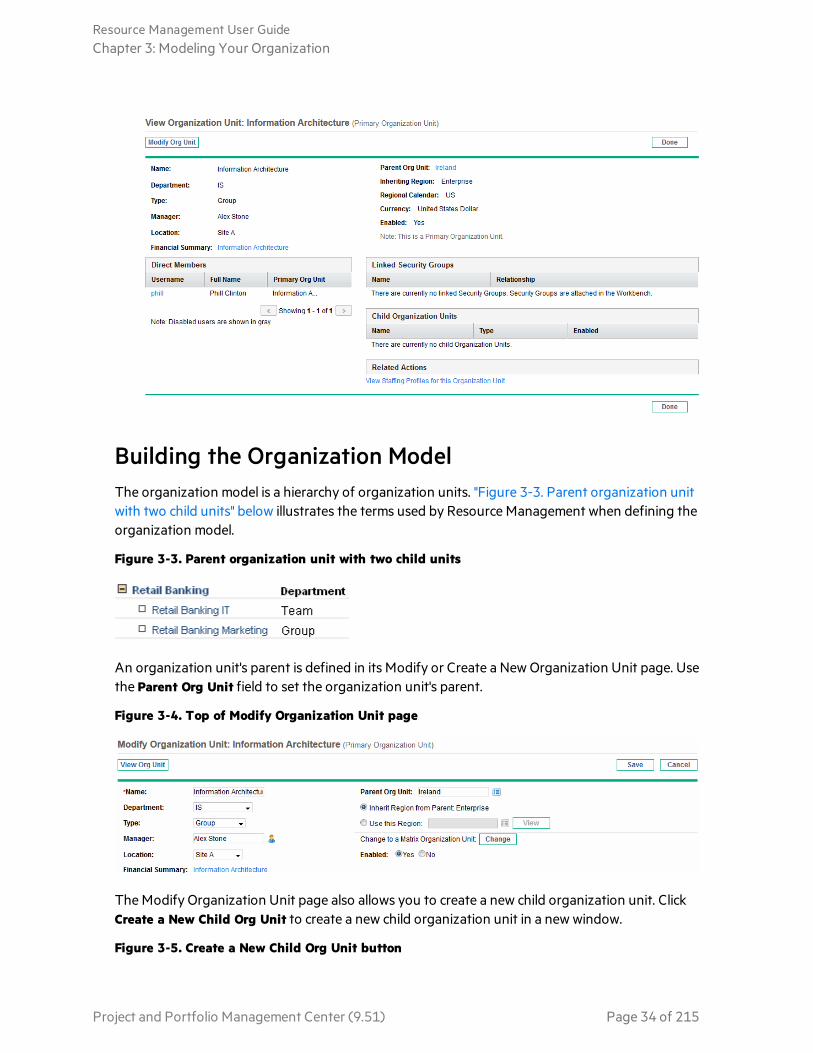
Building the Organization ModelThe organization model is a hierarchy of organization units. "Figure 3-3. Parent organization unit with two child units" below illustrates the terms used by Resource Management when defining the organization model.
Figure 3-3. Parent organization unit with two child units
An organization unit's parent is defined in its Modify or Create a New Organization Unit page. Use the Parent Org Unit field to set the organization unit's parent.
Figure 3-4. Top of Modify Organization Unit page
The Modify Organization Unit page also allows you to create a new child organization unit. Click Create a New Child Org Unit to create a new child organization unit in a new window.
Figure 3-5. Create a New Child Org Unit button
Resource Management User GuideChapter 3: Modeling Your Organization
Project and Portfolio Management Center (9.51) Page 34 of 215

To reach an organization unit's Modify Organization Unit page:
1. Log on to PPM.
2. Selecting Search > Administrative > Org Units from the menu bar.
The Modify Organization Units page opens.
3. Provide search criteria and click Search.
The Modify Organization Units page changes to display the results of your search.
4. Click the name of the organization unit you wish to modify. The View Organization Unit page opens.
5. Click Modify Org Unit. The Modify Organization Unit page opens.
Linking Organization Units to Security GroupsSecurity groups can be linked to organization units. This can allow your security configuration to more accurately reflect your business needs, as well as supply a more convenient and intuitive way of adding or removing security from users by associating or dissociating them from organization units. Doing so also distributes the maintenance of security groups from PPM administrators to business users who actually manage organization units.
Resource Management User GuideChapter 3: Modeling Your Organization
Project and Portfolio Management Center (9.51) Page 35 of 215
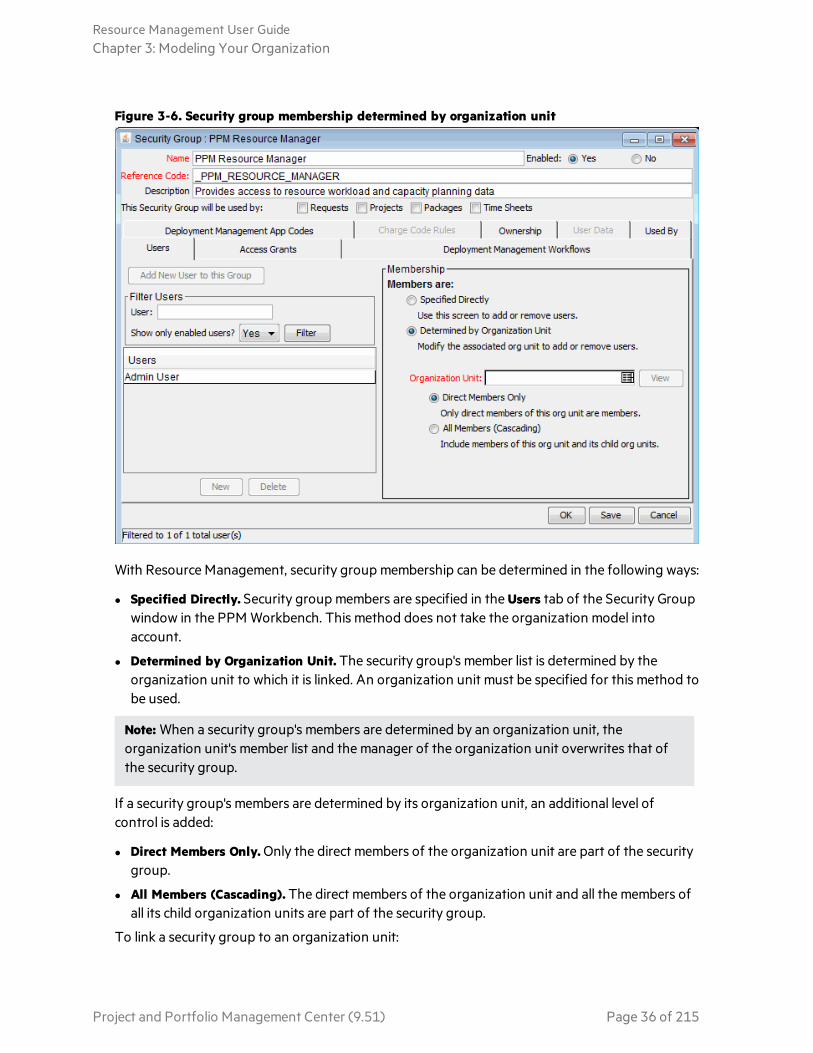
Figure 3-6. Security group membership determined by organization unit
With Resource Management, security group membership can be determined in the following ways:
l Specified Directly. Security group members are specified in the Users tab of the Security Group window in the PPM Workbench. This method does not take the organization model into account.
l Determined by Organization Unit. The security group's member list is determined by the organization unit to which it is linked. An organization unit must be specified for this method to be used.
Note: When a security group's members are determined by an organization unit, the organization unit's member list and the manager of the organization unit overwrites that of the security group.
If a security group's members are determined by its organization unit, an additional level of control is added:
l Direct Members Only. Only the direct members of the organization unit are part of the security group.
l All Members (Cascading). The direct members of the organization unit and all the members of all its child organization units are part of the security group.
To link a security group to an organization unit:
Resource Management User GuideChapter 3: Modeling Your Organization
Project and Portfolio Management Center (9.51) Page 36 of 215
1. Log on to PPM.
2. From the menu bar, select Open > Administration > Open Workbench.
The PPM Workbench opens.
3. From the shortcut bar, select Sys Admin > Security Groups.
The Security Group Workbench opens.
4. Create a new security group or search for and open an existing one.
The Security Group window opens.
5. In the Users tab, select the Determined by Organization Unit option.
A question dialog box opens, warning you that the security group's present member list will be overridden by the current members of the organization unit.
6. Click Yes to continue.
The Organization Unit auto-complete field becomes enabled and required.
7. Select an organization unit to be linked to the security group.
8. Specify either Direct Members Only or All Members (Cascading) for the security group's member list.
9. Click Save.
You will see the new list of members for the security group.
Converting Organization Unit TypePrimary organization units can be converted into matrix organization units and vice versa. The following changes apply when the conversions are made:
l Primary to Matrix. All of the Resources in the organization unit belong to the "Unspecified" organization unit.
l If they were set to inherit their region from their organization unit, they inherit the region belonging to the "Unspecified" organization unit.
l If there was a resource pool associated with the organization unit, it is no longer linked.
l Matrix to Primary. All of the resources in the organization unit are pulled out of their existing primary organization units and placed in the current one. If they were set to inherit their region from their former primary organization unit, they instead inherit their region from the current organization unit.
When you attempt to make this conversion, Resource Management presents you with a window detailing the impact of the change. You can then confirm the conversion or cancel the attempt.
To convert an organization unit from Primary to Matrix or vice versa:
1. Log on to PPM.
2. Search for the organization unit by selecting Search > Administrative > Org Units from the menu bar.
Resource Management User GuideChapter 3: Modeling Your Organization
Project and Portfolio Management Center (9.51) Page 37 of 215

3. Click the name of the organization unit you wish to convert.
The View Organization Unit page opens.
4. Click Modify Org Unit.
The Modify Organization Unit page opens.
5. Click Change next to Change to a Matrix/Primary Organization Unit.
A window opens, displaying a list of the users whose organization unit or region settings will be altered.
6. Click Change.
Deleting an Organization UnitDeleting an organization does not remove resources, security groups, child organization units, or other entities associated with it. You must have either the Resource Mgmt: Edit Entire Organization or Resource Mgmt: Edit Only Organization Units that I Manage access grant to delete an organization unit.
To remove an organization unit:
1. Log on to PPM.
2. Selecting Search > Administrative > Org Units from the menu bar.
The Modify Organization Units page opens.
3. Select the checkbox next to the organization unit to delete.
4. Click Delete.
Resource Management User GuideChapter 3: Modeling Your Organization
Project and Portfolio Management Center (9.51) Page 38 of 215

Chapter 4: Using Resource Management for Capacity Planning l "Overview of Using Resource Management for Capacity Planning" below
l "Planning Capacity with Resource Pools" on the next page
l "Tracking Demand with Staffing Profiles" on page 54
l "Forecast Planning" on page 103
Overview of Using Resource Management for Capacity PlanningResource capacity planning consists of the following activities:
l Gauging present resource capacity and workload
l Predicting future resource capacity in terms of needed roles or resources
l Forecasting future resource demand in terms of needed roles or resources
l Viewing historical trends in resource allocation
l Comparing present resource usage to previous forecasts
Resource Management includes two basic tools to help in resource capacity planning:
l Staffing profiles. Staffing profiles allow a manager to plan the future allocation of resources, broken down by role. This lets the business see what kinds of resources and roles they will need for future work.
l Resource pools. Resource pools provide a way to track future resource capacity, broken down by role. This lets the resource manager see what resources and roles will be available to apply to future work.
Staffing profiles and resource pools integrate to form an end-to-end resource management process:
1. Resource managers create resource pools that define resource capacity. See "Planning Capacity with Resource Pools" on the next page for details on creating resource pools.
2. Project managers create staffing profiles that forecast resource demand. See "Tracking Demand with Staffing Profiles" on page 54 for details on staffing profile usage and creation.
3. These staffing profiles spawn resource requests meant for various resource pools. See "Sending Resource Requests from a Staffing Profile" on page 94 for details on resource requests.
Staffing Profile managers can manage positions and assignments for the projects he owns using the Forecast Planning page. See "Forecast Planning" on page 103 for details on the Forecast Planning page.
4. Resource managers fill resource requests by drawing from the specified resource pools to
Resource Management User GuideChapter 4: Using Resource Management for Capacity Planning
Project and Portfolio Management Center (9.51) Page 39 of 215

make the actual resource allocations to the originating staffing profiles. See "Assigning Resource Pool Resources" on page 111, "Adjusting Resource Participation Within Resource Pools" on page 46, and "Assigning a Resource to a Resource Request from Resource Allocation Management Page" on page 140 for details on making assignments to staffing profiles from resource pools.
Resource managers can also forward requests to another resource pool, or reject resource requests altogether. See "Rejecting and Forwarding Demand" on page 115, "Forwarding a Resource Request from Resource Allocation Management Page" on page 149, and "Rejecting a Resource Request from Resource Allocation Management Page" on page 150 for details on forwarding and rejecting resource requests.
Resource managers can load balance resources from their pools across the staffing profiles requesting resources. They can also examine the utilization of resources on projects. See "Analyzing Staffing Profiles Associated with Projects" on page 123 and "Analyzing Resource Pools" on page 118 for details on this process.
Planning Capacity with Resource PoolsResource pools enable resource planners to designate future resource capacity, arranged by role or resource, split according to any of the options described in "Table 4-1. Resource pool features" below:
Feature Options
Lines on a resource pool can represent l Resources
l Roles
l (both)
A resource pool can show capacity forecasts out to l 3 months
l 6 months
l 9 months
l 1 year
l 2 years
l 3 years
Resource capacity can be grouped by l Week
l Month
l Quarter
l Year
Table 4-1. Resource pool features
Resource Management User GuideChapter 4: Using Resource Management for Capacity Planning
Project and Portfolio Management Center (9.51) Page 40 of 215

Feature Options
Resource capacity totals can be shown in l Hours
l Full Time Equivalents (FTE)
l Person Days
Table 4-1. Resource pool features, continued
Resource pools can be organized into hierarchies, mirroring or elaborating on groupings of responsibility in a business. "Table 4-2. Resource pool attributes" below describes the key attributes of a resource pool.
Field Name Description
Resource Pool Information
Pool Name The name of the resource pool.
Description A description of the resource pool.
Pool manager The user responsible for the resource pool and allocating resources to staffing profiles.
This Resource Pool is for
Defines whether the resource pool is associated with a primary organization unit or freestanding.
Region The region associated with the resource pool; determines holiday schedule for unnamed resources.
Parent resource Pool
Allows you to specify a parent resource pool if desired, creating a hierarchy of resource pools.
Table 4-2. Resource pool attributes
Using Resource Pools: General WalkthroughThe resource pool is a tool for the resource manager. Resource managers can use resource pools and their visualizations to assess whether proposed projects or programs are within capacity bounds.
Aside from making assignments within staffing profiles from resource pools, a resource manager can examine resource pools themselves to determine overallocations. The resource manager can then perform load balancing by doing any of the following:
l Reassigning staffing assignments to other resources
l Adding resources to the resource pool
l Transferring resources to another resource pool
l Modifying a resource's level of participation across multiple resource pools
Resource Management User GuideChapter 4: Using Resource Management for Capacity Planning
Project and Portfolio Management Center (9.51) Page 41 of 215

A resource manager can also assess and manage resources and resource requests for a resource pool from the Resource Allocation Management page. See "Managing Resource Allocation" on page 127 for more information.
Creating a Resource PoolTo create a resource pool:
1. Log on to PPM.
2. Select Create > Administrative > Resource Pool from the menu bar.
The Create a New Resource Pool page opens.
3. Complete the required fields and any optional fields.
At this point, you should decide the following:
l Whether the resource pool is freestanding or associated with a primary organization unit, and if so, which one.
l Whether the resource pool has a parent resource pool.
4. Click Create. The Resource Pool page opens.
5. Add lines to the resource pool.
a. Click Manage Pool Capacity.
The Manage Pool Capacity page opens.
b. Click the links below the resource pool name.
Resource Management User GuideChapter 4: Using Resource Management for Capacity Planning
Project and Portfolio Management Center (9.51) Page 42 of 215
o Show Pool for the Past/Next specifies the amount of time the resource pool will cover.
o Show Resource Capacity In determines the time period breakdown.
o Show Totals In sets the units in which to count allocations.
c. Add a resource or role.
o To add a resource, click Add New Resource to specify a resource and the resource's start date for the resource pool.
o To add a role, click Add Unnamed Headcount to specify a role and the required hours for the role.
The Manage Pool Capacity page reloads with the resource pool line added, specifying a resource or role.
Note: To maintain PPM performance, when the number of resources assigned to a resource pool exceeds RM_MAX_IN_POOL, certain functionality is disabled. However, you can remove the excess resources to re-enable this functionality.
d. Manage participation. See "Adjusting Resource Participation Within Resource Pools" on page 46 for more information.
e. Repeat as necessary.
f. Click Done.
The Resource Pool page opens.
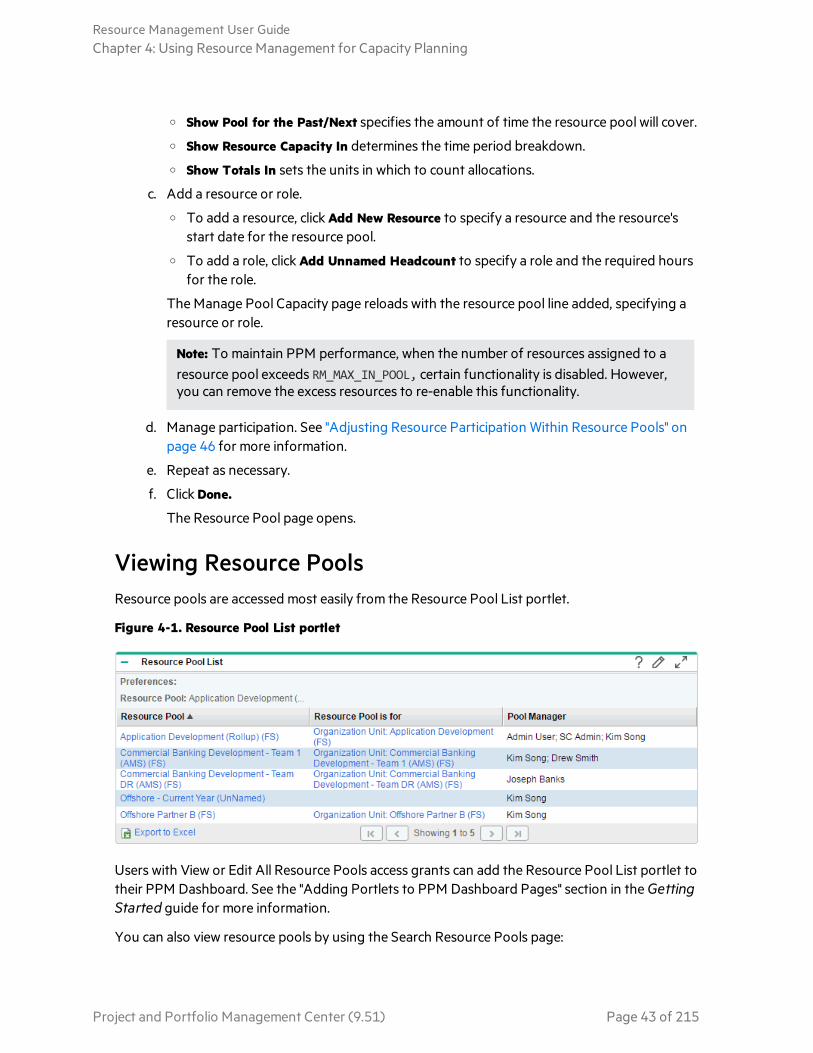
Viewing Resource PoolsResource pools are accessed most easily from the Resource Pool List portlet.
Figure 4-1. Resource Pool List portlet
Users with View or Edit All Resource Pools access grants can add the Resource Pool List portlet to their PPM Dashboard. See the "Adding Portlets to PPM Dashboard Pages" section in the Getting Started guide for more information.
You can also view resource pools by using the Search Resource Pools page:
Resource Management User GuideChapter 4: Using Resource Management for Capacity Planning
Project and Portfolio Management Center (9.51) Page 43 of 215

1. From the menu bar, select Search > Administrative > Resource Pools. The Search Resource Pools page opens.
2. Provide search criteria in the appropriate fields.
3. Click Search.
The Search Resource Pools page reloads, displaying the results of your search.
4. Click the name of a resource pool to open its resource pool page.
Disabling and Enabling Resource PoolsA resource pool can be disabled, preventing it from being used. If a resource pool is not being used or is not actively managed, disabling it prevents it from being mistakenly assigned to or from a staffing profile.
When a resource pool is disabled, you may forward or reject any outstanding resource requests. If the selected resource pool is a default resource pool, you may replace or remove it. Existing capacity and current allocations remain active (they must be manually managed) and continue to be part of resource load and capacity calculations.
To disable a resource pool:
1. Open a resource pool.
2. Click More > Disable Resource Pool.
3. Select to forward or reject all outstanding resource requests. If you forward all outstanding resource requests, select the resource pool to which to forward the requests.
4. If the resource pool is configured as a default resource pool for a staffing profile, project, or project type, additional fields display. You can select to replace the default resource pool with a new default resource pool or you can remove it from being the default resource pool (the staffing profile, project, or project type no longer has a default resource pool).
5. Click Disable. The Status field of the resource pool changes to Disabled.
To enable a resource pool:
1. Open a resource pool.
2. Click More > Enable Resource Pool. The Status field of the resource pool changes to Enabled.
Modifying Resource Pool NotificationsNotifications allow resource pool managers and resources to be notified (by email) when resource requests are sent or forwarded and resources are allocated. By default, resource pool notifications are set to notify the resource pool manager when resource requests are sent or forwarded to this resource pool.
Resource Management User GuideChapter 4: Using Resource Management for Capacity Planning
Project and Portfolio Management Center (9.51) Page 44 of 215

To modify resource pool notifications:
1. Open a resource pool.
2. In the Resource Pool page, click More> Configure Notifications.
3. Select or deselect the checkbox for the level of notification you desire.
Note:
l If you are the resource pool manager and send resource requests to your own resource pool, you will not receive email notifications.
l If you select the two checkboxes in the Forecast Demand Adjustment section, for the positions that have not been sent resource request, no email notification is sent even when they are deleted or their forecast demands are adjusted.
4. Click Save.
Disabling Notification to a Resource
If a resource pool is configured to send notifications to a resource, you can temporarily disable notification to the resource when you make an assignment:
1. Open a resource pool.
2. In the Resource Requests section of the Resource Pool page, click on the name of a staffing profile.
The Staffing Profile page opens.
Resource Management User GuideChapter 4: Using Resource Management for Capacity Planning
Project and Portfolio Management Center (9.51) Page 45 of 215

Note: You can only disable notification to a resource from the Legacy UI of the Staffing Profile page.
3. Click the desired resource.
The Resource Capacity with Assignments dialog opens.
4. To temporarily disable notification to the resource, select the Do not send this resource an email notification checkbox.
5. Click Save.
Notification to this resource is disabled for this assignment only.
Exporting Resource Pool Data to Excel To export the resource pool capacity, resource load, or forecasted demand data tables:
1. Open a resource pool.
2. Click Manage Pool Capacity, View Forecasted Demand, or View Resource Load.
3. Click the Microsoft® Excel icon.
A new window opens, refreshing at a set interval until the system completes the export.
Note: If your PPM instance supports multiple languages, the session language (selected at login) determines the language used in the Microsoft Excel file. Regional settings in your user profile determine the date, time, number, and currency format. See the Multilingual User Interface Guide for more information.
4. Save the exported Excel file.
Note: If you are having problems with the data in Excel, you may need to configure the Internet options of your Web browser. See the Project Management User Guide for more information.
Adjusting Resource Participation Within Resource PoolsA resource may participate in more than one resource pool at a time. You can adjust the distribution of a resource's time across resource pools, which has the effect of altering the resource's capacity in each pool.
To redistribute a resource's participation across multiple resource pools:
1. Open a resource pool.
2. In the Resource Pool page, click Manage Pool Capacity.
The Manage Pool Capacity page for the resource pool opens.
Resource Management User GuideChapter 4: Using Resource Management for Capacity Planning
Project and Portfolio Management Center (9.51) Page 46 of 215

3. Select the radio button next to a resource and click Manage Participation.
The Manage Resource Pool Participation page for that user opens, displaying the user's current distribution of participation across resource pools.
4. Click Add Participation.
The Add Resource Participation across Resource Pools dialog box opens.
5. Type a new distribution of percentages for each resource pool and an Effective Date for the redistribution to take effect.
6. Click Add. The Manage Resource Pool Participation page opens.
7. Click Done. The Manage Pool Capacity page opens.
8. Click Done. The Resource Pool page opens.
Resource Management User GuideChapter 4: Using Resource Management for Capacity Planning
Project and Portfolio Management Center (9.51) Page 47 of 215

Viewing Forecasted DemandTo get a breakdown of total resource capacity viewed against load by staffing profile:
1. Open a resource pool.
2. In the Resource Pool page, click View Forecasted Demand. The Resource Supply and Demand for <Resource_Pool_Name> page. It displays:
l Resource capacity of the resource pool.
l Assigned effort provided by allocated resources or promised resources.
l Effort demanded from the resource pool.
l Resource capacity, assigned effort, and demanded effort by role.
Role Description
Named Resources Maximum amount of effort that can be allocated for named resources.
Unnamed Resources Maximum amount of effort that can be allocated for unnamed resources.
Total Capacity Maximum total amount of effort that can be allocated for named and unnamed resources.
Total Forecast Anticipated demand for named and unnamed resources.a
Soft Booked Resources Amount of effort provided by allocated resources that are not yet committed.
Committed Resources Amount of effort provided by allocated resources that are committed.
Soft Booked Promises Amount of effort provided by promised resources that are not yet committed. Viewable if the ENABLE_PROMISE_RESOURCE_ALLOCATION parameter is enabled.
Committed Promises Amount of effort provided by promised resources that are committed. Viewable if the ENABLE_PROMISE_RESOURCE_ALLOCATION parameter is enabled.
Resource Management User GuideChapter 4: Using Resource Management for Capacity Planning
Project and Portfolio Management Center (9.51) Page 48 of 215

Total Assignments Total effort provided by allocated and promised resources that are soft-booked and committed.b
Unmet Demand Amount of effort needed from unallocated resources. It is shown in different dimensions based on the setting of period type (how the time period is divided) and effort type (how effort is measured).
Unmet Demand = Total Forecast – Total Assignmentsc
For examples about how to use Unmet Demand Calculation in different scenarios, see "Unmet Demand Calculation Sample Scenarios" on page 196
Remaining Capacity The available capacity of the selected resource pool.
Remaining Capacity = Total Capacity – Total Assignments
Breakdown by Role
Named Maximum amount of effort that can be allocated for named resources for the specified role.
Unnamed Maximum amount of effort that can be allocated for unnamed resources for the specified role.
Total Maximum total amount of effort that can be allocated for named and unnamed resources for the specified role.
Forecast Total Anticipated demand for named, unnamed, and promised resources for the specified role.
Assigned Total Total amount of effort that is allocated for named, unnamed, and promised resources for the specified role.
Resource Management User GuideChapter 4: Using Resource Management for Capacity Planning
Project and Portfolio Management Center (9.51) Page 49 of 215

a. Total Forecast is calculated based on the position associated pool calendar. b. Total Assignment is calculated based on the assigned resource associated resource calendar. Total Assignment is also calculated based on the project’s Cost and Effort settings: If "Staffing Profile represents the work load imposed by the project" is selected, Total Assignment includes the sum of effort scheduled in the related staffing profiles. If "Work plan task assignments represents the work load imposed by the project" is selected, Total Assignment includes the sum of the effort scheduled in the related work plan. c. A special case on unmet demand calculation is on the resource pool view forecasted demand page. The negative unmet (that is, an overbooking on one position) is ignored while showing unmet demand for the entire resource pool. This is because when we focus on the real unmet demand for a resource pool, we may not want the negative unmet demand for position 1 to offset the positive unmet demand for position 2 for a given period.
Note: For parent resource pools, the capacity line includes the FTEs from all child resource pools as well, meaning all roll-up lines are included.
Managing AllocationTo assess and manage resources and resource requests for a single resource pool:
1. Open a resource pool.
2. In the Resource Pool page, click Manage Allocation. The Resource Allocation Management page opens.
Note: You must be the manager of at least one resource pool in order to access the Resource Allocation Management page.
See "Managing Resource Allocation" on page 127 for more information.
Viewing Resource LoadTo get a detailed breakdown of total resource capacity and workload:
1. Open a resource pool.
2. In the Resource Pool page, click View Resource Load. The Resource Load Breakdown page (Assignment Summary view) opens.
It displays scheduled total capacity, total assignments, and available capacity of each resource in the resource pool.
Resource Management User GuideChapter 4: Using Resource Management for Capacity Planning
Project and Portfolio Management Center (9.51) Page 50 of 215
Column/Row Description
Sched The scheduled effort of the resource.
Scheduled effort is evenly distributed across working days from the scheduled start date to the scheduled finish date. Hours per week may differ based on regional and personal calendars (for example, holidays and personal vacations).
Total Capacity
Maximum total amount of effort that can be allocated for the resource.
Total Assignments
Total effort provided by the resource.
Available Capacity
The remaining capacity of the resource.
Available Capacity = Total Capacity – Total Assignments
Clicking the Assignment Details link, you change to the Assignment Details view. It displays resource's assigned effort provided to each staffing profile.
Resource Pool SecurityAccess to a resource pool is controlled primarily through access grants set in the security group definitions. Additionally, the user who creates a resource pool can specify a list of users who can view it, edit its basic information, edit its lines, or edit its security.
Resource Pool Access Grants
Users are linked to access grants through the security groups to which they belong. The access grants related to resource pools are discussed in more detail in "Table 4-3. Resource pool access grants" below. Without these access grants, a user cannot view or edit a resource pool regardless of whether or not they are specified in the list on the resource pool's Configure Access page. For more information on access grants and security groups, see the Security Model Guide and Reference.
Access Grant Description
View Resource Pools
The user can view any resource pool for which they are on the Configure Access page list.
View All Resource Pools
The user can view any resource pool in the system, even if they are not listed in the View or Edit list.
Table 4-3. Resource pool access grants
Resource Management User GuideChapter 4: Using Resource Management for Capacity Planning
Project and Portfolio Management Center (9.51) Page 51 of 215

Access Grant Description
Edit Resource Pools
The user can edit any resource pool for which they are on the specified Edit list.
Create Resource Pools
The user can create new resource pools. Supplemental to the Edit Resource Pools or Edit All Resource Pools access grant.
Edit All Resource Pools
The user can edit any resource pool in the system.
Edit All resources The user can edit any resource in the system. This access grant is needed to modify resource participation across resource pools.
Edit only resources that I manage
The user can edit any resource they manage. This access grant is needed to modify resource participation across resource pools.
Table 4-3. Resource pool access grants, continued
Resource Pool Configure Access Page
The Configure Access page for a resource pool is used to grant additional editing access to the resource pool to each user on the list individually. All users listed on the Configure Access page minimally have viewing access.
Note: Without the proper access grants, a user cannot view or edit a resource pool regardless of whether they are specified in the list on the resource pool's Configure Access page. See "Resource Pool Access Grants" on the previous page for more detailed information.
The Configure Access page options are discussed in more detail in "Table 4-4. Security Options for Resource Pool Configure Access page" below.
Option Description
View Access The user can view the resource pool but not edit its information. Any user listed has View access.
Edit Header The user can edit the resource pool's header information, but nothing else.
Edit Unnamed Headcount
The user can edit the lines in the resource pool that specify roles, but nothing else.
Edit Security The user can use the Configure Access page to edit viewing or editing security for the resource pool.
Table 4-4. Security Options for Resource Pool Configure Access page
Resource Management User GuideChapter 4: Using Resource Management for Capacity Planning
Project and Portfolio Management Center (9.51) Page 52 of 215

Using Configure Access Page
To set up a list of users with View or Edit access to a resource pool:
1. Open the Resource Pool page.
If you have permission to modify the resource pool, the Configure Access selection is enabled.
2. Click More > Configure Access.
The Configure Access for Resource Pool page opens.
3. Add a user to the list by click Add User and making a selection from the list.
4. Configure each user's access individually by selecting the checkboxes under each category.
Granting Edit access automatically grants the user View access. See "Table 4-4. Security Options for Resource Pool Configure Access page" on the previous page for more detailed information on each option.
5. Click Done.
If you have Edit Security access grant for the Configure Access for Resource Pool page, you can add a security group to or remove a security group from the resource pool.
To add a security group to a resource pool:
1. Open the Configure Access for Resource Pool page.
2. Click Add Security Group.
3. Select the desired security group.
4. Configure the security group's access by selecting the checkboxes under each category.
The View access is automatically granted to the security group.
5. Click Done.
Rolling Up Resource Pool InformationResource pools can be linked to other resource pools in parent/child relationships, establishing a hierarchy of resource pools that can be useful for organization and visualization purposes.
Display of roll-up information is handled in the following ways:
Resource Management User GuideChapter 4: Using Resource Management for Capacity Planning
Project and Portfolio Management Center (9.51) Page 53 of 215

l The View Resource Pool page displays related resource pools, as shown in "Figure 4-3. View Resource Pool page - Related Resource Pools section" below.
Figure 4-3. View Resource Pool page - Related Resource Pools section
l The Manage Pool Capacity page displays rolled-up lines from child resource pools.
Note: When a primary organization unit is changed to matrixed, its linked resource pool will be unlinked.
Tracking Demand with Staffing ProfilesStaffing profiles enable a project manager to track the forecast demand of resources, arranged by role. Each line in a staffing profile tracks the FTE, hours, or person days forecast for a role, and, optionally, a resource who possesses that role who is assigned to the position. Staffing profiles also allow users to choose the time period breakdown such as Weeks, Months, Quarters, and Years when entering or viewing the allocations.
If project managers finishes making the resource usage forecasts, they send the forecasts to resource managers as resource requests. Resource managers receive these resource requests and proceed with the relevant staffing profile to begin making assignments. Positions with open resource assignment requests display an Unmet Demand message in orange.
Resource pool managers can assign one or more resources to these positions to fulfill the unmet demands by using "Assign" or "Resource Finder" function. The Staffing Profile page reloads with user's changes made. If unmet demand remains, resource pool managers can repeat the assignment process as needed.
Project managers can track the forecast demand from two levels.
From a high-level planning for the long cycle, it is recommended to use a staffing profile which represents the workload imposed by the project. At this phase, a FTEs level rough estimation is sufficient for both project managers and resource pool managers to have an overall understanding of resource demand.
When the project turns to the execution phase, project managers then use project work plan to breakdown the work to pieces of tasks and assign the resource at an accurate (hours) level.
In addition, staffing profile also supports tracking demands using hours view. When switch to this view, managers can see more detailed and accurate data. For example, for an allocated position which requires 40 hours in a week, project managers may have concerns such as whether the assigned engineer is available during this period. Will the assigned engineer take a vacation during this period? If so, project managers need to request other resources to fulfill the unmet gap.
Resource Management User GuideChapter 4: Using Resource Management for Capacity Planning
Project and Portfolio Management Center (9.51) Page 54 of 215

For large projects, it is recommended that project managers and resource pool managers use staffing profile in the FTEs view. This view enables the project managers to have a big picture when plan and schedule the project, without concerning small deviations such as holidays and personal leaves.
For small projects whose work plan is fully defined and scheduled, it is recommended to use the hours view which provides more accurate data.
Typically, we recommend that you plan resources and make assignments in the same view (FTEs or hours). For examples about FTEs view and hours view, see "Unmet Demand Calculation Sample Scenarios" on page 196.
The display settings of the period type and effort type are available in the server.conf file. Relevant parameters are:
com.kintana.core.server.RM_DEFAULT_EFFORT_TYPE=fte
com.kintana.core.server.RM_DEFAULT_PERIOD_TYPE=month
com.kintana.core.server.RM_ALLOWED_EFFORT_TYPES=fte,person_days,hours
Staffing profiles include some features that make them simpler to use:
l Staffing profiles can be linked to organization units, projects, proposals, or assets, to tie them to business functions and facilitate meaningful comparison visualizations.
l If the staffing profile is meant to represent workload, the Workload Category field allows you to categorize it as such.
l These staffing profile positions are then treated as assignments when visualizing operational capacity. For more details, see "Visualizing Assignments" on page 188.
l New lines in the staffing profile can be set to automatically provide the Resource Pool value using the Default Resource Pool field.
l Staffing profile lines can also track actual values.
l Staffing profile effort allocations can be counted in FTEs, hours, or person days.
Using Staffing Profiles: General WalkthroughWhen putting together a project, the project manager should create a staffing profile, which allows her to plan resource usage for that project. Each line in the staffing profile represents a position for a resource with a specific role that needs to be filled. When the project manager is finished making her resource usage forecasts, she sends them to the resource manager as resource requests from her staffing profile. Each resource request is submitted against a specific resource pool. See "Sending Resource Requests from a Staffing Profile" on page 94 for more details on this process.
The resource manager receives these resource requests as alerts on the Resource Pool Overview page for a resource pool he manages, and proceeds to the relevant staffing profile or Resource Allocation Management page to begin making assignments. The Resource Request portlet can
Resource Management User GuideChapter 4: Using Resource Management for Capacity Planning
Project and Portfolio Management Center (9.51) Page 55 of 215

also be configured to display resource requests across resource pools. See "Assigning Resource Pool Resources" on page 111 for more details on this process.
Note: A resource must be in a resource pool in order to be assigned to a staffing profile. By default, only the resource pool manager (or a manager of a parent resource pool) is permitted to make that assignment. To allow a project manager to assign any resource (from any resource pool) to a work plan, staffing profile, or both, set the RM_OVERRIDE_ASSIGNMENT_CONTROLS parameter in the server.conf file on the PPM Server to TRUE.
Once assignments have been made and the project has been started, the project manager can begin providing actual effort amounts into staffing profile positions. The project can also be configured to roll up actual effort amounts from the work plan into the staffing profile as work is completed. See the Project Management User Guide for more detailed information on configuring project settings.
Staffing Profile ViewsEach staffing profile supports two UIs, New UI and Legacy UI. These two UIs provide you with different ways of looking at staffing profiles.
You can switch between these two UIs. For information about switching staffing profile views, see "New UI" below and "Legacy UI" on page 67.
In general, Resource Management keeps track of the staffing profile UI in each staffing profile for you. If you open a staffing profile for the first time, it is opened in the New UI. If you log out and return to the staffing profile later, it is opened in the UI as when you left it. The view selected for a staffing profile is effective for that particular staffing profile only, not for all staffing profiles.
Note: If you open a staffing profile from the Staffing tab of the Project Overview page, the staffing profile is always displayed in the New UI.
New UI
Figure: New UI of staffing profile page
Resource Management User GuideChapter 4: Using Resource Management for Capacity Planning
Project and Portfolio Management Center (9.51) Page 56 of 215

The New UI lists all the positions and resources of the staffing profile in one single page (without pagination). The data load simultaneously as you scroll down the page. If you have a large number of positions and resources in a staffing profile page, we recommend that you switch to the New UI to avoid OutOfMemory error and for better performance.
The following table describes the configuration options and components of the New UI of a staffing profile:
Item Name Description
Staffing Profile Header Information
Name The name of the staffing profile.
Done Return to the page from which you come to the Staffing Profile page.
Table 4-5. Staffing profile configuration options and components
Resource Management User GuideChapter 4: Using Resource Management for Capacity Planning
Project and Portfolio Management Center (9.51) Page 57 of 215

Item Name Description
Legacy UI Switch to the Legacy UI of the Staffing Profile page.
This button is only available if you set the ENABLE_STAFFING_PROFILE_LEGACY_VIEW parameter to true in the Administration Console.
If you set the parameter to false, the Legacy UI of the Staffing Profile page is not available for use. You can only play with staffing profile in the New UI. In this case, this button is replaced with the Change Header button.
More > Change Header Change the information displayed in the header of the staffing profile. See step 3 for a description of the fields.
The Change Header button no longer listed in the More options if the ENABLE_STAFFING_PROFILE_LEGACY_VIEW parameter is set to true.
More > Configure Access Allow you to configure access to the staffing profile. See "Using Configure Access Page" on page 98.
More > Configure Notifications Select the type of notification a staffing profile manager receives. See "Modifying Staffing Profile Notifications" on page 93.
More > Delete Staffing Profile Remove this staffing profile. You must have the Delete Staffing Profile access grant to delete a staffing profile. You must have the Delete Staffing Profile with Actuals access grant to delete a staffing profile that contains actuals. See "Staffing Profile Security" on page 96 for more information about staffing profile access grants.
Table 4-5. Staffing profile configuration options and components, continued
Resource Management User GuideChapter 4: Using Resource Management for Capacity Planning
Project and Portfolio Management Center (9.51) Page 58 of 215

Item Name Description
More > Staffing Profile Audit Trail View the audit trail of the staffing profile. Staffing Profile Audit Trail tracks the changes when you:
l Create the staffing profile.
l Change the staffing profile status.
l Edit forecast demand in the position dialog of the Staffing Profile page, or on the Forecast Planning page.
l Delete positions in the position dialog of the Staffing Profile page, or on the Forecast Planning page.
l Add positions on the Staffing Profile or Forecast Planning page.
l Import positions on the Staffing Profile page.
Statistics
Status The status of the staffing profile.
Description The description of the staffing profile.
Created On The date the staffing profile was created.
Created By The user who created the staffing profile.
Work Load Category The category of work being tracked by the staffing profile.
Region The geographic region in which the staffing profile is used; determines holiday schedule.
Profile Start The starting date for the staffing profile.
Profile Finish The ending date for the staffing profile.
Default Resource Pool When adding a line to the staffing profile, the Resource Pool field will be automatically defaulted with this value.
This staffing profile is for __ Displays what the staffing profile is associated with (Asset, Org Unit, Proposal,Freestanding, or Project) and its name.
Table 4-5. Staffing profile configuration options and components, continued
Resource Management User GuideChapter 4: Using Resource Management for Capacity Planning
Project and Portfolio Management Center (9.51) Page 59 of 215

Item Name Description
Allows you to edit the fields in the Statistics section on the Staffing Profile page.
You can also edit these fields on the Change Header page by clicking More > Change Header.
Discards the changes you made to the Statistics section.
Saves the changes you made to the Statistics section.
More Displays all the staffing profile information in the Statistics section.
Less Hides some staffing profile information in the Statistics section.
Allocations
Position Pie Chart Displays the number of positions categorized by position status. Clicking a specific status filters the positions in that status.
Clicking it switches the right pane of the position table to the Gantt view. For more information, see "Gantt View and Table View of Staffing Profile New UI" on page 65.
Clicking it switches the right pane of the position table to the Table view. For more information, see "Gantt View and Table View of Staffing Profile New UI" on page 65.
Table 4-5. Staffing profile configuration options and components, continued
Resource Management User GuideChapter 4: Using Resource Management for Capacity Planning
Project and Portfolio Management Center (9.51) Page 60 of 215

Item Name Description
Allows you to choose the time period breakdown for the staffing profile.
Possible values: Week, Month, Quarter, Year
Note: If you view the data on the right side of the table without dragging the scroll bar, the first column displays data of three periods (week, month, quarter, year) earlier than current period.
For example, if the current date is March 13, 2014, and you select Week in this field, the first column displays data of the week starting with February 23.
To view more data, drag the horizontal scroll bar at the bottom of the table, and the data in other weeks are loaded and displayed.
Allows you to choose between specifying allocations in Full Time Equivalents (FTE), hours, or person days.
Adds a position entry into the position list. See "Adding Positions in the New UI" on page 81.
Copies the positions from the staffing profile selected using the auto-complete. See "Importing Positions into a Staffing Profile" on page 86.
Clones the positions from the current staffing profile. See Cloning Positions.
Deletes the positions you selected.
Table 4-5. Staffing profile configuration options and components, continued
Resource Management User GuideChapter 4: Using Resource Management for Capacity Planning
Project and Portfolio Management Center (9.51) Page 61 of 215

Item Name Description
Opens the Compare to Work Plan for Project page, which compares staffing profile allocations to work plan assignments. This is only available for staffing profiles that are attached to projects. See "Comparing a Project's Assignments to its Staffing Profile" on page 126.
Selects the columns to be displayed.
For details, see "Adding/Removing Columns on Staffing Profile Page" on page 91.
Filters positions in the staffing profile by some basic attributes of the positions.
For details, see "Filtering Positions on Staffing Profile page" on page 88.
Export the staffing profile page data (including data attributes) to a Microsoft Excel file.
Opens the Gantt Legend dialog box, illustrating the meanings of the indicators in the Gantt Chart.
Available only in the Table view. It is used as a switch to hide unmet demand or display unmet demand.
Expands detailed assignments of all the positions on the Staffing Profile page.
Collapses detailed assignments of all the positions on the Staffing Profile page.
Position The position defines the needed role, skills, and additional resource attributes, along with the forecasted resource FTEs and any named assignments made.
Role The role of the position.
Status The status of the position's assignment.
Resource Pool The resource pool the position draws from. This is determined by the last action taken on the position.
Table 4-5. Staffing profile configuration options and components, continued
Resource Management User GuideChapter 4: Using Resource Management for Capacity Planning
Project and Portfolio Management Center (9.51) Page 62 of 215

Item Name Description
Specific Resources Requested 1 The resources requested by the position.
Start Date The starting date of the position.
Finish Date The ending date of the position.
Average FTE/ Total Hours/ Person Days
The total hours for each position being projected in the staffing profile.
If FTE unit is used, the field appears as Average FTE. If Person Days unit is used, the field appears as Person Days. If Hours unit is used, the field appears as Total Hours.
This column is only available in the Table view.
Forecast Total | Unmet Total The total value of the forecast for all the positions in the staffing profile.
The total value of the unmet demands (or over-allocations) for all the positions in the staffing profile. Unmet Total is displayed in orange.
This row is only available in the Table view.
Gantt Chart Displays position’s forecast demands and resource’s assignments.
For details, see "Viewing and Configuring Gantt Chart on Staffing Profile Page" on page 78.
Send Resource RequestsRequests for resources appear in the resource request queue of the resource pool. Resource managers can then make assignments to the staffing profile. See "Sending Resource Requests from a Staffing Profile" on page 94.
2 Discards the changes you made to the allocation table.
2 Saves the changes you made to the allocation table.
Notes
Table 4-5. Staffing profile configuration options and components, continued
Resource Management User GuideChapter 4: Using Resource Management for Capacity Planning
Project and Portfolio Management Center (9.51) Page 63 of 215

Item Name Description
Allows you to add any notes on the staffing profile itself.
1. When you inline-edit the Specific Resources Requested field, if you select only one resource that belongs to different resource pools in different periods, a window pops up asking you to select a resource pool for the requested resource. The Resource Pool column is filled with the resource pool you select. The Resource Type and Cost Category columns are filled with the resource's type and cost category respectively.
If you select more than one resource, the Resource Pool, Resource Type, and Cost Category columns will not be updated or filled with the resources' attributes.
2. When there are no changes to the position table, the Save and Discard buttons are disabled.
When you edit a position and when the position line is not in the edit mode, a pop-up message "Save the changes?" appears immediately under the Save button. The message disappears in five seconds and no longer appears if you continue editing positions without saving or discarding the changes. It appears again if you continue editing positions after you save or discard the changes,
Table 4-5. Staffing profile configuration options and components, continued
How to Understand Numbers for Positions and Resources in Staffing Profile
In Table view
For each position, staffing profile New UI displays the requested effort and unmet demand in the format of <Requested Effort> | <Unmet Demand>.
l If the unmet demand is in orange, it means the position has demand unfulfilled.
l If the unmet demand is in red, it means the position has more effort allocated to it than it requests. It is over-allocated.
For each resource assigned to a position, staffing profile New UI displays the allocated effort and remaining effort in the format of <Assigned Effort> | <Remaining Capacity>.
l If the remaining capacity is in orange, it means the resource has capacity left.
l If the remaining capacity is in red, it means the resource is assigned more effort than his/her capacity.
In Gantt view
See "Viewing and Configuring Gantt Chart on Staffing Profile Page" on page 78
Resource Management User GuideChapter 4: Using Resource Management for Capacity Planning
Project and Portfolio Management Center (9.51) Page 64 of 215

Gantt View and Table View of Staffing Profile New UI
In the New UI of staffing profile page, there are two views (Gantt view and Table view) available for the position table in the Allocations section. The two views provide you with different ways of reading or editing allocations.
If you click the Gantt view icon ( ) in the position table, the allocations are displayed in the form of Gantt chart.
If you click the Table view icon ( ) in the position table, the allocations are displayed in the form of table.
Every time you open the New UI of staffing profile page, the allocations are displayed in the view that is set as the editable view. For information about setting editable view, see "Specifying Editable View of Staffing Profile New UI" below.
Specifying Editable View of Staffing Profile New UI
In the Staffing Profile New UI page, as a project manager or resource manager, you can select either the Gantt view or the Table view as the editable view. Only when you are under the editable view, you can edit forecast demand and allocation. Once you set one view as the editable view, the other view becomes read-only.
For example, if you set the Gantt view as the editable view, you can only edit forecast demand or allocation in the Gantt view.
Resource Management User GuideChapter 4: Using Resource Management for Capacity Planning
Project and Portfolio Management Center (9.51) Page 65 of 215

You can set the default editable view by configuring the parameter DEFAULT_STAFFING_EFFORT_EDIT_MODE in the Administration Console. If you set this parameter to Gantt, or leave it empty, you can only edit effort in the Gantt view. If you set this parameter to Table, you can only edit effort in the Table view.
Once you set a value to the parameter, it is applied to all the staffing profiles in the system. However, you can change the editable view for every individual staffing profile.
To change the editable view when you create a blank staffing profile:
1. Open the Create a Blank Staffing Profile page.
2. Fill in the required fields.
3. In the Edit effort in field, select Gantt View or Table View as the editable view.
4. Click Create.
To change the editable view for a existing staffing profile:
1. Open the staffing profile.
2. Click Change Header in the upper right corner of the page.
The Change Staffing Profile Header page opens.
3. In the Edit effort in field, select Gantt View or Table View as the editable view.
4. Click Done to save the change and close the Change Header page.
Resource Management User GuideChapter 4: Using Resource Management for Capacity Planning
Project and Portfolio Management Center (9.51) Page 66 of 215

Legacy UI
Only when you set the ENABLE_STAFFING_PROFILE_LEGACY_VIEW parameter to true, the Legacy UI of staffing profile page is available for use.
Figure 4-4. Legacy UI of staffing profile page
The following table describes the configuration options and components of the Legacy UI of a staffing profile:
Item Name Description
Staffing Profile Header Information
This staffing profile is for __ Displays what the staffing profile is associated with (Asset, Org Unit, Proposal,Freestanding, or Project) and its name.
Done Return to the page from which you come to the Staffing Profile page.
New UI Switch to the New UI.
Table 4-5. Staffing profile configuration options and components
Resource Management User GuideChapter 4: Using Resource Management for Capacity Planning
Project and Portfolio Management Center (9.51) Page 67 of 215

Item Name Description
More > Change Header Change the information displayed in the header of the staffing profile. See step 3 for a description of the fields.
More > Configure Access Allow you to configure access to the staffing profile. See "Using Configure Access Page" on page 98.
More > Configure Notifications Select the type of notification a staffing profile manager receives. See "Modifying Staffing Profile Notifications" on page 93.
More > Delete Staffing Profile Remove this staffing profile. You must have the Delete Staffing Profile access grant to delete a staffing profile. You must have the Delete Staffing Profile with Actuals access grant to delete a staffing profile that contains actuals. See "Staffing Profile Security" on page 96 for more information about staffing profile access grants.
More > Staffing Profile Audit Trail View the audit trail of the staffing profile. Staffing Profile Audit Trail tracks the changes when you:
l Create the staffing profile.
l Change the status of the staffing profile.
l Edit forecast demand in the position dialog of the Staffing Profile page, or on the Forecast Planning page.
l Delete positions in the position dialog of the Staffing Profile page, or on the Forecast Planning page.
l Add positions on the Staffing Profile or Forecast Planning page.
l Import positions on the Staffing Profile page.
Table 4-5. Staffing profile configuration options and components, continued
Resource Management User GuideChapter 4: Using Resource Management for Capacity Planning
Project and Portfolio Management Center (9.51) Page 68 of 215
Item Name Description
More > Export Staffing Profile Export the staffing profile page data (including data attributes) to a Microsoft Excel file.
Tip: Exporting data to a Microsoft Excel file (not an HTML page) enables you to process your data by using more Excel functions, such as format and calculation.
Statistics
Status The status of the staffing profile.
Description A description of the staffing profile.
Created On The date the staffing profile was created.
Created By The user who created the staffing profile.
Work Load Category The category of work being tracked by the staffing profile.
Region The geographic region in which the staffing profile is used; determines holiday schedule.
Profile Start The starting date for the staffing profile.
Profile Finish The ending date for the staffing profile.
Default Resource Pool When adding a line to the staffing profile, the Resource Pool field will be automatically defaulted with this value.
Allocation Detail
Table 4-5. Staffing profile configuration options and components, continued
Resource Management User GuideChapter 4: Using Resource Management for Capacity Planning
Project and Portfolio Management Center (9.51) Page 69 of 215

Item Name Description
Enter Allocation In Allows you to choose the time period breakdown for the staffing profile.
Possible values: Weeks, Months, Quarters, Years
Note: If you view the data on the right side of the table without dragging the scroll bar, the first column displays data of three periods (weeks, months, quarters, years) earlier than current period.
For example, if the current date is March 13, 2014, and you select Weeks in this field, the first column displays data of the week starting with February 23.
To view more data, drag the horizontal scroll bar at the bottom of the table, and the data in other weeks are loaded and displayed.
FTE/Hours/Person Days Allows you to choose between specifying allocations in Full Time Equivalents (FTE), hours, or person days.
Allows you to choose to display 5, 10, 25, 50, or 100 positions per page, or to display all positions on the current page.
Allows you to go to the first page.
Allows you to go to the previous page.
Page <Number 1> of <Number 2> <Number 1> represents the current page number. <Number 2> represents the total page number.
Allows you to provide a valid page number in <Number 1> to go to that specific page.
Table 4-5. Staffing profile configuration options and components, continued
Resource Management User GuideChapter 4: Using Resource Management for Capacity Planning
Project and Portfolio Management Center (9.51) Page 70 of 215

Item Name Description
Allows you to go to the next page.
Allows you to go to the last page.
Add a Position Opens a window allowing you to add a line to the staffing profile. See "Adding Positions in the Legacy UI" on page 83.
Send Resource Requests Requests for resources appear in the resource request queue of the resource pool. Resource managers can then make assignments to the staffing profile. See "Sending Resource Requests from a Staffing Profile" on page 94.
Import Positions Copies the positions from the staffing profile selected using the auto-complete. See the Position field below for a description of positions. See "Importing Positions into a Staffing Profile" on page 86.
Compare to Work Plan Opens the Compare to Work Plan for Project page, which compares staffing profile allocations to work plan assignments. This is only available for staffing profiles that are attached to projects. See "Comparing a Project's Assignments to its Staffing Profile" on page 126.
Expand All Expands detailed assignments of all the positions on the current page.
Collapse All Collapses detailed assignments of all the positions on the current page.
Table 4-5. Staffing profile configuration options and components, continued
Resource Management User GuideChapter 4: Using Resource Management for Capacity Planning
Project and Portfolio Management Center (9.51) Page 71 of 215
Item Name Description
Position The position defines the needed role, skills, and additional resource attributes, along with the forecasted resource FTEs and any named assignments made.
You can filter positions by position filters (position/resource, status, and resource pool). For detailed information, see "Filtering Positions on Staffing Profile page" on page 88.
Status The status of the position's assignment.
Resource Pool The resource pool the position draws from. This is determined by the last action taken on the position.
Start Date The starting date of the position.
Finish Date The ending date of the position.
[period totals] The total hours for each position being projected in the staffing profile.
If FTE unit is used, the field appears as Average FTE. If Person Days unit is used, the field appears as Total Days. If Hours unit is used, the field appears as Total Hours.
Forecast Total (number_of_positions)1 The total value of the forecast for all the positions in the staffing profile.
Clicking this displays Assignments Total and Unmet Demand Total. Forecast Total is the sum of Assignments Total and Unmet Demand Total.
Assignments Total 1 The total value of the assignments for all the positions in the staffing profile.
Table 4-5. Staffing profile configuration options and components, continued
Resource Management User GuideChapter 4: Using Resource Management for Capacity Planning
Project and Portfolio Management Center (9.51) Page 72 of 215

Item Name Description
Unmet Demand Total 1 The total value of the unmet demands (or over-allocations) for all the positions in the staffing profile.
Check all Select this checkbox to select all unmet demand. Unselect this checkbox to unselect all unmet demand.
Assign Assign one or more resources to the selected unmet demand. See "Making Assignments" on page 113 for more information.
Resource Finder Use the Resource Finder to search for a resource. See "Making Assignments" on page 113 for more information.
Reject Reject a request for the selected unmet demand. See "Rejecting and Forwarding Demand" on page 115 for more information.
Forward Forward a request to another resource pool. See "Rejecting and Forwarding Demand" on page 115 for more information.
Promise Allocate a promised resource. See "Assigning Promised Allocations" on page 117 and "Promised Allocations" on page 102 for more information.
Refresh2 Clicking Refresh at the bottom of the Staffing Profile page updates the data in the staffing profile table. The data in the header section remain unchanged.
Notes
Table 4-5. Staffing profile configuration options and components, continued
Resource Management User GuideChapter 4: Using Resource Management for Capacity Planning
Project and Portfolio Management Center (9.51) Page 73 of 215

Item Name Description
Add Notes Allows you to add any notes on the staffing profile itself.
1. The total values are calculated based on the following criteria:
l They are totals for all the positions in the staffing profile, instead of totals for positions just on the
current page.
l The values are recalculated when you filter the positions by other criteria.
l Forecast Total is recalculated when there is any forecast change to positions.
2. The refresh feature also works when you:
l Add a new position or edit an existing position.
In this case, only the position you added or edited is updated.
l Assign resources to a position.
In this case, only the relevant attributes of the position are updated.
Table 4-5. Staffing profile configuration options and components, continued
Creating a Staffing ProfileTo create a staffing profile:
1. Log on to PPM.
2. Select Create > Staffing Profile from the menu bar. The Create a Blank Staffing Profile page opens.
3. Provide data for all required fields (Name,Start Period,End Period,Region, and This is a __ Staffing Profile) and any optional fields.
Resource Management User GuideChapter 4: Using Resource Management for Capacity Planning
Project and Portfolio Management Center (9.51) Page 74 of 215

Field Name Description
Name The name of the staffing profile.
Description A description of the staffing profile.
Manager The user responsible for the staffing profile
Start Period The starting period (a fiscal month) for the staffing profile.
End Period The ending period (a fiscal month) for the staffing profile.
Status The status of the staffing profile.
l In Planning. The staffing profile is being developed.
l Active. The staffing profile is available to run.
l Complete. The staffing profile has completed execution.
l Cancelled. The staffing profile has been cancelled.
l Lock Down. The staffing profile has been locked and is read-only (cannot be updated).
Region The geographic region in which the staffing profile is used; determines holiday schedule.
Work Load Category
The category of work being tracked by the staffing profile.
This staffing profile should show as work load
If selected, the Full Time Equivalents set in the staffing profile will be counted as actual work assignments in the Resource Management Analyze Assignment Load capacity visualization.
Copy positions from existing staffing profile
Copies the positions from the staffing profile selected using the auto-complete.
This is a __ Staffing Profile
Defines whether the staffing profile is freestanding, or is associated with an asset, org unit, or proposal.
To create a staffing profile for a project, you should go to the Project Overview page. For details, see "Creating a Staffing Profile for a Project" on the next page.
Default Resource Pool
When adding a line to the staffing profile, the Resource Pool field will be automatically defaulted with this value.
At this point, you should decide the following:
Resource Management User GuideChapter 4: Using Resource Management for Capacity Planning
Project and Portfolio Management Center (9.51) Page 75 of 215

l Whether lines in the staffing profile count as workload
l Whether to copy positions from an existing staffing profile, and if so, which one
l Whether the staffing profile is linked to an organization unit, asset, project, or proposal
l Whether the staffing profile will request resources from a particular resource pool by default, and if so, which one
4. Click Create.
The Staffing Profile page (the New UI) opens.
Note: Clicking Legacy UI, you can switch to the Legacy UI of the Staffing Profile page.
5. Create a blank position list or copy positions from an existing staffing profile.
l Clicking Start in the Create a Blank Position List option, you create a staffing profile with no positions.
l Clicking Select the Staffing Profile in the Copy Positions from an Existing Staffing Profile option, you open the Import Positions dialog box. Using this dialog box, you can create a staffing profile with positions imported from other staffing profiles. For details of importing positions, see "Importing Positions into a Staffing Profile" on page 86.
Creating a Staffing Profile for a Project
To create a staffing profile for a project:
Resource Management User GuideChapter 4: Using Resource Management for Capacity Planning
Project and Portfolio Management Center (9.51) Page 76 of 215

1. Log on to PPM.
2. From the menu bar, select Search > Projects.
3. Click Search after providing the search criteria, and open the project you want.
4. In the Staffing portlet of the Project Overview page, click Create a Blank Staffing Profile.
The Create a Blank Staffing Profile page opens.
5. Provide or edit the values in the required or optional fields.
6. (Optionally)From the Copy positions from existing staffing profile auto-complete list, select an existing staffing profile, if you want to create a staffing profile with positions copied from another staffing profile.
7. Click Create.
The newly create staffing profile is displayed under Staffing tab of the Project Overview page.
Note: Clicking Legacy UI, you leave the Project Overview page, and go to the Legacy UI of the Staffing Profile page.
8. If you skip step 6, do one of the following in the Allocations section:
l Clicking Start in the Create a Blank Position List option, you create a staffing profile with no position.
l Clicking Select the Staffing Profile in the Copy Positions from an Existing Staffing Profile option, you open the Import Positions dialog box. Using this dialog box, you can create a staffing profile with positions imported from other staffing profiles. For details of importing positions, see "Importing Positions into a Staffing Profile" on page 86.
Note: You can view and edit the staffing profile information in the Staffing tab as you do in the Staffing Profile page. The actions listed in the More menus of the Staffing Profile page
Resource Management User GuideChapter 4: Using Resource Management for Capacity Planning
Project and Portfolio Management Center (9.51) Page 77 of 215

are not supported in the Staffing tab of the Project Overview page.
Viewing and Configuring Gantt Chart on Staffing Profile PageYou can view and configure Gantt chart in the Gantt view of the Staffing Profile New UI page. The Gantt chart is displayed in the right pane of the position table in the Allocations section.
The Gantt chart displays the following information for the staffing profile:
l Status of the every position
l Period and demanded effort of every position
Take the position QA for example, it is fulfilled. The number before the slash is the allocated effort while the number after the slash is the demanded effort.
l Period, allocated effort, and remaining capacity of every resource
Take the resource Jane Wu for example, the number (1.00) before the slash is the effort allocated to the position QA while the number (0.00) after the slash is the Jane's remaining capacity.
If a resource is over-allocated, the remaining capacity is a negative value displayed in red.
Note:
l In the Table view, if a resource is over-allocated, the resource remaining capacity is a positive value displayed in red.
l When a resource is assigned to more than one position of a staffing profile and you edit the resource allocation in one of the positions, the resource remaining capacity gets updated only in the position you are editing. You have to refresh the page to get the resource remaining capacity updated in the other positions.
Resource Management User GuideChapter 4: Using Resource Management for Capacity Planning
Project and Portfolio Management Center (9.51) Page 78 of 215

Clicking the Gantt legend icon, , opens the Gantt legend of the staffing profile.
Configuring Gantt Chart on Staffing Profile Page
You can use the Gantt chart of the Staffing Profile page to create or adjust position's forecast demand, and create or adjust resource's assignment.
Creating Position's Forecast Demand
To create a position's period and demand in the Gantt view of the Staffing Profile New UI page:
1. In the Gantt chart, click the line of the position you want to create forecast demand.
The icon appears.
2. Locate the icon to the period when the position's forecast demand begins.
3. Click and hold the icon, and drag it to the period when the position's forecast demand ends.
4. Release the mouse button. A dialog box as follows opens:
Resource Management User GuideChapter 4: Using Resource Management for Capacity Planning
Project and Portfolio Management Center (9.51) Page 79 of 215

Note: Clicking Delete, you cancel the creation of the forecast demand.
5. Modify the period of the position's demand.
6. Specify the effort of the position's demand.
7. Click Confirm.
8. Click to save the changes.
Following the above steps, you can create a resource's assignment. The only difference is that you start the action by clicking the line of the resource you want to create assignment in the Gantt chart.
Adjusting Position's Forecast Demand
To adjust a position's period and demand in the Gantt view of the Staffing Profile New UI page:
1. In the Gantt chart, click on the position's demand you want to adjust.
2. Place the cursor in the left end of the demand bar if you want to adjust the start date of the position's demand, or place the cursor in the right end of the demand bar if you want to adjust the finish date of the position's demand, until the two-headed arrow appears.
3. Click and hold the cursor, and drag it leftwards or rightwards to your desired date.
4. Release the mouse button, and the dialog box opens.
Resource Management User GuideChapter 4: Using Resource Management for Capacity Planning
Project and Portfolio Management Center (9.51) Page 80 of 215

Note: Clicking Delete, you delete the forecast demand.
5. Modify the period and effort of the position's demand.
6. Click Confirm.
7. Click to save the changes.
Also, you can adjust position's forecast demand by double-clicking the demand bar to open the dialog box, and then modify the period and effort.
Following the above steps, you can adjust a resource's assignment. The only difference is that you start the action by clicking on the resource's assignment you want to adjust.
Adding Positions
Adding Positions in the New UI
To add a position in the New UI of staffing profile page, you can:
l Add a new position, or
l Add a position by copying an existing position from the current staffing profile
Add a new position
1. Click the Add Position icon .
A table entry is added on the top of the table.
2. Specify the fields described as follows:
Field (* Required) Description
Position The name of the position.
If you specify a role for the position in the Role field, the Position field is prepopulated with the role name, otherwise, the Position field is empty.
Role * The role needed to fill the position. Click the Role icon to specify a role.
Resource Pool The resource pool from which to assign the role. Click the auto-complete list to specify a resource pool.
Note: You can inline edit staffing profile position user data when they are visible and
Resource Management User GuideChapter 4: Using Resource Management for Capacity Planning
Project and Portfolio Management Center (9.51) Page 81 of 215

editable and when you have the access to edit positions. The user data fields of the following component types support inline editing:
l Text
l Date
l Drop-down list
l Auto-complete list
If a required user data field does not support inline editing, you may have to edit it in the position dialog box.
3. Create the forecast demand of the position.
For details of creating position's forecast demand, see "Configuring Gantt Chart on Staffing Profile Page" on page 79.
4. In the right-corner of the position list, click and the position is added.
5. (Optionally) To add other information of the position, you need to open the position dialog box by clicking the position name. See step 3 and step 4 for the detailed instructions.
Add a position by cloning
1. Select the checkbox before the position you want to copy.
2. Above the allocation table, click .
The cloned position is added to the top of the allocation table.
3. Select the cloned position to edit its Position, Role, and Resource Pool fields or its planned assignments.
To adjust the position's forecast demand, see "Configuring Gantt Chart on Staffing Profile Page" on page 79.
4. Click to save all the changes.
Resource Management User GuideChapter 4: Using Resource Management for Capacity Planning
Project and Portfolio Management Center (9.51) Page 82 of 215

Adding Positions in the Legacy UI
1. Click Add A Position.
2. Specify a Role Required and Position Label for the staffing profile line (required). Provide data for any optional fields such as the assignments needed for each time period.
Field Description
Role Required The role needed to fill the position.
Position Label The name of the position.
Resource Type The kind of resource needed.
Resource Pool The resource pool from which to assign the role. Click Search to find a resource pool.
Note: When you click Search on the right of the Resource Pool field in the Add Position dialog box to search resource pools, the search result will list all the resource pools that fit the search criteria, regardless of whether you have the view access grant to all of them.
Resource Management User GuideChapter 4: Using Resource Management for Capacity Planning
Project and Portfolio Management Center (9.51) Page 83 of 215
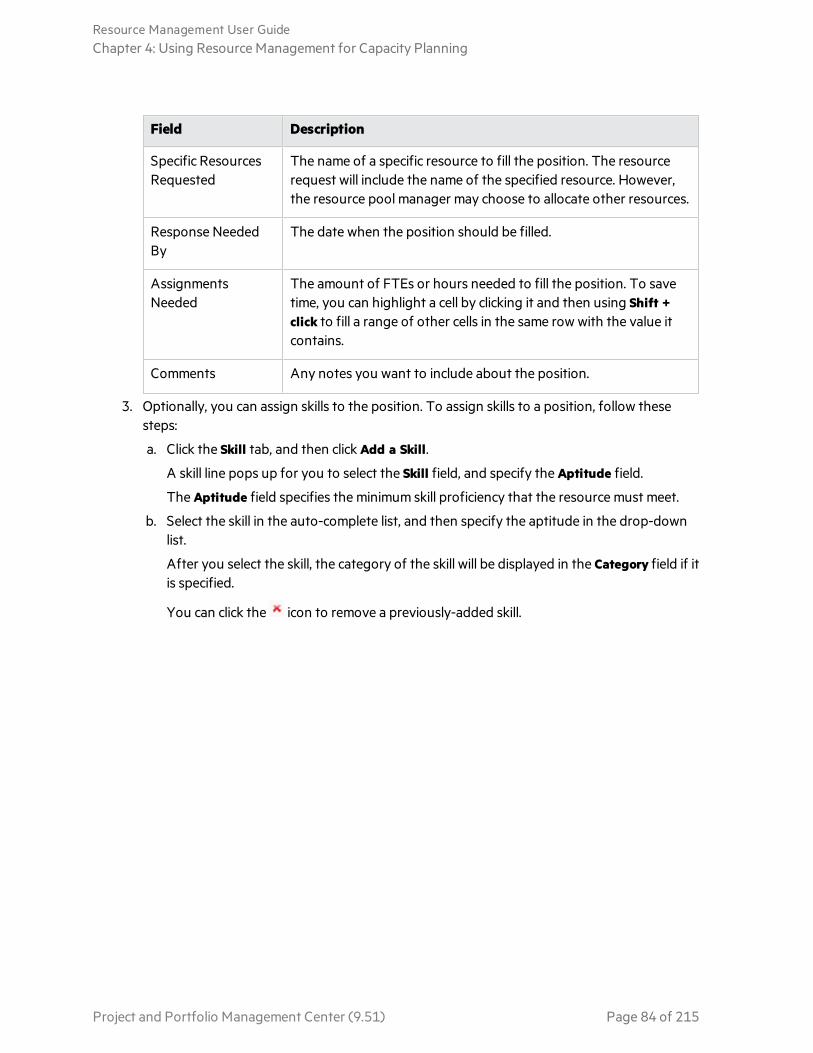
Field Description
Specific Resources Requested
The name of a specific resource to fill the position. The resource request will include the name of the specified resource. However, the resource pool manager may choose to allocate other resources.
Response Needed By
The date when the position should be filled.
Assignments Needed
The amount of FTEs or hours needed to fill the position. To save time, you can highlight a cell by clicking it and then using Shift + click to fill a range of other cells in the same row with the value it contains.
Comments Any notes you want to include about the position.
3. Optionally, you can assign skills to the position. To assign skills to a position, follow these steps:
a. Click the Skill tab, and then click Add a Skill.
A skill line pops up for you to select the Skill field, and specify the Aptitude field.
The Aptitude field specifies the minimum skill proficiency that the resource must meet.
b. Select the skill in the auto-complete list, and then specify the aptitude in the drop-down list.
After you select the skill, the category of the skill will be displayed in the Category field if it is specified.
You can click the icon to remove a previously-added skill.
Resource Management User GuideChapter 4: Using Resource Management for Capacity Planning
Project and Portfolio Management Center (9.51) Page 84 of 215

Figure 4-5 Skills tab of a position profile
4. Optionally, under the Advanced tab, set the cost category and expense type for the position.
The cost category is used to categorize costs of unmet demand. When the project associated with the staffing profile is set to calculate the forecasted labor costs from the staffing profile, the Cost Category field is required.
The expense type is used to categorize capital and operating expenses. Only when SOP 98-1 tracking is enabled on the parent entity of the staffing profile, you can edit the expense type.
Note: You can configure the parameter DEFAULT_EXPENSE_TYPE_FOR_POSITIONS in the server.conf file or Administration Console to decide the default value of the expense type. For more information about this parameter, see the Installation and Administration Guide.
For information about financial summary settings and SOP 98-1 tracking, see the Financial Management User Guide.
5. Click Add.
The Staffing Profile page reloads with the staffing profile line added.
6. Repeat as necessary.
You can add more than one line to the staffing profile at a time without returning to the Staffing Profile page by clicking Add Another once you have filled in the values for one line.
Resource Management User GuideChapter 4: Using Resource Management for Capacity Planning
Project and Portfolio Management Center (9.51) Page 85 of 215

Importing Positions into a Staffing ProfileIf you have created positions in a staffing profile and you want to use them in a new or another existing staffing profile, you can import some or all of these positions.
1. Open the staffing profile in which you want to add positions.
2. Click in the New UI or Import Positions in the Legacy UI.
The Import Positions dialog box opens.
3. Click the Staffing Profile auto-complete list to select the source staffing profile where you want to import positions.
Note: If you click Import after selecting the source staffing profile, all the positions of the source staffing profile are imported to the current staffing profile.
4. Click Select Positions.
The select positions dialog box opens.
5. Select the positions you want to import to the current staffing profile.
6. Click OK.
Resource Management User GuideChapter 4: Using Resource Management for Capacity Planning
Project and Portfolio Management Center (9.51) Page 86 of 215
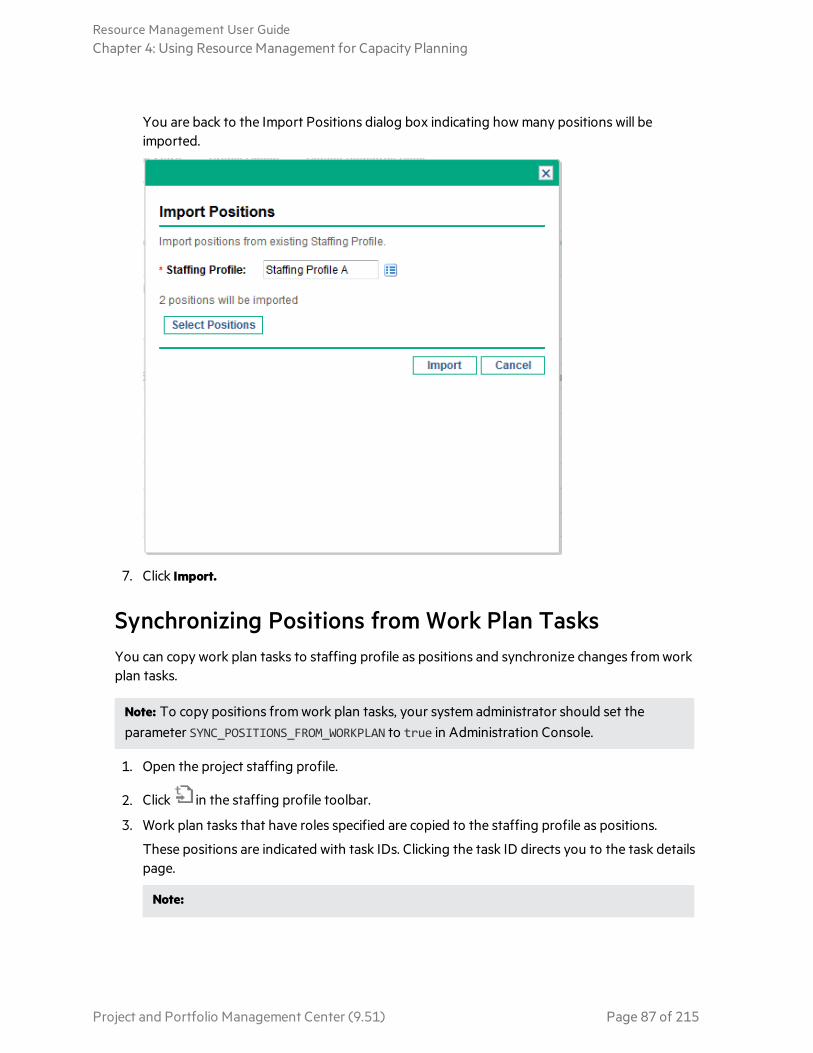
You are back to the Import Positions dialog box indicating how many positions will be imported.
7. Click Import.
Synchronizing Positions from Work Plan TasksYou can copy work plan tasks to staffing profile as positions and synchronize changes from work plan tasks.
Note: To copy positions from work plan tasks, your system administrator should set the parameter SYNC_POSITIONS_FROM_WORKPLAN to true in Administration Console.
1. Open the project staffing profile.
2. Click in the staffing profile toolbar.
3. Work plan tasks that have roles specified are copied to the staffing profile as positions.
These positions are indicated with task IDs. Clicking the task ID directs you to the task details page.
Note:
Resource Management User GuideChapter 4: Using Resource Management for Capacity Planning
Project and Portfolio Management Center (9.51) Page 87 of 215

l Only leaf tasks will be copied to staffing profile as positions.
l Milestone tasks will not be copied to staffing profile as positions.
The following table lists the data mapping between work plan and staffing profile.
Data in work plan Data in staffing profile
Task name Position name
Note: A task name can have 300 characters at most while a position name can have 200 characters at most. If a task name is longer than 200 characters, it will be truncated when copied to the staffing profile.
Task role Position role
Task ID Task ID
Scheduled start Start date
Scheduled finish Finish date
Scheduled effort Forecast demand
4. After copying positions from work plan, click will synchronize the changes from work plan to staffing profile.
Therefore, PPM suggests that you do not edit positions copied from work plan as your changes will be lost after next synchronization.
Filtering Positions on Staffing Profile page l "Filtering Positions in the New UI" below
l "Filtering Positions in the Legacy UI" on page 90
Filtering Positions in the New UI
You can quickly filter positions by position status. Clicking a specific status filters the positions in that status. Clicking Total Positions lists all the positions in the staffing profile.
You can also filter positions in the New UI of the Staffing Profile page by advanced filters:
Resource Management User GuideChapter 4: Using Resource Management for Capacity Planning
Project and Portfolio Management Center (9.51) Page 88 of 215

1. Click to open the dialog box as follows:
2. Provide the filter criteria as described in the following table.
Filter Name Description
Position Name
Filters the positions that contain the name you specify.
Role Filters the positions whose roles are as specify.
Resource Pool
Filters the positions that draw resources from the resource pool or resource pools you specify.
Include Blank Resource Pool
If you select this checkbox, the positions that have no resource pool specified are filtered.
Resources Filters the positions that contain the resource or resources you specify.
Resource Type
Filters the positions that contain the resource or resources pf the type you specify.
Promise If you select this checkbox, the positions that have promise assigned are filtered.
Unmet Demand no less than
Filters the positions whose unmet demands are equal to or greater than the number of FTE you specified.
Over allocation no less than
Filters the positions whose over-allocations are equal to or greater than the number of FTE you specified.
From _ To _
The time range when unmet demand or over-allocation occurs.
These two filters are enabled only when you select the Unmet Demand no less than or Over Allocation no less than checkbox. By default, the time range is the same as that of the staffing profile.
3. Click .
Resource Management User GuideChapter 4: Using Resource Management for Capacity Planning
Project and Portfolio Management Center (9.51) Page 89 of 215

The positions that meet the filter requirements are listed. The specified filters are displayed in the pie chart section.
Note: You cannot filter positions that have unmet demands or over allocations in the New UI. If you want to do so, switch to the Legacy UI.
Filtering Positions in the Legacy UI
In the Legacy UI of the staffing profile page, positions can be filtered by one or more of the following entities:
l Position/Resource
l Status
l Resource pool
Filter Positions by Position/Resource
You can filter positions in the staffing profile by some basic attributes of the positions. To do so,
1. Move the mouse over the Position column.
2. Click the icon.
A dialog box opens.
The following table describes the fields in this dialog box
Field Name Description
Position (Position)
Filter by Position Label Filters the positions that contain the text you specify.
Resource Management User GuideChapter 4: Using Resource Management for Capacity Planning
Project and Portfolio Management Center (9.51) Page 90 of 215

Unmet Demand no less than _ FTE
Filters the positions whose unmet demands are equal to or greater than the number of FTE you specify.
Over Allocation no less than _ FTE
Filters the positions whose over allocations are equal to or greater than the number of FTE you specify.
From _ To _ The time range when unmet demand or overallocation occurs. These two filters are enabled only when you select the Unmet Demand no less than or Over Allocation no less than checkbox. By default, the time range is the same with that of the staffing profile.
Position (Resource)
Resource Name Filters the positions that contain the resource or resources you specify.
Promise Filters positions that contain the promised resources or allocations you specify.
This filter is available only when the ENABLE_PROMISE_RESOURCE_ALLOCATION parameter in the server.conf file is set to true. For more information about editing the server.conf file, see the Installation and Administration Guide.
3. Click the Position or the Resource tab and provide information for your desired filters.
4. Click Apply.
Filter Positions by Status or Resource Pool
Similarly, if you want to filter positions by status or resource pool, click the icon in the Status or Resource Pool column.
If you want to filter positions that are in specific statuses, select the corresponding checkboxes.
If you want to filter positions that belong to specific resource pools, select the corresponding checkboxes. Selecting the (Blank) checkbox filters the positions that do not belong to any resource pools.
Adding/Removing Columns on Staffing Profile PageYou can add or remove columns in the New UI of the Staffing Profile page:
1. Open the Staffing Profile in the New UI.
2. Click to open a multi-select dialog box.
Resource Management User GuideChapter 4: Using Resource Management for Capacity Planning
Project and Portfolio Management Center (9.51) Page 91 of 215

3. Select the columns you want to add and deselect the columns you want to remove. The Position and Role columns are selected by default and cannot be deselected.
Clicking the up or down arrow to see more columns. Selecting Check All displays all the columns on the Staffing Profile page.
4. Click outside the dialog box to close it.
Viewing Staffing ProfilesStaffing profiles can be reached most easily from the Staffing Profile List portlet.
Figure 4-6. Staffing Profile List portlet
Users with the View or Edit access to staffing profiles can add the Staffing Profile List portlet to their PPM Dashboard.
You can also reach staffing profiles by using the search box or Search Staffing Profiles page.
Using Search Box
The search box is used to locate and open staffing profiles based on staffing profile names that contain the specified text. Use the search box if you know the name of the staffing profile or want to search for one or more staffing profiles that use a particular phrase or fragment of text in its name. The search box is located in the upper-right corner.
To locate and open a staffing profile using the search box:
1. Log on to PPM.
2. In the search box, located on the right side of the menu bar, type @ followed by the text to search for in the staffing profile name. When you start typing the text, a submenu appears (the search is not case-sensitive).
3. Once you have finished typing your search text, select Search for staffing profiles: <search_text>.
If the search text matches only one staffing profile name, the Staffing Profile page for that staffing profile opens.
If the search text matches more than one staffing profile name, the Search Staffing Profiles page opens, displaying a list of staffing profiles with matching names. Click the name of a staffing profile to open its Staffing Profile page.
Resource Management User GuideChapter 4: Using Resource Management for Capacity Planning
Project and Portfolio Management Center (9.51) Page 92 of 215

Using Search Staffing Profiles Page
Use the Search Staffing Profiles page if you want to search for a staffing profile based on criteria such as staffing profile type or staffing profile status.
To locate and open a staffing profile using the Search Staffing Profiles page:
1. Log on to PPM.
2. From the menu bar, select Search > Staffing Profiles.
The Search Staffing Profiles page opens.
3. Provide search criteria in the appropriate fields.
4. Click Search.
The Search Staffing Profiles page reloads, displaying the results of your search.
5. Click the name of a staffing profile to open its Staffing Profile page.
Modifying Staffing Profile NotificationsNotifications allow staffing profile managers to be notified (by email) when resource requests are forwarded or rejected, and resources are allocated. By default, staffing profile notifications are set to notify a staffing profile manager when a resource request message is rejected, a resource is committed, a committed resource changes to soft-booked or is removed, and when the start date, end date or FTEs of a committed resource is adjusted.
To modify staffing profile notifications:
1. Open a staffing profile.
2. In the Staffing Profile page, click More > Configure Notifications.
3. Select or deselect the checkbox for the level of notification you desire.
By default, the Prevent any email notifications regarding this staffing profile option is unchecked. Checking this option disables all the other options on this page.
The Prevent any email notifications regarding this staffing profile option is intended for staffing profiles linked to confidential projects. This option enables you to prevent any email notifications about the staffing profile from being sent out. Therefore, checking the option protects the confidential information about the staffing profile and the corresponding project.
For example, by checking this option, you disable the email notifications that the system generates when resource requests are sent to resource pools.
Note: The automatically-generated email notifications cannot be disabled by any original options on the Configuration Notifications page. With this option checked, only users having the appropriate permissions, such as the staffing profile manager, the resource pool manager, and the project manager can view the resource requests after they log on
Resource Management User GuideChapter 4: Using Resource Management for Capacity Planning
Project and Portfolio Management Center (9.51) Page 93 of 215

to the system.
4. Click Save.
Sending Resource Requests from a Staffing ProfileWhen you are creating a staffing profile, its lines represent forecasts for roles that lack a specific resource. Once you have finished creating the staffing profile, you can send assignment requests to the resource pools specified in each staffing profile line. Assignment requests will appear for each resource pool, for the resource manager to fill.
Figure 4-7. Resource pool with unfilled resource requests
To send resource requests for your staffing profile in the New UI:
1. Open the staffing profile in the New UI.
2. Select the position for which you want to send resource request.
3. Click Send Resource Requests.
The Send Resource Requests dialog box opens.
Resource Management User GuideChapter 4: Using Resource Management for Capacity Planning
Project and Portfolio Management Center (9.51) Page 94 of 215
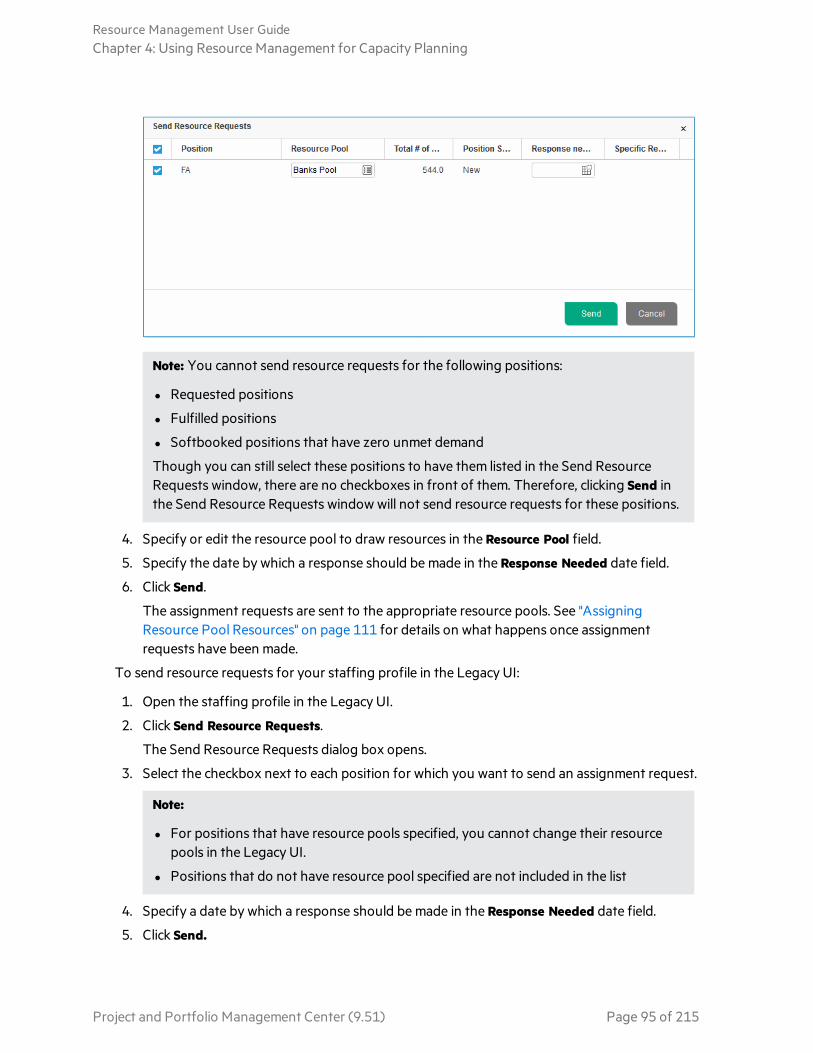
Note: You cannot send resource requests for the following positions:
l Requested positions
l Fulfilled positions
l Softbooked positions that have zero unmet demand
Though you can still select these positions to have them listed in the Send Resource Requests window, there are no checkboxes in front of them. Therefore, clicking Send in the Send Resource Requests window will not send resource requests for these positions.
4. Specify or edit the resource pool to draw resources in the Resource Pool field.
5. Specify the date by which a response should be made in the Response Needed date field.
6. Click Send.
The assignment requests are sent to the appropriate resource pools. See "Assigning Resource Pool Resources" on page 111 for details on what happens once assignment requests have been made.
To send resource requests for your staffing profile in the Legacy UI:
1. Open the staffing profile in the Legacy UI.
2. Click Send Resource Requests.
The Send Resource Requests dialog box opens.
3. Select the checkbox next to each position for which you want to send an assignment request.
Note:
l For positions that have resource pools specified, you cannot change their resource pools in the Legacy UI.
l Positions that do not have resource pool specified are not included in the list
4. Specify a date by which a response should be made in the Response Needed date field.
5. Click Send.
Resource Management User GuideChapter 4: Using Resource Management for Capacity Planning
Project and Portfolio Management Center (9.51) Page 95 of 215

Note: If comments for staffing profile positions exceed field limitations, the comments are automatically truncated (a warning message is not displayed). Field limitations include comments larger than 2,000 characters and comments larger than 255 characters that are sent in notifications (the comment in the notification is truncated).
Staffing Profile SecurityAccess to a staffing profile is controlled primarily through access grants set in the security group definitions. For further granularity, the user who creates a staffing profile can specify a list of users who can view it, edit its basic information, edit its lines, or edit its security.
A staffing profile attached to a project can be viewed by everyone participating in that project who has the proper access grants (see "Staffing Profile Access Grants" below), without necessarily appearing on the list specified for the staffing profile using the Configure Access page (see "Staffing Profile Configure Access Page" on the next page).
Note: When users who are assigned to tasks in the work plan or who are specified on the staffing profile itself only have the View Staffing Profiles access grant, they still need to be added to the Configure Access page. Otherwise, they would not view the project staffing profile.
In addition, project managers can edit staffing profiles attached to their projects. The same type of access applies to staffing profiles attached to proposals and assets, for users of Portfolio Management.
Staffing Profile Access Grants
Users are linked to access grants through the security group they are a part of. The access grants related to staffing profiles are discussed in more detail in "Table 4-6. Staffing profile access grants" below. Without these access grants, a user cannot view or edit a staffing profile regardless of whether they are specified in the list on the staffing profile's Configure Access page, or are a participant in the project the staffing profile is attached to (if any).
l For more information on access grants and security groups, see the Security Model Guide and Reference.
l For more information on project and project process participants, see the Project Management User Guide.
Access Grant Description
View Staffing Profiles The user can view any staffing profile for which they are on the specified View or Edit list.
Table 4-6. Staffing profile access grants
Resource Management User GuideChapter 4: Using Resource Management for Capacity Planning
Project and Portfolio Management Center (9.51) Page 96 of 215

Access Grant Description
View All Staffing Profiles The user can view any staffing profile in the system.
Edit Staffing Profiles The user can edit any staffing profile for which they are on the specified Edit list.
Create Staffing Profiles The user can create new staffing profiles. Supplemental to the Edit Staffing Profiles or Edit All Staffing Profiles access grant.
Edit All Staffing Profiles The user can edit any staffing profile in the system.
Update Staffing Profiles Status The user can update the Profile Status, but nothing else. Supplemental to the Edit Staffing Profiles or Edit All Staffing Profiles access grant.
Delete Staffing Profiles The user can delete a staffing profile as long as no actuals are specified.
Delete Staffing Profiles with Actuals
The user can delete any staffing profile in the system.
Promise Unspecified Resource The user can allocate a promised resource.
Table 4-6. Staffing profile access grants, continued
Staffing Profile Configure Access Page
The Configure Access page for a staffing profile is used to grant additional editing access to the staffing profile to each user on the list individually. All users listed on the Configure Access page minimally have viewing access.
Note: Without the proper access grants, a user cannot view or edit a staffing profile regardless of whether they are specified in the list on the staffing profile's Configure Access page. See "Staffing Profile Access Grants" on the previous page for more detailed information.
The Configure Access page options are discussed in more detail in "Table 4-7. Security options for Staffing Profile Configure Access page" below.
Option Description
View Access The user can view the staffing profile but not edit its information. Any user listed has View access.
Table 4-7. Security options for Staffing Profile Configure Access page
Resource Management User GuideChapter 4: Using Resource Management for Capacity Planning
Project and Portfolio Management Center (9.51) Page 97 of 215
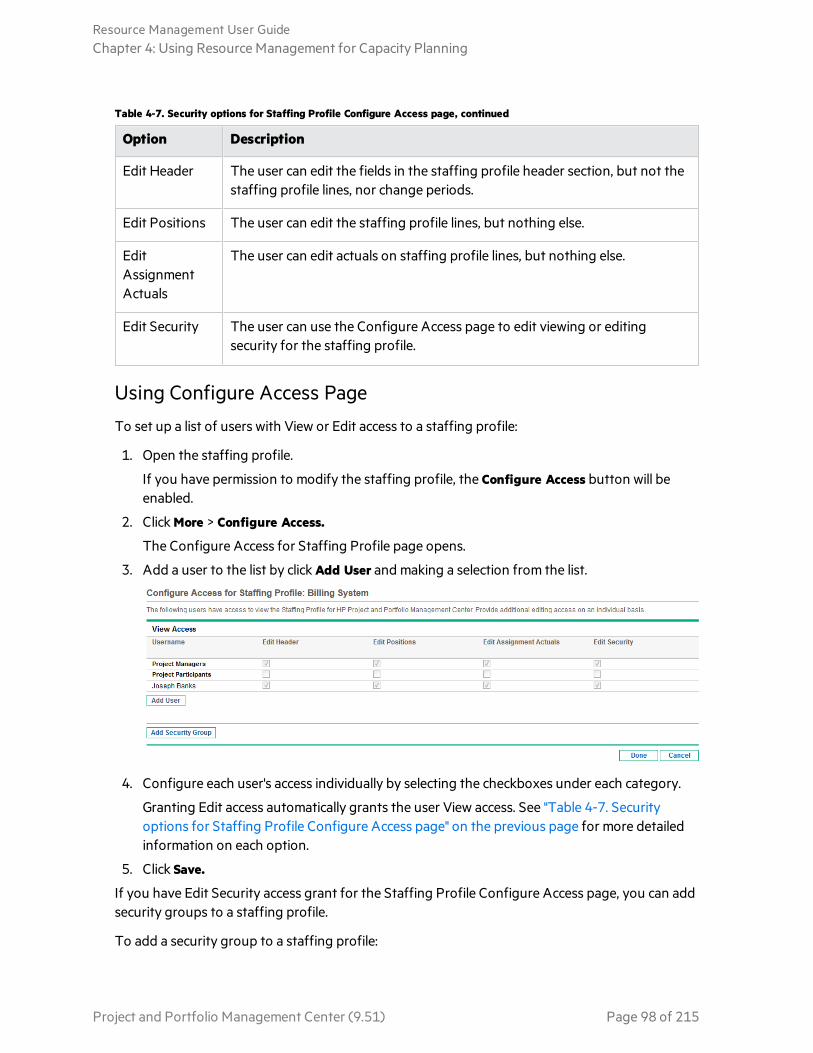
Option Description
Edit Header The user can edit the fields in the staffing profile header section, but not the staffing profile lines, nor change periods.
Edit Positions The user can edit the staffing profile lines, but nothing else.
Edit Assignment Actuals
The user can edit actuals on staffing profile lines, but nothing else.
Edit Security The user can use the Configure Access page to edit viewing or editing security for the staffing profile.
Table 4-7. Security options for Staffing Profile Configure Access page, continued
Using Configure Access Page
To set up a list of users with View or Edit access to a staffing profile:
1. Open the staffing profile.
If you have permission to modify the staffing profile, the Configure Access button will be enabled.
2. Click More > Configure Access.
The Configure Access for Staffing Profile page opens.
3. Add a user to the list by click Add User and making a selection from the list.
4. Configure each user's access individually by selecting the checkboxes under each category.
Granting Edit access automatically grants the user View access. See "Table 4-7. Security options for Staffing Profile Configure Access page" on the previous page for more detailed information on each option.
5. Click Save.
If you have Edit Security access grant for the Staffing Profile Configure Access page, you can add security groups to a staffing profile.
To add a security group to a staffing profile:
Resource Management User GuideChapter 4: Using Resource Management for Capacity Planning
Project and Portfolio Management Center (9.51) Page 98 of 215
1. Open the staffing profile.
If you have permission to modify the staffing profile, the Configure Access button will be enabled.
2. Click More > Configure Access.
The Configure Access for Staffing Profile page opens.
3. Add a security group to the list by clicking Add Security Group and selecting the desired security group from the list.
Note: You cannot add a duplicate security group.
4. Configure the security group's access by selecting the checkboxes under each category.
The View access is automatically granted to the security group.
5. Click Done.
Clearing Future Forecast and AssignmentsWhen a staffing profile is completed, you have an option to clear future forecast and assignments (forecast and assignments that go beyond the finish date) from the staffing profile. If the future forecast and assignments are cleared, they are no longer reflected in areas such as the Analyze Assignment Load and Analyze Resource Pool portlets, a resource's workload capacity, the Resource Finder, forecasted demand, the staffing profile, and the Resource Allocation Management page.
To clear future forecast and assignments (you must have the Edit Positions access grant):
1. Open the staffing profile.
If the staffing profile status is Completed, the Clear Future Forecast and Assignment button is enabled.
2. Click More > Clear Future Forecast and Assignment.
The Clear Future Forecast and Assignment dialog opens.
3. Specify a date from which to clear all forecast and assignment information. The date must be after the Profile Start date.
Note: Verify the Clear From date. Once you click OK, the forecast and assignments cannot be restored.
4. Click OK.
Forecast and assignments starting from the specified date to the future are cleared from the staffing profile.
Deleting Staffing ProfilesIf you have created a staffing profile that you no longer need, you can delete it.
Resource Management User GuideChapter 4: Using Resource Management for Capacity Planning
Project and Portfolio Management Center (9.51) Page 99 of 215

1. Open the staffing profile.
If you have permission to delete the staffing profile, the Delete Staffing Profile button is enabled.
2. Click More > Delete Staffing Profile.
3. Confirm that you want to delete the staffing profile by clicking Delete.
The staffing profile is deleted.
Using Other Staffing Profile FeaturesStaffing profiles have other features that are useful for resource managers.
Staffing Profiles and Portfolio Management
Portfolio Management allows you to create proposals, projects, and assets to build and monitor your portfolio. If a staffing profile is associated with one of these Portfolio Management entities (proposal, project, or asset), then the dates on that staffing profile are determined by the entity to which it has been linked. If the dates for that entity change, the staffing profile's start and finish dates are also altered.
Default Resource Pools for Staffing Profiles
The Default Resource Pool field is used to specify a default resource pool from which a staffing profile makes requests. This can be a convenient way to save time when creating new lines for a staffing profile.
Hiding Staffing Profile User Data Field Name
When the description of the user data field is started with "!", the user data field name is the value behind the "!". Therefore, if you want to hide the user data field name, set the field description to "!" only.
Special Command for Baseline Staffing Profile
You can use the system special command ksc_create_baseline_staffing_profile to create baselines for staffing profiles that are associated with projects. This special command includes the following two default parameters:
l STAFFING_PROFILE_ID
l SP_BASELINE_NAME
You can configure the special command in the following entities:
l Object types
l Request types
l Report types
Resource Management User GuideChapter 4: Using Resource Management for Capacity Planning
Project and Portfolio Management Center (9.51) Page 100 of 215

l Validations
l Workflow step sources
Note: To use this special command, you must have the edit special command access grant. For details about how to use special commands, see Commands, Tokens, and Validations Guide and Reference.
Exceptions
If you run this special command in the following scenarios, you receive errors:
l You do not have the permission to create baseline in the project.
l You create a base line for a staffing profile which is not associated with any project.
Calculating Forecasted Labor Costs from Staffing Profiles
Financial Management allows you to organize and track costs. You can roll up actual costs from a work plan to the financial summary. If you choose to calculate forecasted labor costs from the staffing profile position forecasts and allocations, you are creating lines in the financial summary for planned labor costs that are automatically calculated using cost rate rules.
For more details on cost rate rules and financial summaries, see the Financial Management User Guide. For more details about Financial Management settings in the Cost and Effort policy, see Project Management User Guide and Financial Management User Guide.
PPM keeps two decimals when calculating forecasted labor costs and thus may lead to tiny deviation in Financial Summary.
Note: For example, there are 23 working days in May 2012. You fill 10 hours as labor costs in this month. PPM stores data by working day, so the average labor cost per day is 10 / 23 = 0.434782608695652. When PPM calculates forecasted labor costs in Financial Summary, the forecasted labor costs in May 2012 is 0.434782608695652 * 40.45 * 23 = 404.4999999999998382 not 10 * 40.45 = 404.5.
For more examples of Unmet Demand Calculation, see "Unmet Demand Calculation Sample Scenarios" on page 196.
Entering Actuals Directly
You can specify actual load or effort for a position directly from the Legacy UI of the Staffing Profile page.
Note: You cannot enter actuals in the position dialog box opened from the New UI of the Staffing Profile page. It is read-only.
Resource Management User GuideChapter 4: Using Resource Management for Capacity Planning
Project and Portfolio Management Center (9.51) Page 101 of 215

1. Open an existing staffing profile.
2. Click on a position for which you want to enter actuals.
3. In the Assignments Needed table, scroll down to the user for which you want to enter actuals and provide the actual effort.
4. If you want to add actuals for additional users, click Save. Otherwise, click Done to save your data and exit the dialog.
The actual effort can be viewed in the Analyze Assignment Load portlet.
Note: Data display format inconsistency between the staffing profile page and the Analyze Assignment Load portlet: the staffing profile page displays data by hours in the format of one decimal place, while the Analyze Assignment Load portlet displays data in the format of two decimal places.
If the staffing profile is associated with a project, the actual effort can be used to track resource usage. This is controlled through the projects settings in the Cost and Effort policy. For more information on project settings and policies, see the Project Management User Guide.
Allocation Time Period Adjustment
When a project (with a staffing profile associated with it) changes its start/end date, the last viewed forecasts and allocations (either hours or FTE) is maintained while the non-viewed allocation is adjusted. For example, if a project (starting in January and ending in February, viewed in FTEs with one FTE per month) is adjusted back by one month (starting in December and ending in January), the allocation time period for each month is maintained at 1 FTE per month while the hours are adjusted to equal 1 FTE per month. Or, if the project (for the month of January is viewed in hours with 80 hours) is adjusted ahead by one month (to February), the allocation time period for February is maintained at 80 hours while the FTE is adjusted to equal 80 hours.
Promised Allocations
Promised allocations are resource allocations who are not specifically named or identified. They can be used when a resource is allocated but the resource is not defined in PPM (for example, a subcontractor). Or, they can be used to commit resources and then assign a specific resource at a later time. Actuals cannot be entered for promised allocations.
This feature must be enabled and can be used from the staffing profile and Resource Allocation Management page. To enable this feature, set the ENABLE_PROMISE_RESOURCE_ALLOCATION parameter to TRUE. To add, assign, modify or delete promised allocations, the user must have the Resource Mgmt: Promise Unspecified Resources access grant.
Calculations, such as unmet demand, current demand, and remaining capacity, always include promised allocations. Even if this feature is disabled, if promised allocations exist (that is, values
Resource Management User GuideChapter 4: Using Resource Management for Capacity Planning
Project and Portfolio Management Center (9.51) Page 102 of 215

were entered before the feature was disabled), then promised allocations are used in all calculations even though they are not viewable from the interface.
Calculations that rely on a calendar (such as recalculating a promised allocation from hours to FTE or when rolling up forecasted labor costs from the staffing profile to a financial summary) use the regional calendar of the resource pool of the position to which the promised allocation belongs. The regional calendar determines the promised allocation's working and non-working days. A resource calendar cannot be set up for a promised allocation.
Forecast PlanningWhen planning for multiple projects in an organization, the staffing profile manager may find several projects require deliverables from his team. Rather than accessing the staffing profile of each project one at a time, the staffing profile manager can create his forecast plans for these multiple projects from a single page, the Forecast Planning page.
The Forecast Planning page allows the staffing profile manager to:
l View all positions and staffing profiles he owns, even if they span multiple projects
l Filter the positions and staffing profiles displayed
l View forecasts for all projects simultaneously to quickly and accurately estimate resource needs
l Edit resource forecasts across multiple staffing profiles
l Add positions to a staffing profile
l Send resource requests
Configuring Forecast Planning PageYou can modify parameters in the server.conf file to change the number of staffing profile positions that appear on a single page and change the default units that appear in the Display Options dialog for measurements and groupings. Modifying these parameters are optional.
See the Installation and Administration Guide for more information about editing the server.conf file.
Parameter Description
FORECAST_PLANNING_PAGE_SIZE
The number of staffing profile positions that appear on a Forecast Planning page.
RM_DEFAULT_EFFORT_TYPE
The default effort type that appears in the Display Options dialog. The staffing profile manager can change the effort type by modifying the Measure Effort in field in the Display Options dialog. Valid values: FTE, hours, person days. Default: FTE.
Table 4-8. Forecast planning server.conf parameters
Resource Management User GuideChapter 4: Using Resource Management for Capacity Planning
Project and Portfolio Management Center (9.51) Page 103 of 215

Parameter Description
RM_DEFAULT_PERIOD_TYPE
The default time period section that appears in the Display Options dialog. The staffing profile manager can change the time period section by modifying the Group Periods by field in the Display Options dialog. Valid values: week, month. Default: month.
Table 4-8. Forecast planning server.conf parameters, continued
You can modify the parameter EXCEL_EXPORT_POSITIONS_LIMIT in the Administration Console to change the maximum number of positions that can be exported to Microsoft Excel on the Forecast Planning page. By default, the value is 2000.
Note: When you configure this parameter, consider your performance objectives. If large amounts of data are exported, you might encounter performance issue.
Configuring Access Grants
To access the Forecast Planning page, users must have one of the following access grants:
l Resource Mgmt: Edit All Staffing Profiles
l Resource Mgmt: Edit Staffing Profiles
See theSecurity Model Guide and Reference for more information about access grants.
Accessing the Forecast Planning PageYou can access the Forecast Planning page from the menu bar.
Note: To access the Forecast Planning page, you must have the required access grants. See "Configuring Access Grants" above.
1. Select Open > Project Management > Staffing Profiles > Manage Forecast.
2. Select the search criteria and click Search. For more information about the search fields, see "Search Filter" on page 109.
Resource Management User GuideChapter 4: Using Resource Management for Capacity Planning
Project and Portfolio Management Center (9.51) Page 104 of 215

The Forecast Planning page appears.
Note: The staffing profiles that appear in the Forecast Planning page are ones that you manage and do not have the status of Lock Down, Cancelled, or Completed.
The Forecast Planning page loads data once. If the data is modified by another user (outside of the current Forecast Planning page or using another instance of the Forecast Planning page), the data on the current Forecast Planning page is not updated. If any modifications you made collide with modifications saved by another user, your modifications are not saved. The Forecast Planning page is reloaded and you must retype your data. To avoid these collisions, you should save your modifications often.
Using the Forecast Planning PageUse the Forecast Planning page to:
l Edit and save forecast data
l Add or remove a position
l Send a resource request
l View more detailed information about a staffing profile or position
You can also modify the amount of the information that appears on the Forecast Planning page by using the search and time period filters or adjusting display options.
Changing Forecast Data
To update a forecast value:
1. Select the cell to update.
2. Replace the existing value with a new forecast value.
3. Press TAB or click on another cell.
To copy a value from one cell to multiple cells:
Resource Management User GuideChapter 4: Using Resource Management for Capacity Planning
Project and Portfolio Management Center (9.51) Page 105 of 215

1. Select a cell to copy.
2. Use SHIFT + click to copy the value to all contiguous cells. That is, all cells from the copied cell to the selected cell will have their values updated.
Saving Forecast Data Changes
To save changes made to or exit from the Forecast Planning page, do one of the following:
l To save changes made to the Forecast Planning page, click Save.
l To exit and save any changes made to the Forecast Planning page, click Done.
l To cancel any changes made to the Forecast Planning page since the last save, click Cancel.
Note: If you made changes to and try to save data that has been recently modified by another user (that is, the data that appears in the Forecast Planning page is not the most current data), a message appears and the data is not saved. The Forecast Planning page is reloaded and you must retype your data.
Adding a Position
To add a position to a staffing profile, do the following:
1. From the Forecast Planning page, click next to the staffing profile and select Add Position.
The Add Position dialog box opens.
Resource Management User GuideChapter 4: Using Resource Management for Capacity Planning
Project and Portfolio Management Center (9.51) Page 106 of 215

2. Specify a Role Required, Position Label (name of the position), and Resource Pool.
Note: When you click Search on the right of the Resource Pool field in the Add Position dialog box to search resource pools, the search result will list all the resource pools that fit the search criteria, regardless of whether you have the view access grant to all of them.
3. (Optional) Provide data for any optional fields.
Note: A message appears if any data provided does not match the filter information specified in the Search for Staffing Profile dialog (the added position will not appear in the Forecast Planning page.
For a description of the fields, see step b.
4. Repeat as necessary.
You can add more than one position at a time without returning to the Forecast Planning page by clicking Add Another once you have filled in the values for one position.
5. Click Add.
The Forecast Planning page reloads with the position(s) added.
Removing a Position
A position that has been added to a staffing profile can also be removed from that staffing profile. To remove a position, do the following:
1. Click next to the position to select it for removal. The position and its data remain, but appear in gray.
2. Click Save on the Forecast Planning page.
You can re-add a position that has been selected for removal by clicking . This icon only appears when a position has been selected for removal but before clicking the Save button on the Forecast Planning page.
Sending a Resource Request
To send a resource request for one or more positions of a staffing profile:
1. From the Forecast Planning page, click next to the staffing profile and select Send Requests.
The Send Resource Requests dialog box opens.
Resource Management User GuideChapter 4: Using Resource Management for Capacity Planning
Project and Portfolio Management Center (9.51) Page 107 of 215

2. Select the checkbox next to each position for which you want to send a resource request.
3. Specify a date by which a response should be made in the Response needed by date field.
4. Click Send.
The resource requests are sent to the appropriate resource pools. See "Assigning Resources to Tasks" on page 160 for details about assigning resources.
Viewing Information about a Staffing Profile or Position
You view additional information about a staffing profile or position by using a tooltip or opening an overview window.
Viewing Staffing Profile Information
You can view information about a staffing profile in two different ways:
l Place the cursor on a staffing profile to view the tooltip. The following information appears: staffing profile name, status, staffing profile manager, project name, start date, end date, and work load category.
l Click on the staffing profile name to open a Staffing Profile overview page in another window.
Note: The information that appears is for reference only. Do not edit the staffing profile from this window. If you make changes in this window, changes in the Forecast Planning page may not be saved.
Resource Management User GuideChapter 4: Using Resource Management for Capacity Planning
Project and Portfolio Management Center (9.51) Page 108 of 215

Viewing Position Information
You can view information about a position in two different ways:
l Place the cursor on a position to view the tooltip. The following information appears: position name, status, response needed by, role, resource pool, and resource type.
l Click on the position name to open a position overview page in another window.
Filtering and Sorting
Filtering allows you to modify the information that appears in the Forecast Planning page. The search filter allows you to filter on staffing profiles, roles, resources pools, and positions. The time period filter allows you to filter on a start and end period. You can also sort the information by staffing profile.
The filters currently applied to the Forecast Planning page appear at the top of the table along with the time the page was opened. If the list of applied filters is truncated, you can place the cursor on the filter to show all of the applied filters.
Search Filter
Use the search filter to select multiple items on which to filter the Forecast Planning page. To set the search filter, do the following:
1. Click Modify next to the Filter For header.
The Search Positions page appears.
Resource Management User GuideChapter 4: Using Resource Management for Capacity Planning
Project and Portfolio Management Center (9.51) Page 109 of 215

2. Provide the information for one or more fields on which you want to filter.
Field Name Description
Staffing Profile
Select one or more staffing profiles. This filter displays data for staffing profile positions contained in the selected staffing profile(s).
Role Select one or more roles. This filter displays data for staffing profile positions that contain the selected role(s).
Resource Pool
Select one or more resource pools. This filter displays data for staffing profiles that belong to the selected resource pool(s).
Position Name (contains)
Type a text string. This filter displays data for staffing profile positions that contain the typed text in the position name.
3. Click Search.
Time Period Filter
Showing from<date>to<date> is the time period of the data that appears. The default time period that appears is one year, starting one month prior to the current month.
To change the time period, do the following:
1. Click Change, located next to the time period that appears (Showing from <date> to <date>).
The Change Time Periods dialog appears.
2. Select the Start Period and End Period dates. The months specified are included in the time period of the data that appears.
3. Click Change.
Sorting by Staffing Profile
By default, the list of staffing profiles are sorted in alphabetical order. You can sort the staffing
Resource Management User GuideChapter 4: Using Resource Management for Capacity Planning
Project and Portfolio Management Center (9.51) Page 110 of 215

profiles in reverse alphabetical order by clicking on the staffing profile header. The Sort icon ( ) appears next to the staffing profile header.
Changing the Display Options
Display options alter the amount of data that appears in the Forecast Planning page. You can change the period type and effort type.
To modify display options, do the following:
1. Click Display Options. The change Display Options dialog appears.
2. Edit one or more of the following.
Field Name Description
Group Periods by
The period type (how the time period is divided). Select Week, Month, or Quarter.
Measure Effort in
The effort type (how effort is measured). Select FTE, Hour, or Person Day.
3. Click Change.
Displaying Positions
You can expand and collapse a staffing profile to view its positions in the Forecast Planning page:
l To view all positions of all staffing profiles, click .
l To hide all positions of all staffing profiles, click .
l To view the positions of a staffing profile, click next to the staffing profile.
l To hide the positions of a staffing profile, click next to the staffing profile.
Displaying Additional Pages of Data
Depending on the filters you select, data may appear on more than one page of the Forecast Planning page. In the top-right corner of the table, you can see how many pages of data are available to view and which page you are viewing.
To go to the next page of data, click Next.
To go to the previous page of data, click Prev.
Assigning Resource Pool ResourcesWhen a staffing profile is created, its positions represent needed roles without resources specified. After creating a staffing profile, a project manager can send resource assignment requests from the staffing profile to the various resource pools specified in each staffing profile position (see
Resource Management User GuideChapter 4: Using Resource Management for Capacity Planning
Project and Portfolio Management Center (9.51) Page 111 of 215

"Sending Resource Requests from a Staffing Profile" on page 94 for details). The resource manager can then review the assignment requests for each resource pool and go into each staffing profile, making the appropriate assignments for each line.
Collecting Resource RequestsAs a resource manager, you can see resource requests from positions in any of the following locations:
l Resource Pool page. This page lists:
l Requested positions
l Soft booked positions
l Partially assigned positions
l Resource Allocation Management page. This page lists:
l Fulfilled positions
l Requested positions
l Partially assigned positions
l Soft booked positions
l Resource Request portlet
The portlet lists any positions that meet the portlet filters, except fulfilled positions whose Total Unmet Hours is zero.
Note: New positions, positions that did not send resource requests, can also be shown in the portlet.
Resource Management User GuideChapter 4: Using Resource Management for Capacity Planning
Project and Portfolio Management Center (9.51) Page 112 of 215

Making AssignmentsYou can make assignments from the Staffing Profile page and the Resource Allocation Management page.
Note: To make assignments, you should be the direct manager of the resource pool. If you are the manager of the parent resource pool, you cannot make assignments to positions that request resources from the child resource pool, unless you have the staffing profile: edit all staffing profiles access grant.
To fill a resource assignment request:
1. Open a resource pool.
2. In the Resource Requests section of the Resource Pool page, click on the name of a staffing profile. The Staffing Profile page opens.
3. Assign one or more resources.
l From the New UI of the Staffing Profile page:
i. Click the Assign icon next to the position you want to assign one or more resources.
ii. In the resource finder dialog box, select the resources you want to assign.
Note:
l The maximum number of resources returned is controlled by the parameter RESOURCE_FINDER_SEARCH_MAX_USERS.
l Select Check All if you want to select all displayed resources.
l Clicking Advanced in the dialog box, you are brought to the Select a Resource to Assign dialog box, where you can use the enhanced resource finder functionality. For more information about enhanced resource finder, see "Scalable Resource Finder" on page 174.
iii. (Optional) Check the option Commit selected resources if you want to commit the selected resources after they are assigned.
This option appears only when there are resources available in the resource finder and the parameter ENABLE_COMMIT_RESOURCES_IN_RESOURCE_FINDER is set to true. If you want this option to be checked by default, set the parameter CHECK_COMMIT_RESOURCES_IN_RESOURCE_FINDER to true in Administration Console.
iv. (Optional) Check the option Distribute demand evenly to selected resources if you want to distribute the position's demand evenly to selected resources.
This option appears only when you select at least two resources and the parameter ENABLE_DISTRIBUTE_RESOURCES_IN_RESOURCE_FINDER is set to true. If you want this option to be checked by default, set the parameter CHECK_DISTRIBUTE_RESOURCES_IN_RESOURCE_FINDER to true in Administration Console.
Resource Management User GuideChapter 4: Using Resource Management for Capacity Planning
Project and Portfolio Management Center (9.51) Page 113 of 215

Note: The position demand is distributed evenly to the selected resources, even when it results in over-allocation of some of the resources.
v. Click Assign.
l From the Legacy UI of the Staffing Profile page, positions with open resource assignment requests display Unmet Demand in orange.
i. Select the Unmet Demand checkbox of the position you want to assign.
ii. Click Assign to assign one or more resources, or click the Resource Finder icon to search for a suitable resource using the Resource Finder.
The Resource Capacity with Assignments dialog box opens, displaying the selected resource's current capacity with the staffing profile line's commitments marked as Soft Booked.
l From the Resource Allocation Management page, see "Assigning a Resource to a Resource Request from Resource Allocation Management Page" on page 140.
Note: If one or more specific resources were requested, the Specific Resources Requested dialog opens. You can select and assign the specified resource(s) or you can click Choose Other Resources to assign other resources.
4. Make any changes to the resource's commitment to the staffing profile line.
l You can change the nature of the resource's commitment between Soft Booked and Committed, or you can remove it entirely.
l You can change the number of hours committed to the staffing profile.
l If the resource pool is configured to send notifications to a resource, you can choose not to send an email notification.
5. Click Done.
The Staffing Profile page reloads with your changes made. If unmet demand still remains, you can repeat the assignment process as needed.
Note: A resource must be in a resource pool in order to be assigned to a staffing profile. By default, only the resource pool manager (or a manager of a parent resource pool) is permitted to make that assignment. To allow a project manager to assign any resource (from any resource pool) to a work plan, staffing profile, or both, set the RM_OVERRIDE_ASSIGNMENT_CONTROLS parameter in the server.conf file on the PPM Server to TRUE.
You can only make assignments from the resource pool specified by the originating requests when using the Assign button, but you can assign resources from other resource pools that you manage by using the Resource Finder. The specified resource pool includes resources from its child resource pools.
Resource Management User GuideChapter 4: Using Resource Management for Capacity Planning
Project and Portfolio Management Center (9.51) Page 114 of 215
Rejecting and Forwarding DemandResource demand that comes from staffing profiles can be rejected from a particular resource pool outright, or forwarded to a different resource pool for assignment. You can reject or forward demand from the Staffing Profile page and the Resource Allocation Management page.
When making assignments to a staffing profile in response to resource assignment requests, the Reject and Forward buttons appear next to the Assign button and Resource Finder icon on the Staffing Profile page.
To reject unmet resource demand for a staffing profile line:
1. Click the down arrow next to the Assign icon of the staffing profile line(s) you wish to reject, if you are on the New UI of the Staffing Profile page.
Or, select the checkbox next to the unmet demand for the staffing profile line(s) you wish to reject, if you are on the Legacy UI of the Staffing Profile page.
2. Click Reject.
The Reject Request for Unmet Demand dialog box opens.
3. Supply a reason for rejecting the resource demand in the Comments field and click Done.
To forward unmet resource demand for a staffing profile line to a different resource pool:
1. Click the down arrow next to the Assign icon of the staffing profile line(s) you wish to forward, if you are on the New UI of the Staffing Profile page.
Or, select the checkbox next to the unmet demand for the staffing profile line(s) you wish to forward, if you are on the Legacy UI of the Staffing Profile page.
2. Click Forward.
The Forward Request to Another Pool dialog box opens.
3. Specify a resource pool in the Forward to Resource Pool field.
In the Staffing Profile New UI, you can check the resource availability of any resource when forwarding requests.
a. Click the icon next to the Forward to Resource Pool field.
The resource query page opens and displays all the assignable resources in the resource pool you specified.
Resource Management User GuideChapter 4: Using Resource Management for Capacity Planning
Project and Portfolio Management Center (9.51) Page 115 of 215

b. If you want to check assignable resources in another resource pool, do one of the following:
o Click Done to close the resource query page and go back to the Forward Request to Another Resource Pool window, and then repeat step 3 > a.
o Use the advanced resource query page.
A. Click Advanced.
The advanced resource query page opens in the Resource Results tab, which displays more details of assignable resources.
B. Click the Modify Search Criteria tab.
C. In the Resource Pool field, select the resource pool you want to check.
D. Click Search.
The Resource Results tab displays assignable resources in the resource pool.
E. Click Done to close the advanced resource query page and go back to the Forward Request to Another Resource Pool window.
4. Supply a reason for forwarding the resource demand in the Comments field and click Done.
You can also reject and forward demand from the Resource Allocation Management page. See "Rejecting a Resource Request from Resource Allocation Management Page" on page 150 and "Forwarding a Resource Request from Resource Allocation Management Page" on page 149 for more information.
Resource Management User GuideChapter 4: Using Resource Management for Capacity Planning
Project and Portfolio Management Center (9.51) Page 116 of 215

Assigning Promised AllocationsYou can only assign promised allocations from the Staffing Profile page and the Resource Allocation Management page.
To fill a resource assignment request with a promised allocation:
1. Open a resource pool.
2. In the Resource Requests section of the Resource Pool page, click on the name of a staffing profile.
Positions with open resource assignment requests display Unmet Demand in orange. The position requesting resources will be selected.
3. Assign a promised allocation.
Note: You must have the Resource Mgmt: Promise Unspecified Resources access grant and the parameter ENABLE_PROMISE_RESOURCE_ALLOCATION must be enabled to use the Promise button.
l From the New UI of the Staffing Profile page,
i. Click the down arrow next to the Assign icon of the staffing profile line where you want to assign promised allocations.
ii. Click Promise.
l From the Legacy UI of the Staffing Profile page, Positions with open resource assignment requests display Unmet Demand in orange.
i. Select a checkbox next to Unmet Demand (only one checkbox can be selected).
ii. Click Promise.
The Adjust Allocations for Promise dialog box opens, displaying the promised allocation and status.
l From the Resource Allocation Management page, see "Assigning a Resource to a Promised Allocation from Resource Allocation Management Page" on page 142.
4. Make any changes to the promised resource's commitment to the staffing profile line.
l You can change the nature of the promise's commitment between Soft Booked and Committed, or you can remove it entirely. The commitment defaults to Soft Booked.
l You can change the number of hours/FTE/person days committed to the staffing profile. The values default to the position's unmet demand.
5. Click Done.
The Staffing Profile page reloads with your changes made. If unmet demand still remains, you can repeat the assignment process as needed.
Resource Management User GuideChapter 4: Using Resource Management for Capacity Planning
Project and Portfolio Management Center (9.51) Page 117 of 215

Analyzing Resource PoolsResource capacity planning typically involves the use of both resource pools and staffing profiles. The projected capacity of resources can be tracked with resource pools, while anticipated demand is tracked with staffing profiles. Comparing a resource pool to a staffing profile can yield valuable insight on future resource deployments as they are weighed against planned resource capacity.
Comparing Resource Pools to Staffing ProfilesThe Analyze Resource Pools portlet provides a way to assess planned load on resource pools by directly comparing the projected demand in a staffing profile or Profiles to projected capacity in a resource pool or pools. "Figure 4-9. Analyze Resource Pools portlet" below shows the Analyze Resource Pools portlet.
Figure 4-9. Analyze Resource Pools portlet
Key features of the Analyze Resource Pool portlet include:
l The blue line represents the total capacity of the resource pool or pools being analyzed
l The black line represents the total named capacity of the resource pool or pools being analyzed
l Bars on the chart represent resource allocations from staffing profiles by period, which can be split internally by staffing profile or status
Resource Management User GuideChapter 4: Using Resource Management for Capacity Planning
Project and Portfolio Management Center (9.51) Page 118 of 215

The Analyze Resource Pools portlet can be filtered using the parameters described in Table 4-9.
Field Name Description
Filter By
Analyze Capacity from Resource Pools
A multi-select auto-complete field that selects the resource pool or pools you wish to analyze.
Include (only) Staffing Profiles with Status
Selects staffing profiles with the specified Statuses to display.
Staffing Profiles with Workload Category
Selects staffing profiles of a specific Workload Category to display.
Include (only) Lines from Resource Pools and Staffing Profiles with Specific Role
A multi-select auto-complete field that selects a role or set of roles to display from the resource pools and staffing profiles being analyzed.
Time Period
Period Selects the time period being used by the Analyze Resource Pools portlet such as Weeks, Day, Quarters, Month, or Year.
Display (x) past periods Selects up to 20 time periods before the current date to include in the Analyze Resource Pools portlet. If the period is yearly, selects up to 12 time periods. Useful for viewing historical trends.
Display (x) future periods Selects up to 20 time periods after the current date to include in the Analyze Resource Pools portlet. If the period is yearly, selects up to 8 time periods.
Arrange Data
Group By Determines whether to display the results by Staffing Profile or Committed, Soft-booked, and Unmet Demand.
Table 4-9. Analyze Resource Pools portlet - parameters
Note: If a staffing profile is completed, future forecast and assignments (those past the finish date of the staffing profile) can be cleared and will not display in the portlet. See "Clearing Future Forecast and Assignments" on page 99 for more information.
If large amounts of data are supplied to the portlet, there may be performance problems. Therefore, thresholds for this portlet can be specified in the server.conf file and default values are provided for optimal performance.
Resource Management User GuideChapter 4: Using Resource Management for Capacity Planning
Project and Portfolio Management Center (9.51) Page 119 of 215

l ARP_MAX_RESOURCES: the maximum number of total resources. The default value is 300.
l ARP_MAX_RESOURCE_POOLS: the maximum number of total resource pools. The default value is 30.
See the Installation and Administration Guide for more information about editing the server.conf file.
When a threshold is exceeded, the portlet does not display. Instead, a message containing the threshold value and current value that exceeds the threshold appear. To make the portlet display, you can edit the preferences of the portlet so that the threshold is no longer exceeded. Micro Focus does not recommend that you increase the threshold values as this may cause performance problems.
If the amount of data you need to analyze exceeds the thresholds, you can export the data to Microsoft Excel. To export Analyze Resource Pool portlet data to Microsoft Excel, do the following:
1. Select Open > Resource Management > Data Exports > Analyze Resource Pool.
2. Set the filter criteria for export.
An additional field is included for the filter criteria: Include Detailed Data. Select this checkbox if you want to get a breakdown of total resource capacity viewed against load by staffing profile (data displayed in the Analyze Resource Pool Breakdown table).
3. Click Export To Excel.
The date when the snapshot was taken is included in the export.
Analyze Resource Pools Breakdown Table
To get a breakdown of total resource capacity viewed against load by staffing profile, click View Data Table. The Analyze Resource Pools Breakdown table, pictured in "Figure 4-10. Analyze Resource Pools Breakdown table" on the next page, opens in a new window.
Note: For parent resource pools, the capacity line includes the FTEs from all child resource pools as well, meaning all roll-up lines are included. Similarly, the resource allocation bars represent all staffing profiles that draw from the child resource pools.
Resource Management User GuideChapter 4: Using Resource Management for Capacity Planning
Project and Portfolio Management Center (9.51) Page 120 of 215
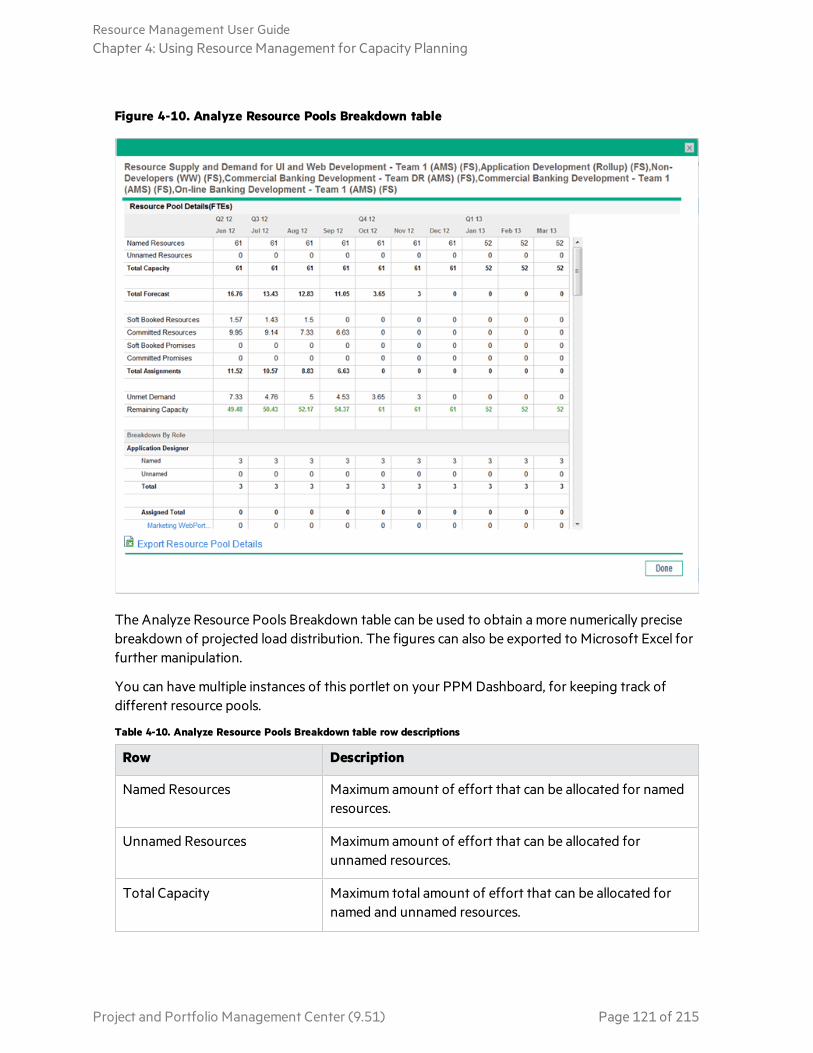
Figure 4-10. Analyze Resource Pools Breakdown table
The Analyze Resource Pools Breakdown table can be used to obtain a more numerically precise breakdown of projected load distribution. The figures can also be exported to Microsoft Excel for further manipulation.
You can have multiple instances of this portlet on your PPM Dashboard, for keeping track of different resource pools.
Row Description
Named Resources Maximum amount of effort that can be allocated for named resources.
Unnamed Resources Maximum amount of effort that can be allocated for unnamed resources.
Total Capacity Maximum total amount of effort that can be allocated for named and unnamed resources.
Table 4-10. Analyze Resource Pools Breakdown table row descriptions
Resource Management User GuideChapter 4: Using Resource Management for Capacity Planning
Project and Portfolio Management Center (9.51) Page 121 of 215
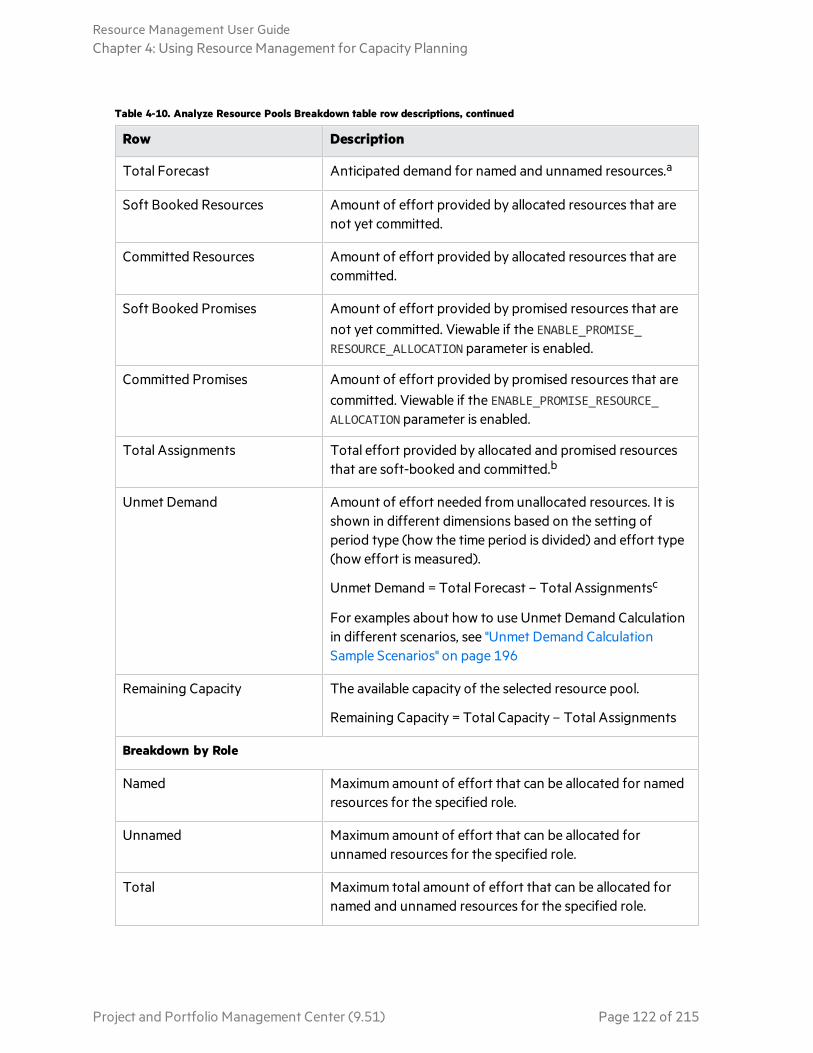
Row Description
Total Forecast Anticipated demand for named and unnamed resources.a
Soft Booked Resources Amount of effort provided by allocated resources that are not yet committed.
Committed Resources Amount of effort provided by allocated resources that are committed.
Soft Booked Promises Amount of effort provided by promised resources that are not yet committed. Viewable if the ENABLE_PROMISE_RESOURCE_ALLOCATION parameter is enabled.
Committed Promises Amount of effort provided by promised resources that are committed. Viewable if the ENABLE_PROMISE_RESOURCE_ALLOCATION parameter is enabled.
Total Assignments Total effort provided by allocated and promised resources that are soft-booked and committed.b
Unmet Demand Amount of effort needed from unallocated resources. It is shown in different dimensions based on the setting of period type (how the time period is divided) and effort type (how effort is measured).
Unmet Demand = Total Forecast – Total Assignmentsc
For examples about how to use Unmet Demand Calculation in different scenarios, see "Unmet Demand Calculation Sample Scenarios" on page 196
Remaining Capacity The available capacity of the selected resource pool.
Remaining Capacity = Total Capacity – Total Assignments
Breakdown by Role
Named Maximum amount of effort that can be allocated for named resources for the specified role.
Unnamed Maximum amount of effort that can be allocated for unnamed resources for the specified role.
Total Maximum total amount of effort that can be allocated for named and unnamed resources for the specified role.
Table 4-10. Analyze Resource Pools Breakdown table row descriptions, continued
Resource Management User GuideChapter 4: Using Resource Management for Capacity Planning
Project and Portfolio Management Center (9.51) Page 122 of 215

Row Description
Forecast Total Anticipated demand for named, unnamed, and promised resources for the specified role.
Assigned Total Total amount of effort that is allocated for named, unnamed, and promised resources for the specified role.
a. Total Forecast is calculated based on the position associated pool calendar. b. Total Assignment is calculated based on the assigned resource associated resource calendar. Total Assignment is also calculated based on the project’s Cost and Effort settings: If "Staffing Profile represents the work load imposed by the project" is selected, Total Assignment includes the sum of effort scheduled in the related staffing profiles. If "Work plan task assignments represents the work load imposed by the project" is selected, Total Assignment includes the sum of the effort scheduled in the related work plan. c. A special case on unmet demand calculation is on the resource pool view forecasted demand page. The negative unmet (that is, an overbooking on one position) is ignored while showing unmet demand for the entire resource pool. This is because when we focus on the real unmet demand for a resource pool, we may not want the negative unmet demand for position 1 to offset the positive unmet demand for position 2 for a given period.
Table 4-10. Analyze Resource Pools Breakdown table row descriptions, continued
Analyzing Staffing Profiles Associated with ProjectsStaffing profiles that are associated with projects can be compared with those projects to see how well they match up in terms of resource allocation and actual workload.
Automatic Tracking of Actuals for Staffing ProfilesIf a staffing profile is associated with a project, you can set it to roll up values for Actual Effort directly from the work plan. This is controlled through the project settings, in the Cost and Effort policy. For more information on project settings and policies, see the Project Management User Guide.
Note: A staffing profile can only be associated with one project, and vice versa.
The roll-up of Actual Effort values from a work plan works thusly:
l Actual FTE values are calculated from the Actual Effort tracked on the work plan's tasks. The actual effort values appear only in the Compare to Work Plan page.
l The Compare to Work Plan page shows the scheduled and actual effort from the project's work plan, grouped by either resource or role.
Resource Management User GuideChapter 4: Using Resource Management for Capacity Planning
Project and Portfolio Management Center (9.51) Page 123 of 215
l When viewing the Compare to Work Plan page grouped by resource, if a resource is not yet assigned to a task, the roll-up of scheduled effort will appear in the unassigned collection.
l When viewing the Compare to Work Plan page by role, the scheduled and actual effort appears under the role specified on the task.
l Actual effort includes promised allocations.
Note: A staffing profile for a project must be created from that project's Project Overview page.
To set Staffing Profile to track actuals for a project:
1. Log on to PPM.
2. From the menu bar, select Search > Projects and open the project you want.
3. Click Settings and click on the Cost and Effort policy.
Note: The Cost and Effort policy may not be editable. If not, you cannot modify the project's Cost and Effort settings unless you modify the project type that governs the project. See the Project Management User Guide for more detailed discussion of how project types govern project settings through project policies.
4. Select Staffing Profile represents the work load imposed by the project.
5. Select Use actual information from the work plan and Time Management when viewing actuals in the staffing profile.
6. Click Save.
Automatic Tracking of Actuals with Time Management
A staffing profile linked to a project can roll up even more accurate Actual Effort data if Time Management has been enabled and is properly set for the project. For more details on Time Management, see the Time Management User Guide.
The Cost and Effort policy in the project's settings determines whether or not financial data is tracked for a project, and how actuals are to be calculated, if at all. The Cost and Effort policy also determines how Time Management is used to track effort, if Time Management has been enabled for the system.
Resource Management User GuideChapter 4: Using Resource Management for Capacity Planning
Project and Portfolio Management Center (9.51) Page 124 of 215

Figure 4-11. Project Settings: Cost and Effort policy
Resource Management User GuideChapter 4: Using Resource Management for Capacity Planning
Project and Portfolio Management Center (9.51) Page 125 of 215

Once Time Management is activated for the project, the Actual Effort values provided will roll up into the staffing profile, assuming the staffing profile is set properly (see "Automatic Tracking of Actuals for Staffing Profiles" on page 123).
To set Time Management to track Actual Effort for a project:
1. Log on to PPM.
2. From the menu bar, select Search > Projects and open the project you want.
3. Click Settings and click on the Cost and Effort policy.
Note: The Cost and Effort policy may not be editable. If not, you cannot modify the project's Cost and Effort settings unless you modify the project type that governs the project. See the Project Management User Guidefor more detailed discussion of how project types govern project settings through project policies.
4. Select Use Time Management to track actual effort against this project.
5. Select the appropriate level of the work plan to track.
6. Click Save.
Comparing a Project's Assignments to its Staffing ProfileThe Compare to Work Plan page, pictured in "Figure 4-12. Compare to Work Plan page" below, compares capacity (as the active staffing profiles for a project) to assignments within the associated project's work plan, viewable by role or by resource. It can be used to monitor compliance of the work plan and actuals to organizationally agreed-upon staffing levels for the project. Open it by clicking Compare to Work Plan in the Staffing Profile page.
Figure 4-12. Compare to Work Plan page
Resource Management User GuideChapter 4: Using Resource Management for Capacity Planning
Project and Portfolio Management Center (9.51) Page 126 of 215

The data in the Compare to Work Plan page can also be exported to a Microsoft Excel file for use in presentations or for further analysis. To export the Compare to Work Plan page to a Microsoft Excel file, click the Export to Excel link.
Note: If you are having problems with the data in Excel, you may need to configure the Internet options of your Web browser. See the Project Management User Guide for more information.
Analyzing Staffing Profiles Associated with AssetsIf a staffing profile is associated with an asset, you can:
l collect actuals from a time sheet and roll them up into the staffing profile,
l view actuals entered against an asset, and
l view resource load that includes time logged against an asset.
Rolling up Time of an Asset to a Staffing ProfileIf the request type of an asset request is configured to use Time Management to track actuals (actuals are collected from the asset's time sheet), time is rolled up to the staffing profile of the asset.
Viewing ActualsIf a staffing profile is associated with an asset, you can view a table that contains the breakdown of the actuals entered against the asset:
1. Open the staffing profile.
2. Click View Actuals.
The table displays actuals and assigned loads for resources who have provided time against the asset associated with the staffing profile.
The actuals are not limited by the staffing profile period.
Analyze Assignment Load PortletIf a staffing profile is associated with an asset, the Analyze Assignment Load portlet includes time logged against an asset (time logged against asset requests is counted as actual effort).
Managing Resource AllocationResource allocation management enables the resource pool manager to assess and manage resources and resource requests for a single resource pool from a quick edit page.
Resource Management User GuideChapter 4: Using Resource Management for Capacity Planning
Project and Portfolio Management Center (9.51) Page 127 of 215

Accessing Resource Allocation Management Page l From the menu bar:
a. Select Open > Resource Management > Resources > Manage Allocations.
b. Select a resource pool by clicking the Select a Resource Pool or Please Specify a Resource Pool link.
l From the Resource Pool Overview page: click Manage Allocation.
Clicking Change next to the page name, you can open the page for another resource pool.
Note: You must be the manager of at least one resource pool in order to access the Resource Allocation Management page.
Understanding Resource Allocation Management Views l The page provides both Gantt view and Table view.
For details, see "Gantt View of Resource Allocation Management Page" and "Table View of Resource Allocation Management Page"
l The first time you open the page, it is opened in the Gantt view.
l Resource Management keeps track of the view of each Resource Allocation Management page. If you log out and return to the page later, it is opened in the view as when you left it.
Managing Resource Requests from Resource Allocation Management Page
What you can do How to
Assign a resource to a resource request
"Assigning a Resource to a Resource Request from Resource Allocation Management Page"
Forward a resource request
"Forwarding a Resource Request from Resource Allocation Management Page"
Reject a resource request "Rejecting a Resource Request from Resource Allocation Management Page"
Assign a resource to a promised allocation
"Assigning a Resource to a Promised Allocation from Resource Allocation Management Page"
Get resource recommendations
"Getting Resources Recommendation from Resource Allocation Management Page"
Resource Management User GuideChapter 4: Using Resource Management for Capacity Planning
Project and Portfolio Management Center (9.51) Page 128 of 215

Promise allocations "Promising Allocations from Resource Allocation Management Page"
Create or adjust resource's assignment
"Creating or Adjusting Resource's Assignment from Resource Allocation Management Page"
Remove an assigned resource or change its status
"Removing an Assigned Resource or Changing its Status"
Remove a promised allocation
"Removing a Promised Allocation"
Best Practice of Resource Allocation Management Page l (Specific to the Table view only) Do not load the Projected Resource Pool Utilization data
unless you must view it. Loading this data may cause system performance to decrease.
l The Mozilla Firefox browser renders tables more efficiently than Microsoft Internet Explorer.
l Save your changes often. This reduces the chance of losing data due to collisions (other users updating the same data at the same time).
The Resource Allocation Management page loads data once. If the data is modified by another user (outside of the current Resource Allocation Management page or using another instance of the Resource Allocation Management page), the data on the current Resource Allocation Management page is not updated. If any modifications you make collide with modifications saved by another user, your modifications are not saved. You must exit and reload the Resource Allocation Management page and retype your data. To avoid these collisions, you should save your modifications often.
l Use the filters to display a small number of positions (20 or less) if you are allocating resources.
l Change the time period to display the smallest period of time possible if you are allocating resources.
Parameters Controlling Resource Allocation Management PageThrough editing the following parameters, system admins can change the maximum number of rows displayed on a single page, change the number of staffing profile positions displayed on a single page, change the units displayed in the Display Options dialog for measurements, change the default unit displayed in the Display Options dialog for groupings and measurements, and change the maximum number of resources for which the Projected Resource Pool Utilization summary is calculated.
Resource Management User GuideChapter 4: Using Resource Management for Capacity Planning
Project and Portfolio Management Center (9.51) Page 129 of 215

Parameter Description
ENABLE_PROMISE_RESOURCE_ALLOCATION
Enable or disable the allocation of promised resources. Promised resources or allocations are resource allocations who are not specifically named or identified. They can be used when a resource is allocated but the resource is not defined in PPM (for example, a subcontractor) or to commit a resource and then assign a specific resource at a later time.
If enabled but the user does not have the Resource Mgmt: Promise Unspecified Resources access grant, promised allocations are view-only.
If enabled or disabled, promised allocations are used in all calculations (such as current demand and remaining capacity).
Promised allocations may exist when this parameter is disabled if values were entered before the parameter was disabled. That is, the parameter was enabled, promised allocations were entered, and then the parameter was disabled.
If disabled, any existing promised allocations are view-only.
Default: false (disabled)
RAMP_MAX_RA_PER_PAGE a The maximum number of rows of data to display on a single page. Default: 200.
RAMP_PAGE_SIZE a The maximum number of staffing profile positions to display on a single page. Default: 20.
RM_ALLOWED_EFFORT_TYPES
The effort types from which the resource pool manager can select for the Measure Effort in field in the Display Options dialog. Valid values: FTE, hours, person days. Default: FTE, hours.
RM_DEFAULT_EFFORT_TYPE
The default effort type. The resource pool manager can change the effort type by modifying the Measure Effort in field in the Display Options dialog. Valid values: fte, hours, person days. Default: fte.
RM_DEFAULT_PERIOD_TYPE
The default time period section. The resource pool manager can change the time period section by modifying the Group Periods by field in the Display Options dialog. Valid values: year, quarter, week, month. Default: month.
Resource Management User GuideChapter 4: Using Resource Management for Capacity Planning
Project and Portfolio Management Center (9.51) Page 130 of 215
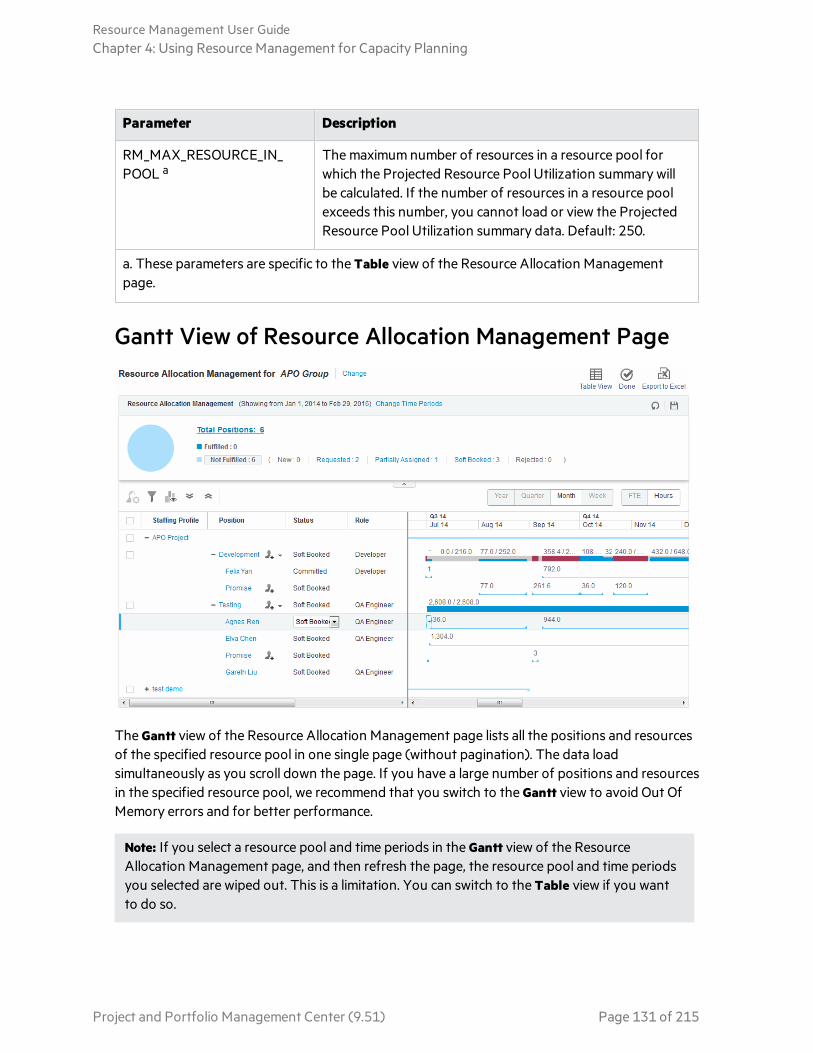
Parameter Description
RM_MAX_RESOURCE_IN_POOL a
The maximum number of resources in a resource pool for which the Projected Resource Pool Utilization summary will be calculated. If the number of resources in a resource pool exceeds this number, you cannot load or view the Projected Resource Pool Utilization summary data. Default: 250.
a. These parameters are specific to the Table view of the Resource Allocation Management page.
Gantt View of Resource Allocation Management Page
The Gantt view of the Resource Allocation Management page lists all the positions and resources of the specified resource pool in one single page (without pagination). The data load simultaneously as you scroll down the page. If you have a large number of positions and resources in the specified resource pool, we recommend that you switch to the Gantt view to avoid Out Of Memory errors and for better performance.
Note: If you select a resource pool and time periods in the Gantt view of the Resource Allocation Management page, and then refresh the page, the resource pool and time periods you selected are wiped out. This is a limitation. You can switch to the Table view if you want to do so.
Resource Management User GuideChapter 4: Using Resource Management for Capacity Planning
Project and Portfolio Management Center (9.51) Page 131 of 215

The following table describes the items that are specific to the Gantt view of the Resource Allocation Management page.
UI Element Description
Pie Chart The pie chart above the table indicates the total number of the positions in the specified resource pool. It is categorized in color by position status. The statuses and numbers displayed next to the pie chart serves as the quick filters for the Resource Allocation Management page.
For details, see "Quick Filters in Gantt View".
Gets resource recommendations for you to better decide on the resource to assign to a position.
For details, see "Getting Resources Recommendation from Resource Allocation Management Page" on page 143.
Filters positions in the specified resource pool by position attributes.
For details, see "Advanced Filter in Gantt View".
Opens the Gantt Legend dialog box, illustrating the meanings of the indicators in the Gantt chart.
Gantt Chart It displays:
l Status of the every position
l Period and demanded effort of every position
The number before the slash is the effort allocated to it while the number after the slash is the demanded effort.
l Period, allocated effort, remaining capacity of every resource
The number before the slash is the effort allocated to the position while the number after the slash is the resource's remaining capacity.
If a resource is over-allocated, the remaining capacity is a negative value displayed in red.
Note: When a resource is assigned to more than one position of a staffing profile and you edit the resource allocation in one of the positions, the resource remaining capacity gets updated only in the position you are editing. You have to refresh the page to get the resource remaining capacity updated in the other positions.
Discards the changes you made to the Resource Allocation Management page.
Saves the changes you made to the Resource Allocation Management page.
Resource Management User GuideChapter 4: Using Resource Management for Capacity Planning
Project and Portfolio Management Center (9.51) Page 132 of 215

Table View of Resource Allocation Management Page
Resource Management User GuideChapter 4: Using Resource Management for Capacity Planning
Project and Portfolio Management Center (9.51) Page 133 of 215
UI Element Description
Display Options Change the period type, effort type, and the columns of data displayed.
l Group Periods by
The period type (how the time period is divided). Select either Month or Week. Default: The value to which the RM_DEFAULT_PERIOD_TYPE parameter is set in the PPM Application Configuration page or server.conf file. Valid values for the parameter: week, month.
l Measure Effort in
The effort type (how effort is measured). Select either FTE (full time equivalents) or Hours.
NOTE: If set to FTE, the position's unmet demand may be calculated incorrectly. Use the unmet demand values from the Staffing Profile page instead. Default: The value to which the RM_DEFAULT_EFFORT_TYPE parameter is set in the PPM Application Configuration page or server.conf file.
l Hide Available Capacity/Unmet Demand Columns
Select this checkbox to hide the second column of data (containing unmet demand and remaining capacity) for each time period section. By default, this checkbox is not selected.
If this checkbox is selected and you assign a resource, the resource's allocations are automatically set to zero. Because the position's unmet demand and the resource's remaining capacity are not calculated, the resource's allocation cannot be calculated and is therefore set to zero.
Legend Illustrate how position demand and resource effort are displayed in the table.
Resource Management User GuideChapter 4: Using Resource Management for Capacity Planning
Project and Portfolio Management Center (9.51) Page 134 of 215

UI Element Description
Projected Resource Pool Utilization
The allocation and capacity for the selected resource pool. Click to view the data. This information changes dynamically when resource allocations are modified.
NOTE: Loading this data may cause system performance to decrease.
This data never includes resources of child resource pools. Selecting the Include children resource pools when calculating the resource load for this resource pool checkbox (from the Edit Resource Pool page) does not affect the data on the Resource Allocation Management page.
See "Viewing Projected Resource Pool Utilization from Resource Allocation Management Page" on page 154 for more information.
Note: Even if the promised allocation feature is disabled, if promised allocations exist (that is, values were entered before the feature was disabled), then promised allocations are used in all calculations (such as current demand and remaining capacity) even though they are not viewable from the interface.
Filtering and Sorting Resource Allocation Management PageFiltering allows you to narrow down the information displayed in the Resource Allocation Management page. You can also sort the information by staffing profile and staffing profile position.
Quick Filters
Quick Filters in Gantt View
In the Gantt view of the Resource Allocation Management page, there is a pie chart as follows to classify the positions by the fulfilled and not fulfilled statuses.
Clicking Total Positions displays all the positions that:
Resource Management User GuideChapter 4: Using Resource Management for Capacity Planning
Project and Portfolio Management Center (9.51) Page 135 of 215
l Have sent resource requests to the specified resource pool and the requests are not rejected
l Have resources from the resource pool assigned.
Not fulfilled positions is further classified into requested, partially assigned, and soft booked positions. Clicking a specific position status displays positions in that status.
Quick Filters in Table View
In the Table view of the Resource Allocation Management page, use the Filter For drop-down list to select a filter item.
Filter Item Description
All Displays all positions for which resources have been requested, soft-booked, partially assigned, fulfilled, or rejected. New positions are not displayed.
Not Fulfilled Displays all positions for which resources have been requested, soft-booked, or partially assigned. By default, this filter is selected when the Resource Allocation Management page is opened.
Requested Displays all positions for which resources have been requested.
Soft Booked Displays all positions for which resources are soft-booked. Soft-booked positions contain soft-booked resources from the selected resource pool (and include forwarded requests).
Partially Assigned
Displays all positions for which resources are partially assigned. Partially assigned positions have all resources committed and there is unmet demand. If one or more resources are not committed (that is, one or more resources are soft-booked), the position is considered soft-booked. Partially assigned positions do not include positions whose resource request is partially allocated from the selected resource pool and the remaining portion of the request has been forwarded.
Staffing Profile Displays all positions of the staffing profile(s) you select from the dialog. A staffing profile with the status of Lock Down, Completed, or Cancelled is not displayed by the filter.
Resource Displays all positions of the resource(s) you select from the dialog.
Advanced Filter
Use the advanced filter to select multiple items on which to filter the Resource Allocation Management page.
Resource Management User GuideChapter 4: Using Resource Management for Capacity Planning
Project and Portfolio Management Center (9.51) Page 136 of 215

Advanced Filter in Gantt View
To set the advanced filter in the Gantt view:
1. Click to open the dialog box as follows.
2. Provide the information for one or more fields on which you want to filter.
Field Name Description
Staffing Profile Select one or more staffing profiles. This filter displays data for staffing profile positions contained in the selected staffing profile(s). A staffing profile with the status of Lock Down, Completed, or Cancelled is not displayed by the filter.
Role Select one or more roles. This filter displays data for staffing profile positions that contain the selected role(s).
Resources Select one or more resources. This filter displays data for staffing profile positions that contain the selected resource(s).
3. Click and the staffing profile positions that meet the criteria are listed. The selected filters are displayed in the pie chart section.
4. Click and then Advanced if you want to use filters other than Staffing Profile, Role, and Resources.
The Search for Staffing Profile Positions dialog displays.
The filters you have specified before clicking Advanced are preserved.
Resource Management User GuideChapter 4: Using Resource Management for Capacity Planning
Project and Portfolio Management Center (9.51) Page 137 of 215

5. Provide the information for the other fields on which you want to filter.
Field Name Description
Position Status Select one or more position statuses. This filter displays all staffing profile positions that match the selected status(es). Choices include: New, Requested, Partially Assigned, Soft Booked, Fulfilled, and Rejected.
If you leave this fields empty, PPM displays all positions except new positions.
To search new positions, you should select New in this field.
Staffing Profile Status
Select one or more staffing profile statuses. This filter displays all staffing profile positions whose staffing profile status matches the selected status(es). Choices include: Active, In Planning, Cancelled, Completed, and Lock Down. Note that Approved and Baselined are not available.
Skill Select one or more skills. This filter displays data for staffing profile positions that contain the selected skill(s).
Staffing Profile Manager
Select one or more staffing profile managers. This filter displays data for staffing profile positions controlled by the selected staffing profile manager(s).
Position Name (contains)
Specify a text string. This filter displays data for staffing profile positions that contain the specified text in the position name.
Resource Type Select one or more resource types. This filter displays data for staffing profile positions that contain the selected resource type(s).
6. Click Search.
Advanced Filter in Table View
To set the advanced filter in the Table view:
1. Click the Filter For drop-down list.
2. Select Advanced.
The Search for Staffing Profile Positions dialog displays.
3. Provide the information for one or more fields on which you want to filter.
For the field descriptions, see the tables in "Filtering and Sorting Resource Allocation Management Page" on page 135.
4. Click Search.
Resource Management User GuideChapter 4: Using Resource Management for Capacity Planning
Project and Portfolio Management Center (9.51) Page 138 of 215
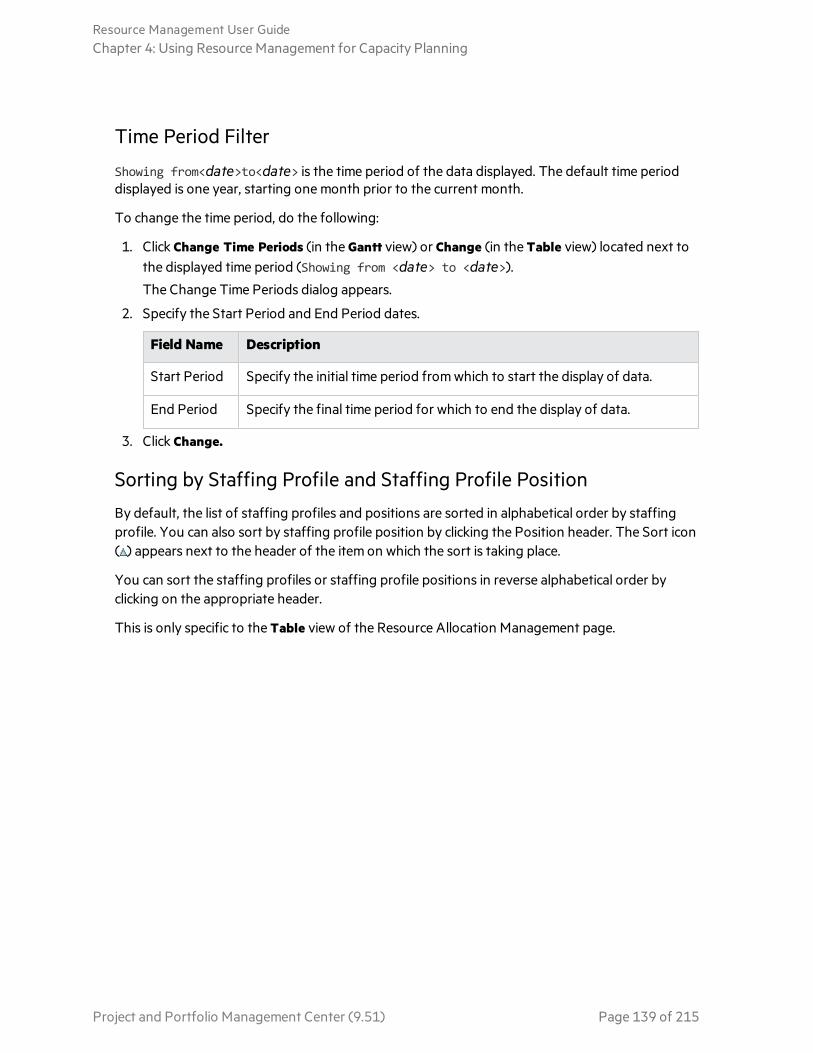
Time Period Filter
Showing from<date>to<date> is the time period of the data displayed. The default time period displayed is one year, starting one month prior to the current month.
To change the time period, do the following:
1. Click Change Time Periods (in the Gantt view) or Change (in the Table view) located next to the displayed time period (Showing from <date> to <date>).
The Change Time Periods dialog appears.
2. Specify the Start Period and End Period dates.
Field Name Description
Start Period Specify the initial time period from which to start the display of data.
End Period Specify the final time period for which to end the display of data.
3. Click Change.
Sorting by Staffing Profile and Staffing Profile Position
By default, the list of staffing profiles and positions are sorted in alphabetical order by staffing profile. You can also sort by staffing profile position by clicking the Position header. The Sort icon ( ) appears next to the header of the item on which the sort is taking place.
You can sort the staffing profiles or staffing profile positions in reverse alphabetical order by clicking on the appropriate header.
This is only specific to the Table view of the Resource Allocation Management page.
Resource Management User GuideChapter 4: Using Resource Management for Capacity Planning
Project and Portfolio Management Center (9.51) Page 139 of 215
Assigning a Resource to a Resource Request from Resource Allocation Management Page
Assign a resource to a resource request in the Gantt view:
1. From the Resource Allocation Management page, click next to the position to assign.
Note: Resources from a child resource pool are not displayed in the window.
By default, the resources with the same role as the position are listed in the order of suitability. You can also find resources by using the filters described in the following table.
Filter Name Description
Sort By The order in which the resources are displayed.
l Capacity: Displays resources in the descending order of resources' availability scores.
l Skill: Displays resources in the descending order of resources' skill scores.
l Suitability: Displays resources in the descending order of resources' suitability score.
l Resource Name: Displays resources alphabetically by resource name.
l Projected Utilization: Displays resources in the descending order of resources' project utilization score.
The scores for all the above criteria except Resource Name are displayed under each resource. For information about how these scores are calculated, see "Resource Finder Calculations" on page 178.
Resource Management User GuideChapter 4: Using Resource Management for Capacity Planning
Project and Portfolio Management Center (9.51) Page 140 of 215

Role The role of the resource to assign.
Category The resource type of the resource to assign.
Resource Name
The name of the resource.
2. Select the checkbox in front of the resource to assign to the position.
You can select more than one resource to assign.
Note:
l By default, 10 resources are displayed at most. If there are more than 10 resources available to assign, clicking More at the bottom display 10 more resources.
l Click Check All if you want to select all displayed resources. Resources that are displayed only after you click More will not be selected.
If you select Check All and then deselect some resources, this option is still selected, however, only the selected resources will be assigned.
l Clicking Advanced in the dialog box, you are brought to the Select a Resource to Assign dialog box, where you can use the enhanced resource finder functionality.
For more information about enhanced resource finder, see "Scalable Resource Finder" on page 174.
3. (Optional) Check the option Commit selected resources if you want to commit the selected resources after they are assigned.
This option appears only when there are resources available in the resource finder and the parameter ENABLE_COMMIT_RESOURCES_IN_RESOURCE_FINDER is set to true. If you want this option to be checked by default, set the parameter CHECK_COMMIT_RESOURCES_IN_RESOURCE_FINDER to true in Administration Console.
4. (Optional) Check the option Distribute demand evenly to selected resources if you want to distribute the position's demand evenly to selected resources.
This option appears only when you select at least two resources and the parameter ENABLE_DISTRIBUTE_RESOURCES_IN_RESOURCE_FINDER is set to true. If you want this option to be checked by default, set the parameter CHECK_DISTRIBUTE_RESOURCES_IN_RESOURCE_FINDER to true in Administration Console.
5. Click Assign.
The allocation provided for the resource is the lowest value of either the remaining capacity of the resource or the position's unmet demand. If the resource's capacity is used as the resource allocation, the position's unmet demand is updated (the updated position's unmet demand= initial unmet demand– the resource's allocation).
If you assign more than one resource to a position, the allocated efforts of the resources are used in a specific order which is decided by how the resources are displayed according to the
Resource Management User GuideChapter 4: Using Resource Management for Capacity Planning
Project and Portfolio Management Center (9.51) Page 141 of 215
Sort By field. In this example, if you assign Elva and Johnson to the position, the allocation of Elva is used first.
Assign a resource to a resource request in the Table view:
1. From the Resource Allocation Management page, click next to the position to assign and select Assign.
Note: If one or more specific resources were requested, the Specific Resources Requested dialog opens. You can select and assign the specified resource(s) or you can click Choose Other Resources to assign other resources.
2. Search for a specific resource and select the resource to assign to the position.
Note: Resources from a child resource pool are not displayed in the auto-complete window.
3. Click Save.
Note: You must click Save from the Table view of the Resource Allocation Management Page in order to save any assignments you made.
See also:
l "Getting Resources Recommendation from Resource Allocation Management Page"
Assigning a Resource to a Promised Allocation from Resource Allocation Management PageA promised allocation that has been assigned to a position can be assigned a specific resource . You must have the Resource Mgmt: Promise Unspecified Resources access grant and the parameter ENABLE_PROMISE_RESOURCE_ALLOCATION must be enabled.
To assign a resource to a promised allocation in the Gantt view:
1. Click next to the promise.
2. Select a resource to assign to the promised allocation.
3. Click Assign.
The allocation provided for the resource is the lowest value of either the capacity of the resource or the promised allocation. If the resource's capacity is used and it is lower than the promised allocation, the promised allocation in the staffing profile remains, showing the remaining allocation (remaining allocation = initial promised allocation – the resource's used capacity). If there is no remaining allocation, Promise is removed.
To assign a resource to a promised allocation in the Table view:
Resource Management User GuideChapter 4: Using Resource Management for Capacity Planning
Project and Portfolio Management Center (9.51) Page 142 of 215

1. Click next to Promise and select Assign.
2. Select a resource to assign to the promised allocation.
Note: Only one resource can be assigned to a promised allocation.
3. Click Save on the Resource Allocation Management page.
Getting Resources Recommendation from Resource Allocation Management PageIn the Gantt view of the Resource Allocation Management page, you can take advantage of the Resource Management Optimization (RMO for short) feature, that is to say, you can get resources recommendation for the positions you want to assign resources to. This helps you better decide on the resources to assign.
Using RMO to Get Resource Recommendations
1. From the Resource Allocation Management page, click Select a Resource Pool to specify the resource pool from which the resources are assigned.
2. Select the position or positions to which you want to assign resources.
If you want to assign resources to all the positions of a staffing profile, select the staffing profile directly.
If you want to assign resources to all the positions on the page, select the check-all checkbox.
Note: The number and duration of the positions you selected cannot exceed what you specified in the parameters RMO_MAX_POSITION_AMOUNT and RMO_MAX_PERIOD_AMOUNT.
For detailed information of these parameters, see "Parameters Controlling Resource Management Optimization".
3. Click .
The RMO dialog box opens.
Resource Management User GuideChapter 4: Using Resource Management for Capacity Planning
Project and Portfolio Management Center (9.51) Page 143 of 215

The left pane of this page displays resources recommended by the system using the default criteria settings. For criteria settings, see step 3.
Field Description
Demanded Effort The total demanded effort (in hours) of the positions
Recommended Effort The total recommended effort (in hours) of the recommended resources
Demand Fulfillment Ratio The ratio of total recommended effort to total demanded effort
Staffing Profile The staffing profiles to which your selected positions belong
Position The name of the position
Status The status of the position
Role The role of the position
The right pane of this page enables you to specify criteria settings (matching criteria and weights of criteria) and save scenarios for RMO. If you do not want to use the resources
Resource Management User GuideChapter 4: Using Resource Management for Capacity Planning
Project and Portfolio Management Center (9.51) Page 144 of 215

recommendations based on the default criteria settings, proceed to step 3 to specify criteria settings.
Note: No resources are available for recommendation in either of the following two cases:
l The positions you selected are fulfilled, or,
l None of the resources in the current resource pool have capacity left.
4. (Optional) Specify criteria settings for RMO.
l Specifying matching criteria
o Role matching is a must?
If you select Yes for this criterion, PPM recommends the resources whose roles match the positions roles.
If you select No for this criterion, the resources recommended by PPM does not necessarily have the same role as the positions.
By default, the value of this criterion is No. o Resource type matching is a must?
If you select Yes for this criterion, PPM recommends the resources of the same resource types specified by the positions.
If you select No for this criterion, the resources recommended by PPM are not necessarily of the same resource types specified by the positions.
By default, the value of this criterion is No. o Availability Score >=
Use the slide bar to decide the value of this criterion. PPM recommends resources whose availability scores are equal to or greater than the value you decided.
By default, the value of this criterion is 50%.
Note: The calculation of availability score in RMO is different from that in the other areas of the Resource Management module.
In RMO, Availability Score = {[RC(1) / PF(1)]*100 + [RC(2) / PF(2)]*100 + ... + [RC(n) / PF(n)]*100} / N
where:
RC = available resource capacity per day (in hours)PF = position forecast demand per day (in hours)N = number of days
l Specifying weights of criteria
The weight of a criterion indicates how important the criterion is in the algorithm to find the optimized resources. You can specify the weight of each matching criterion. Make sure the weights of these criteria add up to 100%.
Resource Management User GuideChapter 4: Using Resource Management for Capacity Planning
Project and Portfolio Management Center (9.51) Page 145 of 215

o Role Score
This is the weight of the criterion "Role matching is a must?". By default, the weight is 33%.
o Resource Type Score
This is the weight of the criterion "Resource type matching is a must?". By default, the weight is 33%.
o Availability Score
This is the weight of the criterion "Availability Score >=". By default, the weight is 34%.
The pie chart is updated accordingly after you adjust the weights of the criteria.
5. Click Preview.
The resources that meet the criteria settings are displayed in the left pane.
6. Click Confirm the Assignment.
All the recommended resources are assigned.
To cancel the assignment, click Cancel or close the dialog box.
Note: RMO keeps track of the criteria settings you used to confirm the assignment. If you open RMO after you have confirmed the assignment at least once, the criteria settings will be what they are when you last confirm the assignment.
Saving Scenarios for RMO
Saving scenarios enables you to save different criteria settings for the comparison purpose. This helps you visualize resource recommendations in different scenarios and then better decide which criteria settings would be applied.
1. Specify matching criteria. See "Specifying matching criteria" on the previous page.
2. Specify weights of the criteria. See "Specifying weights of criteria" on the previous page.
3. Click Preview.
4. Click Save Scenario.
5. In the Save Scenario dialog, enter the scenario name, and then click OK.
The scenario (criteria settings) is listed in the Saved Scenarios table.
Resource Management User GuideChapter 4: Using Resource Management for Capacity Planning
Project and Portfolio Management Center (9.51) Page 146 of 215
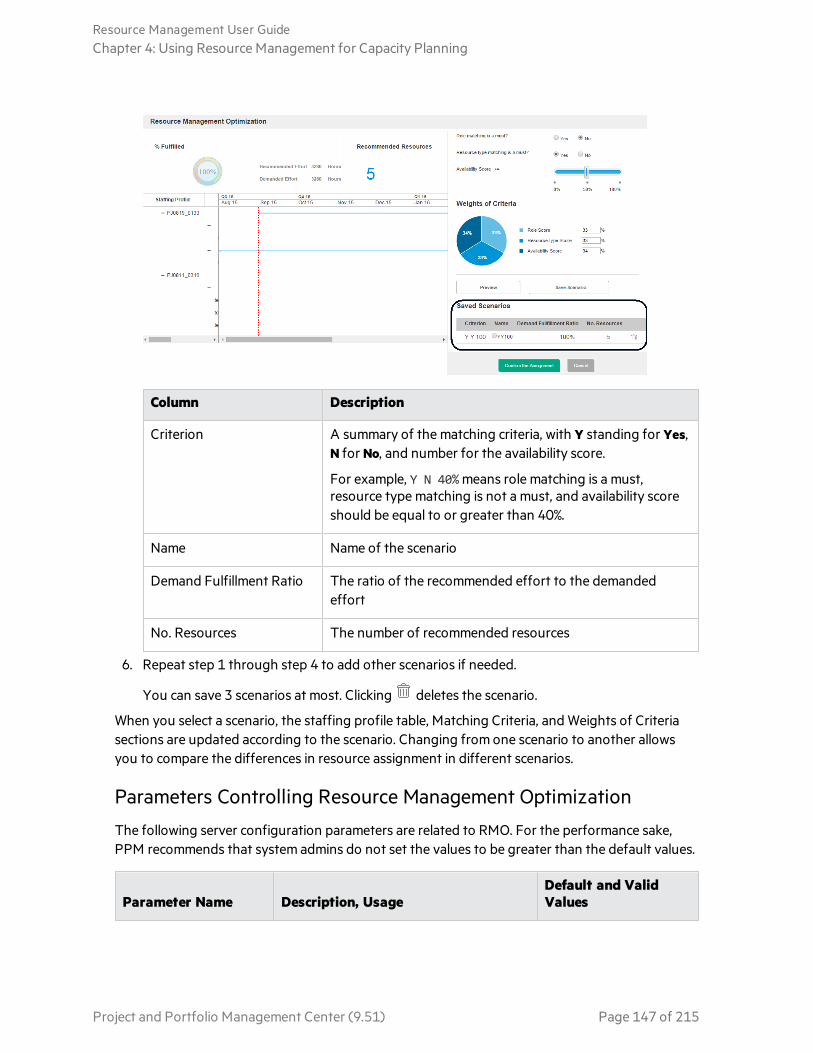
Column Description
Criterion A summary of the matching criteria, with Y standing for Yes, N for No, and number for the availability score.
For example, Y N 40% means role matching is a must, resource type matching is not a must, and availability score should be equal to or greater than 40%.
Name Name of the scenario
Demand Fulfillment Ratio The ratio of the recommended effort to the demanded effort
No. Resources The number of recommended resources
6. Repeat step 1 through step 4 to add other scenarios if needed.
You can save 3 scenarios at most. Clicking deletes the scenario.
When you select a scenario, the staffing profile table, Matching Criteria, and Weights of Criteria sections are updated according to the scenario. Changing from one scenario to another allows you to compare the differences in resource assignment in different scenarios.
Parameters Controlling Resource Management Optimization
The following server configuration parameters are related to RMO. For the performance sake, PPM recommends that system admins do not set the values to be greater than the default values.
Parameter Name Description, UsageDefault and Valid Values
Resource Management User GuideChapter 4: Using Resource Management for Capacity Planning
Project and Portfolio Management Center (9.51) Page 147 of 215
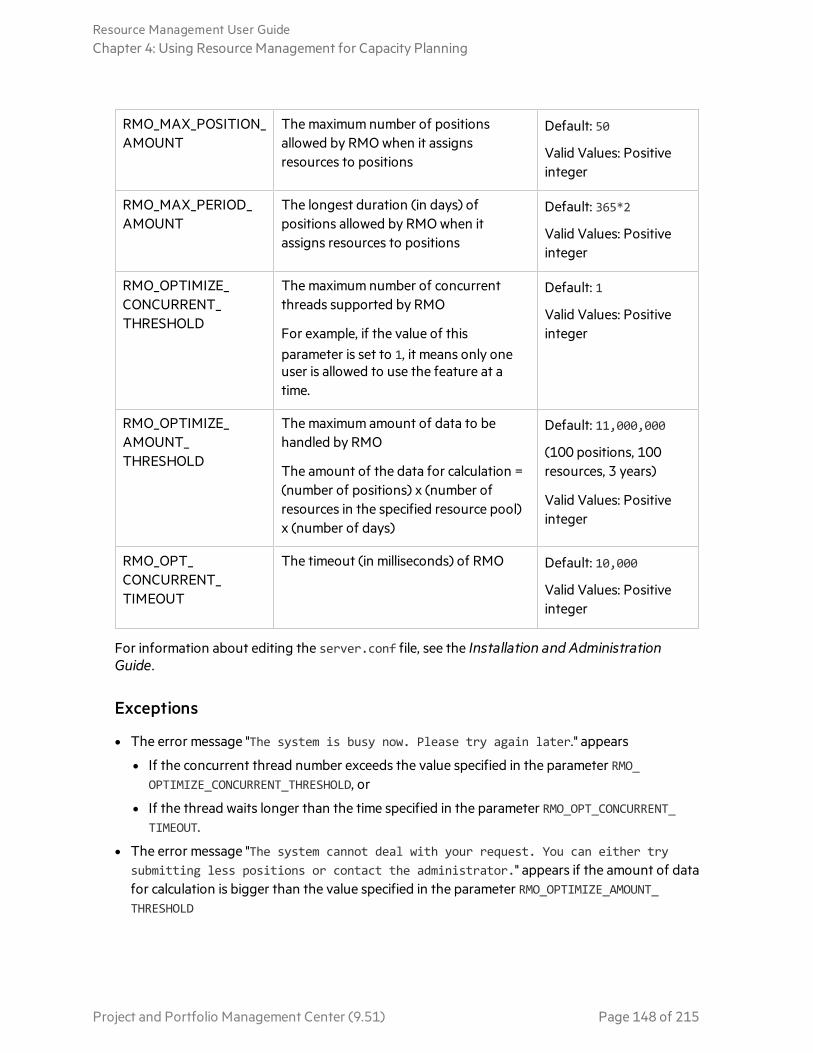
RMO_MAX_POSITION_AMOUNT
The maximum number of positions allowed by RMO when it assigns resources to positions
Default: 50
Valid Values: Positive integer
RMO_MAX_PERIOD_AMOUNT
The longest duration (in days) of positions allowed by RMO when it assigns resources to positions
Default: 365*2
Valid Values: Positive integer
RMO_OPTIMIZE_CONCURRENT_THRESHOLD
The maximum number of concurrent threads supported by RMO
For example, if the value of this parameter is set to 1, it means only one user is allowed to use the feature at a time.
Default: 1
Valid Values: Positive integer
RMO_OPTIMIZE_AMOUNT_THRESHOLD
The maximum amount of data to be handled by RMO
The amount of the data for calculation = (number of positions) x (number of resources in the specified resource pool) x (number of days)
Default: 11,000,000
(100 positions, 100 resources, 3 years)
Valid Values: Positive integer
RMO_OPT_CONCURRENT_TIMEOUT
The timeout (in milliseconds) of RMO Default: 10,000
Valid Values: Positive integer
For information about editing the server.conf file, see the Installation and Administration Guide.
Exceptions
l The error message "The system is busy now. Please try again later." appears
l If the concurrent thread number exceeds the value specified in the parameter RMO_OPTIMIZE_CONCURRENT_THRESHOLD, or
l If the thread waits longer than the time specified in the parameter RMO_OPT_CONCURRENT_TIMEOUT.
l The error message "The system cannot deal with your request. You can either try submitting less positions or contact the administrator." appears if the amount of data for calculation is bigger than the value specified in the parameter RMO_OPTIMIZE_AMOUNT_THRESHOLD
Resource Management User GuideChapter 4: Using Resource Management for Capacity Planning
Project and Portfolio Management Center (9.51) Page 148 of 215
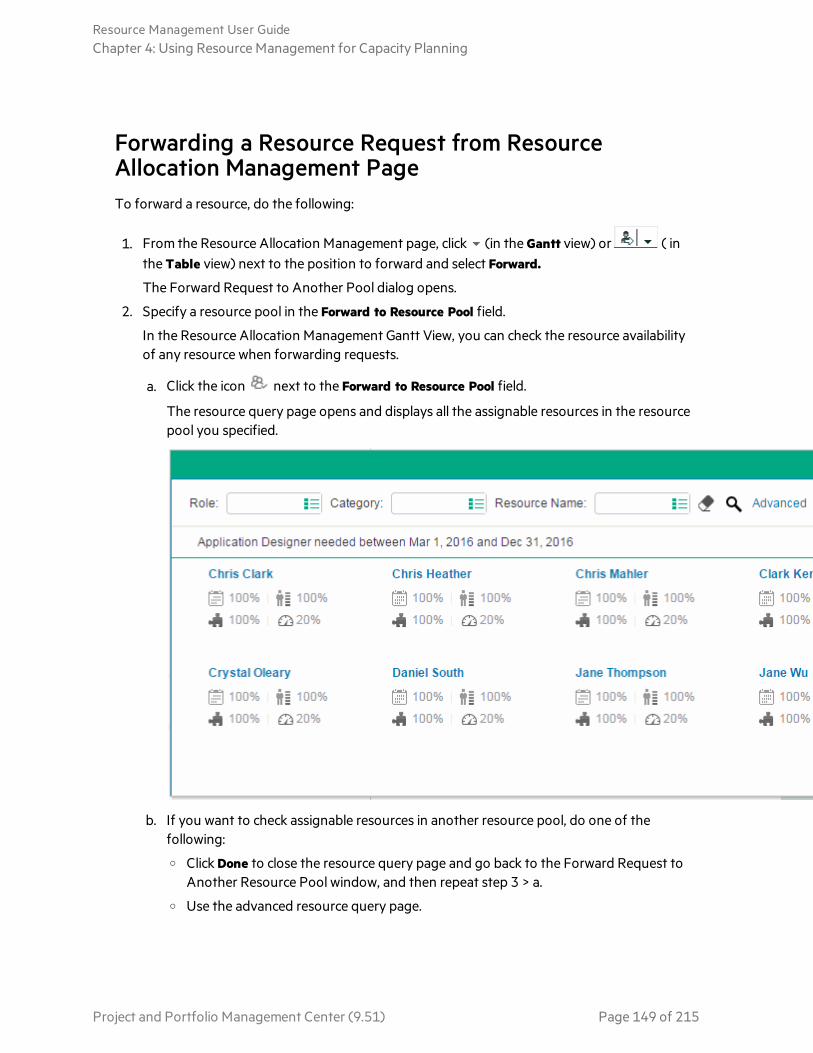
Forwarding a Resource Request from Resource Allocation Management PageTo forward a resource, do the following:
1. From the Resource Allocation Management page, click (in the Gantt view) or ( in the Table view) next to the position to forward and select Forward.
The Forward Request to Another Pool dialog opens.
2. Specify a resource pool in the Forward to Resource Pool field.
In the Resource Allocation Management Gantt View, you can check the resource availability of any resource when forwarding requests.
a. Click the icon next to the Forward to Resource Pool field.
The resource query page opens and displays all the assignable resources in the resource pool you specified.
b. If you want to check assignable resources in another resource pool, do one of the following:
o Click Done to close the resource query page and go back to the Forward Request to Another Resource Pool window, and then repeat step 3 > a.
o Use the advanced resource query page.
Resource Management User GuideChapter 4: Using Resource Management for Capacity Planning
Project and Portfolio Management Center (9.51) Page 149 of 215

A. Click Advanced.
The advanced resource query page opens in the Resource Results tab, which displays more details of assignable resources.
B. Click the Modify Search Criteria tab.
C. In the Resource Pool field, select the resource pool you want to check.
D. Click Search.
The Resource Results tab displays assignable resources in the resource pool.
E. Click Done to close the advanced resource query page and go back to the Forward Request to Another Resource Pool window.
3. Supply a reason for forwarding the resource demand in the Comments field.
4. Click Done (in the Gantt view) or Forward (in the Table view).
Promising Allocations from Resource Allocation Management PageTo allocate a promise (you must have the Resource Mgmt: Promise Unspecified Resources access grant and the parameter ENABLE_PROMISE_RESOURCE_ALLOCATION must be enabled), do the following:
1. From the Resource Allocation Management page, click (in the Gantt view) or (in the Table view) next to the position to promise and select Promise.
A new line appears with Promise as the resource. The status defaults to soft-booked and the promised allocation defaults to the position's unmet demand. You can edit the promised allocation value as needed.
2. Click Save.
Note: You must click Save from the Table view of the Resource Allocation Management Page in order to save any promises you made. In the Gantt view, the promises you made are saved automatically.
Rejecting a Resource Request from Resource Allocation Management PageTo reject a resource, do the following:
1. From the Resource Allocation Management page, click (in the Gantt view) or (in the Table view) next to the position to reject and select Reject.
The Reject Request for Unmet Demand dialog opens.
Resource Management User GuideChapter 4: Using Resource Management for Capacity Planning
Project and Portfolio Management Center (9.51) Page 150 of 215

2. Supply a reason for rejecting the resource demand in the Comments field.
3. Click Done.
Creating or Adjusting Resource's Assignment from Resource Allocation Management PageYou can use the Gantt chart of the Resource Allocation Management page to create or adjust resource's assignment.
Creating Resource's Assignment
To create a resource's assignment in the Gantt view of the Resource Allocation Management page:
1. In the Gantt chart, click the line of the resource you want to create assignment.
The icon appears.
2. Locate the icon to the period when the resource's assignment begins.
You are unable to locate the icon in the period earlier than the staffing profile start period.
3. Click and hold the icon, and drag it to the period when the resource's assignment ends.
You are unable to draft the icon to the period later than the staffing profile end period.
4. Release the mouse button. A dialog box as follows opens:
Note: Clicking Delete, you cancel the creation assignment.
5. Modify the period of the resource's assignment.
6. Specify the effort of the resource's assignment.
7. Click Confirm.
8. Click to save the changes.
Resource Management User GuideChapter 4: Using Resource Management for Capacity Planning
Project and Portfolio Management Center (9.51) Page 151 of 215

Adjusting Resource's Assignment
To adjust a resource assignment in the Gantt view of the Resource Allocation Management page:
1. In the Gantt chart, click on the resource's assignment you want to adjust.
2. Place the cursor in the left end of the assignment bar if you want to adjust the start date of the resource's assignment, or place the cursor in the right end of the assignment bar if you want to adjust the finish date of the resource's assignment, until the two-headed arrow appears.
3. Click and hold the cursor, and drag it leftwards or rightwards to your desired date.
4. Release the mouse button, and the dialog box opens.
Note: Clicking Delete, you delete the assignment.
5. Modify the period and effort of the resource's assignment.
6. Click Confirm.
7. Click to save the changes.
Also, you can adjust resource's assignment by double-clicking the assignment bar to open the dialog box, and then modify the period and effort.
Removing an Assigned Resource or Changing its StatusOnce a resource has been assigned to a position, you can remove the resource, or change the status of the resource to either committed or soft-booked. By default, the status of a resource is soft-booked.
Remove a resource or change its status in the Gantt view:
1. From the Status field of the resource, select Remove to remove the resource, or select Committed or Soft Booked to change the assignment status.
Resource Management User GuideChapter 4: Using Resource Management for Capacity Planning
Project and Portfolio Management Center (9.51) Page 152 of 215

2. Click on the Resource Allocation Management page.
Remove a resource or change its status in the Table view:
1. To remove a resource, click next to the resource. The resource and its data remain, but are displayed in gray.
To change the resource assignment status, in the Position column of the resource, select Committed or Soft Booked.
2. Click Save on the Resource Allocation Management page.
You can re-add a resource that has been selected for removal by clicking . This icon only appears when a resource has been selected for removal but before clicking the Save button on the Resource Allocation Management page.
Note: If a resource request has been forwarded to your resource pool and that resource has been assigned to a position, you cannot remove this resource if you do not manage this resource.
Removing a Promised AllocationA Promise that has been assigned to a position can also be removed from that position (you must have the Resource Mgmt: Promise Unspecified Resources access grant and the parameter ENABLE_PROMISE__RESOURCE_ALLOCATION must be enabled).
To remove a promised allocation in the Gantt view:
1. From the Status field of the promise you want to remove, select Remove.
2. Click on the Resource Allocation Management page.
To remove a promised allocation in the Table view:
1. Click next to Promise and select Remove.
Note: If a Promise has been added but the page has not been saved, the Promise is immediately removed (you do not have the option to re-add the Promise).
You can re-add a promised allocation that has been selected for removal by clicking . This icon only appears when a promised allocation has been selected for removal but before clicking the Save button on the Resource Allocation Management page.
2. Click Save on the Resource Allocation Management page.
Resource Management User GuideChapter 4: Using Resource Management for Capacity Planning
Project and Portfolio Management Center (9.51) Page 153 of 215

Viewing Projected Resource Pool Utilization from Resource Allocation Management PageOnly in the Table view of the Resource Allocation Management page, can you view the Projected Resource Pool Utilization section. This section displays the total capacity, total committed allocations, total soft-booked allocations, and remaining capacity for the resource pool. The data is updated dynamically when resource allocations are modified in the Resource Allocation Management page.
Note: This data never includes resources of child resource pools. Selecting the Include children resource pools when calculating the resource load for this resource pool checkbox (from the Edit Resource Pool page) does not affect the data on the Resource Allocation Management page.
To view the total capacity, total committed allocations, total soft-booked allocations, and remaining capacity, click next to Projected Resource Pool Utilization.
Note: Loading this data may cause system performance to decrease.
Time Period Data Description
Total Capacity The direct capacity of the selected resource pool.
This information is located in the first column of a time period section for the projected resource pool utilization.
Total Committed Resources
The total number of named resources in the selected resource pool committed to a staffing profile.
Total Soft Booked Resources
The total number of named resources in the selected resource pool not yet committed to a staffing profile.
Total Committed Promises
The total number of promised resources in the selected resource pool committed to a staffing profile.
Total Soft Booked Promises
The total number of promised resources in the selected resource pool not yet committed to a staffing profile.
Resource Management User GuideChapter 4: Using Resource Management for Capacity Planning
Project and Portfolio Management Center (9.51) Page 154 of 215

Time Period Data Description
Remaining Capacity
The available capacity of the selected resource pool. A number displayed in red denotes an overallocation.
This information is located in the second column of a time period section for the projected resource pool utilization.
Remaining Capacity = Total Capacity – ( Total Committed Resources + Total Soft Booked Resources + Total Committed Promises + Total Soft Booked Promises )
Resource Management User GuideChapter 4: Using Resource Management for Capacity Planning
Project and Portfolio Management Center (9.51) Page 155 of 215

Chapter 5: Using Resource Management for Work Plan and Request Execution l "Overview of Using Resource Management for Work Plan and Request Execution" below
l "Configuring Requests for Resource Management" on the next page
l "Assigning Requests" on page 158
l "Assigning Tasks" on page 159
l "Using the Resource Finder" on page 163
l "Overriding Scheduled and Actual Values" on page 185
l "Viewing Work Items" on page 186
l "Visualizing Assignments" on page 188
l "Adjusting Resource Calendars" on page 193
Overview of Using Resource Management for Work Plan and Request ExecutionThis section explains how to use Resource Management functionality to perform operational planning tasks and analyze current resource usage. Resource Management can be used for operational resource planning, which concerns itself with how resources are being used for current work. Operational resource planning using Resource Management can consist of the following activities:
l Viewing present resource usage
l Determining areas of over-allocation and under-allocation of workload among resources (load balancing)
l Displaying personal workload for the present and near future
l Finding the most appropriate resources to complete a task or request
Whereas resource capacity planning typically involves only management-level personnel and higher, operational resource planning concerns two main sets of users:
l Managers. Project or team managers use Resource Management to analyze resource workload for their teams and take the appropriate actions.
l Team members. Team members view their own workload with handy visualizations and spot potential trouble areas.
Workload tracked in Resource Management can consist of either project tasks or requests.
Note: Assignments made to resources in staffing profile lines can also be tracked as operational load if so desired. See "Tracking Demand with Staffing Profiles" on page 54 for more information on staffing profiles.
Resource Management User GuideChapter 5: Using Resource Management for Work Plan and Request Execution
Project and Portfolio Management Center (9.51) Page 156 of 215

The system takes into account users' start and end dates in resource capacity calculations and visualizations. For example, a user who is set to leave the company at a certain date cannot be assigned to a task or staffing profile afterward. Likewise, users starting work in the future can be selected for relevant entities scheduled to be active in the future.
Configuring Requests for Resource ManagementIn order to consider requests as work items to be tracked in Resource Management, you must associate work item fields with them. See "Setting Up Request Work Item Fields" on page 20 for more detailed information on associating work item fields with requests.
Note: In order to view or use requests, you must have an Demand Management license.
A request work item features the fields described in "Table 5-1. Request work item fields" below.
Field Name Description
Workload/Non Workload
Whether the request work item is counted as load against the assigned resource's capacity.
Workload Category The reporting category of the request work item.
Scheduled Start Date
The scheduled start date for the request work item.
Scheduled Finish Date
The scheduled finish date for the request work item.
Scheduled Duration
The scheduled duration for the request work item.
Scheduled Effort The scheduled effort for the request work item.
Assigned Resource (Already present as the Assigned User.)
Role The role being used by the Assigned Resource.
% Complete (Automatically updated by request workflow.)
Actual Start Date The actual start date for the request work item.
Actual Finish Date The actual finish date for the request work item.
Actual Duration The actual duration for the request work item.
Actual Effort The actual effort for the request work item.
Table 5-1. Request work item fields
Resource Management User GuideChapter 5: Using Resource Management for Work Plan and Request Execution
Project and Portfolio Management Center (9.51) Page 157 of 215

These work item fields have Resource Management interaction built into them through request type rules and other built-in system functionality. For more information on request type rules, see the Demand Management Configuration Guide document.
The following work item fields can be safely customized with minimal impact to Resource Management functionality:
l Workload/Non Workload (if set to No, the request is not counted as workload)
l Workload Category
Note: Certain work item fields have strong functional defaults, such that altering the way they work could have unintended side effects. The following work item fields can have Rules that read their values, but generally should not be altered unless you need to specify effort other than full time:
l Scheduled Duration
l Actual Duration
l Scheduled Effort
l Actual Effort
Assigning RequestsRequests are assigned using Demand Management. Setting a resource as the Assigned To user for a request automatically books that resource for the request.
Booking a resource for a request also books that resource's primary role. If the resource has a different role you want to book, you can change the value in the Role field.
The request is counted as load against the resource's capacity and will show up in Resource Management visualizations, such as the resource Gantt chart on the Capacity/Load tab of the View Resource page, pictured in "Figure 5-1. View Resource page: Capacity/Load tab" on the next page. If the Workload flag is enabled, the request will show up in load histograms.
Resource Management User GuideChapter 5: Using Resource Management for Work Plan and Request Execution
Project and Portfolio Management Center (9.51) Page 158 of 215

Figure 5-1. View Resource page: Capacity/Load tab
To view your resource Gantt chart, select Open > Administration > View My Resource Information from the menu bar in the standard interface and click the Capacity/Load tab. The resource Gantt chart can be altered to display a wide range of time periods.
Note: To view a Gantt chart, you must have a license for Project Management module. Even when you are assigned, you still cannot view the resource Gantt chart if you do not have a license for the Project Management module.
A request that is in progress but is 0 percent complete appears as Ready in the Gantt chart.
Assigning TasksTasks can be assigned to a role or a specific resource.
Associating Roles with TasksWhen planning a project, tasks can be associated with a specific role prior to booking the exact resource who will complete the task. This can help produce more accurate cost estimates as well as a detailed role load view in the early stages of project plan management.
Figure 5-2. Task with role assigned but no resource
Resource Management User GuideChapter 5: Using Resource Management for Work Plan and Request Execution
Project and Portfolio Management Center (9.51) Page 159 of 215
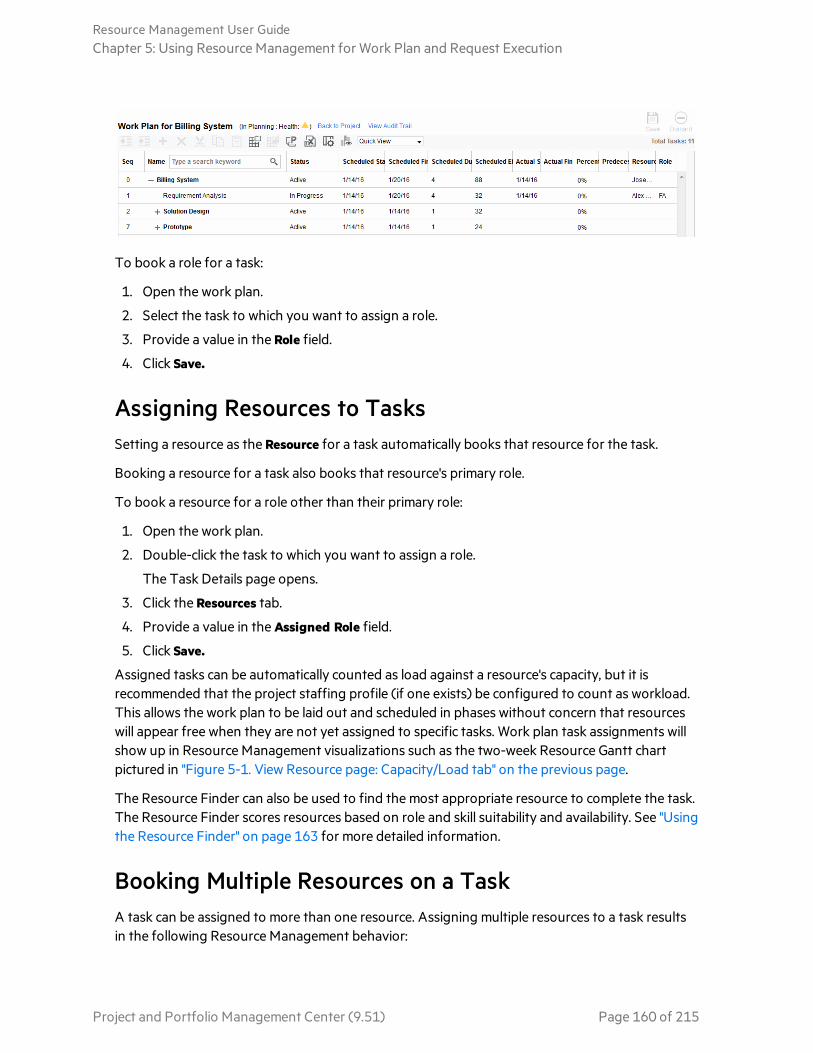
To book a role for a task:
1. Open the work plan.
2. Select the task to which you want to assign a role.
3. Provide a value in the Role field.
4. Click Save.
Assigning Resources to TasksSetting a resource as the Resource for a task automatically books that resource for the task.
Booking a resource for a task also books that resource's primary role.
To book a resource for a role other than their primary role:
1. Open the work plan.
2. Double-click the task to which you want to assign a role.
The Task Details page opens.
3. Click the Resources tab.
4. Provide a value in the Assigned Role field.
5. Click Save.
Assigned tasks can be automatically counted as load against a resource's capacity, but it is recommended that the project staffing profile (if one exists) be configured to count as workload. This allows the work plan to be laid out and scheduled in phases without concern that resources will appear free when they are not yet assigned to specific tasks. Work plan task assignments will show up in Resource Management visualizations such as the two-week Resource Gantt chart pictured in "Figure 5-1. View Resource page: Capacity/Load tab" on the previous page.
The Resource Finder can also be used to find the most appropriate resource to complete the task. The Resource Finder scores resources based on role and skill suitability and availability. See "Using the Resource Finder" on page 163 for more detailed information.
Booking Multiple Resources on a TaskA task can be assigned to more than one resource. Assigning multiple resources to a task results in the following Resource Management behavior:
Resource Management User GuideChapter 5: Using Resource Management for Work Plan and Request Execution
Project and Portfolio Management Center (9.51) Page 160 of 215

l Each assigned resource is booked for the task's entire scheduled duration. The scheduled effort is adjusted proportionately. For example, a one-day duration task, with a 10-hour workday and two resources assigned, would default to 20 hours of effort.
To assign multiple resources to a task:
1. Open the work plan.
2. Double-click the task to which you want to assign a role.
The Task Detail page opens.
3. Click the Resources tab.
4. Click Add Resource to select a new resource to add to the task.
Repeat as necessary.
5. Click Save.
The values for each individual resource's scheduled effort can be altered in the Task Detail page.
To change the scheduled effort for multiple resources assigned to a task:
1. Open the work plan.
2. Double-click the task to which you want to assign a role.
The Task Detail page opens.
3. Click the Resources tab.
4. Click Change to Manual Control.
5. For each resource, type a value in the Scheduled Effort numeric field.
The Total Effort (hours) and Unassigned Effort fields update themselves automatically. If Total Effort is altered directly, the partial effort of each resource is adjusted proportionately.
6. Click Save.
Comparing Project Capacity to Work Plan LoadThe Compare to Work Plan for Project page can be used to compare the forecasts made by the project staffing profile to the task assignments made on the work plan. If the rolled-up scheduled effort from the work plan does not align with the high-level assignments made in the staffing profile, this could be an indication of unbalanced utilization of the resources committed to the project. This is the same page used to compare the actual effort from the work plan with the assigned capacity in the staffing profile.
Compare to Work Plan for Project
The Compare to Work Plan for Project page displays a data table for a staffing profile that can be broken down by role or resource.
Resource Management User GuideChapter 5: Using Resource Management for Work Plan and Request Execution
Project and Portfolio Management Center (9.51) Page 161 of 215

Figure 5-3. Compare to Work Plan for Project page
The page shows a different set of details depending on which view is chosen, listed in "Table 5-2. Details available in Compare to Work Plan for Project page" below.
View byAvailable details Description
Role Forecast Anticipated demand for named and unnamed resources.
Allocation Total effort allocated (includes assigned and promised resources).
Scheduled Effort Total effort required.
Actual Effort Total effort completed.
Resource Allocation Total effort allocated.
Scheduled Effort Total effort required.
Actual Effort Total effort completed.
Table 5-2. Details available in Compare to Work Plan for Project page
Open the Compare to Work Plan for Project page by clicking Compare to Work Plan in the Staffing Profile page. The data in the Compare to Work Plan for Project page can also be exported to a Microsoft Excel file for use in presentations or for further analysis. To export the Compare to Work Plan for Project page to a Microsoft Excel file, click the Export to Excel link.
Note: If you are having problems with the data in Excel, you may need to configure the Internet options of your Web browser. See the Project Management User Guide for more information.
Resource Management User GuideChapter 5: Using Resource Management for Work Plan and Request Execution
Project and Portfolio Management Center (9.51) Page 162 of 215

Work Plan Resource Usage View
The Resource Usage page for work plans allows you to view the load placed on each resource by the work plan, broken down by task by day.
Open the Resource Usage page by clicking Actions at the top of the Work Plan page and selecting Resource Usage. For more details on the Resource Usage page, see the Project Management User Guide.
Using the Resource FinderResource Management's Resource Finder is used when you assign resources to the following entities:
l Tasks
l Requests
l Staffing profile positions
You can also open the Resource Finder for a generic resource availability search by selecting Open > Resource Management > Analyze Resources > Search Resource Availability from the menu bar in the standard interface.
Note: The Resource Finder may display some results in grey. These are resources that belong to a resource pool you do not manage. These resources can be viewed in the Resource Finder, but not assigned.
The Resource Finder's main fields are described in "Table 5-3. Resource Finder fields and buttons" on the next page. Its header fields vary depending on whether a search is being run for a task, request, staffing profile, or generically.
Resource Management User GuideChapter 5: Using Resource Management for Work Plan and Request Execution
Project and Portfolio Management Center (9.51) Page 163 of 215

Figure 5-4. Resource Finder
Field/Button Name Definition
Resource Results
[checkbox] Selecting this option keeps the selected resource at the top of the Resource Finder when paging through or revising the search.
Resource Name The name of the resource. Sortable column.
Suitability Score A numeric score representing the resource's suitability for the entity in question, based on their related role, skills, and availability. The higher this score, the better. See "Suitability Score Calculation" on page 178 for more detailed information on how this score is computed.
Table 5-3. Resource Finder fields and buttons
Resource Management User GuideChapter 5: Using Resource Management for Work Plan and Request Execution
Project and Portfolio Management Center (9.51) Page 164 of 215

Field/Button Name Definition
Availability Score A numeric score representing the resource's availability for the entity in question, based on their current load and capacity. A higher score (close or equal to 100) means better availability. See "Calculating Availability Score" on page 179 for more detailed information on how this score is computed.
Skill Score A numeric score representing the resource's suitability for the entity in question relative to the skill required. A higher score (close or equal to 100) means better suitability. See "Calculating Skill Score" on page 182 for more detailed information on how this score is computed.
Projected Utilization How much the resource would be used if the assignment were made. See "Calculating Projected Utilization" on page 182 for more detailed information on how projected utilization is computed.
Current Utilization (chart)
How much the resource is currently being used during the selected time period, displayed in a chart. Utilization is expressed by color. Current utilization is current load divided by capacity for the given time period.
Check All Selects the checkboxes next to all resources listed.
View Resource Load Opens the Resource Load page with data for all selected resources.
Compare Skills Opens the Compare Skills page with data for all selected resources.
Prev/Next Moves on to the next or previous set of search results, with the selected resources (if any) retained at the top of the list.
Assign Enabled when one or more resources are selected. Assigns the selected resource(s) to the entity in question and closes the Resource Finder.
Cancel Closes the Resource Finder without making changes.
Modify Search Criteria
Availability Within Dates
Searches for resources available within the selected dates.
Table 5-3. Resource Finder fields and buttons, continued
Resource Management User GuideChapter 5: Using Resource Management for Work Plan and Request Execution
Project and Portfolio Management Center (9.51) Page 165 of 215

Field/Button Name Definition
Effort The amount of effort in hours or FTEs required within the available dates. This field only appears on the Resource Finder for tasks and requests.
Delete icon Removes the skill from the filter list.
Skill Searches for resources with the selected skill.
Ideal Proficiency Searches for resources near the selected Proficiency Level.
Add Skill Adds another skill line to the filter list.
Only show results with a Suitability Score greater than
Searches for resources with a Suitability Score greater than the provided value.
Resource Name Only displays the selected resources.
Resource Category Only displays resources in the selected category.
Role Only displays resources with the selected role.
Location Only displays resources in the selected location.
Resource Pool Only displays resources in the selected resource pool.
Department Only displays resources in the selected department.
Organization Unit Only displays resources in the selected organization unit.
Search Reloads the Resource Finder with search results based on the new criteria.
Table 5-3. Resource Finder fields and buttons, continued
Searching for a ResourceTo use the Resource Finder to search for a resource to assign to a task, request or staffing profile:
1. Provide a Role for the desired entity.
2. Click the Resource Finder icon next to the Resource field.
The Resource Finder opens, displaying a set of resources with the desired role.
3. Select the checkboxes next to any of the resources displayed to retain them in case you want to page to the next set of results or refine the search.
Resource Management User GuideChapter 5: Using Resource Management for Work Plan and Request Execution
Project and Portfolio Management Center (9.51) Page 166 of 215

If you select some resources and click Search Again in the Modify Search Criteria tab, the Resource Finder reloads with the selected resources collected at the top of the list for easy comparison.
4. If needed, refine the Resource Finder's search by providing filter criteria in the fields in the Modify Search Criteria tab and clicking Search Again.
The filter fields in the Modify Search Criteria tab vary depending on whether you are looking at a task, request, or staffing profile line.
5. If desired, drill down into the selected resources' load and skill profiles by clicking View Resource Load or Compare Skills.
See "Viewing Resource Load" on page 170 or "Comparing Skills" on page 172 for more detailed information.
6. Click Assign once you have selected the resources you wish to assign.
The Resource Finder closes and the Resource field on the current entity is automatically filled in with the selected resources.
Utilizing Resource User Data Fields for Resource Searching
Starting with version 9.11, PPM Center added 100 resource user data fields to extend the usability for resource entities. This enhancement utilizes these user data fields for resource searching, which enables you to specify the user data fields as search conditions when searching for resources.
Resource User Data
To make user data fields available for resource searching, the Display on Search and Filter option is added to the Attributes tab of a resource user data field in Workbench. See "Figure 5-6. The Display on Seach and Filter option in Workbench" on the next page
Resource Management User GuideChapter 5: Using Resource Management for Work Plan and Request Execution
Project and Portfolio Management Center (9.51) Page 167 of 215

Figure 5-6. The Display on Seach and Filter option in Workbench
This option indicates whether or not the resource user data field is displayed in resource searching pages. If you set this option to Yes, the field is displayed in the following pages:
l Modify Search Criteria page for the Resource Finder
l Search Resources page
l Search Resources Availability page
User data fields with the following component types have the Display on Search and Filter option:
l Text Field
l Text Area
l Drop Down List
l Radio Buttons (Yes / No)
l Auto Complete List
l Date Field
Fields with other component types, such as Link and Attachment, do not have the Display on Search and Filter option. Therefore, these fields cannot be displayed in resource searching pages.
Resource Management User GuideChapter 5: Using Resource Management for Work Plan and Request Execution
Project and Portfolio Management Center (9.51) Page 168 of 215
If a user data field uses one of the component types mentioned in "Table 5-6. Default component type switch" below, the field will be rendered differently a resource searching page (compared with how the field is rendered on the Details tab of the Modify Resource page). This is because the system performs a component type switch and adds values for these user data fields. "Table 5-6. Default component type switch" below details the default component type switches and additional values.
Component Type on the Modify Resource page
Component Type on Resource Searching Pages Additional Value
Drop Down List Auto Complete List a The value <Blank> is added to the Auto Complete List. This option enables you to filter out all resources that have a value set for the field.
Radio Buttons (Yes / No) Drop Down List The value <Blank> is added to the Drop Down List. This option enables you to filter out all resources that have a value set for the field.
Auto Complete List Auto Complete List a The value <Blank> is added to the Auto Complete List. This option enables you to filter out all resources that have a value set for the field.
Date Field Date Field Two Date fields are displayed. These two fields enable you to specify a time period.
a. On resource searching pages, fields with the Auto Complete List component type support multiple selections.
Table 5-6. Default component type switch
Search Validation
For fields that use the component types mentioned in "Table 5-6. Default component type switch" above, you can customize the validations (the component type, and possible field values) that the fields use in resource searching pages by configuring the Search Validation field in Workbench.
For example, field A is an auto complete list that contains three values (average, good, excellent). You can configure the Search Validation field to make it only contain two values (good, excellent) in resource searching pages.
Note: The Search Validation field does not take effect if the Display on Search and Filter option is set to No.
Resource Management User GuideChapter 5: Using Resource Management for Work Plan and Request Execution
Project and Portfolio Management Center (9.51) Page 169 of 215

Retrieving Values from Position User Data Fields
You may create staffing profile position user data fields in Workbench, and specify position user data fields on the Details tab of a position page. To simplify your resource searching, a resource user data field will retrieve the value from a position user data field if the resource user data field uses the same token and component type with the position user data field. In this case, the resource user data field is automatically populated with the position user data value when you open a resource searching page.
Note: You can update or remove the value if the populated value does not fit your search criteria.
Modifying Skill Criteria for Resource Searching
You can do the following modification to the skill criteria for resource searching:
l Click Add Skill to add more skills.
l Click the icon to remove a skill.
l Modify the Ideal Proficiency field for the skill.
The values available for this field is configured by the RSC – Skill Proficiency validation. This validation defines the sequence of proficiency levels. The system measures the proficiency level according to the sequence number. A high sequence number indicates a high proficiency level.
Figure 5-7. Modifying skill criteria
Viewing Resource LoadThe Resource Finder allows you to view a breakdown table of selected resource load similar to the table accessed from the Analyze Assignment Load page. This table includes scheduled effort values for all assigned tasks and requests, resource allocations for staffing profiles, and the available capacity for each resource.
Figure 5-8. Resource Finder Resource Load Breakdown table
Resource Management User GuideChapter 5: Using Resource Management for Work Plan and Request Execution
Project and Portfolio Management Center (9.51) Page 170 of 215
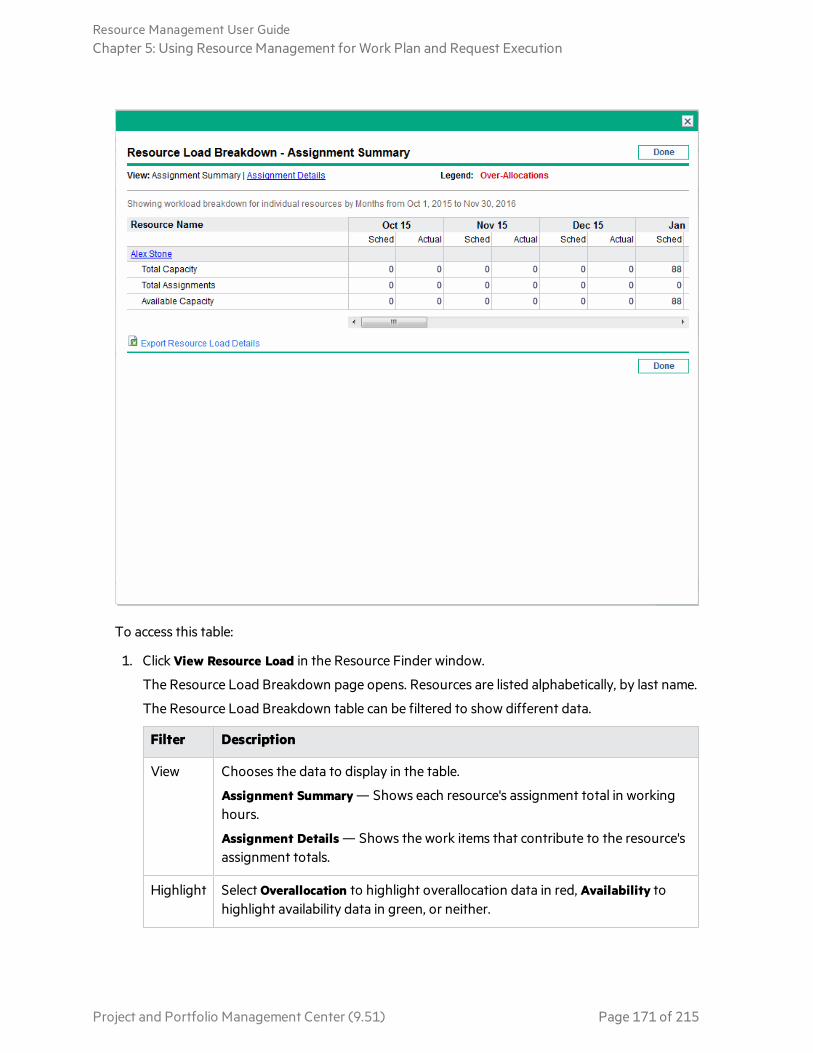
To access this table:
1. Click View Resource Load in the Resource Finder window.
The Resource Load Breakdown page opens. Resources are listed alphabetically, by last name.
The Resource Load Breakdown table can be filtered to show different data.
Filter Description
View Chooses the data to display in the table.
Assignment Summary — Shows each resource's assignment total in working hours.
Assignment Details — Shows the work items that contribute to the resource's assignment totals.
Highlight Select Overallocation to highlight overallocation data in red, Availability to highlight availability data in green, or neither.
Resource Management User GuideChapter 5: Using Resource Management for Work Plan and Request Execution
Project and Portfolio Management Center (9.51) Page 171 of 215

The following table lists the column and row descriptions.
Column/Row Description
Sched The scheduled effort of the resource. Scheduled effort is evenly distributed across working days from the scheduled start date to the scheduled finish date. Hours per week may differ based on regional and personal calendars (for example, holidays and personal vacations). Decimal values may not be displayed when viewing this table from the Analyze Assignment Load portlet.
Actual The actual effort of the resource.
Total Capacity
Maximum total amount of effort that can be allocated for the resource.
Total Assignments
Total effort provided by the resource.
Available Capacity
The remaining capacity of the resource.
Available Capacity = Total Capacity – Total Assignments
2. Click Done to return to the Resource Finder.
Comparing SkillsThe Resource Finder allows you to view a table comparing the skills of selected resources, including each resource's skill level.
Figure 5-11. Resource Finder Compare Resource Skills page
Resource Management User GuideChapter 5: Using Resource Management for Work Plan and Request Execution
Project and Portfolio Management Center (9.51) Page 172 of 215

To access this table:
1. Click Compare Skills in the Resource Finder window. The Compare Resource Skills page opens.
Column Description
Resource Name The name of the resource.
Role User responsibility that helps describe resource requirements.
Overall Skill Score The average of all skill scores of a resource.
Skill Score A numeric score representing the resource's suitability relative to the skill required. A higher score (close or equal to 100) means better suitability. See "Calculating Skill Score" on page 182 for more detailed information on how this score is computed.
Resource Management User GuideChapter 5: Using Resource Management for Work Plan and Request Execution
Project and Portfolio Management Center (9.51) Page 173 of 215

Column Description
Desired Skills Skills selected in the Resource Finder that you would like the resource to possess.
Level The proficiency level of the resource for the specified skill.
2. Click Done to return to the Resource Finder.
Scalable Resource FinderScalable Resource Finder includes the following improvements:
l "Column Refresh" on the next page
l "Required Skill and Preferred Skill" on page 176
l "Scalable Resource Results" on page 177
You can use scalable Resource Finder for staffing profiles, the Resource Allocation Management page, and the Resource Availability search page only.
Note: The Resource Finder for requests and work plans remains unchanged.
To enable Scalable Resource Finder, add the following line in the server.conf file:com.kintana.core.server.SCALABLE_RESOURCE_FINDER_MODE = 1
By default, Scalable Resource Finder is disabled. Setting the SCALABLE_RESOURCE_FINDER_MODE parameter to 0 also makes the system use the regular Resource Finder mode.
Resource Management User GuideChapter 5: Using Resource Management for Work Plan and Request Execution
Project and Portfolio Management Center (9.51) Page 174 of 215

Figure 5-5. Improved resource results
Improved skill criteria for Scalable Resource Finder
Column Refresh
Columns described in "Table 5-4. New Columns in Resource Results" on the next page are added to the Resource Results tab:
Resource Management User GuideChapter 5: Using Resource Management for Work Plan and Request Execution
Project and Portfolio Management Center (9.51) Page 175 of 215

Column Name Description
# of Skill Matched
Represents the sum of RSN and PSN. For more information about RSN and PSN, see the "Calculating Skill Score" on page 182 section.
Category Represents the category (such as full time employee, or contractor) of a resource.
Role Represents the role of the resource.
Resource Pool
Represents the resource pool of the resource.
Email Represents the Email address of the resource.
Direct Manager
Represents the direct manager of the resource.
Table 5-4. New Columns in Resource Results
The following columns are sortable:
l Resource Name
l Suitability Score
l Availability Score
l #of Skill Matched
By default, the results are sorted by the suitability score in a descending order. The following columns are removed from the Resource Results tab:
l Projected Utilization
l Gantt chart
l Skill Score
Except for the column additions and removals, the column width is resizable. You can drag to expand the column width to display long strings. Correspondingly, a horizontal scroll-bar enables you to view the rightmost data if you expand the column width.
Required Skill and Preferred Skill
In some resource searching scenario, you may have to set one or more skills as required skills while the others as nice-to-have (preferred) ones. To fit your business needs, the Scalable Resource Finder classifies skills as required skills and preferred skills by setting the Required field.
l Required Skill: Skills that a resource must have. Additionally, the resource's skill proficiency must meet or exceed the minimum skill proficiency. Otherwise, the resource will be filtered out.
l Preferred Skill: Skill that a resource does not have to have. Having a preferred skill increases the Suitability Score of a resource.
By default, the Required field is set to Yes.
Resource Management User GuideChapter 5: Using Resource Management for Work Plan and Request Execution
Project and Portfolio Management Center (9.51) Page 176 of 215

In addition to the Required field, you can do the following modification to the skill criteria for Scalable Resource Finder:
l Click Add Skill to add more skills.
l Click the icon to remove a skill.
l Modify the Minimum Proficiency field for the skill.
You can modify the value displayed in the Minimum Proficiency field by configuring the RSC – Skill Proficiency validation. This validation defines a sequence of proficiency levels. The system measures the proficiency level according to the sequence number. A high sequence number indicates a high proficiency level.
By default, this field is set to the value you specified in the Aptitude field of the position.
If you set a skill to be a preferred one (set the Required field to No), the Minimum Proficiency field will be grayed out.
Figure 5-7. Modifying skill criteria
Compared with the skills specified in the position (shown in "Adding Positions" on page 81), the following changes occur after the skill criteria modification (shown in "Figure 5-7. Modifying skill criteria" above).
l The skill C becomes a preferred skill. And thus, resources that do not have this skill will not be filtered out. While resources that have this skill may have higher suitability scores.
l The minimum proficiency of the skill java is set to "Trained." This change makes more resources that have the skill Java become eligible.
The skill Linux is added as a required one. This change filters out all the resources that do not have the skill Linux.
Scalable Resource Results
The system by default uses the regular Resource Finder mode which reads the RESOURCE_FINDER_SEARCH_MAX_USERS parameter to determine the maximum number of resources that can be targeted.
When you set the SCALABLE_RESOURCE_FINDER_MODE parameter to 1, the system uses the parameters described in "Table 5-5. Parameters for scalable Resource Finder" on the next page.
Resource Management User GuideChapter 5: Using Resource Management for Work Plan and Request Execution
Project and Portfolio Management Center (9.51) Page 177 of 215
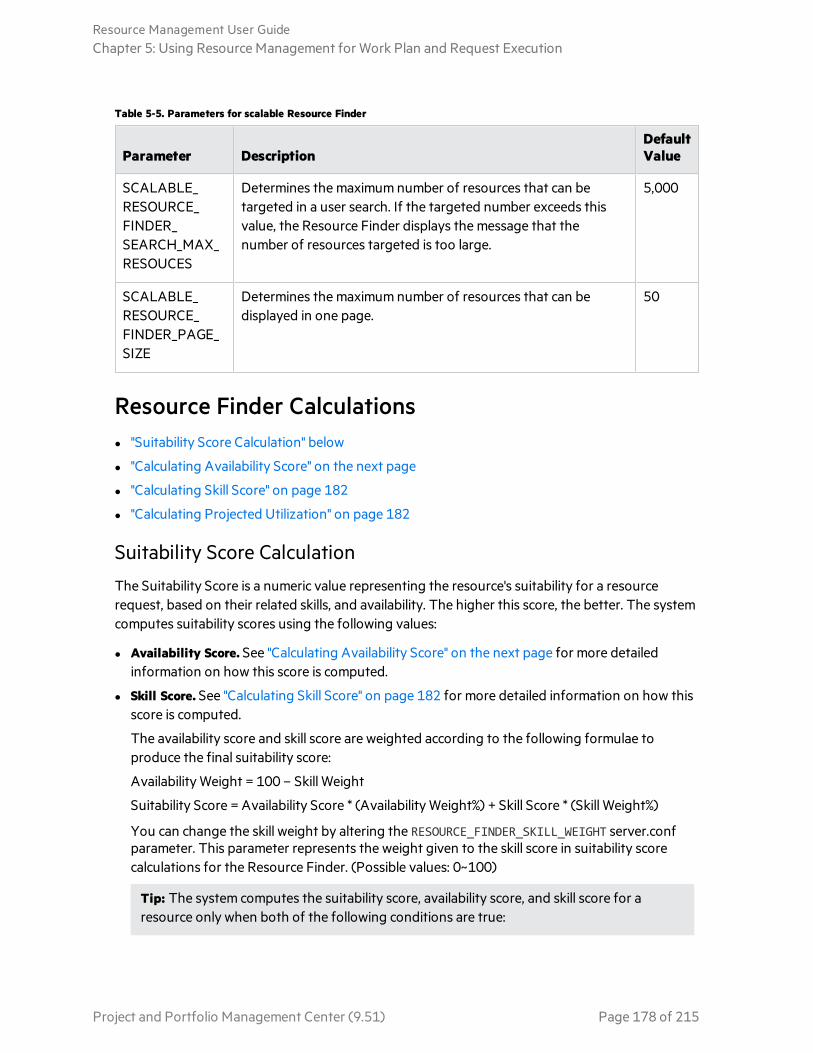
Parameter DescriptionDefault Value
SCALABLE_RESOURCE_FINDER_SEARCH_MAX_RESOUCES
Determines the maximum number of resources that can be targeted in a user search. If the targeted number exceeds this value, the Resource Finder displays the message that the number of resources targeted is too large.
5,000
SCALABLE_RESOURCE_FINDER_PAGE_SIZE
Determines the maximum number of resources that can be displayed in one page.
50
Table 5-5. Parameters for scalable Resource Finder
Resource Finder Calculations l "Suitability Score Calculation" below
l "Calculating Availability Score" on the next page
l "Calculating Skill Score" on page 182
l "Calculating Projected Utilization" on page 182
Suitability Score Calculation
The Suitability Score is a numeric value representing the resource's suitability for a resource request, based on their related skills, and availability. The higher this score, the better. The system computes suitability scores using the following values:
l Availability Score. See "Calculating Availability Score" on the next page for more detailed information on how this score is computed.
l Skill Score. See "Calculating Skill Score" on page 182 for more detailed information on how this score is computed.
The availability score and skill score are weighted according to the following formulae to produce the final suitability score:
Availability Weight = 100 – Skill Weight
Suitability Score = Availability Score * (Availability Weight%) + Skill Score * (Skill Weight%)
You can change the skill weight by altering the RESOURCE_FINDER_SKILL_WEIGHT server.conf parameter. This parameter represents the weight given to the skill score in suitability score calculations for the Resource Finder. (Possible values: 0~100)
Tip: The system computes the suitability score, availability score, and skill score for a resource only when both of the following conditions are true:
Resource Management User GuideChapter 5: Using Resource Management for Work Plan and Request Execution
Project and Portfolio Management Center (9.51) Page 178 of 215
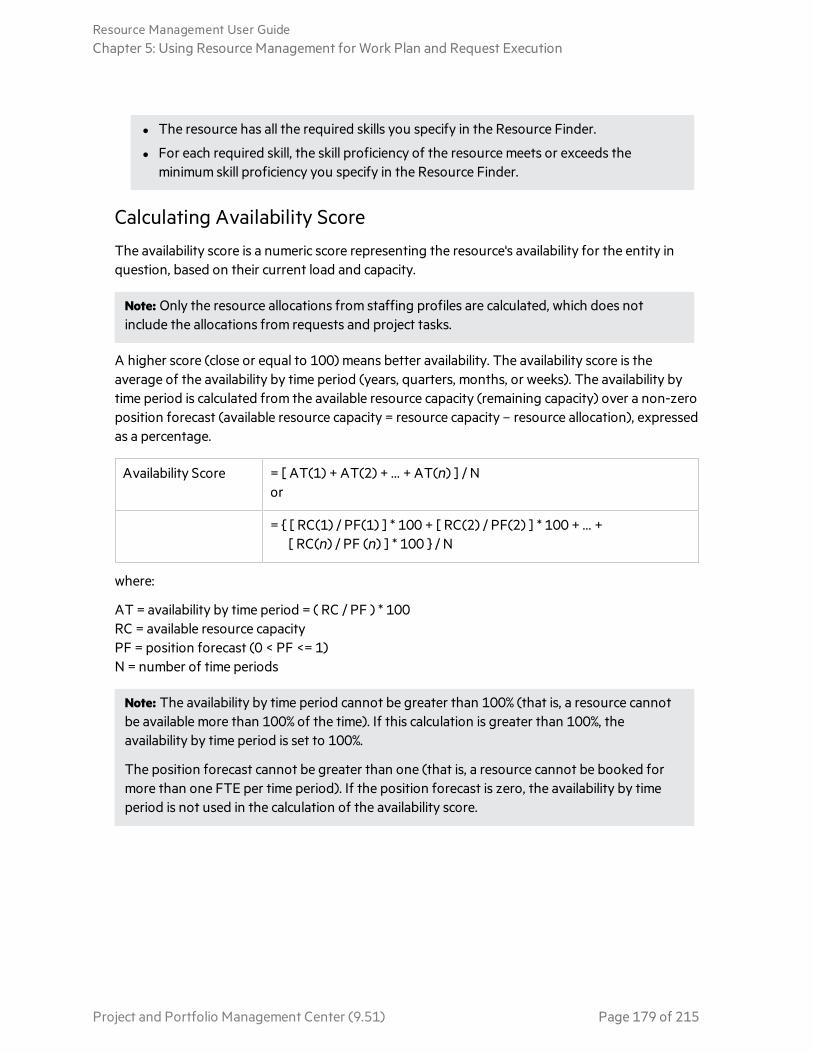
l The resource has all the required skills you specify in the Resource Finder.
l For each required skill, the skill proficiency of the resource meets or exceeds the minimum skill proficiency you specify in the Resource Finder.
Calculating Availability Score
The availability score is a numeric score representing the resource's availability for the entity in question, based on their current load and capacity.
Note: Only the resource allocations from staffing profiles are calculated, which does not include the allocations from requests and project tasks.
A higher score (close or equal to 100) means better availability. The availability score is the average of the availability by time period (years, quarters, months, or weeks). The availability by time period is calculated from the available resource capacity (remaining capacity) over a non-zero position forecast (available resource capacity = resource capacity – resource allocation), expressed as a percentage.
Availability Score = [ AT(1) + AT(2) + ... + AT(n) ] / N or
= { [ RC(1) / PF(1) ] * 100 + [ RC(2) / PF(2) ] * 100 + ... + [ RC(n) / PF (n) ] * 100 } / N
where:
AT = availability by time period = ( RC / PF ) * 100RC = available resource capacityPF = position forecast (0 < PF <= 1)N = number of time periods
Note: The availability by time period cannot be greater than 100% (that is, a resource cannot be available more than 100% of the time). If this calculation is greater than 100%, the availability by time period is set to 100%.
The position forecast cannot be greater than one (that is, a resource cannot be booked for more than one FTE per time period). If the position forecast is zero, the availability by time period is not used in the calculation of the availability score.
Resource Management User GuideChapter 5: Using Resource Management for Work Plan and Request Execution
Project and Portfolio Management Center (9.51) Page 179 of 215

RC PF N Availability by Time PeriodAvailability Score
.33,
.25, 1.33, .5, 1
3 (.33 / .33) * 100 = 100%
(.25 / .5) * 100 = 50%
(1 / 1) * 100 = 100%
(100% + 50% + 100% ) / 3 = 83%
.33,
.25, 10, .5, 1
3 N/A (.25 / .5) * 100 = 50%
(1 / 1) * 100 = 100%
( 50% + 100% ) / 2 = 75%*
Table 5-7. Example availability score calculations
*Because the position forecast is zero in the first time period, the first time period is not included in the calculation of the availability score.
Example: Availability Score for William Klein
In the following example, William Klein is an application developer who has 75% of his time allocated in May to Project A. He is also planning to take two weeks of vacation in July.
Project B requires application developers for six months from May through October. Staffing requirements are three FTEs for May through August, tapering off to one FTE for September, and 1/2 FTE for October.
The following are William Klein's capacity, allocation, available capacity, and availability by month:
May. Jun. Jul. Aug. Sept. Oct.
Capacity 1 1 .5 1 1 1
Allocation .75 0 0 0 0 0
Available Capacity (RC)(Capacity - Allocation)
.25 1 .5 1 1 1
Position Forecast (PF)(0 < PF <= 1)
1 1 1 1 1 .5
Availability by Month (AT)( [RC / PF ] * 100, <= 100% )
25% 100% 50% 100% 100% 100%
Table 5-8. William Klein’s monthly availability calculations for Project B
William Klein's availability score for Project B is:
( 25% + 100% + 50% + 100% + 100% + 100% ) / 6 = 79%
Resource Management User GuideChapter 5: Using Resource Management for Work Plan and Request Execution
Project and Portfolio Management Center (9.51) Page 180 of 215

Example: Availability Score for Joseph Bank
In the following example, Joseph Bank is an application developer who has 50% of his time allocated in May and June to Project A and 100% of his time allocated in September and October to Project C. He is planning to take two weeks of vacation in August.
Project B requires application developers for six months from May through October. Staffing requirements are three FTEs for May through August, tapering off to one FTE for September, and 1/2 FTE for October. William Klein is expected to be allocated to the work in September and October.
The following are Joseph Bank's capacity, allocation, available capacity, and availability by month:
May. Jun. Jul. Aug. Sept. Oct.
Capacity 1 1 1 5 1 1
Allocation .5 .5 0 0 1 1
Available Capacity (RC)(Capacity - Allocation)
.5 .5 1 .5 0 0
Position Forecast (PF)(0 < PF <= 1)
1 1 1 1 0 0
Availability by Month (AT)( [RC / PF ] * 100, <= 100% )
50% 50% 100% 50% N/A N/A
Table 5-9. Joseph Bank’s monthly availability calculations for Project B
Joseph Bank's availability score for Project B is:
( 50% + 50% + 100% + 50% ) / 4 = 63%
Example: Availability Score for Barbara Getty
In the following example, Barbara Getty is a Java™ developer who has no time allocated from May through October. She is not planning to take any vacation during that time.
Project B requires application developers for six months from May through October. Staffing requirements are three FTEs for May through August, tapering off to one FTE for September, and 1/2 FTE for October. William Klein is expected to be allocated to the work in September and October.
The following are Barbara Getty's capacity, allocation, available capacity, and availability by month:
Resource Management User GuideChapter 5: Using Resource Management for Work Plan and Request Execution
Project and Portfolio Management Center (9.51) Page 181 of 215
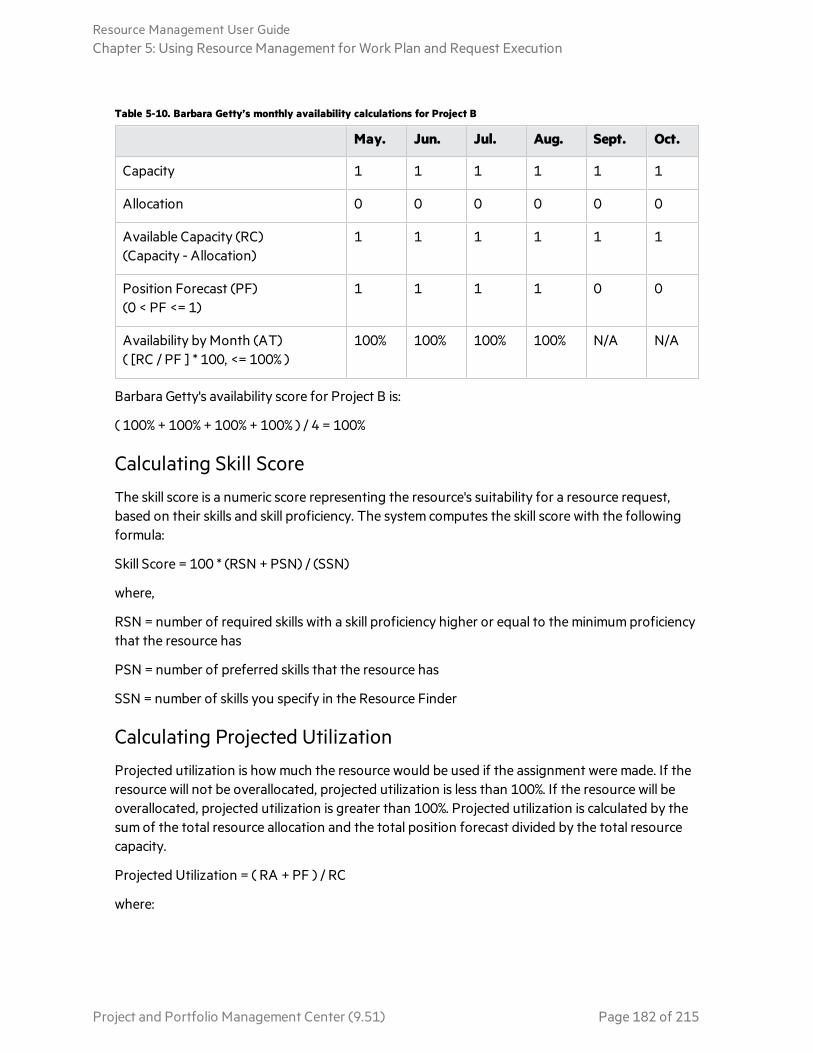
May. Jun. Jul. Aug. Sept. Oct.
Capacity 1 1 1 1 1 1
Allocation 0 0 0 0 0 0
Available Capacity (RC)(Capacity - Allocation)
1 1 1 1 1 1
Position Forecast (PF)(0 < PF <= 1)
1 1 1 1 0 0
Availability by Month (AT)( [RC / PF ] * 100, <= 100% )
100% 100% 100% 100% N/A N/A
Table 5-10. Barbara Getty’s monthly availability calculations for Project B
Barbara Getty's availability score for Project B is:
( 100% + 100% + 100% + 100% ) / 4 = 100%
Calculating Skill Score
The skill score is a numeric score representing the resource's suitability for a resource request, based on their skills and skill proficiency. The system computes the skill score with the following formula:
Skill Score = 100 * (RSN + PSN) / (SSN)
where,
RSN = number of required skills with a skill proficiency higher or equal to the minimum proficiency that the resource has
PSN = number of preferred skills that the resource has
SSN = number of skills you specify in the Resource Finder
Calculating Projected Utilization
Projected utilization is how much the resource would be used if the assignment were made. If the resource will not be overallocated, projected utilization is less than 100%. If the resource will be overallocated, projected utilization is greater than 100%. Projected utilization is calculated by the sum of the total resource allocation and the total position forecast divided by the total resource capacity.
Projected Utilization = ( RA + PF ) / RC
where:
Resource Management User GuideChapter 5: Using Resource Management for Work Plan and Request Execution
Project and Portfolio Management Center (9.51) Page 182 of 215
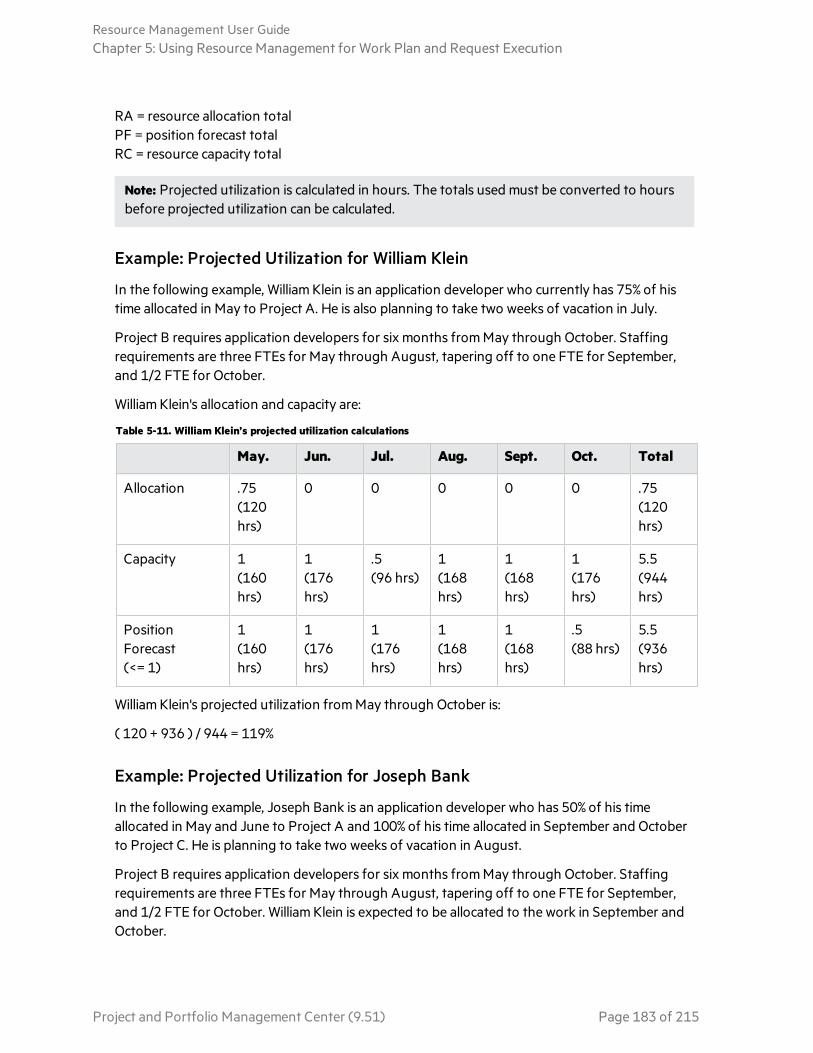
RA = resource allocation totalPF = position forecast totalRC = resource capacity total
Note: Projected utilization is calculated in hours. The totals used must be converted to hours before projected utilization can be calculated.
Example: Projected Utilization for William Klein
In the following example, William Klein is an application developer who currently has 75% of his time allocated in May to Project A. He is also planning to take two weeks of vacation in July.
Project B requires application developers for six months from May through October. Staffing requirements are three FTEs for May through August, tapering off to one FTE for September, and 1/2 FTE for October.
William Klein's allocation and capacity are:
May. Jun. Jul. Aug. Sept. Oct. Total
Allocation .75 (120 hrs)
0 0 0 0 0 .75(120 hrs)
Capacity 1 (160 hrs)
1 (176 hrs)
.5(96 hrs)
1 (168 hrs)
1 (168 hrs)
1 (176 hrs)
5.5(944 hrs)
Position Forecast (<= 1)
1(160 hrs)
1(176 hrs)
1(176 hrs)
1(168 hrs)
1(168 hrs)
.5 (88 hrs)
5.5(936 hrs)
Table 5-11. William Klein’s projected utilization calculations
William Klein's projected utilization from May through October is:
( 120 + 936 ) / 944 = 119%
Example: Projected Utilization for Joseph Bank
In the following example, Joseph Bank is an application developer who has 50% of his time allocated in May and June to Project A and 100% of his time allocated in September and October to Project C. He is planning to take two weeks of vacation in August.
Project B requires application developers for six months from May through October. Staffing requirements are three FTEs for May through August, tapering off to one FTE for September, and 1/2 FTE for October. William Klein is expected to be allocated to the work in September and October.
Resource Management User GuideChapter 5: Using Resource Management for Work Plan and Request Execution
Project and Portfolio Management Center (9.51) Page 183 of 215

Joseph Bank's allocation and capacity are:
May. Jun. Jul. Aug. Sept. Oct. Total
Allocation .5(80 hrs)
.5(88 hrs)
0 0 1 (168 hrs)
1 (176 hrs)
3(512 hrs)
Capacity 1 (160 hrs)
1 (176 hrs)
1(176 hrs)
.5 (88 hrs)
1 (168 hrs)
1 (176 hrs)
5.5(944 hrs)
Position Forecast (<= 1)
1(160 hrs)
1(176 hrs)
1(176 hrs)
1(168 hrs)
0(0 hrs)
0 (0 hrs)
4(680 hrs)
Table 5-12. Joseph Bank’s projected utilization calculations
Joseph Bank's projected utilization from May through October is:
( 512 + 680 ) / 944 = 126%
Example: Projected Utilization for Barbara Getty
In the following example, Barbara Getty is a Java developer who has no time allocated from May through October. She is not planning to take any vacation during that time.
Project B requires application developers for six months from May through October. Staffing requirements are three FTEs for May through August, tapering off to one FTE for September, and 1/2 FTE for October. William Klein is expected to be allocated to the work in September and October.
Barbara Getty's allocation and capacity are:
May. Jun. Jul. Aug. Sept. Oct. Total
Allocation 0 0 0 0 0 0 0
Capacity 1 (160 hrs)
1 (176 hrs)
1(176 hrs)
1 (168 hrs)
1 (168 hrs)
1 (176 hrs)
6(1024 hrs)
Position Forecast (<= 1)
1(160 hrs)
1(176 hrs)
1(176 hrs)
1(168 hrs)
0(0 hrs)
0 (0 hrs)
4(680 hrs)
Table 5-13. Barbara Getty’s projected utilization calculations
Barbara Getty's projected utilization from May through October is:
( 0 + 680 ) / 1024 = 66%
Resource Management User GuideChapter 5: Using Resource Management for Work Plan and Request Execution
Project and Portfolio Management Center (9.51) Page 184 of 215

Overriding Scheduled and Actual ValuesWork items (both tasks and requests) have fields for the Scheduled and Actual values for:
l Start Date
l Finish Date
l Duration
l Effort
Note: Requests use the System Default Regional Calendar's setting for the number of working hours in a day.
Tasks use the setting defined in the project's selected region, defined in the Project Settings window.
Requests with resources assigned use the number of working hours in a day set by the resource's regional calendar.
Scheduled Value Field RelationshipsThe Scheduled Duration and Scheduled Effort for a request work item are automatically calculated in the following manner:
l Scheduled Duration = Scheduled Finish Date – Scheduled Start Date –Regional calendar non-working days)
l Scheduled Effort = Scheduled Duration * (Working hours in a day defined from regional calendar)
Each of these fields automatically updates the other:
l If the Scheduled Start Date is changed by the user, then the Scheduled Finish Date is automatically updated to reflect the Scheduled Duration.
l If the Scheduled Finish Date is changed by the user, then the Scheduled Duration is automatically updated and Scheduled Effort is recalculated.
l If the Scheduled Duration is changed by the user, then the Scheduled Finish Date is automatically updated to reflect the Scheduled Duration, and Scheduled Effort is recalculated.
l For a work item with multiple resources, the total Scheduled Effort is simply the sum of all resources' Scheduled Effort. If the total Scheduled Effort is changed by the user, each assigned user's Scheduled Effort is changed proportionately. (If the total is doubled, for example, each resource's Scheduled Effort will also double.) Concordantly, if an assigned user's Scheduled Effort is updated, total Scheduled Effort is recalculated automatically.
Note: Scheduled Effort is evenly distributed across working days from the Scheduled Start to the Scheduled Finish. Hours per week may differ based on regional and personal calendars
Resource Management User GuideChapter 5: Using Resource Management for Work Plan and Request Execution
Project and Portfolio Management Center (9.51) Page 185 of 215

(for example, holidays and personal vacations).
Changes to Scheduled Effort values do not have a "backstream" effect. Updating only the Scheduled Effort field will not change the Scheduled Duration, which is always derived from the Scheduled Start and Finish values. This allows a task to be assigned at less than full time.
Actual Value Field RelationshipsActual field values for work item requests are captured in the following ways:
l Start Date. When the work item is started (task is set to In Progress or request is submitted)
l Finish Date. When the work item is completed (task is set to Completed or request is closed)
l Duration. Calculated as Actual Finish Date – Actual Start Date – (Regional calendar non-working days)
l Effort. Calculated as Total Scheduled Effort * (Actual Duration / Scheduled Duration)
If the Actual Duration is changed by the user, then the Actual Effort is automatically updated.
Note: Though the Actual Effort field can be updated independently, changes to Actual Effort do not have a "backstream" effect. Updating only the Actual Effort field will not change the Actual Duration.
To prevent the system from overriding a manually updated Actual Effort value, make sure that you have updated the Actual Duration or ActualStart/Finish Dates before specifying the new Actual Effort value.
Viewing Work ItemsOnce work items have been assigned, there are several ways for resources to view and update their workload from the standard interface.
My Tasks PortletTask work items can be viewed and updated from the My Tasks portlet.
Resources with a Project Management or Time Management license can add the My Tasks portlet to one of their PPM Dashboard pages, enabling them to view task work items that have been assigned to them. The My Tasks portlet can be filtered along many useful parameters.
For example, the My Tasks portlet can be filtered to display only tasks beginning within the next two weeks that are ready for action whose Predecessors are more than 50% complete.
For more information on using the My Tasks portlet, see the Project Management User Guide. For more information on using the My Tasks portlet in conjunction with Time Management, see the Time Management User Guide.
Resource Management User GuideChapter 5: Using Resource Management for Work Plan and Request Execution
Project and Portfolio Management Center (9.51) Page 186 of 215
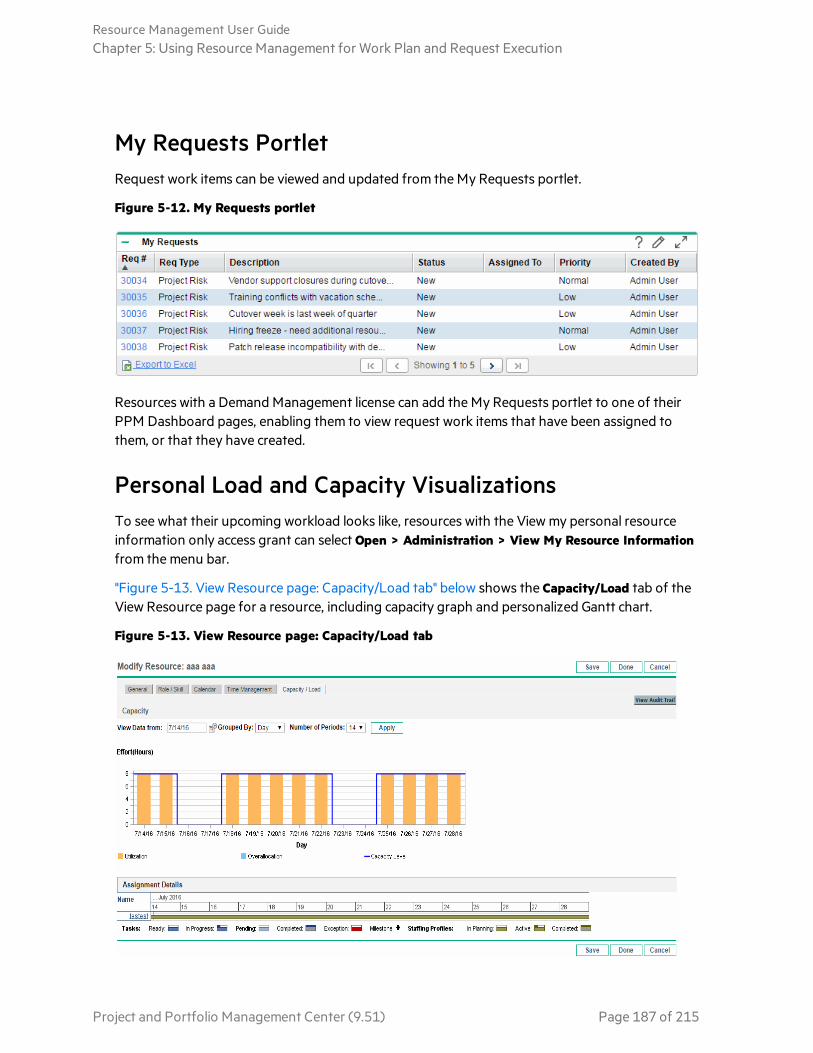
My Requests PortletRequest work items can be viewed and updated from the My Requests portlet.
Figure 5-12. My Requests portlet
Resources with a Demand Management license can add the My Requests portlet to one of their PPM Dashboard pages, enabling them to view request work items that have been assigned to them, or that they have created.
Personal Load and Capacity VisualizationsTo see what their upcoming workload looks like, resources with the View my personal resource information only access grant can select Open > Administration > View My Resource Information from the menu bar.
"Figure 5-13. View Resource page: Capacity/Load tab" below shows the Capacity/Load tab of the View Resource page for a resource, including capacity graph and personalized Gantt chart.
Figure 5-13. View Resource page: Capacity/Load tab
Resource Management User GuideChapter 5: Using Resource Management for Work Plan and Request Execution
Project and Portfolio Management Center (9.51) Page 187 of 215

Of particular interest are the visualizations in the Capacity/Load tab:
l Capacity. Charts the resource's capacity against their current assignments, and shows areas of over-allocation. Non-Workload assignments are omitted.
l Assignment Details. A Gantt chart that displays all of the resource's assignments, as well as showing task exceptions.
The time scale of both of these visualizations can be altered to view a wide range of time periods. They are also available as portlets.
The Analyze Assignment Load portlet pictured in "Figure 5-16. Analyze Assignment Load portlet" on the next page can be personalized to display only allocations for one resource. For more detailed information on the Analyze Assignment Load visualization, see "Visualizing Assignments" below.
The Resource Gantt portlet can be personalized to display only allocations for one resource ("Figure 5-14. Resource Gantt portlet, one resource" below) and can display both task and staffing profile allocations.
Figure 5-14. Resource Gantt portlet, one resource
Visualizing AssignmentsA basic task for project managers and request managers is to ensure that work items are assigned to their team members without overloading anyone. This task of balancing the assignments of all resources is called load balancing.
The Analyze Assignment Load portlet provides a tool for visualizing assignments that allows a manager to view workload sorted according to different criteria and levels of specificity, giving them better control and visibility over their resources' workload.
"Figure 5-16. Analyze Assignment Load portlet" on the next page shows the Analyze Assignment Load portlet, which can help a manager rapidly pinpoint areas of over- or under-allocation.
Resource Management User GuideChapter 5: Using Resource Management for Work Plan and Request Execution
Project and Portfolio Management Center (9.51) Page 188 of 215

Figure 5-16. Analyze Assignment Load portlet
Name Description
Utilization The amount of effort that has been allocated to the selected resources during the time period.
Overallocation The amount of effort that exceeds the capacity level of the selected resources.
Capacity Level The maximum amount of effort that can be allocated to the selected resources during the time period.
Table 5-14. Analyze Assignment Load portlet legend
The Analyze Assignment Load portlet can be filtered according to the parameters described in "Table 5-15. Analyze Assignment Load portlet - parameters" below.
Field Name Description
Preferences
Table 5-15. Analyze Assignment Load portlet - parameters
Resource Management User GuideChapter 5: Using Resource Management for Work Plan and Request Execution
Project and Portfolio Management Center (9.51) Page 189 of 215
Field Name Description
Analyze Capacity from A choice of multi-select auto-complete fields that selects the sets of resources to display in the Analyze Assignment Load page.
Possible choices: Organization Units, Resources in the Resource Pool, Resources Managed By, Resource Name, Resources on Project
If you select Resources in the Resource Pool, two additional options are available:
l Include children resource pools. Include resources from children resource pools of the selected resource pools.
l Limit capacity against selected resource pools. Include the capacity and scheduled effort (from staffing profiles) of resources for the selected resource pools only. If a resource belongs to more than one resource pool, the capacity and scheduled effort for only the selected resource pools are used. Scheduled effort entered in a work plan or request (effort not associated with a resource pool) is not limited.
Assignments with Workload Category
Selects assignments of a specific Workload Category to display.
Resources with Role A multi-select auto-complete field that selects a role or set of roles to display from the sets of resources being analyzed.
Total Assignment Values for
Select to display Scheduled Effort, Actual Effort, or Scheduled and Actual Effort in the Analyze Assignment Load page.
If you are analyzing capacity from a resource pool and have selected Limit capacity against selected resource pools, only Scheduled Effort can be selected.
Time Period
Period Sets the time period being used by the Analyze Assignment Load page.
Display __ past periods Selects up to 20 time periods before the current date to include in the Analyze Assignment Load page. Useful for viewing historical trends.
Display __ future periods
Selects up to 20 time periods after the current date to include in the Analyze Assignment Load page.
Table 5-15. Analyze Assignment Load portlet - parameters, continued
Note: If a staffing profile is completed, future forecast and assignments (those past the finish
Resource Management User GuideChapter 5: Using Resource Management for Work Plan and Request Execution
Project and Portfolio Management Center (9.51) Page 190 of 215

date of the staffing profile) can be cleared and will not display in the portlet. See "Clearing Future Forecast and Assignments" on page 99 for more information.
If large amounts of data are supplied to the portlet, there may be performance problems. Therefore, a threshold for this portlet can be specified in the server.conf file and a default value is provided for optimal performance.
l AAL_PORTLET_MAX_RESOURCES: the maximum number of total resources. The default value is 300.
See the Installation and Administration Guide for more information about editing the server.conf file.
When the threshold is exceeded, the portlet does not display. Instead, a message containing the threshold value and current value that exceeds the threshold appear. To make the portlet display, you can edit the preferences of the portlet so that the threshold is no longer exceeded. Micro Focus does not recommend that you increase the threshold value as this may cause performance problems.
If the amount of data you need to analyze exceeds the threshold, you can export the data to Microsoft Excel. To export Analyze Assignment Load portlet data to Microsoft Excel, do the following:
1. Select Open > Resource Management > Data Exports > Analyze Assignment Load.
2. Set the filter criteria for export.
An additional field is included for the filter criteria: Include Detailed Data. Select this checkbox if you want to get a breakdown of total resource capacity and workload (data displayed in the Analyze Assignment Load Breakdown table).
3. Click Export To Excel.
The date when the snapshot was taken is included in the export.
Note: The data may not contain decimal places. Therefore, numbers such as 2.47 may display as 3.
Resource Load Breakdown TableTo get a detailed breakdown of total resource capacity and workload, click View Resource Breakdown. The Resource Load Breakdown table, pictured in "Figure 5-17. Resource Breakdown table" on the next page, opens in a new dialog box.
Resource Management User GuideChapter 5: Using Resource Management for Work Plan and Request Execution
Project and Portfolio Management Center (9.51) Page 191 of 215
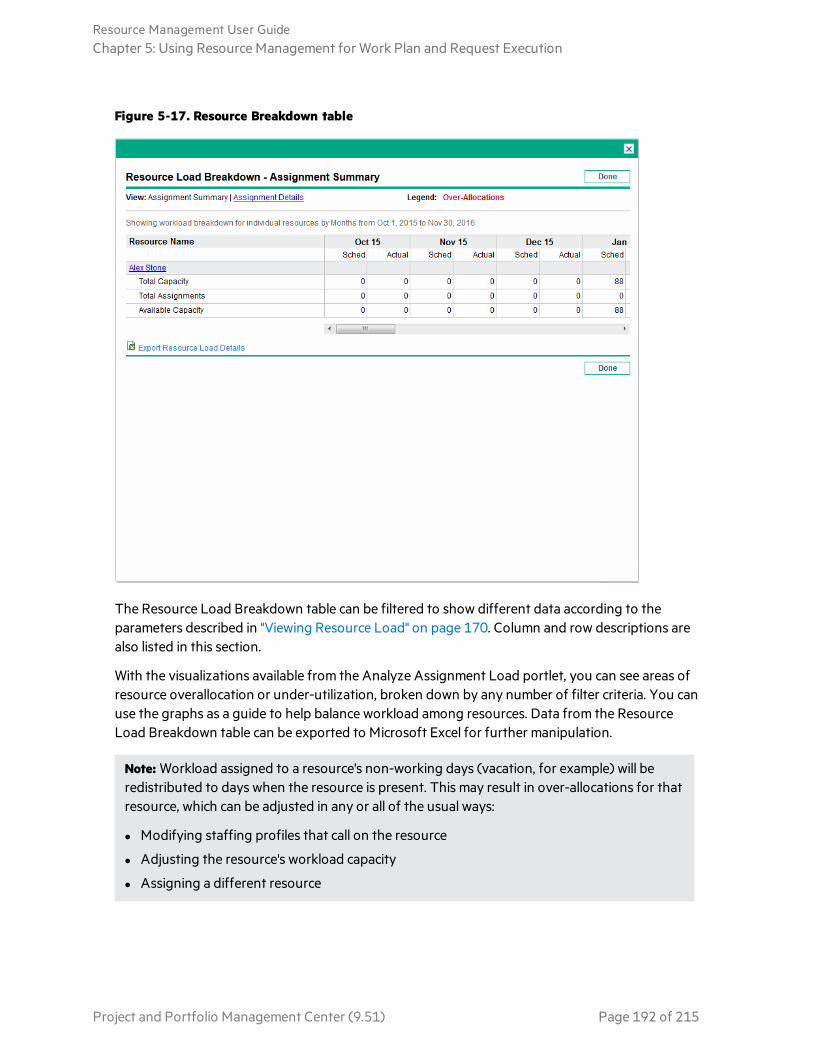
Figure 5-17. Resource Breakdown table
The Resource Load Breakdown table can be filtered to show different data according to the parameters described in "Viewing Resource Load" on page 170. Column and row descriptions are also listed in this section.
With the visualizations available from the Analyze Assignment Load portlet, you can see areas of resource overallocation or under-utilization, broken down by any number of filter criteria. You can use the graphs as a guide to help balance workload among resources. Data from the Resource Load Breakdown table can be exported to Microsoft Excel for further manipulation.
Note: Workload assigned to a resource's non-working days (vacation, for example) will be redistributed to days when the resource is present. This may result in over-allocations for that resource, which can be adjusted in any or all of the usual ways:
l Modifying staffing profiles that call on the resource
l Adjusting the resource's workload capacity
l Assigning a different resource
Resource Management User GuideChapter 5: Using Resource Management for Work Plan and Request Execution
Project and Portfolio Management Center (9.51) Page 192 of 215

Adjusting Resource CalendarsIndividual resource calendars can be modified by a resource or the resource's manager, depending on their levels of access. Modifying an individual's resource calendar can help create more accurate visualizations of that resource's capacity and workload. For more detailed information on modifying resource calendars, see "Setting Up the Resource Calendar" on page 29.
Resource Management User GuideChapter 5: Using Resource Management for Work Plan and Request Execution
Project and Portfolio Management Center (9.51) Page 193 of 215

Appendix A: Typical UsageThe following information is based on typical usage of PPM and Resource Management. Micro Focus cannot warrant that you will have the same or similar experience.
"Table A-1. PPM Resource Management Typical Usage" below lists entities with an amount for its typical usage, amounts that are considered complex and might impact performance, where that performance impact might occur, and recommendations or comments about complex usage.
Typical ComplexPerformance Impact Recommendations/Comments
Duration of a Staffing Profile a
<= 3 years > 3 years View staffing profile when allocation entered in weeks
Enter allocation for a staffing profile in months, quarters, or years.
Use the Forecast Planning page for resource planning.
Number of Positions and Resources in a Staffing Profile a
100 > 200 View staffing profile when allocation entered in weeks
Enter allocation for a staffing profile in months, quarters, or years.
Use the Forecast Planning page for resource planning.
Number of Projects to which a Single Resource is Assigned
<= 10 > 10 Plan for unknown resources using promises.
Use the Resource Allocation Management page to manage individual resources across multiple projects.
Resources in a Resource Pool
<= 300 > 300 Manage Pool Capacity page, View Forecasted Demand page, View Resource Load page
Table A-1. PPM Resource Management Typical Usage
Resource Management User GuideAppendix A: Typical Usage
Project and Portfolio Management Center (9.51) Page 194 of 215

Typical ComplexPerformance Impact Recommendations/Comments
Total Resources in the Analyze Assignment Load Portlet
<= 300 > 300 Analyze Assignment Load portlet
The maximum number of total resources in the Analyze Assignment Load portlet is set by the AAL_PORTLET_MAX_RESOURCES parameter.
Total Resources in the Analyze Resource Pools Portlet
<= 300 > 300 Analyze Resource Pools portlet
The maximum number of total resources in the Analyze Resource Pools portlet is set by the ARP_MAX_RESOURCES parameter.
Total Resource Pools in the Analyze Resource Pools Portlet
<= 30 > 30 Analyze Resource Pools portlet
The maximum number of total resource pools in the Analyze Resource Pools portlet is set by the ARP_MAX_RESOURCE_POOLS parameter.
a. If the number of positions and resources of in a staffing profile exceeds the recommended typical number, we recommend that you switch to the Gantt view of the Staffing Profile page where all the data are displayed in one single page and load simultaneously as you scroll down the page. This helps you experience better system performance and avoid OutOfMemory error.
Table A-1. PPM Resource Management Typical Usage, continued
Resource Management User GuideAppendix A: Typical Usage
Project and Portfolio Management Center (9.51) Page 195 of 215

Appendix B: Unmet Demand Calculation Sample Scenarios l "Sample Data" below
l "Scenario 1: Unmet demand calculation when forecast demands and assignments use the same calendar" on the next page
l "Scenario 2: Unmet demand calculation when forecast demands and assignments use different calendars" on page 199
l "Scenario 3: Unmet Demand Calculation when Assigned Resources are Partially Allocated" on page 200
l "Scenario 4: Unmet Demand Calculation when Unmet Demand is Forwarded to Another Pool" on page 202
l "Scenario 5: Unmet Demand Calculation when Forecasted Demand is Viewed on the Resource Pool Page" on page 203
Sample Data"Table B-1. Example Regional Calendar Settings" below lists an example of regional calendar settings.
Region
Regional Calendar
Hours per day
Working Days per week
Oct. 11 (Working Days)
Nov. 11
Dec. 11
Jan. 12
Feb. 12
Mar. 12
Apr. 12
America
US 8 hrs 5 days 21 21 21 21 20 22 21
China China 10 hrs 5 days 21 22 22 21 21 21 20
EMEA Germany 6 hrs 5 days 16 22 20 22 21 22 19
Table B-1. Example Regional Calendar Settings
"Table B-2. Example Resource Pool Settings" on the next page lists an example of the resource pool settings
Resource Management User GuideAppendix B: Unmet Demand Calculation Sample Scenarios
Project and Portfolio Management Center (9.51) Page 196 of 215

Resource Pool Region ResourcesResource Calendar
% of participation
US Pool America Joseph Bank Inheriting US Calendar
100%
William Klein Inheriting US Calendar
100%
Barbara Getty Inheriting US Calendar
75%
EMEA Pool Germany Lan Zhang Using China Calendar
100%
Jian Wang Using German Calendar
100%
Table B-2. Example Resource Pool Settings
Scenario 1: Unmet demand calculation when forecast demands and assignments use the same calendarIn the following example, Project A requires two senior Java engineers for four months from October 15 through January 16 in US pool. Staffing requirements are two FTEs for October through November, tapering off to one FTE for December, and 1/2 FTE for January.
William Klein and Joseph Bank both are senior java engineers in US pool who have 100% of their time allocated to Project A. William plans to take two weeks of vacation in November.
"Figure B-1. Allocation Detail for Project A in FTEs View" below shows the allocation detail for project A in FTEs view.
Figure B-1. Allocation Detail for Project A in FTEs View
"Figure B-2. Allocation Detail for Project A in Hours View" on the next page shows the allocation detail for project A in Hours View
Resource Management User GuideAppendix B: Unmet Demand Calculation Sample Scenarios
Project and Portfolio Management Center (9.51) Page 197 of 215

Figure B-2. Allocation Detail for Project A in Hours View
"Table B-3. Example Unmet Demand Calculations for Project A" below lists the forecasts, assignments, and unmet demand calculations in different effort types.
Table B-3. Example Unmet Demand Calculations for Project A
Note: Forecast Hours is calculated based on position resource pool associated region calendar. In this example, the position relevant resource pool calendar is US.
Forecast (Hours) = working hrs per day in position calendar * working days per month in position calendar * number of FTE
Note: Assignment Hours is calculated based on the assigned resource associated calendar and his/her personal working day setting. In this example, William Klein is inheriting US calendar and takes two-week leave in Nov.
Assignment (FTE) = (working days in resource calendar - resource personal leaving days)/ working days in resource calendar * 1 FTE
Assignment (Hours) = working hrs per day in US * (working days per month in US - resource personal Leaving Days) * 1 FTE
Unmet Demand = Forecast - Assignment
Note: The calculation logic for different period types (Years, Quarters, Months, Weeks) are the same, it is just a data aggregation from different dimensions.
Resource Management User GuideAppendix B: Unmet Demand Calculation Sample Scenarios
Project and Portfolio Management Center (9.51) Page 198 of 215

Scenario 2: Unmet demand calculation when forecast demands and assignments use different calendarsIn the following example, Project B requires application developers for three months from October 11 through December in EMEA Pool.
Wang Jian and Zhang Lan who are assigned to this position are currently in EMEA pool. Jian is using German calendar while Lan is using China calendar. Both of them have 100% of their time allocated to project B. Lan plans to take 11 days of vacation in November.
"Figure B-3. Allocation Detail for Project B in FTEs View" below shows the allocation detail for project B in FTEs view
Figure B-3. Allocation Detail for Project B in FTEs View
"Figure B-4. Allocation Detail for Project B in Hours View" below shows the allocation detail for project B in hours view
Figure B-4. Allocation Detail for Project B in Hours View
"Table B-4. Example Unmet Demand Calculation for Project B" on the next page shows the forecasts, assignments, and unmet demand calculations in different effort types.
Resource Management User GuideAppendix B: Unmet Demand Calculation Sample Scenarios
Project and Portfolio Management Center (9.51) Page 199 of 215

Table B-4. Example Unmet Demand Calculation for Project B
Note: The forecast is calculated based on position resource pool associated region calendar. In this example, it is EMEA. Assignment Hours is calculated based on the assigned resource associated calendar and his/her personal working day setting. In this example, Lan Zhang is using China calendar and takes 11 days leave in November.
The position is using different calendars from the assigned resource. In this case, position related resource pool is using EMEA calendar that has six working hours per day and 16 working days in October while resource Lan is using China calendar that has ten working hours per day and 21 working days in October. This means working hours in one FTE on the position may differ form working hours in one FTE on the assigned resource. In this example, one FTE on the Application Developer only requires Lan 0.46 FTE to fulfill it. That is why the forecast demands is 2.00 FTEs and the assignment is 1.46 FTEs, but the unmet demand is 0.00 FTE.
PPM first compares the resource capacity with the forecast demand.
l If resource capacity hrs > forecast hours required, Assignment (Hours) = forecast hours
l If resource capacity hours < forecast hours required, Assignment (Hours) = resource capacity
Assignment (FTE) = assignment hours/working hours per day in resource calendar /working days in resource calendar
Unmet Demand (FTE) = (forecast hours - assignment hours)/working hours per day in position calendar/working days in position calendar
Scenario 3: Unmet Demand Calculation when Assigned Resources are Partially AllocatedIn the following example, Project C requires senior java engineers for four months from October 2011 through January 2012 from US Pool. Staffing requirements are three FTEs for October 2011 through November 2011, tapering off to one FTE for December 2011, and 1/2 FTE for January 2012.
Resource Management User GuideAppendix B: Unmet Demand Calculation Sample Scenarios
Project and Portfolio Management Center (9.51) Page 200 of 215
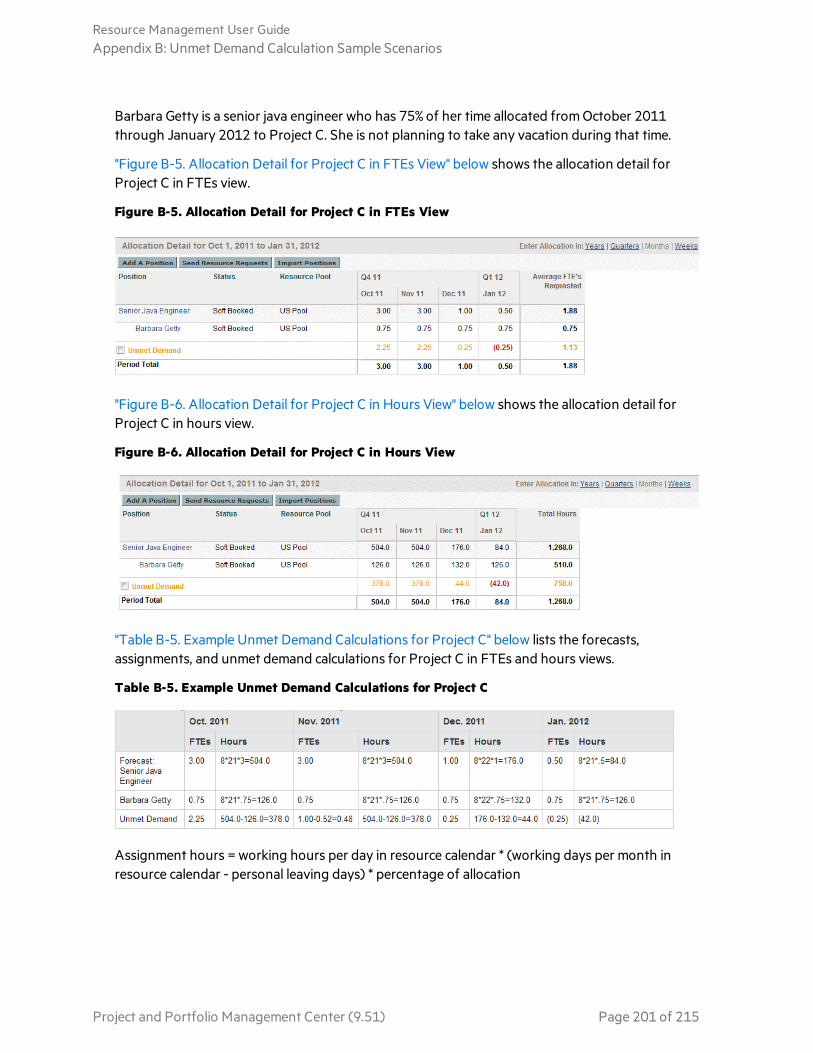
Barbara Getty is a senior java engineer who has 75% of her time allocated from October 2011 through January 2012 to Project C. She is not planning to take any vacation during that time.
"Figure B-5. Allocation Detail for Project C in FTEs View" below shows the allocation detail for Project C in FTEs view.
Figure B-5. Allocation Detail for Project C in FTEs View
"Figure B-6. Allocation Detail for Project C in Hours View" below shows the allocation detail for Project C in hours view.
Figure B-6. Allocation Detail for Project C in Hours View
"Table B-5. Example Unmet Demand Calculations for Project C" below lists the forecasts, assignments, and unmet demand calculations for Project C in FTEs and hours views.
Table B-5. Example Unmet Demand Calculations for Project C
Assignment hours = working hours per day in resource calendar * (working days per month in resource calendar - personal leaving days) * percentage of allocation
Resource Management User GuideAppendix B: Unmet Demand Calculation Sample Scenarios
Project and Portfolio Management Center (9.51) Page 201 of 215
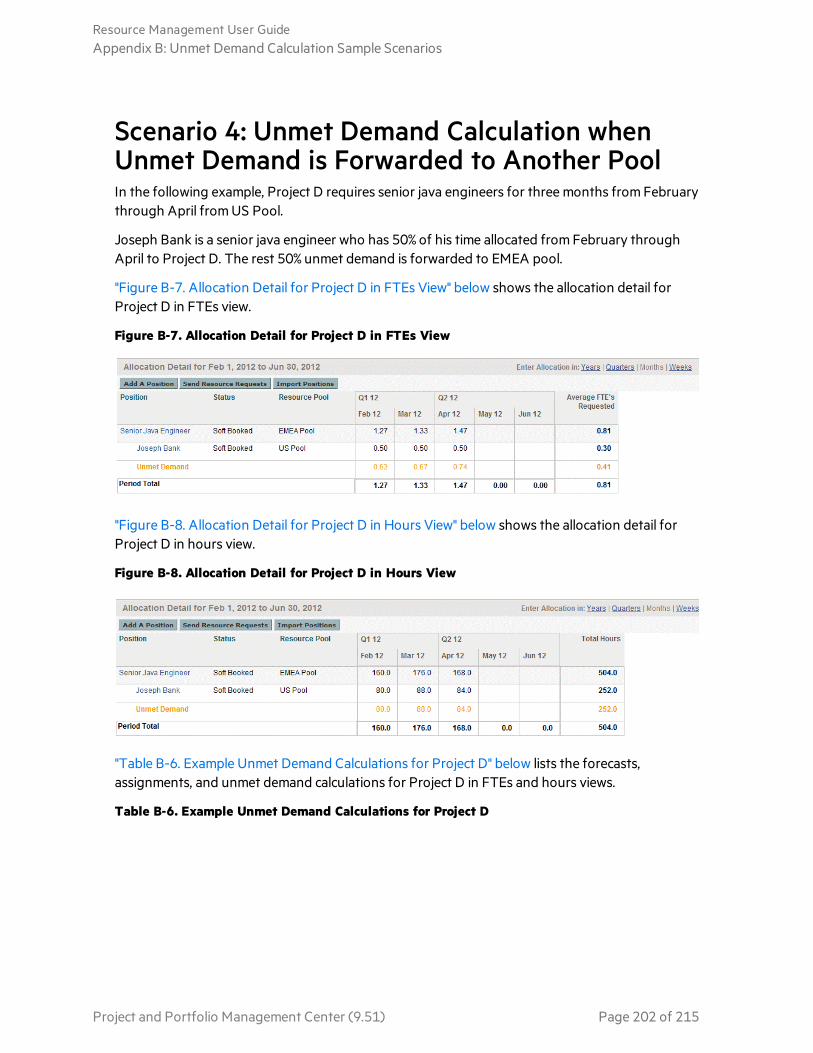
Scenario 4: Unmet Demand Calculation when Unmet Demand is Forwarded to Another PoolIn the following example, Project D requires senior java engineers for three months from February through April from US Pool.
Joseph Bank is a senior java engineer who has 50% of his time allocated from February through April to Project D. The rest 50% unmet demand is forwarded to EMEA pool.
"Figure B-7. Allocation Detail for Project D in FTEs View" below shows the allocation detail for Project D in FTEs view.
Figure B-7. Allocation Detail for Project D in FTEs View
"Figure B-8. Allocation Detail for Project D in Hours View" below shows the allocation detail for Project D in hours view.
Figure B-8. Allocation Detail for Project D in Hours View
"Table B-6. Example Unmet Demand Calculations for Project D" below lists the forecasts, assignments, and unmet demand calculations for Project D in FTEs and hours views.
Table B-6. Example Unmet Demand Calculations for Project D
Resource Management User GuideAppendix B: Unmet Demand Calculation Sample Scenarios
Project and Portfolio Management Center (9.51) Page 202 of 215

When the position's unmet demand is forwarded to another pool, the position's FTE based forecasted demand is re-calculated using the new pool's calendar, and the unmet demand FTE is re-calculated using the new pool's calendar.
Scenario 5: Unmet Demand Calculation when Forecasted Demand is Viewed on the Resource Pool PageIn the following example, Project E requires application developers and senior java engineers for May and June from US Pool. Staffing requirements are 1/2 FTE on application developer for May and June, and one FTE on senior java engineer for May and June.
William Klein is an application developer who has 100% of his time allocated in May and June to Project E. Joseph Bank is a senior java engineer who has 25% of his time allocated in May and June to Project E.
"Figure B-9. Allocation Detail for Project E in FTEs View" below shows the unmet demand on the Staffing Profile page.
Figure B-9. Allocation Detail for Project E in FTEs View
"Figure B-10. Resource Pool Details for Project E in FTEs View" below shows the unmet demand on the Resource Pool page.
Figure B-10. Resource Pool Details for Project E in FTEs View
Resource Management User GuideAppendix B: Unmet Demand Calculation Sample Scenarios
Project and Portfolio Management Center (9.51) Page 203 of 215

"Table B-7. Example Unmet Demand Calculations for Project E" below lists the total capacity, forecast, assignment and unmet demand calculation for Project E on the Resource Pool page.
May. 12 June. 12
FTEs FTEs
Total Capacity 2.75 2.75
Total Forecast (0.50+1.00)=1.50 (0.50+1.00)=1.50
Total Assignment (1.00+0.25)=1.25 (1.00+0.25)=1.25
Unmet Demand (0+0.75)=0.75a (0+0.75)=0.75
a. Unmet Demand = Σ (Positive Position Unmet Demand)
Table B-7. Example Unmet Demand Calculations for Project E
When viewing forecasted demand on the Resource Pool page (In ARP portlet and View Forecasted Demand on the Resource Pool page), you can find that the negative unmet demand (that is, an overbooking on one position) is ignored when unmet demand for the entire resource pool is displayed. This is because we are interested in the real unmet demand for a resource pool, and do not want the negative unmet demand for position application developer to offset the positive unmet demand for position senior java engineer for a fixed period.
Resource Management User GuideAppendix B: Unmet Demand Calculation Sample Scenarios
Project and Portfolio Management Center (9.51) Page 204 of 215

Appendix C: Tracing PPM DataThis section describes:
l "Calculating Unmet Demand" below
l "Calculating Estimated Remaining Effort" below
l "Configuring Project Health" below
l "Calculating Financial Management Data" on page 207
l "Calculating Data in Financial Summary" on page 209
l "Calculating Data in Scenario Comparison" on page 213
Calculating Unmet DemandFor information about calculating unmet demand, see "Analyzing Resource Pools" on page 118 and "Unmet Demand Calculation Sample Scenarios" on page 196.
Calculating Estimated Remaining EffortThis section describes how PPM calculates the Estimated Remaining Effort (ERE) of a task.
ERE is an estimated value derived from actuals, which means that having actuals is key to reflecting changes in ERE. If there are no actuals, PPM resets ERE to zero.
If actuals have been logged against a task, the ERE value gets updated whenever the % Complete field on the Task Details page is modified. This means that ERE is not reset to zero and stays in sync with changes in the % Complete field.
If you manually input ERE, % Complete is calculated as Actual Effort / (Actual Effort + ERE)
If you manually input % Complete, ERE is calculated as one of the following:
l ERE = Scheduled Effort (SE) - Actual Effort (AE)
l ERE = (Last ERE + Last AE) - AE
Configuring Project HealthThis section includes additional information about configuring schedule health and cost health of a project. For more information about configuring project health, see "Schedule Health", "Cost and Earned Value Health", "Project Health", and "Issue Health" sections in Project Management User Guide.
Configuring Schedule HealthOn the project settings page, the Schedule Health policy controls the project’s schedule health indicator, as well as determines the active exception rules for a project.
In the Health section, you can specify the following two rules:
Resource Management User GuideAppendix C: Tracing PPM Data
Project and Portfolio Management Center (9.51) Page 205 of 215
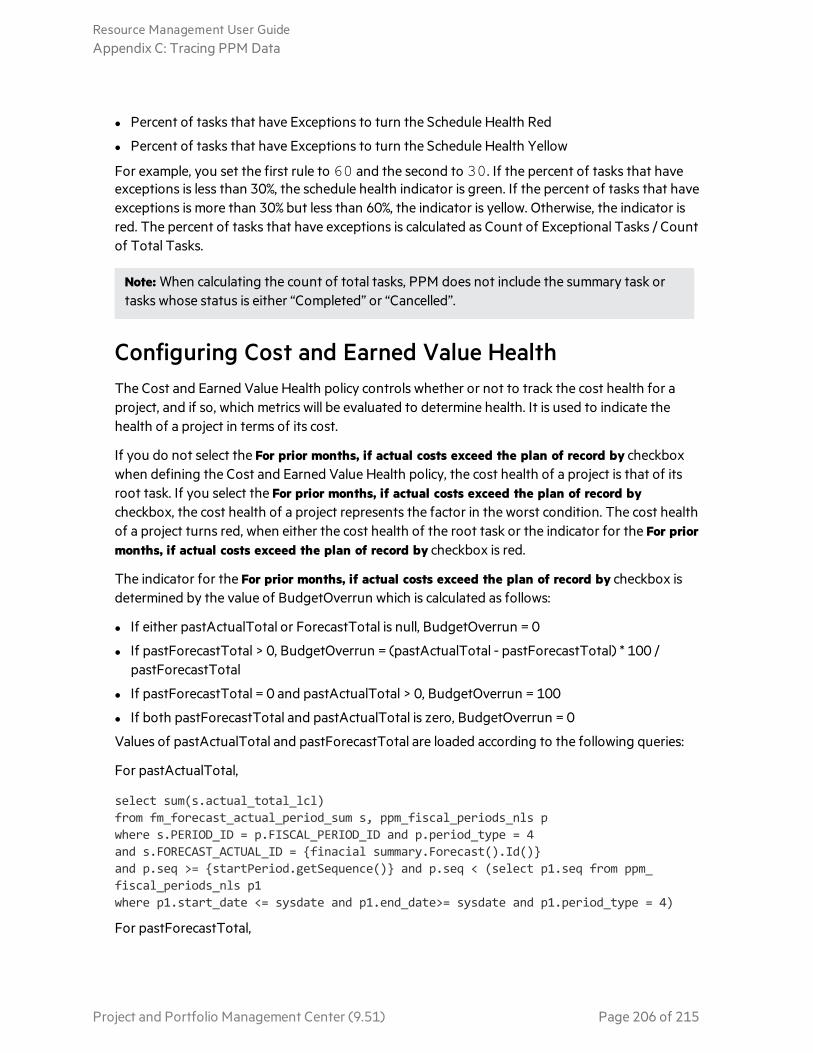
l Percent of tasks that have Exceptions to turn the Schedule Health Red
l Percent of tasks that have Exceptions to turn the Schedule Health Yellow
For example, you set the first rule to 60 and the second to 30. If the percent of tasks that have exceptions is less than 30%, the schedule health indicator is green. If the percent of tasks that have exceptions is more than 30% but less than 60%, the indicator is yellow. Otherwise, the indicator is red. The percent of tasks that have exceptions is calculated as Count of Exceptional Tasks / Count of Total Tasks.
Note: When calculating the count of total tasks, PPM does not include the summary task or tasks whose status is either “Completed” or “Cancelled”.
Configuring Cost and Earned Value HealthThe Cost and Earned Value Health policy controls whether or not to track the cost health for a project, and if so, which metrics will be evaluated to determine health. It is used to indicate the health of a project in terms of its cost.
If you do not select the For prior months, if actual costs exceed the plan of record by checkbox when defining the Cost and Earned Value Health policy, the cost health of a project is that of its root task. If you select the For prior months, if actual costs exceed the plan of record by checkbox, the cost health of a project represents the factor in the worst condition. The cost health of a project turns red, when either the cost health of the root task or the indicator for the For prior months, if actual costs exceed the plan of record by checkbox is red.
The indicator for the For prior months, if actual costs exceed the plan of record by checkbox is determined by the value of BudgetOverrun which is calculated as follows:
l If either pastActualTotal or ForecastTotal is null, BudgetOverrun = 0
l If pastForecastTotal > 0, BudgetOverrun = (pastActualTotal - pastForecastTotal) * 100 / pastForecastTotal
l If pastForecastTotal = 0 and pastActualTotal > 0, BudgetOverrun = 100
l If both pastForecastTotal and pastActualTotal is zero, BudgetOverrun = 0
Values of pastActualTotal and pastForecastTotal are loaded according to the following queries:
For pastActualTotal,
select sum(s.actual_total_lcl)from fm_forecast_actual_period_sum s, ppm_fiscal_periods_nls pwhere s.PERIOD_ID = p.FISCAL_PERIOD_ID and p.period_type = 4and s.FORECAST_ACTUAL_ID = {finacial summary.Forecast().Id()}and p.seq >= {startPeriod.getSequence()} and p.seq < (select p1.seq from ppm_fiscal_periods_nls p1where p1.start_date <= sysdate and p1.end_date>= sysdate and p1.period_type = 4)
For pastForecastTotal,
Resource Management User GuideAppendix C: Tracing PPM Data
Project and Portfolio Management Center (9.51) Page 206 of 215

select sum(s.plan_total_lcl)from fm_forecast_actual_period_sum s, ppm_fiscal_periods_nls p, fm_financial_summary ffswhere ffs.active_fs_id = {finacial summary.Id()} and ffs.plan_of_record_flag = 'Y'and s.PERIOD_ID = p.FISCAL_PERIOD_ID and p.period_type = 4and s.FORECAST_ACTUAL_ID = ffs.forecast_actual_idand p.seq >= {startPeriod.getSequence()} and p.seq < (select p1.seq from ppm_fiscal_periods_nls p1where p1.start_date <= sysdate and p1.end_date>= sysdate and p1.period_type = 4)
Calculating Financial Management DataThis section describes additional information about calculating Financial Management data items.
For more information about calculating Financial Management data, see Financial Management User Guide.
Cost Performance Index (CPI)CPI is calculated as follows:
l If EV is null, CPI is null
l If Actual Cost != 0, CPI = EV / Actual Cost
l If Actual Cost = 0, and
l If EV = 0, CPI = 1
l If EV != 0, CPI = 0
Schedule Performance Index (SPI)SPI is calculated as follows:
l If EV is null, SPI is null
l If PV != 0, SPI = EV / PV
l If PV = 0, and
l If EV = 0, SPI = 1
l If EV != 0, SPI = 0
Earned Value (EV)If a task is the summary task, its EV is calculated as Sum (EV of all its child tasks).
If a task is the leaf task, its EV is calculated as follows:
Resource Management User GuideAppendix C: Tracing PPM Data
Project and Portfolio Management Center (9.51) Page 207 of 215
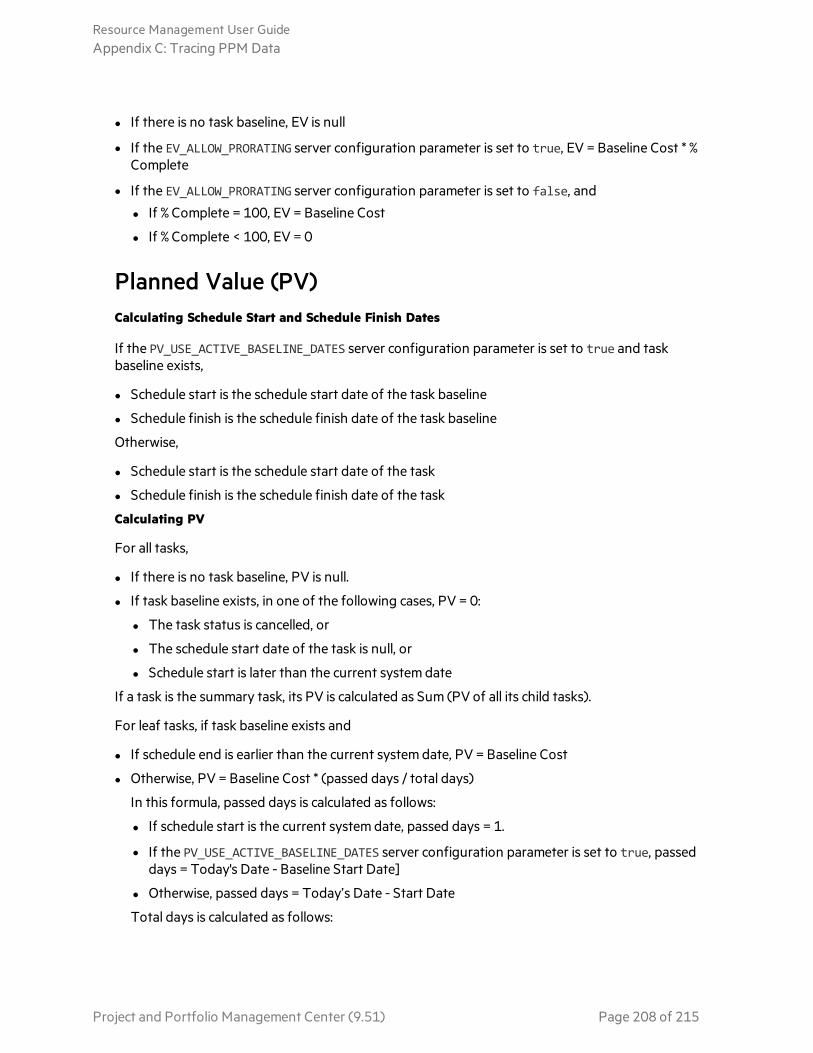
l If there is no task baseline, EV is null
l If the EV_ALLOW_PRORATING server configuration parameter is set to true, EV = Baseline Cost * % Complete
l If the EV_ALLOW_PRORATING server configuration parameter is set to false, and
l If % Complete = 100, EV = Baseline Cost
l If % Complete < 100, EV = 0
Planned Value (PV)Calculating Schedule Start and Schedule Finish Dates
If the PV_USE_ACTIVE_BASELINE_DATES server configuration parameter is set to true and task baseline exists,
l Schedule start is the schedule start date of the task baseline
l Schedule finish is the schedule finish date of the task baseline
Otherwise,
l Schedule start is the schedule start date of the task
l Schedule finish is the schedule finish date of the task
Calculating PV
For all tasks,
l If there is no task baseline, PV is null.
l If task baseline exists, in one of the following cases, PV = 0:
l The task status is cancelled, or
l The schedule start date of the task is null, or
l Schedule start is later than the current system date
If a task is the summary task, its PV is calculated as Sum (PV of all its child tasks).
For leaf tasks, if task baseline exists and
l If schedule end is earlier than the current system date, PV = Baseline Cost
l Otherwise, PV = Baseline Cost * (passed days / total days)
In this formula, passed days is calculated as follows:
l If schedule start is the current system date, passed days = 1.
l If the PV_USE_ACTIVE_BASELINE_DATES server configuration parameter is set to true, passed days = Today's Date - Baseline Start Date]
l Otherwise, passed days = Today’s Date - Start Date
Total days is calculated as follows:
Resource Management User GuideAppendix C: Tracing PPM Data
Project and Portfolio Management Center (9.51) Page 208 of 215

l If the PV_USE_ACTIVE_BASELINE_DATES server configuration parameter is set to true, total days = Baseline Finish Date - Baseline Start Date
l Otherwise, total days = Finish Date - Start Date
Calculating Data in Financial SummaryThis section describes how PPM calculates data in a financial summary.
Calculating Forecasted Labor Costs From Staffing ProfileYou can specify whether forecasted labor costs on the financial summary are to be calculated (rolled up) from the staffing profile. If this option is selected, separate, non-editable forecast lines are automatically created in the financial summary to reflect the staffing profile estimates, including the percentage split between capital and operating costs.
The forecast labor cost of a staffing profile equals to the total sum of forecast labor costs of all positions in this staffing profile. The forecast labor cost of a particular position is calculated as follows:
Forecast Labor Cost of a Position = Sum (Forecast Labor Cost of Assignment/Promise of the position) + (Unmet Demand * Cost rate of the position)
where,
l Forecast Labor Cost of Assignment = Total committed effort of the assigned resource * Cost rate of the resource
Note: Starting from version 9.31, you can decide to use the cost rate of the resource role or the position role to calculate the forecast labor cost of assignment. If you set the SP_RESOURCE_ROLE_RATE_ENABLE parameter to true, the forecast labor cost of assignment is calculated by the cost rate of the resource role. If you set this parameter to false, the forecast labor cost of assignment is calculated by the cost rate of the position role. By default, this parameter is set to true. When the resource has no role defined, and you set the parameter to true, the cost rate of the position role is used.
l Forecast Labor Cost of Promise = Total promised effort of the assignment * Cost rate of the position
The cost rate of a position/resource is determined by the cost rule described in "Best Matching Strategy" on page 211.
Note: If there is over allocation on assignments, the unmet demand becomes negative. The negative unmet demand values are by default ignored in the calculation.
Resource Management User GuideAppendix C: Tracing PPM Data
Project and Portfolio Management Center (9.51) Page 209 of 215

Starting from version 9.31.0001, you can decide whether the negative unmet demand value should be ignored by using the following parameter in the server.conf file:
Parameter Name Usage, Description Value
IGNORE_NEGATIVE_UNMET_DEMAND
If you set this parameter to true, PPM ignores negative unmet demand value in the calculation of forecast labor cost.
If you set this parameter to false, PPM does not ignore negative unmet demand value (regards the negative unmet demand value as it is) in the calculation of forecast labor cost.
Default value: true
Valid values: true, false
The following table describes cost factors used for calculating the forecast labor cost.
Entity Relevant Cost Factors
Forecast labor cost of a position
Role: Role of the position.
Region: Region of the staffing profile where the position belongs.
Resource Type: Resource type of the position.
Project: If the parent entity of the staffing profile where the position belongs is a project, the project is included as a cost factor.
Org Unit: If the default resource pool of the position is defined, the default org unit of the resource pool is included as a cost factor.
Table 4-2. Cost factors and entities to which they apply
Resource Management User GuideAppendix C: Tracing PPM Data
Project and Portfolio Management Center (9.51) Page 210 of 215

Entity Relevant Cost Factors
Forecast labor cost of an assignment
Role: If the role of the assigned resource is defined, use it. Otherwise, use the role of the position to which the resource is assigned.
Region: If the region of the assigned resource is defined, use it. Otherwise, use the region of the staffing profile where the resource belongs.
Resource Type: If the resource type of the assigned resource is defined, use it. Otherwise, use the resource type of the position to which the resource is assigned.
Resource: Resource assigned to the position.
Department: If the department of the assigned resource is defined, it is included as a cost factor.
Project: If the parent entity of the staffing profile where the assigned resource belongs is a project, the project is included as a cost factor.
Org Unit: If the primary Org Unit of the assigned resource is defined, it is included as a cost factor.
Table 4-2. Cost factors and entities to which they apply, continued
The forecast labor cost is not updated immediately when you change cost factors described in "Table 4-2. Cost factors and entities to which they apply" on the previous page. Instead, it is recalculated base on the latest cost factors when the SP-FS sync service is triggered by effort or status change of the position or assignment. PPM does not keep or consider historic cost rates after you change cost factors.
Note: If you change the cost rate by clicking the Add New Rate button on the Edit Cost Rule page and specify a effective start date in the pop-up window, PPM keeps and considers historic cost rates when calculating the forecast and actual labor costs for periods earlier than the effective start date.
For more information about calculating forecast labor cost, see "Configuring a Lifecycle Entity Financial Summary for Capitalization and Roll-Ups" in Financial Management User Guide.
Best Matching StrategyPPM calculates a score for each cost rule and considers the rule with the highest score as the best matching one. Cost rate of a position/resource used in the calculation of forecast labor cost is the one defined in the best matching rule.
Before calculating a score for a cost rule, PPM checks whether the cost rule and the position/resource contain the same cost factor and whether values of the factor are the same. If yes, the cost factor is considered matching. Then, scores of cost rules are calculated as follows:
Resource Management User GuideAppendix C: Tracing PPM Data
Project and Portfolio Management Center (9.51) Page 211 of 215

l If a cost rule contains no matching cost factors, it is considered not applicable and gets -1 point.
l If a cost rule contains one or more matching cost factors, PPM assigns 2n points to each matching factor according to its priority. Priorities of cost factors are configured on the Change Cost Factors page (Open > Administration > Financials > Change Cost Factors). In the Selected Columns field, all cost factors are listed according to their priorities from top to bottom.
For example, if a cost rule contains four cost factors and they are all matching factors, the factor of top priority gets 24 = 16 points; the one of second priority gets 23 = 8 points; the one of third priority gets 22 = 4 points; and the last one gets 21 = 2 points. The score of this cost rule is the sum of all points its factors get. In this example, it is 16 + 8 + 4 + 2 = 30 points.
l If a cost factor contains no value, it is considered as a wildcard factor. PPM assigns one point to each wildcard factor.
l Besides matching and wildcard factors, all other cost factors get no point.
l If a cost rule is not the default one, add one point to its score. Therefore, if a cost rule contains the same cost factors with the default cost rule, it gets a higher score than the default one.
Note: There is at least one matching rule, that is, the default rule which cannot be deleted and whose cost factors are all wildcard factors.
Actual Labor Cost Period Break DownThe actual efforts you log in time sheets and work plans are in a continuous range. However, when rolling up the actual labor cost to the financial summary, PPM breaks it down into periods. The cost of each month is calculated as follows:
Actual Labor Cost of month n = Total Actual Cost * Working days in month n / Total working days during the period when actual efforts are logged
For example, a resource has been working on a task from July 17th to August 20th, 2013 and costs USD $10000. Data used when calculating the actual labor cost of this resource is as follows:
l Total actual cost is USD $10000.
l Total working days from July 17th to August 20th is 25 days.
l Working days in July is 11 days.
l Working days in August is 14 days.
Note: Working days are calculated according to the calendar of the resource.
Therefore, actual labor cost of this resource in July is USD $10000*11/25 = USD $4400, while that in August is USD $10000*14/25 = USD $5600.
The calculation of actual labor cost is the same for part time and full time resources.
For more information about calculating forecast labor cost, see "Configuring a Lifecycle Entity Financial Summary for Capitalization and Roll-Ups" in Financial Management User Guide.
Resource Management User GuideAppendix C: Tracing PPM Data
Project and Portfolio Management Center (9.51) Page 212 of 215
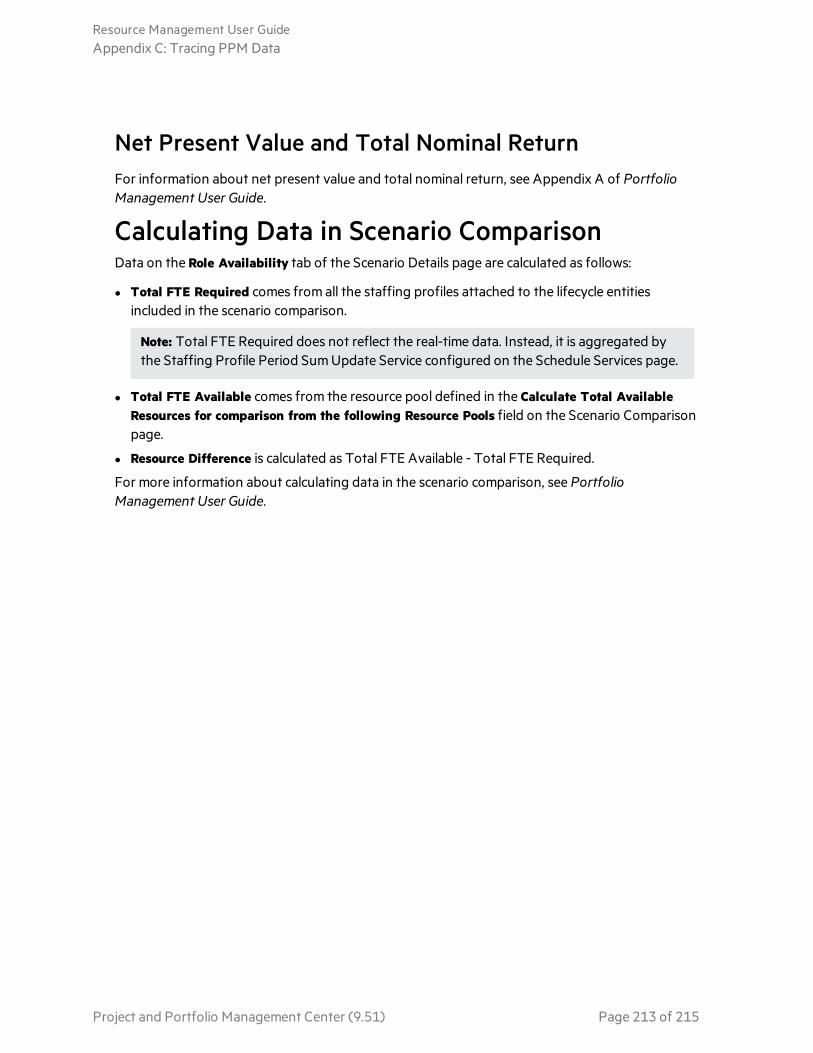
Net Present Value and Total Nominal ReturnFor information about net present value and total nominal return, see Appendix A of Portfolio Management User Guide.
Calculating Data in Scenario ComparisonData on the Role Availability tab of the Scenario Details page are calculated as follows:
l Total FTE Required comes from all the staffing profiles attached to the lifecycle entities included in the scenario comparison.
Note: Total FTE Required does not reflect the real-time data. Instead, it is aggregated by the Staffing Profile Period Sum Update Service configured on the Schedule Services page.
l Total FTE Available comes from the resource pool defined in the Calculate Total Available Resources for comparison from the following Resource Pools field on the Scenario Comparison page.
l Resource Difference is calculated as Total FTE Available - Total FTE Required.
For more information about calculating data in the scenario comparison, see Portfolio Management User Guide.
Resource Management User GuideAppendix C: Tracing PPM Data
Project and Portfolio Management Center (9.51) Page 213 of 215

Appendix D: Enhanced Export to Excel FunctionalityThe “Export to Excel” functionality is enhanced on the following pages:
l Staffing Profile page
l Search Resource page
This enhanced functionality is also available on the following pages:
l Resource Finder page
l Search Resource Availability page
l Resource Allocation Management page
l Forecast Planning page
With this enhanced functionality, you can:
l Export data to a Microsoft Excel file, not HTML page. In this way, you can process your data by using more Excel functions, such as format and calculation.
l Export more data attributes to the Excel file.
Caution: We recommend that you use Microsoft Excel 2007 or higher for this functionality.
Resource Management User GuideAppendix D: Enhanced Export to Excel Functionality
Project and Portfolio Management Center (9.51) Page 214 of 215

Send Us FeedbackLet us know how we can improve your experience with the Resource Management User Guide.Send your email to: [email protected]
Project and Portfolio Management Center (9.51) Page 215 of 215