programmers guide to unix - university of manitoba · as the availability of sophisticated...
TRANSCRIPT

An Application
Programmer’s Guide
to UNIX
at the
University of Manitoba
by
Gary F. Alderson
Manager, Application Technologies
Administrative Systems
Version: 1.8
2002-03-03

Page 2
Table of Contents
Table of Contents ............................................................................................................................2
Introduction.....................................................................................................................................4
The Shells ........................................................................................................................................4
Interactive use of the Shell .............................................................................................................5
Command Aliases........................................................................................................................................6
Command History.......................................................................................................................................6
Command Line Editing ..............................................................................................................................7
Security and Permissions................................................................................................................9
The Basics ....................................................................................................................................................9
Setting File Creation Defaults....................................................................................................................9
Setting Permissions after Creation..........................................................................................................10
Security Groups.........................................................................................................................................10
Set Group-ID Permission .........................................................................................................................11
Set Userid Permission ...............................................................................................................................11
Save Text Image after Execution.............................................................................................................11
Directory Structure Set-up for Production Batch Applications..................................................12
Directory Structures for Development and Production WEB Servers........................................13
Why do we have multiple Web servers? .................................................................................................13
The Common Administrative Systems Web Server Directory Structure ...........................................14
Best Practices.............................................................................................................................................15
Writing Shell Scripts .....................................................................................................................16
Example 1 - A basic shell script. ..............................................................................................................16
Example 2 - A sample database load.......................................................................................................17
Example 3 - A script called by other scripts. ..........................................................................................19
Best Practices.............................................................................................................................................22
CronTab - Production Job Scheduling ........................................................................................23
Pipes, Redirection, Filters and Other Plumbing Fixtures ..........................................................25
Dataflow through Commands..................................................................................................................25
Redirecting Input and Output .................................................................................................................25
Filters..........................................................................................................................................................26 cat ................................................................................................................................................................................26 sort ...............................................................................................................................................................................26 head..............................................................................................................................................................................26 tail ................................................................................................................................................................................26 more or less..................................................................................................................................................................27 grep ..............................................................................................................................................................................27 cut ................................................................................................................................................................................27 sed and awk..................................................................................................................................................................28

Page 3
tar.................................................................................................................................................................................28 gzip ..............................................................................................................................................................................28 find...............................................................................................................................................................................29
find /priv/adminsys/wwwprod –name \*.pl -print ........................................................................................................29
PERL - Practical Extraction and Reporting Language ..............................................................30
Perl Style Guide.........................................................................................................................................30
Example 1 - Using PERL to Substitute Text ..........................................................................................30
Example 2 - Preparing a file for a Sybase BCP Load............................................................................31
Example 3 - A Simple Report using Sybperl ..........................................................................................32
Example 4 - Updating a Sybase Table using Sybperl ............................................................................34
Source Code Management using CVS .........................................................................................38
Setting Up a CVS Repository ...................................................................................................................38
Deciding on Project Granularity .............................................................................................................38
Automatic Documentation .......................................................................................................................38
Importing New Projects ...........................................................................................................................39
Checking Out Projects..............................................................................................................................39
Updating Projects......................................................................................................................................39
Watching Projects for Changes ...............................................................................................................39
Who is Watching You ? ............................................................................................................................40
Adding Files to the Project.......................................................................................................................40
Removing Files from the Project .............................................................................................................40
Committing Project Releases ...................................................................................................................40
Releasing Your Project Sandbox .............................................................................................................40
More Information is Available at ... ........................................................................................................41
Suggestions and Ideas for Improvement......................................................................................42

Page 4
Introduction
In the world of Client/Server computing, the UNIX operating system plays three major roles. First,
primarily due to its scalability and its capability to run on high performance machines which contain
several processors and large amounts of memory and disk, it is the preferred platform for database
servers such as Sybase to run. Secondly, for largely the same reasons as the preceding point, as well
as the availability of sophisticated scripting languages (UNIX’s version of JCL), UNIX provides a
good environment for traditional production “batch” processing. Such activities as database loads,
high volume printing, long running processes, regularly scheduled production tasks, etc. are typical
examples. Lastly, UNIX does provide a lowest common denominator means of providing client
interfaces, namely ASCII terminal emulation, typically VT100 terminal emulation. This ASCII
terminal interface can be used by clients who do not have any other means of running client/server
applications, provided the applications are developed specifically for UNIX or preferably using a
multi-platform application development product such as Uniface. As well, since a connection can be
made using this terminal interface, access from remote locations, such as programmers working from
home, can be accomplished very easily.
The document which follows will attempt to provide Computer Services staff with as set of guidelines
and examples for developing and running applications within the University’s UNIX computing
environment. As this is new to most of us, this document is expected to change over time to
incorporate environmental changes, better ideas, etc. So please feel free to forward any comments or
suggestions to the Application Technologies group and we will attempt to incorporate them.
The Shells
When you use UNIX, the interface that interprets your commands is known as the “shell”. UNIX
started out from AT&T using a command line interface called the “Bourne” shell (referred to as
/bin/sh in UNIX terms). Later, University of California at Berkeley decided to develop its own
version of UNIX known as BSD UNIX. BSD UNIX differed from AT&T in a number of ways, one of
which was its shell, known as the “C Shell” (/bin/csh). The C shell was more based on the syntax of
the C programming language and introduced a number of new facilities, such as command history
and aliases. In the past few years, several of the different UNIX operating systems have been trying
to resolve their differences and establish a single common standard UNIX. AT&T and the Open
Systems Foundation have defined standards known as the UNIX System V spec and OSF/1. Both of
these standards use the “Korn” shell as their standard command interpreter. The Korn shell
(/bin/ksh) was derived from the Bourne shell and combines the efficiency of the Bourne shell with
the enhancements found in the C shell, such as command history, arrays, command re-entry and
directory substitution.

Page 5
Interactive use of the Shell
Since the industry is largely moving towards support of System V and CDE, it is advisable to use the
Korn shell for your own interactive use in UNIX. To establish this you need to enter the command
chsh, which stands for “change shell”. You will be prompted with the following dialogue:
%chsh Changing NIS login shell for your_userid on zaurak. Old Shell: /bin/csh
New Shell:/bin/ksh Password: your_password
The next time you login to UNIX you will be using the Korn shell. For more in-depth information on
the Korn shell, please refer to the command man ksh or the book entitled “Portable UNIX” by
Douglas W. Topham ISBN 0-471-57926-2.
Once the shell has been changed, you will likely wish to modify your start-up procedure. This is held
in a file called .profile which exists in your home directory. A default .profile looks like the
following: #! /bin/sh # # User $HOME/.profile - commands executed at login time # PATH=$PATH:$HOME/bin:. # command search path MAIL=/usr/spool/mail/`logname` # mailbox location VISUAL=pico # visual editor EDITOR=pico # usual editor PAGER=pg # pager DIST=xerox # printer distribution PRINTER=xerox # default printer export PATH MAIL VISUAL EDITOR PAGER DIST PRINTER umask 077 # set file creation mask stty susp '^-' dsusp '^-' # disable job control eval `tset -Qsr -e -k -m dialup:\?vt100 -m network:\?vt100` # set up terminal type #rn -c || echo "Type \`\`rn'' to read news" # r(ead) n(ews) check #nncheck && echo "Type \`\`nn'' to read news" # n(ew) n(ews) check #/usr/games/fortune # cookie # delete the following if you don't want this # start openwin automatically for Sun console logins if [ "`tty`" = "/dev/console" -a "`uname -s`" = "SunOS" ]; then /usr/local/openwin/lib/checkOW :0 [ $? -eq 1 ] && exec openwin fi
The .profile file is what is called a shell script or list of UNIX commands which get executed when
you login to the UNIX system. The majority of these commands set what are called environment
variables, which will be used by other commands and the UNIX operating system to determine
where to look for things or where to print things, what editors you like to use, etc. Some examples
are:
PATH identifies the directories to search through to find commands you enter.
HOME identifies your login directory where your personal files exist.
MAIL identifies where your mail is stored.
VISUAL identifies the full screen editor you prefer to you. For example: mcedit.
EDITOR the same as VISUAL
PAGER identifies the command to use when you view files.
DIST identifies printer distribution.
Page 6
PRINTER identifies your default printer. Note, in ADPC there are several UNIX printers available.
They are identified as: admin108_pq2 (The UniGraphics Xerox Docutech in 108 Admin),
admin110_pq1 (The QMS 825 in room 110), admin111_pq1 (The HP Laserjet in 111
Admin), admin105_pq1 (The QMS 1700 in 105 Admin) and adpc (The Sand impact
printer in the ARC).
You can change these to suit your preferences by modifying your own .profile. You will also want to
add an additional environment variable, UNIFACE_ENV=development. This is used to identify
which Uniface environment you want to use. By default UNIFACE_ENV will be set to production if
you run any Uniface commands such as idf or uniface and the environment variable has not been
set. Once set, these environment variables must be made available to any commands you execute
using the export command. Hence, to make commands aware of the UNIFACE_ENV variable you
must export UNIFACE_ENV.
Command Aliases
If you have a tendency to forget UNIX commands or always type the commands you use in DOS or
MANTES, you can set-up aliases for them using the Korn shell. To make sure they are always
available, you can also add them to your .profile, so that they are defined when you login. Some of
my favourites are as follows:
alias dir=“ls -l” # simulate the MS-DOS dir command
alias ren=“mv “ #simulate the MS-DOS rename command
alias rd=“rmdir” #provide a reasonable abbreviation for remove directory.
alias md=“mkdir” #provide a reasonable abbreviation for make directory
alias del=“rm -I” #can you remember that rm stands for delete ?
alias copy=“cp” #the same for copy
Command History
The other handy feature of the Korn shell is it command history. This similar to the ?b feature of
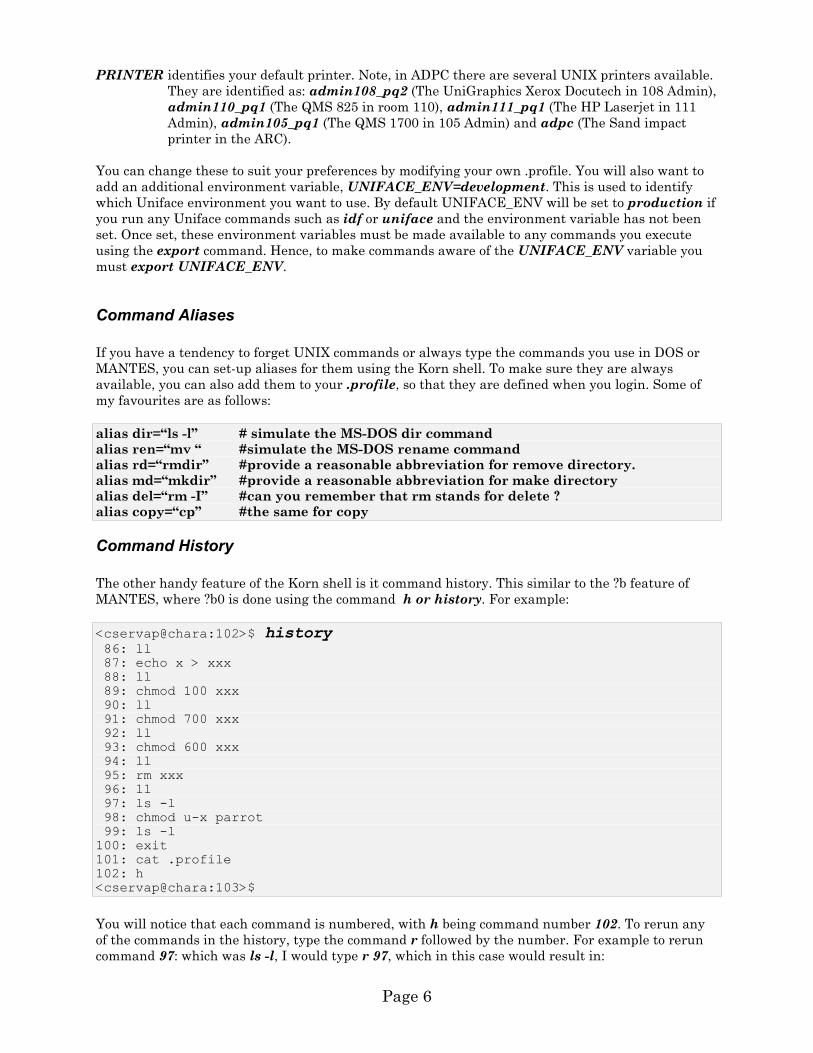
MANTES, where ?b0 is done using the command h or history. For example:
<cservap@chara:102>$ history 86: ll 87: echo x > xxx 88: ll 89: chmod 100 xxx 90: ll 91: chmod 700 xxx 92: ll 93: chmod 600 xxx 94: ll 95: rm xxx 96: ll 97: ls -l 98: chmod u-x parrot 99: ls -l 100: exit 101: cat .profile 102: h <cservap@chara:103>$
You will notice that each command is numbered, with h being command number 102. To rerun any
of the commands in the history, type the command r followed by the number. For example to rerun
command 97: which was ls -l, I would type r 97, which in this case would result in:
Page 7
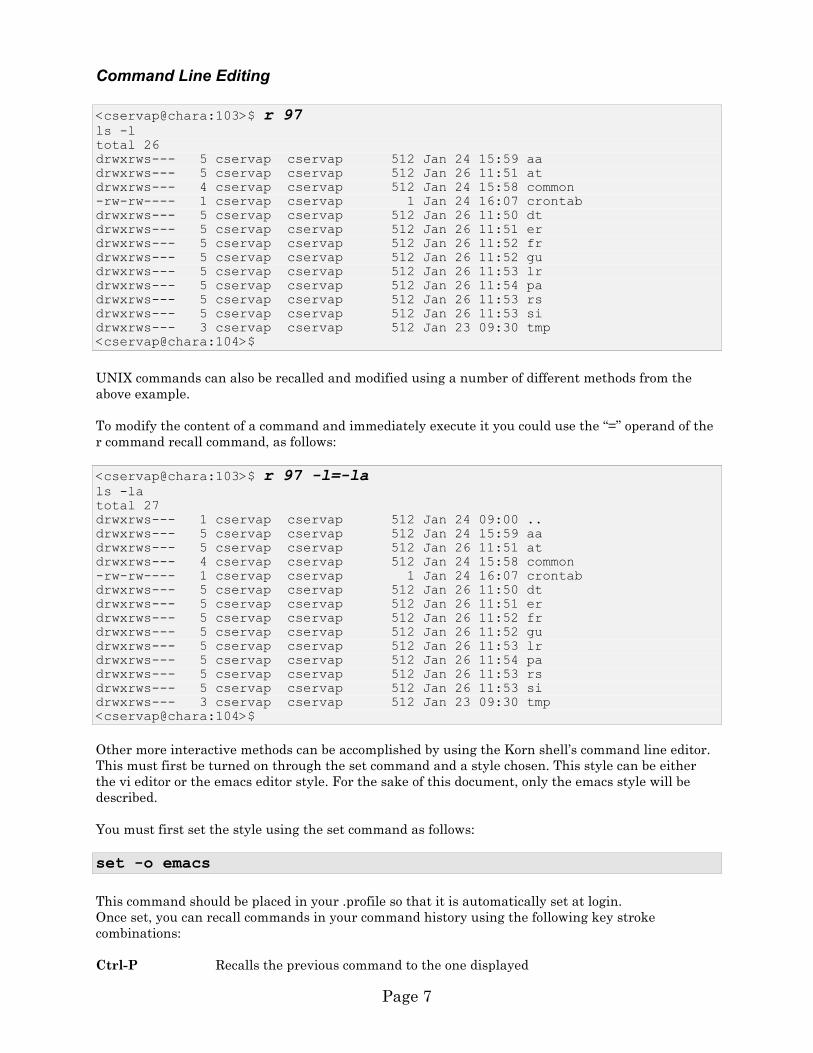
Command Line Editing
<cservap@chara:103>$ r 97 ls -l total 26 drwxrws--- 5 cservap cservap 512 Jan 24 15:59 aa drwxrws--- 5 cservap cservap 512 Jan 26 11:51 at drwxrws--- 4 cservap cservap 512 Jan 24 15:58 common -rw-rw---- 1 cservap cservap 1 Jan 24 16:07 crontab drwxrws--- 5 cservap cservap 512 Jan 26 11:50 dt drwxrws--- 5 cservap cservap 512 Jan 26 11:51 er drwxrws--- 5 cservap cservap 512 Jan 26 11:52 fr drwxrws--- 5 cservap cservap 512 Jan 26 11:52 gu drwxrws--- 5 cservap cservap 512 Jan 26 11:53 lr drwxrws--- 5 cservap cservap 512 Jan 26 11:54 pa drwxrws--- 5 cservap cservap 512 Jan 26 11:53 rs drwxrws--- 5 cservap cservap 512 Jan 26 11:53 si drwxrws--- 3 cservap cservap 512 Jan 23 09:30 tmp <cservap@chara:104>$
UNIX commands can also be recalled and modified using a number of different methods from the
above example.
To modify the content of a command and immediately execute it you could use the “=” operand of the
r command recall command, as follows:
<cservap@chara:103>$ r 97 -l=-la ls -la total 27 drwxrws--- 1 cservap cservap 512 Jan 24 09:00 .. drwxrws--- 5 cservap cservap 512 Jan 24 15:59 aa drwxrws--- 5 cservap cservap 512 Jan 26 11:51 at drwxrws--- 4 cservap cservap 512 Jan 24 15:58 common -rw-rw---- 1 cservap cservap 1 Jan 24 16:07 crontab drwxrws--- 5 cservap cservap 512 Jan 26 11:50 dt drwxrws--- 5 cservap cservap 512 Jan 26 11:51 er drwxrws--- 5 cservap cservap 512 Jan 26 11:52 fr drwxrws--- 5 cservap cservap 512 Jan 26 11:52 gu drwxrws--- 5 cservap cservap 512 Jan 26 11:53 lr drwxrws--- 5 cservap cservap 512 Jan 26 11:54 pa drwxrws--- 5 cservap cservap 512 Jan 26 11:53 rs drwxrws--- 5 cservap cservap 512 Jan 26 11:53 si drwxrws--- 3 cservap cservap 512 Jan 23 09:30 tmp <cservap@chara:104>$
Other more interactive methods can be accomplished by using the Korn shell’s command line editor.
This must first be turned on through the set command and a style chosen. This style can be either
the vi editor or the emacs editor style. For the sake of this document, only the emacs style will be
described.
You must first set the style using the set command as follows:
set -o emacs
This command should be placed in your .profile so that it is automatically set at login.
Once set, you can recall commands in your command history using the following key stroke
combinations:
Ctrl-P Recalls the previous command to the one displayed

Page 8
Ctrl-N Recalls the next command to the one displayed
Ctrl-R [string] Finds the command starting with [string] and recalls it when return or enter is
pressed.
Ctrl-A Moves the cursor to the beginning of the command for editing.
Ctrl-E Moves the cursor to the end of the command for editing.
Ctrl-F Moves the cursor forward one character
Ctrl-B Moves the cursor backwards one character.
These are the basics, for more complete information you should review the man pages for the emacs
editor. As well, you can also simplify the above by setting “key binding” aliases in your .profile or
.kshrc file as follows:
alias -x __A=$(print ‘\020’) # Set the up arrow to Ctrl-P (previous command) alias -x __B=$(print ‘\016’) # Set the down arrow to Ctrl-N (next command) alias -x __B0=$(print ‘\017’) # Trust me on this one … you just need it alias -x __C=$(print ‘\006’) # Set the right arrow to Ctrl-F (move forward) alias -x __D=$(print ‘\002’) # Set the left arrow to Ctrl-B (move backwards) alias -x __H=$(print ‘\001’) # Set the home key to Ctrl-A (start of command) alias -x __K=$(print ‘\005’) # Set the end key to Ctrl-E (end of command)

Page 9
Security and Permissions
The Basics
In UNIX, security is defined at three basic levels, USER (owner), GROUP and OTHER. Within these
levels one can be granted Read, Write and eXecute permissions. These can be seen when you execute
the “ls -l” command as a string of letters preceding the file information which can look like “-
rwxrwxrwx”. The first character in the ten character string indicates whether the entry is a file (-),
a directory (d) or a symbolic link (l). The next three characters rwx shows the permissions granted to
the owner or user, the next set the permissions granted to those people who are a member of the
same security group and finally the last set are the permissions that apply to everyone else on the
system. For example:
<cservap@chara:110>$ ls -l total 8 -rwxrwx--- 1 cservap cservap 3098 Jan 24 16:13 aaload <cservap@chara:111>$
Setting File Creation Defaults
Security rights come into being in several ways. First, when a file is created. If you were to write the
shell script in the previous example, you would most likely use an editor like PICO to create it. By
creating the file, you automatically become the USER or owner of the file. Generally most people
have a default permission mask set in their .profile file called “umask” this most commonly has the
value 077. If you think back to octal arithmetic you will remember that each number is composed of
three bits, 0=000, 1=001, 2=010, 3=011, 4=100, 5=101, 6=110 and 7=111. The bits in umask
represent Read, Write and eXecute permissions that you do not want to assign as a default when
files and directories are created. To do this, UNIX actually assigns the permission by exclusive or’ing
the umask value with the value 666 for files and 777 for directories. The first grouping applies to the
User, the second the group and the third the rest of the world. Hence a umask of 077 will create a
permission or rights mask of rwx------ for any directories you create and rw------- for any files you
create. (Note, you generally must explicitly grant execute permission to a file unless a program that
is designed to create executables, for example a compiler or linkage editor, creates it.)
As with chmod, there is also a simpler way to deal with umask that remembering your octal
arithmetic. The umask command also supports the pneumonics u,g and o as does chmod. For
example, it would be advisable for a personal UNIX account to set the umask to “umask u=rwx,g-
rwx,o-rwx” which is the same effect as setting it to 077, but a whole lot easier to read and
understand. As with chmod please note that = sets exactly those rights, + adds to them and – takes
them away. In the case of a production UNIX account, such as adpcaa, your would be best to ensure
that all files and directories created are accessible by both the owner and the group, but not other. To
do this you would set umask as follows: “umask u=rwx,g=rwx,o-rwx”. Also you would like to have
new files and directories created using the correct group, you should also set the default security
group with the newgrp command, eg. “newgrp cservap”. Typically both these commands should be
set as default in the .profile login script. Beware however, as newgrp will launch a new copy
of the shell, thus terminating your .profile script. Therefore it MUST be the last line of
your .profile.

Page 10
Setting Permissions after Creation
A second way file permissions are set is through the use of the chmod command. If you like the
difficult method of doing things, you can use the octal bit mask to assign permissions to files. For
example, to allow rwx for the User, rx to the group and x to others on a file named parrot, you would
enter the command:
chmod 751 parrot
and the permissions on parrot would be set to rwxr-x--x. Thankfully, there is an easier way. chmod
also supports a symbolic way to state these permissions. User, group and other are signified by the
letters u, g and o, and the Read Write and eXecute permissions are represented by r,w and x. Hence
to grant read-write-execute to the user, read-execute to the group and execute to others, you would
enter the commands:
chmod u=rwx parrot chmod g=rx parrot chmod o=x parrot
You will note that I used the equals sign “=“ between the level and the permissions granted. “=“
specifies that these rights exactly should be assigned. You can also use plus “+” to add to the
permissions or minus “-” to take them away. For example, to grant write permission to parrot for
the group and to take away execute permission from parrot for others, you would enter the following
commands:
chmod g+w parrot chmod o-x parrot
Security Groups
Groups are defined a collection of userids who have a common security need. In our case, all people
who have a need to use and create application production scripts and programs are a member of
security group cservap. If you are authorised to use Uniface under UNIX as a developer, you will
also be a member of the security group uniface. As a employee of Computer Services, you will also
be a member of security group cserv and so on. To find out what security groups you belong to, enter
the command groups, or groups followed by a userid to find out the groups another person is
assigned. Typically your default group will be set to the first group reported by the groups
command, generally other. You should reset this default using the newgrp command to the group
that you most commonly use, for example: newgrp cservap will set your default group to cservap.

Page 11
Set Group-ID Permission
Reflecting back to the file permissions, when a file is created, it is assigned a User or owner, a
default set of file permissions and a group id. The group id assigned to the file comes from the default
group assigned to the userid who created it. As well, it can be changed using the chgrp command.
Alternately, if the SGID permission or Set-Group-ID bit is set on the group permissions of the
directory, the file will inherit its group from the group assigned to the directory. This is why it is
important to set the s bit of the directory using the chmod command. For example, to have all files
created under the /home/adpc/cserap/tmp directory be owned by group cservap, the following
commands were entered:
chgrp cservap /home/adpc/cservap/tmp chmod g+s /home/adpc/cservap/tmp
Set Userid Permission
Similarly, the s permission can also be set on the user or owner permissions for a file or directory.
This is known as the SUID or Set-User-ID bit. This is strongly discouraged and is seldom used due
to its potential security exposure. The SUID bit, when set on an executable file, will tell UNIX that
the userid running the command is the actually owner of the file, rather than the real userid running
it. This is required for utilities such as passwd which grant you root or administrator authority to
allow you to change your password. Since this is one of the primary methods used by hackers to
break into UNIX systems, don’t use it ! If you feel you really must grant SUID for some reason, you
should always review your command with the UNIX group to ensure that it is air-tight before you
grant this access right.
Save Text Image after Execution
There is one last permission bit, the t or sticky bit, also know as the “save text image after execution”
bit. Normally UNIX will load a program into memory from disk, and run it. If a program is run very
often, it is desirable to keep it loaded in memory or a known location in the UNIX swap file area to
provide better response time. This is done by setting the sticky bit via chmod +t filename. Before
using this feature, you should first consult with the UNIX group.

Page 12
Directory Structure Set-up for Production Batch Applications
For product applications set-up and maintained by Administrative Systems, the following directory
structure has been established.
Under the high level node /home/adpc exists several directories: sybase, uniface, extdata,
cservap, etc. The sybase directory contains all of the executables and files required to run Sybase
clients and libraries to link UNIX applications. The uniface directory contains all of the uniface
executables and compiled objects for the UNIX development, test, production maintenance and
quality assurance environments. Extdata is used to house files that are accessed by people outside of
Administrative Systems and are used by Administrative Systems Production jobs and tasks. Lastly,
the directory cservap exists to provide a common repository for all production related shell script,
SQL scripts and documentation. Please note, temporary workspace required during the execution of
production applications should be directed to /priv/tmp/ss, where ss is the two character system id.
Please note that /priv/tmp only exists on chara, so any FTPs must direct their requests to
chara.cc.umanitoba.ca specifically. For the purposes of this section of the document, we will
concentrate on the /home/adpc/cservap directory.
The first level of the /home/adpc/cservap directory is defined as follows:
<cservap@chara:101>$ ll total 26 drwxrws--- 5 cservap cservap 512 Jan 24 15:59 aa drwxrws--- 5 cservap cservap 512 Jan 26 11:51 at drwxrws--- 4 cservap cservap 512 Jan 24 15:58 common -rw-rw---- 1 cservap cservap 1 Jan 24 16:07 crontab drwxrws--- 5 cservap cservap 512 Jan 26 11:50 dt drwxrws--- 5 cservap cservap 512 Jan 26 11:51 er drwxrws--- 5 cservap cservap 512 Jan 26 11:52 fr drwxrws--- 5 cservap cservap 512 Jan 26 11:52 gu drwxrws--- 5 cservap cservap 512 Jan 26 11:53 lr drwxrws--- 5 cservap cservap 512 Jan 26 11:54 pa drwxrws--- 5 cservap cservap 512 Jan 26 11:53 rs drwxrws--- 5 cservap cservap 512 Jan 26 11:53 si drwxrws--- 3 cservap cservap 512 Jan 23 09:30 tmp <cservap@chara:102>$
Please note, the userid cservap owns the directories as well as the group cservap. As well, there are
no permissions granted to others to prevent unauthorized access. The Set-GroupId bit has been set
on all of the directories to ensure all files created will be accessible to other members of the cservap
group. If you feel that this may cause problems for your application, please discuss your concerns
with the Application Technologies group. drwxrws--- 2 cservap cservap 512 Jan 24 15:59 doc drwxrws--- 2 cservap cservap 512 Jan 24 16:13 script drwxrws--- 2 cservap cservap 512 Jan 24 15:59 sql drwxrws--- 2 cservap cservap 512 Jan 24 17:45 src

Page 13
Going down one more level, a directory will be created for each application group or system as
required. This is identified by the standard two-character system id. Within each of these directories
are the standard directories, script, doc, sql and src. All shell scripts associated with a system
should be kept in the system’s script directory (e.g. /home/adpc/cservap/aa/script), any
appropriate documentation should be maintained in the doc directory and any isql scripts
maintained in the sql directory. Any program source code, test scripts, test sample data, etc should
be kept in the src directory. We will discuss the src directory in more detail in the section “Source
Code Management using CVS”. Any other directories may be added as each group requires,
however, keep in mind that from time to time new standard directories will be added as common
needs arise or are suggested. These directories should not however contain large amounts of
transient data as /priv/tmp/ss is to be used for this purpose.
The /home/adpc/cservap/common directory is meant for any scripts or documents which are
common or potentially common to all applications. Any additions or changes to the common directory
should be reviewed with the Application Technologies group first to ensure co-ordination.
Lastly, the /home/adpc/cservap/tmp directory is meant to be used for temporary workspace where
other UNIX machines will need to access the data. Normally, the /priv/tmp directory should be used
for temporary workspace whenever possible. The /priv/tmp directory is unaffected in terms of disk
space from other UNIX users since it is located on a separate disk volume on the chara machine.
Hence, you will only contend with other production applications for space. As well, and more
importantly, /priv/tmp and also /home/adpc/cservap/tmp directory cannot be accessed by any other
UNIX users who do not belong to the cservap security group, unlike /local/tmp which is viewable by
everyone. Activities such as FTPs of extract files from MVS, sorts, tape dumps, etc. are typical
examples of valid usage of this directory. A cron task will be set-up to automatically delete any files
or directories under both /priv/tmp and /home/adpc/cservap/tmp which are seven days old.
However, you should not depend on this facility to delete your temporary files for you. In the event of
a security breech, these files may be read or copied if they are not deleted immediately after use. As
well, in order to be a good production citizen you should always cleanup your space when a task is
completed to prevent other applications from encountering shortages.
Directory Structures for Development and Production WEB Servers
Why do we have multiple Web servers?
The main web server for the University of Manitoba is located on a UNIX machine called spica.cc.umanitoba.ca. It goes by a more appropriate alias of www.UManitoba.CA. Typically, the main web server is used by Information Providers throughout the University to provide static web content and some departmental web applications. However, due to its nature and the broad community it serves, spica was not considered to be a good fit for Administrative System’s web application development. Hence several years ago, Gary Alderson, Dan Hiebert and Colin Angel met to discuss ways in which these issues could be resolved. It was decided that for static web content, spica would be the most appropriate server. For our purposes, we would install and maintain two of our own web servers: dasweb for development and pasweb for production. The programs would be secure, as they would be available only on chara, which restricts access to Administrative Systems staff only. Since then, the UMInfo group has also taken this track in their webapp.cc.umanitoba.ca, which runs their internal Microsoft Windows based applications. The mail servers each have their own web server, to deal with the security issues regarding mail. The Library has Bison2.cc.Umanitoba.CA for the DRA Library system, etc. Hence today, web servers have become much more specialized and commonplace than they were five years ago. The key is to make them logically appear to be a “single system image” to the client community.

Page 14
The Common Administrative Systems Web Server Directory Structure
Since the Administrative Systems web servers are designed primarily to run web applications, their directory structure has been setup differently than spica, yet in common with each other. Their are three main directories than you will need to know: /priv/adminsys/wwwdevl – the development web server, /priv/adminsys/wwwprod – the production web server and /priv/adminsys/wwwpromote – the environment for promoting applications from development into production. The “document root level” directory, or what appears to be the “/” directory to hrefs in your web pages is set at htdocs. Hence in development, this will be /priv/adminsys/wwwdevl/htdocs, in production /priv/adminsys/wwwprod/htdocs and in promote /priv/adminsys/wwwpromote/htdocs. Unlike spica, it is recommended that you store all of your application components (programs, html, xsl, css, images, etc) under htdocs in an appropriate directory for your application. In this way, you will have minimal or no changes during the promotion process. Under htdocs are several directories, as shown below. The images directory is used to stored common images such as logos, buttons, etc. that can be used in every application. Common is required by UNIFACE Web Application Server and is used to store its error web pages and other components. Documentation is an application developed to maintain operational documentation for every system in terms of jobs, programs, datasets, databases, etc. Note, when you use the documentation system, make sure to use the one in production. The one in development is for application testing of the documentation system itself. Finally, there are the system id directories. Application development teams store their application components here. They are also free to create any directories under their system id directory that they require. Hence you have a structure that visually looks like:
/priv/adminsys wwwdevl Main directory for the Development Web Server auth Various htpasswd security files used by .htaccess cgi-bin For legacy applications and special utilities only htdocs Web Server Document Root css University-Wide (UMInfo) Cascade Style Sheets documentation Operational Documentation System (for testing) images Common Images directory manual Apache Web Server Manual webapp Primary Application Directory
common Common directory (used by UNIFACE WAS) css Application Specific Cascade Style Sheets aa Alumni Association at Application Technologies ... etc rs Student Affairs wwwpromote htdocs Same structure as above, Application Developers move files in here to be promoted. wwwprod auth Similar to above, but manually maintained by AT cgi-bin Similar to above, but manually maintained by AT
htdocs Same as above, updated by AT through promotion css Same as above, updated each time a promote occurs documentation Operational Documentation System images Same as above, updated by AT through promotion manual Apache Web Server Manual webapp Same as above, updated by AT through promotion
Note files are available read-only to group cservap

Page 15
Best Practices
Web applications and files follow standards and guidelines, as does everything else in a proper managed Application Development environment. In addition, there are several “best practices” which should be adopted to reduce the likelihood of problems and to future proof your applications. 1. Use standard naming conventions for all program files. 2. Always use the suffix .html for html files, .pl for Perl scripts, .xml for xml, etc. Although it is possible to make
things work using alternate suffixes, it is not obvious to others and will be guaranteed to cause problems down the road.
3. Create index.html as a symbolic link to your main web page. If your main web page is rs_services.html for
example, you would enter the command “ln –s rs_services.html index.html” to achieve this. This allows you flexibility and the ability to maintain multiple versions of your main page during testing. It is also self-documenting.
4. Be considerate to your other team members, when creating new directories and files, make sure that you grant
them read-write access. An easy way to always do this is to set “umask 007” in your .profile. Be careful however that you always create files and directories with the correct security group. Remember your default group is employee, which is available to all employees of the University.
5. When creating new directories, make sure that your “chmod g+rwxs” them to allow team members access. As noted above, also make sure that they are created with the correct security group, typically cservap.
6. Always use relative pathing when you reference files. Given the way in which the directory structure has been setup, hrefs can always be addresses either by using ./ or ../ relative to where your pages are located. This will also work in programs as you are putting them into the same directory as the rest of the application. In the case of css, images, etc., you can also use /css or /images in an href since the document root is set at the htdocs level. Within your programs, you can also access the DOCUMENT_ROOT environment variable to base file location
upon. In Perl this is accessed via $ENV{‘DOCUMENT_ROOT’} IE. Avoid hard-coding pathnames whenever possible.
7. Never hard-code userids or password into scripts. Always read them from a file instead. Aside from the obvious security exposure, they are much easier to maintain in a common location.
8. If you create directories that are used for working on data or holding data files, first consider putting them outside the web server directory structure. If you cannot do this, create a dummy index.html file in that directory that either gives an appropriate message to redirects to client somewhere else. In this way, they will not be able to view the contents of the directory with their browsers. You can also consult with Application Technologies about adding htaccess security to that directory to further secure it.
9. Restricting access to a directory or files is commonly done to prevent access to web pages from outside the University, to specific user groups or to authorized individuals. Consult with Application Technologies.
10. Thoroughly test your applications before they are promoted into production and again after they have been promoted. The web world is much broader and uncontrolled than traditional user communities. If you discover problems after a promotion has occurred, contact Application Technologies immediately, and the changes can be backed out. AT maintains seven days of backup beyond the normal file system nightly backups.

Page 16
Writing Shell Scripts
Shell scripts, UNIX’s answer to MVS JCL, should be written using the Bourne shell scripting
language. This ensures consistency, standardization and compatibility with the lowest common
denominator of UNIX. While this would appear to contradict my previous statement about using the
Korn shell, you should always strive to develop portable shell scripts capable of running on any other
UNIX system.
Shell scripts should always begin with the line: #! /bin/sh. This informs the script processor that the
Bourne shell is to be loaded to interpret this script.
Scripts should begin with comments describing, the name of the script, who authored it, date
written, purpose, syntax, error return codes, an example of usage and a modification history, similar
to the following example:
Example 1 - A basic shell script.
#! /bin/sh
#-----------------------------------------------------------------------
# Script..........: parrot
# Author..........: Gary F. Alderson
# Date-Written....: 1995-01-20
# Purpose.........: This script was written to show an example of how
# to provide comments at the beginning of a UNIX shell
# script.. As a side it will send the message you
# type after the command back to your screen.
# If no message is specified it will send Polly
# want a cracker
#
# Syntax..........: parrot [anything else you care to type]
#
# Example.........: parrot This is a test ....
#
# Error Codes.....: None, should always return 0 in $? status variable.
#
# Modifications...: 1995-01-20 by Gary F. Alderson.
# An example of how to maintain a modification
# history entry.
#-----------------------------------------------------------------------
. /etc/profile > /dev/null 2>&1
if [ $# -gt 0 ]; then
echo "$@"
else
echo "Polly want a cracker"
fi
#---------------- end of script ----------------------------------------
Shell scripts support the standard language constructs, such as: if then-else, case, for, until and
while loops, exit, functions, variables and variable substitution. Logical comparisons and testing can
be done as string comparisons, numerical comparisons and file attribute tests. A complete
explanation of these can be found by executing man sh, or by reading several books including,
“Portable UNIX” by Douglas W. Topham, Appendix B, The Bourne Shell.

Page 17
Example 2 - A sample database load
A real life example of how to write shell scripts is shown below. In this example, two shell scripts are
involved. The first paaload, is scheduled using the UNIX Cron facility to run every half hour
between midnight and 4:30 am. When the file aaload.go is found, aaload will then load all of the
associated Alumni database tables into sybase using the dpload script. (Note. the aaload.go file is
created by an MVS job that extracts data for each table and then sends it to the UNIX system using
FTP. After all of the files have been sent successfully, a dummy file called aaload.go is then sent to
indicate that the load procedure can start.)
The crontab entry for the update is as follows:
0,30 0-4 * * 1-5 /home/adpc/cservap/aa/script/paaload
This indicates to Cron to run the aaload script (0,30) at 0 and 30 minutes past the hour, (0-4) from
midnight through 4 am, (*) every day of the month, (*) every month of the year, (1-5) Monday to
Friday. (see the section on Cron later in this document.)
The paaload script is as follows:
#! /bin/sh #----------------------------------------------------------------------# # Script......: paaload # # Author......: Gary F. Alderson / Lucy Todd # # Date-Written: 1995-01-06 # # Purpose.....: To load AA tables to Sybase Alumni database # # Error Codes.: Code Reason # # 16 aa_alumni table load failed # # 17 aa_member table load failed # # # # Modifications: 1995-01-31 Gary F. Alderson # # Eliminated redundant steps for sake of example. # # 2000-06-01 Gary F. Alderson # # Updated the example to current techniques. # #----------------------------------------------------------------------# #--- Establish normal environment by sourcing /etc/profile . /etc/profile > /dev/null 2>&1
#--- Establish common constants used throughout the script DSTAMP=”`date +%Y%m%d`” SCPNAME=”`basename $0`” DATADIR=/priv/tmp/aa SCPDIR=”/home/adpc/cservap/aa/script” SQLDIR=”/home/adpc/cservap/aa/sql” SYBUSERID=”adpcaa” SYBPWFILE=”/home/adpc/cservap/aa/script/sybpswd” SYBPSWD=”`cat $SYBPWFILE`” SYBSVR=”sybadmin” DSQUERY=$SYBSVR LOG=”$DATADIR/$SCPNAME.$DSTAMP.$$.log” NOTIFY=“[email protected]” PATH=$PATH:/home/adpc/cservap/aa/script:/home/adpc/cservap/common/script export PATH DSQUERY #--- Check to see if the data files are available and ready to load #--- If not, exit and try again later. If so, delete the .go file to #--- prevent this script from running again. if [ ! -f $DATADIR/aaload.go ]; then exit 0 else rm –f $DATADIR/aaload.go

Page 18
fi #---- Initialize the log file echo “Starting $SCPNAME AA Table load on `uname –n` at `date`” >> $LOG #--- Check to see if the Sybase Server is up and available #--- if not, exit and try again later. /usr/local/adminsys/bin/dpissybup $SYBSVR >> $LOG 2>&1 RC=$? if [ $RC –gt 0 ]; then exit $rc fi #---- Load the tables dpload alumni aa_alumni $DATADIR/aa_alumni.dat \ $SYBUSERID $SYBPWFILE $LOG \ $SQLDIR/aa_alumni_t.sql $SQLDIR/aa_alumni_i.sql \^ if [ $? -ne 0 ]; then echo “$SCPNAME alumni table load failed error code: $?” >> $LOG mailx -s "$SCPNAME process id $$ has failed" $NOTIFYID < $LOG exit 16 fi dpload alumni aa_member $DATADIR/aa_member.dat \ $SYBUSERID $SYBPWFILE $LOG \ $SQLDIR/aa_member_t.sql $SQLDIR/aa_member_i.sql \^ if [ $? -ne 0 ]; then echo “$SCPNAME aa_member table load failed error code: $?” >> $LOG mail -s "$SCPNAME process id $$ has failed" $NOTIFY < $LOG exit 17 fi echo “$SCPNAME has completed successfully at `date`” >> $AALOG #------------------------end of paaload script-------------------------#
You will first see the command “. /etc/profile > /dev/null 2>&1”. This does what is called “sourcing” or
establishing the environment for your script to run. In effect, it executes the commands in the file
stated using your current environment and returns. This is similar to what happens when you login
using telnet. Since CRON does not start that way, you must do this manually. The “> /dev/null 2>&1”
simply throws away the output like DD DUMMY.
Next, a number of variables are set at the beginning of the script that are typically used throughout.
This is a common method used to both eliminate the need to retype information and to put it in a
location where it can be easily identified and changed, much the same as we have done previously
with JCL procs. As well, the PATH variable is modified to include both the aa script directory as well
as the common script directory. This will make other shell scripts in these directories available as
commands to this script, and since PATH is exported, any scripts that this script may call. When the
script has completed, the PATH will be reset to the value it had before it was reset by this script.
Any variables used outside this script, must also be exported using export.
The script first tests for the existence of the aaload.go file by perform a -f test. This is a test for
existence. There are other file attribute tests such as: -r (tests if it can be read), -w (tests if it can
written to), -d (test if the file is a directory) and -s (tests if the file exists and has data in it, etc). The !
indicates not. Therefore if the file aaload.go does not exist, the script is terminated with a return
code of 0, otherwise the aaload.go file is deleted using the rm command to prevent the script from
accidentally being starting while an instance is still running.

Page 19
Other logical tests, such as numerical comparisons, are done using -eq for equal, -ne not equal, -lt
less than, -le less than or equal to, -gt greater than and -ge greater than or equal to. String
comparisons are done using -z does the string not exist, -n does the string exist, = are the strings
equal, and != are the strings not equal. These can all be combined using -o for or, -a for and, ! for not.
After this, each table is loaded by the dpload script and its success or failure tested by checking the
special variable $?, which contains the return code of the previous command, which in this case is set
by the dpload script.
Also throughout, you will notice things like `date` inside echo commands and variable sets. When a
UNIX command is place inside ‘backticks’, (the key directly above the Tab key), the output of the
command is substituted as a value. For example on June 1, 2000, echo “The date is `date
+%Y%m%d`” will send the message “The date is 20000601” to the screen. Alternately,
MACHINE=”`uname –n`” when run on chara, will assign the value chara to MACHINE.
Finally, should a failure be detected, an error message is written to the log file and the log file is then
mailed to the userid stated in the mail command. Note a value of zero in $? does not always mean
that things worked. You may need to check other things such as whether an error message file is
empty or if a string exists in a file.
Example 3 - A script called by other scripts.
To complete these examples, the following script is the dpload script.
#! /bin/sh #----------------------------------------------------------------------# # Script......: dpload # # Author......: Gary F. Alderson # # Date-Written: 1995-01-06 # # # # Purpose.....: To load a Sybase database table by first running # # a table create script, then running bcp to load # # the table and finally running the index creation # # script, views and security. # # # # Syntax......: dpload db_name table_name data_file # # sybase_userid pswd_response_file log_file # # table_define_script index_create_script # # field_delimiter # # # # Example.....: dpload pubs2 authors authors.dat \ # # smith pswd.rsp authors.log \ # # authors_t.sql authors_i.sql \! # # # # Errors Codes: ErrorCode in $? Reason # # 1 Missing parameters # # 4 File(s) not found or accessable # # 16 Table creation failed # # 17 Table BCP load failed # # 18 Index creation failed # # # # Modifications: # #----------------------------------------------------------------------# . /etc/profile > /dev/null 2>&1 if [ $# -lt 8 ]; then echo echo "dpload - $# parameters were passed to the script." echo " - 9 parameters are required, as follows:" echo

Page 20
echo " 1. sybase database name" echo " 2. sybase table name" echo " 3. the file name of the data to be loaded" echo " 4. the sybase userid" echo " 5. the file name which contains the sybase password" echo " 6. the file name of the messages log" echo " 7. the isql script file to delete/ define the table" echo " 8. the isql script file to create the indecies after" echo " the load has completed" echo " 9. the field delimiter character to be used" echo echo "example: dpload pubs2 authors au.dat \" echo " smith pswd.rsp au.log \" echo " au_t.sql au_i.sql \!" echo exit 1 fi #---- Put the parameters into variables to document their use in #---- commands. if [ -z “$DSQUERY” ]; then DB_SERVER=sybadmin else DB_SERVER=$DSQUERY fi DB_DATABASE=$1 DB_TABLE=$2 DB_DATA=$3 DB_USERID=$4 DB_PSWD=$5 DB_LOG=$6 DB_TABSCR=$7 DB_NDXSCR=$8 if [ -z "$9" ]; then DB_DLM="\t" else DB_DLM="$9" fi export DB_SERVER DB_DATABASE DB_TABLE DB_DATA export DB_USERID DB_PSWD DB_LOG DB_TABSCR DB_NDXSCR DB_DLM #---- Verify the validity of the parameters. if [ ! -r "$DB_DATA" ]; then echo "dpload - the data file $DB_DATA" echo " cannot be found or is not able to be read." echo " Please check your file permissions." exit 4 fi if [ ! -r "$DB_PSWD" ]; then echo "dpload - the password response file $DB_PSWD" echo " cannot be found or is not able to be read." echo " Please check your file permissions." exit 4 fi if [ ! -r "$DB_TABSCR" ]; then echo "dpload - the isql table define script $DB_TABSCR" echo " cannot be found or is not able to be read." echo " Please check your file permissions." exit 4 fi

Page 21
if [ ! -r "$DB_NDXSCR" ]; then echo "dpload - the isql index create script $DB_NDXSCR" echo " cannot be found or is not able to be read." echo " Please check your file permissions." exit 4 fi if [ ! -w "$DB_LOG" ]; then echo "dpload - the log file $DB_LOG" echo " cannot be created or does not allow write." echo " Please check your file permissions." exit 4 fi echo "****************************************************" >> $DB_LOG echo "Starting database table load on Server: $DB_SERVER" >> $DB_LOG echo " Database: $DB_DATABASE Table: $DB_TABLE" >> $DB_LOG echo " Datafile: $DB_DATA" >> $DB_LOG echo " Userid: $DB_USERID Password File: $DB_PSWD" >> $DB_LOG echo " Logfile: $DB_LOG" >> $DB_LOG echo " Table Create Script: $DB_TABSCR" >> $DB_LOG echo " Index Create Script: $DB_NDXSCR" >> $DB_LOG echo " Field Delimiter: $DB_DLM" >> $DB_LOG echo "****************************************************" >> $DB_LOG #---- Run the ISQL script to delete and define the table. date >> $DB_LOG cat $DB_PSWD | isql -S $DB_SERVER -U $DB_USERID -e \ -i $DB_TABSCR >> $DB_LOG if [ $? -ne 0 ]; then echo “dpload - an error occurred during the table define” >> $DB_LOG exit 16 fi #---- Run the BCP to load the data into the table. date >> $DB_LOG cat $DB_PSWD | bcp ${DB_DATABASE}..$DB_TABLE in $DB_DATA \ -S $DB_SERVER -U $DB_USERID \ -c -t$DB_DLM >> $DB_LOG if [ $? -ne 0 ]; then echo “dpload - an error occurred during the table BCP load” >> $DB_LOG exit 17 fi #---- Run the ISQL script to create the indecies, views and security. date >> $DB_LOG cat $DB_PSWD | isql -S $DB_SERVER -U $DB_USERID -e \ -i $DB_NDXSCR >> $DB_LOG if [ $? -ne 0 ]; then echo “dpload - an error occurred during the index creation” >> $DB_LOG exit 18 fi echo “dpload - completed successfully at `date`” >> $DB_LOG exit 0 #------------------------end of dpload script-------------------------#

Page 22
Best Practices
In the UNIX environment, shell scripts are the equivalent to jobs in the OS390 world. As such they should be treated in much the same way. The following is a list a suggested Best Practice to follow when setting up a shell script. 1. Use standard job naming conventions as you would in OS390 for those scripts that are meant to run as jobs.
2. For scripts which are run to perform on-line functions for clients using the UNIX environment, such as “claimid” or “ems” you may want to use a more English name. If so, consider the English name to be an “alias”
to the production application name, for example “ln –s guclaimid claimid”. Also make sure that the name
you choose does not conflict with any other command name. To check this, run “whereis commandname” to search your paths for the name.
3. For the application scripts described above, consult with Application Technologies about putting the command
into the /usr/local/adminsys/bin directory. This directory is on everyone’s search path.
4. For batch jobs, always try to make sure that no output is produced that is directed at the screen. All output should be logged into a log file that is date and time stamped. This prevents Cron from sent your complaint letters, since it does not know what to do with the output and it will help you debug problems that might arise.
5. All logs should follow a form similar to scriptname.yyyymmdd.hhmmss.log and be placed in the appropriate /priv/tmp/ss directory. In that way, they will be consistent, easy to locate, and be automatically cleaned up every seven days.
6. If you are having difficulty determining where problems are taking place or as a final check to make sure
everything is working correctly, add the command “set –xv” to the beginning of your script temporarily to trace your execution and variable substitution.
7. Never assume that your previous commands have worked, always check to make sure they did not produce errors. Also if you check the return code $?, make sure that the command actually sets it. Many UNIX commands do not. You will sometimes need to check error files for error messages. See the examples of testing for errors using grep later in this document.
8. Always check to make sure that another instance of your script isn’t currently running. This can happen especially when you schedule execution at multiple times during the day. Create a “semaphore” file and check for its existence when your script starts. If it exists, exit otherwise create it. Don’t forget to delete the semaphore at the end of your script.
9. Remember that running under Cron or another users environment is seldom the same as your own. Make sure you design your script to create the environment you expect at the beginning of your script and put it back the way you found it when you leave. Things such as environment variable will be cleaned up automatically by the shell. However other changes need to be undone. IE. Pack out your trash, leave only footprints.

Page 23
CronTab - Production Job Scheduling
With any operating system comes the requirement to run regularly scheduled jobs, or as we know it
“Production Batch Schedules”. UNIX is no different although in a sense UNIX does not have batch,
rather it has background tasks and processes called daemons. The UNIX daemon process that runs
constantly in the background to schedule jobs is called CRON. CRON runs commands that are
scheduled based on a time pattern composed of minutes of the hour, hours of the day, days of the
month, months of the year, and days of the week. You can quite literally schedule a command to run
15 minutes after midnight on the 13th of January only when it falls on a Friday. To do this, you
would enter the following line in a Crontab or CRON Table:
15 0 13 1 5 echo “It is Friday January the 13th at 00:15”
To interpret the time pattern, CRON uses spaces to separate the fields. As well, you can enter more
than one value in each field. Several values can be entered separated by commas and ranges can also
be entered separated by a dash. As well if you want to select all possible values, you would enter * for
that field. Also, days of the week are represented as 0=Sunday, 1=Monday, 2=Tuesday ...
6=Saturday. Hence to run a command at 10, 30 and 45 minutes past the hour from 10am through
5pm and 10pm, every day of the month, during the winter and summer, on Monday, Wednesday and
Friday, you would enter the following CronTab entry:
10,30,45 10-17,22 * 12-3,6-9 1,3,5 echo “Why wait for spring/fall do it now.”
There are also some limitations to CRON that you need to be aware of. First, CRON does not handle
inter-job dependencies, such as job pxx001 must complete successfully before pxx002 can run. This
can be done using flag files or semaphores such as the aaload.go file shown in the shell script
example previously.
CRON does not report job failures nor does it take any special actions when a failure occurs. You
must do this yourself in your script as shown in the dpload and paaload examples.
When CRON tables or CRONTABs are initially scheduled using the crontab command, they will
only run on the UNIX machine on which the crontab command was executed. Within our UNIX
environment, we have a number of login servers into which you will connect when you request CCU.
You may actually connect to any of ten or so different UNIX machines. Whichever machine you
execute crontab on will be the machine where your schedule is executed. To ensure consistency, you
should always select a specific known machine using the rlogin command before you execute the
crontab command. For example, to schedule a crontab found in /home/adpc/cservap/at/crontab
on the “chara” UNIX server, you would enter the following sequence of commands:
rlogin chara
crontab -r
crontab /home/adpc/cservap/at/crontab
exit
Last but not least, if a CRON task misses its scheduling due to a machine being down when the time
pattern occurs, CRON will not reschedule nor execute the event. You can generally get around this
by either scheduling an event to occur repeatedly within a certain time window and only actually
executing if its semaphore file exists. As well, you can also schedule the crontab on multiple servers
once again using a semaphore file to prevent conflicting executions.
Being aware of the above limitations is very important and will ensure you avoid most of the pitfalls
that can occur.

Page 24
CronTabs should always be kept in permanent files called crontab within their associated
application group’s or systems directory in /home/adpc/cservap. Each CronTab entry should be
documented as to its purpose using comments (lines starting with #). For example, the following
crontab exists for the Alumni Association in file /home/adpc/cservap/aa/crontab:
# AA CronTab Events ... # # ... Enter any events in the following format: # min hour dom month dow command # min - the minute portion of the hour # hour - the hour in 24 hour clock # dom - day of the month 1-31 # month - month 1-12 # dow - day of week 0-6 0=sunday # command - unix command to run # In any of the above, values can be expressed as follows: # * - all possible values # 1,3,5,7 - a list of possible values # 1-7 - a range of possible values # Example: run every 15 minutes between 1 through 4 am # the first day of each month regardless of which day it is. # 0,15,30,45 1-4 1 * * unix-command # # Alumni Load ... entered by Lucy Todd 1995-03-03 0,5,10,15,20 15 9 * * /home/adpc/cservap/aa/script/paaload #-------------------------- end of crontab ------------------------------#

Page 25
Pipes, Redirection, Filters and Other Plumbing Fixtures Many people who have used UNIX will tell you that a background in plumbing helps tremendously. The most powerful concepts in UNIX come from its ability to route data into and through various pipes, fixtures and into various storage facilities.
Dataflow through Commands
All UNIX commands have three basic input/output data streams. Standard Input (STDIN), which
is generally used to input data, by default from the keyboard.; Standard Output (STDOUT),
which is generally used to output data, by default to the console or the screen; and finally Standard
Error (STDERR), which is generally used to output error or informational messages to the console
or screen. Hence data can be made to “flow” into STDIN through the command and out through
STDOUT. The program can also be referred to as a “filter”, since it can operate on the data flowing
through it to only let certain information through, or modify the data into a different form, or
rearrange it into a different order. UNIX allows you to redirect this dataflows from their default
sources of the keyboard and the screen to other sources and destinations. First let’s concentrate on
how the flow can be redirected, and then we can discuss the various ways in which it can be filtered.
Redirecting Input and Output
The Standard Input and Output data streams can be redirected in two basic ways: I/O from files or
I/O from or to other commands. To redirect a program’s input from the keyboard to information
stored in a file you must use the “<” (pipe-in) operator. To redirect output from the screen to a file
you must use the “>” (pipe-out) operator. For example, instead of using the cp command to copy the
contents of a file to another file you could use the cat command to do the following:
cat < inputfile > outputfile
The cat command is a simple program that simply copies the data sent to it on STDIN and copies it
to STDOUT.
As previously mentioned, you can also redirect data from one command into another. This is done
using the “|” (pipe) operator. This becomes very useful when you need to apply various filters to
data, which we will discuss later. However, for the time being, the following is an example of how
pipes can be used. As previously we will send a file from one cat command to another then then put
the data into a file as before.
cat < inputfile | cat > outputfile
There are two other special redirection operators which can be very useful. Since the “>” (pipe-out)
operator will completely overwrite the contents of the file into which it is redirected, this is not
always useful. You may want to just add on or append the output to the contents of an existing file.
This is done using the “>>” append operator. Hence the following example will add data to an
existing file, or create it if it does not already exist.
cat < inputfile >> outputfile
Lastly, a common form of redirecting command input from the keyboard is to use the “<<” data
follows operator. This is akin to the //SYSIN DD * in MVS JCL. You must also provide a delimiter to
indicate the end of the input stream. This immediately follows the << operator, as shown in the
following example.
cat <<EOF > outputfile input data line1 input data line2

Page 26
EOF
Filters
Filters, as mentioned previously, are nothing more than programs that operate on input data read
from STDIN and manipulated in some and output to STDOUT. UNIX provides a large number of
standard filters, in fact, most UNIX commands can in some way or other be considered to be filters.
The most commonly used filters, however, are: cat, sort, head, tail, more, less, grep, cut, sed and
awk. When combined with redirection, you now have an extremely powerful mechanism to work
with data. First lets discuss each of the basic filters and then later we will combine them.
cat
As you have already seen cat copies data from its input file STDIN to its output file STDOUT. cat
will also take file name provided on the command line and will automatically redirect them into its
input. Hence, cat can copy one or more files from input to one single output file which is how it got its
name since it conCATinates many input files into one output file. An example is as follows.
cat file1 file2 file3 > outputfile
sort
The sort command, as you would expect, sorts lines of all the named files together and writes the
result to STDOUT. If no files are specified on the command line or if '-' is used as a file name input is
taken from STDIN. Hence the following would have the same result.
cat file1 file2 file3 | sort > sortedfile
sort file1 file2 file3 > sortedfile
Sort uses +pos to indicate the starting field to be sorted and -pos to indicate the field following the
last field. Hence if you wanted to sort a file using the contents of field 2 through 4 you would use the
command line options +2 -5 to indicate this. Note, a field is any set of characters separated by a field
delimiter. The delimiter is a blank by default but can also be specified using the -t option.
Additionally, sort has many other options that you can read up on using the command man sort. A
few examples of these are: -d - dictionary sort order, -f - fold upper and lower case, -i - ignore non-
printable characters, -b - ignore leading blanks, -m - merge files only, etc. For the sake of example, if
you wanted to sort a set of three files into dictionary, case insensitive order based on the contents of
fields 2-5 using a delimiter of “:” and eliminate all duplicate records, you would use the following
command:
sort -u -fd +2 -6 -t: file1 file2 file3 > sortedfile
head
Head copies the first n lines of each filename to the standard output. If no filename is given, head
copies lines from the standard input. By default 10 lines will be displayed. An example to list the
first 5 lines of a file would be:
head -5 inputfile
tail

Page 27
Tail copies the input file to STDOUT beginning at a designated location. If no file is entered on the
command line, STDIN is used. Copying begins at distance +number from the beginning or -number
from the end of the input (if number is null, the value 10 is assumed). Number is counted in units of
lines, blocks, or characters, according to the appended option l, b, or c. When no units are specified,
counting is by lines. As well, tail has an option –f, which allows you to monitor to file for any data
being added to it. This can be extremely useful when you are testing.
more or less
The commands more and less display the contents of a file or pipe, a screen t time. Unlike more, less has many more features “less is more”. In less, type h for a list of commands and features. Less also displays non-printable characters in reverse video. Its only drawback is that it may not be available on all UNIX systems.
grep
The Generalized Regular Expression Processor (GREP) reads files or pipes and uses regular
expressions to display selected records on standard output. Its uses are far-reaching and powerful,
however, a discussion of regular expressions is not appropriate for this document. A simple use of
grep can be to list al records in a file that contains a specific string. For example list all lines that
contain gold disregarding case in file mines.txt.
grep –i gold < mines.txt
Also note, grep will set the return code $? To 0 if there is match or 1 if there is no match. So if you want to check if an isql script worked, you could use the following code:
grep –i error < isql.msgs > /dev/null 2>&1 if [ $? –eq 0 ]; then echo “No errors !!!” else echo “you have problems” fi
You could also test the output from grep as follows:
if [ -z `grep –i < isql.msgs` ]; then echo “No errors !!!” else echo “you have problems” fi
cut
The cut command will “cut” selected fields or strings out of files or pipes. For example, if you have a
file that contains name, address and phone number separated by “!”. You want to create a file that
contains name and phone number only using the same delimiter “!”. You would code:
cut –d”!” –f 1,3 < addressbook.txt >phonebook.txt
Equivalently, cut can also cut by fixed column position using –b or –c. Lets say you want to extract
columns 1-3, 5-10 and 15-25. The following will work:

Page 28
cut –c1-3,5-10,15-25 < datafile.txt > extractfile.txt
sed and awk
sed and awk allow you to modify or take actions based in input. Typically, such functions are better
accomplished and more understandable using Perl. If you really need to understand sed or awk,
please refer to their man pages.
tar
Tar or tape archive is used to create archives of files, list the contents of an archive or extract files
from an archive. In essence, tar will create a single file composed of many files and directories,
effectively a backup. It can then restore that group of files from the single archive file into the same
or another directory. The example below will backup all files in the
/priv/adminsys/wwwpromote/htdocs directory and then restore them into the
/priv/adminsys/wwwprod/htdocs directory, in essence promoting new files into the Production
Administrative Systems WEB server. Note the parameters: c-create archive, x-extract archive, v-
verbose messages and f-archive file name follows. Note the parameters are sensitive to order.
cd /priv/adminsys/wwwpromote
tar cvf /priv/tmp/at/wwwpromote/htdocs.tar htdocs
cd /priv/adminsys/wwwprod
tar xvf /priv/tmp/at/wwwpromote/htdocs.tar htdocs
This can be very useful beyond just the obvious use as a backup and restore. Tar is available on every
UNIX system and is also available on Microsoft Windows and other operating systems. As well, to
qualify as a filter, tar will take a list of files as input on STDIN and operate on those files. I will leave
this to your imagination how this can be useful.
gzip
The Free Software Foundation GNU produces a rather useful program called gzip or GNU Zip. Gzip
does one thing and it does it very well. It compresses and decompresses a single file. The file can be
sent on STDIN via a pipe or be stated on the command line. You can specify the level of compression
between –0 and –9, -0 being no compression and –9 being the highest. To decompress use –d and the
file will be deleted and replaced by its uncompressed image. Alternately, you can send the
decompressed image to STDOUT via –dc. All this for only one file !!! Sounds like a bit of a waste
doesn’t it. Well when that one file is a tar archive, which by the way are not compressed, it now
becomes a big deal. Using the above tar examples, tar has an option that when “-“ is used for the
archive file name, it uses STDOUT. Hence the above example now becomes:
cd /priv/adminsys/wwwpromote tar cvf – htdocs | gzip –9 > /priv/tmp/wwwpromote/htdocs.tar.gz cd /priv/adminsys/wwwprod gzip –dc /priv/tmp/wwwpromote/htdocs.tar.gz | tar xvf - htdocs

Page 29
find
Although not exactly a filter, the find command can be extremely useful when working with generic
files or groups of files. This is especially true if you must work with a set of files inside a large
directory structure. Find will look for files that meet your selection criteria and then perform one or
more operations that you specify. For a simple example, produce a listing of all files in
/priv/adminsys/wwwprod that are Perl scripts.
find /priv/adminsys/wwwprod –name \*.pl -print The find command can also search directories on many different criteria besides file names. For a complete list, see man find. A few notable examples are: -type selects by the type of file f – files, d – directories, l – links, -user ie. The file owner, -group the group owner, -ctime days since last change, -mtime days since last modified, -atime days since last accessed, etc. These selection criteria can also be grouped together logically using –a and, -o or and -\! not. Taking the previous example one step further, produce a listing of all Perl scripts owned by group=cservap that have not been accessed for 90 days.
find /priv/adminsys/wwwprod \( -name \*.pl –a –atime +90 \) –print Note that you must “escape” any characters that could be considered special characters used by the shell. Typically these are ();”\!~#{}[]. If in doubt put a “\” in front of it. In addition to just printing lists, find’s real power is that it can execute commands on the files that it selects. The file name is substituted into the command by using “{}”. Note I strongly advise using –print first to make sure that your selection criteria selects the correct files, before executing any commands against those files. Let’s take an example where you want to first list the details of all backup files (*.bak) that are older than seven days and then delete them. Note operate only on files, not directories. The following will work:
find /priv/tmp \( -name \*.bak –a –type f –a –mtime +7 \) –exec ls –ld {} \; -exec rm –f {} \; A variant of this is used in the temporary file cleanup that runs each night.

Page 30
PERL - Practical Extraction and Reporting Language
Perl is an interpreted language optimised for scanning arbitrary text files, extracting information
from those text files, and printing reports based on that information. It's also a good language for
many system management tasks. The language is intended to be practical (easy to use, efficient, and
complete) rather than beautiful (tiny, elegant, and minimal). It combines some of the best features of
C, sed, awk, and sh, so people familiar with those languages should have little difficulty with it.
Expression syntax corresponds quite closely to C expression syntax.
Perl was written by Larry Wall of NASA to perform the tasks described above. Upon completion,
Larry distributed Perl as a public domain product, free to any installation. Since its inception, Perl
has been ported to a number of other platforms, including MS-DOS, MS-Windows, OS/2, MS-
Windows/NT, etc. As well, Michael Peppler of ITF Management SA, developed database extensions
to the Perl language to allow it access many of today’s popular relational database management
systems, such as Sybase, Ingres, Oracle, etc. In our situation, this extension is called Sybperl (Sybase
Perl). Both Perl and Sybperl are widely used throughout the industry and are both actively
supported on the network newgroups, comp.lang.perl, comp.databases.sybase, etc.
Due to breadth of this subject, I will not attempt to describe the intricacies of Perl and Sybperl in this
document. The reader should refer to Larry Wall’s book entitled “Programming PERL” or also the
UNIX man pages accessible by entering the command man perl. As well, there is documentation for
Sybperl in the UNIX man pages by entering the command man sybperl. For a more detailed
explanation of the Sybperl commands, you should refer the Sybase manual “SQL Server
Programmer’s Reference Guide for C” available through the UNIX X-Windows sybooks command or
by using the printed manual.
Scripts written in Perl and Sybperl can be used to implement many functions. For example, since
Perl was written to perform system related functions, it can be used in-place of or in conjunction with
UNIX shell scripts to write platform independent programs. Given its report writing facilities, it can
be used in much the same way we use Easytrieve on MVS to generate reports from either text files,
or using Sybperl, from Sybase databases. Perl and Sybperl can also be used to interact with World
Wide Web HTML pages to perform operations, retrieve and update data in text files and in Sybase.
The following example are intended to give the reader some ideas and guidelines on how Perl and
Sybperl can be used.
Perl Style Guide
As with many programming languages, developers have discovered that it is much easier to maintain
and understand each other’s code it they follow a standard “style” or rules of thumb when developing
programs. Perl is no different and comes with a common-sense Style Guide published in
“Programming Perl” by O’Reilly & Associates Inc “Programming with Style”. We will not bother to
repeat this here, however, be assured that we will expect to see it followed in design reviews. I am
sure your team members will also give you pleasant reminders when they have to maintain your
code ;-)
Example 1 - Using PERL to Substitute Text
In classic UNIX, the sed or stream editor is used as a “filter” to change text in a file in much the
same way as you would use the mantes change f/l /xxx/yyy/ command. If you wanted to change all
occurrences of the string 95R to 96R in the input file input.txt and save the output in output.txt, you
would enter the following command:
sed -e “s/95R/96R/g;” < input.txt > output.txt

Page 31
This same command can be performed in Perl as follows:
perl -p -e “s/95R/96R/g;” < input.txt > output.txt
Example 2 - Preparing a file for a Sybase BCP Load
In a more elaborate example, given you have a text file of data to be loaded into a Sybase table using
the Sybase BCP utility. The problem is, the text file is in standard fixed field format and Sybase BCP
expects to have a file with each field separated by a delimiter character, say “!”. The following
example will perform this conversion.
#! /usr/local/bin/perl #---------------------------------------------------------------------------- # SDF2DLM.PL # Author........: Gary F. Alderson # Installation..: University of Manitoba Computer Services # Date Written..: 1994-12-10 # Purpose.......: This PERL script was written to translate an input file # produced in System Delimited Format (ie. flat file with # its data in fixed columns) into a Delimited format file # for use by Sybase BCP etc. # Platforms.....: Generic ... MS-DOS, UNIX, etc. # Syntax........: PERL SDF2DLM.PL input_file [input_file ... ] > output_file # Modifications.: #---------------------------------------------------------------------------- die "Usage: PERL $0 input_file [input_file ... ] > output_file \n" if @ARGV < 1; while (<>) { $recsinput++; $inrec = substr($_, 0); # put your field extracts here # eg. $field1 = substr($line,1,10); # note. unpack("Ann", $string) will trim trailing blanks. $bldgno = substr($inrec, 0, 4); $bldgcode = substr($inrec, 4, 4); $bldgname = unpack("A30", substr($inrec, 8, 30)); $bldgadr1 = unpack("A30", substr($inrec, 38, 30)); $bldgadr2 = unpack("A30", substr($inrec, 68, 30)); $ludate = substr($inrec, 100, 2)."/". substr($inrec, 102, 2)."/". substr($inrec, 98, 2); $bldgcmt = unpack("A40", substr($inrec, 104)); # join the fields together to form one delimited string using # a "!" as the delimiter between fields. $outrec = join("!", $bldgno,$bldgcode,$bldgname,$bldgadr1, $bldgadr2,$ludate,$bldgcmt); print STDOUT $outrec."\n" || die "Unable to write to STDOUT\n"; $recsoutput++; } print STDERR "\n"; printf STDERR "%6d records were read.\n", $recsinput; printf STDERR "%6d records were written.\n", $recsoutput; print STDERR "\n";

Page 32
Example 3 - A Simple Report using Sybperl
The following example shows how Sybperl can be used to retrieve data from a Sybase table and
format it into a standard report based on select criteria specified on the command line.
#! /usr/local/bin/perl #----------------------------------------------------------------------- # Script.........: si700.pl # Author.........: Gary F. Alderson # Date-Written...: 1995-03-22 # Purpose........: To list all of the buildings defined in the Space # Inventory Database between a starting and ending # building number given on the command line as a sample # SybPerl script to show people how to use perl with # Sybase. # Syntax.........: si700.pl -S svr -U uu -P pp -o xx.prn -f ffff -t tttt # -S database server name eg. sybadmin # -U sybase userid (your unix id is default) # -P sybase password (envvar SYBPSWD is default # and is preferred for security) # -o report output file (default is si700.prn) # -f from building (default 0000) # -t to building (default 9999) # # Modifications..: #----------------------------------------------------------------------- require "sybperl.pl"; require "getopt.pl"; require "ctime.pl"; print "SI700 - Space Inventory Building Listing ... starting\n"; # # Get Command Line Paramaters # -S sybase server -U userid -P password -o output file # -f from building -t to building # &Getopt('SUPoft'); $opt_S = "$ENV{'DSQUERY'}" unless $opt_S; $ENV{'DSQUERY'} = $opt_S; $opt_U = "$ENV{'USER'}" unless $opt_U; $opt_P = "$ENV{'SYBPSWD'}" unless $opt_P; $opt_o = 'si700.prn' unless $opt_o; $opt_f = '0000' unless $opt_f; $opt_t = '9999' unless $opt_t; $date = &ctime(time); # # Login to Sybase Server and open database. # $dbsvr = &dblogin($opt_U, $opt_P); &dbuse($dbsvr, "spaceinv"); # # Open the output file to make sure it is ok. # open(REPORT, "> $opt_o") || die "SI700 - Unable to open $opt_o: $!\n"; # # define the report format # format REPORT_TOP = SI700 - Space Inventory Buildings - By Building Name Page @<<< $% From @>>>> to @>>>> as of @<<<<<<<<<<<<<<<<<<<<<<<<<<<<<<

Page 33
$opt_f, $opt_t, $date BldgNo BldgCode Building Name ______ ________ __________________________________________________ . format REPORT = @>>>> @<<<<<< @<<<<<<<<<<<<<<<<<<<<<<<<<<<<<<<<<<<<<<<<<<<<<<<<< $bno, $bcd, $bname . # # formulate sql command # &dbcmd($dbsvr, "select bldg_no, bldg_code, bldg_name\n"); &dbcmd($dbsvr, " from building\n"); &dbcmd($dbsvr, " where bldg_no between $opt_f and $opt_t\n"); &dbcmd($dbsvr, " order by bldg_name"); # # execute it on the database server and retrieve results # &dbsqlexec($dbsvr); &dbresults($dbsvr); # # process the retrieved data # $rows = 0; while((@data = &dbnextrow($dbsvr))) { ($bno,$bcd,$bname) = @data; write(REPORT); $rows++; } # # Termination processing # printf(REPORT "\t%d buildings were listed\n", $rows); printf("%d buildings were listed\n", $rows); print "SI700 - Completed successfully\n"; print "SI700 - The report output can be found in file $opt_o\n\n"; close(REPORT); &dbexit;
Sample output is as follows:
SI700 - Space Inventory Buildings - By Building Name Page 1 From 1000 to 1999 as of Wed Mar 22 17:26:27 1995 BldgNo BldgCode Building Name ______ ________ _______________________________________________ 1117 DRAK 181 FREEDMAN CRESCEN 1670 PEM2 2239 PEMBINA HIGHWAY 1931 KIN1 31 KING'S DRIVE 1937 KIN2 37 KING'S DRIVE 1361 UMFA 80 FREEDMAN CRESCENT 1501 GL 1 ADMIN. BLDG. AND WORKSHOP 1331 ADM1 ADMINISTRATION BUILDING 1657 DE 3 AGASSIZ LABORATORY 1023 AGR1 AGRICULTURAL ECONOMICS ANNEX 1022 AGR2 AGRICULTURAL ENGINEERING ANNEX

Page 34
1012 AGR3 AGRICULTURAL ENGINEERING BLDG. 1013 AGR4 AGRICULTURAL ENGINEERING SHED 1011 AGR5 AGRICULTURE BUILDING 1014 AGR6 AGRICULTURE LECTURE BLOCK 1151 ALLE ALLEN BUILDING 1355 ALUM ALUMNI HOUSE 1017 ANI1 ANIMAL FEED MILL 1015 ANI2 ANIMAL SCIENCE BUILDING 1016 ANI3 ANIMAL SCIENCE EQUIPMENT SHED ...
Example 4 - Updating a Sybase Table using Sybperl As well, Sybperl can be used to update Sybase tables. In the following example, the Sybperl program dpupdate will take as input a transaction file containing updates and will apply them to the Sybase table. Please note for the sake of this example, code has also been included to create the Sybase table and to drop it when the example program has completed. #! /usr/local/bin/perl #------------------------------------------------------------------------ # Script.........: dpupdate.pl # Author.........: Gary F. Alderson # Date-Written...: 1995-04-12 # Purpose........: To demonstrate how a Sybase table can be updated # using sybperl. Transactions are contained in a file # with a transaction code of either I-insert, U-update, # or D-delete. Following this are the sample data fields # empno, name, phone. # Syntax.........: dpupdate.pl -S svr -U uu -P pp -i ii -o oo # -S database server name eg. sybadmin # -U sybase userid (your unix id is default) # -P sybase password (envvar SYBPSWD is default # and is preferred for security) # -i transaction input file # -o report output file (default is dpupdate.prn) # # Modifications..: # #------------------------------------------------------------------------ require "sybperl.pl"; require "getopt.pl"; require "ctime.pl"; print "DPUPDATE - Example Sybase Table Update ... starting\n"; # # Get Command Line Paramaters # -S sybase server -U userid -P password -i input file -o output file # &Getopt('SUPio'); $opt_S = "$ENV{'DSQUERY'}" unless $opt_S; $ENV{'DSQUERY'} = $opt_S; $opt_U = "$ENV{'USER'}" unless $opt_U; $opt_P = "$ENV{'SYBPSWD'}" unless $opt_P; $opt_i = 'dpupdate.dat' unless $opt_i; $opt_o = 'dpupdate.prn' unless $opt_o; $date = &ctime(time); chop($date); # # Login to Sybase Server and open database. # $dbsvr = &dblogin($opt_U, $opt_P);

Page 35
&dbuse($dbsvr, "tempdb") || die "Unable to access database tempdb\n"; # # Create a temporary table to perform the updates on # This is not normally done, just here to make the example work. # &dbcmd($dbsvr, "create table phonebook \n"); &dbcmd($dbsvr, " ( \n"); &dbcmd($dbsvr, " employee_no char(6), \n"); &dbcmd($dbsvr, " name char(25), \n"); &dbcmd($dbsvr, " phone_no char(7) \n"); &dbcmd($dbsvr, " ) "); &dbsqlexec($dbsvr) || die "Unable to create the phonebook table\n"; # # Open the input file to make sure it is ok. # open(UPDATES, "< $opt_i") || die "DPUPDATE - Unable to open $opt_i: $!\n"; # # Open the output file to make sure it is ok. # open(REPORT, "> $opt_o") || die "DPUPDATE - Unable to open $opt_o: $!\n"; print REPORT "DPUPDATE was started on $date using the parameters:\n\n"; print REPORT "\t Sybase Server.....: $opt_S\n"; print REPORT "\t Sybase Userid.....: $opt_U\n"; print REPORT "\t Transaction File..: $opt_i\n"; print REPORT "\t Report Output File: $opt_o\n\n"; # # Read and process the update transactions # $tochkpt = 0; while (<UPDATES>) { $inrec = substr($_, 0); chop($inrec); $xcnsread++; $xcncode = substr($inrec, 0, 1); $empno = substr($inrec, 1, 6); $name = unpack('A25', substr($inrec, 7, 25)); $phone = substr($inrec, 32, 7); printf(REPORT "Transaction read |%s|\n", $inrec); if ($xcncode eq 'i' || $xcncode eq 'I') { $xcnsins++; &dpins(); } elsif ($xcncode eq 'u' || $xcncode eq 'U') { $xcnsupd++; &dpupd(); } elsif ($xcncode eq 'd' || $xcncode eq 'D') { $xcnsdel++; &dpdel(); } else { $xcnsinv++; printf(REPORT " Transaction code %s is invalid\n", $xcncode); } if ($tochkpt >= 50) { &dbcmd($dbsvr, "commit"); &dbsqlexec($dbsvr); $tochkpt = 0;

Page 36
} } &dbcmd($dbsvr, "commit"); &dbsqlexec($dbsvr); # # Termination processing # printf(REPORT "\n\t%d transactions were read from %s\n", $xcnsread, $opt_i); printf(REPORT "\t%d rows were inserted\n", $xcnsins); printf(REPORT "\t%d rows were updated\n", $xcnsupd); printf(REPORT "\t%d rows were deleted\n", $xcnsdel); printf(REPORT "\t%d transactions were invalid\n", $xcnsinv); # # list the table contents # &dbcmd($dbsvr, "select employee_no, name, phone_no \n"); &dbcmd($dbsvr, " from phonebook "); &dbsqlexec($dbsvr); &dbresults($dbsvr); print REPORT "\n\tContents of the Phonebook table after the update\n\n"; print REPORT "\tEmpNo. Name PhoneNo\n"; while ((@data = &dbnextrow($dbsvr))) { ($empno,$name,$phone) = @data; printf(REPORT "\t%6s %25s %7s\n", $empno, $name, $phone); } print REPORT "\t-----------------end of table-------------\n"; $date = &ctime(time); chop($date); print REPORT "DPUPDATE processing was completed at $date\n"; close(UPDATES); close(REPORT); print "DPUPDATE - Completed successfully\n"; print "DPUPDATE - The audit report can be found in file $opt_o \n\n"; &dbcmd($dbsvr, "drop table phonebook"); &dbsqlexec($dbsvr) || die "Unable to drop the phonebook table\n"; &dbexit(); sub dpins { &dbcmd($dbsvr, "insert phonebook \n"); &dbcmd($dbsvr, " values('$empno', '$name', '$phone') "); $stat = &dbsqlexec($dbsvr); if ($stat) { print REPORT " Inserted successfully.\n"; } else { print REPORT " Could not be inserted.\n"; } } sub dpupd { &dbcmd($dbsvr, "update phonebook \n"); &dbcmd($dbsvr, " set name = '$name', \n"); &dbcmd($dbsvr, " phone_no = '$phone' \n"); &dbcmd($dbsvr, " where employee_no = '$empno' "); $stat = &dbsqlexec($dbsvr); if ($stat) { print REPORT " Updated successfully.\n"; } else { print REPORT " Could not be updated.\n"; } }

Page 37
sub dpdel { &dbcmd($dbsvr, "delete from phonebook \n"); &dbcmd($dbsvr, " where employee_no = '$empno' "); $stat = &dbsqlexec($dbsvr); if ($stat) { print REPORT " Deleted successfully.\n"; } else { print REPORT " Could not be deleted.\n"; } }
Sample output for Example 4 follows:
DPUPDATE was started on Fri Apr 14 3:03:31 1995 using the parameters: Sybase Server.....: sybdevl Sybase Userid.....: alders Transaction File..: dpupdate.dat Report Output File: dpupdate.prn Transaction read |xeeeeeennnnnnnnnnnnnnnnnnnnnnnnnppppppp| Transaction code x is invalid Transaction read |I000001John Smith 1234567| Inserted successfully. Transaction read |I000002Bill Payer 5555624| Inserted successfully. Transaction read |U000002William Payer 5555624| Updated successfully. Transaction read |I000003Jane Doe 7654321| Inserted successfully. Transaction read |D000003| Deleted successfully. Transaction read |I000004Indiana Jones 3334444| Inserted successfully. Transaction read |U000004Dr. Indiana Jones 3334444| Updated successfully. Transaction read |I000005Kermit the Frog 5551212| Inserted successfully. Transaction read |I000006Mickey Mouse 5551122| Inserted successfully. Transaction read |I000007Donald Duck 5556565| Inserted successfully. 11 transactions were read from dpupdate.dat 7 rows were inserted 2 rows were updated 1 rows were deleted 1 transactions were invalid Contents of the Phonebook table after the update EmpNo. Name PhoneNo 000001 John Smith 1234567 000002 William Payer 5555624 000004 Dr. Indiana Jones 3334444 000005 Kermit the Frog 5551212 000006 Mickey Mouse 5551122 000007 Donald Duck 5556565 -----------------end of table------------- DPUPDATE processing was completed at Fri Apr 14 3:03:33 1995

Page 38
Source Code Management using CVS
CVS or the Concurrent Versioning System is the most commonly used non-commercial source code
management system in the industry today. CVS is used to manage projects such as Netscape,
Mozilla, RedHat Linux, Free BSD and Perl to name a few. CVS is not restricted to UNIX, but can be
used by Microsoft Windows, Macintosh and many other operating systems using the same common
source repository. Complete information on CVS can be found on CNS in S:\Adminsys\Docs\CVS.
Setting Up a CVS Repository
Within Administrative Systems, we have initially decided to setup CVS on a Application Group basis.
For example, the Application Technologies CVS repository is located in
/home/adpc/cservap/at/src/cvs. Student Records can be found in /home/adpc/cservap/rs/src/cvs and so
on.
To create your team’s repository, you will need to do the following:
1. Create the cvs directory under /home/adpc/cservap/ss/src. If a src directory does not exist, create
that also. Note ss is your major system identifier.
2. Set the permissions on your cvs directory correctly. You should make sure that your src and cvs
directories are group owned by cservap using chgrp cervap src src/cvs. Then make sure that
permissions are set to u=rwx,g=rwxs for both the src and src/cvs directories. To do this, chmod
u=rwx,g+rwxs src src/cvs..
3. Add CVSROOT=/home/adpc/cservap/ss/src/cvs; export CVSROOT to your .profile. Note ss is your
major system identifier.
4. Execute the commands to set your CVSROOT environment variable.
5. Initialize your CVS repository by running the command “cvs init”. Note you must only do this once. 6. Have all of your team members add CVSROOT=/home/adpc/cservap/ss/src/cvs and export CVSROOT to their
.profile’s.
Deciding on Project Granularity
This is a tough decision to make. CVS works with projects. A project can be anything from a single program to an entire system. There is no right or wrong answer to what level each project is defined. You may in fact decide to mix your definition of projects within the same repository. Perhaps the best definition is to group everything together for a typical project into a single working directory. This may be the source code for several related programs, their test scripts, test data files, documents, sql, webpages, etc. If it makes sense to be together and if every time you work on it, you will want to retrieve the same set of files, then you have your project defined.
Automatic Documentation
CVS maintains a history of your project every time you decide to commit your changes into the repository. It starts from a base the first time that you import your project and then maintains changes from that point forward. Also every time you commit changes, you will be prompted to enter a diary comment of changes in this release. In turn, CVS will maintain comments in your source code automatically for you. By putting certain strings into your comments, CVS will make sure the current values are substituted every time you checkout, commit or update your source. A typical example is as follows:

Page 39
# $Id:$ - the repository file, revision number, last commit date and time and userid, state. # $Revision:$ - the current revision number # $Source:$ - the directory of the cvs repository # $Author:$ - the userid who originally imported the project # $Log:$ - a history of revisions and diary entries. Therefore before importing your project into the repository for the first time, you would be wise to enter these comment lines into appropriate source code and script files.
Importing New Projects
Once you have a project ready in a working directory to be put into your CVS repository for the first time, and you have all of your comments defined as discussed above, you can run an import to load it. For example, say your project was named af_phload, you would perform the following commands to import it while you are located within the directory of its files.. Note V denotes the vendor tag and R denotes the release tag.
cd ~/sandbox/af_phload
cvs import af_phload V R Note. All of the files within the directory will now be imported and made a part of the project named “af_phload”. Its initial revision will be 1.1. If you wish, you can now delete the files in the directory as they are backed up in CVS. If you plan to continue working on them, delete the files in the directory and then perform a checkout.
Checking Out Projects
Projects may be checked out of the CVS respository by any number of people who are granted access. To keep things simple, let’s say that you now want to checkout a copy of the af_phload project to work on it. You must first decide where you will put the files. Typically this is some place within your own personal directories, such as ~/sandbox. (~ is automatically expanded into your home directory name eg /home/u4/smith). Note, checkout will create a new directory inside the directory you are located to, so make sure you position there first. Let’s checkout af_phload. This is done using the following commands:
cd ~/sandbox
cvs checkout af_phload You will see a list of files being created, and now you are ready to start working on them.
Updating Projects
As I mentioned before, more than one person can checkout the same project. In order to keep up to date with other people’s changes, or to upgrade an old sandbox copy of a project, you can run the cvs update command. CVS will update your sandbox copy by merging in all of the changes in the repository since your last commit or update.
cd ~/sandbox/af_phload
cvs update
Watching Projects for Changes
After reading the last item on update, you are probably wondering if this concurrent updating is really a great idea or not. How will you ever know if someone else is changing part of the same program you are working on. CVS includes a watch mechanism to let developers know about any changes others are doing on specific files. To monitor a file, you must first add a watch to it and turn it on. You will then be emailed with any changes as they occur. Back to our example. Let’s set a watch on the file af_phload.pl.

Page 40
cd ~/sandbox/af_phload
cvs watch add af_phload.pl
Who is Watching You ?
At the same time, other people may be watching you to see if you are making changes to specific files. To find out, enter the following commands:
cd ~/sandbox/af_phload
cvs watchers af_phload.pl
Adding Files to the Project
You will at some point want to add new files or directories to your project. This is done using the cvs add command. Let’s add a file called af_phload_test.
cd ~/sandbox/af_phload
cvs add af_phload_test
Removing Files from the Project
Whenever you can add, you will also need to remove files from the official project archive. CVS is intelligent enough to store these files in the “attic” directory just in case you want to them back. The return them, use the cvs add command. Removing files is done as follows:
cd ~/sandbox/af_phload
cvs remove my_old_testfile
Committing Project Releases
At long last, you are finally finished makes changes to your new release of af_phload. You have done all your testing and everything works. It is time to back it up or in CVS commit your changes. Commit can automatically generate a new release number by adding 0.1 to the last revision number or you can specify your own using the –r option. You should choose whatever method is more appropriate to your team. Below are example with an without revision numbers>
cd ~/sandbox/af_phload
cvs commit
-- or --
cvs commit –r 1.5.1
Releasing Your Project Sandbox
After committing your changes, you can cleanout your sandbox or leave it to continue work on the next release. In either case it is good form to “release” your project. Using the release command logs an entry into the history file and also check the disposition of all of the sandbox files before deleting anything. This guards against deleting any work which has not yet been committed. You should always use the –d commandline option to perform the above check.
cd ~/sandbox

Page 41
cvs release –d ~/sandbox/af_phload
More Information is Available at ...
CVS has many more commands and features than I will cover here. For a complete guide to CVS, refer to the document “Per Cederqvist et al” or “Version Management with CVS” found on Netware in S:\Adminsys\Docs\CVS. As well, you should visit the CVS website at http://www.cvshome.org. CVS is also available through Microsoft Windows 95/NT/2000. Contact Application Technologies to help you install and configure this. A document will be forthcoming as we work out the various kinks and issues. For web information, you can also refer to http://march-hare.com/library/html/ud6o6rjm.htm. Most important, set yourself up a test repository, try the commands and get a feel for how they work.

Page 42
Suggestions and Ideas for Improvement
As I said at the beginning, this is a new environment for all of us. Not a week goes by where we
aren’t discovering a better way to do things. This document is intended to provide guidelines for
application development and production of the UNIX system. If you identify any new ideas or better
suggestions for how this can be done, please forward them to any member of the Application
Technologies group and we will try to incorporate them.