progeny 10 patients quick start guide - progenygenetics.com · 1 | 33 this quick start guide will...
TRANSCRIPT

Progeny 10 Patients Dashboard Quick Start Guide

1 | 33
This quick start guide will allow users to follow a list of topics to learn how to use Progeny
Clinical application through your web browser.
The Table of Contents below are hyperlinks to the topics within this document.
Table of Contents
Progeny 10 New Features …………………………………………………………………………………………………………………………………………
Getting Started …………………………………………………………………………………………………………………………………………………………
Login …………………………………………………………………………………………………………………………………………………………………………
Patients Dashboard ……………………….………………………………………………………………………………………………………………………….
Create New Patient ……………………………………………………………………………………………………………………………………..
Invite a Patient to Fill Out a Questionnaire ………………………………………………………………………………………………….
Patient Invite Status ………………………………………………………………………………………………………………………………......
Actions Menu ………………………………………………………………………………………………………………………………………………
Review and Edit Pedigrees and Individuals ………………………………………………………………………………………………….
Pedigree Viewer ………………………………………………………………………………………………………………………………………………………..
Pedigree …………………………………………………………………………………………………………..…………………………………………
Individual Datasheet ……………………………………………………………………………………………………………………………………
Cancer Risk Assessment Tool …………………………………………………………………………….………………………………………………………
Order Genetic Testing ……………………………………………………………………………………………………………………………………………….
Order Status – Genetic Testing Results ……………………………………………………………………………………………………………………..
Patient Letter Generator …………………………………………………………………………………………………………………………………………..
Spreadsheets and Queries …………………………………………………………………………………….………………………………………………….

2 | 33
Progeny 10 – Top New Features
LETTER GENERATION Create letter templates that include database fields and quickly generate letters, notes and reports for any patient.
PROGENY APP Use our free iPad application to access your database allowing more flexible and personal contact with your patients.
EMR HYPERLINK Embedding a Pedigree Hyperlink in a Patient’s Record
NEW INTERFACE DESIGN Our updated modern design looks great and makes it easier and more intuitive to navigate.
SPEED Upgraded database engine provides faster and more reliable performance.
Progeny 10 has a new look and feel – making it easier for you to read, find and navigate screens.

3 | 33
Triage Patient via questionnaire
Identify patients who meet referral criteria
Invite patient to complete full family history
Review and edit family history
Run cancer and hereditary genetic risk
models
Order appropriate testing. Track and review results directly within the
software
IDENTIFYING AT RISK PATIENTS

4 | 33
Let’s get started!
Trial user?
Open your web browser and go to http://cloudtrial.progenygenetics.com
Use your provided credentials to log in. Default password is set to Cloud2016 you will be
prompted to change this at your first login. During your first log in, please be sure to update your profile
with first name, last name, and email address.
Keep in mind!
This profile information will be required for support and unlocking accounts after unsuccessful logins. All
password resets will be sent to the email stored in this profile. If this information is not entered, the
account will remain locked and you will need to create a new account.
Already Have an Account? The login URL, username and password should be provided to you by your Progeny administrator
Login Screen
Fill in your Username and Password
If you have more than 1 database,
use the dropdown to choose your database
Need Immediate Assistance?
Contact support [email protected] or call 1-800-PROGENY

5 | 33
Patients Dashboard
Patient Dashboard Navigation
1. MAIN MENU NAVIGATION
2. VIEW/EDIT YOUR PROFILE
3. CREATE NEW PATIENT
4. INVITE NEW PATIENT TO FAMILY HISTORY QUESTIONNAIRE
5. DISPLAY ONLY PROBANDS OR ALL INDIVIDUALS?
6. SMART LISTS
7. SMART SEARCH
8. PATIENTS ACTION MENU
9. REVIEW PEDIGREE OR INDIVIDUAL

6 | 33
1. MAIN MENU NAVIGATION
This menu is always accessible to you for fast multi-tasking access
2. VIEW/EDIT YOUR PROFILE
View/Edit Profile
Located at the top right hand side of the Patients screen
These buttons are part of the top TOOL BAR. Details below
View and/or Sign Out of user Profile
View/Edit Profile first and last name, email, photo and change password here
Help button loads the user guides webpage
(http://www.progenygenetics.com/software/client/userguides)
7 | 33
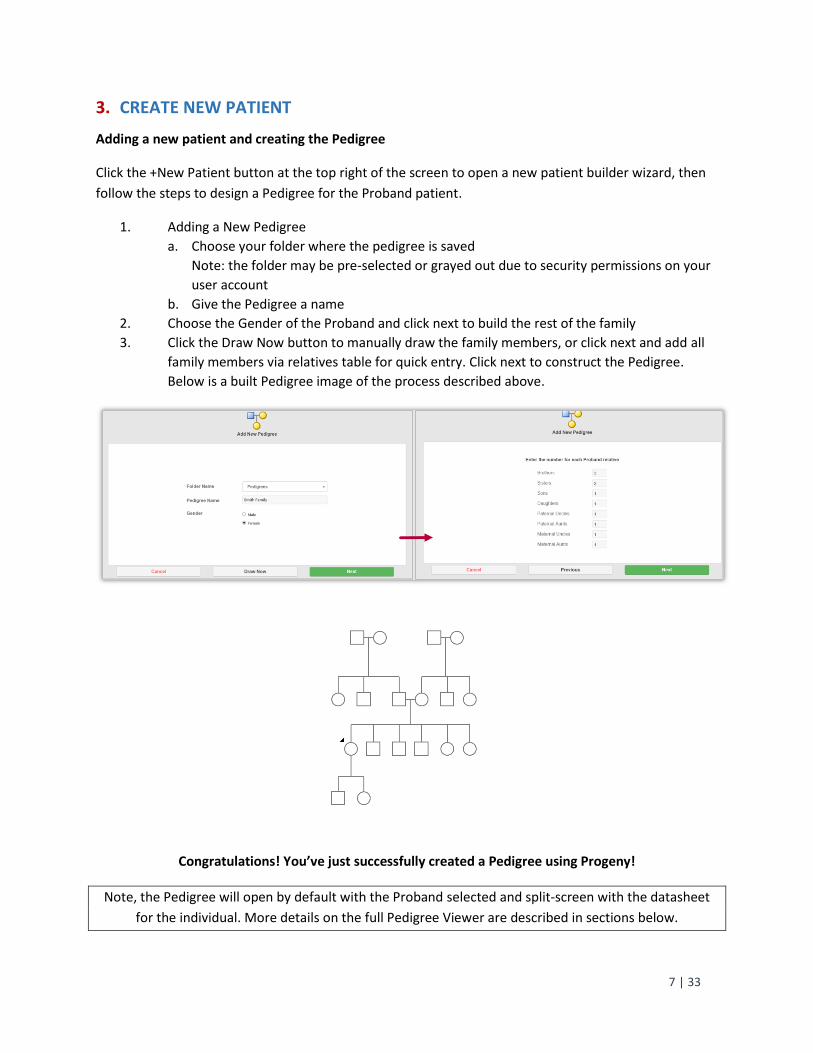
3. CREATE NEW PATIENT
Adding a new patient and creating the Pedigree
Click the +New Patient button at the top right of the screen to open a new patient builder wizard, then
follow the steps to design a Pedigree for the Proband patient.
1. Adding a New Pedigree
a. Choose your folder where the pedigree is saved
Note: the folder may be pre-selected or grayed out due to security permissions on your
user account
b. Give the Pedigree a name
2. Choose the Gender of the Proband and click next to build the rest of the family
3. Click the Draw Now button to manually draw the family members, or click next and add all
family members via relatives table for quick entry. Click next to construct the Pedigree.
Below is a built Pedigree image of the process described above.
Congratulations! You’ve just successfully created a Pedigree using Progeny!
Note, the Pedigree will open by default with the Proband selected and split-screen with the datasheet
for the individual. More details on the full Pedigree Viewer are described in sections below.

8 | 33
4. INVITE NEW PATIENT TO FAMILY HISTORY QUESTIONNAIRE
Progeny helps the clinicians to send invitations to patients via email or link
INVITE NEW PATIENT
Sending a questionnaire to a new patient
An automated way to have your patients fill out their own Family History Questionnaires on their own
time, then submit the Pedigree information directly to your database.
1. From the Patients screen, click Invite Patient button to begin the new patient invitation
2. Choose to Invite new Patient
a. This quick start only covers invitations for New Patients, not existing patients in the
database
3. Select a Questionnaire you want to send the patient invitation to
a. Breast Risk Assessment
b. Full Risk Assessment
c. Pre-Screening
4. Choose the Folder Name where the Pedigree will be saved
5. Give your patient a Family Name (pedigree name)
6. Choose the Gender of the Proband for this family
7. Enter an Email address for the recipient (Proband) who will be filling out the questionnaire
8. Edit the content of your email if necessary
9. Send Invite to Patient

9 | 33
CHECK PATIENT INVITE STATUS
Steps below describe how to check the status of your sent Family History Questionnaire invitations
A. Click the INVITES button at the Top Menu Navigation pane to open the Invite screen
B. INVITATION FILTERS are used to filter the view of the exact invitations you want to see
You can filter by:
Questionnaire sent out to the patient
Invitation status
Clinician who sent the invitation
Time frame of the invitation
You can invite new patients from the Invite status screen or Query the current patients
to display in a preferred view type
C. INVITE SCREEN: ACTIONS MENU
This menu allows for quick navigation from the Invite Status module and works just like the
Actions Menu on the Patients Screen.
Note, the smart header columns work just like on the Patients screen and can be customized. This is a
list of uniquely chosen data fields to display on the main Invites screen for quick view.

10 | 33
5. DISPLAY ONLY PROBANDS OR ALL INDIVIDUALS?
Click the dropdown option to choose to view all Individuals in the database or only the Probands.
6. SMART LISTS
What is a Smart List?
A list of uniquely chosen data fields to display on the main screen for quick view. These fields are used to
search the data quickly from the smart search feature. The search results only display the data found in
the fields on the smart list.
1. Filter – Filter the individuals by any field in the smart list by clicking on the field and choosing an
arrow ascending or descending value
2. Add Column – Smart list allows you to add any field within the database to this quick view list on
the go
Right click the smart list bar area
Click “Add Column”
Choose your desired field to display
3. Delete Column – Delete any column from the list. This view can be customized and applied as a
default per each user.

11 | 33
7. SMART SEARCH
What is a Smart Search?
Searches only the data that is displayed in the columns in your smart list (Smart List details). The search
is limited to the exact order of the characters in the string and use the asterisk (*) as a wildcard to
extend the search.
8. PATIENTS ACTION MENU
Actions Menu provides quick access to functions within the application for your clinical workflow. This is
located within your Patients screen.
Open Pedigree – Opens the Pedigree for this Individual patient
Open Datasheet – Opens the Individual Datasheet for this patient
Invite Patient – Sends an invitation to a patient using the (FHQ) Family History Questionnaire
module for the patient to fill out their family history and design their pedigree on their own time
View Risk – Open the Risk calculations screen (BRCAPro, MMRPro, PancPro, MelaPro, Tyrer-Cuzick,
Premm, Gail, Claus) associated to the selected patient
Delete Pedigree – Deletes the selected Pedigree and ALL of the associated Individuals within the
Pedigree. Note, deleting this is permanent, take caution with this step
Order Test – Initiates the Order Test confirmation screen to place a genetic test order from Ambry
Genetics
Move Pedigree – Opens a prompt screen to move the selected Pedigree and all of the Individuals to
a different folder directory
Generate Letter – Opens the Letter Generator tool to generate custom letters for patients

12 | 33
9. REVIEW PEDIGREE OR INDIVIDUAL
Review, edit, add, delete
Click on the Pedigree name or number to open the Pedigree or click the Individual Name/number to
view the Individual Datasheet.
Pedigree Viewer
Creating, reviewing, editing, deleting

13 | 33
A pedigree, also known as a genogram, is a diagram that depicts individuals who are related by blood or
another factor. As shown here, we offer a few ways to build a Pedigree, and details are below.
DATA FIELDS
Data Fields that are displayed on the Pedigree are also called the Pedigree Drop Fields. The data in these
fields is displayed for the Proband and can be edited via the Individual Datasheet for the Proband.
Pedigree Drop Fields are very dynamic and customizable.
CANCER LEGEND
This legend auto populates as you add cancers and/or other disease that are predefined with custom
Pedigree symbols. Pedigree symbols can be customized and used with various data fields to display
symbols on the Pedigree. To add a cancer to an Individual, see Individual Datasheet for more details.

14 | 33
SUBTEXT
This text is found under each Individual and can be edited via the Individual Datasheet. Subtext can be
customized to display data on the Pedigree from any fields within your Individual Datasheet.
PROBAND
Person serving as the starting point for the genetic study of a family is the Proband and is marked with a
black arrow on the Pedigree.
QUICK BUILDER ARROWS
Displayed by left-clicking on an Individual.
The black squares around the Individual are for the Relationship Lines. You can click on the small black
square and drag to the next individual to create the appropriate relationship. The black squares create
relationships in the same order as the Yellow Arrows.

15 | 33
INDIVIDUAL MENU
Displayed by right-clicking on an Individual.
Add Relation – Adding a relationship to the selected individual
Change Gender – Change the gender of the selected individual
Change Status – Change individual to Deceased or Alive
Adopted Status – Shows the adopted status of the individual
Change Marked By – Add an (*) (+) (-) to the selected individual
Change Attributes – Change individual to be the Proband of the pedigree, No issue, Infertile, SAB, and
input custom Icon Text for the individual
Select – One click selection of ALL individuals on the pedigree of the same hierarchy
Delete – Permanently deletes the individual from the database
Remove Individual(s) From Pedigree – Removes the individual from the pedigree, making the individual
a singlet in the database and not associate to any pedigree
RELATIONSHIP LINE MENU
1. Select the line between two individuals, you will see two yellow boxes on opposite sides of the line,
connecting the two individuals
2. Right-click the selected line
3. Choose your menu option here

16 | 33
RIGHT-CLICK MENU
Right click with your mouse anywhere on the empty space of the Pedigree screen to open the right-click
menu.
INDIVIDUAL DATASHEET

17 | 33
The individual datasheet is used to enter and store information about individuals in the Progeny
database. An Individual Datasheet can be one of many formats in your Progeny database. The datasheet
is customizable to display only the data fields necessary for you.
HOW TO ACCESS AN INDIVIDUAL DATASHEET?
1. Access by clicking on an Individual Name on the main Patients screen
2. Access from the Pedigree Viewer by clicking on Show Datasheet
3. Open the Full Datasheet screen from the Pedigree Viewer
DATA FIELDS
The field type determines the type of data that a user can enter into the field (alphanumeric, numeric,
date, and so on) or determines how the field functions in the database. For example, an image displays
in the field when a user selects an image file for and image field, dropdown fields provide a custom pick
list and date fields provide a date and time picker when end users are doing data entry for those field
types. By default, each field type is marked with a unique icon in the application. Not all field types are
available for all record levels.
Text - Alphanumeric characters (all digits and printable characters) up to a maximum of 32,000
characters
Date - M/D/YY or M/D/YYYY
Numeric - The digits 0-9. Negative numbers and decimals allowed
Yes/No - Checkbox field that holds a value of either 1 (to indicate Yes) or 0 (to indicate No)
Dropdown - Displays a list of pre-defined items from which the user can select one item
Image - Allows for the display of an image in an allowed format in the field
Table - The field is to be included in a table. The field does not have a pre-defined value
Lookup Table - The field is to be included in a table. The fields have predefined values
Computed - No data entry is allowed in this field. Instead, a non-editable value is displayed in
the field. The value that is displayed is automatically calculated based on the expression,
function, or constant assigned to the field or values that are contained in other fields
Summary - Provides summary information for a given column on a per pedigree basis. The
summary can be an average, a total count, a minimum value, a maximum value, or a sum total
Table Summary - A computed field that summarizes the data for a given column in a given table
Hyperlink - Links to an external document, website, and so on

18 | 33
DATA FIELDS TABS
These tabs can be customized to store any Data Fields and designed to fit comfortably with your
workflow process.
PEDIGREE TOOLBAR
Quick tools for your clinical workflow
Save – Save your work!
Show Datasheet – Quickly navigate between datasheets, spreadsheets and/or Show Invites to be
displayed on the Pedigree viewer screen without having to launch a new tab
Smartdraw – Recognizes the preferred saved Pedigree display settings. Clicking the Smartdraw will
rearrange the Pedigree to look exactly how the settings are set. This option helps to keep all
Pedigrees to have the same look and feel across the database
Show Risk – Open the Risk Assessment tool. Click Here for more details
Order Test – Order Genetic testing from the Progeny screen. Click Here for more details
Actions – Quick navigation for drawing, editing the Pedigree
Settings – Select elements shown on Pedigrees, modify display view, and configure smartdraw
settings.

19 | 33
Using the Cancer Risk Assessment Tool
Did you know that you can run validated hereditary cancer risk assessment models at the touch of a
button without re-entering data and generate custom queries and spreadsheets on this data?
Progeny Clinical includes validated risk assessment models to calculate 5-year and lifetime cancer risk, as
well as gene mutation probabilities for any member of the pedigree. Any missing or invalid data
required to run these models are automatically identified for you. Risk calculations can be easily saved
and timestamped, or generated as a .pdf at any time
First, Click Show Risk button on the Pedigree Toolbar to open the risk Models screen (next page):
FEATURES:
Calculate or Configure Risk – By default, opens the Risk Assessment Settings
Delete the selected saved report from Progeny
Date and time stamp dropdown for saved reports
View the PDF of the selected report

20 | 33
RISK ASSESSMENT RESULTS
Validation Errors – Show if you have bad or missing data in the cancer table. Displayed in red on
the Cancer Risk and/or Mutation Probabilities (Ex: missing age at breast cancer)
Cancer Risk – 5 year and Life
Mutation Probabilities – Any mutation probabilities displayed here

21 | 33
How Do I Order Genetic Testing Through Progeny?
Order genetic testing from Ambry Genetics seamlessly within Progeny. Track orders and review results
without ever leaving the application
Progeny Clinical features the ability to order genetic testing for any patient through Ambry Genetics.
Ordering tests from the Progeny interface is easy and saves you time by passing the required patient
data and pedigree securely to Ambry. The interface also allows you to check the status and results of all
your orders with Ambry, even those that were not submitted through the Progeny interface. The
addition of this feature completes a turnkey operation of collecting family history data from your
patients, performing risk assessment to identify at-risk patients, and now ordering tests and reviewing
results for those patients all in one place.
You can place a genetic test order from various screens inside of Progeny: Patients screen, Pedigree
Viewer and Individual Datasheets by clicking on the Orders button.
Click here to Request Order Setup if your Progeny account has not been set up with the Ambry Orders
feature

22 | 33
Order Status
Check the genetic testing results within Progeny.
On the Patients Screen toolbar, click the Order Status button to check ALL orders you placed with Ambry
Genetics, including orders that were placed outside of Progeny.
If you placed genetic testing orders with Ambry Genetics in the past, your orders will display
here with an Actions option to Link to a patient.
Orders that were placed within Progeny will display the Actions Button with options to Open
Pedigree or Open Datasheet.

23 | 33
Patient Letter Generator
Creating a New Letter Template
The Letters option on the navigation tool bar opens up a Letter Templates tab. Here you can create, edit,
and delete customized Letter Templates. The templates use an extensive editor that allows you to
implement a variety of different styles, special characters, images, and links. Progeny also has two
custom buttons in the editor: Field and Pedigree. Field will allow you to input any custom or system field
placeholder in the database, and Pedigree will allow you to add a resizable placeholder for the pedigree
image in the template. These letters can then be generated for any individual in the database. They can
also be modified, and saved to a specific individual.

24 | 33
Generate Letters for Patients
Access the generate letter screen to create letters for your patients using various methods.
PATIENTS SCREEN On the Patient dashboard, click the Actions Menu dropdown, then choose Generate Letter.
PEDIGREE VIEWER
Click the Generate Letter button at the top toolbar menu for the Pedigree.
INDIVIDUAL DATASHEET
Click the Generate Letter button on the Individual Datasheet toolbar menu.

25 | 33
LETTER GENERATOR BUTTONS
Cut: deletes and copies selection to clipboard (Ctrl+X)
Copy: copies selection to clipboard (Ctrl+C)
Paste: pastes contents of clipboard
Paste as plain text: pastes contents of clipboard as the unformatted default format of the letter
Paste from Word: pastes contents from Microsoft Word
Undo: cancels the last change made and restores the letter to its previous state (Ctrl+Z)
Redo: reverts the last undo operation (Ctrl+Y)
Source: allows editing of html source code
Document Properties: displays window with General, Design, Meta Tags, and Preview options
Print: allows printing of letter
Templates: displays window of pre-defined forms with page layout, text formatting and styling
Find: displays window that allows searching and replacing multiple occurrences of text
Select All: selects all contents of the letter (Ctrl+A)
Link: displays window that allows adding of hyperlinks, anchors, and email addresses
Unlink: removes a link when cursor is placed in a link or part of a link is selected
Image: displays window that allows setting of configuration options that define image source,
size, display properties, and other advanced properties
Table: displays window that allows setting of configuration options that define size, display
properties, and other advanced properties
Insert Horizontal Line: adds a horizontal rule from one side of the letter to another at the
location of the cursor
Insert Special Character: displays a window that allows choosing of a symbol from a set
containing Latin letters, numbers (including fractions), currency symbols, punctuation, arrows, and
mathematical operators
Insert Page Break for Printing: adds a separation, at the location of the cursor, between physical
pages when printed
Bold: bolds text (Ctrl+B)
Italic: italicize text (Ctrl+I)

26 | 33
Underline: underlines text (Ctrl+U)
Strikethrough: strikes text through
Subscript: sets a character that is slightly smaller than the text that surrounds it below the
baseline
Superscript: sets a character that is slightly smaller than the text that surrounds it above the
baseline
Remove Format: removes text styling from selected text to display default formatting
Insert/Remove Numbered List: creates or removes a numbered list
Insert/Remove Bulleted List: creates or removes a bulleted list
Decrease Indent: decreases the indentation of a block-level element containing the cursor by
one tabulator length
Increase Indent: increases the indentation of a block-level element containing the cursor by one
tabulator length
Align Left: aligns paragraph with the left margin and rags text on the right side
Center: aligns paragraph symmetrically along the vertical axis and rags text on both sides
Align Right: aligns paragraph with the right margin and rags text on the left side
Justify: aligns paragraph with the right margin and rags text on the left side
Formatting Styles: allows selection of a number of pre-defined block and inline styles
from a drop-down list
Paragraph Format: allows selection of a number of pre-defined block-level styles from
a drop-down list
Font Name: allows selection of a number of typefaces that are applied to text
Font Size: allows selection of a number of font sizes that change how big or small the text is
Paragraph Margin: allows selection of a number of line spacing margins that change
how much space is between each line in a paragraph
Text Color: allows selection of a number of colors for text
Add Field: displays a Field Chooser window that allows adding field placeholders from the
database
Add Pedigree: adds a resizable placeholder for the pedigree image

27 | 33
Spreadsheets and Queries
Spreadsheet Queries are used for searching for specific field data and displaying the results in a
spreadsheet. You can search either your Individual level fields or your Pedigree level fields.
From the Patients screen, click the Build Spreadsheet button to create a new spreadsheet or Run
Spreadsheet to open a saved spreadsheet query format.
BUILD SPREADSHEET
Select which Fields you wish to Query, add logical operators to your search, and specify how the results
are sorted. This is a powerful tool which can be used to perform broad and general, or specific and
granular queries of your database. After you build a Query it can be saved as a Format, then re-run or
edited as needed.
Query Panes – The four panes on a query screen are for building the query
On the left is the Fields pane which lists the fields of your database. You can search for fields
in this pane by typing a portion of the field name into the search field atop the Fields pane

28 | 33
The upper right Columns pane is used to list the columns (fields) you wish displayed on the
results spreadsheet. The top to bottom ordering of fields in this pane will reflect as left to
right columns on the spreadsheet results. You can change the order of the spreadsheet
results columns by moving each field up or down in the Columns pane
The middle right pane “Sort (optional)” determines the sort order of your query results.
Drag fields from the Fields pane into this pane or use the Add to sort icon on a Column field
to copy the field into the Sort pane
Query (Optional) pane is where you can add specific conditions to a field, (Example: Last
Name equals Smith)
BUILDING QUERIES
To build a Spreadsheet Query, first select the level (Individual or Pedigree) you wish to query as
shown above.
1. Select which field(s) you want shown on the spreadsheet results - You can use the search
field to quickly find the field you are looking for. Just type in any portion of the field name
and click the magnifying glass icon on the right side of the search field.
Note, your spreadsheet results will be in the order that your fields are placed (top to
bottom)
2. Drag the field into the Columns and/or Query panes
3. From the fields you have dragged into the Columns pane use the icons available in the
mouse over menu to add it to the Sort or Query panes
4. Specify whether you would like to sort in ascending (default) or descending order. You may
sort by several fields. The first field will be the primary sort column, the second field the
secondary, and so on.
5. Configure the logical operators, values, Boolean operators, and parentheses (to apply an
order of operations) in the Query pane.
ORDER OF OPERATIONS FOR A QUERY:
When carrying out a multiple fields query, use parentheses to define the order of operations for
a query. The order of operations determines the queries that must be carried out first in a series
of queries. For example, the below image shows a query that first sorts individuals who were
diagnosed with breast cancer at the age of 65. The query then sorts individuals who were
diagnosed with colon cancer. Because this query uses the OR operator, the query returns
individuals who meet either query criteria.

29 | 33
Once you’ve built your Query, you can Save the Format and Run the query from the top toolbar. See
Logical Operators next.
LOGICAL OPERATORS
The following page contains logical operators which are available to target your search results
Operator Description
begins
with
Search for an item where the specified field contains data that begins with the search criteria. For
example, if the query field for individuals is the Weight field, and you specify Weight begins with 17,
then only those individuals for whom the weight begins with a 17 (17 or 170-179) are returned in the
search.
contains
Search for an item where the specified field contains any instance of the search criteria. For example,
if the query field for individuals is the Weight field, and you specify Weight contains 75
does
not
begin
with
Search for an item where the specified field contains data that does not begin with the search
criteria. For example, if the query field for individuals is the Weight field, and you specify Weight does
not begin with 17, then only those individuals for whom the weight does not begin with a 17 (0-16,
18 -169, and so on) are returned in the search.
does
not
contain
Search for an item where the specified field does not contain any instance of the search criteria. For
example, if the query field for individuals is the Weight field, and you specify Weight does not
contain 75, then all individuals who have a weight in which 75 does not appear (0-74, 76-174,
176274, and so on) are returned in the search.
does
not end
with
Search for an item where the specified field contains data that does not end with the search criteria.
For example, if the query field for individuals is the Weight field, and you specify Weight does not
end with 75, then only those individuals for whom the weight does not end with a 75 (074, 76-174,
176-274, and so on) are returned in the search.
does
not
equal
Search for an item that meets any criteria other than the specified value For example, if the query
field for individuals is the Weight field, and you specify Weight ≠ 175, then only those individuals
whose weight does not equal 175

30 | 33
ends
with
Search for an item where the specified field contains data that ends with the search criteria. For
example, if the query field for individuals is the Weight field, and you specify Weight ends with 75,
then only those individuals for whom the weight ends with a 75 (75, 175, 275, and so on) are
returned in the search.
equals
Search for an exact match. For example, if the query field for individuals is the Weight field, and you
specify the search criteria as Weight = 175, then only those individuals whose weight is exactly 175
are returned in the search.
in
Allows for comma separated values to be entered into a field so that multiple items can be searched
and returned in the search results. For example, if the query field for individuals is the Weight field,
and you specify Weight in 75, 80, 85, 90, then all individuals whose weight is exactly 75, 80, 85, or 90
are returned in the search.
Note: You can copy and paste a list of values from .csv file into a query of this type.
is blank
Search for an item where the specified field contains absolutely no data. For example, if the query
field for individuals is the Weight field, and you specify Weight is blank, only those individuals for
whom data has not been entered into the Weight field are returned in the search.
Note: A zero (0) is an actual data value. This means that if a zero (0) has been entered into the Weight
field for an individual, then the individual is not returned in the search.
is
greater
than
Search for an item that is greater than the specified value. For example, if the query field for
individuals is the Weight field, and you specify Weight > 175, then only those individuals whose
weight is greater than 175 are returned in the search.
is
greater
than or
equal to
Search for an item that is greater than the specified value or is an exact match for the specified value.
For example, if the query field for individuals is the Weight field, and you specify Weight > 175, then
those individuals whose weight is exactly 175 or greater are returned in the search.
is less
than
Search for an item that is less than the specified value. For example, if the query field for individuals
is the Weight field, and you specify Weight < 175, then only those individuals whose weight are less
than 175 are returned in the search.
is less
than or
equal to
Search for an item that is less than the specified value or is an exact match for the specified value.
For example, if the query field for individuals is the Weight field, and you specify Weight < 175, then
those individuals whose weight is exactly 175 or less are returned in the search.
is not
blank
Search for an item where the specified field contains any valid data. For example, if the query field
for individuals is the Weight field, and you specify Weight is not blank, all individuals for whom data
has been entered into the Weight field are returned in the search.
Note: A zero (0) is an actual data value. This means that if a zero (0) has been entered into the Weight
field for an individual, then the individual is returned in the search.

31 | 33
is not in
Allows for comma separated values to be entered into a field so that multiple items can be searched
and excluded from the search results. For example, if the query field for individuals is the Weight
field, and you specify Weight is not in 75, 80, 85, 90, then all individuals whose weight is not exactly
75, 80, 85, or 90 are returned in the search.
Note: You can copy and paste a list of values from .csv file into a query of this type.
is not
like
A pattern matching search based on the keyword “like.” An underscore (_) is used to match exactly
one character, and the percent sign (%) is used to indicate any number of characters. For example, if
the query field for individuals is the Weight field, then to search for all individuals whose weight is
not like 75, select “is not like” as the operator and enter %75 in the Value field. The % indicates that
any number of characters can come before 75, for example, 0 -74, 176 - 184, 186 - 274, and so on.
Note: You can use the % anywhere in the search criteria, for example, 75% or 7%5.
like
A pattern matching search based on the keyword “like.” An underscore (_) is used to match exactly
one character, and the percent sign (%) is used to indicate any number of characters. For example, if
the query field for individuals is the Weight field, then to search for all individuals whose weight is
like 75, select “like” as the operator and enter %75 in the Value field. The % indicates that any
number of characters can come before 75, for example, 75, 175, 275, and so on.
Note: You can use the % anywhere in the search criteria, for example, 75% or 7%5.
RUN SPREADSHEET
Run the spreadsheet. For more information on Building, editing, saving, using spreadsheets and queries,
please see our full User Guide webpage.

32 | 33
Guide
Need further assistance?
Want our extended user guides?
Our Support Team is here to help!
(800) PROGENY 776-4369 x1