profiling with colormunki™ display - x-rite · essential for previewing edits. ... • d65 is...
TRANSCRIPT

1
PROFILING WITH COLORMUNKI™ DISPLAY
X-Rite Color Services • 800.248.9748 x2685 • [email protected]
INTRODUCTIONThe ability to preview accurate color on your display can save a considerable amount of time and money for anyone in the photo and printing industry. Photographers and designers who need to adjust images fi nd that a color-calibrated monitor is essential for previewing edits. To ensure that colors you see on screen are the same colors from your fi le, you simply need to calibrate and profi le your monitor. ColorMunki makes it easy.
This document will take you through ColorMunki’s Advanced profi ling wizard to calibrate and profi le your display using the ColorMunki Display spectrophotometer.
PROFILING YOUR DISPLAY1. With the ColorMunki Display device connected
to your computer, launch the ColorMunki software.
2. ColorMunki will detect all displays connected to your computer. Choose one to profi le.
2. i1Profi ler allows you to profi le your display using “Easy” and “Advanced” user modes.
• “Easy” mode uses your current display hardware settings for brightness and contrast to achieve a fi xed target white point of D65 and a fi xed white luminance level of 120 cd/m2, plus enables the Ambient Light Smart Control feature. This mode is suffi cient for those who are new to display profi ling because it is simple and achieves accurate results in most environments.
• “Advanced” mode offers customization of the display luminance level and the white point of your display. In addition, it also offers selection of Ambient Light Smart Control and Flare Correct™ features.
Select the Advanced profi ling mode for this tutorial.
3. The White Point selection determines the color of white used for your display. For most applications we recommend D65.
Selection of a white point is typically based on your workfl ow, the type of lighting used to view prints in comparison to your display, and paper stock you use when printing. Here is a little more information.
• D65 is recommended for most photography applications.
2
PROFILING WITH COLORMUNKI™ DISPLAY
X-Rite Color Services • 800.248.9748 x2685 • [email protected]
• D50 is recommended for most pre-press and proofi ng applications.
• Native will not make any adjustments to the current white point of your display. You would typically use the Native setting if you have already set your display to the desired white point (and luminance value) using your display’s hardware controls.
3. Under “White Luminance,” if you work in a setting where the ambient light doesn’t vary much, you can allow ColorMunki to automatically determine the optimum luminance for the display based on the ambient light conditions. If you have lots of windows in your offi ce or are calibrating a laptop that will be used under many different lighting conditions, select 120 cd/m2.
Click Next.
4. Advanced options offers “Ambient Light Smart Control” and “Flare Correct™.”
• Ambient Light Smart Control measures your ambient light and compensates for changes after the profi le is set.
• Flare Correct™ measures the display surface glare and adjusts the profi le to correct for it.
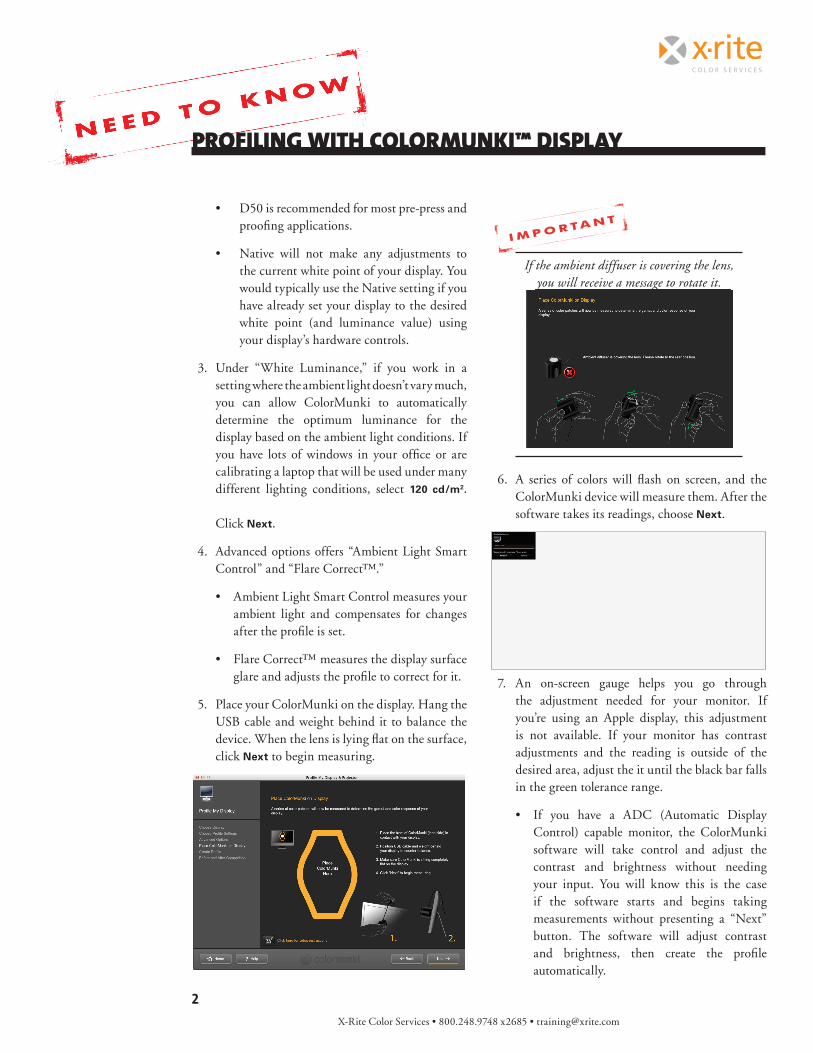
5. Place your ColorMunki on the display. Hang the USB cable and weight behind it to balance the device. When the lens is lying fl at on the surface, click Next to begin measuring.
If the ambient diffuser is covering the lens, you will receive a message to rotate it. you will receive a message to rotate it.
6. A series of colors will fl ash on screen, and the ColorMunki device will measure them. After the software takes its readings, choose Next.
7. An on-screen gauge helps you go through the adjustment needed for your monitor. If you’re using an Apple display, this adjustment is not available. If your monitor has contrast adjustments and the reading is outside of the desired area, adjust the it until the black bar falls in the green tolerance range.
• If you have a ADC (Automatic Display Control) capable monitor, the ColorMunki software will take control and adjust the contrast and brightness without needing your input. You will know this is the case if the software starts and begins taking measurements without presenting a “Next” button. The software will adjust contrast and brightness, then create the profi le automatically.

3
PROFILING WITH COLORMUNKI™ DISPLAY
MonitorSetColorMunkiCalNTK_10SEPT13
ClassroomTraining
eLearningTraining
On-SiteTraining
For information on a variety classroom, custom on-site, and
highly interactive on-line training options, see X-Rite’s Color
Services web site at http://www.xrite.com/top_services.aspx
Contact us at:
Email: [email protected]
Phone: 800.248.9748 x2685
The product names used in this Need To Know document are for educational purposes only and do not imply endorsement by the makers of those products, or the endorsement of those products by X-Rite. All trademarks and registered trademarks are the property of their respective owners. ©2013 X-Rite Incorporated. All rights reserved.
7. If your monitor is not recognized as having DDC capability, a brightness measurement will follow the contrast adjustment screen. After a few initial measurements, the “Brightness Adjustment” gauge will appear. At this point, simply adjust your monitor brightness up or down as necessary until the orange bar is as centered as possible in the green tolerance range.
If you have an Apple display, the brightness controls are typically on the right edge of the monitor, and Apple laptops have keyboard brightness controls. If your monitor has brightness adjustment knobs or brightness is adjusted with an On Screen Display, make adjustments here until you are in tolerance.
8. When the measurement process is complete, you will be prompted to name your profi le. You can leave it at the default, or add more descriptive information such as the date. Click Save to begin building the profi le.
9. A green check mark will indicate when your profi le is complete. If you’d like, you can choose a frequency to be reminded to re-profi le. The frequency is up to you, but those who print color-critical images, such as photos or corporate colors, should profi le at least weekly. Click Next.
11. ColorMunki software offers the ability to see a before and after comparison. Select an image from the drop-down and click Before and After
to see the change the new monitor profi le has made.
12. Click Finish. The next time you profi le your monitor, the new profi le will write over the old one.
