professional studio lighting kris baum. times 09:30 the studio & equipment 10:00 metering &...
TRANSCRIPT

Professional Studio Lighting
Kris Baum

Times
• 09:30 The Studio & Equipment• 10:00 Metering & Exposure• 10:30 Break• 11:00 Equipment & Metering Practical• 12:30 Lunch• 13:30 Light shapers demo• 14:00 Light shapers prac• 15:30 Afternoon tea• 16:00 foreground / background intro• 16:30 foreground / background practical• 17:30 finish

Flash Equipment• Why use flash & studio?
– Light control & versatility, heat, price, reproducibility, cost, comfort, accessibility, time.
• Demo of a single flash unit in operation.• What is a flash unit & what are its settings.
– Power, modelling lamp, sync, cell mode, discharge, on/off.• How do I measure flash power?
– W/S & f-stops• The other equipment
– Standard reflectors, umbrella’s, soft boxes, beauty dishes, barn doors, snoots, speed rings, grids, gels
– Sync cables, pocket wizards, – Mono block, packs, battery packs (pro 7b), sync cord– Gaff tape, safety, power leads

Equipment Brands
• Profoto* www.profoto.com L&P Photo..• Broncholor* www.broncolor.com Sun Studios• Elinchrom www.elinchrom.com Kayell• Interfit www.interfitphotographic.com Vanbar, Dragon Image• Bowens* www.bowens.co.uk Vanbar• Briese www.briese-studios.de Briese
price, performance, support* industry standard

Lighting Kits• Affordable beginners packages
• Bowens, Broncholor offer a ranges.
• Kits can provide lighting or lighting accessories
• Prices from $2000 - $5000

Bowens 2 x 500w/s Kit• 2 of Gemini 500Ws Monolights.• 1 of 60x80cm Softbox.• 1 of 90cm Silver/White Umbrella.• 1 of 120d Wide-Angle Umbrella Reflector.• 2 of Lighting Support Stand.• 1 of Trolley Case.• 2 of Flash Tube.• 2 of 250W Modeling Lamp.• 2 of Power Cord.• 1 of Sync Lead. - $2000

Camera & Exposure• The Camera Histogram &
Exposure …• RHS data = whites• MID data = greys• LHS data = blacks
• Lets check everyone’s histogram…

The Meter
• Metering modes & settings– Ambient reading – Flash with sync cable– Flash without sync– Setting ISO etc– Shutter Speed

Metering & Equipment Practical

Basic Light Theory• Demonstration distance & shadow, light quality & light shapers.• Light always travels straight• Light has colour temperature (warm / cold etc) measured in Kelvin
– (white balance)• Light quality;
– Size of light source, distance of light source, type of reflector & shape of reflector & surface
– The smaller the light source, the harder the shadow.– The smaller the light source, the smaller the specular highlights– The softer the light source, the less contrast in highlights/midtones
• Distance vs power – – Inverse square law
• Light intensity is inversely proportional to the square of the distance from the source

Inverse Square Law
• Move an object from 4 feet away to 16 feet away and you need to increase f-stop from F4 to F16
F16 F11 F8

Light Shapers
• Soft boxes big, small, medium• Beauty Dishes & its diffusers & types• Umbrella’s (silver, white shoot thru)• Standard Reflector• Grid• Snoot• Light Stands• Barn Doors• Gels• Gobo’s• Correct packing & unpacking soft boxes & other shapers• Blacks / Whites / Poly-boards

• Highlights
• Mid tones
• Shadows

Light Shapers Practical

Foreground / back Lights• Planning Shoot
– Distance to background– Camera F-stop– F-stop of background– F-stop of subject– Light background– Meter Background– Light foreground – Meter Foreground
• Setting up background light with kill spills correctly• Setting up foreground light• Metering correctly

Standard Studio Portrait Setup
F11
F11
F16
5m approx
backdrop roll
kill spill
Key light

General Studio Tips & Hints
• Plan your shoot – draw the lighting plan out before embarking on a shoot
• Metering correctly can save much photoshop & troubleshooting
• Meter all lights separately then together• Fill cards can replace lights

Foreground/back Practical

Day 2

Times
• 09:00 Clean White Backdrop• 09:30 Multiple Lights intro• 10:00 Multiple Lights Prac• 11:00 Break• 11:15 Multiple Lights Prac• 12:30 Lunch• 13:30 Portrait Lighting Intro• 14:00 Portrait Lighting Prac• 15:00 Break• 15:30 Lighting effects intro• 16:00 Lighting effects Prac• 18:00 Finish
White Background
• Clean 100% white background• Well exposed subject, no spill light• Try different light shapers
– Soft box, beauty dish, umbrellas, std refl. Grid

Multiple Lights• Demonstration & hands-on:
– Multiple foreground lights / light ratios• Key light & fill light & what is a ratio• What should your camera be?• Check the background• Metering correctly
– Filling shadows silver/white cards– Analysing Face– Changing ratio to change contrast– Introduce Hair light

Portrait Lighting Intro• Creating a catch light• Handouts showing broad, short, Rembrandt,
butterfly • Broad Lighting• Short Lighting• Rembrandt• Butterfly• High key• Low Key

Lighting Effects
• Graduated lighting, spots, paper rolls
• Gels incl. 1 or 2
• Fill cards, cutters, gobos, focussed light, modelled light

Hints for obtaining a better image
• Use a grey card for correct white point / colour balance measure• Use Prime Lenses L series where possible
– Or 70-200L F2.8 • Determine optimum aperture for Lens & use if possible• Always use Adobe RGB 98 & RAW mode on Camera• Calibrate Monitor & Printer; Gretag McBeth• 35mm Digital SLR’s will only sync at 1/250 or lower, some only
1/125 or lower• Compensate for lens –overexpose ½ or determine your grey card
reading results.• More Megapixels & bits per pixel & exposing for highlights
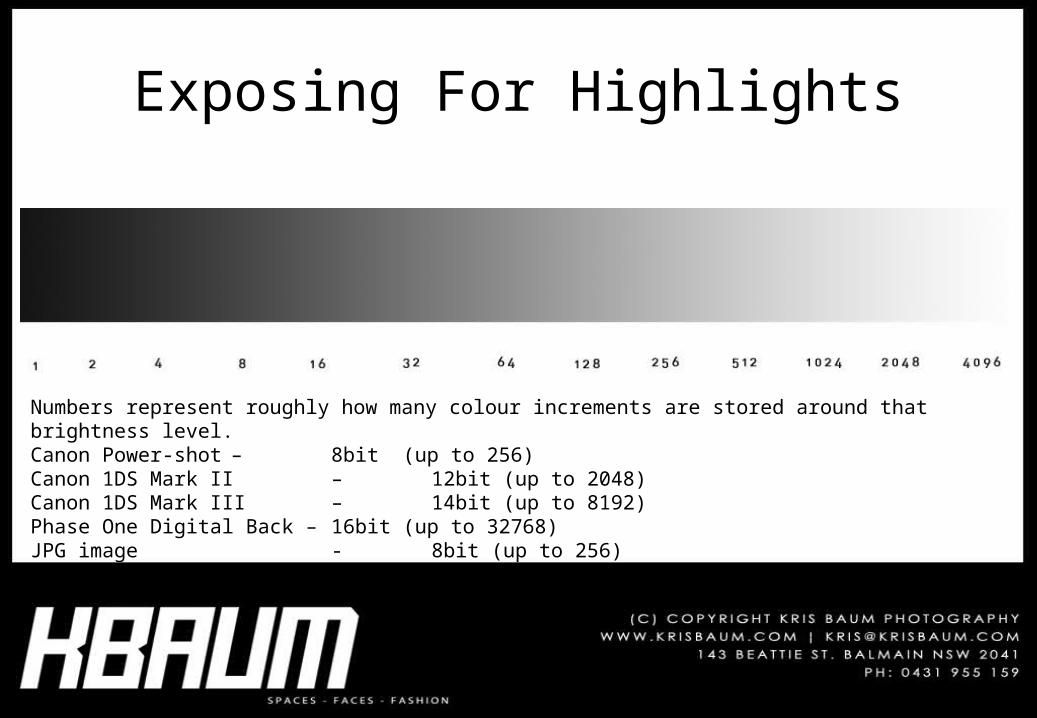
Numbers represent roughly how many colour increments are stored around that brightness level.Canon Power-shot – 8bit (up to 256)Canon 1DS Mark II – 12bit (up to 2048)Canon 1DS Mark III – 14bit (up to 8192)Phase One Digital Back – 16bit (up to 32768)JPG image - 8bit (up to 256)
Exposing For Highlights