professional gp340 portable radio guide.pdf · this user guide covers the operation of the gp340...
TRANSCRIPT

Professional Radio
GP340
User Guide
68P64110B23A
Issue: July 1999

2
9
3 4
8
5 6
1
7
11
10

1
English
CO
NT
EN
TS
nel . . . . . . . . . . . .12 . . . . . . . . . . . . . . .12 . . . . . . . . . . . . . . .12
. . . . . . . . . . . . . . .13
. . . . . . . . . . . . . . .13all . . . . . . . . . . . .13
e Call . . . . . . . . . .13 . . . . . . . . . . . . . . .14 . . . . . . . . . . . . . . .15 . . . . . . . . . . . . . . .16
. . . . . . . . . . . . . . .17
. . . . . . . . . . . . . . .18 . . . . . . . . . . . . . . .19 . . . . . . . . . . . . . . .20it (VOX) . . . . . . . .21
. . . . . . . . . . . . . . .22
. . . . . . . . . . . . . . .23
an . . . . . . . . . . . . .23 . . . . . . . . . . . . . . .23annel . . . . . . . . . .24nce Channel. . . . .24
CONTENTS
Radio Overview . . . . . . . . . . . . . . . . . . . . 3
Operation and Control Functions . . . . . . . . 3Radio Controls . . . . . . . . . . . . . . . . . . . 3 Programmable Buttons . . . . . . . . . . . . 3Audio Signal Tones. . . . . . . . . . . . . . . . 6
Getting Started . . . . . . . . . . . . . . . . . . . . . 7
Battery Information. . . . . . . . . . . . . . . . . . . 7Battery Care and Tips . . . . . . . . . . . . . . 7Recycling or Disposal of Batteries . . . . 8Charging the Battery . . . . . . . . . . . . . . . 8
Accessory Information . . . . . . . . . . . . . . 9
Attaching the Battery . . . . . . . . . . . . . . . . . 9Removing the Battery. . . . . . . . . . . . . . . . . 9Attaching the Antenna . . . . . . . . . . . . . . . 10Removing the Antenna. . . . . . . . . . . . . . . 10Attaching the Belt Clip . . . . . . . . . . . . . . . 11Removing the Belt Clip. . . . . . . . . . . . . . . 11
Radio Operation . . . . . . . . . . . . . . . . . . . 12
Turning the Radio On-Off. . . . . . . . . . . . . 12Adjusting the RadioÕs Volume . . . . . . . . . 12
Selecting a Radio ChanSending a Call . . . . . . .Receiving a Call. . . . . .
Radio Calls . . . . . . . . .
Selective Call . . . . . . . .Making a Selective CReceiving a Selectiv
Emergency Call . . . . . .Lone Worker . . . . . . . .Talkaround. . . . . . . . . .
Features . . . . . . . . . . .
Transmit Power . . . . . .Whisper . . . . . . . . . . . .Call Forward . . . . . . . .Voice Operated TransmVoice Recorder . . . . . .
Scan . . . . . . . . . . . . . .
Starting or Stopping ScTalkback . . . . . . . . . . .Deleting a Nuisance ChAdding a Deleted Nuisa

CO
NT
EN
TS
opyright
may include copyrighted computer emories or other media. Laws in the ntries preserve for Motorola Europe ts for copyrighted computer
y or reproduce in any form the ordingly, any copyrighted computer described in this manual may not be ithout the express written permission of he purchase of these products shall not implication, estoppel, or otherwise, any r patent applications of the holders of clusive royalty free licence to use that
le of the product.
2English
Safety Information . . . . . . . . . . . . . . . . . 25
Safe and Efficient Operation . . . . . . . . . . 25Exposure to Radio Frequency Energy . . . 25Radio Operation and EME Exposure . . . . 26Electromagnetic Interference/Compatibility. . . . . . . . . . . . . . . . . . . . . . . 26Operational Warnings . . . . . . . . . . . . . . . 26
Vehicles with an Air Bag . . . . . . . . . . . 26Potentially Explosive Atmospheres. . . 26Batteries . . . . . . . . . . . . . . . . . . . . . . . 26Blasting Caps and Areas . . . . . . . . . . 27
Operational Cautions . . . . . . . . . . . . . . . . 27Damaged Antennas . . . . . . . . . . . . . . 27Batteries . . . . . . . . . . . . . . . . . . . . . . . 27
General Radio Care . . . . . . . . . . . . . . . . . 27
Computer Software C
The products described in this manual programmes stored in semiconductor mUnited States of America and other couand Motorola Inc. certain exclusive righprogrammes, including the right to copcopyrighted computer programme. Accprogrammes contained in the productscopied or reproduced in any manner wthe holders of the rights. Furthermore, tbe deemed to grant either directly or bylicence under the copyrights, patents, othe rights, except for the normal non-exarises by operation of the law in the sa

3
English
RA
DIO
OV
ER
VIE
W
wer up.
io scanning.
g.
el busy - when receiving.
io call reminder alert.
ttery warning - when
microphone when
or
emote speaker/micro-essories. Replace en not in use.
s
ttons can be stomer Programming ate the radio features. s the features that can
button and the three
RADIO OVERVIEW
This user guide covers the operation of the GP340 Portable Radio. Please read pages 25 to 27 before using this radio
OPERATION AND CONTROL FUNCTIONS
Radio Controls
The numbers below refer to the illustrations on the inside front cover.
1. Channel Selector KnobAllow selection of up to 16 channels.
2. On-Off / Volume KnobUsed to turn the radio on or off, and to adjust the radioÕs volume.
3. Side Button 1 (programmable)
4. Push to Talk Button (PTT)Press and hold down this button to talk, release it to listen.
5. Side Button 2 (programmable)
6. Side Button 3 (programmable)
7. Top Button (programmable)Recommended for Emergency Button.
8. LED IndicatorGreen: Successful poGreen Flashing: RadRed: Radio transmittinRed Flashing: ChannYellow: Radio called.Yellow Flashing: RadRed Flashing: Low batransmitting.
9. MicrophoneSpeak clearly into thesending a message.
10. Antenna
11. Accessory ConnectConnects headsets, rphones and other accattached dust cap wh
Programmable Button
Several of your radio buprogrammed, by the CuSoftware (CPS), to activThe following table showbe assigned to the Top Side Buttons.

RA
DIO
OV
ER
VIE
W
ity
.
.
operation.
g
ack from
tween High
ng through a
nters emer-rompted by
io if you are
4English
Feature Description
Monitor/CancelTo monitor the selected channel for any activor to cancel a current outgoing or incoming call
Radio Call To make an individual or group selective call
Scan On/Off To toggle between start and stop of the scan
Nuisance Delete/Cancel
To delete a nuisance channel while scanninor delete the message currently being played bvoice storage.
Transmit PowerTo toggle your radioÕs transmit power level beand Low power.
Talkaround On/OffTo talk directly with another radio without goisystem or dispatcher.
Emergency To activate the Emergency alarm call.
Lone WorkerTo identify yourself as a lone worker. Radio egency sequence unless you respond when ppressing any radio button.
Call ForwardTo transfer calls automatically to another radunable to take the call.

5
English
RA
DIO
OV
ER
VIE
W
to speak
using
back from
WhisperTo increase the microphone gain to allow youquietly.
Record/Play-backTo record/play-back incoming calls or memo voice recorder feature.
Cancel MessageDeletes the message currently being played voice recorder (Voice storage).
Feature Description
RA
DIO
OV
ER
VIE
W
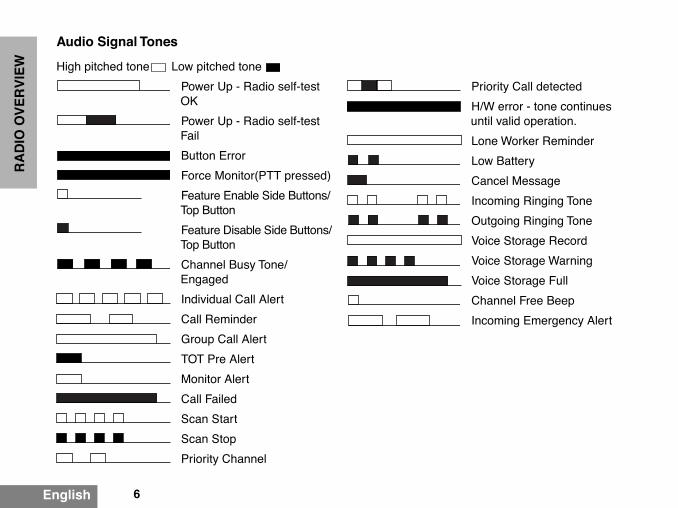
iority Call detected
W error - tone continues til valid operation.
ne Worker Reminder
w Battery
ncel Message
oming Ringing Tone
tgoing Ringing Tone
ice Storage Record
ice Storage Warning
ice Storage Full
annel Free Beep
oming Emergency Alert
6English
Audio Signal Tones
High pitched tone Low pitched tone
Power Up - Radio self-test OK
Power Up - Radio self-test Fail
Button Error
Force Monitor(PTT pressed)
Feature Enable Side Buttons/Top Button
Feature Disable Side Buttons/Top Button
Channel Busy Tone/Engaged
Individual Call Alert
Call Reminder
Group Call Alert
TOT Pre Alert
Monitor Alert
Call Failed
Scan Start
Scan Stop
Priority Channel
Pr
H/un
Lo
Lo
Ca
Inc
Ou
Vo
Vo
Vo
Ch
Inc
7
English
GE
TT
ING
ST
AR
TE
D
io. Motorola rapid-rate in a temperature-sensing e battery is charged re limits.
tored up to two years e loss. Store new/unused erature, in cool dry area.
een in storage should be
rged batteries to the ostÓ. This action will
ycle life.
and battery in the ing. Continuous charging
. (Do not use your charger
e and operation use only rs. They were designed to d energy system.
GETTING STARTED
BATTERY INFORMATION
Battery Care and Tips
This product is powered by a nickel-cadmium (Ni-Cd), nickel-metal-hydride (NiMH), or lithium-ion rechargeable battery.
The following battery tips will help you obtain the highest performance and longest cycle life from your Motorola rechargeable battery.
¥ Charge your new battery overnight (14-16 hrs) before using it to obtain maximum battery capacity and performance.
¥ Charging in non-Motorola equipment may lead to battery damage and void the battery warranty.
¥ When charging a battery that is attached to the radio, turn the radio off to ensure a full charge.
¥ The battery should be at about 25¡C (room temperature) whenever possible. Charging a cold battery (below 10¡C) may result in leakage of electrolyte and ultimately, in failure of the battery.
¥ Charging a hot battery (above 35¡C) results in reduced discharge capacity, affecting the
performance of the radbattery chargers contacircuit to ensure that thwithin these temperatu
¥ New batteries can be swithout signiÞcant cyclbatteries, at room temp
¥ Batteries which have bcharged overnight.
¥ Do not return fully chacharger for an Òextra bosigniÞcantly reduce c
¥ Do not leave your radiocharger when not chargwill shorten battery lifeas a radio stand.)
¥ For optimum battery lifMotorola brand chargeoperate as an integrate
GE
TT
ING
ST
AR
TE
D
e battery attached, or the harger.
dicates the charging
only the Motorola elow; other batteries will
Status
is charging
is fully charged
is unchargeable
r is getting ready to charge
is 90% charged
contact your dealer.
Description
NiMHacity NiMH acity FM NiMH
FM NiCd NiCd
8English
Recycling or Disposal of Batteries
At the end of its useful life, the NiCd battery can be recycled. However, recycling facilities may not be available in all areas.
Motorola endorses and encourages the recycling of all re-chargeable batteries. Contact your local Motorola dealer for further information.
Charging the Battery
If a battery is new, or its charge level is very low, you will need to charge the battery before you can use it in your radio.
Please contact your dealer for further information.
Note: Batteries are shipped uncharged from the factory. New batteries could prematurely indicate full charge, charge a new battery for 14-16 hrs before initial use.
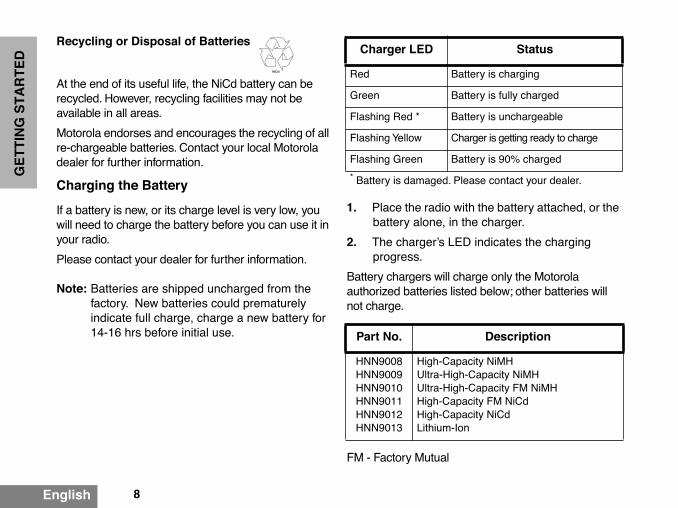
1. Place the radio with thbattery alone, in the c
2. The chargerÕs LED inprogress.
Battery chargers will chargeauthorized batteries listed bnot charge.
FM - Factory Mutual
NiCd
Charger LED
Red Battery
Green Battery
Flashing Red * Battery
Flashing Yellow Charge
Flashing Green Battery
* Battery is damaged. Please
Part No.
HNN9008HNN9009HNN9010HNN9011HNN9012HNN9013
High-CapacityUltra-High-CapUltra-High-CapHigh-CapacityHigh-CapacityLithium-Ion

9
English
GE
TT
ING
ST
AR
TE
D
is turned on.
es, on both sides of the
e battery away from the ove the battery.
3
2
Battery Latches
ACCESSORY INFORMATION
Attaching the Battery
1. Fit the extensions at the bottom of the battery into the slots at the bottom of the radioÕs body.
2. Press the top part of the battery towards the radio until you hear a click.
Removing the Battery
1. Turn off the radio, if it
2. Slide the battery latchbattery, downwards.
3. Pull the top part of thradioÕs body, and rem
Slots
1
2

GE
TT
ING
ST
AR
TE
D
a
nterclockwise until you
10English
Attaching the Antenna
1. Align the threaded end of the antenna with the radioÕs antenna connector.
2. Turn the antenna clockwise to fasten it.
Removing the Antenn
1. Turn the antenna coucan remove it.
11
English
GE
TT
ING
ST
AR
TE
D
p
e belt clip tab away from
ards to remove it.
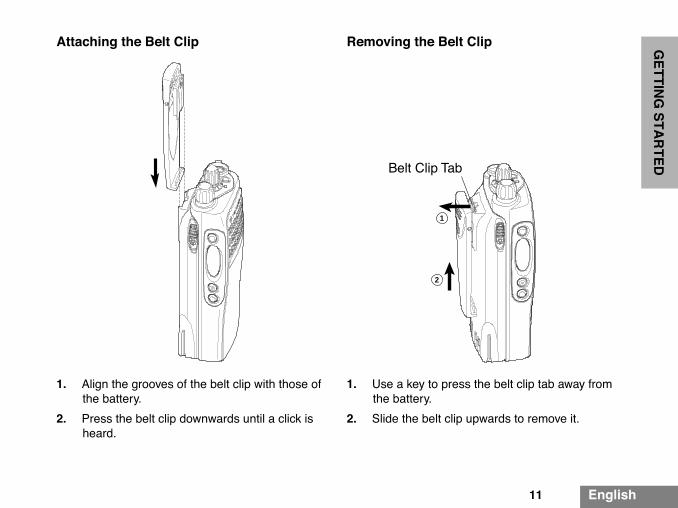
Attaching the Belt Clip
1. Align the grooves of the belt clip with those of the battery.
2. Press the belt clip downwards until a click is heard.
Removing the Belt Cli
1. Use a key to press ththe battery.
2. Slide the belt clip upw
2
1
Belt Clip Tab

GE
TT
ING
ST
AR
TE
D
CHANNEL
els, however some may k with your dealer for
ctor
knob clockwise or you reach the desired e selector graduation.
ector
knob to change to
and speak clearly into the uth should be about 2.5 - icrophone.
on when you Þnish
d adjust the volume level.
channel.
s received, you will hear level you have set.
12English
TURNING THE RADIO ON OR OFF
¥ To turn the radio on, turn the On-Off/Volume Control knob clockwise.
¥ To turn the radio off, turn the On-Off/Volume Control knob counterclockwise until you hear a click.
ADJUSTING THE RADIOÕS VOLUME
¥ Turn the On-Off/Volume Control knob to adjust the volume level.
SELECTING A RADIO
Your radio offers 16 channnot be programmed. Checmore information.
¥ Turn the Channel Selecounterclockwise until channel indicated on th
SENDING A CALL
1. Use the Channel Selthe required channel.
2. Press the PTT buttonmicrophone. Your mo5cm away from the m
3. Release the PTT buttspeaking.
RECEIVING A CALL
1. Turn your radio on an
2. Switch to the desired
3. If, at any time, a call ithe call at the volume
ON OFF

13
English
RA
DIO
CA
LL
S
indicate that .e, the Channel Free ll sound, and you can
with a transmit time ing tone d a few seconds
is cut off. Your radio inhibit retransmission
Call
ctive call, you will hear alert tone a group call alert tone the LED Indicator will
n or Call button.
te automatically when s ended or press the
RADIO CALLS
SELECTIVE CALL
Making a Selective Call
You can make a selective call to a particular radio, known as an individual call, or to a selected group of radios, known as a group call. To make a Selective Call :
1. Press the PTT or Call Button (depending on the way your radio has been pro-grammed by your dealer), to set up the call.
2. Wait until the conversation has been set up, which means you are authorised to use the system.
3. Talk with your mouth 2.5 - 5cm from the microphone. Release PTT to listen.
4. When transmitting the red indicator will light continuously.
Your radio may be conÞgured for ÔTransmit InhibitÕ under certain conditions (e.g. when the channel is in use by others) in which case, the channel busy tone will sound when you press
the PTT or call button totransmission is inhibitedWhen the channel is frebeep wimake a call.If your radio is equippedout timer (TOT), a warn
will sounbefore the transmissionmay be programmed towithin a preset time.
Receiving a Selective
When you receive a seleeither an individual call
, or and
light (yellow).
To answer the call:
1. Press the PTT butto
2. The call will terminathe conversation haMonitor button.

RA
DIO
CA
LL
S
mergency call the rt tone
14English
EMERGENCY CALL
Your radio can be programmed to give you a one-button quick access to call a particular radio or centre (predeÞned by your dealer) in emergency situations. This is the Emergency Call.
When you make an Emergency call, your radio goes into an Emergency state, which can be programmed to:
¥ continually give audio feedback,
¥ give no audio feedback; the radio can receive and transmit.
1. Press the Emergency button to initiate an Emergency call.
2. Emergency can be stopped by:
¥ Switching the radio Off and On again.
¥ A reset message is received by your radio.
¥ The emergency time duration is reached.
Note: The emergency time duration and reset message are programmed into your radio by your dealer.
Should you receive an Eincoming emergency alewill sound.

15
English
RA
DIO
CA
LL
S
LONE WORKER
The Lone Worker feature enables you to work alone with added safety. To use this feature :
1. Press the Lone Worker button.
2. The feature enable alert will sound.
You will be reminded at intervals that Lone Worker is switched on by a high pitched alert
being sounded .
¥ Press any button to respond and cancel the alert, if you do not the radio will enter the Emergency state.
To switch off this feature:
1. Press the Lone Worker button when the
feature disable alert will soundor,
2. Change the channelor,
3. Switch radio off and on again.
RA
DIO
CA
LL
S
16English
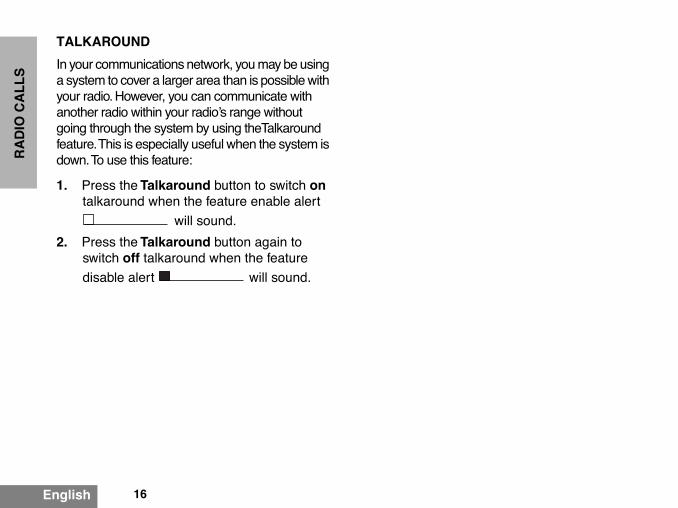
TALKAROUND
In your communications network, you may be using a system to cover a larger area than is possible with your radio. However, you can communicate with another radio within your radioÕs range without going through the system by using theTalkaround feature. This is especially useful when the system is down. To use this feature:
1. Press the Talkaround button to switch on talkaround when the feature enable alert
will sound.
2. Press the Talkaround button again to switch off talkaround when the feature
disable alert will sound.
17
English
FE
AT
UR
ES
FEATURES
The features described below are programmed into your radio by your dealer and are accessible via the radioÕs programmable buttons.

FE
AT
UR
ES
18English
TRANSMIT POWER
You can transmit your calls at different transmit power levels. A higher level means you can reach a radio that is farther away. A lower power level conserves battery power. You are advised to transmit as frequently as possible on low power, and use high power only when needed. To use this feature :
1. Press the Tx Power button to switch to high power when the feature enable alert
will sound.
2. Press the Tx Power button again to switch to low power when the feature
disable alert will sound.

19
English
FE
AT
UR
ES
WHISPER
Whisper allows you to talk quietly into the radio microphone when making a call. To switch Whisper on:
1. Press the Whisper button once, when the
feature enable alert will sound.
To switch Whisper off:
1. Press the Whisper button again, when the
feature disable alert will sound.

FE
AT
UR
ES
20English
CALL FORWARD
You can call forward calls to your radio to another radio if you are unable to take calls or are away from your radio.To enable Call Forward:
1. Press the Call Forward button once, when
the feature enable alert will sound.
To disable Call Forward:
1. Press the Call Forward button again, when
the feature disable alert will sound.
21
English
FE
AT
UR
ES
VOICE OPERATED TRANSMIT (VOX)
When the VOX headset/microphone is connected, your radio may be used with hands-free operation.
To start the VOX feature:
1. Connect the VOX headset onto the acces-sory connector of the radio.
2. Switch On the radio.You can disable the VOX feature by pressing the PTT button on the radio. This allows you to use the VOX headset but you must press the radio PTT to transmit.To re-enable the VOX feature:
1. Switch the OFF and ON again with the headset connected to the accessory connectoror,
2. Change channel with the VOX headset connected.

FE
AT
UR
ES
he radio microphone to .
Warning alert sounds when the ll.
Full alert
sounds when the recording ceases.
/Playback button at ording. call or memo:
layback button with the te( i.e. not receiving or o playback the latest mo.
layback button again to ssage to be played
ll or memo:
essage button to currently being played
22English
VOICE RECORDER
You can record and playback incoming calls or make a memo using the voice recorder feature, which allows up to 2 minutes of recording.To record an incoming call:
1. Press and hold the Record/Playback but-ton, the Voice Storage Recording alert
sounds momentarily.
2. Record the call or part of the call.
3. The Voice Storage Warning alert sounds when the
memory is nearly full.
4. The Voice Storage Full alert
sounds when the memory is full and recording ceases.
5. Release the Record/Playback button at any time to stop recording.
To record a memo:
1. Press and hold the Record/Playback but-ton, the Voice Storage Recording alert
sounds momentarily.
2. Speak clearly into trecored your memo
3. The Voice Storage
memory is nearly fu
4. The Voice Storage
memory is full and
5. Release the Recordany time to stop rec
To playback a recorded
1. Press the Record/Pradio in the idle statransmitting calls) trecorded call or me
2. Press the Record/Pskip to the next meback.
To delete a recorded ca
1. Press the Cancel Mdelete the messageback.
23 English
SC
AN
ING SCAN
can operation by using
ton to start scanning. t tone
will sound.
ton again to stop scan- alert tone
will sound.
link green during a op blinking when the nel.
back option is set, you received during the ng the PTT button hang-time ends. Check ls.
SCAN
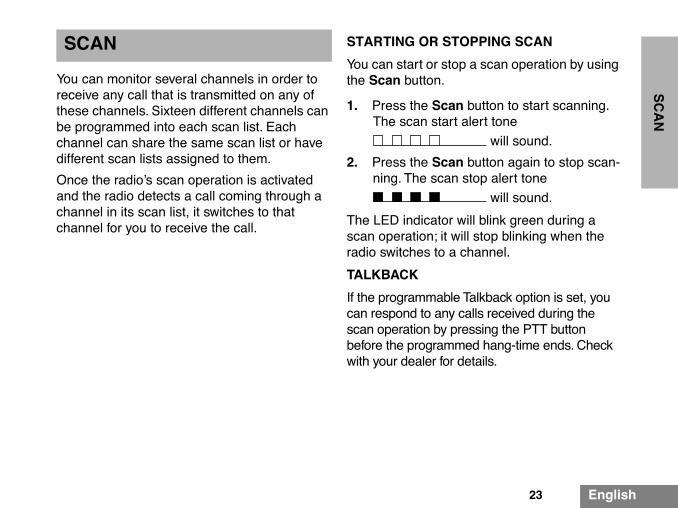
You can monitor several channels in order to receive any call that is transmitted on any of these channels. Sixteen different channels can be programmed into each scan list. Each channel can share the same scan list or have different scan lists assigned to them.
Once the radioÕs scan operation is activated and the radio detects a call coming through a channel in its scan list, it switches to that channel for you to receive the call.
STARTING OR STOPP
You can start or stop a sthe Scan button.
1. Press the Scan butThe scan start aler
2. Press the Scan butning. The scan stop
The LED indicator will bscan operation; it will stradio switches to a chan
TALKBACK
If the programmable Talkcan respond to any callsscan operation by pressibefore the programmed with your dealer for detai

SC
AN
UISANCE CHANNEL LIST
ton to stop scanning. tone
will sound.
ton again to re-start start alert tone
will sound, and the all programmed chan-
24English
DELETING A NUISANCE CHANNEL
If a channel continually generates unwanted calls/noise (a ÒnuisanceÓ channel), you can temporarily remove it from the scan list by performing a Nuisance Channel Delete operation:
1. While the radio is on the Nuisance Chan-nel, press and hold the Nuisance Delete/Cancel button until you hear the scan start
alert tone .
2. Release the Nuisance Delete/Cancel but-ton.
Note:You cannot perform a Nuisance Channel Delete on a priority channel or if there is only one remaining channel in the scan list.
ADDING A DELETED NBACK INTO THE SCAN
1. Press the Scan butThe scan stop alert
2. Press the Scan butscanning. The scan
scan list will containnels.

25 English
SA
FE
TY
diation Protection and - 1986)
ion on Non-Ionizing Radi-P - 1986)
or Electrotechnical LEC):
rformance and that requency electromagnetic ines set forth in the above to the following
an Exposure to Electro-netic Fields Low Fre-ncy (0Hz to 10kHz)
an Exposure to Electro-netic Fields High Fre-ncy (10kHz to 300GHz)
ety Considerations for an Exposure to E.M.F.s Mobile Telecommunica-
s Equipment (M.T.E.) in Frequency Range Hz - 6 GHz (E.M.F. - tromagnetic Fields)
SAFETY INFORMATION
Safe and EfÞcient Operation of Motorola Two-Way Radios
This section provides information and instructions for the safe and efÞcient operation of Motorola Portable and Mobile Two-Way Radios.
For information regarding radio use in hazardous areas, please refer to the Factory Mutual (FM) approval manual supplement or Instruction Card which is included with radio models that offer this capability.
Exposure To Radio Frequency Energy
National and International Standards and Guidelines
Your Motorola Two-Way Radio, which generates and radiates radio frequency (RF) electromagnetic energy (EME) is designed to comply with the following National and International Standards and Guidelines regarding exposure of human beings to radio frequency electromagnetic energy:
¥ Federal Communications Commission Report and Order No. FCC 96-326 (August 1996)
¥ American National Standards Institute (C95.1 - 1992)
¥ National Council on RaMeasurements (NCRP
¥ International Commissation Protection (ICNR
¥ European Committee fStandardisation (CENE
To assure optimal radio pehuman exposure to radio fenergy is within the guidelstandards, always adhere procedures:
¥ ENV. 50166-1 1995 E
Hummagque
¥ ENV. 50166-2 1995 E
Hummagque
¥ Proceedings of SC211/8 1996
SafHumfromtionthe 30MElec

SA
FE
TY
ag
dio in the area over an air yment area. Air bags portable radio is placed area and the air bag propelled with great force occupants of the vehicle.
tmospheres
o when you are in any losive radio type especially eas (for example, Factory oved). Sparks in a sphere can cause an n bodily injury or even
e batteries in a potentially ntact sparking may occur g batteries and cause an
!W A R N I N G
!
26English
Portable Radio Operation and EME Exposure
When transmitting with a portable radio, hold the radio in a vertical position with its microphone 2.5 to 5 centimeters (1 to 2 inches) away from your mouth. Keep antenna at least 2.5 centimeters (1 inch) from your head and body. If you wear a portable two-way radio on your body, ensure that the antenna is at least 2.5 centimeters (1 inch) from your body when transmitting.
Electromagnetic Interference/Compatibility
Note: Nearly every electronic device is susceptibleto electromagnetic interference (EMI) ifinadequately shielded, designed or other-wise conÞgured for electromagnetic com-patibility.
To avoid electromagnetic interference and/or compatibility conßicts, turn off your radio in any facility where posted notices instruct you to do so. Hospitals or health care facilities may be using equipment that is sensitive to external RF energy.When instructed to do so, turn off your radio when on board an aircraft. Any use of a radio must be in accordance with airline regulations or crew instructions.
Operational Warnings
Vehicles With an Air B
Do not place a portable rabag or in the air bag deploinßate with great force. If ain the air bag deployment inßates, the radio may be and cause serious injury to
Potentially Explosive A
Turn off your two-way radiarea with a potentially expatmosphere, unless it is a qualiÞed for use in such arMutual or CENELEC Apprpotentially explosive atmoexplosion or Þre resulting ideath.
Batteries
Do not replace or rechargexplosive atmosphere. Cowhile installing or removinexplosion.
MAN WITH RA

27 English
SA
FE
TY
perty damage and/or if a conductive material
beaded chains touch nductive material may uit (short circuit) and e care in handling any ly when placing it inside a tainer with metal objects.
uch as osol m ul to and damage the
the radio such as na.
or (if Þtted) has a ould be left in place when se.
using a cloth moistened mild dishwashing liquid.
d radio accessories may nvalidate warranty.
!C a u t i o n
Blasting Caps and Areas
To avoid possible interference with blasting operations, turn off your radio when you are near electrical blasting caps, in a blasting area, or in areas posted: ÒTurn off two-way radio.Ó Obey all signs and instructions.
Note:The areas with potentially explosive atmospheres referred to above include fueling areas such as: below decks on boats; fuel or chemical transfer or storage facilities; areas where the air contains chemicals or particles, such as grain, dust or metal powders; and any other area where you would normally be advised to turn off your vehicle engine. Areas with potentially explosive atmospheres are often but not always posted.
Operational Cautions
Damaged Antennas
Do not use any portable two-way radio that has a damaged antenna. If a damaged antenna comes into contact with your skin, a minor burn can result.
Batteries
All batteries can cause probodily injury such as burnssuch as jewellery, keys, orexposed terminals. The cocomplete an electrical circbecome quite hot. Exercischarged battery, particularpocket, purse, or other con
General Radio Care
¥ The use of chemicals sdetergents, alcohol, aersprays, and/or petroleuproducts may be harmfradio housing.
¥ Avoid physical abuse ofcarrying it by the anten
¥ The accessory connectprotective cap which shthe connector is not in u
¥ Clean the radio exteriorwith clean water and a
¥ The use of non-approvedamage the radio and i
!C a u t i o n

NO
TE
S
28English
NOTES