product: k886764 07-13 toyota tundra 2wd 6 lift spindles
TRANSCRIPT

MAXTRAC SUSPENSION4522 E. EISENHOWER CIR.ANAHEIM, CA 92807877-929-3016WWW.MAXTRACSUSPENSION.COMSALES@MAXTRACSUSPENSION.COM
PRODUCT: K88676407-13 TOYOTA TUNDRA 2WD 6" LIFT SPINDLES
PARTS LIST QTYLIFT SPINDLE - DRIVER SIDE 1 CARRIER BEARING SPACER 2LIFT SPINDLE - PASS. SIDE 1 REAR BRAKE LINE BRACKET 1
2 EMERGENCY BRAKE CABLE BRACKET 22 HEX CAP SCREW, M10-1.25X50 8.8 24 FLAT WASHER, M10 24 HEX CAP SCREW, M8-1.25 X 20MM 38 FLANGE NUT, M8-1.25 34 FLATWASHER, M8 34 SPLIT LOCK WASHER, 10MM 24282488
PRIOR TO INSTALLATION:
1. Factory service manual is recommended to have on hand.2. Secure and properly block vehicle prior to beginning installation3. Always wear safety glasses when using power tools or working under the vehicle4. Modifications to any part will void the warranty associated with that product.5. Jack up front of vehicle, place jack stands under frame, behind front suspension.
After removing parts from vehicle, save hardware for reinstallation
IT IS RECOMMENDED THAT YOU HAVE YOUR VEHICLE’S ALIGNMENT CHECKED WHENEVER INSTALLING NEW TIRES. IT IS ALSO RECOMMENDED THAT YOU ADJUST YOUR HEADLIGHTS WHENEVER YOUR VEHICLE’S RIDE HEIGHT IS ALTERED.
U BOLT WASHER, 9/16
STRUT SPACER EXTENSIONFLANGE SERRATED NUT, M10 X 1.25STEEL FABRICATED 4" BLOCKSQUARE UBOLT, 2.63" X 12.5 X 9/16 HI NUT, 9/16-18
COTTER PIN
1/4" ADEL CLAMP
EXTENDED BRAKE LINE18-2.0 X 110 HEX CAP SCREW
6MM FLAT WASHER
18-2.0 STOVER NUT18MM FLAT WASHER6-1.0 X 16 HEX CAP SCREW

INSTRUCTIONS – K886764 07-13 TOYOTA TUNDRA 6” LIFT KIT
WWW.MAXTRACSUSPENSION | 877-929-3016
1. Release the ABS wire from the clips on the spindle. 2. Unbolt ABS bracket from brake line bracket and discard. Unbolt brakeline bracket from spindle. 3. Unbolt the brake caliper and support out of the way, then remove brake rotor.
4. Unbolt wheel bearing and remove along with the dust shield. 5. Unbolt ABS sensor from spindle and remove the grey housing by releasing the 3 retaining clips
and discard. 6. Remove cotter pin from tie rod, loosen tie rod nut, but do not remove. Break the tie rod loose
by hitting the side of the spindle arm with a hammer. (Do not hit the threads at the tie rod)
7. Loosen upper ball joint nut, but do not remove completely. Break upper ball joint loose by hitting the side of the spindle with a hammer. Once loose, remove the nut from the ball joint, and separate from the spindle.
8. Remove the 2 bolts holding the spindle to the lower dog bone and remove spindle. 9. Install new spindle using provided hardware at the bottom. Bolts will be installed from the
bottom up.

INSTRUCTIONS – K886764 07-13 TOYOTA TUNDRA 6” LIFT KIT
WWW.MAXTRACSUSPENSION | 877-929-3016
10. Attach upper ball joint using original hardware, tighten, and re-insert factor cotter pin. 11. Install the unit bearing with the factory dust shield, tighten, and then install the brake rotor. 12. Unbolt stock brake line at both ends and remove. Install the new steel braided brake line at the
frame first, then allow fluid to run through line before bolting it back up at the caliper.
13. Reinstall brake line bracket to new spindle, you may need to bend the factory brake clip for more tension during the re-install. Bleed brakes thoroughly once everything is installed.
14. Install ABS sensor using the factory bolt. Then guide the ABS wire up the side of the spindle using the provided clamps and hardware. Be sure to leave slack from the control arm to the spindle and cycle the spindle back and forth to insure the wire doesn’t get pinched or stretched.
15. Rotate the tie rod 180 degrees and re-install into the spindle from the top down. (Put the wheel on and check for clearance, the driver’ side and passenger side outer tie rods may need to be switched if not enough clearance between the tie rod and wheel.
INSTRUCTIONS – K886764 07-13 TOYOTA TUNDRA 6” LIFT KIT
WWW.MAXTRACSUSPENSION | 877-929-3016
INSTALLATION STEPS FOR STRUT SPACER KIT
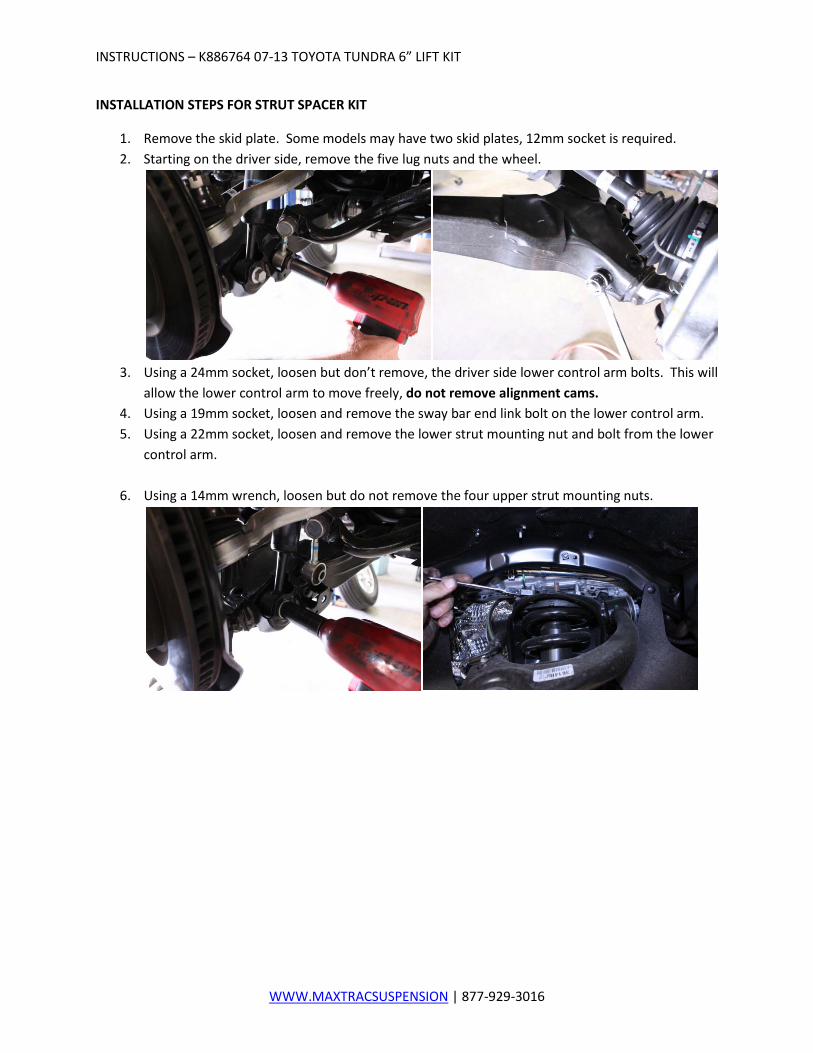
1. Remove the skid plate. Some models may have two skid plates, 12mm socket is required. 2. Starting on the driver side, remove the five lug nuts and the wheel.
3. Using a 24mm socket, loosen but don’t remove, the driver side lower control arm bolts. This will
allow the lower control arm to move freely, do not remove alignment cams. 4. Using a 19mm socket, loosen and remove the sway bar end link bolt on the lower control arm. 5. Using a 22mm socket, loosen and remove the lower strut mounting nut and bolt from the lower
control arm.
6. Using a 14mm wrench, loosen but do not remove the four upper strut mounting nuts.

INSTRUCTIONS – K886764 07-13 TOYOTA TUNDRA 6” LIFT KIT
WWW.MAXTRACSUSPENSION | 877-929-3016
7. Loosen and remove the two 22mm bolts that connect the upper ball joint to the spindle. Holding the strut with one hand, remove the four 14mm upper strut mounting nuts. Remove the strut, being careful not to damage the CV boot on 4WD models.
8. Install the Maxtrac strut extention and torque to factory specs.
9. Reinstall strut into vehicle and install the new nuts provided, but do not tighten yet. Using a
jack, raise the lower arm and guide both the lower strut mount and sway bar end link into their pockets. Install the lower strut mounting bolt and nut, torque to factory specs, use thread locker if necessary.
10. Use of a pry bar and hammer may be needed to align mounting holes for the end link bolt, install 19mm bolt and torque to factory specs.
11. Install the two 22mm upper ball joint bolts starting with the rear bolt first, as it is easier to line up with the spindle. Torque to factory specs and use thread locker. Tighten the four 14mm upper strut mounting bolts and torque to factory specs. Put the wheel back on and torque to 85-90 ft/lbs. With vehicle on the ground, tighten the lower control arm bolts and torque to factory specs.
12. Repeat previous steps for the opposite side of the vehicle. 13. After 50 miles of driving, re-torque all hardware. 14. Perform Alignment.

INSTRUCTIONS – K886764 07-13 TOYOTA TUNDRA 6” LIFT KIT
WWW.MAXTRACSUSPENSION | 877-929-3016
INSTALLATION FOR REAR BLOCKS
1. Place a floor jack under the differential and jack up the rear.
2. If you have jack stands, place them under the frame rails and lower
3. Remove tires and wheels.
4. Remove factory shock absorbers, retain factory hardware.
5. Remove factory ubolts, lower the axle using the floor jack.
6. Install the lift block on the factory spring pad with the angled part towards the front of the
vehicle.
7. Use the floor jack to lift the rear axle, keeping the pin aligned, and install the new ubolts and
hardware.
8. Reinstall stock or aftermarket shock absorbers.
9. Install wheels and tires, set vehicle on the ground.

INSTRUCTIONS – K886764 07-13 TOYOTA TUNDRA 6” LIFT KIT
WWW.MAXTRACSUSPENSION | 877-929-3016
1. The brake line clamps face down from factory, and will need to be flipped and re-installed to pull the brake line upwards.
2. Install the small plate between the axle and the brake line bracket using the original bolt at the axle and a provided bolt at the bracket.
3. Bend the original bracket so that the line ends are at the same angle as the lines themselves.
# 1 #2 #3
4. Release the ABS line from the bracket on the axle so that the line will be loose at full droop. 5. Install the two long brackets with the bends facing up between the axle and the emergency
brake cable bracket, use the factory bolts at the axle and the provided bolts at the bracket. 6. Install provided carrier bearing spacers one at a time for ease of install, using provided bolts and
washers. Do not tighten completely yet. 7. Arrows should be pointing up and towards the front of the truck. Once both spacers are
installed, tighten to factory specs.
#4 #5 #6
#7-1 #7-2