procamera 8 & shutter fullscreen anti-shake. selecting self-timer in the control panel assigns...
TRANSCRIPT
PROCAMERA 8(v 6.3)
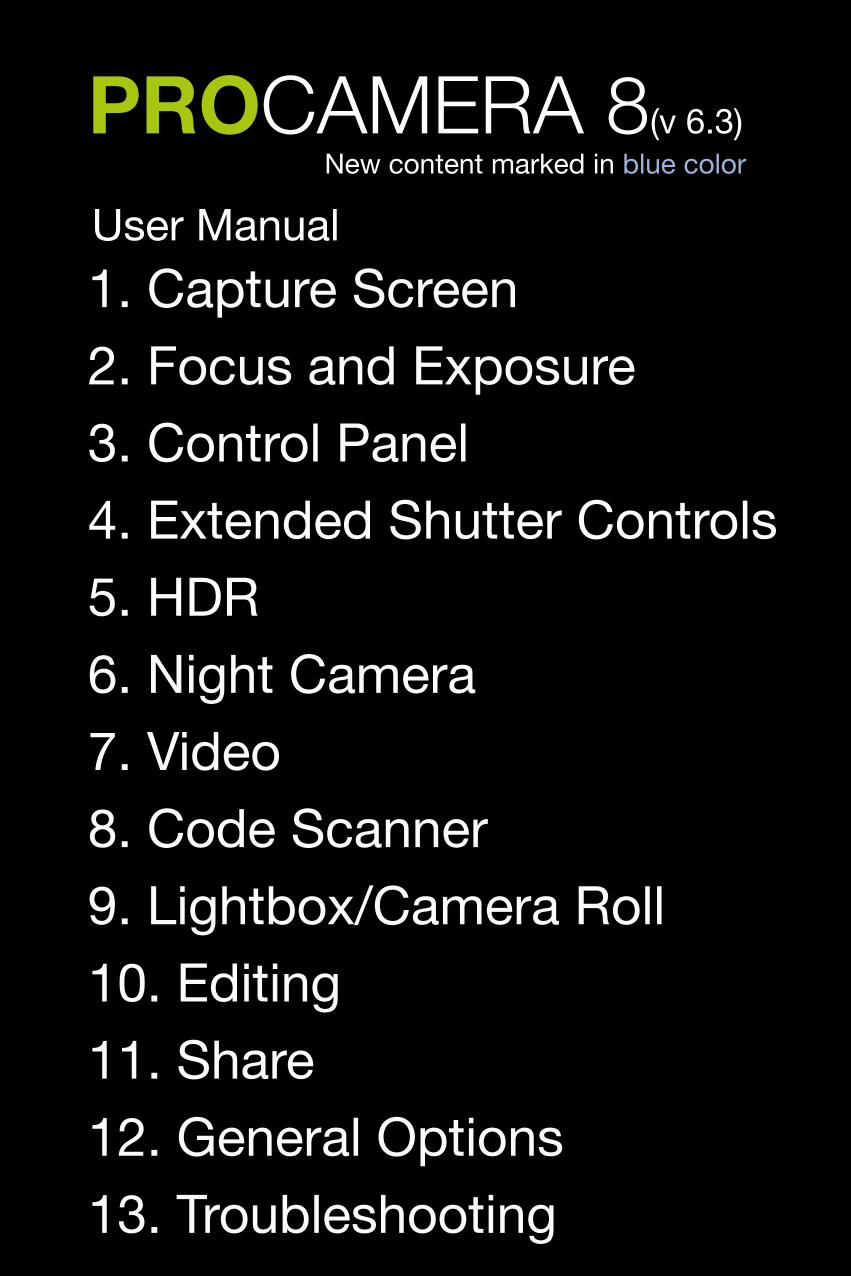
1. Capture Screen2. Focus and Exposure3. Control Panel4. Extended Shutter Controls5. HDR6. Night Camera7. Video8. Code Scanner9. Lightbox/Camera Roll10. Editing11. Share12. General Options13. Troubleshooting
New content marked in blue color
User Manual

Phot
o: J
ens
Däm
gen
1Capture Screen
This section outlines the main shooting functions on the
ProCamera capture screen

1.7
Lightbox/Camera Roll
Front/Back Camera Open EV-Dial View Flash/Torch
MainShutter
Mode Switch
SecondShutter
Control Panel
Digital Zoom
FoCuS
ExPoSER

Press the Main Shutter to take a photo. The screen will flash black to indicate a photo has been taken.
The Second Shutter can be set as either an Anti-Shake or Self-Timer through the Control Panel.
The Camera Switch function allows you to select different cameras including Photo, Video, HDR, Night and Code Scanner.
The Control Panel provides one-tap access to a range of advanced shooting controls.
The Lightbox/Camera Roll provides one-click access to the Camera Roll or Lightbox.
Pressing on the Flash toggles between the Auto, On and Off settings. Performing a long-press on the Flash de/activates the Torch. A single tap on the torch icon deactivates the torch. Long press the torch icon to switch between torch intensity slider or exposure and ISO display.

The Front/Rear Camera Switch is available on devices equipped with a front camera.
A single tap on the EV icon opens the exposure compensation slider. Exposure value is displayed. Another single tap closes the slider, while keeping the exposure compensation value. A double tap on the exposure compensation slider closes it and resets the value.
The 6x Full-Resolution Zoom can be controlled in two ways:1. Slide your finger over the semi-transparent zoom slider to adjust the level of magnification. The slider fades into the background when the zoom factor is 1x (to limit distractions when shooting).2. Use the pinch gesture (two fingers) to zoom in and out (the zoom slider will appear). This function can be turned on and off under the Photo Zoom option in the ProCamera Settings.
Tip
ProCamera’s Anti-Shake mode is recommended at higher zoom levels (3x or more). Even slight movements of your iPhone can result in motion blur while zooming.
1.7
+0.8 EV

NIGHTHDRPHOTO
Rearrange Camera Modes is placed at the right end of the menu.
Swipe to the left to get there.
SCANVIDEO
Kamera-Modi verwalten
HDR
NIGHT
VIDEO
PHOTO
SCAN
1,99 €
Camera Mode Selector does not only allow you to select different camera modes, but can also be customized. To change the mode, slide the desired icon to the center or simply tap on it.
To Rearrange Camera Modes press and move the modes according to personal preferences. You can even hide Camera Modes you rarely use.
If you only want to change the order of the camera modes, you can achieve that directly in the Camera Mode Selector. Simply tap, hold, and then drag the mode to its new position.

Phot
o: J
an V
anpr
aet
2Focus and Exposure
This section explains how to set focus and exposure separately
on the viewfinder, how to adjust exposure, ISO and color temperature, and how to shoot
better photos.

You can set focus and exposure by tapping on the preview image, or by moving the control elements (square and circle) directly on the viewfinder. Additionally, you can use the new exposure sliders to brighten or darken your image or to manually set ISO and shutter speed values.
FOCUS
ExPOSURE
Exposure compensation
-2 0 2 31-1
+0.8 EV ISO 1001/200 s
Exposure point
Focus point
Exposure value slider
Shutter speed Exposure value ISO sensitivity
4501 KWB -14 T
Control element to adjust color temperature and tint

Separate Focus and Exposure Points They can also be split by dragging one from the other. In the spot on the viewfinder where you locate the exposure circle,
exposure is measured and adjusted optimally. Placing the focus square determines the point where your
picture is focused. A long press anywhere on the screen other than on these control elements resets the points to the centre.
Lock and UnlockA long press locks (shown with the small lock symbol)
and unlocks either the Focus Square and Exposure Circle. This allows you to change and readjust what you see in the
viewfinder without altering your settings of exposure and focus. Moving a locked focus or exposure control element
causes another automatic metering and saving of the resulting value. The control element will be locked when adjustment has
finished.
Combined Focus and Exposure A single tap anywhere on the capture screen activates
the combined Focus/Exposure point. This mode is great for quick and easy adjustments when shooting.

The Focus and Exposure option lets you customize your preferred behavior of focus and exposure tools.Settings
If you wish to control exposure exclusivelyby using dials, you can turn off theexposure control (yellow circle). Exposure is measured automatically and can be biased with the exposure compensation control.You can also set exposure manually with ISO and Shutter Speed controls.
You can set the priority of exposurecircle over focus square.In order to set focus first and adjustexposure afterwards, switch offExposure Priority (which is the‚classic‘ setting).
Enable Manual Focus by activatingthis option. You can decide, whether this function is always active or if it has to be activated with a long-press on the focus reticle. This tool is in Public Beta stage.Check it out and let us know yourfeedback and suggestions viaSettings > Customer Support.(More information on how it works on thenext page.)
Enable Show Focus Lens Position tomake it appear in the viewfinder.(see next page)
(Beta)
(Beta)

Lens Position Indicator Manual Focus (Beta)
The Lens PositionIndicator lets you see when automatic focusinghas finished, that is whenthe point on the sliderstops moving.Particularly on oldergeneration devices which do not have focus pixels and perform a slow focus scan, this is useful.
You can manually set focus by sliding your finger up and down on the viewfinder. Afterwards, without taking your finger off the screen, slide left/right to fine-tune focus. Fine-tuning only works when done as a sequence in this order.
1.) Focusing roughlySliding your finger upwards:Focus towards infinitySliding your finger downwards:Focus towards object at close distance (Macro).
2.) Fine-tune focusingKeep your finger on the screen (don’t lift it off) and slide horizontally (left/right). Give it a go, it’s easier than it sounds.
With Manual Focus enabled a long press on the focus reticle toggles between auto-focus and manual focus. If you set manual focus to “always active”, you can take over focus
control anytime.Manual focus works in video mode as well. Thereby you can
change the focal plane by gradually shifting focus during video recording.

3Control Panel
This section explains the different controls and functions in the
ProCamera Control Panel
Phot
o: M
isho
Bar
anov
ic

Tip
Tiltmeter
Aspect ratioHistogram
Fullscreen
Grids
Self-timerAnti-shake
F/E LockRapid Fire
Settings
The Control Panel is designed to provide one-tap access to a range of advanced shooting controls.
Try tapping on all the functions and see what changes on the capture screen (for example the gridlines and aspect ratio)
ISO & Shutter White Balance

Rapid Fire
F/E Lock
Grids
Tiltmeter
Histogram
Rapid fire mode allows you to shoot continuous, full-resolution shots in quick succession.
The F/E Lock sets the Exposure and Focus Points to lock on touch release (flashes briefly). Once locked, you can recompose your scene without changing the exposure level or focus distance.
Toggles between three Grid views (Small Grid, Rule of Thirds Grid and Golden Ratio) to assist with photo composition.
Turns on a virtual horizon 3D Tiltmeter to help straighten photos.
Turns on the Live Histogram which shows overall light levels as bars or squares. Red bars or squares indicate over (right) or under (left) exposure. The higher the bars or the more intense the red color of the squares, the more the image is over or under exposed.

When White Balance (WB) is enabled,an icon appears on the capture screen. Tap it to open a menu: An indicator for color temperature (in Kelvin) and one for color tint. Tapping on either activates the corresponding slider at the bottom of the viewfinder.Your setting is saved until you activateAutomatic White Balance by tapping theWB icon. This allows you to take a seriesof photos with the same color temperatureand tint, or to compensate for too intensely orange colors in a sunset by sliding to a blue tint, e.g.
You can initiate a color calibration with a long press on the WB Lock icon. Place a standardized grey card with a reflectance of 18% or 25% in front of your camera so it covers at least 50% of the viewfinder. Try to avoid shadows on the gray card. Then calibrate by long pressing WB Lock.Calibration is recommended when automatic white balance may not be properly functioning. This might occur with objects surrounded by a neutral palette (e.g. photos for advertisement purposes on white background).AWB can result in incorrect color values in such situations. If you don’t have a gray card at hand, street asphalt is a good approximation.
WBWB Lock for
color calibration
White Balance

Turns on ISO and shutter speed readings at the top of the viewfinder. Tapping one of them opens a slider at the bottom of the viewfinder for manual control. Slide or tap to set a value of your choice. In Manual Mode, you have full control over ISO and shutter speed. Once set, the camera will not adjust the values automatically anymore.
Toggles between six Aspect Ratios: Standard (4:3), 35mm film (3:2), Widescreen (16:9), Square (1:1), Letterbox (3:1) and Golden Mean. A long press displays all modes.
The Fullscreen mode turns off all non-critical display elements on the Capture Screen. Focus and Exposure points work as standard. The mode can be combined with different Aspect Ratios for a customized shooting experience.
Selecting Anti-Shake assigns it to the Second Shutter button (right of the Main Shutter). Anti-Shake will delay the shutter release until the iPhone is held steady, resulting in clearer and sharper photos. Movement detection is displayed onscreen by the small icon above the Main Shutter Button. When ProCamera’s Anti-Shake is active the Automatic Image Stabilization (AIS), which is provided by iOS and available on iPhone 5s and newer, is disabled.
Aspect Ratio
ISO & Shutter
Fullscreen
Anti-shake

Selecting Self-Timer in the Control Panel assigns it to the Second Shutter button (right of the Main Shutter). Pressing the Second Shutter activates the count-down, three beeps will signal the last seconds before the photo is taken. The timer duration can be adjusted within ProCamera’s Settings.A Series of three photos in a burst instead of a single Self-timer exposure may be activated at the same place.
3
Series of 3
Self-timer

Settings
Under Settings > Stabilization there are two options available: The Anti-Shake slider controls how steady the iPhone must be held before ProCamera takes the photo. Slider to the left: camera will snap a photo when the iPhone is completely stable - maximum shake protection. Slider to the right: will take a photo even if it is still a little shaky - minimum shake protection. Automatic Image Stabilization (AIS): On iPhone 5s and newer AIS is activated by default. With this settings option you can deactivate AIS, which will give you the maximum amount of detail in the photo, but might lead to motion blur caused by camera shake.
Controls the Self-Timer length from 0.5 seconds to 20 seconds. You can use the lowest setting (0.5s) as another shake-preventing capture method.
The Series of three setting takes three photos in a quick burst after the specified delay time. This setting helps you to minimize the risk of eye-blinks in selfies and in group shots. This is also one of the benefits of the ProTimer, which offers full customizability (see chapter 4).
You can save photos in three file formats: TIFF: Highest quality and largest file size. TIFF LZW: TIFF format with lossless compression and smaller file size. Compression requires longer save times (up to 1 second per photo).JPEG: The standard file format for Apple devices. JPEG compression results in lower photo quality and smaller file size. You can set the amount of JPEG compression in ProCamera from 70% (lowest quality) to 100% (highest quality). The higher the % the larger the file size and better photo quality.
File formats apply to photos captured and edited in ProCamera. Photo sizes and formats can change when uploading to social media. Please check with the respective social media providers for file and compression rates.
The Settings mode opens up the advanced ProCamera settings. The Photo options are explained below.
3

Turn on Fullscreen Trigger to tap anywhere on the viewfinder to instantly take a photo. The shutter will not fire if you press directly on either the focus or exposure points. Perform a long-press to set focus and exposure to the point of interest.
Turns the Photo Zoom on/off.
Turn on Auto Save to automatically save photos to your Camera Roll or Lightbox. Turn off Auto Save to see a preview after an image is taken where you can choose to save or discard the image.
The Datestamp adds the date and time to the bottom of the saved photo.

Phot
o: J
ens
Hed
tke
4
Remote Trigger and time-controlled ProTimer photo series extend the creative possibilities of ProCamera. on the Apple
Watch, you can set and start the ProTimer, preview the viewfinder, and take a look at
the photos you have taken.
Extended Shutter Controls

Delay: 15 s
Number of photos: 20
5 15 25 302010
Pause between succeeding photos: 7.0 s
Close ProTimer
2 6 30 1200,5 8 104
7 15 45 605 25 359
1s
A tap on the Second Shutter closes the settings menu.
Another tap on the Second Shutter starts the Self-Timer or ProTimer.To stop the countdown or an ongoing capturing process, simply tap on the Second Shutter. To switch between Self-Timer and ProTimer tap on Open ProTimer and Close ProTimer. The respective settings are retained.
Self-Timer
ProTimer
ProTimer is an intervalometer. This extension of the already known Self-Timer provides you with new options to set a total number of photos as well as a pause between succeeding photos.
Make sure you have set the Self-Timer as your Second Shutter in the Control Panel (see chapter 3: Control Panel).
Long press on the Second Shutter, in order to get access to the settings of the Self-Timer. Here you can adjust the delay time before the camera starts capturing. Tap on “Open ProTimer” to additionally set the total number of photos and the pause between succeeding photos.
ProTimer is not available in HDR mode.
20
The icon of the Second Shutter indicates which Timer is active at the moment: The ProTimer icon includes the number of photos set.
Self-Timer ProTimer

3s 3
Ready 8:16 AM
The ProCamera Remote Trigger extension for Apple Watch lets you control ProCamera remotely.For this, ProCamera has to be running in the foreground.
You have the following options with the ProCamera Remote Trigger:• Start capturing in Photo, HDR and Night mode• Set the delay and total number of photos • Preview the viewfinder on the Apple Watch• View photos
Show Preview Settings for delay and number of
photos
Remote Trigger

5
vividHDR enables you to capture photos with a high dynamic range. This means more details in highlights and shadows even if your scene has a high contrast.
With auto-bracketing, three pictures are shot with different exposure settings which are then combined into one HDR image. The processing is so fast and precise,
you can take photos without a tripod and capture scenes with objects in motion
without ghosting.
Phot
o: J
ens
Hed
tke
In ProCAMERAViVidHDR

What is real HDR imaging?HDR images contain a greater range of light that is
present in real-world scenes. Three photos are captured at different exposure levels, which are then combined
into one with a higher level of color precision aka higher dynamic range. A standard screen has a limited dynamic
range that inadequately displays the full range of light intensities found in an HDR image. To address this issue,
the contrast range is compressed with a technology called tone-mapping so the photo can be displayed on a
standard non-HDR screen. vividHDR enables you to tweak the parameters of tone-mapping so that you can choose between a natural-looking image or one with exaggerated
contrast for dramatic effects.
vividHDR in ProCameraYou can purchase vividHDR as a special extension to
ProCamera 8. vividHDR in ProCamera combines the best HDR for iOS 8 along with the professional feature set
already found in ProCamera 8.To make sure you like it, you can try it out before
buying it. In demo mode, your HDR photos will have a watermark that can’t be removed.
NIGHTHDRPHOTO
1
2
SCANVIDEO
Select Mode Switch
Swipe left to select HDR Mode

Take great HDR photos with ease in Auto-mode, or set manual exposure for each of the three individual photos which are taken in quick succession in HDR mode.
Automatic HDR mode analyzes the range of contrast for your subject in a two-step scene analysis. In this mode, optimal values are automatically set to capture both an under- and overexposed image of your subject. This intelligent scene analysis forms a crucial part of the quality of vividHDR, making it the go-to choice in most situations. Just set exposure and focus (or let the camera do this automatically), then tap the shutter button and hold your iPhone steady. ProCamera will take three shots in quick succession (Bracketing). A preview shows the results. The medium exposed photo (a LDR-photo (Low-Dynamic-Range)) will be saved along with the HDR photo. You can deactivate saving the LDR photo or showing a preview via Settings > HDR Settings.
In ManualExposureBracketingMode (MEB), you determine the value of the medium exposure, as well as the range of contrast between over- and underexposure. In manual mode no two-step scene-analysis is performed, so it’s up to you to set the optimal values.For under- and overexposure slide one of the red brackets and the other bracket will adjust symmetrically based on your setting. While moving a bracket, a magnifier helps you to fine-tune. Many users may already be familiar with this popular feature available with most DSLR cameras.
MEB
Auto

In Advanced Manual Exposure Bracketing Mode (AMEB) you have full control over exposure values of your HDR photos.As in Manual HDR Mode, you set the central exposure by moving the green mark on the dial.Underexposure is set by moving the orange bracket, overexposure by moving the blue bracket. Both settings work independently (asymmetrically).While moving a bracket, the picture at the under- or overexposure you are setting is displayed in the viewfinder. Upon release of your finger, the viewfinder shows the picture at your central exposure setting. While moving a bracket, a magnifier helps you to fine-tune.An automatic two-step scene-analysis does not take place.In this mode you can create artistic modifications or nuanced HDR effects.However, careful arranging of the settings is required, in order to achieve good results.
AMEB

HDR Dramatic
SaveCancel
Switch to compare HDR with auto exposed photo.
Choose how your HDR photo should lookAfter the HDR photo has been processed, you can
choose one of five presets.In the control panel, you can select your preferred preset,
which will then become the first presetshown in the HDR preview screen.
The remaining four presets can be applied to your preview,just like in ProFx Studio, by swiping to the left of the screen.
A swipe to the right, as well as tapping your finger on the compare button in the center of the bottom tool bar,
lets you compare your HDR photo to the medium exposure photo of your exposure bracket.
natural Vivid Dramatic FadedBlack‘n White
Slide

Phot
o: J
ens
Däm
gen
6night Camera
This section shows you how to turn on and use the night Camera mode in ProCamera - which lets
you take better photos in low light

NIGHTPHOTO
Select Mode Switch
1
2
Swipe left to select Night Camera Mode
3
Tip
How to Switch to Night Camera Mode
Tiltmeter
Aspect ratioHistogram
Fullscreen
Grids
Self-timerAnti-shake
F/E LockRapid Fire
Settings
1/2s 1s1/4s1/8s
There are three or four shutter speed options in the Night Camera Control Panel.
Each option sets the minimum shutter speed used by ProCamera. It needs to be dark enough for ProCamera to drop to the lowest speed.
It is recommended that the 1/2 sec and 1 sec speeds are used with a tripod to limit camera shake.On iPhone6 and iPhone6+ you can’t select 1s.
Open Control Panel to select shutter speed
ISO & Shutter White Balance

7Video
This section shows you how to turn on and use the Video mode in ProCamera including the Control
Panel and advanced Video Settings
Phot
o: M
isho
Bar
anov
ic

PHOTOVIDEO
Select Mode Switch
1
2
Swipe right to select Video Mode
Set Framerate and Advanced Settings in the Control Panel
3
How to Switch to Video Camera Mode
The Flash/Torch, White Balance, Front/Back Camera, Main Shutter Button, Light Box and Focus and Exposure controls operate the same way as in the Photo and Night Mode.
The Secondary Shutter button enables you to capture photo stills while recording video. Photos are saved at native video resolution (e.g. 1920 x 1080 pixels).

Resolution
Framerate
Note
The Video Control Panel contains dedicated options for better recording. They are outlined below
You can choose between three different resolutions depending on your needs. There are two additional modes that provide high resolution in combination with high frame rates (HFR):A) HD+ HFR: 1920 x 1080B) HD HFR: 1280 x 720C) HD+: 1920 x 1080D) HD: 1280 x 720E) HQ: 640 x 480
Framerate sets the number of frames captured per second when recording. Framerate options vary across devices: A) 24, 25 & 30 fps on 4S/5/5C/5S/6/6PlusB) Up to 60 fps on 5/5CC) Up to 120 fps on 5SD) Up to 240 fps on 6/6Plus
ProCamera can playback high framerate footage captured in slow motion.
HFR

Settings
The advanced Video Settings are explained below
Video Focus Mode: Turn on Continuous Focus to automatically adjust focus while recording video. Turn off Continuous Focus to manually adjust and lock focus when recording.
Turn on for automatic Video Stabilization.
Allows you to turn off the Video Zoom control on both the front and back cameras (if available). On iPhone 4 and 4S non-zoomed video saves faster than zoomed-in video. HD video zoom requires approximately 50 seconds of post-processing for every minute of recorded video.

8Code Scanner
In addition to taking photos and videos ProCamera can also read QR codes, barcodes and more.
Whether URL, address, GPS or product info – ProCamera recognizes the content type
automatically and offers suitable actions to use the recognized
codes in other apps or for online search.

1
2
Once scanner mode is switched on, ProCamera automatically recognizes any readable code you lined up inside the squared viewfinder. (You don’t have to press a shutter button.) ProCamera will then display the result screen.
Back to the mode that was selected last.
The Steady Light (top-left corner) can also be turned on to assist with scanning in low-light conditions.
NIGHT SCANPHOTO
How to Switch to Code Scanner Mode
Select Mode Switch
Swipe left to select Scanner Mode.

ProCamera’s code scanner reads more than 10 types of codes. A sample of the type will appear at the top of the result screen. Codes can include various types of data. Scanner mode distinguishes the following:
Result ScreenOnce scanned, you can automatically open the web URL, copy, paste or share the link or use one of the context-sensitive options depending on the type of code (e.g. address book vCard). Additionally, ProCamera gives you the option to directly search for a book on Amazon. Just scan the bar code on the book and tap on “Search on Amazon”.
URL
Contact
Calendar
Map
Message
Phone
Text
Search
WIFI
BAR

9Lightbox
This section shows you how to turn on and use the dedicated
ProCamera Lightbox which lets you save and delete photos from within
the app.
Phot
o: M
isho
Bar
anov
ic

CAUTION. Please ensure that you export any Lightbox photos to the Camera Roll before you delete ProCamera. Otherwise they will be deleted along with the app.
The ProCamera Lightbox can be found in the Settings as the first topic. (Settings are accessed from the Control Panel). When activated (highlighted with green color), ProCamera saves photos and videos to a dedicated “Lightbox” album in the app.
!
Use Lightbox

< Albums
Album and Lightbox Functions are listed below
Provides access to your Photo Library, including Camera Roll, saved albums and Lightbox. The Lightbox is always located second on the Albums list.
In thumbnail view the Multi-Select tool allows you to select multiple photos and videos to share, export or delete.
The Select All icon appears if the Multi-Select tool is turned on. This tool selects all photos and videos in the Lightbox. Perfect for mass saving or deleting of photos.
Camera returns to Photo/Video capture mode.
The following gestures can be used to navigate within the Lightbox:
A) Double-Tap to zoom in or out on a photo (single image view)
B) Two-finger Pinch to zoom in or out on a photo (single image view)
C) Long-press for copying to clipboard.

ProCamera stores all Exif data for your photos (e.g. date, time, location, exposure, aperture and ISO value). View the photo’s metadata by tapping the Info button.ProCamera displays where the photo was taken and which cardinal direction the camera was facing (only available for photos which contain compass orientation and GPS data).
Photo Info (Exif & Map View)
Camera Roll
1936 x 2592 (5.0 MP) 1,5 MB JPEG
27.06.2015 13:51:54
f/2.8 1/15s ISo 200 4 mm
Mannheim East
back Map Satellite Double Tap: Full-screen map view.Choose between Map and Satellite view.
Swipe above bar: Switch between Exif, map view and Photo Compass
Swipe below bar: Scroll through your photos
Heidelberg
MannheimPhoto Location
Current Location
20,06 kmDistance
Tap the red dot in Fullscreen map view to show the photo’s location in your Maps app.

10Editing
This section shows you how to use the editing options in ProCamera
including the ProFX filters, ProLab image adjustments
and ProCut crop tools
Phot
o: J
ens
Hed
tke
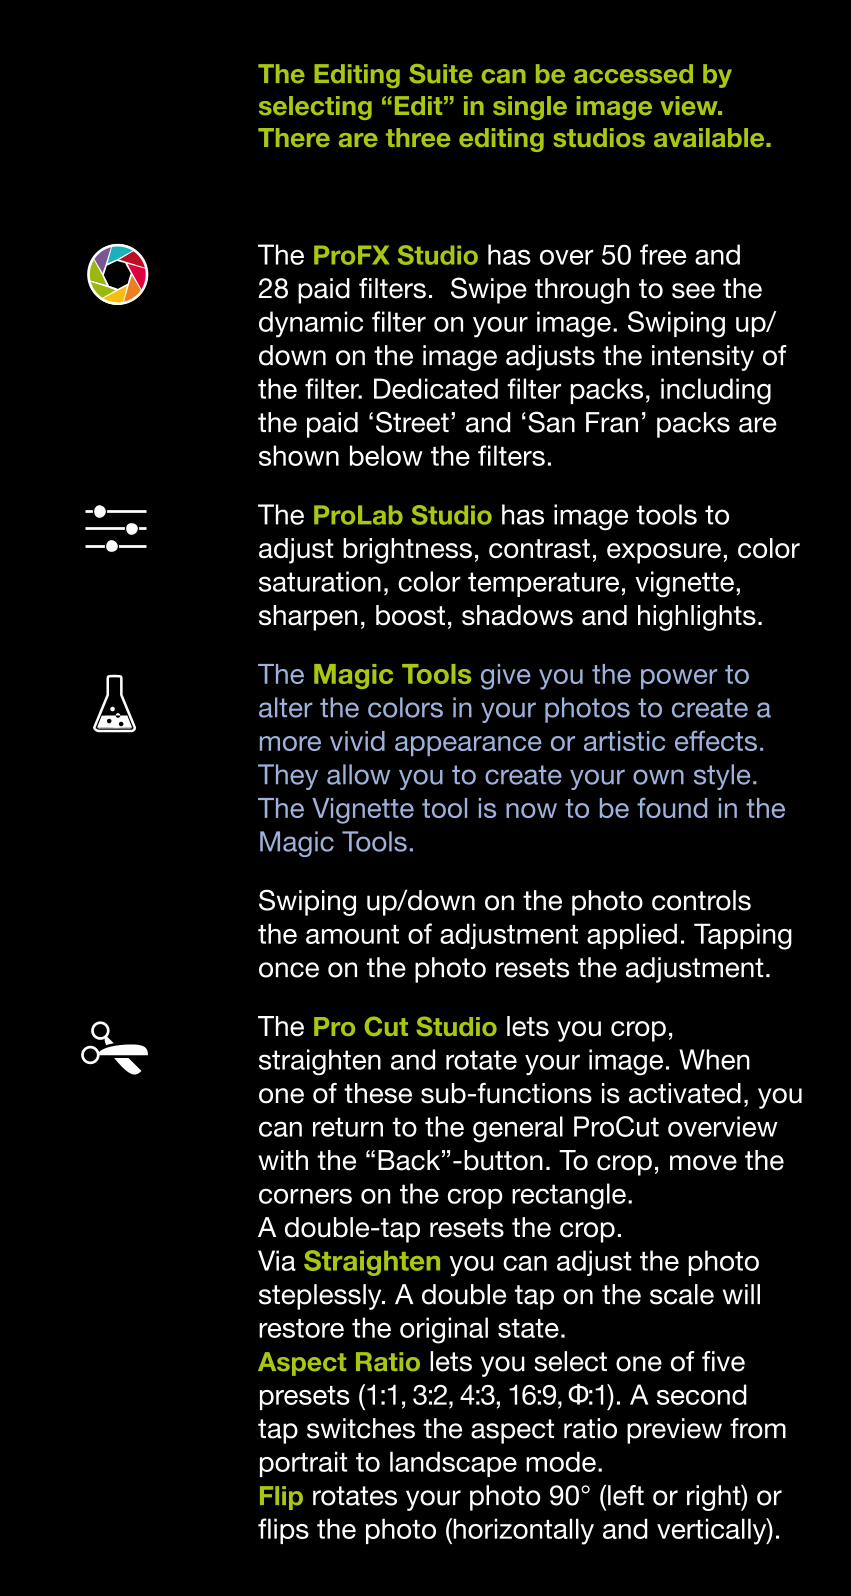
The Editing Suite can be accessed by selecting “Edit” in single image view. There are three editing studios available.
The ProFX Studio has over 50 free and 28 paid filters. Swipe through to see the dynamic filter on your image. Swiping up/down on the image adjusts the intensity of the filter. Dedicated filter packs, including the paid ‘Street’ and ‘San Fran’ packs are shown below the filters.
The ProLab Studio has image tools to adjust brightness, contrast, exposure, color saturation, color temperature, vignette, sharpen, boost, shadows and highlights.
The Magic Tools give you the power to alter the colors in your photos to create a more vivid appearance or artistic effects. They allow you to create your own style. The Vignette tool is now to be found in the Magic Tools.
Swiping up/down on the photo controls the amount of adjustment applied. Tapping once on the photo resets the adjustment.
The Pro Cut Studio lets you crop, straighten and rotate your image. When one of these sub-functions is activated, you can return to the general ProCut overview with the “Back”-button. To crop, move the corners on the crop rectangle. A double-tap resets the crop. Via Straighten you can adjust the photo steplessly. A double tap on the scale will restore the original state. Aspect Ratio lets you select one of five presets (1:1, 3:2, 4:3, 16:9, :1). A second tap switches the aspect ratio preview from portrait to landscape mode. Flip rotates your photo 90° (left or right) or flips the photo (horizontally and vertically).

11Share
This section shows you how you can share your photos through
ProCamera
Phot
o: M
isho
Bar
anov
ic

Dropbox
Message Mail
Twitter Facebook
Inserts your photo directly into an email or text. You can attach up to five photos at one time into emails. Even videos saved in your Lightbox can be sent this way. Videos saved in your Camera Roll will be compressed when shared via Mail or Message.
Share to one or more social networks, including Facebook, Flickr and Twitter.
Share videos to Vimeo.
Our dedicated SquarePrepare function lets you upload non-square photos into Instagram. It also lets you snap to edges and resize within the frame.
You can share single and multiple images and videos to Dropbox, allowing you to backup your photos to the cloud.
The Share button is located in the bottom-left corner of the Lightbox/Camera Roll. ProCamera can share to the following services:
Vimeo
Via Settings > More > Social Tag you can define a default tag for sharing photos on Twitter, Facebook and Instagram. You can always change or extend this text manually when uploading your photo.

Share your photos to EyeEm.
Print your photos wirelessly with compatible AirPrint printers and retail services.
Use Open in to transfer your photos to other apps for further editing or sharing. Photos will be transferred in the file format they are saved.
Airprint
Open In
EyeEm

12General options
This section explains the General options section of the Settings
Phot
o: M
isho
Bar
anov
ic

Settings
The General Options are listed below.
Geo-tagging: Turn on/off the ability to automatically save GPS photo data.
It’s possible to use the Volume Buttons on your device or on your headphones to trigger the shutter release. To activate this function go to Settings (General Options) > Volume Buttons. ProCamera generally provides the capability to trigger the shutter release via Bluetooth, as long as the utilized device emulates headphones.
System Sounds: Turn on/off the ProCamera sounds.
Copyright (EXIF): Enter text to embed Copyright information in photo and video metadata (ExIF).

13Troubleshooting
This section addresses common user questions and issues with
ProCamera. If you have any problems or find a bug please use the Feedback/Support function in
the Settings.
Phot
o: M
isho
Bar
anov
ic

1. I neither see my last photo, nor the flash symbol, nor the front/rear camera switch. How do I restore the original design?
You have activated Fullscreen mode. Tap on the Fullscreen icon in the control panel to leave this mode.
2. Is it possible to trigger the shutter release via Bluetooth?
ProCamera generally provides the capability to trigger the shutter release via Bluetooth, as long as the utilized device emulates headphones. Under Settings > General Options “Volume Buttons” has to be activated.
If you have any other questions or would like to provide feedback then please use the Support & Feedback option in the ProCamera Settings. We now provide the option to send screenshots and photos along with your message.