pro ecu manual daftar isi / table of contents filepro ecu manual daftar isi / table of contents...
TRANSCRIPT
PRO ECU MANUAL DAFTAR ISI / TABLE OF CONTENTS
Daftar Isi / Table Of Contents :
A. Bahasa
1. Cara Installasi Software dan USB Driver Hal 1 2. Pengenalan Fungsi Tampilan Hal 7 3. Menghubungkan ECU Dengan Komputer Hal 10 4. Kalibrasi Throttle Position Sensor (TPS) Hal 11 5. Mengirimkan Data(Map & Setting) ke ECU Hal 12 6. Data(Map & Setting) Reading from ECU Hal 12 7. Menyimpan Data (Map & Setting) Hal 13 8. Memprogram Injeksi Bahan Bakar Hal 14 9. Ignition Map Programming Hal 17 10. Enrichment Setting Hal 18 11. General Settings Hal 22
B. English
1. Software and Cable Driver Installation Page 24
2. Software Display Introduction Page 30
3. How to Connect ECU with PC Page 33
4. Throttle Position Sensor (TPS) Calibration Page 34
5. Data(Map & Setting) Loading to ECU Page 35
6. Data(Map & Setting) Reading from ECU Page 35
7. Data(Map & Setting) Saving Page 36 8. Fuel Injection Map Programming Page 37
9. Ignition Map Programming Page 40 10. Enrichment Setting Page 42 11. General Settings Page 45
PRO ECU MANUAL BAHASA
1
1. Cara Installasi Software dan USB Driver
A. Installasi Pada Windows XP
1. Sebelum melakukan langkah-langkah berikut, pastikan computer tidak terhubung
dengan internet!
2. Masukkan CD ECU Manager ke dalam CD ROM, lalu buka melalui explorer.
3. Klik file “DEMP_Setup.exe” lalu ikuti petunjuk langkah installasi pada software
hingga selesai.
4. Sambungkan kabel mini USB pada ECU dan ujung lainnya ke port USB computer.
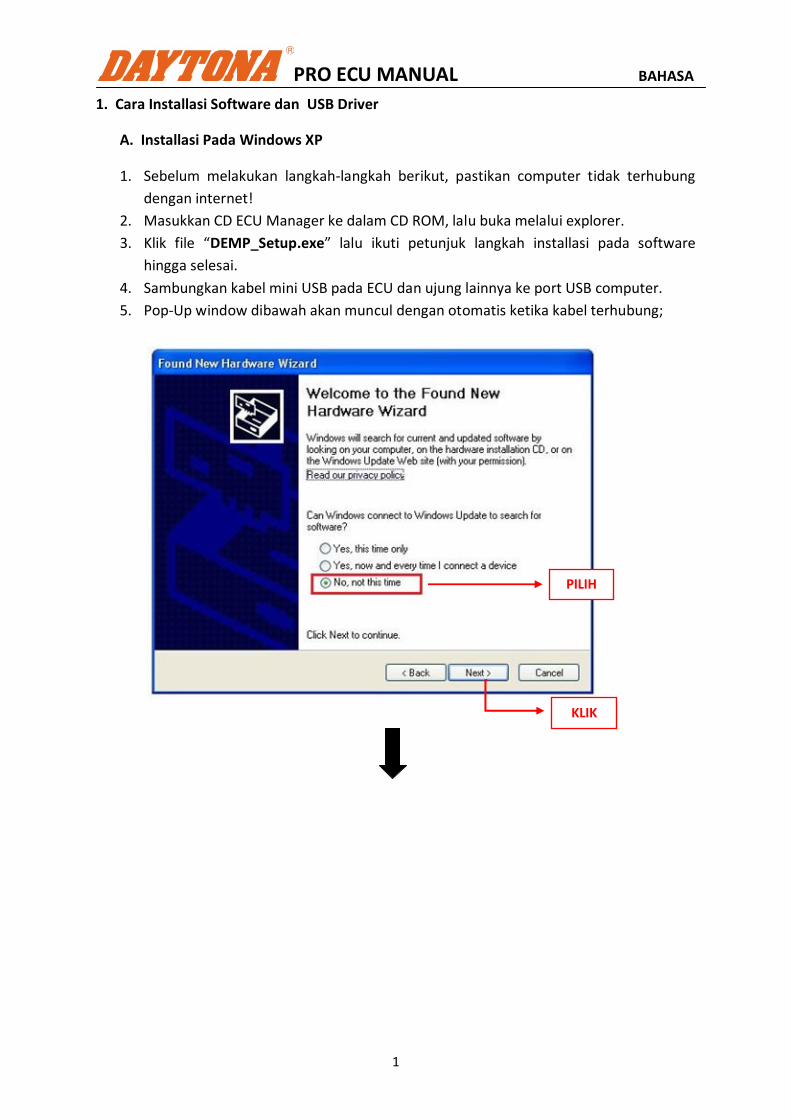
5. Pop-Up window dibawah akan muncul dengan otomatis ketika kabel terhubung;
PILIH
KLIK

PRO ECU MANUAL BAHASA
2
PILIH
PILIH
KLIK
KLIK
Popup Window A
PRO ECU MANUAL BAHASA
3
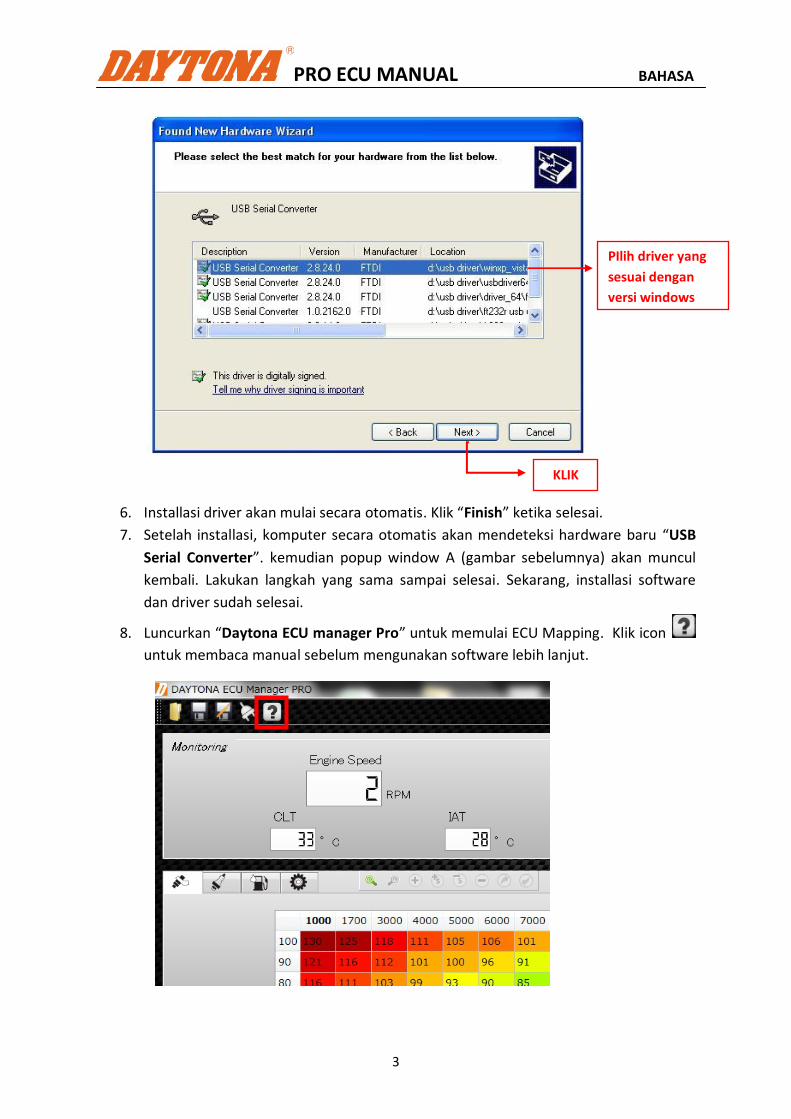
6. Installasi driver akan mulai secara otomatis. Klik “Finish” ketika selesai.
7. Setelah installasi, komputer secara otomatis akan mendeteksi hardware baru “USB
Serial Converter”. kemudian popup window A (gambar sebelumnya) akan muncul
kembali. Lakukan langkah yang sama sampai selesai. Sekarang, installasi software
dan driver sudah selesai.
8. Luncurkan “Daytona ECU manager Pro” untuk memulai ECU Mapping. Klik icon
untuk membaca manual sebelum mengunakan software lebih lanjut.
PIlih driver yang
sesuai dengan
versi windows
Anda
KLIK
PRO ECU MANUAL BAHASA
4
B. Installasi Pada Windows 7
1. Sebelum melakukan langkah-langkah berikut, pastikan computer tidak terhubung
dengan internet!
2. Klik Start Menu, ketik devices and printers di kotak “search”, kemudian klik Devices
and Printers.
3. Pada Devices, klik kanan pada gambar icon computer, kemudian klik Device
installation settings.
4. Klik No, let me choose what to do, pilih Never install driver software from Windows
update, kemudian klik Save Changes.
5. Klik Yes, setelah pop-up konfimasi muncul.
6. Masukkan CD ECU Manager ke dalam CD ROM, laku buka melalui explorer.
7. Klik file “DEMP_Setup.exe” lalu ikuti petunjuk langkah installasi pada software
hingga selesai.
8. Sambungkan kabel mini USB pada ECU dan ujung lainnya ke port USB computer.
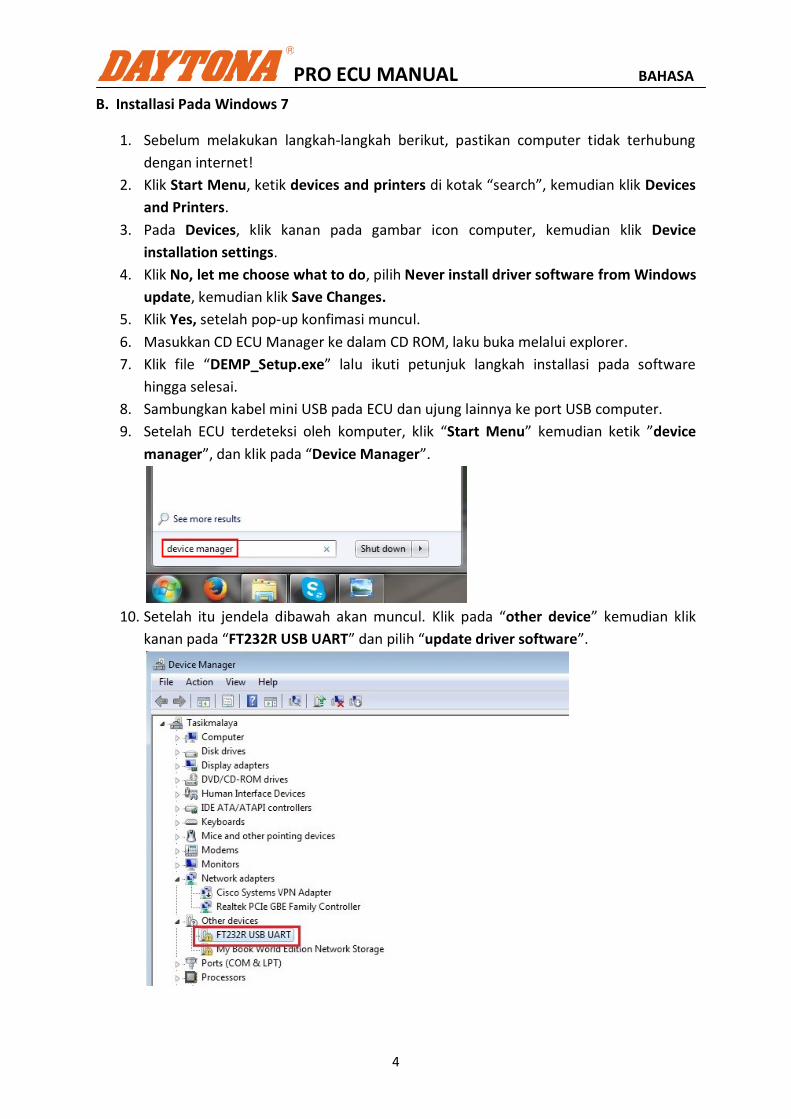
9. Setelah ECU terdeteksi oleh komputer, klik “Start Menu” kemudian ketik ”device
manager”, dan klik pada “Device Manager”.
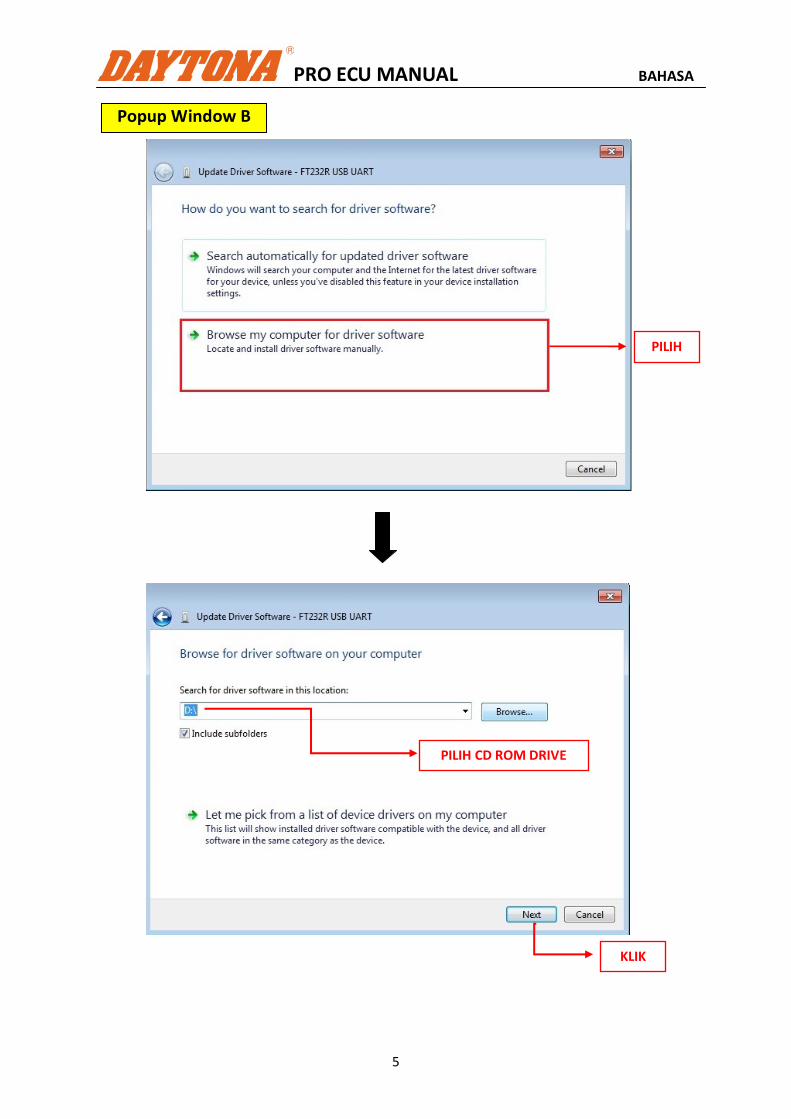
10. Setelah itu jendela dibawah akan muncul. Klik pada “other device” kemudian klik
kanan pada “FT232R USB UART” dan pilih “update driver software”.
PRO ECU MANUAL BAHASA
5
PILIH CD ROM DRIVE
PILIH
KLIK
Popup Window B
PRO ECU MANUAL BAHASA
6
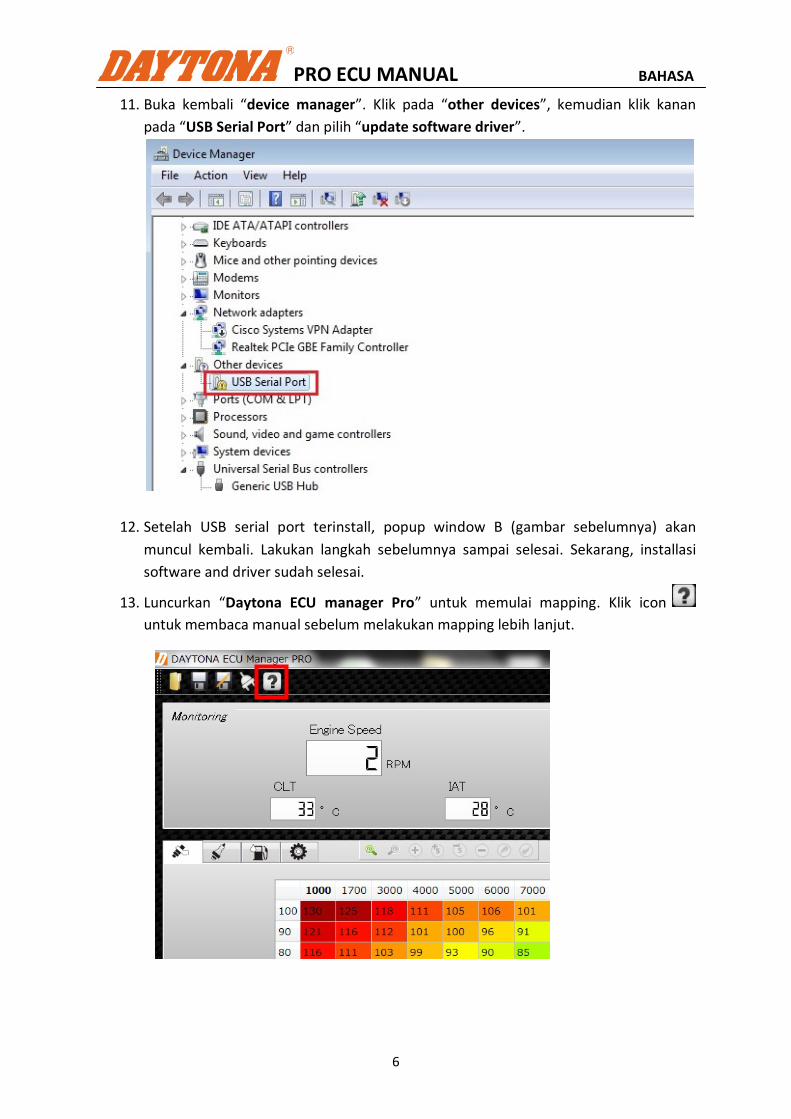
11. Buka kembali “device manager”. Klik pada “other devices”, kemudian klik kanan
pada “USB Serial Port” dan pilih “update software driver”.
12. Setelah USB serial port terinstall, popup window B (gambar sebelumnya) akan
muncul kembali. Lakukan langkah sebelumnya sampai selesai. Sekarang, installasi
software and driver sudah selesai.
13. Luncurkan “Daytona ECU manager Pro” untuk memulai mapping. Klik icon
untuk membaca manual sebelum melakukan mapping lebih lanjut.
PRO ECU MANUAL BAHASA
7
2. Pengenalan Fungsi Tampilan
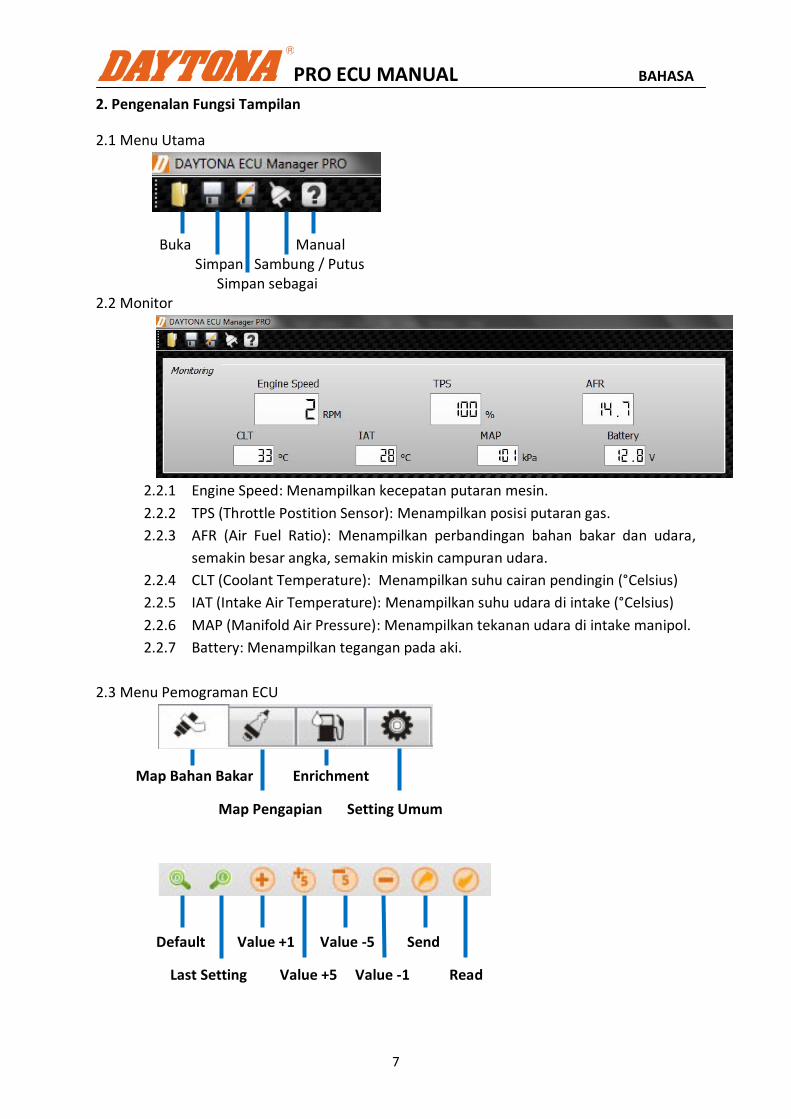
2.1 Menu Utama
Buka Manual Simpan Sambung / Putus Simpan sebagai
2.2 Monitor
2.2.1 Engine Speed: Menampilkan kecepatan putaran mesin.
2.2.2 TPS (Throttle Postition Sensor): Menampilkan posisi putaran gas.
2.2.3 AFR (Air Fuel Ratio): Menampilkan perbandingan bahan bakar dan udara,
semakin besar angka, semakin miskin campuran udara.
2.2.4 CLT (Coolant Temperature): Menampilkan suhu cairan pendingin (°Celsius)
2.2.5 IAT (Intake Air Temperature): Menampilkan suhu udara di intake (°Celsius)
2.2.6 MAP (Manifold Air Pressure): Menampilkan tekanan udara di intake manipol.
2.2.7 Battery: Menampilkan tegangan pada aki.
2.3 Menu Pemograman ECU
Map Bahan Bakar Enrichment
Map Pengapian Setting Umum
Default Value +1 Value -5 Send
Last Setting Value +5 Value -1 Read
PRO ECU MANUAL BAHASA
8
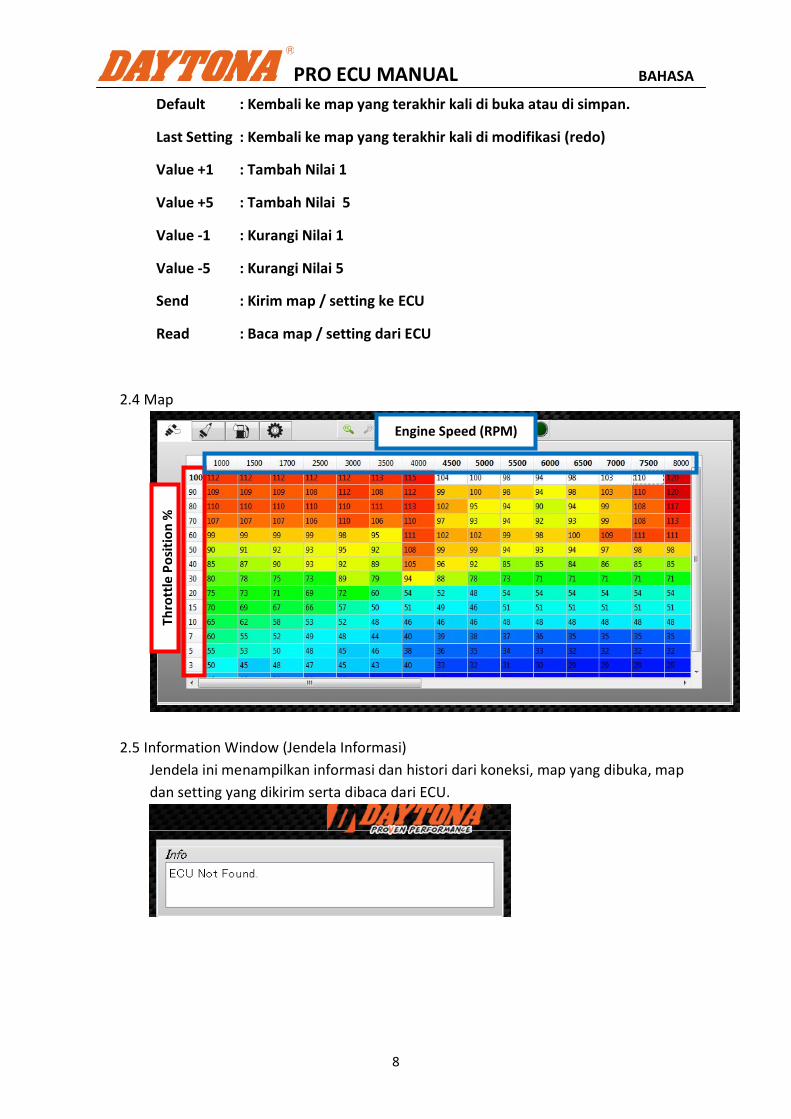
Default : Kembali ke map yang terakhir kali di buka atau di simpan.
Last Setting : Kembali ke map yang terakhir kali di modifikasi (redo)
Value +1 : Tambah Nilai 1
Value +5 : Tambah Nilai 5
Value -1 : Kurangi Nilai 1
Value -5 : Kurangi Nilai 5
Send : Kirim map / setting ke ECU
Read : Baca map / setting dari ECU
2.4 Map
2.5 Information Window (Jendela Informasi)
Jendela ini menampilkan informasi dan histori dari koneksi, map yang dibuka, map
dan setting yang dikirim serta dibaca dari ECU.
Engine Speed (RPM)
Thro
ttle
Po
siti
on
%
PRO ECU MANUAL BAHASA
9
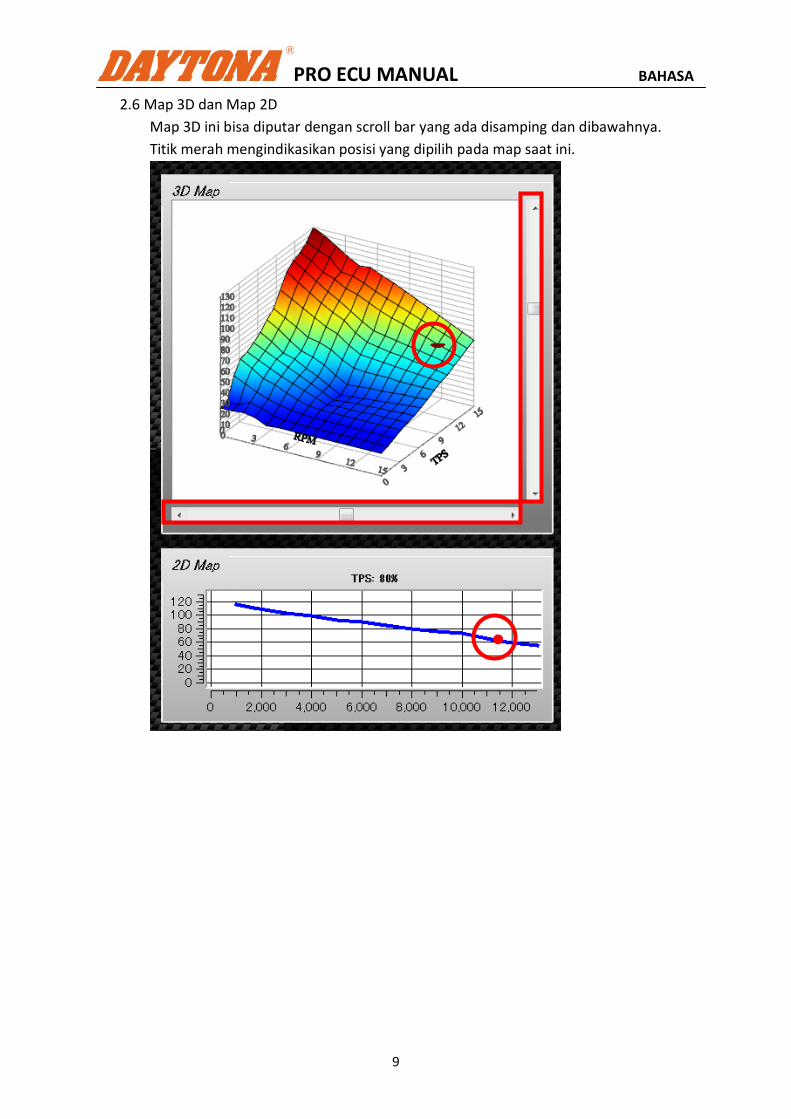
2.6 Map 3D dan Map 2D
Map 3D ini bisa diputar dengan scroll bar yang ada disamping dan dibawahnya.
Titik merah mengindikasikan posisi yang dipilih pada map saat ini.
PRO ECU MANUAL BAHASA
10
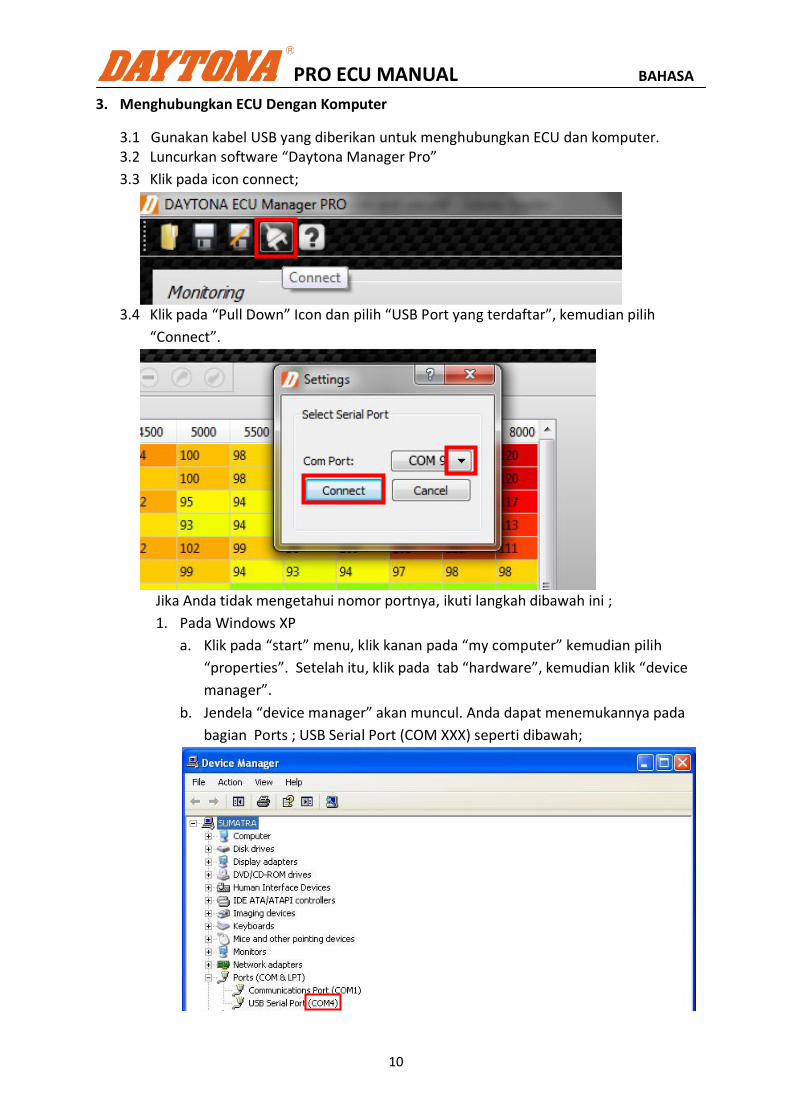
3. Menghubungkan ECU Dengan Komputer
3.1 Gunakan kabel USB yang diberikan untuk menghubungkan ECU dan komputer. 3.2 Luncurkan software “Daytona Manager Pro”
3.3 Klik pada icon connect;
3.4 Klik pada “Pull Down” Icon dan pilih “USB Port yang terdaftar”, kemudian pilih
“Connect”.
Jika Anda tidak mengetahui nomor portnya, ikuti langkah dibawah ini ;
1. Pada Windows XP
a. Klik pada “start” menu, klik kanan pada “my computer” kemudian pilih
“properties”. Setelah itu, klik pada tab “hardware”, kemudian klik “device
manager”.
b. Jendela “device manager” akan muncul. Anda dapat menemukannya pada
bagian Ports ; USB Serial Port (COM XXX) seperti dibawah;

PRO ECU MANUAL BAHASA
11
2. Pada Windows 7
a. Klik pada start menu, kemudian ketik “Device Manager” pada kotak
pencarian, kemudian klik “device manager”.
b. Jendela “device manager” akan muncul. Anda dapat menemukannya di
bagian Ports; USB Serial Port (COM XXX) seperti dibawah:
c.
3.5 Lampu Hijau akan menyala ketika terkoneksi dengan ECU.
4. Kalibrasi Throttle Position Sensor (TPS)
Untuk membuat ECU bekerja dengan tepat, kita perlu melakukan kalibrasi TPS Hanya
pada saat pertama kali ECU digunakan. (tidak perlu dilakukan berulang-ulang)
4.1 Hidupkan kunci kontak.
4.2 Klik pada . Jendela kalibrasi TPS akan muncul disebelah kanan. 4.3 Untuk kalibrasi, tutup putaran gas, kemudian klik “Read” 4.4 Buka putaran gas sampai penuh, klik “Read” 4.5 Klik pada icon “Set” untuk mengakhiri kalibrasi.
PRO ECU MANUAL BAHASA
12
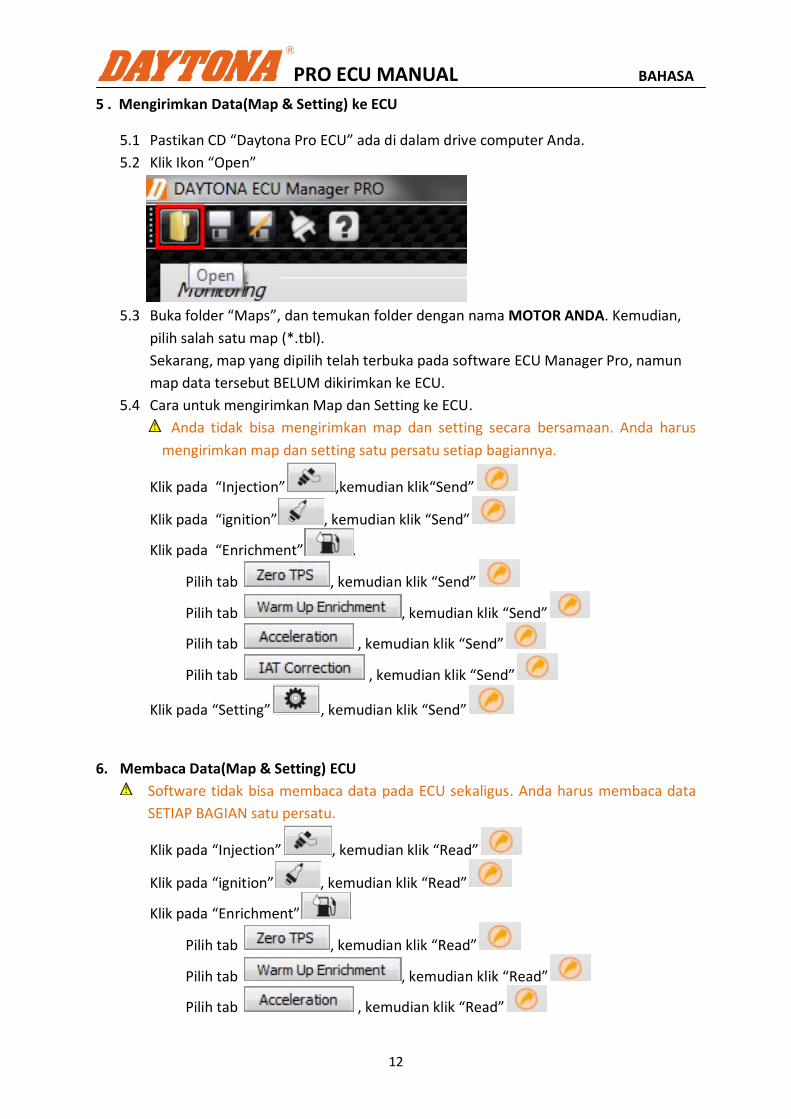
5 . Mengirimkan Data(Map & Setting) ke ECU
5.1 Pastikan CD “Daytona Pro ECU” ada di dalam drive computer Anda.
5.2 Klik Ikon “Open”
5.3 Buka folder “Maps”, dan temukan folder dengan nama MOTOR ANDA. Kemudian,
pilih salah satu map (*.tbl).
Sekarang, map yang dipilih telah terbuka pada software ECU Manager Pro, namun
map data tersebut BELUM dikirimkan ke ECU.
5.4 Cara untuk mengirimkan Map dan Setting ke ECU.
Anda tidak bisa mengirimkan map dan setting secara bersamaan. Anda harus
mengirimkan map dan setting satu persatu setiap bagiannya.
Klik pada “Injection” ,kemudian klik“Send”
Klik pada “ignition” , kemudian klik “Send”
Klik pada “Enrichment” .
Pilih tab , kemudian klik “Send”
Pilih tab , kemudian klik “Send”
Pilih tab , kemudian klik “Send”
Pilih tab , kemudian klik “Send”
Klik pada “Setting” , kemudian klik “Send”
6. Membaca Data(Map & Setting) ECU
Software tidak bisa membaca data pada ECU sekaligus. Anda harus membaca data
SETIAP BAGIAN satu persatu.
Klik pada “Injection” , kemudian klik “Read”
Klik pada “ignition” , kemudian klik “Read”
Klik pada “Enrichment” .
Pilih tab , kemudian klik “Read”
Pilih tab , kemudian klik “Read”
Pilih tab , kemudian klik “Read”

PRO ECU MANUAL BAHASA
13
Pilih tab , kemudian klik “Read”
Klik pada “Settings” , kemudian klik “Read”
7. Menyimpan Data (Map & Setting)
7.1 Klik ikon untuk menyimpan semua data (Map and Setting).
7.2 Klik ikon untuk menyimpan semua data (Map and Setting) dengan nama yang berbeda.
PRO ECU MANUAL BAHASA
14
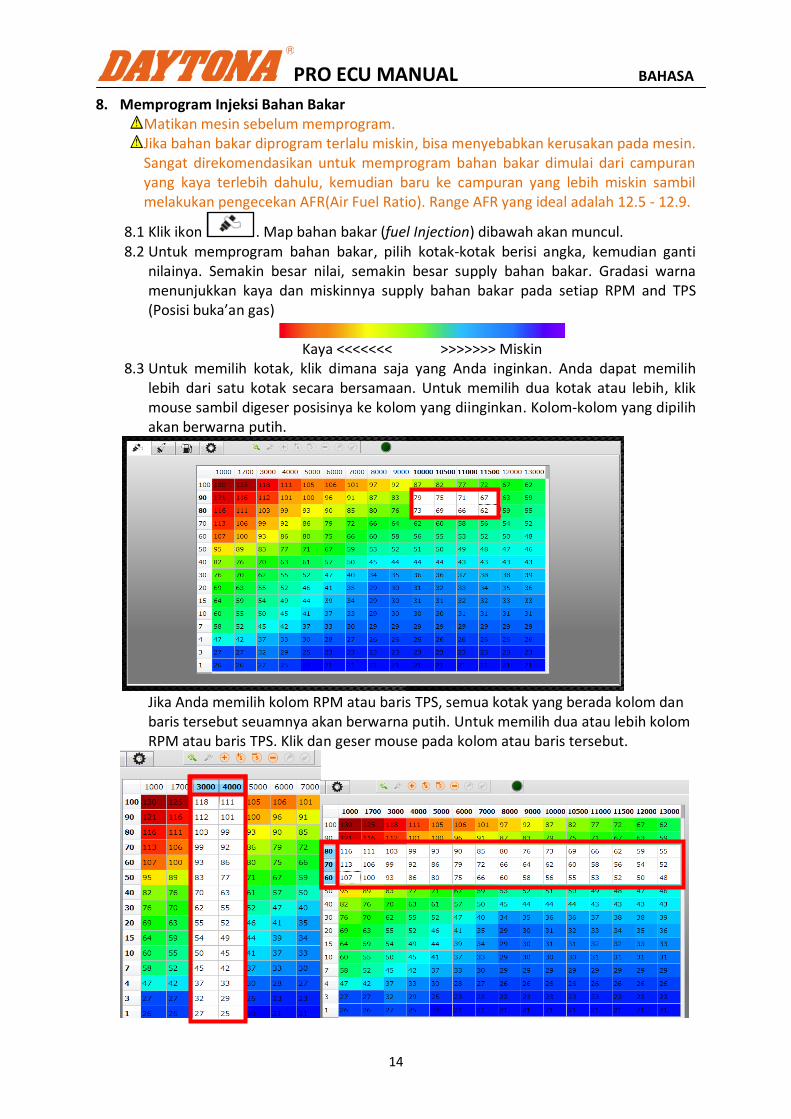
8. Memprogram Injeksi Bahan Bakar Matikan mesin sebelum memprogram. Jika bahan bakar diprogram terlalu miskin, bisa menyebabkan kerusakan pada mesin. Sangat direkomendasikan untuk memprogram bahan bakar dimulai dari campuran yang kaya terlebih dahulu, kemudian baru ke campuran yang lebih miskin sambil melakukan pengecekan AFR(Air Fuel Ratio). Range AFR yang ideal adalah 12.5 - 12.9.
8.1 Klik ikon . Map bahan bakar (fuel Injection) dibawah akan muncul. 8.2 Untuk memprogram bahan bakar, pilih kotak-kotak berisi angka, kemudian ganti
nilainya. Semakin besar nilai, semakin besar supply bahan bakar. Gradasi warna menunjukkan kaya dan miskinnya supply bahan bakar pada setiap RPM and TPS (Posisi buka’an gas)
Kaya <<<<<<< >>>>>>> Miskin
8.3 Untuk memilih kotak, klik dimana saja yang Anda inginkan. Anda dapat memilih lebih dari satu kotak secara bersamaan. Untuk memilih dua kotak atau lebih, klik mouse sambil digeser posisinya ke kolom yang diinginkan. Kolom-kolom yang dipilih akan berwarna putih.
Jika Anda memilih kolom RPM atau baris TPS, semua kotak yang berada kolom dan baris tersebut seuamnya akan berwarna putih. Untuk memilih dua atau lebih kolom RPM atau baris TPS. Klik dan geser mouse pada kolom atau baris tersebut.

PRO ECU MANUAL BAHASA
15
8.4 Untuk mengganti nilai, klik pada salah satu ikon dibawah ini. Matikan mesin sebelum memprogram. Nyalakan kunci kontak jika ingin memonitor status.
: Menambah nilai +1
: Menambah nilai +5
: Mengurangi nilai -1
: Mengurangi nilai -5
* Jika Anda klik dua kali pada kotak tersebut, Anda juga bisa langsung mengetikkan nilai yang Anda inginkan.
8.5 Untuk mengirimkan map yang sudah dimodifikasi ke ECU, klik icon .
8.6 Memprogram supply bahan bakar menggunakan dynamometer Sangat disarankan untuk menggunakan dynamometer agar pemograman lebih akurat. Dynamometer harus dilengkapi dengan Lambda Sensor (Air Fuel Ratio Sensor) untuk mengukur AFR(Air Fuel Ratio).
Chassis Dynamometer Lambda Sensor Terpasang di Knalpot
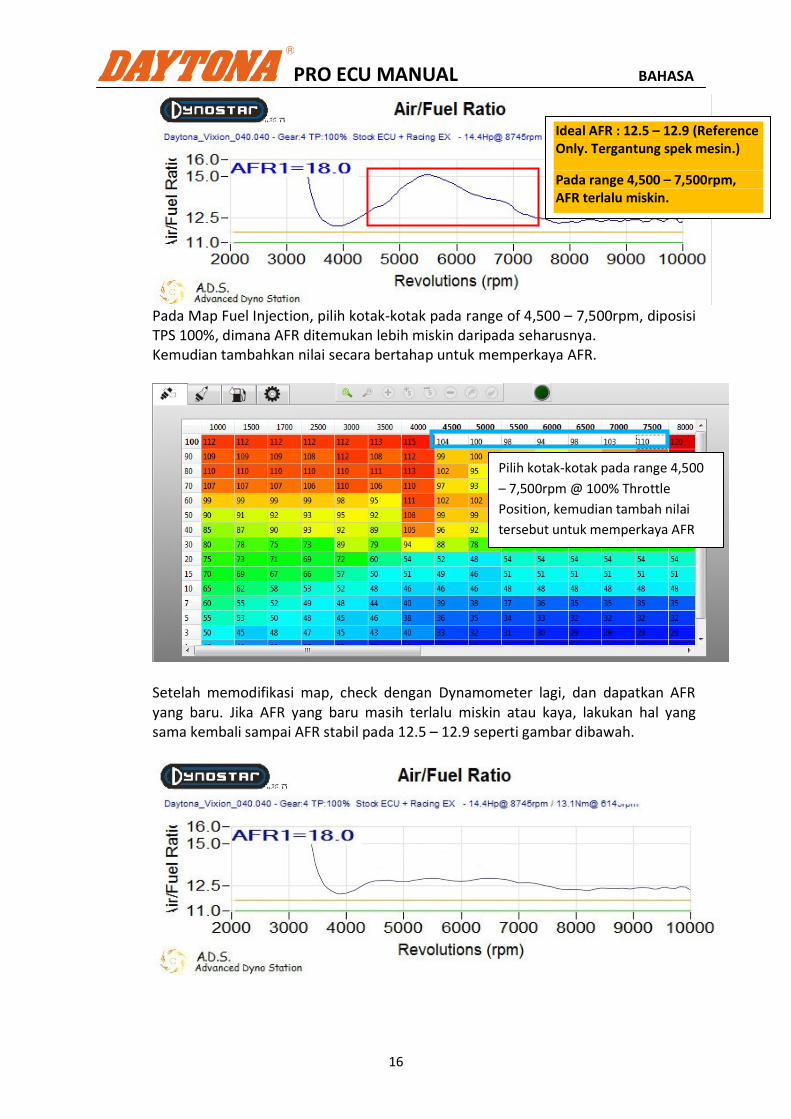
Dibawah ini adalah contoh data AFR yang didapatkan dari Dyno pada TPS 100%. Gambar tersebut menunjukkan bahwa AFR pada range of 4,500-7,500 campuran udaranya terlalu miskin.
PRO ECU MANUAL BAHASA
16
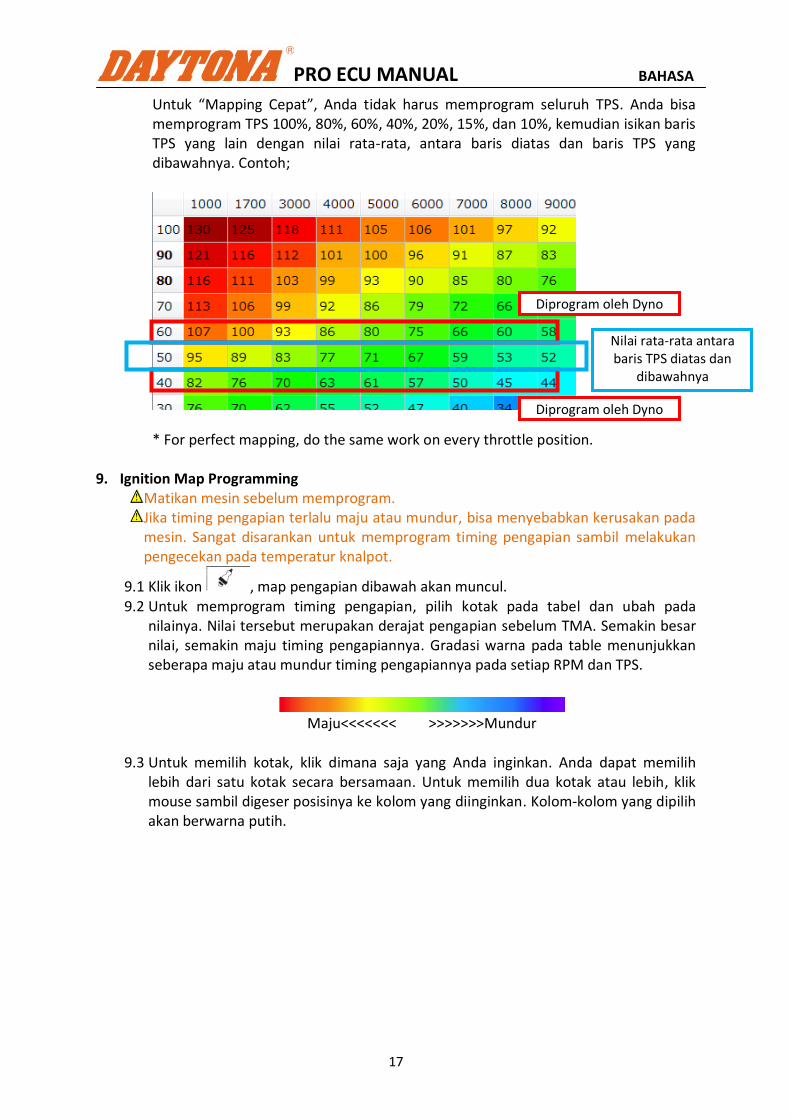
Pada Map Fuel Injection, pilih kotak-kotak pada range of 4,500 – 7,500rpm, diposisi TPS 100%, dimana AFR ditemukan lebih miskin daripada seharusnya. Kemudian tambahkan nilai secara bertahap untuk memperkaya AFR.
Setelah memodifikasi map, check dengan Dynamometer lagi, dan dapatkan AFR yang baru. Jika AFR yang baru masih terlalu miskin atau kaya, lakukan hal yang sama kembali sampai AFR stabil pada 12.5 – 12.9 seperti gambar dibawah.
Ideal AFR : 12.5 – 12.9 (Reference Only. Tergantung spek mesin.)
Pada range 4,500 – 7,500rpm, AFR terlalu miskin.
Pilih kotak-kotak pada range 4,500
– 7,500rpm @ 100% Throttle
Position, kemudian tambah nilai
tersebut untuk memperkaya AFR
PRO ECU MANUAL BAHASA
17
Untuk “Mapping Cepat”, Anda tidak harus memprogram seluruh TPS. Anda bisa memprogram TPS 100%, 80%, 60%, 40%, 20%, 15%, dan 10%, kemudian isikan baris TPS yang lain dengan nilai rata-rata, antara baris diatas dan baris TPS yang dibawahnya. Contoh;
* For perfect mapping, do the same work on every throttle position.
9. Ignition Map Programming Matikan mesin sebelum memprogram. Jika timing pengapian terlalu maju atau mundur, bisa menyebabkan kerusakan pada mesin. Sangat disarankan untuk memprogram timing pengapian sambil melakukan pengecekan pada temperatur knalpot.
9.1 Klik ikon , map pengapian dibawah akan muncul. 9.2 Untuk memprogram timing pengapian, pilih kotak pada tabel dan ubah pada
nilainya. Nilai tersebut merupakan derajat pengapian sebelum TMA. Semakin besar nilai, semakin maju timing pengapiannya. Gradasi warna pada table menunjukkan seberapa maju atau mundur timing pengapiannya pada setiap RPM dan TPS.
Maju<<<<<<< >>>>>>>Mundur
9.3 Untuk memilih kotak, klik dimana saja yang Anda inginkan. Anda dapat memilih
lebih dari satu kotak secara bersamaan. Untuk memilih dua kotak atau lebih, klik mouse sambil digeser posisinya ke kolom yang diinginkan. Kolom-kolom yang dipilih akan berwarna putih.
Diprogram oleh Dyno
Diprogram oleh Dyno
Nilai rata-rata antara baris TPS diatas dan
dibawahnya
PRO ECU MANUAL BAHASA
18
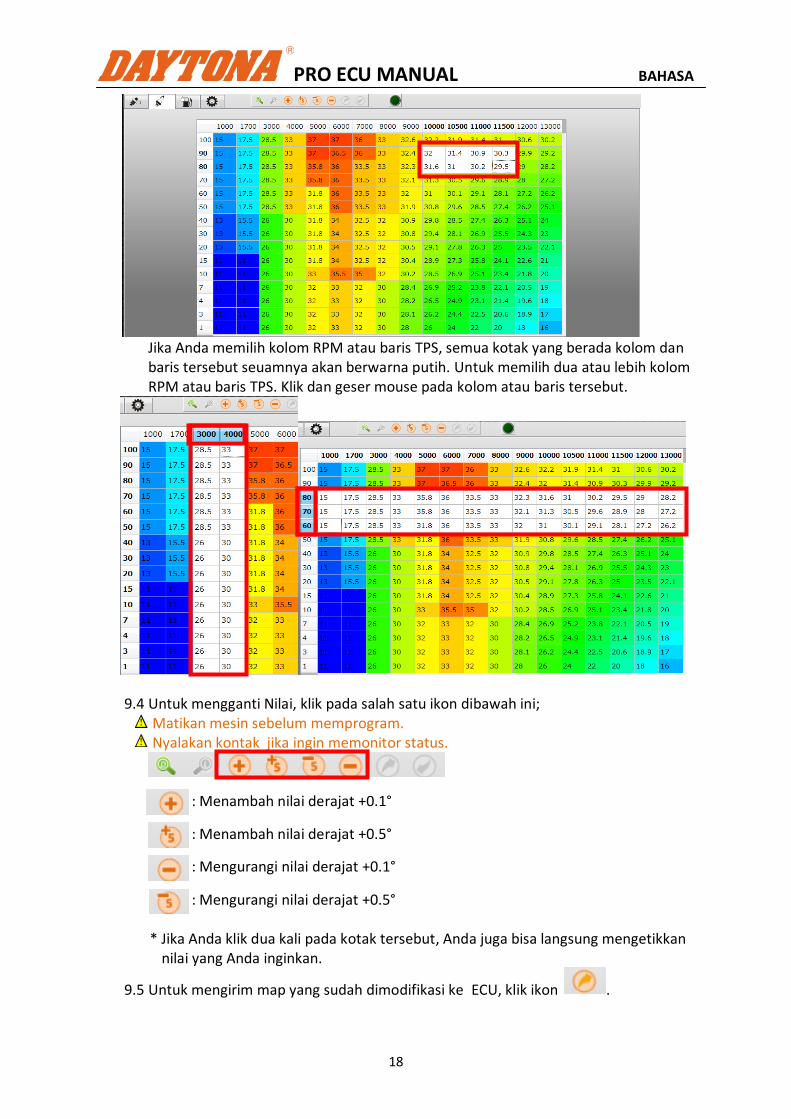
Jika Anda memilih kolom RPM atau baris TPS, semua kotak yang berada kolom dan baris tersebut seuamnya akan berwarna putih. Untuk memilih dua atau lebih kolom RPM atau baris TPS. Klik dan geser mouse pada kolom atau baris tersebut.
9.4 Untuk mengganti Nilai, klik pada salah satu ikon dibawah ini; Matikan mesin sebelum memprogram. Nyalakan kontak jika ingin memonitor status.
: Menambah nilai derajat +0.1°
: Menambah nilai derajat +0.5°
: Mengurangi nilai derajat +0.1°
: Mengurangi nilai derajat +0.5°
* Jika Anda klik dua kali pada kotak tersebut, Anda juga bisa langsung mengetikkan nilai yang Anda inginkan.
9.5 Untuk mengirim map yang sudah dimodifikasi ke ECU, klik ikon .

PRO ECU MANUAL BAHASA
19
10. Enrichment Setting Matikan mesin saat memprogram. Enrichment Setting sudah di set sebelumnya, tetapi untuk mesin yang sudah dimodifikasi dan perbedaan cuaca, penyetalan ulang mungkin diperlukan Enrichment dapat mengontrol idle RPM(Zero TPS), start pada mesin ketika dingin(Warm Up), akselerasi dan koreksi terhadap temperatur(IAT Correction).
Klik pada untuk masuk ke menu Enrichment Setting.
10.1 Pilih Memprogram “Zero TPS” akan mengontrol dan menyetabilkan RPM saat idle.
Untuk merubah nilai RPM, klik dua kali pada nilai RPM dan masukkan RPM yang diinginkan.
Untuk memodifikasi nilai, pilih satu kotak atau lebih, kemudian klik ikon berikut
untuk merubah nilai, atau ketik nilai yang diinginkan.
10.2 Pilih Memprogram Warm Up Enrichment akan mengontrol dan menyetabilkan RPM saat mesin dingin. Ketika mesin masih dingin, lebih banyak bahan bakar yang diperlukan.

PRO ECU MANUAL BAHASA
20
Ada tiga parameter yang bisa dirubah, Temperatur, Enrichment % and FID %. Dengan merubah nilai pada paramenter tersebut, program ini dapat mengontrol seberapa banyak bahan bakar yang disuplai pada temperature tertentu, dan juga berapa banyak udara yang disuplai ke mesin.
Temp. : Merubah temperatur pada mesin.
Ecrich % : Memberikan tambahan % bahan bakar pada temperatur tersebut.
FID % : Fast Idle Solenoid mengontrol udara yang diberikan pada temperatur
tersebut.
* untuk motor yang suplai udaranya di kontrol oleh stepper motor, nilai akan
merubah besarnya lubang udara yang dibuka oleh motor tersebut,
10.3 Pilih Memprogram akselerasi akan mengontrol supply bahan bakar ketika berakselerasi dan berdeselerasi.
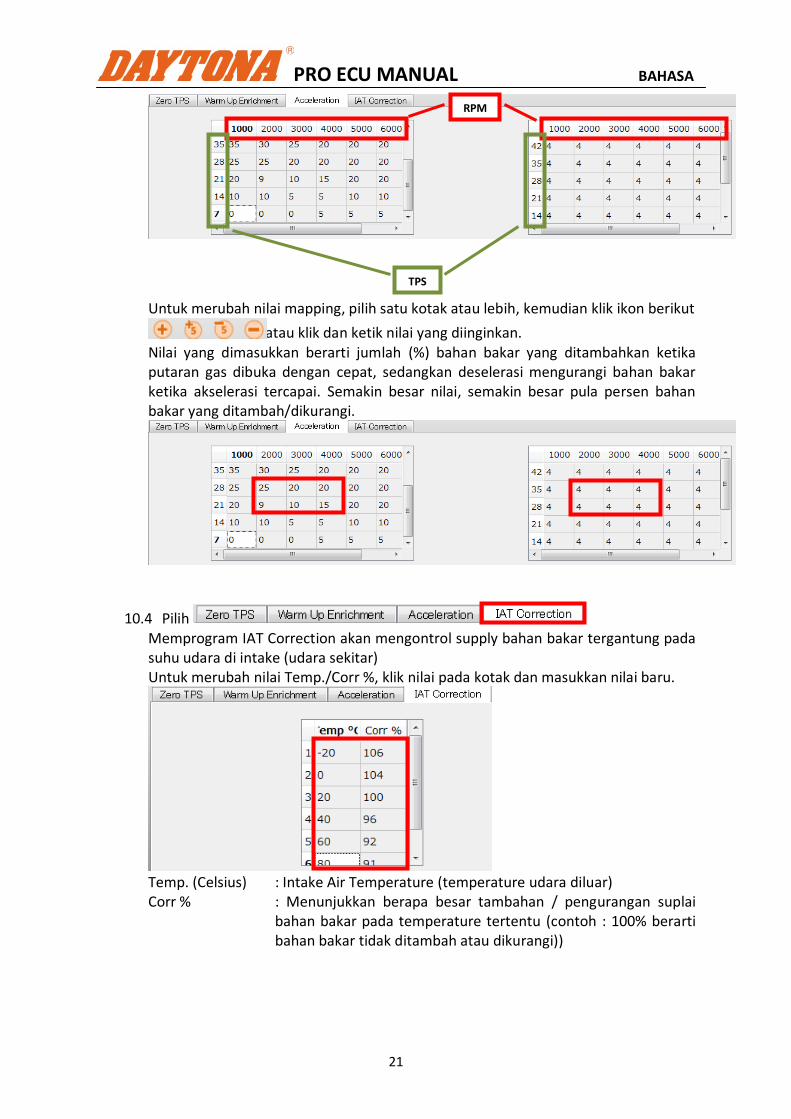
Map yang disebelah kiri adalah Akselerasi, dan yang disebelah kanan adalah deselerasi. Untuk merubah nilai RPM, klik dua kali pada nilai RPM, kemudian masukkan nilai baru. Untuk merubah nilai TPS, klik dua kali pada nilai TPS, kemudian masukkan nilai baru.
PRO ECU MANUAL BAHASA
21
Untuk merubah nilai mapping, pilih satu kotak atau lebih, kemudian klik ikon berikut
atau klik dan ketik nilai yang diinginkan. Nilai yang dimasukkan berarti jumlah (%) bahan bakar yang ditambahkan ketika putaran gas dibuka dengan cepat, sedangkan deselerasi mengurangi bahan bakar ketika akselerasi tercapai. Semakin besar nilai, semakin besar pula persen bahan bakar yang ditambah/dikurangi.
10.4 Pilih Memprogram IAT Correction akan mengontrol supply bahan bakar tergantung pada suhu udara di intake (udara sekitar) Untuk merubah nilai Temp./Corr %, klik nilai pada kotak dan masukkan nilai baru.
Temp. (Celsius) : Intake Air Temperature (temperature udara diluar) Corr % : Menunjukkan berapa besar tambahan / pengurangan suplai
bahan bakar pada temperature tertentu (contoh : 100% berarti bahan bakar tidak ditambah atau dikurangi))
TPS
RPM
PRO ECU MANUAL BAHASA
22
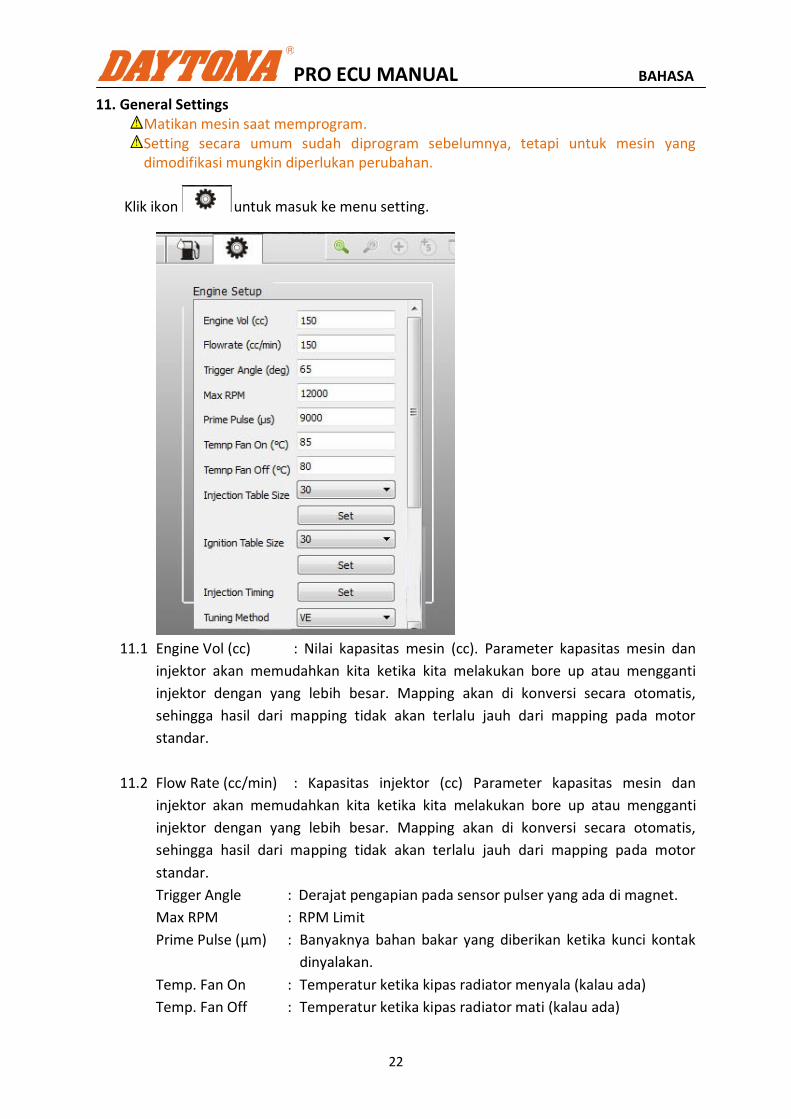
11. General Settings Matikan mesin saat memprogram. Setting secara umum sudah diprogram sebelumnya, tetapi untuk mesin yang dimodifikasi mungkin diperlukan perubahan.
Klik ikon untuk masuk ke menu setting.
11.1 Engine Vol (cc) : Nilai kapasitas mesin (cc). Parameter kapasitas mesin dan
injektor akan memudahkan kita ketika kita melakukan bore up atau mengganti
injektor dengan yang lebih besar. Mapping akan di konversi secara otomatis,
sehingga hasil dari mapping tidak akan terlalu jauh dari mapping pada motor
standar.
11.2 Flow Rate (cc/min) : Kapasitas injektor (cc) Parameter kapasitas mesin dan
injektor akan memudahkan kita ketika kita melakukan bore up atau mengganti
injektor dengan yang lebih besar. Mapping akan di konversi secara otomatis,
sehingga hasil dari mapping tidak akan terlalu jauh dari mapping pada motor
standar.
Trigger Angle : Derajat pengapian pada sensor pulser yang ada di magnet.
Max RPM : RPM Limit
Prime Pulse (μm) : Banyaknya bahan bakar yang diberikan ketika kunci kontak
dinyalakan.
Temp. Fan On : Temperatur ketika kipas radiator menyala (kalau ada)
Temp. Fan Off : Temperatur ketika kipas radiator mati (kalau ada)
PRO ECU MANUAL BAHASA
23
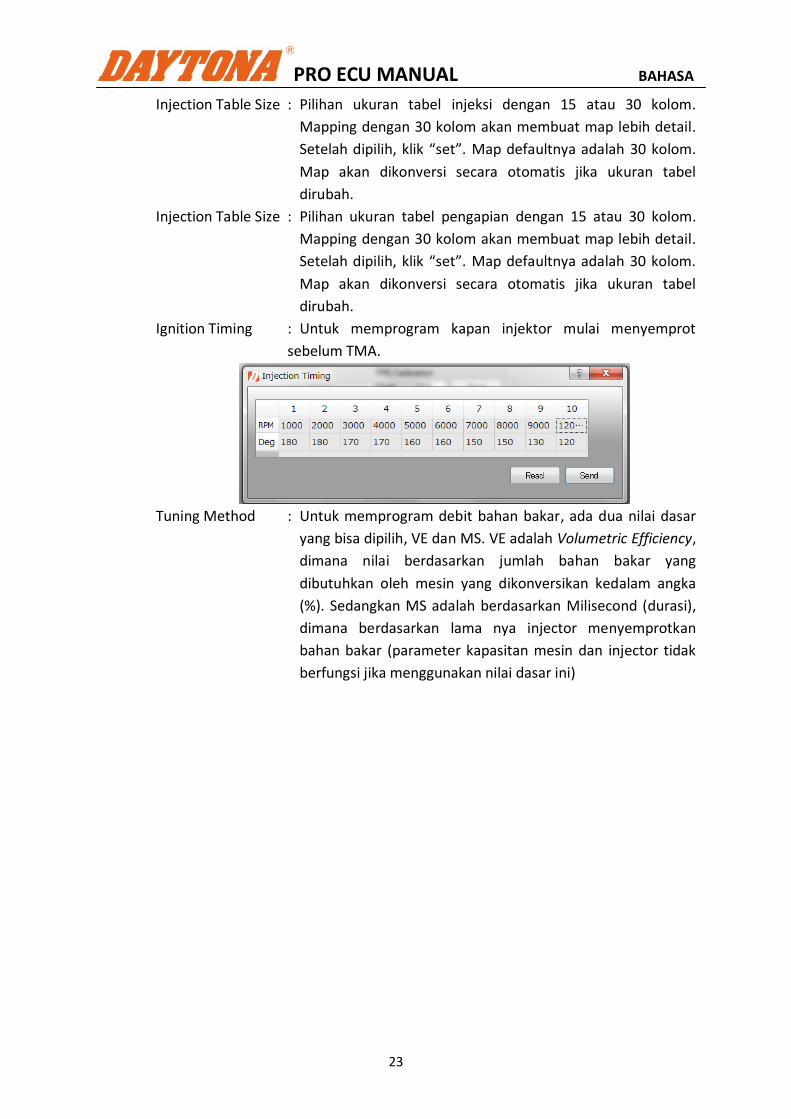
Injection Table Size : Pilihan ukuran tabel injeksi dengan 15 atau 30 kolom.
Mapping dengan 30 kolom akan membuat map lebih detail.
Setelah dipilih, klik “set”. Map defaultnya adalah 30 kolom.
Map akan dikonversi secara otomatis jika ukuran tabel
dirubah.
Injection Table Size : Pilihan ukuran tabel pengapian dengan 15 atau 30 kolom.
Mapping dengan 30 kolom akan membuat map lebih detail.
Setelah dipilih, klik “set”. Map defaultnya adalah 30 kolom.
Map akan dikonversi secara otomatis jika ukuran tabel
dirubah.
Ignition Timing : Untuk memprogram kapan injektor mulai menyemprot
sebelum TMA.
Tuning Method : Untuk memprogram debit bahan bakar, ada dua nilai dasar
yang bisa dipilih, VE dan MS. VE adalah Volumetric Efficiency,
dimana nilai berdasarkan jumlah bahan bakar yang
dibutuhkan oleh mesin yang dikonversikan kedalam angka
(%). Sedangkan MS adalah berdasarkan Milisecond (durasi),
dimana berdasarkan lama nya injector menyemprotkan
bahan bakar (parameter kapasitan mesin dan injector tidak
berfungsi jika menggunakan nilai dasar ini)

PRO ECU MANUAL ENGLISH
24
1. Software and Cable Driver Installation
A. For Windows XP
1. Disconnect PC from Internet.
2. Insert the supplied CD into CD ROM, then open it with Windows Explorer.
3. Click on “DEMP_Setup.exe”,then follow the instruction until completed.
4. Have DAYTONA ECU connected to PC using the supplied USB cable.
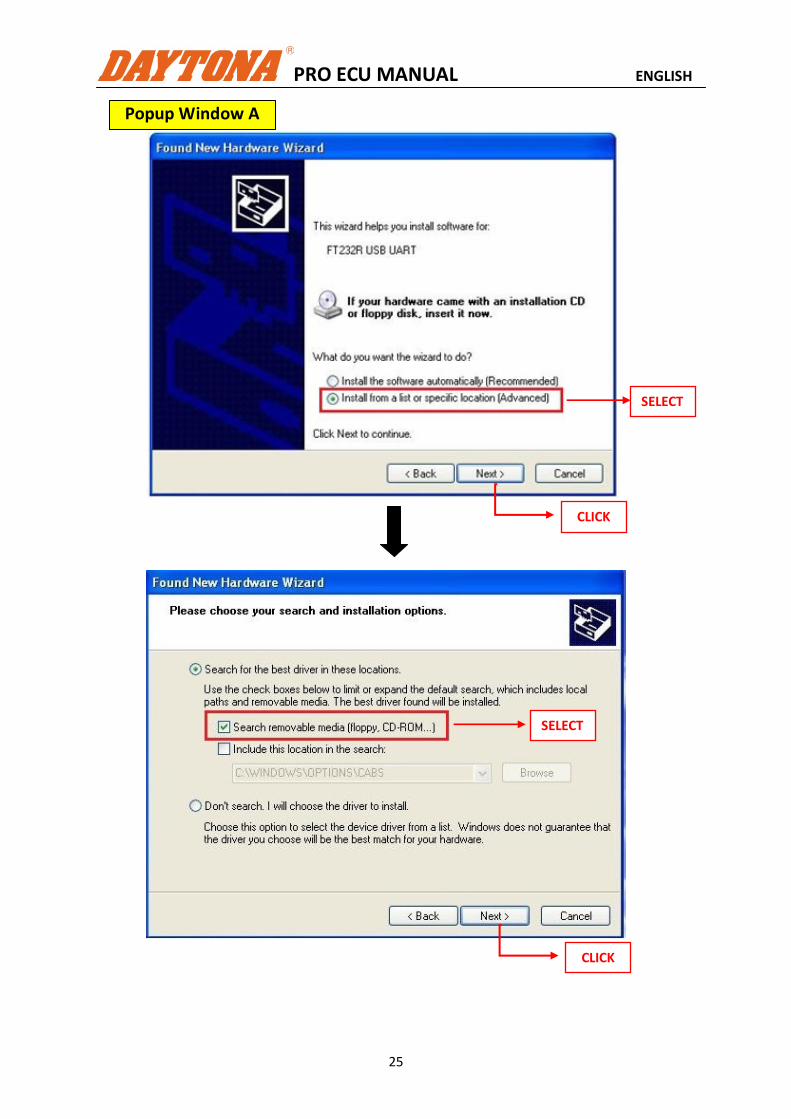
5. The belowpopup window will automatically appear on screen.
SELECT
CLICK
PRO ECU MANUAL ENGLISH
25
SELECT
SELECT
CLICK
CLICK
Popup Window A
PRO ECU MANUAL ENGLISH
26
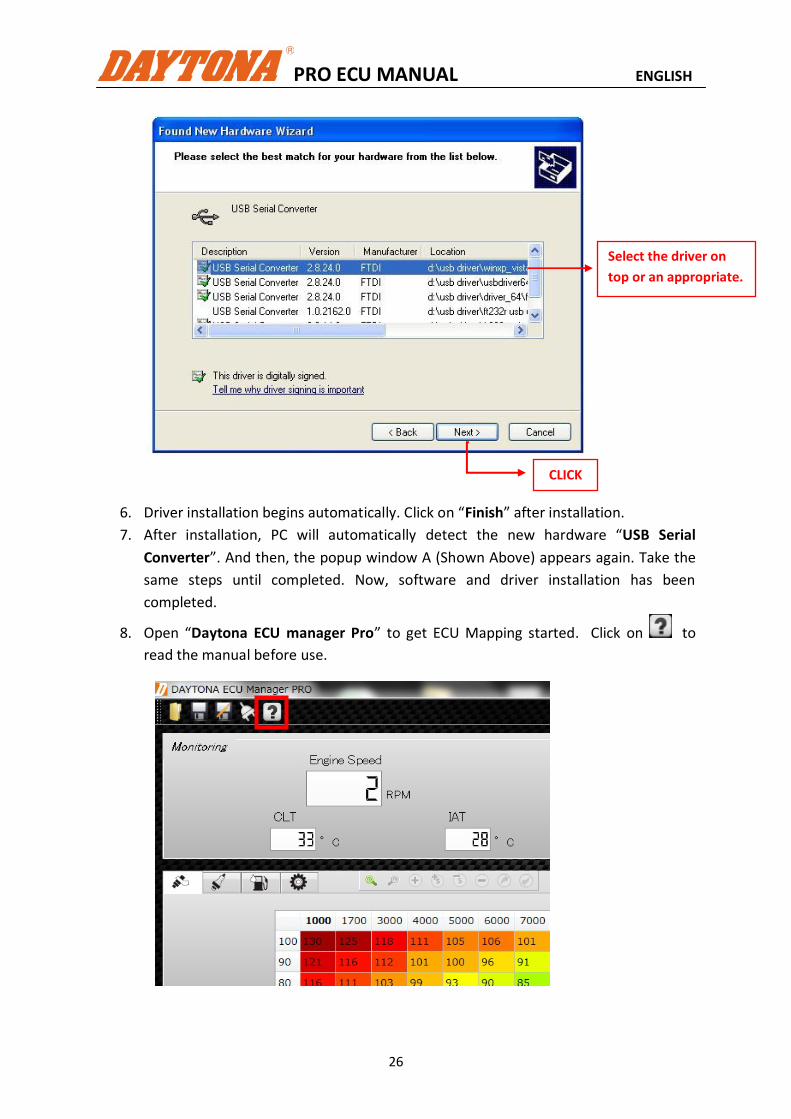
6. Driver installation begins automatically. Click on “Finish” after installation.
7. After installation, PC will automatically detect the new hardware “USB Serial
Converter”. And then, the popup window A (Shown Above) appears again. Take the
same steps until completed. Now, software and driver installation has been
completed.
8. Open “Daytona ECU manager Pro” to get ECU Mapping started. Click on to
read the manual before use.
Select the driver on
top or an appropriate.
CLICK
PRO ECU MANUAL ENGLISH
27
B. Installing in Windows 7
1. Disconnect PC from Internet.
2. Click Start, type devices and printers in the search box, and then click Devices and
Printers.
3. Under Devices, right-click the icon for the computer, and then click Device
installation settings.
4. Click to select No, let me choose what to do, select Never install driver software
from Windows update, and then click Save Changes.
5. Click Yes when you are prompted for confirmation.
6. Insert the supplied CD into CD ROM, then open it with Windows Explorer
7. Click on “DEMP_Setup.exe”,then follow the instruction until completed.
8. Have DAYTONA ECU connected to PC using the supplied USB cable.
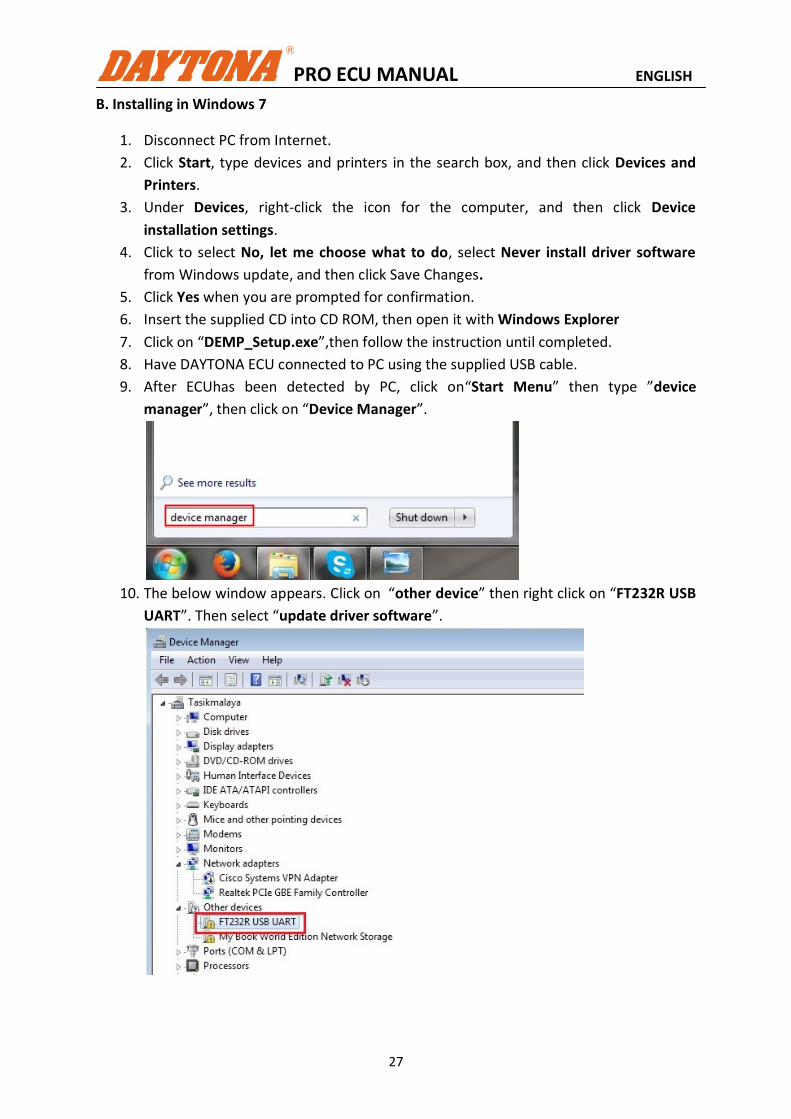
9. After ECUhas been detected by PC, click on“Start Menu” then type ”device
manager”, then click on “Device Manager”.
10. The below window appears. Click on “other device” then right click on “FT232R USB
UART”. Then select “update driver software”.
PRO ECU MANUAL ENGLISH
28
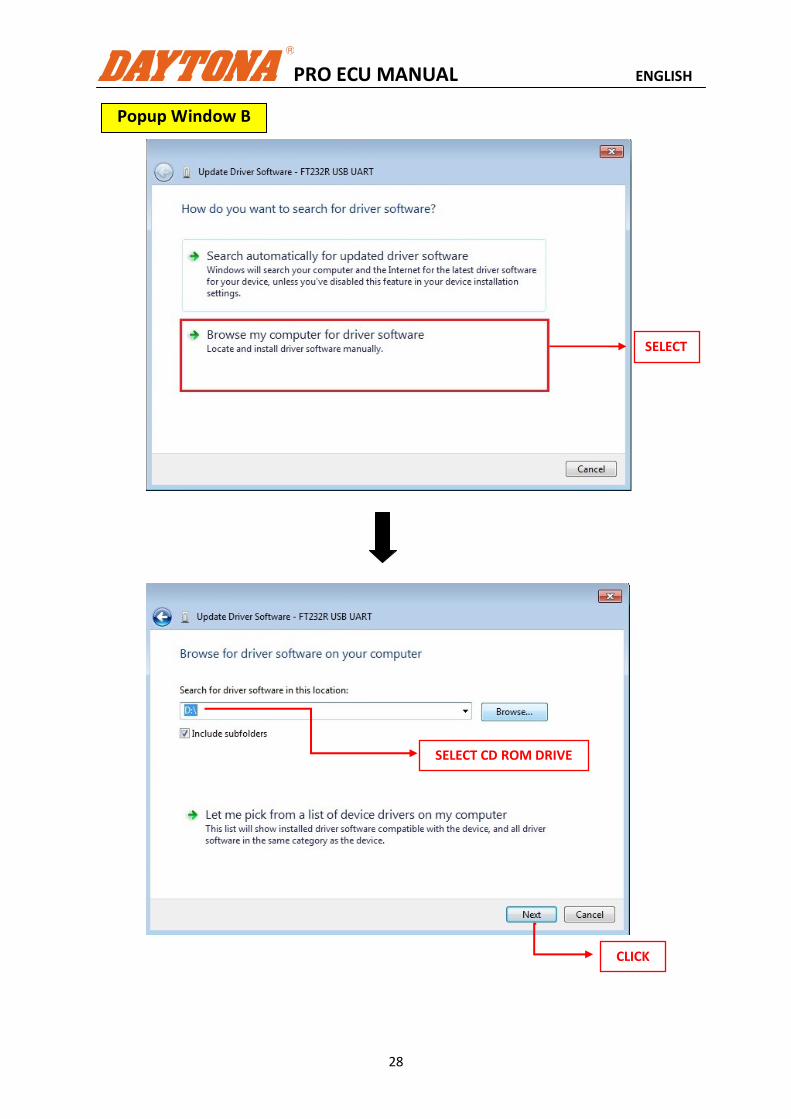
SELECT CD ROM DRIVE
SELECT
CLICK
Popup Window B
PRO ECU MANUAL ENGLISH
29
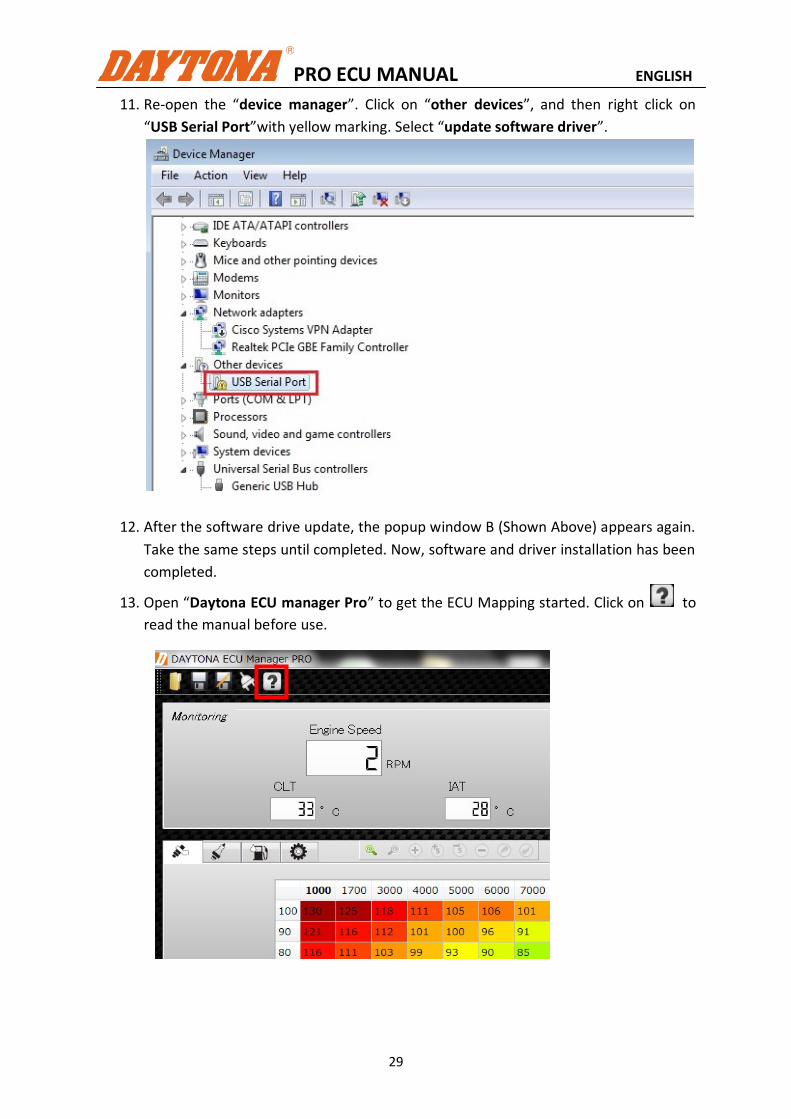
11. Re-open the “device manager”. Click on “other devices”, and then right click on
“USB Serial Port”with yellow marking. Select “update software driver”.
12. After the software drive update, the popup window B (Shown Above) appears again.
Take the same steps until completed. Now, software and driver installation has been
completed.
13. Open “Daytona ECU manager Pro” to get the ECU Mapping started. Click on to
read the manual before use.
PRO ECU MANUAL ENGLISH
30
2.Software Display Introduction
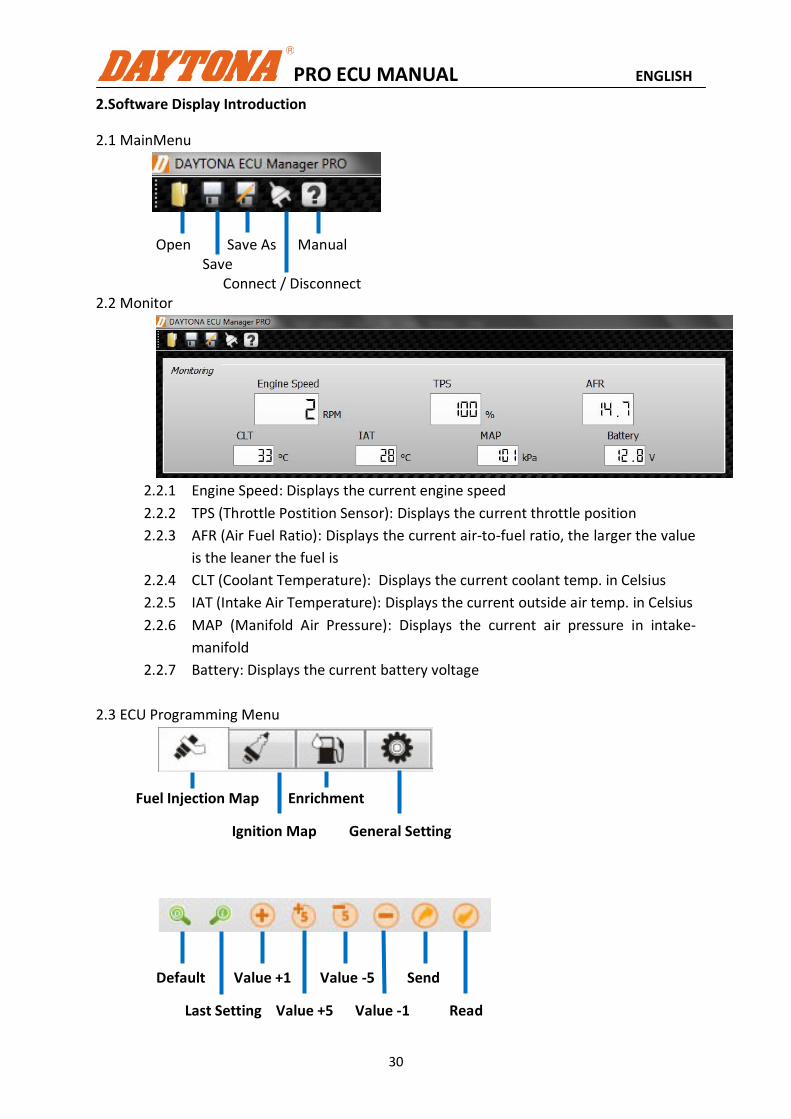
2.1 MainMenu
Open Save As Manual Save
Connect / Disconnect 2.2 Monitor
2.2.1 Engine Speed: Displays the current engine speed
2.2.2 TPS (Throttle Postition Sensor): Displays the current throttle position
2.2.3 AFR (Air Fuel Ratio): Displays the current air-to-fuel ratio, the larger the value
is the leaner the fuel is
2.2.4 CLT (Coolant Temperature): Displays the current coolant temp. in Celsius
2.2.5 IAT (Intake Air Temperature): Displays the current outside air temp. in Celsius
2.2.6 MAP (Manifold Air Pressure): Displays the current air pressure in intake-
manifold
2.2.7 Battery: Displays the current battery voltage
2.3 ECU Programming Menu
Fuel Injection Map Enrichment
Ignition Map General Setting
Default Value +1 Value -5 Send
Last Setting Value +5 Value -1 Read
PRO ECU MANUAL ENGLISH
31
Default : Goes back to last saved or last loaded setting.
Last Setting : Goes back one step to the last modified setting (redo)
Value +1 : Increases value by 1
Value +5 : Increases value by 5
Value -1 : Decreases Value by 1
Value -5 : Decreases Value by 5
Send : Sends the current map/setting to ECU
Read : Reads and receives the current map/setting from ECU
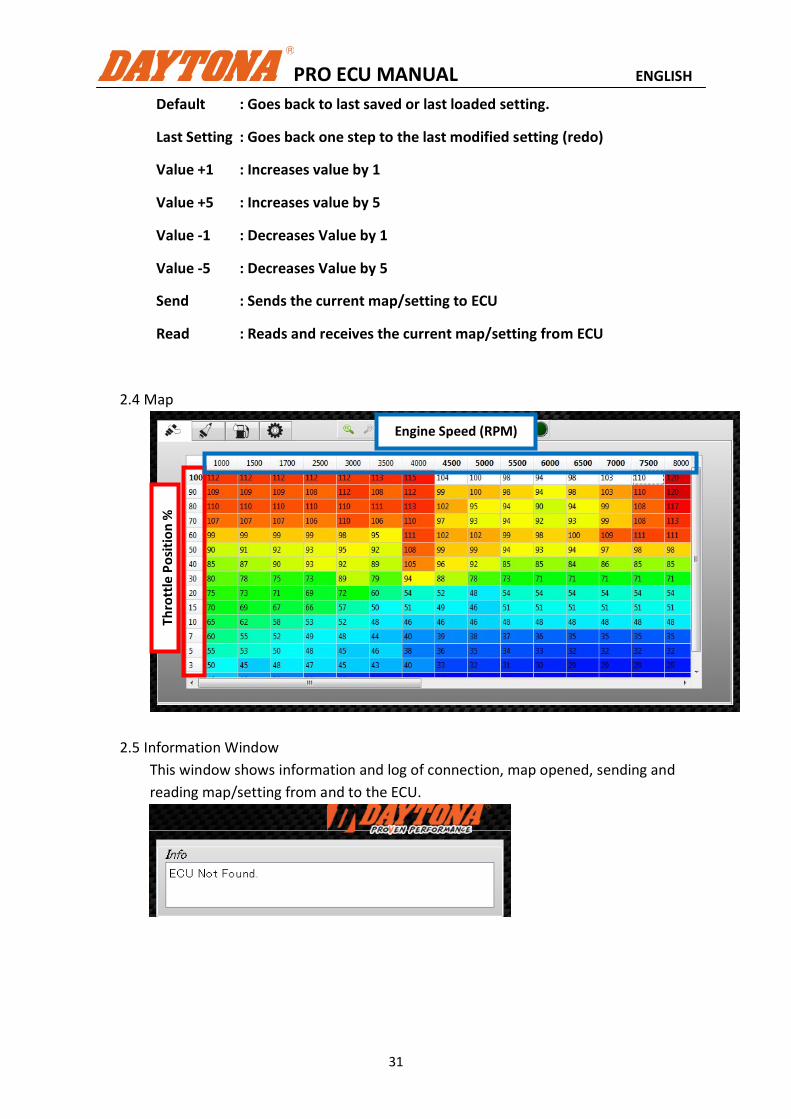
2.4 Map
2.5 Information Window
This window shows information and log of connection, map opened, sending and
reading map/setting from and to the ECU.
Engine Speed (RPM)
Thro
ttle
Po
siti
on
%

PRO ECU MANUAL ENGLISH
32
2.6 3D Map and 2D Map
The 3D map is rotatable using the scroll bar on the side and on the bottom.
The RED Point indicates the place where the map is being selected.

PRO ECU MANUAL ENGLISH
33
3. How to Connect ECU with PC
3.1 Use the supplied USB cable to connect ECU with PC 3.2 Launch“Daytona Manager Pro” software
3.3 Click on connect Icon.
3.4 Click on the “Pull Down” Icon and select the “Registered” USB Port (COM XXX), and
then click on “Connect”.
To find the “Registered” USBPort (COM XXX), take the following steps.
1. For Windows XP
a. Click on “Start” menu, and then right click on “My Computer” then
select“Properties”. Click on “Hardware” tab, and then click on “Device
Manager”.
b. Device Manager appears as below. You will then find the “USB Serial Port
(COM XXX)”.
PRO ECU MANUAL ENGLISH
34
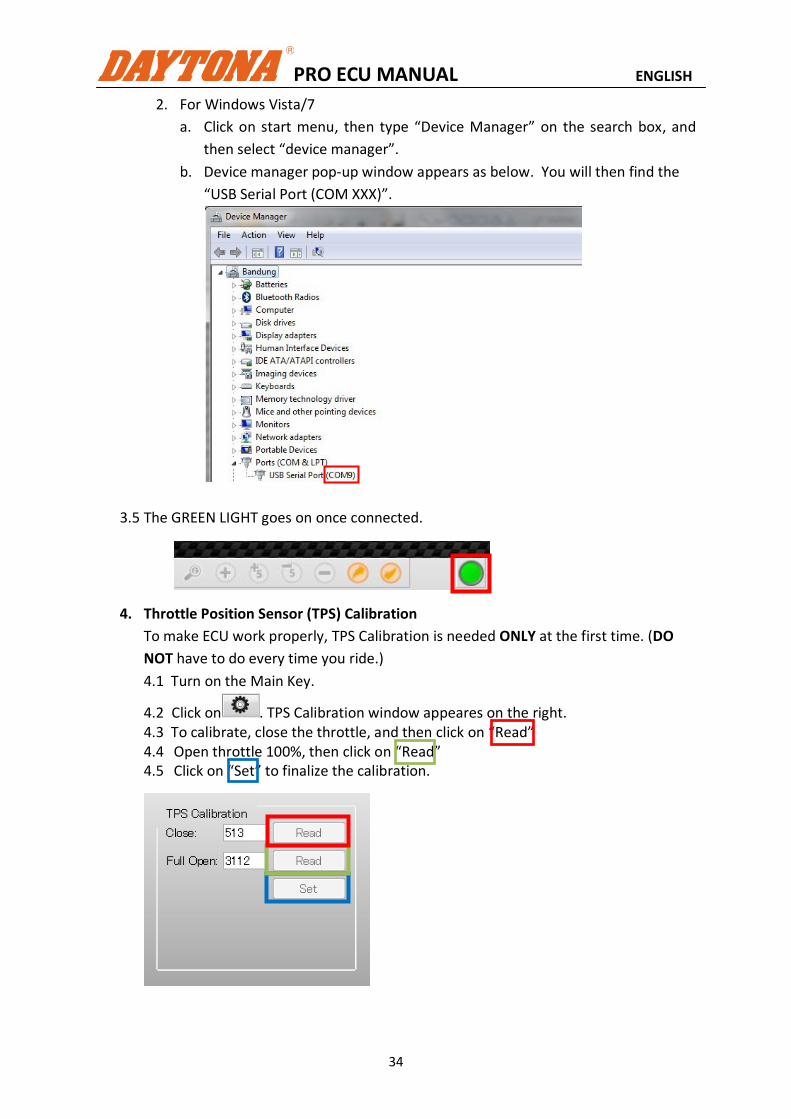
2. For Windows Vista/7
a. Click on start menu, then type “Device Manager” on the search box, and
then select “device manager”.
b. Device manager pop-up window appears as below. You will then find the
“USB Serial Port (COM XXX)”.
3.5 The GREEN LIGHT goes on once connected.
4. Throttle Position Sensor (TPS) Calibration
To make ECU work properly, TPS Calibration is needed ONLY at the first time. (DO
NOT have to do every time you ride.)
4.1 Turn on the Main Key.
4.2 Click on . TPS Calibration window appeares on the right. 4.3 To calibrate, close the throttle, and then click on “Read” 4.4 Open throttle 100%, then click on “Read” 4.5 Click on “Set” to finalize the calibration.
PRO ECU MANUAL ENGLISH
35
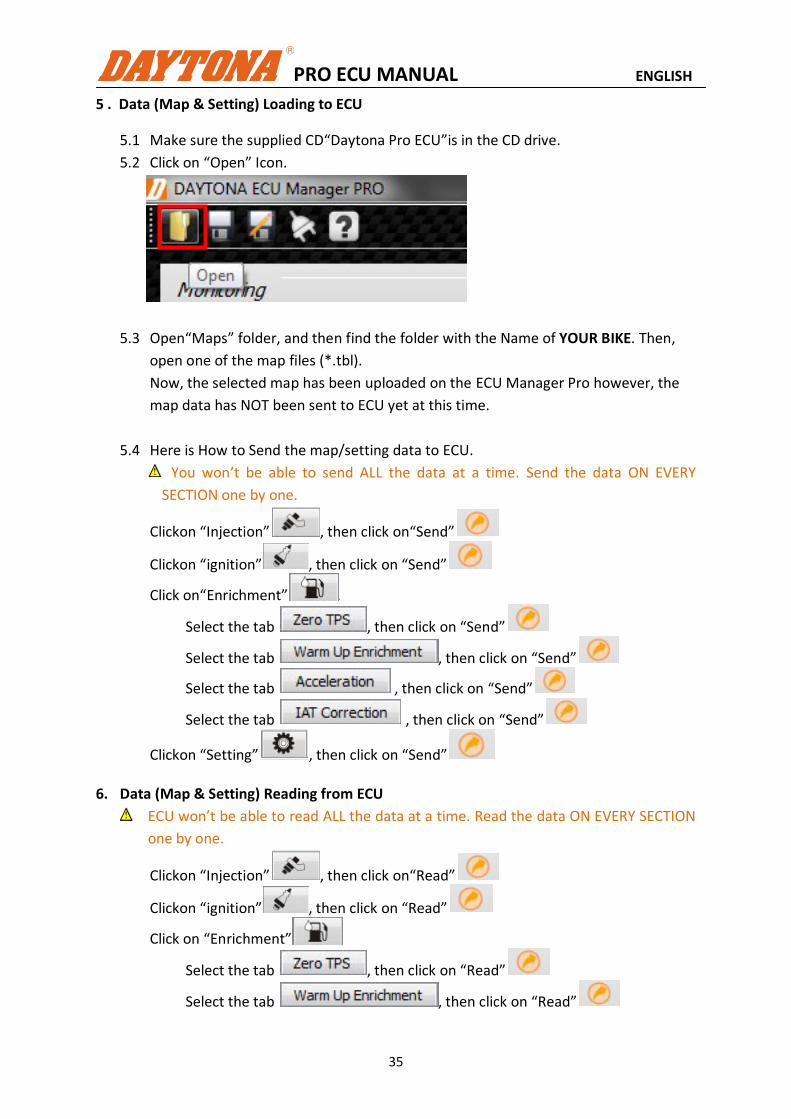
5 . Data (Map & Setting) Loading to ECU
5.1 Make sure the supplied CD“Daytona Pro ECU”is in the CD drive.
5.2 Click on “Open” Icon.
5.3 Open“Maps” folder, and then find the folder with the Name of YOUR BIKE. Then,
open one of the map files (*.tbl).
Now, the selected map has been uploaded on the ECU Manager Pro however, the
map data has NOT been sent to ECU yet at this time.
5.4 Here is How to Send the map/setting data to ECU.
You won’t be able to send ALL the data at a time. Send the data ON EVERY
SECTION one by one.
Clickon “Injection” , then click on“Send”
Clickon “ignition” , then click on “Send”
Click on“Enrichment” .
Select the tab , then click on “Send”
Select the tab , then click on “Send”
Select the tab , then click on “Send”
Select the tab , then click on “Send”
Clickon “Setting” , then click on “Send”
6. Data (Map & Setting) Reading from ECU
ECU won’t be able to read ALL the data at a time. Read the data ON EVERY SECTION
one by one.
Clickon “Injection” , then click on“Read”
Clickon “ignition” , then click on “Read”
Click on “Enrichment” .
Select the tab , then click on “Read”
Select the tab , then click on “Read”
PRO ECU MANUAL ENGLISH
36
Select the tab , then click on “Read”
Select the tab , then click on “Read”
Clickon “Settings” , then click on “Read”
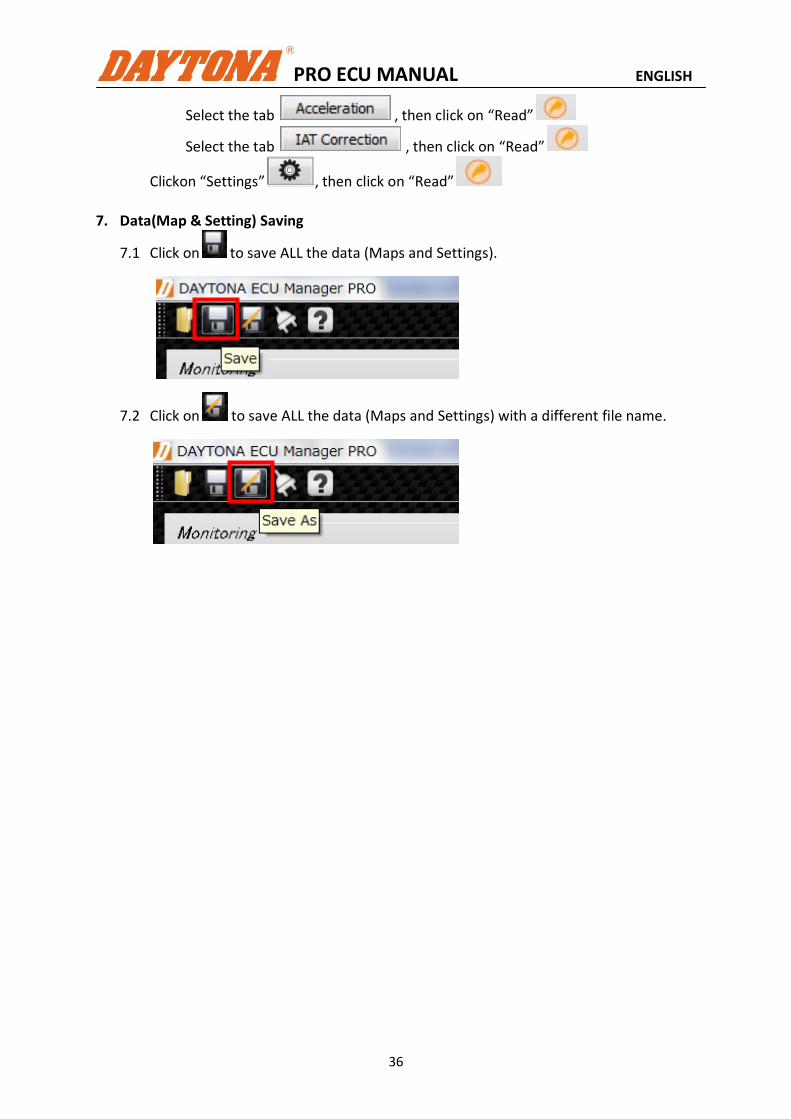
7. Data(Map & Setting) Saving
7.1 Click on to save ALL the data (Maps and Settings).
7.2 Click on to save ALL the data (Maps and Settings) with a different file name.

PRO ECU MANUAL ENGLISH
37
8. Fuel Injection Map Programming Stop the engine before programming. If the fuel supply is programmed too lean, the engine may be damaged. It is highly recommended to program the fuel supply from richer to leaner while checking the AFR(Air Fuel Ratio). The ideal AFR range would be12.5 - 12.9.
8.1 Click on . Fuel map below appears. 8.2 To program fuel map, select the cell(s) and then modify the value(s). The larger the
value is, the more the fuel is supplied. The color gradation will help you understand the whole picture of the map.
Richer <<<<<<< >>>>>>> Leaner
8.3 To select the cell(s), click on wherever you like. You could select one or more cells. To select two or more cells, just drag the mouse.The selected cell(s) turns into WHITE color.
If you select RPM column(s) or TPS row(s), all the cells in the selected column(s) or row(s) will turn into white. To select two or more RPM columnsor TPS rows, just drag the mouse on the columns or rows.
PRO ECU MANUAL ENGLISH
38
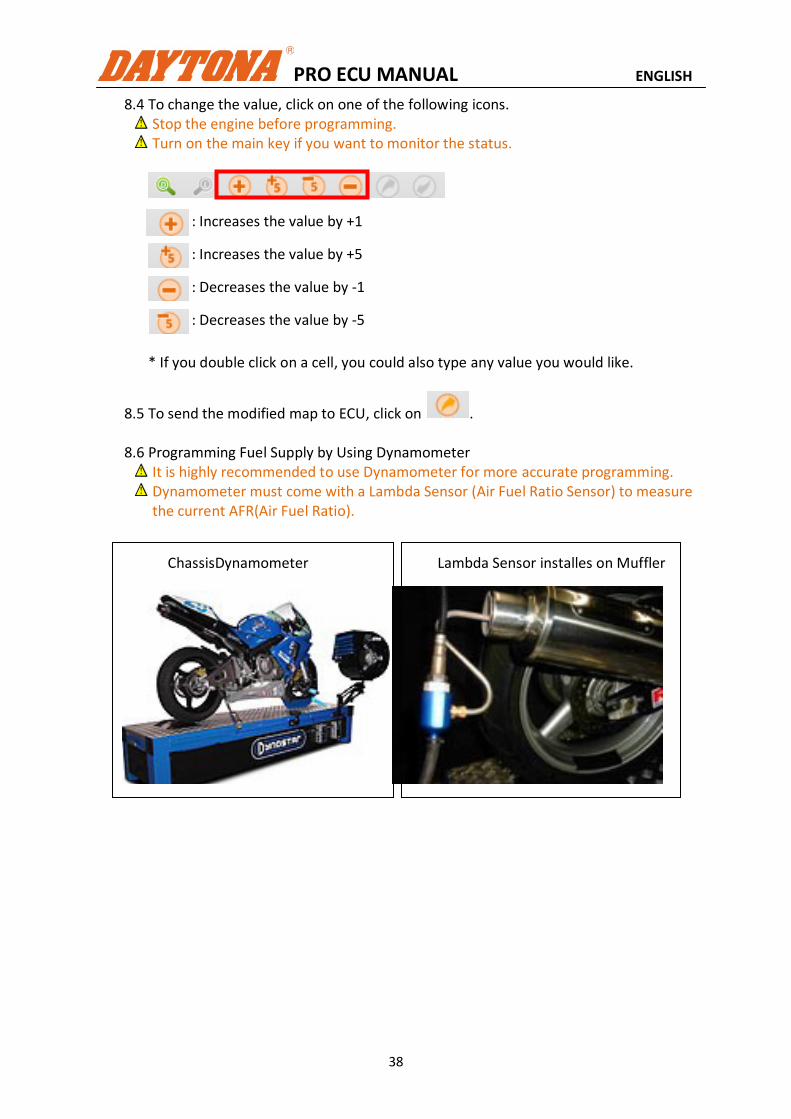
8.4 To change the value, click on one of the following icons. Stop the engine before programming. Turn on the main key if you want to monitor the status.
: Increases the value by +1
: Increases the value by +5
: Decreases the value by -1
: Decreases the value by -5
* If you double click on a cell, you could also type any value you would like.
8.5 To send the modified map to ECU, click on .
8.6 Programming Fuel Supply by Using Dynamometer It is highly recommended to use Dynamometer for more accurate programming. Dynamometer must come with a Lambda Sensor (Air Fuel Ratio Sensor) to measure the current AFR(Air Fuel Ratio).
ChassisDynamometer Lambda Sensor installes on Muffler
PRO ECU MANUAL ENGLISH
39
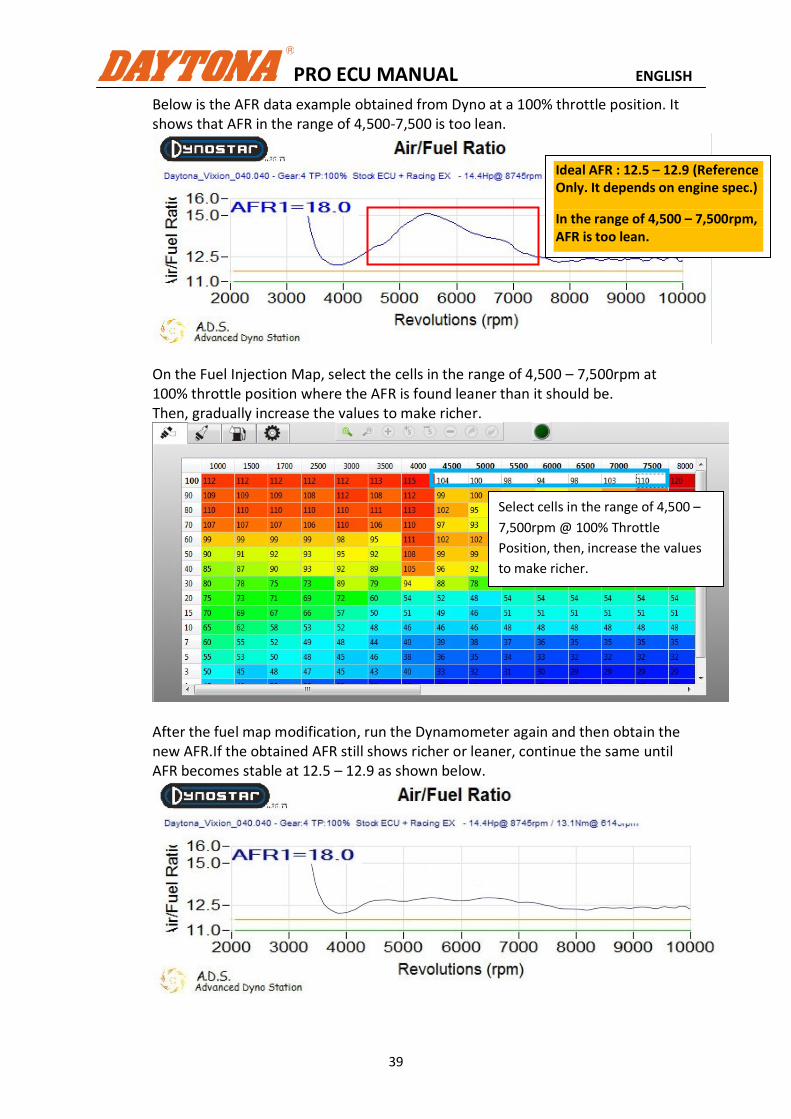
Below is the AFR data example obtained from Dyno at a 100% throttle position. It shows that AFR in the range of 4,500-7,500 is too lean.
On the Fuel Injection Map, select the cells in the range of 4,500 – 7,500rpm at 100% throttle position where the AFR is found leaner than it should be. Then, gradually increase the values to make richer.
After the fuel map modification, run the Dynamometer again and then obtain the new AFR.If the obtained AFR still shows richer or leaner, continue the same until AFR becomes stable at 12.5 – 12.9 as shown below.
Ideal AFR : 12.5 – 12.9 (Reference Only. It depends on engine spec.)
In the range of 4,500 – 7,500rpm, AFR is too lean.
Select cells in the range of 4,500 –
7,500rpm @ 100% Throttle
Position, then, increase the values
to make richer.
PRO ECU MANUAL ENGLISH
40
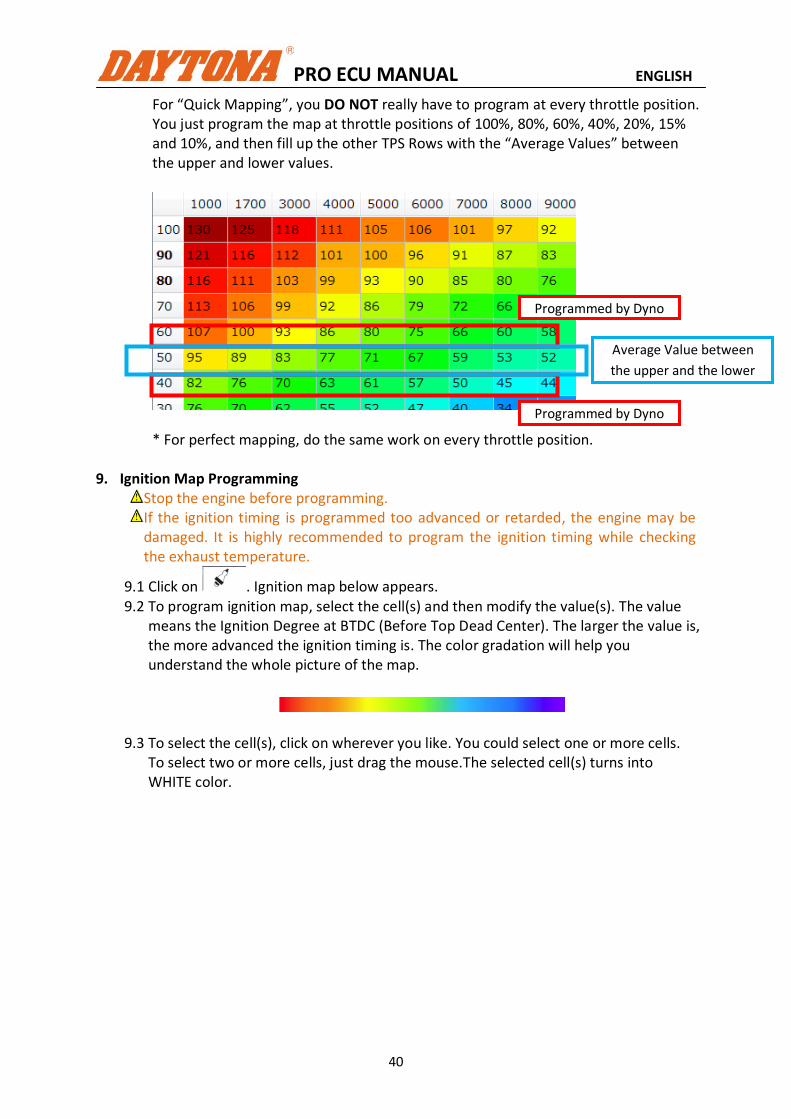
For “Quick Mapping”, you DO NOT really have to program at every throttle position. You just program the map at throttle positions of 100%, 80%, 60%, 40%, 20%, 15% and 10%, and then fill up the other TPS Rows with the “Average Values” between the upper and lower values.
* For perfect mapping, do the same work on every throttle position.
9. Ignition Map Programming Stop the engine before programming. If the ignition timing is programmed too advanced or retarded, the engine may be damaged. It is highly recommended to program the ignition timing while checking the exhaust temperature.
9.1 Click on . Ignition map below appears. 9.2 To program ignition map, select the cell(s) and then modify the value(s). The value
means the Ignition Degree at BTDC (Before Top Dead Center). The larger the value is, the more advanced the ignition timing is. The color gradation will help you understand the whole picture of the map.
9.3 To select the cell(s), click on wherever you like. You could select one or more cells. To select two or more cells, just drag the mouse.The selected cell(s) turns into WHITE color.
Programmed by Dyno
Programmed by Dyno
Average Value between
the upper and the lower
PRO ECU MANUAL ENGLISH
41
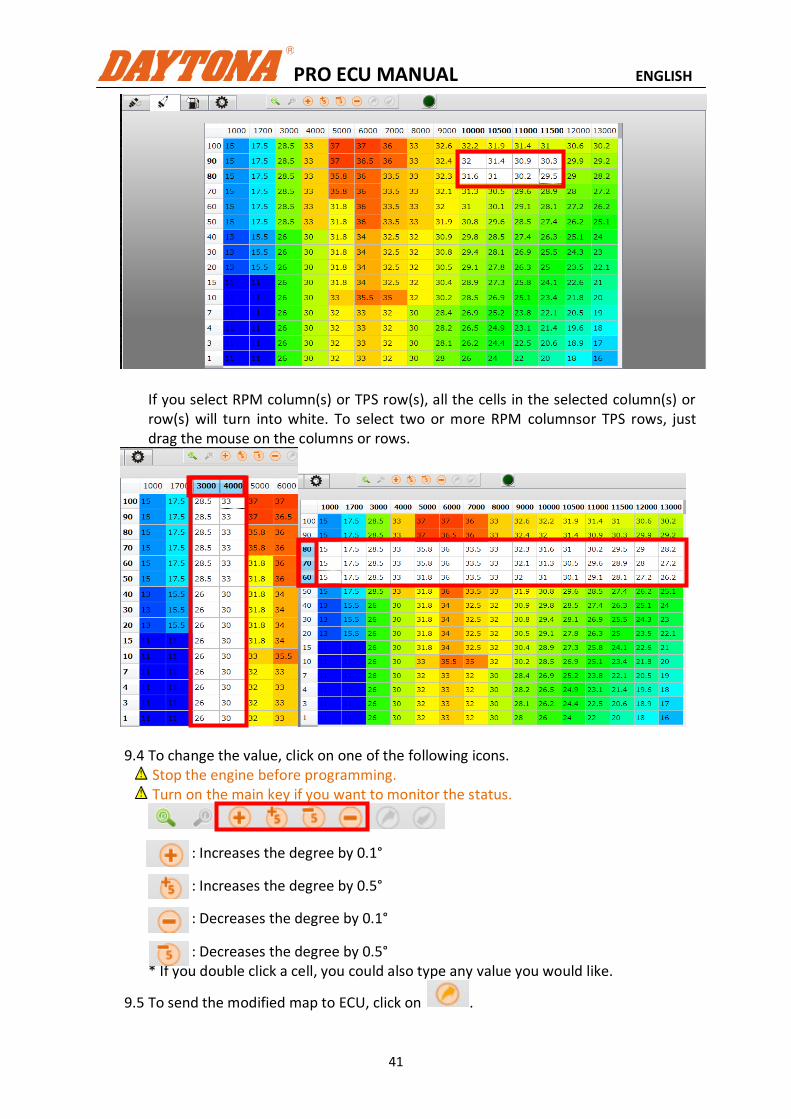
If you select RPM column(s) or TPS row(s), all the cells in the selected column(s) or row(s) will turn into white. To select two or more RPM columnsor TPS rows, just drag the mouse on the columns or rows.
9.4 To change the value, click on one of the following icons. Stop the engine before programming. Turn on the main key if you want to monitor the status.
: Increases the degree by 0.1°
: Increases the degree by 0.5°
: Decreases the degree by 0.1°
: Decreases the degree by 0.5° * If you double click a cell, you could also type any value you would like.
9.5 To send the modified map to ECU, click on .
PRO ECU MANUAL ENGLISH
42
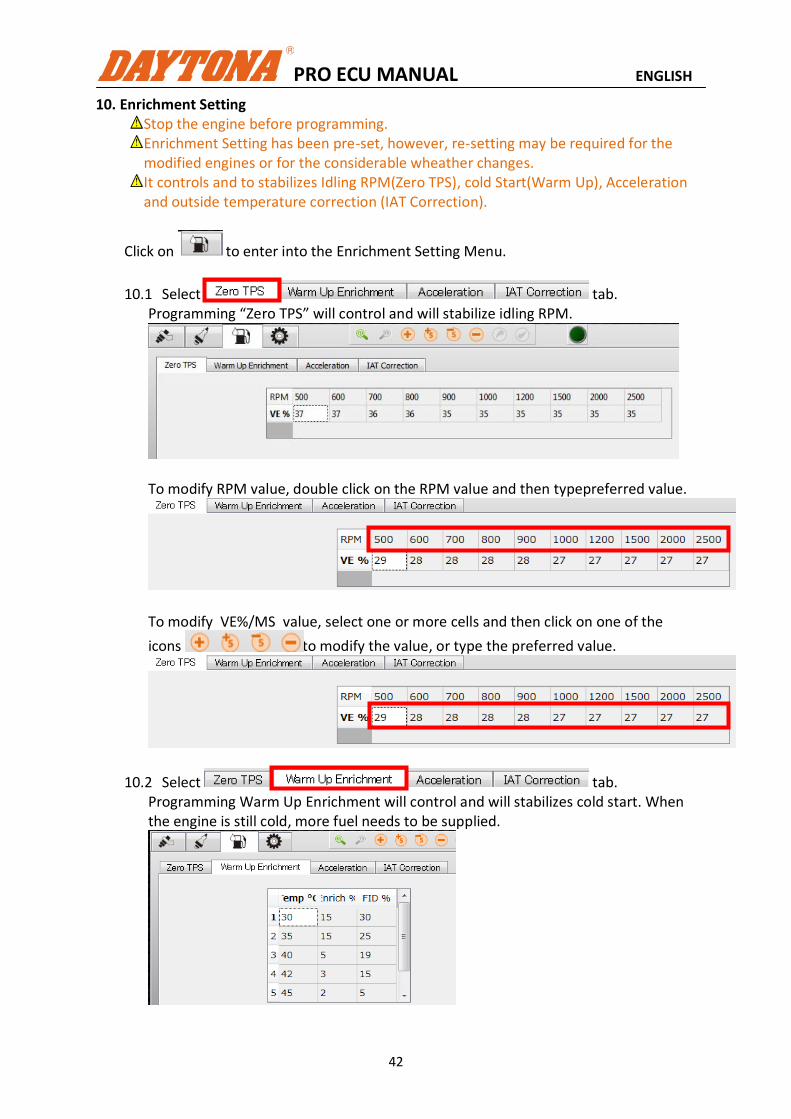
10. Enrichment Setting Stop the engine before programming. Enrichment Setting has been pre-set, however, re-setting may be required for the modified engines or for the considerable wheather changes. It controls and to stabilizes Idling RPM(Zero TPS), cold Start(Warm Up), Acceleration and outside temperature correction (IAT Correction).
Click on to enter into the Enrichment Setting Menu.
10.1 Select tab. Programming “Zero TPS” will control and will stabilize idling RPM.
To modify RPM value, double click on the RPM value and then typepreferred value.
To modify VE%/MS value, select one or more cells and then click on one of the
icons to modify the value, or type the preferred value.
10.2 Select tab. Programming Warm Up Enrichment will control and will stabilizes cold start. When the engine is still cold, more fuel needs to be supplied.
PRO ECU MANUAL ENGLISH
43
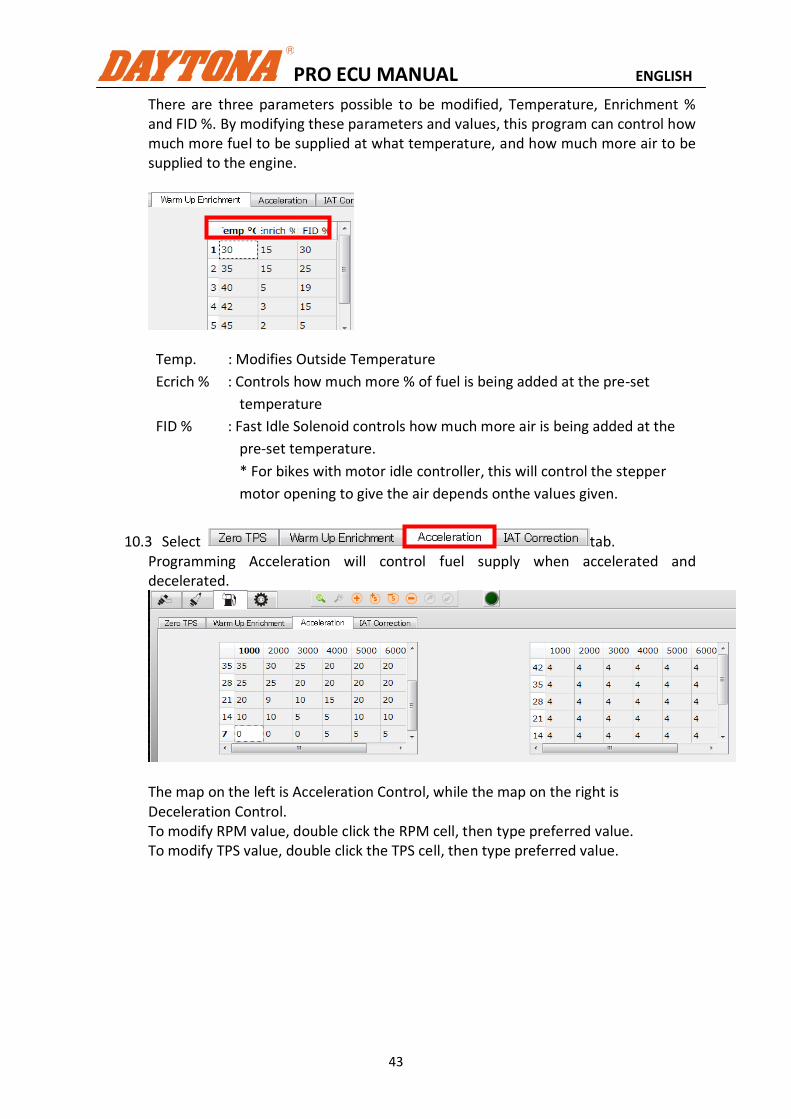
There are three parameters possible to be modified, Temperature, Enrichment % and FID %. By modifying these parameters and values, this program can control how much more fuel to be supplied at what temperature, and how much more air to be supplied to the engine.
Temp. : Modifies Outside Temperature
Ecrich % : Controls how much more % of fuel is being added at the pre-set
temperature
FID % : Fast Idle Solenoid controls how much more air is being added at the
pre-set temperature.
* For bikes with motor idle controller, this will control the stepper
motor opening to give the air depends onthe values given.
10.3 Select tab. Programming Acceleration will control fuel supply when accelerated and decelerated.
The map on the left is Acceleration Control, while the map on the right is Deceleration Control. To modify RPM value, double click the RPM cell, then type preferred value. To modify TPS value, double click the TPS cell, then type preferred value.
PRO ECU MANUAL ENGLISH
44
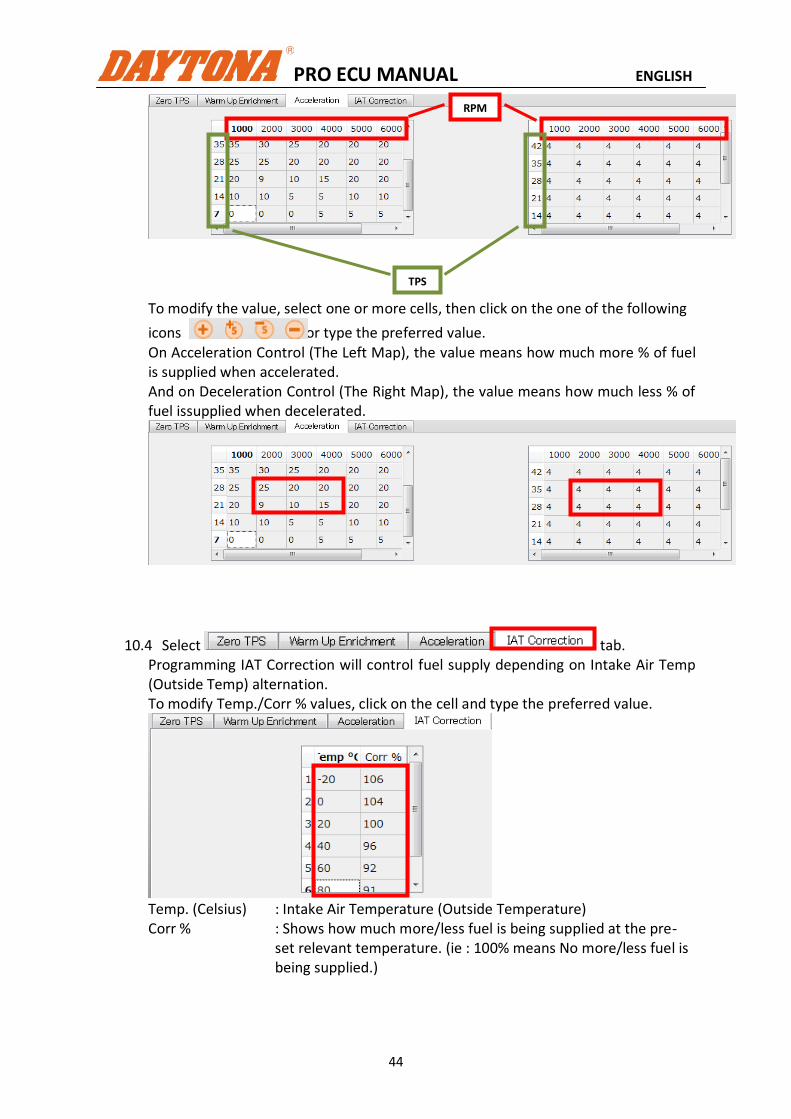
To modify the value, select one or more cells, then click on the one of the following
icons or type the preferred value. On Acceleration Control (The Left Map), the value means how much more % of fuel is supplied when accelerated. And on Deceleration Control (The Right Map), the value means how much less % of fuel issupplied when decelerated.
10.4 Select tab. Programming IAT Correction will control fuel supply depending on Intake Air Temp (Outside Temp) alternation. To modify Temp./Corr % values, click on the cell and type the preferred value.
Temp. (Celsius) : Intake Air Temperature (Outside Temperature) Corr % : Shows how much more/less fuel is being supplied at the pre-
set relevant temperature. (ie : 100% means No more/less fuel is being supplied.)
TPS
RPM
PRO ECU MANUAL ENGLISH
45
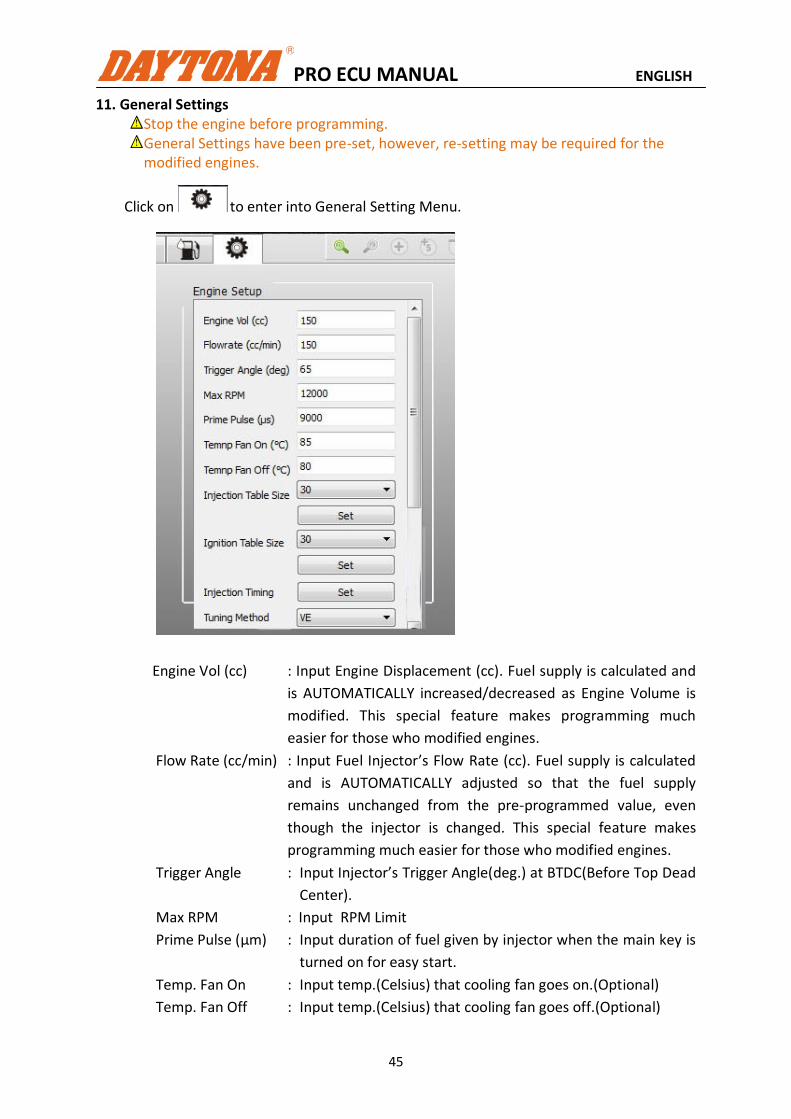
11. General Settings Stop the engine before programming. General Settings have been pre-set, however, re-setting may be required for the modified engines.
Click on to enter into General Setting Menu.
Engine Vol (cc) : Input Engine Displacement (cc). Fuel supply is calculated and
is AUTOMATICALLY increased/decreased as Engine Volume is
modified. This special feature makes programming much
easier for those who modified engines.
Flow Rate (cc/min) : Input Fuel Injector’s Flow Rate (cc). Fuel supply is calculated
and is AUTOMATICALLY adjusted so that the fuel supply
remains unchanged from the pre-programmed value, even
though the injector is changed. This special feature makes
programming much easier for those who modified engines.
Trigger Angle : Input Injector’s Trigger Angle(deg.) at BTDC(Before Top Dead
Center).
Max RPM : Input RPM Limit
Prime Pulse (μm) : Input duration of fuel given by injector when the main key is
turned on for easy start.
Temp. Fan On : Input temp.(Celsius) that cooling fan goes on.(Optional)
Temp. Fan Off : Input temp.(Celsius) that cooling fan goes off.(Optional)
PRO ECU MANUAL ENGLISH
46
Injection Table Size : Select either 15 or 30 of RPM column. 30 column map will
enable to program more detail. Once selected, click on “Set”.
The default map is 30.The map is automatically converted to
another if the table size is changed.
Injection Table Size : Select either 15 or 30 of RPM column. 30 column map will
enable to program more detail. Once selected, click on “Set”.
The default map is 30.The map is automatically converted to
another if the table size is changed.
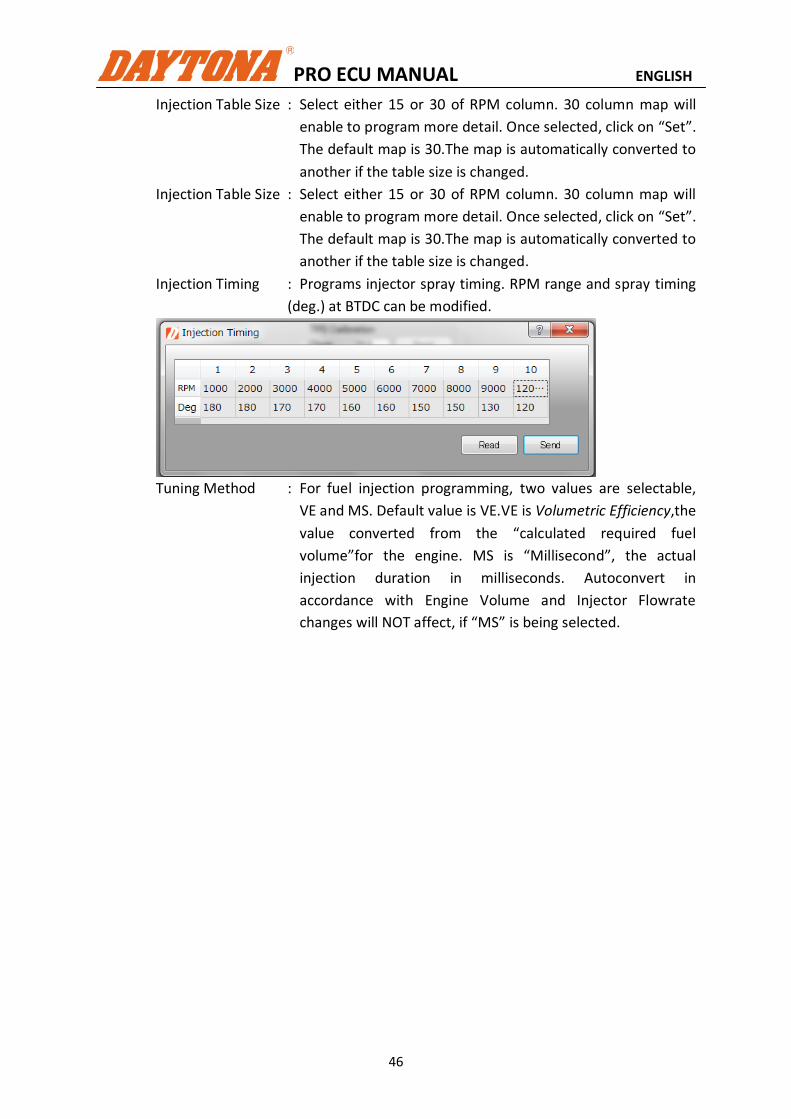
Injection Timing : Programs injector spray timing. RPM range and spray timing
(deg.) at BTDC can be modified.
Tuning Method : For fuel injection programming, two values are selectable,
VE and MS. Default value is VE.VE is Volumetric Efficiency,the
value converted from the “calculated required fuel
volume”for the engine. MS is “Millisecond”, the actual
injection duration in milliseconds. Autoconvert in
accordance with Engine Volume and Injector Flowrate
changes will NOT affect, if “MS” is being selected.