pro 2 - download.algoriddim.comdownload.algoriddim.com/manual/djay pro 2 mac manual...
TRANSCRIPT

2
User Manual (Mac)
PRO2

PRO User Manual (Mac)2
Table of contents1 Introduction 7
1.1 Minimum requirements 7
1.2 Interface tour 8
2 Glossary of terms 133 Quick start 16
3.1 Installing djay Pro 2 16
3.1.1 Download from the App Store 163.1.2 Download from Algoriddim 163.1.3 Launching djay Pro 2 17
3.2 Navigating the library browser 17
3.2.1 My Library 173.2.2 iTunes playlists 183.2.3 Spotify 183.2.4 Finder 183.2.5 Searching 18
3.3 Loading a track 19
3.4 Mixing your tracks 20
3.5 Recording your mix 21
3.6 Adding hardware 21
4 Core features 234.1 Layout 24
4.2 Volume controls 25
4.2.1 Master out 254.2.2 Headphone pre-cueing 264.2.3 Mic input 26
4.3 Media library browser 27
4.4 Decks 28
4.5 Deck views 28
4.5.1 2-deck view 284.5.2 Vertical waveforms 294.5.3 Horizontal waveforms 29
4.6 Mixer 29
4.6.1 Crossfader section 294.7 Shortcuts and multi-touch control 31
4.8 Preferences 34

PRO User Manual (Mac)24.8.1 General preferences 344.8.2 Devices 364.8.3 Mixer 374.8.4 Automix 384.8.5 Media library 394.8.6 Appearance 404.8.7 Shortcuts 42
4.8.8 Advanced 434.9 Mix recorder 44
4.9.1 Audio 444.9.2 Video 45
4.10 Uninstalling djay Pro 2 47
4.10.1 Algoriddim stored data 475 Advanced tools 49
5.1 djay Pro 2 menus 49
5.2 Advanced deck layouts 51
5.2.1 Four decks 515.2.2 Video decks 535.2.3 Waveforms 60
5.3 Beatgrids 62
5.3.1 What are beatgrids? 625.3.2 Setting a beatgrid 625.3.3 Adjusting incorrect beatgrids 63
5.4 BPM and tempo 64
5.4.1 Adjusting BPM 645.4.2 Tempo sensitivity 65
5.5 Key lock and changing key 66
5.6 Syncing 67
5.6.1 Tempo sync 67
5.6.2 Beat sync 67
5.7 Slicer mode 68
5.8 Slip mode 69
5.9 Library management 70
5.9.1 Browser overview 70
5.9.2 Analyzing your music 70
5.9.3 Previewing tracks 71
5.9.5 Automix 715.9.6 List views 725.9.7 Metadata columns 73

PRO User Manual (Mac)25.9.8 Sorting your music 735.9.9 Spotify 74
5.9.10 iTunes 76
5.9.11 Videos 76
5.9.12 History 77
5.9.13 Finder 78
5.9.14 Track Match 78
5.10 Effects 80
5.10.2 Video 81
5.10.3 Audio/visual 81
5.10.4 Favorites 82
5.10.5 Using effects 83
5.10.6 Audio Unit effects 855.11 Loops 86
5.11.1 Loop creator 86
5.11.2 Loop panel 87
5.12 Cue points 89
5.13 Sampler 90
5.14 Using hardware 93
5.14.1 Controllers 93
5.14.2 CDJs 94
5.15 MIDI mapping 98
5.15.1 Mapping Jogwheels 101
5.15.2 Editing an existing mapping 102
5.15.3 Importing and exporting mappings 1035.16 External mixing 104
6 Tips and support 1066.1 Special tips 106
6.1.1 Avoid the red 106
6.1.2 Audio file quality 1076.1.3 Mixing in key 1076.1.4 Know your tracks 1076.1.5 Keep your library tip-top 1076.1.6 Cables 107
6.2 FAQ and Support 108
7 What's new in 2.0 1107.1 2-deck view 110
7.2 4-deck view 111
7.3 Single Deck view 111

PRO User Manual (Mac)2
7.4 Automix view 112
7.4.1 Automix playlist 1137.5 My Library 114
7.5.1 Split Library Mode 1157.5.2 Adding music to your library 1167.5.3 Playlists 1177.5.4 Smart playlists 1187.5.5 Playlist folders 1207.5.6 History 1217.5.7 Filtering 121
7.6 Library side panel 123
7.6.1 Compact library 1237.6.2 Queue 1237.6.3 Session 1247.6.4 Match 124
7.7 PhotoBeat 125

PRO
Introduction
User Manual (Mac)2

PRO
7
User Manual (Mac)2
1 IntroductionWelcome to djay Pro 2. Whether you’re a seasoned DJ or a rookie to the concept of mixing music, djay Pro 2 is powerful and flexible, with all the tools you might need to mix both audio and video. The app is built from the ground up to work perfectly with macOS, meaning rock-solid stability, built in Force Touch & multi-touch gestures, and silky smooth visuals on Retina Displays.
• Up to four channels of music and two channels of video
• Built-in audio and video effects
• Spotify and iTunes integration
• Ultra-low latency audio engine
• 64-bit processing
• Silky smooth 60 frames per second interface
• Optimized for high resolution Retina Displays
• Native support for over 50 MIDI controllers from major manufacturers
• Native plug-and-play HID integration for supported Pioneer CDJs
• Both Force touch and multi-touch gestures native to the app
1.1 Minimum requirementsYou can run djay Pro 2 on any Apple Mac computer running macOS 10.9 or later. The
minimum install size for the software is 290 MB, plus space for your music and videos. Since
djay Pro 2 is designed with macOS in mind, all you need to bring is your music!
Tip: More RAM and a faster processor will ensure a smoother experience while DJing.

PRO
8
User Manual (Mac)2
1.2 Interface tourNeed to know what everything is when you first load djay Pro 2? Here's a at-a-glance tour of
the interface.
1. Master volume control. Change the master output and access settings (see section 4.2.1 Master out).
2. Headphone pre-cue control. Change the pre-cue output and access settings (see
section 4.2.2 Headphone pre-cueing).
3. Microphone volume control. Change the microphone output and access settings (see
27
26
3837
49
47
50
45
29
23
18
65 8
43
710 11 15 16
20
12 13 14
3224
2533
21
2831
40 41 423635
4321
19
9
39
22
30
46 48
44
51
17
34

PRO
9
User Manual (Mac)2
section 4.2.3 Mic input).
4. Mix recorder. Toggles the Mix recorder pop up (see section 4.9 Mix recorder).
5. Track title. Displays the track title metadata.
6. Track artists. Displays the track artist(s) metadata.
7. Track musical key. Displays the current track musical key (see section 5.5 Key lock and changing key).
8. Track time remain. Shows how much time is left on the deck. Click to toggle to time
played.
9. Sampler. Open/close the Sampler panel (see section 5.13 Sampler).
10. Effects. Toggle the quick effects panels for decks 1 & 2 (see section 5.10 Effects).
11. Deck tools button. Toggles displaying the FX, loop and pads tool panel (see sections 5.10 Effects, 5.11 Loops, and 5.12 Cue points).
12. Clock. Tells you the time while in fullscreen mode.
13. Single deck mode. Select from single deck and Automix views (see section 5.2 Advanced deck layouts).
14. Two-deck mode. Select different two-deck modes (see section 5.2 Advanced deck layouts).
15. Four-deck mode. Select different four-deck modes (see section 5.2 Advanced deck layouts).
16. Video mode. Select video mode (see section 5.2 Advanced deck layouts).
17. Album art. Displays the album art metadata.
18. Track waveform. Displays the overall visual render of track audio, with progress
marker (see section 5.2.3 Waveforms).
19. Deck sync button. Toggles whether the track is synced (see section 5.6 Syncing).
20. Deck progress indicator & jogwheel. Standard DJ control system for cueing,
scratching, and rewinding deck audio. Displays the track progress around the edge.
21. Tempo slider. Speeds up and slows down the playing track.
22. Deck key lock. Maintains the current musical key of the audio, even if tempo is
changed (see section 5.5 Key lock and changing key).
23. Deck BPM. Displays the current BPM of the playing track (see section 5.4 BPM and tempo).
24. High EQ. Controls the amount of high frequencies in the track between -24dB to
+6dB.
25. Mid EQ. Controls the amount of mid frequencies in the track between -24dB to +6dB.
26. Deck low EQ. Controls the amount of low frequencies in the track between -24dB to

PRO
10
User Manual (Mac)2
+6dB.
27. Channel level meter. Indicator to show how loud the track is.
28. Channel gain. Controls the gain trim for the deck (see section 4.6 Mixer).
29. Volume fader. Controls the amount of volume a deck outputs (see section 4.6 Mixer).
30. Deck number indicator/options. Tells you which deck the waveform is from and gives
access to deck options (see sections 5.7 Slicer mode, and 5.8 Slip mode).
31. Beatgrid edit button. Accesses options to alter track beatgrid (see section 5.3 Beatgrids).
32. Scrolling waveform. Zoomed in visual of track audio, which follows the progress of the
deck (see section 5.2.3 Waveforms).
33. Deck +/- tempo bend buttons. Buttons to temporarily slow down or speed up the
audio to nudge a track while beatmatching.
34. Track sticker indicator. Displays a marker showing the position of the virtual spinning
record as it plays.
35. Play/pause button. Stops and starts the audio on the deck (see section 4.1 Layout).
36. Cue set button. Sets a temporary cue point at the current location of the progress
indicator (see section 4.1 Layout).
37. Cue jump button. Returns the deck to the existing cue point, plays audio from the
cue point if held down, or returns you to the start of the track if no cue point is set (see
section 4.1 Layout).
38. Loop halve button. Button to reduce the loop length by half from 32 beats to 1/16
beat (see section 5.11 Loops).
39. Loop set button. Toggles a loop on/off at the current progress marker (see section 5.11 Loops).
40. Loop double button. Button to increase the loop length by double from 1/16 beat to
32 beats (see section 5.11 Loops).
41. DJ Filter. Both low pass (LPF) and high pass (HPF) filters on one knob (see section 4.1 Layout).
42. Crossfader. Horizontal slider that fades volume between the decks (see section 4.6.1 Crossfader section).
43. Library tabs. Switches between My Library, iTunes, Spotify, Video, and Finder browser
tabs (see section 5.9 Library management).
44. Library browser tree. Displays the playlist tree, with folders and playlists (see section 5.9 Library management).
45. Playlist window. Displays the currently selected playlist (see section 4.3 Media

PRO
11
User Manual (Mac)2
library browser).
46. Filter bar toggle. Hides/displays the playlist filter rules (see section 7.5.7 Filtering).
47. List view buttons. Buttons to change playlist view between compact, regular, and grid
(see section 5.9.3 List views).
48. Search box. Input box for typing in search words to filter your library. Can switch
between searching playlist or collection (see section 4.3 Media library browser).
49. Library expand button. Toggles between showing full library browser or browser and
decks.
50. Automix. Accesses Automix options and functions (see section 4.8.3 Automix).
51. Side panel toggle. Show/hide the library side panel (see section 7.6 Library side panel)

PRO User Manual (Mac)2
Glossary of terms

PRO
13
User Manual (Mac)2
2 Glossary of termsThere are many common technical and DJ terms used throughout this manual. Below is a quick list of some of these words along with a short definition.
BPM (Beats per minute). The standard unit of measuring the tempo of music.
Channel. An individual input route for audio on the mixer. A channel can output either video
or audio.
Cue point. Markers that can be set along the timeline of the track and jumped to instantly.
Up to eight can be created per track.
Deck. Like it’s physical counterpart, this is where your individual tracks are played and
controlled. You can change the tempo, view track progress and overall waveforms, and
emulate the behavior of CDJs and turntables.
Downbeat. The first beat of a measure.
Effect. A method of applying alterations to the audio of a track or mix. You can chain up to
three audio effects, and two video effects per channel.
EQ (equalization). A filtering of the audio to cut out specific frequencies. djay Pro 2
features the standard DJ mixer High, Mid, and Low EQs.
Fader/slider. A control method which uses a sliding action to fade between amounts. DJ
mixers tend to feature vertical faders and a crossfader.
Force touch. An addition to touch technology that allows for detecting different pressures of
touch.
Jogwheel. A round platter used for controlling music. They are designed to emulate the feel
of a turntable and usually come in pairs on DJ controllers.
Library. The section of djay Pro 2 where you can quickly browse, search and prepare your
music and videos to mix with.
Loop. A segment of a track that’s repeated. The size and location of the loop can be

PRO
14
User Manual (Mac)2
determined by the user.
Measure. Also known as a Bar, a measure is the number of beats corresponding to the
timing of the music. For example, most dance music is 4/4 timing, so one measure is four
beats.
Mixer. The hub of your equipment that controls the output of music by changing channel
volume, gain, EQs, filters, and crossfade.
Multi-touch. Technology such as the MacBook Pro’s trackpad that allows for more than one
touch point and multiple point gestures.
Playlist. A saved list of tracks within your library. You can use these to prepare your mixes
and Automix queue.
Quantize. The act of ensuring music is precisely set to a rhythm. Quantized music will stay in
time with a set tempo, and will always launch at a selected interval of this tempo, even if it’s
off the beat.
Sample. A short clip of audio or video taken from another source that can be quickly played
back.
Sync. The act of automatically ensuring tracks stay in time, either by simply matching the
tempo, or quantizing the beats to stay together.
Tempo. The speed at which music is played. This is usually measured in beats per minute.
Transport. The buttons used to control a track. These include start/stop, cue start, and
sometimes rewind and fast forward.
UI (User interface). The system of screen elements the user interacts with, such as buttons,
menus, scrolling lists, or waveforms.
Waveform. The visual representation of the music, displaying audio volume, and sometimes
showing frequencies in different colors.
PRO User Manual (Mac)2
Quick Start

PRO
16
User Manual (Mac)2
3 Quick startFrom the moment you first load djay Pro 2, the experience is designed to be as intuitive as possible. Getting your first mix started is almost as easy as playing tracks in iTunes.
3.1 Installing djay Pro 2You can either buy djay Pro 2 via the Mac App Store or the Algoriddim web store. Both
the Algoriddim license and App Store allow you to install and run the software on any active
Mac computers you own.
3.1.1 Download from the App StorePurchase and download the app like any other on the Mac App Store. The purchase will be
tied to your Apple ID, which means you won’t need a license key to install.
3.1.2 Download from AlgoriddimPurchase, download, and install djay Pro 2 like you would any other software. Once you’ve
paid for the software, you’ll be sent a license key. Be sure to keep the license key you
received safe.
NOTE: Only the App Store version of djay Pro 2 has iCloud integration which allows
you to sync hot cues and other user data with other versions of djay.

PRO
17
User Manual (Mac)2
3.1.3 Launching djay Pro 2 The first time you load into the software, you’ll see the default layout: two decks, a mixer and
a browser for your music collection.
3.2 Navigating the library browserYou can find the library browser in the lower half of the djay Pro 2 window, which give you
access to all your music, from your own collection as well as the Spotify streaming service
(Premium account required).
3.2.1 My LibraryThe My Library lets you manage, edit and sort your music from within djay Pro 2. See
section 7 What's new in 2.0 for more information.

PRO
18
User Manual (Mac)2
3.2.2 iTunes playlistsYou can browse your iTunes playlists by clicking the iTunes icon on the far-left strip of the
browser. The browser tree will then display your playlists.
3.2.3 SpotifyTo access Spotify’s music streaming library, you’ll need an active Premium account on the
service, and to be logged in to your account within djay Pro 2.
3.2.4 FinderYou can browse your music by adding folders from your hard drive, external drives, and USB
sticks through the Finder tab of the library browser. Simply click Add Folder and find where
your music collection is stored.
3.2.5 SearchingTo find a specific track, choose the relevant tab in your library and use the search box (1) in
the top right of the library browser.
1

PRO
19
User Manual (Mac)2
3.3 Loading a trackMove the crossfader in the center of the window all the way to the left, either by clicking the
arrow between the crossfader and filter knob (1), or clicking and dragging the crossfader
yourself (2).
Next, there are two ways to load a track into a deck.
1. Right click on your chosen track and select Load On Deck 1 from the context menu.
2. Drag the track into the left-hand deck.
Hit the Play button on the far left of the mixer strip to start your music playing.
1
2

PRO
20
User Manual (Mac)2
3.4 Mixing your tracksAdd a new music track from iTunes or Spotify to Deck 2 then make sure it isn’t playing (if it is, use the PLAY button to stop playback).
Click the SYNC button to match the new track's BPM with the first track.
Restart the track by two-finger dragging or click-dragging across the track waveform above the deck all the way to the left. Ensure the red indicator is set to the far left.
Press PLAY at the start of a measure on the first track to play both in time. Move the crossfader across to the middle to hear both tracks playing at once.
If you find that the beats sound a bit out, use the + and – symbols (1) on the deck 2 to nudge the track in time. Keep practicing this until you get it right and you will have learned the fundamentals of beatmatching, one of the cornerstones of DJing.
Congratulations! You’ve just done a mix!
1

PRO
21
User Manual (Mac)2
3.5 Recording your mixYou can record your mix by clicking the red button at the top-left of the window. When the popup appears, press Start New Audio Recording to activate the recorder. A timer next to the red button will then light up and count up, to indicate recording in progress. For more details about the mix recording functions, see section 4.9 Mix recorder.
3.6 Adding hardwareYou can see the full list of supported MIDI controllers and HID-enabled media players over on our website. The listed hardware is plug-and-play, meaning djay Pro 2 will recognize it’s connected and the all your controls will work without any extra settings. For more detailed information please read section 5.14 Using hardware.

2PRO
Core features
User Manual

PRO
23
User Manual (Mac)2
4 Core featuresA fresh install of djay Pro 2 will present you with the default view, a familiar layout designed to get you mixing quickly. The core features of the software are all at your fingertips from the moment you open the software.

PRO
24
User Manual (Mac)2
4.1 LayoutThe main djay Pro 2 screen consists of your music decks, mixer and library. If you’re familiar
with existing DJ paradigms or other modern DJ software, you will recognize many of these
functions.
1. Global volume controls: This section allows you to set the volume and select
hardware devices for the Master out, headphone pre-cueing, and microphone input.
2. Sampler: Access up to 12 samples to spice up your set. You can choose from official
purchasable sample packs, or add your own saved samples from your music collection.
See section 5.13 Sampler for more information.
3. Deck options: Switch between the different two, four and video deck layouts (see
section 4.5 Deck views and section 5.2 Advanced deck layouts).
4. Decks: The music players used to play and control your audio and video.
5. Transport: Your basic controls for your decks.
6. Mixer: see section 4.6 Mixer for more information
7. Library browser: Access all your music and videos from here (see section 4.3 Media library browser and section 5.9 Library management for more details).
1 2
6
3
4
5
7
5

PRO
25
User Manual (Mac)2
4.2 Volume controlsEach of your volume inputs and outputs can be configured quickly and easily from the top of
your djay Pro 2 window in the global section. Choose the desired hardware for each before
doing anything else.
4.2.1 Master outThe master out pop up gives you quick access to the master volume control as well as the
Configure Audio Devices preferences.

PRO
26
User Manual (Mac)2
4.2.2 Headphone pre-cueingChange the Volume of your headphone monitoring. Alter the Cue/mix amounts to allow
your headphones to hear as much of the cued track and the main mix as you need. Use Split Cue to hear your cued track in your left ear and the main mix in your right. Toggle Auto Select to allow djay Pro 2 to automatically choose which channel you’re cueing.
TIP: Using the Cue/mix and Split Cue can be useful when DJing in a noisy environment
or if there’s significant delay to the house PA system.
4.2.3 Mic inputOnce you’ve configured your microphone hardware, toggle the microphone input on or
off, change the volume to suit your needs. You can also add Echo and alter the Pitch of the
incoming sound for some cool effects!

PRO
27
User Manual (Mac)2
4.3 Media library browserThe library browser is a powerful tool to help organize your music and prepare your sets. The
browser consists of two main parts: the Playlist Tree and the Track List, and includes music
searching, track filtering and access to both iTunes and the Spotify music streaming service.
TIP: You can access the expanded browser view quickly by hitting ENTER on your
computer keyboard.
1. Playlist tree: Displays all your playlists, smart playlists, and playlist folders. Selecting a
playlist will display saved tracks in the track list on the right of the browser.
2. Track list: Shows a list of all the tracks in the currently selected playlist or folder.
Along with the two main sections of the library browser, there are also some other important
functions:
3. List view options: These icons let you change how the track list windows displays
your music collection. You can switch between compact grid, and collection view.
12
3 4
5

PRO
28
User Manual (Mac)2
See section 5.9 Library management for more information.
4. Search: The search box allows you to quickly find tracks within your current collection
(My Library, iTunes, Spotify, Videos, History, and Finder) by searching for text
strings in track metadata.
TIP: You can switch between searching the whole library and
the current playlist by clicking the little menu arrow in the
search box.
5. Library tab buttons: Easily switch between your different collections using the buttons
on the left of the browser. You can switch between My Library, iTunes, Spotify,
Videos, History, and Finder.
4.4 DecksJust like hardware DJ equipment, the decks within djay Pro 2 allow you to load, play and
manipulate up to four different music tracks or two different videos. The Waveform views
feature parallel scrolling, designed to help you mix. You can control the track gain (otherwise
known as trim) and left/right balance using the sliders incorporated into the deck level
meters at the top corners of the screen.
4.5 Deck viewsYou can switch to different deck views, depending on your preference, using the deck view
buttons a thte top-right of the window. More details for both the two and four deck layouts in
section 5.2 Advanced deck layouts.
4.5.1 2-deck viewThe default layout for djay Pro 2 displays your decks as virtual jogwheels, emulating the look
and feel of their real counterparts to help familiarity.

PRO
29
User Manual (Mac)2
You can also choose to switch between horizontal or vertical scrolling waveforms, and virtual
turntables.
4.5.2 Vertical waveformsYou can set your track waveforms to flow from top to bottom, in parallel.
4.5.3 Horizontal waveformsWith horizontal waveforms, the visuals scroll from right to left, in parallel.
4.6 MixerThe mixer section controls which deck plays out to the master. There are also filter controls, as well as loop and transport buttons across this strip.
4.6.1 Crossfader sectionThe crossfader can be found in the center of the screen. The left/right arrow buttons on either side automate a crossfade in the direction of the arrow. The speed of the fade can be set in the preferences (see section 4.8.3 Automix preferences).

PRO
30
User Manual (Mac)2
FiltersEither side of the crossfader, you can find dedicated deck DJ Filter knobs. These knobs are designed to cut out either the low or high frequencies, depending on whether you turn left or right.
Transport controlsThe transport section consists of three controls: the PLAY button, CUE SET, and CUE PLAY (CUP). The PLAY button starts and stops the track based on the start and stop times (see section 4.8.1 General preferences). The CUE SET button sets a temporary cue point which can be recalled while the deck is playing music. When the deck is stopped, the CUE SET
button sets a new cue point.
Loop controlsThe djay Pro 2 loop controls feature a simple set-up consisting of three buttons: loop length decrease, loop activate, and loop length increase. The loop length is shown in
beats, and changing the size halves or doubles, from 1/16th of a beat up to 32 beats. When
a loop is active, the loop activate button will turn blue.

PRO
31
User Manual (Mac)2
4.7 Shortcuts and multi-touch controldjay Pro 2 features both multi-touch and Force touch gestures on the trackpad (Force touch
only on enabled trackpad hardware), along with a comprehensive list of keyboard shortcuts
to get you mixing. For more information, view the full list of shortcuts by selecting Keyboard shortcuts from the Help menu (or ⇧ + K). You can also customize your shortcuts via the
Shortcuts preferences (see section 4.8.6 Shortcuts preferences).
Deck 1 Deck 2Play/pause 1 0
Reverse/break ⌥/⌘ + 1 ⌥/⌘ + 0
Sync / match key 2 / ⌘ + 2 9 / ⌘ + 9
BPM tap / set grid ⌥ + ⌘ + 2 / ⌥ + 2 ⌥ + ⌘ + 9 / ⌥ + 9
Skip backward/forward 3/4 7/8
Pitch bend -/+ Hold ⌥ + 3/4 Hold ⌥ + 7/8
Tempo -/+ ⌃ + ⌥ + 3/4 ⌃ + ⌥ + 7/8
Key lock ⌃ + ⌥ + 5 ⌃ + ⌥ + 6
FX 1/2 toggle 5 / ⌥ + 5 6 / ⌥ + 6
Gain up/down ⇧ + Q/A ⇧ + P/L
EQ low up/down/kill ⇧ + W/S/X ⇧ + U/H/B
EQ mid up/down/kill ⇧ + E/D/C ⇧ + I/J/N
EQ mid up/down/kill ⇧ + R/F/V ⇧ + O/K/M
Jump to start/end/point Q/T P/Y
Jump to cue points 1/2/3 W/E/R U/I/O
Set start/end point ⌥ + Q/T ⌥ + P/Y
Set cue points 1/2/3 ⌥ + W/E/R ⌥ + U/I/O
Autoloop on/off A L
Set loop in/out S/D J/K
Set loop duration ½/x2 ⌥ + S/D ⌥ + J/K
Loop off / reloop ⌥ + A ⌥ + L
Bounce loop ⌃ + 1/2/3/4/5 ⌃ + 6/7/8/9/0
Instant FX ⇧ + ⌥ + 1/2/3/4/5 ⇧ + ⌥ + 6/7/8/9/0
Duplicate song ⇧ + ⌘ + D ⇧ + ⌘ + J
Reset sliders ⇧ + ⌥ + A ⇧ + ⌥ + L

PRO
32
User Manual (Mac)2
MixerTransition left LEFT arrow
Crossfade middle ⌘ + UP arrow
Transition right RIGHT arrow
Switch to left ⌃ + ⇧ + LEFT arrow
Switch to middle ⌃ + ⇧ + UP arrow
Switch to right ⌃ + ⇧ + RIGHT arrow
Cut crossfader F
Auto-cut slow Hold G
Auto-cut fast Hold H
Cut active line fader ⌥ + Z
Volume up/down + / - keys
Pre-cueingSwitch to left ⌥ + LEFT arrow
Switch to right ⌥ + RIGHT arrow
Volume up/down ⌥ + +/- key
LibraryLoad on deck 1 / 2 ⌘ + LEFT or RIGHT arrow
Add to queue ⌘ + ENTER
Remove from queue BACKSPACE
Find in library ⌘ + F
SamplerRecord from deck 1/2/MIC ⇧ + ⌥ + B/N/M
Play sample X/C/V/B/N/M, ⌥ + X/C/V/B/N/M
Slip modeSlip scratch ⌘ + scratch deck
Slip play ⌘ + click play button
Slip cue ⌘ + click cue jump button

PRO
33
User Manual (Mac)2
Slip loop ⌘ + click loop button
Multi-touchScratch record Two-finger drag or swipe
Move selected slider Two-finger drag or swipe
Auto crossfader cut scratch ⇧ + two-finger drag/swipe
Force touchCue play Force click CUE JUMP button
EQ kill Force click EQ knob
High pass: Force click filter knob
Reset slider Force click slider
Preview track Force click tracklist
NOTE: Keyboard shortcuts may vary depending on your selected keyboard layout.
Shortcuts in the menu and in the keyboard shortcuts window will always match the
active keyboard layout.

PRO
34
User Manual (Mac)2
4.8 PreferencesYou can use either the ⌘ + , keyboard shortcut or go to djay Pro 2 > Preferences in the
application menu to access the software preferences.
NOTE: Keyboard shortcuts may vary depending on your selected language layout.
4.8.1 General preferences
Song LoadingAutomatically start playing song: Automatically have songs begin playing as soon as they
load into a deck.
Automatically jump to start point: Loads the track at the first cue point set with the CUE SET action.
Reset (EQ, effects, controls): Sets all your track controls back to defaults upon track load.

PRO
35
User Manual (Mac)2
Auto-sync BPM: Automatically sets the BPM of your new track to match your currently
playing one.
Deck ProtectionPrevent song loading on active deck: Locks all your decks while they have a track playing
to prevent you accidentally replacing a loaded track.
Play/PauseStart time: Sets how long it takes for a track to gain full speed from when you hit Play. This
effect is similar to the torque adjust on a turntable.
Stop time: Sets how long it takes for a track to stop playing. This effect is similar to adjusting
the brake when stopping a track on a turntable.
TempoTempo range: Changes the +/- maximum percentage of the deck pitch slider. You can
choose from 6%, 8%, 10%, 16%, 25%, 50%, or 75%. You can also invert the +/- on both
software and hardware layouts.
LoopingQuantize manual loops: When active, forces manually created loops to start on the nearest
beat. Disabling will create the loop at the exact point it is set.

PRO
36
User Manual (Mac)2
4.8.2 Devices
Mixer ModeThis options allows you to switch between Internal mixing (ie “inside-the-box” such as a
MIDI controller or External mixing (ie hooked up to an external audio interface and mixer).
Internal mixing optionsMain Output: Select the stereo output source for the master out, ie the audio source to your
speakers.
Pre-Cueing: Select the stereo output source for your headphone cue channel, ie what you
use to beatmatch and listen to in your headphones.
Microphone: Tick this option to choose your microphone source. Disable this if you aren’t
using a microphone to ensure no external sound is interfering with your mix.
External mixing optionsDeck 1: Select the stereo output source for deck 1.
Deck 2: Select the stereo output source for deck 2.
Deck 3: Select the stereo output source for deck 3.
Deck 4: Select the stereo output source for deck 4.

PRO
37
User Manual (Mac)2
Note: To output four decks to a four channel mixer, you will need an audio interface
with at least four separate stereo outputs (see section 5.16 External mixing).
4.8.3 Mixer
MixerFX: Switch between applying Pre-Fader or Post-Fader effects.
Crossfader curve: Changes how the crossfader fades between tracks. Choose from Default , Linear , Constant power , or Cut .
VolumeAudio Limiter: Toggles a hard audio limiter to help reduce distortion and other artifacts
related to clipping sound.
Auto Gain: Toggles whether djay Pro 2 automatically sets the channel gain when a track is
loaded to match the rest of your mix. Disable this to manually adjust the gain of each track.

PRO
38
User Manual (Mac)2
4.8.4 AutomixAutomix is a feature that allows djay Pro 2 to automatically mix your music based on a pre-made, user created track queue. For more information, see section 5.9.4 Play cue and Automix.
MixTransition: This option changes how transitions between tracks are done by the software. Choose from Automatic, Fade, EQ, Filter, Echo, Brake, or Reverse.
TIP: You can trigger a transition by using the arrows to the sides of the crossfader, or
using the arrow keys on your keyboard.
Duration: Increase to create longer blends. Toggle between Automatic and Manual. When in manual set X number bars (measures) or seconds.
Tempo adjust: Change how Automix treats tempo differences between tracks. Use Off to disable beatmatching, Sync to keep a steady BPM across the whole set, and Morph to have the outgoing track change tempo to match the incoming track .
Song RangeStart point: Set either an Automatic start point, or Manual. When in manual, set X seconds after beginning.

PRO
39
User Manual (Mac)2
End point: Set either an Automatic end point, or Manual. When in manual, set X seconds before end.
Use start and end point of song if available: Toggle whether mixes will include both the
start and end of the track
Maximum song play duration: This setting lets you change how long a track will play before
djay Pro 2 loads and mixes a new track
Automix listShuffle: Turning this on randomly chooses tracks to mix from the play queue.
4.8.5 Media library
QueueRemove Songs When Played: With this active, songs will be removed from the queue after
they’ve been played. Otherwise, your queue will remain.
iTunesShow unavailable tracks: Tick this to display tracks in your iTunes playlist that aren’t
available to play.

PRO
40
User Manual (Mac)2
KeySort by: Changes how our tracks are ordered when sorted by key. Choose from either
Similarity (circle of fifths), or Pitch distance (chromatically).
Distinguish major/minor keys: Toggle’s whether your key metadata shows major or minor
keys.
SpotifyQuality: Switch between Default (160 kbps) and High (320 kbps) audio when streaming
music from Spotify.
4.8.6 Appearance
LibraryFont Size: Changes the font size of the library text.
Row Height: Changes the space between each row in the library.

PRO
41
User Manual (Mac)2
WaveformsZoom Level: Change the default Zoom level of displayed waveforms using the slider. The
more magnified, the more detail, but there’s less of the track displayed.
VinylStyle: Switch between a Real vinyl look and a Picture disc using the track artwork.
Attach tape marker: Adds a white sticker strip to mark your place on the record.

PRO
42
User Manual (Mac)2
CrossfaderDeck Dimming: Fades out your decks depending on where the crossfader is placed.
4.8.7 Shortcuts
Keyboard shortcuts: Switch between keyboard shortcut lists. Edit and add custom lists.
Manage your custom and built-in keyboard shortcut lists, customize your keyboard shortcuts
to better suit your needs, and create and manage new shortcut lists using the list manager.

PRO
43
User Manual (Mac)2
There are two built-in lists. The Default list provides control over everything needed to DJ
using just the keyboard. The User Interface Only list removes any mixing controls to focus
on the browser and other interface elements.
Create a custom list by choosing New Shortcut List from the dropdown. To adapt one of
the built-in shortcut lists, choose Edit from the dropdown, then select Duplicate from the
dropdown on the shortcut list manager.
4.8.8 Advanced
RecordingRecording format: Switch between recording using compressed AAC and uncompressed
WAV formats.
Send anonymous user data: When this setting is ticked, djay Pro 2 will send anonymized
data to Algoriddim to help improve the software and alert of any bugs.
PRO
44
User Manual (Mac)2
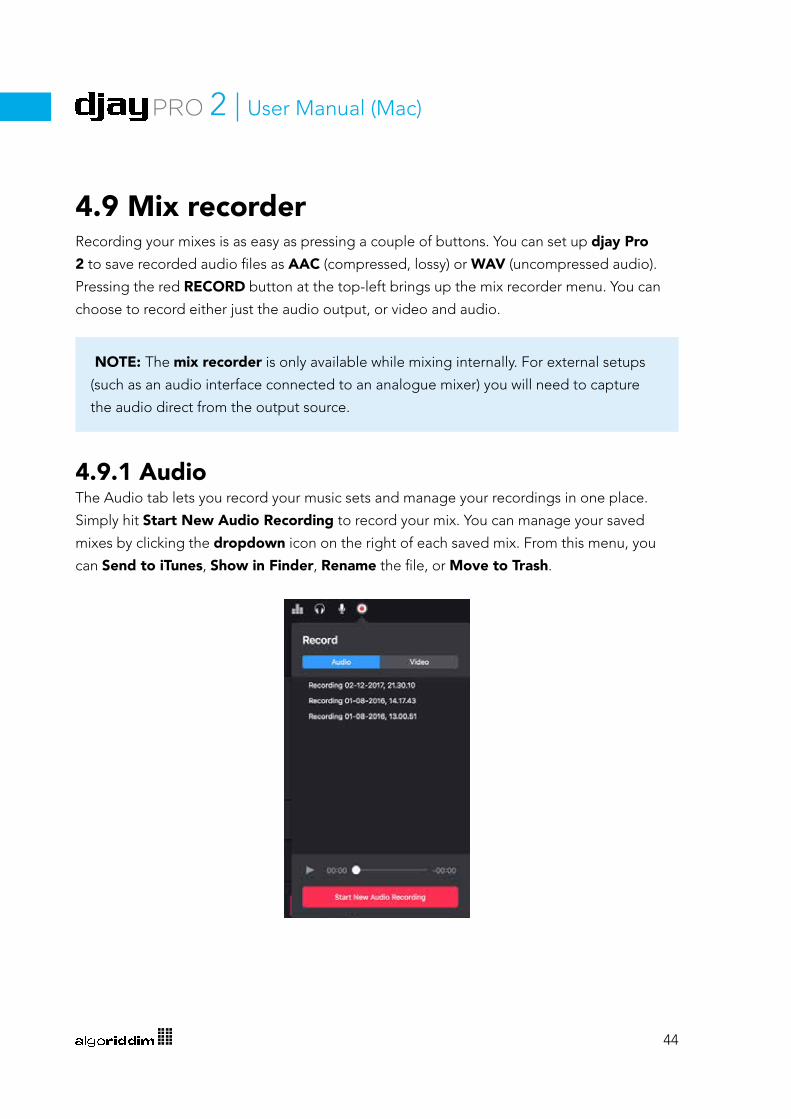
4.9 Mix recorderRecording your mixes is as easy as pressing a couple of buttons. You can set up djay Pro 2 to save recorded audio files as AAC (compressed, lossy) or WAV (uncompressed audio).
Pressing the red RECORD button at the top-left brings up the mix recorder menu. You can
choose to record either just the audio output, or video and audio.
NOTE: The mix recorder is only available while mixing internally. For external setups
(such as an audio interface connected to an analogue mixer) you will need to capture
the audio direct from the output source.
4.9.1 AudioThe Audio tab lets you record your music sets and manage your recordings in one place.
Simply hit Start New Audio Recording to record your mix. You can manage your saved
mixes by clicking the dropdown icon on the right of each saved mix. From this menu, you
can Send to iTunes, Show in Finder, Rename the file, or Move to Trash.

PRO
45
User Manual (Mac)2
4.9.2 VideoSelecting the Video tab switches the recorder to video mode. The video recorder tab has a screen displaying the final output as it has been recorded. Like the audio tab, you can manage all your recorded video sets from here.

PRO
46
User Manual (Mac)2

PRO
47
User Manual (Mac)2
4.10 Uninstalling djay Pro 2To completely remove djay Pro 2 from your system, you need to follow these steps. If you just want to delete the app, only follow step 1.
1. Delete the djay Pro 2 app from the Applications folder.
NOTE: You may be asked for your macOS administrator password at this point.
2. Reset your software to defaults by opening the Terminal app on your Mac (located in
the Applications > Utilities folder) and copying this command for your version of djay Pro 2.
Mac App Store: defaults delete com.algoriddim.djay-pro-2-mac Algoriddim website: defaults delete com.algoriddim.direct.djay-pro-2-mac
NOTE: The following settings won’t be affected, as these are stored separately: song
metadata like BPM, beat grid, cue points; history; recordings; samples and sample
presets; video image and text effects; and MIDI mappings.
4.10.1 Algoriddim stored dataIf you wish to remove or edit the djay Pro 2 stored data, including Recordings, Samples,
Sampler Presets, MIDI Mappings, and Key Bindings, you can find it at this location:
App data: ~/Music/djay Pro 2/
Track analysis data: ~/Library/Group Containers/VJXTL73S8G.com.algoriddim.userdata/Library/Application Support/Algoriddim/
Note: To move djay Pro 2 to another computer, simply copy the djay Pro 2 folder to
the same location on the new machine. You can also create a backup by saving this
folder.

2PRO
Advanced features
User Manual
PRO
49
User Manual (Mac)2
5 Advanced toolsDoing a simple mix within djay Pro 2 only requires some of the basic features and knowledge of DJing, but there are many more advanced tools to explore and exploit. From adding extra decks of music, to improving your library management or using the built-in sampler, there’s plenty to take your mixing to the next level.
5.1 djay Pro 2 menusThe djay Pro 2 menus provide quick availability to some of the basic functionality within the
app, along with some actions only accessible here, such as some of the MIDI options. Below
is an overview of some of the important features in the djay Pro 2 menus.
File
Add a new playlist, smart playlist, and playlist folder to your collection.
Start/stop recording to control your Mix recorder.
Edit
Undo lets you quickly revert your last action, such as loading the wrong track.
View
Switch between deck views, horizontal and vertical waveforms, change waveform zoom
levels, show/hide panels, and enter fullscreen mode.
Deck
Control your decks using their respective menus. Switch the deck in Reverse, Repeat the
track, Skipping backwards and forwards. Control FX, Cue Points, and Loops. Use Load Previous Track and Load Next Track to quicky work through your playlists. Load Scratch Tools gives access to a track of samples and one-shots to help your scratch. Duplicate your
tracks in empty decks for instant doubles.
Mixer
Adjust the Crossfader Curve from this manu to suit your mixing style. Switch between
Default, Linear, Constant Power, and Cut (see section 4.8.1 General preferences for
more information). Control transition between tracks, and change the Transition Style.

PRO
50
User Manual (Mac)2
Access external Audio Unit Effects (see section 5.10.6 Audio Unit effects for more
information).
Library Search switches the cursor directly to the search box, Analyze begins analyzing any tracks
not yet finished in your collection, Automix starts the Automix function, and Refresh Library
checks if there are any changes since the library database was last opened. Add or Remove
selected track from the Queue.
MIDI Configure your active MIDI controller, and access controller options from here: Crossfader Cutting Mode gives you an ultra-sensitive crossfader, Invert Crossfader reverses the
direction of the crossfader, and Jog Pitch Bend Mode toggles non-touch-sensitive
jogwheels between pitch-bend and scratch modes.
Window
Show the Microphone and Pre-Cueuing pop-ups via this menu.
Help
Access the djay Pro 2 support site and keyboard shortcuts list.
TIP: Many of the essential DJ functions are available in the menus as well as keyboard
shortcuts, such as adding cue points or EQ kills.

PRO
51
User Manual (Mac)2
5.2 Advanced deck layoutsAlong with the default two-deck layouts, you can run up to four separate decks of audio at
once, as well as video decks. Much like with the two-deck layouts, you can present the track
waveforms scrolling vertically or horizontally.
5.2.1 Four decksYou can access the four deck views via the deck view buttons at the top of the window.
While similar to the default two deck view, some parts of the user interface will be different to
accommodate the extra controls.
Like its two-deck counterparts, the four-deck horizontal waveform view scrolls from right to
left.

PRO
52
User Manual (Mac)2
The vertical waveform view has the music scrolling from top to bottom.
TIP: The vertical waveform views are more compact and space efficient, but the
horizontal views are able to show more of the scrolling track.
Crossfader routingWhen in four-deck mode, djay Pro 2 allows you to choose which side of the crossfader to
route your music to, as well as pass the audio through to disable the crossfader.
There are three options for routing your deck audio:
1. Left crossfader channel
2. Thru to have the deck ignore crossfader assignment
3. Right crossfader channel
TIP: If you’re using three or more decks of audio, default your crossfader to Thru and
use the channel volume faders, unless you intend to do crossfader tricks or cuts.
PRO
53
User Manual (Mac)2
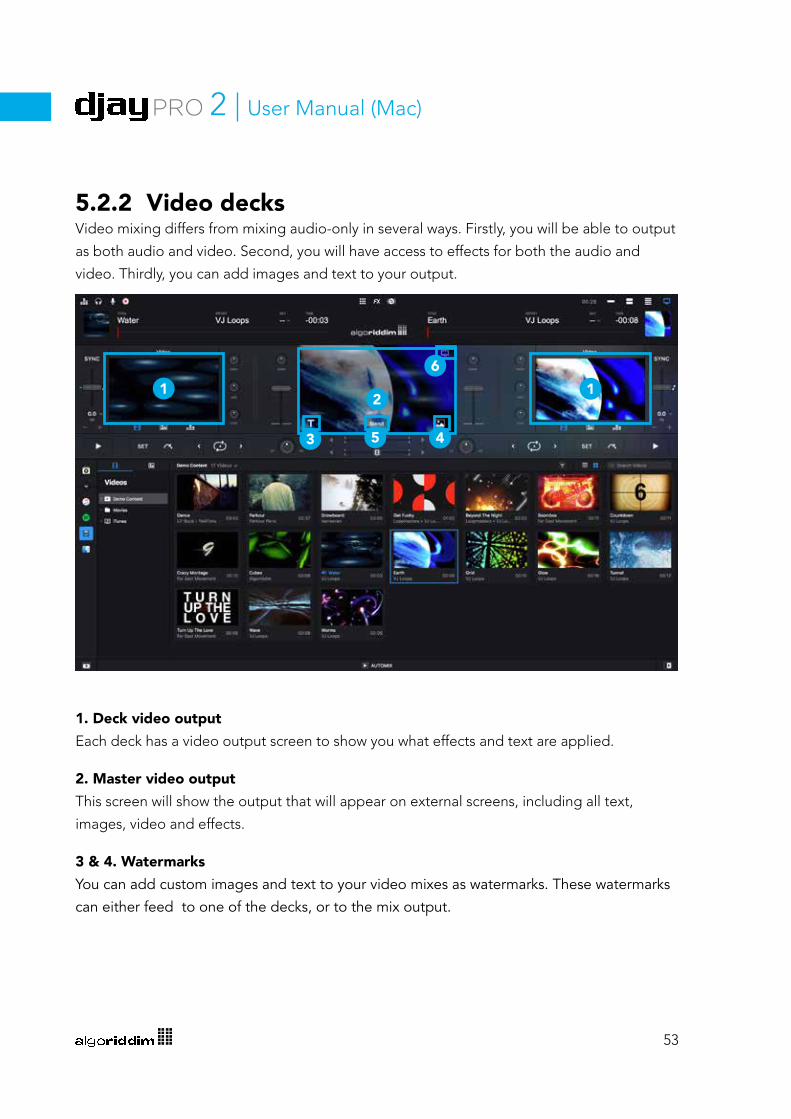
5.2.2 Video decksVideo mixing differs from mixing audio-only in several ways. Firstly, you will be able to output
as both audio and video. Second, you will have access to effects for both the audio and
video. Thirdly, you can add images and text to your output.
1. Deck video output Each deck has a video output screen to show you what effects and text are applied.
2. Master video output This screen will show the output that will appear on external screens, including all text,
images, video and effects.
3 & 4. Watermarks You can add custom images and text to your video mixes as watermarks. These watermarks
can either feed to one of the decks, or to the mix output.
5
12
3 4
61

PRO
54
User Manual (Mac)2
Adding an image overlay To add an image to the djay Pro 2 image overlay library, click the plus (+) symbol below the
image overlay list and navigate to your image on you hard drive. You can also remove images
from the list using the minus (-) symbol.
Screen select: Choose whether the image will appear on deck 1, deck 2, or the master video
output.
Image manager: Add, remove and pick your image watermarks.
Scale: A slider to change the size of the image on the screen. Left for smaller, right for
bigger.
Opacity: Choose how see-through the image is.
Alignment: Click the sector of the screen you want the image to appear on using the grid.
The active sector will be in blue.
PRO
55
User Manual (Mac)2
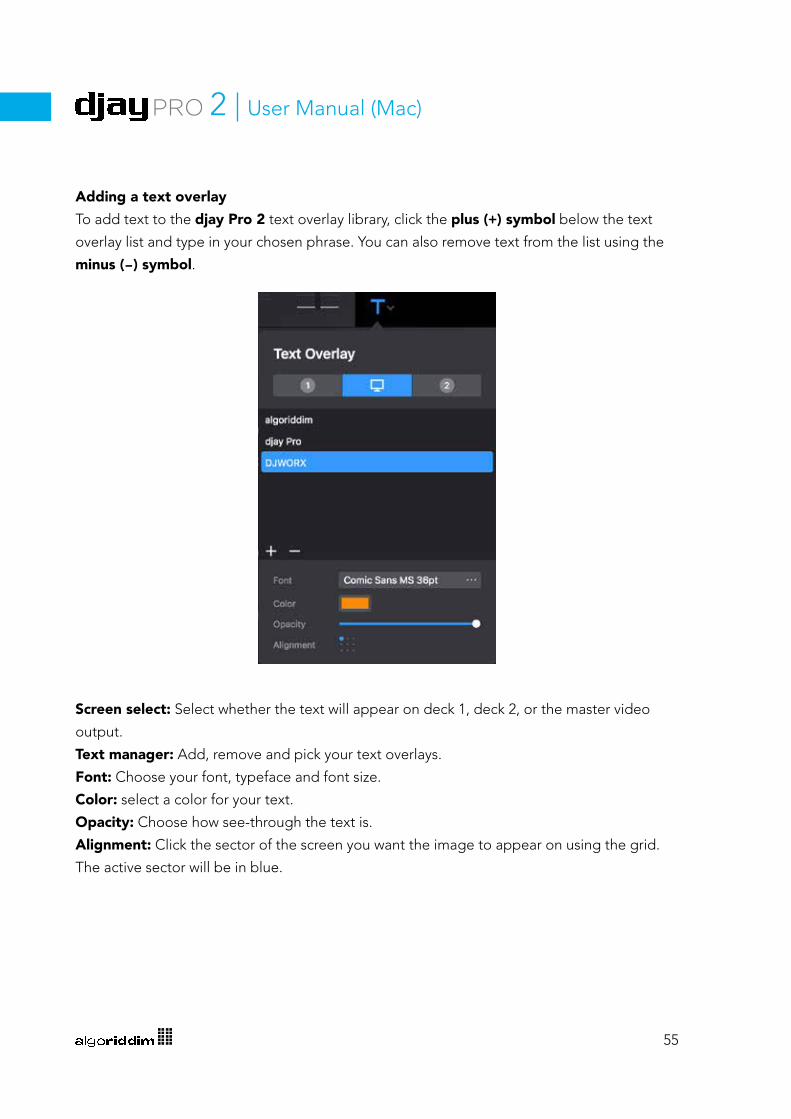
Adding a text overlay To add text to the djay Pro 2 text overlay library, click the plus (+) symbol below the text
overlay list and type in your chosen phrase. You can also remove text from the list using the
minus (-) symbol.
Screen select: Select whether the text will appear on deck 1, deck 2, or the master video
output.
Text manager: Add, remove and pick your text overlays.
Font: Choose your font, typeface and font size.
Color: select a color for your text.
Opacity: Choose how see-through the text is.
Alignment: Click the sector of the screen you want the image to appear on using the grid.
The active sector will be in blue.
PRO
56
User Manual (Mac)2
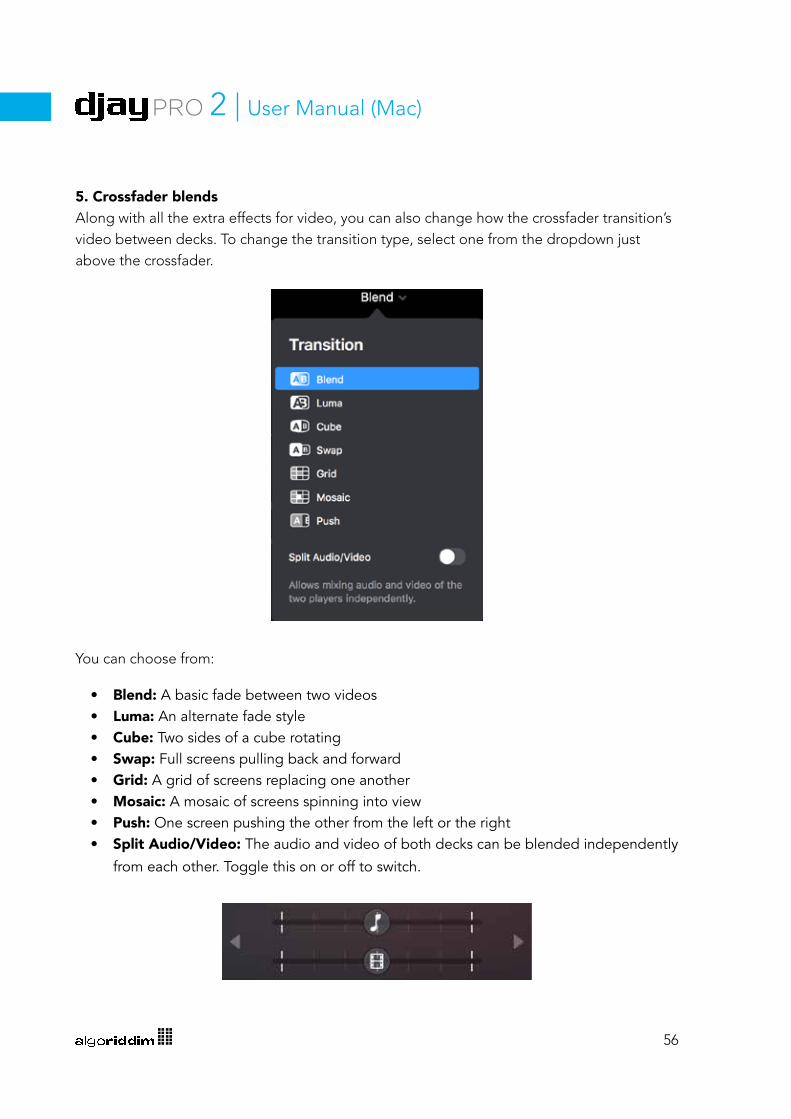
5. Crossfader blends Along with all the extra effects for video, you can also change how the crossfader transition’s video between decks. To change the transition type, select one from the dropdown just above the crossfader.
You can choose from:
• Blend: A basic fade between two videos• Luma: An alternate fade style• Cube: Two sides of a cube rotating• Swap: Full screens pulling back and forward• Grid: A grid of screens replacing one another• Mosaic: A mosaic of screens spinning into view• Push: One screen pushing the other from the left or the right• Split Audio/Video: The audio and video of both decks can be blended independently
from each other. Toggle this on or off to switch.

PRO
57
User Manual (Mac)2
6. Routing video You can route your video output to any of your connected monitors via the Choose Screen pop-up. You can access the screen selection window by clicking the little monitor icon in the top right of the master video output. Select the screen you wish to output to and click Show. If you decide not to route your video to a specific screen, click Cancel. Once full screen video is active, you can either hit ESC on your keyboard, or click the little arrows in the top right of the screen.
NOTE: In video mode, the channel faders will only affect audio. You will need to use
the crossfader to transition video.

PRO
58
User Manual (Mac)2
Playing only audio or videoWhen in video mode, you can choose only to play the audio or video of a video file by
dragging and dropping the file on a specific dropzones of a deck. Drag your video file
from the playlist and the decks will automatically show the dropzones. The main dropzone
(1) loads the video on the deck as normal, with both audio and video. Above that (2), the
dropzone will load just video. Finally, the dropzone that replaces the track waveform (3) will
load just the audio into the deck.
TIP: You can mix and match your audio and video on a deck while in video mode.
Drag your video file to the video-only dropzone, and the audio file to the audio-only dropzone. Whichever file is longer will continue playing after the other has ended.
1
2
3
PRO
59
User Manual (Mac)2
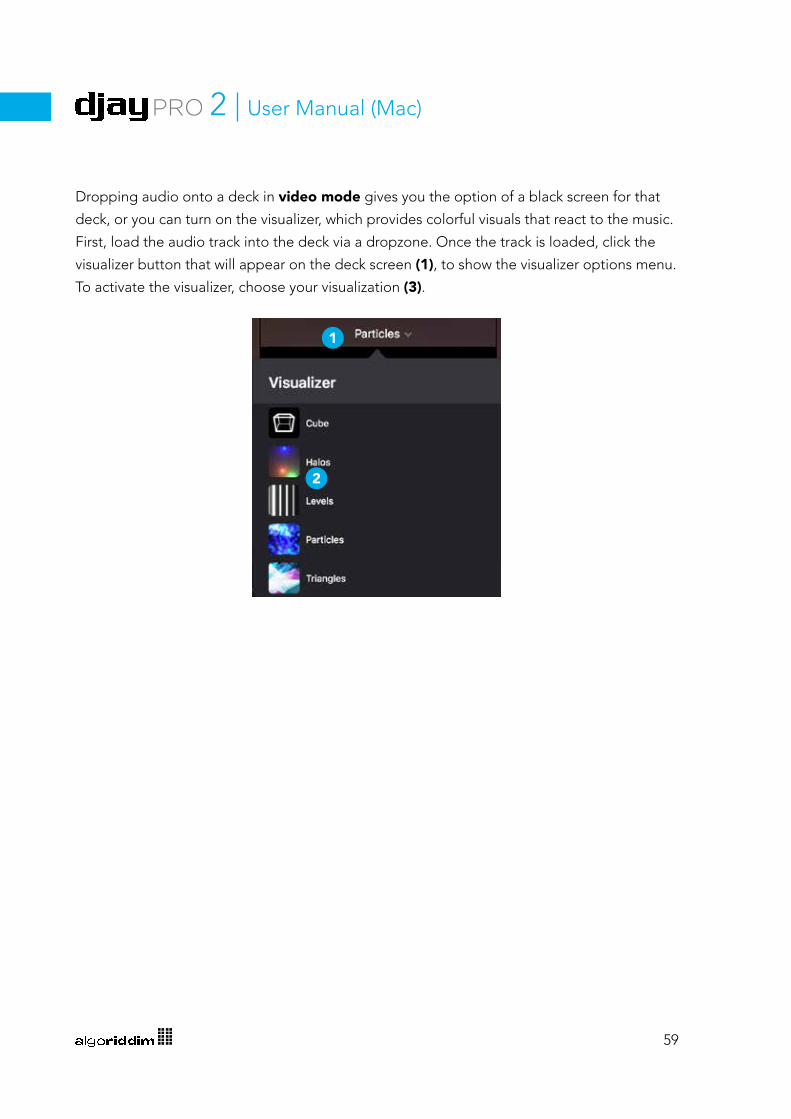
Dropping audio onto a deck in video mode gives you the option of a black screen for that
deck, or you can turn on the visualizer, which provides colorful visuals that react to the music.
First, load the audio track into the deck via a dropzone. Once the track is loaded, click the
visualizer button that will appear on the deck screen (1), to show the visualizer options menu.
To activate the visualizer, choose your visualization (3).
1
2

PRO
60
User Manual (Mac)2
5.2.3 WaveformsGlancing at a waveform in djay Pro 2 can give you critical information very quickly. Each
deck has both a track waveform and scrolling waveform to provide all the information you
need. Both views are color coded to show which audio frequency is playing at that point in
the track: RED represents bass, YELLOW for low-mid, GREEN for high-mid, and BLUE is for
high frequencies.
Track waveformThe track waveform displays the full visual representation of the audio file, from start to
finish. This view also shows your colored cue points (1) (see section 5.12 Cue points) and a
red track progress marker (2).
TIP: You can quickly jump to any part of the loaded track by either clicking the location
of two-finger swiping across the waveform.
2 1

PRO
61
User Manual (Mac)2
Scrolling waveformThis is a zoomed-in visualization showing your current location that scrolls along as the music
progresses. Since this view follows the music, it will move or jump backwards and forwards
should you manipulate the sound with scratching, scrubbing or jumping to cue points. In this
view, you can see your cue points (1) as they scroll past, the red progress marker (2) showing
the exact location in the music and the beat markers (3), including the downbeat of each
measure (4).
TIP: You can also change the zoom level of the scrolling waveform to suit your needs.
(See section 4.8.5 Appearance Preferences)
21
4 43

PRO
62
User Manual (Mac)2
5.3 Beatgrids5.3.1 What are beatgrids?The word beatgrid is a literal definition of itself. Track beatgrids are a grid of key markers
overlaid on top of a track, to ensure the BPM of the music is consistent. In practice, beatgrids
are used by DJ software to make sure that tracks are synced in time (either quantized to the
beats, or just tempo synced) and that the timings of effects and samples are accurate.
5.3.2 Setting a beatgridWhen you first load a track into a deck, djay Pro 2 analyzes the file to create the visual
representation of the music, along with what it estimates is the correct beatgrid for the
music. This beatgrid is based on two things: the starting downbeat (ie the first beat of the
track), and the tempo (ie beats per minute) of the track.

PRO
63
User Manual (Mac)2
5.3.3 Adjusting incorrect beatgridsOccasionally, djay Pro 2 will analyze a track’s beatgrid incorrectly, and might need manual
editing. This is a simple to do.
1. Make sure the offending track is loaded in a deck and that the track has finished analyzing.
2. Click the little pencil icon to open up the beatgrid editor.
3. If the downbeat is incorrectly placed, find the right location, and in the downbeat tab, tap Set Grid Start to reset it.
4. You can also adjust the grid itself to further tweak your beatgrid by going to the Grid tab and using the back and forward nudge arrows.
5. If, at any time, you need to roll back to the original beatgrid created by djay Pro 2,
you can use the Restore button on either tab.

PRO
64
User Manual (Mac)2
5.4 BPM and tempo5.4.1 Adjusting BPMOccasionally, djay Pro 2 analyses a track and guesses the wrong BPM, causing the beatgrid
to be set incorrectly, or guesses the BPM at half or double the actual tempo of the track.
Using the BPM tab in the BPM & tempo pop-up, you can change the BPM, should you
need to.
1. Manual adjust: If you know the correct BPM, type it in after clicking the EDIT pencil
icon and hitting ENTER.
2. Half/Double BPM: Use these buttons if you find the BPM is half or double the correct
tempo.
3. Tap: You can approximate the correct BPM by using the Tap button. While the track is
playing, click the Tap button in time with the beat until a BPM reading show.
Once you've adjusted the BPM, you can click Apply to save, or Restore to go back to
previous settings.
TIP: Many modern electronic productions will have a rounded off BPM which should be
easy to fix manually should djay Pro 2 not analyze correctly.
1
2
3

PRO
65
User Manual (Mac)2
5.4.2 Tempo sensitivityUse the Tempo tab of the BPM & tempo pop-up to tweak your tempo slider sensitivity and settings. From here, you can change the percentage increase/decrease Range the slider can change (1), as well as Invert the slider (2), like many turntables feature.
NOTE: djay Pro 2 determines the master deck based on which is currently the loudest.
For example, if the crossfader is moved all the way to the left, deck 1 will be selected as
the master deck. While this is all done 'behind the scenes', it will help to be aware how
it works. The master deck helps maintain track sync, as well as determine key match (see
section 5.5 Key lock and changing key).
1
2

PRO
66
User Manual (Mac)2
5.5 Key lock and changing keyIn djay Pro 2, you can keep your music from changing pitch as you increase the tempo by using Key lock. To activate Key lock, click the musical note button (1) to the outside edge of the deck tempo slider. You can also map the command to a MIDI controller button (see section 5.15 MIDI mapping).
TIP: Key lock can sometimes affect audio quality, particularly with big tempo changes.
You can also match the key of tracks using the key match feature, as well as transpose the key by semitones, all using the key options panel. To access the panel, click on the track key display in the deck info (see section 1.2 Interface tour).
1. Down semitone. Transposes the audio down a semitone.
2. Key transpose activate. Toggle on/off the key transpose of the deck audio.
3. Up semitone. Transposes the audio up a semitone.
4. Key match. Matches the key of the audio to that of the master deck.
1 2 3
4
1

PRO
67
User Manual (Mac)2
5.6 SyncingThere are two ways to sync music within djay Pro 2: tempo sync, and beat sync. Both can
be accessed using the deck sync buttons (see section 1.2 Interface tour). For a more
detailed explanation of syncing music, see section 2 Glossary of terms.
5.6.1 Tempo syncTempo sync simply matches the BPM of a deck track to the current master deck, but allows
decks to play independently. To activate beat sync, press the SYNC button once on the deck
you would like to match to the playing audio.
5.6.2 Beat syncBeat sync takes it a step further and quantizes the beats to ensure they stay in time, by
matching the downbeat. To activate beat sync in djay Pro 2, make sure the you already have
a song playing, and press the SYNC button twice on the other deck with a track loaded and
ready.

PRO
68
User Manual (Mac)2
5.7 Slicer modeSlicer mode helps you quickly juggle hotcues on the fly while playing your tracks. As the
audio progresses, the slicer tracks the current four or eight beat measure and "slices" it,
creating a virtual hotcue for each beat, which can be mapped to buttons or pads on a MIDI
controller (see section 5.15 MIDI mapping).
To activate the Slicer, use the waveform pop-up on your preferred deck, and activate the
Slice option.
To disable the Slicer, reverse the process.

PRO
69
User Manual (Mac)2
5.8 Slip modedjay Pro 2 has Slip mode for scratching with jogwheels. While enabled, Slip mode continues
playing audio when the jogwheel is used. This works for both virtual (software) and hardware
jogwheels (for example, see section 5.14.2 CDJs).
To enable Slip mode, activate the option within the waveform pop-up. Reverse the steps to
disable the feature. You can also start deck playback with slip mode automatically activated
by using ⌘ + PLAY button.

PRO
70
User Manual (Mac)2
5.9 Library managementWith today’s DJs carrying thousands of tracks in their collections, managing your music has become as important a skill as any. With djay Pro 2, you have access to a powerful and flexible library browser, with features you’d expect from any professional DJ software.
Knowing your way round your music collection not only saves you time in your workflow, it can help give you confidence while you’re busy in a mix. The library browser within djay Pro 2 offers tools to help you get the most out of your music.
5.9.1 Browser overviewFor a breakdown of the elements of the Media library browser, please revisit section 4.3 Media library browser.
5.9.2 Analyzing your musicWhile djay Pro 2 analyzes each track the first time it’s loaded, this can take up computing resources and may interrupt playback. You can set up djay Pro 2 to analyze your whole music collection, or even just parts of it, as a batch operation. Navigate to the playlist or folder you want analyzed, and choose Analyze Songs from the dropdown next to the track count at the top of the track list window.
NOTE: Spotify tracks can not be pre-analyzed.
TIP: Batch analysis can be quite resource intensive so should be left running while your
computer is free from other tasks. The task might be best left overnight or while you’re
away from your screen.

PRO
71
User Manual (Mac)2
5.9.3 Previewing tracksWith djay Pro, you can preview your tracks directly from the library. Previewed tracks will play via your pre-cue channel. For example, should you have a controller with audio interface set up, you can hear your previews in your headphones.
To preview a track, either Force-touch click it, or click the play button button on the far left of the track in the library tracklist (1).
5.9.4 QueueThe play Queue acts as a playlist which can stay up to date by removing tracks that have
already been played. To access the queue, open up the library sidepanel and use the second
tab.
You can add tracks to the Play queue in two ways:
1. Drag individual tracks into the Queue from your playlists.
2. Right click tracks and choose Add To Queue.
For more information see section 7 What's new in 2.0.
TIP: You can add tracks from any of the library tabs to your play queue.
5.9.5 AutomixLet Automix take over your set, based on your preferences (see section 4.8.4 Automix preferences). Hit the Automix button at the bottom of the djay Pro 2 window to get started.
For more information on the Automix features, see section 7 What's new in 2.0.
1

PRO
72
User Manual (Mac)2
5.9.6 List viewsCompact gridThis view displays the most track information, with cover art displayed as a small icon.
Collection viewCover art is featured prominently in this view, but it doesn't have metadata columns.

PRO
73
User Manual (Mac)2
5.9.7 Metadata columnsSimilar to many music players, the playlists in djay Pro 2 display track
metadata (ID3 tags) as columns within the compact and regular list
views. You can customize which columns appear in your playlist by
right-clicking the metadata bar at the top of the playlist window and
ticking or unticking the desired metadata to display. If you need to edit
your track metadata, you will need to use iTunes or some other music
management application.
NOTE: Spotify music metadata is managed on Spotify’s servers
and isn’t user-editable.
NOTE: Metadata sorting is unavailable in collection view.
NOTE: The type of metadata columns can change depending on
the source of your music. For example, Spotify will make different
metadata available to iTunes.
5.9.8 Sorting your musicYou can use the metadata columns to sort your music quickly and easily. Click on the column you wish to sort by to switch between ascending and descending order, as well as a third click to switch back to the default play order. For example, sorting by artists will make the list ordered alphabetically, and sorting by BPM will order from slowest to fastest tempo and vice versa.
TIP: Sorting by key is a great way to see what tracks are grouped by key.

PRO
74
User Manual (Mac)2
5.9.9 SpotifyWith a Spotify Premium account, you can have access to millions of tracks, directly within djay Pro 2. To get started, select the Spotify tab from the music sources panel on the left of the library. All you need to do is log in using your account details to access everything in your Spotify library.
Playlists, and BrowseFrom the Spotify tab, you can access all the playlists you’ve previously created from the Spotify desktop music player. There are also sections for music categories to browse for hits. You can switch between these sections using the two tabs at the top of the browser tree.
NOTE: You can only view playlists within the djay Pro 2 library browser. You will need to
either edit your playlists within Spotify, or use the Spotify button to save your session
as a playlist.
NOTE: Mix recording will not work when
you use tracks from Spotify, due to licensing
agreements. Recording a mix disables the
Spotify tab and using Spotify disables the
mix recorder.

PRO
75
User Manual (Mac)2
Searching SpotifyYou can search for any tracks within the Spotify database via the search box, while in the Spotify tab. Search results can then be expanded further using the Show all songs... button below each set of results. You can expand results from Songs, Artists, Albums, and Playlists.
Logging out
To log out of Spotify within djay Pro 2, go to the Library menu item and select Log Out Of Spotify (<username>).
NOTE: Remember that access to Spotify requires a premium account. You will need to
upgrade if you have the free account.

PRO
76
User Manual (Mac)2
5.9.10 iTunesYou can access your iTunes collection directly from within djay Pro 2. This includes all your music, playlists and folders, as well as any smart playlists you have created. The collection can also be sorted by Music, Artists, Albums and Genres, using the buttons in the middle of the bottom bar, similar to the iTunes desktop app.
5.9.11 VideosThe videos tab of the browser has three folders in the browser tree:
• Demo content: The free videos provided with djay Pro 2 to help get you started.• Movies: Your account’s Movies folder.• iTunes: Any video files found in your iTunes collection.
You can store any purchased or user-created video files in either the iTunes collection or Movies folder.
TIP: It can be helpful to separate your silent and audio-based videos, either in iTunes
playlists or folders on your drive.
5.9.11.1 PhotoBeatsAdd photos from your macOS Photos app collection using the Photos tab. For more
information, see section 7.7 PhotoBeats.

PRO
77
User Manual (Mac)2
5.9.12 HistoryAll your DJ sessions are automatically saved by djay Pro 2 in the History tab of the My Library. Saved sessions are similar to playlists and show the tracks from each session in the main browser window. You can also delete your saved sessions by right-clicking on them and using the context menu. Rename the sessions by selecting them, waiting two seconds, and clicking them again.
You can also export your sets using the Export menu item at tnext to the search Filter button, to the top-right of the library. Choose which set to export, and click the Export button to show the set export menu. You can choose to export as a CSV file, iTunes playlist, or Spotify playlist.
You will then be prompted to name the exported playlist.
Once saved, you'll see a confirmation pop-up asking if you want to view the new playlist.
PRO
78
User Manual (Mac)2
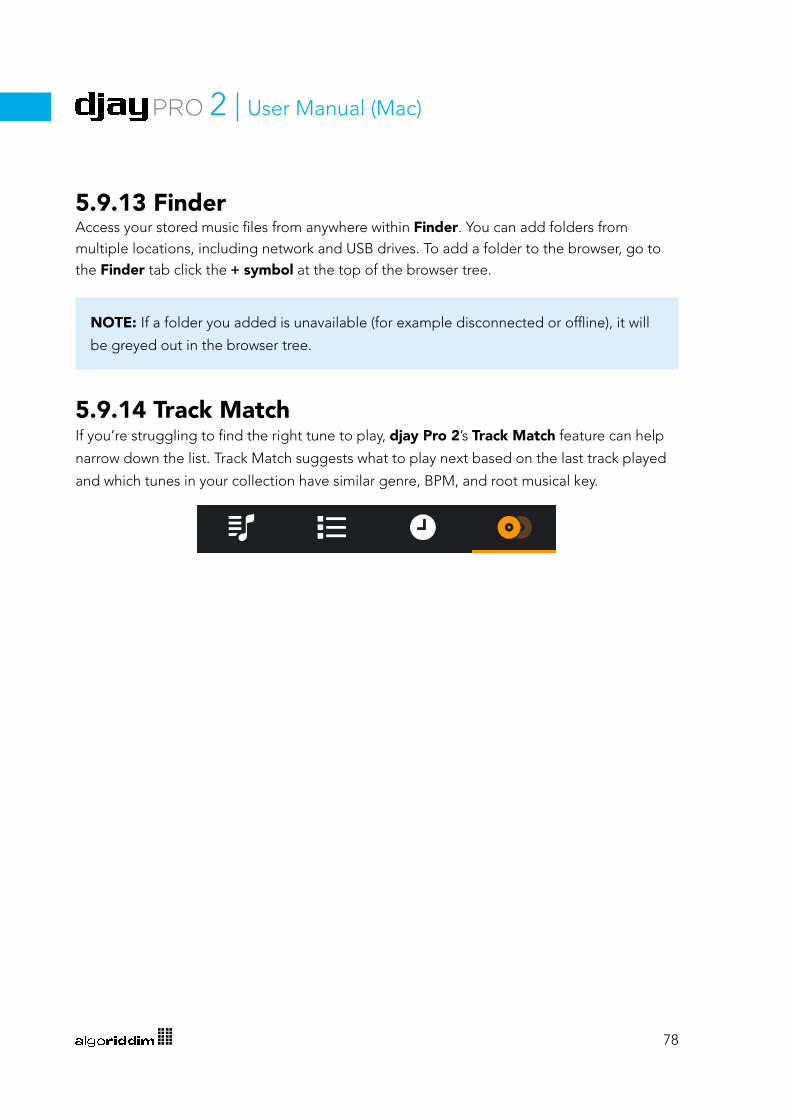
5.9.13 FinderAccess your stored music files from anywhere within Finder. You can add folders from multiple locations, including network and USB drives. To add a folder to the browser, go to the Finder tab click the + symbol at the top of the browser tree.
NOTE: If a folder you added is unavailable (for example disconnected or offline), it will
be greyed out in the browser tree.
5.9.14 Track MatchIf you’re struggling to find the right tune to play, djay Pro 2’s Track Match feature can help
narrow down the list. Track Match suggests what to play next based on the last track played
and which tunes in your collection have similar genre, BPM, and root musical key.

PRO
79
User Manual (Mac)2
Track Match appears as a list down the right side of the library browser and shows up to
24 track suggestions. To show or hide the Track Match list, use the Track Match icon at the
bottom right of the app window.
Track Match and SpotifyWhen you use Track Match (for more information, see section 5.9.14 Track Match) with
Spotify, djay Pro 2 will access the entire Spotify library for recommendations. This makes it
a very powerful tool, offering the widest possible choice of suggested tracks to play next.
TIP: Use Track Match as a guide rather than the rule. Learn to trust your ears above all
else and you'll discover much more creativity.

PRO
80
User Manual (Mac)2
5.10 EffectsThere are three different types of effects in djay Pro 2: audio, audio/video, and video.
Each type of effect has a specific use, and may not be appropriate for all your collection.
Algoriddim has endeavored to produce a wide range of distinctive sounds to help DJs push
their creativity.
To access the effects controls for decks 1 & 2, use the FX panel toggle
button found in the middle of the top bar. To control effects on decks 3 &
4, open the Tools Panel using the button next to the FX panel toggle.
5.10.1 AudioThere are a total of 39 different audio effects in djay Pro 2, with five Essentials included and
the rest available to unlock within the app. The effects can only be applied to audio, but also
work on videos with audio built in.
Essentials• Echo
• Flanger
• Phaser
• Bit crusher
• Gate
Sugar Bytes Resonate• Reverb
• Beatverb
• Gate panner
• Gate masher
• Sweep delay
• Stutter delay
• Quack delay
Sugar Bytes Modulate• Space flanger
• Filter machine
• Zeitgeist
• Tonalizer
• Magnetizer
• Tremolizer
Sugar Bytes Warp• Deep phaser
• Vowel LFO
• Wobble
• Beatwobble
• Scratcher
• Reactor
• Deformer

PRO
81
User Manual (Mac)2
Sugar Bytes Slice• Time travel
• Space hop
• Trippple trap
• Snare gun
• Bumble bee
Sugar Bytes Juggle• Looper
• Complexer
• Uhnk uhnk
• Bass gun
• Wake up
• Chromatic
• Freestyle
• Shuffle
• UFO
5.10.2 VideoThese effects only work on visuals. You can use them on videos with sound, but they will only
affect the video element. You can chain any two effects per deck, including a mix of video
and audio effects.
• Grid EQ
• Kaleidoscope
• Circle Splash
• Mosaic
• Edges
• Invert
• Tiles
• Splash
• RGB offset
• Ripples
• Radial blur
5.10.3 Audio/visualThese A/V effects are designed to work on both audio and video at the same time, for
example, music videos. You can also use them on either video-only or audio files.
• Echo AV
• Strobe AV
• Crush AV
• Magnet AV
• Reverb AV

PRO
82
User Manual (Mac)2
5.10.4 FavoritesYou can easily access your favorite effects in their own tab. To add to your favorites, just click
the star symbol () next to the effect. You can add or remove effects to the favorites list as
you see fit.

PRO
83
User Manual (Mac)2
5.10.5 Using effectsAudio decks display effects in three different ways. Depending on the deck type, you can
switch between them on the fly to change how you perform. Depending on whether you
are using audio or video decks, you will have access to different controls, which are outlined
below.
5.10.x.x FX panelThe FX panel give you quick access to three effects each for decks 1 & 2. All six effects slots
can be changed to suit, by clicking the effect name and choosing a new one from the list.
5.10.x.x Tools panelWhen switched to the FX section of the Tools panel via the buttons at the bottom, you can
control up to two effects per deck, using three different methods: Manual, Instant, and Pad.
Manual: Decide the activation, dry/wet amount, as well as the effects quantity, giving you
absolute control at your fingertips.

PRO
84
User Manual (Mac)2
Instant: This is a panel of six pre-made effects designed for ‘instant gratification’. You can
choose from Absorb, Drift, Sway, Crush, Punch, and Twist.
Pad: Control the effects using an X/Y pad, similar to those on traditional hardware effects
units and musical MIDI controllers. Using the X/Y pad automatically switches the effect on.
TIP: Use two-fingered drag gestures to use the trackpad as the X/Y pad when the
cursor is over the effects section on screen.

PRO
85
User Manual (Mac)2
5.10.6 Audio Unit effectsAudio Units (AUs) are Apple audio plug-ins, similar to VSTs, that can be run in music software. These
plug-ins can range from effects, to synths to drum machines. With djay Pro 2, you can run effects
plug-ins on your master output, on top of the built in effects within the software.
NOTE: You can run one AU effect at a time.
First ensure your AU files are installed in the correct location. There are two places you can add them:
1. If you want any account on your computer to use the AU file, install them to the OS library folder, found at: ~/Library/Audio/Plug-Ins/Components
2. Install them to your user account library folder to have sole access. You can find them here: ~/
Library/Audio/Plug-Ins/Components
After starting djay Pro 2, find the Mixer menu items and go to Audio Unit Effects. As long as they're
installed to the correct location, you should see your AU in the list. Select it to activate it. To disable
the AU on the deck, select No Effect from the AU list.

PRO
86
User Manual (Mac)2
5.11 LoopsYou can extend your music and create extra texture to your mix by using Loops. From
creating vocal stabs to playing a distinctive breakbeat over a track, loops open up a world of
mixing.
There are two ways to start a loop:
1. Using the loop creator within the deck transport section;
or;2. Using the advanced loop panel.
5.11.1 Loop creatorTo activate a loop using the loop creator, select the loop length using the left/right arrow
buttons, and at the correct point in the track, click the middle loop active button.

PRO
87
User Manual (Mac)2
5.11.2 Loop panelYou can use the advanced loop panel for even more looping options. To access the panel,
you will need to click the advanced deck panel button, then tap the loop icon within the
panel. You can then switch between BOUNCE, PAD, and MANUAL at the top of the panel.
BounceUse six trigger pads to quickly switch between loops of different lengths. Loop length varies
from 1/16th of a beat to two beats.
PadMuch like with effects, you can use the X/Y pad to simultaneously apply a manual loop length
and high-pass/low-pass filter for an interesting effect.

PRO
88
User Manual (Mac)2
ManualYou can manually set loop length by triggering loop IN and setting loop OUT when ready.
Loops are automatically quantized to ensure they’re in time.
Saved loopsA bank of up to eight hot loops per track which can be recalled instantly. These hot loops
work similarly to saved cue points. Use the pencil icon to delete loops.
TIP: Use the Bounce pads to create build up with a beat roll just before a drop or
breakdown in the music.
TIP: Use loops to extend intros and outros on tracks that are too short to mix.

PRO
89
User Manual (Mac)2
5.12 Cue pointsYou can store up to eight cue points per track in djay Pro 2. These cue points can be created on-the-fly or prepared beforehand and remain saved in your collection database.The cuepoint panel can either display three or eight saved cuepoints, via the dropdown at the top of the panel.
To add a cue point, simply move the track marker to where you want (1) and tap an unassigned cue button (2). Each of your cue points will be assigned its own color, and you can rename each cue using the dropdown (3) to easily identify which is set where on the waveform. You can delete your cue points via the cue point edit button (4) at the top right of your cue point panel. When edit mode is active, use the X on each button (5) to remove the cue point from the track.
TIP: Name your cue points to give you hints abou the track and where the cue point is
located.
NOTE: The App Store version of djay Pro 2 features iCloud integration, allowing for
online back ups of your cue points and other user data.
2
4
13
3 5

PRO
90
User Manual (Mac)2
5.13 Sampler
djay Pro 2 features a built-in sampler that can play either the default sample packs (Essentials included with the software, others available to purchase and unlock) or your own recorded samples. To access the sampler, use the sampler button, next to the global volume controls.
The sampler consists of two grids of six pads, and as default, come preloaded with the Essentials pack of classic audio clips and sounds. The other packs available are:
• Sound FX• Dubstep pack• DJ Qbert beat kit
• Snoop Dogg pack• Milk & Sugar pack• GE Drop Science pack
To access these sample packs, click the sampler preset button just above the sampler volume fader in the middle of the screen. You can see all the available sample packs along
with a tab for your own user presets called My Presets.
Adding your own samplesYou can create your own samples and presets by recording audio clips from your music tracks
directly within djay Pro 2.
1. First, bring up the sampler interface using the sampler button and click the Edit
button just below the crossfader. The button will light up blue and each of the sampler
slots will now have a three dot icon appear to allow you to edit them individually.
2. Click the new button on one of the sample slots to show the sample manager. You will
see three buttons along the bottom: two for left and right deck recording, and one for
Mic record.

PRO
91
User Manual (Mac)2
3. To record a sample, play the track, and at the location you wish to sample hit the
relevant deck record button on the sampler pop up. If your microphone is properly set
up, you can also record your sample using the mic record button.
4. You will then see a new sample appear in the sample manager list. Rename the sample
to make it easier to remember by clicking the menu button on the right and choosing
Rename. You can also customize the sampler button color or delete the sample if you
need to try again.

PRO
92
User Manual (Mac)2
5. Once you’re happy with the sample, ensure it’s selected for that sample slot and click
out of the sample manager to hide it.
6. Repeat for each of the sample slots until you have all the samples you need.
7. Once you are happy with the custom samples, click the sampler presets button just
above the sampler volume fader, go to the My Presets tab and press Save new preset
to create a new, custom user preset that you can now use at any time.
8. Rename the preset using the button to the right of the preset name and you’re good
to go!
Adding existing pre-made samplesAlternatively, you can add pre-made samples by saving them to your djay Pro 2 data folder,
which can be found at the following location: ~/Music/djay Pro 2/Samples
You can access these folders by pasting them into your Finder's Go to the folder... box,
found in the Go menu.
1. First, drop your samples in the Samples folder within the Algoriddim data folder.
2. Go to edit a Sampler pad, and choose the Samples option from the sample packs
dropdown.
3. You should now see all your saved samples (both recorded and saved to the folder) so
you can add your desired custom samples to your pads.
You can rename, or delete your sampler presets from the sampler at any time using the
sampler preset manager.
NOTE: The Mic record button in the sample manager will be greyed out if no
microphone input device is set up.
NOTE: The sampler is only available when using two audio decks.

PRO
93
User Manual (Mac)2
5.14 Using hardwareAlgoriddim works closely with hardware partners to create the perfect integration of machine
and software. With big brands like Pioneer DJ, Reloop, and Numark, as partners, there’s
hardware to suit all styles of DJing.
5.14.1 ControllersUsing a MIDI controller is an important factor in a good DJ workflow. You can see a full list
of supported controllers on the Algoriddim support site. Setting up an officially supported
controller is straightforward plug-and-play:
1. Ensure that djay Pro 2 is fully loaded.
2. Plug your controller in via a spare USB port and power it up using the ON/OFF switch
or power button.
3. Once the controller has powered up, you should see a pop-up asking for your Audio and MIDI settings. Click OK to use default preferences.
4. You should now have control of djay Pro 2 using your controller.
NOTE: If your preferred controller isn’t listed, you can always map any MIDI compatible
hardware using the powerful MIDI mapping system. See section 5.15 MIDI mapping
for more information.

PRO
94
User Manual (Mac)2
5.14.2 CDJsThe following Pioneer DJ CDJ models currently have native integration with djay Pro 2.
• CDJ-TOUR1
• CDJ-2000NXS2
• CDJ-2000nexus
• CDJ-900nexus
• CDJ-2000
• CDJ-900
• CDJ-850
• CDJ-400
• CDJ-350
• XDJ-1000
• XDJ-700
NOTE: You can connect your CDJ-2000NXS2s with your DJM-900NXS2 (or your CDJ-
TOUR1s with your DJM-TOUR1) using USB-HID control, via LAN cables. Plug your Mac
into the mixer with a single USB cable and everything syncs seamlessly. djay Pro 2 can
use the DJM mixer's built-in audio interface for a streamlined setup.
Setting up your CDJLike all the other officially supported hardware, the Pioneer DJ media players are plug and
play… All you will need to do is choose which deck the player controls! You’ll be guided
through the process on-screen within djay Pro 2.
NOTE: The process will vary slightly between hardware models, and we use the CDJ-2000nexus to illustrate this process.

PRO
95
User Manual (Mac)2
1. Launch djay Pro 2 and wait for it to be fully loaded.
2. Plug your player into your computer via a spare USB port and turn it on. You will then
see a pop up message with instructions to set up the player as a deck.
3. Press the LINK button at the top left of the media player.
4. Press the endless encoder to the right of the screen to select USB MIDI.
5. Scroll to the deck within djay Pro 2 you want to use and press the encoder to activate
it.

PRO
96
User Manual (Mac)2
6. A pop-up will appear asking if you want to use the media player as your audio
device. Click Use CDJ/XDJ audio to do so, or hit Cancel and go to the djay Pro 2
preferences to set up your preferred audio device(s).
TIP: Algoriddim would always recommend using a good quality powered USB hub
when connecting more devices than there are available plugs on your computer.

PRO
97
User Manual (Mac)2
Controlling your music with CDJsDepending on hardware features, you will have direct access to many of the software
functions like loops, key lock, or playlist browsing. Generally, you can expect to use your
media player as you would with USB or CD. The built in screens will also display track
information in real-time.
Feature overview:
1. Track info and waveform
screen
2. Playlist navigation encoders
3. Hotcue 1-3 buttons
4. Track scroll and needle drop
touch strip
5. Loop controls
6. Slip mode button
7. Track direction toggle
8. CUE and PLAY/PAUSE
buttons
9. Track skip and search
10. Jogwheel
11. Jog mode VINYL/CDJ toggle
12. TEMPO range select
13. KEY LOCK button
14. Pitch fader
NOTE: If you have nested playlists within folders, you’ll need to access them via the
library browser as it isn’t possible via the media player navigation.
1 2
34
5
76
8
910
11
12
13
14
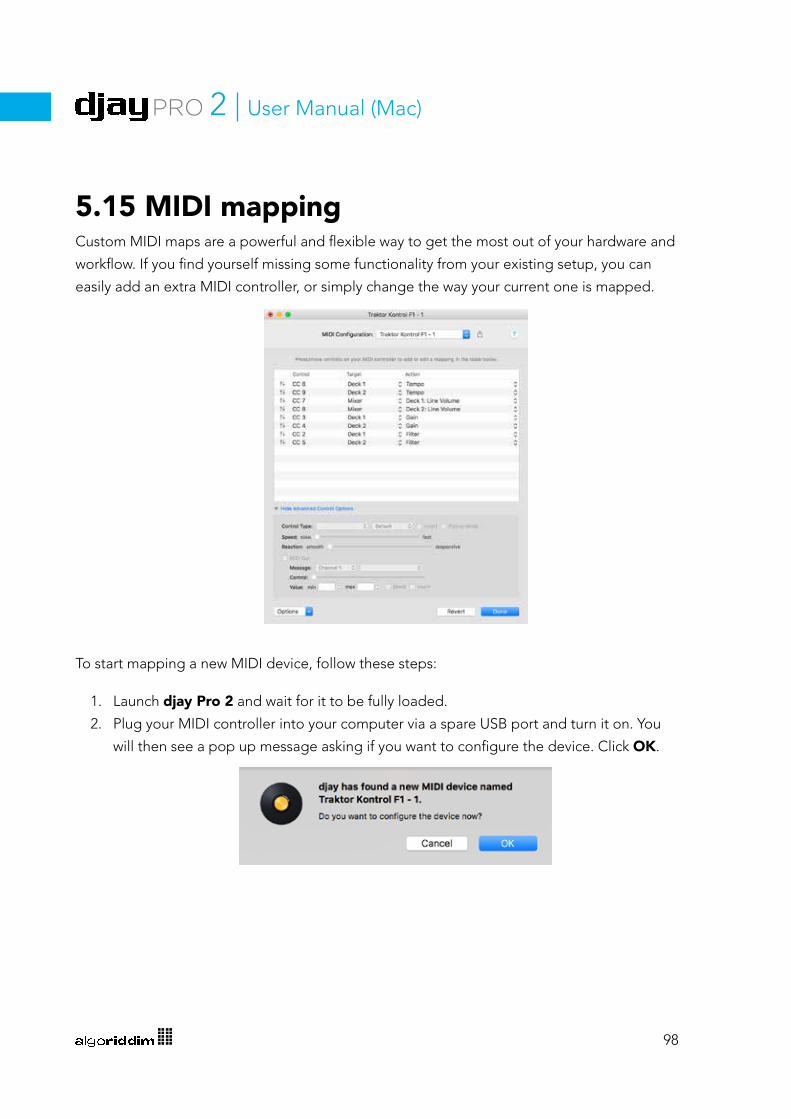
PRO
98
User Manual (Mac)2
5.15 MIDI mappingCustom MIDI maps are a powerful and flexible way to get the most out of your hardware and
workflow. If you find yourself missing some functionality from your existing setup, you can
easily add an extra MIDI controller, or simply change the way your current one is mapped.
To start mapping a new MIDI device, follow these steps:
1. Launch djay Pro 2 and wait for it to be fully loaded.
2. Plug your MIDI controller into your computer via a spare USB port and turn it on. You
will then see a pop up message asking if you want to configure the device. Click OK.
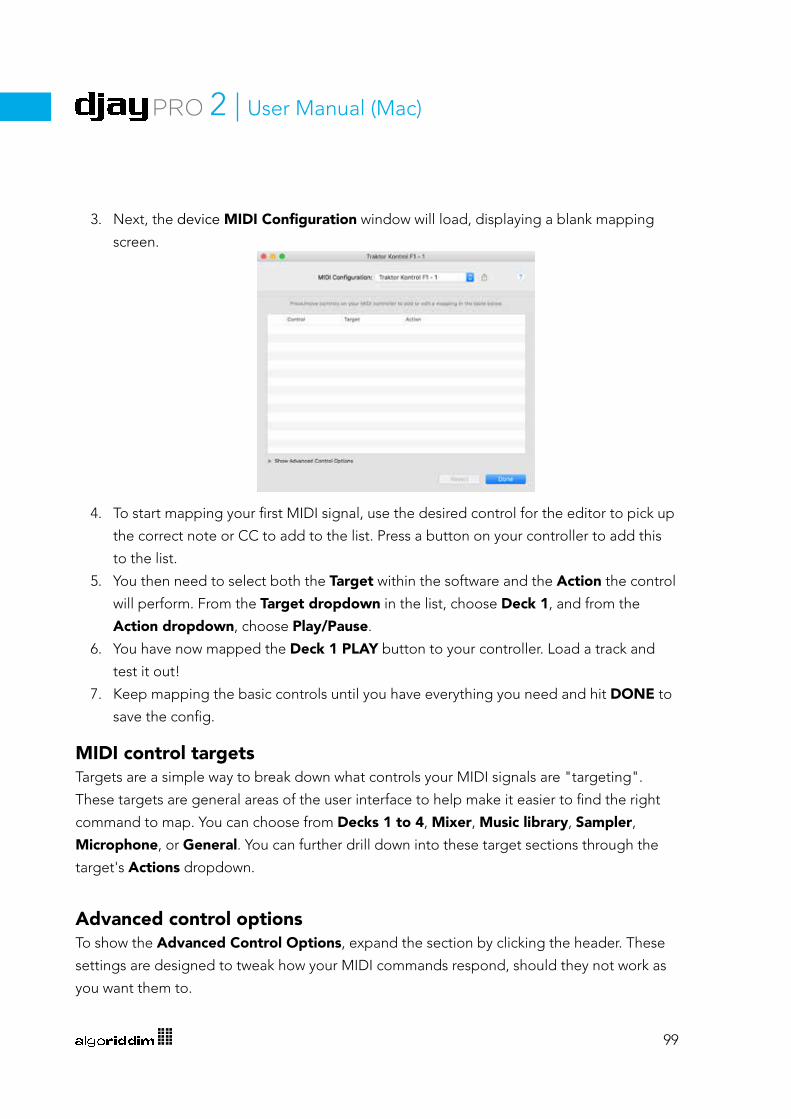
PRO
99
User Manual (Mac)2
3. Next, the device MIDI Configuration window will load, displaying a blank mapping
screen.
4. To start mapping your first MIDI signal, use the desired control for the editor to pick up
the correct note or CC to add to the list. Press a button on your controller to add this
to the list.
5. You then need to select both the Target within the software and the Action the control
will perform. From the Target dropdown in the list, choose Deck 1, and from the
Action dropdown, choose Play/Pause.
6. You have now mapped the Deck 1 PLAY button to your controller. Load a track and
test it out!
7. Keep mapping the basic controls until you have everything you need and hit DONE to
save the config.
MIDI control targetsTargets are a simple way to break down what controls your MIDI signals are "targeting".
These targets are general areas of the user interface to help make it easier to find the right
command to map. You can choose from Decks 1 to 4, Mixer, Music library, Sampler,
Microphone, or General. You can further drill down into these target sections through the
target's Actions dropdown.
Advanced control optionsTo show the Advanced Control Options, expand the section by clicking the header. These
settings are designed to tweak how your MIDI commands respond, should they not work as
you want them to.

PRO
100
User Manual (Mac)2
Control type: Choose from Button, Fader/Knob, Rotary (01h/7Fh), Rotary (3Fh/41h), Rotary (absolute). Invert: Swaps the direction of your control.
Pickup mode: Controls with this option checked will only start responding once they’ve
reached (“picked up”) the MIDI value they last received. This is useful when using one
control for different functions (ie two mixer channels sharing one fader as ‘layers’).
Speed: Change the slider between Slow and Fast to alter the size of movement between
steps. This is particularly useful when using endless encoders for scrolling, for example.
Reaction: Use this option to change how Smooth or Responsive you want your jogwheels to
feel. The more ‘responsive’ this is set, the more immediate jogwheel movements will feel.
MIDI out: Check this box to activate the option for djay Pro 2 to return MIDI signals to your
controller. You can use MIDI out commands to let djay Pro 2 respond with LED feedback for
controls that allow it (for example, pads with backlight or LED toggles).
Message: Change the channel and message type for your MIDI signal. Choose between
Note on/off or Control Change (CC). Control: Selects which control a return message is sent to. This can be different from the
mapped control.
Value: Set the minimum and maximum value of the MIDI out signal, and whether to blend
it, and/or invert it.
TIP: Most controls should work by simply enabling the option, but some may need you
to experiment with the other settings or read your controller’s documentation.
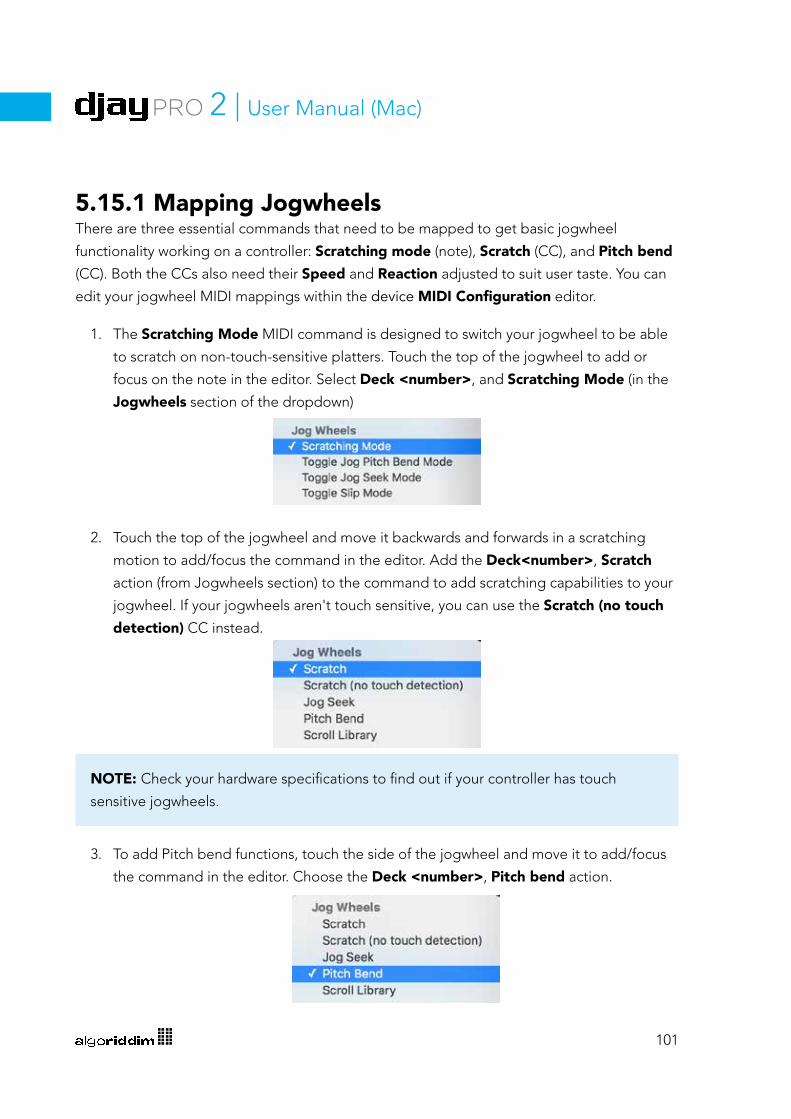
PRO
101
User Manual (Mac)2
5.15.1 Mapping JogwheelsThere are three essential commands that need to be mapped to get basic jogwheel
functionality working on a controller: Scratching mode (note), Scratch (CC), and Pitch bend
(CC). Both the CCs also need their Speed and Reaction adjusted to suit user taste. You can
edit your jogwheel MIDI mappings within the device MIDI Configuration editor.
1. The Scratching Mode MIDI command is designed to switch your jogwheel to be able
to scratch on non-touch-sensitive platters. Touch the top of the jogwheel to add or
focus on the note in the editor. Select Deck <number>, and Scratching Mode (in the
Jogwheels section of the dropdown)
2. Touch the top of the jogwheel and move it backwards and forwards in a scratching
motion to add/focus the command in the editor. Add the Deck<number>, Scratch
action (from Jogwheels section) to the command to add scratching capabilities to your
jogwheel. If your jogwheels aren't touch sensitive, you can use the Scratch (no touch detection) CC instead.
NOTE: Check your hardware specifications to find out if your controller has touch
sensitive jogwheels.
3. To add Pitch bend functions, touch the side of the jogwheel and move it to add/focus
the command in the editor. Choose the Deck <number>, Pitch bend action.

PRO
102
User Manual (Mac)2
4. Finally, you can adjust the Sensitivity via the Advanced Control Options section of
your MIDI actions (see section 5.15 MIDI mapping). Play with both the Speed and
Reaction sliders until your are satisfied with the feel of all the jogwheel behavior.
If your controller supports it, you can also add an extra layer of SHIFT commands to control
other software features by holding down the SHIFT button while adding the commands in
the device MIDI Configuration editor.
TIP: The jogwheel is treated as any other rotary control, meaning you can also use them
for controlling effects or even browser navigation!
5.15.2 Editing an existing mappingYou can also modify an existing MIDI mapping to suit your needs. Select your existing
controller’s MIDI Configuration window to access these changes. The device MIDI editor
will already show a list of all the mapped controls. Using the guide above, you can add to or
alter the commands any way you need.
TIP: Sometimes you can find alternative mappings for hardware on the Algoriddim or
manufacturer forums.
TIP: Many controllers have SHIFT functions to double up your control options.

PRO
103
User Manual (Mac)2
5.15.3 Importing and exporting mappingsAll your custom controller mappings are saved automatically when you click DONE in the
MIDI configuration window. You can quickly access your mappings folder from the MIDI configuration window via the macOS Share Menu feature, next to the MIDI hardware selection dropdown, and choosing Show in Finder.
Within the mapping list window, you can also manage these files in one convenient place.
1. To quickly find where they’re saved, open the MIDI configuration window and click Edit Configurations… from the dropdown box at the top.
2. In the new window, select the controller from the list and choose Show in Finder from
the Options dropdown at the bottom.
3. Alternatively, you can find them by hand at this location in Finder:
Home/user/<USERNAME>/Music/djay Pro 2/MIDI Mappings/
4. You can also use this window to organize your mapping files. Select the mapping from
the list and use the dropdown to Duplicate, Rename, or Delete the file.
You can also add new mapping files to djay Pro 2 by downloading and double-clicking
them. The controller mapping files use the *.djayMidiMapping extension and will be
recognized by macOS as unique to djay Pro 2.
TIP: You can quickly access your controller MIDI configuration by going to the MIDI menu item and selecting your device. Alternatively, you can use the keyboard shortcut
⌘ + Y.

PRO
104
User Manual (Mac)2
5.16 External mixingAs well as mixing using MIDI on a controller, it is also possible to use up to four decks in djay Pro 2 with an external DJ mixer and audio interface.
1. If you're using both a mixer and separate audio interface, plug your audio interface outputs into their respective mixer channel inputs.
TIP: You can route your audio into the mixer channels however you feel comfortable. Just keep track of which is which!
2. Plug the USB cable into your computer. Like with MIDI controllers, djay Pro 2 will automatically detect your audio interface, with a pop-up asking how audio routing should be set up.
3. On the pop-up, click the Advanced... button to open up the Devices preferences.4. You can now change your audio to External using the tabs at the top. This will let you
assign stereo outputs to individual decks, allowing your audio to be routed to external mixer channels.
5. Hit Apply to save your settings, and turn your mixer on if it isn't already. You're now ready to mix using djay Pro 2 and an external DJ mixer!

2PRO
Tips and support
User Manual

PRO
106
User Manual (Mac)2
6 Tips and supportWe all need some extra tips and assistance from time to time. If you have any questions that haven't been covered so far, this section will point you in the right direction.
6.1 Special tipsA big part of being a DJ is understanding how to get the best possible quality out of your
equipment, and djay Pro 2 fro Mac is an important part of that. From mixing in key to
ensuring the sound stays under control, djay Pro 2 is designed to help you achieve that
perfect sound. Follow the tips below to help craft your mix and push your boundaries. Being
a DJ is an ever-evolving skill set, and you can never know too much.
6.1.1 Avoid the redIt’s important to get your audio levels right from the start. Making the sound too loud can
result in distortion and make the music unpleasant to listen to. While everyone likes loud
music, it’s important to give your audio plenty of space (known as headroom) to avoid any
unpleasantness.
1. First, make sure your channel gains are properly set. You want to set your channel gains
as close to zero as you can (this means setting it so it just avoids the red at its loudest
point)
2. Remember that each channel of audio will add extra volume to the master output and
adjust accordingly. Use EQ or the volume faders to cut out extra sound while you’re
mixing. This becomes especially important when you’re mixing with more than two
decks.
3. Never push the volume too much on any one part of the audio chain. If your amplifier is
at maximum, it’ll start to sound bad as it pushes too hard.
You can use the Autogain and Autolimiter features built in to djay Pro 2 to assist you. For
more information on this, see section 4.8.76 Advanced preferences.

PRO
107
User Manual (Mac)2
6.1.2 Audio file qualityThe recording and encoding quality of your music files is critical to getting the most out of your sound
system. While the argument about what quality audio DJs should seek rages on, most everyone
agrees that you should aim for at least 192kbps stereo MP3 quality, with 320kbps stereo MP3 as
the ideal.
6.1.3 Mixing in keyAll music has a root musical key, which works with other musical keys to create pleasant harmonies.
Tracks that have clashing keys can sound bad when played together (especially during ‘musical’ parts,
rather than percussive parts). You can use djay Pro 2’s key lock and key analysis features to better
piece your music together.
EXTRA TIP: This is one of the ways the Track Match feature works, and is a skill many DJs find
essential.
6.1.4 Know your tracksModern digital music might be much better mastered than in the past, and there might be better ways
to be visually aware of your tracks, but there's no substitute for knowing them inside out. Not only
does it help you understand you volume levels, it also gives you insight into how best to structure your
mix.
6.1.5 Keep your library tip-topIt's easy to get overwhelmed with the wealth of music in your collection, so keeping it lean, and
ensuring all your track metadata is accurate and up-to-date will help you stay on top of things. Resist
the urge to fill your library without considering your musical tastes. DJs are known as music selectors
for a reason.
6.1.6 CablesEvery step in the chain affects the quality of your audio. The condition, as well as quality, of any audio
or digital cables is important to ensuring consistent and reliable sound. That doesn’t mean you need
to spend a fortune on audiophile cables, just make sure you have cables you can trust.

PRO
108
User Manual (Mac)2
6.2 FAQ and SupportIf you have any technical issues, or questions not answered in this manual, please visit the
Algoriddim support community and FAQ. You can also contact Algoriddim email support
directly by using the support portal to raise a ticket.

PRO User Manual (Mac)2
What's new in 2.0

PRO
110
User Manual (Mac)2
7 What's new in 2.0The user interface has been completely overhauled for djay Pro 2 (see section 7.5 My Library). Along with the 2-deck and 4 deck mixing, the Single Deck and Automix views give DJs even more tools to mix. There’s also a consistent interface across all the different views, with master volume, recording, effects and tools retaining the same functionality.
7.1 2-deck viewThe two-deck view has been redesigned with a clearer layout, including a larger level meter
as part of the main deck interface.
For a more detailed look at the 2-deck view, see section 4.5 Deck views.

PRO
111
User Manual (Mac)2
7.2 4-deck viewLike 2 Deck view, the four-deck layout has been improved, with tempo, EQ, gain, filter, and
volume controls for each deck on-screen.
For more information on 4 Deck view, see section 5.2 Advanced deck layouts.
7.3 Single Deck viewThe Single Deck view loads one track at a time, with transport controls for quickly skimming
through music collections. Skip back to a previous track in the playlist, play/pause the
current track, or move on to the next track.
Prepare your music with the track Tools:
• Cue Points
• Loop
• BPM/Grid
TIP: Use Single Deck mode to prepare your music without the clutter.

PRO
112
User Manual (Mac)2
7.4 Automix viewSwitch to Automix view to let djay Pro 2 take control of your mixing. When active, tracks
from the Automix playlist will be mixed together based on the user preferences. Read
section x Automix preferences for more information on how to set up your Automix
transitions.
To start using Automix:
1. Drag your first track onto the Currently Playing deck area dropzone.
2. The music can be controlled using the PLAY/PAUSE button in the center of the track
artwork.
3. Once the music has started playing, drag another track onto the next slot dropzone, to
the right of the deck area.
4. When the current track nears the end, the incoming track will start to move to replace
it.
5. Automix will play this track to the end, unless you add another.

PRO
113
User Manual (Mac)2
7.4.1 Automix playlistTo automate things further, you can use the
Automix playlist panel to keep the music flowing.
There are three ways to add music to the Automix
playlist: Manual, Matching Songs, and Current Playlist. Switch between the different sources by
using the dropdown just below-left of the Start/Stop Automix button.
• Manual lets you create and manage your
own playlist by adding music manually, using
drag-and-drop
• Matching Songs uses djay’s Match feature
to find tracks from all sources that work with
the current track.
• Current Playlist loads all the tracks from the
currently selected playlist, and plays through
them in the order they are listed.
To load the next track from the Automix playlist into the queue, click the Start Automix
button at the top of the panel.
TIP: You can start transitioning to the next track early by clicking the chevrons below-
right of the Start/Stop Automix button. The software will find the soonest possible
moment to start the blend.

PRO
114
User Manual (Mac)2
7.5 My LibraryYou can manage your music within djay Pro 2 using the My Library, with powerful features
such as smart playlists, search filters, and split library mode.
TIP: The My Library lets you edit and manage your locally stored music collection
directly within djay Pro 2.

PRO
115
User Manual (Mac)2
7.5.1 Split Library ModeThe djay Pro 2 browser is able to display both the My Library window, and a second browser
tree and playlist window. To activate the split view, click the Split Library Mode button,
below the My Library tab.
TIP: You can adjust the ration between both views by dragging the central splitter up or
down.

PRO
116
User Manual (Mac)2
7.5.2 Adding music to your libraryThere are two ways to add new media to your My Library: dragging and dropping via the
Split Library Mode, or dropping files or folders from a Finder window.
To add using the Split Library Mode:
1. Make sure Split Library Mode is active (see section 7.5.1 Split Library Mode).
2. Select the source you want to import from using the library tabs on the left of the
browser.
3. Drag the tracks from the lower playlist window (or folder/playlist from the lower
browser tree) onto the My Library at the top of the browser.
To add using a Finder window:
1. Make sure the My Library tab is active.
2. Use a Finder window to navigate to the media or folder you’d like to import.
3. Click-hold what you’d like to import, and drag over to the library browser tree until

PRO
117
User Manual (Mac)2
focus switches to the djay Pro 2 window.
4. Drop the item at the location in the browser tree you’d like it to import.
NOTE: Adding tracks to djay Pro 2 only adds them to the database. It does not
duplicate or move your music files.
TIP: You can drag-and-drop folders or playlists from the iTunes, video, and Finder tabs,
onto your My Library browser tree to quickly batch-add them.
7.5.3 PlaylistsPlaylists are an easy way to keep track of your music, ready
for a set.
To add a playlist:
1. Make sure the My Library collection is the active tab on the left side of the browser.
2. In the Playlists browser tree, navigate to the location you’d like your playlist to exist.
3. Click on the + button at the top right, and choose Add Playlist from the menu that
appears.
4. A new blank playlist will show in the library browser tree, with the name field selected,
ready to edit.
5. Rename your playlist.
6. You can now add tracks from your My Library by dragging them from the tracklist
window to the playlist.
TIP: you can reorder your playlists either using the metadata columns, or by dragging
tracks to a different part of the playlist.

PRO
118
User Manual (Mac)2
7.5.4 Smart playlistsKeep your tracks in the right place without doing the work. Smart playlists sort through your
entire collection into playlists based on custom track metadata filter variables. As new music
is added, it automatically gets sorted into any relevant smart playlist.
1. Make sure the My Library collection is active.
2. In the Playlists browser tree, navigate to the location you’d like your smart playlist to
exist.
3. Click on the + button at the top right, and choose Add Smart Playlist from the menu
that appears.
4. A new, blank smart playlist will show in the main track list window.
5. Click the + icon at the top to the right of Smart Playlist Rules to start adding rules for
the playlist filtering.
6. To close the filter rules panel, click the orange Done button, to the left of the search
bar.
7. You can further change your filter by clicking the Edit button which replaces the Done
button.

PRO
119
User Manual (Mac)2
Rules can be set up based on Album, Artist, BPM, Comments, Date Added, Date Released, Genre, Grouping, Key, Label, Name, Rating, and Tags track metadata. With
different rules, you will have different parameter options you can choose from. For example,
text fields will have variables for:
• Contains
• Does not contain
• Is
• Is not
• Begins with
• Ends with
TIP: The order in which you set your rules will change how your music is filtered.

PRO
120
User Manual (Mac)2
7.5.5 Playlist foldersPlaylist folders are an easy way to contain multiple playlists together for organization. When
active in the library browser tree, the folders will display all the tracks from all the contained
playlists in the playlist window.
To create a playlist folder:
1. Make sure the My Library collection is active.
2. In the Playlists browser tree, navigate to the location you’d like your playlist folder to
exist.
3. Click on the + button at the top right, and choose Add Playlist Folder from the menu
that appears.
4. A new playlist folder will show in the library browser tree, with the name field selected,
ready to edit.
5. Name your folder.
Once the folder is created, you can either add new, empty playlists or smart playlists using
the + button, or drag and drop existing playlists to re-home them. Click on the folder icon or
name will display all the tracks from the playlists. Click the triangle to the left of the folder will
expand the contents.
NOTE: Select a playlist, smart playlist, or folder, then click it again to rename it.

PRO
121
User Manual (Mac)2
7.5.6 HistoryEvery track you play from the My Library is automatically added to a playlist of your current
session, within the History tab. Quickly switch between Playlists and History by using the
tabs to the right of your My Library icon.
TIP: you can start a fresh session in your history by clicking the + icon at the top of the
History tab.
7.5.7 FilteringFilters allow you to quickly drill down using search rules based on Album, Artist, BPM,
Comments, Date Added, Date Released, Genre, Grouping, Key, Label, Name, Rating,
and Tags track metadata. Unlike smart playlists, any active filter will carry over to the currently
selected playlist or playlist folder. To create a filter, click the filter icon to the left of the search
box. Add rules to your filter using the + symbol.
TIP: Since filters stay active, you can scrub through your playlists with a search filter on,
to quickly see what results show up.

PRO
122
User Manual (Mac)2

PRO
123
User Manual (Mac)2
7.6 Library side panelThe library side panel offers a means to display extra information next to your main library
view. Switch between the Compact library, Queue, Current session, and Match using the
tabs along the top.
7.6.1 Compact libraryDisplay a second, independent, library view. You can navigate all your music, playlists, and
folders by using the dropdown at the top left of the panel.
TIP: Use the library panel while preparing your sets, to quickly access playlists or music
from more than one source.
7.6.2 QueueThe Queue tab loads your Play Queue, which lets you prepare a list of tracks to sketch
ideas. The Play Queue acts as a playlist which stays up to date by removing tracks that have
already been played. To access the Play queue, use the button on the far right button group
at the bottom of the window.
You can add tracks to the Play Queue two ways:
1. Drag individual tracks into the Play Queue from your playlists.
2. Right click tracks and choose Add To Queue.
TIP: You can add tracks from any of the library tabs to your play queue.

PRO
124
User Manual (Mac)2
7.6.3 SessionThe Session tab shows the historical playlist of your current mix session. Any tracks that have
been loaded and played in a deck will show in the order they first played.
7.6.4 MatchChange which target track to match to, and which source collection to search matches from
by selecting from the two drop-down lists at the top of the panel.
Using the left drop-down, switch between the Currently Playing track, a Custom choice via
drag-and-drop, or select a specific deck for Match to monitor.
The right drop-down allows you to change which source collection Match will search. Switch
between music from your djay playlists, iTunes, or Spotify.
TIP: The collection used to find matches doesn’t have to be the same as the one with
the current track. If you can’t find something that works, try a different collection.

PRO
125
User Manual (Mac)2
7.7 PhotoBeatWith djay Pro 2, images can be loaded directly into video mode from both the Apple
Photos app and via drag and drop from the Finder tab.
To access your PhotoBeats collection, navigate to the Videos tab in the browser, then switch
to the PhotoBeat section using the icon above the browser tree. Any images in the Photos
app will display in the browser playlist window, ready to be added to your video feed.
NOTE: You will need to have audio loaded into the deck you add your photos.