printpartner 20w page printer product description · 2007-11-14 · emulation, and 35 scalable...
TRANSCRIPT
PrintPartner 20W
PAGE PRINTER
PRODUCT DESCRIPTION
C145-C037-01EN

PrintPartner 20W
PAGE PRINTER
PRODUCT DESCRIPTION
FUJITSU LIMITED
Communications and Electronics
Tokyo, Japan

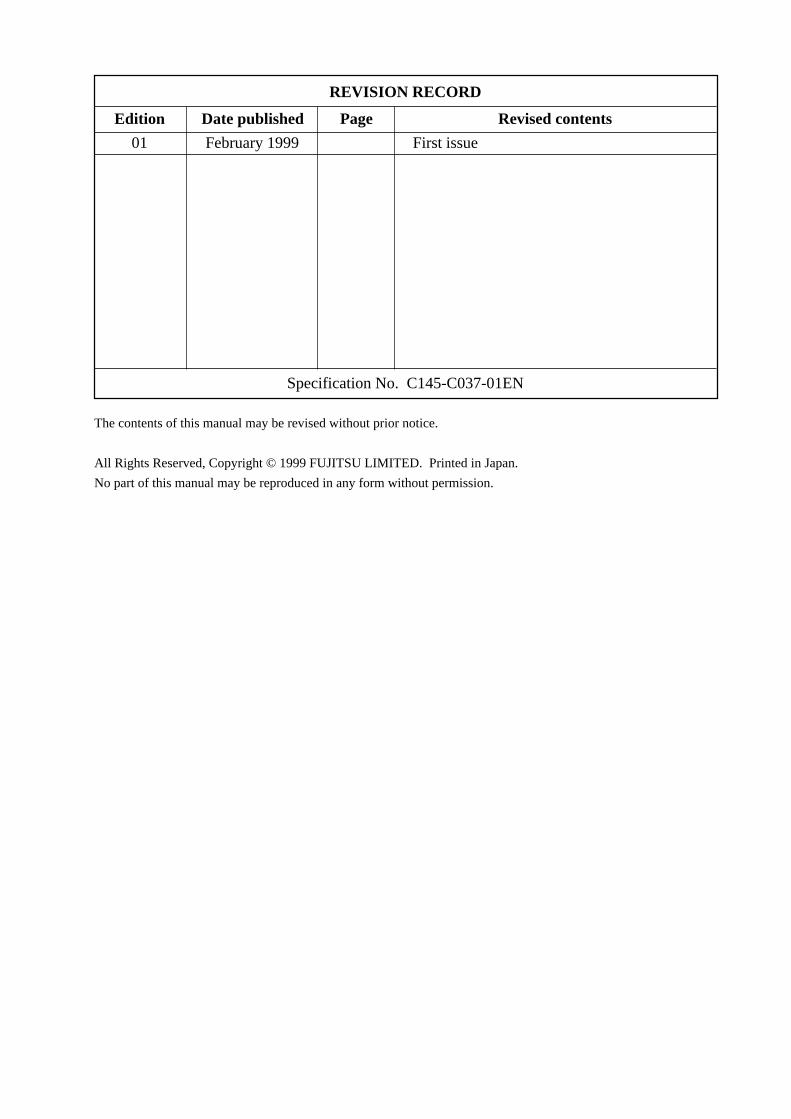
Edition
01
Date published
February 1999
Revised contents
First issue
REVISION RECORD
Page
Specification No. C145-C037-01EN
The contents of this manual may be revised without prior notice.
All Rights Reserved, Copyright © 1999 FUJITSU LIMITED. Printed in Japan.
No part of this manual may be reproduced in any form without permission.

Address your comments and inquiries on this manual to:
FUJITSU ITALIA S.p.A.Via Nazario Sauro, 3820099 Sesto S, Giovanni (MI), ITALYTEL: (39-2) 26294-1FAX: (39-2) 26294-201
FUJITSU KOREA LTD.9th Floor, Korean Reinsurance Bldg.80, Susong-Dong, Chongro-GuSeoul Special City, KOREATEL: (82-2) 739-3281FAX: (82-2) 739-3294
FUJITSU NORDIC ABKung Hans Väg 12S-191 76 Sollentuna, SWEDENTEL: (46-8) 626-6000FAX: (46-8) 626-6711
FUJITSU (SINGAPORE) PTE. LTD.75 Science Park Drive#02-06 CINTECH II, SINGAPORE 0511TEL: (65) 777-6577FAX: (65) 777-8794
FUJITSU SYSTEMS BUSINESS(MALAYSIA) SDN. BHD.Fujitsu Plaza, 1A, Jalan Tandang 204P.O. Box 636 Pejabat Pos Jalan Sultan46770 Petaling JayaSelangor Darul Ehsan, MALAYSIATEL: (60-3) 793-3888FAX: (60-3) 793-0888
FUJITSU SYSTEMS BUSINESS(THAILAND) LTD.12th Floor, Olympia Thai Tower444 Rachadapisek Road, SamsennokHuaykwang, Bangkok 10310, THAILANDTEL: (662) 512-6066FAX: (662) 512-6068
FUJITSU TAIWAN LTD.8th FL., NO. 170, Hung Tai CenterTun Hwa N. RD., Taipei, TAIWANTEL: (886-2) 545-7700FAX: (886-2) 717-4644
FUJITSU LIMITEDComputer Products Business GroupKamikodanaka 4-1-1, Nakahara-kuKawasaki-shi 211, JAPANTEL: (81-44) 754-8633FAX: (81-44) 754-8510
FUJITSU COMPUTER PRODUCTS OFAMERICA, INC.2904 Orchard Parkway, San JoseCA 95134-2022, U.S.A.TEL: (1-408) 432-6333FAX: (1-408) 894-1709
FUJITSU CANADA INC.2800 Matheson Boulevard EastMississauga, Ontario L4W 4X5, CANADATEL: (1-905) 602-5454FAX: (1-905) 602-5457
FUJITSU AUSTRALIA LIMITED475 Victoria Avenue, ChatswoodN.S.W., 2067, AUSTRALIATEL: (61-2) 410-4555FAX: (61-2) 411-8603
FUJITSU DEUTSCHLAND GmbH.Frankfurter Ring 21180807 München, GERMANYTEL: (49-89) 32378-0FAX: (49-89) 32378-100
FUJITSU ESPAÑA, S.A.Almagro 40, 28009 Madrid, SPAINTEL: (34-1) 581-8400FAX: (34-1) 581-8125
FUJITSU EUROPE LTD.2 Longwalk Road, Stockly Park, UxbridgeMiddlesex UB11 1AB, ENGLANDTEL: (44-81) 573-4444FAX: (44-81) 573-2643
FUJITSU FRANCE S.A.1, place des Etats-Unis Silic 31094588 RUNGIS Cedex, FRANCETEL: (33-1) 41-80-38-80FAX: (33-1) 41-80-38-66
FUJITSU HONG KONG LIMITEDRoom 2521, Sun Hung Kai Centre30 Harbour Road, HONG KONGTEL: (852) 827-5780FAX: (852) 827-4724
FUJITSU ICIM LTD.Nagar Road, Pune 411 014, INDIATEL: (91-212) 681-528FAX: (91-212) 680-238
PREFACE
This manual gives the product specifications for the PrintPartner 20W (PP20W) page printers. The manual provides
prospective customers with required engineering specifications.
Chapter 1: Describes the main features.
Chapter 2: Gives the model configuration and equipment structure.
Chapter 3: Gives the functional, electrical, environmental, and paper specifications.
Chapter 4: Describes the control panel (LED indicators, LCD, and push-button switches). It also summarizes
control panel’s setup functions and the printer utility programs, MarkVision™ and PPMENU.
Chapter 5: Gives information on the interface, its hardware specifications, and software specifications. It also
summarizes command sets.
Chapter 6: Explains maintenance.
Chapter 7: Lists options and supplies.
Appendixes: Give information on symbol sets, fonts, and nameplate and label locations.
i
CONTENTS
CHAPTER 1 FEATURES ................................................................................................................................ 1-1
1.1 Fine Print Quality ........................................................................................................................................... 1-3
1.2 Quiet Operation .............................................................................................................................................. 1-3
1.3 Easy Paper Handling ...................................................................................................................................... 1-3
1.4 High Reliability and Easy Maintenance ........................................................................................................ 1-4
1.5 Compact, Lightweight, and Small Footprint Design ..................................................................................... 1-4
1.6 Wide Variety of Interfaces and Emulation .................................................................................................... 1-5
1.7 Environment Friendly .................................................................................................................................... 1-5
1.8 User-Friendly Operation ................................................................................................................................ 1-6
1.9 Duplex Printing Capability ............................................................................................................................ 1-6
1.10 Wide Variety of Media .................................................................................................................................. 1-6
1.11 Extendability .................................................................................................................................................. 1-6
CHAPTER 2 MODEL CONFIGURATION AND EQUIPMENT STRUCTURE...................................... 2-1
2.1 Model Configuration ...................................................................................................................................... 2-1
2.2 Block Diagram ............................................................................................................................................... 2-2
2.3 Structure ......................................................................................................................................................... 2-4
CHAPTER 3 SPECIFICATIONS ................................................................................................................... 3-1
3.1 General Specifications ................................................................................................................................... 3-1
3.2 Paper Specifications ....................................................................................................................................... 3-11
3.2.1 Type, size, and thickness ........................................................................................................................ 3-11
3.2.2 Printing area ............................................................................................................................................ 3-12
3.2.3 Other precautions .................................................................................................................................... 3-13
3.2.4 Paper storage ........................................................................................................................................... 3-13
CHAPTER 4 CONTROL PANEL AND PRINTER SOFTWARE .............................................................. 4-1
4.1 Control Panel ................................................................................................................................................. 4-1
4.1.1 Indicators ................................................................................................................................................ 4-1
4.1.2 LCD ........................................................................................................................................................ 4-2
4.1.3 Buttons .................................................................................................................................................... 4-2
4.1.4 Menu modes............................................................................................................................................ 4-2
4.2 Printer Utility Programs ................................................................................................................................. 4-4
4.2.1 MarkVision™ ......................................................................................................................................... 4-4
4.2.2 PPMENU ................................................................................................................................................ 4-6
4.3 Printer Drivers ................................................................................................................................................ 4-8
4.3.1 Standard printer drivers for Windows 95/98 and NT 4.0 ....................................................................... 4-9
4.3.2 Standard printer drivers for Windows NT 3.51 ...................................................................................... 4-10
4.3.3 FPS printer drivers for Windows 95/98 .................................................................................................. 4-11
4.3.4 FPS printer drivers for Windows NT 4.0................................................................................................ 4-13
ii
CHAPTER 5 INTERFACE INFORMATION ............................................................................................... 5-1
5.1 Overview ........................................................................................................................................................ 5-1
5.2 Parallel Interface (IEEE 1284-B Connector) ................................................................................................. 5-1
5.2.1 Hardware requirements ........................................................................................................................... 5-1
5.2.2 Connector pin assignment....................................................................................................................... 5-2
5.2.3 Data transmission timing ........................................................................................................................ 5-5
5.3 Parallel Interface (IEEE 1284-C Connector) ................................................................................................. 5-7
5.3.1 Hardware requirements ........................................................................................................................... 5-7
5.3.2 Connector pin assignment....................................................................................................................... 5-8
5.3.3 Data transmission timing ........................................................................................................................ 5-11
5.4 RS-232C Serial Interface ............................................................................................................................... 5-13
5.4.1 Hardware requirements ........................................................................................................................... 5-13
5.4.2 Connector pin assignment....................................................................................................................... 5-14
5.4.3 Serial data format .................................................................................................................................... 5-15
5.4.4 Cable connection diagrams ..................................................................................................................... 5-15
5.4.5 Data protocols ......................................................................................................................................... 5-16
5.5 Command Sets ............................................................................................................................................... 5-18
5.5.1 Printer emulation .................................................................................................................................... 5-18
5.5.2 HP LaserJet 5 command set summary .................................................................................................... 5-19
5.5.2.1 HP LaserJet 5 PCL mode ............................................................................................................... 5-19
5.5.2.2 HP LaserJet 5 HP-GL/2 mode ........................................................................................................ 5-25
5.5.2.3 HP LaserJet 5 PJL mode ................................................................................................................ 5-28
5.5.3 PostScript Operators (Commands) ......................................................................................................... 5-30
CHAPTER 6 MAINTENANCE ....................................................................................................................... 6-1
6.1 Overview ........................................................................................................................................................ 6-1
6.2 Preventive Maintenance ................................................................................................................................. 6-1
6.3 Maintenance Philosophy ................................................................................................................................ 6-1
6.4 Diagnostics ..................................................................................................................................................... 6-1
6.4.1 ROM/RAM check ................................................................................................................................... 6-1
6.4.2 Error display ........................................................................................................................................... 6-1
6.5 Maintenance Tool .......................................................................................................................................... 6-2
6.5.1 Self test printing ...................................................................................................................................... 6-2
6.6 Recommended Spare Parts ............................................................................................................................ 6-2
CHAPTER 7 OPTIONS AND SUPPLIES ...................................................................................................... 7-1
7.1 Options ........................................................................................................................................................... 7-1
7.2 Consumables .................................................................................................................................................. 7-2
7.3 Periodic Replacement Parts ........................................................................................................................... 7-2
7.4 Documentation ............................................................................................................................................... 7-2

iii
APPENDIX A SYMBOL SETS ........................................................................................................................ A-1
APPENDIX B RESIDENT FONTS .................................................................................................................. B-1
B.1 HP LaserJet 5 Emulation ............................................................................................................................... B-1
B.2 PostScript Level 2 Emulation ........................................................................................................................ B-4
APPENDIX C PRINTER LOGO AND LABELS ............................................................................................ C-1
iv
ILLUSTRATIONS AND TABLES
Figure 1.1 PrintPartner 20W printer ....................................................................................................................... 1-2
Figure 1.2 Printer dimensions................................................................................................................................. 1-4
Figure 1.3 Optional interface and emulation .......................................................................................................... 1-5
Figure 2.1 Printer block diagram ............................................................................................................................ 2-2
Figure 2.2 Structure (with duplex unit + paper trays 1 to 3) .................................................................................. 2-4
Figure 3.1 Printing area .......................................................................................................................................... 3-12
Figure 4.1 Control panel ......................................................................................................................................... 4-1
Figure 4.2 Printer utility programs ......................................................................................................................... 4-4
Figure 5.1 Parallel interface input circuit ............................................................................................................... 5-1
Figure 5.2 Parallel interface output circuit ............................................................................................................. 5-2
Figure 5.3 Parallel interface connector (IEEE1284-B) .......................................................................................... 5-2
Figure 5.4a Data transmission timing (compatible mode) ..................................................................................... 5-5
Figure 5.4b Data transmission timing (nibble mode) ............................................................................................. 5-6
Figure 5.5 Parallel interface input circuit ............................................................................................................... 5-7
Figure 5.6 Parallel interface output circuit ............................................................................................................. 5-7
Figure 5.7 Parallel interface connector (IEEE1284-C) .......................................................................................... 5-8
Figure 5.8a Data transmission timing (compatible mode) ..................................................................................... 5-11
Figure 5.8b Data transmission timing (nibble mode) ............................................................................................. 5-12
Figure 5.9 RS-232C interface input circuit ............................................................................................................ 5-13
Figure 5.10 RS-232C interface output circuit ........................................................................................................ 5-13
Figure 5.11 Serial interface connector .................................................................................................................... 5-14
Figure 5.12 RS-232C data format .......................................................................................................................... 5-15
Figure 5.13a Example of RS-232C cable wiring (25-pin connector at computer side) ......................................... 5-15
Figure 5.13b Example of RS-232C cable wiring (9-pin connector at computer side) ........................................... 5-16
Table 5.1 Parallel interface signals ......................................................................................................................... 5-2
Table 5.2 Parallel interface signals ......................................................................................................................... 5-8
Table 5.3 RS-232C interface signals ...................................................................................................................... 5-14
1-1
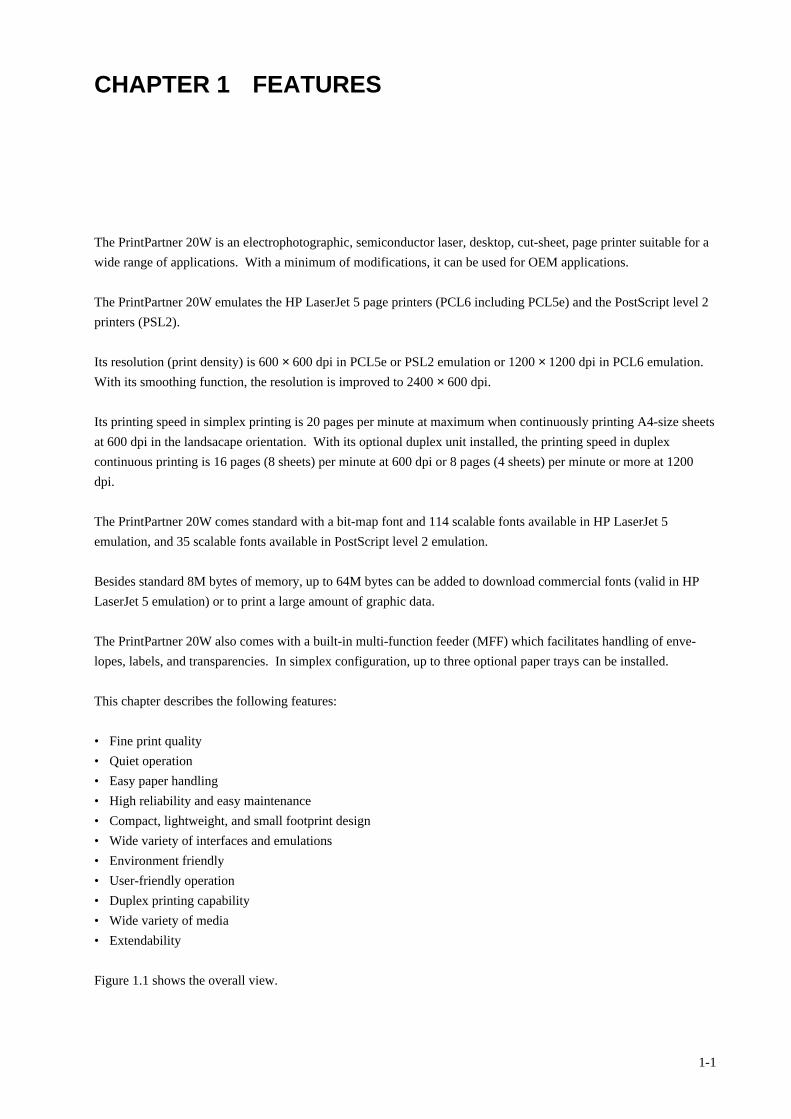
CHAPTER 1 FEATURES
The PrintPartner 20W is an electrophotographic, semiconductor laser, desktop, cut-sheet, page printer suitable for a
wide range of applications. With a minimum of modifications, it can be used for OEM applications.
The PrintPartner 20W emulates the HP LaserJet 5 page printers (PCL6 including PCL5e) and the PostScript level 2
printers (PSL2).
Its resolution (print density) is 600 × 600 dpi in PCL5e or PSL2 emulation or 1200 × 1200 dpi in PCL6 emulation.
With its smoothing function, the resolution is improved to 2400 × 600 dpi.
Its printing speed in simplex printing is 20 pages per minute at maximum when continuously printing A4-size sheets
at 600 dpi in the landsacape orientation. With its optional duplex unit installed, the printing speed in duplex
continuous printing is 16 pages (8 sheets) per minute at 600 dpi or 8 pages (4 sheets) per minute or more at 1200
dpi.
The PrintPartner 20W comes standard with a bit-map font and 114 scalable fonts available in HP LaserJet 5
emulation, and 35 scalable fonts available in PostScript level 2 emulation.
Besides standard 8M bytes of memory, up to 64M bytes can be added to download commercial fonts (valid in HP
LaserJet 5 emulation) or to print a large amount of graphic data.
The PrintPartner 20W also comes with a built-in multi-function feeder (MFF) which facilitates handling of enve-
lopes, labels, and transparencies. In simplex configuration, up to three optional paper trays can be installed.
This chapter describes the following features:
• Fine print quality
• Quiet operation
• Easy paper handling
• High reliability and easy maintenance
• Compact, lightweight, and small footprint design
• Wide variety of interfaces and emulations
• Environment friendly
• User-friendly operation
• Duplex printing capability
• Wide variety of media
• Extendability
Figure 1.1 shows the overall view.
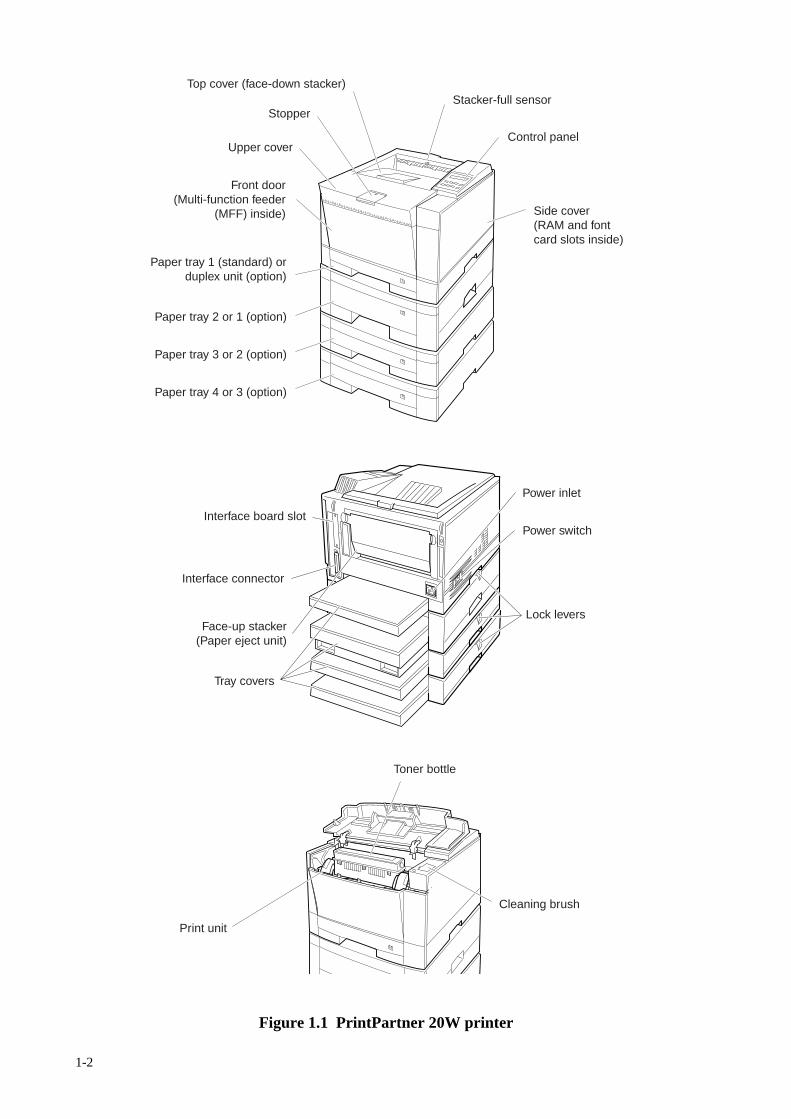
1-2
Figure 1.1 PrintPartner 20W printer
Interface connector
Power inlet
Interface board slot
Face-up stacker(Paper eject unit)
Tray covers
Power switch
Lock levers
Top cover (face-down stacker)
Side cover(RAM and font card slots inside)
Stacker-full sensor
Control panel
Stopper
Upper cover
Front door(Multi-function feeder
(MFF) inside)
Paper tray 1 (standard) orduplex unit (option)
Paper tray 2 or 1 (option)
Paper tray 3 or 2 (option)
Paper tray 4 or 3 (option)
Cleaning brush
Toner bottle
Print unit
1-3
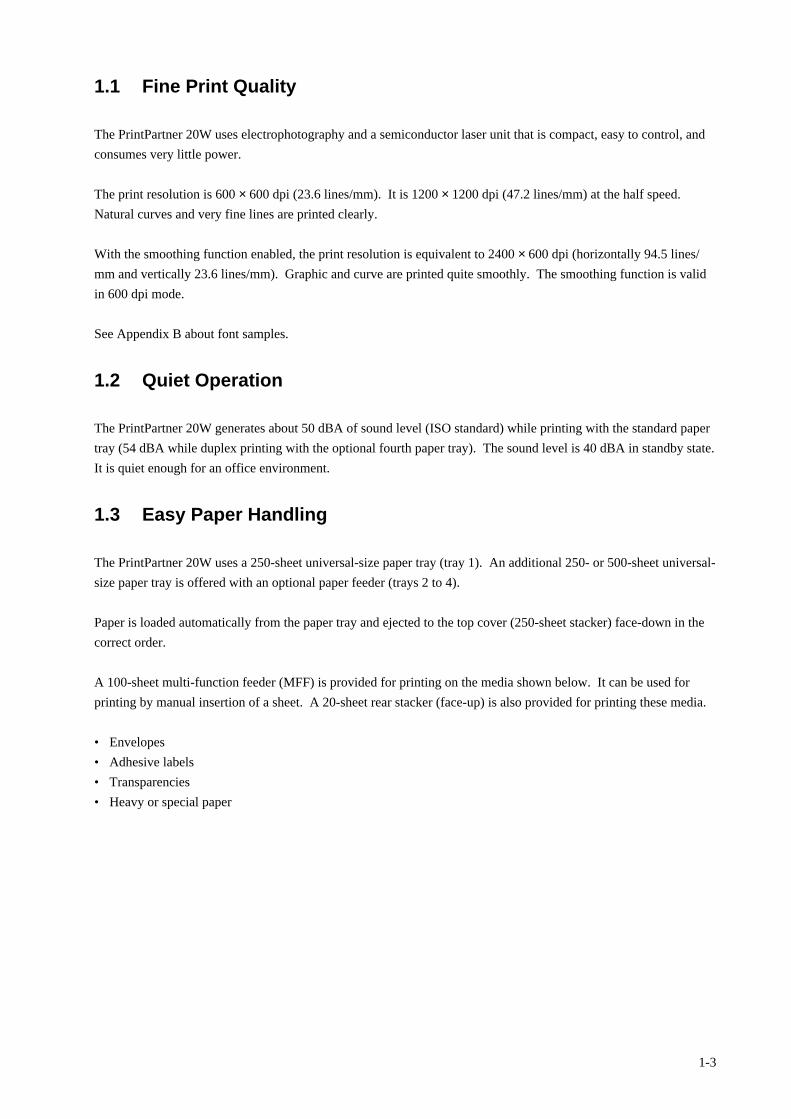
1.1 Fine Print Quality
The PrintPartner 20W uses electrophotography and a semiconductor laser unit that is compact, easy to control, and
consumes very little power.
The print resolution is 600 × 600 dpi (23.6 lines/mm). It is 1200 × 1200 dpi (47.2 lines/mm) at the half speed.
Natural curves and very fine lines are printed clearly.
With the smoothing function enabled, the print resolution is equivalent to 2400 × 600 dpi (horizontally 94.5 lines/
mm and vertically 23.6 lines/mm). Graphic and curve are printed quite smoothly. The smoothing function is valid
in 600 dpi mode.
See Appendix B about font samples.
1.2 Quiet Operation
The PrintPartner 20W generates about 50 dBA of sound level (ISO standard) while printing with the standard paper
tray (54 dBA while duplex printing with the optional fourth paper tray). The sound level is 40 dBA in standby state.
It is quiet enough for an office environment.
1.3 Easy Paper Handling
The PrintPartner 20W uses a 250-sheet universal-size paper tray (tray 1). An additional 250- or 500-sheet universal-
size paper tray is offered with an optional paper feeder (trays 2 to 4).
Paper is loaded automatically from the paper tray and ejected to the top cover (250-sheet stacker) face-down in the
correct order.
A 100-sheet multi-function feeder (MFF) is provided for printing on the media shown below. It can be used for
printing by manual insertion of a sheet. A 20-sheet rear stacker (face-up) is also provided for printing these media.
• Envelopes
• Adhesive labels
• Transparencies
• Heavy or special paper
1-4
Figure 1.2 Printer dimensions
1.4 High Reliability and Easy Maintenance
The PrintPartner 20W design has been simplified. The print unit and the toner bottle can be removed and replaced
easily without getting hands dirty.
A variety of functions are integrated onto a single printed circuit board (main controller). A mechanism controller
board including driver circuits is provided separately from the main controller.
The self-diagnostics function checks printer hardware.
Almost all printer operations and regular maintenance procedures (handlimg paper and replacing consumables) are
performed from the front, right side, and rear of the printer. The side cover is removable.
The above items have improved reliability and made maintenance easier, both for general users and service
technicians.
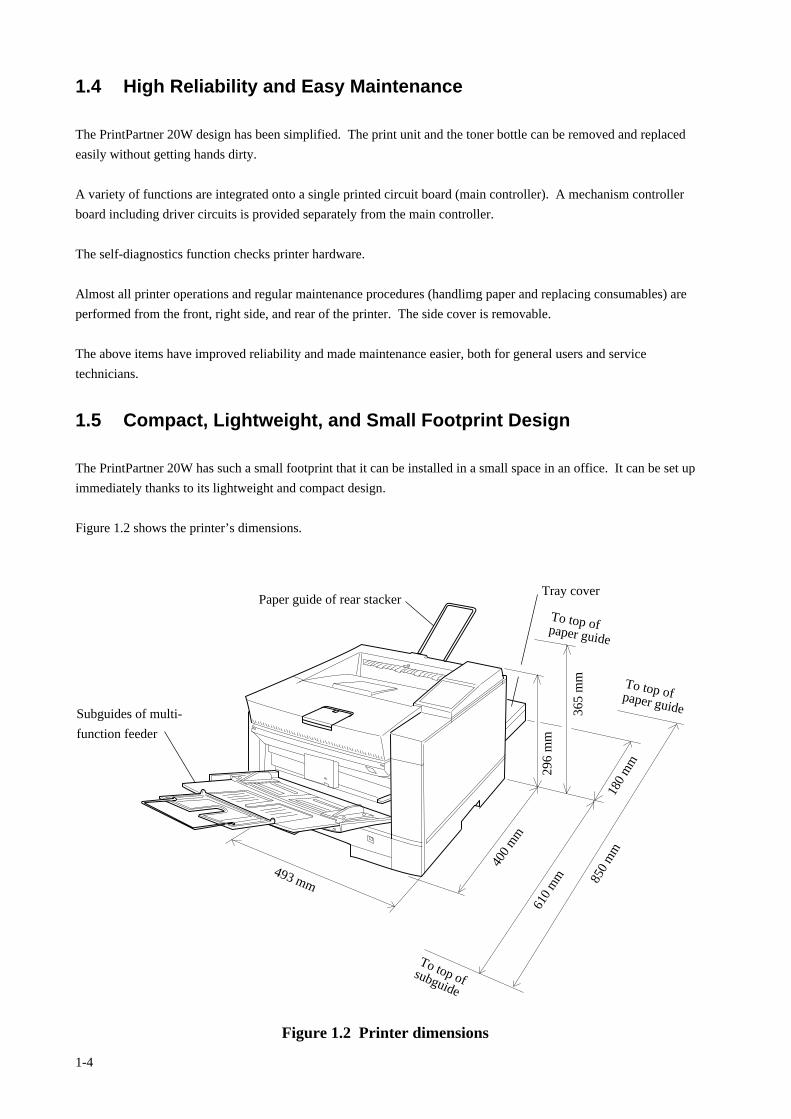
1.5 Compact, Lightweight, and Small Footprint Design
The PrintPartner 20W has such a small footprint that it can be installed in a small space in an office. It can be set up
immediately thanks to its lightweight and compact design.
Figure 1.2 shows the printer’s dimensions.
493 mm
400
mm
850
mm
296
mm
365
mm
Subguides of multi-
function feeder
180
mm
Paper guide of rear stackerTray cover
To top ofpaper guide
To top ofpaper guide
610
mm
To top ofsubguide
1-5
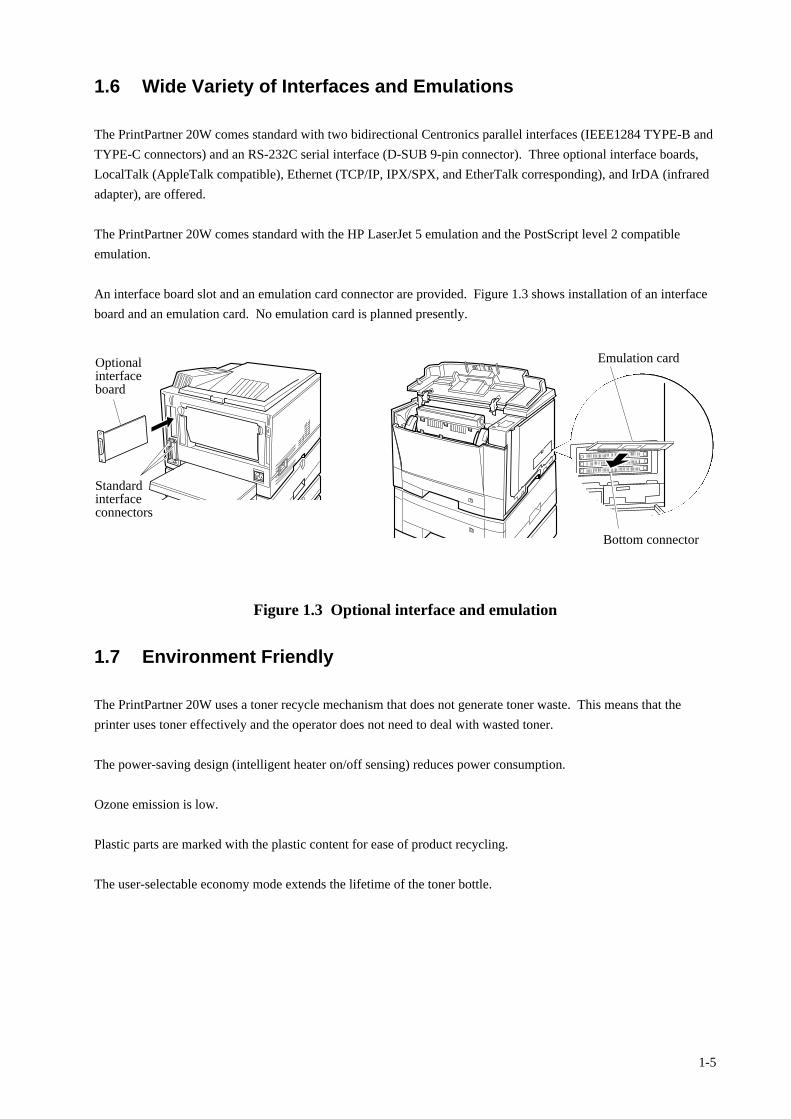
1.6 Wide Variety of Interfaces and Emulations
The PrintPartner 20W comes standard with two bidirectional Centronics parallel interfaces (IEEE1284 TYPE-B and
TYPE-C connectors) and an RS-232C serial interface (D-SUB 9-pin connector). Three optional interface boards,
LocalTalk (AppleTalk compatible), Ethernet (TCP/IP, IPX/SPX, and EtherTalk corresponding), and IrDA (infrared
adapter), are offered.
The PrintPartner 20W comes standard with the HP LaserJet 5 emulation and the PostScript level 2 compatible
emulation.
An interface board slot and an emulation card connector are provided. Figure 1.3 shows installation of an interface
board and an emulation card. No emulation card is planned presently.
Figure 1.3 Optional interface and emulation
1.7 Environment Friendly
The PrintPartner 20W uses a toner recycle mechanism that does not generate toner waste. This means that the
printer uses toner effectively and the operator does not need to deal with wasted toner.
The power-saving design (intelligent heater on/off sensing) reduces power consumption.
Ozone emission is low.
Plastic parts are marked with the plastic content for ease of product recycling.
The user-selectable economy mode extends the lifetime of the toner bottle.
Optionalinterfaceboard
Emulation card
Bottom connector
Standardinterfaceconnectors
1-6
1.8 User-Friendly Operation
The control panel consists of eight push-button switches, four LED indicators, and an LCD (two lines by sixteen
characters).
The LED indicators provide printer’s basic status information and the LCD provides status and error messages by
language.
Print menu, such as a message language, paper size, and line spacing, can be set easily using the control panel or
remotely using the utility programs, MarkVision™ and PPMENU.
1.9 Duplex Printing Capability
An optional duplex unit is provided for double-sided printing. It can be installed into the slot where the standard
paper tray is originally installed. In this case, an optional feeder unit must be added and the standard paper traymust installed into the slot of the optional feeder unit.
1.10 Wide Variety of Media
The PrintPartner 20W can handle the following wide variety of media.
• Copy paper including recycled paper
• Heavy or special paper
• Envelopes
• Adhesive labels
• Transparencies
It also can handle the following wide variety of sizes.
• A5, A4, A3
• JIS B5, JIS B4
• Executive, Letter, Legal, Ledger
• COM10, Monarch, C5, DL, B5 (envelopes)
• Custom-sized paper
1.11 Extendability
Optional 250- or 500-sheet second, third, and fourth paper trays can be easily installed by users at the field. The
fourth paper tray is available in simplex configuration. Including 250 sheets of the standard paper tray and 100
sheets of the built-in multi-function feeder, the printer can load with 1,850 sheets at the maximum.
An optional duplex unit can be simply installed by users at the field, easily enabling automatic double-sided
printing.
2-1
CHAPTER 2 MODEL CONFIGURATION ANDEQUIPMENT STRUCTURE
This chapter gives the model configuration and equipment structure. Printer specifications differ between the 110–
120V version printers and the 220–240 V version printers.
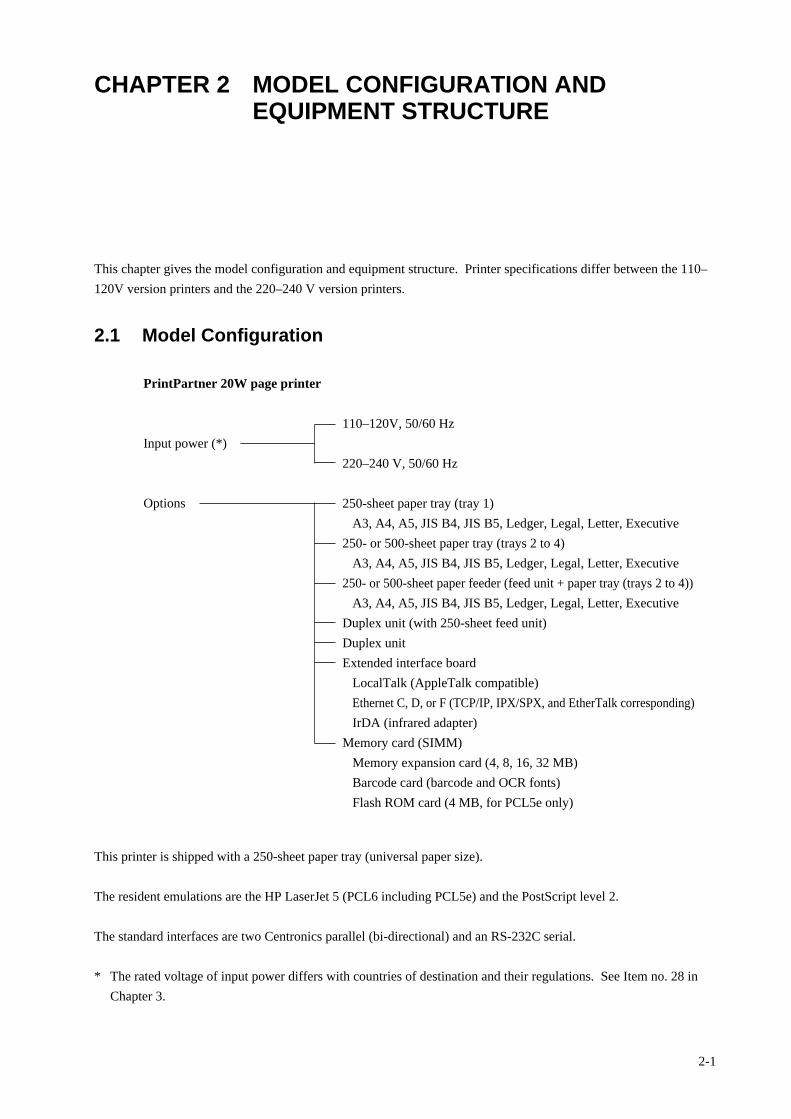
2.1 Model Configuration
PrintPartner 20W page printer
Input power (*)
Options
110–120V, 50/60 Hz
220–240 V, 50/60 Hz
250-sheet paper tray (tray 1)
A3, A4, A5, JIS B4, JIS B5, Ledger, Legal, Letter, Executive
250- or 500-sheet paper tray (trays 2 to 4)
A3, A4, A5, JIS B4, JIS B5, Ledger, Legal, Letter, Executive
250- or 500-sheet paper feeder (feed unit + paper tray (trays 2 to 4))
A3, A4, A5, JIS B4, JIS B5, Ledger, Legal, Letter, Executive
Duplex unit (with 250-sheet feed unit)
Duplex unit
Extended interface board
LocalTalk (AppleTalk compatible)
Ethernet C, D, or F (TCP/IP, IPX/SPX, and EtherTalk corresponding)
IrDA (infrared adapter)
Memory card (SIMM)
Memory expansion card (4, 8, 16, 32 MB)
Barcode card (barcode and OCR fonts)
Flash ROM card (4 MB, for PCL5e only)
This printer is shipped with a 250-sheet paper tray (universal paper size).
The resident emulations are the HP LaserJet 5 (PCL6 including PCL5e) and the PostScript level 2.
The standard interfaces are two Centronics parallel (bi-directional) and an RS-232C serial.
* The rated voltage of input power differs with countries of destination and their regulations. See Item no. 28 in
Chapter 3.
2-2
2.2 Block Diagram
Figure 2.1 shows a block diagram of the PrintPartner 20W printers.
Mechanism controller
Control panel
Switches, LEDs, anddisplay (LCD)
Control panel interface
Videointer-face
DC supply
Main controller
Interfacecontrolcircuit
Multi-function feeder
Drivecircuit Sensors (cover-open, etc.)
Printing mechanism
Motors
Halogen lamp (fuser)
High-voltagepower supply
Low-voltagepower supply
Double-sided print mechanismPower-supply unit
Printer mechanism
First paper tray Duplex (double-sided print) unit
Second feeder unit First feeder unit (with paper tray)
Third feeder unit Second feeder unit (with paper tray)
AC cable
AC power supply
: Option
Simplex configuration Duplex configuration
Paper feeders
Fourth feeder unit Third feeder unit (with paper tray)
Moved for duplex
Emulation orfont card
ExtendedRAM card
ExtendedRAM card
Extendedinterface board
Parallel interface(Centro type B)
Parallel interface(Centro type C)
Serial interface(RS232C, 9-pin)
CPU
PrintPartnerSoftwareCD-ROM
Printer driverMarkVisionPPMENU
Face-down stacker
Face--up stacker
Multifunction feeder
Figure 2.1 Printer block diagram
(1) Printer
The printer consists of a main controller, a control panel, a printer mechanism, a mechanism controller, paper
feeding mechanisms including paper feeders, a power supply, and covers.
The printing mechanism consists of a laser unit, a print unit (photoconductive drum, developing magnet roller,
precharger), a toner bottle, a transfer charger, and a fuser unit.
2-3
Images are printed using an electrographic process:
The laser unit, modulated by video signals, sends light to the photoconductive drum and generates a latent
electrostatic image that is converted to a toner image in the print unit. The paper attracts the toner image fromthe photoconductive drum, and the image is transferred to the paper.
Heat generated by the heat roller fuses the transferred toner image to the paper, and the paper is ejected to thestacker.
The photoconductive drum is then cleaned for the next printing.
The above operations are continuous and enables uninterrupted quality printing.
(2) Controller
The controller controls the interfaces to the computer, mechanism controller, and control panel.
(3) Control panel and MarkVision/PPMENU
The control panel has LED indicators, LCD, and push-button switches. The LED indicators display basic
printer status, for example, whether the printer is online, whether the power supply is on, and whether an error
has occurred. The LCD shows status or error messages by characters. The push-button switches control printeroperation, for example, resetting the printer and printing a status report.
The printer setup can be changed using the control panel (in menu mode). It can also be changed remotelyusing the printer utility programs, MarkVision™ and PPMENU.
See Chapter 4 for details on control panel operation and MarkVision/PPMENU.
(4) Interfaces
Two bi-directional Centronics parallel interfaces and an RS-232C serial interface are standard. Other interfaces
are available as an accessory. See Chapter 5 for details.
(5) Memory Expansion cards
The RAM card is used to expand the resident RAM memory (8 MB) to download soft fonts or to process more
data.
The RAM card is a SIMM type board and its memory capacity is 4M, 8M, 16M, or 32M bytes. RAM cards are
installed to the top and middle SIMM connectors on the controller board. So, up to 64 MB can be added.
(6) Emulation card (not available currently)
The emulation card is used to add a printer emulation.
The emulation card is a SIMM type board and is installed to the bottom SIMM connector on the controller
board.
2-4
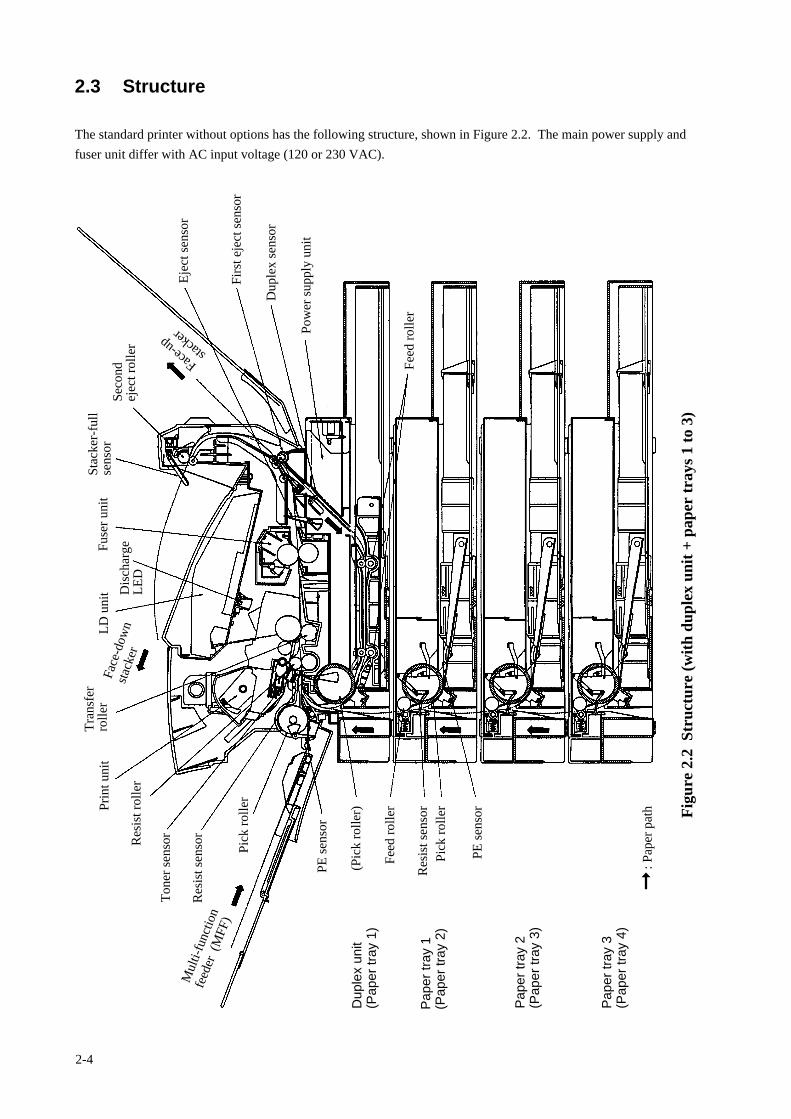
2.3 Structure
The standard printer without options has the following structure, shown in Figure 2.2. The main power supply and
fuser unit differ with AC input voltage (120 or 230 VAC).
LD u
nit
Prin
t uni
tS
econ
dej
ect r
olle
r
Mul
ti-fu
nctio
nfe
eder
(M
FF
)
Sta
cker
-ful
lse
nsor
Res
ist r
olle
r
Ton
er s
enso
r
Dis
char
geLE
D
Fus
er u
nit
Face-u
psta
cker
Pap
er tr
ay 2
(Pap
er tr
ay 3
)
Dup
lex
unit
(Pap
er tr
ay 1
)
Pap
er tr
ay 1
(Pap
er tr
ay 2
)
Tra
nsfe
rro
ller
Pap
er tr
ay 3
(Pap
er tr
ay 4
)
Pic
k ro
ller
:
Pap
er p
ath
Fig
ure
2.2
Str
uctu
re (
with
dup
lex
unit
+ p
aper
tray
s 1
to 3
)
Res
ist s
enso
r
PE
sen
sor
(Pic
k ro
ller)
Fee
d ro
ller
Res
ist s
enso
r
PE
sen
sor
Pic
k ro
ller
Fee
d ro
ller
Fac
e-do
wn
stac
ker
Eje
ct s
enso
r
Firs
t eje
ct s
enso
r
Dup
lex
sens
or
Pow
er s
uppl
y un
it
3-1
Specification
Semiconductor laser and electrophotographic process
Contact development using magnetic toner and carrier
Heat roller (*1)
600 × 600 dpi, 1200 × 1200 dpi
Pages per minute, continuous printing
Paper size Paper tray Multi-function(paper orientation) 1st to 3rd 4th feeder (MFF) (*2)
A4 (Landscape) 20.0 (*3) 14.4 20.0Letter (Landscape) 19.0 14.4 19.0A3 (Portrait) 10.5 9.0 10.5
A4 (Landscape) 16.0 13.3 9.8Letter (Landscape) 15.2 13.1 9.6A3 (Portrait) 7.2 6.5 6.8
Paper size Paper tray Multi-function(paper orientation) 1st to 3rd 4th feeder (MFF) (*2)
A4 (Landscape) 10.0 9.4 10.0Letter (Landscape) 9.7 9.2 9.7A3 (Portrait) 5.4 5.1 5.4
A4 (Landscape) 8.5 8.5 5.9Letter (Landscape) 8.4 8.4 5.8A3 (Portrait) 3.9 3.8 3.9
80 s or less (23˚C)
16 s or less at 600 dpi26 s or less at 1200 dpi
Up to 999 copies
No.
1
2
3
4
5
6
7
7a
Item
Printing technology
Development
Fusing
Dot density (resolution)
Printing speed (average)
Warm-up time (*4)
First print time (A4-landscape,single-sided printing) (*5)
Copy
CHAPTER 3 SPECIFICATIONS
This chapter gives detailed specifications of the PrintPartner 20W, starting with general specifications like printer
mechanism specifications and going on to electrical specifications such as input voltage and power consumption,
environmental specifications, and paper specifications.
3.1 General Specifications
600 dpi
Single-sidedprinting
Double-sidedprinting
1200 dpi
Single-sidedprinting
Double-sidedprinting
3-2
Specification
Size Portrait Landscape
A3, A5, Ledger, Legal, JIS-B4 OK NoA4, Letter, Executive, JIS-B5 No OK
Size of paper loaded can be set by the paper size dial.
Ream weight: 64 to 90 g/m2
Size Portrait Landscape
A3, A5, Ledger, Legal, JIS-B4 OK NoA4, Letter, Executive, JIS-B5 No OKUser-defined OK NoEnvelopes (*8) OK No (COM10, Monarch, C5, DL, B5)
Single-sided printing Size: 148.5 to 431.8 (H) × 100 to 297 (W) mm Ream weight: 64 to 128 g/m2 (*9)
Double-sided printing Size: 182 to 431.8 (H) × 100 to 297 (W) mm Ream weight: 64 to 90 g/m2
First paper tray 250 sheets2nd to 4th paper tray (option) 250/500 sheetsMulti-function feeder 100 sheets
Single-sided: 250 sheets (face-down) + 20 (face-up)Double-sided: 250 sheets (face-down)
Common, irrespective of paper type
5
Print area(Print qualityguaranteed)
5 5 5
Unit: mm
493 (W) × 423 (D) × 296 (H) mm(19.4 in) (16.7 in) (11.2 in)
(595 (D) mm with tray cover)
About 25 kg (55.1 pounds)(including print unit and toner bottle)
Light gray (Munsell No. 2.5Y 7.2/0.4)
No.
8
9
10
11
12
13
13a
Item
Paper feed capacity (64 g/m2
paper) (*10)
Stacker capacity (64 g/m2 paper)(*11)
Print area
Dimensions (standard model)
Weight
Color of printer enclosures
Paper size, feeddirection, and weight
(*6)
Paper tray
MFF (*7)
3-3
*1 When no print data is not received for 15 minutes (default) after the last printing or warming-up, the printer
turns off the fuser’s heater and enters sleep mode. The control panel can inhibit the printer from entering
sleep mode.
*2 Print speed when paper size is specified.
*3 Print speed is 19.2 s when the 3rd paper tray is of 500 sheets.
*4 The warm-up time begins when the power switch is turned on until the printer becomes ready for printing
(“READY” displayed). Before, measuring, the printer must be left for a period long enough at 23˚C. The
warm-up time may increase if the toner is low, the toner bottle has just been replaced, the print density is
changed, or installation of options such as memory is changed.
*5 The first printing time begins when a print start signal is sent to the printer in the ready state until the first
printed sheet (A4, landscape) is completely ejected to the face-down stacker. The first printing time may be
about one minute after the paper size has just been changed. It may take more time if the printer starts from
sleep mode (see *1) or after changing the print density.
*6 Paper feed direction is portrait only for A5, A3, JIS B4, Legal, and Ledger sizes. Paper feed direction is
landscape only for A4, JIS B5, Letter, and Executivesizes.
*7 When printing using the MFF, specifying the size of paper used is recommended. If the size is not specified,
the in-page cumulative print position accuracy in the paper feed direction slightly gets lower as compared
with printing using a paper tray.
*8 Envelopes and OHP transparencies are for single-sided printing only. Do not print on both sides.
*9 For printing sheets of paper whose weights are 90 to 128 g/m2 or printing envelopes or OHP transparencies,
the face-up stacker must be used.
*10 The paper feed capacity may vary depending on paper types and environmental conditions.
*11 The stacker capacity is for the recommended paper and may vary depending on paper types and
environmental conditions.
3-4
Specification
Printing with 1st paper tray 50 dBA or less
with 2nd/3rd paper tray (incl duplex print) 52 dBA or less
with 4th paper tray (incl duplex print) 54 dBA or less
Reference: with multi-function feeder 53 dBA or less
Standby mode 40 dBA or less
0.08 ppm or less (within 28 m2 tightly-closed environment, 6 hoursprinting, 25˚C 50%RH)According to UL478 Section 45 test procedure
Density Screen Level OD ratio: 0.9 or more
Difference ∆OD ratio: 0.3 or less
Resolution The following vertical line and horizontal line arediscernible.600 dpi: 2-dot line/3-dot space1200 dpi: 4-dot line/5-dot space
Fusibility 75% or more (average of 9 points of OD ratios persheet, room temperature and humidity, tape peelingmethod, recommended paper)
Dot pitch Main scan direction: ±5%Subscan direction: ±20%
Single line pitch 0.6 mm or less at 1/6-inch pich
Cumulative line pitch (Note 4)±0.8% or less at over 1/6-inch pitch
Linearity 0.6 mm/200 mm
Parallelism 1.0 mm/200 mm
Perpendicularity 1.2 mm/200 mm
Registration Left side: 5 ±2.5 mmTop: 5 ±2.0 mm (at the width center)
Skew 0.5˚ or less (2.53 mm/290 mm)
Smearing ∆OD ratio: 0.02 or less
Black dot 0.3 to 1.0 mm: 8 max. per drum cycle and0.6 to 1.0 mm: 1/drum cycle max.
White dot 0.3 to 1.2 mm: 8 max, per drum cycle and0.8 to 1.2 mm: 1/drum cycle max.
Jam (including pick error): single-sided; 1/3,000 sheetsdouble-sided; 1/1,500 sheets
Double feed: 1/2,000 sheets
Conditions and environment• Loading errors are to be excluded. (The loading procedure is as
specified in the user’s manual.)• The uppermost and lowermost sheets of paper in a package are to
be removed.• Paper feeding errors due to sheets at the boundary between old
stack of paper and new stack of paper are to be excluded.• The maximum number (250/500) of sheets of paper are to be
loaded on the paper tray at a time.• 23˚C and 50% RH• Recommended paper• Size: A5, A4, A3, Letter, Legal, Executive, Ledger, JIS-B4, JIS-
B5
No.
14
15
16
17
18
19
Item
Noise (ISO 7779)
Ozone emission
Print quality
Notes:1) This specification applies to the
recommended paper.2) The print area is as specified in
No. 11.3) The environmental conditions
are: 10 to 32.5˚C, 20 to 80%RH.(max wet-bulb 29˚C)
Print precision
Notes:1) This specification applies to the
recommended paper.2) The print area is as specified in
No. 11.3) The environmental conditions
are: 10 to 32.5˚C, 20 to 80%RH.
4) At room temperature andhumidity
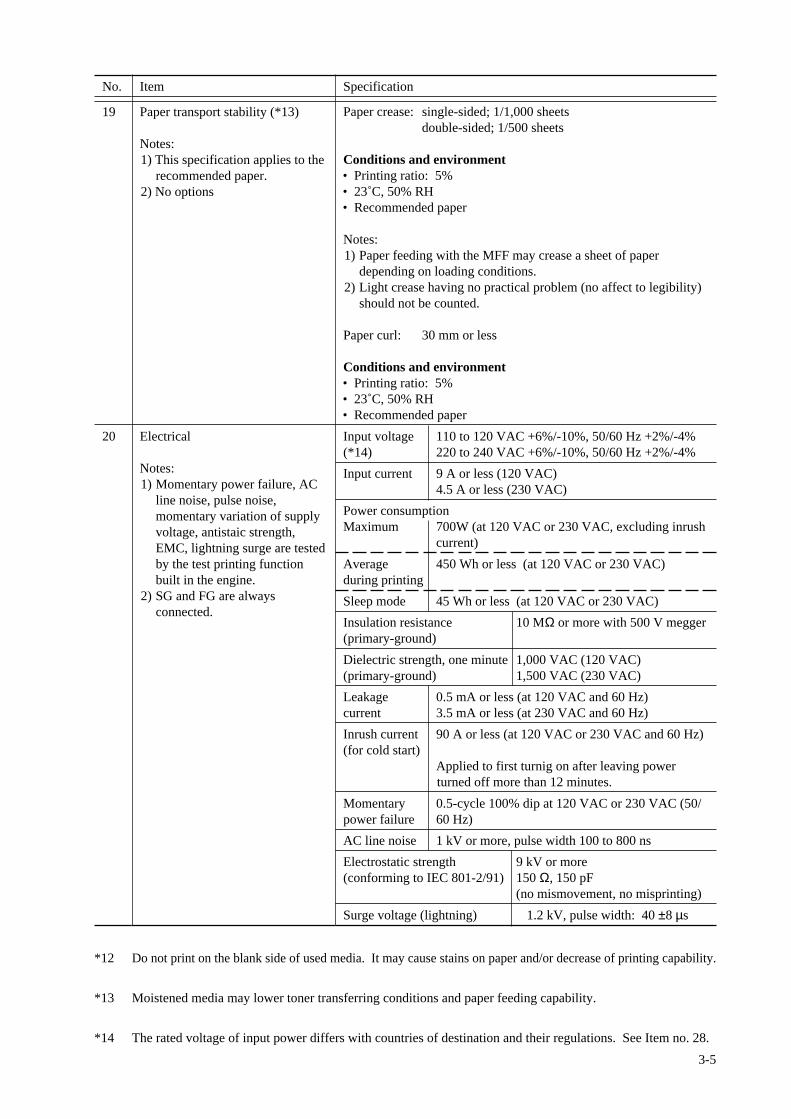
Printing defects (*12, *13)
Notes:1) This specification applies to the
recommended paper.2) The environmental condidtons
are: 10 to 32.5˚C, 20 to 80%RH.
Paper transport stability (*13)
Notes:1) This specification applies to the
recommended paper.2) No options
To be continued to the next page
3-5
Specification
Paper crease: single-sided; 1/1,000 sheetsdouble-sided; 1/500 sheets
Conditions and environment• Printing ratio: 5%• 23˚C, 50% RH• Recommended paper
Notes:1) Paper feeding with the MFF may crease a sheet of paper
depending on loading conditions.2) Light crease having no practical problem (no affect to legibility)
should not be counted.
Paper curl: 30 mm or less
Conditions and environment• Printing ratio: 5%• 23˚C, 50% RH• Recommended paper
Input voltage 110 to 120 VAC +6%/-10%, 50/60 Hz +2%/-4%(*14) 220 to 240 VAC +6%/-10%, 50/60 Hz +2%/-4%
Input current 9 A or less (120 VAC)4.5 A or less (230 VAC)
Power consumptionMaximum 700W (at 120 VAC or 230 VAC, excluding inrush
current)
Average 450 Wh or less (at 120 VAC or 230 VAC)during printing
Sleep mode 45 Wh or less (at 120 VAC or 230 VAC)
Insulation resistance 10 MΩ or more with 500 V megger(primary-ground)
Dielectric strength, one minute 1,000 VAC (120 VAC)(primary-ground) 1,500 VAC (230 VAC)
Leakage 0.5 mA or less (at 120 VAC and 60 Hz)current 3.5 mA or less (at 230 VAC and 60 Hz)
Inrush current 90 A or less (at 120 VAC or 230 VAC and 60 Hz)(for cold start)
Applied to first turnig on after leaving powerturned off more than 12 minutes.
Momentary 0.5-cycle 100% dip at 120 VAC or 230 VAC (50/power failure 60 Hz)
AC line noise 1 kV or more, pulse width 100 to 800 ns
Electrostatic strength 9 kV or more(conforming to IEC 801-2/91) 150 Ω, 150 pF
(no mismovement, no misprinting)
Surge voltage (lightning) 1.2 kV, pulse width: 40 ±8 µs
No.
19
20
Item
Paper transport stability (*13)
Notes:1) This specification applies to the
recommended paper.2) No options
Electrical
Notes:1) Momentary power failure, AC
line noise, pulse noise,momentary variation of supplyvoltage, antistaic strength,EMC, lightning surge are testedby the test printing functionbuilt in the engine.
2) SG and FG are alwaysconnected.
*12 Do not print on the blank side of used media. It may cause stains on paper and/or decrease of printing capability.
*13 Moistened media may lower toner transferring conditions and paper feeding capability.
*14 The rated voltage of input power differs with countries of destination and their regulations. See Item no. 28.
3-6
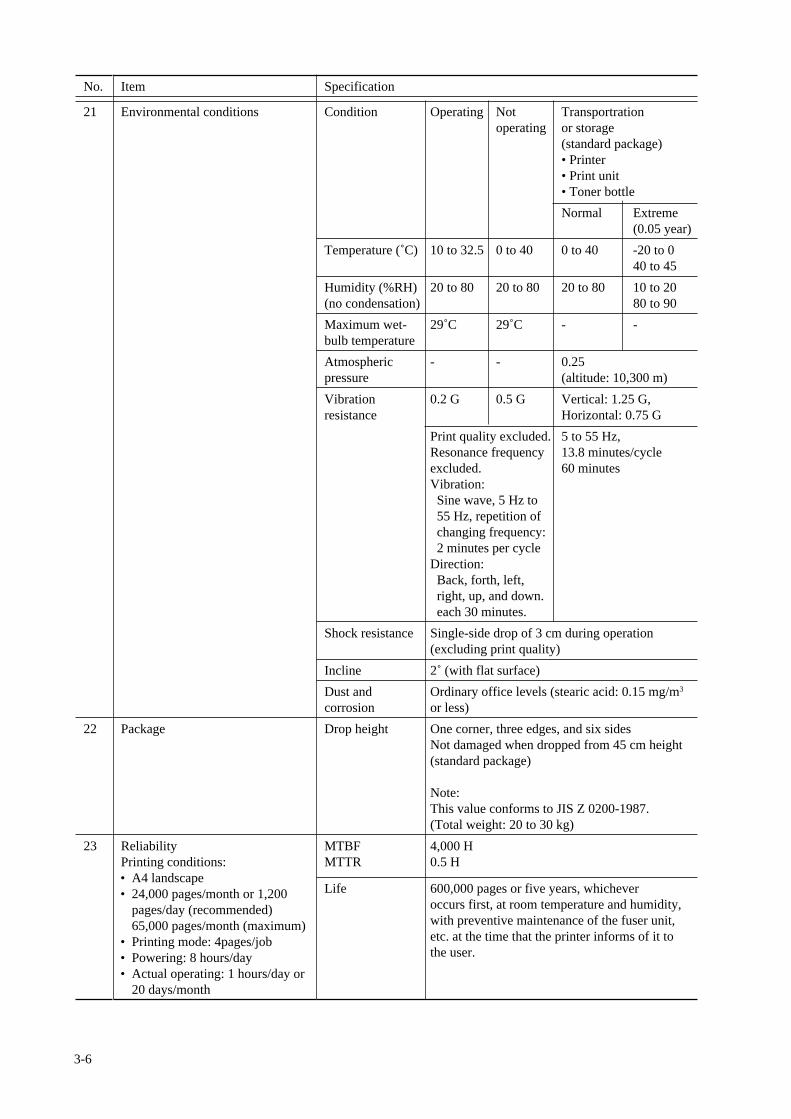
Specification
Condition Operating Not Transportrationoperating or storage
(standard package)• Printer• Print unit• Toner bottle
Normal Extreme(0.05 year)
Temperature (˚C) 10 to 32.5 0 to 40 0 to 40 -20 to 040 to 45
Humidity (%RH) 20 to 80 20 to 80 20 to 80 10 to 20(no condensation) 80 to 90
Maximum wet- 29˚C 29˚C - -bulb temperature
Atmospheric - - 0.25pressure (altitude: 10,300 m)
Vibration 0.2 G 0.5 G Vertical: 1.25 G,resistance Horizontal: 0.75 G
Print quality excluded. 5 to 55 Hz,Resonance frequency 13.8 minutes/cycleexcluded. 60 minutesVibration: Sine wave, 5 Hz to 55 Hz, repetition of changing frequency: 2 minutes per cycleDirection: Back, forth, left, right, up, and down. each 30 minutes.
Shock resistance Single-side drop of 3 cm during operation(excluding print quality)
Incline 2˚ (with flat surface)
Dust and Ordinary office levels (stearic acid: 0.15 mg/m3
corrosion or less)
Drop height One corner, three edges, and six sidesNot damaged when dropped from 45 cm height(standard package)
Note:This value conforms to JIS Z 0200-1987.(Total weight: 20 to 30 kg)
MTBF 4,000 HMTTR 0.5 H
Life 600,000 pages or five years, whicheveroccurs first, at room temperature and humidity,with preventive maintenance of the fuser unit,etc. at the time that the printer informs of it tothe user.
No.
21
22
23
Item
Environmental conditions
Package
ReliabilityPrinting conditions:• A4 landscape• 24,000 pages/month or 1,200
pages/day (recommended)65,000 pages/month (maximum)
• Printing mode: 4pages/job• Powering: 8 hours/day• Actual operating: 1 hours/day or
20 days/month
3-7
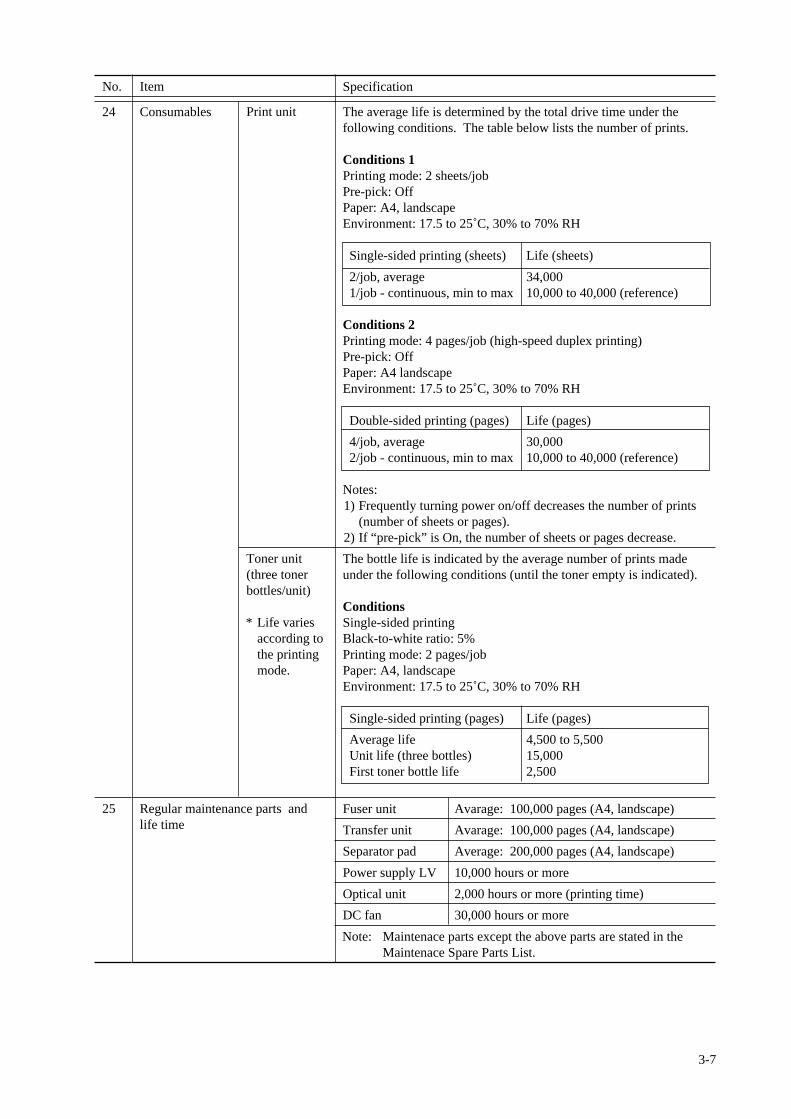
Specification
The average life is determined by the total drive time under thefollowing conditions. The table below lists the number of prints.
Conditions 1Printing mode: 2 sheets/jobPre-pick: OffPaper: A4, landscapeEnvironment: 17.5 to 25˚C, 30% to 70% RH
Single-sided printing (sheets) Life (sheets)
2/job, average 34,000 1/job - continuous, min to max 10,000 to 40,000 (reference)
Conditions 2Printing mode: 4 pages/job (high-speed duplex printing)Pre-pick: OffPaper: A4 landscapeEnvironment: 17.5 to 25˚C, 30% to 70% RH
Double-sided printing (pages) Life (pages)
4/job, average 30,000 2/job - continuous, min to max 10,000 to 40,000 (reference)
Notes:1) Frequently turning power on/off decreases the number of prints
(number of sheets or pages).2) If “pre-pick” is On, the number of sheets or pages decrease.
The bottle life is indicated by the average number of prints madeunder the following conditions (until the toner empty is indicated).
ConditionsSingle-sided printingBlack-to-white ratio: 5%Printing mode: 2 pages/jobPaper: A4, landscapeEnvironment: 17.5 to 25˚C, 30% to 70% RH
Single-sided printing (pages) Life (pages)
Average life 4,500 to 5,500 Unit life (three bottles) 15,000 First toner bottle life 2,500
Fuser unit Avarage: 100,000 pages (A4, landscape)
Transfer unit Avarage: 100,000 pages (A4, landscape)
Separator pad Average: 200,000 pages (A4, landscape)
Power supply LV 10,000 hours or more
Optical unit 2,000 hours or more (printing time)
DC fan 30,000 hours or more
Note: Maintenace parts except the above parts are stated in theMaintenace Spare Parts List.
No.
24
25
Item
Consumables
Regular maintenance parts andlife time
Print unit
Toner unit(three tonerbottles/unit)
* Life variesaccording tothe printingmode.
3-8
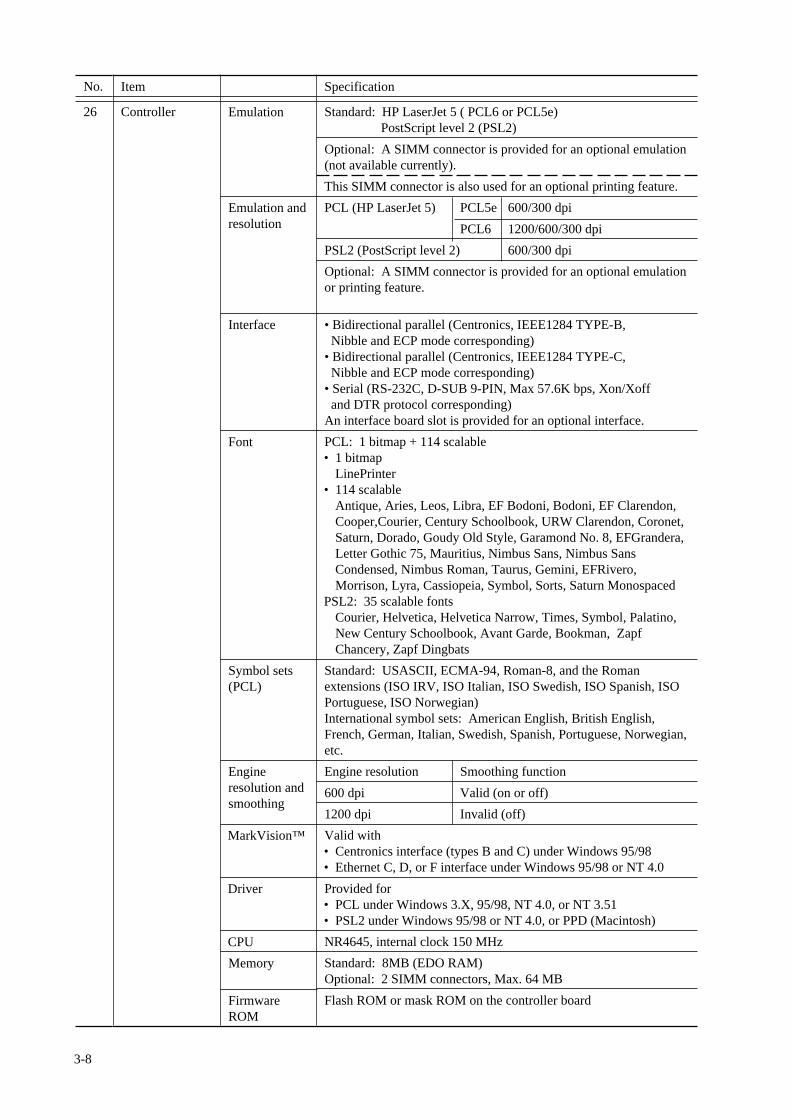
Specification
Standard: HP LaserJet 5 ( PCL6 or PCL5e) PostScript level 2 (PSL2)
Optional: A SIMM connector is provided for an optional emulation(not available currently).
This SIMM connector is also used for an optional printing feature.
PCL (HP LaserJet 5) PCL5e 600/300 dpi
PCL6 1200/600/300 dpi
PSL2 (PostScript level 2) 600/300 dpi
Optional: A SIMM connector is provided for an optional emulationor printing feature.
• Bidirectional parallel (Centronics, IEEE1284 TYPE-B, Nibble and ECP mode corresponding)• Bidirectional parallel (Centronics, IEEE1284 TYPE-C, Nibble and ECP mode corresponding)• Serial (RS-232C, D-SUB 9-PIN, Max 57.6K bps, Xon/Xoff and DTR protocol corresponding)An interface board slot is provided for an optional interface.
PCL: 1 bitmap + 114 scalable• 1 bitmap
LinePrinter• 114 scalable
Antique, Aries, Leos, Libra, EF Bodoni, Bodoni, EF Clarendon,Cooper,Courier, Century Schoolbook, URW Clarendon, Coronet,Saturn, Dorado, Goudy Old Style, Garamond No. 8, EFGrandera,Letter Gothic 75, Mauritius, Nimbus Sans, Nimbus SansCondensed, Nimbus Roman, Taurus, Gemini, EFRivero,Morrison, Lyra, Cassiopeia, Symbol, Sorts, Saturn Monospaced
PSL2: 35 scalable fontsCourier, Helvetica, Helvetica Narrow, Times, Symbol, Palatino,New Century Schoolbook, Avant Garde, Bookman, ZapfChancery, Zapf Dingbats
Standard: USASCII, ECMA-94, Roman-8, and the Romanextensions (ISO IRV, ISO Italian, ISO Swedish, ISO Spanish, ISOPortuguese, ISO Norwegian)International symbol sets: American English, British English,French, German, Italian, Swedish, Spanish, Portuguese, Norwegian,etc.
Engine resolution Smoothing function
600 dpi Valid (on or off)
1200 dpi Invalid (off)
Valid with• Centronics interface (types B and C) under Windows 95/98• Ethernet C, D, or F interface under Windows 95/98 or NT 4.0
Provided for• PCL under Windows 3.X, 95/98, NT 4.0, or NT 3.51• PSL2 under Windows 95/98 or NT 4.0, or PPD (Macintosh)
NR4645, internal clock 150 MHz
Standard: 8MB (EDO RAM)Optional: 2 SIMM connectors, Max. 64 MB
Flash ROM or mask ROM on the controller board
No.
26
Item
Controller Emulation
Emulation andresolution
Interface
Font
Symbol sets(PCL)
Engineresolution andsmoothing
MarkVision™
Driver
CPU
Memory
FirmwareROM
3-9
Specification
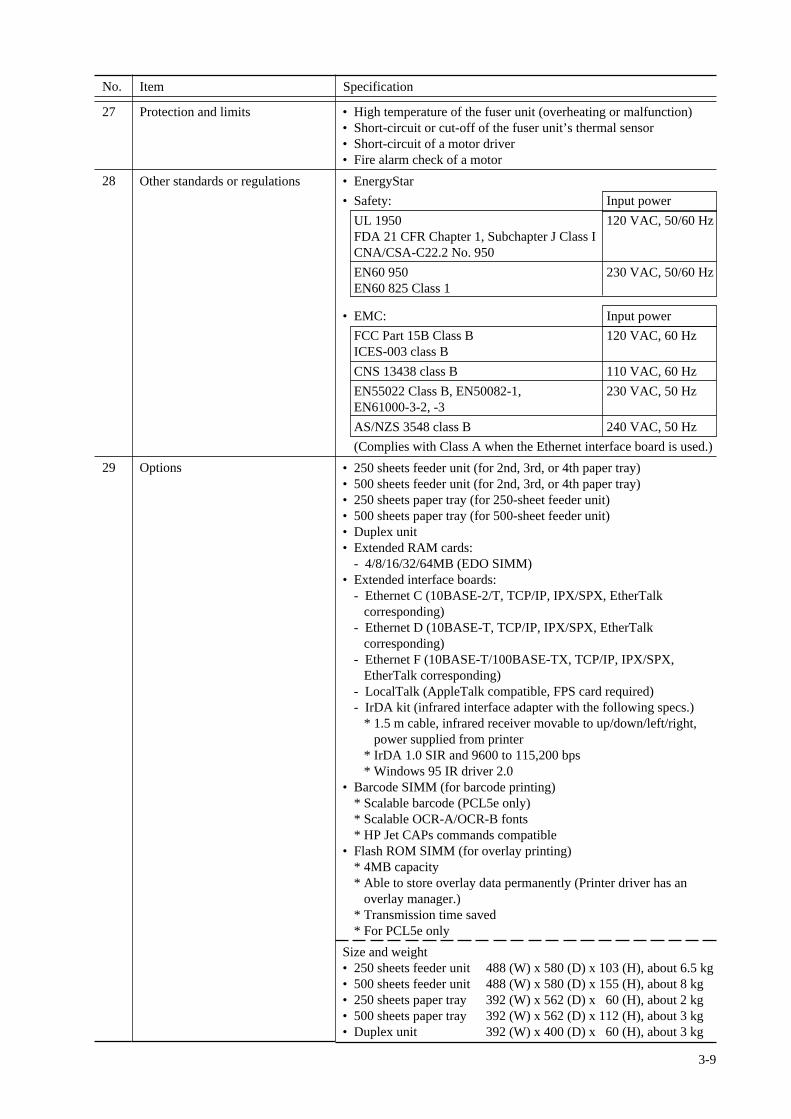
• High temperature of the fuser unit (overheating or malfunction)• Short-circuit or cut-off of the fuser unit’s thermal sensor• Short-circuit of a motor driver• Fire alarm check of a motor
• EnergyStar
• Safety: Input power
UL 1950 120 VAC, 50/60 HzFDA 21 CFR Chapter 1, Subchapter J Class ICNA/CSA-C22.2 No. 950
EN60 950 230 VAC, 50/60 HzEN60 825 Class 1
• EMC: Input power
FCC Part 15B Class B 120 VAC, 60 HzICES-003 class B
CNS 13438 class B 110 VAC, 60 Hz
EN55022 Class B, EN50082-1, 230 VAC, 50 HzEN61000-3-2, -3
AS/NZS 3548 class B 240 VAC, 50 Hz
(Complies with Class A when the Ethernet interface board is used.)
• 250 sheets feeder unit (for 2nd, 3rd, or 4th paper tray)• 500 sheets feeder unit (for 2nd, 3rd, or 4th paper tray)• 250 sheets paper tray (for 250-sheet feeder unit)• 500 sheets paper tray (for 500-sheet feeder unit)• Duplex unit• Extended RAM cards:
- 4/8/16/32/64MB (EDO SIMM)• Extended interface boards:
- Ethernet C (10BASE-2/T, TCP/IP, IPX/SPX, EtherTalk corresponding)- Ethernet D (10BASE-T, TCP/IP, IPX/SPX, EtherTalk corresponding)- Ethernet F (10BASE-T/100BASE-TX, TCP/IP, IPX/SPX, EtherTalk corresponding)- LocalTalk (AppleTalk compatible, FPS card required)- IrDA kit (infrared interface adapter with the following specs.) * 1.5 m cable, infrared receiver movable to up/down/left/right, power supplied from printer * IrDA 1.0 SIR and 9600 to 115,200 bps * Windows 95 IR driver 2.0
• Barcode SIMM (for barcode printing)* Scalable barcode (PCL5e only)* Scalable OCR-A/OCR-B fonts* HP Jet CAPs commands compatible
• Flash ROM SIMM (for overlay printing)* 4MB capacity* Able to store overlay data permanently (Printer driver has an overlay manager.)* Transmission time saved* For PCL5e only
Size and weight• 250 sheets feeder unit 488 (W) x 580 (D) x 103 (H), about 6.5 kg• 500 sheets feeder unit 488 (W) x 580 (D) x 155 (H), about 8 kg• 250 sheets paper tray 392 (W) x 562 (D) x 60 (H), about 2 kg• 500 sheets paper tray 392 (W) x 562 (D) x 112 (H), about 3 kg• Duplex unit 392 (W) x 400 (D) x 60 (H), about 3 kg
No.
27
28
29
Item
Protection and limits
Other standards or regulations
Options

3-10
Specification
• Print unit (mounted in the printer) x 1• Toner bottle x 1• 250-sheet paper tray x 1• Tray cover x 1• Power cord x 1• Cleaning sheets x 1 set• Cleaning brush (mounted in the printer) x 1• Paper guide x 1• Software set x 1 set (CD-ROM and 3.5” floppy disk) containing
printer drivers and MarkVision™
No.
30
Item
Accessories and componentspackaged with the printer
3-11
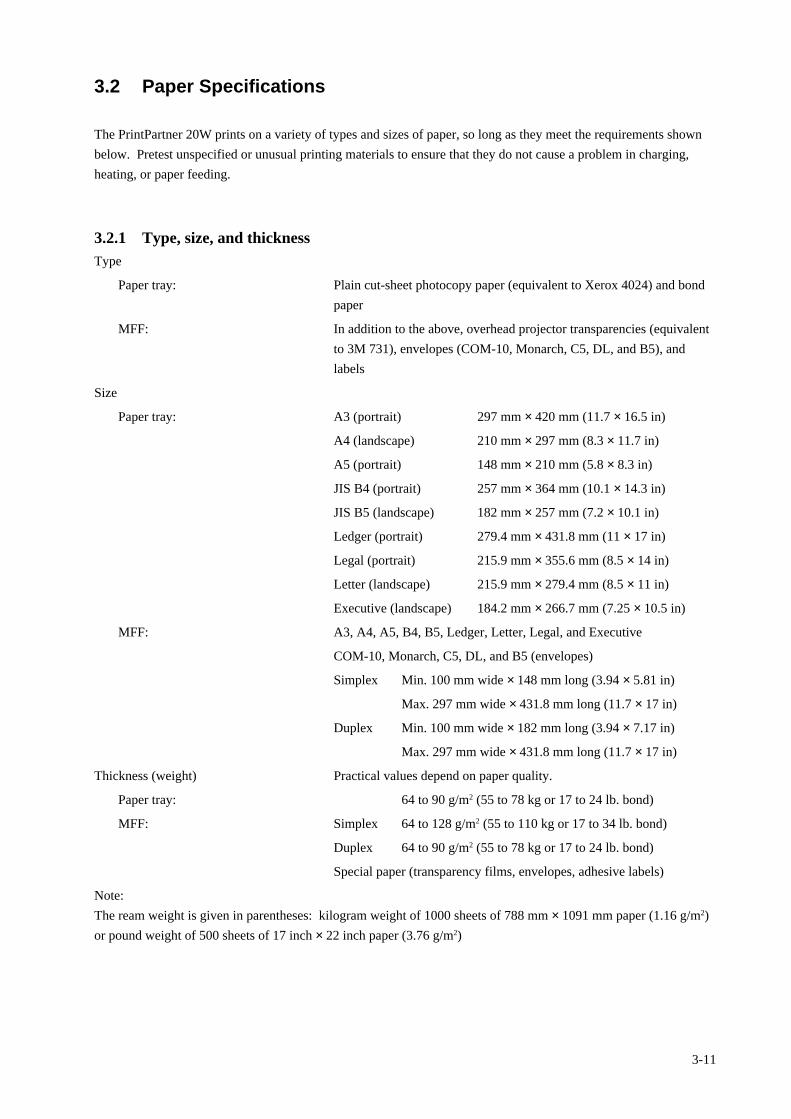
3.2 Paper Specifications
The PrintPartner 20W prints on a variety of types and sizes of paper, so long as they meet the requirements shown
below. Pretest unspecified or unusual printing materials to ensure that they do not cause a problem in charging,
heating, or paper feeding.
3.2.1 Type, size, and thicknessType
Paper tray: Plain cut-sheet photocopy paper (equivalent to Xerox 4024) and bond
paper
MFF: In addition to the above, overhead projector transparencies (equivalent
to 3M 731), envelopes (COM-10, Monarch, C5, DL, and B5), and
labels
Size
Paper tray: A3 (portrait) 297 mm × 420 mm (11.7 × 16.5 in)
A4 (landscape) 210 mm × 297 mm (8.3 × 11.7 in)
A5 (portrait) 148 mm × 210 mm (5.8 × 8.3 in)
JIS B4 (portrait) 257 mm × 364 mm (10.1 × 14.3 in)
JIS B5 (landscape) 182 mm × 257 mm (7.2 × 10.1 in)
Ledger (portrait) 279.4 mm × 431.8 mm (11 × 17 in)
Legal (portrait) 215.9 mm × 355.6 mm (8.5 × 14 in)
Letter (landscape) 215.9 mm × 279.4 mm (8.5 × 11 in)
Executive (landscape) 184.2 mm × 266.7 mm (7.25 × 10.5 in)
MFF: A3, A4, A5, B4, B5, Ledger, Letter, Legal, and Executive
COM-10, Monarch, C5, DL, and B5 (envelopes)
Simplex Min. 100 mm wide × 148 mm long (3.94 × 5.81 in)
Max. 297 mm wide × 431.8 mm long (11.7 × 17 in)
Duplex Min. 100 mm wide × 182 mm long (3.94 × 7.17 in)
Max. 297 mm wide × 431.8 mm long (11.7 × 17 in)
Thickness (weight) Practical values depend on paper quality.
Paper tray: 64 to 90 g/m2 (55 to 78 kg or 17 to 24 lb. bond)
MFF: Simplex 64 to 128 g/m2 (55 to 110 kg or 17 to 34 lb. bond)
Duplex 64 to 90 g/m2 (55 to 78 kg or 17 to 24 lb. bond)
Special paper (transparency films, envelopes, adhesive labels)
Note:
The ream weight is given in parentheses: kilogram weight of 1000 sheets of 788 mm × 1091 mm paper (1.16 g/m2)
or pound weight of 500 sheets of 17 inch × 22 inch paper (3.76 g/m2)
3-12
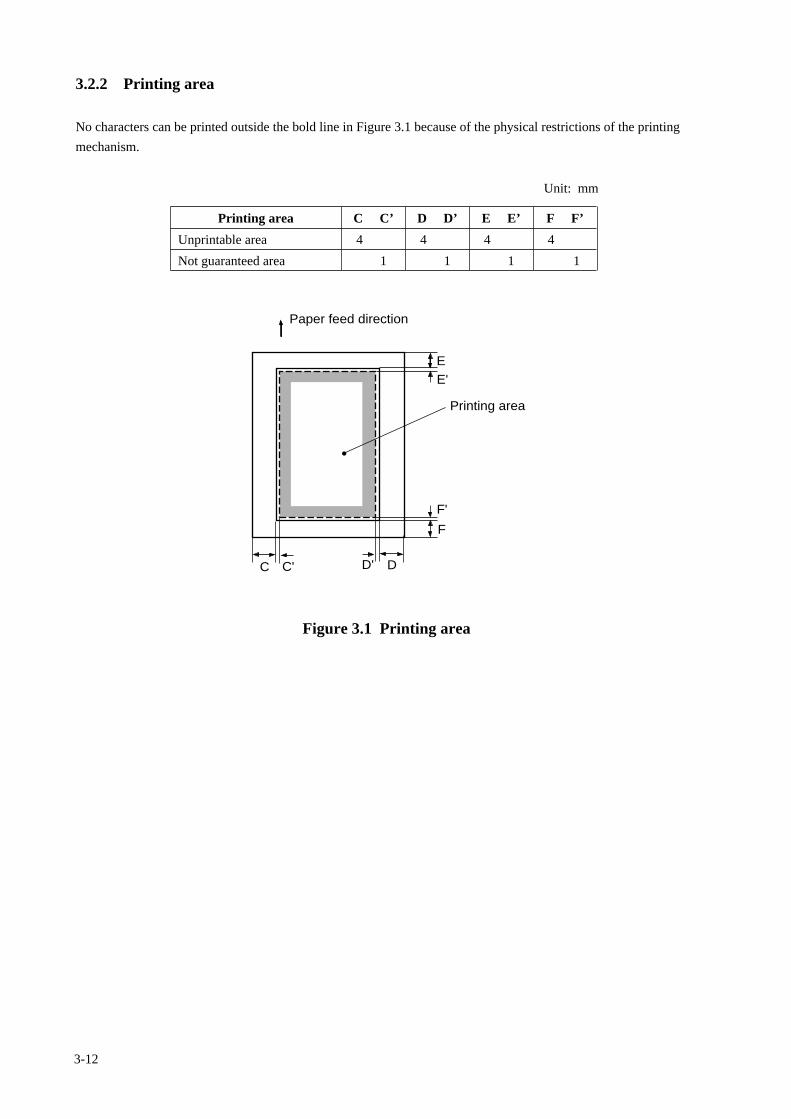
3.2.2 Printing area
No characters can be printed outside the bold line in Figure 3.1 because of the physical restrictions of the printing
mechanism.
Printing area
Unprintable area
Not guaranteed area
C C’
4
1
D D’
4
1
E E’
4
1
F F’
4
1
Unit: mm
Figure 3.1 Printing area
Printing area
C' D'
E'
F'
Paper feed direction
•
E
F
C D
3-13
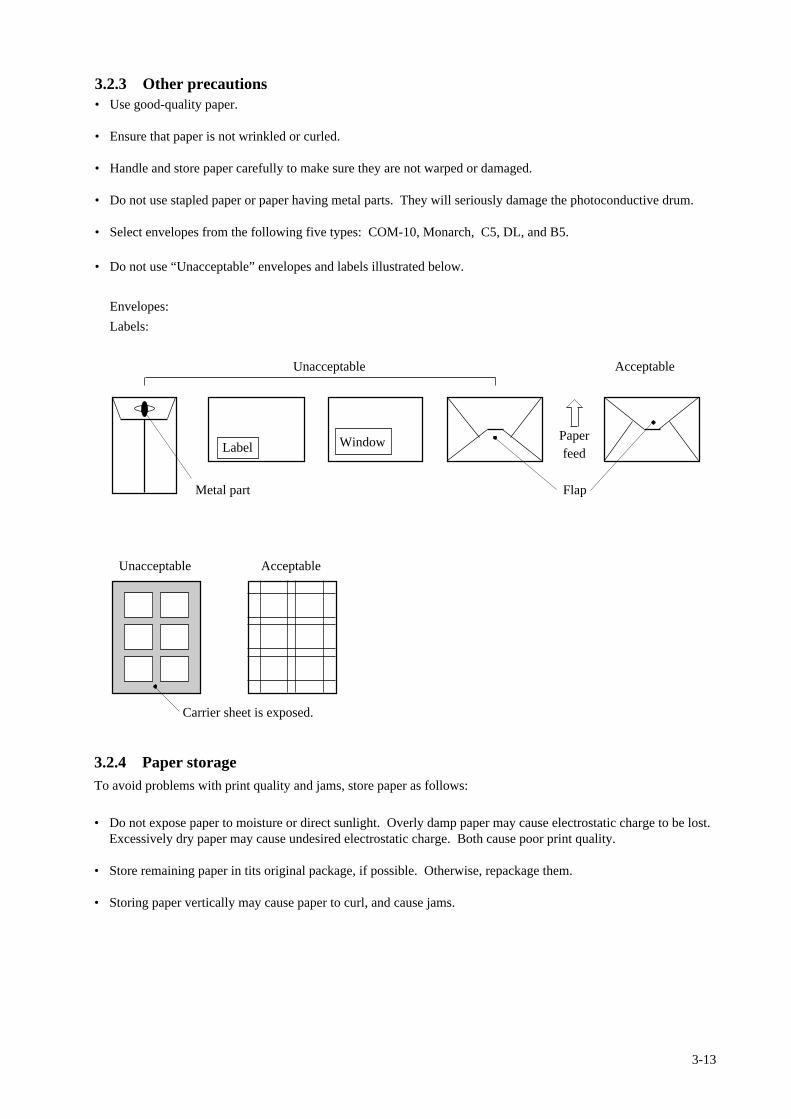
3.2.4 Paper storageTo avoid problems with print quality and jams, store paper as follows:
• Do not expose paper to moisture or direct sunlight. Overly damp paper may cause electrostatic charge to be lost.Excessively dry paper may cause undesired electrostatic charge. Both cause poor print quality.
• Store remaining paper in tits original package, if possible. Otherwise, repackage them.
• Storing paper vertically may cause paper to curl, and cause jams.
Label Window Paperfeed
Metal part Flap
Unacceptable Acceptable
Unacceptable Acceptable
Carrier sheet is exposed.
3.2.3 Other precautions• Use good-quality paper.
• Ensure that paper is not wrinkled or curled.
• Handle and store paper carefully to make sure they are not warped or damaged.
• Do not use stapled paper or paper having metal parts. They will seriously damage the photoconductive drum.
• Select envelopes from the following five types: COM-10, Monarch, C5, DL, and B5.
• Do not use “Unacceptable” envelopes and labels illustrated below.
Envelopes:
Labels:

3-14
4-1
CHAPTER 4 CONTROL PANEL AND PRINTERSOFTWARE
4.1 Control Panel
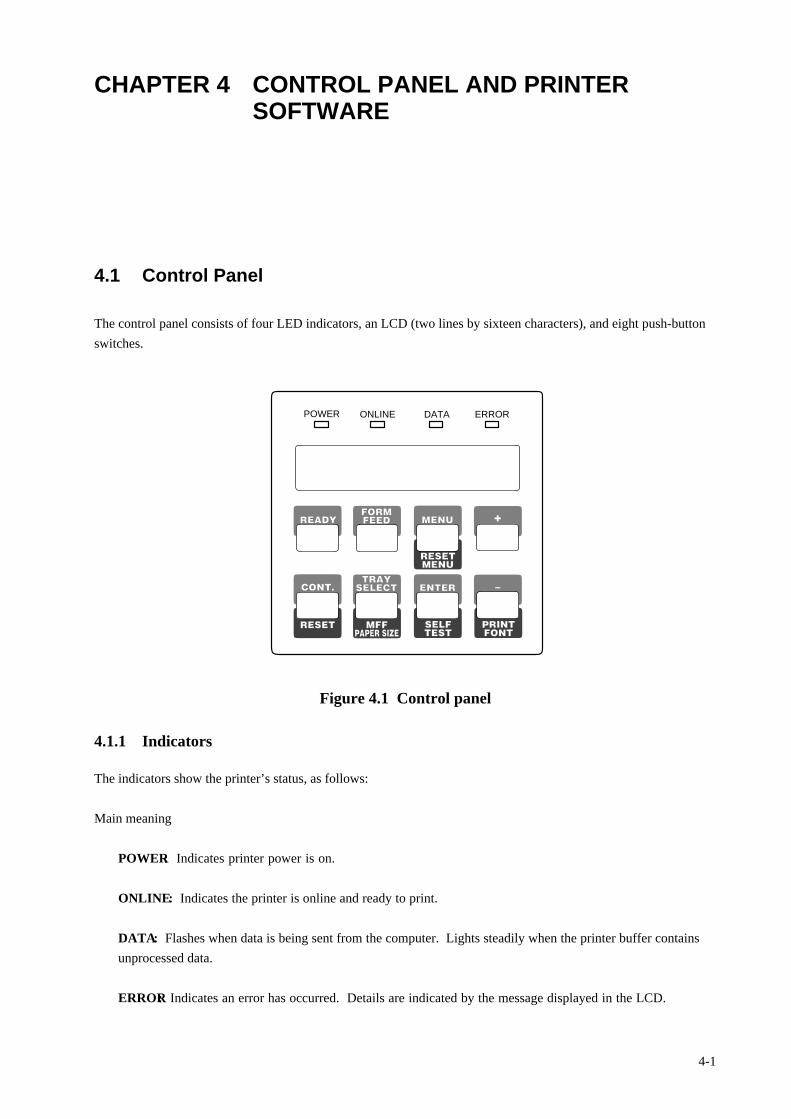
The control panel consists of four LED indicators, an LCD (two lines by sixteen characters), and eight push-button
switches.
POWER ONLINE DATA ERROR
MFFPAPER SIZEPAPER SIZE
PRINTFONT
SELFTEST
RESET
CONT. ENTER –
+MENUREADYFORMFEED
RESETMENU
TRAYSELECT
Figure 4.1 Control panel
4.1.1 Indicators
The indicators show the printer’s status, as follows:
Main meaning
POWER: Indicates printer power is on.
ONLINE: Indicates the printer is online and ready to print.
DATA: Flashes when data is being sent from the computer. Lights steadily when the printer buffer contains
unprocessed data.
ERROR: Indicates an error has occurred. Details are indicated by the message displayed in the LCD.
4-2
4.1.2 LCD
The liquid-crystal display (LCD) shows status and error messages with two lines by sixteen characters.
• Error message informs the user of a condition requiring an action, such as TRAYn PAPER OUT, COVER
OPENn, or PAPER JAMn
• Status message informs the user of a condition requiring no action, such as WARMING UP or SELF TEST
• A certain status message informs the user of a condition requiring an action, such as TONER LOW or REPLACE
PARTS
POWER ONLINE DATA ERRORPOWER ONLINE DATA ERROR
COVER OPEN 1 READYTONER LOW
4.1.3 Buttons
One or two functions are assigned to a button. To use the functions represented by the top labels, simply press the
button. To use the functions represented by the bottom labels, press and hold down the button for five or more
seconds.
Simply press the button.
Press and hold down the button for five or more seconds.
Simply press the button.
Press and hold down the button for five or more seconds.MFFPAPER SIZEPAPER SIZE
PRINTFONT
SELFTEST
RESET
CONT. ENTER –
+MENUREADYFORMFEED
RESETMENU
TRAYSELECT
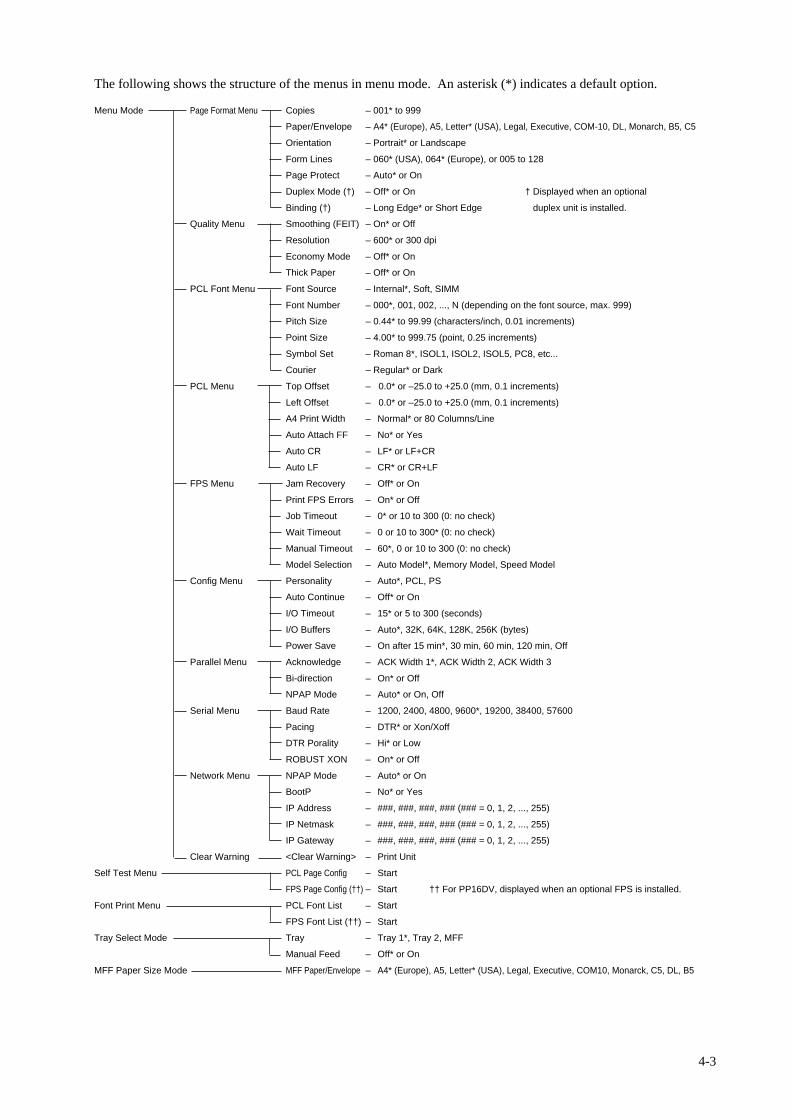
4.1.4 Menu mode
The menu mode allows the user to change the printer’s defaults using the four buttons on the control panel. The
control panel has the menu mode to configure the printer to suit the requirements of user‘s computer, software, and
documents. The menu mode is structured as a tree consisting of submenus, items, and options as shown in the next
page.
4-3
The following shows the structure of the menus in menu mode. An asterisk (*) indicates a default option.
Menu Mode Page Format Menu Copies – 001* to 999
Paper/Envelope – A4* (Europe), A5, Letter* (USA), Legal, Executive, COM-10, DL, Monarch, B5, C5
Orientation – Portrait* or Landscape
Form Lines – 060* (USA), 064* (Europe), or 005 to 128
Page Protect – Auto* or On
Duplex Mode (†) – Off* or On † Displayed when an optional
Binding (†) – Long Edge* or Short Edge duplex unit is installed.
Quality Menu Smoothing (FEIT) – On* or Off
Resolution – 600* or 300 dpi
Economy Mode – Off* or On
Thick Paper – Off* or On
PCL Font Menu Font Source – Internal*, Soft, SIMM
Font Number – 000*, 001, 002, ..., N (depending on the font source, max. 999)
Pitch Size – 0.44* to 99.99 (characters/inch, 0.01 increments)
Point Size – 4.00* to 999.75 (point, 0.25 increments)
Symbol Set – Roman 8*, ISOL1, ISOL2, ISOL5, PC8, etc...
Courier – Regular* or Dark
PCL Menu Top Offset – 0.0* or –25.0 to +25.0 (mm, 0.1 increments)
Left Offset – 0.0* or –25.0 to +25.0 (mm, 0.1 increments)
A4 Print Width – Normal* or 80 Columns/Line
Auto Attach FF – No* or Yes
Auto CR – LF* or LF+CR
Auto LF – CR* or CR+LF
FPS Menu Jam Recovery – Off* or On
Print FPS Errors – On* or Off
Job Timeout – 0* or 10 to 300 (0: no check)
Wait Timeout – 0 or 10 to 300* (0: no check)
Manual Timeout – 60*, 0 or 10 to 300 (0: no check)
Model Selection – Auto Model*, Memory Model, Speed Model
Config Menu Personality – Auto*, PCL, PS
Auto Continue – Off* or On
I/O Timeout – 15* or 5 to 300 (seconds)
I/O Buffers – Auto*, 32K, 64K, 128K, 256K (bytes)
Power Save – On after 15 min*, 30 min, 60 min, 120 min, Off
Parallel Menu Acknowledge – ACK Width 1*, ACK Width 2, ACK Width 3
Bi-direction – On* or Off
NPAP Mode – Auto* or On, Off
Serial Menu Baud Rate – 1200, 2400, 4800, 9600*, 19200, 38400, 57600
Pacing – DTR* or Xon/Xoff
DTR Porality – Hi* or Low
ROBUST XON – On* or Off
Network Menu NPAP Mode – Auto* or On
BootP – No* or Yes
IP Address – ###, ###, ###, ### (### = 0, 1, 2, ..., 255)
IP Netmask – ###, ###, ###, ### (### = 0, 1, 2, ..., 255)
IP Gateway – ###, ###, ###, ### (### = 0, 1, 2, ..., 255)
Clear Warning <Clear Warning> – Print Unit
Self Test Menu PCL Page Config – Start
FPS Page Config (††) – Start †† For PP16DV, displayed when an optional FPS is installed.
Font Print Menu PCL Font List – Start
FPS Font List (††) – Start
Tray Select Mode Tray – Tray 1*, Tray 2, MFF
Manual Feed – Off* or On
MFF Paper Size Mode MFF Paper/Envelope – A4* (Europe), A5, Letter* (USA), Legal, Executive, COM10, Monarck, C5, DL, B5
4-4
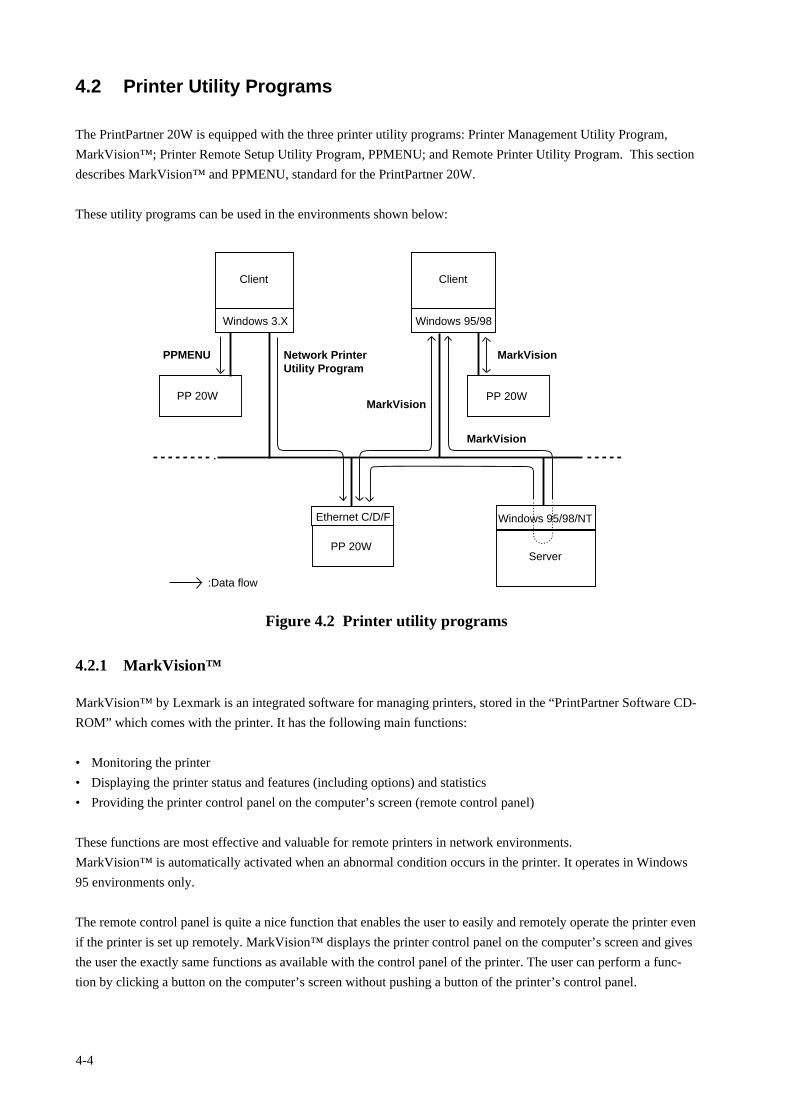
4.2 Printer Utility Programs
The PrintPartner 20W is equipped with the three printer utility programs: Printer Management Utility Program,
MarkVision™; Printer Remote Setup Utility Program, PPMENU; and Remote Printer Utility Program. This section
describes MarkVision™ and PPMENU, standard for the PrintPartner 20W.
These utility programs can be used in the environments shown below:
Figure 4.2 Printer utility programs
4.2.1 MarkVision™
MarkVision™ by Lexmark is an integrated software for managing printers, stored in the “PrintPartner Software CD-
ROM” which comes with the printer. It has the following main functions:
• Monitoring the printer
• Displaying the printer status and features (including options) and statistics
• Providing the printer control panel on the computer’s screen (remote control panel)
These functions are most effective and valuable for remote printers in network environments.
MarkVision™ is automatically activated when an abnormal condition occurs in the printer. It operates in Windows
95 environments only.
The remote control panel is quite a nice function that enables the user to easily and remotely operate the printer even
if the printer is set up remotely. MarkVision™ displays the printer control panel on the computer’s screen and gives
the user the exactly same functions as available with the control panel of the printer. The user can perform a func-
tion by clicking a button on the computer’s screen without pushing a button of the printer’s control panel.
Windows 3.X
Client
Windows 95/98
Client
PP 20W PP 20W
PP 20W
Ethernet C/D/F Windows 95/98/NT
Server
PPMENU Network PrinterUtility Program
MarkVision
MarkVision
MarkVision
:Data flow
4-5
To use MarkVision™, the computer and its operating environments must be as follows:
• IBM PC/AT or compatible or PS/2
• Microsoft Windows 95/98 or NT 4.0 (not Windows 3.X)
• VGA (640 x 400) or higher display
• Hard disk drive installed (9 MB essential for MarkVision™)
• CD-ROM drive
Menu Bar Functions
The top menu bar offers three functions. The screen displays information and a graphic of the printer corresponding
to the function selected. The bottom line displays printer status. Help is available from each screen.
The three functions of the top menu bar are as follows:
Status: Shows a printer status message which is identical to the message appearing on the printer control panel. The
status is also indicated graphically. The user can determine what the printer is doing and what the printer needs to
complete the task. It also includes information about the printer’s features including options which are installed on
the printer.
With an optional setting, the MarkVision™ icon flashes to let the user know there is a problem with the printer even
if the icon is minimized on the monitor.
Control Panel: Allows the user to remotely operate the printer. It displays an exact replica of the physical control
panel on the printer, on the monitor. The user can click the appropriate button on the screen by the mouse as if he is
pressing the real button on the printer control panel by a finger. Both panels have exactly the same functions.
Statistics: Summarizes details about jobs such as the total number of jobs printed, total pages, and average print
time.
4-6
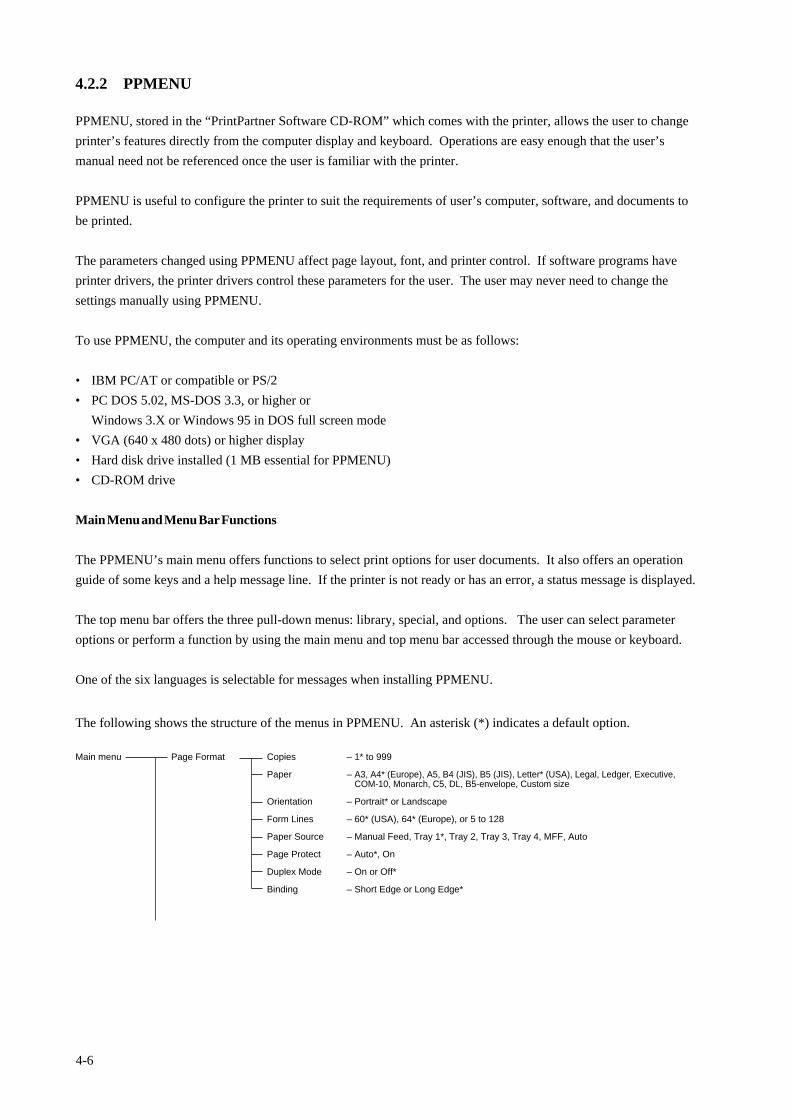
4.2.2 PPMENU
PPMENU, stored in the “PrintPartner Software CD-ROM” which comes with the printer, allows the user to change
printer’s features directly from the computer display and keyboard. Operations are easy enough that the user’s
manual need not be referenced once the user is familiar with the printer.
PPMENU is useful to configure the printer to suit the requirements of user’s computer, software, and documents to
be printed.
The parameters changed using PPMENU affect page layout, font, and printer control. If software programs have
printer drivers, the printer drivers control these parameters for the user. The user may never need to change the
settings manually using PPMENU.
To use PPMENU, the computer and its operating environments must be as follows:
• IBM PC/AT or compatible or PS/2
• PC DOS 5.02, MS-DOS 3.3, or higher or
Windows 3.X or Windows 95 in DOS full screen mode
• VGA (640 x 480 dots) or higher display
• Hard disk drive installed (1 MB essential for PPMENU)
• CD-ROM drive
Main Menu and Menu Bar Functions
The PPMENU’s main menu offers functions to select print options for user documents. It also offers an operation
guide of some keys and a help message line. If the printer is not ready or has an error, a status message is displayed.
The top menu bar offers the three pull-down menus: library, special, and options. The user can select parameter
options or perform a function by using the main menu and top menu bar accessed through the mouse or keyboard.
One of the six languages is selectable for messages when installing PPMENU.
The following shows the structure of the menus in PPMENU. An asterisk (*) indicates a default option.
Main menu Page Format Copies – 1* to 999
Paper – A3, A4* (Europe), A5, B4 (JIS), B5 (JIS), Letter* (USA), Legal, Ledger, Executive, COM-10, Monarch, C5, DL, B5-envelope, Custom size
Orientation – Portrait* or Landscape
Form Lines – 60* (USA), 64* (Europe), or 5 to 128
Paper Source – Manual Feed, Tray 1*, Tray 2, Tray 3, Tray 4, MFF, Auto
Page Protect – Auto*, On
Duplex Mode – On or Off*
Binding – Short Edge or Long Edge*
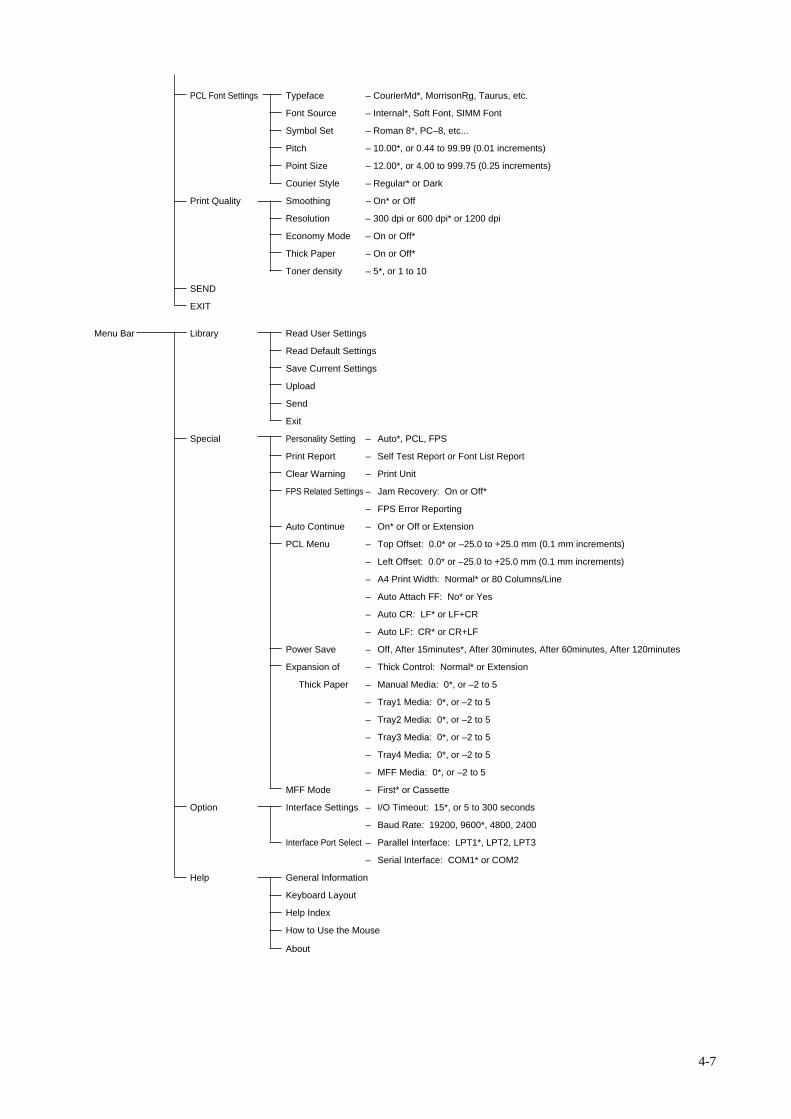
4-7
PCL Font Settings Typeface – CourierMd*, MorrisonRg, Taurus, etc.
Font Source – Internal*, Soft Font, SIMM Font
Symbol Set – Roman 8*, PC–8, etc...
Pitch – 10.00*, or 0.44 to 99.99 (0.01 increments)
Point Size – 12.00*, or 4.00 to 999.75 (0.25 increments)
Courier Style – Regular* or Dark
Print Quality Smoothing – On* or Off
Resolution – 300 dpi or 600 dpi* or 1200 dpi
Economy Mode – On or Off*
Thick Paper – On or Off*
Toner density – 5*, or 1 to 10
SEND
EXIT
Menu Bar Library Read User Settings
Read Default Settings
Save Current Settings
Upload
Send
Exit
Special Personality Setting – Auto*, PCL, FPS
Print Report – Self Test Report or Font List Report
Clear Warning – Print Unit
FPS Related Settings – Jam Recovery: On or Off*
– FPS Error Reporting
Auto Continue – On* or Off or Extension
PCL Menu – Top Offset: 0.0* or –25.0 to +25.0 mm (0.1 mm increments)
– Left Offset: 0.0* or –25.0 to +25.0 mm (0.1 mm increments)
– A4 Print Width: Normal* or 80 Columns/Line
– Auto Attach FF: No* or Yes
– Auto CR: LF* or LF+CR
– Auto LF: CR* or CR+LF
Power Save – Off, After 15minutes*, After 30minutes, After 60minutes, After 120minutes
Expansion of – Thick Control: Normal* or Extension
Thick Paper – Manual Media: 0*, or –2 to 5
– Tray1 Media: 0*, or –2 to 5
– Tray2 Media: 0*, or –2 to 5
– Tray3 Media: 0*, or –2 to 5
– Tray4 Media: 0*, or –2 to 5
– MFF Media: 0*, or –2 to 5
MFF Mode – First* or Cassette
Option Interface Settings – I/O Timeout: 15*, or 5 to 300 seconds
– Baud Rate: 19200, 9600*, 4800, 2400
Interface Port Select – Parallel Interface: LPT1*, LPT2, LPT3
– Serial Interface: COM1* or COM2
Help General Information
Keyboard Layout
Help Index
How to Use the Mouse
About
4-8
4.3 Printer Drivers
Printer driver is a software acting under MS-Windows 3.X, 95/98, NT 3.51, or NT 4.0 and provides the printer with
the information which can be read by the printer. Internal values of printer environments can be specified by the
printer driver, and the user can specify paper size, resolution and/or other selectable values.
To use the printer driver, the computer and its operating environments must be as follows:
• IBM PC/AT or compatible
• Microsoft Windows 3.X, 95/98, NT 3.51, or NT 4.0
• VGA (640 x 400) or higher display
• Hard disk drive installed (2 MB essential for a printer driver)
• 3.5” double-sided high density (2HD) floppy disk drive or CD-ROM drive
The PrintPartner 20W comes with the following printer drivers:
• Standard drivers for Windows 3.X
• Standard drivers for Windows 95/98
• Standard drivers for Windows NT 3.51
• Standard drivers for Windows NT 4.0
In addition, the PrintPartner 20W comes with the following printer drivers:
• FPS drivers for Windows 95/98
• FPS drivers for Windows NT 4.0
This section shows the settings of each driver, excluding the standard drivers for Windows 3.X. (The settings of the
standard driver for Windows 3.X are simpler than those of the standard drivers for Windows 95/98, the successor of
Windows 3.X.)
An asterisk (*) indicates a default option.
4-9
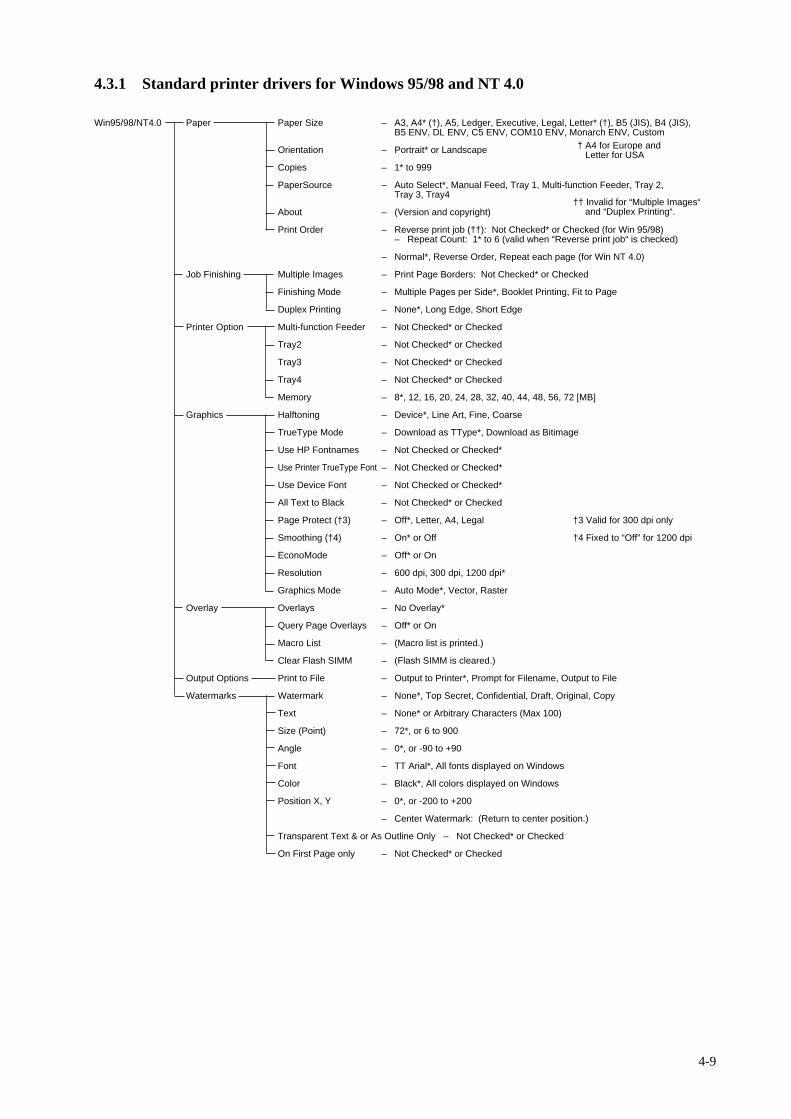
Win95/98/NT4.0 Paper Paper Size – A3, A4* (†), A5, Ledger, Executive, Legal, Letter* (†), B5 (JIS), B4 (JIS), B5 ENV, DL ENV, C5 ENV, COM10 ENV, Monarch ENV, Custom
Orientation – Portrait* or Landscape
Copies – 1* to 999
PaperSource – Auto Select*, Manual Feed, Tray 1, Multi-function Feeder, Tray 2, Tray 3, Tray4
About – (Version and copyright)
Print Order – Reverse print job (††): Not Checked* or Checked (for Win 95/98) – Repeat Count: 1* to 6 (valid when “Reverse print job“ is checked)
– Normal*, Reverse Order, Repeat each page (for Win NT 4.0)
Job Finishing Multiple Images – Print Page Borders: Not Checked* or Checked
Finishing Mode – Multiple Pages per Side*, Booklet Printing, Fit to Page
Duplex Printing – None*, Long Edge, Short Edge
Printer Option Multi-function Feeder – Not Checked* or Checked
Tray2 – Not Checked* or Checked
Tray3 – Not Checked* or Checked
Tray4 – Not Checked* or Checked
Memory – 8*, 12, 16, 20, 24, 28, 32, 40, 44, 48, 56, 72 [MB]
Graphics Halftoning – Device*, Line Art, Fine, Coarse
TrueType Mode – Download as TType*, Download as Bitimage
Use HP Fontnames – Not Checked or Checked*
Use Printer TrueType Font – Not Checked or Checked*
Use Device Font – Not Checked or Checked*
All Text to Black – Not Checked* or Checked
Page Protect (†3) – Off*, Letter, A4, Legal †3 Valid for 300 dpi only
Smoothing (†4) – On* or Off †4 Fixed to “Off” for 1200 dpi
EconoMode – Off* or On
Resolution – 600 dpi, 300 dpi, 1200 dpi*
Graphics Mode – Auto Mode*, Vector, Raster
Overlay Overlays – No Overlay*
Query Page Overlays – Off* or On
Macro List – (Macro list is printed.)
Clear Flash SIMM – (Flash SIMM is cleared.)
Output Options Print to File – Output to Printer*, Prompt for Filename, Output to File
Watermarks Watermark – None*, Top Secret, Confidential, Draft, Original, Copy
Text – None* or Arbitrary Characters (Max 100)
Size (Point) – 72*, or 6 to 900
Angle – 0*, or -90 to +90
Font – TT Arial*, All fonts displayed on Windows
Color – Black*, All colors displayed on Windows
Position X, Y – 0*, or -200 to +200
– Center Watermark: (Return to center position.)
Transparent Text & or As Outline Only – Not Checked* or Checked
On First Page only – Not Checked* or Checked
4.3.1 Standard printer drivers for Windows 95/98 and NT 4.0
† A4 for Europe and Letter for USA
†† Invalid for “Multiple Images“and “Duplex Printing“.
4-10
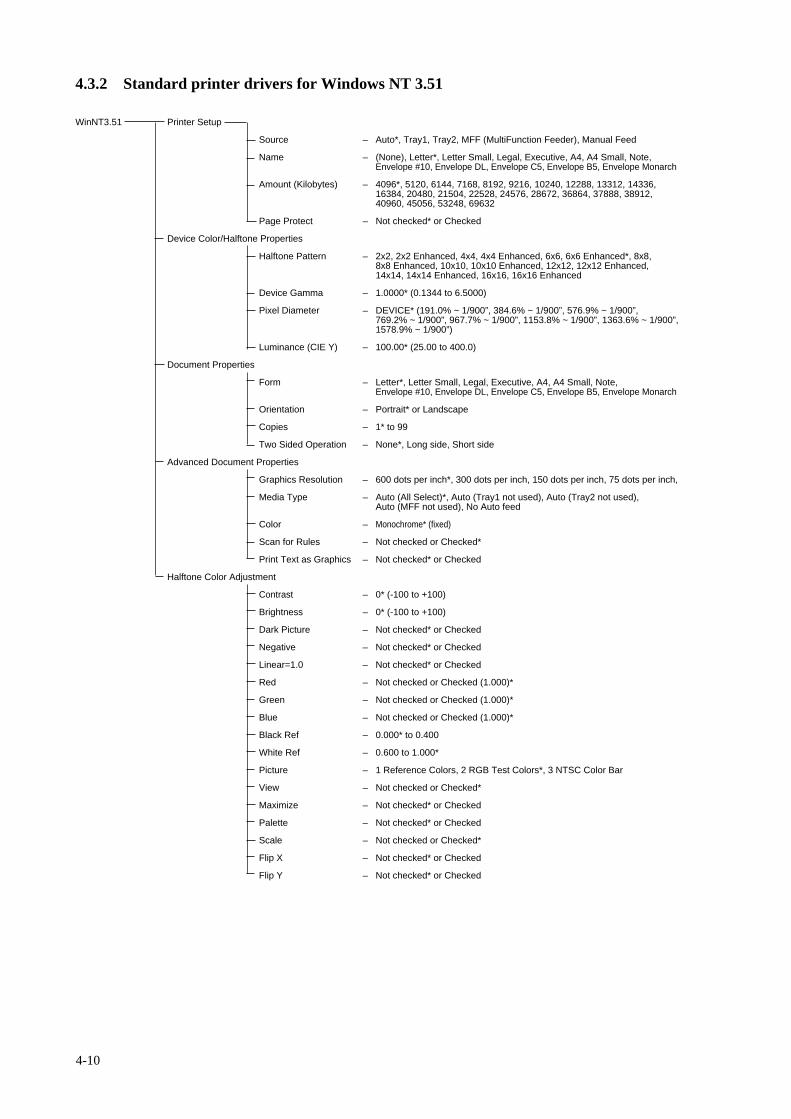
4.3.2 Standard printer drivers for Windows NT 3.51
WinNT3.51 Printer Setup
Source – Auto*, Tray1, Tray2, MFF (MultiFunction Feeder), Manual Feed
Name – (None), Letter*, Letter Small, Legal, Executive, A4, A4 Small, Note, Envelope #10, Envelope DL, Envelope C5, Envelope B5, Envelope Monarch
Amount (Kilobytes) – 4096*, 5120, 6144, 7168, 8192, 9216, 10240, 12288, 13312, 14336, 16384, 20480, 21504, 22528, 24576, 28672, 36864, 37888, 38912, 40960, 45056, 53248, 69632
Page Protect – Not checked* or Checked
Device Color/Halftone Properties
Halftone Pattern – 2x2, 2x2 Enhanced, 4x4, 4x4 Enhanced, 6x6, 6x6 Enhanced*, 8x8, 8x8 Enhanced, 10x10, 10x10 Enhanced, 12x12, 12x12 Enhanced, 14x14, 14x14 Enhanced, 16x16, 16x16 Enhanced
Device Gamma – 1.0000* (0.1344 to 6.5000)
Pixel Diameter – DEVICE* (191.0% ~ 1/900”, 384.6% ~ 1/900”, 576.9% ~ 1/900”, 769.2% ~ 1/900”, 967.7% ~ 1/900”, 1153.8% ~ 1/900”, 1363.6% ~ 1/900”, 1578.9% ~ 1/900”)
Luminance (CIE Y) – 100.00* (25.00 to 400.0)
Document Properties
Form – Letter*, Letter Small, Legal, Executive, A4, A4 Small, Note, Envelope #10, Envelope DL, Envelope C5, Envelope B5, Envelope Monarch
Orientation – Portrait* or Landscape
Copies – 1* to 99
Two Sided Operation – None*, Long side, Short side
Advanced Document Properties
Graphics Resolution – 600 dots per inch*, 300 dots per inch, 150 dots per inch, 75 dots per inch,
Media Type – Auto (All Select)*, Auto (Tray1 not used), Auto (Tray2 not used), Auto (MFF not used), No Auto feed
Color – Monochrome* (fixed)
Scan for Rules – Not checked or Checked*
Print Text as Graphics – Not checked* or Checked
Halftone Color Adjustment
Contrast – 0* (-100 to +100)
Brightness – 0* (-100 to +100)
Dark Picture – Not checked* or Checked
Negative – Not checked* or Checked
Linear=1.0 – Not checked* or Checked
Red – Not checked or Checked (1.000)*
Green – Not checked or Checked (1.000)*
Blue – Not checked or Checked (1.000)*
Black Ref – 0.000* to 0.400
White Ref – 0.600 to 1.000*
Picture – 1 Reference Colors, 2 RGB Test Colors*, 3 NTSC Color Bar
View – Not checked or Checked*
Maximize – Not checked* or Checked
Palette – Not checked* or Checked
Scale – Not checked or Checked*
Flip X – Not checked* or Checked
Flip Y – Not checked* or Checked
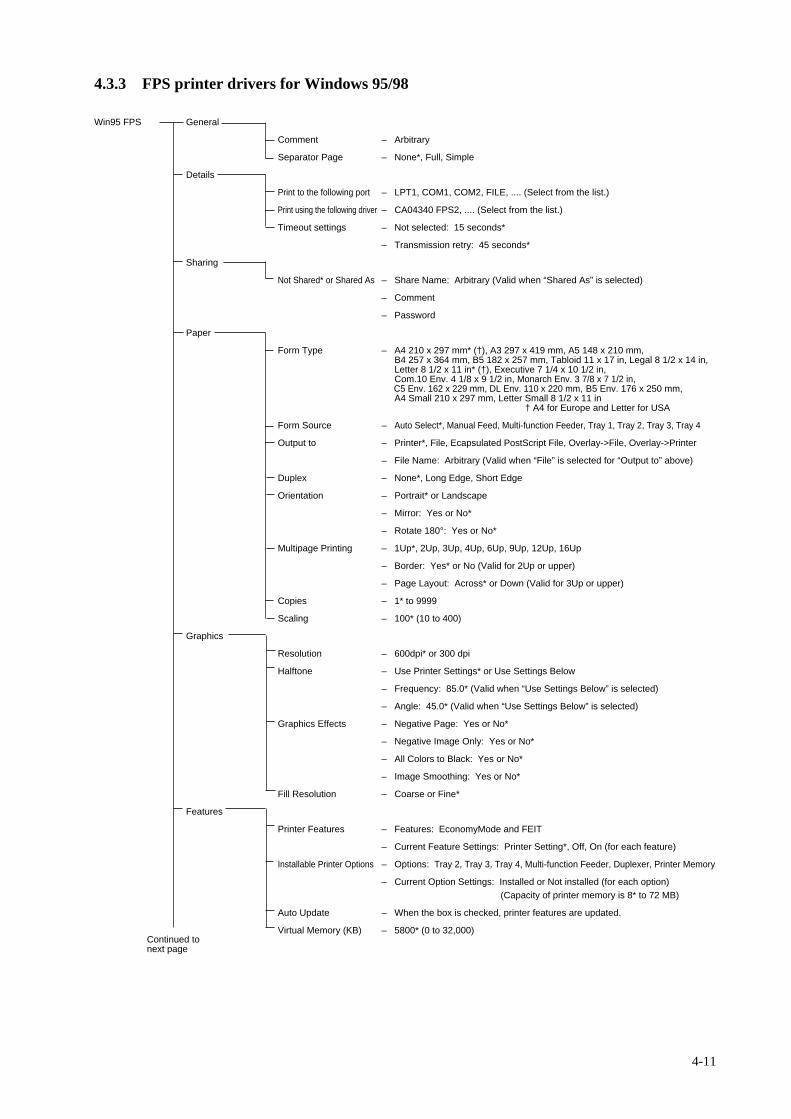
4-11
4.3.3 FPS printer drivers for Windows 95/98
Win95 FPS General
Comment – Arbitrary
Separator Page – None*, Full, Simple
Details
Print to the following port – LPT1, COM1, COM2, FILE, .... (Select from the list.)
Print using the following driver – CA04340 FPS2, .... (Select from the list.)
Timeout settings – Not selected: 15 seconds*
– Transmission retry: 45 seconds*
Sharing
Not Shared* or Shared As – Share Name: Arbitrary (Valid when “Shared As” is selected)
– Comment
– Password
Paper
Form Type – A4 210 x 297 mm* (†), A3 297 x 419 mm, A5 148 x 210 mm, B4 257 x 364 mm, B5 182 x 257 mm, Tabloid 11 x 17 in, Legal 8 1/2 x 14 in, Letter 8 1/2 x 11 in* (†), Executive 7 1/4 x 10 1/2 in, Com.10 Env. 4 1/8 x 9 1/2 in, Monarch Env. 3 7/8 x 7 1/2 in, C5 Env. 162 x 229 mm, DL Env. 110 x 220 mm, B5 Env. 176 x 250 mm, A4 Small 210 x 297 mm, Letter Small 8 1/2 x 11 in
† A4 for Europe and Letter for USA
Form Source – Auto Select*, Manual Feed, Multi-function Feeder, Tray 1, Tray 2, Tray 3, Tray 4
Output to – Printer*, File, Ecapsulated PostScript File, Overlay->File, Overlay->Printer
– File Name: Arbitrary (Valid when “File” is selected for “Output to” above)
Duplex – None*, Long Edge, Short Edge
Orientation – Portrait* or Landscape
– Mirror: Yes or No*
– Rotate 180°: Yes or No*
Multipage Printing – 1Up*, 2Up, 3Up, 4Up, 6Up, 9Up, 12Up, 16Up
– Border: Yes* or No (Valid for 2Up or upper)
– Page Layout: Across* or Down (Valid for 3Up or upper)
Copies – 1* to 9999
Scaling – 100* (10 to 400)
Graphics
Resolution – 600dpi* or 300 dpi
Halftone – Use Printer Settings* or Use Settings Below
– Frequency: 85.0* (Valid when “Use Settings Below” is selected)
– Angle: 45.0* (Valid when “Use Settings Below” is selected)
Graphics Effects – Negative Page: Yes or No*
– Negative Image Only: Yes or No*
– All Colors to Black: Yes or No*
– Image Smoothing: Yes or No*
Fill Resolution – Coarse or Fine*
Features
Printer Features – Features: EconomyMode and FEIT
– Current Feature Settings: Printer Setting*, Off, On (for each feature)
Installable Printer Options – Options: Tray 2, Tray 3, Tray 4, Multi-function Feeder, Duplexer, Printer Memory
– Current Option Settings: Installed or Not installed (for each option) (Capacity of printer memory is 8* to 72 MB)
Auto Update – When the box is checked, printer features are updated.
Virtual Memory (KB) – 5800* (0 to 32,000)Continued tonext page
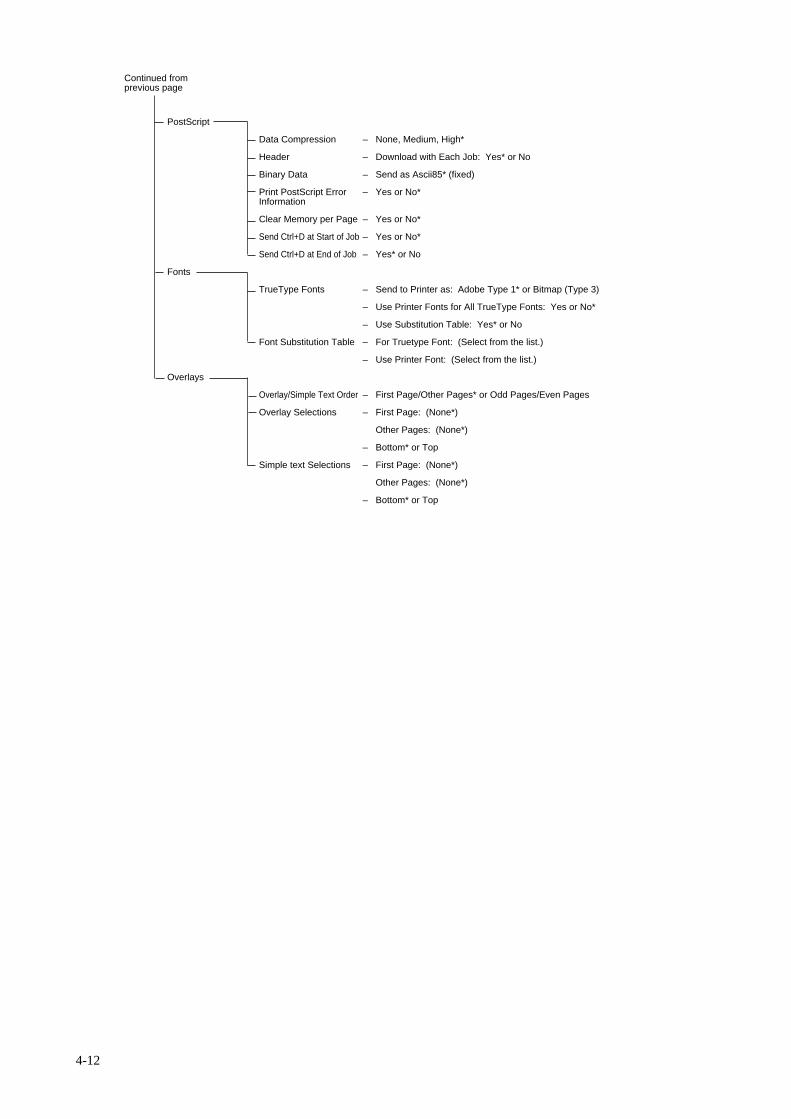
4-12
PostScript
Data Compression – None, Medium, High*
Header – Download with Each Job: Yes* or No
Binary Data – Send as Ascii85* (fixed)
Print PostScript Error – Yes or No*Information
Clear Memory per Page – Yes or No*
Send Ctrl+D at Start of Job – Yes or No*
Send Ctrl+D at End of Job – Yes* or No
Fonts
TrueType Fonts – Send to Printer as: Adobe Type 1* or Bitmap (Type 3)
– Use Printer Fonts for All TrueType Fonts: Yes or No*
– Use Substitution Table: Yes* or No
Font Substitution Table – For Truetype Font: (Select from the list.)
– Use Printer Font: (Select from the list.)
Overlays
Overlay/Simple Text Order – First Page/Other Pages* or Odd Pages/Even Pages
Overlay Selections – First Page: (None*)
Other Pages: (None*)
– Bottom* or Top
Simple text Selections – First Page: (None*)
Other Pages: (None*)
– Bottom* or Top
Continued fromprevious page
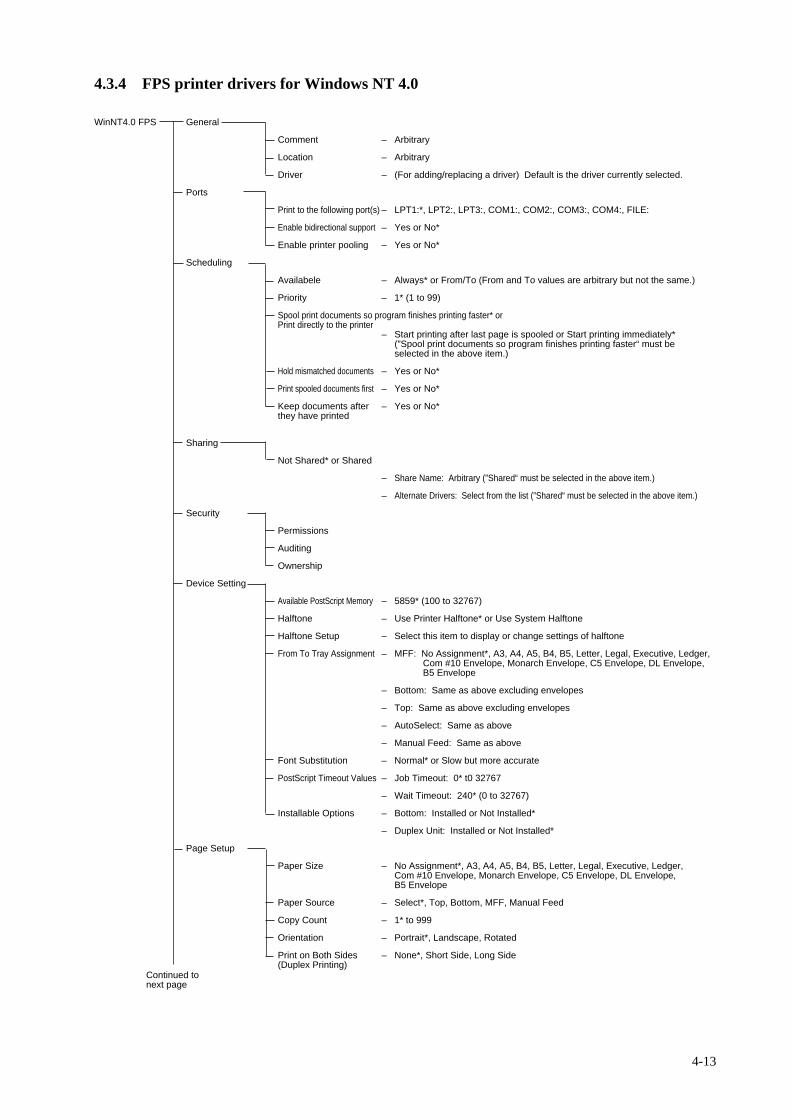
4-13
4.3.4 FPS printer drivers for Windows NT 4.0
WinNT4.0 FPS General
Comment – Arbitrary
Location – Arbitrary
Driver – (For adding/replacing a driver) Default is the driver currently selected.
Ports
Print to the following port(s) – LPT1:*, LPT2:, LPT3:, COM1:, COM2:, COM3:, COM4:, FILE:
Enable bidirectional support – Yes or No*
Enable printer pooling – Yes or No*
Scheduling
Availabele – Always* or From/To (From and To values are arbitrary but not the same.)
Priority – 1* (1 to 99)
Spool print documents so program finishes printing faster* orPrint directly to the printer
– Start printing after last page is spooled or Start printing immediately* (”Spool print documents so program finishes printing faster“ must be selected in the above item.)
Hold mismatched documents – Yes or No*
Print spooled documents first – Yes or No*
Keep documents after – Yes or No*they have printed
Sharing
Not Shared* or Shared
– Share Name: Arbitrary (”Shared“ must be selected in the above item.)
– Alternate Drivers: Select from the list (”Shared“ must be selected in the above item.)
Security
Permissions
Auditing
Ownership
Device Setting
Available PostScript Memory – 5859* (100 to 32767)
Halftone – Use Printer Halftone* or Use System Halftone
Halftone Setup – Select this item to display or change settings of halftone
From To Tray Assignment – MFF: No Assignment*, A3, A4, A5, B4, B5, Letter, Legal, Executive, Ledger, Com #10 Envelope, Monarch Envelope, C5 Envelope, DL Envelope, B5 Envelope
– Bottom: Same as above excluding envelopes
– Top: Same as above excluding envelopes
– AutoSelect: Same as above
– Manual Feed: Same as above
Font Substitution – Normal* or Slow but more accurate
PostScript Timeout Values – Job Timeout: 0* t0 32767
– Wait Timeout: 240* (0 to 32767)
Installable Options – Bottom: Installed or Not Installed*
– Duplex Unit: Installed or Not Installed*
Page Setup
Paper Size – No Assignment*, A3, A4, A5, B4, B5, Letter, Legal, Executive, Ledger, Com #10 Envelope, Monarch Envelope, C5 Envelope, DL Envelope, B5 Envelope
Paper Source – Select*, Top, Bottom, MFF, Manual Feed
Copy Count – 1* to 999
Orientation – Portrait*, Landscape, Rotated
Print on Both Sides – None*, Short Side, Long Side(Duplex Printing)
Continued tonext page
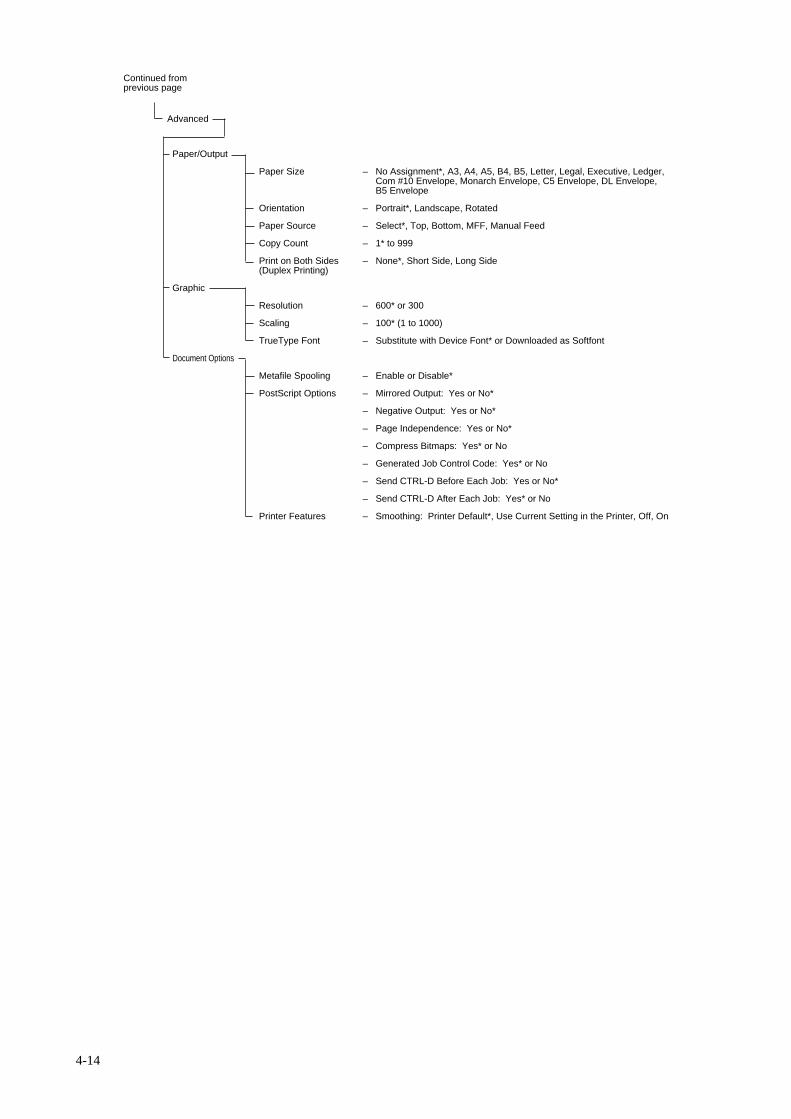
4-14
Advanced
Paper/Output
Paper Size – No Assignment*, A3, A4, A5, B4, B5, Letter, Legal, Executive, Ledger, Com #10 Envelope, Monarch Envelope, C5 Envelope, DL Envelope, B5 Envelope
Orientation – Portrait*, Landscape, Rotated
Paper Source – Select*, Top, Bottom, MFF, Manual Feed
Copy Count – 1* to 999
Print on Both Sides – None*, Short Side, Long Side(Duplex Printing)
Graphic
Resolution – 600* or 300
Scaling – 100* (1 to 1000)
TrueType Font – Substitute with Device Font* or Downloaded as Softfont
Document Options
Metafile Spooling – Enable or Disable*
PostScript Options – Mirrored Output: Yes or No*
– Negative Output: Yes or No*
– Page Independence: Yes or No*
– Compress Bitmaps: Yes* or No
– Generated Job Control Code: Yes* or No
– Send CTRL-D Before Each Job: Yes or No*
– Send CTRL-D After Each Job: Yes* or No
Printer Features – Smoothing: Printer Default*, Use Current Setting in the Printer, Off, On
Continued fromprevious page
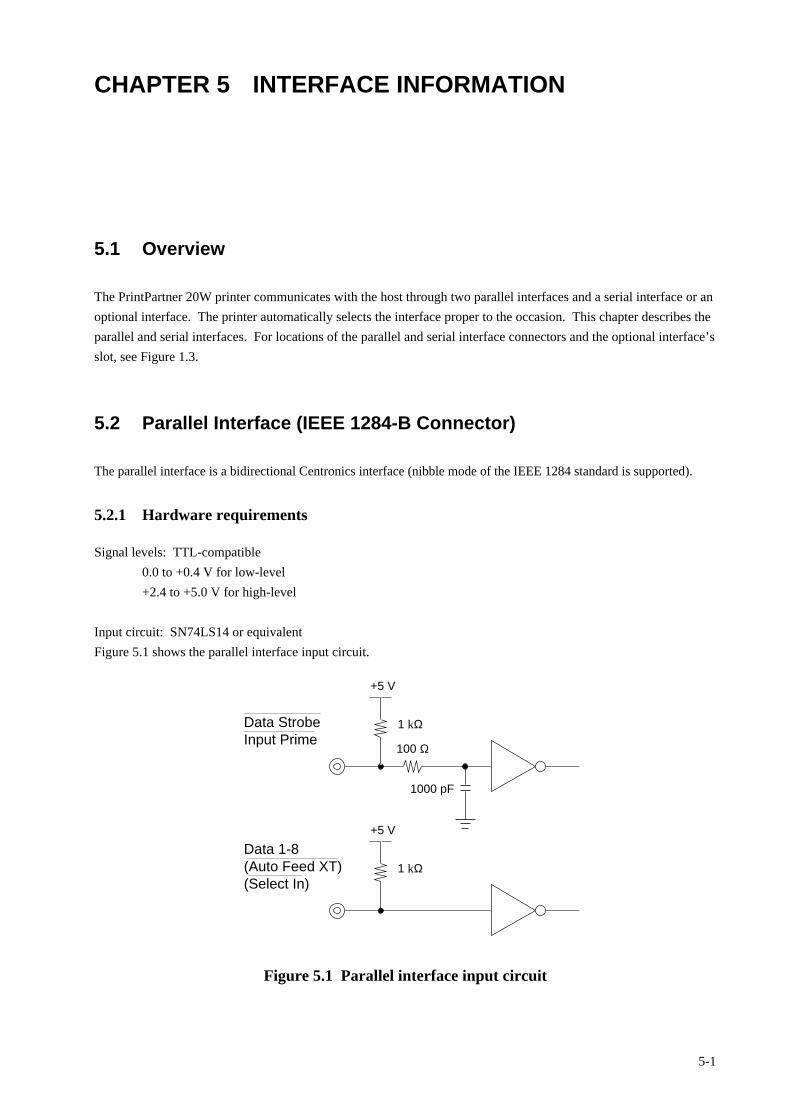
5-1
CHAPTER 5 INTERFACE INFORMATION
5.1 Overview
The PrintPartner 20W printer communicates with the host through two parallel interfaces and a serial interface or an
optional interface. The printer automatically selects the interface proper to the occasion. This chapter describes the
parallel and serial interfaces. For locations of the parallel and serial interface connectors and the optional interface’s
slot, see Figure 1.3.
5.2 Parallel Interface (IEEE 1284-B Connector)
The parallel interface is a bidirectional Centronics interface (nibble mode of the IEEE 1284 standard is supported).
5.2.1 Hardware requirements
Signal levels: TTL-compatible
0.0 to +0.4 V for low-level
+2.4 to +5.0 V for high-level
Input circuit: SN74LS14 or equivalent
Figure 5.1 shows the parallel interface input circuit.
+5 V
1 kΩ
100 Ω
1000 pF
+5 V
1 kΩ
Data StrobeInput Prime
Data 1-8(Auto Feed XT)(Select In)
Figure 5.1 Parallel interface input circuit
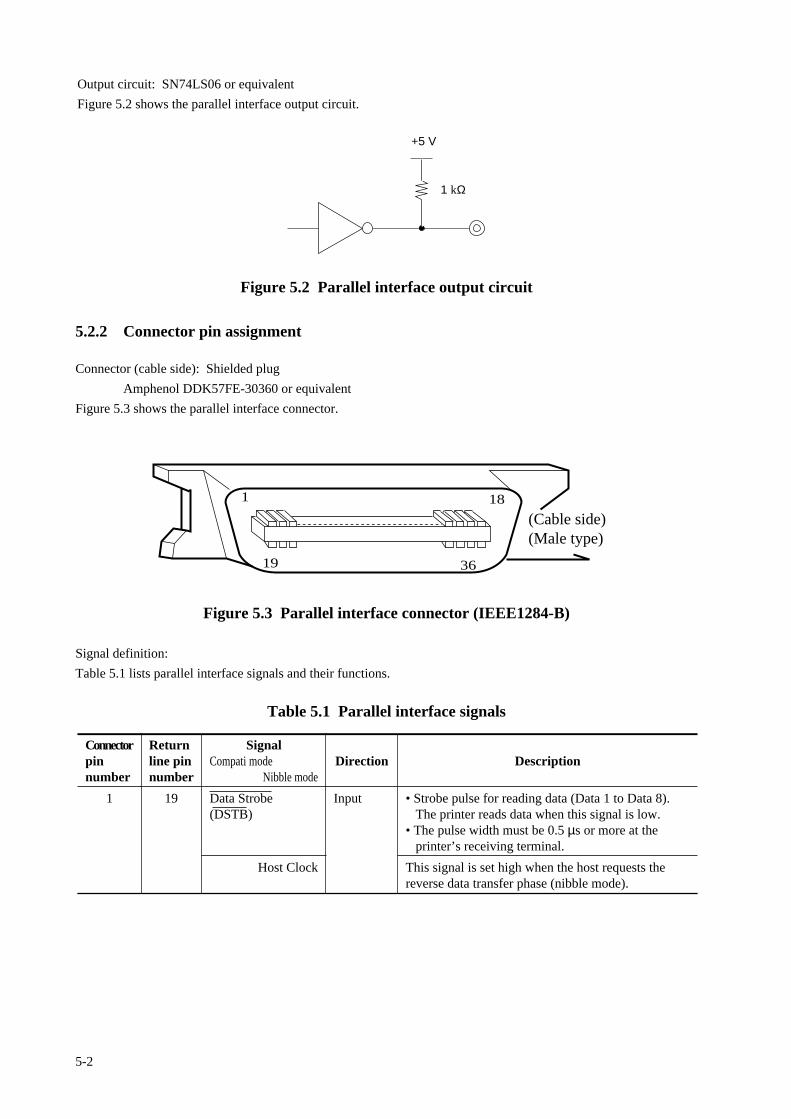
5-2
Figure 5.2 Parallel interface output circuit
5.2.2 Connector pin assignment
Connector (cable side): Shielded plug
Amphenol DDK57FE-30360 or equivalent
Figure 5.3 shows the parallel interface connector.
Output circuit: SN74LS06 or equivalent
Figure 5.2 shows the parallel interface output circuit.
Figure 5.3 Parallel interface connector (IEEE1284-B)
Signal definition:
Table 5.1 lists parallel interface signals and their functions.
Table 5.1 Parallel interface signals
+5 V
1 kΩ
(Cable side)(Male type)
36
181
19
Returnline pinnumber
19
SignalCompati mode
Nibble mode
Data Strobe(DSTB)
Host Clock
Description
• Strobe pulse for reading data (Data 1 to Data 8). The printer reads data when this signal is low.• The pulse width must be 0.5 µs or more at the printer’s receiving terminal.
This signal is set high when the host requests thereverse data transfer phase (nibble mode).
Connectorpinnumber
1
Direction
Input

5-3
Table 5.1 Parallel interface signals (continued)
Connectorpinnumber
23456789
10
11
12
13
14
Description
• Data 1 to Data 8 signals correspond to parallel data bits 1 to 8.• Data 8 is the most significant bit.• All signals must go high at least 0.5 µs before the falling edge of the Data Strobe signal, and must stay high for at least 0.5 µs after the rising edge.
• Pulse signal indicating data reception completed (or data reception enabled) status• Issued when the printer switches from offline to online
Reverse data transfer phase:This signal goes high when data being sent to thehost is established.Reverse idle phase:This signal is set low then goes high to interrupt thehost, indicating that data is available.
Data cannot be received when this signal is high,e.g., if the buffer is full or an error occurs.
Reverse data transfer phase:Data bit 3, data bit 7, then forward path (host toprinter) busy status
This signal goes high if paper runs out.
Reverse data transfer phase:Data bit 2, then data bit 6Reverse idle phase:This signal is set high until the host requests dataand, after that, follows the Data Available signal.
This signal goes high when the printer is selected(online), and goes low when the printer is deselected(offline).
Reverse data transfer phase:Data bit 1, then data bit 5
Reserved (*1)
Reverse data transfer phase:This signal is set low when the host can receive data,and goes high when the host has received data.Following a reverse data transfer, the interface entersthe reverse idle phase when the Host Busy signal goeslow and the printer has no data.Reverse idle phase:This signal goes high when the Printer Clock signalgoes low so that the interface re-enters the reversedata transfer phase. If it goes high with the 1284Active signal low, the 1284 idle phase is aborted andthe interface returns to the compatibility mode.
SignalCompati mode
Nibble mode
Data 1Data 2Data 3Data 4Data 5Data 6Data 7Data 8
Acknowledge(ACK)
Printer Clock
Busy
Printer Busy
Paper Empty (PE)
Ack Data Req
Select (SLCT)
X Flag
Auto Feed XT
Host Busy
Direction
InputInputInputInputInputInputInputInput
Output
Output
Output
Output
Input
Returnline pinnumber
2021222324252627
28
29
28
28
30
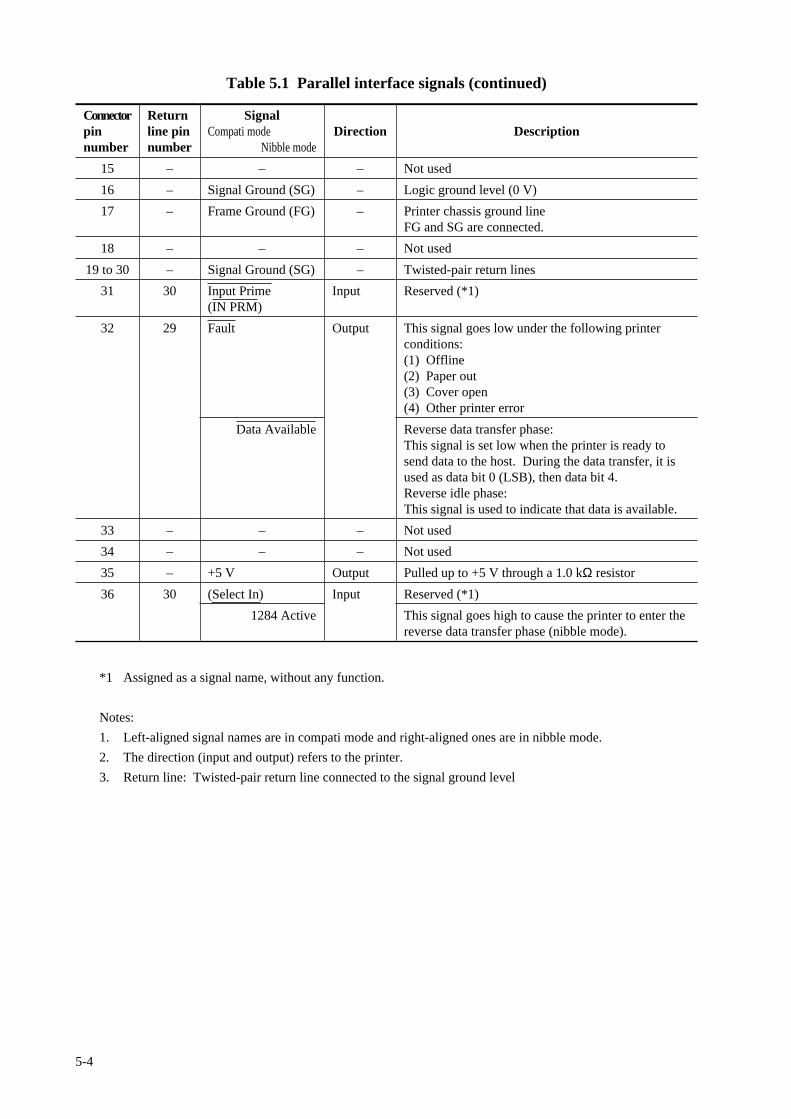
5-4
Connectorpinnumber
15
16
17
18
19 to 30
31
32
33
34
35
36
Returnline pinnumber
–
–
–
–
–
30
29
–
–
–
30
Direction
–
–
–
–
–
Input
Output
–
–
Output
Input
Description
Not used
Logic ground level (0 V)
Printer chassis ground lineFG and SG are connected.
Not used
Twisted-pair return lines
Reserved (*1)
This signal goes low under the following printerconditions:(1) Offline(2) Paper out(3) Cover open(4) Other printer error
Reverse data transfer phase:This signal is set low when the printer is ready tosend data to the host. During the data transfer, it isused as data bit 0 (LSB), then data bit 4.Reverse idle phase:This signal is used to indicate that data is available.
Not used
Not used
Pulled up to +5 V through a 1.0 kΩ resistor
Reserved (*1)
This signal goes high to cause the printer to enter thereverse data transfer phase (nibble mode).
SignalCompati mode
Nibble mode
–
Signal Ground (SG)
Frame Ground (FG)
–
Signal Ground (SG)
Input Prime(IN PRM)
Fault
Data Available
–
–
+5 V
(Select In)
1284 Active
Table 5.1 Parallel interface signals (continued)
*1 Assigned as a signal name, without any function.
Notes:
1. Left-aligned signal names are in compati mode and right-aligned ones are in nibble mode.
2. The direction (input and output) refers to the printer.
3. Return line: Twisted-pair return line connected to the signal ground level
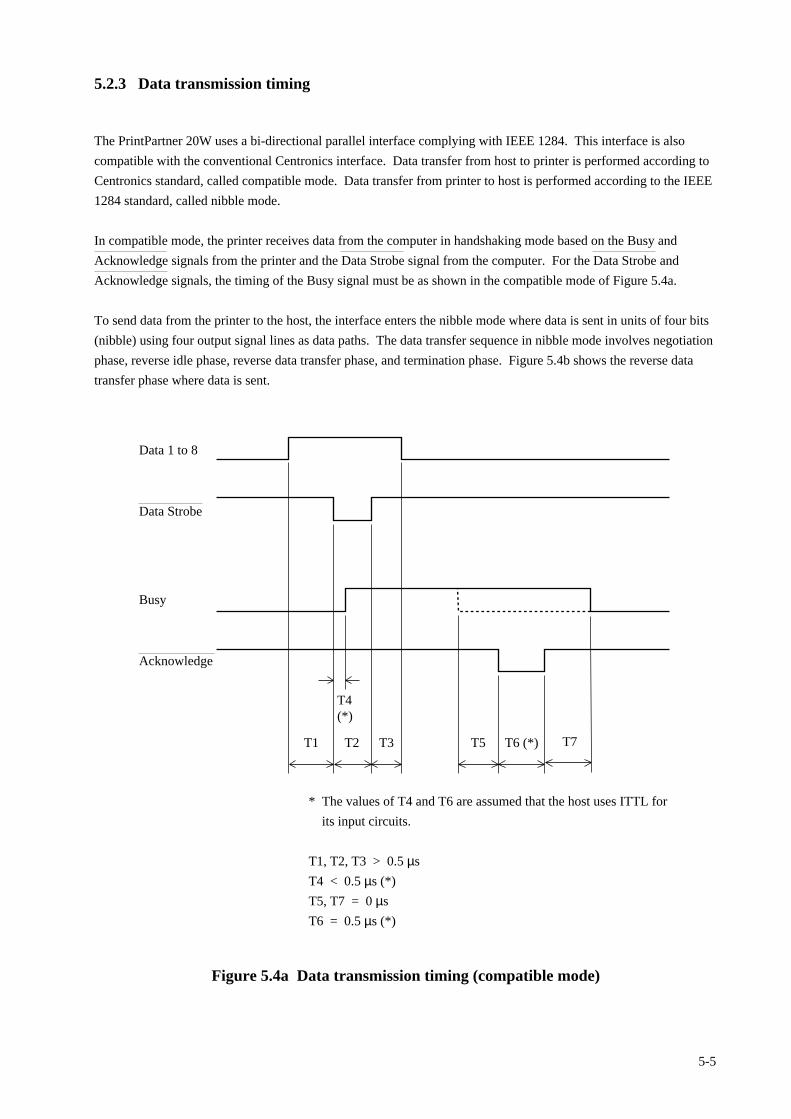
5-5
T2T1 T3 T5 T6 (*)
T4(*)
Data 1 to 8
Data Strobe
Busy
* The values of T4 and T6 are assumed that the host uses ITTL for
its input circuits.
T1, T2, T3 > 0.5 µs
T4 < 0.5 µs (*)
T5, T7 = 0 µs
T6 = 0.5 µs (*)
Acknowledge
T7
Figure 5.4a Data transmission timing (compatible mode)
5.2.3 Data transmission timing
The PrintPartner 20W uses a bi-directional parallel interface complying with IEEE 1284. This interface is also
compatible with the conventional Centronics interface. Data transfer from host to printer is performed according to
Centronics standard, called compatible mode. Data transfer from printer to host is performed according to the IEEE
1284 standard, called nibble mode.
In compatible mode, the printer receives data from the computer in handshaking mode based on the Busy and
Acknowledge signals from the printer and the Data Strobe signal from the computer. For the Data Strobe and
Acknowledge signals, the timing of the Busy signal must be as shown in the compatible mode of Figure 5.4a.
To send data from the printer to the host, the interface enters the nibble mode where data is sent in units of four bits
(nibble) using four output signal lines as data paths. The data transfer sequence in nibble mode involves negotiation
phase, reverse idle phase, reverse data transfer phase, and termination phase. Figure 5.4b shows the reverse data
transfer phase where data is sent.

5-6
Data Available (*)
X Flag
Ack Data Req
Printer Busy
Host Busy(from CPU)
Printer Clock
Data bit 4
Data bit 5
Data bit 6
Data bit 7
Data bit 0
Data bit 1
Data bit 2
Data bit 3
1284 Active(from CPU)
* Data Available is assigned for the cable.
Figure 5.4b Data transmission timing (nibble mode)

5-7
5.3 Parallel Interface (IEEE 1284-C Connector)
The parallel interface is a bidirectional Centronics interface (nibble mode of the IEEE 1284 standard is supported).
5.3.1 Hardware requirements
Signal levels: TTL-compatible
0.0 to +0.4 V for low-level
+2.4 to +5.0 V for high-level
Input circuit: SN74LS14 or equivalent
Figure 5.5 shows the parallel interface input circuit.
+5 V
1 kΩ
22 Ω
100 pF
+5 V
1.2 kΩ
Data StrobeInput Prime(Auto Feed XT)(Select In)
Data 1-822 Ω
Figure 5.5 Parallel interface input circuit
Figure 5.6 Parallel interface output circuit
Output circuit: SN74LS244 or equivalent
Figure 5.6 shows the parallel interface output circuit.
+5 V
1.2 kΩ
22 Ω
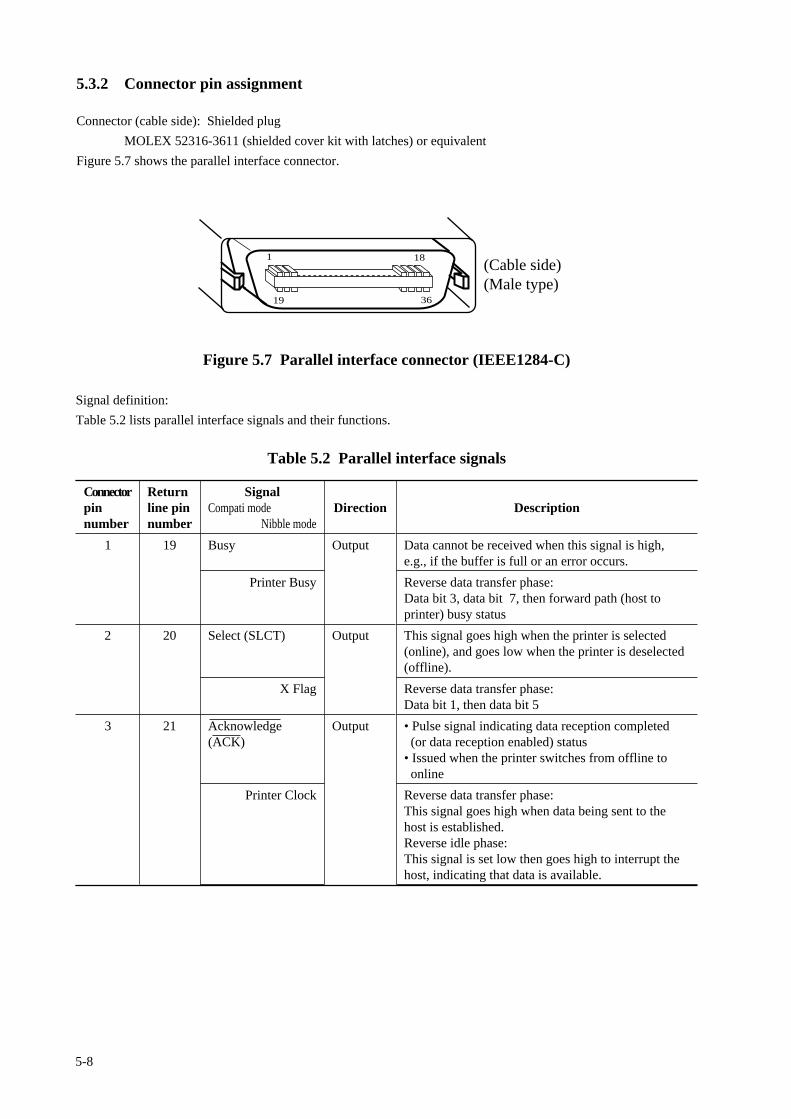
5-8
5.3.2 Connector pin assignment
Connector (cable side): Shielded plug
MOLEX 52316-3611 (shielded cover kit with latches) or equivalent
Figure 5.7 shows the parallel interface connector.
Figure 5.7 Parallel interface connector (IEEE1284-C)
Signal definition:
Table 5.2 lists parallel interface signals and their functions.
Table 5.2 Parallel interface signals
(Cable side)(Male type)
36
181
19
Returnline pinnumber
19
20
21
SignalCompati mode
Nibble mode
Busy
Printer Busy
Select (SLCT)
X Flag
Acknowledge(ACK)
Printer Clock
Description
Data cannot be received when this signal is high,e.g., if the buffer is full or an error occurs.
Reverse data transfer phase:Data bit 3, data bit 7, then forward path (host toprinter) busy status
This signal goes high when the printer is selected(online), and goes low when the printer is deselected(offline).
Reverse data transfer phase:Data bit 1, then data bit 5
• Pulse signal indicating data reception completed (or data reception enabled) status• Issued when the printer switches from offline to online
Reverse data transfer phase:This signal goes high when data being sent to thehost is established.Reverse idle phase:This signal is set low then goes high to interrupt thehost, indicating that data is available.
Connectorpinnumber
1
2
3
Direction
Output
Output
Output
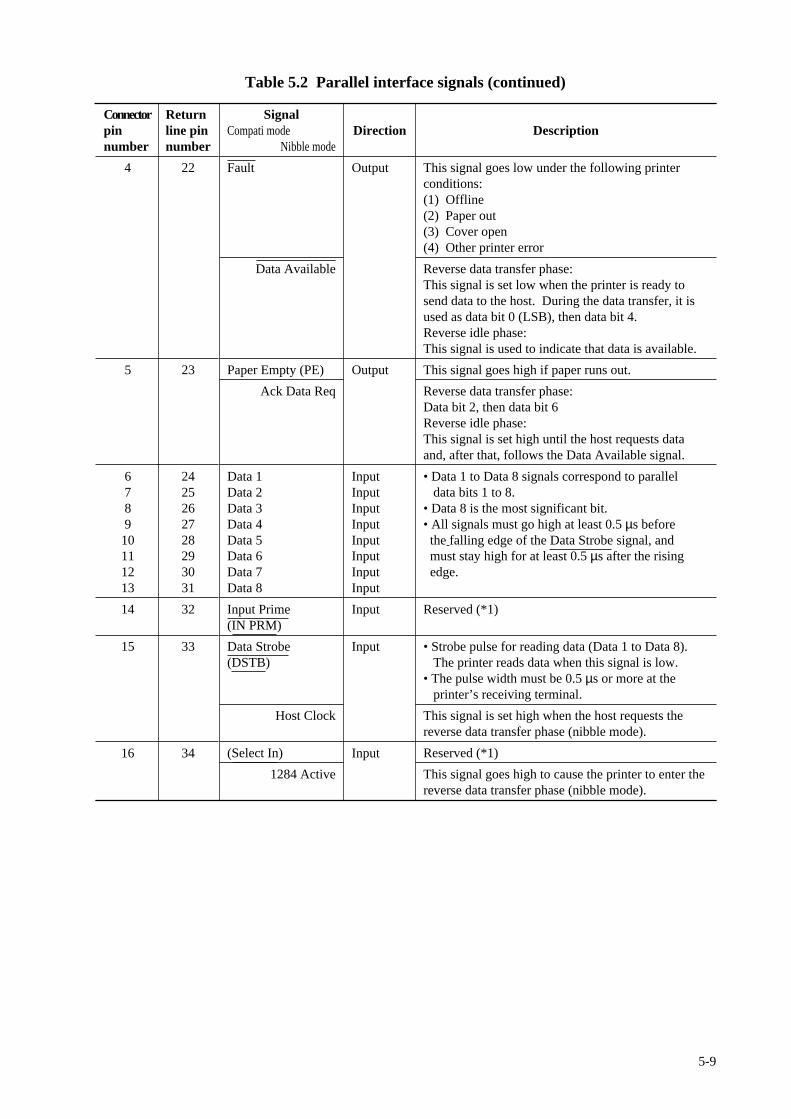
5-9
Table 5.2 Parallel interface signals (continued)
Connectorpinnumber
4
5
678910111213
14
15
16
Description
This signal goes low under the following printerconditions:(1) Offline(2) Paper out(3) Cover open(4) Other printer error
Reverse data transfer phase:This signal is set low when the printer is ready tosend data to the host. During the data transfer, it isused as data bit 0 (LSB), then data bit 4.Reverse idle phase:This signal is used to indicate that data is available.
This signal goes high if paper runs out.
Reverse data transfer phase:Data bit 2, then data bit 6Reverse idle phase:This signal is set high until the host requests dataand, after that, follows the Data Available signal.
• Data 1 to Data 8 signals correspond to parallel data bits 1 to 8.• Data 8 is the most significant bit.• All signals must go high at least 0.5 µs before the falling edge of the Data Strobe signal, and must stay high for at least 0.5 µs after the rising edge.
Reserved (*1)
• Strobe pulse for reading data (Data 1 to Data 8). The printer reads data when this signal is low.• The pulse width must be 0.5 µs or more at the printer’s receiving terminal.
This signal is set high when the host requests thereverse data transfer phase (nibble mode).
Reserved (*1)
This signal goes high to cause the printer to enter thereverse data transfer phase (nibble mode).
SignalCompati mode
Nibble mode
Fault
Data Available
Paper Empty (PE)
Ack Data Req
Data 1Data 2Data 3Data 4Data 5Data 6Data 7Data 8
Input Prime(IN PRM)
Data Strobe(DSTB)
Host Clock
(Select In)
1284 Active
Direction
Output
Output
InputInputInputInputInputInputInputInput
Input
Input
Input
Returnline pinnumber
22
23
2425262728293031
32
33
34
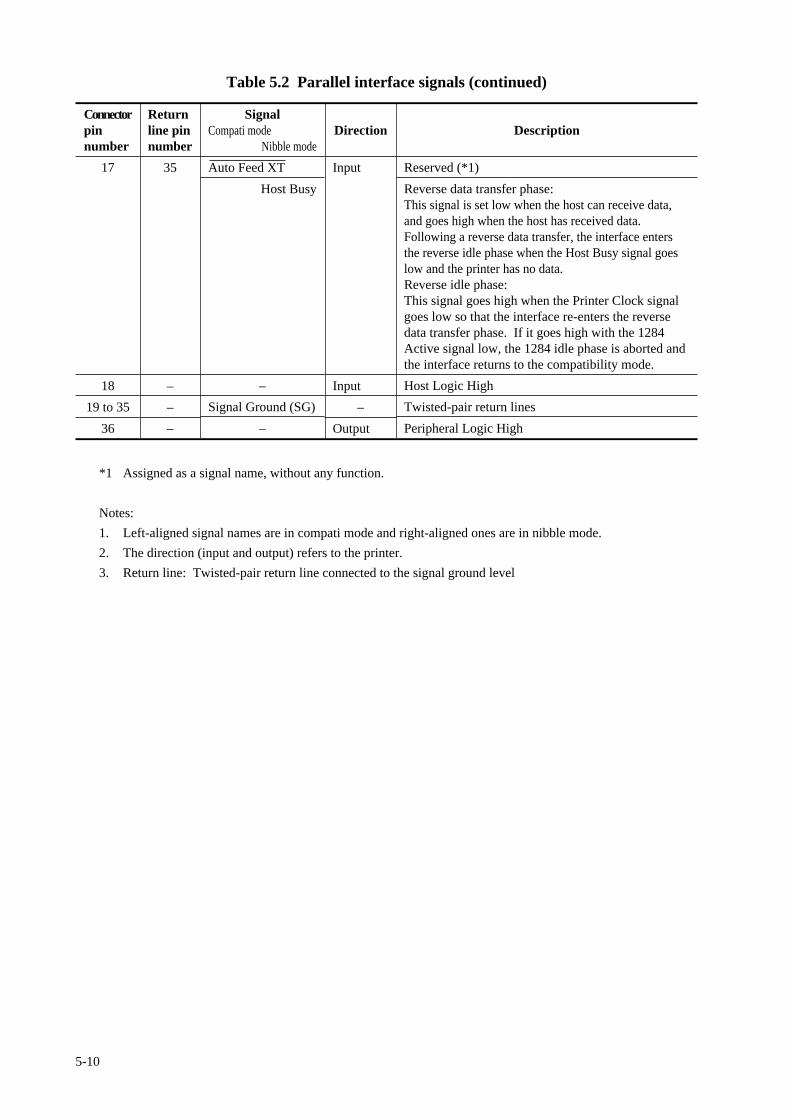
5-10
Connectorpinnumber
17
18
19 to 35
36
Returnline pinnumber
35
–
–
–
Direction
Input
Input
–
Output
Description
Reserved (*1)
Reverse data transfer phase:This signal is set low when the host can receive data,and goes high when the host has received data.Following a reverse data transfer, the interface entersthe reverse idle phase when the Host Busy signal goeslow and the printer has no data.Reverse idle phase:This signal goes high when the Printer Clock signalgoes low so that the interface re-enters the reversedata transfer phase. If it goes high with the 1284Active signal low, the 1284 idle phase is aborted andthe interface returns to the compatibility mode.
Host Logic High
Twisted-pair return lines
Peripheral Logic High
SignalCompati mode
Nibble mode
Auto Feed XT
Host Busy
–
Signal Ground (SG)
–
Table 5.2 Parallel interface signals (continued)
*1 Assigned as a signal name, without any function.
Notes:
1. Left-aligned signal names are in compati mode and right-aligned ones are in nibble mode.
2. The direction (input and output) refers to the printer.
3. Return line: Twisted-pair return line connected to the signal ground level

5-11
T2T1 T3 T5 T6 (*)
T4(*)
Data 1 to 8
Data Strobe
Busy
* The values of T4 and T6 are assumed that the host uses ITTL for
its input circuits.
T1, T2, T3 > 0.5 µs
T4 < 0.5 µs (*)
T5, T7 = 0 µs
T6 = 0.5 µs (*)
Acknowledge
T7
Figure 5.8a Data transmission timing (compatible mode)
5.3.3 Data transmission timing
The PrintPartner 20W uses a bi-directional parallel interface complying with IEEE 1284. This interface is also
compatible with the conventional Centronics interface. Data transfer from host to printer is performed according to
Centronics standard, called compatible mode. Data transfer from printer to host is performed according to the IEEE
1284 standard, called nibble mode.
In compatible mode, the printer receives data from the computer in handshaking mode based on the Busy and
Acknowledge signals from the printer and the Data Strobe signal from the computer. For the Data Strobe and
Acknowledge signals, the timing of the Busy signal must be as shown in the compatible mode of Figure 5.8a.
To send data from the printer to the host, the interface enters the nibble mode where data is sent in units of four bits
(nibble) using four output signal lines as data paths. The data transfer sequence in nibble mode involves negotiation
phase, reverse idle phase, reverse data transfer phase, and termination phase. Figure 5.8b shows the reverse data
transfer phase where data is sent.
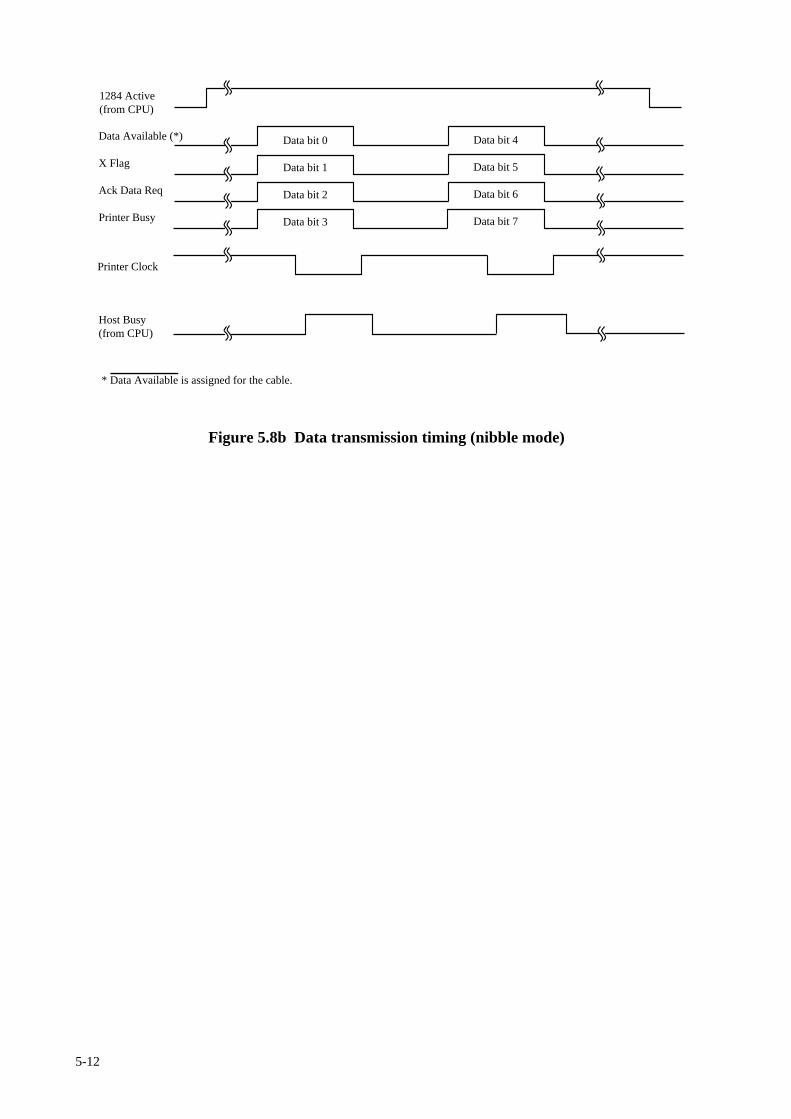
5-12
Data Available (*)
X Flag
Ack Data Req
Printer Busy
Host Busy(from CPU)
Printer Clock
Data bit 4
Data bit 5
Data bit 6
Data bit 7
Data bit 0
Data bit 1
Data bit 2
Data bit 3
1284 Active(from CPU)
* Data Available is assigned for the cable.
Figure 5.8b Data transmission timing (nibble mode)
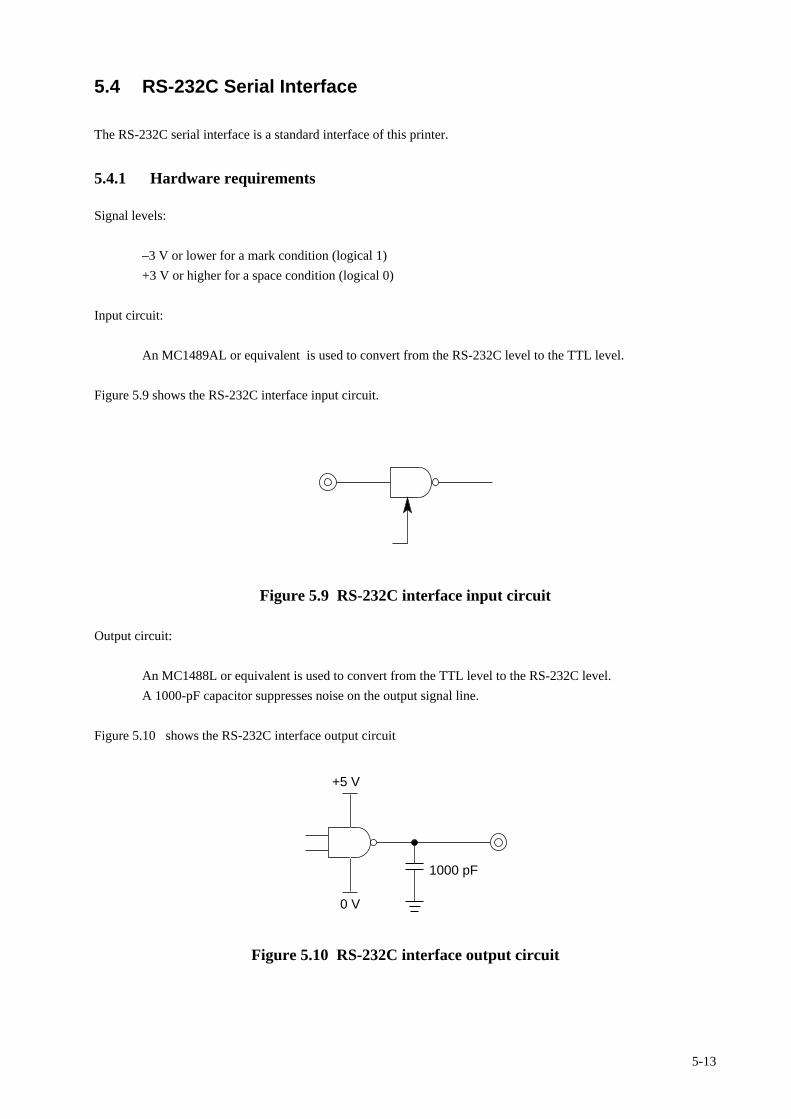
5-13
5.4 RS-232C Serial Interface
The RS-232C serial interface is a standard interface of this printer.
5.4.1 Hardware requirements
Signal levels:
–3 V or lower for a mark condition (logical 1)
+3 V or higher for a space condition (logical 0)
Input circuit:
An MC1489AL or equivalent is used to convert from the RS-232C level to the TTL level.
Figure 5.9 shows the RS-232C interface input circuit.
Figure 5.9 RS-232C interface input circuit
Output circuit:
An MC1488L or equivalent is used to convert from the TTL level to the RS-232C level.
A 1000-pF capacitor suppresses noise on the output signal line.
Figure 5.10 shows the RS-232C interface output circuit
1000 pF
+5 V
0 V
Figure 5.10 RS-232C interface output circuit
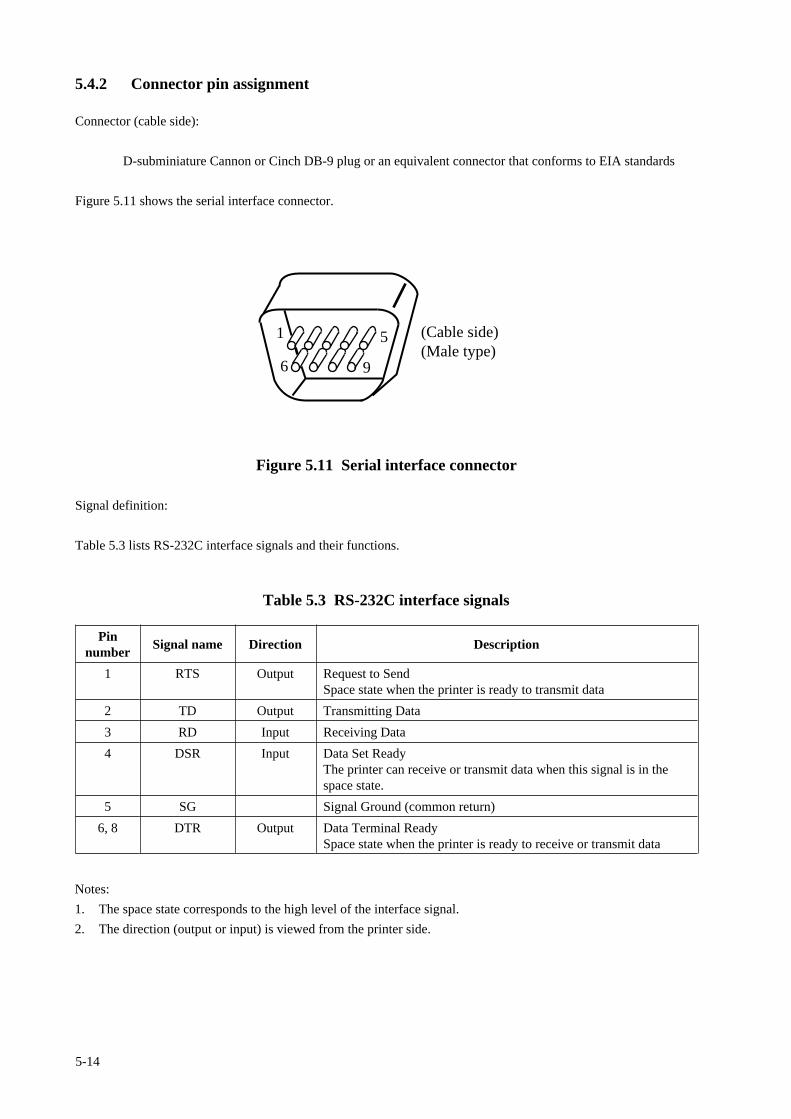
5-14
5.4.2 Connector pin assignment
Connector (cable side):
D-subminiature Cannon or Cinch DB-9 plug or an equivalent connector that conforms to EIA standards
Figure 5.11 shows the serial interface connector.
Figure 5.11 Serial interface connector
Signal definition:
Table 5.3 lists RS-232C interface signals and their functions.
(Cable side)(Male type)
1
6
5
9
Table 5.3 RS-232C interface signals
Pinnumber
1
2
3
4
5
6, 8
Description
Request to SendSpace state when the printer is ready to transmit data
Transmitting Data
Receiving Data
Data Set ReadyThe printer can receive or transmit data when this signal is in thespace state.
Signal Ground (common return)
Data Terminal ReadySpace state when the printer is ready to receive or transmit data
Signal name
RTS
TD
RD
DSR
SG
DTR
Direction
Output
Output
Input
Input
Output
Notes:
1. The space state corresponds to the high level of the interface signal.
2. The direction (output or input) is viewed from the printer side.
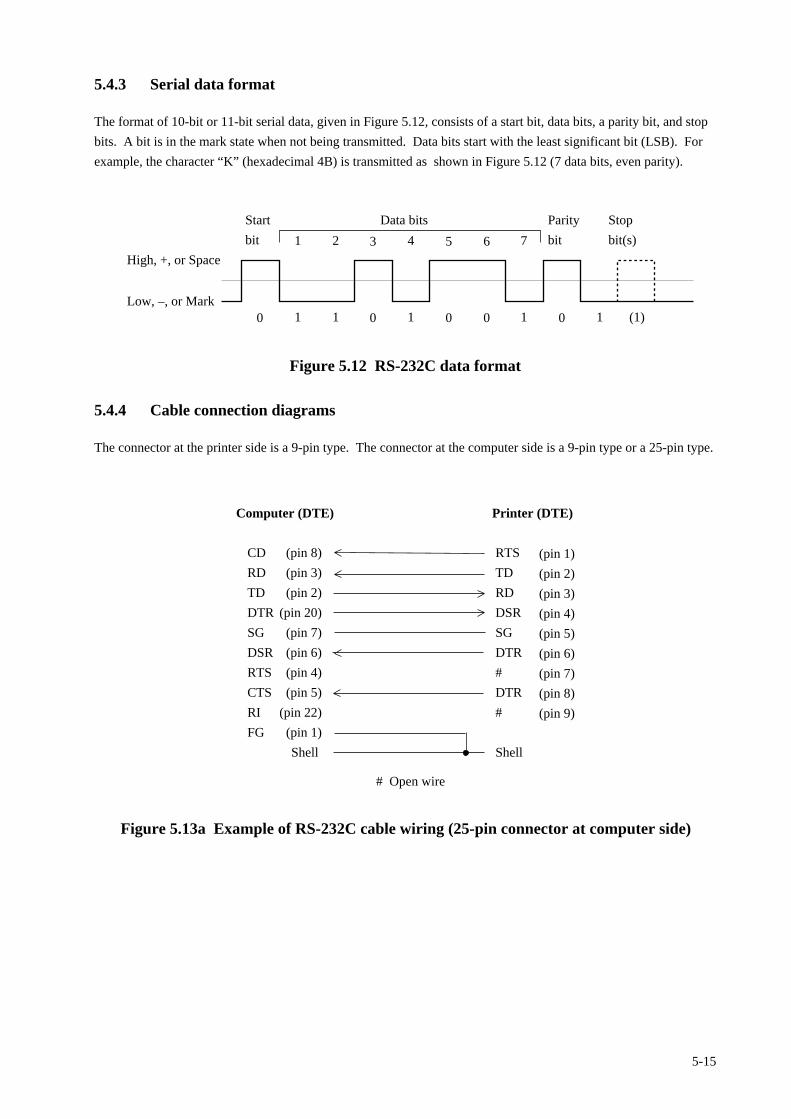
5-15
5.4.3 Serial data format
The format of 10-bit or 11-bit serial data, given in Figure 5.12, consists of a start bit, data bits, a parity bit, and stop
bits. A bit is in the mark state when not being transmitted. Data bits start with the least significant bit (LSB). For
example, the character “K” (hexadecimal 4B) is transmitted as shown in Figure 5.12 (7 data bits, even parity).
Start
bit
Parity
bit
Stop
bit(s)
Data bits
High, +, or Space
Low, –, or Mark0 0 0 0 01 1 1 1
3 5 61 2 4 7
1 (1)
Figure 5.12 RS-232C data format
5.4.4 Cable connection diagrams
The connector at the printer side is a 9-pin type. The connector at the computer side is a 9-pin type or a 25-pin type.
CD
RD
TD
DTR
SG
DSR
RTS
CTS
RI
FG
RTS
TD
RD
DSR
SG
DTR
#
DTR
#
Shell
(pin 8)
(pin 3)
(pin 2)
(pin 20)
(pin 7)
(pin 6)
(pin 4)
(pin 5)
(pin 22)
(pin 1)
Shell
Computer (DTE) Printer (DTE)
# Open wire
(pin 1)
(pin 2)
(pin 3)
(pin 4)
(pin 5)
(pin 6)
(pin 7)
(pin 8)
(pin 9)
Figure 5.13a Example of RS-232C cable wiring (25-pin connector at computer side)

5-16
Figure 5.13b Example of RS-232C cable wiring (9-pin connector at computer side)
5.4.5 Data protocols
Different types of protocols are used for the RS-232C serial interface, depending on the computer manufacturer.
These protocols prevent the print data receive buffer from overflowing because interface data transmission is faster
than buffer data printing. The printer uses specific character codes or an interface signal for each protocol to inform
the computer of the buffer status, as follows:
(1) X-ON/X-OFF or DC1/DC3 protocol
With either protocol, the XOFF (DC3) code (hexadecimal 13) is transmitted from the printer when less than 255
bytes of buffer space remains. The XON (DC1) code (hexadecimal 11) is transmitted when less than 255 bytes
of data remains in the buffer.
Normal data processing cannot be guaranteed if data is transmitted to the printer when insufficient buffer space
is available after the XOFF code has been transmitted.
When the printer is first turned on, the DTR signal is set to the space state (ready) and an XON (DC1) code is
transmitted from the printer. When the printer is placed offline, the XOFF code is transmitted even if the buffer
is not full. The XON code is transmitted when the printer is placed online again.
CD
RD
TD
DTR
SG
DSR
RTS
CTS
RI
RTS
TD
RD
DSR
SG
DTR
#
DTR
#
Shell
(pin 1)
(pin 2)
(pin 3)
(pin 4)
(pin 5)
(pin 6)
(pin 7)
(pin 8)
(pin 9)
Shell
Computer (DTE) Printer (DTE)
# Open wire
(pin 1)
(pin 2)
(pin 3)
(pin 4)
(pin 5)
(pin 6)
(pin 7)
(pin 8)
(pin 9)
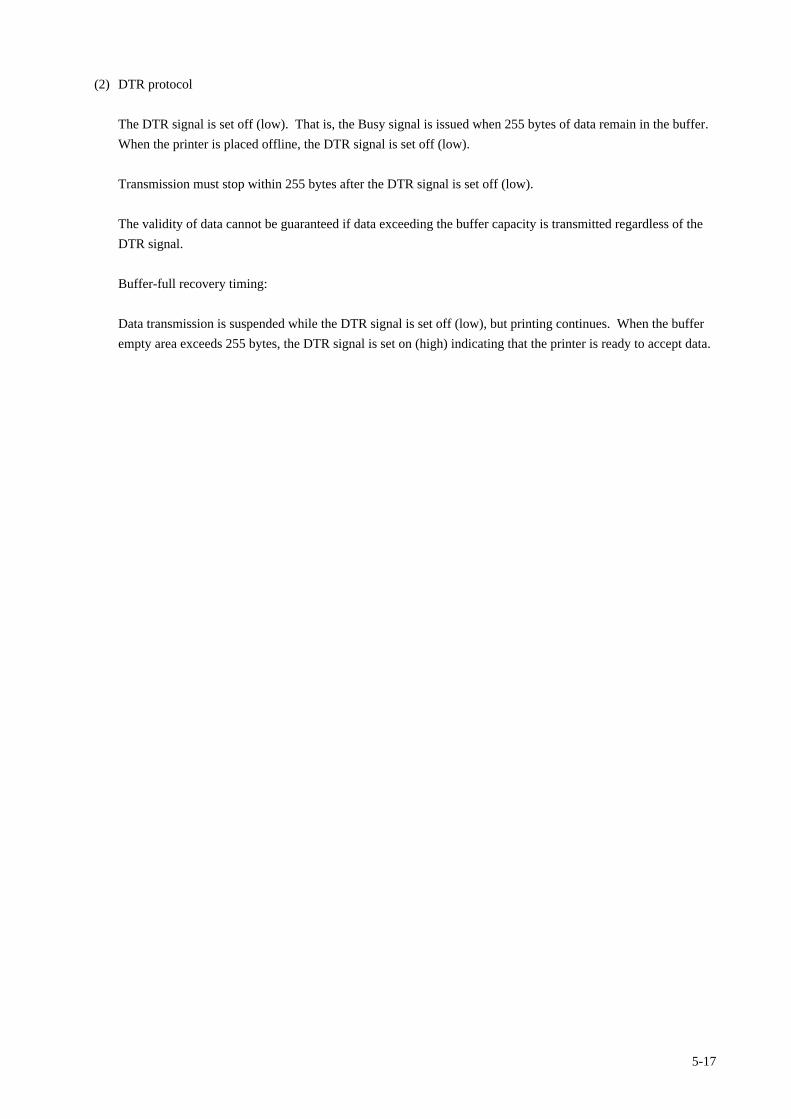
5-17
(2) DTR protocol
The DTR signal is set off (low). That is, the Busy signal is issued when 255 bytes of data remain in the buffer.
When the printer is placed offline, the DTR signal is set off (low).
Transmission must stop within 255 bytes after the DTR signal is set off (low).
The validity of data cannot be guaranteed if data exceeding the buffer capacity is transmitted regardless of the
DTR signal.
Buffer-full recovery timing:
Data transmission is suspended while the DTR signal is set off (low), but printing continues. When the buffer
empty area exceeds 255 bytes, the DTR signal is set on (high) indicating that the printer is ready to accept data.
5-18
5.5 Command Sets
5.5.1 Printer emulation
This section gives an overview of the Hewlett-Packard LaserJet 5 command set and the PostScript level 2 command
set, which are the resident emulation of the PrintPartner 20W. This section does not provide the command details
and programming examples needed to modify software packages or write user programs.
The printer automatically senses the proper emulation. Either emulation can be set by the menu mode (config menu,
personality item) of the control panel, according to the table shown below.
Option to be selected in menu mode
PCL
FPS
Printer emulation
HP LaserJet 5 (PCL6)
PostScript level 2
When a new emulation is selected, the printer initializes control information on printer features. All downloaded
fonts and page format data are lost.
The following section (5.5.2) lists commands available in the HP LaserJet 5 emulation.
5-19
5.5.2 HP LaserJet 5 command set summary
5.5.2.1 HP LaserJet 5 PCL mode
The printer responds to all HP LaserJet 5 control codes and escape sequences the same way as the native printer.
The following listing is in command level sequence:
Control code Description
BS Backspace. Move the cursor left one column (HMI).
HT Horizontal tabulation. Move the cursor to the next horizontal tab stop.
LF Line feed. Move down the cursor one line (VMI).
FF Form feed. Print the current page and move the cursor to the top of the next
page.
CR Carriage return. Move the cursor to the left margin of the current line.
SO Shift out. Select the secondary font.
SI Shift in. Select the primary font.
ESC Begin an escape sequence.
SP Space. Move the cursor right one column (HMI).
Level 1 escape code Description
ESC 9 Clear left and right margins.
ESC E Reset all settings to the defaults and set the PCL mode.
ESC = Half line feed. Move down the cursor half a line.
ESC Y Display functions mode on. Print all codes received.
ESC Z Display functions mode off
ESC z Start the self test function. It is ignored by this printer.
Level 2 escape code Description
ESC ( # @ Select a symbol set or font attributes for the primary font. (#: 0 or 1=default
symbol set, 2=current primary symbol set, 3=default font’s attributes)
ESC ( # Zn
Select a symbol set for the primary font. (#Zn: symbol set ID; #: 0 to 2047,
Zn: A-Z, [, \, ], and ^)
ESC ( # X Select the primary font by the font ID. (#: font ID; 0 to 32767)
ESC ) # @ Select a symbol set or font attributes for the secondary font. (#: 0=default
symbol set, 1=default primary symbol set, 2=current primary symbol set,
3=default secondary font’s attributes)
ESC ) # Zn
Select a symbol set for the secondary font. (#Zn: symbol set ID; #: 0 to 2047,
Zn: A-Z, [, \, ], and ^)
ESC ) # X Select the secondary font by the font ID. (#: font ID; 0 to 32767)
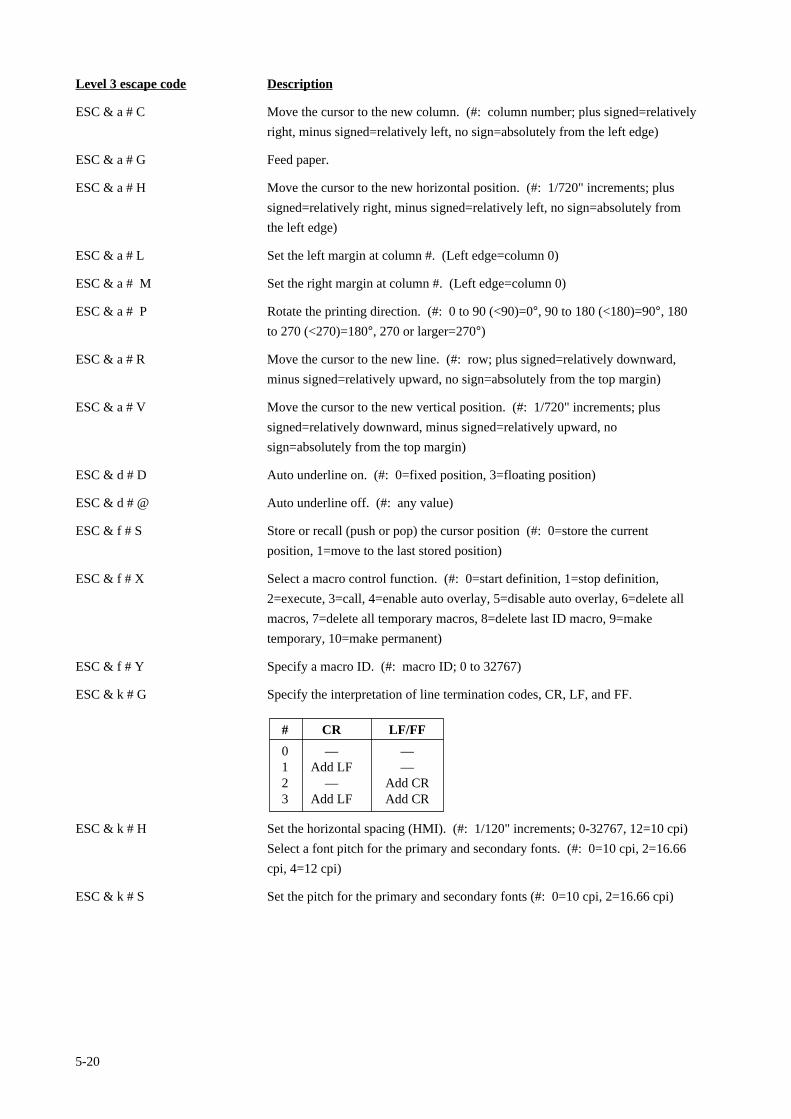
5-20
Level 3 escape code Description
ESC & a # C Move the cursor to the new column. (#: column number; plus signed=relatively
right, minus signed=relatively left, no sign=absolutely from the left edge)
ESC & a # G Feed paper.
ESC & a # H Move the cursor to the new horizontal position. (#: 1/720" increments; plus
signed=relatively right, minus signed=relatively left, no sign=absolutely from
the left edge)
ESC & a # L Set the left margin at column #. (Left edge=column 0)
ESC & a # M Set the right margin at column #. (Left edge=column 0)
ESC & a # P Rotate the printing direction. (#: 0 to 90 (<90)=0°, 90 to 180 (<180)=90°, 180
to 270 (<270)=180°, 270 or larger=270°)
ESC & a # R Move the cursor to the new line. (#: row; plus signed=relatively downward,
minus signed=relatively upward, no sign=absolutely from the top margin)
ESC & a # V Move the cursor to the new vertical position. (#: 1/720" increments; plus
signed=relatively downward, minus signed=relatively upward, no
sign=absolutely from the top margin)
ESC & d # D Auto underline on. (#: 0=fixed position, 3=floating position)
ESC & d # @ Auto underline off. (#: any value)
ESC & f # S Store or recall (push or pop) the cursor position (#: 0=store the current
position, 1=move to the last stored position)
ESC & f # X Select a macro control function. (#: 0=start definition, 1=stop definition,
2=execute, 3=call, 4=enable auto overlay, 5=disable auto overlay, 6=delete all
macros, 7=delete all temporary macros, 8=delete last ID macro, 9=make
temporary, 10=make permanent)
ESC & f # Y Specify a macro ID. (#: macro ID; 0 to 32767)
ESC & k # G Specify the interpretation of line termination codes, CR, LF, and FF.
0123
—Add LF
—Add LF
——
Add CRAdd CR
# CR LF/FF
ESC & k # H Set the horizontal spacing (HMI). (#: 1/120" increments; 0-32767, 12=10 cpi)
Select a font pitch for the primary and secondary fonts. (#: 0=10 cpi, 2=16.66
cpi, 4=12 cpi)
ESC & k # S Set the pitch for the primary and secondary fonts (#: 0=10 cpi, 2=16.66 cpi)
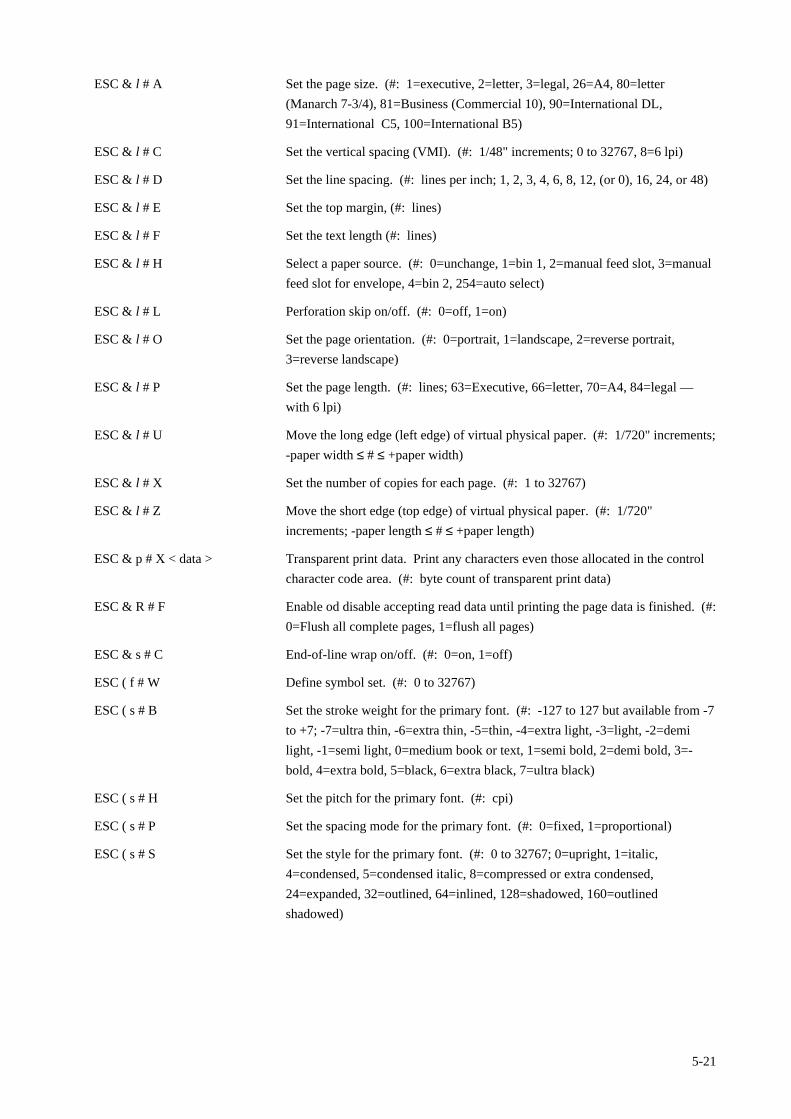
5-21
ESC & l # A Set the page size. (#: 1=executive, 2=letter, 3=legal, 26=A4, 80=letter
(Manarch 7-3/4), 81=Business (Commercial 10), 90=International DL,
91=International C5, 100=International B5)
ESC & l # C Set the vertical spacing (VMI). (#: 1/48" increments; 0 to 32767, 8=6 lpi)
ESC & l # D Set the line spacing. (#: lines per inch; 1, 2, 3, 4, 6, 8, 12, (or 0), 16, 24, or 48)
ESC & l # E Set the top margin, (#: lines)
ESC & l # F Set the text length (#: lines)
ESC & l # H Select a paper source. (#: 0=unchange, 1=bin 1, 2=manual feed slot, 3=manual
feed slot for envelope, 4=bin 2, 254=auto select)
ESC & l # L Perforation skip on/off. (#: 0=off, 1=on)
ESC & l # O Set the page orientation. (#: 0=portrait, 1=landscape, 2=reverse portrait,
3=reverse landscape)
ESC & l # P Set the page length. (#: lines; 63=Executive, 66=letter, 70=A4, 84=legal —
with 6 lpi)
ESC & l # U Move the long edge (left edge) of virtual physical paper. (#: 1/720" increments;
-paper width ≤ # ≤ +paper width)
ESC & l # X Set the number of copies for each page. (#: 1 to 32767)
ESC & l # Z Move the short edge (top edge) of virtual physical paper. (#: 1/720"
increments; -paper length ≤ # ≤ +paper length)
ESC & p # X < data > Transparent print data. Print any characters even those allocated in the control
character code area. (#: byte count of transparent print data)
ESC & R # F Enable od disable accepting read data until printing the page data is finished. (#:
0=Flush all complete pages, 1=flush all pages)
ESC & s # C End-of-line wrap on/off. (#: 0=on, 1=off)
ESC ( f # W Define symbol set. (#: 0 to 32767)
ESC ( s # B Set the stroke weight for the primary font. (#: -127 to 127 but available from -7
to +7; -7=ultra thin, -6=extra thin, -5=thin, -4=extra light, -3=light, -2=demi
light, -1=semi light, 0=medium book or text, 1=semi bold, 2=demi bold, 3=-
bold, 4=extra bold, 5=black, 6=extra black, 7=ultra black)
ESC ( s # H Set the pitch for the primary font. (#: cpi)
ESC ( s # P Set the spacing mode for the primary font. (#: 0=fixed, 1=proportional)
ESC ( s # S Set the style for the primary font. (#: 0 to 32767; 0=upright, 1=italic,
4=condensed, 5=condensed italic, 8=compressed or extra condensed,
24=expanded, 32=outlined, 64=inlined, 128=shadowed, 160=outlined
shadowed)
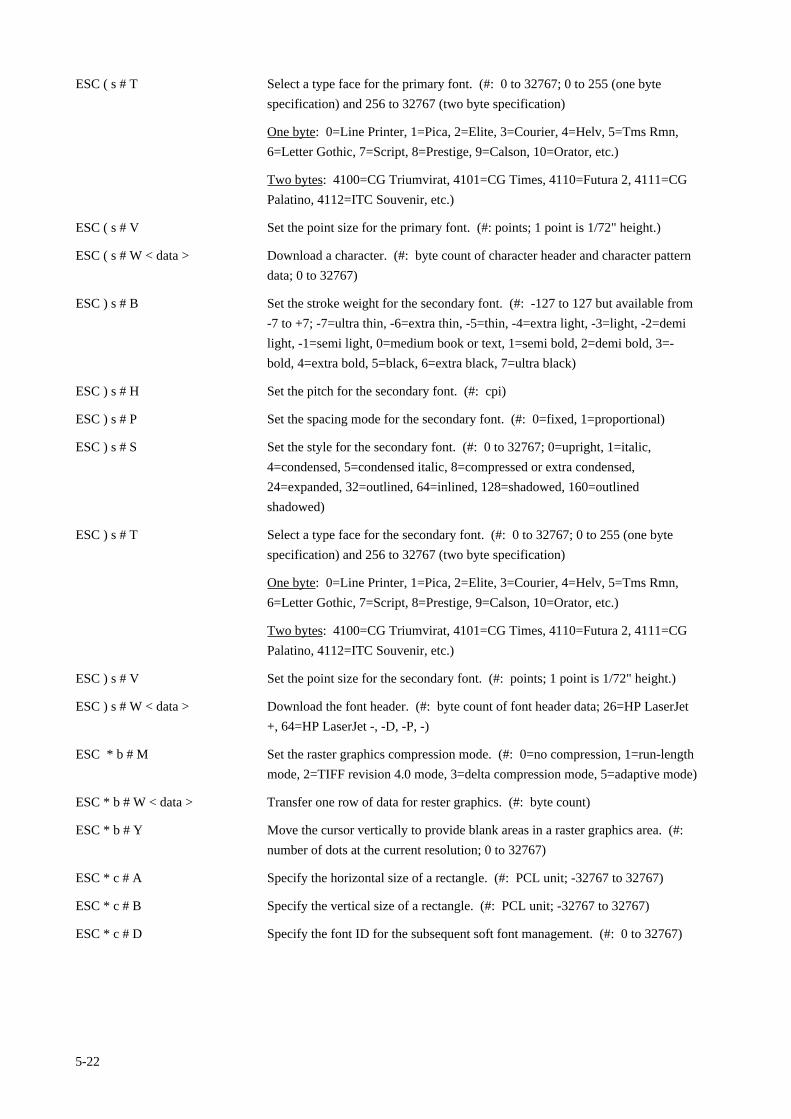
5-22
ESC ( s # T Select a type face for the primary font. (#: 0 to 32767; 0 to 255 (one byte
specification) and 256 to 32767 (two byte specification)
One byte: 0=Line Printer, 1=Pica, 2=Elite, 3=Courier, 4=Helv, 5=Tms Rmn,
6=Letter Gothic, 7=Script, 8=Prestige, 9=Calson, 10=Orator, etc.)
Two bytes: 4100=CG Triumvirat, 4101=CG Times, 4110=Futura 2, 4111=CG
Palatino, 4112=ITC Souvenir, etc.)
ESC ( s # V Set the point size for the primary font. (#: points; 1 point is 1/72" height.)
ESC ( s # W < data > Download a character. (#: byte count of character header and character pattern
data; 0 to 32767)
ESC ) s # B Set the stroke weight for the secondary font. (#: -127 to 127 but available from
-7 to +7; -7=ultra thin, -6=extra thin, -5=thin, -4=extra light, -3=light, -2=demi
light, -1=semi light, 0=medium book or text, 1=semi bold, 2=demi bold, 3=-
bold, 4=extra bold, 5=black, 6=extra black, 7=ultra black)
ESC ) s # H Set the pitch for the secondary font. (#: cpi)
ESC ) s # P Set the spacing mode for the secondary font. (#: 0=fixed, 1=proportional)
ESC ) s # S Set the style for the secondary font. (#: 0 to 32767; 0=upright, 1=italic,
4=condensed, 5=condensed italic, 8=compressed or extra condensed,
24=expanded, 32=outlined, 64=inlined, 128=shadowed, 160=outlined
shadowed)
ESC ) s # T Select a type face for the secondary font. (#: 0 to 32767; 0 to 255 (one byte
specification) and 256 to 32767 (two byte specification)
One byte: 0=Line Printer, 1=Pica, 2=Elite, 3=Courier, 4=Helv, 5=Tms Rmn,
6=Letter Gothic, 7=Script, 8=Prestige, 9=Calson, 10=Orator, etc.)
Two bytes: 4100=CG Triumvirat, 4101=CG Times, 4110=Futura 2, 4111=CG
Palatino, 4112=ITC Souvenir, etc.)
ESC ) s # V Set the point size for the secondary font. (#: points; 1 point is 1/72" height.)
ESC ) s # W < data > Download the font header. (#: byte count of font header data; 26=HP LaserJet
+, 64=HP LaserJet -, -D, -P, -)
ESC * b # M Set the raster graphics compression mode. (#: 0=no compression, 1=run-length
mode, 2=TIFF revision 4.0 mode, 3=delta compression mode, 5=adaptive mode)
ESC * b # W < data > Transfer one row of data for rester graphics. (#: byte count)
ESC * b # Y Move the cursor vertically to provide blank areas in a raster graphics area. (#:
number of dots at the current resolution; 0 to 32767)
ESC * c # A Specify the horizontal size of a rectangle. (#: PCL unit; -32767 to 32767)
ESC * c # B Specify the vertical size of a rectangle. (#: PCL unit; -32767 to 32767)
ESC * c # D Specify the font ID for the subsequent soft font management. (#: 0 to 32767)
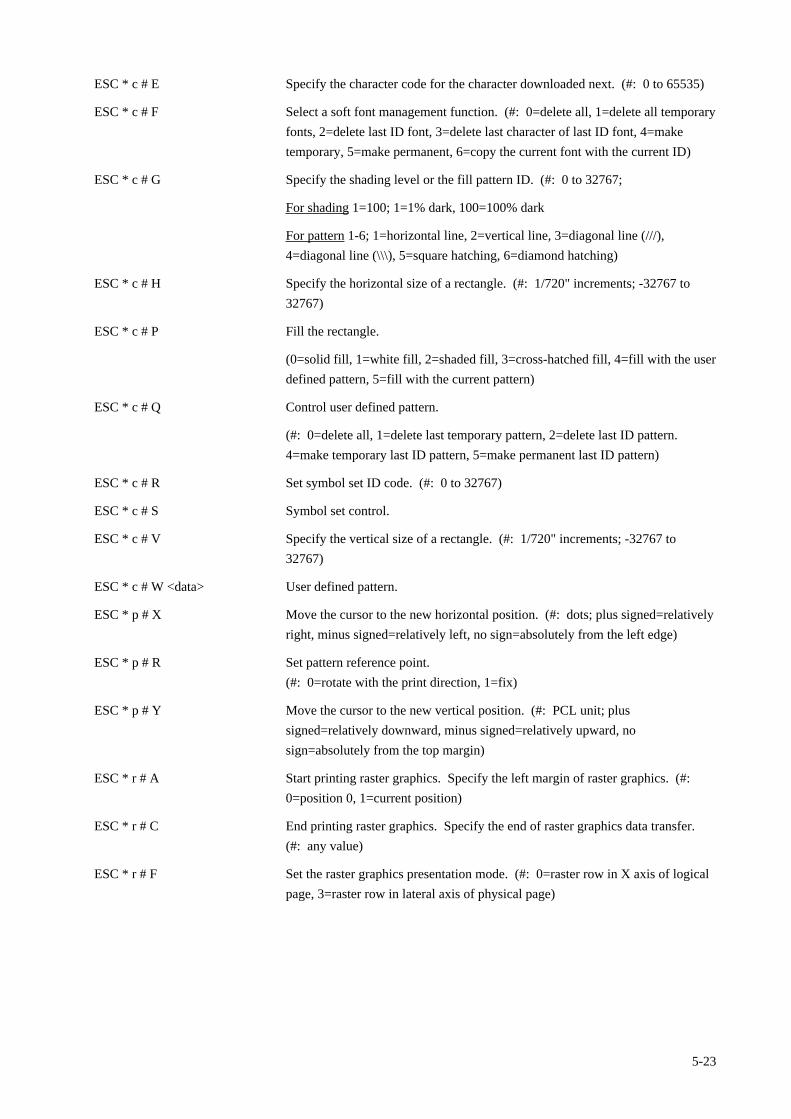
5-23
ESC * c # E Specify the character code for the character downloaded next. (#: 0 to 65535)
ESC * c # F Select a soft font management function. (#: 0=delete all, 1=delete all temporary
fonts, 2=delete last ID font, 3=delete last character of last ID font, 4=make
temporary, 5=make permanent, 6=copy the current font with the current ID)
ESC * c # G Specify the shading level or the fill pattern ID. (#: 0 to 32767;
For shading 1=100; 1=1% dark, 100=100% dark
For pattern 1-6; 1=horizontal line, 2=vertical line, 3=diagonal line (///),
4=diagonal line (\\\), 5=square hatching, 6=diamond hatching)
ESC * c # H Specify the horizontal size of a rectangle. (#: 1/720" increments; -32767 to
32767)
ESC * c # P Fill the rectangle.
(0=solid fill, 1=white fill, 2=shaded fill, 3=cross-hatched fill, 4=fill with the user
defined pattern, 5=fill with the current pattern)
ESC * c # Q Control user defined pattern.
(#: 0=delete all, 1=delete last temporary pattern, 2=delete last ID pattern.
4=make temporary last ID pattern, 5=make permanent last ID pattern)
ESC * c # R Set symbol set ID code. (#: 0 to 32767)
ESC * c # S Symbol set control.
ESC * c # V Specify the vertical size of a rectangle. (#: 1/720" increments; -32767 to
32767)
ESC * c # W <data> User defined pattern.
ESC * p # X Move the cursor to the new horizontal position. (#: dots; plus signed=relatively
right, minus signed=relatively left, no sign=absolutely from the left edge)
ESC * p # R Set pattern reference point.
(#: 0=rotate with the print direction, 1=fix)
ESC * p # Y Move the cursor to the new vertical position. (#: PCL unit; plus
signed=relatively downward, minus signed=relatively upward, no
sign=absolutely from the top margin)
ESC * r # A Start printing raster graphics. Specify the left margin of raster graphics. (#:
0=position 0, 1=current position)
ESC * r # C End printing raster graphics. Specify the end of raster graphics data transfer.
(#: any value)
ESC * r # F Set the raster graphics presentation mode. (#: 0=raster row in X axis of logical
page, 3=raster row in lateral axis of physical page)
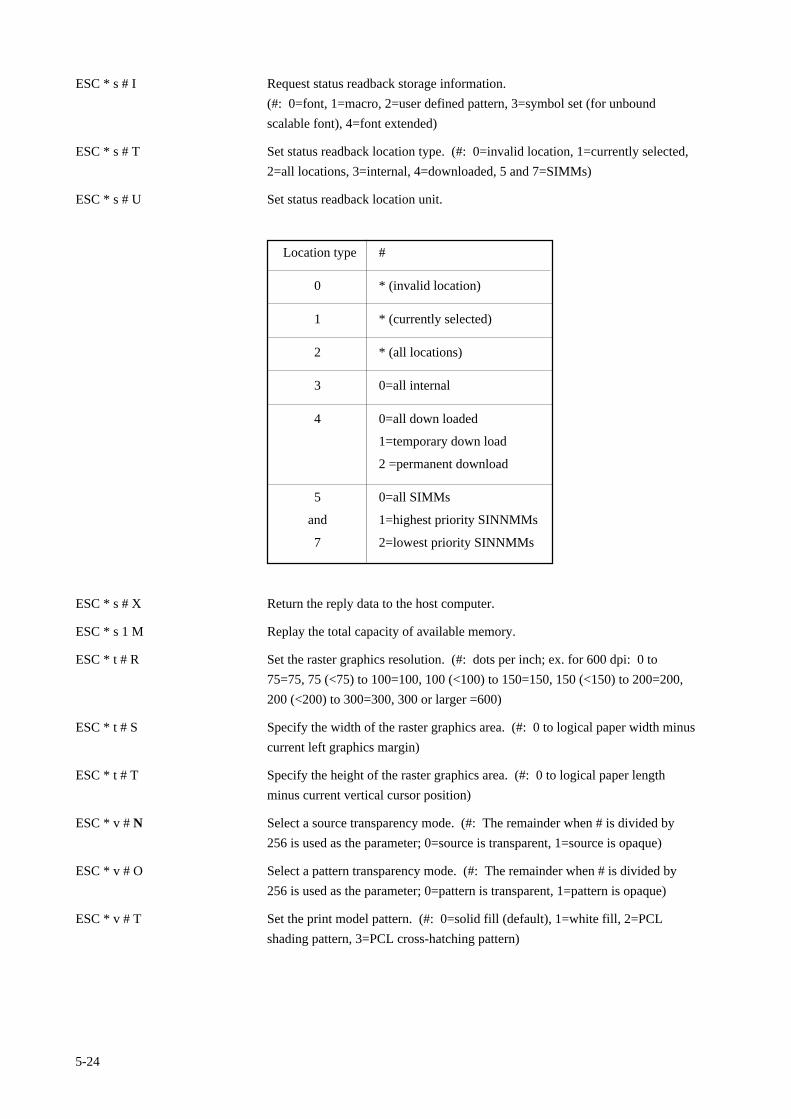
5-24
ESC * s # I Request status readback storage information.
(#: 0=font, 1=macro, 2=user defined pattern, 3=symbol set (for unbound
scalable font), 4=font extended)
ESC * s # T Set status readback location type. (#: 0=invalid location, 1=currently selected,
2=all locations, 3=internal, 4=downloaded, 5 and 7=SIMMs)
ESC * s # U Set status readback location unit.
Location type #
0 * (invalid location)
1 * (currently selected)
2 * (all locations)
3 0=all internal
4 0=all down loaded
1=temporary down load
2 =permanent download
5 0=all SIMMs
and 1=highest priority SINNMMs
7 2=lowest priority SINNMMs
ESC * s # X Return the reply data to the host computer.
ESC * s 1 M Replay the total capacity of available memory.
ESC * t # R Set the raster graphics resolution. (#: dots per inch; ex. for 600 dpi: 0 to
75=75, 75 (<75) to 100=100, 100 (<100) to 150=150, 150 (<150) to 200=200,
200 (<200) to 300=300, 300 or larger =600)
ESC * t # S Specify the width of the raster graphics area. (#: 0 to logical paper width minus
current left graphics margin)
ESC * t # T Specify the height of the raster graphics area. (#: 0 to logical paper length
minus current vertical cursor position)
ESC * v # N Select a source transparency mode. (#: The remainder when # is divided by
256 is used as the parameter; 0=source is transparent, 1=source is opaque)
ESC * v # O Select a pattern transparency mode. (#: The remainder when # is divided by
256 is used as the parameter; 0=pattern is transparent, 1=pattern is opaque)
ESC * v # T Set the print model pattern. (#: 0=solid fill (default), 1=white fill, 2=PCL
shading pattern, 3=PCL cross-hatching pattern)
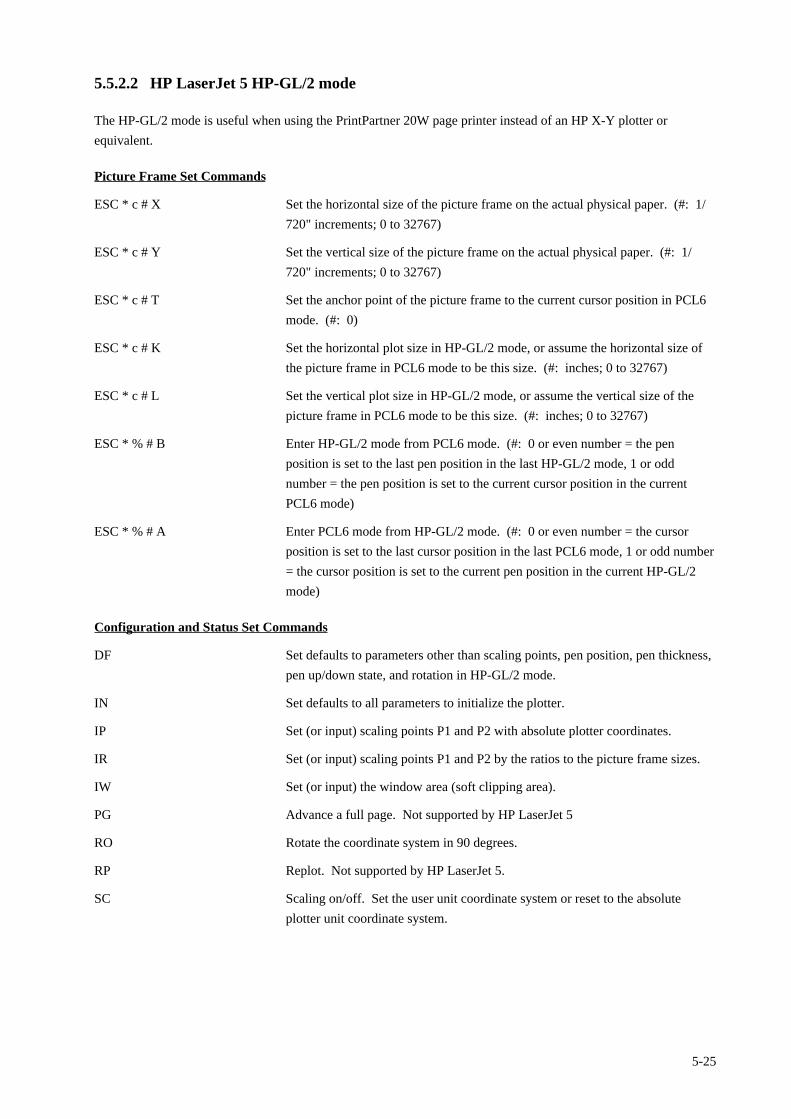
5-25
5.5.2.2 HP LaserJet 5 HP-GL/2 mode
The HP-GL/2 mode is useful when using the PrintPartner 20W page printer instead of an HP X-Y plotter or
equivalent.
Picture Frame Set Commands
ESC * c # X Set the horizontal size of the picture frame on the actual physical paper. (#: 1/
720" increments; 0 to 32767)
ESC * c # Y Set the vertical size of the picture frame on the actual physical paper. (#: 1/
720" increments; 0 to 32767)
ESC * c # T Set the anchor point of the picture frame to the current cursor position in PCL6
mode. (#: 0)
ESC * c # K Set the horizontal plot size in HP-GL/2 mode, or assume the horizontal size of
the picture frame in PCL6 mode to be this size. (#: inches; 0 to 32767)
ESC * c # L Set the vertical plot size in HP-GL/2 mode, or assume the vertical size of the
picture frame in PCL6 mode to be this size. (#: inches; 0 to 32767)
ESC * % # B Enter HP-GL/2 mode from PCL6 mode. (#: 0 or even number = the pen
position is set to the last pen position in the last HP-GL/2 mode, 1 or odd
number = the pen position is set to the current cursor position in the current
PCL6 mode)
ESC * % # A Enter PCL6 mode from HP-GL/2 mode. (#: 0 or even number = the cursor
position is set to the last cursor position in the last PCL6 mode, 1 or odd number
= the cursor position is set to the current pen position in the current HP-GL/2
mode)
Configuration and Status Set Commands
DF Set defaults to parameters other than scaling points, pen position, pen thickness,
pen up/down state, and rotation in HP-GL/2 mode.
IN Set defaults to all parameters to initialize the plotter.
IP Set (or input) scaling points P1 and P2 with absolute plotter coordinates.
IR Set (or input) scaling points P1 and P2 by the ratios to the picture frame sizes.
IW Set (or input) the window area (soft clipping area).
PG Advance a full page. Not supported by HP LaserJet 5
RO Rotate the coordinate system in 90 degrees.
RP Replot. Not supported by HP LaserJet 5.
SC Scaling on/off. Set the user unit coordinate system or reset to the absolute
plotter unit coordinate system.
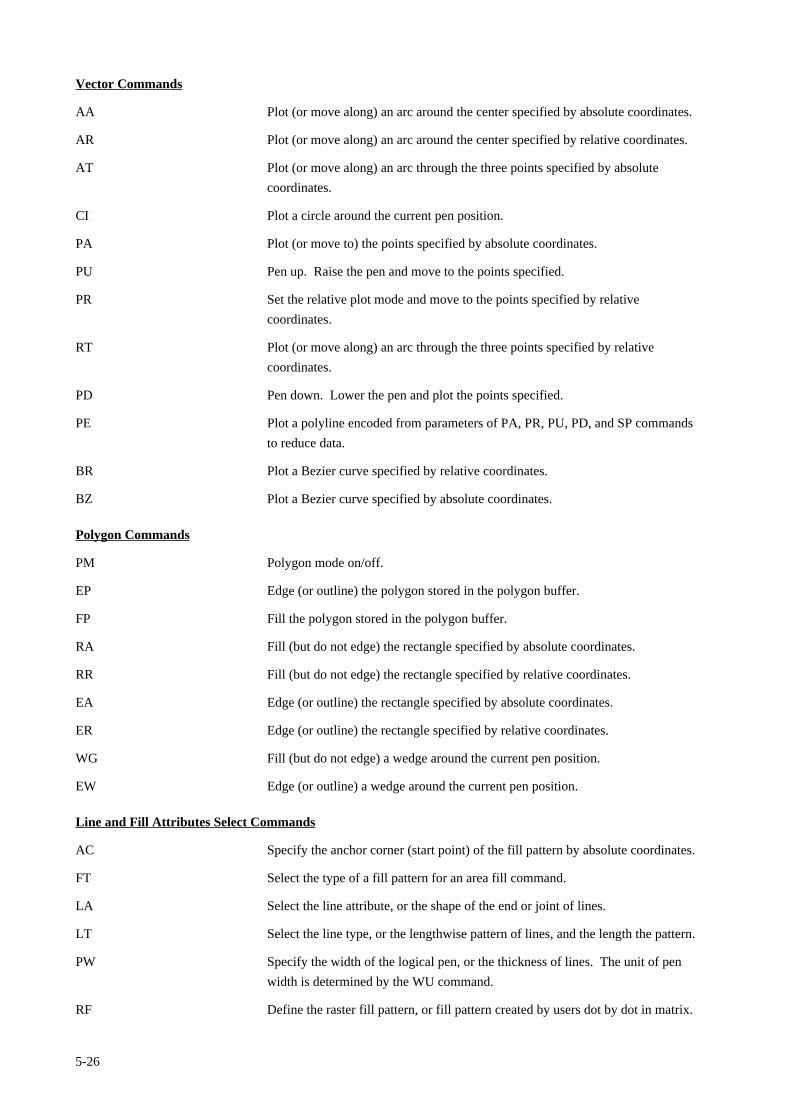
5-26
Vector Commands
AA Plot (or move along) an arc around the center specified by absolute coordinates.
AR Plot (or move along) an arc around the center specified by relative coordinates.
AT Plot (or move along) an arc through the three points specified by absolute
coordinates.
CI Plot a circle around the current pen position.
PA Plot (or move to) the points specified by absolute coordinates.
PU Pen up. Raise the pen and move to the points specified.
PR Set the relative plot mode and move to the points specified by relative
coordinates.
RT Plot (or move along) an arc through the three points specified by relative
coordinates.
PD Pen down. Lower the pen and plot the points specified.
PE Plot a polyline encoded from parameters of PA, PR, PU, PD, and SP commands
to reduce data.
BR Plot a Bezier curve specified by relative coordinates.
BZ Plot a Bezier curve specified by absolute coordinates.
Polygon Commands
PM Polygon mode on/off.
EP Edge (or outline) the polygon stored in the polygon buffer.
FP Fill the polygon stored in the polygon buffer.
RA Fill (but do not edge) the rectangle specified by absolute coordinates.
RR Fill (but do not edge) the rectangle specified by relative coordinates.
EA Edge (or outline) the rectangle specified by absolute coordinates.
ER Edge (or outline) the rectangle specified by relative coordinates.
WG Fill (but do not edge) a wedge around the current pen position.
EW Edge (or outline) a wedge around the current pen position.
Line and Fill Attributes Select Commands
AC Specify the anchor corner (start point) of the fill pattern by absolute coordinates.
FT Select the type of a fill pattern for an area fill command.
LA Select the line attribute, or the shape of the end or joint of lines.
LT Select the line type, or the lengthwise pattern of lines, and the length the pattern.
PW Specify the width of the logical pen, or the thickness of lines. The unit of pen
width is determined by the WU command.
RF Define the raster fill pattern, or fill pattern created by users dot by dot in matrix.
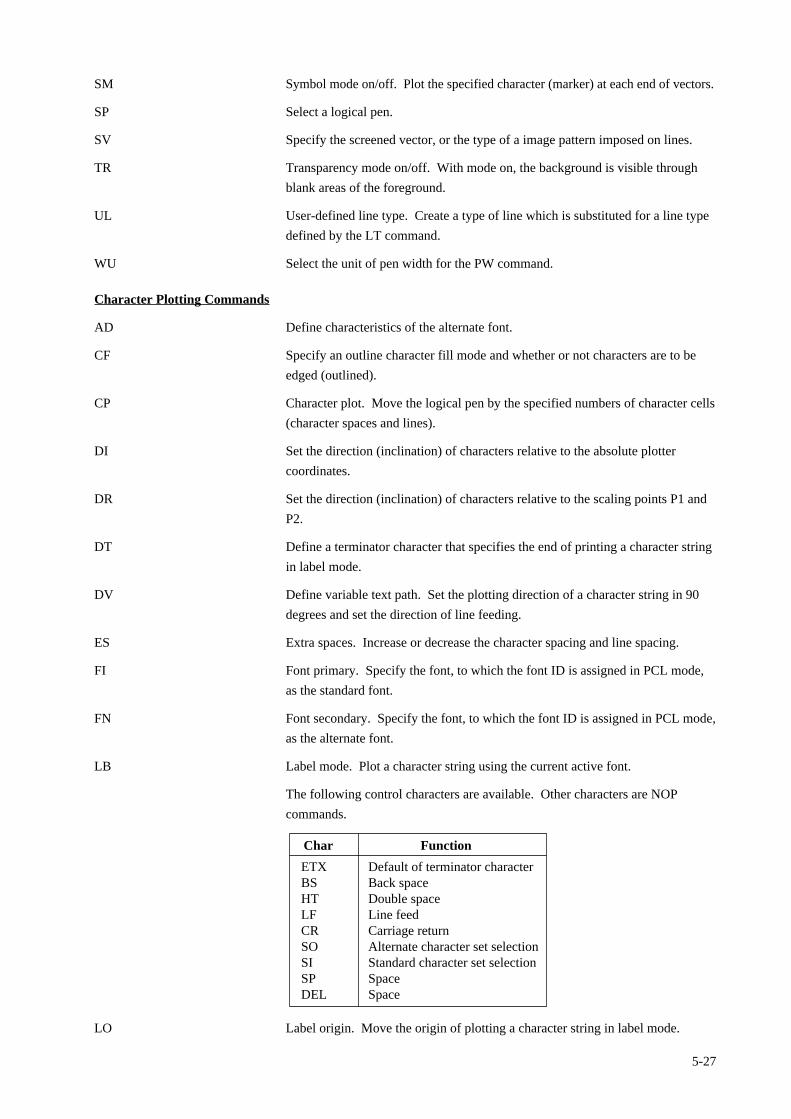
5-27
SM Symbol mode on/off. Plot the specified character (marker) at each end of vectors.
SP Select a logical pen.
SV Specify the screened vector, or the type of a image pattern imposed on lines.
TR Transparency mode on/off. With mode on, the background is visible through
blank areas of the foreground.
UL User-defined line type. Create a type of line which is substituted for a line type
defined by the LT command.
WU Select the unit of pen width for the PW command.
Character Plotting Commands
AD Define characteristics of the alternate font.
CF Specify an outline character fill mode and whether or not characters are to be
edged (outlined).
CP Character plot. Move the logical pen by the specified numbers of character cells
(character spaces and lines).
DI Set the direction (inclination) of characters relative to the absolute plotter
coordinates.
DR Set the direction (inclination) of characters relative to the scaling points P1 and
P2.
DT Define a terminator character that specifies the end of printing a character string
in label mode.
DV Define variable text path. Set the plotting direction of a character string in 90
degrees and set the direction of line feeding.
ES Extra spaces. Increase or decrease the character spacing and line spacing.
FI Font primary. Specify the font, to which the font ID is assigned in PCL mode,
as the standard font.
FN Font secondary. Specify the font, to which the font ID is assigned in PCL mode,
as the alternate font.
LB Label mode. Plot a character string using the current active font.
The following control characters are available. Other characters are NOP
commands.
ETXBSHTLFCRSOSISPDEL
Default of terminator characterBack spaceDouble spaceLine feedCarriage returnAlternate character set selectionStandard character set selectionSpaceSpace
Char Function
LO Label origin. Move the origin of plotting a character string in label mode.
5-28
SA Select alternate font. Make the alternate font active.
SB Scalable or bitmap fonts. Enable or disable scalable fonts to be changed to
bitmap fonts.
SD Define characteristics of the standard font.
SI Specify the character width and height in absolute size (cm).
SL Specify the slant of characters by tan θ.
SR Specify the character width and height relative to the distance between the
scaling points P1 and P2.
SS Select standard font. Make the standard font active.
TD Transparent data. Plot characters assigned to control codes, for example, “←”
to the escape code (decimal 27) in the PC-8 character set.
5.5.2.3 HP LaserJet 5 PJL mode
This section lists all the Printer Job Language (PJL) commands, which arrange printing jobs in a shared printer
system and read printer status messages back to the user. Except UEL, PJL commands start with @PJL followed by
a command name, option data, and an LF character.
Kernel Commands Description
UEL Universal Exit Language. Unlike other PJL commands, the command is an
escape sequence: ESC % -– 1 2 3 4 5 X. All printing jobs controlled by PJL
start with UEL and end with UEL. The UEL command has a function to exit the
current printer language and return control to PJL.
ENTER Specify the current printer language.
Option: LANGUAGE
COMMENT Insert notes among the PJL command lines.
Job Separation Commands Description
JOB Make the printer recognize start of jobs and reset the page count.
It enables specifying the pages to be printed in jobs, naming jobs, and separating
jobs.
Option: NAME, JOB, EOJ
EOJ Make the printer recognize stop of jobs and reset the page count.
Option: NAME
Environment Commands Description
DEFAULT Set or change default values in the user default environment.
SET Enable changing to the specified value until a job is finished in the PJL current
environment.
INITIALIZE Change the user default environment or the PJL current environment to the
factory default values.
RESET Change the PJL current environment to the user default values.
5-29
Status Readback Commands Description
INQUIRE Request specified environment variables in the PJL current environment.
DINQUIRE Request specified environment variables in the user default environment.
ECHO Return <words> in this command to the host computer.
INFO Respond with information of specified statuses.
Option: ID, CONFIG, MEMORY, STATUS, VARIABLES, USTATUS,
PAGECOUNT
USTATUS Enable responding with status information asynchronously, that is, when the
printer status changes, when a job starts or ends, when a printed page is ejected,
or when specified seconds elapsed.
Option: DEVICE, JOB, PAGE, TIMED
USTATUSOFF Disable responding with asynchronous status information in the current
interface.
Additional Commands Description
PRINTREPORT Print a status report or a font report.
Option: SELFTEST, PRINTFONT
CLEARWARNING Clear the consumables replacement request to the print unit.
Option: PRINTUNIT

5-30
5.5.3 PostScript Operators (Commands)
The PostScript level 2is the resident emulation of the PrintPartner 20W. For operators (commands) available in the
PostScript level 2 emulation, refer to “PostScript Level 2 Reference Manual” provided by Adobe Systems
Incorporated.
6-1
CHAPTER 6 MAINTENANCE
6.1 Overview
The PrintPartner 20W printer, with its simple mechanism and latest electronics techniques, is highly reliable and
easy to maintain. Changing spare parts require no adjustments so that replacement is easy.
6.2 Preventive Maintenance
No scheduled maintenance is required. However, it is recommended that the printer be kept clean to increase the
service life and MTBF.
6.3 Maintenance Philosophy
The printer is designed to make maintenance as infrequent as possible. No periodic lubrication is required.
Quality assurance
• Every unit is checked before assembly.
• All products go through full inspection.
• All spare parts are easy to change. (MTTR: 0.5 h)
6.4 Diagnostics
6.4.1 ROM/RAM check
When power is turned on, a ROM sum and RAM write/read check are performed automatically.
6.4.2 Error display
Printer operation is checked by firmware and, if an error is detected, the error status is displayed on the LCD on the
control panel.
6-2
6.5 Maintenance Tool
6.5.1 Self test printing
The SELF TEST button prints a setup report page which summarizes printer option settings. It can be used to easily
check the electrical and mechanical states of the printer without the help of a computer. It also distinguishes
between printer and computer errors, and confirms correct operation after an error recovery. The PRINT FONT
button can be used instead. It prints font report pages which list all available fonts.
6.6 Recommended Spare Parts
The following parts can be replaced.
(1) Operator panel (control panel)
(2) Power board
100 to 120 VAC
220 to 240 VAC
(3) HV board (high-voltage power supply board)
(4) HR unit (heat roller unit/fuser unit)
(5) WD98AA (driver board)
(6) LD unit (laser diode unit)
(7) DCV01AA
(8) ROM board SK (controller board and ROM)
(9) Fan
(10) DCH LED unit (for discharging drum)
(11) Roller P. ASY (pick-up roller for paper tray)
(12) PSS board ASY (paper size sensor)
(13) P. motor ASY (pick-up roller drive)
(14) Stepping motor (feed roller drive)
(15) Motor ASY (duplex drive)
(16) M. motor ASY (print unit drive/main motor)
(17) Switch ASY (cover open)
(18) Switch ASY1 (for eject unit)
(19) Switch ASY (MFF plate position detect)
(20) S. pad holder (separator for paper tray)
(21) Photosensor (eject/reverse sensor)
(22) Pick guide ASY (for MFF pick)
(23) TS ASY (toner sensor)
(24) Feed roller (register roller + sheet)
(25) Roller ASY (eject/reverse roller)
(26) Photosensor ASY (MFF paper empty)
(27) Roller ASY (MFF pick roller)
(28) TRCG unit (transfer charger)
(29) Ozone filter
(30) SFS ASY (stacker-full sensor)
(31) Roller ASY (eject/reverse roller)
(32) Side cover L
(33) Side cover R
(34) Cleaning pad
(35) Rear guide
(36) RC pad
7-1
CHAPTER 7 OPTIONS AND SUPPLIES
7.1 Options
(1) Paper feeder and paper tray
250-sheet paper feed unit (feeder unit with 250-sheet paper tray)
500-sheet paper feed unit (feeder unit with 500-sheet paper tray
250-sheet paper tray
500-sheet paper tray
(2) Two-sided printing
Duplex unit with 250-sheet paper tray
Duplex unit
(3) Extended RAM memory (EDO SIMM)
4MB RAM card
8MB RAM card
16MB RAM card
32MB RAM card
* Two cards can be installed.
(4) Expansion interface boards
Ethernet-C (10-BASE-2/T board (TCP/IP, IPX/SPX, and EtherTalk corresponding)
Ethernet-D (10-BASE-T board (TCP/IP, IPX/SPX, and EtherTalk corresponding)
Ethernet-F (100BASE-TX/10-BASE-T board (TCP/IP, IPX/SPX, and EtherTalk corresponding)
LocalTalk board 2 (AppleTalk compatible)
IrDA kit (infrared adapter)
(5) Other cards
Barcode card (SIMM for barcodes and OCR fonts)
Flash ROM card (4MB SIMM, for PCL5e only)
7-2
7.2 Consumables
(1) Print unit
(2) Toner pack (two toner bottles)
(3) Cleaner pad (two cleaner pads)
(4) Toner kit (two tonner bottles and two cleaner pads)
7.3 Periodic Replacement Parts
(1) Fuser unit
• 120 VAC
• 220 to 240 VAC
7.4 Documentation
(1) User’s Manual
(2) Maintenance Manual
(3) Schematic Diagrams
(4) Parts Catalogue
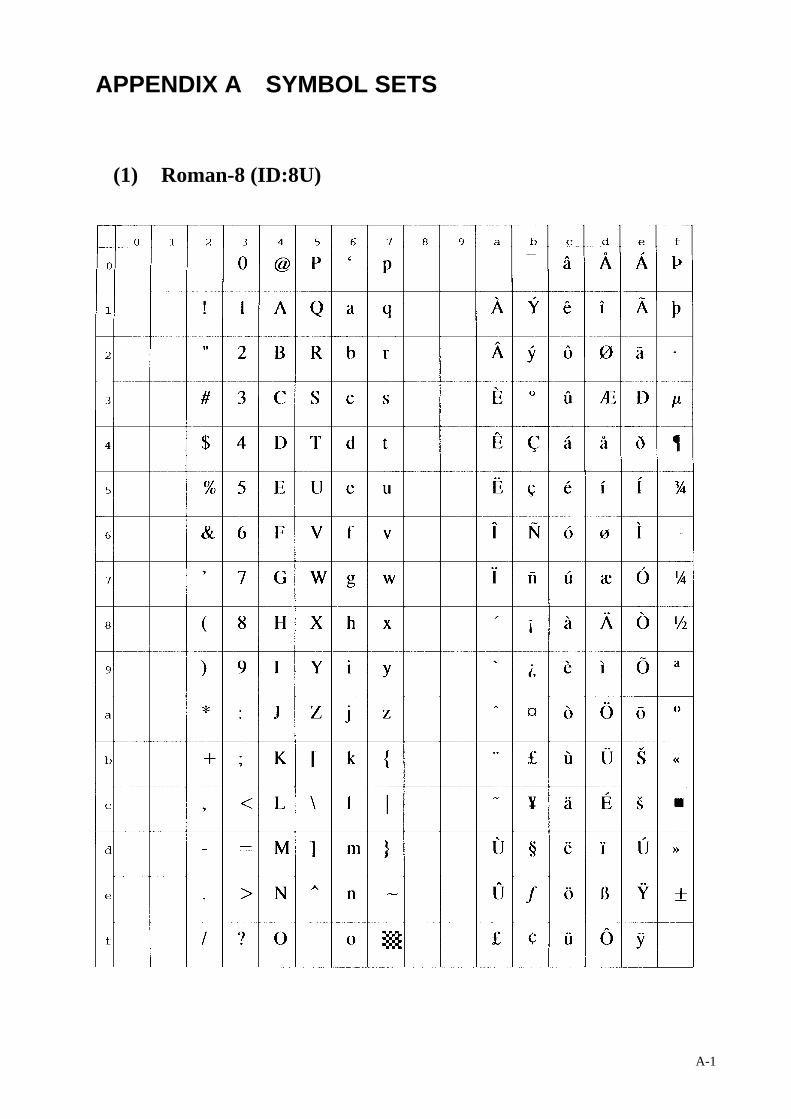
A-1
(1) Roman-8 (ID:8U)
APPENDIX A SYMBOL SETS
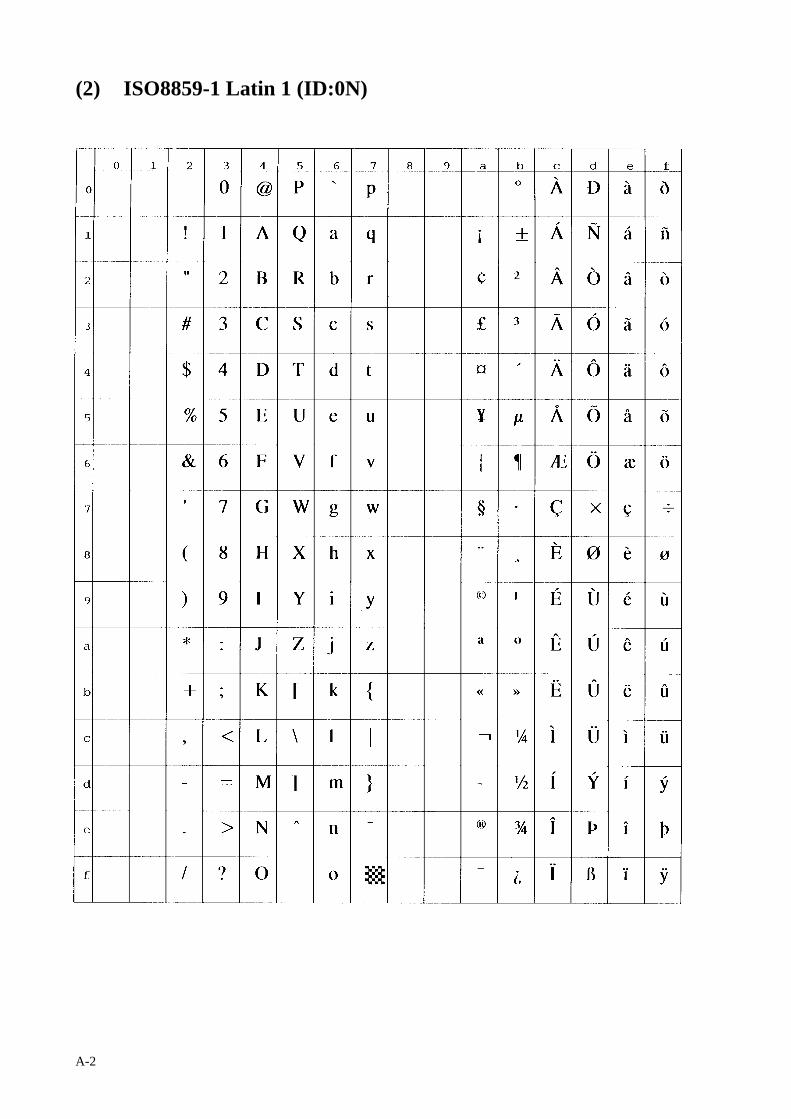
A-2
(2) ISO8859-1 Latin 1 (ID:0N)
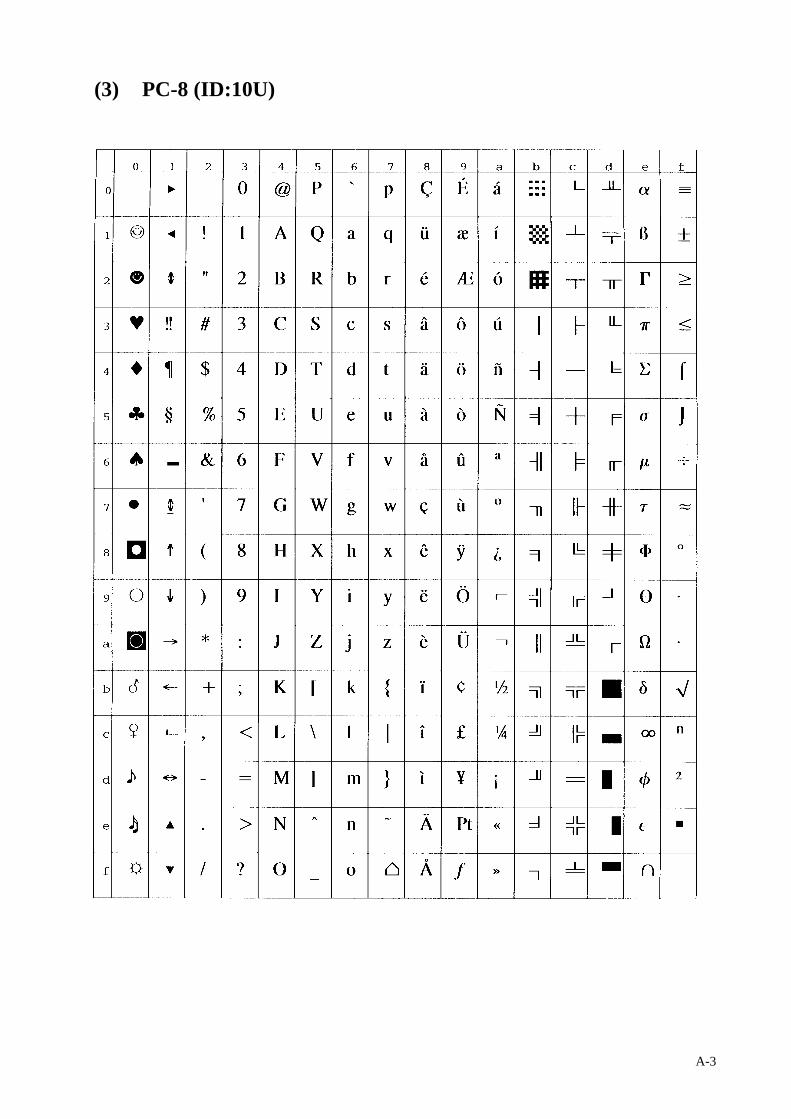
A-3
(3) PC-8 (ID:10U)
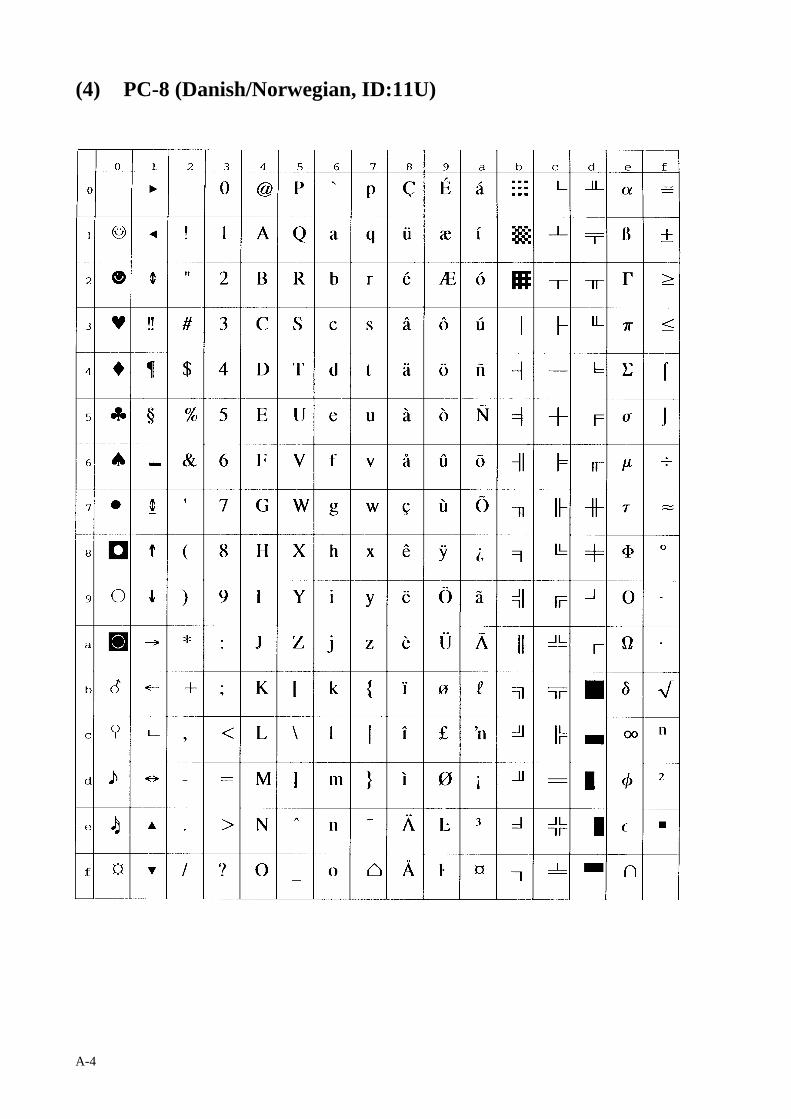
A-4
(4) PC-8 (Danish/Norwegian, ID:11U)
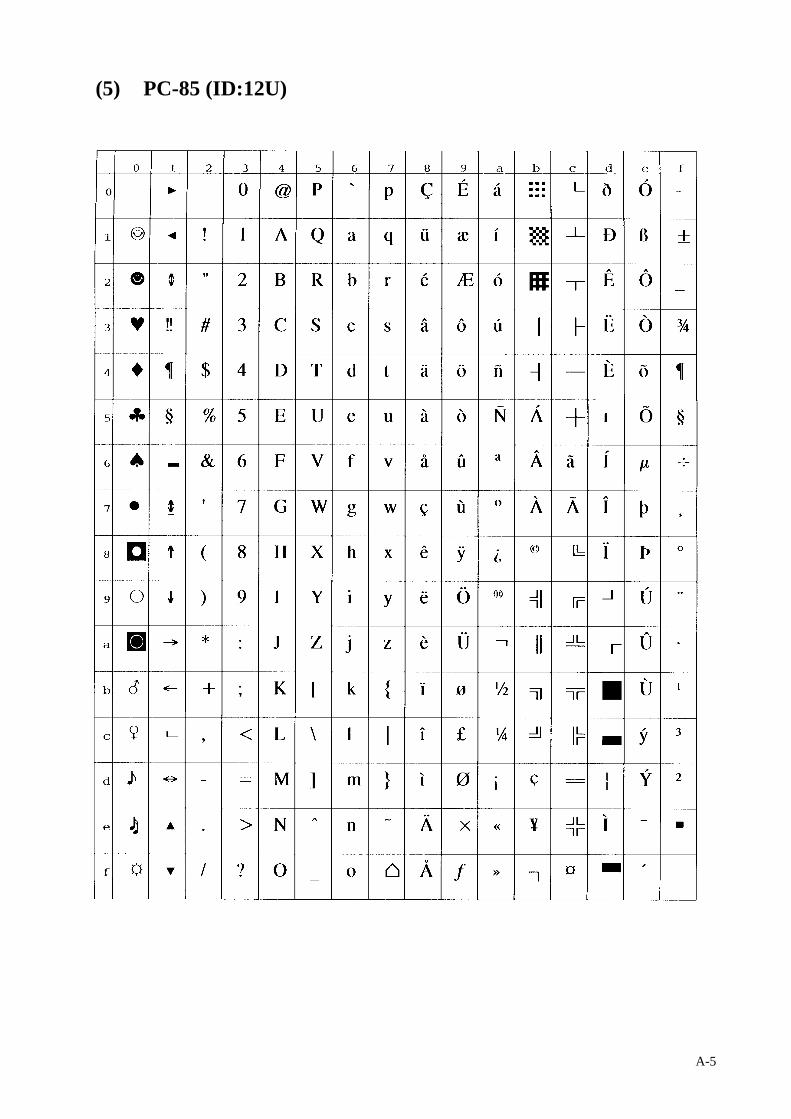
A-5
(5) PC-85 (ID:12U)
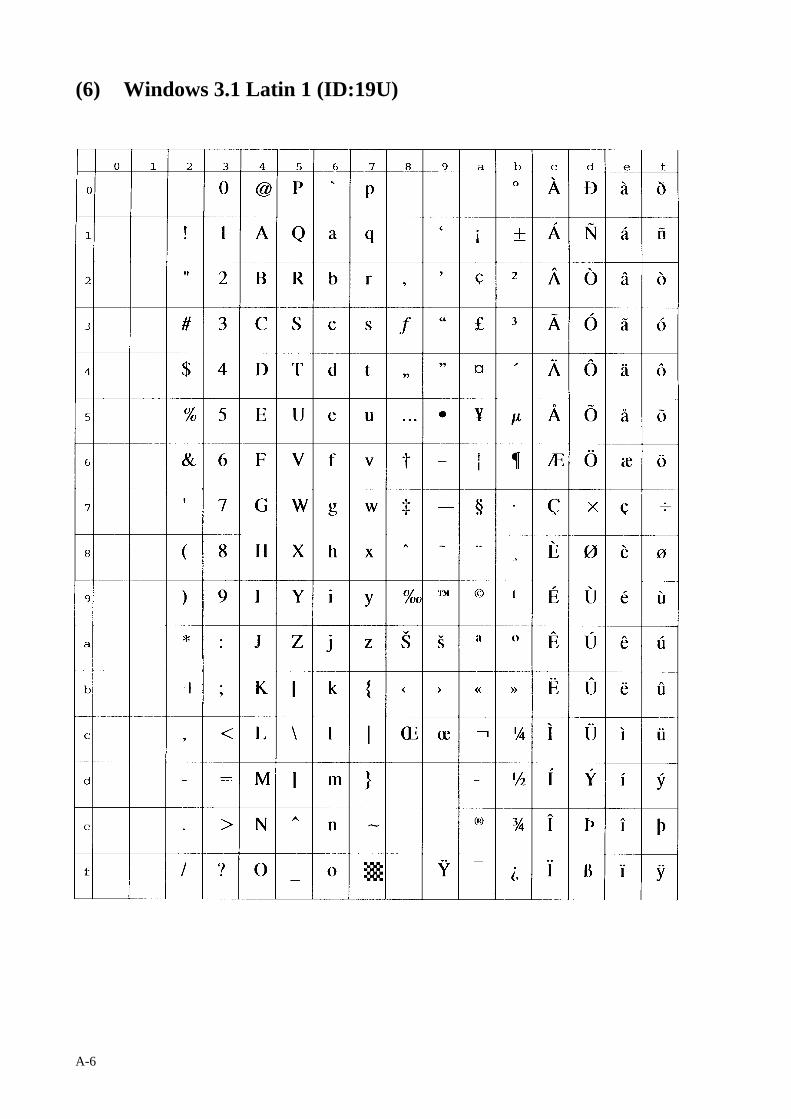
A-6
(6) Windows 3.1 Latin 1 (ID:19U)
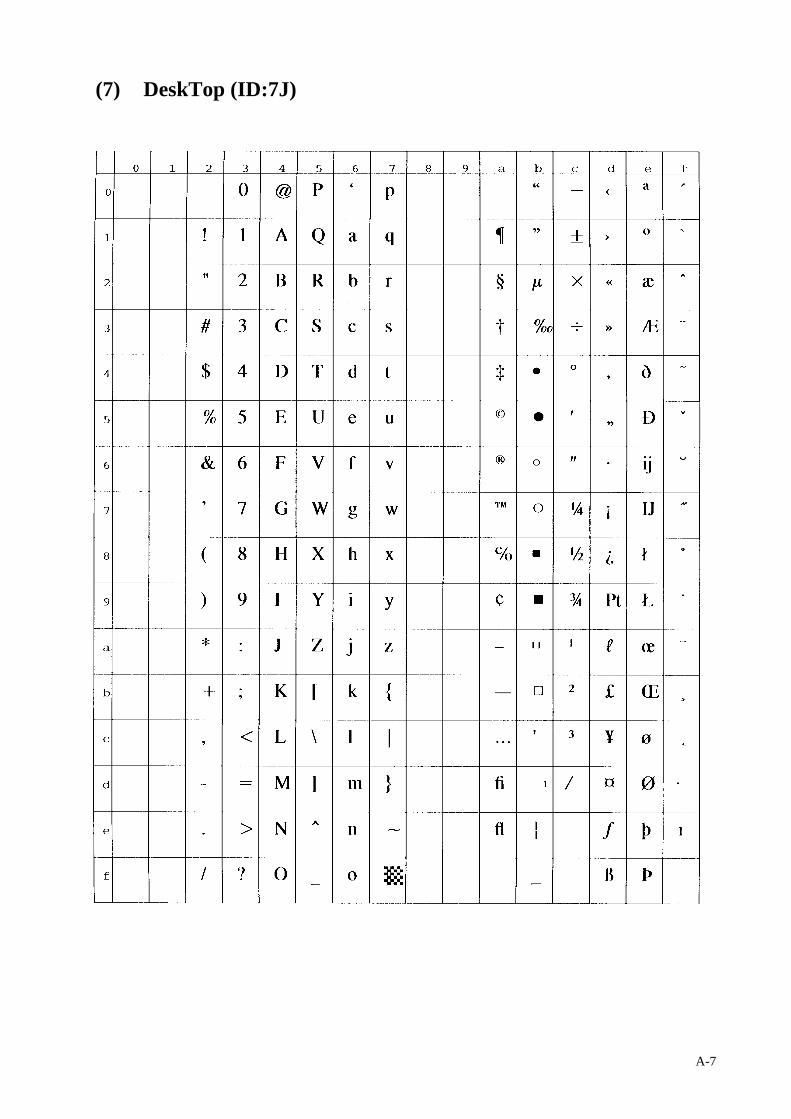
A-7
(7) DeskTop (ID:7J)
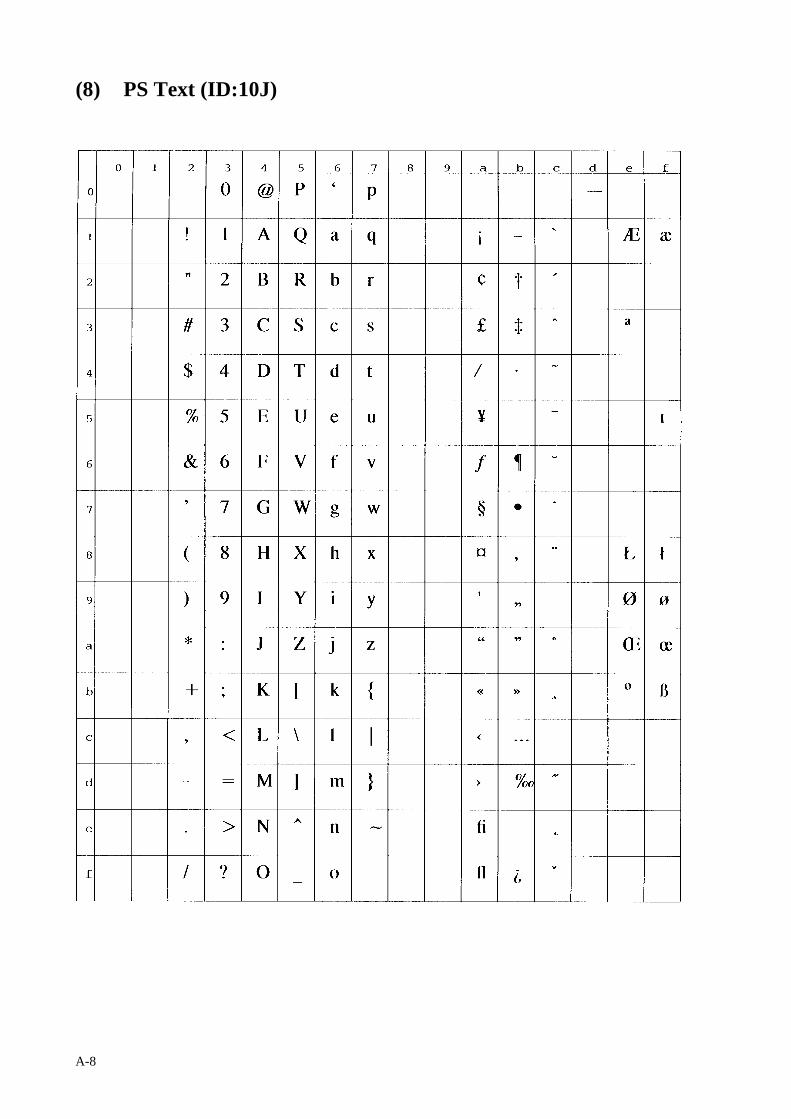
A-8
(8) PS Text (ID:10J)
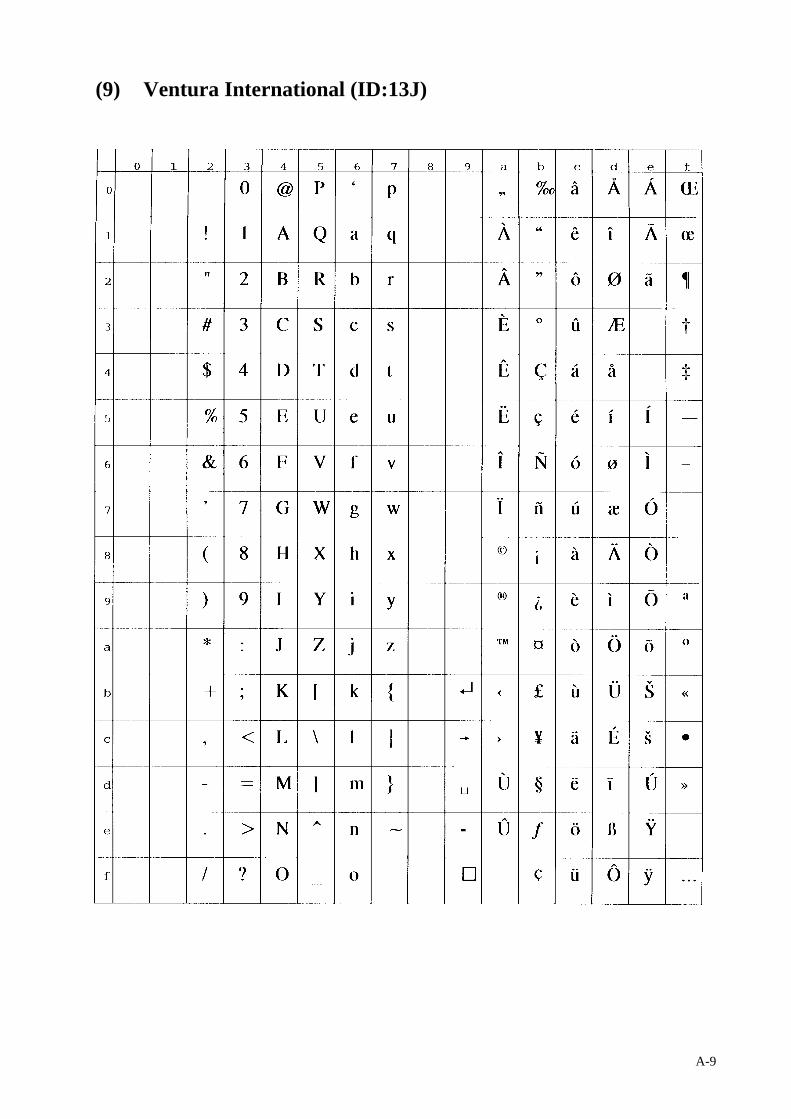
A-9
(9) Ventura International (ID:13J)
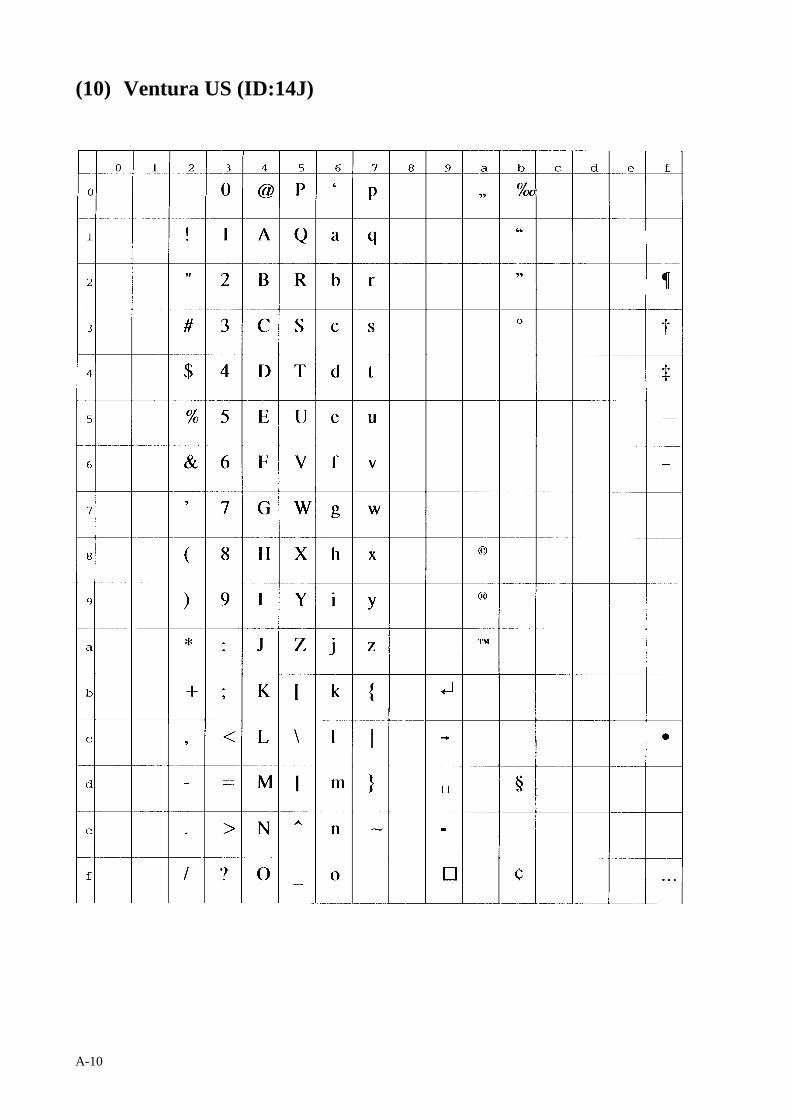
A-10
(10) Ventura US (ID:14J)
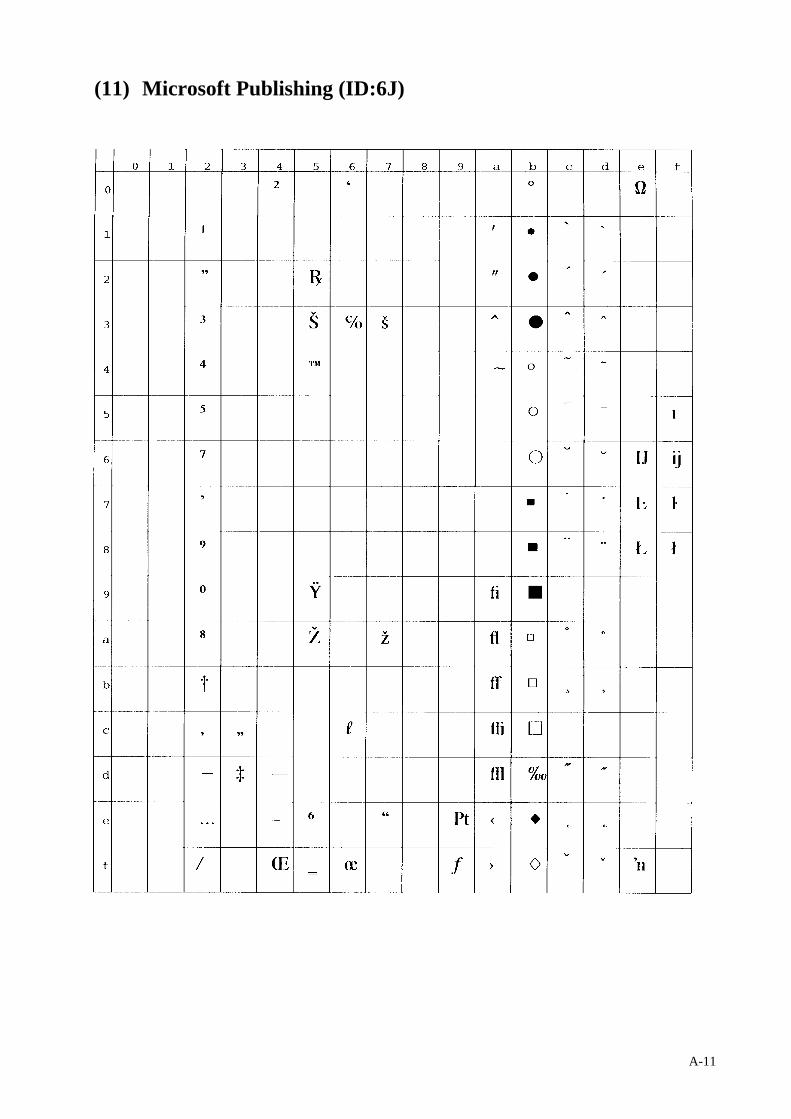
A-11
(11) Microsoft Publishing (ID:6J)
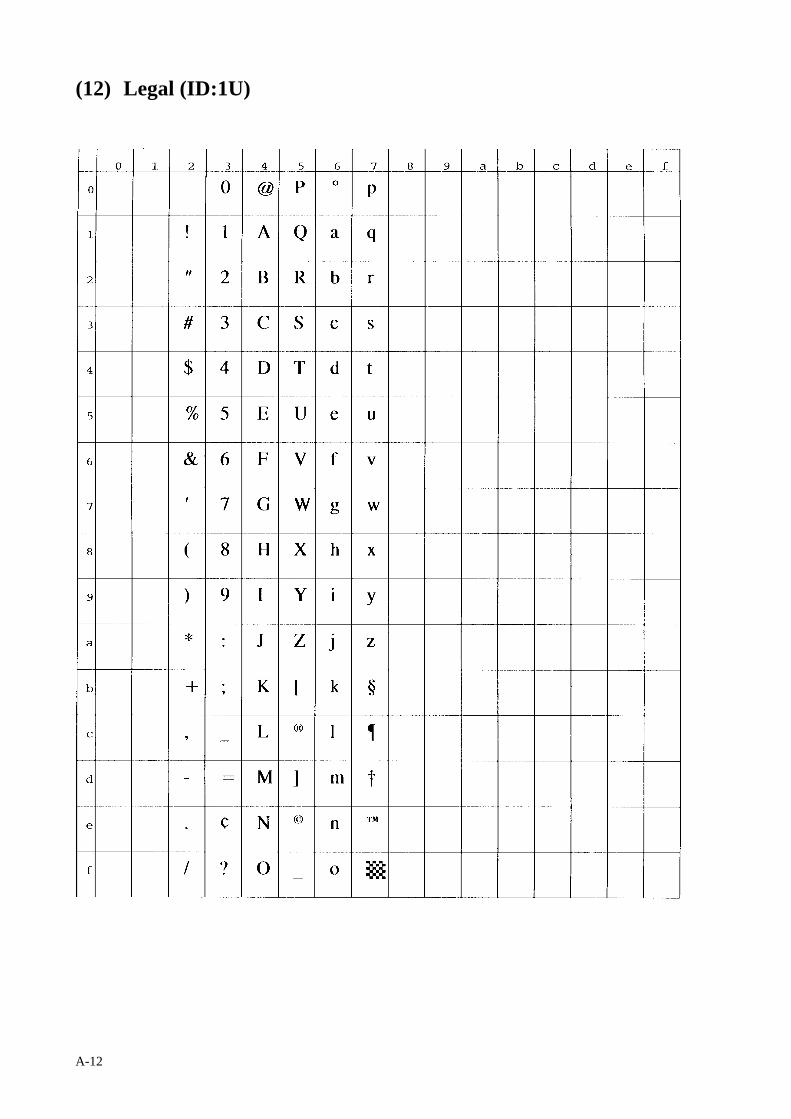
A-12
(12) Legal (ID:1U)
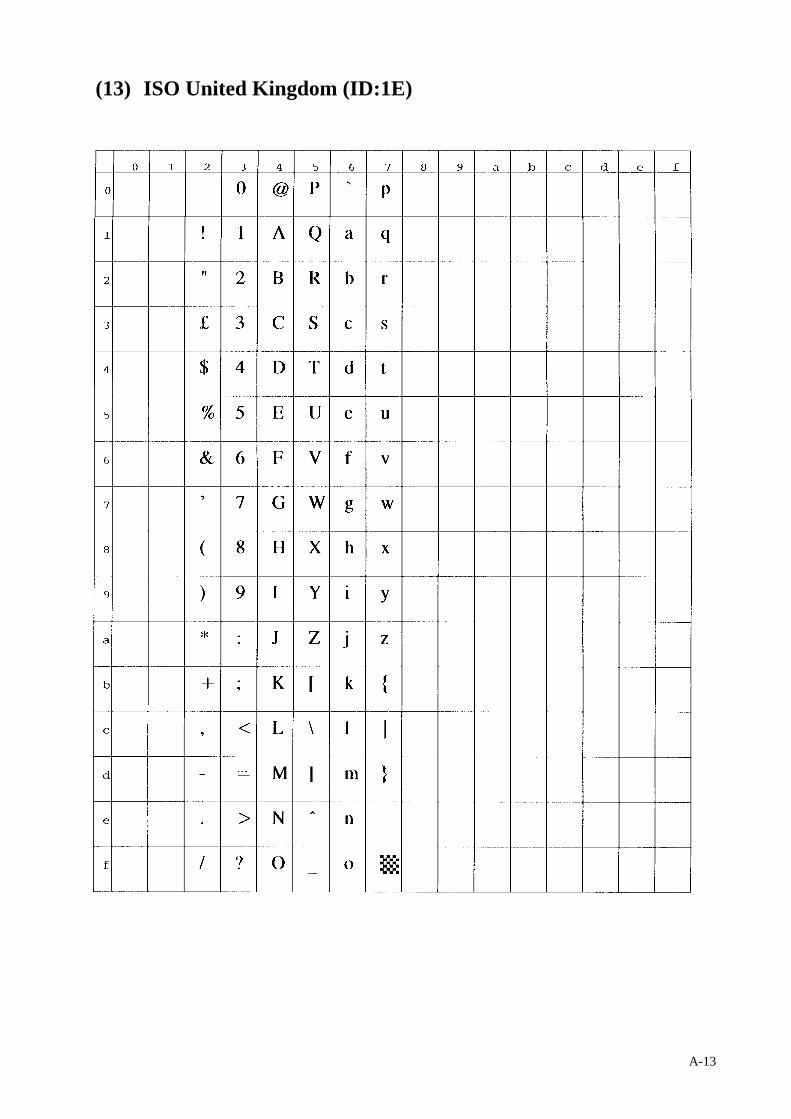
A-13
(13) ISO United Kingdom (ID:1E)
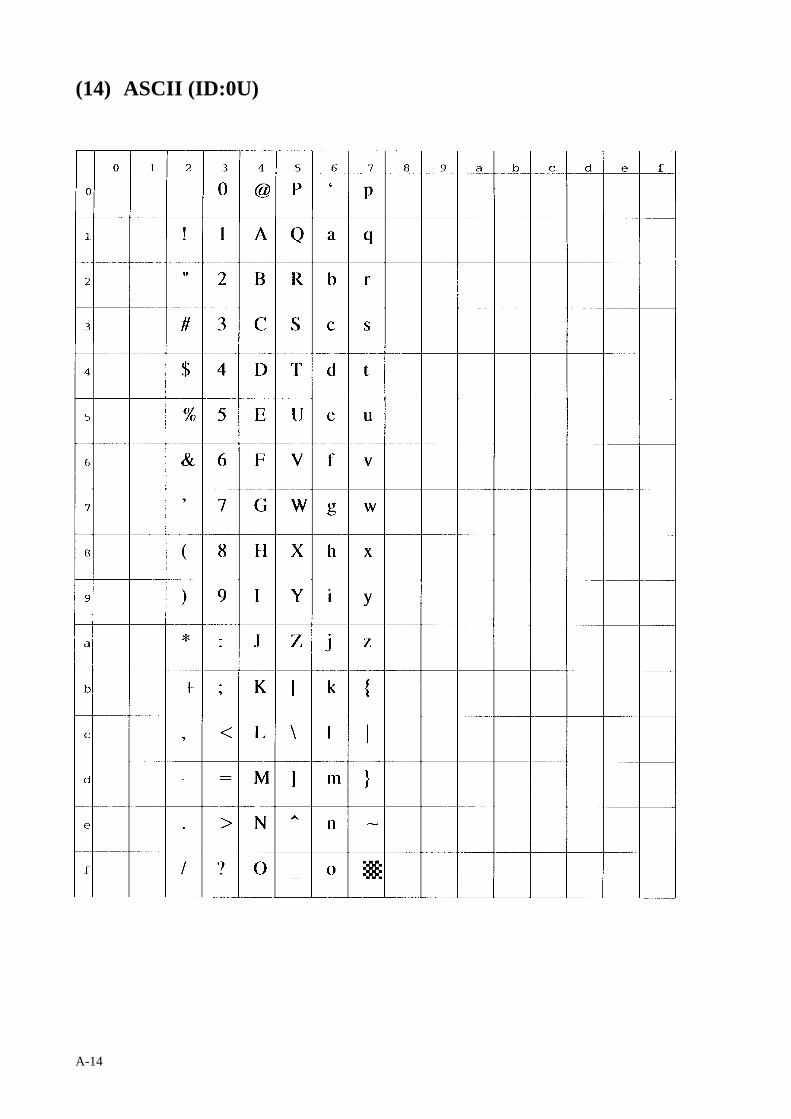
A-14
(14) ASCII (ID:0U)
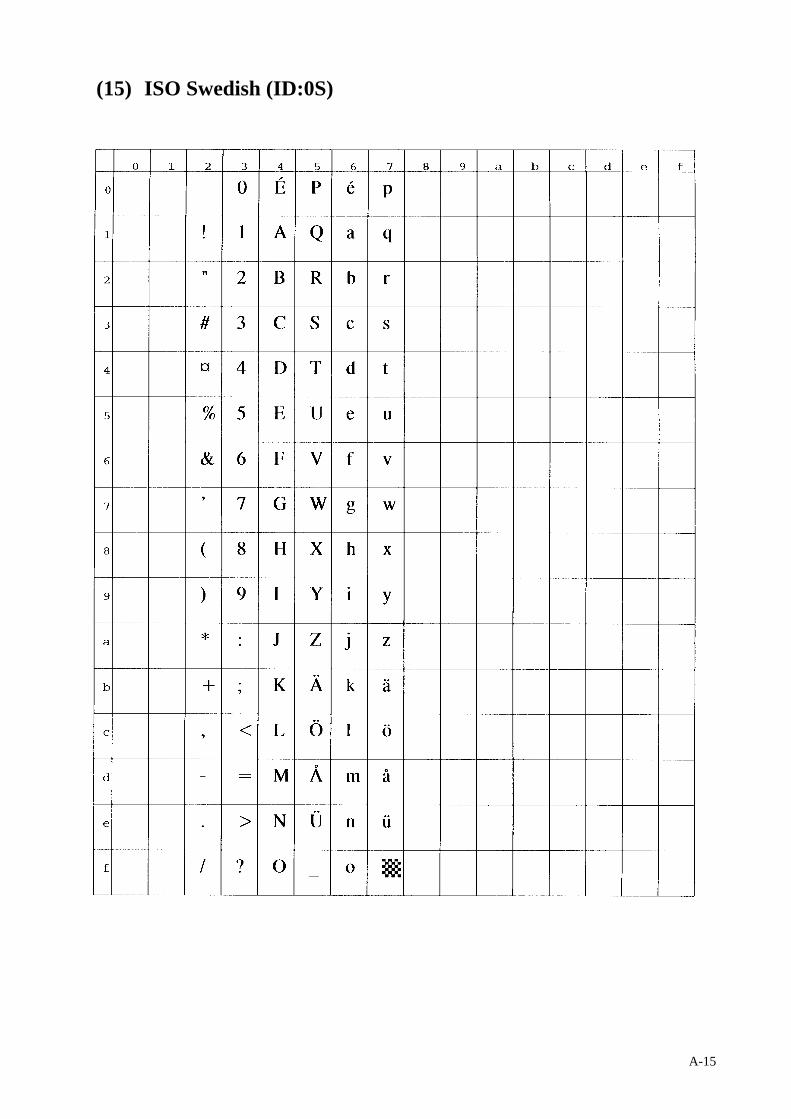
A-15
(15) ISO Swedish (ID:0S)
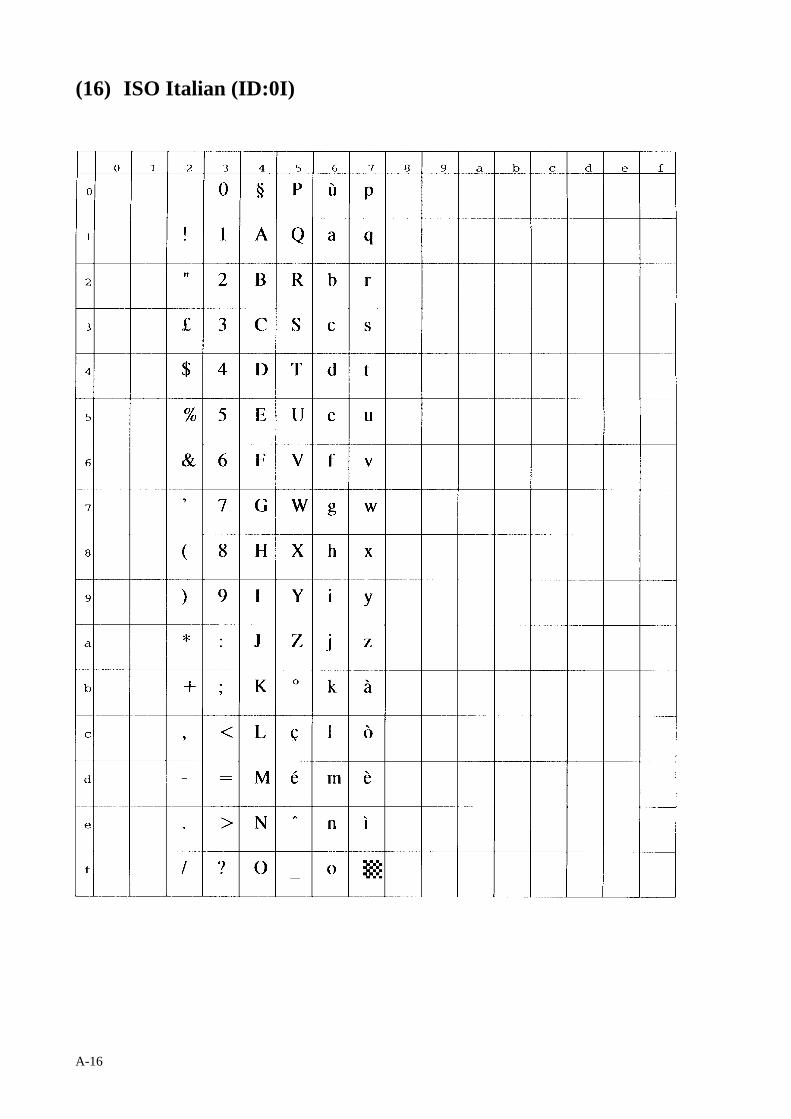
A-16
(16) ISO Italian (ID:0I)
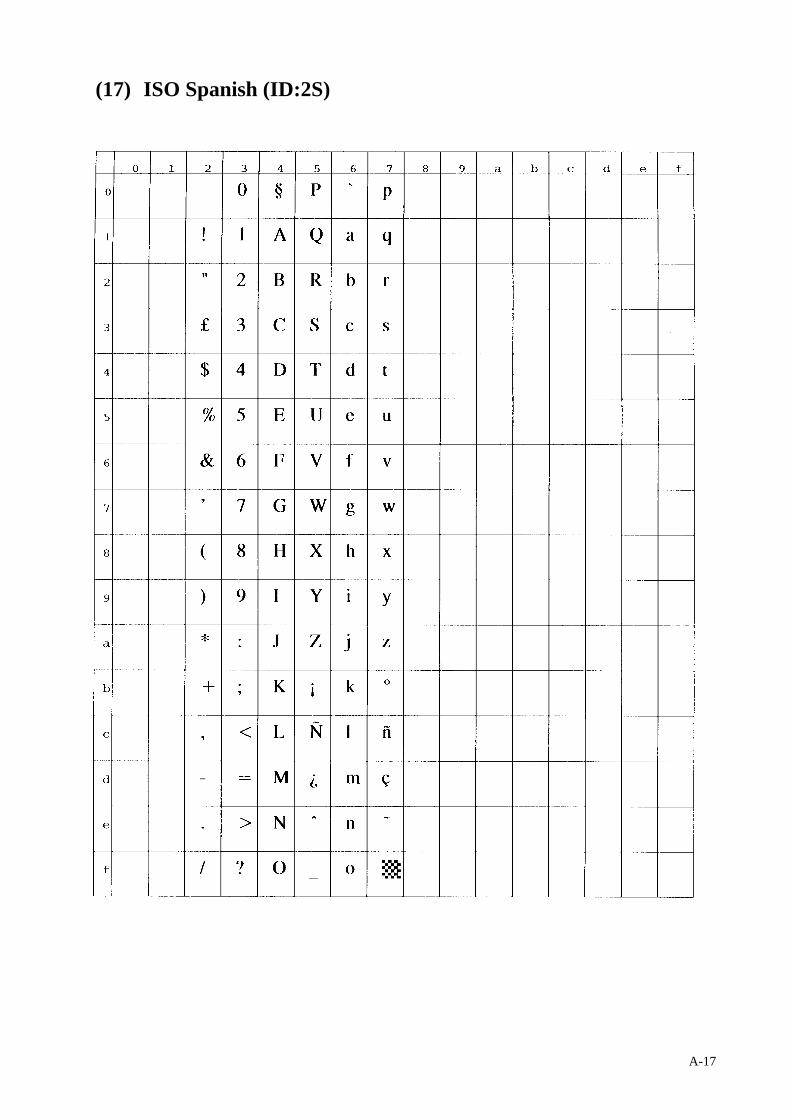
A-17
(17) ISO Spanish (ID:2S)
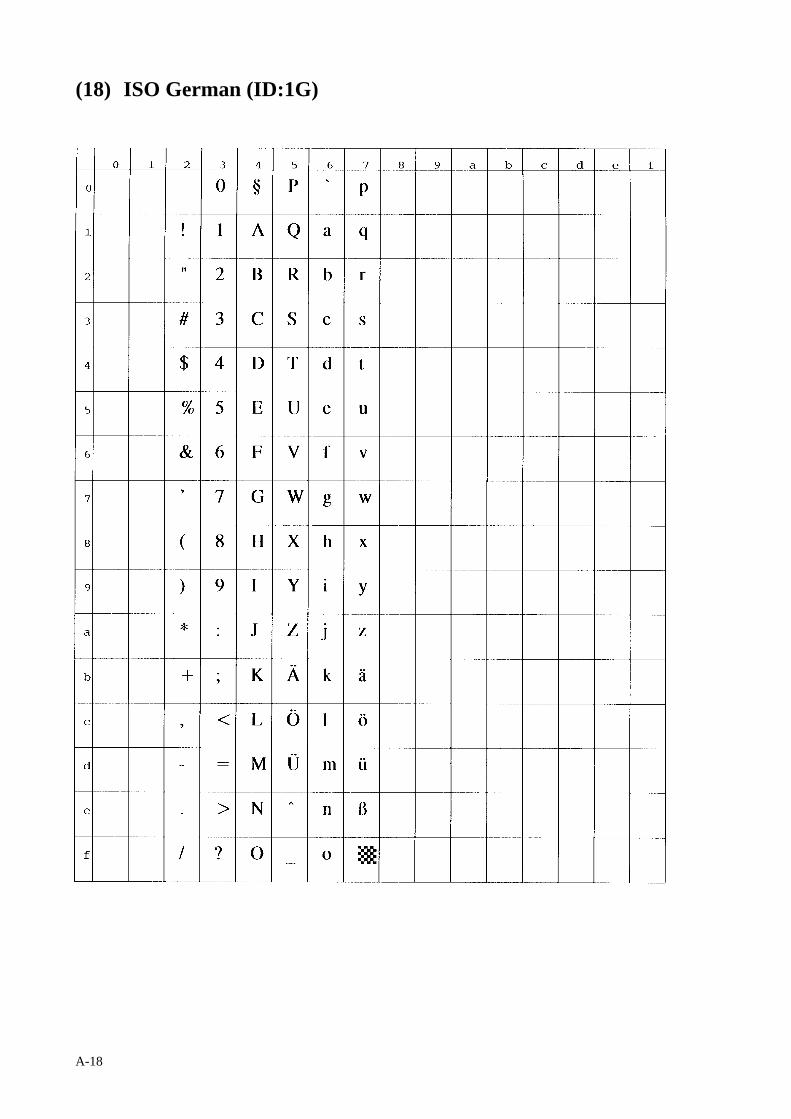
A-18
(18) ISO German (ID:1G)
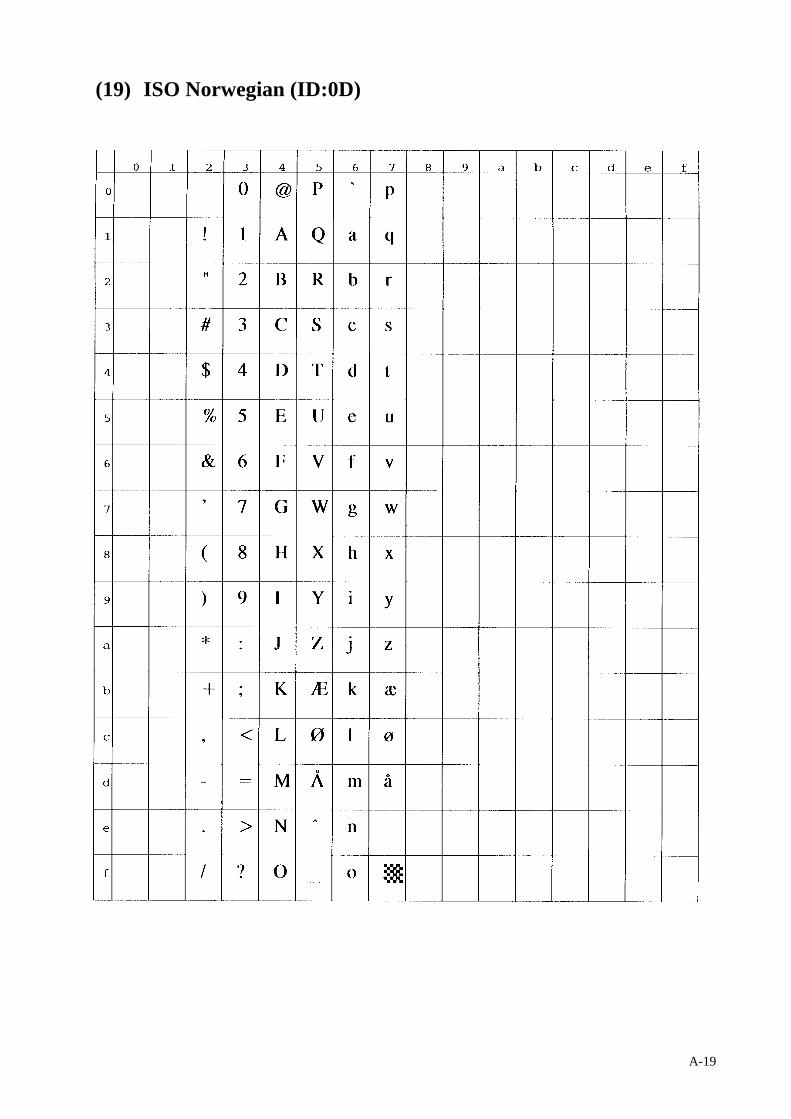
A-19
(19) ISO Norwegian (ID:0D)
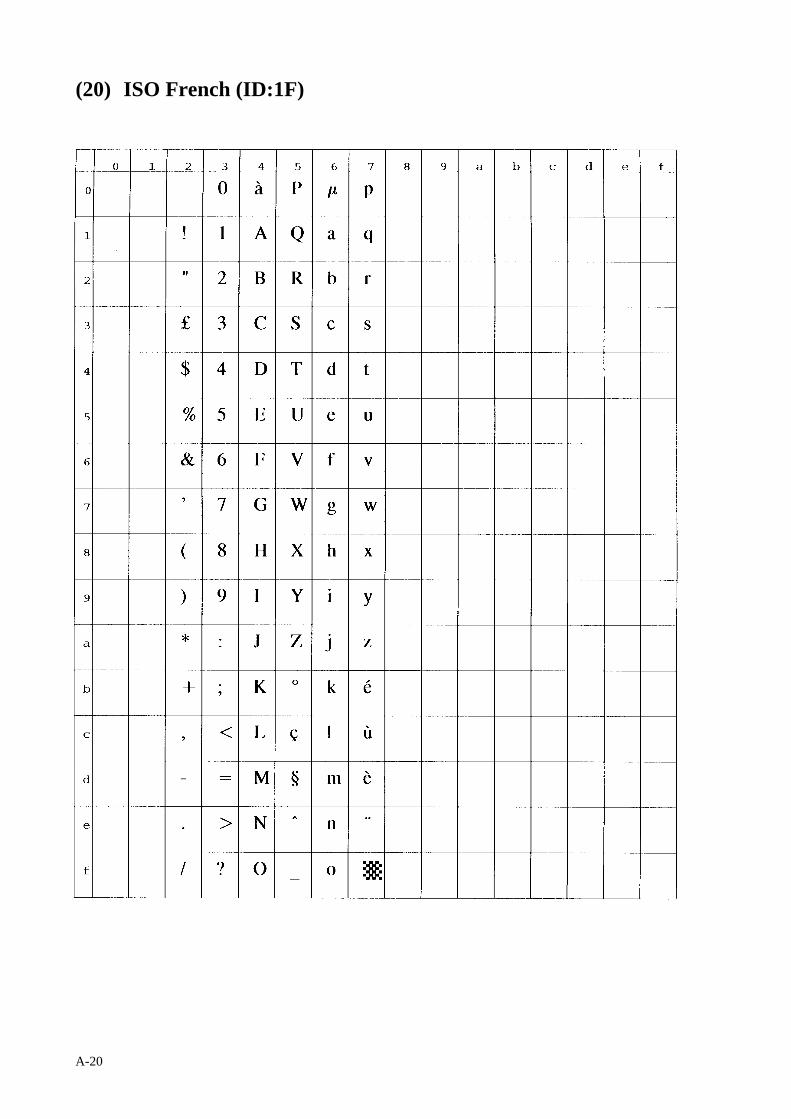
A-20
(20) ISO French (ID:1F)
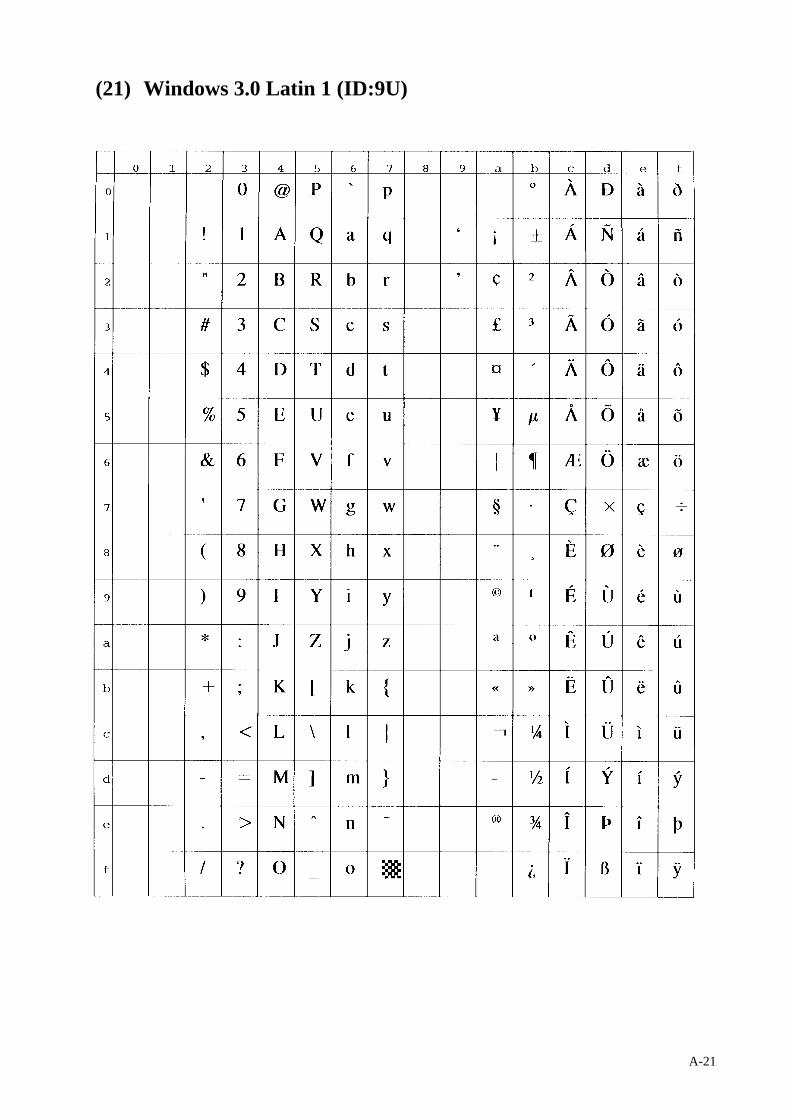
A-21
(21) Windows 3.0 Latin 1 (ID:9U)
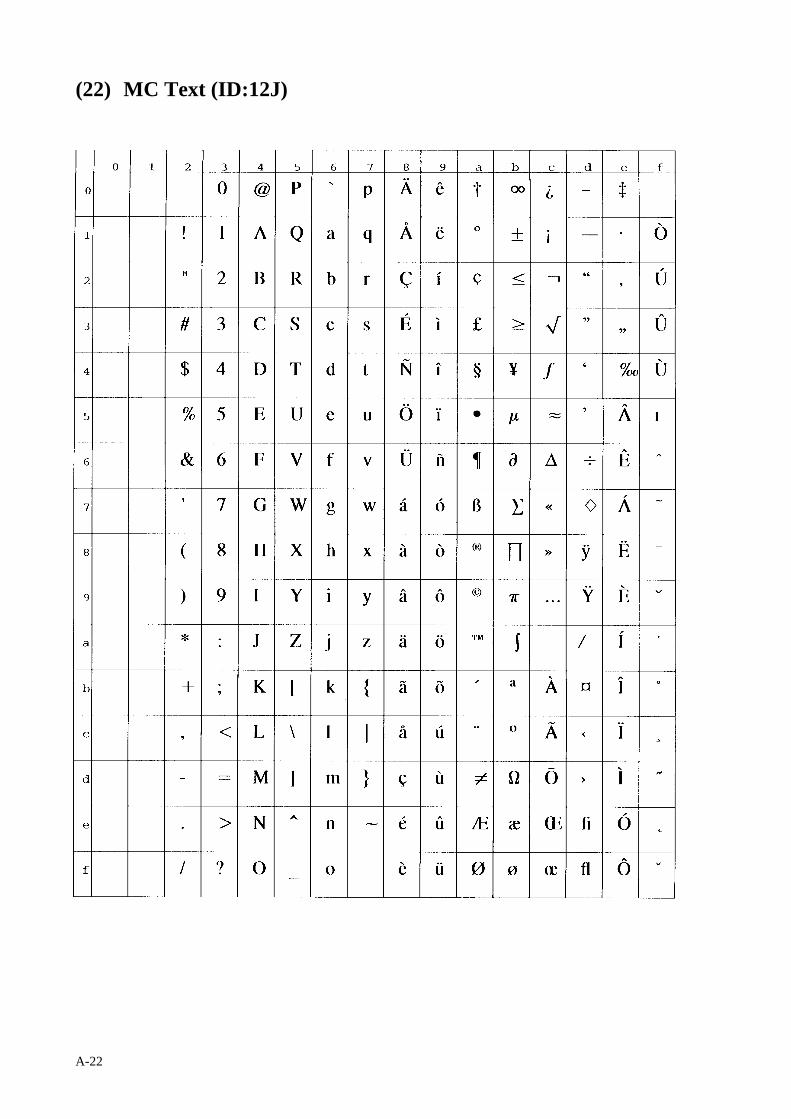
A-22
(22) MC Text (ID:12J)
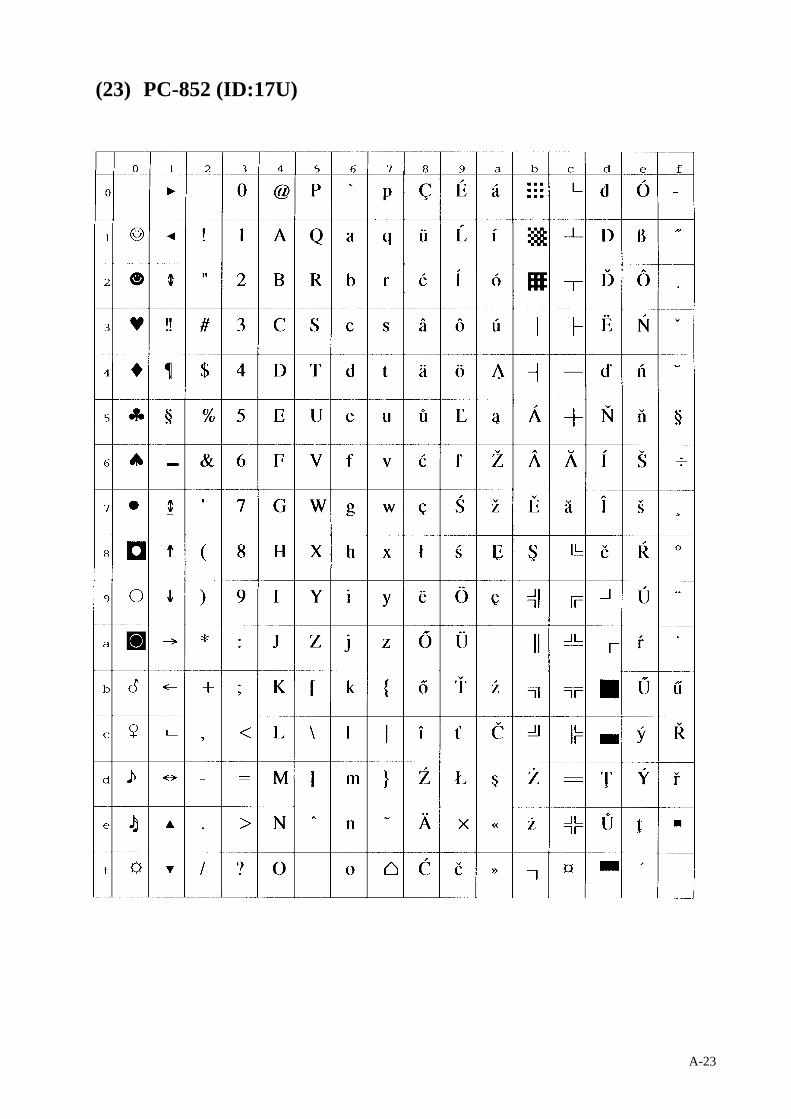
A-23
(23) PC-852 (ID:17U)
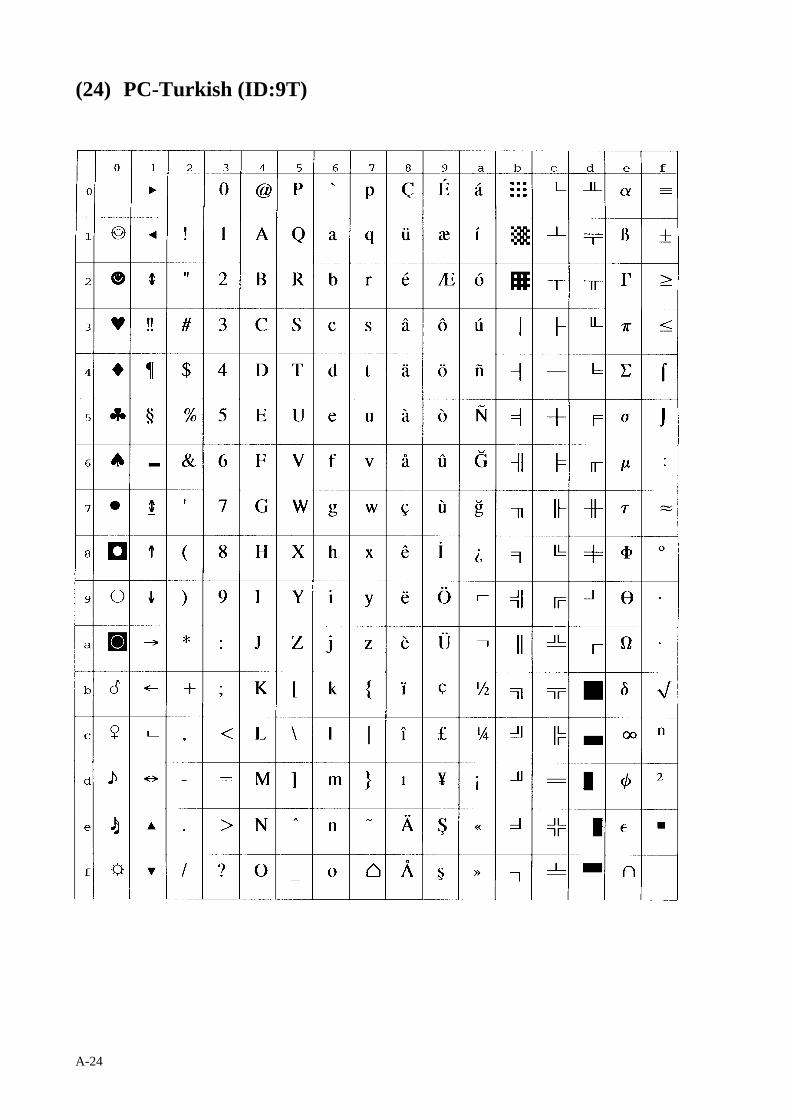
A-24
(24) PC-Turkish (ID:9T)
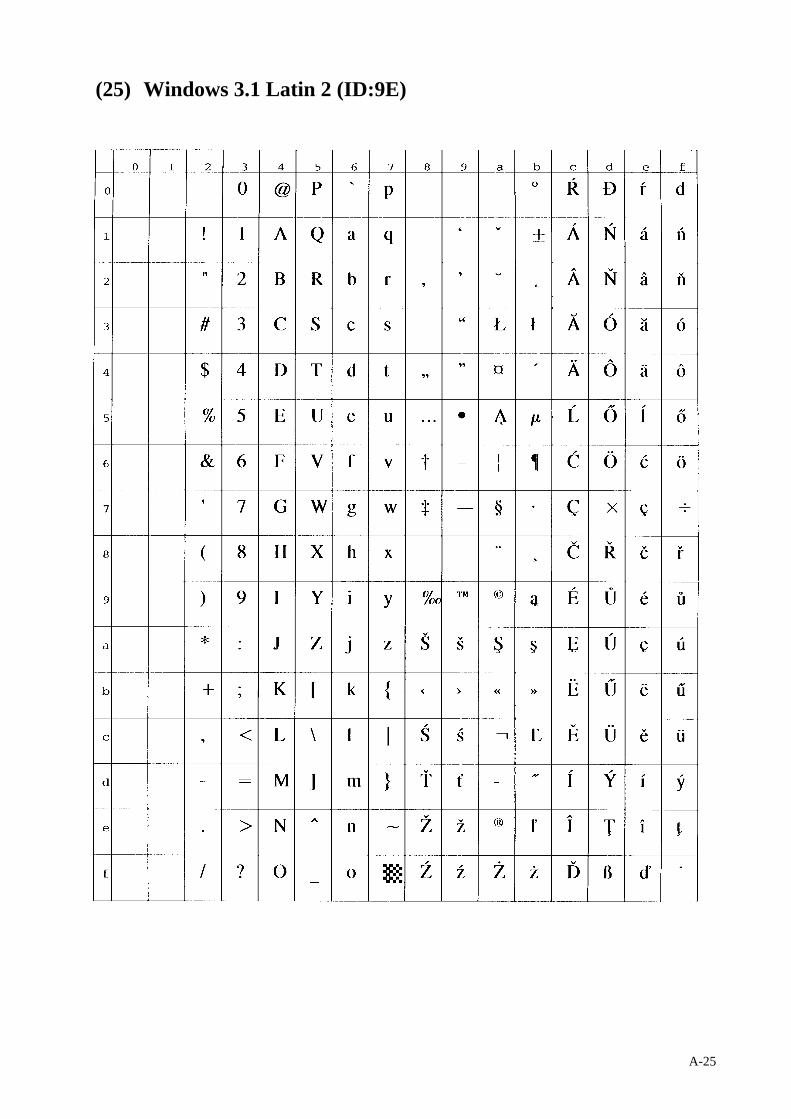
A-25
(25) Windows 3.1 Latin 2 (ID:9E)
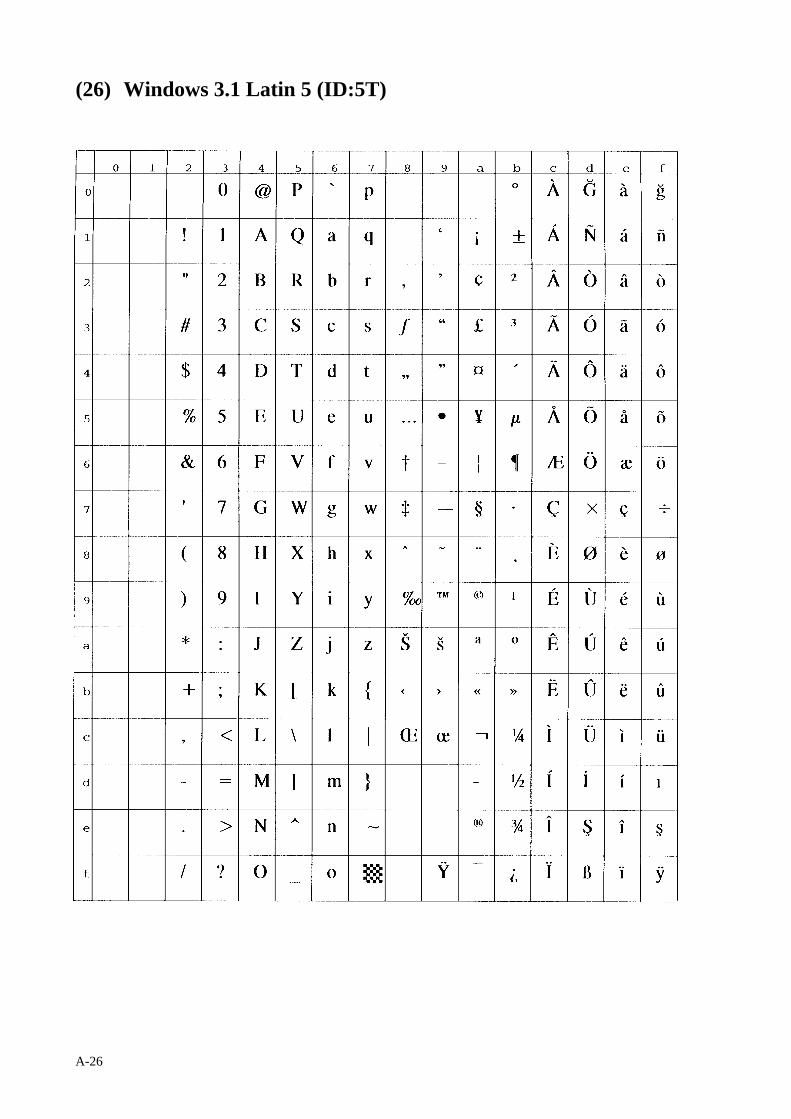
A-26
(26) Windows 3.1 Latin 5 (ID:5T)
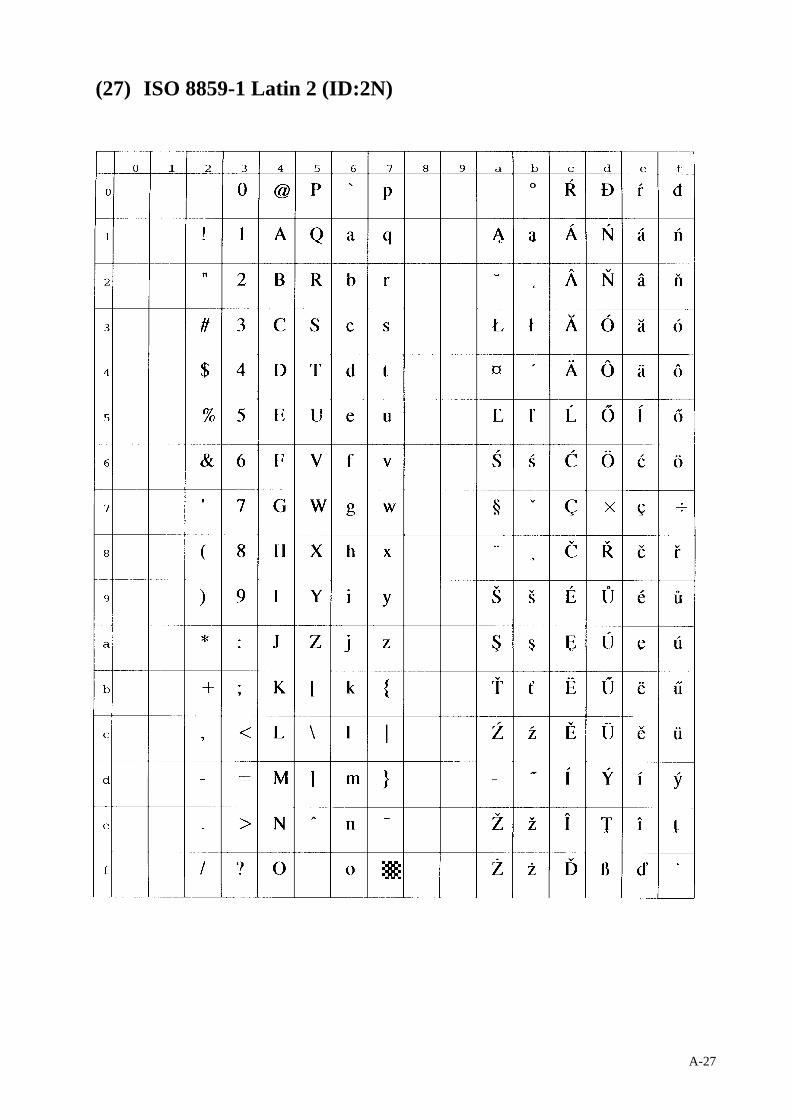
A-27
(27) ISO 8859-1 Latin 2 (ID:2N)
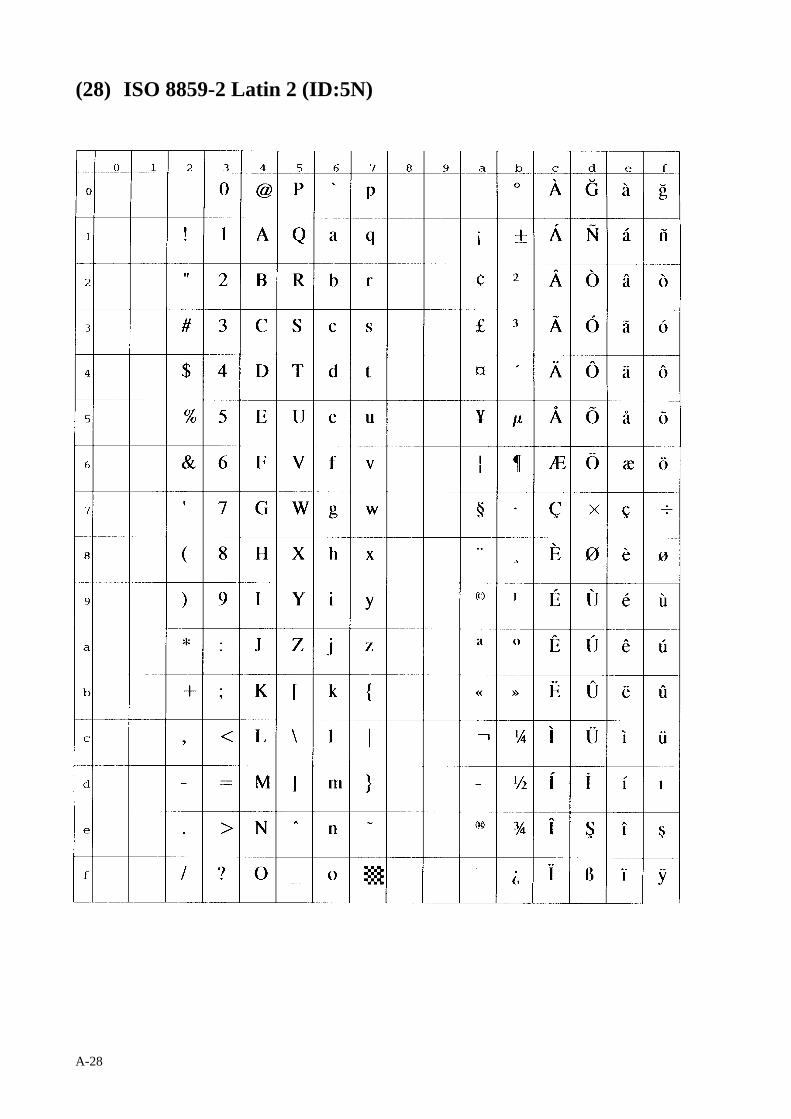
A-28
(28) ISO 8859-2 Latin 2 (ID:5N)
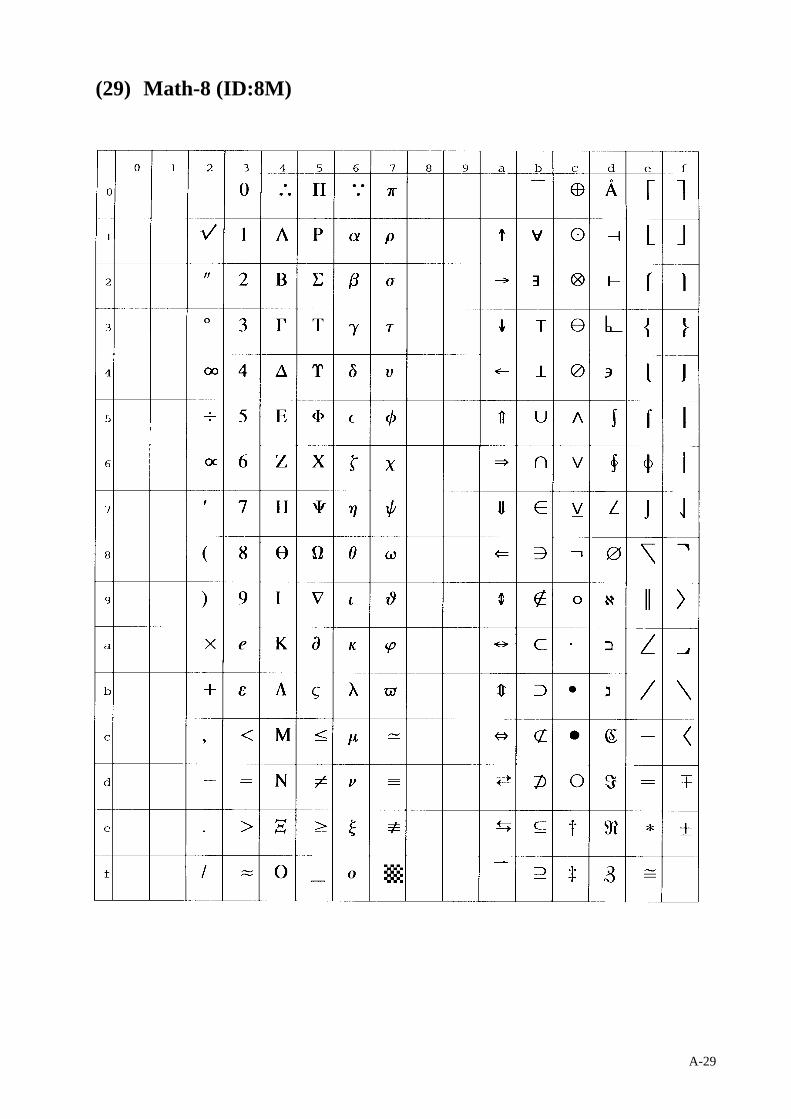
A-29
(29) Math-8 (ID:8M)
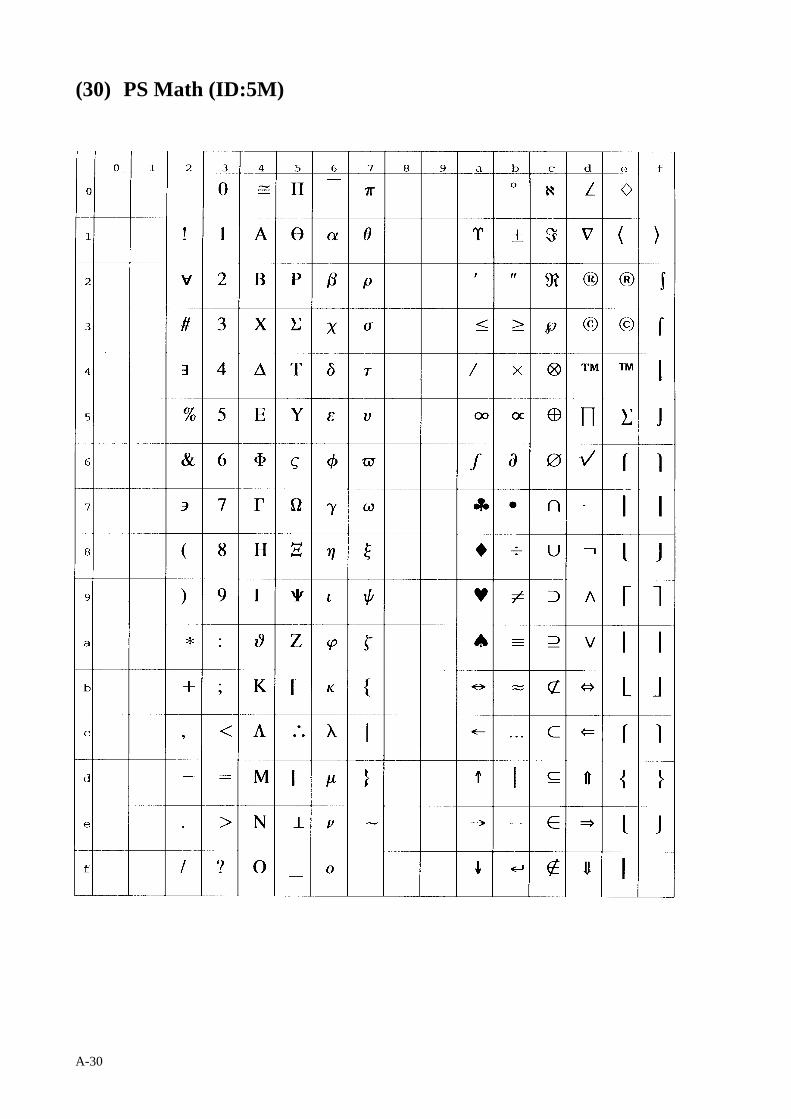
A-30
(30) PS Math (ID:5M)
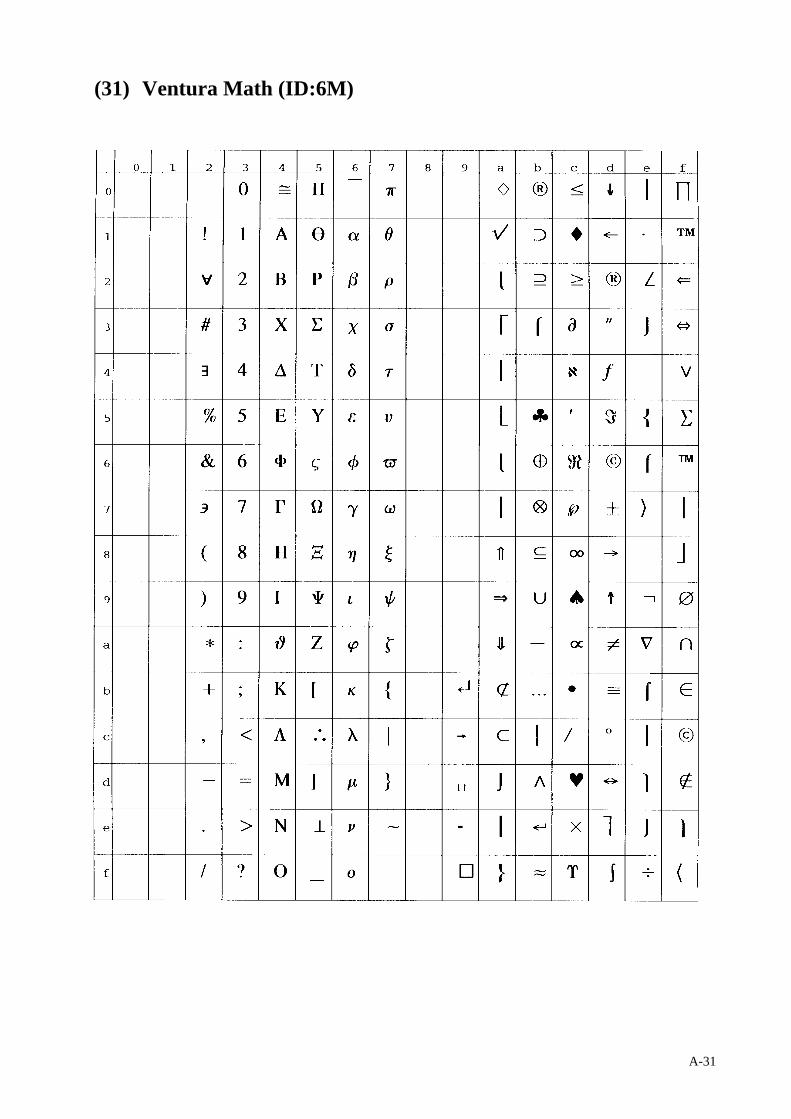
A-31
(31) Ventura Math (ID:6M)
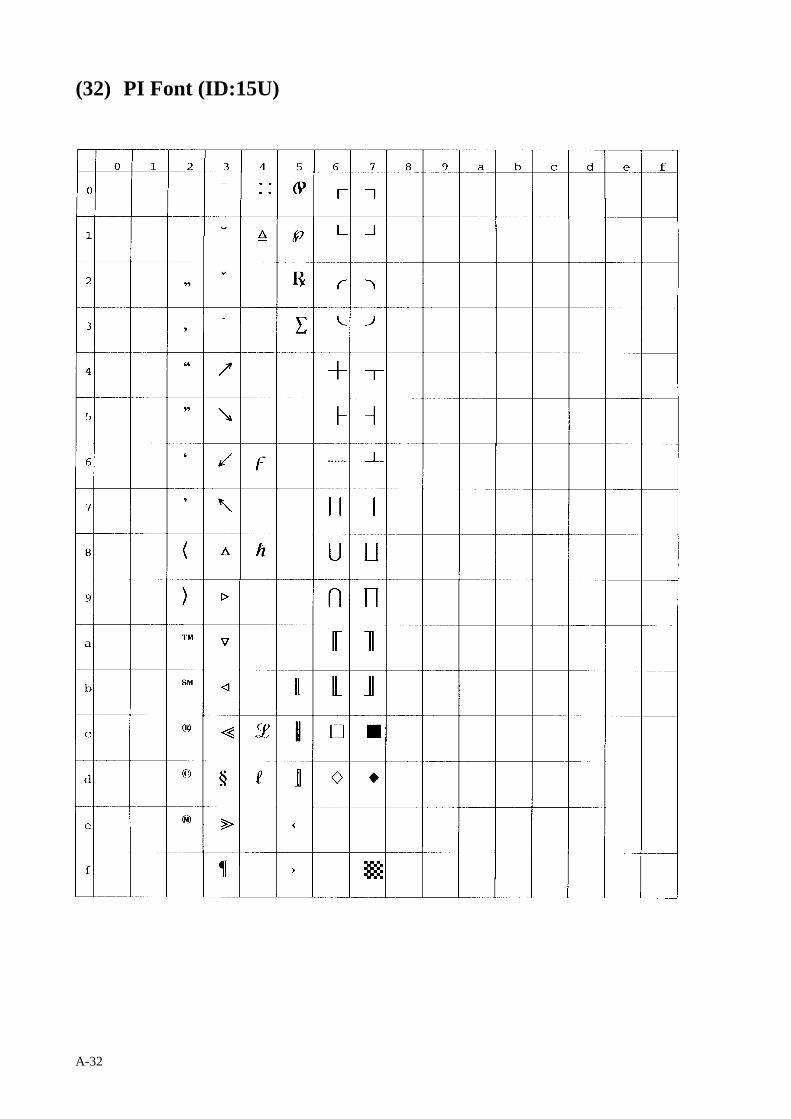
A-32
(32) PI Font (ID:15U)
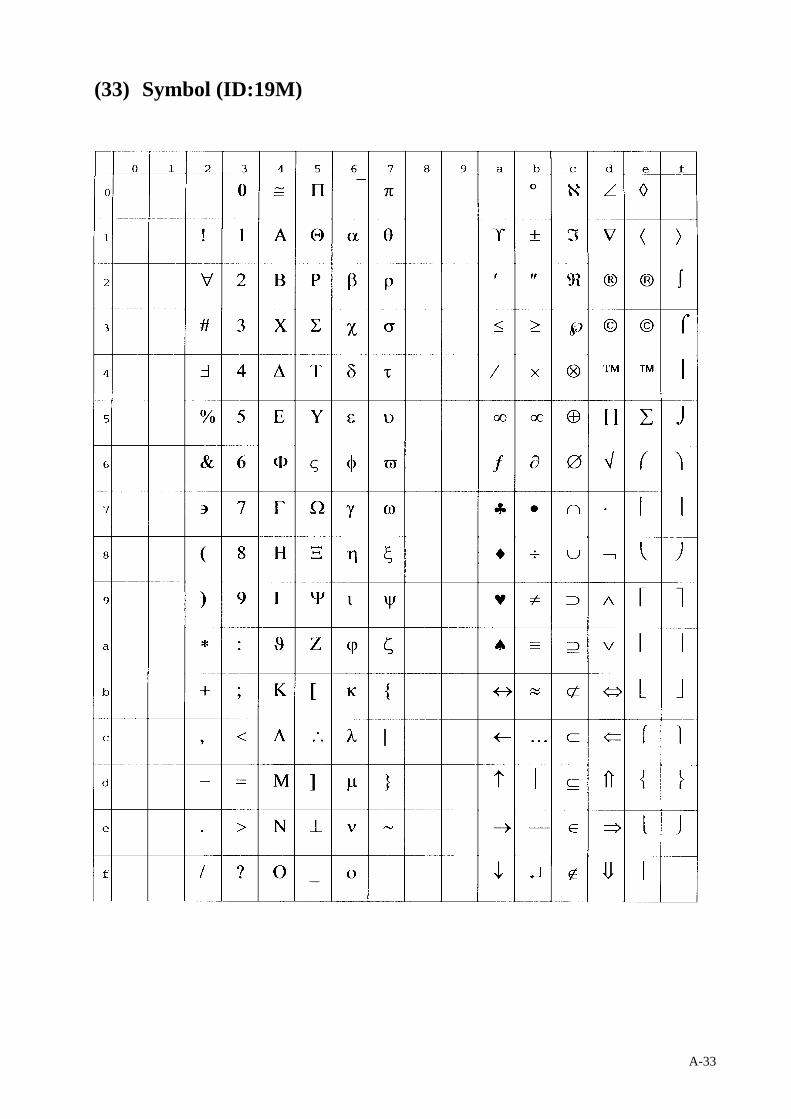
A-33
(33) Symbol (ID:19M)
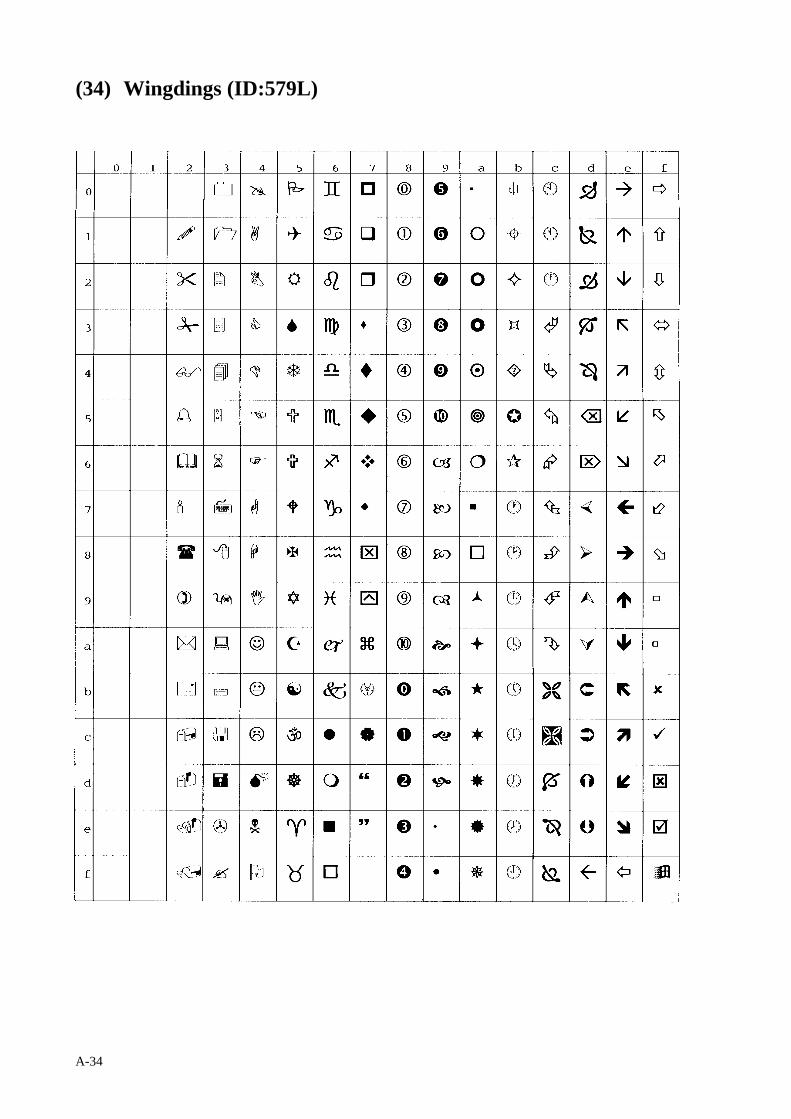
A-34
(34) Wingdings (ID:579L)
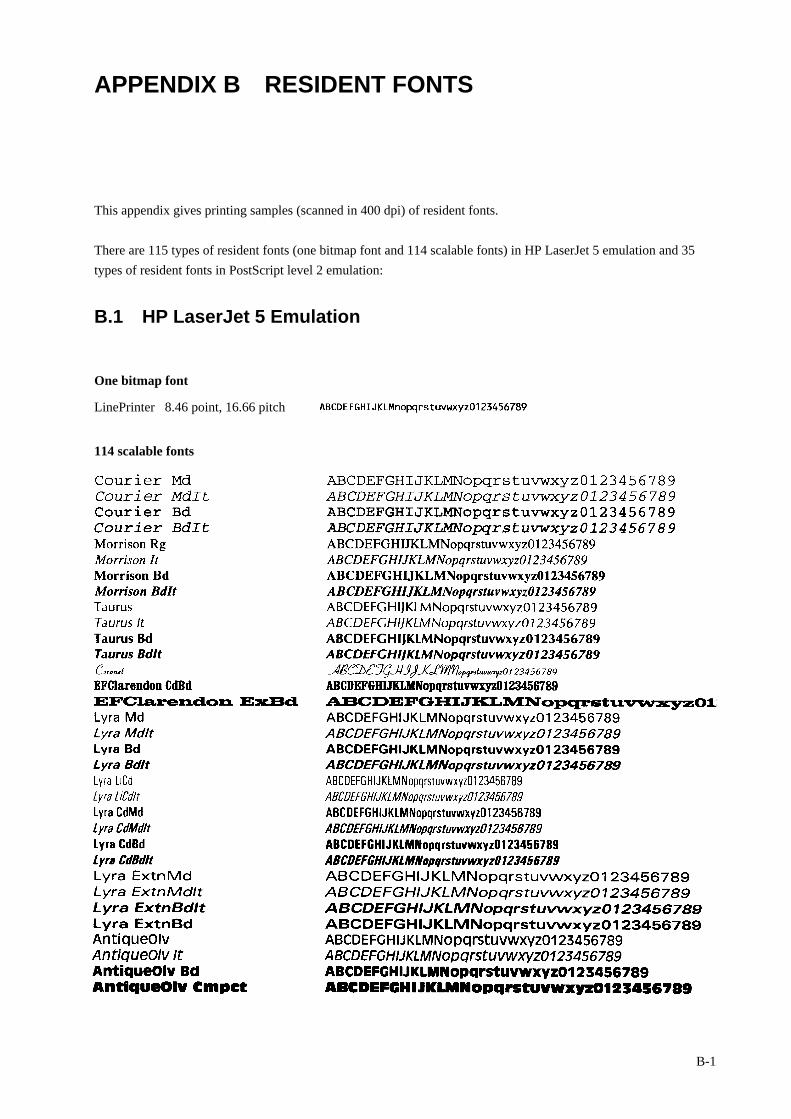
B-1
APPENDIX B RESIDENT FONTS
This appendix gives printing samples (scanned in 400 dpi) of resident fonts.
There are 115 types of resident fonts (one bitmap font and 114 scalable fonts) in HP LaserJet 5 emulation and 35
types of resident fonts in PostScript level 2 emulation:
B.1 HP LaserJet 5 Emulation
One bitmap font
114 scalable fonts
LinePrinter 8.46 point, 16.66 pitch
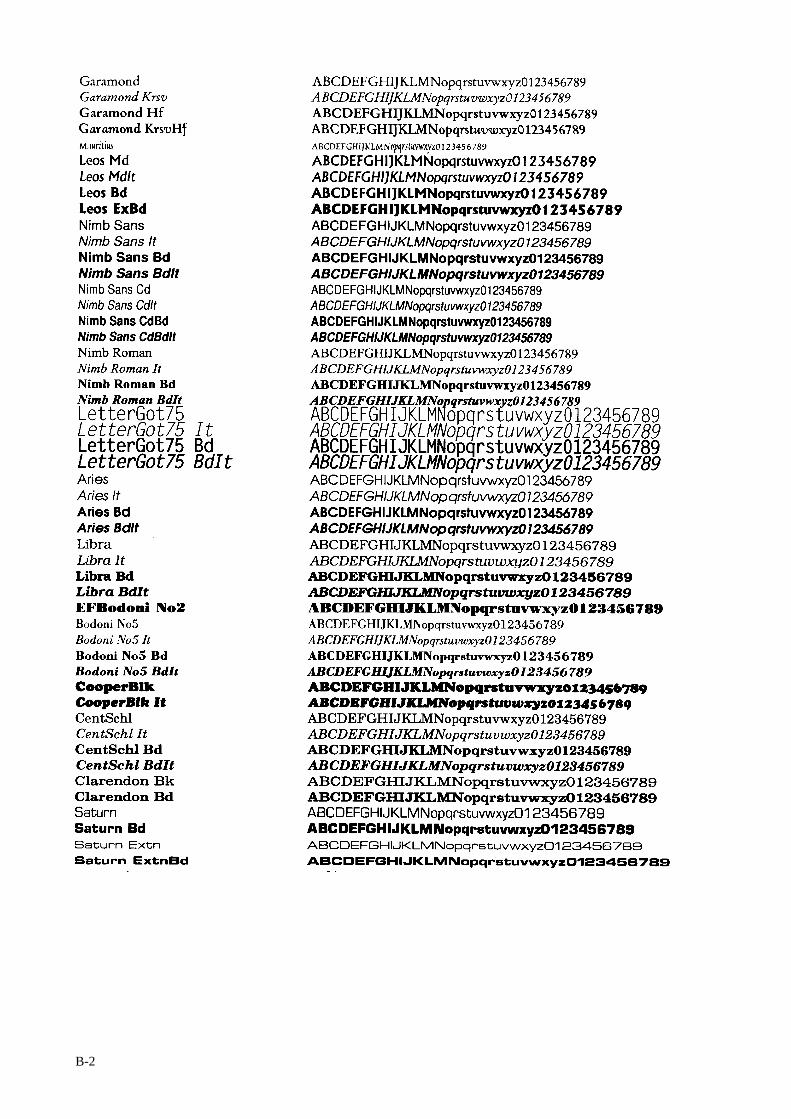
B-2
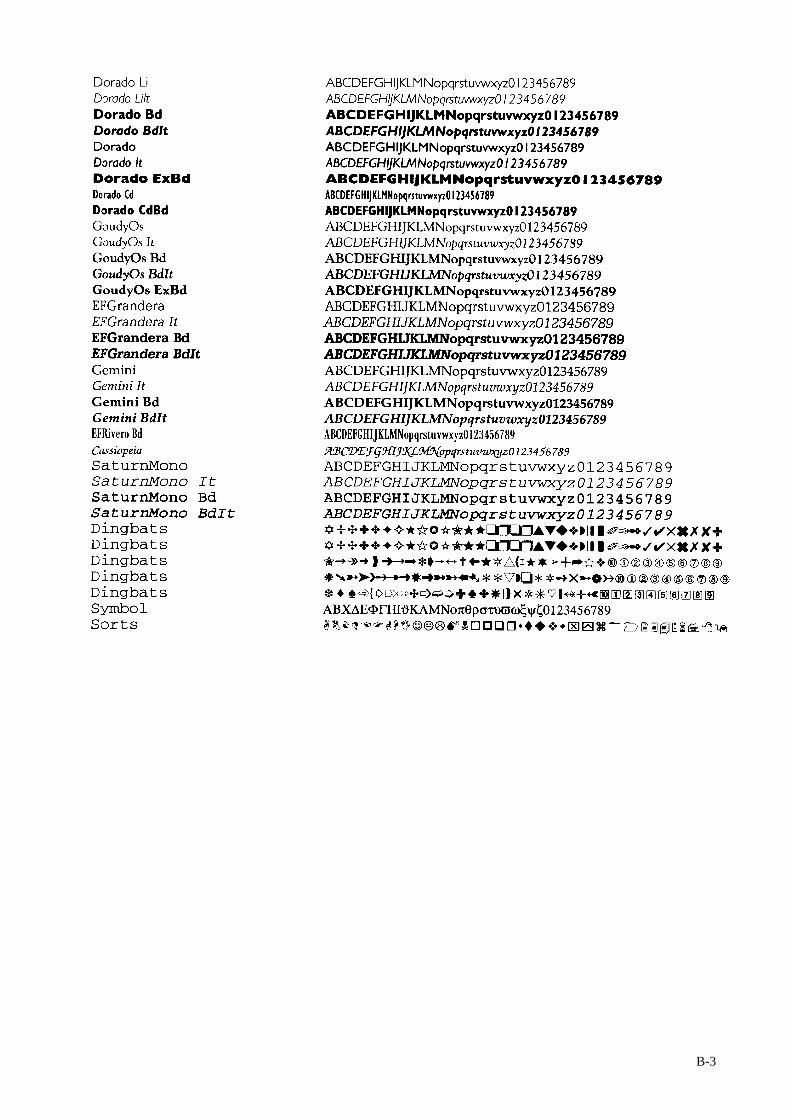
B-3
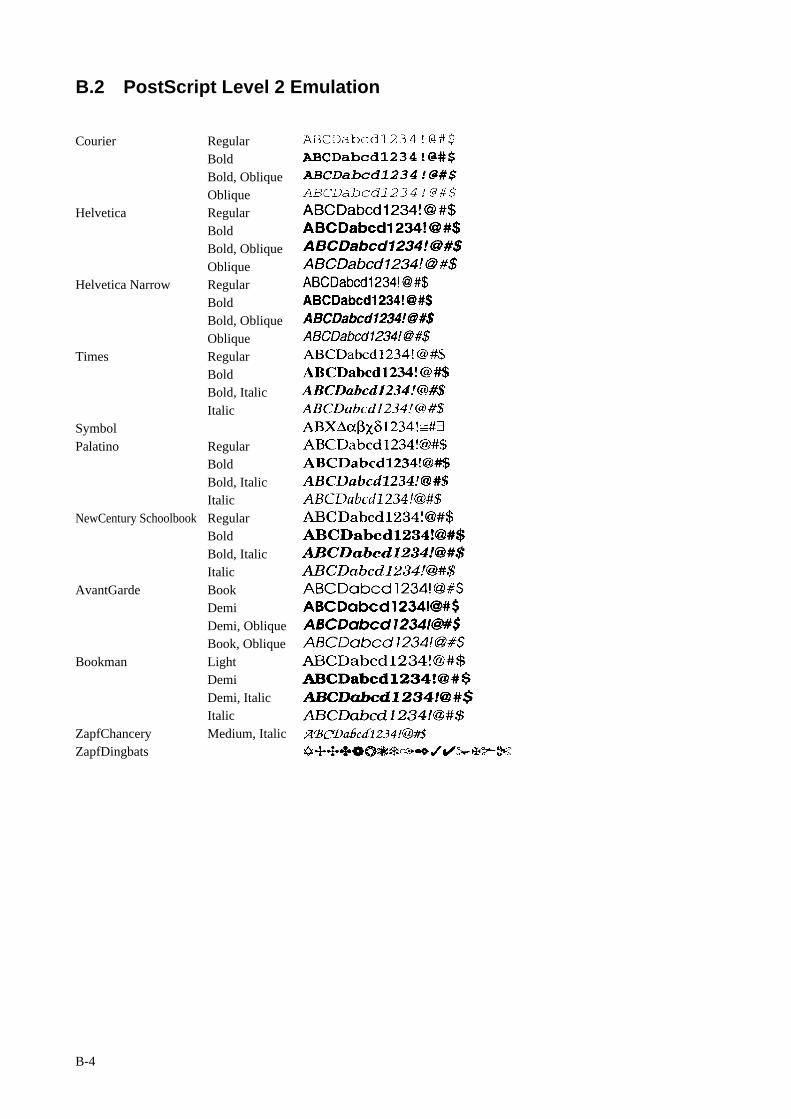
B-4
B.2 PostScript Level 2 Emulation
Courier RegularBoldBold, ObliqueOblique
Helvetica RegularBoldBold, ObliqueOblique
Helvetica Narrow RegularBoldBold, ObliqueOblique
Times RegularBoldBold, ItalicItalic
SymbolPalatino Regular
BoldBold, ItalicItalic
NewCentury SchoolbookRegularBoldBold, ItalicItalic
AvantGarde BookDemiDemi, ObliqueBook, Oblique
Bookman LightDemiDemi, ItalicItalic
ZapfChancery Medium, ItalicZapfDingbats
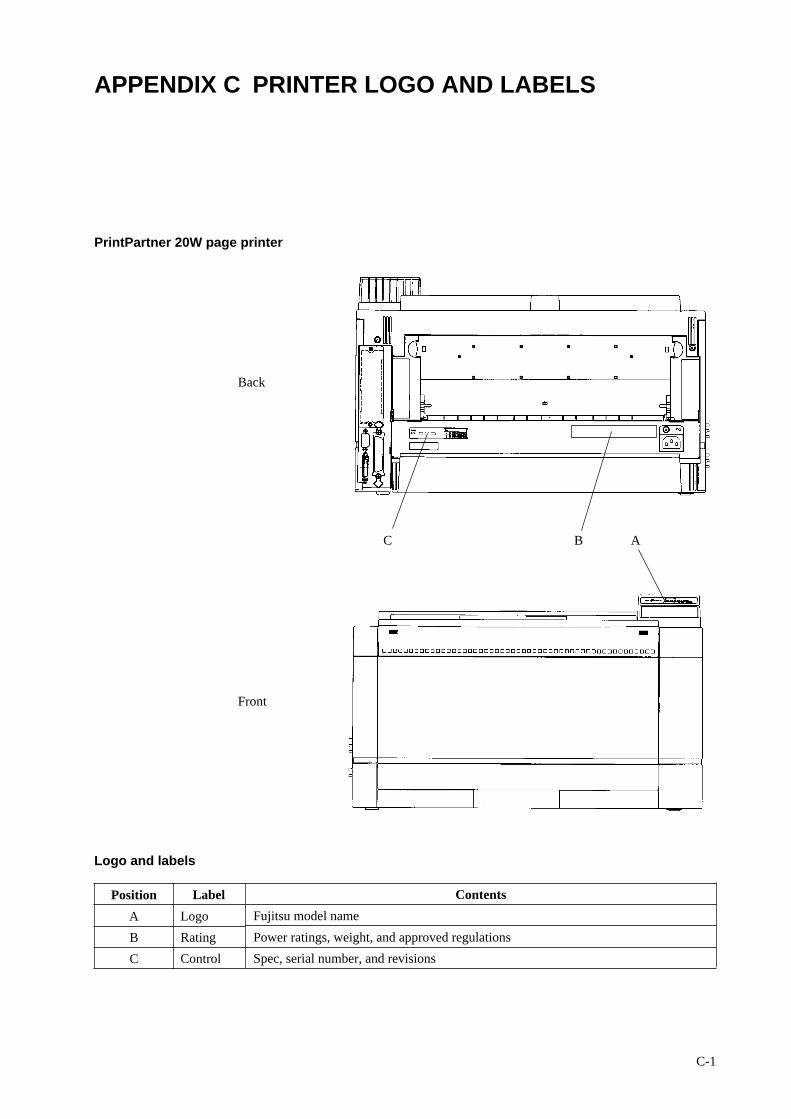
C-1
APPENDIX C PRINTER LOGO AND LABELS
PrintPartner 20W page printer
Back
Front
Logo and labels
Label
Logo
Rating
Control
Position
A
B
C
B A
Contents
Fujitsu model name
Power ratings, weight, and approved regulations
Spec, serial number, and revisions
C

C-2