printing blankets handling and maintenance instructions
TRANSCRIPT

ServicesMedia No. 6036
Habasit– Solutions in motion
Printing BlanketsHandling andMaintenance Instructions
1000 mm
1000 mm
x mm
x mm
ca. 2
m
6
ft

2Contents
Top-quality textile printing solutions 3Precautionary measures / Safety provisions 4Packaging/Handling 5Transport/Storage 6Installation 7–12• Joining on-site • Tensioning and retensioning• Tracking and mistracking• Trimming Immaculate printing blanket surface 13Start/Use 14Pretreatment with silica powder 14Recommended pretreatment 15Application of adhesives 16Cleaning, removing of adhesives 17–18Stripping of agents 18Repairing of printing blankets with TPU 19Repairing of printing blankets with resin 20Selection of recommended adhesives, reducers andcleaning agents 21Chemicals 22Worldwide service network 23Contacts 24
Product liability, application considerationsIf the proper selection and application of Habasit products are not recommended by an authorized Habasit sales specialist, the selection and application of Habasit products, including the related area of product safety, are the responsibility of the customer. All indications / information are recommendations and believed to be reliable, but no representations, guarantees, or warranties of any kind are made as to their accuracy or suitability for particular applications. The data provided herein are based on laboratory work with small-scale test equipment, running at standard conditions, and do not necessarily match product performance in industrial use. New knowledge and experiences can lead to modifi cations and changes within a short time without prior notice. BECAUSE CONDITIONS OF USE ARE OUTSIDE OF HABASIT’S AND ITS AFFILIATED COMPANIES’ CONTROL, WE CANNOT ASSUME ANY LIABILITY CONCERNING THE SUITABILITY AND PROCESS ABILITY OF THE PRODUCTS MENTIONED HEREIN. THIS ALSO APPLIES TO PROCESS RESULTS / OUTPUT / MANUFACTURING GOODS AS WELL AS TO POSSIBLE DEFECTS, DAMAGES, CONSEQUENTIAL DAMAGES, AND FURTHER-REACHING CONSEQUENCES.

3Top-quality textile printing solutions
How to protect and repair your printing blanketCorrect installation and regular care definitely extend the life of your printing blanket.With this handling and maintenance instruction we want to provide you with the most comprehensive information for a long service life and trouble-free operation.

4
Precautionary measures/Information
Before starting installation, operation, or maintenance, please read the installation, operating and maintenance instructions carefully.These instructions contain information for the appropriate use of the printing blanket, and instructions to carry out installation and maintenance work in a safe and expert way.
Open prepared printing blankets must be installed, drawn into the machine, and joined under the supervision of a Habasit technician or staff who has been trained for this job by Habasit specialists, exclusively.
Precautionary measures • Safety provisions
Safety provisions
WARNING
Running printing blankets may catch and cause serious injuries, if touched by body parts or objects.
Always disconnect the machine with the main switch before starting any installation, adjustment, and/or maintenance work.Make sure the machine cannot be switched on again while work is in progress.
CAUTION
• Do not crinkle, crease nor buckle printing blanket
• Do not place printing blanket on belt edges
• Do not pull printing blanket across the floor
• Avoid any contact of the printing blanket with sharp-edged objects
• Use only specified solvents
• We do not recommend to clean printing blankets with acetone or similar,
low-molecular ketones
• Do not exceed operating temperature of 70 °C (158 °F)

5Packaging • Handling
Packaging
Habasit printing blankets are shipped in stable, non-returnable pallets (by airfreight, truck) or in wooden cases (sea freight).
The printing blanket is additionally protected by a plastic foam sheet inside the packaging.
It is imperative to proceed with the utmost care when opening the packaging.
Handle with care!
Employ only the piece of fabric supplied by Habasit by using it as a sling to remove the blanket from the box.
• Do not remove and lift printing blanket with a single, unpadded rope
• Do not crease, crimp, buckle the printing blanket or pull it across the floor or over edges
• Do not step on the printing blanket
Handling

6Transport • Storage
Storage
• Store printing blankets in their original packaging
• Protect from sunlight
• Keep in a cool, dry place (not below –10 °C / 14 °F or above +25 °C / 77 °F, relative humidity between 40 and 65%)
• Storage should not exceed two years
Transport
Habasit printing blankets must be handled with extreme care. Avoid any damage.
• Transport the printing blanket only in its original packaging, or on a Habasit coiling cart (e.g. CH-2400 orCH-2401)
• Check condition of the Habasit printing blanket after each transport
• When winding/transferring the printing blanket, make sure edges are flush (i.e. all coils are precisely placed one upon the other)

7Joining on-site
1 Align rollers and cover up sharp parts/edges
Insert prepared ends into press(Hot pressing a test sample if available. Control the jointand the bottom side)
Hot pressing according to Habasit Joining Data Sheet
Visual check of joint
Cleaning and pretreatment of printing blanket surface with soap, water and silica powder
2
3
4
5

8Tensioning of a new printing blanket
1000 mm
1000 mm
1005 mm
1005 mm
1,005 mm1,005 mm
1,005 mm1,005 mm
1,000 mm1,000 mm
1,000 mm1,000 mm
IntroductionThe following explanation helps to understand the importance of the correct tensioning of a printing blanket.
After tensioning the printing blanket to a constant initial elongation ε, a reduction of the tensile force will take place. This characteristic phenomena is called relaxation. It is not visible, but can be observed in a decrease of the shaft load. The decrease of force is originally large and gradually tapers off until it reaches a constant value. The effective tensile force after the running-in period has to be at least equal or even greater than the required force for slippage-free operation.
This prerequisite is achieved, if the printing blanket is suffi ciently tensioned to the recommended initial elongation ε (see product data sheet of the respective printing blanket).
First time tensioning of a new printing blanket
• Place two measuring marks on a distance of 1,000 mm oneach side of the untensioned blanket
• Tension the blanket with the tensioning device to the required initial elongation
• At for example 0.5% initial elongation, the correct tension is achieved if the distance of the marks has increased to1005 mm
Because Habasit considers the relaxation effect in his recommendation for the initial elongation ε, the above described method makes sure that the blanket is suffi ciently tensioned. Periodical retensioning is not required and not recommended.
LegendF Tensile force [N]1 Tensile force immediately after tensioning2 Effective tensile force after running-in3 Required tensile force for slippage free operation after relaxation

9
1000 mm
1000 mm
x mm
x mm
1000 mm
1000 mm
1,000 mm1,000 mm
1,000 mm1,000 mm
1,000 mm1,000 mm
1,000 mm1,000 mm
x mmx mm
x mmx mm
Tensioning of a previously tensioned printing blanket
IntroductionIf a used printing blanket has to be removed (e.g. for machine revision work), the characteristic behavior of synthetic material when it is released from tension has to be considered.Immediately after the release (t0), the blanket contracts. During the so-called elastic recovery , the blanket contracts to a certain amount of its initial length only (lε), it does not reach its initial length (l0).
After the elastic recovery, the belt still recovers gradually over a long time period. First the process is going on quite fast (however, it is not visible) and gets slower and slower. This viscoelastic recovery takes days or even weeks until the contraction comes to a standstill. Again, the belt does still not reach its initial length.
Removal (slackening) of a printing blanket, tensioning of a previously tensioned printing blanket
• Before (!) slackening the blanket, place measuring markson a distance of for example 1000 mm on each side of the tensioned blanket. If the marks of the fi rst tensioning are still visible, these can be used as well
• Memorize or take a note of the distance between the measuring marks of the tensioned blanket!
• Slacken the blanket by releasing the tensioning device. The distance of the measuring marks gets shorter. The absolute length (x) is not of interest
• After the maintenance work is fi nished, install the blanket and tension it until the measuring marks reach thepreviously noted distance (for example 1,000 mm)
This method makes sure that the blanket is tensioned with the proper percentage related to its untensioned length.
Caution: Do not retension a released blanket with the method described for the tensioning of a new printing blanket! It may result in overtensioning, as the new elongation will be added to the not fully released part of the remaining elongation.
The difference of the initial belt length (l0) and the length after the viscoelastic recovery (l3) is called remaining elongation. The amount of the remaining elongation depends on the time elapsed after release. It might be considerable after release (t1) and is usually negligible after some days (t2) and weeks (t3). Because the exact amount of the remaining elongation can neither be calculated nor be forecasted, the de-installation and tensioning of a previous tensioned printing blanket has to be done differently compared to the fi rst-time installation.
10Tracking
“Tracking” refers to the procedure of adjusting a printing blanket so that it runs straight and stable (without any sideways movement) through the machine. Usually this is achieved through one or several of the following means:
• Proper tensioning of the left and right edges of the blanket
• Adjustable snub rollers on the return path
• Fixed guiding blocks set against the edge of the printing blanket
• Automatic tracking control devices with a sensor on the edge of the printing blanket, controlling a tracking roller
Fixed guiding blocks as well as automatic tracking control devices should only be engaged after straight and steady running has been ensured by other means (especially proper tensioning of the right and left edge). They are good to compensate for any additional influences that might be added during the service life of the blanket, but they should not have the task of making it run straight if it does not do so naturally.
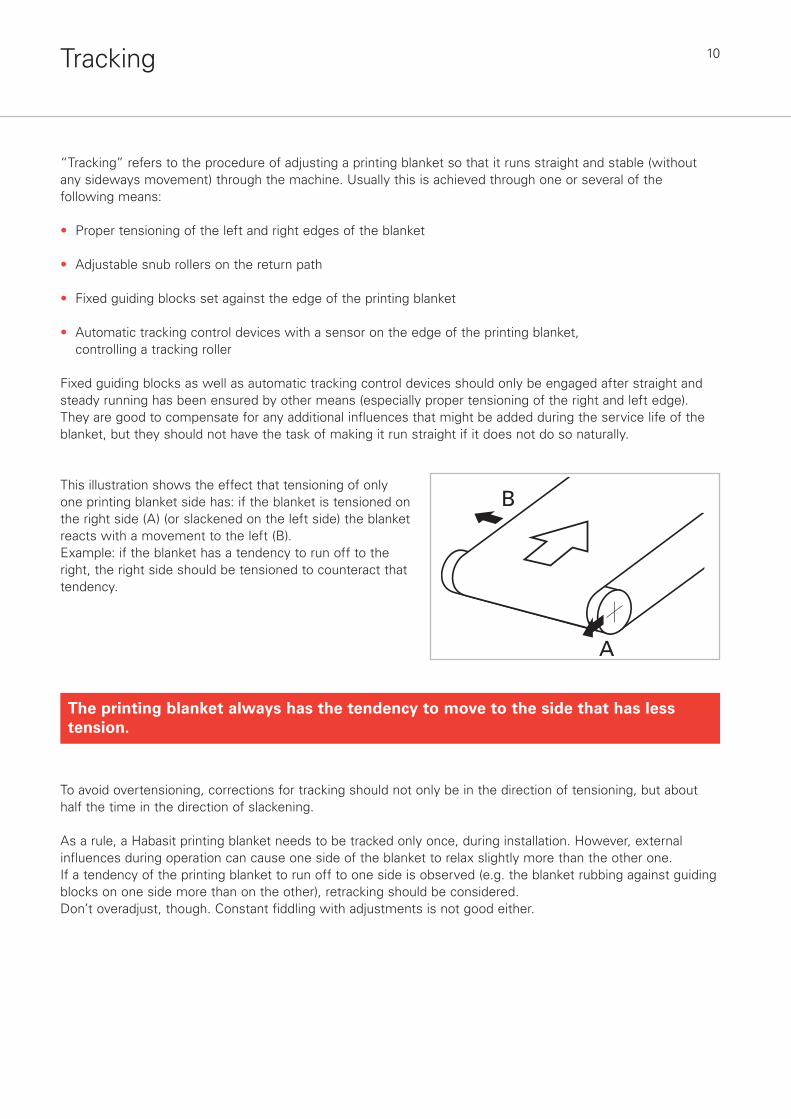
This illustration shows the effect that tensioning of only one printing blanket side has: if the blanket is tensioned on the right side (A) (or slackened on the left side) the blanket reacts with a movement to the left (B). Example: if the blanket has a tendency to run off to the right, the right side should be tensioned to counteract that tendency.
A
B
To avoid overtensioning, corrections for tracking should not only be in the direction of tensioning, but about half the time in the direction of slackening.
As a rule, a Habasit printing blanket needs to be tracked only once, during installation. However, external influences during operation can cause one side of the blanket to relax slightly more than the other one. If a tendency of the printing blanket to run off to one side is observed (e.g. the blanket rubbing against guiding blocks on one side more than on the other), retracking should be considered. Don’t overadjust, though. Constant fiddling with adjustments is not good either.
The printing blanket always has the tendency to move to the side that has less tension.
11
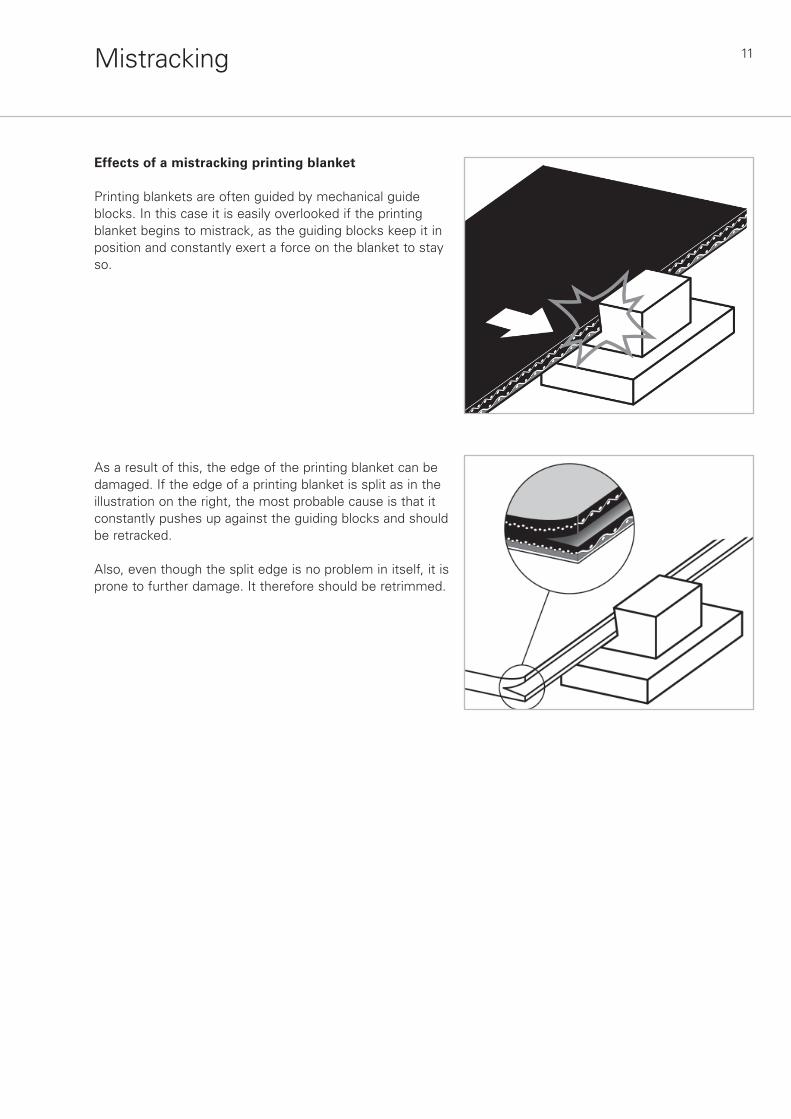
Effects of a mistracking printing blanket
Printing blankets are often guided by mechanical guide blocks. In this case it is easily overlooked if the printing blanket begins to mistrack, as the guiding blocks keep it inposition and constantly exert a force on the blanket to stay so.
As a result of this, the edge of the printing blanket can be damaged. If the edge of a printing blanket is split as in the illustration on the right, the most probable cause is that it constantly pushes up against the guiding blocks and should be retracked.
Also, even though the split edge is no problem in itself, it is prone to further damage. It therefore should be retrimmed.
Mistracking

12Trimming
Slight deviations from straight running of the edge of a newly installed, untrimmed blanket are normal; printing blankets therefore normally are edge-trimmed after running in. This is especially important if automatic tracking control devices are used that use a sensor on the edge of the printing blanket.
The proper procedure is as follows:
• Tension the blanket to its proper elongation as explained in the respective section
• Switch off automatic tracking controls, if present
• Track the blanket until it runs straight in the center of its slider bed as described in the respective section of this manual
• Let the blanket run in for several hours and observe tracking. If necessary, retrack, until steady running is achieved.
Tracking is best observed by fixing a ballpoint pen on the machine frame and having it trace on the blanket (silver colored ink works well on the black surface)
• Fix a trimming device on the machine frame. This should feature a blade that is beveled on one side only, so that the plain side can be set against the blanket that remains in the machine, the beveled side against the cut-off strip. Carefully adjust the blade in running direction of the blanket, so that it does not exert lateral forces on the blanket when engaged
• Run the blanket at creep speed, carefully lower the blade into the blanket until it reliably penetrates through the blanket and cuts off a strip
• Manually cut the beginning of the strip loose, so that it can be taken away at the side
• Let the blanket run for one revolution until the strip has been cut off all round
• If two trimming devices are available, both sides can be cut at the same time. That has the additional advantage that any lateral forces of the trimming operation will cancel each other out
With the edge now perfectly trimmed, automatic control devices have a reliable basis; they now can be switched on.

13Immaculate printing blanket surface
Habasit printing blankets are manufactured to the highest standards, they allow superb printing results. Care should be taken in use, cleaning and maintenance, in order to preserve this quality, so best printing results are possible over the full service life, and to extend this service life as long as possible.
Habasit printing blankets are delivered with superb surface quality. All use and maintenance of the blanket should strive to preserve it. The reason is the following:
For instructional purposes we look at a damage in the printing blanket surface, which might be caused by an accident or careless maintenance work.
When adhesive is now spread on the printing blanket, more adhesive is taken up by the damaged spot.
When the fabric is pressed on, the adhesive (we are assuming a water soluble adhesive here) is partially absorbed into the fabric. Since there is more adhesive at the damaged spot, more adhesive is absorbed into the fabric.
When dye is now applied to the fabric in the printing process, depth of penetration is limited by the adhesive that already fills part of the thickness of the fabric.
Where the fabric adhered to the damaged part of the blanket, less dye is absorbed by the fabric; this spot shows weaker coloration; a printing flaw is the result.
This example showed results when water soluble adhesive is used, as consequences are most severe there. However, damages of the printing blanket surface have negative effects on printing result regardless of the adhesive system used.
Treat the surface of a printing blanket with care!Scratching, gouging, cutting is to be avoided at all costs. So is creasing, crimping and buckling of the blanket as a whole.If damages are present, repair them (see pages 19 – 20) or have them repaired.
14Start/Use • Pretreatment with silica powder
Start/Use
Operating preparationsAfter installing and running-in the Habasit printing blanket, thoroughly clean the conveying side with soft brushes. The following cleaning agents are suitable for this preliminary cleaning:
• Water and soap (household cleaners)
• Ethyl and butyl acetate
• Petroleum spirit or white spirits of low aromatic content (< 5% amount of aromatics)
ATTENTION
Limited contact with acetone admissible, not resistant to MEK (low ketones such as methyl ethyl ketone) and chlorinated hydrocarbons.
After cleaning carefully, rinse printing blanket with water.
Pretreatment with silica powder
One or several plastic tubes fi lled with silica powder are packed with each printing blanket at Habasit. They are inside the winder core (cardboard tube). Pretreatment of the printing blanket with this powder is a must since this will microscopically roughen the printing blanket surface to assure perfect adhesion of the adhesive.
Procedure
• Clean printing blanket with water and soap
• Let dry
• Pretreat blanket with the silica powder:Station two persons at the end of the machine. Apply manually a paste comprising approx. 80% impalpable pumice or silica powder + 20% water, rub the blanket thoroughly with brushes, wash it using the printing blanket washing unit allowing the blanket to complete several full runs
• Rinse off with water
• Let dry

15Recommended pretreatment
Application of Resina MC ATR 1353 (or similar products available in the market)
The coating product Resina MC is used in combination with Habasit printing blankets in three important areas:
Primary coating of Habasit printing blanketsRepairing of minor surface damages (see page 20)Repairing of permanent adhesive films (see page 20)
Primary coating of Habasit printing blanketsBy preventive coating of the surface of Habasit printing blankets with Resina MC, the resistance to scratching is markedly improved. This procedure can considerably extend the service life of the printing blanket and also improve the bonding of the adhesive to the blanket surface.
When a printing blanket is new, its surface is probably smooth and glossy. Before applying any kind of adhesive and/or protective resin film, the surface should be washed by proper solvents and roughened by silica powder. By this way the contact area between surface and adhesive film is increased, better adhesion is obtained on the surface.
For this purpose the following procedure is recommended:• See “Pretreatment with silica powder” on page 14
• Make several full runs of the blanket with Idrosolveol or Adhesolv, using washing unit of the machine• Take off washing unit• Place the doctor blade – make 2 – 3 turns of blanket with Idrosolveol• Dry the blanket (Before applying the resin, check that the washing unit, which has been detached
beforehand, has not left any residue of water on the blanket)• On top, apply Resina MC, 150 g/m2 or the needed quantity to obtain a well levelled printing surface. (Pour the adhesive from a suitable vessel quickly and evenly over the whole length of the blade, at the
same time starting up the run of the blanket in a continuous manner and at the minimum speed.) It is also possible to apply a coat of Primer ATR before using Resina MC
If the product gets too viscous during application ATR adhesives and Resina MC can be diluted with 3-4% acetone or ethyl acetate.
• When the required amount of adhesive has been applied, the blanket is left running until only a small residue of adhesive remains in front of the blade
• On completion of this operation the blade must be lifted quickly and simultaneously on both sides by means of the support screws
• After completion of the application, let the blanket turn for at least two hours, then on top apply 100 – 150 g/m2 Thermoplast or permanent adhesive with the same procedure.
Let the blanket turn for at least one hour in order to obtain complete evaporation of solvents, before you start printing
PS: Blanket support rollers of machine must be well teflonated.

16Application of adhesives
Water soluble adhesivesMay be applied directly on the printing blanket with the adhesive application system.The adhesion of polyvinyl alcohol (PVA) adhesives is improved by adding 10 – 15% of ethanol to the adhesives in the machine.Whenever the machine stops or the printing process is scheduled to be stopped (e.g. on weekends), the adhesive applicator must be cleaned, or else the adhesive will dry and cake on the doctor blade. This may result in mechanical damage (scores/scratches) on the printing blanket surface when operation restarts.
Thermoplastic and permanent adhesivesBoth types can be used without any problem on Habasit printing blankets.Some thermoplastic adhesives are primed with acetone by the manufacturer. This does not pose a problem for Habasit printing blankets since the adhesive has to be aired after application to the printing blanket, and this usually takes several hours. During that time, the acetone evaporates completely and the surface regenerates totally.
When only water soluble adhesives are used, priming with a thermoplastic adhesive offers substantial advantages. A thermoplastic adhesive is applied to the cleaned/prepared surface and the water soluble adhesive is then applied as usual on top of the thermoplastic adhesive.This provides additional protection for the printing blanket.(See also list “Recommended adhesives” on page 21)
Adhesion of adhesives to the printing blanket surface• Should any problems of adhesion arise, check whether the pretreatment with silica powder was
done with sufficient care. In case of doubt, repeat pretreatment• Always reorder silica powder from the nearest Habasit Affiliated Company or from Headquarters
in Reinach, Switzerland. Do not use any other products• Never roughen printing blanket with emery paper! This may cause deep grooves where water will
accumulate and further dilute the wet adhesive
Intensive treatment with ethyl acetate to further improve affinity to adhesivesMount a piece of cloth, a “flag” on a rod across the full width of the printing blanket, pour ethyl acetate on the cloth and let the machine run at creep speed for several cycles.Remove “flag” and let the solvent evaporate. The printing blanket is now completely degreasedand adhesion is improved.

17Cleaning, removing of adhesives
Cleaning agentsProceed with extreme care when using so-called “removers” and “strippers.”Before using any agent, test whether it attacks the Habasit printing blanket: Apply some drops of the agent near the edge (outside of the printing area) and let react for 1 to 2 hours. Observe the effect on the printing blanket. If the surface starts to swell after a short period of time, do not use this agent under any circumstances.
Cleaning to remove residual pigment dyestuffIn order to remove and prevent the formation of residual pigment dyestuff, it is advisable to rub the dry, uncoated printing blanket every fortnight with the following cleaning solution and to rinse it with water after a reaction time of about 1 to 2 hours.
Composition of cleaning solution:35% of 95° ethyl alcohol65% of ND-150 from ChemsearchIt is also possible to clean the printing blanket by washing it with 50% acetic acid.
In case of extreme, persistent soiling, alkaline cleaning pastes may be used. However, such pastes are to be applied locally only. Due to their high degree of aggressiveness, their time of contact with the printing blanket should not exceed 10 minutes.The pastes are processed at room temperature and then rinsed off with lots of water.
Cleaning to remove lime depositsRecommendation: Clean the printing blanket with 10% hydrochloric acid or with 50% acetic acid, and rinse with water.
Removal of thermoplastic adhesivesPreparation work• All heating devices have to be turned off and cooled down• All mechanical parts have to be released from the printing blanket
surface• Fix a flag, a piece of absorbent cloth or molleton, close to the return
drum. The flag has the same size as the adhesive layer and a length of about 2 meters
• Install a plastic squeegee (e.g. polyurethane elastomer, Shore 95) on the return drum and make adjustment so that the squeegee slightly touches the printing blanket surface
• Install collecting buckets underneath the squeegee to collect the residues and to prevent them from pouring onto the machine parts and floor
A
B
ca. 2
m
6
ft
C
LegendA = FlagB = SqueegeeC = Collecting buckets or tray

18Cleaning, removing of adhesives • Stripping of agents
Procedure• Pour butyl acetate or other approved chemical on the flag• Run the machine at creep speed (approx. 5 m/min)• Make sure the squeegee never runs dry. Continuously pour butyl acetate on the flag. We do not recommend direct pouring on the printing blanket• Use approximately 1 liter of butyl acetate per m2 of printing blanket• Let the machine run for 2 or 3 cycles• The thermoplastic adhesive should be removed by now. Some smaller spots can be treated manually with a cloth
Chemicals/Solvents
Chemical Solvent Recommendation
Alcohol Methyl alcohol Ethyl alcohol Isopropyl alcoholEster Butyl acetate Ethyl acetateAromatic Benzene Toluene XyleneAliphatic Hexane Cyclohexane
Ketone Acetone
Methyl ethyl ketone (MEK) Chlorinated Methyl chloridehydrocarbon (Mono)chlorbenzene Chloroform Trichloroethane TrichloroethyleneEther Ethyl ether Tetrahydrofurane (THF)
Legend
= Usable
= Usable, but limited contact (max. 1 minute) with printing blanket surface only = Not recommended
Stripping of agents (e.g. Idrosolveol or Adhesolv)• Before starting to remove the film, take off the washing and drying unit
• Now attach a piece of heavy fabric (cotton or wool) of the same width as the film of adhesive applied to a fabric feed roll or alternatively to a screen printing carriage. Soak the fabric thoroughly with stripping agent.
While advancing the blanket at slow speed, take care to ensure that the fabric is kept well soaked with stripping agent.
• Exert a pressure on the blade located on the printing blanket, continue this operation until the film of adhesive has been removed completely
• Remove the fabric and spray the blanket with stripping agent until it has been cleaned completely.Wipe the blanket thoroughly with stripping agent

19Repairing of printing blankets with TPU
In many cases, Habasit printing blankets can be repaired with short machine downtimes. The thermoplastic layer on the conveying side of the blanket offers various repairing possibilities.
Required materials
Material/Tool SpecificationFilling material Meltable foil ENAS-13XB (black, hard TPU)Support plate Steel or aluminum plate with a planarity of 0.1 mm / 200 mmSoldering tool Electronic soldering station. Recommendation: Weller WES 50Soldering bit Weller ET-MX chrome-plated, special Habasit surface treatment (N-28472)Cooling plate Steel or aluminum plate, about 5 mm thickSurface grinding disk Round aluminum disk, about 120 mm diameter, round shape is preferableUniversal knife Stanley box cutter, NT cutter or equivalentRandom sander Electric random orbit sander (Bosch, Makita, DeWalt or equivalent)Abrasive paper 150 grit and 400 grit wet and dry paper. Recommendation: SIA 1913 siawatDouble-face adhesive tape Lohmann Duplofol 0.1 mm thick, 310 mm wide (N-28525)Cover sheet ENIS-10 meltable foil. Serves as a transparent, heat-resistant cover sheet, when melting the surface of the printing blanketCooling spray Fluorinated hydrocarbon-free (FHC-free) product
Repairing• Move the printing blanket until the damaged area is positioned over a
crossbeam
• Slide support plate under damaged area and fix it with double-face adhesive tape
• Clean and dry damaged area of all residual pigments and impurities
• With soldering tool, melt down conveying layer at damaged spot to the fabric, to obtain a vertically melted borderline. Do not melt at a flattening angle as the filling material will not adhere sufficiently
• Fill cleared area with meltable foil by means of the soldering tool
• Make sure that the meltable foil to be filled in is always liquefied; this will produce a homogeneous bond with the material of the conveying cover
• The formerly damaged area will have to be filled with meltable foil above the regular surface of the printing blanket
• Cool area of repair with cooling spray
• Grind off excess material at repaired spot with surface grinding disk. Smooth crosswise to assure a uniform result

20
Repairing of minor surface damages with Resina MC ATR 1353This procedure is suitable for repairing minor surface damages such as, for instance, scores, grooves, scratches. See “Application of Resina MC” on page 15 for the relevant coating instructions.
Repairing of permanent adhesive filmsThis application helps you to repair worn permanent adhesive films or heavy soiling from fibers on the adhesive surface, without completely removing the adhesive coating. See “Application of Resina MC” on page 15 for the relevant coating instructions. In this case, the necessary quantity of Resina MC is dependent on the state of the permanent adhesive. Resina MC is usually applied several times in small quantities until achieving an absolutely even surface for the application of the new permanent adhesive.
Chemical and Appearance Viscous solution, practically transparent, yellowishphysical properties Viscosity at 25 °C 440 ± 150 cps Solvent Ethyl acetate, acetone Tackiness Not sticky Adhesion Good
Suitable for • leveling of insufficiently even printing blanket surface • full neutralization of the tackiness of a permanent adhesive • obtaining uniform permanent adhesive films, damaged as a result of abrasion/scuffing • reanchoring of permanent adhesives detached from the printing blanket • improving the resistance of permanent adhesives to solvent when printing with pigment and dispersion dyestuff
Product description Resina MC ATR 1353
Dosage: Approx. 150–200 g/m2 printing blanket
Chemical and Appearance Viscous solution, opaquephysical properties Viscosity at 25 °C Approx. 400 cps Solvent Ethyl acetate, acetone Tackiness Not sticky Adhesion Excellent; can be directly applied to the printing blanket
Suitable for • use as a bonding agent between the surface of the printing blanket and the subsequently applied Resina MC
Product description Primer ATR (synthetic resin in organic solvent)
Application conditionsPrimer ATR can be diluted with ethyl acetate prior to application, the mixing ratio being dependent on the condition of the printing blanket surface or the damage to be repaired (up to 30% ethyl acetate can be added for new printing blankets). It is recommended to apply the coating at a low printing blanket feed rate.
Due to the constitution of the primer, sediment can form. It is therefore recommended to mix the product thoroughly before removing it from the container. Before applying the Primer ATR, the printing blanket must be thoroughly washed, degreased and dried. The primer can subsequently be rubbed down with sandpaper, grain size 300, to obtain improved uniformity of the printing surface.
Dosage: Approx. 120 – 150 g/m2 printing blanket
Manufacturer: ATR Chemicals SA, www.atrchemical.com
Repairing of printing blankets with resin

21Selection of recommended permanent and thermoplastic adhesives, reducers and cleaning agents
Manu- Type of Designation/ Activation Approx. applied Recommended Recommendedfacturer product Application °C quantities (g/m2) reducer agent
Permanent Kiwotex® DK 66 D – 150 – 200 Water Kiwotex® stripper adhesives Cotton, cotton mixtures, synthetics Kiwotex® DK 54 L – 150 – 200 Kiwosolv® L72 Kiwotex® stripper Cotton, blended fabrics (Medium heavy cloth) Thermoplastic Kiwotex® TDK 35 L 30 – 60 150 – 200 Kiwosolv® L72 Kiwotex® stripper adhesives Synthetics and heat- sensitive fabrics Kiwotex® TDK 55 L 50 – 70 150 – 200 Kiwosolv® L72 Kiwotex® stripper Synthetics and heavy cloth Protection Kiwotex® TDK 85 L – 150 – 200 Kiwosolv® L72 Kiwotex® stripper precoat Protection layer for use of PVA adhesives Protective Primer ATR 2720 P/ soft – 120 – 150 Ethyl acetate Adhesolv (ATR 3322) resines Protection or levelling of surface Idrosolveol (ATR 1222) Resina MC ATR 1353 / hard – 120 – 150 Ethyl acetate Adhesolv (ATR 3322) Protection or levelling of surface Idrosolveol (ATR 1222) Permanent Adesivo 642 ATR 1642 / soft 20 – 25 100 – 150 Ethyl acetate Adhesolv (ATR 3322) adhesives Wool, lycra and synthetic fibers Idrosolveol (ATR 1222) Attamin GO ATR 1566 / hard 20 – 25 100 – 150 Ethyl acetate Adhesolv (ATR 3322) Cotton, cotton blends, synthetics Idrosolveol (ATR 1222) Thermosensitive Atrasol T ATR 1597 / soft 15 100 – 150 Ethyl acetate Adhesolv (ATR 3322) agents Silk, cotton, polyester, lycra Idrosolveol (ATR 1222) Atrasol X ATR 1597 / hard 20 100 – 150 Ethyl acetate Adhesolv (ATR 3322) Silk, cotton, polyester, lycra Idrosolveol (ATR 1222) Thermoplastic Atrasol LV ATR 1721 / soft > 30 100 – 150 Ethyl acetate Adhesolv (ATR 3322) adhesives Synthetics and their lycra blends Idrosolveol (ATR 1222) Atrasol OG ATR 1731 / hard > 45 100 – 150 Ethyl acetate Adhesolv (ATR 3322) Synthetics and their lycra blends Idrosolveol (ATR 1222) Cleaning Remover NLP ATR 1336 – – – – agents Removing of dyes and fabric piles Thermoplastic Grafiplast TP-630 30 20 – 25 Ethyl acetate Ethyl acetate
adhesives Grafiplast TP-640 40 Ethyl acetate Ethyl acetate Grafiplast TP-650 50 Ethyl acetate Ethyl acetate Grafiplast TP-660 60 Ethyl acetate Ethyl acetate Grafiplast TP-680 80 Ethyl acetate Ethyl acetate Grafiplast TP-690 90 Ethyl acetate Ethyl acetate
Permanent Grafiplast DK-620 20 Ethyl acetate Ethyl acetate adhesive Table printing, T-shirts Acetone (brief contact) Acetone (brief contact)
Wet adhesive Grafiplast WK-621 20 Water Ethyl acetate Primer Resina SF – 50 Ethyl acetate Persolvan NV Permanent Vistasol® K – 100 Ethyl acetate Persolvan NV adhesives (KL / G1 / GM1) Silk, cotton, polyester Vistasol® PM2 – 100 Ethyl acetate Persolvan NV Wool, nylon, acrylic fibers, jersey of synthetic fibers Vistasol® PM3 – 100 Ethyl acetate Persolvan NV Silk, cotton, polyester, acetate, jersey of cotton Thermoplastic Vistasol® TP40 40 150 – 200 Ethyl acetate Persolvan NV adhesives Vistasol® TP50 50 150 – 200 Ethyl acetate Persolvan NV Synthetic Resina BR / BR2 – 50 Ethyl acetate Persolvan NV
resin Repair / levelling of damaged blanket
Important remarks: Chemicals can damage your health. In any case consult the manufacturer’s Material Safety Data Sheet (MSDS) to ensure proper storage and use as well as to prevent health and safety problems and to avoid any risk for your staff and the product. This list is based on the information of the manufacturers and does not claim to be complete. Habasit cannot be made responsible for problems which are caused by the wrong use of these chemicals. Always follow Habasit’s or the manufacturer’s recommendations or consult the manufacturer’s operating instructions.
GR
AFI
TE
Xw
ww
.gra
fitex
.com
Vil
la I
nd
ust
rie
Ch
imic
he
s.r.
l.w
ww
.acf
is.f
eder
chim
ica.
itA
lber
t R
ose
Ch
emie
ww
w.k
iwo.
com
AT
R C
hem
ical
s S
Aw
ww
.atr
chem
ical
.com

22Chemicals
General information
Solvents may cause damage. Keep the contact time as brief as possible. We advise against using any kind of nonrecommended solvents.
See also “Selection of recommended permanent and thermoplastic adhesives, reducers and cleaning agents” on page 21
• Mineral products such as cleaners, thinned mineral acids and their salts do not react with the printing blanket
• Soluble dyestuffs will not affect the printing blanket as long as the white spirits used in the thickenings are perfectly emulsifi ed and contain only a low percentage of aromatic compounds (< 5%)
• Under normal working conditions, no damage will occur in the pH range from 3 to 11
• The printing blanket will not be damaged by atmospheric variations
• For detailed technical data for each belt type, please consult the specifi c product data sheet which can be downloaded from www.habasit.com

23Worldwide service network
Habasit’s worldwide service network offers you tailor-made solutions to meet your needs and fast delivery times. You can count on the reliability of a professional service crew and the availability of installation presses in over 80 locations worldwide. For additional information please visit: www.habasit.com
Available PP/PM presses for fitting on-siteCountries Habasit company 2,400 mm 3,000 mm 3,600 mm 4,200 mmArgentina USA
Australia South East Asia
Austria Belgium
Bangladesh India
Brazil USA Canada Chile USA
China (PRC) East Asia Columbia USA Czech Republic Austria Egypt Italy Finland Sweden
France Germany
Great Britain Greece Italy Hungary Austria
India Indonesia South East Asia
Israel Italy Italy
Japan
Mexico USA Netherlands Pakistan South East Asia
Poland Austria Romania Austria Russia Austria Singapore South East Asia
South Korea South East Asia Spain
Sweden
Switzerland Germany
Taiwan East Asia
Thailand South East Asia Turkey Italy
USA Venezuela USA
Responsible

HeadquartersHabasit AG CH-4153 Reinach-BaselPhone +41 61 715 15 15 Fax +41 61 715 15 55E-mail [email protected]
Copyright Habasit AGSubject to alterationsPrinted in SwitzerlandPublication data:6036INS.TPR-en1010HQR
Austria Habasit GmbH, Wien Phone: +43 1 690 66www.habasit.at
BelgiumHabasit Belgium N.V., ZaventemPhone: +32 2 725 04 30www.habasit.be
CanadaHabasit Canada Ltd., OakvillePhone: +1 905 827 4131www.habasit.ca
ChinaHabasit East Asia Ltd., Hong KongPhone: +852 2145 01 50 www.habasit.com.hk
Habasit (Shanghai) Co., Ltd.ShanghaiPhone: +8621 5488 1228Phone: +8621 5488 1218www.habasit.com.hk
Czech RepublicHabasit Bohemia spol. s.r.o., BrnoPhone: +4205 41 421 651 www.habasit.cz
FranceHabasit France S.A.S., MulhousePhone: +33 389 33 89 03 www.habasit.fr
Germany Habasit GmbHEppertshausenPhone: +49 6071 969 0 www.habasit.de
HungaryHabasit Hungária Kft., EsztergomPhone: +36 33 510 610 www.habasit.hu
IndiaHabasit-Iakoka Pvt. Ltd., CoimbatorePhone: +91 422 262 78 79www.habasitiakoka.com
ItalyHabasit Italiana SpACustomer Care:Phone: 199 199 333For int. calls: +39 0438 911444 www.habasit.it
JapanHabasit Nippon Co. Ltd., YokohamaPhone: +81 45 476 03 71 www.habasit.co.jp
NetherlandsHabasit Netherlands BV, NijkerkPhone: +31 33 24 72 030 www.habasit.nl
New Zealand Habasit Australasia Ltd., Hornby Phone: +64 3348 5600 www.habasit.co.nz
NorwayHabasit Norge A/S, OsloPhone: +47 81 55 84 58www.habasit.no
PolandHabasit Polska Sp. zo.o., Dàbrowa Górnicza,Phone: +48 32 639 02 40www.habasit.pl
RomaniaHabasit Import/Export Romania SRL, Bucuresti, Phone: +40 21 323 95 65 www.habasit.ro
RussiaOOO Habasit Ltd., St. PetersburgPhone: +7 812 325 40 82www.habasit.ru
SingaporeHabasit Far East Pte. Ltd.,SingaporePhone: +65 6862 55 66 www.habasit.com.sg
SpainHabasit Hispanica S.A., Barberà del VallèsPhone: +34 93 719 19 12 www.habasit.es
SwedenHabasit AB, HindasPhone: +46 301 226 00www.habasit.se
SwitzerlandHabasit GmbH, ReinachPhone: +41 61 577 51 00www.habasit.ch
TaiwanHabasit Rossi (Taiwan) Ltd.Taipei HsienPhone: +886 2 2267 0538www.habasit.com.tw
TurkeyHabasit Kayis San. Ve Tic. Ltd. Sti.Yenibosna - Bahcelievler - IstanbulPhone: +90-212-654 94 04www.habasit.com.tr
UkraineHabasit Ukraina, VinnicaPhone: +38 0432 58 47 35www.habasit.ua
United Kingdom and IrelandHabasit Rossi (UK) Ltd., Silsden Phone: +44 870 835 9555 www.habasitrossi.co.uk
USAHabasit America Conveyor belts, power transmission belts, gearmotors Suwanee, Georgia Phone: +1 800-458-6431 www.habasitamerica.com
Habasit America Seamless belts, timing belts Middletown, Connecticut Phone: +1 860 632 2211 www.seamlessbelts.comwww.habasync.com
Rossi is one of Europe’s largest manufacturers of gear reducers, gearmotors, inverters, standard and brakemotors, and is a member of the Habasit Group.
Rossi S.p.A. Via Emilia Ovest 915/A41100 Modena – ItalyPhone: +39 059 33 02 [email protected]