print management - download.microsoft.comdownload.microsoft.com/.../printmgmtintegrationguide.pdf3...
TRANSCRIPT

Microsoft Dynamics®
AX 2009
Print Management
Integration Guide White Paper
Print management gives users specialized control of print settings for selected Microsoft Dynamics AX reports.
Date: April 27, 2009
Print Management

2 PRINT MANAGEMENT INTEGRATION GUIDE
Table of Contents
Feature description .................................................................................................. 3
Why use Print Management? ..................................................................................... 3
Architectural overview.............................................................................................. 4
Defining metadata ................................................................................................... 4
Set up print management ....................................................................................... 12
Use print management settings ............................................................................... 14
Conclusion ............................................................................................................ 18

3
PRINT MANAGEMENT INTEGRATION GUIDE
Feature description
Print management gives users control of print settings for selected Microsoft Dynamics® AX
reports. Print settings include the number of copies, the printer destination, and the multi-
language text that can be included on the report. Print management also includes the
following features:
The ability to modify the print settings of a report based on the contents of the data
being printed. For example, send sales orders > $1000 to Printer A and sales orders
> $10,000 to Printer B.
The ability to specify print settings at various levels of the application. For example,
module-level print settings apply to all documents in a given module, while
customer-level print settings only apply to specific customers and transaction-level
print settings apply only to specific transactions.
The ability to override or add to the settings from higher levels in the application. For
example, module-level settings can be overridden at the customer or transaction
level if not desirable. Furthermore, additional settings can be added to the existing
settings for similar reasons.
Why use Print Management?
You should consider using the print management framework when the following conditions
are true:
Your new or existing feature has reports that require specialized print management.
You are adding a new document type to the application similar to the document
types currently supported by print management. The document types supported by
print management in the Dynamics AX 2009 release are as follows:
Accounts Payable Purchase order
Purchase order invoice
Purchase order packing slip
Purchase order receipts list
Request for quote
Request for quote - Accept
Request for quote - Reject
Request for quote - Return
Accounts Receivable Confirmation
Free text invoice
Quotation

4 PRINT MANAGEMENT INTEGRATION GUIDE
Sales order confirmation
Sales order invoice
Sales order packing slip
Inventory management
Picking list
Project Project invoice
Architectural overview
The print management subsystem can be broken into three main parts: metadata, setup,
and retrieval. The metadata portion defines a series of classes that allow you to describe
how print management should work. Here you can describe how many levels of defaulting
are possible, what tables and columns should be involved in queries, and other pertinent
information. The setup portion defines a generic user experience that can be opened
throughout the application based on certain inputs. You would call this in areas where print
management information has to be managed by end users. The retrieval portion defines an
API which enables you to retrieve and use the print management information set up by the
user.
Defining metadata
Print management metadata is defined completely in code and stems from three main
classes or concepts: PrintMgmtDocType (documents), PrintMgmtNode (nodes) and
PrintMgmtHierarchy (hierarchies).
A document is the document or report to which specific print management settings apply.
Documents are at the heart of print management because all settings are defined for
documents of a particular type. Once users set up this information it is used whenever that
Define metadata
Set up print management
settings
Use print management
settings

5
PRINT MANAGEMENT INTEGRATION GUIDE
document is printed. The documents in the print management system are defined in the
PrintMgmtDocType class and are always related to specific nodes in print management.
A node is a particular level of defaulting in a hierarchy. For example, in the Accounts
Receivable module print management settings can exist at the Sales Order Transaction
level, the Customer level and the Module level. Each of these levels is considered a node
and each node in print management must derive from the abstract PrintMgmtNode class.
While nodes define the level at which print management settings can exist, they do not
have any order by themselves which is where hierarchies help.
A hierarchy is a group of related nodes. Using the previous example, the nodes mentioned
would all be a part of the Account Receivable Hierarchy. The ordering of nodes in a
hierarchy defines the ordering of defaulting for print management settings. Each hierarchy
in print management must derive from the abstract PrintMgmtHierarchy class.
To bring it all together, consider the following diagram which shows how documents, nodes
and hierarchies all relate to each other to define the print management metadata for a
hypothetical Accounts Receivable hierarchy.

6 PRINT MANAGEMENT INTEGRATION GUIDE
Accounts Receivable (Hierarchy)
The Accounts Receivable node represents the module level settings and all documents
present in the module apply at this level. The Customer node represents settings that apply
to specific customers and once again all documents present in the module apply. At the
lowest level the nodes represent transaction level settings and, as expected, only certain
documents apply to each specific transaction.
To integrate with print management you may have to modify existing nodes or hierarchies
to meet the needs of the documents you want to print. You may also be required to create
new nodes, hierarchies or documents to accomplish the same goal. The following sections
outline the steps that are required to accomplish these common integration tasks.
Accounts Receivable (Node)
- Sales packing slip (Document)
- Sales invoice (Document)
- Sales confirmation (Document)
- Pick list (Document)
- Sales quote (Document)
- Free text invoice (Document)
Customer (Node)
- Sales packing slip (Document)
- Sales invoice (Document)
- Sales confirmation (Document)
- Pick list (Document)
- Sales quote (Document)
- Free text invoice (Document)
Sales order (Node)
- Sales packing slip (Document)
- Sales invoice (Document)
- Sales confirmation (Document)
- Pick list (Document)
Sales quote (Node)
- Sales quote (Document)Free text invoice (Node)
- Free text invoice (Document)

7
PRINT MANAGEMENT INTEGRATION GUIDE
Adding a new document Whether you are adding a new document to new or existing nodes the same steps are
required. If you want a better understanding of the classes or methods mentioned in the
steps, see the XML documentation that is included in the source code.
(1) Update the PrintMgmtDocumentType enumeration
Add the document type to the enumeration immediately following the last element.
Create and assign a label for the document type that follows the pattern for existing
document types.
(2) Update the PrintMgmtDocType class to handle the new document type.
Modify the getQueryTableId method. Add the table ID of the table that will be used
when enabling users to enter conditional queries for the document type. This is
generally the Jour table that is used when you post, but could be any table that
applies.
Modify the getQueryRangeFields method. Add the default fields that should be used
when entering conditional queries for the new document type. The order in which
they are added will also be the order in which they appear in the query window.
Consider wrapping this logic with a call to isConfigurationkeyEnabled, passing the
appropriate configuration key, to guarantee that the fields only appear when the
functionality is enabled in the system.
(3) Update the PrintMgmtDocTypeTest class to handle the new document type.
Modify the testGetDisplayName method. Add a test to guarantee that the document
type appears with the correct text.
Modify the testGetQueryTableId method. Add a test to guarantee that the document
type has the correct query table id.
Modify the testGetQueryRangeFields method. Add a test to guarantee that the
document type has the correct default query fields.
(4) Update all PrintMgmtNode derivatives to which the document type applies.
Modify the getDocumentTypes method. Add the document type to the list of
supported document types. Wrap this logic with a call to isConfigurationkeyEnabled,
passing the appropriate configuration key, to guarantee that the documents only
appear when the functionality is enabled in the system.
(5) Update necessary PrintMgmtNode derivatives’ tests for the document type.
Modify the testNodeDocumentTypes method. Create or update this method to handle
the document type.
(6) Update necessary PrintMgmtHierarchy derivatives to which the document type applies.
Modify the getParentImplementation method. This method is used to define the
structure of the nodes in a hierarchy. In some cases, the document type affects the
logic to determine the parent and in other cases it does not. For example, Sales
order invoice documents use the InvoiceAccount field of the SalesTable to find their
parent node, whereas Sales order confirmation documents use the CustAccount field
of the SalesTable. This is all determined based on the document type. If your new
document type requires special behavior such as this, update the method.
(7) Update necessary PrintMgmtHierarchy derivatives’ tests for the document type.

8 PRINT MANAGEMENT INTEGRATION GUIDE
This step is only necessary if you were required to update the
getParentImplementation method.
Update the testGetParent method. Add tests for the new document type following
the existing pattern.
Update the testGetParentSkippingLevels method. Add tests for the new document
type following the existing pattern.
Creating or modifying nodes New nodes are necessary when a new level of defaulting is necessary for the documents
you want to print. If you want a better understanding of the classes or methods mentioned
in the steps, see the XML documentation that is included in the source code.
(1) Ensure a node does not already exist that meets your needs. Look at the classes that
derive from the PrintMgmtNode class to determine this information. Even if an existing node
defines document types you are not interested in using, you can still use the node. If none
of the existing nodes meet your needs, continue to step 2.
(2) Create a new enumeration value in the PrintMgmtNodeType enumeration
Add the node type to the enumeration immediately following the last element.
The name of the element should match the table to which the print management
settings will be related. If the print management settings do not relate to a table,
choose a name following the existing patterns present.
Create and assign a label for the node type. If the node references a table, use the
table name label from the table it references. If not, follow the existing patterns
present.
(3) Create a new class that derives from the PrintMgmtNode class. Be sure to reference the
existing PrintMgmtNode derivatives for examples.
The class should be prefixed with 'PrintMgmtNode_' and should follow the naming
pattern of the existing nodes. If the node is tied to a particular table, the table name
should follow the prefix such as PrintMgmtNode_CustTable, for example.
Implement the getDisplayCaptionImplementation method.
o This method controls the caption that will appear for the instance of the node
in the Print Management window.
o Return the appropriate label for Module level settings. See existing examples
in PrintMgmtNode_Purch or PrintMgmtNode_Sales.
o Return strfmt("@SYS108943", _tableBuffer.caption()) for account level
settings. See existing example in PrintMgmtNode_CustTable or
PrintMgmtNode_VendTable.
o Return strfmt("@SYS108944", _tableBuffer.caption()) for transaction level
settings. See existing examples in PrintMgmtNode_SalesTable or
PrintMgmtNode_PurchTable.
o Customize as necessary for unique situations.
Implement the getDocumentTypes method.
o Return a list of document types the node supports.
o The document types should be wrapped in configuration key checks so that
they are only loaded if the configuration key is enabled. For example,
isConfigurationkeyEnabled(configurationkeynum(LogisticsBasic)).

9
PRINT MANAGEMENT INTEGRATION GUIDE
Implement the getIconImageResNum method.
o This method controls the icon that will appear for the instance of the node in
the Print Management window.
o Return the resource ID used to display the icon representing this node. The
resAppl macro contains the resource ID definitions for icon images. This
method should return one of those resource IDs. If additional resource IDs
are used, they should also be added to the build method of the
ImageListAppl_PrintMgmt class.
o Module level nodes should use the same icon that is used for the module,
account level nodes should use #ImagePrintManagementAccount, and
transaction level nodes should use #ImagePrintManagementTrans.
Implement the getNodeType method.
o Return the appropriate PrintMgmtNodeType enumeration value.
Implement the getReferenceTableId method.
o Return the table to which the node will be related. For example, if a node is
tied to specific customers you would return tablenum(CustTable).
o If the node is not related to a specific table, return the value of 0. Module
level settings are examples of nodes that are not tied to specific tables.
(4) Modify the PrintMgmtNode::construct method. Add a case statement to construct your
new node.
(5) Create appropriate unit tests.
The name of the test class should be identical to the node followed by the postfix
'Test'.
Regarding the contents of the tests, follow the example of existing node tests that
are similar to your node type. For example, module-level, account level, transaction
level nodes, or other.
To add data, follow the existing examples in the PrintMgmtTestSuite class.
o Add a macro that defines the id of the table in the classDeclaration.
o Add a new method that retrieves the table following the existing pattern. For
example, getSalesTable, getCustInvoiceTable, and so forth.
o Create the data in the setUpReferenceData method and make to
trackInsertedRows for the table you add.
Once done, add the new test to the PrintMgmtTestSuite by adding the appropriate
entry in the new method.
(6) If the node relates to a table, update the appropriate relations and cascading deletes.
Create a relation on the PrintMgmtDocInstance table to the table you are
referencing. For example, PrintMgmtDocInstance -> SalesTable.
Add a cascading delete on the table you are referencing to the
PrintMgmtDocInstance table. For example, SalesTable -> PrintMgmtDocInstance.
(7) Add the node to the appropriate hierarchy. See the Creating or modifying hierarchies
section for the steps that are needed to do this.
(8) Add the node to the PrintMgmt shared project.
Creating or modifying hierarchies
10 PRINT MANAGEMENT INTEGRATION GUIDE
In some cases existing hierarchies can be modified to include or rearrange existing nodes.
In other cases completely new hierarchies are necessary. Both scenarios have similar steps
which are outlined later in this document. If you want a better understanding of the classes
or methods mentioned in the steps, see the XML documentation that is included in the
source code.
(1) Create a new enumeration value in the PrintMgmtHierarchyType enumeration.
Add the hierarchy type to the enumeration immediately following the last element.
Create and assign a label for the hierarchy type following the existing patterns.
(2) Create a new class that derives from the PrintMgmtHierarchy class. Be sure to reference
the existing PrintMgmtHierarchy derivatives for examples.
The class should be prefixed with 'PrintMgmtHierarchy_' and should follow the
naming pattern of the existing hierarchies.
Implement the getNodesImplementation method.
o Return the list of nodes the hierarchy supports.
Implement the getParentImplementation method.
o This method is used to define the structure of the nodes in a hierarchy.
It provides an instance of a node and a document type as input parameters
and will be required to return an instance of the PrintMgmtNodeInstance
class. This PrintMgmtNodeInstance class brings together a PrintMgmtNode
instance with the actual table buffer record it relates with.
o If the parent node does not reference a table, only the PrintMgmtNodeType
enumeration value of the parent is required to be returned through the
parmNodeDefinition property of the PrintMgmtNodeInstance class.
o If the parent node does reference a table, the specific record of the parent
node should be returned also. This is returned through the
parmReferencedTable property of the PrintMgmtNodeInstance class. If the
record cannot be found, a null value should be returned.
o See existing implementations for a better understanding of what is necessary
for this method.
(4) Modify the PrintMgmtHierarchy::construct method. Add a case statement to construct
your new hierarchy.
(5) Create appropriate unit tests.
The name of the test class should be identical to the hierarchy followed by the
postfix 'Test'.
Regarding the contents of the tests, follow the example of existing hierarchy tests.
To add data, follow the existing examples in the PrintMgmtTestSuite class.
o Add a macro that defines the id of the table in the classDeclaration.
o Add a new method that retrieves the table following the existing pattern. For
example, getSalesTable or getCustInvoiceTable.
o Create the data in the setUpReferenceData method and make sure to
trackInsertedRows for the table you add.
Once done, add the new test to the PrintMgmtTestSuite by adding the appropriate
entry in the new method.

11
PRINT MANAGEMENT INTEGRATION GUIDE
(6) If you are modifying an existing hierarchy, make sure to update the appropriate
hierarchy tests.
Modify the testIsValidNodeType method. Update the count because the number of
nodes added will have changed.
(7) Add the hierarchy to the PrintMgmt shared project.

12 PRINT MANAGEMENT INTEGRATION GUIDE
Set up print management
Users need the ability to set up print management for each node in a hierarchy. Using the
Accounts Receivable example, this means that users should be able to set up print
management settings at the module level, the customer level and at each transaction level.
To make this possible you must start the user experience from the appropriate forms for
each node in your hierarchy. Since the user experience is based on the metadata which
defines your documents, nodes and hierarchies there is not much you need to provide to get
a fully functional and reusable user experience.
The API to start the user experience is centered around the PrintMgmtSetupContext class.
To demonstrate the usage of this class, consider the following code which starts the print
management user experience from the Purchase Order Details window:
This represents a fairly common scenario and will likely suit your needs most of the time.
Note that all documents associated with the PurchTable node type will be displayed in the
user experience. Sometimes there are cases where you may want to display only certain
documents associated to a node or want to show multiple hierarchies. A scenario such as
this is outlined in the code example that follows. It shows the code that starts the print
management user experience from the Customer details window:
void clicked()
{
PrintMgmtSetupContext setupContext = new PrintMgmtSetupContext();
;
// If you reference a table, always include this check
if (purchTable_ds.cursor() == null)
return;
super();
// The first parameter specifies the hierarchy to display and
// the second specifies which node to start with. All parent
// nodes "above" the starting node will be displayed, along
// with the starting node.
setupContext.addHierarchyContext(
PrintMgmtHierarchyType::Purch,
PrintMgmtNodeType::PurchTable);
// This links the caller to the instance of the print mgmt form
setupContext.parmCaller(element);
// This is the record the node is associated with. If a node
// is not related to a table, pass null.
setupContext.parmReferencedTableBuffer(purchTable_ds.cursor());
PrintMgmt::launchSetup(setupContext);
}

13
PRINT MANAGEMENT INTEGRATION GUIDE
The following screenshot illustrates the resulting user experience:
void clicked()
{
PrintMgmtSetupContext setupContext = new PrintMgmtSetupContext();
List salesDocs = new List(Types::Enum);
List projectDocs = new List(Types::Enum);
List inventDocs = new List(Types::Enum);
;
if (custTable_ds.cursor() == null)
return;
super();
// This example shows the ability to call with multiple hierarchies
// as well as the ability to limit which documents appear for each
// node in those hierarchies. If the document filter list was not
// passed, all documents would appear in each hierarchy and it
// would not make sense to show Project or Inventory documents in
// the Accounts Receivable hierarchy, for example.
// Add sales documents
salesDocs.addEnd(PrintMgmtDocumentType::Confirmation);
salesDocs.addEnd(PrintMgmtDocumentType::Quotation);
salesDocs.addEnd(PrintMgmtDocumentType::SalesFreeTextInvoice);
salesDocs.addEnd(PrintMgmtDocumentType::SalesOrderConfirmation);
salesDocs.addEnd(PrintMgmtDocumentType::SalesOrderInvoice);
salesDocs.addEnd(PrintMgmtDocumentType::SalesOrderPackingSlip);
setupContext.addHierarchyContext(
PrintMgmtHierarchyType::Sales,
PrintMgmtNodeType::CustTable,
salesDocs);
// Add project documents
projectDocs.addEnd(PrintMgmtDocumentType::ProjectInvoice);
setupContext.addHierarchyContext(
PrintMgmtHierarchyType::Project,
PrintMgmtNodeType::CustTable,
projectDocs);
// Add invent documents
inventDocs.addEnd(PrintMgmtDocumentType::InventPickList);
setupContext.addHierarchyContext(
PrintMgmtHierarchyType::Invent,
PrintMgmtNodeType::CustTable,
inventDocs);
setupContext.parmCaller(element);
// Note that even though multiple hierarchies are allowed, the
// starting node for each must reference the same table buffer.
setupContext.parmReferencedTableBuffer(custTable_ds.cursor());
PrintMgmt::launchSetup(setupContext);
}

14 PRINT MANAGEMENT INTEGRATION GUIDE
If you want a better understanding of the PrintMgmtSetupContext class, see the XML
documentation that is included in the source code.
Use print management settings
Once the metadata has been defined and users can set up print management settings it is
necessary to use those settings when printing documents. There are two options available
to accomplish this task based on the purpose of your document:
(1) Create a derivative of the FormLetterReport class and use the FormLetterReport class to
retrieve and enumerate settings. In this case, your document is (or should be) part of the
FormLetter class hierarchy. These documents are generated during posting and require a
unique FormLetter and FormLetterReport derivative.
(2) Call print management directly through the PrintMgmt::getSettings method. In this
case, your document is not required to be a part of the FormLetter class hierarchy. These
documents are independent and are not generated during posting time.
Even if Option #2 matches your scenario, you will likely find the most benefit in using
Option #1. Option #1 provides some nice shortcuts and prevents you from worrying about
many of the details, even if your document is not involved in the posting process. As a
result, Option #2 will not be described in detail because it is mainly available for custom
needs. Refer to the XML documentation of the PrintMgmtPrintContext,
PrintMgmtPrintSetting and PrintMgmtPrintSettingDetail classes for more detail about Option
#2, or view the implementation of the methods on the FormLetterReport abstract class.
The API to retrieve user settings is centered around the abstract FormLetterReport class and
its concrete derivatives. The following steps describe how to implement the necessary

15
PRINT MANAGEMENT INTEGRATION GUIDE
classes and interact with the FormLetterReport class to retrieve the print management
settings. If you want a better understanding of the classes or methods mentioned in the
steps, see the XML documentation that is included in the source code.
(1) Create a new class that derives from the FormLetterReport class. Be sure to reference
the existing FormLetterReport derivatives for examples.
Use a name that follows a similar pattern as the following existing derivatives:
o PurchFormLetterReport_Invoice
o PurchFormLetterReport_PackingSlip
o SalesFormLetterReport_Confirm
o SalesFormLetterReport_Invoice
Implement the getDefaultPrintJobSettings method. Based upon the
PrintSetupOriginalCopy enumeration value provided, return the default print job
setting. This is the default that will be used if no printer destination is specified on
the print management setting. Normally this value can be retrieved from the
FormLetter class derivative that corresponds to the FormLetterReport class derivative
because default printers are set up on the posting form.
Implement the getPrintMgmtDocumentType method. Return the appropriate
PrintMgmtDocumentType enumeration value.
Implement the getPrintMgmtHierarchyType method. Return the appropriate
PrintMgmtHierarchyType enumeration value.
Implement the getPrintMgmtNodeType method. Return the appropriate
PrintMgmtNodeType enumeration value.
(2) Modify the FormLetterReport::construct method. Add a case statement to construct your
new form letter report.
(3) Create appropriate unit tests.
The name of the test class should be identical to the form letter report class followed
by the postfix 'Test'.
Regarding the contents of the tests, follow the example of existing form letter report
tests that are present.
(4) Modify the document being printed to use the print settings.
The following code example retrieves and uses the print management settings for
the Sales invoice report.
16 PRINT MANAGEMENT INTEGRATION GUIDE
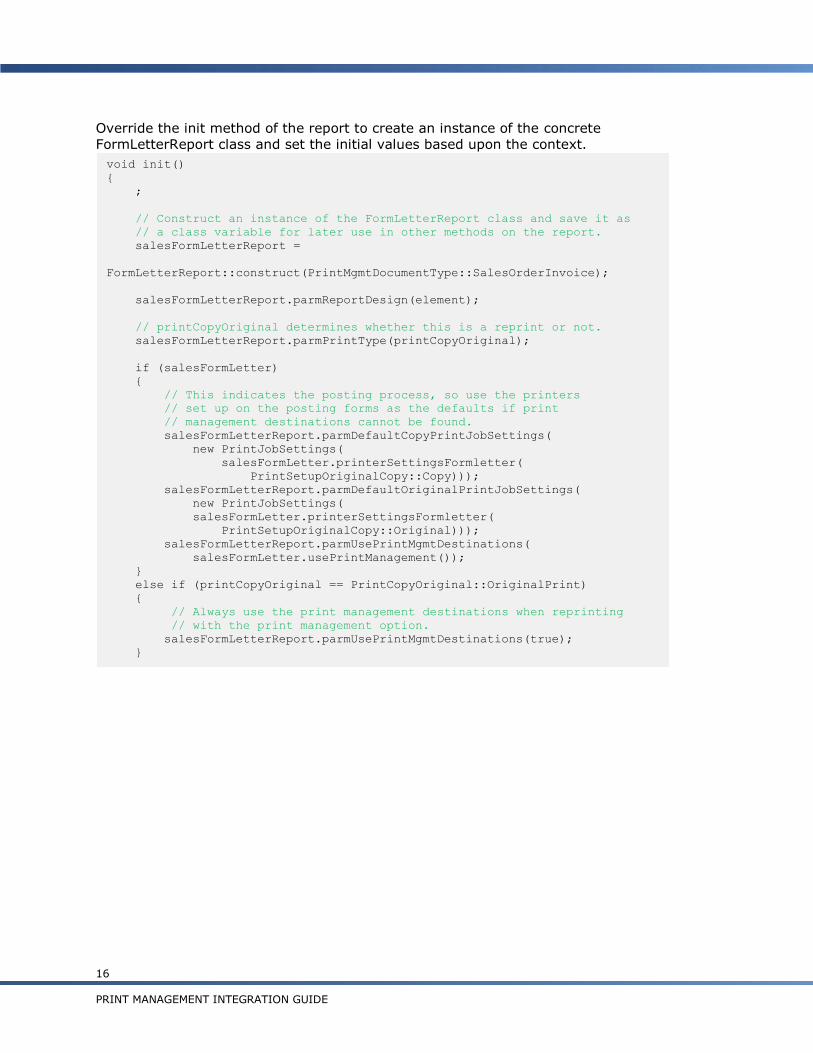
Override the init method of the report to create an instance of the concrete
FormLetterReport class and set the initial values based upon the context.
void init()
{
;
// Construct an instance of the FormLetterReport class and save it as
// a class variable for later use in other methods on the report.
salesFormLetterReport =
FormLetterReport::construct(PrintMgmtDocumentType::SalesOrderInvoice);
salesFormLetterReport.parmReportDesign(element);
// printCopyOriginal determines whether this is a reprint or not.
salesFormLetterReport.parmPrintType(printCopyOriginal);
if (salesFormLetter)
{
// This indicates the posting process, so use the printers
// set up on the posting forms as the defaults if print
// management destinations cannot be found.
salesFormLetterReport.parmDefaultCopyPrintJobSettings(
new PrintJobSettings(
salesFormLetter.printerSettingsFormletter(
PrintSetupOriginalCopy::Copy)));
salesFormLetterReport.parmDefaultOriginalPrintJobSettings(
new PrintJobSettings(
salesFormLetter.printerSettingsFormletter(
PrintSetupOriginalCopy::Original)));
salesFormLetterReport.parmUsePrintMgmtDestinations(
salesFormLetter.usePrintManagement());
}
else if (printCopyOriginal == PrintCopyOriginal::OriginalPrint)
{
// Always use the print management destinations when reprinting
// with the print management option.
salesFormLetterReport.parmUsePrintMgmtDestinations(true);
}
}

17
PRINT MANAGEMENT INTEGRATION GUIDE
Override the fetch method of the report to retrieve the settings and iterate over them
printing a copy for each one found.
void fetch()
{
;
// Load all print settings associated with the current record.
// The custInvoiceJour table is the record being printed and the
// user-defined queries will be run against this table to see which
// print settings apply.
// The custInvoiceJour.salesTable() is the transaction that the
// print management settings are related with. This is the record
// that starts the defaulting process for the settings that should
// be considered.
salesFormLetterReport.loadPrintSettings(
custInvoiceJour,
custInvoiceJour.salesTable(),
custInvoiceJour.LanguageId);
while (salesFormLetterReport.moveNextPrintSetting())
{
// Set print settings for this document
element.unpackPrintJobSettings(
salesFormLetterReport.getCurrentPrintSetting()
.parmPrintJobSettings().packPrintJobSettings());
element.printJobSettings().copies(
salesFormLetterReport.getCurrentPrintSetting().parmNumberOfCopies());
// Perform report logic here
this.send(custInvoiceJour);
// The FormLetterReport class handles iterating over the settings
if (salesFormLetterReport.checkNextPrintSetting())
{
element.reset();
}
}
}

18 PRINT MANAGEMENT INTEGRATION GUIDE
Create a section to print the text associated with the setting and override the
executeSection method to determine when the section should be displayed.
Create a display method in the section that prints the text to get the text associated with
the current setting.
Your document may also have a requirement to show whether or not it is an original or a
copy. If so, create the appropriate display method to handle this that would look something
like the following.
Conclusion
Now your document can take advantage of the rich features of print management. If you
have additional questions about the details behind the print management subsystem, refer
to the XML documentation included in the source code or the online help.
// BP Deviation Documented
display str invoiceText()
{
;
if (salesFormLetterReport.getCurrentPrintSetting().parmType()
== PrintMgmtDocInstanceType::Copy)
{
// Return label that has something to do with "Copy"
}
else
{
// Return label that has something to do with "Original"
}
}
// BP Deviation Documented
display PrintFooterText footerTextMsg()
{
;
return
salesFormLetterReport.getCurrentPrintSetting().parmIdentificationText();
}
public void executeSection()
{
;
if (salesFormLetterReport.isFooterPresentForCurrentPrintSetting())
{
super();
}
}

19
PRINT MANAGEMENT INTEGRATION GUIDE
Microsoft Dynamics is a line of integrated, adaptable business management solutions that enables you and your people to make business decisions with greater confidence. Microsoft Dynamics works like and with familiar Microsoft software, automating and streamlining financial, customer relationship and supply chain processes in a way that helps you drive business success.
U.S. and Canada Toll Free 1-888-477-7989
Worldwide +1-701-281-6500
www.microsoft.com/dynamics
The information contained in this document represents the current view of Microsoft Corporation on the issues discussed as of the
date of publication. Because Microsoft must respond to changing market conditions, this document should not be interpreted to be a
commitment on the part of Microsoft, and Microsoft cannot guarantee the accuracy of any information presented after the date of
publication.
This document is for informational purposes only. MICROSOFT MAKES NO WARRANTIES, EXPRESS, IMPLIED, OR STATUTORY, AS
TO THE INFORMATION IN THIS DOCUMENT.
Complying with all applicable copyright laws is the responsibility of the user. Without limiting the rights under copyright, no part of
this document may be reproduced, stored in or introduced into a retrieval system, or transmitted in any form or by any means
(electronic, mechanical, photocopying, recording, or otherwise), or for any purpose, without the express written permission of
Microsoft Corporation.
Microsoft may have patents, patent applications, trademarks, copyrights, or other intellectual property rights covering subject
matter in this document. Except as expressly provided in any written license agreement from Microsoft, the furnishing of this
document does not give you any license to these patents, trademarks, copyrights, or other intellectual property.
© 2009 Microsoft Corporation. All rights reserved.
Microsoft, Microsoft Dynamics, and the Microsoft Dynamics Logo are either registered trademarks or trademarks of Microsoft
Corporation, or Microsoft Business Solutions ApS in the United States and/or other countries. Microsoft Business Solutions ApS is a
subsidiary of Microsoft Corporation.