prestige - hvacdirect
TRANSCRIPT

2015-10 Prestige ACVMax Control Appl. Supl.
This document is intended to be used by a factory trained and qualified heat-ing contractor or service technician only. Read all instructions within thisdocument and within the PRESTIGE Boiler Installation and MaintenanceManual before proceeding. It is recommended to follow the procedures inthe steps given. Skipping or missing procedural steps could result in severepersonal injury, death or substantial property damage.
prestigeControl ApplicationSupplement - ACVMax
Revised 12/15/2015
L I S T E D
WARNING

Table of Contents
i
PRODUCT AND SAFETY INFORMATION
Definitions ................................................................................................................1
1.0 - OPERATING INFORMATION
1.1 Entering Installer Access Code ......................................................................21.2 ACVMax Installer Menu Structure..................................................................3
2.0 - CH SETTINGS
2.1 Navigation ...............................................................................................52.2 Heating Operation ..........................................................................................52.3 Demand Type ...............................................................................................52.4 Absolute Max CH Setpoint .............................................................................62.5 CH1 Maximum Setpoint .................................................................................62.6 CH1 Minimum Setpoint ..................................................................................62.7 Outdoor Curve Coldest Day...........................................................................62.8 Outdoor Curve Warmest Day.........................................................................72.9 CH2 Circuit ...............................................................................................72.10 CH2 Maximum Setpoint .................................................................................72.11 CH2 Minimum Setpoing .................................................................................72.12 Warm Weather Shutdown ..............................................................................72.13 Circulation Pump Permanent .........................................................................82.14 CH Post Pump Time ......................................................................................82.15 Freeze Protection...........................................................................................82.16 Frost Protection Setpoint................................................................................92.17 Parallel Shift Value .........................................................................................92.18 CH Call Blocking ............................................................................................9
3.0 - DHW SETTINGS
3.1 Navigation ...............................................................................................103.2 DHW Operation ..............................................................................................103.3 Demand Type ...............................................................................................103.4 Boiler DHW Setpoint ......................................................................................113.5 DHW Setpoing ...............................................................................................113.6 DHW On Differential.......................................................................................113.7 DHW Storage Adder.......................................................................................123.8 DHW Post Pump Time ...................................................................................123.9 DHW Priority Timeout.....................................................................................123.10 DHW Priority ...............................................................................................123.11 DHW Call Blocking.........................................................................................133.12 DHW To CH Call Blocking..............................................................................133.13 Antilegionella Function ...................................................................................14
4.0 - BOIlER SETTINGS
4.1 Navigation ...............................................................................................154.2 Prestige Model ...............................................................................................154.3 Lockout Temp. ...............................................................................................154.4 Modbus Address ............................................................................................164.5 Pump Settings ...............................................................................................16
4.5.1 Current Pump Configuration ..........................................................16

Table of Contents - Continued
ii
4.5.2 Preset Pump Configuration (Solo) .................................................164.5.3 Preset Pump Configuration (Excellence).......................................164.5.4 Flexible Pump Configuration..........................................................164.5.5 Flex. Relay Configuration...............................................................174.5.6 Error Relay.....................................................................................17
4.6 Ignition Level NAT ..........................................................................................17
5.0 - RESET All SETTINGS
5.1 Navigation ...............................................................................................36
6.0 - FACTORY ACVMAx SETTINGS
6.0 Factory ACVMax Settings ..............................................................................37
7.0 - CASCADE
7.1 Cascade Operating Information .....................................................................387.2 ACVMax Cascade Menu Structure ................................................................397.3 Cascade Installation.......................................................................................40
7.3.1 System Piping ................................................................................407.3.2 System Sensor Installation ............................................................407.3.3 Cascade Communication Cable ....................................................417.3.4 Low Voltage Wiring Connections ...................................................417.3.5 Line Voltage Wiring Connections...................................................427.3.6 Cascade Autodetection ..................................................................427.3.7 Lockouts.........................................................................................43
7.4 Cascade Information ......................................................................................507.4.1 Navigation ......................................................................................507.4.2 System Temperature Logging ........................................................50
7.5 Cascade Settings ...........................................................................................517.5.1 Navigation ......................................................................................517.5.2 Stage Delay ...................................................................................517.5.3 Minimum Firing Rate......................................................................517.5.4 Boiler Enabling Algorithm...............................................................527.5.5 Boiler Disabling Algorithm..............................................................527.5.6 Maximum Firing Rate.....................................................................527.5.7 CH/DHW Boilers ............................................................................537.5.8 Automatic Rotation.........................................................................537.5.9 CH Proportional Gain.....................................................................547.5.10 CH Integral Gain ............................................................................547.5.11 DHW Proportional Gain .................................................................557.5.12 DHW Integral Gain.........................................................................56
8.0 - MODBUS INTERFACE
8.0 Modbus Interface ...........................................................................................57
9.0 - MANUAl OPERATION
9.1 Navigation ...............................................................................................599.2 Fan ...............................................................................................599.3 CH1 ...............................................................................................599.4 DHW ...............................................................................................599.5 CH2 ...............................................................................................59

(Page left intentionally blank)
iii

Product and Safety Information
1
The following terms are used throughout thismanual to bring attention to the presence ofpotential hazards or to important informationconcerning the product.
Indicates the presence of a hazardous situa-tion which, if ignored, will result in death,serious injury or substantial property dam-age.
Indicates a potentially hazardous situationwhich, if ignored, can result in death, seriousinjury or substantial property damage.
Indicates a potentially hazardous situationwhich, if ignored, may result in minor injuryor substantial property damage.
Indicates special instructions on installation,operation or maintenance, which are impor-tant to the equipment but not related to per-sonal injury hazards.
Indicates recommendations made by ACV-Triangle Tube for the installers which willhelp to ensure optimum operation andlongevity of the equipment.WARNING
NOTICE
CAUTION
DANGER
BEST PRACTICE
DEFINITIONS
IMPORTANT INFORMATION - READBEFORE PROCEEDING
This document is intended to be used by a fac-tory trained and qualified heating contractor orservice technician only. Read all instructionswithin this document and within the PRES-TIGE Boiler Installation and MaintenanceManual before proceeding. It is recommendedto follow the procedures in the steps given.Skipping or missing procedural steps couldresult in severe personal injury, death or sub-stantial property damage.
WARNING
ACV-Triangle Tube reserves the right to modify the technical specifications and components of itsproduct without prior notice.
NOTICE
This Control Application Supplement appliesto ACVMax controls with the following soft-ware version numbers:
Display SWv.1.22Burner Controller SW v.0.30
The software version numbers are displayedon the initial screen after turning on the unit.
NOTICE

2
1.0 Operating Information
1.0 OPERATING INFORMATION
The ACVMax Boiler Management System is designed to be flexible yet easy to use. ACVMax mon-itors and controls the Prestige to operate as efficiently as possible. ACVMax monitors the boiler sup-ply, return and flue gas temperatures and operates the igniter, gas valve and blower. ACVMax usesthis information to modulate the boiler’s firing rate to maintain the required setpoint.
ACVMax offers many advanced control options, which may be adjusted for various applications toachieve optimum boiler efficiency and operation.• Two central / space heating (CH) call inputs with separate outdoor reset curves.• Two temperature central/space heating (CH) temperature control via optional mixing valve.• Domestic Hot Water (DHW) call input with optional priority.• System temperature sensing and control with an optional system temperature sensor.• Cascade function allows up to six Prestige boilers to operate together in a single heating system.• Modbus interface for integrating with building management systems.
These advanced features are adjustable in the Installer Menu after entering an access code.

3
1.0 Operating Information
1.1 Entering Installer Access Code
InstallerButton
The INSTALLER button (the small round button) provides the installing contractor with full accessto all available features after entering an access code.
ENTER INSTALLERACCESS CODE
05[4]
Entering installer access code procedure1. Press the round INSTALLER button.2. Enter the installer access code “054” by using the LEFT and RIGHT
buttons to select a digit and the UP and DOWN buttons to change thedigit. Press the OK button to enter the access code.
3. The Installer Menu will be displayed after successfully entering theaccess code. The Home Screen will be displayed if the access code isnot entered correctly.
Entering the installer access code allows the installer to make adjust-ments for 30 minutes. After 30 minutes, the access code will need tobe entered again to make any adjustments.
The Installer Menu is divided into four sections:
1. CH & DHW Settings – Allows the installer to adjust the boilerscentral / space heating, domestic hot water and boiler settings for theapplication. See pages 5 through 35.
2. Manual Operation – The burner and circulators can be manuallyenabled for testing. See page 59.
3. Reset All Settings – Resets all CH, DHW, Boiler, and CascadeSettings back to the factory defaults. See pages 36 through 37.
4. Cascade – Allows the installer to setup, adjust, and monitor theCascade System. See pages 38 through 56.
NOTICE
CH & DHW Settings
Fig. 1: ACVMax Navigation Buttons

4
1.0 Operating Information
CH & DHW Settings
Home Screen
ENTER INSTALLERACCESS CODE
05[4]
CH & DHW Settings Menu Reset All Settings Cascade Menu Manual Operation
Installer Menu
Installer Access Code
CH Settings Reset All Settings
Press OK to restore factory settings,any other button to keep current
settings
Cascade Info. Manual Operation
Released
O!
O!
O!
CH1
FAN
DHW
CH2
Home - return to home screen
Back - return to previous screen
1.2 ACVMax Installer Menu Structure

5
2.0 CH Settings
2.0 CH SETTINGS 2.1 Navigation: Home Screen > Installer Menu > CH & DHW Settings > CH SettingsThe CH Settings menu contains settings related to central heating oper-ation. Each line contains a CH Setting followed by its current value.Six CH Settings are displayed on the screen at one time. Press the UPor DOWN buttons to scroll through additional CH Settings.2.2 Heating Operation Default: EnabledHeating Operation allows the central heating function to be enabled anddisabled. Press the UP or DOWN buttons to select Enabled or Disabledthen press the OK button to store the setting.
• Enabled - The Prestige will respond to a central heating call.• Disabled - The Prestige will not respond to a central heating call.
The heating operation disabled icon ( ) is displayed on the homescreen when central heating operation has been disabled.
Freeze protection will remain enabled when Heating Operation isDisabled.
2.3 Demand Type Default: Thermostat & Outd. CurveDemand Type allows the installer to select how a CH Demand is generat-ed. Press the UP or DOWN buttons to select the CH Demand Type thenpress the OK button to store the setting. The CH Demand options are:• Thermostat & Outd. Curve – A central heating call from a dry
contact switch will enable the Prestige and the setpoint will varywith the outdoor temperature for central heating calls.
• Thermostat & Setpoint - A central heating call from a dry contactswitch will enable the Prestige and the setpoint will be fixed forcentral heating calls.
• Constant & Outdoor Curve - The Prestige will maintain setpointand the central heating circulators will be constantly enabled with-out an external call from a dry contact switch. The central heatingcirculators will be disabled when the outdoor temperature exceedsthe Warm Weather Shutdown Temperature setting. The setpointwill vary with the outdoor temperature for central heating calls.
• Constant & Setpoint - The Prestige will maintain setpoint and thecentral heating circulators will be constantly enabled without anexternal call from a dry contact switch. The central heating circula-tors will be disabled when the outdoor temperature exceeds theWarm Weather Shutdown Temperature setting. The setpoint will befixed for central heating calls.
• 0-10V Modulation Signal – This option allows the Prestige firing rateto be controlled by an external control system with a 0-10 VDC signal.
Heating Settings
Heating Operation
Demand
Abs. Max CH Setpoint
CH1 Max. Setpoint
CH1 Min. Setpoint
Outdoor Curve / Coldest Day
Enabled
Thermostat & Outd. Curve
188ºF
180ºF
120ºF
10ºF
Heating Operation
Disabled
Enabled
Demand Type
Thermostat & Outd. Curve
Thermostat & Setpoint
Constant & Outdoor Curve
Constant & Setpoint
0-10V Modulation Signal

6
2.0 CH Settings
2.4 Absolute Max CH Setpoint Default: 188°F [87°C]Absolute Max CH Setpoint can be used to prevent a user from adjusting thecentral heating setpoint or outdoor reset curve above a safe operating tem-perature in the EZ Setup Menu. A warning screen will be displayed in EZSetup if the user attempts to raise the setpoint above the Absolute Max CHSetpoint. The Absolute Max CH Setpoint will be displayed on the outdoorreset curve in EZ Setup if the user selects an outdoor reset curve which goesabove the Absolute Max CH Setpoint. Press the LEFT or RIGHT buttonsto adjust the Absolute Max CH Setpoint then press the OK button to storethe setting.
2.5 CH1 Maximum Setpoint Default: 176°F [80°C]CH1 Maximum Setpoint is the maximum setpoint for a CH1 heating callwhen an Outdoor Curve option is chosen in Demand Type. CH1Maximum Setpoint is the fixed setpoint for a CH1 heating call when aSetpoint option is chosen in CH Demand. Press the LEFT or RIGHTbuttons to adjust the CH1 Maximum Setpoint then press the OK button tostore the setting.
2.6 CH1 Minimum Setpoint Default: 80°F [27°C]CH1 Minimum Setpoint is the minimum setpoint for a CH1 heating callwhen an Outdoor Curve option is chosen in Demand Type. This setting isnot applicable when a Setpoint option is chosen in Demand Type. CH1Minimum Setpoint must be set equal to or below the CH1 MaximumSetpoint. Press the LEFT or RIGHT buttons to adjust the CH1 MinimumSetpoint then press the OK button to store the setting.
2.7 Outdoor Curve Coldest Day Default: 10°F [-12°C]Outdoor Curve Coldest Day is the coldest outdoor design temperature ofthe heating system when an Outdoor Curve option is chosen in DemandType. This setting is not applicable when a Setpoint option is chosen inDemand Type. Press the LEFT or RIGHT buttons to adjust the OutdoorCurve Coldest Day then press the OK button to store the setting.
68ºF 188ºF
176ºF
CH1 Max.Setpoint
60ºF 188ºF
80ºF
CH1 Min.Setpoint
-30ºF 50ºF
10ºF
Outdoor CurveColdest Day
68ºF 188ºF
188ºF
Abs. MaxCH Setpoint

7
2.0 CH Settings
2.8 Outdoor Curve Warmest Day Default: 64°F [18°C]Outdoor Curve Warmest Day is the warmest outdoor design temperatureof the heating system when an Outdoor Curve option is chosen inDemand Type. This setting is not applicable when a Setpoint option ischosen in Demand Type. Press the LEFT or RIGHT buttons to adjustthe Outdoor Curve Warmest Day then press the OK button to store thesetting.
2.9 CH2 Circuit Default: EnabledCH2 Circuit allows the CH2 Maximum and Minimum Setpoints to beenabled and disabled. When disabled, the CH2 heating call will operateusing the CH1 Maximum and Minimum Setpoints. Press the UP orDOWN buttons to select Enabled or Disabled then press the OK buttonto store the setting.• Enabled – A CH2 heating call will use CH2 Maximum and
Minimum Setpoints.• Disabled – A CH2 heating call will use CH1 Maximum and
Minimum Setpoints.
2.10 CH2 Maximum Setpoint Default: 140°F [60°C]CH2 Maximum Setpoint is the maximum setpoint for a CH2 heating callwhen an Outdoor Reset option is chosen in CH Demand. CH2Maximum Setpoint is the fixed setpoint for a CH2 heating call when aSetpoint option is chosen in CH Demand. Press the LEFT or RIGHTbuttons to adjust the CH2 Maximum Setpoint then press the OK buttonto store the setting.2.11 CH2 Minimum Setpoint Default: 80°F [27°C] CH2 Minimum Setpoint is the minimum setpoint for a CH2 heatingcall when an Outdoor Reset option is chosen in CH Demand. Thissetting is not applicable when a Setpoint option is chosen in CHDemand. CH2 Minimum Setpoint must be set equal to or below theCH2 Maximum Setpoint. Press the LEFT or RIGHT buttons toadjust the CH2 Minimum Setpoint then press the OK button to storethe setting.2.12 Warm Weather Shutdown Default: OFFWarm Weather Shutdown allows the installer to enter an optional out-door temperature at which to disable the central heating function andany circulators placed into constant circulation with the CirculationPump Permanent setting. The Prestige will continue to respond to adomestic hot water call or a 0-10V Modulation Signal when the out-door temperature exceeds the Warm Weather Shutdown Temperaturesetting. Press the LEFT or RIGHT buttons to adjust the WarmWeather Shutdown Temperature then press the OK button to store thesetting. The Warm Weather Shutdown icon is displayed on thehome screen when the outdoor temperature reaches the Warm WeatherShutdown Temperature.
60ºF 78ºF
64ºF
Outdoor CurveWarmest Day
CH2 / CV2 Circuit
Disabled
Enabled
Off 78ºF
Off
Warm Weather Shutdown

8
2.0 CH Settings
2.13 Circulation Pump Permanent Default: DisabledCirculation Pump Permanent allows the circulators configured for centralheating calls in Pump Settings to be constantly enabled even without acentral heating call. The Warm Weather Shutdown function will disablecirculators enabled via this function. A domestic hot water call will causethe circulators to be disabled during the domestic call as long as DHWPriority is enabled. Press the UP or DOWN buttons to select Enabled orDisabled then press the OK button to store the setting.• Enabled – The central heating circulators will be enabled for con-
stant circulation without a central heating call.
• Disabled – The central heating circulators will only be enabled dur-ing a central heating call.
2.14 CH Post Pump Time Default: 5 MinuteCH Post Pump Time sets how long the circulators configured for centralheating calls in Pump Settings will continue to operate at the completionof a heating call. The CH Post Pump feature allows the heat remainingin the boiler at the completion of a call to be sent to the heating system,which will improve the overall efficiency of the system. Press the LEFTor RIGHT buttons to adjust the CH Post Pump Time then press the OKbutton to store the setting.
2.15 Freeze Protection Default: EnabledFreeze Protection allows the freeze protection feature to be enabled anddisabled. Press the UP or DOWN buttons to select Enabled or Disabledthen press the OK button to store the setting.• Enabled – The Freeze Protection feature is enabled to protect the
boiler from freezing. This feature monitors the boiler water tem-perature and responds as follows when no call is present:- 46°F [8°C] – Circulators configured to respond to a CH1 Call are
enabled.- 42°F [6°C] – Burner operates at low fire and ciculators configured
to respond to a CH1 or CH2 Call are enabled.- 60°F [15°C] – Freeze protection ends. Burner & all pumps turn
OFF after completing CH Post Pump Time.• Disabled – The Freeze Protection feature is disabled.
Freeze Protection
Enabled
Disabled
Circulation PumpPermanent
Disabled
Enabled
O� 20 min
5 min
CH PostPump Time

9
2.0 CH Settings
Freeze Protection should only be disabled when the system con-tains antifreeze to prevent the system from freezing. Serious dam-age could occur to the Prestige as well as the entire heating systemif Freeze Protection is disabled without antifreeze in the system.
The Prestige should NEVER be installed in a location wherefreezing could occur. Subjecting the Prestige to freezing condi-tions could lead to freezing of the condensate possibly causingserious injury or death.
2.16 Frost Protection Setpoint Default: -22ºF [-30ºC]Frost Protection will enable the circulators configured for central heatingcalls in Pump Settings if the outdoor temperature falls below the FrostProtection Setpoint and no call is present. This feature requires using theoutdoor temperature sensor and is always active and cannot be disabled.Press the LEFT or RIGHT buttons to adjust the Frost Protection Setpointthen press the OK button to store the setting.
2.17 Parallel Shift Value Default: 0°F [0°C]Parallel Shift allows the CH setpoint to be externally adjusted when aConstant option is chosen in CH Demand. When a Constant option is cho-sen in CH Demand, continuous CH1 and CH2 heating calls are generated.Simultaneous CH1 and CH2 calls will result in the Prestige operating at thehighest CH1 or CH2 setpoint. The CH1 or CH2 Thermostat terminals withthe highest setpoint will be used to adjust the setpoint. If the Thermostatterminals with the highest setpoint are open, the CH setpoint will decreaseby the Parallel Shift Value. If the Thermostat terminals with the highestsetpoint are closed, the CH setpoint will return to the highest CH1 or CH2setpoint. Press the LEFT or RIGHT buttons to adjust the Parallel ShiftValue then press the OK button to store the setting.2.18 CH Call Blocking Default: 2 MinuteCH Call Blocking sets the minimum time between burner firings forcentral heating calls. At the completion of a burner firing, the CH CallBlocking time will begin. The burner will not fire again until after theCH Call Blocking time has elapsed. The CH Call Blocking time onlyprevents the burner from firing, the central heating circulators willrespond to a central heating call. This blocking time has no affect ondomestic hot water calls. The CH Call Blocking feature prevents shortcycling of the burner and extends the life of the burner components.Press the LEFT or RIGHT buttons to adjust the CH Call Blockingtime then press the OK button to store the setting.
WARNING
WARNING
-22ºF 50ºF
-22ºF
Frost ProtectionSetpoint
0ºF 144ºF
0ºF
Parallel Shift Value
0 min. 30 min.
2 min.
CH Call Blocking

10
Demand Type
Thermostat
Sensor
3.0 DHW Settings
3.1 Navigation: Home Screen>Installer Menu>CH & DHW Settings>DHW SettingsThe DHW Settings menu contains settings related to domestic hotwater operation. Each line contains a DHW Setting followed by its cur-rent value. Six DHW Settings are displayed on the screen at one time.Press the UP or DOWN buttons to scroll through additional DHWSettings.
3.2 DHW Operation Default: EnabledDHW Operation allows the domestic hot water function to be enabledand disabled. Press the UP or DOWN buttons to select Enabled orDisabled then press the OK button to store the setting.
• Enabled - The Prestige will respond to a domestic hot water call.• Disabled - The Prestige will not respond to a domestic hot water
call. The domestic hot water operation disabled icon is dis-played on the home screen when domestic hot water operation hasbeen disabled.
3.3 Demand PRESTIGE Solo Default: ThermostatPRESTIGE Excellence Default: Sensor
Demand Type allows the installer to select the type of device which willgenerate a domestic hot water call. Press the UP or DOWN buttons toselect the DHW Demand Type then press the OK button to store the set-ting. The DHW Demand options are:• Thermostat - A domestic hot water call from an aquastat or dry
contact switch will enable the Prestige with a fixed setpoint for adomestic hot water call.
• Sensor - This option requires the use of Indirect Water HeaterSensor PSRKIT22 which is included with every PRESTIGE Solo.The PRESTIGE Excellence utilizes an Indirect Water HeaterSensor. The Prestige will monitor the DHW storage temperatureand generate a domestic hot water call when the temperature dropsbelow the DHW Setpoint - DHW On Differential.
3.0 DHW SETTINGS
DHW Settings
DHW Operation
Demand
DHW Boiler Setpoint
DHW Setpoint
DHW On Di!erential
DHW Storage Adder
Enabled
Thermostat
186ºF
140ºF
6ºF
46ºF
DHW Operation
Disabled
Enabled

11
3.4 DHW Boiler Setpoint Default: 168ºF [76ºC]DHW Boiler Setpoint is the fixed boiler setpoint temperature during adomestic hot water call when the Thermostat option is chosen in DHWDemand. Press the LEFT or RIGHT buttons to adjust the DHW BoilerSetpoint then press the OK button to store the setting.
3.5 DHW Setpoint Default: 140°F [60°C]DHW Setpoint is the domestic hot water storage setpoint temperaturewhen the Sensor option is chosen in DHW Demand. Press the LEFT orRIGHT buttons to adjust the DHW Setpoint then press the OK button tostore the setting.
The boiler setpoint is automatically set to the DHW Setpoint +DHW Storage Adder when the Sensor option is chosen in DHWDemand. The boiler setpoint is limited to 194°F [90°C].
3.6 DHW On Differential Default: 6°F [3°C]DHW On Differential sets how far the DHW storage temperature must fallbelow the DHW Setpoint to create a domestic hot water call when theSensor option is chosen in DHW Demand. The domestic hot water callwill end when the DHW storage temperature rises above the DHWSetpoint. Press the LEFT or RIGHT buttons to adjust the DHW OnDifferential then press the OK button to store the setting.
The DHW On Differential setting greatly affects the productionof domestic hot water. A low setting could result in a rapidresponse to a domestic hot water call resulting in a potentialscald hazard. It is strongly recommended that the installer uti-lize a thermostatic mixing valve on the hot water outlet of theIndirect Water Heater. Failure to comply could result in severepersonal injury, death, or substantial property damage.
NOTICE
DANGER
3.0 DHW Settings
96ºF 188ºF
168ºF
DHW Boiler Setpoint
4ºF 18ºF
6ºF
DHW On Di�erential
68ºF 176ºF
140ºF
DHW Setpoint

12
DHW Priority
Enabled
Disabled
3.0 DHW Settings3.7 DHW Storage Adder Default: 46°F [25°C]DHW Storage Adder is used to compute the boiler setpoint when theSensor option is chosen in DHW Demand. The boiler setpoint will beDHW Setpoint + DHW Storage Adder for a domestic hot water call.Press the LEFT or RIGHT buttons to adjust the DHW Storage Adderthen press the OK button to store the setting.
3.8 DHW Post Pump Time Default: 2 MinuteDHW Post Pump Time sets how long the circulators configured fordomestic hot water calls in Pump Settings will continue to operate at thecompletion of a domestic hot water call. The DHW Post Pump featureallows the heat remaining in the boiler at the completion of a call to besent to the Indirect Water Heater, which will improve the overall effi-ciency of the system. Press the LEFT or RIGHT buttons to adjust theDHW Post Pump Time then press the OK button to store the setting.
3.9 DHW Priority Timeout Default: OffDHW Priority Timeout allows the installer to enter an optional time limitthat a domestic hot water call has priority over a central heating call whenDHW Priority is set to Enabled. Press the LEFT or RIGHT buttons toadjust the DHW Priority Timeout then press the OK button to store thesetting.
3.10 DHW Priority Default: EnabledDHW Priority allows the domestic hot water priority function to beenabled and disabled. Press the UP or DOWN buttons to select Enabledor Disabled then press the OK button to store the setting.• Enabled- Domestic hot water calls will have priority over a central
heating call. The boiler setpoint will be set to the domestic hotwater setpoint during a domestic hot water call. The DHW circu-lator will be enabled and the heating circulators will be disabledduring a domestic hot water call.
• Disabled - Domestic hot water calls will not have priority over acentral heating call. The boiler setpoint will be set to the domestichot water setpoint when only a domestic hot water call is present.The boiler setpoint will be set to the highest setpoint when simul-
10ºF 54ºF
28ºF
DHWStorage Adder
O� 30 min.
2 min.
DHW Post Pump Time
O� 120 min.
O�
DHW Priority Timeout

13
3.0 DHW Settings
taneous domestic hot water and central heating calls are present. TheDHW circulator will be enabled during a domestic hot water call.The heating circulators will be enabled during a central heating call.
Simultaneous domestic hot water and central heating calls willresult in the PRESTIGE operating at the highest target temper-ature when DHW Priority is set to Disabled. The use of a mixingdevice on the lower temperature zones may be required to pro-tect the lower temperature zones from damage.
DHW Priority should only be set to Disabled when PrestigeModel is set to Solo. Setting DHW Priority to Disabled whenPrestige Model is set to Excellence will not disable DHWPriority.
3.11 DHW Call Blocking Default: 0 MinuteDHW Call Blocking sets the minimum time between burner firings fordomestic hot water calls. At the completion of a burner firing, the DHWCall Blocking time will begin. The burner will not fire again until after theDHW Call Blocking time has elapsed. The DHW Call Blocking time onlyprevents the burner from firing, the circulators configured for domestic hotwater calls in Pump Settings will respond to a domestic hot water call.This blocking time has no affect on central heating calls. The DHW CallBlocking feature prevents short cycling of the burner and extends the lifeof the burner components. Press the LEFT or RIGHT buttons to adjustthe DHW Call Blocking time then press the OK button to store the setting.
3.12 DHW To CH Call Blocking Default: 1 MinuteDHW To CH Call Blocking sets the minimum time between a DHW burn-er firing and a CH burner firing. At the completion of a DHW burner fir-ing, the DHW to CH Call Blocking time will begin. The burner will notfire again for a central heating call until after the DHW To CH CallBlocking time has elapsed. The DHW To CH Call Blocking time only pre-vents the burner from firing, the circulators configured for central heatingcalls in Pump Settings will respond to a central heating call. This blockingtime has no affect on domestic hot water calls. The DHW To CH CallBlocking feature prevents the burner from firing when switching from adomestic hot water call to a central heating call. This allows the remainingheat in the heat exchanger to be dissipated and potentially satisfy the cen-tral heating call. Press the LEFT or RIGHT buttons to adjust the DHWTo CH Call Blocking time then press the OK button to store the setting.
NOTICE
WARNING
0 min. 30 min.
0 min.
DHW Call Blocking
0 min. 30 min.
1 min.
DHW to CHCall Blocking

14
3.0 DHW Settings
3.13 Antilegionella Function Default: EnabledThe Antilegionella Function ensures that an Indirect Water Heater is heat-ed at least once per week to prevent the growth of Legionella bacteria.Press the UP or DOWN buttons to select Enabled or Disabled then pressthe OK button to store the setting.• Enabled- When the Thermostat option is chosen in DHW Demand,
a domestic hot water call is generated for 15 minutes once per weekto heat the Indirect Water Heater. When the Sensor option is cho-sen in DHW Demand, a domestic hot water call is generated untilthe DHW storage temperature reaches 140°F [60°C] once perweek. When the Sensor option is chosen in DHW Demand, theweekly timer is reset whenever the DHW storage temperaturereaches 140°F [60°C] to prevent unnecessary firings. This functionwill be active even if DHW Operation has been set to Disabled.
• Disabled - The Prestige will only fire in DHW mode when adomestic hot water call is received.
The Antilegionella Function should only be left enabled whenan Indirect Water Heater is installed. Enabling theAntilegionella Function without an Indirect Water Heater willresult in the Prestige firing once per week in DHW mode. Thiscould cause a Manual Reset Hard Lockout resulting in sub-stantial property damage.
The Antilegionella Function is most effective when the Sensoroption is chosen in DHW Demand. The use of an IndirectWater Heater Sensor ensures that the domestic hot water isheated to 140°F [60°C] at least once per week.
WARNING
BEST PRACTICE
Antilegionella Function
Enabled
Disabled

15
4.1 Navigation: Home Screen>Installer Menu>CH & DHW Settings>Boiler SettingsThe Boiler Settings menu contains settings related to general boileroperation. Each line contains a Boiler Setting followed by its currentvalue.
4.2 Prestige Model PRESTIGE Solo Default: Solo (2 pumps)PRESTIGE Excellence Default: Solo/Excel. 3 way valve
Prestige Model selects between Solo with pump operation andExcellence with 3-way diverter valve operation. Press the UP or DOWNbuttons to select Solo (2 pumps) or Solo/Excel. 3 way valve then pressthe OK button to store the setting.• Solo (2 pumps) - A CH Demand is satisfied using the circulators
configured for central heating calls in Pump Settings. A DHWDemand is satisfied using the circulators configured for domestichot water calls in Pump Settings.
• Solo/Excel. 3 way valve - CH and DHW Demands are satisfied bythe built-in circulator and 3 way diverter valve.
Excellence units also require setting Demand Type to Sensor forcorrect DHW operation.
4.3 Lockout Temp. Default: 210°F [99°C]Lockout Temp. allows the High Boiler Temperature lockout (E3) to betemporarily adjusted down to 102°F [39°C] for inspector demonstra-tion. Press the UP or DOWN buttons to select 210°F [99°C] or 102°F[39°C] then press the OK button to store the setting.
• 102°F [39°C] – A High Boiler Temperature lockout (E3) will occurwhen the boiler temperature reaches 102°F [39°C].
• 210°F [99°C] – A High Boiler Temperature lockout (E3) will occurwhen the boiler temperature reaches 210°F [99°C].
NOTICE
4.0 Boiler Settings
Prestige Model
Solo (2 pumps)
Solo/Excel. 3 way valve
Boiler Settings
Prestige Model
Lockout Temp.
Modbus Address
Pump Settings
Ignition Level NAT
Solo (2 pumps)
210ºF [99ºC]
0=BCST
3000rpm
Lockout Temp.
102ºF [39ºC]
210ºF [99ºC]
4.0 BOILER SETTINGS

16
4.0 Boiler Settings
4.4 Modbus Address Default:0=BCSTModbus Address assigns the boiler with a unique address in the Modbuscontrol system. Press the LEFT or RIGHT buttons to change theModbus Address then press the OK button to store the setting. See Pages57 & 58 for Modbus Interface information.
4.5 Pump SettingsPump Settings allows the selection or assigment of the appropriatepump configuration for the installation piping arrangement. The cur-rent pump configuration will be displayed in the first line. There arenumerous preset configurations to select from and a flexible configu-ration mode.
4.5.1 Current Pump ConfigurationCurrent Pump Configuration displays the selected pump configurationor indicates that there is a custom pump configuration used by display-ing “Modified.”
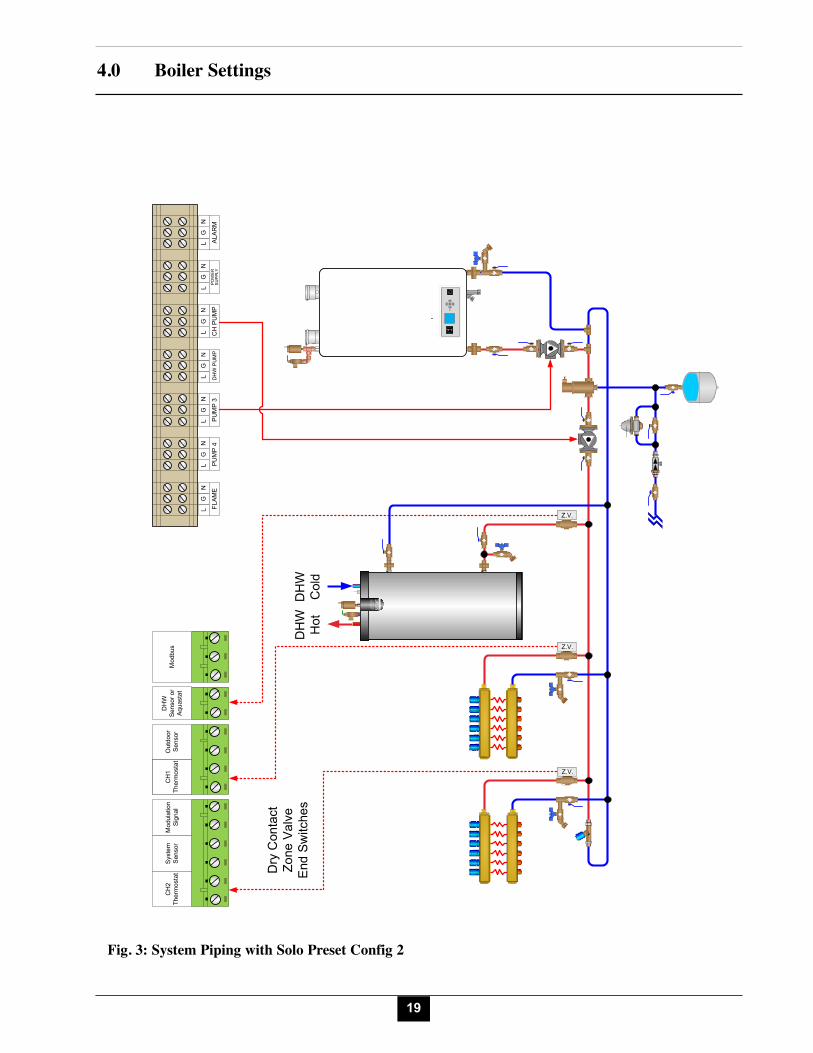
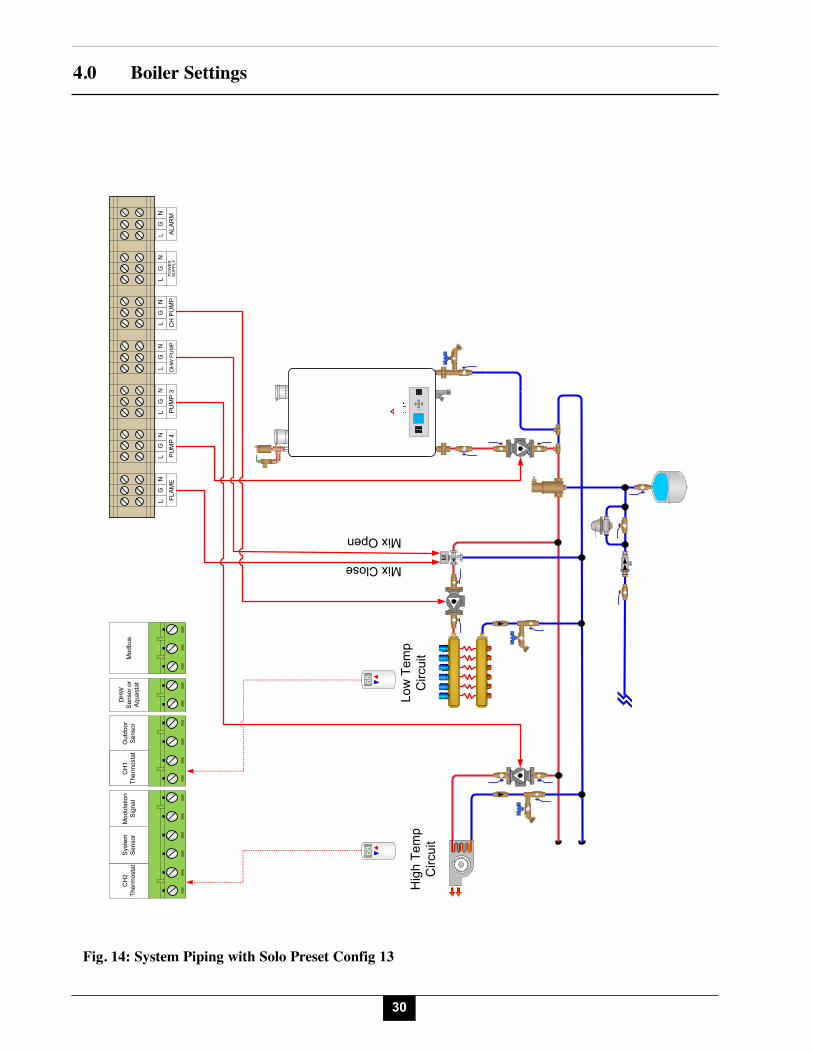
4.5.2 Preset Pump Configuration Prestige Model: SoloPreset Pump Configuration will display thirteen options (Config 1 -Config 13) that correspond to specific hydraulic schemes. Please referto Figs. 2 through 14 on pages 18-30. Press the UP or DOWN buttonsto scroll through the options then press the OK button to store the set-ting.
4.5.3 Preset Pump Configuration Prestige Model: ExcellencePreset Pump Configuration will display four options (Solo/Excellence1 - Solo/Excellence 4) that correspond to specific hydraulic schemes.Please refer to Figs. 15 through 18 on pages 31-34. Press the UP orDOWN buttons to scroll through the options then press the OK buttonto store the setting.
4.5.4 Flexible Pump ConfigurationFlexible Pump Configuration allows the installer to customize the flex-ible relays to a specific installation arrangement that is not addressed inthe Preset Pump Configuration options. There are a total of sixFlexible Relays and an Error Relay setting that must be set.
0=BCST 247
0=BCST
Modbus Address
Pump Settings
Current Pump Con!g
Preset Pump Con!g
Flexible Pump Con!g
Modi!ed
Flexible Pump Con�g
Flex. Relay 1 (CH)
Flex. Relay 2 (DHW)
Flex. Relay 3 (P3)
Flex. Relay 4 (ERR)
Flex. Relay 5 (Flame)
Flex. Relay 6 (P4)

17
4.0 Boiler Settings
4.5.5 Flex. Relay ConfigurationEach relay function has several options that must be set for activation.Press the UP or DOWN buttons to scroll through the options then pressthe OK button to toggle between the On/Off status. At the end of thelist is Save & Exit which will store the settings for the particular relay.• On - Activation of the relay will occur.• Off - Activation of the relay will not occur.The options are as follows:• CH1/CV1 - Relay is activated at CH 1 Demand.• CH2/CV2 - Relay is activated at CH 2 Demand.• DHW/ECS/SWW - Relay is actived at DHW Demand.• MIX OPEN - Mixing valve open input is activated.• MIX CLOSED - Mixing valve closed input is activated.• ERROR - Relay is activated on error.• FLAME - Relay is activated when appliance is running and a
flame signal has been detected.• Save & Exit - Store all settings to appliance and return to previous
screen.4.5.6 Error RelayError Relay allows the installer to select when to activate the ErrorRelay (alarm):• On Lockout, Blocking and Warning - Relay is activated at a non-
volatile lock-out, at a blocking error (self-resetting), or at a warn-ing.
• On Lock-out and Blocking - Relay is activated at a non-volatilelock-out or at a blocking error (self-resetting).
• On Lock-out - Relay is actived at a non-volatile lock-out only.4.6 Ignition Level NATIgnition Level NAT allows the installer to change the ignition fan speedto accomodate varying site conditions. Press the LEFT or RIGHT but-tons to adjust the Ignition Level NAT then press the OK button to storethe setting. Default values are:
Flex. Relay 1 (CH)CH1 / CV1
CH2 / CV2
DHW / ECS / SWW
MIX OPEN
MIX CLOSE
ERROR
FLAME
On
O!
O!
O!
O!
O!
O!
Flex. Relay 1 (CH)CH2 / CV2
DHW / ECS / SWW
MIX OPEN
MIX CLOSE
ERROR
FLAME
Save & Exit
O!
O!
O!
O!
O!
O!
Error Relay
On Lockout, Blocking and Warning
On Lockout and Blocking
On Lockout
1450rpm 4900rpm
3000rpm
Ignition Level NAT
Model Natural Gas PropaneSolo 80 3000 rpm 3000 rpmSolo/Excellence 110 3500 rpm 3000 rpmSolo 155 3500 rpm 3350 rpmSolo 175 3500 rpm 3300 rpmSolo 250 3700 rpm 3000 rpmSolo 299/399 2600 rpm 2600 rpm

18
���
���
���
����
����
�
����
�
�
�
�
�
�
�
� �
���
����
������
��������
�������
������
�����
�
�
����
�������� �
�!�����
��"���
���
#� �$�"�
�$%"
�����
�������� �
��&�
�������� �
�#���
���
��"���
����
��"�����
�� '
# �� �
���
(#�
Fig. 2: System Piping with Solo Preset Config 1
4.0 Boiler Settings
19
����
����
���
���
���
��
����
����
�
�� �������
���������
������������
��
��
��
��
��
��
��
��
��
��
�
����
� !
� �"
!� �#
���� !�
�� !�
$��%�
�! �&
���%
�
�'�
(���)�����
� ���)�
������
���*������
��+��
�'�
(���)�����
�,�
(���)�����
$*������
������
����
����������
�-*�����
���.*�
4.0 Boiler Settings
Fig. 3: System Piping with Solo Preset Config 2

20
����
�
����
����
���
���
���
��
�� �������
���������
������������
��
��
��
��
��
��
��
��
��
��
�
����
� !
� �"
!� �#
���� !�
�� !�
$��%�
�! �&
���%
�
�'�
(���)�����
� ���)�
������
���*������
��+��
�'�
(���)�����
�,�
(���)�����
$*������
������
����
����������
�-*�����
���.*�
4.0 Boiler Settings
Fig. 4: System Piping with Solo Preset Config 3

21
����
�
���
���
���
����
�
�
�
�
�
�
�
� �
���
����
������
��������
�������
������
�����
�
�
����
�������� �
�!�����
��"���
���
#� �$�"�
�$%"
�����
�������� �
��&�
�������� �
�#���
���
��"���
����
��"�����
�� '
# �� �
���
(#�
����
Fig. 5: System Piping with Solo Preset Config 4
4.0 Boiler Settings

22
4.0 Boiler Settings
���
���
���
����
����
�
����
�
�
�
�
�
�
�
� ��
������
������
��������
�������
������
�����
��
����
�������� �
�!����
���
"���
���
#� �$�"�
�$%" �
����
�������� �
��&�
�������� �
�#���
���
��"���
����
��"�����
�� '
# �� �
���
(#�
Fig. 6: System Piping with Solo Preset Config 5

23
4.0 Boiler Settings
����
�
���
���
���
����
�
�
�
�
�
�
�
� �
���
����
������
��������
�������
������
�����
�
�
����
�������� �
�!�����
��"���
���
#� �$�"�
�$%"
�����
�������� �
��&�
�������� �
�#���
���
��"���
����
��"�����
�� '
# �� �
���
(#�
��
Fig. 7: System Piping with Solo Preset Config 6

24
4.0 Boiler Settings
����
�
���
���
���
����
�
�
�
�
�
�
�
� �
���
����
������
��������
�������
������
�����
�
�
����
�������� �
�!�����
��"���
���
#� �$�"�
�$%"
�����
�������� �
��&�
�������� �
�#���
���
��"���
����
��"�����
�� '
# �� �
���
(#�
��
�$)������
�$)��*�"
�$+���� �
�,����
*��$�+#$�
�$%����
�*�
�$�+#$�
�
Fig. 8: System Piping with Solo Preset Config 7
Note:This Configuration to be used where the Low Temp Circuit is a micro load as the HighTemp Circuit will run for any call on the Low Temp Circuit to prevent boiler cycling.

25
4.0 Boiler Settings
���
���
���
����
����
�
����
�
�
�
�
�
�
�
� �
���
����
������
��������
�������
������
�����
�
�
����
�������� �
�!�����
��"���
���
#� �$�"�
�$%"
�����
�������� �
��&�
�������� �
�#���
���
��"���
����
��"�����
�� '
# �� �
���
(#�
Fig. 9: System Piping with Solo Preset Config 8

26
4.0 Boiler Settings
���
���
���
����
����
���
�
�
�
�
�
�
�
� �
���
����
������
��������
�������
������
�����
�
�
����
�������� �
�!�����
��"���
���
#� �$�"�
�$%"
�����
�������� �
��&�
�������� �
�#���
���
��"���
����
��"�����
�� '
# �� �
���
(#�
��$)������
�$)��*�"
�$+����
��,����
*��$�+#$�
�$%����
�*�
�$�+#$�
Fig. 10: System Piping with Solo Preset Config 9
Note:This Configuration requires that the Low Temp Pump and High Temp Pump be connected in par-allel to the CH Pump Relay. An isolation relay is may be used to ensure the CH Pump Relay willnot be overloaded during operation.

27
4.0 Boiler Settings
����
�
���
���
���
����
�
�
�
�
�
�
�
� �
���
����
������
��������
�������
������
�����
�
�
����
�������� �
�!�����
��"���
���
#� �$�"�
�$%"
�����
�������� �
��&�
�������� �
�#���
���
��"���
����
��"�����
�� '
# �� �
���
(#�
��
�$)������
�$)��*�"
�$+����
��,����
*��$�+#$�
��
�
�$%����
�*�
�$�+#$�
Fig. 11: System Piping with Solo Preset Config 10
Note:This Configuration to be used where the Low Temp Circuit is a micro load as the HighTemp Circuit will run for any call on the Low Temp Circuit to prevent boiler cycling.

28
4.0 Boiler Settings
����
�
���
���
���
����
�
�
�
�
�
�
�
� �
���
����
������
��������
�������
������
�����
�
�
����
�������� �
�!�����
��"���
���
#� �$�"�
�$%"
�����
�������� �
��&�
�������� �
�#���
���
��"���
����
��"�����
�� '
# �� �
���
(#�
��
�$)������
�$)��*�"
�+����
*��$�,#$�
��
�
�$%����
�*�
�$�,#$�
Fig. 12: System Piping with Solo Preset Config 11

29
4.0 Boiler Settings
��
��
��
��
��
��
��
��
��
��
�
����
��
���
����
�����
�����
�����
�����
����
�
���
����������
������
�� ���
��!
"#��$�
�$% �
#���
����������
��&
����������
�"�!�
��
�� ���
��
�� ����
��'
"�����
��!
("�
��
�$)�#���
�$)�*�
��+���
*�$�,"$�
��
�
����
�
�$%���
�*
�$�,"$�
Fig. 13: System Piping with Solo Preset Config 12
30
4.0 Boiler Settings
��
��
��
��
��
��
��
��
��
��
�
����
��
���
����
�����
�����
�����
�����
����
�
���
����������
������
�� ���
��!
"#��$�
�$% �
#���
����������
��&
����������
�"�!�
��
�� ���
��
�� ����
��'
"�����
��!
("�
����
��$)�#���
�$)�*�
��+���
*�$�,"$�
�$%���
�*
�$�,"$�
Fig. 14: System Piping with Solo Preset Config 13

31
4.0 Boiler Settings
��
��
��
��
��
��
��
��
��
��
�
����
��
���
����
�����
�����
�����
�����
����
�
���
����������
������
�� ���
��!
"#��$�
�$% �
#���
����������
��&
����������
�"�!�
��
�� ���
��
�� ����
��'
"�����
��!
("�
����
Fig. 15: System Piping with Excellence Preset Config 1

32
4.0 Boiler Settings
��
��
��
��
��
��
��
��
��
��
�
����
��
���
����
�����
�����
�����
�����
����
�
���
����������
������
�� ���
��!
"#��$�
�$% �
#���
����������
��&
����������
�"�!�
��
�� ���
��
�� ����
��'
"�����
��!
("�
����
Fig. 16: System Piping with Excellence Preset Config 2

33
4.0 Boiler Settings
��
��
��
��
��
��
��
��
��
��
�
����
��
���
����
�����
�����
�����
�����
����
�
���
����������
������
�� ���
��!
"#��$�
�$% �
#���
����������
��&
����������
�"�!�
��
�� ���
��
�� ����
��'
"�����
��!
("�
����
��)���
*�$�+"$�
�$%���
�*
�$�+"$�
��$,�#���
�$,�*�
Fig. 17: System Piping with Excellence Preset Config 3

34
4.0 Boiler Settings
��
��
��
��
��
��
��
��
��
��
�
����
��
���
����
�����
�����
�����
�����
����
�
���
����������
������
�� ���
��!
"#��$�
�$% �
#���
����������
��&
����������
�"�!�
��
�� ���
��
�� ����
��'
"�����
��!
("�
����
�$)�����!
��*���
+�$�)"$�
�$%���
�+
�$�)"$�
��$,�#���
�$,�+�
Fig. 18: System Piping with Excellence Preset Config 4

35
4.0 Boiler Settings
(Page left intentionally blank)

5.0 Reset All Settings
36
5.1 Navigation: Home Screen>Installer Menu>Reset All SettingsReset All Settings allows the installer to reset all CH, DHW, Boilerand Cascade settings back to the original PRESTIGE Solo factorydefaults. Follow the onscreen instructions to reset all settings back tothe original factory defaults.
PRESTIGE Excellence units require setting Prestige Model toSolo/Excel. 3 way valve and DHW Demand Type to Sensor afterusing the Reset All Settings function.
NOTICE
5.0 RESET ALL SETTINGS
Reset All Settings
Press OK to restore factory settings,any other button to keep current
settings.

6.0 Factory ACVMax Settings
37
6.0 FACTORY ACVMAX SETTINGS
Section Setting Factory Default Minimum Setting
Maximum Setting
EZ Setup Reset
Installer Reset
2.2 Heating Operation Enabled 3
2.3 Demand Type Thermostat & Outd. Curve 3 3
2.4 Absolute Max CH Setpoint 188°F [87°C] 68°F [20°C] 188°F [87°C]2.5 CH1 Maximum Setpoint 180°F [82°C] 68°F [20°C] 188°F [87°C] 3 3
2.6 CH1 Minimum Setpoint 80°F {27°C] 60°F [15°C] 188°F [87°C] 3 3
2.7 Outdoor Curve Coldest Day 10°F [-12°C] -30°F [-34°C] 50°F [10°C] 3
2.8 Outdoor Curve Warmest Day 64°F [18°C] 60°F [15°C] 78°F [25°C] 3
2.9 CH2 Circuit Enabled 3
2.10 CH2 Maximum Setpoint 140°F [60°C] 68°F [20°C] 194°F [90°C] 3 3
2.11 CH2 Minimum Setpoint 80°F [27°C] 60°F [15°C] 190°F [88°C] 3 3
2.12 Warm Weather Shutdown OFF OFF 78°F [25°C] 3 3
2.13 Circulation Pump Permanent Disabled 3
2.14 CH Post Pump Time 5 Minute OFF 20 minutes 3
2.15 Freeze Protection Enabled 3
2.16 Frost Protection Setpoint -22°F [-30°C] -22°F [-30°C] 50°F [10°C] 3
2.17 Parallel Shift Value 0°F [0°C] 0°F [0°C] 144°F [80°C] 3
2.18 CH Call Blocking 2 Minute 0 minute 30 minutes 3
3.2 DHW Operation Enabled 3
3.3 Demand Type Thermostat (Solo)Sensor (Excellence)
3.4 Boiler DHW Setpoint 168°F [76°C] 96°F [35°C] 188°F [87°C] 3 3
3.5 DHW Setpoint 140°F [60°C] 68°F [20°C] 176°F [80°C] 3 3
3.6 DHW On Differential 6°F [3°C] 4°F [-15°C] 18°F [-8°C] 3
3.7 DHW Storage Adder 28°F [15°C] 10°F [0°C] 54°F [30°C] 3
3.8 DHW Post Pump Time 2 Minute OFF 120 minutes 3
3.9 DHW Priority Timeout Off OFF 120 minutes 3 3
3.10 DHW Priority Enabled 3
3.11 DHW Call Blocking 0 Minute 0 minute 30 minutes 3
3.12 DHW to CH Call Blocking 1 Minute 0 minute 30 minutes 3
3.13 Antilegionella Function Disabled 3*
7.5.2 Stage Delay 60 Seconds 0 second 255 seconds 3
7.5.3 Minimum Firing Rate 25% 0% 100% 3
7.5.6 Maximum Firing Rate 852 MBH [250kW] 0 MBH [0kW] 869 MBH[255kW] 3
7.5.7 CH/DHW Boilers 0 0 6 3
7.5.8 Automatic Rotation Enabled 3
7.5.9 CH Proportional Gain 7 0 255 3
7.5.10 CH Integral Gain 245 0 255 3
7.5.11 DHW Proportional Gain 7 0 255 3
7.5.12 DHW Integral Gain 245 0 255 3
4.2 Prestige Model Solo (2 pumps)3**Solo/Excel. (3 way valve)
4.3 Lockout Temp. 210°F [99°C] 3
4.4 Modbus Address 0=BCST 0 247 3
4.5 Pump Settings Solo/Excellence 2 3
4.6 Ignition Level NAT
* Installer Reset will reset value to Enabled.** Installer Reset will reset value to Solo (2 pumps).

38
7.0 Cascade
7.0 CASCADE7.1 Cascade Operating InformationThe ACVMax Boiler Management System includes a Cascade function which allows multiple Prestigeboilers to operate together without the need for an external controller. One Prestige will be selected asthe Master and will be wired to accept all the low voltage control signals. The other Prestige boilers willbe designated as Slaves and will only have a communication cable connecting them to the other boilersin the Cascade System.• The Cascade function allows up to six identical Prestige boilers to operate together in a single
heating system.• Parallel Modulation fires as many boilers as possible to maximize system efficiency.• Lead Stage Automatic Rotation rotates the lead boiler to ensure even wear on each boiler in the
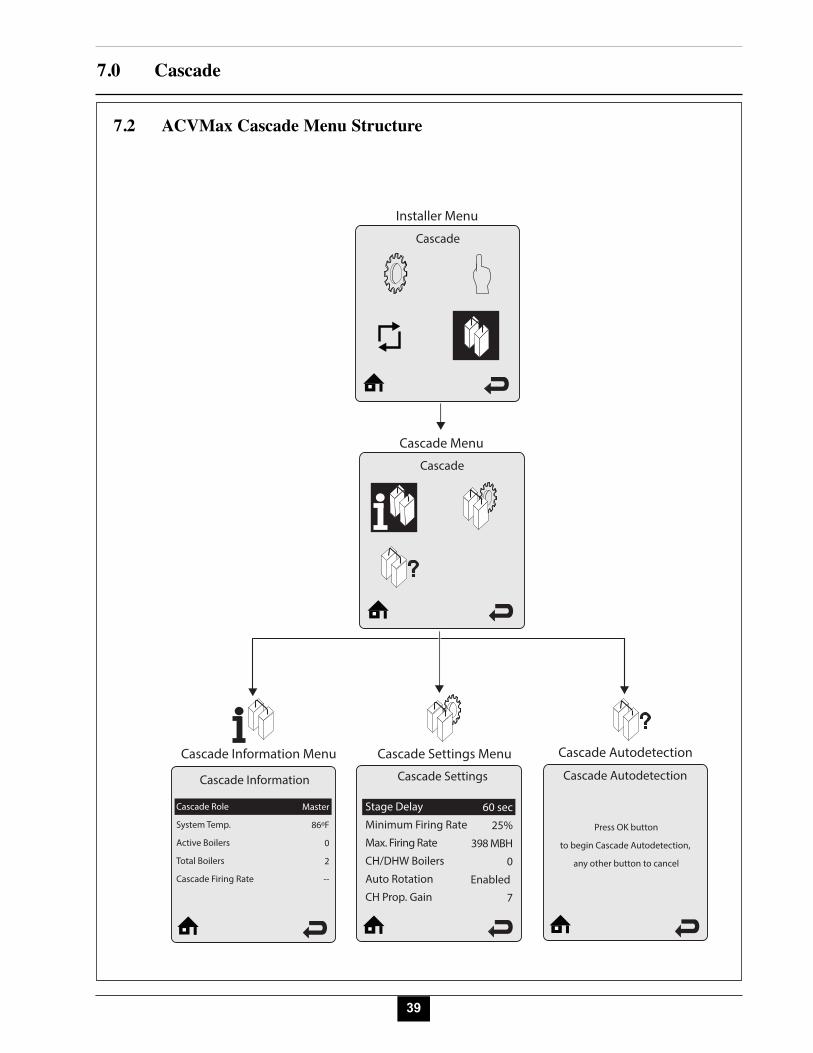
Cascade System. This function can be disabled by the Automatic Rotation Setting.The Cascade Menu is divided into three sections
1. Cascade Information – Provides real time operating information of the Cascade System.See page 50.
2. Cascade Settings – Allows the installer to adjust the Cascade System settings for the appli-cation. See pages 51 through 56.
3. Cascade Autodetection – Automatically finds and configures each boiler of the CascadeSystem. See page 42.
39
7.0 Cascade
Cascade Information Menu Cascade AutodetectionCascade Settings Menu
Cascade Menu
Installer Menu
Cascade
Cascade
Cascade Information Cascade Settings Cascade Autodetection
Cascade Role
System Temp.
Active Boilers
Total Boilers
Cascade Firing Rate
Master
86ºF
0
2
--
Stage Delay
Minimum Firing Rate
Max. Firing Rate
CH/DHW Boilers
Auto Rotation
CH Prop. Gain
60 sec
25%
398 MBH
0
Enabled
7
Press OK button
to begin Cascade Autodetection,
any other button to cancel
7.2 ACVMax Cascade Menu Structure

40
7.0 Cascade
7.3 Cascade Installation7.3.1 System PipingStandard Cascade installations will utilize a balanced manifold system asthe primary / secondary connection to the system piping as shown inFigure 21 on page 44 or a reverse return piping arrangement as shown inFigure 23 on page 46. Split Cascade installations will utilize a balancedmanifold system as the primary / secondary connection to the central heat-ing loop. Each boiler configured to respond to a domestic hot water callwill also have a direct connection to the indirect water heater as shown inFigure 25 on page 48. Reference the Prestige Installation andMaintenance Manual for general boiler installation and piping require-ments.
7.3.2 System Sensor InstallationCascade operation requires a System Temperature Sensor to be installedon the common supply header downstream of all boilers in the system.Place the System Temperature Sensor within 10’ of the last boiler in theCascade System for an accurate temperature reading. Proper placementand installation of the System Temperature Sensor is critical for reliablecascade operation. The type of System Temperature Sensor chosen alsogreatly affects the accuracy of the system temperature readings.Three types of System Temperature Sensor are available:
• Direct Immersion - A direct immersion temperature sensor(MDRKIT05) is the recommended type since it will provide themost accurate water temperature readings. Install the 1/2” NPTdirect immersion temperature sensor in a tee on the common sup-ply header downstream of all boilers in the system. Ensure that thetemperature sensor probe is directly in the water flow but not touch-ing the opposite side of the tee. Wire the sensor to terminals 3 & 4of X5 on the control module of the Master boiler.
• Dry Well Installation – A temperature sensor (PSRKIT22) installedin a dry well will measure up to 10°F [5°C] lower than the actualwater temperature. All water setpoints must be lowered at theMaster boiler by 10°F [5°C] from the desired setpoints for reliableCascade operation. Install a 3/8”ID drywell in the common supplyheader downstream of all boilers in the system. The drywell shouldbe long enough to be directly in the water flow for the most accu-rate temperature reading. Insert the temperature sensor into thewell and wire to terminals 3 & 4 of X5 on the control module of theMaster boiler.
• Pipe Mounted Installation – A temperature sensor (PTSENS12)mounted to the outside of the pipe will measure up to 20°F [11°C]lower than the actual water temperature. All water setpoints mustbe lowered at the Master boiler by 20°F [11°C] from the desired set-points for reliable Cascade operation. The Pipe Mounted tempera-ture sensor can be directly strapped to the outside of a 1” to 3”metallic pipe. Install the temperature sensor as follows:
Fig. 19: System SensorDirect Immersion
Fig. 20: System SensorDry Well Installation

41
7.0 Cascade
1. Remove the white plastic cover from the sensor2. Cut a small slit in the gasket seal on the end of the sensor.3. Route 18 AWG 2-wire cable or similar cable through the seal gas-
ket into the enclosure.4. Push down on the orange wire terminal retainers to insert the
wires into the sensor terminals. Release the orange wire terminalretainers and confirm that the wires are firmly attached to the sen-sor terminals.
5. Select a location for the sensor on the common supply headerdownstream of all boilers in the system. Clean the pipe with finesandpaper or emery cloth to ensure the pipe is clean and sensorwill make good contact with the pipe.
6. Press the white cover onto the sensor and strap the sensor to thepipe using the included wire tie.
7. Wire the sensor to terminals 3 & 4 of X5 on the control moduleof the Master boiler.
7.3.3 Cascade Communication Cable• A communication cable PACAB01 must be installed between each
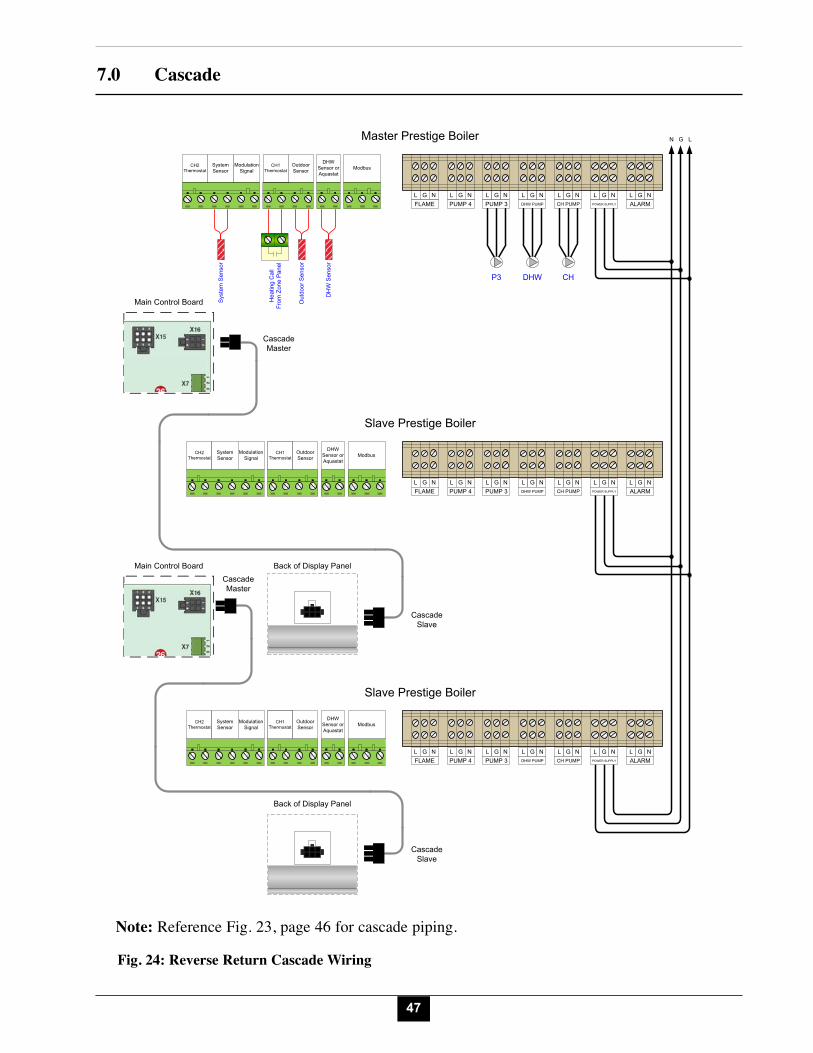
boiler in the Cascade System. The cable has a 4 pin molex connec-tor on one end and a 6 pin molex connector on the other end. The 4pin molex connector plugs into the Cascade Master X16 connectoron the control module of the Master boiler or prior Slave boiler incascades of three or more boilers. The 6 pin molex connector plugsinto the Cascade Slave connector of the Slave boiler. ReferenceFigures 22, 24 and 26 on pages 45, 47 and 49 for wiring details.
7.3.4 Low Voltage Wiring Connections• Thermostat Wiring – CH1 and CH2 calls must be wired into the
Cascade Master.• Outdoor Sensor Wiring – The outdoor temperature sensor must be
wired into the Cascade Master.• Domestic Hot Water Wiring – A DHW call must be wired into the
Cascade Master.• Additional Boiler Limits – Boiler Limits must be wired into each
boiler in the Cascade System. When a boiler limit opens, that par-ticular boiler will lockout and will be removed from Cascade Systemoperation. The other boilers in the Cascade System will continue tooperate if they are not in a lockout.
• External Modulation Control – An External Modulation Signal must bewired into the Cascade Master. The modulation signal will control thefiring rate of the entire Cascade System, not just the Cascade Master.
• Modbus Wiring – A building management system (BMS) connectionmust be wired into the Cascade Master to obtain cascade system andMaster boiler information.

42
7.0 Cascade
7.3.5 Line Voltage Wiring Connections• Circulator Wiring - Reference Figures 22, 24 and 26 on pages 45, 47
and 49 for circulator wiring required for each type of Cascade System.The circulator connections used will depend on the systems pipinglayout.
All circulators are powered from a common 5A fuse located on the con-trol module. The total combined amp draw of the all circulators mustnot exceed 5 amps at any time. Use an isolation relay to lower the totalcombined amp draw if exceeding this limits.• Power Supply – A dedicated 120 VAC / 15A minimum service must
be used to power the boilers in the Cascade System. Multiple boil-ers in the Cascade System can be placed on the same electrical cir-cuit. Each boiler can draw a maximum of 8 amps.
• Alarm Wiring – The alarm contact closes whenever that particularPrestige is in a condition set by the Error Relay Setting. The alarmcontact will also close on the Master boiler when any of the Slaveboilers are locked in a condition set by the Error Relay setting.
7.3.6 Cascade Autodetection7.3.6.1 Navigation: Home Screen>Installer Menu>Cascade>Cascade AutodetectionThe Cascade System must be configured after wiring is completed andany required adjustments are made in Cascade Settings. The CascadeAutodetection function automatically finds and configures all boilers inthe Cascade System. This eliminates the need to manually configureeach boiler of the Cascade System. Select Cascade Autodetection onthe Master boiler then follow the onscreen instructions to performCascade Autodetection. Once Cascade Autodetection is finished, amessage will be displayed indicating how many boilers have beenfound. If the number of boilers found is correct, press OK to finishCascade Autodetection. If the number of boilers found is not correct,check the cascade communication cables between the boilers andrepeat Cascade Autodetection.
NOTICE
Cascade Autodetect.
Press OK button
to begin Cascade Autodetection,
any other button to cancel

43
7.0 Cascade
Boiler #3 locked out dueto failed ignition
Boiler #2Slave
Boiler #1Master
The Master boiler indicatesthat boiler #3 is locked outbecause of failed ignition.
Failed Ignition
The burner failed to light
after 5 ignition attempts.
Check gas supply to boiler.
If problem persists after two
reset attempts, call service.
Press OK to reset.
[3] E1
Boiler #3Slave
Failed Ignition
The burner failed to light
after 5 ignition attempts.
Check gas supply to boiler.
If problem persists after two
reset attempts, call service.
Press OK to reset.
E1Slave Operation--
7.3.7 LockoutsIf a lockout occurs to a boiler in a Cascade System, it will be removed fromCascade System operation. The remainder of the Cascade System contin-ues to operate and the next available boiler will fire if necessary. TheLockout Screen will be displayed on the locked out boiler as well as theMaster boiler. The Master boiler Lockout Screen will also indicate whichboiler in the Cascade System is locked out.

44
7.0 Cascade
����
����
��
��
��
����
�
�
��
��
����
����
������
�����
�����
Fig. 21: Primary Secondary Cascade Piping
Note:
Refer
ence
Fig.
22, p
age 4
5 for
casca
de w
iring
.

45
7.0 Cascade
P3P4 DHW
N G LMaster Prestige Boiler
Slave Prestige Boiler
CH
Slave Prestige Boiler
L G N L G N L G N L G N L G N L G N L G NFLAME PUMP 4 PUMP 3 DHW PUMP CH PUMP POWER SUPPLY ALARM
CH2 Thermostat
System Sensor
Modulation Signal
CH2 Thermosta
t
CH1 Thermostat
Outdoor Sensor
DHW Sensor or Aquastat
Modbus
CH
L G N L G N L G N L G N L G N L G N L G NFLAME PUMP 4 PUMP 3 DHW PUMP CH PUMP POWER SUPPLY ALARM
CH2 Thermostat
System Sensor
Modulation Signal
CH2 Thermosta
t
CH1 Thermostat
Outdoor Sensor
DHW Sensor or Aquastat
Modbus
CH
L G N L G N L G N L G N L G N L G N L G NFLAME PUMP 4 PUMP 3 DHW PUMP CH PUMP POWER SUPPLY ALARM
CH2 Thermostat
System Sensor
Modulation Signal
CH2 Thermosta
t
CH1 Thermostat
Outdoor Sensor
DHW Sensor or Aquastat
Modbus
Main Control Board Back of Display Panel
Back of Display Panel
ZV-2 End Switch
ZV-1 End Switch
Out
door
Sen
sor
DH
W S
enso
r
Sys
tem
Sen
sor
CascadeMaster
CascadeMaster
CascadeSlave
CascadeSlave
Main Control Board
Fig. 21: Primary Secondary Cascade WiringNote: Reference Fig. 21, page 44 for cascade piping.

46
7.0 Cascade
����
����
����
�
��
��
�
� ���
������
������
������
����
����
� ���
Fig. 23: Reverse Return Cascade Piping
Note:
Refer
ence
Fig.
24, p
age 4
7 for
casca
de w
iring
.
47
7.0 Cascade
P3 DHW
N G LMaster Prestige Boiler
Slave Prestige Boiler
Slave Prestige Boiler
L G N L G N L G N L G N L G N L G N L G NFLAME PUMP 4 PUMP 3 DHW PUMP CH PUMP POWER SUPPLY ALARM
CH2 Thermostat
System Sensor
Modulation Signal
CH2 Thermosta
t
CH1 Thermostat
Outdoor Sensor
DHW Sensor or Aquastat
Modbus
L G N L G N L G N L G N L G N L G N L G NFLAME PUMP 4 PUMP 3 DHW PUMP CH PUMP POWER SUPPLY ALARM
CH2 Thermostat
System Sensor
Modulation Signal
CH2 Thermosta
t
CH1 Thermostat
Outdoor Sensor
DHW Sensor or Aquastat
Modbus
CH
L G N L G N L G N L G N L G N L G N L G NFLAME PUMP 4 PUMP 3 DHW PUMP CH PUMP POWER SUPPLY ALARM
CH2 Thermostat
System Sensor
Modulation Signal
CH2 Thermosta
t
CH1 Thermostat
Outdoor Sensor
DHW Sensor or Aquastat
Modbus
Main Control Board Back of Display Panel
Back of Display Panel
Hea
ting
Cal
l Fr
om Z
one
Pan
el
Out
door
Sen
sor
DH
W S
enso
r
Sys
tem
Sen
sor
CascadeMaster
CascadeMaster
CascadeSlave
CascadeSlave
Main Control Board
Fig. 24: Reverse Return Cascade Wiring
Note: Reference Fig. 23, page 46 for cascade piping.

7.0 Cascade
48
����
����
����
����
�
�
�
�
�
����
�
��
� ��
�����
�����
������
������
������
��
Fig. 25: Split Cascade System
Note 1:
Refer
ence
Fig.
26, p
age 4
9 for
casca
de w
iring
.Note 2:
DHW
Prior
ity m
ust b
e set
to En
abled
in D
HW Se
ttings
of th
e Casc
ade M
aster
for pr
oper
opera
tion.

49
7.0 Cascade
DHW
P3P4 DHW
N G LMaster Prestige Boiler
Slave Prestige Boiler
CH
Slave Prestige Boiler
L G N L G N L G N L G N L G N L G N L G NFLAME PUMP 4 PUMP 3 DHW PUMP CH PUMP POWER SUPPLY ALARM
CH2 Thermostat
System Sensor
Modulation Signal
CH2 Thermosta
t
CH1 Thermostat
Outdoor Sensor
DHW Sensor or Aquastat
Modbus
CH
L G N L G N L G N L G N L G N L G N L G NFLAME PUMP 4 PUMP 3 DHW PUMP CH PUMP POWER SUPPLY ALARM
CH2 Thermostat
System Sensor
Modulation Signal
CH2 Thermosta
t
CH1 Thermostat
Outdoor Sensor
DHW Sensor or Aquastat
Modbus
CH
L G N L G N L G N L G N L G N L G N L G NFLAME PUMP 4 PUMP 3 DHW PUMP CH PUMP POWER SUPPLY ALARM
CH2 Thermostat
System Sensor
Modulation Signal
CH2 Thermosta
t
CH1 Thermostat
Outdoor Sensor
DHW Sensor or Aquastat
Modbus
Main Control Board Back of Display Panel
Back of Display Panel
Hea
ting
Cal
l Fro
m
Zone
Pan
el
Out
door
Sen
sor
DH
W S
enso
r
Sys
tem
Sen
sor
Main Control Board
CascadeMaster
CascadeMaster
CascadeSlave
CascadeSlave
Fig. 26: Split Cascade Wiring
Note: Reference Fig. 25, page 48 for cascade piping.

50
7.0 Cascade
7.4.1 Navigation: Home Screen>Installer Menu>Cascade>Cascade InformationCascade Information provides real time operating information of theCascade System. Each line contains an information item followed byits current value. See below for a list of all Cascade Information items.
7.4.2 System Temperature LoggingSystem Temperature has a logging function which records one sampleevery 12 minutes to produce a graph of the last 24 hours. Select SystemTemperature in Cascade Information then press the OK button to viewthe graph.
7.4 Cascade Information
Cascade Information
Cascade RoleSystem Temp.Active BoilersTotal BoilersCascade Firing Rate
Master86ºF
02--
Cascade Role Master
194
68
-24.00 -16.00 -8.00 0.00
System Temp.
Information Item Description
Cascade Role
Displays the current role of the Prestige in the Cascade System.Cascade Role will be one of the following:
• Master – Indicates this Prestige is the Master boiler in theCascade System.
• Slave – Indicates this Prestige is a Slave boiler in the CascadeSystem.
• Standalone – Indicates this Prestige is not part of a CascadeSystem.
System TemperatureDisplays the current system temperature reading wired to theMaster boiler. If the system sensor is not wired in to the Masterboiler,”--” is displayed.
Active Boilers Displays the current number of boilers fired in the Cascade System.
Total Boilers Displays the total number of boilers in the Cascade System.
Cascade Firing Rate Displays the current firing rate of the entire Cascade System.
Cascade Information Items

51
7.0 Cascade
7.5.1 Navigation: Home Screen>Installer Menu>Cascade>Cascade SettingsThe Cascade Settings menu contains settings related to cascade operation.Each line contains a Cascade Setting followed by its current value. SixCascade Settings are displayed on the screen at one time. Press the UPor DOWN buttons to scroll through additional Cascade Settings.
Cascade Setting changes must be made only on the Cascade Master.Cascade Autodetection must be performed after making anychanges to a Cascade Setting before the change will take effect.7.5.2 Stage Delay Default: 60 SecondsStage Delay sets the time delay before enabling or disabling a boiler in theCascade System. The Stage Delay begins once the Master boiler determines thata boiler must be enabled to reach the setpoint or when the Master boiler deter-mines a boiler should be disabled because of a decreasing load. Press the LEFTor RIGHT buttons to adjust the Stage Delay then press the OK button to storethe setting. Adjusting the Stage Delay will have the following effects:• Increase Stage Delay
- Reaching the setpoint could take longer due to a longer delaybetween enabling boilers.
- Overshooting the setpoint could occur due to boilers staying onlonger before being disabled.
• Decrease Stage Delay- Overshooting the setpoint could occur due to boilers being
enabled quicker.- Boilers will be disabled quicker, possibly increasing boiler
cycling and decreasing runtimes.7.5.3 Minimum Firing Rate Default: 25%Minimum Firing Rate is the minimum firing rate of a single boiler in the CascadeSystem. The Master boiler uses this setting to determine when boilers can beenabled and disabled. Setting the Minimum Firing Rate below the recommend-ed minimum will result in boilers being enabled too quickly which may causesharp increases in temperature from the Cascade System. Setting the MinimumFiring Rate above the recommended minimum will delay the enabling of boilerswhich may lower the system efficiency. Press the LEFT or RIGHT buttons toadjust the Minimum Firing Rate then press the OKbutton to store the setting. Forthe minimum and maximum recommended settings refer to Table 6 on page 52.
NOTICE
7.5 Cascade Settings
Cascade Setting
Stage Delay
Minimum Firing Rate
Max. Firing Rate
CH/DHW Boilers
Auto Rotation
CH Prop. Gain
60 sec
25%
398 MBH
0
Enabled
7
0% 100%
25%
Minimum Firing Rate
0sec. 255sec.
60Sec.
Stage Delay

52
7.0 Cascade
7.5.4 Boiler Enabling AlgorithmThe Master boiler uses the following algorithm to determine when the nextboiler can be enabled:
Once the currently fired boilers reach the calculated firing rate, the nextboiler can be enabled without affecting the overall cascade firing rate. Forexample, the calculation for a Cascade System consisting of two PRES-TIGE Solo 399s would be:
Once the first PRESTIGE Solo 399 firing rate reaches 50%, the secondPRESTIGE Solo 399 can be enabled. Both will then fire at the minimum25% firing rate so that the overall output from the Cascade System remainsthe same.7.5.5 Boiler Disabling AlgorithmOnce the firing rate of all currently fired boilers decreases to the MinimumFiring Rate, a boiler can be disabled. The boilers which continue to firewill increase their firing rate if required to replace the output of the dis-abled boiler.
Stable cascade operation requires that all boilers in a Cascade Systembe the same size. Mixing boiler sizes in a Cascade System could leadto temperature fluctuations and erratic cascade operation. 7.5.6 Maximum Firing Rate Default: 398 MBHMaximum Firing Rate is the maximum firing rate of a single boiler in theCascade System. Press the LEFT or RIGHT buttons to adjust theMaximum Firing Rate then press the OK button to store the setting. Therecommended settings are:
NOTICE
0MBH 869MBH
398 MBH
MaximumFiring Rate
Number of Boilers Firing +1Number of Boilers Firing x Minimum Firing Rate = Individual Boiler Firing Rate
1 + 11
x 25% = 50%
Table 6: Min/Max Firing Rate
Prestige Model Minimum Firing Rate
MaximumFiring Rate
Solo 80 20% 80 MBHSolo/Excellence 110 19% 110 MBHSolo 155 19% 153 MBHSolo 175 19% 170 MBHSolo 250 19% 240 MBHSolo 299 25% 299 MBHSolo 399 19% 399 MBH

53
7.0 Cascade
0 6
0
CH/DHW Boilers7.5.7 CH/DHW Boilers Default: 0The CH/DHW Boilers setting specifies how many boilers in a SplitCascade System will respond to a domestic hot water call. The CH/DHWBoilers always begins with the Master boiler. The remaining boilers ofthe Cascade System will only respond to central heating calls. Thisallows the Cascade System to satisfy both central heating and domestichot water calls at the same time. At the completion of a domestic hotwater call, the CH/DHW Boilers will again be available to respond tocentral heating calls. Press the LEFT or RIGHT buttons to adjust theCH/DHW Boilers setting then press the OK button to store the setting.
Splitting the Cascade System into CH only and CH/DHW boilersrequires the boilers to be piped as shown in Figure 25 on page 48.The CH/DHW boilers must be piped to both CH and DHW loadsdirectly for proper operation.
DHW Priority must be set to Enabled in DHW Settings of theCascade Master for proper operation.
All CH/DHW Boilers will respond to a domestic hot water call. It isimportant that the domestic load is capable of transferring all of theheat generated to prevent excessive boiler cycling.7.5.8 Automatic Rotation Default: EnabledAutomatic Rotation allows the lead stage automatic rotation function tobe disabled. Press the UP or DOWN buttons to select Enabled orDisabled then press the OK button to store the setting.
• Enabled – The lead boiler automatically rotates every time a call forheat is received when a Switch option is chosen in CH Demand orevery 24 hours when a Constant option is chosen in CH Demand.
• Disabled – The lead boiler is always the Master boiler followed byeach Slave boiler.
NOTICE
NOTICE
NOTICE
Automatic Rotation
Enabled
Disabled

54
7.0 Cascade7.5.9 CH Proportional Gain Default: 7CH Proportional Gain allows the cascade response to be adjusted for a cen-tral heating call. CH Proportional Gain has the greatest influence when thesystem temperature is far away from the setpoint. Press the LEFT orRIGHT buttons to adjust the CH Proportional Gain then press the OKbutton to store the setting. • Increase CH Proportional Gain
- The Cascade System will reach setpoint faster, but overshootingthe setpoint may occur.
- To reach the setpoint faster, increase the CH Proportional Gainvalue by 2. Perform Cascade Autodetection and initiate a centralheating call. Observe the cascade response and make furtheradjustments if necessary.
• Decrease CH Proportional Gain- The Cascade System will take longer to reach the setpoint, but
setpoint overshooting is minimized.- If the setpoint is reached too quickly, decrease the CH
Proportional Gain value by 2. Perform Cascade Autodetectionand initiate a central heating call. Observe the cascade responseand make further adjustments if necessary.
Only make adjustments to this setting after consulting ACV-TriangleTube Technical Support. Improper adjustment of CH ProportionalGain could lead to temperature fluctuations and erratic cascadeoperation.
7.5.10 CH Integral Gain Default: 245CH Integral Gain allows the cascade response to be adjusted for a centralheating call. CH Integral Gain has the greatest influence when the systemtemperature is close to the setpoint. Press the LEFT or RIGHT buttons toadjust the CH Integral Gain then press the OK button to store the setting.
• Increase CH Integral Gain- The Cascade System will take longer to reach the setpoint, but
setpoint overshooting is minimized.- If the setpoint is reached too quickly, increase the CH Integral
Gain value by 2. Perform Cascade Autodetection and initiate acentral heating call. Observe the cascade response and make fur-ther adjustments if necessary.
• Decrease CH Integral Gain- The Cascade System will reach setpoint faster, but overshooting
the setpoint may occur.
NOTICE
1 255
245
CH Integral Gain
1 255
7
CH Proportional Gain

55
7.0 Cascade
- To reach the setpoint faster, decrease the CH Integral Gainvalue by 2. Perform Cascade Autodetection and initiate a cen-tral heating call. Observe the cascade response and make fur-ther adjustments if necessary.
Only make adjustments to this setting after consulting ACV-Triangle Tube Technical Support. Improper adjustment of CHIntegral Gain could lead to temperature fluctuations and erraticcascade operation.
7.5.11 DHW Proportional Gain Default: 7DHW Proportional Gain allows the cascade response to be adjusted for adomestic hot water call. DHW Proportional Gain has the greatest influ-ence when the system temperature is far away from the setpoint. Pressthe LEFT or RIGHT buttons to adjust the DHW Proportional Gain thenpress the OK button to store the setting.
• Increase DHW Proportional Gain- The Cascade System will reach setpoint faster, but overshooting
the setpoint may occur.- To reach the setpoint faster, increase the DHW Proportional
Gain value by 2. Perform Cascade Autodetection and initiate adomestic hot water call. Observe the cascade response andmake further adjustments if necessary.
• Decrease DHW Proportional Gain- The Cascade System will take longer to reach the setpoint, but
setpoint overshooting is minimized.- If the setpoint is reached too quickly, decrease the DHW
Proportional Gain value by 2. Perform Cascade Autodetectionand initiate a domestic hot water call. Observe the cascaderesponse and make further adjustments if necessary.
Only make adjustments to this setting after consulting ACV-Triangle Tube Technical Support. Improper adjustment of DHWProportional Gain could lead to temperature fluctuations anderratic cascade operation.
NOTICE
NOTICE
1 255
7
DHW Proportional Gain

56
7.0 Cascade
7.5.12 DHW Integral Gain Default: 245DHW Integral Gain allows the cascade response to be adjusted for adomestic hot water call. DHW Integral Gain has the greatest influencewhen the system temperature is close to the setpoint. Press the LEFT orRIGHT buttons to adjust the DHW Integral Gain then press the OK but-ton to store the setting.
• Increase DHW Integral Gain- The Cascade System will take longer to reach the setpoint, but
setpoint overshooting is minimized.- If the setpoint is reached too quickly, increase the DHW Integral
Gain value by 2. Perform Cascade Autodetection and initiate adomestic hot water call. Observe the cascade response and makefurther adjustments if necessary.
• Decrease DHW Integral Gain- The Cascade System will reach setpoint faster, but overshooting
the setpoint may occur.- To reach the setpoint faster, decrease the DHW Integral Gain
value by 2. Perform Cascade Autodetection and initiate a domes-tic hot water call. Observe the cascade response and make fur-ther adjustments if necessary.
Only make adjustments to this setting after consulting ACV-Triangle Tube Technical Support. Improper adjustment of DHWIntegral Gain could lead to temperature fluctuations and erraticcascade operation.
NOTICE
1 255
245
DHW Integral Gain

57
8.0 Modbus Interface
8.0 MODBUS INTERFACEThe Modbus Interface allows a Building Management System (BMS) to directly connect to the Prestige.A BMS can read information from the boiler to determine its operating state, lockout status, sensor read-ings, etc. A BMS can also operate the boiler by providing a setpoint.
Table 7: Modbus ConfigurationProtocol MODBUS RTU
Baud Rate 38400bpsData Length 8
Parity NoneStop Bits 1
Physical Layer RS485 (2 wire)
Table 8: Supported CommandsDEC HEX Description
03 0x03 Read Holding Registers04 0x04 Read Input Registers06 0x06 Write Single Register16 0x10 Write Multiple Registers17 0x11 Report Slave ID
Table 9: Holding Registers (Read/Write)Address
DEC (HEX)SupportedCommands Description Byte: Format Notes
512 (0x0200) 0x030x060x10
CH Demand MB:U8
LB:U8
Writing0= Modbus CH1 Demand has prior-ity over a DHW call255 = DHW call has priority over aModbus CH1 Demand
Reading0 = No CH Calls Present255 = CH1 or CH2 Call Present
Writing0 = End CH1 Demand255= Begin CH1 DemandA CH1 Demand lasts for 30 secondsfrom the last successful write.
513 (0x201) 0x030x060x10
Maximum FiringRate
LB:U8 Value = Maximum Firing Rate %This register becomes active when255 is written to register 512(0x0200)
514 (0x202) 0x030x060x10
CH Setpoint LB:U8 Value = CH Setpoint °CThis register becomes active when255 is written to register 512(0x0200)
1280 (0x0500) 0x03 CH1 MaximumSetpoint
LB:U8 Value = °C
1281 (0x0501) 0x03 DHW StorageSetpoint
LB:U8 Value = °C

58
8.0 Modbus Interface
Table 10: Input Registers (Read Only)Address
DEC (HEX)SupportedCommands Description Byte: Format Notes
0 (0x0000) 0x04 Boiler Status LB: Flag8 Bit: Description0: PC Manual Mode1: DHW Mode2: CH Mode3: Freeze Protection Mode4: Flame Present5: CH(1) Pump6: DHW Pump7: System / CH2 Pump0 = Off, 1 = On
1 (0x0001) 0x04 Lockout Status MB: Flag8
LB:U8
Bit: Description1: Lockout Code Type0 = Automatic Reset Lockout1 = Manual Reset Lockout
Value = Lockout Code2 (0x0002) 0x04 Lockout Status LB:U8 0 = Single / Master Boiler
1 = Slave 12 = Slave 23 = Slave 34 = Slave 45 = Slave 5F = Single / Master Display
768 (0x0300) 0x04 Boiler SupplyTemperature /
System Temperature
S16 Value = 0.1°CInvalid Value = 32768 (0x8000)Value is the Boiler SupplyTemperature unless the SystemTemperature Sensor is installed
769 (0x0301) 0x04 Boiler ReturnTemperature
LB:S8 Value = °CInvalid Value = 65472 (0xFFC0)
770 (0x0302) 0x04 DHW StorageTemperature
LB:S8 Value = °CInvalid Value = 32768 (0x8000)
771 (0x0303) 0x04 Boiler FlueTemperature
LB:S8 Value = °CInvalid Value = 65472 (0xFFC0)
772 (0x0304) 0x04 OutdoorTemperature
LB:S8 Value = °CInvalid Value = 32768 (0x8000)
773 (0x0305) 0x04 Future Use LB:U8
774 (0x0306) 0x04 Flame IonizationCurrent
LB:U8 Value = Flame Current µA
775 (0x0307) 0x04 Boiler / CascadeFiring Rate
LB:U8 Value = Firing Rate %
776 (0x0308) 0x04 Boiler Setpoint LB:U8 Value = °CInvalid Value = 32768 (0x8000)

59
9.0 Manual Operation
9.1 Navigation: Home Screen>Installer Menu>Manual OperationThe Manual Operation Screen allows the burner and circulators to be man-ually enabled for testing.9.2 FanPress the OK button while the FAN icon is highlighted to manually firethe burner and power the CH (1) circulator. Press the LEFT andRIGHT buttons to adjust the firing rate from 1 % (Low Fire) to100% (High Fire). Hold down the LEFT or RIGHT buttons to rapidlyincrease or decrease the firing rate. Press the OK button again while theFAN icon is highlighted to shutdown the burner when finished.
An adequate CH load must be present to dissipate the heat generatedwhile the burner is manually fired. If an adequate CH load is not avail-able, an indirect water heater can be used to dissipate the heat by creat-ing a domestic hot water call which will enable the DHW circulator.
9.3 CH CH1Press the OK button while the CH CH1 icon is highlighted to manuallypower the CH (1) circulator. Press the OK button again while the CHCH1 icon is highlighted to shutdown the CH (1) circulator.
The Auxiliary Boiler circulator is also powered when the CH (1) cir-culator is manually enabled.
9.4 DHWPress the OK button while the DHW icon is highlighted to manuallypower the DHW circulator. Press the OK button again while the DHWicon is highlighted to shutdown the DHW circulator.
The Auxiliary Boiler circulator is also powered when the DHW circu-lator is manually enabled.
9.5 SYS CH2Press the OK button while the SYS CH2 icon is highlighted to manuallypower the System circulator. Press the OK button again while the SYSCH2 icon is highlighted to shutdown the System circulator.
NOTICE
NOTICE
NOTICE
9.0 MANUAL OPERATION
Manual Operation
Released
O!
O!
O!
CH1
FAN
DHW
CH2
Manual Operation
Released
O!
O!
O!
CH1
FAN
DHW
CH2
Manual Operation
Released
O!
O!
O!DHW
FAN
CH1
CH2
Manual Operation
Released
O!
O!
O!CH2
FAN
DHW
CH1

Additional quality water heating equipment available from ACV- Triangle Tube
MAxI-FlO AND SPA HEAT ExCHANGERS
SMART INDIRECT FIRED WATER HEATERS
TTP BRAzED PlATE HEAT ExCHANGERS
- Exclusive tank-in-tank design- Stainless steel construction- Available in 7 sizes - Limited LIFETIME residential warranty- 6 year Limited commercial warranty- Self cleaning/self descaling design
- For domestic water, snow melting, radiant floor, refrigeration- Plates made of stainless steel, with a 99.9 % copper and
brazed, ensuring a high resistance to corrosion- Self cleaning and self descaling- Computerized sizing available from ACV- Triangle Tube- Available in capacities from 25,000 BTU/hr to 5,000,000
BTU/hr
- Construction of high quality corrosion resistant stainlesssteel (AISI 316) or titanium
- Specially designed built-in flow restrictor to assure maxi-mum heat exchange
- Compact and light weight- Available in 8 sizes that can accommodate any size pool
or spa
Triangle Tube - 1 Triangle Lane - Blackwood, NJ 08012 - Tel: (856) 228 8881 - Fax: (856) 228 3584E-mail: [email protected]