presents 4guides free - sew news · adjust the bustline.thefeaturedmodel’s bustmeasurementis3”...
TRANSCRIPT

presents
11 22 33 4411 Fitting Benefits Pt. 1
by Londie Phillips
22 Fitting Benefits Pt. 2by Londie Phillips
33 Sleeve Fittingby Julie Culshaw
44 Make it Fit: Simple Sheath Dressby Rae Cumbie
Fitting Basics
FREESEWING GUIDES44

Fitting Basics
FREESEWING GUIDES44
11 Fitting Benefits Pt. 1........................................PAGE 1
22 Fitting Benefits Pt. 1 ..................................PAGE 6
33 Sleeve Fitting.............................................PAGE 12
44 Make it Fit: Simple Sheath Dress ................PAGE 17
TABLE OF CONTENTS
Taking the time to correctly fit your garments will help you
create a flattering wardrobe that you’ll be proud to flaunt. Dis-
cover expert fitting techniques for various garment types by
following these essential step-by-step guides. Begin by learn-
ing how to properly fit a jacket in “Fitting Benefits: Part 1,”
and then expand your fitting skills to include pants in “Fitting
Benefits: Part 2.” Refine the fit of your sleeves and learn trou-
bleshooting tricks in “Sleeve Fitting.” Finally, “Make it Fit: Sim-
ple Sheath Dress” shows you how to fit a classic sheath
dress. Apply your newfound fitting knowledge to your future
sewing projects to create a closet full of gorgeous garments! Happy sewing!
Beth BradleyAssociate Editor, Sew News

make it fit LONDIE PHILLIPS
- 1 sewnews
FITTING BENEFITS, PART 1
Vogue7947
Elbow dart
Sleevelength
Pantlength
After
Tight-fittingbustline
Before

sewnews 2
THE BENEFITS OF FITTINGAREOBVIOUS in the before and afterphotos shown at left.The before photoshows the model wearing a size 10 cutexactly from the pattern.The after photoshows a size 10 altered to the model’sshape and measurements.
The Best Pattern SizeConsider both body shape and measure-ments when choosing a basic patternsize. Bust, waist and hip measurementsmay be misleading, especially when onearea needs special attention. For instance,a full bust may suggest a size 14,whenin fact a size 10 better suits your heightand shape. By using a size 10, thebustline is altered by adjusting onlythe bodice front— not by changing theentire jacket size.Using a size 14 wouldlengthen the jacket, broaden the shoulders,drop the waist, lower the armhole,increase the waist and hip fullness, andcreate a whole different set of problems.
Compare the across-chest, across-backand across-shoulder measurements tothe stitching lines on the pattern pieces.Most patterns don’t include stitchinglines, but they’re generally identifiedwith pattern markings. Stitching linesare normally ⅝” from the cuttingedge. Use a clear ruler and mark theselines with a soft pencil to help makeaccurate comparisons. For jacketsinclude about ⅜” for ease.
Note the size that’s most consistent withyour across-chest, across-back andacross-shoulder measurements.
Compare the neck-to-waist measure-ment. (The featured model’s backneck-to-waist measurement is 15”,but the size 10 pattern measures 16”.This extra inch in the bodice length
causes the jacket to blouse in the back, asshown at left. ForV-necklines or neck-lines scooped in the back, use the sizingchart to compare neck-to-waist meas-urements.Adjust the length accordingly.
Compare the bust, waist and hip measure-ments. Jackets are designed with ampleease to wear over a blouse and drapenicely.To determine the ease amountallowed for the pattern, compare thesizing-key measurements to the patternpieces. Some patterns print this infor-mation on the pattern pieces. In thefeatured pattern, the bust and hipsinclude 3½” of ease and the waistincludes 5” of ease. Retain the recom-mended allowances for comfort andproper drape.
The featured model’s waist and hipsare closest to a size 10.This size isalso a good base for future patternselections. Her bust size will almostalways present fitting challenges andrequire pattern alterations.
Muslin FittingVery few people perfectly fit any standardsize.The benefits of sewing let youdevelop a perfectly fitted garment inany of today’s current styles in the col-ors and fashion fabrics you enjoy most.Make a muslin or practice sample untilyou’re familiar with fitting techniques.Perfect the sample and pattern beforecutting the fashion fabric.
Adjust the bodice length.To adjust thebodice back length, find the shorten-or-lengthen-here markings on the backpattern piece.To shorten the bodice, foldthe pattern and reduce the length bythe necessary amount.Tape or pinthe pattern to secure.To lengthen thebodice, cut the pattern at the shorten-or-lengthen-here markings, separate thepieces the necessary amount, and trueall straight-of-grain lines. Use a clearruler as a guideline. Place pattern-tracingcloth behind the pattern pieces andsecure with tape. Repeat this processon the front pattern piece (1).
A significant benefit for the fashion sewer is a custom fit for any bodytype. This month, we explore the benefits of fitting a jacket. Next month, you’ll learn
the importance of fitting pants. These two segments will give you the knowledge to
complete a perfectly fitted suit that will become a wardrobe staple.
1 Adjust bodice length equally on front and back
1⁄2 Across chest(plus 3⁄8”)
1⁄2 Across back(plus 3⁄8”)
1⁄2 Acrossshoulders
Shorten orlengthen here
Shorten orlengthen here
Waist
Cent
erfr
ont
Fold
line

3 sewnews
Take all measurements wearing the undergarments and shoes you’ll wear with the jacket. Stand straightand in a natural position. Don’t pull the tape too tight; have a friend measure you.
Body Measurements
Five additional measurements in red areneeded to fit the pattern:1 Bust depth: Measure from the shoulder
(at the neckline) to the bust point.
2 Bust-point to bust-point: Measure from bust-pointto bust-point (generally 7” to 8” for sizes 8 to 14).
3 Sleeve length: With your arm bent, measure fromthe top of the shoulder to the elbow to the wrist.
4 Shoulder to elbow: With your arm slightly bent,measure from the top of the shoulder to the elbow.
5 Bicep: Measure around the fullest part ofthe upper arm.
Seven body measurements in yellow helpdetermine your basic jacket pattern size:1 Bust: Measure around the fullest part of the chest;
don’t let the tape sag in the back.
2 Waist: Measure around the natural waistline.
3 Hips: Measure the fullest part of your hips(approximately 7” down from the waistline).
4 Across chest: Measure across the chest, fromsleeve edge to sleeve edge.
5 Across back: Measure across the back, from sleeveedge to sleeve edge.
6 Across shoulders: Measure from the shoulder upperedge across the neck bone to the other shoulderupper edge.
7 Back neck-to-waist: Measure from the neck boneto the waist.
1
1
42
2
3
3
4
5
5
6
7

Adjust the bustline.The featured model’sbust measurement is 3” larger than thesize-10 pattern.To add 3” to the centerfront or side seams appears like a goodsolution, but it doesn’t account fornecessary shaping around the bust.Thebest solution is to separate the patternat the bust point, adding the increasespecifically where it’s needed.To increasethe bustline, draw a line down each dartcenter. Connect the dart points and cutthe pattern. Since 3” are needed, eachside needs to be increased by 1½”.Separate the pattern pieces 1½”.Trueall horizontal and vertical lines. Insertpattern-tracing cloth under each sideand tape (2). Even though the dartsare changed, the waist, hip and shouldermeasurements remain the same.Mark the bust point on the new
pattern. Redraw the darts, using thenew markings to determine placement.The point of the lower dart shouldbegin about ¾” below the bust point;the upper dart point should be at least2” higher than the lower dart point(3). The new darts are now verywide and will be bulky if left as is.To resolve this problem cut away theexcess fabric. Use a clear ruler andmark cutting lines ⅝” outside the dartlines (4). To true the shoulder seam,fold the shoulder dart and redraw theshoulder seam using a clear ruler orstraight edge. Adjust the upper dartlength and/or width further duringthe fitting process if necessary.
Reduce bust fullness using the sameapproach. Cut the pattern along thedart lines, and then reduce the bustlinefullness the desired amount by overlap-ping the pattern pieces. Keep thegrainlines and vertical markings true,and then secure with tape. Redefinethe darts as outlined above and truethe shoulder seam.
sewnews 4
Taking accurate measurementswill actually help you look moreslender and proportionate whenyou wear the garment.
3 Redefine darts
Bustdepth
3⁄4”
Cent
erfr
ont
Orig
inal
dart
Fold
line
1⁄2 Bustpoint
to bustpoint
4 True shoulder seam; add seam allowanceto darts
New cutting line
2 Draw line through dart centers
Cent
erfr
ont
Fold
line
Dart
Separate pattern and fill withpattern-tracing cloth; tape
11⁄2”
Pattern-tracing cloth
Cent
erfr
ont
Fold
line
tip: Decrease the hipline either at the
side seam or the back darts. Don’t reduce
the hip measurement on the front dart.

5 sewnews 5 O C T O B E R 2 0 0 6
To increase the waistline, determine theproblem area(s): front, sides or back.Addto the side seams or reduce the dartsdepending on your body shape. Sideseams should always be reduced orincreased equally on the front and back.If the shaping of one seam is changedand not the other, it produces a puck-ered seam and affects the jacket drape.Side seams should hang straight up anddown and not pull toward the front orback.The same is true for darts. Increaseor decrease them equally on each side.
Follow the same procedure to increasethe hip.Add shape to the side seamsor fullness to the front or back byreducing the darts.
Make a sample jacket front from muslin.Allow for seam allowances and thecenter-front overlap when observingthe muslin fit. Pin-fit the muslin sampleif it needs further adjustment.Markalong the pins, and then transfer thenew markings to the adjusted pattern.When a pattern calls for shoulder pads,pin the shoulder pads to your bra strapsbefore fitting.
Compare bicep measurements. Jacketsleeves don’t fit snuggly like aT-shirtand there’s a certain amount of built-inease. Refer again to the markings on
the pattern to determine if the width,or bicep area, needs to be altered.
Compare shoulder-to-elbow measurements.If shoulder pads are used, add the shoulderpad thickness to your body measure-ment. Length is usually added to theupper sleeve in order to accommodateshoulder pads. Compare your measure-ments to the pattern;measure from thetop of the sleeve to the point of the elbowdart (5).The dart point should pointdirectly to your elbow when your arm isbent.Adjust the upper sleeve length tocorrect the elbow-dart placement.
Adjust the lower sleeve length. Mark thehemline on the pattern and lengthenor shorten the pattern as needed at theshorten-or-lengthen-here markings.Fold out the excess, or cut and separatethe pattern pieces to add length. Don’tsimply make the pattern longer byadding length to the hem edge orshorten it by trimming the pattern.This changes the sleeve contour andmakes it either too full or too narrowat the wrist and/or hem.
After adjusting the main pattern pieces,consider if any of these changes willaffect the lining or facing patternpieces. If so, make similar adjustmentsto them.
Cutting &ConstructionCut the fabric and stitch the darts asdirected on the pattern. Stitch the shoulderseams and hand baste the side seamsusing a long running stitch.Don’t pressthe seams or darts until you fit the jacket.
For each fitting, wear the undergarmentsand shoes you’ll wear with the outfit.Even though shoes don’t affect thejacket length, they do affect your stanceand the fabric drape.
Stitch the elbow dart and baste theunderarm sleeve seam. Baste the sleevecap and ease it slightly. Pin the top ofthe sleeve to the jacket shoulder seam.Check that the dart is in the accuratelocation; determine the correct sleevelength.Make necessary adjustmentsbefore pressing the darts and stitchingthe underarm and side seams.
Follow the remaining pattern guidelinesfor construction, including interfacing,pressing and finishing edges.
Londie Phillips is a graduate of the SanFrancisco School of Fashion Design.She’s presently the lead designer forNancy Ann Storybook Dolls.
sourceHancock Fabrics, www.hancockfabrics.com,supplied the fabric and supplies for this project.
5 Compare sleeve measurements
To elbow
Sleevelength
tip: When using fusible interfacing,
cut out the pattern pieces about 1⁄2”
larger all the way around. Recut the
pattern pieces after the interfacing is
applied as ironing may cause
slight fabric shrinkage. Z

make it fit LONDIE PHILLIPS
LAST MONTHYOU LEARNEDABOUTTHE BENEFITS OFFITTING A JACKET through thediscussion of alterations and sizingpreferences.The topics for this segmentare body contours and pant alterations.Learn how to choose the correctpattern size, alter the pattern accordingto body contour, and pin fit.Whilechoosing the correct pattern size isimportant, pattern adjustments areusually necessary for beautifully tailoredresults. In the before photo at right,the model wears a size-10 pant cutexactly from the pattern.The afterphoto shows an altered size 10 thatbest complements the model’s figure.
Best Pattern SizeCompare your waist and hip measurementsto the pattern-sizing chart. Patternsizes vary considerably compared toready-to-wear clothing sizes. Patternsalso include various ease amountsdepending on the style.A pant withpleats may have 1” to 4” added atthe hipline, making it difficult tocompare your measurements directlyto the pattern. Choose a patternbased on the hip size if the comparedmeasurements don’t correspond to thesame size. For instance, if your waistis a size 10 and your hips are a 14,choose the size-14 pattern.This allowsfor enough pattern paper to make thenecessary adjustments.
Consider your body contoursonce you’ve determinedyour best pattern size. Bodyor shape deviations from thebasic pattern cause the pantsto pull or sag. Subtlevariations and patternadjustments make aremarkable difference in fit(1). Consider the variousdeviations from the patternand identify the areas youshould address. Patternadjustments should be madewhere they’re needed andnot just by randomly addingor subtracting inches at thewaist, the hips or eventhe length.
If you base the pattern size on yourwaist measurement, the pattern shouldbe fairly correct in that area. If youopted for a larger or smaller patternsize due to your hip measurement,refer to figure 1 to determine wherethe waistline should be adjusted.
If your body is narrow front to backwith dramatic waist-to-hip shaping,alter the pattern at the side seams.Subtract equal amounts from thefront and back side seams (2).
If your body contour is very straight atthe side and your waist is larger thanthe pattern-sizing chart, straighten theside seams extending the front andback equally the needed amount (3).
If your stomach is round but dents inat the waist, increase the front darts.Add up to ¼” on each side of thedart for a total of 1” (4). Make anadditional dart if you need to reducethe waist even more.
If your hips are fullest in the back,decrease the waist up to ¼” on eachside of the back darts, and/or at thecenter-back seam (5).
Any reduction or increase on the patternis doubled on the finished garment,since there’s a left and right side.Thealterations need not be limited to onelocation, i.e., front, back or side. Smallor considerable adjustments may benecessary in several locations.
Pants may be simple to sew, yet they’re
often the hardest to fit. Adjust the pattern
according to your body contours for the
optimum fit.
FITTING BENEFITS, PART 2Before
Vogue 7947
Pantlengthtoo long
Extrafabric inthe seat
sewNews 6

Never choose apattern size basedon your ready-to-
wear size. If it helpsyour self-esteem,
ignore the numbers!You’ll feel and look
better in properlyfitted clothing.
1 Body contours
Basicpatternsize
Dramaticwaist-to-hipshaping
Basicpatternsize
Stomachcontourcontributesto hipmeasurement
Upper legcircumference
Basicpatternsize
Extendedbodyprofile
Straightat sides
2 Narrow body contour
Subtract equal amounts fromfront and back side seams
Back Front
3 Straight body contour
Straighten side seams equallyon front and back
Back Front
4 Round body contour
Up to1⁄4”
Increasefront dart
Front
5 Full hip contour
Increase back dart and/orcenter-back seam
Back
Up to1⁄4”
After
Vogue 7947
7 sewNews

Compare& ContrastMost patterns don’t show the stitchingline, which is generally ⅝” fromthe cutting line. For more accuracy,use a soft pencil and clear rulerto mark the stitching line beforecomparing measurements.
Hips: If the pattern size was basedon your hip size, make no changesat this time.
Crotch Depth: Compare your crotch-depth measurement, plus 1” for ease,to the pattern side seam.Adjust thepattern at the shorten-or-lengthen-here markings at the hipline (6).
Crotch length (front and back): Once thepattern is adjusted for crotch depth,compare your front and back crotchlength measurement plus 1” for ease tothe pattern.This measurement providesfor the contour shaping around thestomach and seat area.
Take your measurements wearing theshoes and undergarments you’ll wear withthe pants. Don’t pull the tape too tight orlet it sag.
Six body measurements determineyour basic pant pattern size:
7 Waist: Measure around thenatural waistline.
7 Hips: Measure the fullest part ofyour hips (approximately 7” downfrom the waistline).
7 Crotch length: Measure from thecenter-front waistline between thelegs to the center-back waistline.Notice approximately where theinner leg seam will be.
7 Crotch depth: Sit on a hard chair,and then measure from the sidewaist to the chair seat.
7 Pant length: Measurefrom the side waist tothe approximate hem.(This varies withdifferent shoes.)
7 Upper-leg circumference:Measure around thefullest part of theupper leg.
Body Measurements
6 Adjust crotch depth
Crotchdepth
Shorten orlengthen here
tip: Patterns are
drafted with a narrow
crotch profile (width).
It’s rare that the
front-crotch length
needs to be reduced.
Don’t confuse this
with the crotch depth.
1
2
3
3
44
5
5
6
6
1
2
sewNews 8

Pattern ProfileRefer to figure 1 to outline your profile.To get a feel for the pattern profile,place the pattern pieces together,aligning the inseams; secure with pinsat the crotch stitching line.Note theprofile width and shape (7).
If your stomach is round, make theadjustment for the crotch length atthe center-front seam (at the fullestpart of the stomach). Draw a linefrom the dart to the fullest part ofthe center front. Cut the pattern andseparate the desired length. Slide paperunder the separated pattern piecesand tape to secure.The center-frontseam will be slightly curved (8).
If your seat is fuller than the basicpattern, make an adjustment at thefullest part of the center-back seam.Draw a line from the dart to thefullest point of the seat, and thenhorizontally to the center-back seam.Cut on the line and separate the
pattern pieces the needed amount.Slide paper under the separated piecesand tape to secure (9).
If your fullness is at the lower seat and leg,draw a perpendicular line from thelower seat to the center leg, and then tothe knee. Cut on the line and separatethe pattern the needed amount. Securewith paper and tape (10 on page 32).
For a very slim figure the crotch lengthmay need reducing. If your bodywidth is narrow, reduce the pattern-profile width. Draw a line from thelower-back crotch to the inseam.Fold the pattern in a dart fashion.Secure with tape (11). If necessary,address the problem area further inthe pin-fitting stage.
7 Outline your profile
Profilewidth
Profilewidth
Crotch lengthfront and back
8 Round stomach
Amountlengthened
Front
9 Full seat
Amountlengthened
Back
tip: If dramatic changes are
made during a muslin fitting,
consider making another
sample. This saves time
from further alterations.
9 sewNews

º Lower leg/seat fullness ¡ Reduce crotch length ™ Belled or tapered leg adjustment areas
Shorten orlengthen here
Amountlengthened
Folddarthere
Back Back
Pant LengthCompare the pant-length measurementto the pattern’s side seam. Don’tinclude the waist seam allowanceor the hem in this comparison.(The hem is generally marked andcan be from ½” to 2½”, dependingon the pant style.)
Shorten the pant pattern before youcut out the fashion fabric. If the legis cut straight or only slightly tapered,shorten the pattern around theknee area.
To lengthen pants, cut the patternat the shorten-or-lengthen-heremarkings. Spread the pattern piecesthe needed amount. Insert paper underthe pattern pieces and secure with tape.Make sure the grainlines remain true. Ifthe leg has a bell or tapered shape, truethe cutting line making gradualdirectional changes (12).
To shorten pants fold the pattern at theshorten-or-lengthen-here markings,reducing the length by the neededamount. If there’s a shaped hemline,shorten the pant above and below theknee.Take equal amounts from boththe front and back pattern pieces as thisinsures a gradual taper and/or that thebell begins below the knee. Redefinethe cutting lines.
Muslin FittingUse basting stitches to make a samplepant from muslin or sample fabric.Wear the undergarments and shoes thatyou’ll wear with the pants. Pin-fit anyareas that still need adjusting.Transferthe changes to the pattern pieces.
Pin out any excess fabric and markthe adjustment with a fabric marker(13). Remove the stitching from themuslin and compare each piece to thepattern. Fold the pattern, reducing itthe adjusted amount; tape to secure.
If the pants are too tight, mark themuslin where the fabric pulls. Cut themuslin, and then allow it to separate.Pin a muslin scrap under the clippedareas (14). Mark the new stitchinglines on the center-back seam.
Take apart the pants and lay the muslinpieces over the pattern.Transfer the newstitching lines to the pattern. Extend thepattern paper by taping paper to theoutside edges. It’s not necessary to cutthe pattern and separate it as for themuslin pant.Re-establish the cuttinglines—they should be ⅝” from thestitching line.
This process may seem time intensive, butthe result is a pattern you can use as abase to alter other pant patterns. Sincethe crotch and darts remain consistent,transfer the changes to any pattern.Usethe grainline markings as a guide forplacement, keeping them parallel.
sewNews 10

Cutting &ConstructionCut the fashion fabric and stitch thedarts as directed by the pattern guide-lines. Stitch the center-front andcenter-back seams and baste the sideseams. Don’t press the seams or dartsuntil you fit the pants.The waistlinewill be slightly tighter after the waist-band or facing is applied. Follow theremaining pattern guidelines forconstruction, including pressing,interfacing and finishing the edges.
When choosing fabric for pants considerthe weight and drape. Fabrics with asmall amount of stretch or give aremore comfortable, especially for fittedpants.Test the fabric by pulling itslightly from side to side. Choose afabric that drapes nicely with a closeweave. Fabrics with a loose weavepull apart at stress areas on the seams.
Designer Details7 Add a double row of stitching to theside seams for a faux flat-felled seam.Use contrasting thread for interest.Roll the pant legs and add tabs andbuttons for a contemporary look.
7 Shorten the pant legs and taperthem slightly by taking equalamounts from each side (frontand back). Include a vent orbuttons for an accent.
7 Add purchased decorative tape oraccent fabric to a turned-back cufffor trendy fashion appeal.
Londie Phillips is a freelance designerand writer. She also teaches designand pattern-making seminars.
sourceHancock Fabrics, www.hancockfabrics.com,supplied the fabric and supplies forthis project.
£ Pin excess fabric; mark ¢ Pin muslin under tight areas
11 sewNews
tip: Reduce, increase
or modify side seams
equally on the front and
back. If you change the
shaping of one seam
and not the other, you
affect the drape and
can produce a puck-
ered seam. Side seams
should hang straight
and not pull toward the
front or back. Z

MOST SEWERS FIT THE BODICEOF GARMENTS but often overlookthe sleeves. Has this ever happened toyou?You’re sewing a garment andeverything’s looking fine. But whenyou insert the sleeves, suddenly thegarment doesn’t fit as comfortably asbefore.To avoid that disappointment,check the fit of the sleeves beforesetting them into the garment.
Length
Check the sleeve pattern length.Measure your arm (or have someoneelse do it for you) from the bone atthe end of your shoulder, around yourelbow with your arm bent, down toyour wrist bone (1).This measurementincludes the ease required for movingyour arm.
Use this measurement to check thesleeve length on set-in styles. Lengthenor shorten as necessary. If your alter-
ation is more than 2”, alter the sleevein two places—above the elbow andbetween the elbow and wrist.
To lengthen the sleeve, slash across thelengthen/shorten line(s) and spread therequired amount, placing pattern-tracingcloth beneath your pattern to fill inthe gap (2).To shorten the sleeve, drawa line above or below the lengthen/shorten line, cut the pattern on the lineand tape it to the new line (3).
For garments with dropped sleeves, abetter way to measure is from the boneat the top of the spine, over to theshoulder bone, then down the arm tothe wrist with the elbow bent.Tomeasure the pattern, pin the patternsleeve to the back pattern piece, over-lapping the seam allowances. Measurefrom the center back, diagonally overto the outer shoulder seam, and thendown the sleeve center (4). If thesleeve has a cuff, pin it to the sleeve;
SleevesJULIE CULSHAW
how to Fitting problems & solutions
1 2
sewNews 12

the cuff adds 2” or more to the armlength.Add 1” or more if you wantthe sleeve to blouse.
Don’t skip measuring a short sleeve.If you have short arms, elbow-lengthsleeves may be too long, and you’llneed to shorten the sleeve in the upperarm area. Conversely, if you have longarms, you probably need to lengthenshort sleeves.
Shorten the sleeve in the body of thesleeve rather than at the hem. Choppingoff the sleeve at the hem changes thewidth and you’ll lose the pattern’s hemshaping. For a long sleeve without acuff, shape the hem so it mirrors thesleeve shape. It will be easier to stitchin place (5).
Arm Width
Measure around the fullest part of yourbicep and allow 2” to 3” of ease in the
garment unless you’re working withknit. Because knits stretch and providenatural ease, you may only want 1” ofease in a knit sleeve.
Instead of measuring your arm, measurethe sleeve of a garment you feelcomfortable in for the most accurateamount of desired ease. Lay the garmentflat, measure the sleeve 2” below theunderarm, and subtract your arm meas-urement. Measure the pattern and notethe difference.
To enlarge the sleeve use the followingmethod, which allows you to make alarger alteration to the sleeve circum-ference while maintaining the size ofthe sleeve cap.This method doesn’taffect the bodice seams or armseye inany way.
Draw a vertical line through the sleevecenter and a horizontal line throughthe sleeve just below the underarm
If your pattern has a two-piece sleeve, as isoften the case with jackets, tape the sleevepieces together overlapping the seam allowances,and alter both pieces at the same time.
3 54
13 sewNews

curve. Cut both lines up to, but notthrough, the stitching lines. Clip thetissue from the outer edge toward, butnot through, the first cut.This createshinges that allow the tissue to layflat (6).
Place the sleeve on pattern-tracing clothand trace around the original sleevecap. Spread the pattern open to gainextra width. If the change is significant,the sleeve cap will drop down.Tape thealtered sleeve in place and trace aroundthe outer edges. Straighten the hem-line.This gives you more room withinthe sleeve where you need it, but keepsthe sleeve cap intact so it will ease intothe armseye as designed.
To make the sleeve smaller, reversethe above procedure, overlapping thepattern instead of spreading it to makeit narrower.
Armhole Too Tight?
Sometimes, the sleeve fits but the arm-hole feels tight.
Trim away the seam allowances in theunderarm area as seam bulk restrictsarm movement. If the armseye still feelstight, remove the sleeve in the under-arm area and trim the underarm of thegarment to about ¼”. Reinsert thesleeve and you should notice animprovement.
If that adjustment isn’t enough the entirearmhole needs to be longer. Slash thebodice front and back through thearmhole area, add length and alter thesleeve cap the same amount.Thismakes both the armseye and the sleevecap longer. Make any necessary changesto your front facings and neckline sincethey will have changed. Don’t addmore than ½” to 1” with this alteration.
Too Much Ease
Setting a sleeve into a garment can bedifficult, but sometimes the problem isthe pattern, not you.The sleeve capshould only measure about 1” to 1½”larger than the armseye. If the sleeve islarger than that, getting it to fit withoutpuckers will be difficult.
To reduce the sleeve-cap ease, slashfrom the cap cutting line down intothe head of the sleeve. Overlap theslashes equally to remove some ease(7). Reverse the procedure and add tothe sleeve cap if you need to make thesleeve bigger.
Altering Cuffs
Cuffs don’t usually pose much of aproblem, but check that there’s 1” to2” of ease.
Pin the cuff around your wrist, matchingthe button marking with the button-hole, and make sure you can slip a fin-ger between your wrist and the cuff. Ifyou’re making a short sleeve with aband, check that you have sufficientease.
To alter cuffs, slash and spread them tolengthen or overlap them to shorten.Disregard the notches on cuffs; justmake them fit the hem circumference.
If you alter a cuff on a long sleeve shirtor blouse, alter the sleeve circumferenceto fit. Change the pleats on a longsleeve shirt or change the angle of theunderarm seam to reduce or enlargethe sleeve lower edge.
Making a Muslin
Although they’re advised to, very fewseamstresses make muslins. Making asleeve muslin is easy and can preventproblems. It’s especially wise to makeone for a jacket sleeve.You’ll see rightaway how the sleeve fits, whether thecap has too much ease, if it’s hangingon grain and what length adjustmentsyou’ll need. Be sure to put in the prop-er shoulder pad when fitting.A halfhour spent making a muslin can save
how to Fitting problems & solutions
6 Overlap7
Hinge
sewNews 14

countless hours if you spot a problemand correct it before cutting the gar-ment fabric.
Cut out one sleeve in a similar fabricweight to your garment fabric. Drawthe vertical and horizontal grainlines onthe sleeve. Sew the garment front andback together, baste in the sleevemuslin, and check the following:
k Is the sleeve hanging straight? Themarked grainlines will show this rightaway. If not, remove the basting andshift the ease in the sleeve cap. Movethe sleeve cap toward the garment frontor back to make the sleeve hang better.
k Is the sleeve the right length? Turn upand mark the hem—this is essential ifyou’re adding a cuff or putting in asleeve vent.
k Are there wrinkles in the sleeve cap?If there are draglines near the under-arm, add more height to the sleeve capbecause there isn’t enough fabric forthe cap to hang smoothly. Remove thebasting at the sleeve cap and let thesleeve drop until the draglines disap-pear.The opened space is the amountyou need to add to the sleeve cap.
k Is the sleeve too tight or too loose?Wrinkles across the cap indicate tight-ness; folds collapsing in the cap indicatethat it’s too loose.
k Is the cap too full? Easing a sleeve intoa jacket is a mark of a good seamstress.If the sleeve cap stitching line is morethan 1½” longer than the armseyeyou’re inserting it into, you’ll have diffi-culty.Wool is the easiest fabric to set in;polyesters and microfibers are the hard-est—reduce the amount of ease insleeves made from those fibers.
Alterations vary depending on the sleeve.The four basic sleeves are set-in, dropped orextended, raglan, and dolman.
SET-IN sleeves have a cap shaped distinctlylike a bell and are meant to sit right at theshoulder point; 1⁄4” to 1⁄2” beyond if there’s ashoulder pad. The armhole also comes uphigher underneath the arm. These sleevesgive the trimmest look and give your arm morefreedom of movement than the more casualdropped sleeve.
DROPPED OR EXTENDED sleeves have aflattened cap and are generally inserted intothe garment before the underarm seam issewn. This sleeve is good if you lose weightbecause you can alter the garment sideseams and sleeves without removing thesleeves. Most shirts fall into this category.
Dropped sleeves can look sloppy becausethey’re loose fitting. To improve the fit, shortenthe bodice in the sleeve area and reduce theshoulder width. This brings the sleeve and theseam higher up under the arm. Slash thebodice front and back andoverlap the tissue toreduce the armseye size(A). Shorten the shoulderseam; no change isnecessary to the sleeve.(Remove up to 1” withthis alteration.)
RAGLAN sleeves areseamed diagonally to thebodice front and back. They may havea dart at the top of the shoulder or may beseamed down the sleeve center. They’recomfortable in sportswear, coats and jackets,as they provide shoulder room and allow forbulkier garments underneath. Sleeves with a center seam areeasy to alter. Alter the length between the underarm and wrist.Alter the width within the tissue, as the seams joining the sleeveto the garment are often shaped and you don’t want to affect theway they fit into the armseye.
DOLMAN sleeves are cut as one piece with thebodice. The underarm is often cut very low, but youcan raise that seam. Sew the curve deeper, startinggradually (B). Check the fit, as you need room to getthe garment over your head and shoulders. Thesharper the curve becomes, the more you need totrim and clip it so it lays flat.
SLEEVE TYPESSet-in sleeve
Dropped sleeve
Raglan sleeve
Dolman sleeve
A
B
15 sewNews

Setting in Sleeves
A dropped, or extended, sleeve has aflattened cap and is sewn to the arms-eye before sewing the underarm seam.There’s little or no ease in this sleevecap; the little there is can be eased inby sewing with the sleeve side againstthe feed dogs to help draw in thefabric. For blouses, press the seamallowances toward the sleeve. For shirts,press the seam allowances toward thebodice. Edgestitch and/or topstitchshirt seam allowances.A set-in sleeve has a higher, more
shaped cap and is inserted in theround (underarm seam is sewn andthe sleeve is sewn as a circle into thearmseye). For most blouses and dresses,you can ease the sleeve cap using amethod called “ease stitch plus.”
Place the sleeve cap under the presserfoot, and sew from notch to notchon the stitching line with your leftforefinger held tightly against the backof the presser foot.This causes thefabric to bunch up and gathers the capslightly.When you remove the sleeve, italready has a curved shape. If this isn’tenough gathering, repeat.Then pin thesleeve into the armseye and stitch.
For jackets, sew two lines of bastingstitches on the cap: one on the stitchingline and one ½” from the raw edge.Pull up the bobbin thread and adjustthe gathers to match the armseye.Workthe gathers so the fullness is even withno puckers.When stitching the sleeveto the garment, sew with the sleeveside on top so you can see the gather-ing. Pull the fabric on either side ofthe presser foot to flatten it and, as longas you sew right on the stitching line,the sleeve will be pucker free.
Another method for jacket sleevesinvolves adding a sleeve header to the
cap. Remove the interfacing from anold tie. Cut a strip about 1” to 1½”wide. On the sleeve wrong side, placethe tie interfacing on the stitching line.Sew from one notch around the sleevecap to the other notch, pulling theinterfacing as tightly as you can andletting the fabric feed normally.Whenyou remove the sleeve, the interfacingreturns to its normal length, gatheringthe sleeve cap with it.The interfacingremains in the cap.When the sleeve issewn into the jacket the interfacing ispressed out into the sleeve cap with theseam allowances. It acts as a bufferbetween the sleeve and the garment,supporting the cap and giving arounded tailored shape.
Hem Treatment
This method for hemming shortsleeves is quick and gives a nice look.
When cutting out the sleeve, make surethe side seams are straight and don’tangle in. If the pattern doesn’t have a1¼” hem, make that change on thepattern.
Cut the sleeve 1⁄2” longer than thepattern. Sew the underarm seam. Pressunder 1¼” on the hem; press under1¼” again.
On the sleeve wrong side, stitch exactly¼” from the fold around the entirehem. Pull down the hem allowance,pushing the little tuck up toward theshoulder; press (8).The result is a tuckon the sleeve right side and a nicefinish inside.
Adding a Cuff
Many jackets look good with folded-back cuffs.This also solves the problemof sleeve length—simply fold the cuffmore or less depending on how longyou want the sleeve.
To add a contrast cuff to a jacket,lengthen the sleeve by the depth ofthe cuff. Keep the sleeve straight whengoing down to the hem or the cuffwon’t turn back smoothly.
Replace the bottom third of the liningwith a contrast fabric.Add seamallowances when cutting the fabric.
Stitch the contrast fabric to the lining;line the sleeve right to the edge (9). Z
how to Fitting problems & solutions
Tuck
8
Stitch
9
sewNews 16
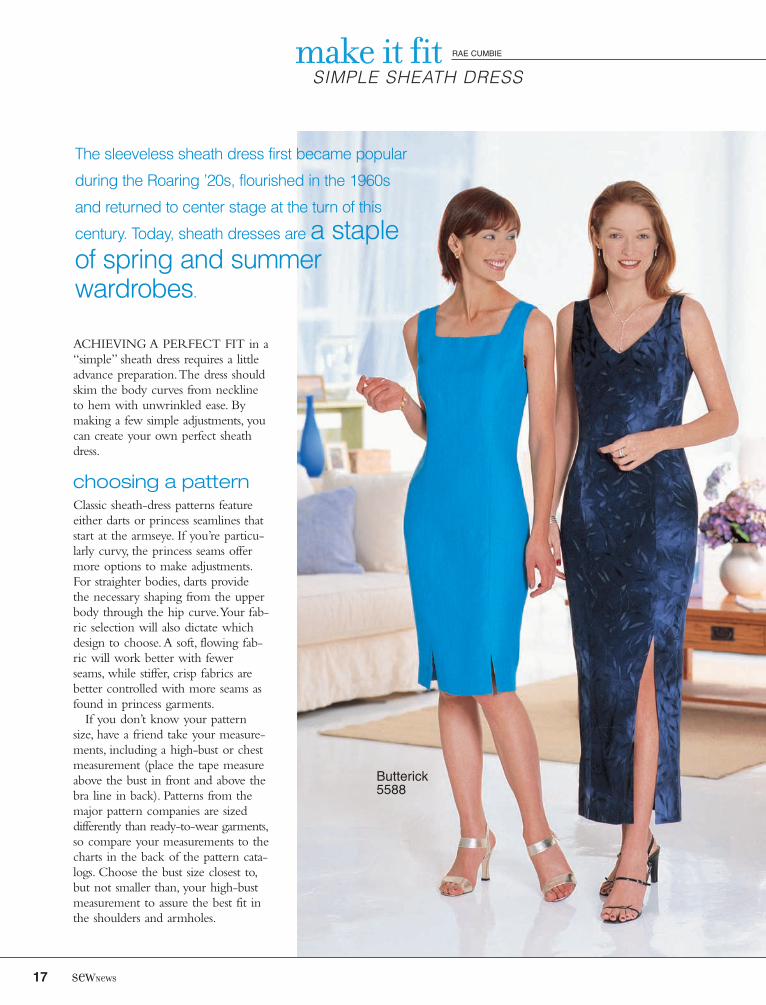
ACHIEVING A PERFECT FIT in a“simple” sheath dress requires a littleadvance preparation.The dress shouldskim the body curves from necklineto hem with unwrinkled ease. Bymaking a few simple adjustments, youcan create your own perfect sheathdress.
choosing a patternClassic sheath-dress patterns featureeither darts or princess seamlines thatstart at the armseye. If you’re particu-larly curvy, the princess seams offermore options to make adjustments.For straighter bodies, darts providethe necessary shaping from the upperbody through the hip curve.Your fab-ric selection will also dictate whichdesign to choose.A soft, flowing fab-ric will work better with fewerseams, while stiffer, crisp fabrics arebetter controlled with more seams asfound in princess garments.If you don’t know your pattern
size, have a friend take your measure-ments, including a high-bust or chestmeasurement (place the tape measureabove the bust in front and above thebra line in back). Patterns from themajor pattern companies are sizeddifferently than ready-to-wear garments,so compare your measurements to thecharts in the back of the pattern cata-logs. Choose the bust size closest to,but not smaller than, your high-bustmeasurement to assure the best fit inthe shoulders and armholes.
make it fit RAE CUMBIE
SIMPLE SHEATH DRESS
17 sewNews
The sleeveless sheath dress first became popular
during the Roaring ’20s, flourished in the 1960s
and returned to center stage at the turn of this
century. Today, sheath dresses are a stapleof spring and summerwardrobes.
Butterick5588

If your chest and hip measurementsindicate different sizes, a multisizepattern is a good solution—you cancut on the appropriate size line ineach area.
tell-talemeasurementsYour measurements provide informa-tion about how you’ll need to adjustyour pattern.
If your full bust measures 2½” ormore than your high bust, make afull-bust adjustment.
If your back-waist length is shorter orlonger than the pattern, adjust thepattern at the above-waist patternadjustment line. For a shorter backlength, fold out the extra amount atthe adjustment line and tape. If yourback-length measurement is longerthan the pattern, cut along the adjust-ment line and spread the patternthe needed amount.Tape a strip ofpattern tracing cloth in place to fillthe space.
If your waist and hip measurementsdiffer from those listed on the pat-tern, add or subtract from the patternwaist and hip, dividing the adjustmentamount equally between the verticalseamlines. For example, if an extra 6”is needed at the hips and you have aprincess-seam pattern, there are sixadjustable seams—two side-front, twoside-back and two side seams—equal-ing 12 seam allowances. Divide theadjustment amount (6”) by the num-ber of seam allowances (12).Theresulting ½” is the amount to add toeach seam edge from the hipline tothe hem. Use a French curve tosmoothly redraw the seam from thewaist to the hip adjustment (1).These adjustments may need to be
fine-tuned in the fabric, but they’llgive you a good start toward anexcellent fit.
making a mock-upAfter making adjustments to the flatpattern, it’s useful to sew the patternin fabric to fine-tune the fit. Choosemuslin or a fabric similar to the fash-ion fabric. (Avoid dark or large-printfabrics, as the needed adjustmentswon’t be as obvious.)
Cut only the main garment pieces. Ifyou know you need extra room atthe hips, cut out the garment withextra-wide seam allowances in thatarea—2” is usually sufficient.Transferall seamlines, marks and darts to thefabric, including the center-front and-back lines and the horizontal hipline. Hand or machine-baste the fab-ric pieces together leaving the zipperarea open.
Staystitch the curved seamlines atthe neck and armhole edges. Clip to,but not through, the stitching so thefabric will give and the garment willsit correctly at the neck and armhole.Put on the mock-up garment, andpin the zipper opening closed.
Look for areas that are too tight ortoo loose. Release and stitch narrowerseams to add room where it’s needed.(Fabric drag lines will “point” to areasneeding adjustment.) If an area needseven more fabric, such as across abroad back, slash the area and addadditional fabric. Pin out areas wherethere is too much fabric. Make thesame changes on the pattern forfuture garments.
Darts should follow body curves, andbust darts should end approximately¾” from the bust apex.There should
be no excess fabric or pouching atdart points.
Princess seamlines should runsmoothly from the armhole to justoutside the bust apex and continue tothe hem.
Neck edges and armholes should liesmoothly against the body with nopulls or gaps. Side seams should fallperpendicular to the floor, and hori-zontal lines should run parallel to thefloor. Make any necessary correctionsso the mock-up fits this way.
rounded upper backFor many, a rounded upper backrequires a fitting adjustment. If yourdress crawls up the back of your neck,or pulls across the upper back, slashthe garment horizontally through thecenter-back seam across the curve,ending just before the armhole seam.The fabric will spread the amountneeded to add to your pattern.
sewNews 18
tip: Fitting is much easier if you have someone to help make theadjustments. To find a sewing educator to help you, ask about sewing
teachers at your favorite fabric store or visit www.paccprofessionals.orgfor their dressmaker and sewing educator referral list. Oftentimes, sewing
professionals will work with you on an hourly basis.
1 Begin at waist and draw gradual curve tofull hip, then straight down to hem.
Full Hip Line

Add a piece of fabric, and pin inplace to achieve a smooth back (2).Slash the paper pattern along thesame line, and tape in a wedge thatcorresponds exactly to the mock-up.
True the center-back seam so itremains on the straight grain. Fill inthe pattern with tissue to assure astraight center-back line.
Add a dart in the back neck to rede-fine the neck contour (3).
bust adjustmentsIf a princess-seam garment pullsacross the bustline, release the seamsin the bust area, and repin them to fit.
For a very full bust, slash the mock-up side-front and the center-front,adding fabric to allow for a smoothfit.Then go to your paper pattern,and make the same adjustments (4).Also see “Make It Fit” in the August’04 Sew News for making a full-bustadjustment to a princess-seamgarment.
Adjust for a smaller bust on a dartedsheath dress by pinning out a fabrictuck from the shoulder to the hem.For a princess-seam sheath dress, take
in the side-front seams as needed.
Add these adjustments to the patternby redrawing the princess bust curveor shortening the dart after foldingand taping out the pattern excess (5).
neck & armholesExcess fabric in the neck and arm-hole can be pinned out with smalltucks on the pattern—true the cut-ting line at the tuck. If the excessfullness is more than ½”, transfer theextra to an existing dart or princessseam.
Pin out the excess fabric, and markalong the pins; remove the pins.Thenew marks will look like a dart, butthey’ll appear in an area where youdon’t want a dart for design purposes(6).The dart will be moved to amore conventional area on the gar-ment. Start by transferring the marksto the corresponding place on thepattern.
For patterns with bust darts, slashthrough the dart center and throughthe adjustment “dart,” extending theslashes until they almost touch, leav-ing a small hinge of tissue (7).
19 sewNews
3 True center back seam. Add dart toremove excess added by truing seam.
2 Slash fabric and add amount needed forrounded back.
Center
Back
Center
Back
Princess
Seam
line
4 Slash and spreadpattern to addroom for full bust.
Center
Front
Center
FrontSlash.
Slash.
Side
Front
Side
Front
A sheath is a great way to showcase a newfabric. Or, create an understated dress to set off
a lovely jacket or scarf.
Butterick6001

Bring together the lines of the dartyou wish to eliminate, and tape themtogether.This will further open thebust dart. Fill in the expanded dartwith pattern tracing cloth and tape inplace (8).
True the dart end by pinning the darttogether, folding the dart toward itsfinished direction, and trimming theexcess tissue (9).
For princess-seam dresses, removeexcess armhole fabric at the upperedge of the side-front seam. Make aneckline adjustment similar to thedart method: Pin out the extra, markalong the pins, and transfer the marksto the pattern. Slash the new dart andthe front and side-front starting at thebust apex, again leaving a hinge oftissue. Bring the dart lines together,spreading the front and side front. Fillin the spread area with tissue, andtape in place (10).
waist & hipsUse your mock-up to perfect thelower-body fit by pinning out anyexcess or releasing seams whereneeded.Transfer the adjustments tothe paper pattern, adding pattern
tracing cloth as needed. If seams needto be re-drawn, use a French curve tosmoothly connect the areas.If you’ve made a number of adjust-
ments to your pattern, considermaking another mock-up to test andtweak the changes for a perfect fit.
sewNews 20
8 Fold out dart at neck; fill in spread areaof bust dart.
Center
Front
6 Pin out excess at neck or bust; markalong pins.
Center
Front
Center
Front
Excess marked at neck.
Excess markedat armholes.
9 Fold out dart and pin. Trim excess atedge.
Cut off.
5 Adjust pattern for smaller bust.
Reducedart.
Center
Front
Center
Front
Side
Front
Tuck out fullness.
Reducebustcurve.
7 Slash through darts, leaving hinge of tissuewhere slashes meet.
Center
Front
Leavehinge oftissue.
P Remove excess neck fabric. Slash, fold outexcess and fill in spread area.
Center
Front
Side
Front
Slash.
Slash.
resourcesLook for the following books at your local library, bookstore or fabric store.Fabulous Fit by Judith Rasband; Fairchild Press, 1994.Fantastic Fit for Every Body by Gale Grigg Hazen; Rodale Press, 1998.Fast Fit: Easy Pattern Alterations for Every Figure by Sandra Betzina; TauntonPress, 2003.Fit for Real People by Pati Palmer and Marta Alto; Palmer/Pletsch, 1998.Vogue Sewing; Butterick Publishing Co., 2000. Z
Center
Front

Get inspired and start creating incredible new designs with a subscription to
• Stitch amazing gifts for your family and friends
• Create a fl attering fashion-savvy outfi t
• Transform your home with colorful pillows, curtains, duvets and more
• Save time with the latest tips from the pros
• Save money with discounts on exclusive designer patterns
Whether you’re an eager beginner or a seasoned
expert, you’ll fi nd every issue of Sew News a
perfect mix of pure inspiration, practical tips and
techniques, and stimulating projects for adding
your own personal touch to every piece you
create – from fashion and accessories to gifts
and home décor.
sewnews.com
SWEET VALENTINE DECORATIONS—FREE patterns included! (P. 50)
10 PLUS-SIZE FIT TIPS + PATTERN REVIEW
Fit & FashionTips, Tricks & Techniques25
Create Your
Signature Style with
DesignerDetails8 zipper rosettes
8 lace overlays
8 needle-felted
flourishes
TOP TRENDS for Spring
Your fit questions answered
Basic draping principles
Basic draping principles
Choosing the right pattern size
Ease explainedEase explained
Fashion sketching 101
Simple pattern Simple pattern manipulation
++
&
Enter our FIRST-EVER
Style StarCONTEST WIN
BIG! (P. 38)
February/March 2011
DISPLAY UNTIL 3/14/11
$5.99 US / $6.99 CAN
sew NEWS
SEWP-110500-Cover.indd cn1
12/15/10 2:44:25 PM12/15/10 2:44:25 PM
Reach our Subscriber Services Center:www.sewnews.com/subscriberservices
800-289-6397 (U.S.) / 386-597-4387 (Int’l) • [email protected]
Sew News Subscriber Services • P.O. Box 433054 • Palm Coast, FL • 32143
Subscribe to Sew News magazine, the trusted sewing source
It’s quick and easy! Visit www.SewNews.com/Subscribe
Discover how to:
sewnews.com
LENTTTIIINNNNE DECORATIONS—FREE patterns included! (P. 50)
g 101ation
manipulamaaninipippululaatatitioon
&
Enter our
FIRST-EVER
Style StarCONTESTStyle SStyle S
&&W&&W&& IIIIIIIIIINNIINNINININNNNNNNNNNNNNNNNNNNNNNNNNNIINNNNNNNNNNIIIIIININININNNNNNN&B&&B&BB&&BIG!GIIGIGIGIGIGGIGGGGGGGGGGGGGGIGGGGGIGGGGGGGGGIGIGG!G!G!IGIGIIGGGGGGGGGGGGGGGGGGGGGGGGGGGGGIG!!!!!!IGIGIIGGGGGGGGGGGGIGGGGG!!!!! (P. 388883838883333888)))))))
DISPLAY UNTIL 3/14/11
$5.99 US / $6.99 CAN
April/May 2011
RUFFLE TECHNIQUES STRAIGHT FROM THE RUNWAY (P. 60)
6 GREAT MOTHER’S DAY GIFT IDEAS
Make aSSppllaasshhwith REVERSIBLE RAINWEAR
Figure- FlatteringPatterns
to Inspire Your Spring STYLE
++Quick Fixes for MACHINETENSION TROUBLES
EXPERT TIPSfor KNIT SEWING SUCCESS Create for a Cause:14 Charitiesto sew for
step-by-step tutorial inside!
How to Fit the PERPERFFEECCTT PPAANNTTSS ORGANIZEOffice Supplies in under an hour!
Create interlocking scallops
along a skirt placket. (P. 40)
1010
15
SEWP-110500-Cover-CN1.indd 1
2/3/11 11:15:25 AM2/3/11 11:15:25 AM
www.sewnews.com/subscribe