prepare samples for flow cytometry
TRANSCRIPT

STANDARD OPERATING PROCEDURES
SOP.UCF.005 – PREPARE SAMPLES FOR FLOW
CYTOMETRY
SOP.UCF.005 26-03-2021 Pag. 1/17
INSTITUTO DE MEDICINA MOLECULAR JOÃO LOBO ANTUNES
PREPARE SAMPLES FOR FLOW CYTOMETRY
AUTHORS: Andreia Santos Mariana Fernandes
Rute Gonçalves

STANDARD OPERATING PROCEDURES
SOP.UCF.005 – PREPARE SAMPLES FOR FLOW
CYTOMETRY
SOP.UCF.005 26-03-2021 Pag. 2/17
HOW DO YOU GET STARTED?
Talk to us about your experiment! If you want to use Flow Cytometry, we can help you design your
new experiment. Get in contact with us and we will guide you through the Flow Cytometry Facility,
and suggest the best systems for your project. Finally, we will book a training session with you and
plan a trial run with your samples.
HOW SHOULD YOU BRING YOUR SAMPLES?
Obtain a Single-cell Suspension
Your cells must be in a single-cell suspension. Thus, peripheral blood cells or cells that grow in
suspension are well suited for analysis by flow cytometry.
Adherent cell lines, solid tissue samples, and tumors require processing into single-cell suspensions
before they can be analyzed. The protocol to get your samples into single-cell suspension may involve
enzymatic digestion or mechanical dissociation of the tissue. Be careful when performing these
protocols, as these may result in the destruction of the antibody epitope or cell damage.
Run your samples and evaluate single cell preparation: - Cell viability - Absence of cell aggregates - Absence of cell debris
Too many dead cells Too much debris Too many tissue pieces
Too many cell clumps
Over Digestion Harsh handling
Incomplete Digestion Inappropriate enzyme cocktail
Tissue dissection Rinse with PBS Mince Add Digestive enzymes
Incubate considering time, temperature and
use of shaker
Visual inspection Filter

STANDARD OPERATING PROCEDURES
SOP.UCF.005 – PREPARE SAMPLES FOR FLOW
CYTOMETRY
SOP.UCF.005 26-03-2021 Pag. 3/17
The optimal cell concentration depends on how likely your cells are to clump together in the tube.
These are the recommended concentrations:
Flow Cytometer Analyzers: 1 million cells/mL, minimum volume 250 µL.
Imaging Flow Cytometer: 20 million cells/mL, in a volume range of 15-200 µL.
Cell Sorters: 50 million cells/mL (70µm nozzle), 20 million cells/mL (85 µm nozzle) and 5 million
cells/mL (100 µm nozzle).
In all situations, removing cell clumps, dead cells, and debris is essential to eliminate false positives
and obtain results of the highest quality.
After getting a single-cell suspension, you should bring your cells in the right buffer, to avoid
reestablishment of cell clumps. A buffer of PBS + 2% FBS/BSA is a good basic buffer.
Adding 25 mM HEPES buffer (pH 7.0) is a good idea as well, as HEPES has better buffering
properties at high pressure than PBS does.
You may need to add 1mM EDTA, especially if you have adherent cells, as it helps chelate divalent
cations that are often required for the formation of cell aggregates. In addition, if you have a high
percentage of dead cells, adding DNase is strongly recommended as it reduces clumping caused by
free DNA.
Before analysis or sorting, you should filter your cells through a nylon mesh. For analysis, a 70µm or
100µm mesh (BD Falcon™ cell strainers ref. 352350 and 352360) should work. For sorting, the mesh
size should be inferior to the size of the nozzle: 40µm mesh for 70µm nozzle (BD Falcon™ cell
strainers ref. 352340) and 70µm mesh for 85µm and 100µm nozzle.
Pay attention to the biosafety level of your samples
Notify us before bringing any cells of human or non-human primate origin to the core facility so we
can help you assess the biosafety level of your cells. Most human primary cells and many human cell
lines are BSL-2, posing hazards to laboratory staff and the environment.
Microbes are not known to cause disease in healthy hosts and pose minimal risk to workers and the
environment
Microbes are tipically indigenous and are
associated with diseases of varying severity. They
pose moderate risk to workers and the
environment
Microbes are indigenous or exotic and cause
serious or potentially lethal diseases through
respiratory transmission
Microbes are dangerous and exotic, posing a high risk of aerosol-transmitted
infections, which are frequently fatal without treatment or vaccines.
Few labs are at this level.

STANDARD OPERATING PROCEDURES
SOP.UCF.005 – PREPARE SAMPLES FOR FLOW
CYTOMETRY
SOP.UCF.005 26-03-2021 Pag. 4/17
Only BSL-1 and BSL-2 samples are allowed in the UCF room. BSL-3 and BSL-4 samples are not
permitted.
Also, many samples, such as clinical samples of COVID-19 patients, require additional enhancements
to the standard BSL-2 work practices, such as the need of extra personal protective equipment (like
safety goggles, extra gloves and KN95 safety masks) and the creation of a standard operation
procedure (SOP) for ensuring compliance with the rules from all the staff members.
Analysis of cells by flow cytometry: The analytical cytometers (BD LSRFortessa 1, 2, X-
20, BD Accuri C6 and Amnis ImageStream Mark II) are suitable for BSL-1 work only.
BSL-2 cells must be fixed before use on these instruments. If your work requires analysis of
unfixed BSL-2 cells, this can be done on the BD FACSAria III with aerosol containment.
Sorting of cells by flow cytometry: BSL-2 unfixed cells (e.g., human samples) may only be
sorted on the BD FACSAria III with aerosol containment.
BD FACSAria IIu can only sort BSL-1 and fixed BSL-2 material. For all cells of human origin,
provide product sheet listing biosafety level or proof the cells.
Many staining protocols include a fixation and/or permeabilization step. However, if yours doesn’t and
you need to fix your BSL-2 cells for analysis, we suggest a quick and easy PFA fixation (See Appendix
A).
Exclude your dead cells (cell viability staining)
Even though you keep your cells as happy as possible, some cells can die while handling and
performing staining protocols. Dead cells can affect the analysis by compromising the integrity of the
data by non-specifically binding antibodies. That’s why most experiments benefit from adding a
viability dye, to exclude dead cells from analysis and sorting. Also this viability staining can help you
evaluate and compare the cell apoptosis and necrotic stages between cell conditions.
There are Fixable and Non-Fixable viability dyes. You can choose the right one for your assay
depending on the purpose of your analysis and the post-staining protocol that will be performed. For
more info see Appendix B.

STANDARD OPERATING PROCEDURES
SOP.UCF.005 – PREPARE SAMPLES FOR FLOW
CYTOMETRY
SOP.UCF.005 26-03-2021 Pag. 5/17
Perform the desired cell staining
If you are interested in analyzing or isolating specific cell subsets, you can label your cells with
fluorochrome-conjugated antibodies or dyes.
Cell surface markers can be used to define cell subsets based on lineage and developmental
stage, as well as function. These surface markers have different forms and functions, including
receptors for both soluble and cell-bound ligands, ion channels, glycoproteins, phospholipids,
and more.
Intracellular flow cytometry can be used to analyze a variety of intracellular molecules
including cytokines, inflammatory mediators, transcription factors and phosphoproteins. It can
provide you rich information about the function and signaling responses of specific cell
subsets.
DNA staining can be used for cell cycle analysis.
While staining of surface markers can be performed in live/unfixed cells, intracellular staining requires
cell fixation and permeabilization before staining. Such fixation/permeabilization treatment allows the
antibodies against intracellular antigens to cross the plasma membrane to stain intracellularly, while
maintaining the morphological characteristic of cells.
Even when staining proteins inside the cell, it is important to consider their location as this may dictate
the optimal protocol and buffer system. For example, the staining of nuclear proteins like Transcription
Factors works best with the strongest permeabilization protocol, while secreted proteins such as
cytokines and chemokines work well best with a much softer permeabilization method.
For more detailed information see Appendix C
Choose the right tubes
Samples for the analyzers (BD LSRFortessa 1, 2 and X-20) must be in BD Falcon™ Round-
Bottom Tubes 5mL 12x75 mm polystyrene tubes (ref. 352052 without cap, ref. 352054 with cap,
ref. 352235 with filter-cap) or the identical but cheaper Sarstedt 5ml 75x12mm polystyrene tubes
(ref. 55.1579).
For Amnis ImageStream Mark II, it is only possible to use 1.5 mL tubes with a rectangular
connection to the cap (Sarstedt ref. 72.706)
For BD Accuri C6, you can use BD Falcon™ Round-Bottom Tubes 5 ml 12x75 mm polystyrene
tubes (ref. 352052 without cap, ref. 352054 with cap, ref. 352235 with filter-cap) or 1.5 mL tubes.

STANDARD OPERATING PROCEDURES
SOP.UCF.005 – PREPARE SAMPLES FOR FLOW
CYTOMETRY
SOP.UCF.005 26-03-2021 Pag. 6/17
On the sorters BD FACSAria IIu and BD FACSAria III please use polypropylene tubes
(Falcon 5 mL 12x75 mm (ref. 352063); BD Falcon™ Conical Tubes 15mL (ref. 352096) or 1.5
mL polypropylene tubes).
WHICH CONTROLS DO YOU NEED?
Every experiment needs controls.
Bring unlabeled cells as a negative control. This sample will help you selecting the right cytometer
settings for your acquisition. In addition, it will assist you in the analysis, while doing the gating
strategy.
If you are using more than one color, you need single-color compensation controls. These will work
to evaluate the spectral overlap between all the colors you have. If there is spillover between some
colors, compensation will be performed.
Single-color controls can be cells or Anti-Ig k beads (for mouse, rat, hamster…). These beads can be
helpful for compensation if you have minute samples, rare target populations or dim antigens. These
are some examples:
- BD™ CompBeads (ref. 552843) are highly recommended for use in all experiments using tandem
dye conjugates (e.g., PE-Cy™7, APC-Cy™7, etc.), which may have distinct spectral characteristics
for each conjugate.
- OneComp eBeads™ Invitrogen™ (ref. 01-1111-41) are designed for use in compensation with all
fluorochromes excited by blue (488 nm), green (532 nm), yellow-green (561 nm), and red (633-635
nm) lasers. This product is compatible with eFluor™ 450 but is not optimized for compensation of
fluorochromes excited by a violet (405 nm) laser.
- Compensation Beads UltraComp eBeads™ Invitrogen™ (ref. 01-2222-42) are compatible with most
standard lasers (UV to 633 nm) and improved for polymer dye use from violet laser.
While performing the Compensation setup, ensure you follow these principles:
- Compensation must be calculated with the same antibody/fluorochrome as the ones used in the final
experiment;
- Bring the brightest markers for compensation;
- The positive and negative populations should have similar backgrounds.
In addition, you may need or want other controls for your experiment, such as FMOs.

STANDARD OPERATING PROCEDURES
SOP.UCF.005 – PREPARE SAMPLES FOR FLOW
CYTOMETRY
SOP.UCF.005 26-03-2021 Pag. 7/17
FOR SORTING, WHICH COLLECTION DEVICES CAN YOU USE?
You have many different options for collecting your sorted cells.
Collect up to four different populations simultaneously into tubes of your choice, 1.5 mL, 5 mL
tubes, or up to two population into 15 mL tubes.
Sort into any kind of plate. 6-well, 12-well, 24-well, 36-well, 96-well, 384-well, PCR plate, etc.
The most recommended collection buffer is your cell culture medium with 10% FBS or some other
serum. Collection tubes should be about 1/3 full of collection media.
We try to keep everything as clean as possible, but our sorters are not in cell culture hoods, so if you
want to culture your sorted cells it’s a good idea to add antibiotics as Pen-strep or gentamycin, and
antifungal agents to the collection media. You can also sort directly into lysis buffer (for example,
buffer that contains Trizol).
CAN YOU DETERMINE THE IDEAL SORT CONDITIONS?
We can adjust the temperature of the sorters to 4 ºC, 20 ºC, 37 ºC, 42 ºC or at room temperature, and
we can keep your sorted cells on ice, if that is what you need.
We need to use the adequate nozzle for your experiment.
Our sorters have the following options:
• 70 µm nozzle / 70 psi
• 85 µm nozzle / 45 psi
• 100 µm nozzle / 20 psi
The nozzle selection depends on the size and sensibility of your cells.
The most important thing to consider: cells that are fragile or easily stressed (e.g. cultured cells) need
a lower pressure sort (100 µm nozzle), independently of their size.
The BD FACSAria sorts faster with a smaller nozzle at higher pressure - 70 µm nozzle. With this
nozzle, you can sort up to 20,000 events/second. This nozzle is a great choice for small cells that are
happy in single-cell suspension (e.g., blood and bone marrow).

STANDARD OPERATING PROCEDURES
SOP.UCF.005 – PREPARE SAMPLES FOR FLOW
CYTOMETRY
SOP.UCF.005 26-03-2021 Pag. 8/17
Your cells should be no more than one-third of the size of the nozzle. Therefore, if you have larger
cells, they need a larger nozzle size (85 µm or 100 µm nozzle). With these nozzles, sorts are subjected
to lower pressures: with the 85 µm nozzle, you can sort at 10,000 events/second, and with the 100
µm nozzle you can sort up to 7,000 events/second.
We normally use PBS (0.9% NaCl) in our sorters as sheath fluid. Each individual
cell is sorted inside a tiny drop of this sheath fluid. If you are using the 70 µm
nozzle (high pressure, faster sorting), the drops are small and you will get
approximately 1 ml of sheath fluid with every 1 million sorted cells.
If you are using the 100um nozzle (low pressure, slower sorting), with bigger
drops, you will get approximately 3 ml of sheath fluid with every 1 million sorted
cells.
WHAT SHOULD YOU BRING WITH YOU?
Sorting Checklist Analysis Checklist
Unstained Unstained
Single colors Single colors
Samples (on ice if appropriate) Samples (on ice if appropriate)
Gating stategy Gating stategy
Collection tubes/plates with 1/3 of media Extra media/FACS buffer to dilute samples
Extra media/FACS buffer to dilute samples Your DIVA password
100
Nozzle
70
Nozzle

STANDARD OPERATING PROCEDURES
SOP.UCF.005 – PREPARE SAMPLES FOR FLOW
CYTOMETRY
SOP.UCF.005 26-03-2021 Pag. 9/17
Wash cells in FACS Buffer (PBS+2%
FBS), by centrifugation at 350xg for 5 min
Resuspend cells with PFA 2%
Incubate for 20 min at 2-8ºC
Wash cells 2x with FACS buffer
Run cells on a flow cytometer or continue with
staining protocol
APPENDIX A - Cell Fixation Protocol
o Samples should not be left in PFA overnight, this may increase the autofluorescence.

STANDARD OPERATING PROCEDURES
SOP.UCF.005 – PREPARE SAMPLES FOR FLOW
CYTOMETRY
SOP.UCF.005 26-03-2021 Pag. 10/17
Appendix B - Cell Viability Staining
Fixable Viability Dyes
Fixable dyes have the ability to stain cells and preserve that staining pattern after fixation and/or
permeabilization. If you need to fix your cells afterwards, you should use these dyes!
The LIVE/DEAD fixable dead cell stains are the most
commonly known. The staining is based on the reaction
of a fluorescent reactive dye with cellular proteins. On
live cells, the dye only labels the cell surface proteins,
while in dead cells, it can penetrate the damaged
membranes and bind to internal proteins, resulting in
very bright fluorescence. They are available in multiple
single-color formats and compatible with multiple lasers.
It is recommended that experimental conditions, such as incubation time, and temperature, be optimized for
each flow cytometry experiment.
o For a brighter staining, it is best to stain in azide- and protein-free PBS;
o Cells may be stained for LD before or after surface staining;
o After this viability staining, cells can be cryopreserved for analysis at a later time;
o This staining can be used in combination with fixation, permeabilization, and intracellular staining. It can also be used
in live, unfixed cells;
o To do the single-color sample for compensations, if the percentage of dead cells is less than 5%, it is recommended to
take a small aliquot of cells and heat them at 65ºC for 1 min. The heat-killed cells can be combined 1:1 with live cells
and then stained with the fixable dye.
Wash cells in azide-and protein-free
PBS, by centrifugation at
350xg for 5 minutes
Resuspend cells at 1-10x106 cells/mL in azide- and protein-
free PBS
Add 1 uL of dye to 1 mL cells
Incubate for 30 min at 2-8ºC, in dark
Wash cells 2x with FACS buffer
(PBS+2%FBS)
Run cells on a flow cytometer or continue with
staining protocol

STANDARD OPERATING PROCEDURES
SOP.UCF.005 – PREPARE SAMPLES FOR FLOW
CYTOMETRY
SOP.UCF.005 26-03-2021 Pag. 11/17
Some fixable viability dyes available:
- Invitrogen™ LIVE/DEAD™ Fixable Violet, Yellow, Green, and Far Red stain;
- Biolegend Zombie Green, Violet, Yellow and Aqua;
-Bio-Rad Laboratories, Inc. VivaFix 410/450, 408/512, 398/550, 498/521, 547/573 and 649/660
-BD Biosciences Horizon FVS 450, 510, 520, 570, 660 and 700.
Non-Fixable Viability Dyes
Non-Fixable Viability Dyes are not compatible with fixations. They are high affinity DNA-binding dyes
that are effectively excluded from live cells.
The most widely-used are the Propidium Iodide, 7-AAD,
DAPI, SYTOX DNA-binding dyes and Annexin V.
It is recommended that experimental conditions, such as
incubation time, and temperature, be optimized for each flow
cytometry experiment.
Propidium Iodide, 7-AAD and DAPI are cell-impermeant classic DNA-binding dyes. These dyes can
only freely enter cells with compromised cell membranes. PI and DAPI intercalate into dsDNA or
dsRNA, while 7-AAD will intercalate preferentially with dsDNA. Noncovalent forces mediate these
intercalations, reason why the dyes must remain present in the buffer used to resuspend cells for data
acquisition so that dead cells will remain labeled.
o Cells should be analyzed within 4 hours after staining due to adverse effects on the viability of cells left in the present
of PI or 7-AAD for prolonged periods. If required, store at 2-8ºC and protect from light until ready for analysis.
o High concentrations of DAPI may still enter intact cells. Titration must be done with your specific cells, and the incubation
time required before cell analysis.
Wash cells in FACS Buffer, by centrifugation at
350xg for 5 minutes
Resuspend cells in FACS buffer
(1x10⁶ cells/mL)
- Add PI to a final conc. of 1-2 ug/mL
- Add DAPI to a final conc. of 0.1 ug/mL
- Add 7-AAD to a final conc. of 0.5 ug/mL
Incubate for 5-10 min, in dark
Run cells on a flow cytometer

STANDARD OPERATING PROCEDURES
SOP.UCF.005 – PREPARE SAMPLES FOR FLOW
CYTOMETRY
SOP.UCF.005 26-03-2021 Pag. 12/17
SYTOX Dead Cell Stains do not cross intact cell membranes. When entering through damaged
membranes of compromised cells they exhibit increased fluorescence upon dsDNA binding. They
are non-fluorescent in aqueous media, so they can be added to cells without any additional wash
step. They are available in multiple single-color formats and compatible with multiple lasers
(Invitrogen™ SYTOX™ Blue, SYTOX™ Green, SYTOX™ Orange, SYTOX™ AADvanced™ and
SYTOX™ Red).
Annexin V is used to detect apoptotic cells. The staining only works in live cells and tissue. It is
available in multiple single-color formats and compatible with multiple lasers.
Annexin V has a high affinity for the anionic phospholipid phosphatidylserine (PS). In normal cells, PS
is located on the cytoplasmic surface of the plasma membrane. However, during apoptosis, the
plasma membrane undergoes structural changes that include translocation of PS from the inner to
the outer surface of the plasma membrane.
Some available kits allow the simultaneous staining of Annexin and PI, such as:
- Invitrogen™ Dead Cell Apoptosis Kit (ref. V13242)
- Abcam Annexin V-FITC Apoptosis Staining / Detection Kit (ref. ab14085)
- Biolegend FITC Annexin V Apoptosis Detection Kit with PI (ref. 640914)
Wash cells once in 1X PBS, then once in 1X
Binding buffer, by centrifugation at 350xg
for 5 min
Resuspend cells at 1x10⁶
cells/mL in 1X Binding buffer
Add 5 uL of fluorochrome-
conjugated Annexin V to 100
uL of cells
Incubate for 10 min at RT, in
dark
Wash cells once with 1X Binding buffer
Perform the PI or 7-AAD staining
Run cells on a flow cytometer
Wash cells in FACS Buffer, by centrifugation at 350xg for 5 min
Resuspend cells in FACS buffer
(5x10⁷ cells/mL)
Add 1 uL of dye to 1 mL of cells
Incubate for 15 min
Run cells on a flow cytometer

STANDARD OPERATING PROCEDURES
SOP.UCF.005 – PREPARE SAMPLES FOR FLOW
CYTOMETRY
SOP.UCF.005 26-03-2021 Pag. 13/17
Wash cells with FACS buffer (PBS +2% FBS)
by centrifugation at 350xg for 5 minutes
Resuspend cells at 2x10⁷ cells/mL in
FACS buffer
Distribute aliquots of 5x10⁵ cells for each
conditions (tubes/wells)
Pellet your cells by centrifugation at 350xg
for 5 minutes
Ressuspend each conditions in 50 uL
FACS buffer + predetermined
concentrations of antibodies
Incubate for 20 minutes at 2-8ºC,
protected from light
Wash cells 2x with FACS buffer by
centrifugation at 350xg for 5 minutes
Repeat the process with either secondary
antibodies or streptavidin conjugates
Run samples on flow cytometer or continue
with intracellular staining
Appendix C - Cell Staining
Surface Staining
Immunophenotyping is a very common flow cytometry test in which
fluorophore-conjugated antibodies are used as probes to stain target
cells with high avidity and affinity. This technique allows rapid and easy
phenotyping of each cell line in a heterogeneous sample according to
the presence or absence of a protein combination.
Cell surface proteins such as ion channels, glycoproteins and
phospholipids are readily accessible to the antibody so a
permeabilization step is not required.
It is recommended that experimental conditions, such as antibody concentration, incubation time, and
temperature, be optimized for each flow cytometry experiment.
o If analysis must be delayed, you can fix your cells with PFA (Appendix A). However, not all antibodies have been tested
for fixations. Verify if the fixation protocol does not affect antibody binding and/or fluorescence intensity.

STANDARD OPERATING PROCEDURES
SOP.UCF.005 – PREPARE SAMPLES FOR FLOW
CYTOMETRY
SOP.UCF.005 26-03-2021 Pag. 14/17
Intracellular Staining
Intracellular flow cytometry can be used to analyze a variety of
intracellular molecules including cytokines, inflammatory
mediators, transcription factors and phosphoproteins. It can
provide you rich information about the function and signaling
responses of specific cell subsets.
The protocol for most intracellular staining experiments,
follows the next steps:
There are several ways to permeabilize your cells after fixation:
With Saponin buffer (PBS/ 0.1% Saponin/ 10% FBS)
With 0.2% Tween Buffer
With High Grade Ethanol (-20ºC)
There are also Commercial buffer kits for Fixation and Permeabilization that you can easily use
to perform your intracellular staining protocol:
Simultaneous Fixation and Permeabilization
(one-step protocol; recommended for the detection of intracellular nuclear protein, like
Transcription Factors)
o BD Cytofix/Cytoperm™ Fixation/Permeabilization Kit (Cat No. 554714)
o Thermo fisher Foxp3 / Transcription Factor Staining Buffer Set (Cat No. 00-5523-00)
o BioLegend Cyto-Fast™ Fix/Perm Buffer Set (Cat No. 426803)
Live/Dead Fixable Staining
Surface staining (optional)
Fixation
(stabilize the cell membrane)
Permeabilization with alcohol or
detergent
(allow antibodies to enter the cell)
Intracellular Staining

STANDARD OPERATING PROCEDURES
SOP.UCF.005 – PREPARE SAMPLES FOR FLOW
CYTOMETRY
SOP.UCF.005 26-03-2021 Pag. 15/17
Fixation + Permeabilization
(two-step protocol; recommended for the detection of intracellular cytoplasmic proteins, like
Cytokines)
o Thermo Fisher Intracellular Fixation & Permeabilization Buffer Set (Cat. no. 88-8824)
o BioLegend Fixation and Intracellular Staining Perm Wash buffers (Cat. No. 420801 and
421002)
For cytokine and chemokine detection:
Cells must be stimulated in-vitro (cell culture) or in-vivo (animal/tissue model). Different
cytokines/chemokines have different production peaks. In order to obtain optimal staining
signals, the stimulation conditions for each stimulant need to be optimized;
It is critical to include a protein transport inhibitor such as brefeldin A or monensin in the last
4-6 hours of cell culture activation (to block the cytokines inside the cell).
For detection of activated phosphoproteins:
Cells must be stimulated at 37ºC in RPMI medium with appropriate treatment for desired time
points. After this, cells must be immediately fixed in order to maintain phosphorylation state of
the protein.
After fixation/permeabilization the intracellular staining is performed mostly as the surface one, but in
this case, you will use fixation/permeabilization buffers to dilute your antibodies.
It is recommended that experimental conditions, such as antibody concentration, incubation time, and
temperature, be optimized for each flow cytometry experiment.
STANDARD OPERATING PROCEDURES
SOP.UCF.005 – PREPARE SAMPLES FOR FLOW
CYTOMETRY
SOP.UCF.005 26-03-2021 Pag. 16/17
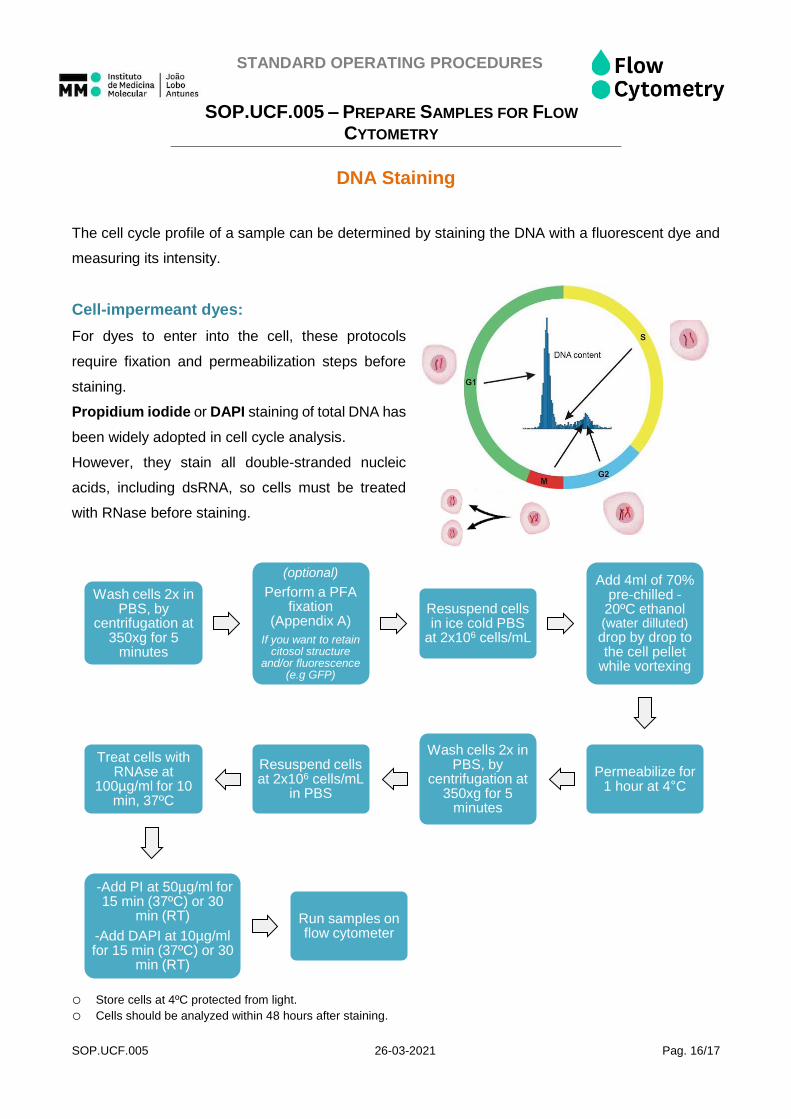
DNA Staining
The cell cycle profile of a sample can be determined by staining the DNA with a fluorescent dye and
measuring its intensity.
Cell-impermeant dyes:
For dyes to enter into the cell, these protocols
require fixation and permeabilization steps before
staining.
Propidium iodide or DAPI staining of total DNA has
been widely adopted in cell cycle analysis.
However, they stain all double-stranded nucleic
acids, including dsRNA, so cells must be treated
with RNase before staining.
o Store cells at 4ºC protected from light. o Cells should be analyzed within 48 hours after staining.
Wash cells 2x in PBS, by
centrifugation at 350xg for 5
minutes
(optional)
Perform a PFA fixation
(Appendix A)
If you want to retain citosol structure
and/or fluorescence (e.g GFP)
Resuspend cells in ice cold PBS
at 2x10⁶ cells/mL
Add 4ml of 70% pre-chilled -
20ºC ethanol (water dilluted) drop by drop to the cell pellet
while vortexing
Permeabilize for 1 hour at 4°C
Wash cells 2x in PBS, by
centrifugation at 350xg for 5
minutes
Resuspend cells at 2x10⁶ cells/mL
in PBS
Treat cells with RNAse at
100µg/ml for 10 min, 37ºC
-Add PI at 50µg/ml for 15 min (37ºC) or 30
min (RT)
-Add DAPI at 10µg/ml for 15 min (37ºC) or 30
min (RT)
Run samples on flow cytometer
STANDARD OPERATING PROCEDURES
SOP.UCF.005 – PREPARE SAMPLES FOR FLOW
CYTOMETRY
SOP.UCF.005 26-03-2021 Pag. 17/17
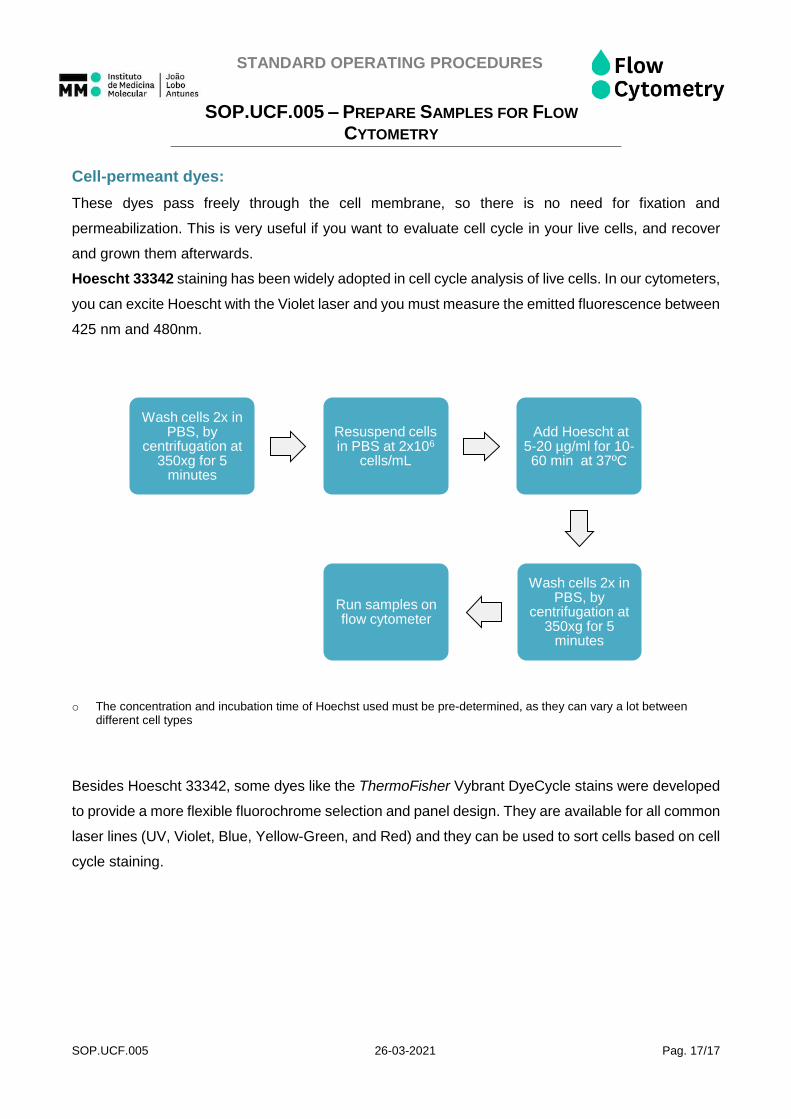
Cell-permeant dyes:
These dyes pass freely through the cell membrane, so there is no need for fixation and
permeabilization. This is very useful if you want to evaluate cell cycle in your live cells, and recover
and grown them afterwards.
Hoescht 33342 staining has been widely adopted in cell cycle analysis of live cells. In our cytometers,
you can excite Hoescht with the Violet laser and you must measure the emitted fluorescence between
425 nm and 480nm.
o The concentration and incubation time of Hoechst used must be pre-determined, as they can vary a lot between different cell types
Besides Hoescht 33342, some dyes like the ThermoFisher Vybrant DyeCycle stains were developed
to provide a more flexible fluorochrome selection and panel design. They are available for all common
laser lines (UV, Violet, Blue, Yellow-Green, and Red) and they can be used to sort cells based on cell
cycle staining.
Wash cells 2x in PBS, by
centrifugation at 350xg for 5
minutes
Resuspend cells in PBS at 2x10⁶
cells/mL
Add Hoescht at 5-20 µg/ml for 10-60 min at 37ºC
Wash cells 2x in PBS, by
centrifugation at 350xg for 5
minutes
Run samples on flow cytometer