precisioneered reloading equipment ... the priming tool in your hand and gently squeeze the handle...
TRANSCRIPT

PRECISIONEERED RELOADING EQUIPMENT
We think that we make the very best reloading equipment in the world. If you agree, please tell your friends.
If you disagree, tell us - we want to do something about it!
Customer Service
1-800-533-5000 (US or Canada) or 530-533-5191
Hours: Monday - Thursday, 6:30am - 3:00pm Pacific Time (hours may vary)
e-mail: [email protected] or visit our website at www.rcbs.com
RCBS, 605 Oro Dam Blvd. East, Oroville, CA 95965
CCI - SPEER - RCBS OUTERS - RAMLINE - ORBEX - FEDERAL
7200539/0509
_____________________________
UNIVERSAL HAND PRIMING TOOL
PRODUCT INSTRUCTIONS
SAFETY Reloading is an enjoyable and rewarding hobby that is easily conducted with safety. But carelessness or negligence can make reloading hazardous. This product has been designed from the beginning with the user’s safety in mind. As with any reloading operation, some safety rules must be followed. By observing these few rules, the chance of hazardous occurrence causing damage or injury becomes extremely remote. GENERAL • Use the equipment as the manufacturer recommends. Study the instructions
carefully and become thoroughly familiar with the operation of the product. Don’t take short cuts.
• Observe “good housekeeping” in the work area. Keep tools and components neat, clean and orderly. Promptly clean up any powder spills.
• Always wear adequate eye protection. • If any unusual resistance is encountered when moving the operating handle,
STOP IMMEDIATELY and investigate the cause. To proceed against unusual resistance may damage equipment and/or cause serious injury!
LOADING DATA • Use only laboratory tested data. We highly recommend the use of the
SPEER Reloading Manual. • OBSERVE ALL WARNINGS ABOUT THE USE OF MAXIMUM
LISTED LOADS. PRIMER HANDLING • WARNING: Primers are designed to explode and will do so when subjected
to heat or percussion. • Do not decap live primers! • Never attempt to seat or reseat a primer in a loaded cartridge. • Store primers and powder beyond the reach of children and away from heat,
dampness, open flames and electrical equipment. • DO NOT use any primer unless its identity is positively known. Discard all
mixed primers and those of uncertain or unknown identity. • After a reloading session ends, return the remaining primers back into its
original factory container. This will preserve the identity and shelf life of the primers.
• DO NOT SMOKE while handling powder or primers.

09452 Universal Case Load Block
09090 Scale Pan w/Integrated Funnel
09190 Quick Change Funnel Kit
RECORD KEEPING • Keep complete records of reloads. Apply a descriptive label to each box
showing the date produced, and the primer, powder and bullet used. Labels for this purpose are packed with SPEER bullets.
Since RCBS has no control over the choice of components, the manner in which they are assembled, the use of this product, or the firearms in which the resulting ammunition may be used, no responsibility, either expressed or implied, is assumed for the use of ammunition reloaded with this tool.
GENERAL INFORMATION The Universal Hand Priming Tool from RCBS is the safest and most convenient priming tool you can get your hand on. Its most important feature is the exclusive safety gate mechanism which isolates the primer seating operation from the primer supply. The gate is an essential safety mechanism and is designed to eliminate the possibility of a primer tray detonation caused by an improperly seated primer propagating or “flashing back” into the tray of primers. DO NOT UNDER ANY CIRCUMSTANCE attempt to operate the tool without the safety gate in position or attempt to modify the tool in any way. The Universal Shell Holder accepts cases from .32 ACP to .45-70 Gov’t. Simply install the proper threaded primer seating plug and primer feeds for large or small primers and you are ready to prime your cases. Other features include: • Universal Shell Holder will accommodate cases from .32 ACP to .45-70
Gov’t. • A primer feeding system that requires no hand contact with primers. • A detachable 100-count primer tray that is “grooved” to position primers
anvil-side-up. • Detachable primer tray fits all manufacturers primer packaging. • A die cast body designed to fit comfortably in the palm of your hand. • RCBS lifetime guarantee. Unpack the Universal Hand Priming Tool carefully. Look for and identify the following items: • Universal Hand Priming Tool with large primer feed installed. • Green plastic primer tray with clear plastic lid. • Plastic bag with the following parts: Primer plug tool, Hex Wrench, Small
Primer Feed, Small and Large Primer Seat Plugs. .
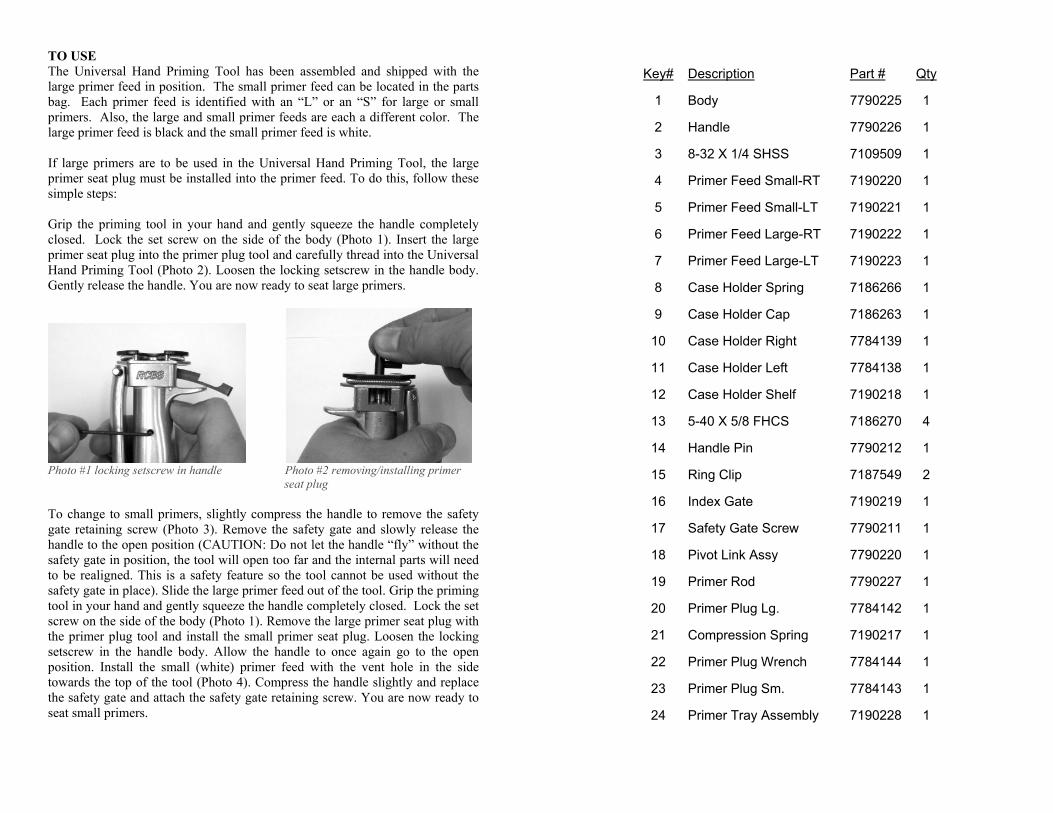
TO USE The Universal Hand Priming Tool has been assembled and shipped with the large primer feed in position. The small primer feed can be located in the parts bag. Each primer feed is identified with an “L” or an “S” for large or small primers. Also, the large and small primer feeds are each a different color. The large primer feed is black and the small primer feed is white. If large primers are to be used in the Universal Hand Priming Tool, the large primer seat plug must be installed into the primer feed. To do this, follow these simple steps: Grip the priming tool in your hand and gently squeeze the handle completely closed. Lock the set screw on the side of the body (Photo 1). Insert the large primer seat plug into the primer plug tool and carefully thread into the Universal Hand Priming Tool (Photo 2). Loosen the locking setscrew in the handle body. Gently release the handle. You are now ready to seat large primers.
Photo #1 locking setscrew in handle Photo #2 removing/installing primer
seat plug To change to small primers, slightly compress the handle to remove the safety gate retaining screw (Photo 3). Remove the safety gate and slowly release the handle to the open position (CAUTION: Do not let the handle “fly” without the safety gate in position, the tool will open too far and the internal parts will need to be realigned. This is a safety feature so the tool cannot be used without the safety gate in place). Slide the large primer feed out of the tool. Grip the priming tool in your hand and gently squeeze the handle completely closed. Lock the set screw on the side of the body (Photo 1). Remove the large primer seat plug with the primer plug tool and install the small primer seat plug. Loosen the locking setscrew in the handle body. Allow the handle to once again go to the open position. Install the small (white) primer feed with the vent hole in the side towards the top of the tool (Photo 4). Compress the handle slightly and replace the safety gate and attach the safety gate retaining screw. You are now ready to seat small primers.
Key# Description Part # Qty
1 Body 7790225 1
2 Handle 7790226 1
3 8-32 X 1/4 SHSS 7109509 1
4 Primer Feed Small-RT 7190220 1
5 Primer Feed Small-LT 7190221 1
6 Primer Feed Large-RT 7190222 1
7 Primer Feed Large-LT 7190223 1
8 Case Holder Spring 7186266 1
9 Case Holder Cap 7186263 1
10 Case Holder Right 7784139 1
11 Case Holder Left 7784138 1
12 Case Holder Shelf 7190218 1
13 5-40 X 5/8 FHCS 7186270 4
14 Handle Pin 7790212 1
15 Ring Clip 7187549 2
16 Index Gate 7190219 1
17 Safety Gate Screw 7790211 1
18 Pivot Link Assy 7790220 1
19 Primer Rod 7790227 1
20 Primer Plug Lg. 7784142 1
21 Compression Spring 7190217 1
22 Primer Plug Wrench 7784144 1
23 Primer Plug Sm. 7784143 1
24 Primer Tray Assembly 7190228 1

Photo #3 removing/installing safety gate Photo #4 proper orientation of primer feed retaining screw The next step is to install the primer tray. At some point, primers will need to be loaded into the tray. This can be done before or after the tray is attached to the priming tool. The following instructions are for loading the tray with primers before the tray is attached to the tool.
Photo #5 install primer tray into tool First, remove the clear plastic lid from the primer tray and scatter some primers onto the grooved surface of the green tray. Gently shake the green tray from side to side and the primers will “flip over” and be positioned anvil side up for feeding into the Universal Hand Priming Tool. Replace the clear plastic lid. You’ll notice there is a “notch” cut into the lid that fits over the portion of the tray that funnels the primers into the primer feed. Install the primer tray into the primer feed on the tool (Photo 5). The small green slide in the tray lid is the primer shut off. By sliding the shut off right or left you can either start or stop the flow of primers into the primer feed. Photo #6 shows the primer shut off slide in a position to stop the flow of primers. Photo #7 shows the primer shut off slide in an open position to allow primers into the primer feed.
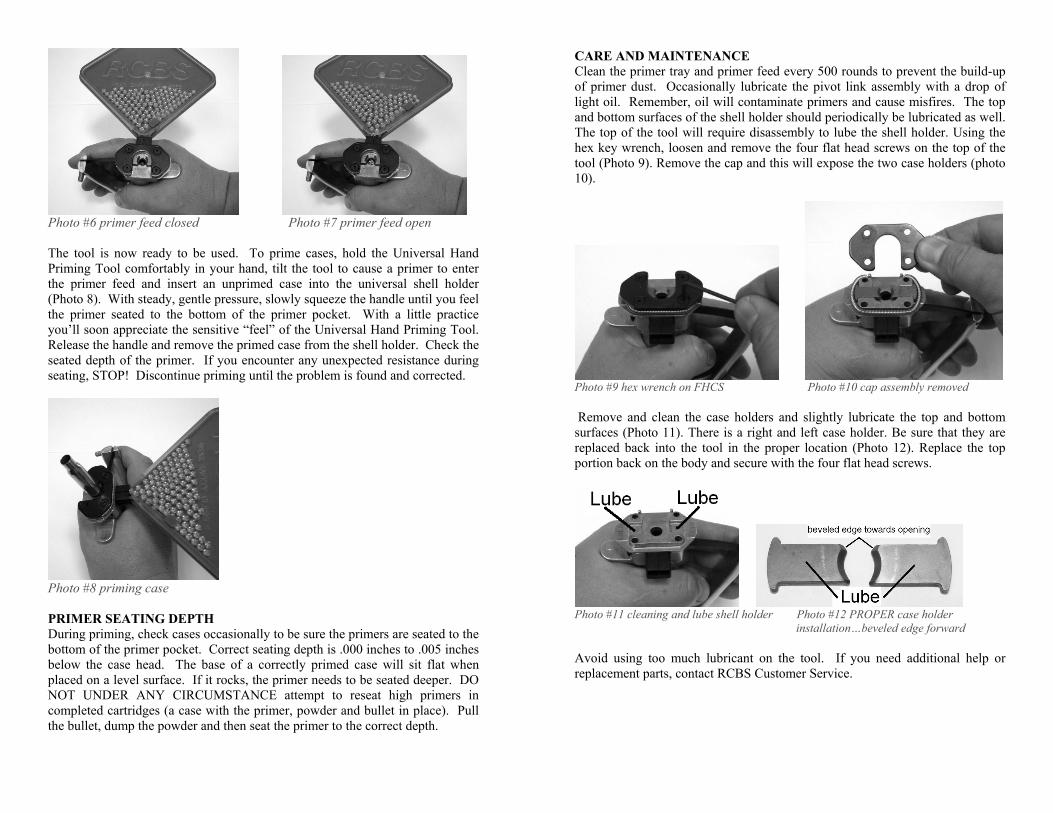
Photo #6 primer feed closed Photo #7 primer feed open The tool is now ready to be used. To prime cases, hold the Universal Hand Priming Tool comfortably in your hand, tilt the tool to cause a primer to enter the primer feed and insert an unprimed case into the universal shell holder (Photo 8). With steady, gentle pressure, slowly squeeze the handle until you feel the primer seated to the bottom of the primer pocket. With a little practice you’ll soon appreciate the sensitive “feel” of the Universal Hand Priming Tool. Release the handle and remove the primed case from the shell holder. Check the seated depth of the primer. If you encounter any unexpected resistance during seating, STOP! Discontinue priming until the problem is found and corrected.
Photo #8 priming case PRIMER SEATING DEPTH During priming, check cases occasionally to be sure the primers are seated to the bottom of the primer pocket. Correct seating depth is .000 inches to .005 inches below the case head. The base of a correctly primed case will sit flat when placed on a level surface. If it rocks, the primer needs to be seated deeper. DO NOT UNDER ANY CIRCUMSTANCE attempt to reseat high primers in completed cartridges (a case with the primer, powder and bullet in place). Pull the bullet, dump the powder and then seat the primer to the correct depth.
CARE AND MAINTENANCE Clean the primer tray and primer feed every 500 rounds to prevent the build-up of primer dust. Occasionally lubricate the pivot link assembly with a drop of light oil. Remember, oil will contaminate primers and cause misfires. The top and bottom surfaces of the shell holder should periodically be lubricated as well. The top of the tool will require disassembly to lube the shell holder. Using the hex key wrench, loosen and remove the four flat head screws on the top of the tool (Photo 9). Remove the cap and this will expose the two case holders (photo 10).
Photo #9 hex wrench on FHCS Photo #10 cap assembly removed Remove and clean the case holders and slightly lubricate the top and bottom surfaces (Photo 11). There is a right and left case holder. Be sure that they are replaced back into the tool in the proper location (Photo 12). Replace the top portion back on the body and secure with the four flat head screws.
Photo #11 cleaning and lube shell holder Photo #12 PROPER case holder installation…beveled edge forward Avoid using too much lubricant on the tool. If you need additional help or replacement parts, contact RCBS Customer Service.