precautions -...
TRANSCRIPT

1
Precautions
Very important information. Please read this section carefully before using this product.
This product is intended to provide turn-by-turn instructions to safely guide you to your desired destination. Please make sure that all persons using this navigation software carefully read these precautions and the operating instructions in the Nextar Software Manual.
Nextar cannot accept any responsibility whatsoever for accidents resulting from failure to observe these precautions.
Your personal judgment, traffic regulations, and common sense must always take precedence over instructions produced by the software.
• This product is not a substitute for your driving technique, driving knowledge or especially your personal judgment. Route suggestions made by this navigation system should never supersede any traffic regulations, your personal judgment, or your knowledge of safe driving practices. If you feel that a route suggestion made by the software instructs you to perform an unsafe or illegal maneuver, places you in an unsafe situation, or routes you into an area that you consider unsafe, do not follow the instructions. Your personal judgment, traffic regulations, and common sense must always take precedence over instructions produced by the software.
• When your vehicle is moving, keep your eyes on the road instead of looking at the screen. If you need to look at the screen for a prolonged time, always park the car in a safe manner and in accordance with all traffic regulations.
• Do not select or input destinations, change settings or otherwise manually operate this software unless you have parked your car in a safe manner, observing all traffic regulations.
• If you are responding to an emergency, it may not be prudent to rely on this system unless you have no other means to obtain accurate directions. The database does not include all of the facilities and streets necessary for emergency response, and the system’s maps may not reflect recent changes in roads, traffic controls and driving conditions. Use your own judgment in these situations.
2
• The database utilized by this software is the most accurate and up-to-date database available. Because of road closures, construction, weather, new roads and other conditions, the database might not contain accurate information regarding all streets and locations. If so, the system might not be able to correctly guide you on your route or may inaccurately estimate the time needed to reach your destination. Please use your judgment in these cases. Renewing your subscription to the database will aid in keeping it up-to-date.
• There are situations when the navigation system will incorrectly display the vehicle’s position on the map. Usually this situation will correct itself automatically. Use your own judgment at all times. If you need to reset the position, pull over in a safe manner observing all traffic regulations.
3
Points to Observe for Safe Usage
WarningFailure to follow the following instructionscan result in severe injury or death. !
• Read this manual carefully and make sure you understand the cautions. Nextar is not responsible for problems resulting from failure to observe the precautions, warnings, and instructions in this manual. Store this guide where it will be accessible at all times, for example in your glove compartment.
• The driver must not manually operate the software while driving the vehicle. This may lead to traffic accidents. If the driver is to operate the software with the controls, the driver must pull over in a safe manner observing all traffic regulations.
• When your vehicle is moving, keep your eyes on the road instead of looking at the screen. Listen to the voice prompts for guidance instructions. If you wish to look at the display, pull over in a safe manner observing all traffic regulations.
• Immediately stop using the software if a problem arises. Problems might include no sound or display errors.
• Always comply with all traffic regulations.
• Regardless of the guidance instructions, do not enter roads on which your type of vehicle is prohibited or which appear unsafe. Always observe signs.
• Keep the volume low enough so that you can hear outside sounds.
• Stop the vehicle before performing any GPS operation that could interfere with driving. Always pull over in a safe manner observing all traffic regulations.
4
Contents Chapter 1 – Introduction……………………………………………………………………6
Summary of Features…………………………………………………………………...6
About This Guide………………………………………………………………………...7
Chapter 2 - Quick Start Examples………………………………………………………...8
Setting a Destination Using a Street Address………………………………………..8
Setting a Destination Using a Point of Interest (POI)……………………………….9
Chapter 3 - GPS Basics……………………………………………………………..…….11
Main Screen Components…………………………………………………………….12
Changing Map Display Modes………………………………………………………..13
Browsing the Map Display…………………………………………………………….15
Selecting Options and Entering Data………………………………………………..16
Setting Destinations……………………………………………………………………18
Selecting and Working with Turn-By-Turn Views…………………………………..19 Main Turn-by-Turn View…………………………………………………………20 Split Map View……………………………………………………………………20 Maneuvers List View……………………………………………………………..21
Zooming In and Out……………………………………………………………………21
Canceling a Route……………………………………………………………………..22
Automatic Route Recalculation……………………………………………………….22
Setting and Using Your Home Location……………………………………………..23
Planning a Route Using a Different Starting Point…………………………………24
Managing Favorites……………………………………………………………………25
Chapter 4 - Setting Destinations…………………………………………….…………..26
Setting a Destination Using an Address…………………………………………….26
Setting a Destination Using a Point of Interest (POI)……………………………...30
Setting a Destination Using Crossroads…………………………………………….33
Setting a Destination Using an Entry in the Favorites List………………………..36
5
Setting a Destination Using an Item in the History List……………………………37
Chapter 5 - Other Options………………………………………………………………...38
Configuring Map Display Settings……………………………………………………38
Selecting a Language………………………………………………………………….40
Viewing GPS Status……………………………………………………………………41
Setting Default Route Calculation Criteria…………………………………………..42
Setting Origin…………………………………………………………………………...43
Previewing a Route Using Demo Mode…………………………………..………...44
Viewing Program Version Information……………………………………………….45
Exiting the Application…………………………………………………………………46
Chapter 6- Technical Reference…………………………………………………………47
Menu Commands………………………………………………………………………47
Screen Icons and Controls……………………………………………………………48 Compass and GPS……………………………………………………………….48 User Interface Controls and Icons……………………………………………..49
General Turn-By-Turn Symbols………………………………………………………52
FAQ'S………………………………………………………………………………………….53
Copyright……………………………………………………………………………………..54
6
Chapter 1—Introduction
Nextar GPS is a full-featured GPS navigation application for mobile computing platforms. Developed by Nextar, Inc., you can install GPS portable computing devices that utilize integrated or externally connected GPS receivers.
Nextar GPS uses a patented and patent pending interface that employs statistical and probability analysis to make selecting and setting destinations fast and easy. The main display is clear and easy to read, and the context sensitive menus provide quick access to common tasks that include setting destinations, saving routes, and retrieving recently used destinations.
Once underway, your route is tracked and displayed in real-time on the map display. As you travel, the application’s voice guidance system announces each maneuver that you need to make while the main screen displays turn directions, compass heading, distance to next maneuver, and street names. If you leave your route, Nextar GPS automatically calculates a new route to your destination.
To help you get up and running quickly, this manual provides detailed descriptions and instructions on how to use Nextar GPS.
Summary of Features • Specialized, innovative, and intuitive user interface
• Ready for in-vehicle use
• Easy-to-use patented and patent-pending destination entry that improves efficiency using statistical and probability analysis
• Context-sensitive menus
• 2-D and 3-D map display with built-in compass
• Discernible map zoom levels
• Multi-modal voice guidance
• Approaching cross-street display
• Accurate vehicle positioning and map matching
• Instant recalculations when off-route
• Point of Interest access
• On-board NAVTEQ™ map database

7
About This Guide
This manual is organized as follows:
Chapter 1—Introduction introduces the GPS application.
Chapter 2—Quick Start Examples provides two quick start examples that are for users who simply want to jump right in.
Chapter 3—GPS Basic describes how to use the GPS to calculate a route.
Chapter 4—Setting Destinations provides visual quick reference to the GPS screens and options.
Chapter 5—Other Options describes how to use the options in the Settings screen to configure the GPS, set preferences, cancel a route in progress, exit the application, and more.
Chapter 6—Command Reference provides detailed reference information regarding the GPS menus, controls, and icons.
Note. The steps and procedures presented in this guide represent the best practice methods for working successfully with the GPS. If you have any questions or encounter any difficulties that are not addressed in the documentation or web-based support, contact Customer Support. In addition, please note that the information in this guide, including references to the various graphical elements in the program, is subject to change due to on-going updates and improvements.

8
Chapter 2—Quick Start Examples
This chapter provides two quick start examples (1) Setting a Destination Using a Street Address; and (2) Setting a Destination Using a Point of Interest (POI).
Setting a Destination Using a Street Address To set a destination using an address
1. From the main screen, tap the GO TO button. The Enter Destination screen opens.
2. If necessary, tap the ADDRESS tab.
3. Select an option button for entering an address. You can enter an address starting with—
- START WITH CITY—to set a destination by entering a city name, then a street name, and then a building number
- START WITH STREET—to set a destination by entering a street name, then a city name, and then a building number
- ADDRESS IN <<LAST-USED CITY NAME>>—to set a destination using a street and address in the last-used city (This option displays only if a city has previously been entered.)
- CITY CENTER—to set a destination to the center of a city or town you specify.
For this example, select START WITH CITY.
4. Begin spelling out the item as prompted by tapping out the name (e.g., the city name) starting with the first letter. As you make selections, the screen displays and highlights the most likely characters based on the GPS’s patentent technology.
5. Tap on the city name that matches the one you are looking for. The system next prompts you to enter the street name.
6. Enter the street name. The system will display matching street names within the first few characters. As prompted, select the appropriate street name from the list.
7. Enter the building number, and then tap OK when you are done. The system next shows the Destination Confirmation for the selected destination.
9
8. Next—
- Tap GO to calculate the route and start the turn-by-turn instructions.
—Or—
- Tap SAVE & GO to save the destination location in the Favorites list before receiving turn-by-turn instructions. The system will prompt you to enter a location name. The system will then provide turn-by-turn instructions to that destination from your current location.
—Or—
- Tap SET ORIGIN to set this location as the starting position, e.g., to plan a route using a different starting point.
Setting a Destination Using a Point of Interest (POI) To set a destination using a point of interest
1. From the the main screen, tap GO TO. The Enter Destination screen opens.
2. If necessary, tap the POI tab.
3. Select an option to locate a POI as follows—
- POI BY CITY—to locate a POI by entering the city location, and then the POI name
- POI BY NAME—to locate a POI by entering the POI name
- POI NEAR VEHICLE—to locate a POI that is close to your current vehicle position
- POI NEAR DESTINATION—to locate a POI that is close to your destination
For this example, select POI BY CITY.
4. Select a POI category (restaurants, gas stations, Bank/ATM). You may use the Up or Down buttons to scroll up and down the list of categories. After you choose a category, the data entry screen appears next and prompts you for the first item to enter.
5. Begin spelling out the item as prompted by tapping out the city name starting with the first letter. As you make selections, the screen displays and highlights the most likely characters based on the GPS’s patentent technology.
10
6. Tap on the city name that matches the one you are looking for. At this point, two possible things will happen.
- The system will display the list of matching POIs for the selected category.
—OR—
- The system prompts you to enter the POI name. Begin spelling out the item. Within a few characters, the system will display the matching list.
7. Select the desired POI from the displayed list. The system next shows the Destination Confirmation for the selected destination.
8. Next—
- Tap GO to calculate the route and start the turn-by-turn instructions.
—OR—
- Tap SAVE & GO to save the destination location in the Favorites list before receiving turn-by-turn instructions. The system will prompt you to enter a location name. The system will then provide turn-by-turn instructions to that destination from your current location.
—Or—
- Tap SET ORIGIN to set this location as the starting position, e.g., to plan a route using a different starting point.
11
Chapter 3—GPS Basics
To introduce you to key features and common functions in the GPS, this chapter covers—
• Starting the GPS
• Main Screen Components
• Changing Map Display Modes
• Browsing the Map Display
• Selecting Options and Entering Data
• Setting Destinations
• Selecting and Working Turn-By-Turn Views
• Zooming In and Out
• Canceling a Route
• Automatic Route Recalculation
• Setting and Using Your Home Location
• Planning a Route Using a Different Starting Point
• Saving, Using, and Managing Favorites List Entries
• Descriptions of Buttons and Icons
12
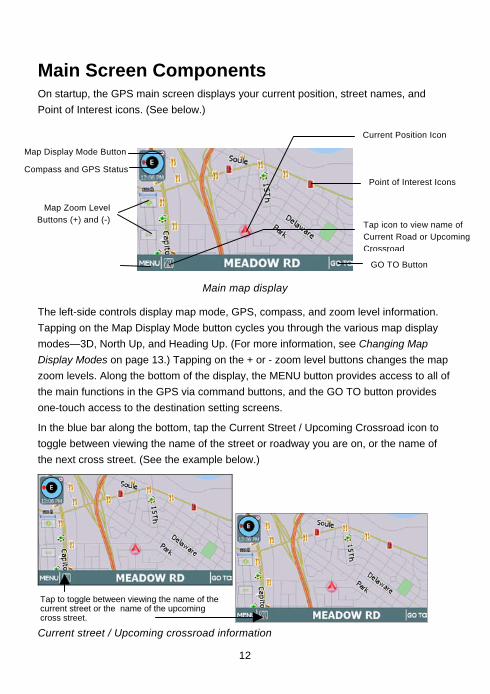
Main Screen Components
On startup, the GPS main screen displays your current position, street names, and Point of Interest icons. (See below.)
Main map display
The left-side controls display map mode, GPS, compass, and zoom level information. Tapping on the Map Display Mode button cycles you through the various map display modes—3D, North Up, and Heading Up. (For more information, see Changing Map Display Modes on page 13.) Tapping on the + or - zoom level buttons changes the map zoom levels. Along the bottom of the display, the MENU button provides access to all of the main functions in the GPS via command buttons, and the GO TO button provides one-touch access to the destination setting screens.
In the blue bar along the bottom, tap the Current Street / Upcoming Crossroad icon to toggle between viewing the name of the street or roadway you are on, or the name of the next cross street. (See the example below.)
Current street / Upcoming crossroad information
Map Zoom Level Buttons (+) and (-)
Current Position Icon
Tap icon to view name of Current Road or Upcoming Crossroad
Tap to toggle between viewing the name of the current street or the name of the upcoming cross street.
Point of Interest Icons
Map Display Mode Button
Compass and GPS Status
GO TO Button

13
Once you set a destination and tap GO, the map displays your route in blue, along with turn-by-turn and trip information on the right. As shown below, map icons display Points of Interest along the way. Other controls allow you to change the map display mode, zoom in or out, view the name of the current street or upcoming crossroad, and turn voice guidance on or off. The VIEW button provides access to alternate views of turn-by-turn instructions. For more information, see Selecting and Working with Turn-By-Turn Views on page 19.
The Map Display
Changing Map Display Modes
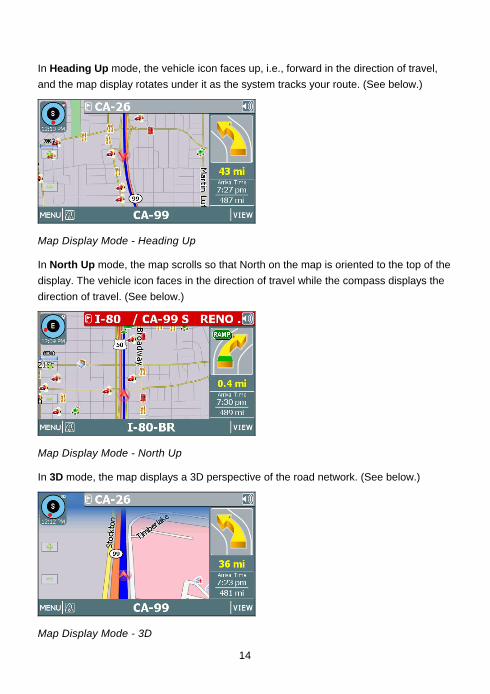
Tapping on the Map Display Mode button cycles the map through three views—Heading Up, North Up, and 3D. (See below.)
Map Display Mode button
Current Street /Upcoming Crossroad
(Toggle)
Current Vehicle Position Indicator
Next maneuver and distance from that maneuver.
Street name of nextmaneuver
Tap the Map Display Mode button
to change map display options
Volume Control for the audible turn-by-turn instructions
Estimated arrival time and distance to destination VIEW button cycles through guidance views
14
In Heading Up mode, the vehicle icon faces up, i.e., forward in the direction of travel, and the map display rotates under it as the system tracks your route. (See below.)
Map Display Mode - Heading Up
In North Up mode, the map scrolls so that North on the map is oriented to the top of the display. The vehicle icon faces in the direction of travel while the compass displays the direction of travel. (See below.)
Map Display Mode - North Up
In 3D mode, the map displays a 3D perspective of the road network. (See below.)
Map Display Mode - 3D
15
Note that not all map display modes are supported in all zoom levels. The map can display 3D at scales below 500 ft (Community zoom level). If the map display mode is 3D, the map switches from 3D to 2D mode when you zoom out to 500 ft. The program will not allow you to change the map display mode to 3D at the 500 ft scale and higher. The map display mode will automatically return to 3D mode once you zoom in to a scale below 500 ft.
Similarly, if the map display mode is Heading Up, the display will automatically switch to North Up mode when you zoom out to the 100 mile scale (State zoom level) or higher. The map display mode will automatically return to Heading Up mode once you zoom in to a scale below 100 miles. The program will not allow you to change the map display mode to Heading Up at the 100 mile scale or higher.
In addition to using the Map Display Mode button on the map to change the display mode, you can also use the Settings screen to set the default (startup) map display mode. For more information, see Configuring Map Display Settings
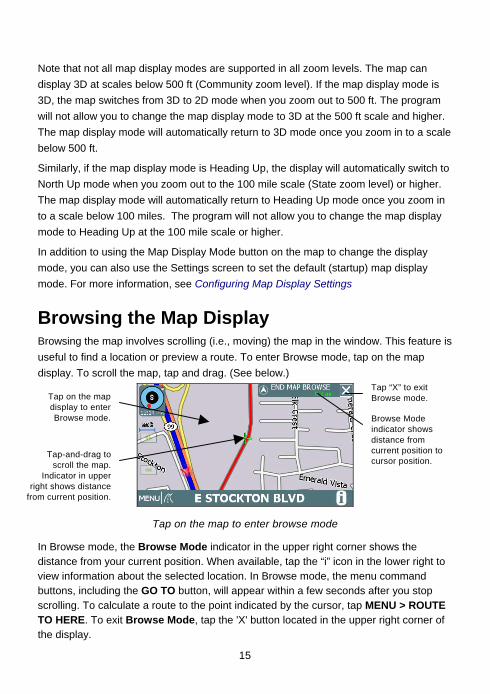
Browsing the Map Display
Browsing the map involves scrolling (i.e., moving) the map in the window. This feature is useful to find a location or preview a route. To enter Browse mode, tap on the map display. To scroll the map, tap and drag. (See below.)
Tap on the map to enter browse mode
In Browse mode, the Browse Mode indicator in the upper right corner shows the distance from your current position. When available, tap the “i” icon in the lower right to view information about the selected location. In Browse mode, the menu command buttons, including the GO TO button, will appear within a few seconds after you stop scrolling. To calculate a route to the point indicated by the cursor, tap MENU > ROUTE TO HERE. To exit Browse Mode, tap the 'X' button located in the upper right corner of the display.
Tap on the mapdisplay to enterBrowse mode.
Tap-and-drag toscroll the map.
Indicator in upperright shows distance
from current position.
Tap “X” to exit Browse mode.
Browse Mode indicator shows distance from current position to cursor position.

16
Selecting Options and Entering Data
The GPS’s patented and patent-pending destination entry interface utilizes statistical and probability analysis to improve efficiency and ease-of-use. This predictive method of selecting and entering data makes setting destinations fast and easy. (See example below.)
For example, when entering a destination, you first specify how you want to enter the destination location. Your choices range from entering the address or intersecting streets (crossroads) to choosing a location from the favorites or “point of interest” database.
Following the prompts on the screen, you begin spelling out the item by tapping on each letter on the data entry screen.
As you make selections, the screen displays and highlights the most likely options based on the GPS patented technology.
Note. Your current GPS location appears in the upper left.
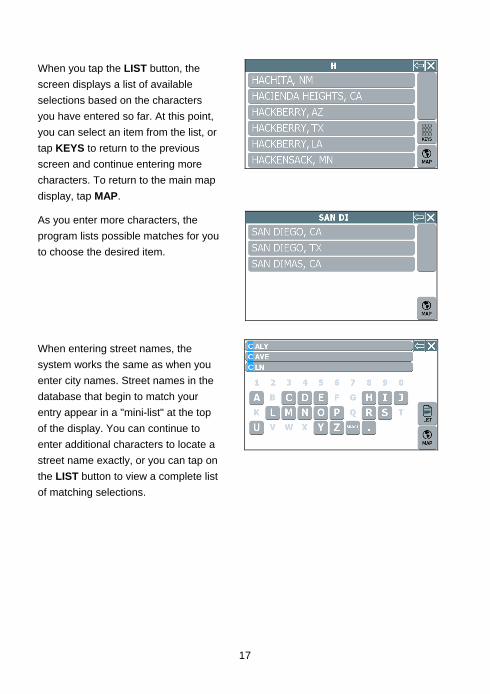
Items in the database that match the characters you have entered so far appear in a "mini-list" at the top of the display. In addition, the keyboard area displays the next set of matching characters for you to tap and select. To expand the "mini-list" to view more selections, tap the LIST button. To return to the main map display, tap MAP.
17
When you tap the LIST button, the screen displays a list of available selections based on the characters you have entered so far. At this point, you can select an item from the list, or tap KEYS to return to the previous screen and continue entering more characters. To return to the main map display, tap MAP.
As you enter more characters, the program lists possible matches for you to choose the desired item.
When entering street names, the system works the same as when you enter city names. Street names in the database that begin to match your entry appear in a "mini-list" at the top of the display. You can continue to enter additional characters to locate a street name exactly, or you can tap on the LIST button to view a complete list of matching selections.
18
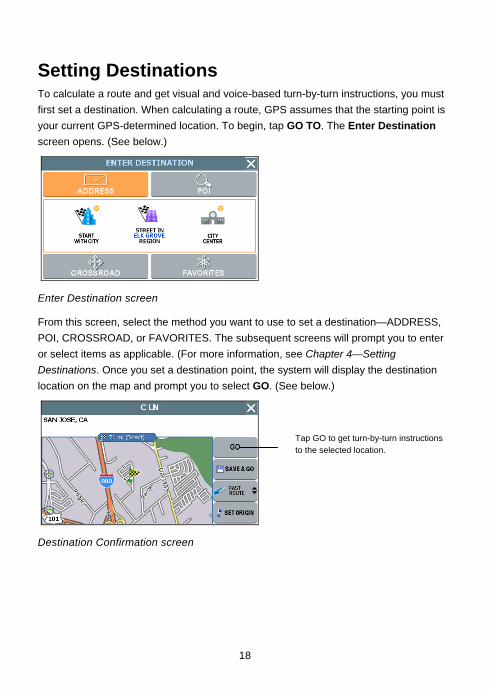
Setting Destinations
To calculate a route and get visual and voice-based turn-by-turn instructions, you must first set a destination. When calculating a route, GPS assumes that the starting point is your current GPS-determined location. To begin, tap GO TO. The Enter Destination screen opens. (See below.)
Enter Destination screen
From this screen, select the method you want to use to set a destination—ADDRESS, POI, CROSSROAD, or FAVORITES. The subsequent screens will prompt you to enter or select items as applicable. (For more information, see Chapter 4—Setting Destinations. Once you set a destination point, the system will display the destination location on the map and prompt you to select GO. (See below.)
Destination Confirmation screen
Tap GO to get turn-by-turn instructions to the selected location.
19
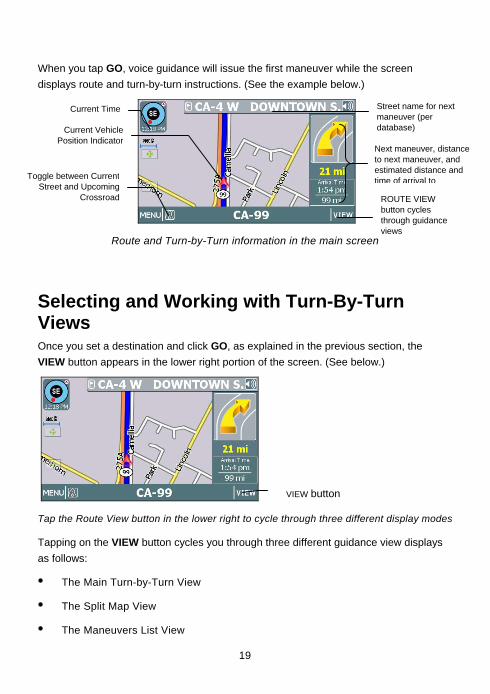
When you tap GO, voice guidance will issue the first maneuver while the screen displays route and turn-by-turn instructions. (See the example below.)
Route and Turn-by-Turn information in the main screen
Selecting and Working with Turn-By-Turn Views
Once you set a destination and click GO, as explained in the previous section, the VIEW button appears in the lower right portion of the screen. (See below.)
Tap the Route View button in the lower right to cycle through three different display modes
Tapping on the VIEW button cycles you through three different guidance view displays as follows:
• The Main Turn-by-Turn View
• The Split Map View
• The Maneuvers List View
VIEW button
Current VehiclePosition Indicator
ROUTE VIEW button cycles through guidance views
Street name for next maneuver (per database)
Current Time
Toggle between CurrentStreet and Upcoming
Crossroad
Next maneuver, distance to next maneuver, and estimated distance and time of arrival to

20
Main Turn-by-Turn View
Main Turn-by-Turn View
In the Main Turn-by-Turn View, the right side of the display shows the Next Maneuver arrow and the distance to that maneuver as you follow the calculated route. The street name for the next maneuver appears at the top of the display. The estimated time of arrival and distance to the final location also display on the lower right side of the screen. The background color of the street name and the Next Maneuver arrow change colors as you approach the location where you are to make the next maneuver. If you missed the voice instructions, tap on the Next Maneuver arrow to repeat the voice announcement.
Split Map View
Split Map View
The Split Map View divides the screen into two panes. The left pane displays travel progress on the map in the selected Map Display mode. The right pane displays a close up view of the approaching maneuver. The street name for the next maneuver and distance to that maneuver appear at the top of the display. The background color of the street name changes colors as you approach the location where you are to make the next maneuver.
Blue line shows travel route.
Tap VIEW to cycle to the next guidance view.
Arrow indicates the next maneuver; tap on this arrow to repeat the voice instruction.
Estimated arrival time and distance to destination
Distance to go to make the next maneuver.
Tap VIEW to cycle to the next guidance view.
The left pane displays travel progress in 3D, Heading Up, or North Up mode.
The right pane displays a close up view of the approaching maneuver.
Estimated arrival time and distance to destination

21
Maneuvers List View
Maneuvers List View The Maneuvers List View replaces the map display with a scrollable list of the calculated maneuvers. Use the FIRST, LAST, UP, and DOWN arrow button to scroll the list of maneuvers. Similar to the other views, the background color of the Next Maneuver arrow changes color as you approach the location.
Zooming In and Out
To facilitate navigation and make it easier for you to get a sense of where you are, the GPS provides zoom options that allow you to view the map display at different levels ranging from street level all the way to country level. (See the examples below.)
Examples of various zoom levels
To change zoom levels for the map display • Tap the Zoom In (+) or Zoom Out (-) buttons to set the map zoom level. Each
zoom level is labeled as appropriate, e.g., County or City, etc. Note. Not all map display modes are supported in all zoom levels. For more information, see Changing Map Display Modes .
Tap to scroll up.
Tap to scroll down.
Tap to jump to first maneuver in the list.
Tap to jump to last maneuver in the list.
Next maneuver.
List of maneuvers required for calculated route.
Tap VIEW to cycle to the next guidance view.
22
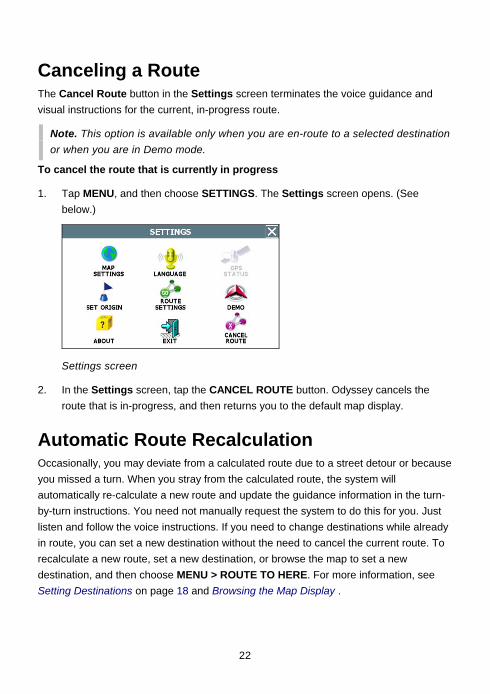
Canceling a Route
The Cancel Route button in the Settings screen terminates the voice guidance and visual instructions for the current, in-progress route.
Note. This option is available only when you are en-route to a selected destination or when you are in Demo mode.
To cancel the route that is currently in progress
1. Tap MENU, and then choose SETTINGS. The Settings screen opens. (See below.)
Settings screen
2. In the Settings screen, tap the CANCEL ROUTE button. Odyssey cancels the route that is in-progress, and then returns you to the default map display.
Automatic Route Recalculation
Occasionally, you may deviate from a calculated route due to a street detour or because you missed a turn. When you stray from the calculated route, the system will automatically re-calculate a new route and update the guidance information in the turn-by-turn instructions. You need not manually request the system to do this for you. Just listen and follow the voice instructions. If you need to change destinations while already in route, you can set a new destination without the need to cancel the current route. To recalculate a new route, set a new destination, or browse the map to set a new destination, and then choose MENU > ROUTE TO HERE. For more information, see Setting Destinations on page 18 and Browsing the Map Display .
23
Setting and Using Your Home Location
The GPS allows you to label an address or destination as a “home” location. Your “home” can be any address that you want to use as a base location—such as your residence, your office, or your hotel.
To set the home location
• Choose MENU > SET AS HOME to set your current, GPS-determined location as your home location
—Or—
• Tap MENU > FAVORITES, and then choose SET FAVORITE AS HOME. In the Select Favorite to Set as Home screen, select a location listed.
Once you select and save a location as HOME, the menu button changes from SET AS HOME to GO HOME.
To calculate a route to your home location
• Choose MENU > GO HOME.
To remove a home location
• Choose MENU > GO TO DESTINATION > FAVORITES > DELETE FAVORITE. In the Select Favorite to Delete screen, tap the item that displays the Home icon. When the program asks you to confirm the deletion, tap Yes, and then tap the MAP button to return to the main display. You may now set a different location as “home”.
24
Planning a Route Using a Different Starting Point
The SET ORIGIN option in the GPS allows you to set the car position manually in order to plan or preview a route from a different starting point. You can also use this option to set the vehicle position manually when GPS data is not available.
To plan or preview a route from a different starting location —
• Tap on the map and place the display in Browse mode, find the location you want to use as the starting point, and then choose MENU > SETTINGS > SET ORIGIN. At the Set Origin Instructions screen, tap the OK button.
—Or—
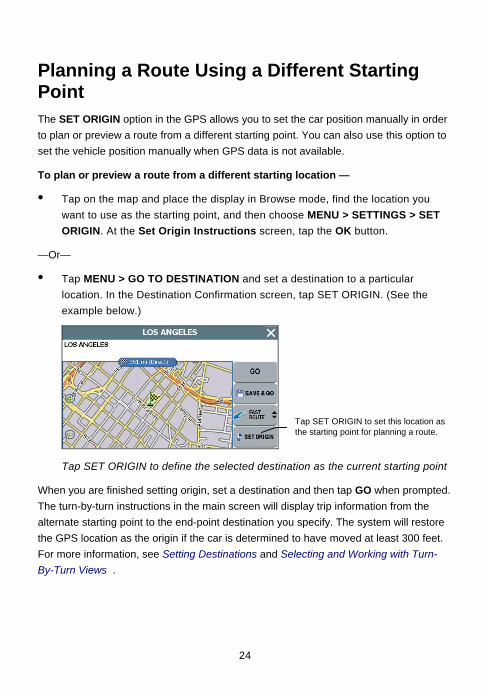
• Tap MENU > GO TO DESTINATION and set a destination to a particular location. In the Destination Confirmation screen, tap SET ORIGIN. (See the example below.)
Tap SET ORIGIN to define the selected destination as the current starting point
When you are finished setting origin, set a destination and then tap GO when prompted. The turn-by-turn instructions in the main screen will display trip information from the alternate starting point to the end-point destination you specify. The system will restore the GPS location as the origin if the car is determined to have moved at least 300 feet. For more information, see Setting Destinations and Selecting and Working with Turn-By-Turn Views .
Tap SET ORIGIN to set this location as the starting point for planning a route.
25
Managing Favorites
To store a location as a destination in the GPS Favorites list—
• Set a destination and then tap SAVE & GO. As prompted, enter a location name, and then tap OK.
—Or—
• Browse to a location on the map, tap MENU and then tap SAVE TO FAVORITES.
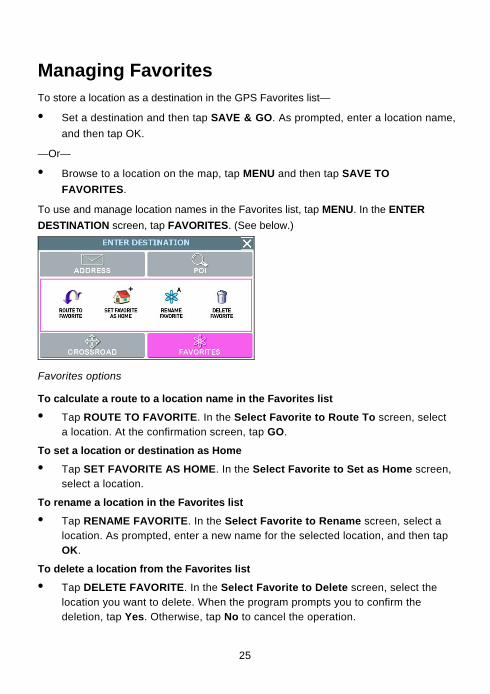
To use and manage location names in the Favorites list, tap MENU. In the ENTER DESTINATION screen, tap FAVORITES. (See below.)
Favorites options
To calculate a route to a location name in the Favorites list
• Tap ROUTE TO FAVORITE. In the Select Favorite to Route To screen, select a location. At the confirmation screen, tap GO.
To set a location or destination as Home
• Tap SET FAVORITE AS HOME. In the Select Favorite to Set as Home screen, select a location.
To rename a location in the Favorites list
• Tap RENAME FAVORITE. In the Select Favorite to Rename screen, select a location. As prompted, enter a new name for the selected location, and then tap OK.
To delete a location from the Favorites list
• Tap DELETE FAVORITE. In the Select Favorite to Delete screen, select the location you want to delete. When the program prompts you to confirm the deletion, tap Yes. Otherwise, tap No to cancel the operation.
26
Chapter 4—Setting Destinations
This chapter describes how to set destinations. The main topics cover—
• Setting a Destination Using an Address
• Setting a Destination Using a Point of Interest
• Setting a Destination Using Crossroads
• Setting a Destination Using an Entry in the Favorites List
• Setting a Destination Using an Item in the History List
Setting a Destination Using an Address
To set a destination using an address
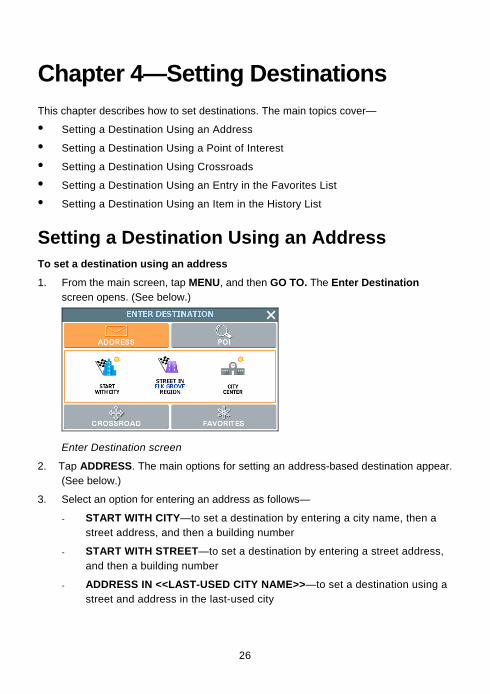
1. From the main screen, tap MENU, and then GO TO. The Enter Destination screen opens. (See below.)
Enter Destination screen
2. Tap ADDRESS. The main options for setting an address-based destination appear. (See below.)
3. Select an option for entering an address as follows—
- START WITH CITY—to set a destination by entering a city name, then a street address, and then a building number
- START WITH STREET—to set a destination by entering a street address, and then a building number
- ADDRESS IN <<LAST-USED CITY NAME>>—to set a destination using a street and address in the last-used city
27
- CITY CENTER—to set a destination to the center of a city or town you specify.
4. Upon setting a destination point, tap GO to start turn-by-turn instructions to the selected location. Alternatively, tap SAVE & GO if you first want to save the destination as a location in the Favorites list before getting turn-by-turn instructions to the selected location.
Example 1
• In the Enter Destination screen, tap START WITH CITY.
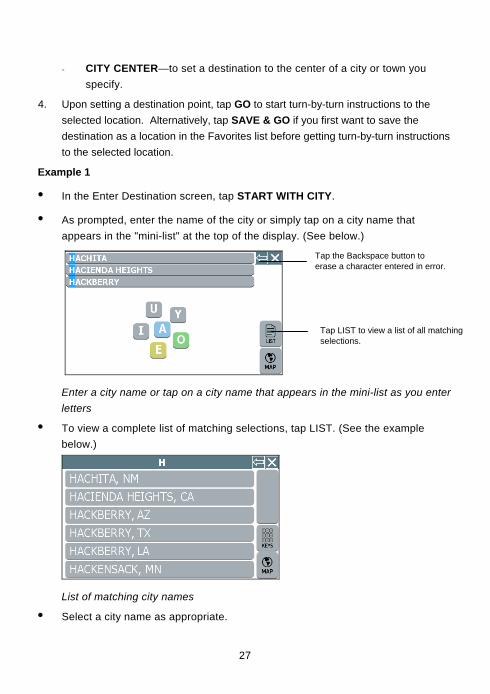
• As prompted, enter the name of the city or simply tap on a city name that appears in the "mini-list" at the top of the display. (See below.)
Enter a city name or tap on a city name that appears in the mini-list as you enter letters
• To view a complete list of matching selections, tap LIST. (See the example below.)
List of matching city names
• Select a city name as appropriate.
Tap the Backspace button to erase a character entered in error.
Tap LIST to view a list of all matching selections.

28
• Next, enter the street name. Matching street names appear in the mini-list.
Enter the street name
• Enter the building number, and then tap OK when you are done. The system next shows the Destination Confirmation for the selected destination.
Destination Confirmation screen for calculating route to selected destination
• At this point—
- Tap GO to calculate the route and start the turn-by-turn instructions.
—Or—
- Tap SAVE & GO to save the destination location in the Favorites list before receiving turn-by-turn instructions. The system will prompt you to enter a location name. The system will then provide turn-by-turn instructions to that destination from your current location.
—Or—
- Tap the Route Criteria button to select different route calculation criteria.
—Or—
- Tap SET ORIGIN to set this location as the starting position, e.g., to plan a route using a different starting point.
Route Criteria button toggles between available options for calculating the route.
Close button returns you to previous screen.
29
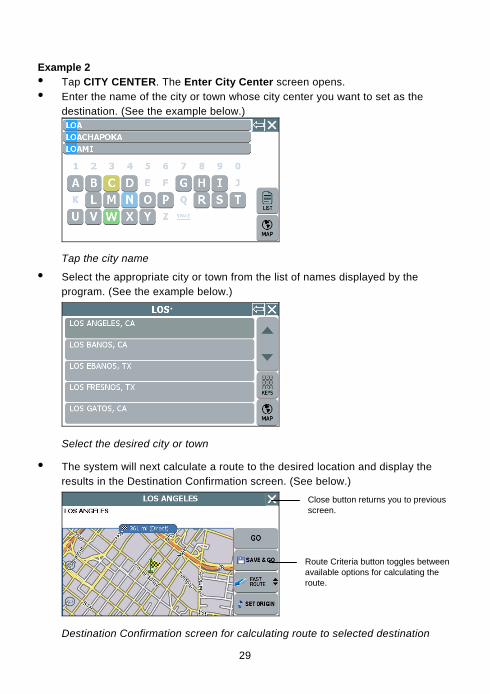
Example 2 • Tap CITY CENTER. The Enter City Center screen opens. • Enter the name of the city or town whose city center you want to set as the
destination. (See the example below.)
Tap the city name
• Select the appropriate city or town from the list of names displayed by the program. (See the example below.)
Select the desired city or town
• The system will next calculate a route to the desired location and display the results in the Destination Confirmation screen. (See below.)
Destination Confirmation screen for calculating route to selected destination
Route Criteria button toggles between available options for calculating the route.
Close button returns you to previous screen.

30
• At this point—
- Tap GO to calculate the route and start the turn-by-turn instructions.
—Or—
- Tap SAVE & GO to save the destination location in the Favorites list before receiving turn-by-turn instructions. The system will prompt you to enter a location name. The system will then provide turn-by-turn instructions to that destination from your current location.
—Or—
- Tap the Route Criteria button to select a different route calculation criteria.
—Or—
- Tap SET ORIGIN to set this location as the starting position, e.g., to plan a route using a different starting point.
Note. To cancel the destination setting operation at any time, tap the MAP button located along the right edge of any data entry or destination-setting screen.
Setting a Destination Using a Point of Interest (POI)
Use the Point of Interest (POI) feature to locate a restaurants, gas stations, hotels, banks, etc.
To set a destination to a point of interest
1. From the the main screen, tap MENU, and then choose GO TO. The Enter Destination screen opens.
2. If necessary, tap the POI tab located along the top of the screen. The main options for setting a point-of-interest based destination appear in the main display. (See below.)
POI options for the Enter Destination screen
31
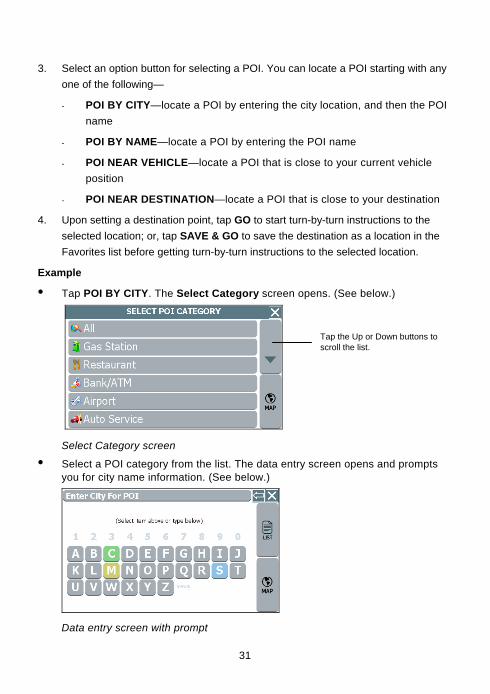
3. Select an option button for selecting a POI. You can locate a POI starting with any one of the following—
- POI BY CITY—locate a POI by entering the city location, and then the POI name
- POI BY NAME—locate a POI by entering the POI name
- POI NEAR VEHICLE—locate a POI that is close to your current vehicle position
- POI NEAR DESTINATION—locate a POI that is close to your destination
4. Upon setting a destination point, tap GO to start turn-by-turn instructions to the selected location; or, tap SAVE & GO to save the destination as a location in the Favorites list before getting turn-by-turn instructions to the selected location.
Example
• Tap POI BY CITY. The Select Category screen opens. (See below.)
Select Category screen
• Select a POI category from the list. The data entry screen opens and prompts you for city name information. (See below.)
Data entry screen with prompt
Tap the Up or Down buttons to scroll the list.
32
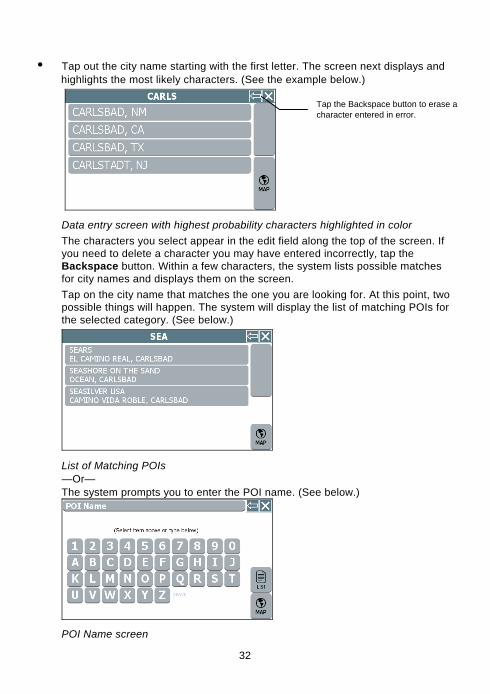
• Tap out the city name starting with the first letter. The screen next displays and highlights the most likely characters. (See the example below.)
Data entry screen with highest probability characters highlighted in color The characters you select appear in the edit field along the top of the screen. If you need to delete a character you may have entered incorrectly, tap the Backspace button. Within a few characters, the system lists possible matches for city names and displays them on the screen. Tap on the city name that matches the one you are looking for. At this point, two possible things will happen. The system will display the list of matching POIs for the selected category. (See below.)
List of Matching POIs —Or— The system prompts you to enter the POI name. (See below.)
POI Name screen
Tap the Backspace button to erase a character entered in error.
33
If the latter happens, begin spelling the POI name. Within a few characters, the system will display the matching list.
• Select the desired POI from the displayed list.
• Tap GO to calculate the route and view the turn-by-turn instructions.
—Or—
Tap SAVE & GO to save the destination as a location in the Favorites list before receiving turn-by-turn instructions. The system will prompt you to enter a location name before continuing.
—Or—
Tap SET ORIGIN to set this location as the vehicle starting position.
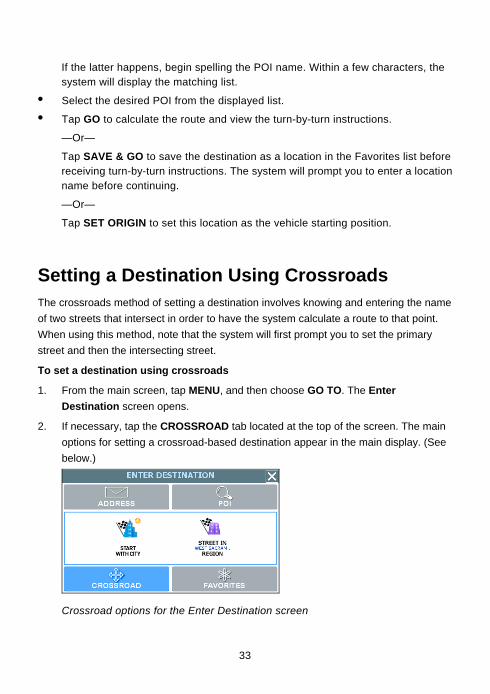
Setting a Destination Using Crossroads
The crossroads method of setting a destination involves knowing and entering the name of two streets that intersect in order to have the system calculate a route to that point. When using this method, note that the system will first prompt you to set the primary street and then the intersecting street.
To set a destination using crossroads
1. From the main screen, tap MENU, and then choose GO TO. The Enter Destination screen opens.
2. If necessary, tap the CROSSROAD tab located at the top of the screen. The main options for setting a crossroad-based destination appear in the main display. (See below.)
Crossroad options for the Enter Destination screen
34
3. Select an option button for entering the crossroads. You can enter street names starting with any one of the following—
- START WITH CITY—to define the primary street by entering a city name and then the street name
- START WITH STREET—to define the primary street by entering the street name
4. Upon setting a destination point, tap GO to start turn-by-turn instructions to the selected location; or, tap SAVE & GO to save the destination as a location in the Favorites list before getting turn-by-turn instructions to the selected location.
Example
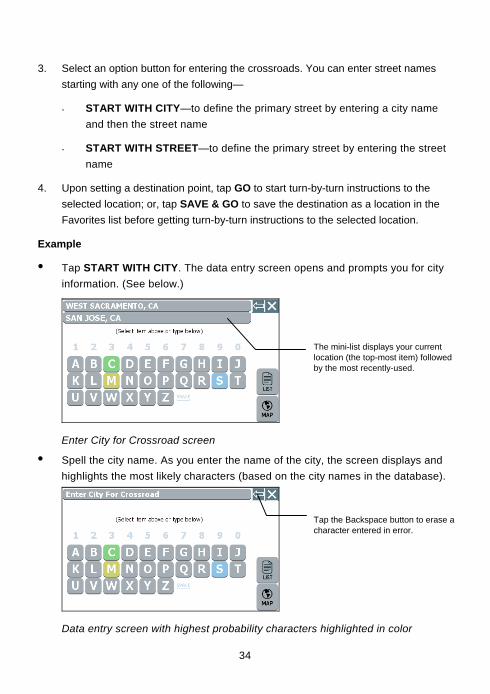
• Tap START WITH CITY. The data entry screen opens and prompts you for city information. (See below.)
Enter City for Crossroad screen
• Spell the city name. As you enter the name of the city, the screen displays and highlights the most likely characters (based on the city names in the database).
Data entry screen with highest probability characters highlighted in color
Tap the Backspace button to erase a character entered in error.
The mini-list displays your current location (the top-most item) followed by the most recently-used.
35
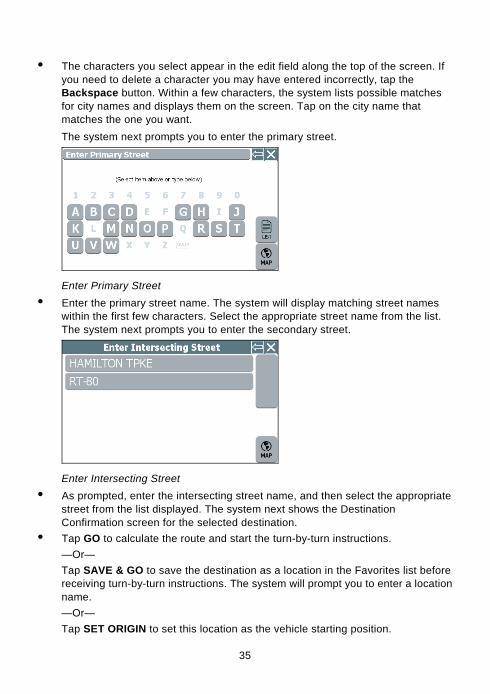
• The characters you select appear in the edit field along the top of the screen. If you need to delete a character you may have entered incorrectly, tap the Backspace button. Within a few characters, the system lists possible matches for city names and displays them on the screen. Tap on the city name that matches the one you want. The system next prompts you to enter the primary street.
Enter Primary Street • Enter the primary street name. The system will display matching street names
within the first few characters. Select the appropriate street name from the list. The system next prompts you to enter the secondary street.
Enter Intersecting Street • As prompted, enter the intersecting street name, and then select the appropriate
street from the list displayed. The system next shows the Destination Confirmation screen for the selected destination.
• Tap GO to calculate the route and start the turn-by-turn instructions. —Or— Tap SAVE & GO to save the destination as a location in the Favorites list before receiving turn-by-turn instructions. The system will prompt you to enter a location name. —Or— Tap SET ORIGIN to set this location as the vehicle starting position.
36
Setting a Destination Using an Entry in the Favorites List
This procedure describes how to calculate a route from your current location to a location in the Favorites list.
To set a destination using the Favorites list
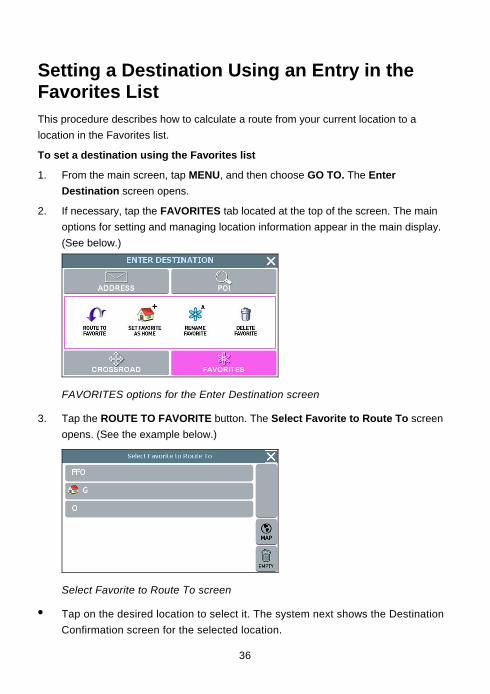
1. From the main screen, tap MENU, and then choose GO TO. The Enter Destination screen opens.
2. If necessary, tap the FAVORITES tab located at the top of the screen. The main options for setting and managing location information appear in the main display. (See below.)
FAVORITES options for the Enter Destination screen
3. Tap the ROUTE TO FAVORITE button. The Select Favorite to Route To screen opens. (See the example below.)
Select Favorite to Route To screen
• Tap on the desired location to select it. The system next shows the Destination Confirmation screen for the selected location.
37
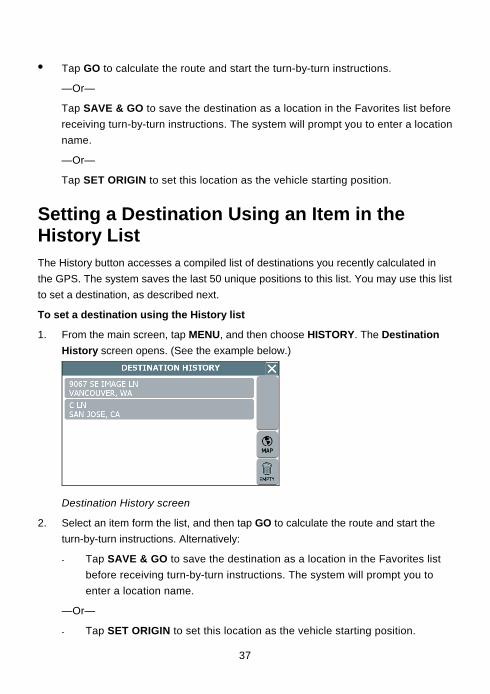
• Tap GO to calculate the route and start the turn-by-turn instructions.
—Or—
Tap SAVE & GO to save the destination as a location in the Favorites list before receiving turn-by-turn instructions. The system will prompt you to enter a location name.
—Or—
Tap SET ORIGIN to set this location as the vehicle starting position.
Setting a Destination Using an Item in the History List
The History button accesses a compiled list of destinations you recently calculated in the GPS. The system saves the last 50 unique positions to this list. You may use this list to set a destination, as described next.
To set a destination using the History list
1. From the main screen, tap MENU, and then choose HISTORY. The Destination History screen opens. (See the example below.)
Destination History screen
2. Select an item form the list, and then tap GO to calculate the route and start the turn-by-turn instructions. Alternatively:
- Tap SAVE & GO to save the destination as a location in the Favorites list before receiving turn-by-turn instructions. The system will prompt you to enter a location name.
—Or—
- Tap SET ORIGIN to set this location as the vehicle starting position.

38
Chapter 5—Other Options
This chapter describes how to use the options in the Settings screen to configure navigation, set preferences, cancel a route in progress, exit the application, and more. The main topics cover—
• Configuring Map Display Settings
• Selecting a Language
• Viewing GPS Status
• Setting Default Route Calculation Criteria
• Setting Origin
• Selecting a Map Region
• Previewing a Route Using Demo Mode
• Viewing Program Version Information
• Exiting the Application
Configuring Map Display Settings
The Map Settings screen allows you to—
• Set the default (startup) map mode
• The default display mode (day, night, or auto)
• Whether you want to view or hide Point of Interest (POI) icons in the map display
To configure map display settings for your device
1. Choose MENU, and then SETTINGS. The Settings screen opens. (See below.)
Settings screen
39
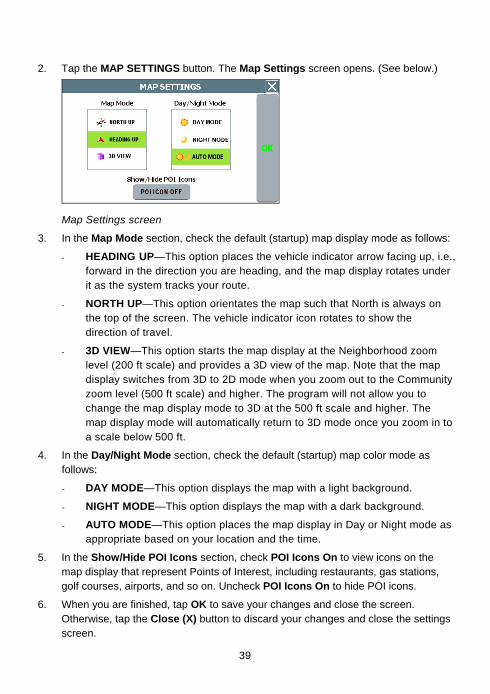
2. Tap the MAP SETTINGS button. The Map Settings screen opens. (See below.)
Map Settings screen
3. In the Map Mode section, check the default (startup) map display mode as follows:
- HEADING UP—This option places the vehicle indicator arrow facing up, i.e., forward in the direction you are heading, and the map display rotates under it as the system tracks your route.
- NORTH UP—This option orientates the map such that North is always on the top of the screen. The vehicle indicator icon rotates to show the direction of travel.
- 3D VIEW—This option starts the map display at the Neighborhood zoom level (200 ft scale) and provides a 3D view of the map. Note that the map display switches from 3D to 2D mode when you zoom out to the Community zoom level (500 ft scale) and higher. The program will not allow you to change the map display mode to 3D at the 500 ft scale and higher. The map display mode will automatically return to 3D mode once you zoom in to a scale below 500 ft.
4. In the Day/Night Mode section, check the default (startup) map color mode as follows:
- DAY MODE—This option displays the map with a light background.
- NIGHT MODE—This option displays the map with a dark background.
- AUTO MODE—This option places the map display in Day or Night mode as appropriate based on your location and the time.
5. In the Show/Hide POI Icons section, check POI Icons On to view icons on the map display that represent Points of Interest, including restaurants, gas stations, golf courses, airports, and so on. Uncheck POI Icons On to hide POI icons.
6. When you are finished, tap OK to save your changes and close the screen. Otherwise, tap the Close (X) button to discard your changes and close the settings screen.

40
Selecting a Language
Use the LANGUAGE option in the Settings screen to select a language.
To configure language settings for your device
1. Choose MENU and then SETTINGS. The Settings screen opens. (See below.)
Settings screen
2. Tap the LANGUAGE button. The Language / Voice settings screen opens. (See below.)
Language / Voice screen
3. Select a language setting, and then tap OK. Optionally, select TTS Streets if you want the system to read street names when supplying guidance information.
Note. The TTS (Text-To-Speech) Streets option is available in English only.
41
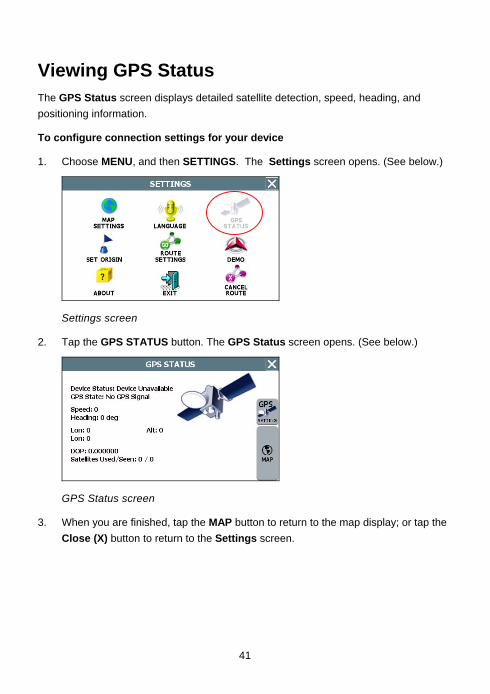
Viewing GPS Status
The GPS Status screen displays detailed satellite detection, speed, heading, and positioning information.
To configure connection settings for your device
1. Choose MENU, and then SETTINGS. The Settings screen opens. (See below.)
Settings screen
2. Tap the GPS STATUS button. The GPS Status screen opens. (See below.)
GPS Status screen
3. When you are finished, tap the MAP button to return to the map display; or tap the Close (X) button to return to the Settings screen.

42
Setting Default Route Calculation Criteria
Use the ROUTE SETTINGS option in the Settings screen to configure default route calculation criteria. You can also specify the measuring system—Imperial or Metric—that you want navigation software to use when displaying distance units.
To set route calculation criteria
1. Tap MENU, and then SETTINGS. The Settings screen opens.
Settings screen
2. Tap the ROUTE SETTINGS button. The Route Calc Settings screen opens.
Route Calc Settings screen
3. Choose the desired settings, and then tap OK.
If a route is in progress when you change the Route Calc Settings, the system will calculate a new route based on the updated selections.
Choose a default route calculation criteria.
Choose a measuring system to be used for guidance announcements and the display of distance units.

43
Setting Origin
The SET ORIGIN feature allows you to set the car position manually. This is useful for planning and previewing a route using a starting point you specify; or, if you want to set the current car position manually when GPS data is not available.
To set an alternate point of origin
• Tap on the map and place the display in Browse mode, find the location you want to use as the starting point, and then choose MENU > SETTINGS > SET ORIGIN. (See below.)
Settings screen
Alternatively—
• Tap GO TO from the main screen, and set a destination to a location you want to use as an originating point. In the Destination Confirmation screen, tap the SET ORIGIN button. (See the example below.)
Tap checkered flag to view the selected destination in full screen
For more information, see Planning a Route Using a Different Starting Point .
SET ORIGIN button
44
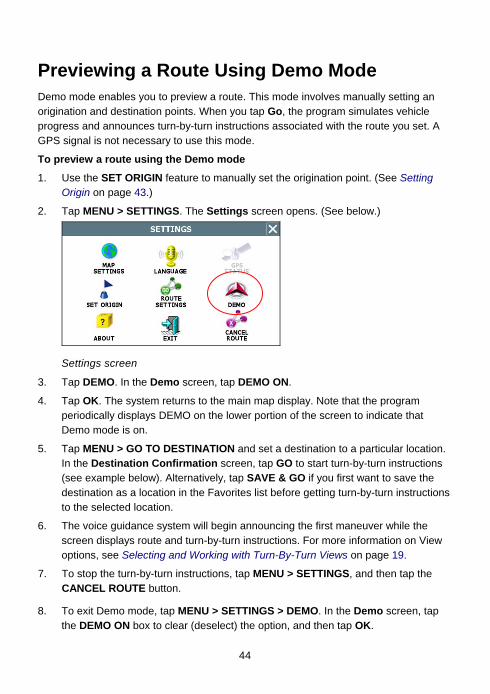
Previewing a Route Using Demo Mode
Demo mode enables you to preview a route. This mode involves manually setting an origination and destination points. When you tap Go, the program simulates vehicle progress and announces turn-by-turn instructions associated with the route you set. A GPS signal is not necessary to use this mode.
To preview a route using the Demo mode
1. Use the SET ORIGIN feature to manually set the origination point. (See Setting Origin on page 43.)
2. Tap MENU > SETTINGS. The Settings screen opens. (See below.)
Settings screen
3. Tap DEMO. In the Demo screen, tap DEMO ON.
4. Tap OK. The system returns to the main map display. Note that the program periodically displays DEMO on the lower portion of the screen to indicate that Demo mode is on.
5. Tap MENU > GO TO DESTINATION and set a destination to a particular location. In the Destination Confirmation screen, tap GO to start turn-by-turn instructions (see example below). Alternatively, tap SAVE & GO if you first want to save the destination as a location in the Favorites list before getting turn-by-turn instructions to the selected location.
6. The voice guidance system will begin announcing the first maneuver while the screen displays route and turn-by-turn instructions. For more information on View options, see Selecting and Working with Turn-By-Turn Views on page 19.
7. To stop the turn-by-turn instructions, tap MENU > SETTINGS, and then tap the CANCEL ROUTE button.
8. To exit Demo mode, tap MENU > SETTINGS > DEMO. In the Demo screen, tap the DEMO ON box to clear (deselect) the option, and then tap OK.

45
Viewing Program Version Information
The ABOUT option in the Settings screen displays software version and copyright information.
To view program version information
1. Tap MENU, and then SETTINGS. The Settings screen opens. (See below.)
Settings screen
2. Tap ABOUT. The About screen opens.and displays copyright and version information. (See the example below.)
Example About screen
3. Tap the Close (X) button to return to the Settings screen.

46
Exiting the Application
To exit and close the GPS
1. Tap MENU, and then choose SETTINGS. The Settings screen opens. (See below.)
Settings screen
2. In the Settings screen, tap EXIT APP. A confirmation message opens. (See below.)
Exit App confirmation message 3. Tap Exit.
Tap here to cancel the operation.
Tap Exit to close the application.
47
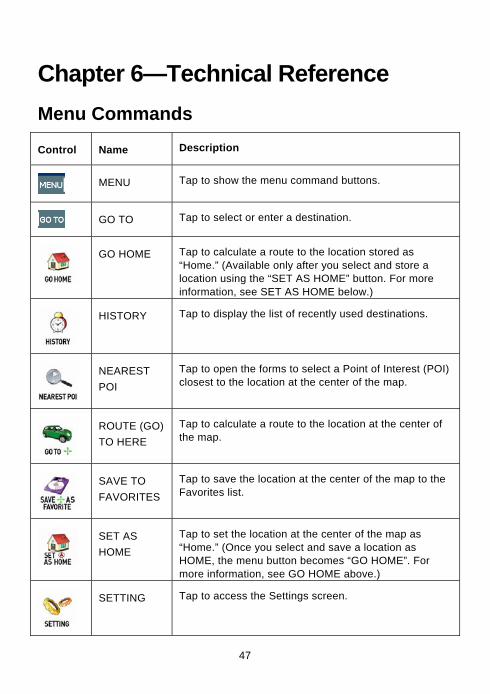
Chapter 6—Technical Reference
Menu Commands
Control Name Description
MENU Tap to show the menu command buttons.
GO TO Tap to select or enter a destination.
GO HOME Tap to calculate a route to the location stored as “Home.” (Available only after you select and store a location using the “SET AS HOME” button. For more information, see SET AS HOME below.)
HISTORY Tap to display the list of recently used destinations.
NEAREST POI
Tap to open the forms to select a Point of Interest (POI) closest to the location at the center of the map.
ROUTE (GO) TO HERE
Tap to calculate a route to the location at the center of the map.
SAVE TO FAVORITES
Tap to save the location at the center of the map to the Favorites list.
SET AS HOME
Tap to set the location at the center of the map as “Home.” (Once you select and save a location as HOME, the menu button becomes “GO HOME”. For more information, see GO HOME above.)
SETTING Tap to access the Settings screen.
48
Screen Icons and Controls
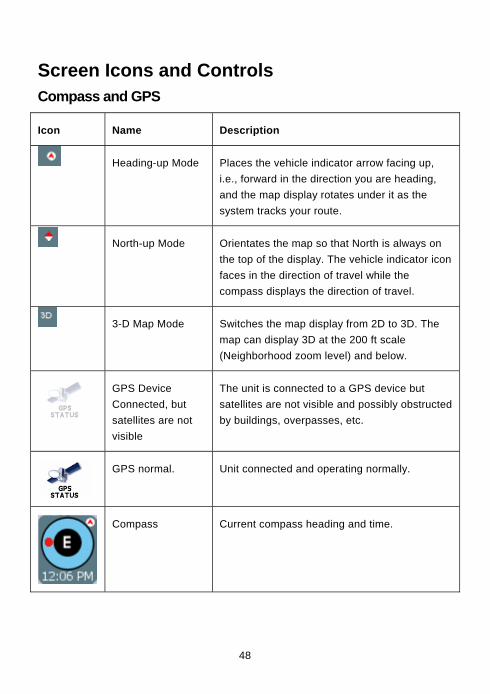
Compass and GPS
Icon Name Description
Heading-up Mode Places the vehicle indicator arrow facing up, i.e., forward in the direction you are heading, and the map display rotates under it as the system tracks your route.
North-up Mode Orientates the map so that North is always on the top of the display. The vehicle indicator icon faces in the direction of travel while the compass displays the direction of travel.
3-D Map Mode Switches the map display from 2D to 3D. The map can display 3D at the 200 ft scale (Neighborhood zoom level) and below.
GPS Device Connected, but satellites are not visible
The unit is connected to a GPS device but satellites are not visible and possibly obstructed by buildings, overpasses, etc.
GPS normal. Unit connected and operating normally.
Compass Current compass heading and time.
49
User Interface Controls and Icons
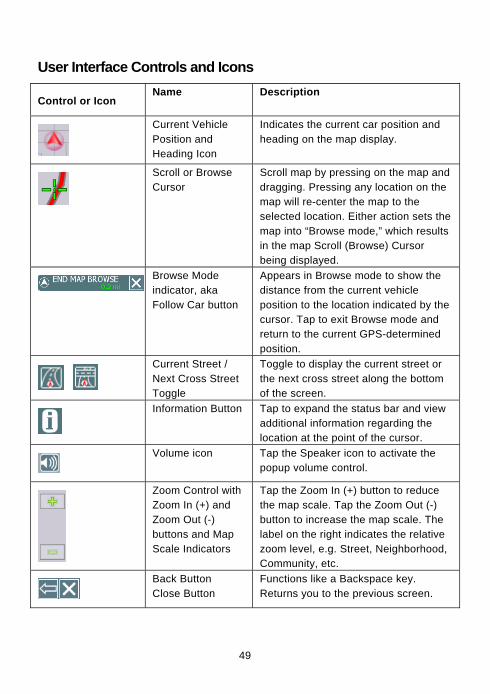
Control or Icon Name Description
Current Vehicle Position and Heading Icon
Indicates the current car position and heading on the map display.
Scroll or Browse Cursor
Scroll map by pressing on the map and dragging. Pressing any location on the map will re-center the map to the selected location. Either action sets the map into “Browse mode,” which results in the map Scroll (Browse) Cursor being displayed.
Browse Mode indicator, aka Follow Car button
Appears in Browse mode to show the distance from the current vehicle position to the location indicated by the cursor. Tap to exit Browse mode and return to the current GPS-determined position.
Current Street / Next Cross Street Toggle
Toggle to display the current street or the next cross street along the bottom of the screen.
Information Button Tap to expand the status bar and view additional information regarding the location at the point of the cursor.
Volume icon Tap the Speaker icon to activate the
popup volume control.
Zoom Control with Zoom In (+) and Zoom Out (-) buttons and Map Scale Indicators
Tap the Zoom In (+) button to reduce the map scale. Tap the Zoom Out (-) button to increase the map scale. The label on the right indicates the relative zoom level, e.g. Street, Neighborhood, Community, etc.
Back Button Close Button
Functions like a Backspace key. Returns you to the previous screen.
50
Control or Icon Name Description
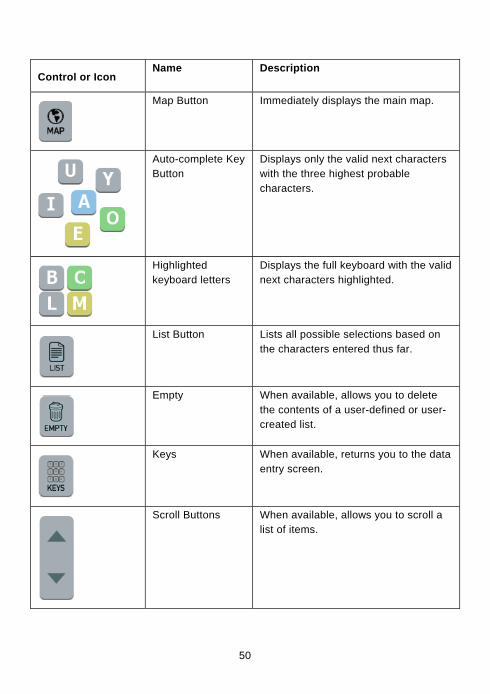
Map Button Immediately displays the main map.
Auto-complete Key Button
Displays only the valid next characters with the three highest probable characters.
Highlighted keyboard letters
Displays the full keyboard with the valid next characters highlighted.
List Button Lists all possible selections based on the characters entered thus far.
Empty When available, allows you to delete the contents of a user-defined or user-created list.
Keys When available, returns you to the data entry screen.
Scroll Buttons When available, allows you to scroll a list of items.

51
Control or Icon Name Description
List Selection Button (Example Shown at left)
Selects the displayed item and advances to the next form.
OK Button Accepts entered text and advances to the next form.
VIEW Options Button
Cycles the main display through three views: Main Turn-by-Turn, Split Map, and Maneuvers List.
GO / SAVE & GO GO: Compute route and start voice and visual guidance to the selected location. SAVE & GO: Save the selected location in the Favorites list, and then compute route and start voice and visual guidance to the selected location.
Route Calculation Criteria button
Toggles route calculation criteria, e.g. Fast Route, Short Route, Avoid Freeway, Avoid Tollway.
SET ORIGIN Set the current location as the starting vehicle position.
POI Icons Points of interest icons denote locations of interest, including restaurants, banks, hotels, and more. To hide POI icons, choose MENU > SETTINGS > MAP SETTINGS, and then clear the POI ICON ON check box.
Green Flag Next maneuver location.
52
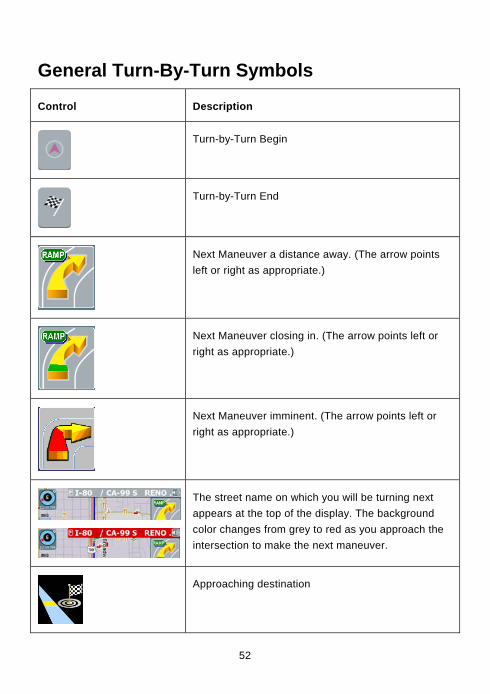
General Turn-By-Turn Symbols
Control Description
Turn-by-Turn Begin
Turn-by-Turn End
Next Maneuver a distance away. (The arrow points left or right as appropriate.)
Next Maneuver closing in. (The arrow points left or right as appropriate.)
Next Maneuver imminent. (The arrow points left or right as appropriate.)
The street name on which you will be turning next appears at the top of the display. The background color changes from grey to red as you approach the intersection to make the next maneuver.
Approaching destination

53
FAQ's
Q. How do I cancel a route once I have tapped Go?
A. To cancel a route, i.e., to stop the turn-by-turn instructions and corresponding voice guidance, choose MENU > SETTINGS > CANCEL ROUTE. Note that canceling a route means stopping the current set of turn-by-turn and voice guidance instructions.
Q. I missed hearing the voice instruction. Can I repeat the voice announcement?
A. Yes. In the Main Turn-by-Turn View, tap on the Next Maneuver arrow to repeat the voice instruction.
Q. Can I change my destination on the fly, i.e. while following instructions to a previously selected location?
A. Yes. Choose MENU > GO TO DESTINATION. The system will cancel the current route automatically as it prompts you to select and enter new destination information.
Q. Is there a quick and easy way to view and select recently used destinations?
Yes. Choose MENU > HISTORY. The system will display a list of previously set destinations. Tap on any item in the history list to calculate a route to that destination quickly.
Q. While in the middle of setting a destination, how do I cancel out and go back to the main screen?
A. Tap the MAP button located along the right side of any date entry or destination-setting screen. This cancels the current operation and returns you to the opening screen.
Q. How do I switch to other applications without having to exit Nextar GPS?
A. To switch to other programs on your handheld device while keeping Odyssey open, press the ENTER or Program Navigation Keys on your device as appropriate. For more information, consult your handheld device owner’s manual. Alternatively, choose MENU > SETTINGS > EXIT APP, and then tap SWITCH at the confirmation message.
26
© 2008 Nextar (Hong Kong) Limited. Nextar is a trademark and service mark of Nextar (Hong Kong) Limited. All other brand names, trademarks and service marks are property of their owners. Nextar may find it necessary to modify, amend or otherwise change or update this manual. We may reserve the right to do this at any time, without any prior notice. All specifications and features are subject to change without notice. www.nextar.comOr write us at: Nextar Inc. 1661 Fairplex Dr. La Verne, CA91750 USA