pre-testing and configuring of - commscope€¦ · overview pre-testing and configuring of ret...
TRANSCRIPT

Overview
Pre-Testing and Configuring of
RET Antenna Systems
Prior to Installation
Bulletin 653260 • Revision B • July 2014
www.commscope.com/andrew
Customer Service 24 hoursCommScope
(828) 324-2200 (800) 982-17081100 CommScope Place SE P.O. Box 339, Hickory, NC 28603-0339
email: [email protected] country: +1-779-435-6500North America: +1-800-255-1479 (toll free)
Notice: CommScope disclaims any liability or responsibility for the results of improper or unsafe installation, inspection, maintenance, or removal practices.Aviso: CommScope no acepta ninguna obligación ni responsabilidad como resultado de prácticas incorrectas o peligrosas de instalación, inspección, mantenimiento o retiro.Avis : CommScope décline toute responsabilité pour les conséquences de procédures d’installation, d’inspection, d’entretien ou de retrait incorrectes ou dangereuses.Hinweis: CommScope lehnt jede Haftung oder Verantwortung für Schäden ab, die aufgrund unsachgemäßer Installation, Überprüfung, Wartung oder Demontage auftreten.Atenção: A CommScope abdica do direito de toda responsabilidade pelos resultados de práticas inadequadas e sem segurança de instalação, inspeção, manutenção ou remoção.Avvertenza: CommScope declina eventuali responsabilità derivanti dell’esecuzione di procedure di installazione, ispezione, manutenzione e smontaggio improprie o poco sicure.注意:CommScope 公司申明对于不恰当或不安全的安装、检验、维修或拆卸 操作所导致的后果不负任何义务和责任。
@2014 CommScope Bulletin 653260

WARRANTY NOTICE
SAFETY NOTICE
ON THE GROUND before installing the antenna.
Pre-Testing and Configuring of the RET Antenna System
Bulletin 653260 • Revision B • July 2014 Page 2 of 7
Notices and Precautions
• Register online at www.andrew.com to receive e-mail announcements for software updates.• Please contact the Andrew Customer Support Center (see bottom of cover page) for any questions.
qualified personnel to verify proper installation,
Do not install near Wear shoes with rubber soles and heels. Wear
installation procedures defined by Andrew will void warranty.latest available actuator firmware release is installed on the actuator. Failure to conduct pre-test and pre-Products→Antennas→Teletilt® RET System). This will verify proper actuator functionality and also ensure that the
(available online at www.commscope.com/andrew under and the latest version of the controller software Andrew requires pre-testing actuators on the ground prior to installation using the Andrew portable controller
may cause warranty for such products to be void.installations are done properly by trained installation personnel and to follow procedures discussed in this bulletin Proper installation procedures must be followed when installing and operating RET equipment. Failure to assure
protective clothing includ-ing a long-sleeved shirt and
GENERAL INSTRUCTIONS
rubber glovespage.all applicable safety precautions as shown on this off when the field installation is performed. Follow It is recommended that transmit power be turned
practices.the results of improper or unsafe installation Andrew disclaims any liability or responsibility for maintenance, and condition of equipment.
you.line can electrocute Assume any wire or look the same. lines, and guy wires lines, tele-phone
use metal ladder.the area. Do not or thunder is in or when lightning wet or windy day Do not install on a
power lines. Power
The installation, maintenance, or removal of an antenna requires qualified, experienced personnel. Andrew installation instructions are written for such installation personnel. Antenna systems should be inspected once a year by
• It is recommended to turn off the transmit power when working around an installed antenna.• RET connections are weather resistant and must not be weatherproofed.• It is required to connect the RET antenna system to the controller and to test it
Andrew Institute offers installation training.

how the antenna system can be configured and set to the desired tilt positions.
Figure 1-1. Pre-Testing Setup For Andrew’s RET Antenna System.
Pre-Testing and Configuring of the RET Antenna System
Pre-Testing and Configuring of the
This bulletin covers pre-testing procedures for the Andrew RET antenna system. It also shows
Bulletin 653260 • Revision B • July 2014 Page 3 of 7
RET Antenna System
1.0 Introduction
Required Material:1 ea ATC200-LITE-USB1 ea Short RET cable, e.g. ATCB-B01-0011 ea Laptop with the latest version of ATC Lite running on Windows 2000, XP, or Vista operating system

Figure 2-1. Pre-Testing Setup For Andrew RET Antenna System.
Follow the steps as illustrated below to pre-test the RET antenna system for full functionality and
Pre-Testing and Configuring of the RET Antenna System
movement, and to ensure that the latest actuator firmware is applied.
Bulletin 653260 • Revision B • July 2014 Page 4 of 7
2.0 Procedure
Note: 1). For antennas with more than one actuator, please ensure that all daisy-chain cables between actuators are attached before testing to verify proper cable installation. 2). Actuators are factory set to 2 downtilt.

Find Devices
Program Icon.
Pre-Testing and Configuring of the RET Antenna System
Refer to Bulletin 639559, ATC200-LITE-USB Teletilt Control System Computer Interface Setup, for installation of the ATC Lite software.
Bulletin 653260 • Revision B • July 2014 Page 5 of 7
3.0 Controller Program Startup And Operation
Please download the latest version of the ATC Lite software from www.andrew.com.
. See Figure 3-2.
3.1. Program Startup:
• Double-click on the ATC Lite program icon on the computer’s desk-top. See Figure 3-1.
3.2. Device Search:
• Click on Figure 3-1. ATC Lite
Figure 3-2. Main Startup Screen Ready For Device Search.

(Figure 3-4).
Figure 3-3. Selecting Actuator In A RET Antenna System.
Pre-Testing and Configuring of the RET Antenna System
Bulletin 653260 • Revision B • July 2014 Page 6 of 7
3.3. Configuring The Actuator:
• With the actuator selected, click on Edit Selected (Figure 3-3). • To configure the selected device, make the appropriate selections and text entries in the Configuring Device dialog (Figure 3-4). • After the configuration data is entered, click on Configure
Figure 3-4. Configuring A Selected Device Prior To Operations.
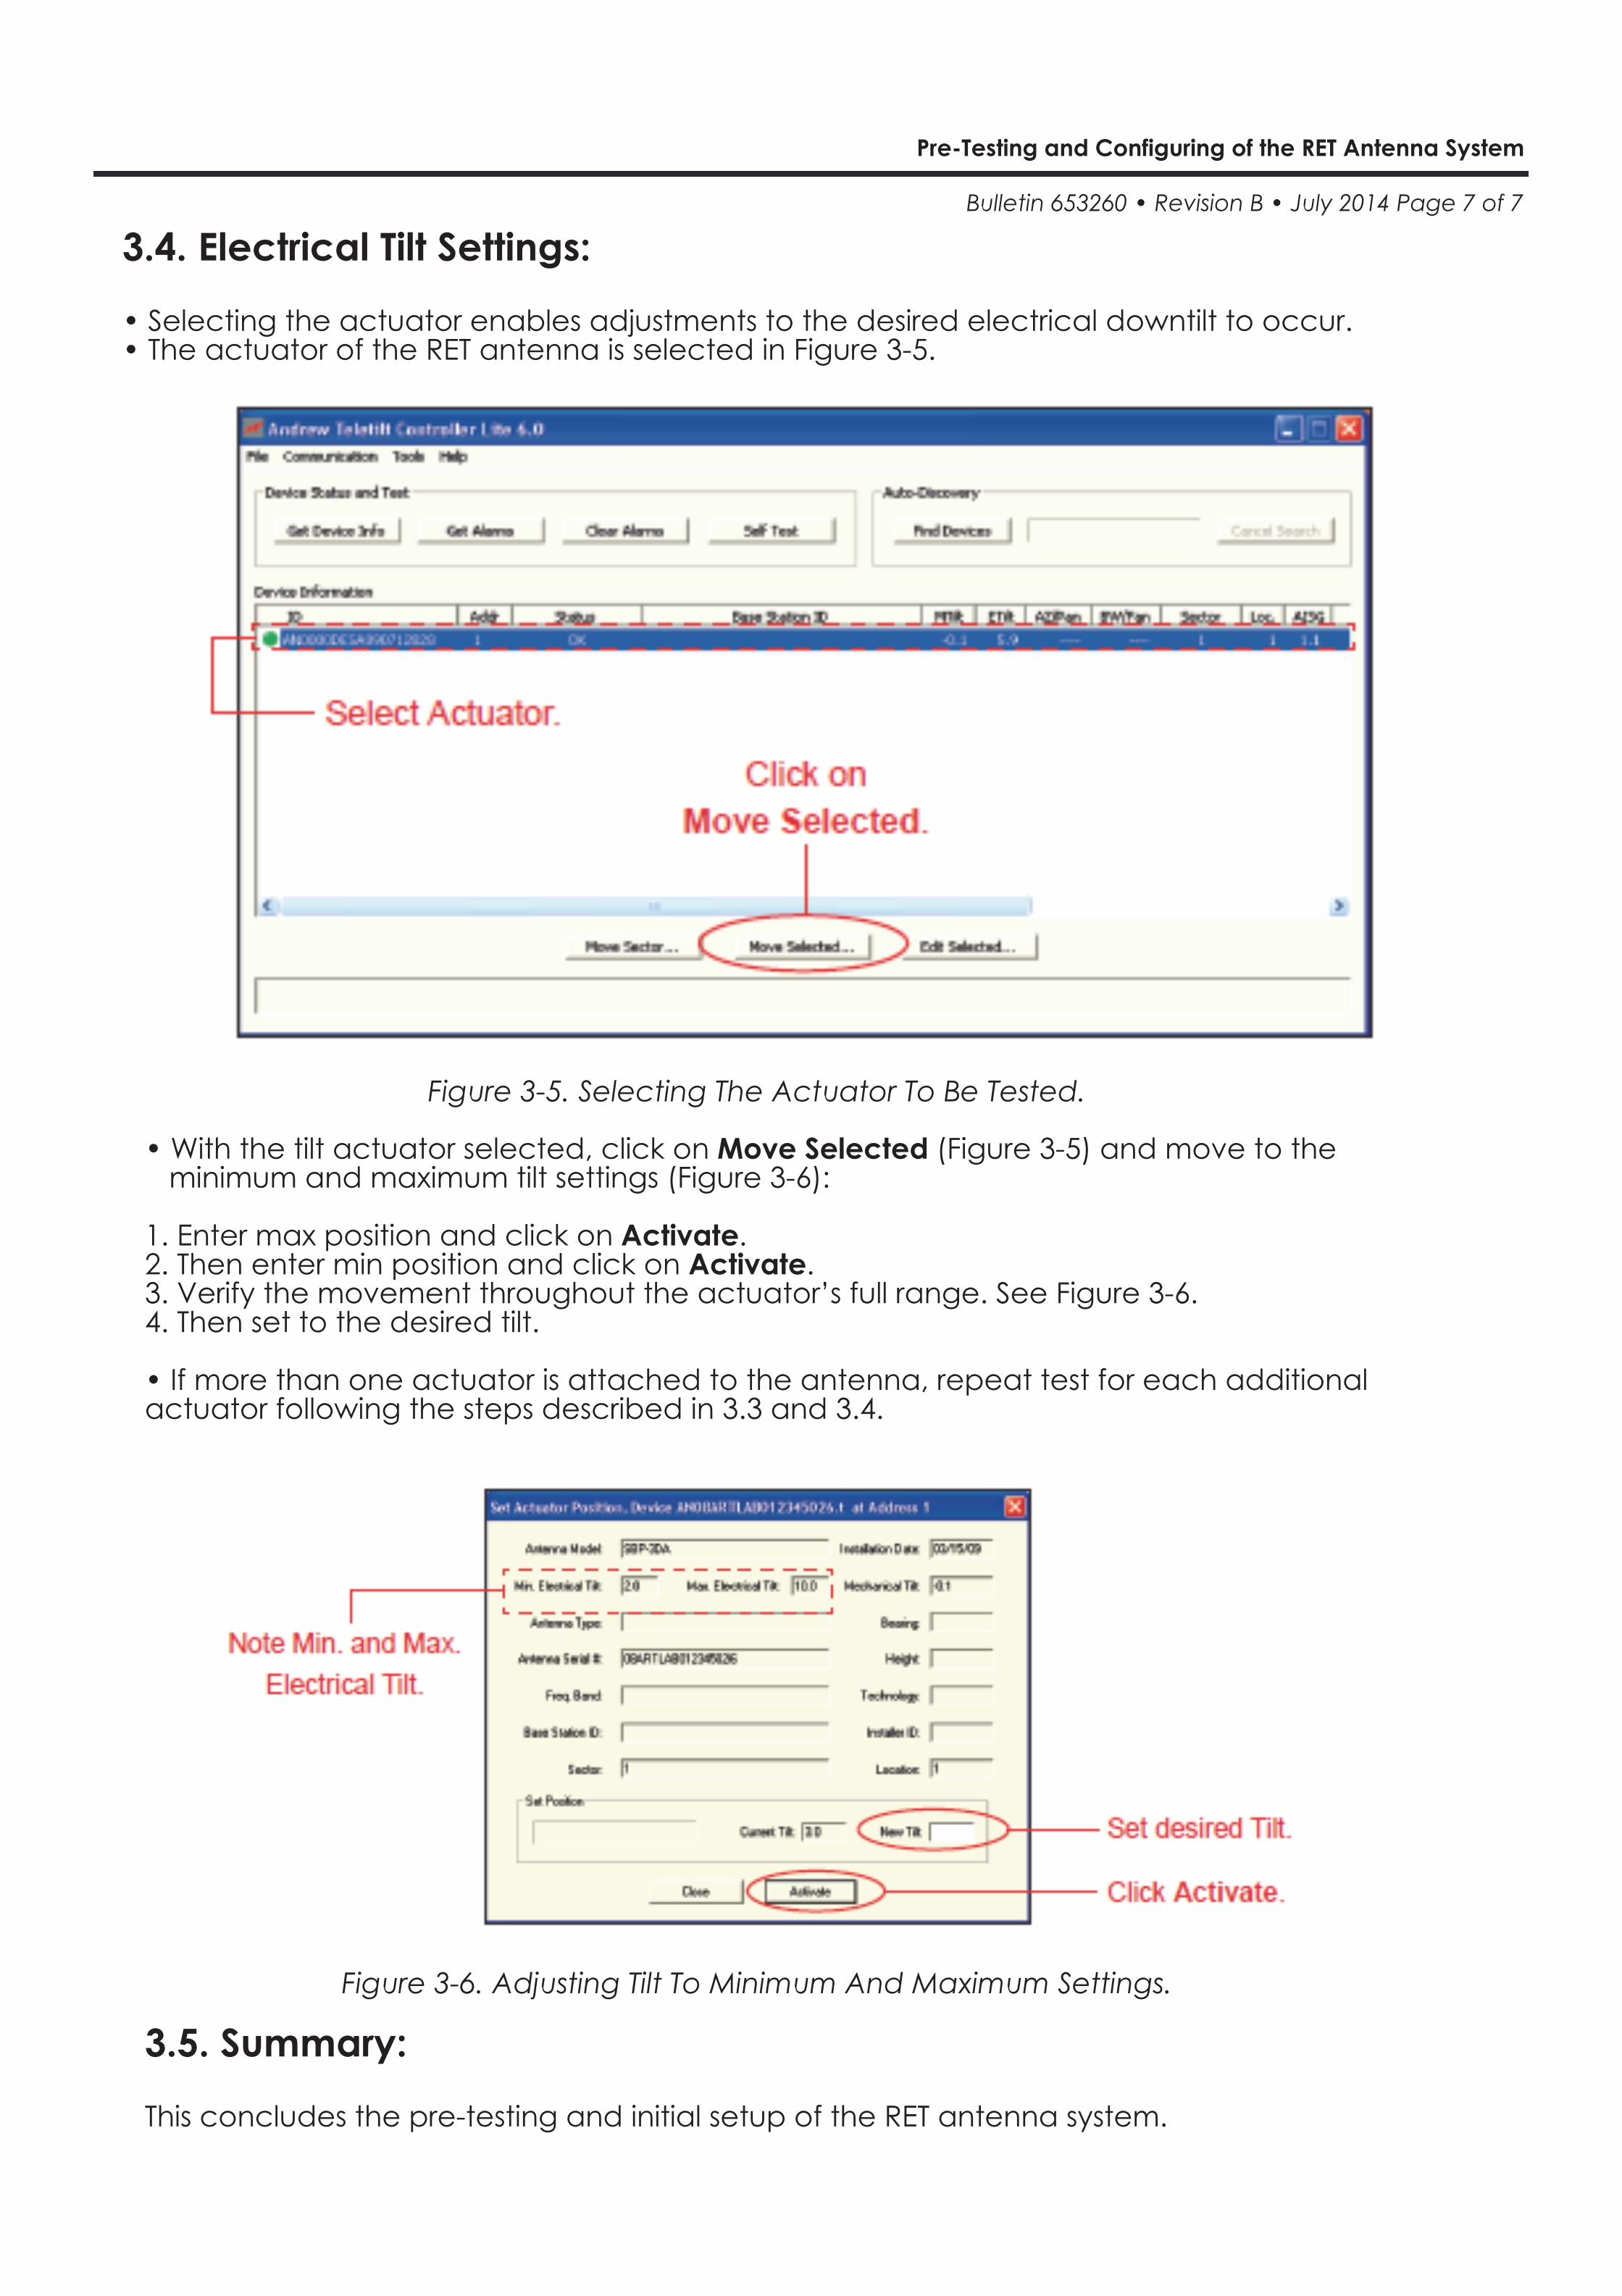
• Selecting the actuator enables adjustments to the desired electrical downtilt to occur.
• If more than one actuator is attached to the antenna, repeat test for each additional
Pre-Testing and Configuring of the RET Antenna System
actuator following the steps described in 3.3 and 3.4.
Figure 3-5. Selecting The Actuator To Be Tested.
3.4. Electrical Tilt Settings:
• The actuator of the RET antenna is selected in Figure 3-5.
Figure 3-6. Adjusting Tilt To Minimum And Maximum Settings.
Bulletin 653260 • Revision B • July 2014 Page 7 of 7
• With the tilt actuator selected, click on Move Selected (Figure 3-5) and move to the minimum and maximum tilt settings (Figure 3-6):
1. Enter max position and click on Activate. 2. Then enter min position and click on Activate.3. Verify the movement throughout the actuator’s full range. See Figure 3-6. 4. Then set to the desired tilt.
3.5. Summary:
This concludes the pre-testing and initial setup of the RET antenna system.