practice plans - west ferris ringette association · ring soccer with basic ringette rules ......
TRANSCRIPT

U12 Practice plans
This guide was completed by a group of volunteer coaches as part of an LTAD initiative. Thank you to: Tracey Tulloch, Brian Crandell, Murray Pettem, Lori Blinn

Stage: U12
Practice: # 2 (
Ice Practice)
Introduction (pre-practice) (3-5min in the dressing room) Welcome athletes.
Review procedures for safety, water breaks, etc.
Discuss goals of practice + planned drills/activities
Warm up (10-12 minutes) Drill # 1: (see practice # 2 Drill # 1 doc)
Figure 8 Laps – forwards W7-2.5.6.3
Dynamic (with movement) Stretches W7-2.5.2.2
Shoulders & Arms
Back & Sides
Hamstrings & Quadriceps
Groin & Legs (adductor/inside and abductor/outside) – bubbles between blue lines
Ankles & Caves
Snow QueenS23-3.15.2 – with variation
Drill # 2:
Ring Soccer with basic ringette rules F3-7.6
Passing over blue lines
3 in the zone
Everyone is on the ice (i.e. no lines or shifts)
If possible use two soccer balls so more players engaged
Can limit to 3-touches max if needed
Goalie General: getting up and down quickly
Positioning: finding the posts, hugging the posts
Find and Hug Posts/G4-5.4.2
Goalkeeper starts at top of crease and without looking back moves back to find the posts
Cool down (5-10min) Game of Prisoner’s Base F9-7.25
Two teams are at opposite ends of the ice. The players on one team are the police; those on the
other are the robbers. One team moves toward the other.
One person on the police team gives a signal when the robbers are relatively close, and the police
line gives chase. Prisoners are brought back to the goal line and lined up with arms linked.
If a robber approaches and touches the last person in the prisoner’s line, all are freed.
Then the alternate team approaches (reverse roles).
Post-practice wrap up) (3-5min in the dressing room)
Wrap up daily activities and prepare athletes for next ice time.
Before each athlete leaves the ice discuss what position they like playing the best
Coaches are available for questions

Drill #1
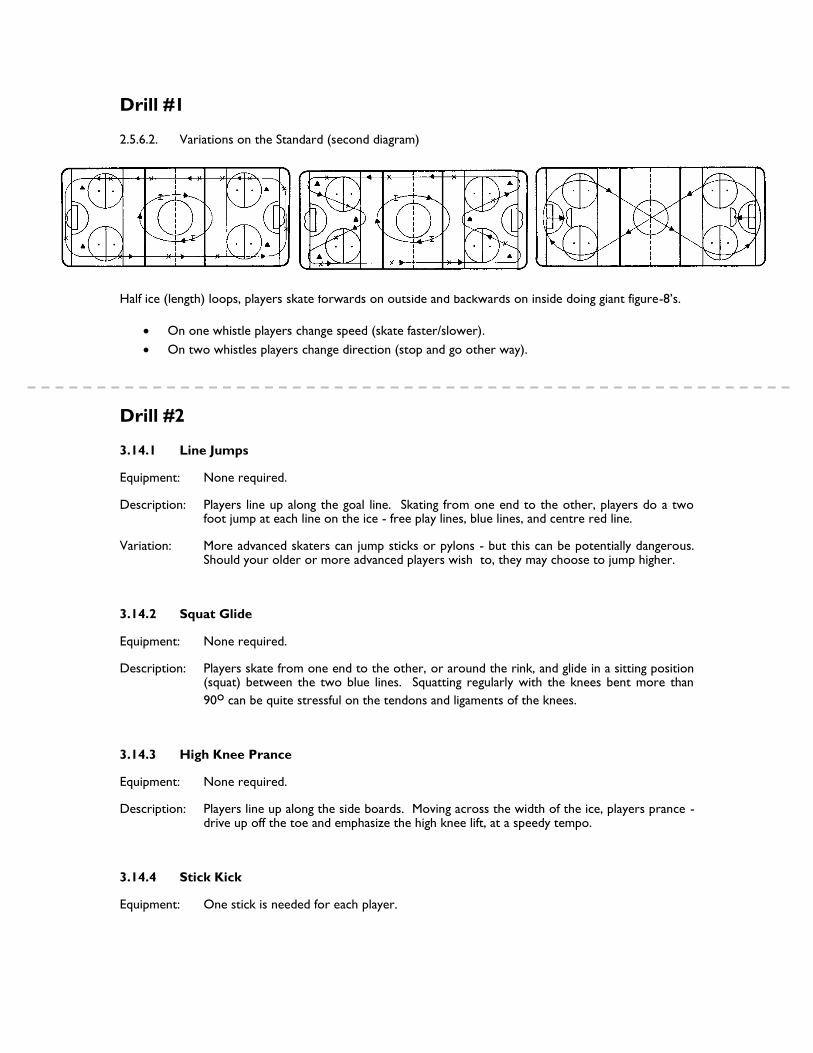
2.5.6.3. Figure eight set-up (third diagram): This is a good warm-up set-up for extra skating conditioning. Instructor/coach/demonstrator can provide comments to players at each end of the ice surface or in the middle near the crossover.
2.5.2.2 Warm-up - Stretches Description
Neck - Stretch the neck slowly, first from one side to the other, shoulder to shoulder, then forward - never back.
Shoulders - Shrug up and down. - Roll shoulder forward and backward. Arms - Bring the arm across the body and hold with the opposite hand, stretching the
triceps and shoulder. - Grasping with both hands, bring the arms above the head to stretch the triceps
and forearm.
- With both hands behind the back, grasp and stretch the biceps and deltoids.
Back - Position the feet slightly wider than the proper stance, and with the knees bent,
roll forward and touch the toes. This will stretch the lower back and hamstrings.
Sides - With one arm, reach above the head to stretch one side, then the other.
Avoid over exaggerated side bends. - Variation - Raise the stick above the head with two hands on it. Press one
hand up, then the other. Ankles - Toe in - Between the blue lines, glide on one foot (knee slightly bent) turn
the toe inward and hold for eight seconds. - Toe out - Use the same motion, but turn the toe out.
Calves - Stationary - With motion, and the feet shoulder width apart, lift the toes(supporting leg knee is slightly bent). Stretch the opposite calf.
Hamstrings - Stationary - Kneel on the ice, bring one leg out to the side with the toe pointing upward, and hold position for 8 seconds (should feel a stretch in the back of the leg and calf area). Switch legs.
Quadriceps - Stationary - Hold onto the boards with one hand and use the other hand to grasp ankle behind back. The supporting knee is bent and the back should be straight, with the knees parallel.
- Moving - Same motion, but between blue lines while gliding. - Moving - Similar to a groin stretch, the player puts the toe on ice rather than
side of foot. Groin (Adductor) - Moving - One leg is put behind the other, with the inside of the foot on the
ice. The supporting knee is bent (no more than 90°). Do not bounce.
Abductors

(outside of leg) - Moving - Similar to the quadriceps stretch, except the player grasps the foot with the opposite hand, in front of body. This is a good balance drill.
3.15.2 Snow Queen
Equipment: None required.
Description: Players start on the goal line and skate forward the length of the ice. At the first blue line, they dive forward under control and slide on their stomach (with their stick directly out in front - if carrying one). Then they get up as quickly as possible.
Variation: Same as above, except while sliding on the ice, players roll like a log, keeping control of their body (and stick) and then get up again as quickly as possible.
Drill #2
Ring Soccer with basic ringette rules F3-7.6
Passing over blue lines
3 in the zone
Everyone is on the ice (i.e. no lines or shifts)
If possible use two soccer balls so more players engaged
Can limit to 3-touches max if needed
Drill #3
4.2.1 Partner Passing
Equipment: Rings are needed.
Description: Players line up as illustrated approximately 4m. apart. Each pair has a ring and practices passing it back and forth to their partner. The type of pass may be specified by the coach.
Variation: Both partners have rings which they pass simultaneously to each other.
5.4.2 Find and Hug Posts
Equipment: None is required.
Description: The goalkeeper starts at the top of the crease. While always facing forward (not looking at posts), the goalkeeper slowly backs in to the net finding a post on either side. The goalkeeper then hugs the post. Have the goalkeeper practice the move on both sides of the net.
Drill #4
3.9.1 Board Push and Glide
Equipment: None required.
Description: Players start facing end boards. In the basic stance, push off the boards with hands and arms and glide backwards. Then come back to boards and try again. (Beginning skaters are often afraid to go backwards, this drill will take away the fear.)
3.1.6 Gliding
Equipment: None required.
Description: Skate from the end boards to the blue line and glide in basic stance between blue lines, then skate to other end.
Variation: Skate around the rink and on the whistle command, or at blue lines, glide in a basic stance.
3.10.1 Board Push and Stop
Equipment: None required.
Description: Players start facing boards and push off the boards with the hands and arms and glide in basic stance and then stop. Return to boards and repeat, gradually shortening the glide time with each push off.
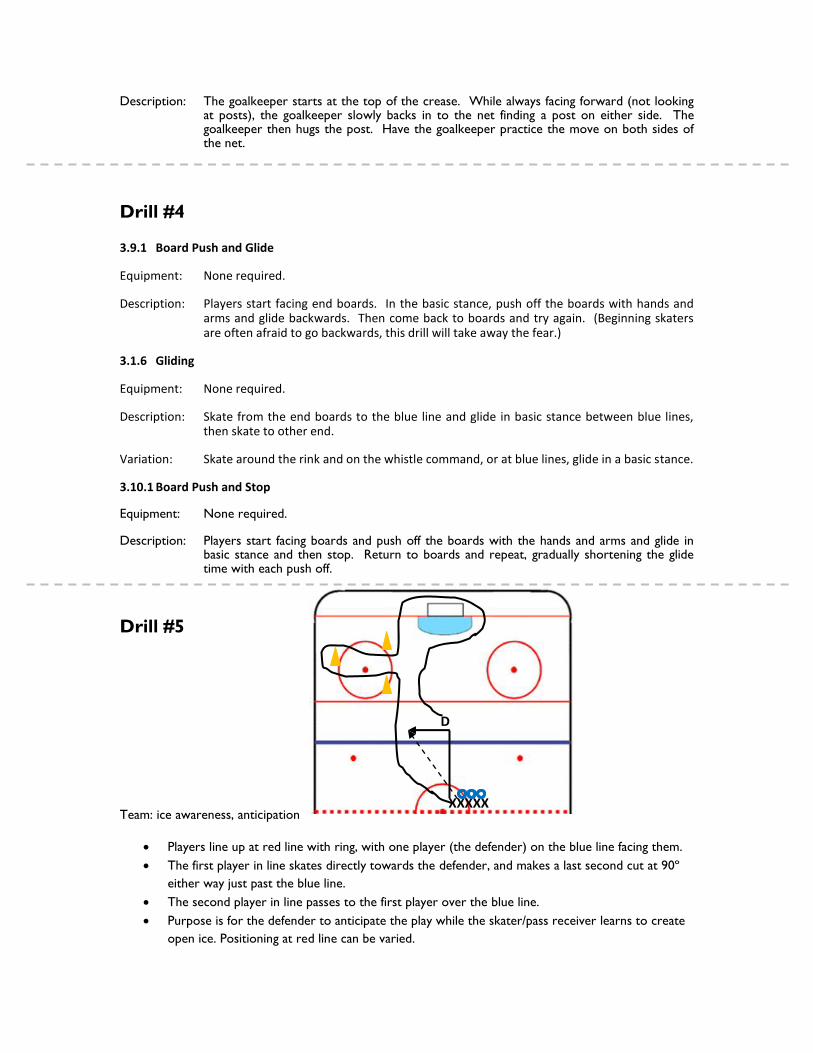
Drill #5
Team: ice awareness, anticipation
Players line up at red line with ring, with one player (the defender) on the blue line facing them.
The first player in line skates directly towards the defender, and makes a last second cut at 90º
either way just past the blue line.
The second player in line passes to the first player over the blue line.
Purpose is for the defender to anticipate the play while the skater/pass receiver learns to create
open ice. Positioning at red line can be varied.
XXXXX
D

Create drill (change defenders)
Shot on net – become D
After D – pylon course. Back to end of line
Drill #6
7.25 Prisoner's Base
Purpose: Stops, starts, and changing direction will be practiced.
Equipment: None is required.
Description: Two teams are at opposite ends of the ice. The players on one team are the police; those on the other are the robbers. One team moves toward the other. One person on the police team gives a signal. When the robbers are relatively close, and the police team gives chase. Prisoners are brought back to the goal line and lined up with arms linked. If a robber approaches and touches the last person in the prisoner line, all are freed. Then the alternate team approaches.
POLICE
ROBBERS
JAIL

Stage: U12
Practice: # 3 (
Ice Practice)
Introduction (pre-practice) (3-5min in the dressing room) Welcome athletes.
Review procedures for safety, water breaks, etc.
Discuss goals of practice + planned drills/activities
Warm up (10-12 minutes) Drill #1: Skating drills: forwards
Circles S16-3.11.5
Circles
Tight turns on dots – 1 foot slalom (add)
Stops on dots
Drill #2: Stretching – Agility / Balance / Coordination (ABC’S) of Warm-Up
Agility Skating S22-3.15
Knee Drop
Snow Queen
Hop
Wide Crossovers
Skiing
Inside Edges
Outside Edges
Single Leg Snaking
Drill #3: Skating & Passing
Three Person Weave R16-4.4.5
Players line up in 3 lines at one end. Player 1 starts with the ring. Player 1 passes to Player 2 who is
skating towards the centre of the ice.
Player 1 skates behind Player 2 but angles in towards the centre of the ice.
Player 2 continues to skate and passes to Player 3. Player 2 goes behind Player 3.
Player 3 passes to Player 1, and goes behind Player 1, etc.
At the other end of the ice players take a (sweep) shot on goal.
Goalie Ring: blocking, stopping
One to One/ G3-5.3.1
Cool down (5-10min) Scrimmage
Any 3 in concept
Cannot go in the zone 2x in a row
Cannot stay in the zone for more than 10 seconds
3 defenders (protecting house)
3 offensive players switch to D after full cycle of drill
Post-practice wrap up) (3-5min in the dressing room)
Wrap up daily activities and prepare athletes for next ice time.
Before each athlete leaves the ice discuss what position they like playing the best
Coaches are available for questions

Drill #1
3.11.5 Circles
Equipment: None required.
Description: Players line up in one corner of the ice. Three(3) players begin skating forward around the free pass circle closest to the boards. They complete one and one half revolutions of the circle they start on, then cross to skate 1 1/2 times around the other circle in the same end zone but in the opposite direction. They then continue to the centre circle and then the circles at the far end, alternating between clockwise and counter clockwise. Once the first 3 players have passed the starting point on the first circle, the next 3 join the drill, and so on, until all players are skating.
Variation: This drill may also be done skating backwards; and may be done facing the far end at all times, causing skaters to pivot from forward to backward and vice versa.
Drill #2
3.15 - AGILITY
3.15.1 Knee Drop
Equipment: None required.
Description: Standing in their own space, players drop to their knees (using their hands to break the fall) and get back up again as quickly as possible. Then players do the same while skating - dropping at each blue line and getting up and skating again.
Variation: This drill can also be done with players only touching one knee to the ice at a time while skating.
3.15.2 Snow Queen
Equipment: None required.
Description: Players start on the goal line and skate forward the length of the ice. At the first blue line, they dive forward under control and slide on their stomach (with their stick directly out in front - if carrying one). Then they get up as quickly as possible.
Variation: Same as above, except while sliding on the ice, players roll like a log, keeping control of their body (and stick) and then get up again as quickly as possible.

3.15.3 Hop the Stick
Equipment: One stick for every two players is needed.
Description: In pairs in their own space on the ice, one partner is the sweeper and the other is the hopper. The sweeper is on two knees holding the stick pointing outward in one or two hands. With the stick on the ice, the sweeper moves it back and forth like a windshield wiper. The hopper has to jump over the stick one foot at a time (like skipping), while trying to keep the head up and eyes straight ahead. Partners then switch roles and repeat the drill.
3.15.4 Mirror Drill
Equipment: None required.
Description: In partners, the two face each other. One is the leader and the other the follower. The leader moves forward, backward, side to side, jumps, falls to knees, to stomach, rolls over, etc. Any combination of these can be used while the follower mimics each of the moves. Then the partners switch roles and continue the drill.
Variation: This drill can also be done as a large group, with the instructor as the leader. Using signals, the leader stands facing the players who are spread out in their own space, and points to what the players are to do.
3.15.5 Wide Crossovers
Equipment: None required.
Description: While skating either the length of the ice or around the rink, players lift one leg high to the side, then cross it over the other leg. When that leg touches down on the ice, the other leg is lifted and repeats the movement of the first leg. This is a continuous movement. The intent is to use the outside edges of the skate blades as much as possible.
Variation: This drill can also be done skating backwards.
3.15.6 Skiing
Equipment: None required.
Description: While moving from one end to the other or around the ice, players keep both feet together and cut the ice pushing with their heels on one side then the other in a parallel skiing motion. Both feet stay on the ice at all times.
Variation: Once proficient in skiing, moguls can be added so that after each cut the player does a two foot hop before cutting the other way. This is a difficult movement requiring good leg strength.

3.15.7 Inside Edges
Equipment: None required.
Description: While moving from one end to the other or around the ice, players first push once with their left foot and glide on the inside edge of their right foot in a semi-circle to the left. When they get back to the middle, they push once with their right foot and then glide on the inside edge of their left foot in a semi-circle to the right, and repeat the drill. This is a continuous movement.
Variation: This drill can be done backwards as well.
3.15.8 Outside Edges
Equipment: None required.
Description: While moving from one end to the other or around the ice, players first push once with their right foot and glide on their left foot outside edge in a semi-circle to the left. Then when they get back to the middle, they push once with their left foot and glide on the outside edge of their right foot in a semi-circle to the right. Then the drill is repeated in a continuous motion.
Variation: This drill can be done backwards as well.
3.15.9 Single Leg Snaking
Equipment: None required.
Description: While skating forward, players lift one leg off the ice. The supporting leg, well flexed, continues to push, alternating from inside to outside edge, in a snaking motion. The other leg can help with momentum by swinging it in the direction of travel.
Variation: Once proficient, this drill can be done backwards.
Drill #3
4.4.5 Weave
Equipment: Rings are required.
Description: Players line up in 3 lines at one end. Player 1 starts with the ring, Player 1 passes to Player 2 who is skating towards the centre of the ice. Player 1 skates behind Player 2 but angles in towards the centre of the ice. Player 2 continues to skate and passes to Player 3. Player 2 goes behind Player 3. Player 3 passes to Player 1, and goes behind Player 1, etc.
Variation: Players may shoot on goal.

Drill #4
4.10.1 Stationary Shooting
Equipment: Rings are needed.
Description: Players spread out around ice surface and practice against the boards. Watch for proper technique.
4.10.3 4 Corners
Equipment: Rings/Pylons are required.
Description: Players line up in four lines (in the shape of a square) at one end. Rings start with Player 1. Player 1 passes to Player 2; Player 2 to Player 3; and Player 3 to Player 4 who is skating towards the net and shoots. All players follow their pass to a new line. Players may stay stationary to start, then encourage players to skate towards the pass.
5.2.4 Pylon Course
Equipment: Approximately 12 pylons are required.
Description: Set up the pylons in two parallel lines about 3 meters apart. Goalkeepers start at one end and go through the pylons in a zig zag pattern with the instructor specifying which actions (shuffle right, telescope forward, T-push left, etc.) are to be done while completing the course.

Drill #5
3.9.3 "C" Cut and Glide
Equipment: None required.
Description: Players start in one corner. Travelling backwards along the goal line, players push with one foot in a "C" cut and then glide in basic stance for a 3 count. Then they push with the other foot and glide for a 3 count. This pattern continues, trying to travel in a straight line, along the goal line, then back along the next blue line, down the other blue line, and back along the far end goal line.
Drill #6
3.10.1 Board Push and Stop
Equipment: None required.
Description: Players start facing boards and push off the boards with the hands and arms and glide in basic stance and then stop. Return to boards and repeat, gradually shortening the glide time with each push off.
Drill #7
Defensive Triangle
The objective of the defensive triangle is to keep the offense out of the "slot" (the area in front of the goal). Ultimately, the triangle will make it more difficult for the opposition to score. The defensive player closest to the ring carrier will always be the apex of the triangle while the other two defencemen form the base. Defencemen should try to keep opponents to the outside and not let them into the centre of the triangle.
6.5.1 Passive Defences
Passive implies that generally it is a formation which waits for opposition to attack. This is most effective against teams that pass frequently when in the offensive zone.
6.5.1.1 - Triangle Defence
Equipment: None is needed.
Description: The triangle is larger when the opposition is further from the goal. The triangle gets smaller, or tighter, as the opposition gets closer to the goal. It is important for the defenders at the base of the triangle to watch for the opposition at the side of net so as to avoid shots from the side, or passes across the crease. It is also important to avoid screening the goalkeeper. To practice group movement within the triangle simply utilize offensive players by passing and skating with the ring, within the zone. Emphasize that the triangular position should be maintained while the players move.
Purpose: This is used to protect the slot area.
6.5.1.2 - Inverted Triangle

Equipment: None is needed.
Description: The triangle gets smaller or tighter as the opponent gets closer to net. The object is to block the shot and not give the shooter much of the net to shoot for. The goalkeeper should move out of the crease in order to reduce the shooter's angle.
Purpose: To defend against teams that generally shoot rather than pass.
6.5.1.3 - Wall Defence
Equipment: None is needed.
Description: The defender in the middle should attempt to get in front of the shooter. The other two defenders should move closer in an attempt to force the shooter off to the side (Note: This type of defense does not provide any depth, only breadth).
Purpose: This is the system used to form a barrier in front of the shooter.
Drill #8
Tactical – Offensive
Team: any 3 in concept.
First 3 in race
Drill #9
Scrimmage
Any 3 in concept
Cannot go in the zone 2x in a row
Cannot stay in the zone for more than 10 seconds
3 defenders (protecting house)
3 offensive players switch to D after full cycle of drill

Stage: U12
Practice: # 4 (
Ice Practice)
Introduction (pre-practice) (3-5min in the dressing room) Welcome athletes.
Review procedures for safety, water breaks, etc.
Discuss goals of practice + planned drills/activities
Warm up (10-12 minutes) Drill #1: Skating Drill
Circles (variation on dots) S16-3.11.5
Stop & Starts: stop on dots using specific skate edge
Tight turns on dots, starting with shoulder
Drill #2: Stretching – Agility / Balance / Coordination (ABC’S) of Warm-Up
Balance Skating S20-3.14
Line Jumps
Squat Glide
High Knee Prance
Stick Kick
One Foot Glide
On Your Toes
The Cork Screw
Drill #3: Passing with Partner around ice
Skating Partner PassingS12-4.3.5
Skaters in partners, passing back and forth as they skate around the ice surface
Can use board passes and lead passes, making sure to maintain positioning
Communication should be encouraged
Goalie Mobility (lateral): shuffle, t-push and glide
Pylon course/G2-5.2.4
Mobility (forward and backward): push & glide
Cool down (5-10min) Push Pull Game with Sticks
Partner Pull / Horse and Buggy S4-3.3.2
Partner Push 3.4.4
Edge control - focus on using inside or outside edge
Low center of gravity & wide base of support
Knees bent
Post-practice wrap up) (3-5min in the dressing room) Wrap up daily activities and prepare athletes for next ice time.
Before each athlete leaves the ice discuss what position they like playing the best
Coaches are available for questions

Drill #1
3.11.5 Circles
Equipment: None required.
Description: Players line up in one corner of the ice. Three (3) players begin skating forward around the
free pass circle closest to the boards. They complete one and one half revolutions of the circle they start
on, then cross to skate 1 1/2 times around the other circle in the same end zone but in the opposite
direction. They then continue to the centre circle
Drill #2
3.14 - BALANCE
3.14.1 Line Jumps
Equipment: None required.
Description: Players line up along the goal line. Skating from one end to the other, players do a two foot jump at each line on the ice - free play lines, blue lines, and centre red line.
Variation: More advanced skaters can jump sticks or pylons - but this can be potentially dangerous. Should your older or more advanced players wish to, they may choose to jump higher.
3.14.2 Squat Glide
Equipment: None required.
Description: Players skate from one end to the other, or around the rink, and glide in a sitting position (squat) between the two blue lines. Squatting regularly with the knees bent more than
90o can be quite stressful on the tendons and ligaments of the knees.
3.14.3 High Knee Prance
Equipment: None required.
Description: Players line up along the side boards. Moving across the width of the ice, players prance - drive up off the toe and emphasize the high knee lift, at a speedy tempo.
3.14.4 Stick Kick
Equipment: One stick is needed for each player.
Description: While skating from one end to the other or around the ice, players hold their stick out in front at shoulder height and slowly kick one leg at a time up to meet the end of the stick. This is a controlled movement, not a quick snap.

3.14.5 One Foot Glide
Equipment: None required.
Description: Players skate from one end to the other or around the ice, and glide on one foot between the blue lines or free play lines, maintaining control of their body.
Variation: More advanced players can also try to jump the lines on one foot.
3.14.7 On Your Toes
Equipment: None required.
Description: Players line up along the side boards. Moving across the width of the ice, the players first walk on their toes. Then after becoming proficient at that, players run on their toes.
Variation: This drill may be repeated with players walking and then running on their heels.
3.14.8 The Cork Screw
Equipment: None required.
Description: Players stand in their own space, lift one leg slightly off the ice and turn 180° (1/2 turn), then turn back again. Alternate the direction and leg.
Drill #3
4.3.5 Skating Partner Passing
Equipment: Rings are required.
Description: Players start at one end. Players skate around ice passing back and forth while skating together. Encourage players to make as many passes as possible.
Drill #4
4.2.3 Diagonal Passing
Equipment: Rings are needed.

Description: Players line up as illustrated. Rings are placed at the end of one line. The player closest to the rings passes the ring to the player in the opposite line. That player receives the ring and passes to the second player in the opposite line. Players continue passing the ring back and forth down the line. After a brief pause, the first player passes another ring in the same manner. Repeat from the other end once all the rings have been passed through the drill.
5.3.1 One to One
Equipment: A net or two pylons and five rings to every goalkeeper are needed.
Description: With one shooter for every goalkeeper, the shooter stands in the slot and shoots rings at the goalkeeper who practices the following.
Variations: Cushioning - the shot comes at the stick on the ice and the goalkeeper cushions the ring to keep it in the crease.
Deflecting - the shot comes on the ice to either side of the goalkeeper and the stick is used to deflect the ring to the corners.
Clearing - the shot comes on the ice and the goalkeeper stops it then uses the stick to clear it to a specific target.
Drill #5
3.15.7 Inside Edges
Equipment: None required.
Description: While moving from one end to the other or around the ice, players first push once with their left foot and glide on the inside edge of their right foot in a semi-circle to the left. When they get back to the middle, they push once with their right foot and then glide on the inside edge of their left foot in a semi-circle to the right, and repeat the drill. This is a continuous movement.
Variation: This drill can be done backwards as well.
3.15.8 Outside Edges
Equipment: None required.
Description: While moving from one end to the other or around the ice, players first push once with their right foot and glide on their left foot outside edge in a semi-circle to the left. Then when they get back to the middle, they push once with their left foot and glide on the outside edge of their right foot in a semi-circle to the right. Then the drill is repeated in a continuous motion.

Variation: This drill can be done backwards as well.
3.6.3 W-Drill
Equipment: None required.
Description: Players line up in one corner. The first player skates to the blue line at the opposite boards, stops, and then skates back across to the red line at the other side, stops, then back to the opposite side blue line, stops, and back to opposite side corner and stops. Player always stop facing the direction they are travelling down the ice. Allow sufficient space between players to perform the stop correctly.
Variation: More advanced players can have 2 groups going at once, starting in opposite corners (head up to avoid collision). Try using the free play lines as additional stopping points. This drill can also be done skating backwards.
Drill #6
6.4.3 Deep Centre Breakout
Equipment: None is required.
Description: This drill can be done using both ends of the ice surface. The coach should position players and walk through the drill pattern as the play progresses. Start the drill slowly and position all players as outlined in the diagram. The centre starts from centre ice at blue lines, and moves into either corner to swing and receive a pass from the defense behind the net. The right forward (in the diagram) breaks out and fills the centre ice position to accept a pass from the centre. The centre alternates going deep into each corner while the defence also alternate handling the ring behind the net.
Purpose: The objective of the deep centre breakout is to gain possession of the ring in the centre zone.
Variation: The players can start at the centre red line and have the coach shoot the ring into defensive zone. The players skate for their respective positions as quickly as possible.
Add to this drill by using checkers and increasing the pressure on the offensive players.
Reminder: If all forwards are covered, the defense positioned in front of the net should move to the corner opposite to the centre's swing and be open for a pass.

6.4.4 High Centre Breakout
Equipment: None is needed.
Description: The coach should explain the pattern on chalkboard and walk players through the drill during on-ice demonstration. The breakout positions are identical for the forwards and defenders as in the "deep centre breakout". The exception is that the centre should attempt to skate at the proper angle to receive the pass and should also be able to quickly see the opposing defence.
Purpose: The objective of the high centre breakout is to gain possession of the ring in the centre zone.
Variations: #1 Use the same progression as in "deep centre breakout", by adding checkers to increase the pressure on the offensive players. Pressure should only be added when the players have developed adequate knowledge about the pattern and have had opportunity to work together as a unit. The coach can add variations (so can the players) if certain players are not open but the concept is to keep the pattern as simple as possible.
#2 Both ends may be used - alternate passes from one side of net to the other.
Drill #7
3.3.2 Partner Pull/Horse and Buggy
Equipment: Ringette sticks (one for each person).
Description: In partners, both players face the same direction, one standing in front of the other. Players hold two sticks between them. The front partner pulls the other, while the back partner practices snowplow stops.
Variation: For beginning skaters, the coach/instructor may need to be the puller, and can skate backwards to offer advice on technique. This drill can also be done with the front partner skating backwards.

3.4.4 Partner Push
Equipment: None required.
Description: In partners, the back player places hands on the stick of the front player and pushes that player across the ice using the inside edges.
Variation: The front partner can either glide or apply some resistance (e.g. snowplow stop) to make it more difficult.

Stage: U12
Practice: # 5 (
Ice Practice)
Introduction (pre-practice) (3-5min in the dressing room) Welcome athletes.
Review procedures for safety, water breaks, etc.
Discuss goals of practice + planned drills/activities
Warm up (10-12 minutes) Drill #1: Ship Shape F18-7.41
Bow (one end of the ice – front of the boat)
Stern (opposite end of the ice – back of the boat)
Port (the left side of the ice facing bow)
Starboard (the right side of the ice facing bow)
Man Overboard (lie down on ice and get back up quick)
Captain Aboard (stop, stand straight, and salute coach)
Swab the Deck (mopping action with ring and stick)
Mutiny (chase the coach)
Drill #2: Stretching – Agility / Balance / Coordination (ABC’S) of Warm-Up
Figure 8 Laps – forwards W7-2.5.6.3
Dynamic (with movement) Stretches W7-2.5.2.2
Shoulders & Arms
Back & Sides
Hamstrings & Quadriceps
Groin & Legs (adductor/inside and abductor/outside)
Ankles & Caves
Drill #3: Skating & Passing
Skating Zigzag (Lazy S) R15-4.4.3
Goalie Mobility (forward & backward): keeping stick flat on the ice, handling shots, cushioning the shot.
One to One/G3-5.3.1
Cool down (5-10min) True and False Game F17-7.40
The forwards cannot go in the defence zone
The goalkeeper may never pick up the ring
The goalkeeper may play the ring anywhere on the ice
A player can skate through the crease
The ring must be passed over each blue line
Post-practice wrap up) (3-5min in the dressing room) Wrap up daily activities and prepare athletes for next ice time.
Before each athlete leaves the ice discuss what position they like playing the best
Coaches are available for questions

Drill #1
7.41 Ship Shape Purpose: Carrying the ring, stopping, starting, and changing directions will be practiced. Equipment: One ring per player is needed. Description: This is a game especially for young skaters. Gather all the skaters in the centre
circle and explain the calls. Bow - one end of the ice (front of the boat). Stern - the opposite end of the ice (back of the boat.) Port - the left side of the ice (facing the bow). Starboard - the right side of the ice (facing the bow). Man Overboard - lie down on the ice, then get up. Captain Aboard - salute to the captain (coach). Swab the Deck - moving the ring and stick around like it was a mop. Mutiny - chase the coach. For example, if the instructor yells "bow", all the students skate with their rings to
the designated end of the ice and come back. When all are back or nearly back, the teacher makes another call. Continue to reinforce the skating skills, and vary the calls.
2.5.6.3. Figure eight set-up (third diagram): This is a good warm-up set-up for extra skating conditioning. Instructor/coach/demonstrator can provide comments to players at each end of the ice surface or in the middle near the crossover.
Drill #2
2.5.2.2 Warm-up - Stretches Description
Neck - Stretch the neck slowly, first from one side to the other, shoulder to shoulder, then forward - never back.
Shoulders - Shrug up and down. - Roll shoulder forward and backward. Arms - Bring the arm across the body and hold with the opposite hand, stretching the
triceps and shoulder. - Grasping with both hands, bring the arms above the head to stretch the triceps
and forearm. - With both hands behind the back, grasp and stretch the biceps and deltoids. Back - Position the feet slightly wider than the proper stance, and with the knees bent,
roll forward and touch the toes. This will stretch the lower back and hamstrings.
Sides - With one arm, reach above the head to stretch one side, then the other. Avoid over exaggerated side bends.
- Variation - Raise the stick above the head with two hands on it. Press one hand up, then the other.
Ankles - Toe in - Between the blue lines, glide on one foot (knee slightly bent) turn the toe inward and hold for eight seconds.
- Toe out - Use the same motion, but turn the toe out.

Calves - Stationary - With motion, and the feet shoulder width apart, lift the toes(supporting leg knee is slightly bent). Stretch the opposite calf.
Hamstrings - Stationary - Kneel on the ice, bring one leg out to the side with the toe pointing upward, and hold position for 8 seconds (should feel a stretch in the back of the leg and calf area). Switch legs.
Quadriceps - Stationary - Hold onto the boards with one hand and use the other hand to grasp ankle behind back. The supporting knee is bent and the back should be straight, with the knees parallel.
- Moving - Same motion, but between blue lines while gliding. - Moving - Similar to a groin stretch, the player puts the toe on ice rather than
side of foot. Groin (Adductor) - Moving - One leg is put behind the other, with the inside of the foot on the
ice. The supporting knee is bent (no more than 90°). Do not bounce. Abductors (outside of leg) - Moving - Similar to the quadriceps stretch, except the player grasps the foot with
the opposite hand, in front of body. This is a good balance drill.
Drill #3
4.4.3 Skating Zigzag
Equipment: Rings/Pylons are needed.
Description: The shaded area is the passing area. Player 1 and Player 2 are at the blue line as shown. Player 3 starts with the ring and skates towards Player 2. Player 3 passes the ring straight up the centre where Player 2 receives it. Player 2 passes to Player 1 who skates to the corner and returns along the boards to the starting position. Player 3 replaces Player 2, and Player 2 replaces Player 1. Player 4 now begins the drill.
Variation: Players may shoot on goal.

Drill #4
4.10.1 Stationary Shooting
Equipment: Rings are needed.
Description: Players spread out around ice surface and practice against the boards. Watch for proper technique.
5.3.1 One to One
Equipment: A net or two pylons and five rings to every goalkeeper are needed.
Description: With one shooter for every goalkeeper, the shooter stands in the slot and shoots rings at the goalkeeper who practices the following.
Variations: Cushioning - the shot comes at the stick on the ice and the goalkeeper cushions the ring to keep it in the crease.
Deflecting - the shot comes on the ice to either side of the goalkeeper and the stick is used to deflect the ring to the corners.
Clearing - the shot comes on the ice and the goalkeeper stops it then uses the stick to clear it to a specific target.
Drill #5
3.11.1 Circle Sculling
Equipment: None required.
Description: Players spread out evenly among the five free pass circles and start with their left foot on the circle. Pushing with their right foot only, players make hard cuts with their skate around the circle, never lifting their skate off the ice. After about 3 times around the circle, stop and change direction, pushing with their left foot while their right foot stays on the circle.
Variation: This drill can also be used for backward crossover turns.
3.11.2 Cross and Hold Position
Equipment: None required.
Description: Players spread out evenly around the 5 free pass circles and start by placing their left foot on the circle (facing counterclockwise). Using their right foot, players push 3 times and then cross their right foot well over their left foot as far as they can and hold that position

for a 3 count. Then push 3 more times and hold again. After about 3 times around the circle, stop and change direction, using the left foot to push.
3.11.4 End Zone Figure Eight
Equipment: None required.
Description: Players divide into 2 groups, half at each end of the ice. Using the 2 free pass circles in their end, players skate in a figure of eight pattern around the circles. (Around one circle once one way, and on to the other circle, skating around it the opposite way, and back to the other circle, etc.)
Variation: This drill can also be used for backward crossover turns.
Drill #6
3.6.2 Push and Stop
Equipment: None required.
Description: Players line up along the goal line (for large groups make 2 lines). All players begin by pushing with one T-push and then parallel stop facing one direction. Then push again and stop facing the other direction. Continue the length of the ice, alternating the direction of the stop.
Variation: This drill can also be done with increasing strides before stopping. Start with one stride and stop, then 2 strides and stop, then 3, etc.
3.6.6 Red Light, Green Light
Equipment: None required.
Description: One player is the "traffic light" and stands at one end facing everyone else at the other end. The traffic light yells "Green light", then turns around to face away from the skaters. Everyone skates forward. When the light yells "Red light", everyone must stop. The traffic light turns around quickly and sends anyone caught moving back to the starting position. The first player to reach the traffic light, gets to be the light in the next round.
Drill #7
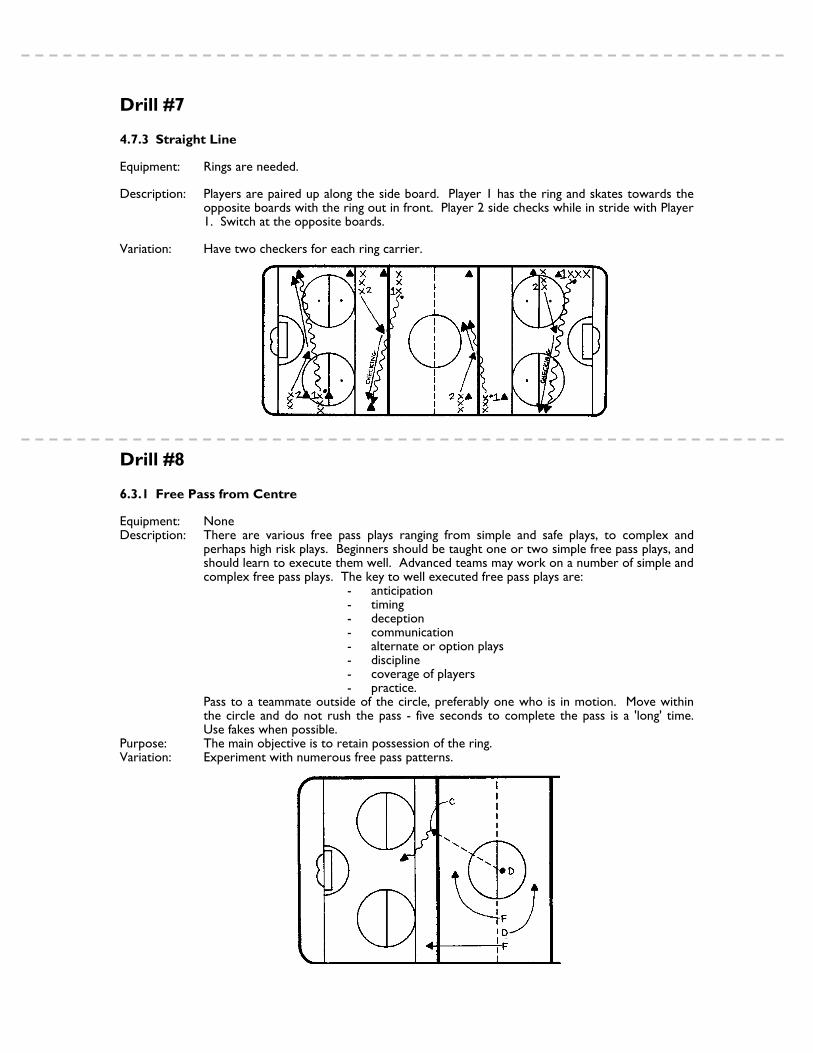
4.7.3 Straight Line
Equipment: Rings are needed.
Description: Players are paired up along the side board. Player 1 has the ring and skates towards the opposite boards with the ring out in front. Player 2 side checks while in stride with Player 1. Switch at the opposite boards.
Variation: Have two checkers for each ring carrier.
Drill #8
6.3.1 Free Pass from Centre
Equipment: None Description: There are various free pass plays ranging from simple and safe plays, to complex and
perhaps high risk plays. Beginners should be taught one or two simple free pass plays, and should learn to execute them well. Advanced teams may work on a number of simple and complex free pass plays. The key to well executed free pass plays are:
- anticipation - timing - deception - communication - alternate or option plays - discipline - coverage of players - practice. Pass to a teammate outside of the circle, preferably one who is in motion. Move within
the circle and do not rush the pass - five seconds to complete the pass is a 'long' time. Use fakes when possible.
Purpose: The main objective is to retain possession of the ring. Variation: Experiment with numerous free pass patterns.

6.3.4 High Risk Free Pass Equipment: None is needed. Description: This usually involves a long pass which is intended to create a breakaway shot on goal.
These are sometimes used at the end of a period or as a desperation effort in order to score a goal.
Purpose: The main objective is to gain a high percentage scoring opportunity. Variation: Experiment with numerous free pass patterns.
Drill #9 7.40 True and False
Purpose: Agility, stopping, and knowledge of rules will be improved. Equipment: A list of statements, to be called out by the teacher is needed. Description: There are two teams. Each team lines up on its blue line facing the other. The
coach stands at one end of the red line. One line is designated as the "false" line and the other the "true" line. The coach states a rule. If it is false, the "false" line turns and skates to the end boards.
The players on the "true" line chase after those on the "false" line. (e.g. the coach
says "the ring may be carried over the blue line." This is obviously false, so the "false" team turns and skates to its end boards with the "trues" chasing in hot pursuit. Anyone who is tagged before reaching the end red line joins the other team and the game is repeated.
Examples of statements are • the forwards cannot play in the entire defense zone • the goalkeeper may never pick up the ring • knee pads are mandatory • you may body check in Ringette • there is a blue line bordering each zone • the goalkeeper may play the ring anywhere on the ice • there must always be six skaters on the ice • goalkeeper may pick up the ring on the crease line • you may go into the crease at any time to play the ring • the ring must be passed over the blue line .

Stage: U12
Practice: # 6 (
Ice Practice)
Introduction (pre-practice) (3-5min in the dressing room)
Welcome athletes.
Review procedures for safety, water breaks, etc.
Discuss goals of practice + planned drills/activities
Warm up (10-12 minutes)
Skating drills: forwards (circles, tight turns on dots or stop on dots)
Drill #1: Circles S16-3.11.5
Include a debrief about acceleration and which is easier of the two drills
Do drills again after discussion
Drill #2: Stretching – Agility / Balance / Coordination (ABC’S) of Warm-Up
Agility Skating S22-3.15
Knee Drop
Snow Queen
Hop
Wide Crossovers
Skiing
Inside Edges
Outside Edges
Single Leg Snaking
Drill #3: Technical - Ring
Skating Passing Drill
Give and Go R14-4.4.2
Goalie
Style: Crouch
Cool down (5-10min)
Chariot Races F9-7.23
Knees bent
Low center of gravity
Acceleration and drive
Post-practice wrap up) (3-5min in the dressing room)
Wrap up daily activities and prepare athletes for next ice time.
Before each athlete leaves the ice discuss what position they like playing the best
Coaches are available for questions

Drill #1
3.11.5 Circles
Equipment: None required.
Description: Players line up in one corner of the ice. Three(3) players begin skating forward around the free pass circle closest to the boards. They complete one and one half revolutions of the circle they start on, then cross to skate 1 1/2 times around the other circle in the same end zone but in the opposite direction. They then continue to the centre circle and then the circles at the far end, alternating between clockwise and counterclockwise. Once the first 3 players have passed the starting point on the first circle, the next 3 join the drill, and so on, until all players are skating.
Variation: This drill may also be done skating backwards; and may be done facing the far end at all times, causing skaters to pivot from forward to backward and vice versa.
Drill #2
3.15 - AGILITY
3.15.1 Knee Drop
Equipment: None required.
Description: Standing in their own space, players drop to their knees (using their hands to break the fall) and get back up again as quickly as possible. Then players do the same while skating - dropping at each blue line and getting up and skating again.
Variation: This drill can also be done with players only touching one knee to the ice at a time while skating.
3.15.2 Snow Queen
Equipment: None required.
Description: Players start on the goal line and skate forward the length of the ice. At the first blue line, they dive forward under control and slide on their stomach (with their stick directly out in front - if carrying one). Then they get up as quickly as possible.
Variation: Same as above, except while sliding on the ice, players roll like a log, keeping control of their body (and stick) and then get up again as quickly as possible.

3.15.3 Hop the Stick
Equipment: One stick for every two players is needed.
Description: In pairs in their own space on the ice, one partner is the sweeper and the other is the hopper. The sweeper is on two knees holding the stick pointing outward in one or two hands. With the stick on the ice, the sweeper moves it back and forth like a windshield wiper. The hopper has to jump over the stick one foot at a time (like skipping), while trying to keep the head up and eyes straight ahead. Partners then switch roles and repeat the drill.
3.15.4 Mirror Drill
Equipment: None required.
Description: In partners, the two face each other. One is the leader and the other the follower. The leader moves forward, backward, side to side, jumps, falls to knees, to stomach, rolls over, etc. Any combination of these can be used while the follower mimics each of the moves. Then the partners switch roles and continue the drill.
Variation: This drill can also be done as a large group, with the instructor as the leader. Using signals, the leader stands facing the players who are spread out in their own space, and points to what the players are to do.
3.15.5 Wide Crossovers
Equipment: None required.
Description: While skating either the length of the ice or around the rink, players lift one leg high to the side, then cross it over the other leg. When that leg touches down on the ice, the other leg is lifted and repeats the movement of the first leg. This is a continuous movement. The intent is to use the outside edges of the skate blades as much as possible.
Variation: This drill can also be done skating backwards.
3.15.6 Skiing
Equipment: None required.
Description: While moving from one end to the other or around the ice, players keep both feet together and cut the ice pushing with their heels on one side then the other in a parallel skiing motion. Both feet stay on the ice at all times.
Variation: Once proficient in skiing, moguls can be added so that after each cut the player does a two foot hop before cutting the other way. This is a difficult movement requiring good leg strength.
3.15.7 Inside Edges
Equipment: None required.
Description: While moving from one end to the other or around the ice, players first push once with their left foot and glide on the inside edge of their right foot in a semi-circle to the left.

When they get back to the middle, they push once with their right foot and then glide on the inside edge of their left foot in a semi-circle to the right, and repeat the drill. This is a continuous movement.
Variation: This drill can be done backwards as well.
3.15.8 Outside Edges
Equipment: None required.
Description: While moving from one end to the other or around the ice, players first push once with their right foot and glide on their left foot outside edge in a semi-circle to the left. Then when they get back to the middle, they push once with their left foot and glide on the outside edge of their right foot in a semi-circle to the right. Then the drill is repeated in a continuous motion.
Variation: This drill can be done backwards as well.
3.15.9 Single Leg Snaking
Equipment: None required.
Description: While skating forward, players lift one leg off the ice. The supporting leg, well flexed, continues to push, alternating from inside to outside edge, in a snaking motion. The other leg can help with momentum by swinging it in the direction of travel.
Variation: Once proficient, this drill can be done backwards.
Drill #3
4.4.2 Give and Go
Equipment: Rings are required.
Description: Players line up in opposite corners of the ice. Stationary players are located as indicated. On the whistle, Player 1 passes to Player 2 and receives the pass back over the blue line from Player 2. Player 1 then passes to Player 3 and receives a pass over the second blue line. Player 1 then goes to the other line which has started the same drill down the opposite side of the ice.
Variation: Players may shoot on goal.

Drill #4
4.4.1 Lead Passing
Equipment: Rings are required.
Description: Players form 2 lines on either side of the goal crease. In pairs, they skate the length of the ice passing ring back and forth ahead of the receiver. The ring must be passed as soon as it is received. When reaching the other end, players return up the ice along boards and change lines.
Variation: Three lines may be used. Players may shoot on the net.
Drill #5
3.7.1 Side Steps
Equipment: None required.
Description: Players line up in one corner. Starting in the basic stance, players step one foot over the other and then bring the other foot back into basic stance again, always keeping shoulders and knees square to the opposite end boards. Continue side stepping all the way across the goal line. Then the players skate straight up the boards to the near blue line and side step along the blue line back to the other side. Continue to the next blue line, and again at the far end goal line.
Variation: More advanced players can use running/hopping side steps, and can go across the free play lines and centre line as well.
3.7.3 Line to Line
Equipment: None required.
Description: Players start on the goal line facing one side. They crossover start and skate to the next line and stop. Then crossover start again and continue to the next line and stop. This continues the complete length of the ice, always stopping and starting facing the same direction. Then they come back down the ice doing the same thing, still facing the same direction, to practice both sides.

3.4.5 Quick Step
Equipment: None required.
Description: Begin in a front start position. Lean forward and take 4 or 5 quick steps and then go into full stride. The quick steps should be pushes off inside edges with toes rotated out initially as far as possible, and body leaning forward.
3.5.2 Lengthen Strides
Equipment: None required.
Description: Skating the length of the ice, start off with short, quick strides and gradually increase to long, powerful strides.
Drill #6
Tactical – Offensive
- X1 passes to X2 and skates to X2 position
- X2 passes to X3 who shoots (X2 passes to X3)
- X3 immediately becomes defence (after playing D to end of the line)
- Then new X1, goes
- Once pass is made to X2, she has option to pass back to X1, or to X3 or to shoot.
- Quick rotation
* If they get this, then move to 2 defenses. (5 girls in rotation)
Drill #7
7.23 Chariot Race
Purpose: Development of the drive leg will be accomplished.
Equipment: A rope is required.
Description: Skaters work in threes. Those who cannot skate as well may participate in this game. Two children pull the third, who is in a squat position between them. To make grouping easier, rope may be used, rather than hands
X1
X2 X3
D

Stage: U12
Practice: # 7 (
Ice Practice)
Introduction (pre-practice) (3-5min in the dressing room)
Welcome athletes.
Review procedures for safety, water breaks, etc.
Discuss goals of practice + planned drills/activities
Warm up (10-12 minutes)
Drill #1: Skating
Standard Variations W7-2.5.6.2
Half ice (length) loops, players skate forwards on outside and backwards on inside doing giant figure-8’s.
On one whistle players change speed (skate faster/slower).
On two whistles players change direction (stop and go other way).
Drill #2: Stretching – Agility / Balance / Coordination (ABC’S) of Warm-Up
Balance Skating S20-3.14
Line Jumps
Squat Glide
High Knee Prance
Stick Kick
One Foot Glide
On Your Toes
The Cork Screw
Drill #3: Skating and Passing:
Connect the Dots S19-3.13.3
Tight turns around dots with rings
As the player comes around the dot they pass to the person coming next and be ready for a pass
back from the person in front of them
Each time call for pass
Lead in to next drill
Goalie
Mobility (forward & backward): forehand and backhand passes
Stich Handling/G4-5.3.2
Cool down (5-10min)
Power Pass F2-7.3
Purpose is to get rid of all of your team’s rings.
Players divide into two teams and each have ½ the ice, divided by the centre ice red line.
Each player has a ring and when the whistle goes, tries to get all of their team’s rings into the other
team’s half.
First team to get rid of all the rings wins.
Post-practice wrap up) (3-5min in the dressing room)
Wrap up daily activities and prepare athletes for next ice time.
Before each athlete leaves the ice discuss what position they like playing the best
Coaches are available for questions

Drill #1
2.5.6.2. Variations on the Standard (second diagram)
Half ice (length) loops, players skate forwards on outside and backwards on inside doing giant figure-8’s.
On one whistle players change speed (skate faster/slower).
On two whistles players change direction (stop and go other way).
Drill #2
3.14.1 Line Jumps
Equipment: None required.
Description: Players line up along the goal line. Skating from one end to the other, players do a two foot jump at each line on the ice - free play lines, blue lines, and centre red line.
Variation: More advanced skaters can jump sticks or pylons - but this can be potentially dangerous. Should your older or more advanced players wish to, they may choose to jump higher.
3.14.2 Squat Glide
Equipment: None required.
Description: Players skate from one end to the other, or around the rink, and glide in a sitting position (squat) between the two blue lines. Squatting regularly with the knees bent more than
90o can be quite stressful on the tendons and ligaments of the knees.
3.14.3 High Knee Prance
Equipment: None required.
Description: Players line up along the side boards. Moving across the width of the ice, players prance - drive up off the toe and emphasize the high knee lift, at a speedy tempo.
3.14.4 Stick Kick
Equipment: One stick is needed for each player.

Description: While skating from one end to the other or around the ice, players hold their stick out in front at shoulder height and slowly kick one leg at a time up to meet the end of the stick. This is a controlled movement, not a quick snap.
3.14.5 One Foot Glide
Equipment: None required.
Description: Players skate from one end to the other or around the ice, and glide on one foot between the blue lines or free play lines, maintaining control of their body.
Variation: More advanced players can also try to jump the lines on one foot.
3.14.7 On Your Toes
Equipment: None required.
Description: Players line up along the side boards. Moving across the width of the ice, the players first walk on their toes. Then after becoming proficient at that, players run on their toes.
Variation: This drill may be repeated with players walking and then running on their heels.
3.14.8 The Cork Screw
Equipment: None required.
Description: Players stand in their own space, lift one leg slightly off the ice and turn 180° (1/2 turn), then turn back again. Alternate the direction and leg.
Drill #3
3.13.3 Connect the Dots
Equipment: None required.
Description: Players line up in one corner. In a single file line, zig zagging back and forth across the width of the ice, players skate in order, performing a tight/sharp turn around each of the hockey face-off dots on the ice.

Drill #4
4.6.1 Board Passing
Equipment: Rings are needed.
Description: Players line up in opposite corners of the rink. Each player has a ring. Players skate around the ice surface passing to themselves by rebounding the ring off the boards.
Variation: Pylons may be placed 1m. from boards for players to pass around.
4.6.2 Partner Board Passing
Equipment: Rings are needed.
Description: Players line up at one end of the ice in two lines. One player has a ring. Player 2 skates ahead of Player 1. Player 1 passes off the boards to Player 2. Player 1 skates around Player 2 to get ahead to receive the ring. Once Player 1 is ahead, Player 2 will pass to Player 1, off the boards. Repeat while skating around the ice.
Drill #5
3.9.3 "C" Cut and Glide
Equipment: None required.
Description: Players start in one corner. Travelling backwards along the goal line, players push with one foot in a "C" cut and then glide in basic stance for a 3 count. Then they push with the other foot and glide for a 3 count. This pattern continues, trying to travel in a straight line, along the goal line, then back along the next blue line, down the other blue line, and back along the far end goal line.

3.8.1 Toe to Heel
Equipment: None required.
Description: Players stand with the outside of one foot flush up against the boards and hang on to the boards with their arm on the same side. The other foot will practice making "C" cuts in the ice by putting toe to toe together and pushing that foot out and around in a semi-circle until it comes nearly heel to heel with the other foot. Continue until the player gets the idea of making "C" cuts, and then change feet.
Drill #6
Technical-Defensice/Tactical-Offensive
1 on 1from corners
o Forward carries ring around pylon at same time
o At same D races around pylon and tries to check F
o When done D goes to F and F goes to D line
2 on 1 from corners
o 2 Forwards take off versus 1 D
Change to a 2 on 2
Forwards come over blue line and to have to pass back in
Drill #7
7.3 Power Pass
Purpose: This drill is to strengthen passing ability.
Equipment: One ring per player is needed.
Description: Divide the group in half. Each team is responsible for their zone, which is between the goal line and the red line. No one is able to cross the red line into the other end. Players on both teams should have one ring each: the objective of this game is to try and pass all the rings from one zone into the other team's zone. Players should spread out. The rings must remain on the ice at all times. The game begins and stops by sounding the whistle. If you wish to add more competition, explain to the teams that the group that has the least rings in their end when the whistle blows will be rewarded.
F D D F

Stage: U12
Practice: # 7 (
Ice Practice)
Introduction (pre-practice) (3-5min in the dressing room)
Welcome athletes.
Review procedures for safety, water breaks, etc.
Discuss goals of practice + planned drills/activities
Warm up (10-12 minutes)
Drill #1: Skating
Standard Variations W7-2.5.6.2
Half ice (length) loops, players skate forwards on outside and backwards on inside doing giant figure-8’s.
On one whistle players change speed (skate faster/slower).
On two whistles players change direction (stop and go other way).
Drill #2: Stretching – Agility / Balance / Coordination (ABC’S) of Warm-Up
Balance Skating S20-3.14
Line Jumps
Squat Glide
High Knee Prance
Stick Kick
One Foot Glide
On Your Toes
The Cork Screw
Drill #3: Skating and Passing:
Connect the Dots S19-3.13.3
Tight turns around dots with rings
As the player comes around the dot they pass to the person coming next and be ready for a pass
back from the person in front of them
Each time call for pass
Lead in to next drill
Goalie
Mobility (forward & backward): forehand and backhand passes
Stich Handling/G4-5.3.2
Cool down (5-10min)
Power Pass F2-7.3
Purpose is to get rid of all of your team’s rings.
Players divide into two teams and each have ½ the ice, divided by the centre ice red line.
Each player has a ring and when the whistle goes, tries to get all of their team’s rings into the other
team’s half.
First team to get rid of all the rings wins.
Post-practice wrap up) (3-5min in the dressing room)
Wrap up daily activities and prepare athletes for next ice time.
Before each athlete leaves the ice discuss what position they like playing the best
Coaches are available for questions
Drill #1
2.5.6.2. Variations on the Standard (second diagram)
Half ice (length) loops, players skate forwards on outside and backwards on inside doing giant figure-8’s.
On one whistle players change speed (skate faster/slower).
On two whistles players change direction (stop and go other way).
Drill #2
3.14.1 Line Jumps
Equipment: None required.
Description: Players line up along the goal line. Skating from one end to the other, players do a two foot jump at each line on the ice - free play lines, blue lines, and centre red line.
Variation: More advanced skaters can jump sticks or pylons - but this can be potentially dangerous. Should your older or more advanced players wish to, they may choose to jump higher.
3.14.2 Squat Glide
Equipment: None required.
Description: Players skate from one end to the other, or around the rink, and glide in a sitting position (squat) between the two blue lines. Squatting regularly with the knees bent more than
90o can be quite stressful on the tendons and ligaments of the knees.
3.14.3 High Knee Prance
Equipment: None required.
Description: Players line up along the side boards. Moving across the width of the ice, players prance - drive up off the toe and emphasize the high knee lift, at a speedy tempo.
3.14.4 Stick Kick
Equipment: One stick is needed for each player.

Description: While skating from one end to the other or around the ice, players hold their stick out in front at shoulder height and slowly kick one leg at a time up to meet the end of the stick. This is a controlled movement, not a quick snap.
3.14.5 One Foot Glide
Equipment: None required.
Description: Players skate from one end to the other or around the ice, and glide on one foot between the blue lines or free play lines, maintaining control of their body.
Variation: More advanced players can also try to jump the lines on one foot.
3.14.7 On Your Toes
Equipment: None required.
Description: Players line up along the side boards. Moving across the width of the ice, the players first walk on their toes. Then after becoming proficient at that, players run on their toes.
Variation: This drill may be repeated with players walking and then running on their heels.
3.14.8 The Cork Screw
Equipment: None required.
Description: Players stand in their own space, lift one leg slightly off the ice and turn 180° (1/2 turn), then turn back again. Alternate the direction and leg.
Drill #3
3.13.3 Connect the Dots
Equipment: None required.
Description: Players line up in one corner. In a single file line, zig zagging back and forth across the width of the ice, players skate in order, performing a tight/sharp turn around each of the hockey face-off dots on the ice.

Drill #4
4.6.1 Board Passing
Equipment: Rings are needed.
Description: Players line up in opposite corners of the rink. Each player has a ring. Players skate around the ice surface passing to themselves by rebounding the ring off the boards.
Variation: Pylons may be placed 1m. from boards for players to pass around.
4.6.2 Partner Board Passing
Equipment: Rings are needed.
Description: Players line up at one end of the ice in two lines. One player has a ring. Player 2 skates ahead of Player 1. Player 1 passes off the boards to Player 2. Player 1 skates around Player 2 to get ahead to receive the ring. Once Player 1 is ahead, Player 2 will pass to Player 1, off the boards. Repeat while skating around the ice.
Drill #5
3.9.3 "C" Cut and Glide
Equipment: None required.
Description: Players start in one corner. Travelling backwards along the goal line, players push with one foot in a "C" cut and then glide in basic stance for a 3 count. Then they push with the other foot and glide for a 3 count. This pattern continues, trying to travel in a straight line, along the goal line, then back along the next blue line, down the other blue line, and back along the far end goal line.

3.8.1 Toe to Heel
Equipment: None required.
Description: Players stand with the outside of one foot flush up against the boards and hang on to the boards with their arm on the same side. The other foot will practice making "C" cuts in the ice by putting toe to toe together and pushing that foot out and around in a semi-circle until it comes nearly heel to heel with the other foot. Continue until the player gets the idea of making "C" cuts, and then change feet.
Drill #6
Technical-Defensice/Tactical-Offensive
1 on 1from corners
o Forward carries ring around pylon at same time
o At same D races around pylon and tries to check F
o When done D goes to F and F goes to D line
2 on 1 from corners
o 2 Forwards take off versus 1 D
Change to a 2 on 2
Forwards come over blue line and to have to pass back in
Drill #7
7.3 Power Pass
Purpose: This drill is to strengthen passing ability.
Equipment: One ring per player is needed.
Description: Divide the group in half. Each team is responsible for their zone, which is between the goal line and the red line. No one is able to cross the red line into the other end. Players on both teams should have one ring each: the objective of this game is to try and pass all the rings from one zone into the other team's zone. Players should spread out. The rings must remain on the ice at all times. The game begins and stops by sounding the whistle. If you wish to add more competition, explain to the teams that the group that has the least rings in their end when the whistle blows will be rewarded.
F D D F

Stage: U12
Practice: # 8 (
Ice Practice)
Introduction (pre-practice) (3-5min in the dressing room)
Welcome athletes.
Review procedures for safety, water breaks, etc.
Discuss goals of practice + planned drills/activities
Warm up (10-12 minutes)
Drill #1: Knee tag (see practice # 8 Drill # 4 doc)
Drill #2: Stretching – Agility / Balance / Coordination (ABC’S) of Warm-Up
Figure 8 Laps – forwards W7-2.5.6.3
Dynamic (with movement) Stretches W7-2.5.2.2
Shoulders & Arms
Back & Sides
Hamstrings & Quadriceps
Groin & Legs (adductor/inside and abductor/outside)
Ankles & Caves
Drill #3: Skating: circles focusing on technique over speed
Circles S16-3.11.5
Skate two players at a time, first one has the ring.
Second player chases and checks.
When they get possession, turnover changes positions and other player becomes the checker.
Only go around circle once
Goalie
Ring: catching/trapping
Catch and Throw/G5-4.7.9
Cool down (5-10min)
Hunting the Rabbit F11-7.30
Divide players into groups of Hunters (two players linked together at elbow) and Rabbits (solo
players)
Hunters chase rabbits and when they are caught link together to keep hunting
Post-practice wrap up) (3-5min in the dressing room)
Wrap up daily activities and prepare athletes for next ice time.
Before each athlete leaves the ice discuss what position they like playing the best
Coaches are available for questions

Drill #1
Knee Tag
This exercise forces athletes to get low, be agile and be balanced all at once
Have athletes pair up and spread out in one half of the ice
On whistle, it becomes a battle to see which member of the pair can touch her partner’s knee
first
Let the athletes ‘duke it out’ for 15-20 second intervals and repeat the game 3 or 4 times
Drill #2
2.5.6.3. Figure eight set-up (third diagram): This is a good warm-up set-up for extra skating conditioning. Instructor/coach/demonstrator can provide comments to players at each end of the ice surface or in the middle near the crossover.
2.5.2.2 Warm-up - Stretches Description
Neck - Stretch the neck slowly, first from one side to the other, shoulder to shoulder,
then forward - never back.
Shoulders - Shrug up and down.
- Roll shoulder forward and backward.
Arms - Bring the arm across the body and hold with the opposite hand, stretching the
triceps and shoulder.
- Grasping with both hands, bring the arms above the head to stretch the triceps
and forearm.
- With both hands behind the back, grasp and stretch the biceps and deltoids.
Back - Position the feet slightly wider than the proper stance, and with the knees bent,
roll forward and touch the toes. This will stretch the lower back and
hamstrings.
Sides - With one arm, reach above the head to stretch one side, then the other.
Avoid over exaggerated side bends.
- Variation - Raise the stick above the head with two hands on it. Press one
hand up, then the other.

Ankles - Toe in - Between the blue lines, glide on one foot (knee slightly bent) turn the
toe inward and hold for eight seconds.
- Toe out - Use the same motion, but turn the toe out.
Calves - Stationary - With motion, and the feet shoulder width apart, lift the
toes(supporting leg knee is slightly bent). Stretch the opposite calf.
Hamstrings - Stationary - Kneel on the ice, bring one leg out to the side with the toe
pointing upward, and hold position for 8 seconds (should feel a stretch in the
back of the leg and calf area). Switch legs.
Quadriceps - Stationary - Hold onto the boards with one hand and use the other hand to
grasp ankle behind back. The supporting knee is bent and the back should be
straight, with the knees parallel.
- Moving - Same motion, but between blue lines while gliding.
- Moving - Similar to a groin stretch, the player puts the toe on ice rather than
side of foot.
Groin (Adductor) - Moving - One leg is put behind the other, with the inside of the foot on the
ice. The supporting knee is bent (no more than 90°). Do not bounce.
Abductors
(outside of leg) - Moving - Similar to the quadriceps stretch, except the player grasps the foot
with the opposite hand, in front of body. This is a good balance drill.
Drill #3
3.11.5 Circles
Equipment: None required.
Description: Players line up in one corner of the ice. Three(3) players begin skating forward around
the free pass circle closest to the boards. They complete one and one half revolutions of the circle they
start on, then cross to skate 1 1/2 times around the other circle in the same end zone but in the opposite
direction. They then continue to the centre circle

Drill #4:
4.7.8 1 on 1 Corners
Equipment: Rings are required.
Description: Players form two lines at the blue line. The instructor shoots the ring into the corner. Both Player 1 and Player 2 race to get the ring. The player who reaches the ring first is to carry it back to the blue line. The other player checks the ring carrier on the way back. Caution should be taken by the instructor to ensure that the players hold their stick across their body to avoid spearing themselves accidentally.
4.7.9 Angle Checking
Equipment: Rings are required.
Description: Players form two lines on either side of the ice. The instructor takes a shot on goal. The goalkeeper tosses the ring to Player 1, who continues around the net. Player 2 skates at an angle, and checks the ring carrier out to the free pass circle. Alternate lines.
Variation: Add one more line for double teaming.
5.5.2 Catch and Throw
Equipment: A shooter with one to five rings is required for every goalkeeper.
Description: With the shooter in the slot and the goalkeeper in the crease, the shooter takes light flip shots. The goalkeeper catches the ring with the glove hand and then throws it, on the ice, back to the shooter. Have the shooter move around providing the goalkeeper with a good target.

Any of the shooting drills which provide the goalkeeper with many shots in succession are excellent for developing goalkeeping skills. When training goalkeepers, it is important to stress technique early in their development. Once good technique is established, rapid succession shooting drills will improve reaction time. It is important that goalkeepers develop a good balance between reaction time (reflexes) and technique (skills).
Variations can be added to the shooting drills to work on specific goalkeeping skills. For example:
1) doing the drill without a stick to work on using the feet and upper body more
2) dropping into butterfly position between each shot
3) moving back to hug the post between shots
4) for longer time periods between shots - shuffle to the boards and back, telescope out to the free play line and retreat, do a slide save and stack the pads to each side, or slide the stick over to the boards then go pick it up and get back into position.
There are many constructive practice drills a goalkeeper can do while the skaters are working on something that doesn't involve shooting, and even during scrimmages, which can help to develop skills at a faster rate. All it takes is a little creativity and pre-planning by the instructor or coach with a quick explanation and some encouragement for the goalkeeper.
Drill #5
3.11.1 Circle Sculling
Equipment: None required.
Description: Players spread out evenly among the five free pass circles and start with their left foot on the circle. Pushing with their right foot only, players make hard cuts with their skate around the circle, never lifting their skate off the ice. After about 3 times around the circle, stop and change direction, pushing with their left foot while their right foot stays on the circle.
Variation: This drill can also be used for backward crossover turns.
3.11.2 Cross and Hold Position
Equipment: None required.
Description: Players spread out evenly around the 5 free pass circles and start by placing their left foot on the circle (facing counterclockwise). Using their right foot, players push 3 times and then cross their right foot well over their left foot as far as they can and hold that position for a 3 count. Then push 3 more times and hold again. After about 3 times around the circle, stop and change direction, using the left foot to push.
3.11.3 Partner Turn
Equipment: Sticks (one for every 2 players) are needed.
Description: In partners, each holds on to an opposite end of a stick. One player stands in one spot and will serve as the axis of a circular pattern. The other player skates around the partner while holding the stick with both hands, crossing over both feet while turning. After a number of revolutions, stop and change direction, and then switch roles.

Variation: This drill can also be used for backward crossover turns.
3.11.4 End Zone Figure Eight
Equipment: None required.
Description: Players divide into 2 groups, half at each end of the ice. Using the 2 free pass circles in their end, players skate in a figure of eight pattern around the circles. (Around one circle once one way, and on to the other circle, skating around it the opposite way, and back to the other circle, etc.)
Variation: This drill can also be used for backward crossover turns.
Drill #6
D to G to D
- Coach shoots ring into corner
- D gets extra step and passes to G, G to D
F covers and then plays D as D passes to coachB and gets pass back after going around coachB
Drill #7
6.5.3.1 - In the Offensive Zone
Equipment: None is required.
Description: Anticipation is the key. Cover all players including the goalkeeper's space. Watch out for
'sleepers'. Stay between your check and your goal. Cover both sides of the circle. Anticipate where open ice may be. Don't 'concede' the free pass. Anticipate open ice and the pattern of potential receivers. To practice simply attempt free passes alternating players doing the passing and the direction of the pass.
CA
CB F D
G
(
(
(
)
)
)

6.5.3.2 - In the Neutral Zone
Equipment: None is required.
Description: Play one on one (i.e. defence cover forwards, forwards cover defence, centre covers centre). Don't 'concede' the pass. Attempt to force a long pass. Stay between your check and your goal. To practice simply attempt free passes alternating players doing the passing and the direction of the pass.
6.5.3.3 - In the Defensive Zone
Equipment: None is needed.
Description: Guard the "slot" but also be ready for a shot on goal. Protect the ice space between the free pass circle and your goal. 'Concede' the deep and high corners of the zone. Defence players cover the forwards. Goalkeeper must cover the angles. Anticipate open ice and look for the potential receiver. Stay between your check and your goal. To practice, simply attempt free passes alternating players doing the passing and the direction of the pass.
Drill #8
7.30 Hunting the Rabbit
Purpose: Agility will be improved. Equipment: None is required. Description: This game is especially good for younger skaters. No sticks or gloves are needed.
For this game you need hunters (two players skating hand in hand), and rabbits (solitary skaters). Have one rabbit for every hunter. The idea is for the hunters to work together to capture the rabbit in their net (join both hands with rabbit inside). Change the rabbits and hunters frequently.

Stage: U12
Practice: # 9 (
Ice Practice)
Introduction (pre-practice) (3-5min in the dressing room)
Welcome athletes.
Review procedures for safety, water breaks, etc.
Discuss goals of practice + planned drills/activities
Warm up (10-12 minutes)
Drill #1: Skating: tight turns on dots
Connect the Dots S19-3.13.3
Skating: ½ pivots on dots (always facing same boards)
Drill #2: Stretching – Agility / Balance / Coordination (ABC’S) of Warm-Up
Agility Skating S22-3.15
Knee Drop
Snow Queen
Hop
Wide Crossovers
Skiing
Inside Edges
Outside Edges
Single Leg Snaking
Drill #3: Skating & Shooting Drill
Horseshoe (Butterfly or ½ Ice Philly) S20-3.14
Adapted to full ice drill using wrist shots
Goalie
Positioning: triangle
Cool down (5-10min)
Scrimmage G20-7.45
Post-practice wrap up) (3-5min in the dressing room)
Wrap up daily activities and prepare athletes for next ice time.
Before each athlete leaves the ice discuss what position they like playing the best
Coaches are available for questions

Drill #1
3.13.3 Connect the Dots
Equipment: None required.
Description: Players line up in one corner. In a single file line, zig zagging back and forth across the width of the ice, players skate in order, performing a tight/sharp turn around each of the hockey face-off dots on the ice.
Drill #2
3.15.1 Knee Drop
Equipment: None required.
Description: Standing in their own space, players drop to their knees (using their hands to break the fall) and get back up again as quickly as possible. Then players do the same while skating - dropping at each blue line and getting up and skating again.
Variation: This drill can also be done with players only touching one knee to the ice at a time while skating.
3.15.2 Snow Queen
Equipment: None required.
Description: Players start on the goal line and skate forward the length of the ice. At the first blue line, they dive forward under control and slide on their stomach (with their stick directly out in front - if carrying one). Then they get up as quickly as possible.
Variation: Same as above, except while sliding on the ice, players roll like a log, keeping control of their body (and stick) and then get up again as quickly as possible.
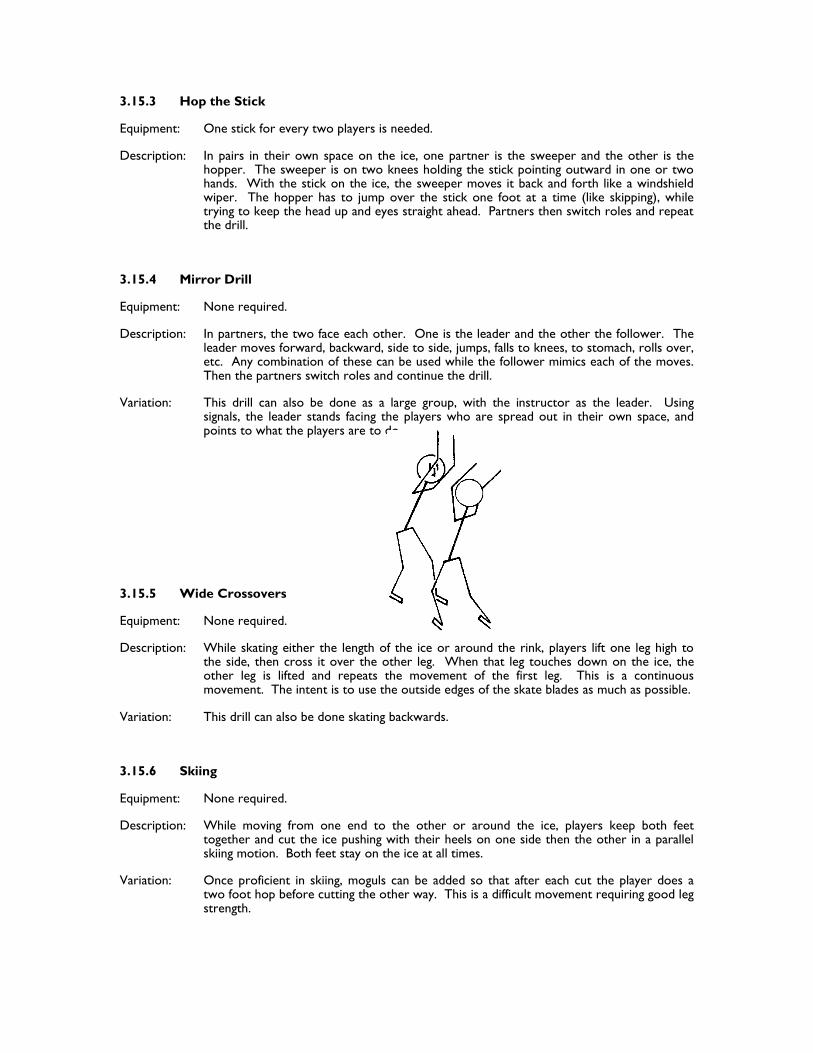
3.15.3 Hop the Stick
Equipment: One stick for every two players is needed.
Description: In pairs in their own space on the ice, one partner is the sweeper and the other is the hopper. The sweeper is on two knees holding the stick pointing outward in one or two hands. With the stick on the ice, the sweeper moves it back and forth like a windshield wiper. The hopper has to jump over the stick one foot at a time (like skipping), while trying to keep the head up and eyes straight ahead. Partners then switch roles and repeat the drill.
3.15.4 Mirror Drill
Equipment: None required.
Description: In partners, the two face each other. One is the leader and the other the follower. The leader moves forward, backward, side to side, jumps, falls to knees, to stomach, rolls over, etc. Any combination of these can be used while the follower mimics each of the moves. Then the partners switch roles and continue the drill.
Variation: This drill can also be done as a large group, with the instructor as the leader. Using signals, the leader stands facing the players who are spread out in their own space, and points to what the players are to do.
3.15.5 Wide Crossovers
Equipment: None required.
Description: While skating either the length of the ice or around the rink, players lift one leg high to the side, then cross it over the other leg. When that leg touches down on the ice, the other leg is lifted and repeats the movement of the first leg. This is a continuous movement. The intent is to use the outside edges of the skate blades as much as possible.
Variation: This drill can also be done skating backwards.
3.15.6 Skiing
Equipment: None required.
Description: While moving from one end to the other or around the ice, players keep both feet together and cut the ice pushing with their heels on one side then the other in a parallel skiing motion. Both feet stay on the ice at all times.
Variation: Once proficient in skiing, moguls can be added so that after each cut the player does a two foot hop before cutting the other way. This is a difficult movement requiring good leg strength.

3.15.7 Inside Edges
Equipment: None required.
Description: While moving from one end to the other or around the ice, players first push once with their left foot and glide on the inside edge of their right foot in a semi-circle to the left. When they get back to the middle, they push once with their right foot and then glide on the inside edge of their left foot in a semi-circle to the right, and repeat the drill. This is a continuous movement.
Variation: This drill can be done backwards as well.
3.15.8 Outside Edges
Equipment: None required.
Description: While moving from one end to the other or around the ice, players first push once with their right foot and glide on their left foot outside edge in a semi-circle to the left. Then when they get back to the middle, they push once with their left foot and glide on the outside edge of their right foot in a semi-circle to the right. Then the drill is repeated in a continuous motion.
Variation: This drill can be done backwards as well.
3.15.9 Single Leg Snaking
Equipment: None required.
Description: While skating forward, players lift one leg off the ice. The supporting leg, well flexed, continues to push, alternating from inside to outside edge, in a snaking motion. The other leg can help with momentum by swinging it in the direction of travel.
Variation: Once proficient, this drill can be done backwards.
Drill #3
Skating & Shooting Drill
Horseshoe (Butterfly or ½ Ice Philly) S20-3.14
Using wrist shots
XXXXXX XXXXXX

Drill #4
4.10.1 Stationary Shooting
Equipment: Rings are needed.
Description: Players spread out around ice surface and practice against the boards. Watch for proper technique.
4.10.2 Quick Shot
Equipment: Rings are needed.
Description: Players are paired and spread out over the ice surface. Each pair has 3-4 rings. Player 1 passes to Player 2 who receives the ring and takes a quick shot. Emphasize quick release and suitable shots.
Drill #5
3.12.1 Step Turns
Equipment: None required. Description: Players spread out along the blue line. On the spot, players walk through the steps of
pivoting from forward to backward and vice versa.

3.12.3 Flower Drill Equipment: None required.
Description: Players divide into 4 groups, one in each corner. The first player in each group skates toward the centre free pass circle, pivoting from forward to backward at the free play line, and stops at the circle. Skating forwards to the nearest side boards, the player pivots to go backward towards their group, and pivots at the free play line again to skate forward to rejoin their group. Once they are finished (or sooner, depending on numbers), the next person in each group takes a turn, and so on.
Drill #6
6.3.5 Offensive Triangle ("T" Offense)
Equipment: None is needed.
Description: Offensive players simply pass the ring within a triangle formation while attempting to catch the defence off guard to create a scoring opportunity.
Purpose: The objective of the "T" offense is to set up for a drop pass or to catch the defence out of position. The biggest advantage of the "T" offence is that it can create two on one situations. Offensive players simply pass ring within triangle formation while attempting to catch defense off guard to venture a goal attempt.

6.3.6 "T" Offense - Give and Go
Equipment: None is required.
Description: O1, the ringhandler at the top of the triangle, passes to the player on the left side(O3). The player at the top(O1) breaks behind the top of the defensive triangle to receive a quick pass from O3. O1 takes a shot on the net. O3 skates to the side of the net for a rebound or a pass from O1.
Purpose: The objective of the give and go is to catch the defence off guard and create a good scoring opportunity.
Variation: The passer may also use the player on the right side of the triangle (O2).
4.7.9 Angle Checking
Equipment: Rings are required.
Description: Players form two lines on either side of the ice. The instructor takes a shot on goal. The goalkeeper tosses the ring to Player 1, who continues around the net. Player 2 skates at an angle, and checks the ring carrier out to the free pass circle. Alternate lines.
Variation: Add one more line for double teaming.
Drill #7 Guard ring and drive
Line of players
X1 skates AC (‘At me’), goes around coach while
guarding ring then past C2 who checks as well
C3 who checks X1 needs to guard ring alternating
ways get to slot for shot
Then do from other side
XXXXX1
AC1
C2
C3 HOT

Drill #8
7.45 Scrimmages
An important aspect of a practice may include a scrimmage. The concept will develop skill and teamwork and give the players an opportunity to practice certain plays before they play an actual game. Once again, "fun" should be a part of this activity.
There are several ways to improve the concept of a scrimmage.
- Omit whistle stoppage. Players should be encouraged to play by the rules so that play will be continuous and more aerobic in nature. At the same time have the players stay away from the boards to prevent freezing the ring and unnecessary congestion.
- Use the players as referees. This will give all players the chance to see what it is like to referee. They will learn to interpret and understand the rules during regular games.
- The coach controls the game and also the location of the ring. Occasionally the coach shall blow the whistle unnecessarily. At this time all players stop and try to locate a new ring that the coach has introduced. The idea is to try and have players react quickly to a new situation and also keep all players involved.
- The coach can also determine the role or the way certain players can play during the scrimmage so that the athlete works on a specific skill. This can be useful because the athlete has a goal to reach (i.e. work hard on checking in the defensive zone, carry the ring with control in the offensive zone). Shoot for the corners, and continue moving even though the ring is not in your zone.
Stage: U12
Practice: # 10 (
Ice Practice)
Introduction (pre-practice) (3-5min in the dressing room)
Welcome athletes.
Review procedures for safety, water breaks, etc.
Discuss goals of practice + planned drills/activities
Warm up (10-12 minutes)
Drill #1: Skating: tight turns focusing on technique, to lead into sharp turns
Connect the Dots S19-3.13.3
Drill #2: Stretching – Agility / Balance / Coordination (ABC’S) of Warm-Up
Balance Skating S20-3.14
Line Jumps
Squat Glide
High Knee Prance
Stick Kick
One Foot Glide
On Your Toes
The Cork Screw
Drill #3: Skating: Circles
Leap Frog/Circles S16-3.11.5
Players skate full ice circles in small groups, dropping ring back to player behind. Last player in line
skates to the front with ring and starts again.
Cool down (5-10min)
Crows and Cranes G16-7.38
There are two teams, each team lines up facing the other at the centre red line. The coach stands
at one end of the line.
If the coach says “cranes”, the cranes skate to their end and the crows chase them. If a crane is
touched by a crow before reaching the end line (safety zone), they player must join the crows.
The caller can make things fun by saying “crackers” or “crowns” etc. to confuse everyone.
Post-practice wrap up) (3-5min in the dressing room)
Wrap up daily activities and prepare athletes for next ice time.
Before each athlete leaves the ice discuss what position they like playing the best
Coaches are available for questions

Drill #1
3.13.3 Connect the Dots
Equipment: None required.
Description: Players line up in one corner. In a single file line, zig zagging back and forth across the width of the ice, players skate in order, performing a tight/sharp turn around each of the hockey face-off dots on the ice.
Drill #2
3.14 - BALANCE
3.14.1 Line Jumps
Equipment: None required.
Description: Players line up along the goal line. Skating from one end to the other, players do a two foot jump at each line on the ice - free play lines, blue lines, and centre red line.
Variation: More advanced skaters can jump sticks or pylons - but this can be potentially dangerous. Should your older or more advanced players wish to, they may choose to jump higher.
3.14.2 Squat Glide
Equipment: None required.
Description: Players skate from one end to the other, or around the rink, and glide in a sitting position (squat) between the two blue lines. Squatting regularly with the knees bent more than
90o can be quite stressful on the tendons and ligaments of the knees.
3.14.3 High Knee Prance
Equipment: None required.
Description: Players line up along the side boards. Moving across the width of the ice, players prance - drive up off the toe and emphasize the high knee lift, at a speedy tempo.

3.14.4 Stick Kick
Equipment: One stick is needed for each player.
Description: While skating from one end to the other or around the ice, players hold their stick out in front at shoulder height and slowly kick one leg at a time up to meet the end of the stick. This is a controlled movement, not a quick snap.
3.14.5 One Foot Glide
Equipment: None required.
Description: Players skate from one end to the other or around the ice, and glide on one foot between the blue lines or free play lines, maintaining control of their body.
Variation: More advanced players can also try to jump the lines on one foot.
3.14.7 On Your Toes
Equipment: None required.
Description: Players line up along the side boards. Moving across the width of the ice, the players first walk on their toes. Then after becoming proficient at that, players run on their toes.
Variation: This drill may be repeated with players walking and then running on their heels.
3.14.8 The Cork Screw
Equipment: None required.
Description: Players stand in their own space, lift one leg slightly off the ice and turn 180° (1/2 turn), then turn back again. Alternate the direction and leg.
Drill #3
Skating: Circles
Leap Frog/Circles S16-3.11.5
Players skate full ice circles in small groups, dropping ring back to player behind. Last player in line skates
to the front with ring and starts again.
Drill #4 4.5.1 One Player Following the Other
Equipment: Rings are required.
Description: Players line up with a partner along the side boards, one in front of the other. Player 1 and Player 2 skate forward. Player 1 drops ring to Player 2. Player 2 passes ring up to Player 1 who drops it again. Continue across the ice and back. Alternate the ring carriers.

4.5.2 Straight On Drop
Equipment: Rings are required.
Description: Players line up in two lines facing each other. Player 1 skates towards Player 3, drops the ring, and skates behind the opposite line. Player 3 skates towards Player 2 and drops the ring. Continue through each line and repeat several times.
4.5.4 Drop Pass With Shot
Equipment: Rings are needed.
Description: Players form two lines facing the goal. Player 1 passes across the blue line to Player 2. Player 2 skates toward the goal and drops the ring in front. Player 1 who is skating close behind picks up ring and shoots. Players skate back to the beginning along boards. Alternate lines.
Drill #5 3.13.2 Fish Hook
Equipment: One pylon for every 2 players is needed.
Description: With pylons set up about ten feet from the side boards (spaced out) players stand in pairs directly opposite a pylon. The first partner skates to the pylon and turns around it to the left. Then the next partner does the same, and the drill is then repeated turning to the right. Continue to practice, keeping the inside foot slightly ahead and leaning into the turn.
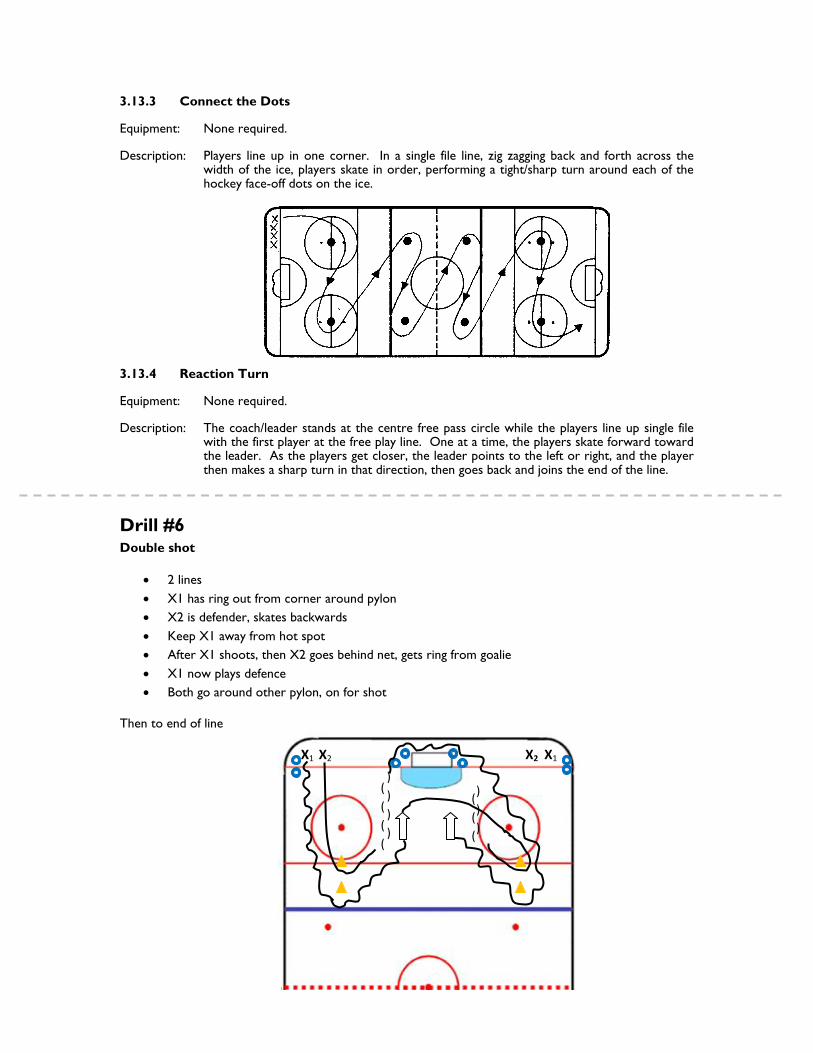
3.13.3 Connect the Dots
Equipment: None required.
Description: Players line up in one corner. In a single file line, zig zagging back and forth across the width of the ice, players skate in order, performing a tight/sharp turn around each of the hockey face-off dots on the ice.
3.13.4 Reaction Turn
Equipment: None required.
Description: The coach/leader stands at the centre free pass circle while the players line up single file with the first player at the free play line. One at a time, the players skate forward toward the leader. As the players get closer, the leader points to the left or right, and the player then makes a sharp turn in that direction, then goes back and joins the end of the line.
Drill #6 Double shot
2 lines
X1 has ring out from corner around pylon
X2 is defender, skates backwards
Keep X1 away from hot spot
After X1 shoots, then X2 goes behind net, gets ring from goalie
X1 now plays defence
Both go around other pylon, on for shot
Then to end of line
X1 X1 X2 X2
(
(
(
(
)
)
)
)
)
)
)
(
(
(

Drill #7 7.38 Crows and Cranes
Purpose: Starting power and stopping will be practiced.
Equipment: None is required.
Description: There are two teams. Each team lines up facing the other at the centre red line. The coach stands at one end of the line. If the coach says "cranes", the cranes skate to their end and the crows chase them. If a crane is touched by a crow before reaching the end red line (safety zone), that player must join the crows. The caller can make things fun by saying "crackers", "crowns", etc., to confuse everyone!

Stage: U12
Practice: # 11 (
Ice Practice)
Introduction (pre-practice) (3-5min in the dressing room)
Welcome athletes.
Review procedures for safety, water breaks, etc.
Discuss goals of practice + planned drills/activities
Warm up (10-12 minutes)
Drill #1: Stretching – Agility / Balance / Coordination (ABC’S) of Warm-Up
Figure 8 Laps – forwards W7-2.5.6.3
Dynamic (with movement) Stretches W7-2.5.2.2
Shoulders & Arms
Back & Sides
Hamstrings & Quadriceps
Groin & Legs (adductor/inside and abductor/outside)
Ankles & Caves
Drill #2: Game of Nerf Football with Ringette Rules
Drill #3: Slingshot Drill – Full ice
Players in corner lined up with rings
First player skates to center ice and loops back
Picks up a pass at the first blue line and goes to net at far end and shoots
Second player in line, who just made pass, follows same pattern to center ice and loops back
Once pass is received she skates to second blue line and loops back, as soon as she turns makes
pass to next player skating up
Receives her pass back over second blue line and skates in on net
Goalie
Positioning: free passes
Cool down (5-10min)
Steal the Gold G19-7.44
There are two teams divided by the centre line.
Seven rings are placed on the dots of each of two diagonal circles.
There are two “jails” located in each of the opposite diagonal corners.
The object of the game is to steal the “gold” without being captures by the other team.
Two players from each team guard the “gold”. Players crossing the centre line may be touched by a
guard. If touched, players go to jail.
A prisoner can be freed when they have possession of a gold ring, when passed from a teammate
carrying a “gold” ring.
Post-practice wrap up) (3-5min in the dressing room)
Wrap up daily activities and prepare athletes for next ice time.
Before each athlete leaves the ice discuss what position they like playing the best
Coaches are available for questions

Drill #1
2.5.6.3. Figure eight set-up (third diagram): This is a good warm-up set-up for extra skating conditioning.
Instructor/coach/demonstrator can provide comments to players at each end of the ice surface or in the
middle near the crossover.
2.5.2.2 Warm-up - Stretches Description
Neck - Stretch the neck slowly, first from one side to the other, shoulder to shoulder, then forward - never back.
Shoulders - Shrug up and down. - Roll shoulder forward and backward. Arms - Bring the arm across the body and hold with the opposite hand, stretching the
triceps and shoulder. - Grasping with both hands, bring the arms above the head to stretch the triceps
and forearm. - With both hands behind the back, grasp and stretch the biceps and deltoids. Back - Position the feet slightly wider than the proper stance, and with the knees bent,
roll forward and touch the toes. This will stretch the lower back and hamstrings.
Sides - With one arm, reach above the head to stretch one side, then the other. Avoid over exaggerated side bends.
- Variation - Raise the stick above the head with two hands on it. Press one hand up, then the other.
Ankles - Toe in - Between the blue lines, glide on one foot (knee slightly bent) turn
the toe inward and hold for eight seconds. - Toe out - Use the same motion, but turn the toe out. Calves - Stationary - With motion, and the feet shoulder width apart, lift the
toes(supporting leg knee is slightly bent). Stretch the opposite calf.
Hamstrings - Stationary - Kneel on the ice, bring one leg out to the side with the toe pointing upward, and hold position for 8 seconds (should feel a stretch in the back of the leg and calf area). Switch legs.
Quadriceps - Stationary - Hold onto the boards with one hand and use the other hand to grasp ankle behind back. The supporting knee is bent and the back should be straight, with the knees parallel.
- Moving - Same motion, but between blue lines while gliding. - Moving - Similar to a groin stretch, the player puts the toe on ice rather than
side of foot. Groin (Adductor) - Moving - One leg is put behind the other, with the inside of the foot on the
ice. The supporting knee is bent (no more than 90°). Do not bounce.

Abductors (outside of leg) - Moving - Similar to the quadriceps stretch, except the player grasps the foot with
the opposite hand, in front of body. This is a good balance drill.
Drill #2
Nerf football
2 teams
Cannot skate with ball
Can coast with ball
Have to pass
Really works on give and go
Emphasizes support and short passes going down the ice
Cannot take gloves off
Drill #3
Slingshot Drill – Full ice
Players in corner lined up with rings
First player skates to center ice and loops back
Picks up a pass at the first blue line and goes to net at far end and shoots
Second player in line, who just made pass, follows same pattern to center ice and loops back
Once pass is received she skates to second blue line and loops back, as soon as she turns makes
pass to next player skating up
Receives her pass back over second blue line and skates in on net
XXXXX XXXXX

Drill #4
4.10.21 Dekes
Equipment: Rings are needed.
Description: Players are paired up and find free space in which to skate. One player skates toward the stationary defending player. The ring carrier will practice body and head dekes.
Drill #5
3.8.2 Backward Bubbles
Equipment: None required.
Description: Players start on the goal line facing the near end boards. Starting in a snowplow stop position, players then push out with both feet and make semi-circles until their feet come together again heel to heel. Then push out again and pull in again making circles (bubbles) all the way down the length of the ice (never lifting the feet off the ice).
Drill #6
4.10.23 "C" Defending
Equipment: Rings/Pylons are required.
Description: Player 1 and Player 2 skate through pylons as shown. Player 1 goes around the far pylon and receives a pass from Player 3. Player 2 skates between pylons, turns, and skates backward for a 1 on 1. Player 3 and Player 4 continue.
Variation: Add another offensive player for 2 on 1.

Drill #7
7.44 Steal the Gold
Purpose: This is an activity game.
Equipment: Sticks and rings are required.
Description: There are two teams divided by the centre line. Seven rings are placed on the dots of each of two diagonal circles. There are two "jails" located in each of the opposite diagonal corners. The object of the game is to steal the "gold" without being captured by the other team.
Important Rules
1. Two players from each team guard their "gold". Players crossing the centre line may be touched by a guard.
2. If touched, players go to jail.
3. When holding a "gold" ring, players cannot be touched. 4. One prisoner is freed when touched by a teammate carrying "gold" and will then accompany the player with the "gold" back to the other side.
Stage: U12
Practice: # 12 (
Ice Practice)
Introduction (pre-practice) (3-5min in the dressing room)
Welcome athletes.
Review procedures for safety, water breaks, etc.
Discuss goals of practice + planned drills/activities
Warm up (10-12 minutes)
Drill #1: Skating: Player skate in and out of cones, protecting the ring and doing tight turns. Focus is on
protecting the ring.
Connect the Dots S19-3.13.3
Drill #2: Stretching – Agility / Balance / Coordination (ABC’S) of Warm-Up
Agility Skating S22-3.15
Knee Drop
Snow Queen
Hop
Wide Crossovers
Skiing
Inside Edges
Outside Edges
Single Leg Snaking
Drill #3: Skating Drill – Lightning Drill S11-3.6.5
With rings
Review/demonstrate proper stopping technique.
Athletes must come to a complete stop
Focus on knees bent, low to the ice, head up.
It is not a race, technique matters.
Goalie
Ring Skills: throwing the ring (flat and aim)
Catch and Throw/G5-5.5.2
Cool down (5-10min)
Scrimmage: Double teaming and channelling
Post-practice wrap up) (3-5min in the dressing room)
Wrap up daily activities and prepare athletes for next ice time.
Before each athlete leaves the ice discuss what position they like playing the best
Coaches are available for questions

Drill #1
3.13.3 Connect the Dots
Equipment: None required.
Description: Players line up in one corner. In a single file line, zig zagging back and forth across the width of the ice, players skate in order, performing a tight/sharp turn around each of the hockey face-off dots on the ice.
Drill #2
3.15 - AGILITY
3.15.1 Knee Drop
Equipment: None required.
Description: Standing in their own space, players drop to their knees (using their hands to break the fall) and get back up again as quickly as possible. Then players do the same while skating - dropping at each blue line and getting up and skating again.
Variation: This drill can also be done with players only touching one knee to the ice at a time while skating.
3.15.2 Snow Queen
Equipment: None required.
Description: Players start on the goal line and skate forward the length of the ice. At the first blue line, they dive forward under control and slide on their stomach (with their stick directly out in front - if carrying one). Then they get up as quickly as possible.
Variation: Same as above, except while sliding on the ice, players roll like a log, keeping control of their body (and stick) and then get up again as quickly as possible.

3.15.3 Hop the Stick
Equipment: One stick for every two players is needed.
Description: In pairs in their own space on the ice, one partner is the sweeper and the other is the hopper. The sweeper is on two knees holding the stick pointing outward in one or two hands. With the stick on the ice, the sweeper moves it back and forth like a windshield wiper. The hopper has to jump over the stick one foot at a time (like skipping), while trying to keep the head up and eyes straight ahead. Partners then switch roles and repeat the drill.
3.15.4 Mirror Drill
Equipment: None required.
Description: In partners, the two face each other. One is the leader and the other the follower. The leader moves forward, backward, side to side, jumps, falls to knees, to stomach, rolls over, etc. Any combination of these can be used while the follower mimics each of the moves. Then the partners switch roles and continue the drill.
Variation: This drill can also be done as a large group, with the instructor as the leader. Using signals, the leader stands facing the players who are spread out in their own space, and points to what the players are to do.
3.15.5 Wide Crossovers
Equipment: None required.
Description: While skating either the length of the ice or around the rink, players lift one leg high to the side, then cross it over the other leg. When that leg touches down on the ice, the other leg is lifted and repeats the movement of the first leg. This is a continuous movement. The intent is to use the outside edges of the skate blades as much as possible.
Variation: This drill can also be done skating backwards.
3.15.6 Skiing
Equipment: None required.
Description: While moving from one end to the other or around the ice, players keep both feet together and cut the ice pushing with their heels on one side then the other in a parallel skiing motion. Both feet stay on the ice at all times.
Variation: Once proficient in skiing, moguls can be added so that after each cut the player does a two foot hop before cutting the other way. This is a difficult movement requiring good leg strength.

3.15.7 Inside Edges
Equipment: None required.
Description: While moving from one end to the other or around the ice, players first push once with their left foot and glide on the inside edge of their right foot in a semi-circle to the left. When they get back to the middle, they push once with their right foot and then glide on the inside edge of their left foot in a semi-circle to the right, and repeat the drill. This is a continuous movement.
Variation: This drill can be done backwards as well.
3.15.8 Outside Edges
Equipment: None required.
Description: While moving from one end to the other or around the ice, players first push once with their right foot and glide on their left foot outside edge in a semi-circle to the left. Then when they get back to the middle, they push once with their left foot and glide on the outside edge of their right foot in a semi-circle to the right. Then the drill is repeated in a continuous motion.
Variation: This drill can be done backwards as well.
3.15.9 Single Leg Snaking
Equipment: None required.
Description: While skating forward, players lift one leg off the ice. The supporting leg, well flexed, continues to push, alternating from inside to outside edge, in a snaking motion. The other leg can help with momentum by swinging it in the direction of travel.
Variation: Once proficient, this drill can be done backwards.
Drill #3
3.6.5 Lightning
Equipment: None required.
Description: Players start at the goal line and skate to centre red line, stop, and skate to the blue line closest to their starting point, and stop. Then they skate to the far blue line, stop, skate to the centre red line, stop, and then skate to the far end. Always face the same side when stopping to practice left and right stops.
Variation: Alternate forward and backward skating between each of the stops. Try using the free play lines as additional stopping points. This drill can make good use of sharp turns instead of stops at each line.

Drill #4
4.9.1 Stationary Double Teaming
Equipment: Rings are required.
Description: Players are in groups of three. Player 1 skates between Player 2 and Player 3 who check the ring carrier. Player 1 does not protect the ring. Rotate players through every position.
4.9.2 Confined Area Double Teaming
Equipment: Rings are required.
Description: Players are sent to a confined area (e.g. free pass circle) in groups of 3. Two players check the ring carrier. Rotate positions.
4.9.3 2 on 1 Corners
Equipment: Rings are required.
Description: Players line up in three lines outside the blue line. The instructor shoots the ring into the corner. The first player in each line races to the corner. The player reaching the ring first tries to bring it out past the blue line, while the other two players double team. Caution players before about the way they carry their sticks going into the boards.

6.7.3.- Double Teaming
Equipment: None is needed.
Description: In this drill, the offensive player starts with the ring behind the net. The ring can be shot in from the red line and a full complement of offensive and defensive player(s) is/are sent in. The defensive or forechecking team is delayed being sent in by a possible 1-2 seconds. The ring starts out from behind the net and the front two forecheckers play the defence - having a forward come from opposite sides of the net. The defense then passes the ring off the boards to either side. The forechecking defense on the side to which the ring has gone, moves in on the ring handler while the trailing defense covers up. The forechecker tries to stop the play before the ring comes out of the offensive zone.
5.5.2 Catch and Throw
Equipment: A shooter with one to five rings is required for every goalkeeper.
Description: With the shooter in the slot and the goalkeeper in the crease, the shooter takes light flip shots. The goalkeeper catches the ring with the glove hand and then throws it, on the ice, back to the shooter. Have the shooter move around providing the goalkeeper with a good target.
Any of the shooting drills which provide the goalkeeper with many shots in succession are excellent for developing goalkeeping skills. When training goalkeepers, it is important to stress technique early in their development. Once good technique is established, rapid succession shooting drills will improve reaction time. It is important that goalkeepers develop a good balance between reaction time (reflexes) and technique (skills).
Variations can be added to the shooting drills to work on specific goalkeeping skills. For example:
1) doing the drill without a stick to work on using the feet and upper body more
2) dropping into butterfly position between each shot
3) moving back to hug the post between shots
4) for longer time periods between shots - shuffle to the boards and back, telescope out to the free play line and retreat, do a slide save and stack the pads to each side, or slide the stick over to the boards then go pick it up and get back into position.
There are many constructive practice drills a goalkeeper can do while the skaters are working on something that doesn't involve shooting, and even during scrimmages, which can help to develop skills at a faster rate. All it takes is a little creativity and pre-planning by the instructor or coach with a quick explanation and some encouragement for the goalkeeper.

Drill #5
3.8.1 Toe to Heel
Equipment: None required.
Description: Players stand with the outside of one foot flush up against the boards and hang on to the boards with their arm on the same side. The other foot will practice making "C" cuts in the ice by putting toe to toe together and pushing that foot out and around in a semi-circle until it comes nearly heel to heel with the other foot. Continue until the player gets the idea of making "C" cuts, and then change feet.
3.8.2 Backward Bubbles
Equipment: None required.
Description: Players start on the goal line facing the near end boards. Starting in a snowplow stop position, players then push out with both feet and make semi-circles until their feet come together again heel to heel. Then push out again and pull in again making circles (bubbles) all the way down the length of the ice (never lifting the feet off the ice).
3.8.3 Backward Sculling
Equipment: None required.
Description: Players start on the goal line facing the near end boards, in a basic stance. Pushing with one foot only, make semi-circles or "C" cuts down the length of the ice without lifting the feet off the ice. Return using the opposite foot.
Drill #6
4.7.3 Straight Line
Equipment: Rings are needed.
Description: Players are paired up along the side board. Player 1 has the ring and skates towards the opposite boards with the ring out in front. Player 2 side checks while in stride with Player 1. Switch at the opposite boards.
Variation: Have two checkers for each ring carrier.

Drill #8
2 on 1 reaction
X1 and X2 stand with their backs to each other on the face off dot
Ring is in between them
Toe caps have to face south and north (to be fair)
Coach A says ‘go’, X1 and X2 turn and battle for the ring
Whoever gets ring passes back to the player who passes to her in a give and go
Other player plays defence
Then from other side, X4 and X5 do same thing after Coach B says ‘go’
Pass to X6 and then passes back
Now players switch up
Drill #9
Scrimmage: Double teaming and channelling
X1
X2
X3
X4
X5
X6
Coach B Coach A

Stage: U12
Practice: # 13 (
Ice Practice)
Introduction (pre-practice) (3-5min in the dressing room)
Welcome athletes.
Review procedures for safety, water breaks, etc.
Discuss goals of practice + planned drills/activities
Warm up (10-12 minutes)
Drill #1: Skating
Combo S26-3.15.10
Drill#2: Stretching – Agility / Balance / Coordination (ABC’S) of Warm-Up
Balance Skating S20-3.14
Line Jumps
Squat Glide
High Knee Prance
Stick Kick
One Foot Glide
On Your Toes
The Cork Screw
Drill#3: Skating & Passing – Russian Drill or “C” Drill R40-4.10.22
Players form two lines at opposite ends of the ice at the blue line.
Two stationary players are Player 1 and Player 4.
Player 2 skates around the centre circle and receives a pass from Player 3.
Player 2 passes to Player 4, who returns a pass. Player 2 shoots and returns to the original line.
After Player 3 made the first initial pass.
Goalie
Communication & Interaction: calling when open
Cool down (5-10min)
Hit the Skate (Kapture the Kid) F2-7.5
Players start on the goal line at one end.
Coaches are at the centre ice red line at the boards and have a bunch of rings (more than the
number of players)
When the coaches yell “kapture the kid” the players skate to the other end and try not to get hit
by a ring.
If they do they join the coaches. Last person to be out wins.
Post-practice wrap up) (3-5min in the dressing room)
Wrap up daily activities and prepare athletes for next ice time.
Before each athlete leaves the ice discuss what position they like playing the best
Coaches are available for questions

Drill #1
3.15.10 Combo
Equipment: Three(3) pylons and 3 sticks are needed.
Description: Pylons and sticks are set up as indicated in the diagram. Players line up at the end boards and begin the drill one at a time. At the first circle, the players skate counterclockwise around it and then skate to the boards at the first blue line. Then they walk or hop sideways along the blue line to a pylon near the middle of the ice. Then they skate forward to the pylon at the centre red line, where they walk or hop sideways back to the boards, and skate forward to the next blue line. Again they walk or hop sideways to the pylon. Then they skate clockwise around the circle and go behind the net. They do a two foot jump over each of the sticks and then turn backwards and skate counterclockwise around the circle and to the centre red line. Then skate forward to the blue line, backward to the other blue line, forward to the centre red line and backward to and around the circle clockwise, at the other end and line up in the corner, ready to begin again.
Drill #2
3.14.1 Line Jumps
Equipment: None required.
Description: Players line up along the goal line. Skating from one end to the other, players do a two foot jump at each line on the ice - free play lines, blue lines, and centre red line.
Variation: More advanced skaters can jump sticks or pylons - but this can be potentially dangerous. Should your older or more advanced players wish to, they may choose to jump higher.
3.14.2 Squat Glide
Equipment: None required.
Description: Players skate from one end to the other, or around the rink, and glide in a sitting position (squat) between the two blue lines. Squatting regularly with the knees bent more than
90o can be quite stressful on the tendons and ligaments of the knees.
3.14.3 High Knee Prance
Equipment: None required.

Description: Players line up along the side boards. Moving across the width of the ice, players prance - drive up off the toe and emphasize the high knee lift, at a speedy tempo.
3.14.4 Stick Kick
Equipment: One stick is needed for each player.
Description: While skating from one end to the other or around the ice, players hold their stick out in front at shoulder height and slowly kick one leg at a time up to meet the end of the stick. This is a controlled movement, not a quick snap.
3.14.5 One Foot Glide
Equipment: None required.
Description: Players skate from one end to the other or around the ice, and glide on one foot between the blue lines or free play lines, maintaining control of their body.
Variation: More advanced players can also try to jump the lines on one foot.
3.14.7 On Your Toes
Equipment: None required.
Description: Players line up along the side boards. Moving across the width of the ice, the players first walk on their toes. Then after becoming proficient at that, players run on their toes.
Variation: This drill may be repeated with players walking and then running on their heels.
3.14.8 The Cork Screw
Equipment: None required.
Description: Players stand in their own space, lift one leg slightly off the ice and turn 180° (1/2 turn), then turn back again. Alternate the direction and leg.
Drill #3
4.10.22 "C" Drill
Equipment: Rings are needed.
Description: Players form two lines on opposite sides of the ice at the blue line. Two stationary players are Player 1 and Player 4. Player 2 skates around the centre circle and receives a pass from Player 3. Player 2 passes to Player 4, who returns a pass. Player 2 shoots and returns to the original line. After Player 3 made the first initial pass, Player 3 goes through the same pattern.
Variations: #1: Players may make a board pass to Player 1 over the blue line. #2: Two players may go at once on the goalkeeper.

#3: Rather than skating around the free pass circle, a pylon may be added and players stop at the pylon, then continue back to the net at which they are shooting.
Drill #4
Main Part
3.15.6 Skiing
Equipment: None required.
Description: While moving from one end to the other or around the ice, players keep both feet together and cut the ice pushing with their heels on one side then the other in a parallel skiing motion. Both feet stay on the ice at all times.
Variation: Once proficient in skiing, moguls can be added so that after each cut the player does a two foot hop before cutting the other way. This is a difficult movement requiring good leg strength.
Drill #5
3 on 2 from corner
F1 has ring, passes to F2 over blue line coming in 3 on 2 against 2D who has come out
F2 F1 F3 D D
(
(
(
(
(
(
(
(
)
)
)
)
)
)
)
)

Drill #6
2 on 1 with drop
Try to have right handed players on goalies right and left on left
Ring carrier drops ring in front of coach and then goes to open ice
In diagram X2 can then shoot or pass back
Drill #7
7.5 Hit the Skate
Purpose: This drill will improve skating skills and passing and shooting accuracy.
Equipment: One ring per player is needed.
Description: This is a simple game, but involves all of the skating skills in the player's repertoire. All players have a ring and skate anywhere on the ice surface. Each player tries to hit another player's skate with their ring, while the other players are doing the same. Once you are hit on the skate you are "out" and step aside until the last person has been tagged. With some age groups, the area of play can be restricted to one zone to promote real heads-up play. One specific area may also be designated for those who are "out" so that they may be involved in another activity rather than standing still.
X2 X1
COACH

Stage: U12
Practice: # 14 (
Ice Practice)
Introduction (pre-practice) (3-5min in the dressing room)
Welcome athletes.
Review procedures for safety, water breaks, etc.
Discuss goals of practice + planned drills/activities
Warm up (10-12 minutes)
Drill #1: Skating drills: forwards
Circles S16-3.11.5
Circles
Tight turns on dots
Stops on dots
Drill #2: Stretching – Agility / Balance / Coordination (ABC’S) of Warm-Up
Figure 8 Laps – forwards W7-2.5.6.3
Dynamic (with movement) Stretches W7-2.5.2.2
Shoulders & Arms
Back & Sides
Hamstrings & Quadriceps
Groin & Legs (adductor/inside and abductor/outside)
Ankles & Caves
Drill #3: Skating & Passing Drill
The Star Drill R9-4.2.7
Team stands in a large circle in the middle of the ice (with bigger team make two circles)
Players pass randomly to someone across from them
Once passed then must follow your pass and always go in same order
Review safety to be sure to not trip or collide – head up
Cool down (5-10min)
Rebound Game (other players work on shooting centre ice)
X1 shoots on net if it rebounds players on either side can shoot or pass – players get point
If goalie keeps it, increase or stops it or kicks it behind net – goalie gets point
(see Rebound Game doc)
Post-practice wrap up) (3-5min in the dressing room)
Wrap up daily activities and prepare athletes for next ice time.
Before each athlete leaves the ice discuss what position they like playing the best
Coaches are available for questions
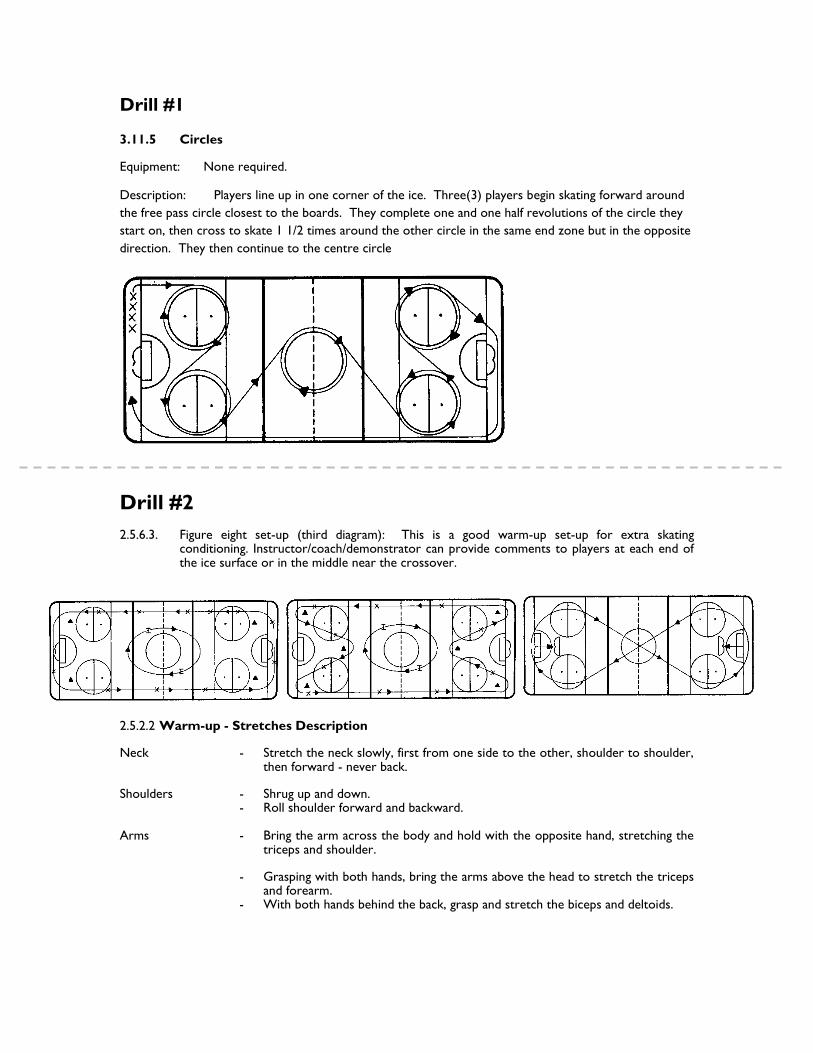
Drill #1
3.11.5 Circles
Equipment: None required.
Description: Players line up in one corner of the ice. Three(3) players begin skating forward around
the free pass circle closest to the boards. They complete one and one half revolutions of the circle they
start on, then cross to skate 1 1/2 times around the other circle in the same end zone but in the opposite
direction. They then continue to the centre circle
Drill #2
2.5.6.3. Figure eight set-up (third diagram): This is a good warm-up set-up for extra skating conditioning. Instructor/coach/demonstrator can provide comments to players at each end of the ice surface or in the middle near the crossover.
2.5.2.2 Warm-up - Stretches Description
Neck - Stretch the neck slowly, first from one side to the other, shoulder to shoulder, then forward - never back.
Shoulders - Shrug up and down. - Roll shoulder forward and backward. Arms - Bring the arm across the body and hold with the opposite hand, stretching the
triceps and shoulder.
- Grasping with both hands, bring the arms above the head to stretch the triceps and forearm.
- With both hands behind the back, grasp and stretch the biceps and deltoids.

Back - Position the feet slightly wider than the proper stance, and with the knees bent, roll forward and touch the toes. This will stretch the lower back and hamstrings.
Sides - With one arm, reach above the head to stretch one side, then the other. Avoid over exaggerated side bends.
- Variation - Raise the stick above the head with two hands on it. Press one hand up, then the other.
Ankles - Toe in - Between the blue lines, glide on one foot (knee slightly bent)
turn the toe inward and hold for eight seconds. - Toe out - Use the same motion, but turn the toe out. Calves - Stationary - With motion, and the feet shoulder width apart, lift the
toes(supporting leg knee is slightly bent). Stretch the opposite calf.
Hamstrings - Stationary - Kneel on the ice, bring one leg out to the side with the toe pointing upward, and hold position for 8 seconds (should feel a stretch in the back of the leg and calf area). Switch legs.
Quadriceps - Stationary - Hold onto the boards with one hand and use the other hand to grasp ankle behind back. The supporting knee is bent and the back should be straight, with the knees parallel.
- Moving - Same motion, but between blue lines while gliding. - Moving - Similar to a groin stretch, the player puts the toe on ice rather than
side of foot. Groin (Adductor) - Moving - One leg is put behind the other, with the inside of the foot on the
ice. The supporting knee is bent (no more than 90°). Do not bounce.
Abductors (outside of leg) - Moving - Similar to the quadriceps stretch, except the player grasps the foot
with the opposite hand, in front of body. This is a good balance drill.
Drill #3
4.2.7 Star
Equipment: Rings are needed.
Description: Divide players into 5 groups and arrange in a circular fashion. Players pass across the circle in the pattern shown (forming a star). Player 1, to Player 4, Player 4 to Player 2, Player 2 to Player 5, Player 5 to Player 3, Player 3 back to Player 1.
Variation: Add a second or third ring to the drill or have the players follow their pass when using one ring.

Drill #4
3.15.6 Skiing
Equipment: None required.
Description: While moving from one end to the other or around the ice, players keep both feet together and cut the ice pushing with their heels on one side then the other in a parallel skiing motion. Both feet stay on the ice at all times.
Variation: Once proficient in skiing, moguls can be added so that after each cut the player does a two foot hop before cutting the other way. This is a difficult movement requiring good leg strength.
Drill#5
4 on 3
When penalty is being called, tell your players that your goalie will come off AND
As soon as other team gains control of the ring, the whistle sounds
So do not worry about the other team scoring
When goalie reaches our bench, we can put another player on the ice
Our team needs to take control of the ring and move into the offensive zone for a shot
If possible, the extra player will go into the middle of the defensive triangle and screen the goalie or look for a rebound
Drill #6
Shotgun with screen
X1 skates, gets pass from X2
Then goes around pylon, so that comes in low
Shot, then screens for X3 who shoots, then X4 shoots
Then X2 goes, gets pass from X1, around pylon and shoots, then screens for X4 who shoots, then X3
shoots
X2
X
X
X1
X
X
X4 X3

Drill #7
7.45 Scrimmages
An important aspect of a practice may include a scrimmage. The concept will develop skill and teamwork and give the players an opportunity to practice certain plays before they play an actual game. Once again, "fun" should be a part of this activity.
There are several ways to improve the concept of a scrimmage.
- Omit whistle stoppage. Players should be encouraged to play by the rules so that play will be continuous and more aerobic in nature. At the same time have the players stay away from the boards to prevent freezing the ring and unnecessary congestion.
- Use the players as referees. This will give all players the chance to see what it is like to referee. They will learn to interpret and understand the rules during regular games.
- The coach controls the game and also the location of the ring. Occasionally the coach shall blow the whistle unnecessarily. At this time all players stop and try to locate a new ring that the coach has introduced. The idea is to try and have players react quickly to a new situation and also keep all players involved.
- The coach can also determine the role or the way certain players can play during the scrimmage so that the athlete works on a specific skill. This can be useful because the athlete has a goal to reach (i.e. work hard on checking in the defensive zone, carry the ring with control in the offensive zone). Shoot for the corners, and continue moving even though the ring is not in your zone.
Drill #8
The Rebound Game
A group of players line up on each side of the goalie.
Ex. 3 players on the left side. 3 players on the right side.
A shooter is at the top with a ring standing in the slot.
(You can use as many players as you want.)
The player at the top takes a standing still shot from the slot.
The goalie gets a point if she keeps the ring in the crease or controls the
rebound to the side or back boards.
The players get a point if the shooter scores right away OR if they can bury
a rebound that was put out right in front of the net.
The players can pass around the rebound shot.
You can limit the passes if you want.
Replace players with other players who were working on shooting skills in centre ice.
X X
X
X X
X C

Stage: U12
Practice: # 15 (
Ice Practice)
Introduction (pre-practice) (3-5min in the dressing room)
Welcome athletes.
Review procedures for safety, water breaks, etc.
Discuss goals of practice + planned drills/activities
Warm up (10-12 minutes)
Drill #1: Circles- Drill Manual S16-3.11.5
o Always facing one direction
o Stops on dots
Drill #2: Forward to Backward Pivots
Drill #3: Stretching-agility/balance/coordination (ABC’s of warm-up)
Figure eight laps – forwards - Drill Manual W7-2.5.6.3.
Dynamic stretches - Drill Manual W7-2.5.2.2.
o Shoulders + arms
o Back + sides
o Hamstrings + Quadriceps
o Groin
o Legs (abductor inside and outside)
o Ankles + calves
Cool down (5-10min)
Game of Backwards Ringette (using the width of the ice)
Backwards British Bull Dog – Drill Manual G13-7.3.2
Post-practice wrap up) (3-5min in the dressing room)
Wrap up daily activities and prepare athletes for next ice time.
Before each athlete leaves the ice discuss what position they like playing the best
Coaches are available for questions

Drill #1
3.11.5 Circles
Equipment: None required.
Description: Players line up in one corner of the ice. Three(3) players begin skating forward around
the free pass circle closest to the boards. They complete one and one half revolutions of the circle they
start on, then cross to skate 1 1/2 times around the other circle in the same end zone but in the opposite
direction. They then continue to the centre circle
Drill #2
Forward to Backward Pivots If more than 10 players split into two Groups (A/B or ½). First group lines up on line and second group
lines up on the end boards behind the group. Players skate forward to free play line, pivot and skate
backwards to blue line, pivot and skate forwards to centre line, pivot and skate backwards to blue line,
pivot and skate forwards to free play line, pivot and skate backwards to the other end goal line. (Second
group may start when first group has reached centre line). Players are instructed to pivot
counterclockwise the second time through the drill.
Drill #3 2.5.6.3. Figure eight set-up (third diagram): This is a good warm-up set-up for extra skating
conditioning. Instructor/coach/demonstrator can provide comments to players at each end of the ice surface or in the middle near the crossover.
2.5.2.2 Warm-up - Stretches Description
Neck - Stretch the neck slowly, first from one side to the other, shoulder to shoulder, then forward - never back.
Shoulders - Shrug up and down. - Roll shoulder forward and backward. Arms - Bring the arm across the body and hold with the opposite hand, stretching the
triceps and shoulder.

- Grasping with both hands, bring the arms above the head to stretch the triceps and forearm.
- With both hands behind the back, grasp and stretch the biceps and deltoids. Back - Position the feet slightly wider than the proper stance, and with the knees bent,
roll forward and touch the toes. This will stretch the lower back and hamstrings.
Sides - With one arm, reach above the head to stretch one side, then the other. Avoid over exaggerated side bends.
- Variation - Raise the stick above the head with two hands on it. Press one hand up, then the other.
Ankles - Toe in - Between the blue lines, glide on one foot (knee slightly bent)
turn the toe inward and hold for eight seconds. - Toe out - Use the same motion, but turn the toe out. Calves - Stationary - With motion, and the feet shoulder width apart, lift the
toes(supporting leg knee is slightly bent). Stretch the opposite calf.
Hamstrings - Stationary - Kneel on the ice, bring one leg out to the side with the toe pointing upward, and hold position for 8 seconds (should feel a stretch in the back of the leg and calf area). Switch legs.
Quadriceps - Stationary - Hold onto the boards with one hand and use the other hand to grasp ankle behind back. The supporting knee is bent and the back should be straight, with the knees parallel.
- Moving - Same motion, but between blue lines while gliding. - Moving - Similar to a groin stretch, the player puts the toe on ice rather than
side of foot. Groin (Adductor) - Moving - One leg is put behind the other, with the inside of the foot on the
ice. The supporting knee is bent (no more than 90°). Do not bounce.
Abductors (outside of leg) - Moving - Similar to the quadriceps stretch, except the player grasps the foot
with the opposite hand, in front of body. This is a good balance drill.

Drill #4 Box Skate
3.12.4 Box Skate
Equipment: Pylons (about 4 for every 2-3 players) are needed.
Description: Four(4) pylons are set up in a box formation (with about 2-3 meters space between each pylon), for every 2 or 3 players. With one player in each group skating around their box at a time, the player pivots from forward to backward and vice versa at every pylon. (They must remain facing the same direction at all times.)
Variation: More advanced and older players can do this drill without the pylons.
Technical skating:
Transition: 2 foot Mohawk pivot- back to front, front to back
Drill #5
Channelling from centre ice
Forwards have rings
On whistle, D1 and F1 skate forward
D1 must decide when to turn to skate backwards, when to skate hip to hip, how to push out
Make sure everyone plays both F and D
Players move to other line, so F1 becomes F2, F2 becomes F3, F3 becomes F1
F3 D3 F2 D3 F1 D1
(
(
(
(
(
(
(
(
(
(
(
(
(
(
(
)
)
)
)
)
)
)
)
)
)
)
)
)
)
)

Drill #6
Channelling from corners
F1 and D1 leave
D1 channels away
F1 gets to hot spot (D uses hand on hip or stick on stick), then D2 and F2
Variation: D’s do not have sticks
Get their hands on F’s hips
Key teaching: F’s vary their speed
Drill #7 Big circle pivots
F with ring skates around pylons with D at the same time
D starts skating backwards
Change direction of circle once everyone through
D-goal side-inside-tight
F1 D1 F2 D2
)
)
)
(
(
(
(
(
(
)
)
)
F
D
(
(
(
(
(
(
(
(
)
)
)
)
)
)
)
)

Drill #8
7.32 British Bulldog
Purpose: This will practice forward skating, stopping, and agility.
Equipment: None is required.
Description: One person is "It". "It" stands at centre ice while everyone else lines up at one end. "It" yells, "British Bulldog" and everyone skates from one blue line to the next. Anyone who gets tagged stays in the centre to assist those already caught. The game is played until everyone is tagged.

Stage: U12
Practice: # 16 (Full Ice Practice)
Introduction (pre-practice) (3-5min in the dressing room)
Welcome athletes.
Review procedures for safety, water breaks, etc.
Discuss goals of practice + planned drills/activities
- Goalie Ring option (priorities) - Review Drill manual T-6.4 to 6.4.5.
Warm up (10-12 minutes)
Drill #1: Skating Drill: Double W drill– (to get players used to traffic and skating with head up)
Drill #2: Light stretching
Cool down (5-10min)
Included into the main part of the practice.
Post-practice wrap up) (3-5min in the dressing room)
Wrap up daily activities and prepare athletes for next ice time.
Before each athlete leaves the ice discuss what position they like playing the best
Coaches are available for questions

Drill #1
Double W
Drill #2
Light stretching
Drill #3
Breakout step # 1 – one on one
Run out of both ends
Start on whistle
D1 gets pass from G1 at ame time as D2 gets pass from G2
F1 and F2 skate over blue lines and get passes
D skates to blue line and then plays defence against opposite forward
* Watch for D pivots timing
* Watch timing of F starting to skate
X X X X X
X X X X X
G1 G2 D1 D D
D D
D2
F1
F2
C
C

Drill #4
Breakout step # 2 – two on two
X1 passes to X2 (and then X1 goes to end of X2 line),
X2 passes to X3, X2 and X3 go in for shot, then become defence-skate out to blue line-practice
pivots.
2 on 2 then original X1 and X2 go down to end and rotate.
Drill #5 Controlled scrimmage
Team 1 defends against Team 2
Breaks out to other end
*let teams scrimmage for a while but then reset from other end – add other players
once a breakout from each end occurs
Team 2 defends against Team 1
When play returns to other end, switch players out
G
X
X
X1
X3 X X
X2 X X
Become D
Become D

Stage: U12
Practice: # 17 (1/2 Ice Practice)
Introduction (pre-practice) (3-5min in the dressing room)
Welcome athletes.
Review procedures for safety, water breaks, etc.
Discuss goals of practice + planned drills/activities
Warm up (10-12 minutes)
Included into the main part of the practice
Cool down (5-10min)
3 on 2 player support.
Post-practice wrap up) (3-5min in the dressing room)
Wrap up daily activities and prepare athletes for next ice time.
Before each athlete leaves the ice discuss what position they like playing the best
Coaches are available for questions

Drill #1
Quick passes
Goalie passes ring to X1 who passes to X2 who passes to X3 who goes in for shot
Then X3 goes to end of line
Then X3 goes through one direction, then changes to go to goalie’s right Then X3 goes through
one direction, then changes to go to goalie’s right
Drill #2
Follow your pass drill
X1 to X2 (could be a board pass)
X2 to X3
X3 to X4 (over blue line)
X4 skates and passes to X5
X5 shoots and then becomes defence
Rotate to positions and go to back of the line
G
X
X
X1
X2
X3
X
X
X1
X2
X3
X4
X5 D

Drill #3
DIGGITY (D to G to D)
X1 gets to ring first as coach A shoots into corner
X2 plays defence - checks X1 to G and then behind net – gets pass back, passes to coach B then
gets pass back over blue line – in for a shot against X2 who pivots to play D – then resets in
opposite line
As soon as X1 is skating in for shot – coach can start the next line with shot in corner * Encourage your defence to skate up with the play
Drill #4
3 on 2 – player support
X1, X2, X3 around pylons
Pass from X1 to X2 over blue line
X2 drops to X1 who coasts in X2, skates behind net to other side
X3 skates to the middle
X4 and X5 play defence
X1 either passes to X2 or X3 or shoots
X3
X2
X1
X4 X5
DROP PASS

Stage: U12
Practice: # 18 (
Ice Practice)
Introduction (pre-practice) (3-5min in the dressing room)
Welcome athletes.
Review procedures for safety, water breaks, etc.
Discuss goals of practice + planned drills/activities
Warm up (10-12 minutes)
Drill #1: Skating Passing Drill
Give and Go R14-4.2.2
Players in both corners and 4 players on blue lines in the middle of the ice
At same time both ends start, player skates to free play line and passes to player at blue ice.
Player passes back at center ice and skater receives ring and passes right away to next player in
middle of the ice.
Player then picks up ring over second blue line and goes in a shoots.
Player then becomes the first passer on the opposite side of the ice
Drill #2: Stretching – Agility / Balance / Coordination (ABC’S) of Warm-Up
Agility Skating S22-3.15
Knee Drop
Snow Queen
Hop
Wide Crossovers
Skiing
Inside Edges
Outside Edges
Single Leg Snaking
Cool down (5-10min)
Half ice – Scrimmage: 5on 5 OR
Full ice (discuss pre-practice with other coach)
Post-practice wrap up) (3-5min in the dressing room)
Wrap up daily activities and prepare athletes for next ice time.
Before each athlete leaves the ice discuss what position they like playing the best
Coaches are available for questions
Drill #1

4.4.2 Give and Go
Equipment: Rings are required.
Description: Players line up in opposite corners of the ice. Stationary players are located as indicated. On the whistle, Player 1 passes to Player 2 and receives the pass back over the blue line from Player 2. Player 1 then passes to Player 3 and receives a pass over the second blue line. Player 1 then goes to the other line which has started the same drill down the opposite side of the ice.
Variation: Players may shoot on goal.
Drill #2
3.15.1 Knee Drop
Equipment: None required.
Description: Standing in their own space, players drop to their knees (using their hands to break the fall) and get back up again as quickly as possible. Then players do the same while skating - dropping at each blue line and getting up and skating again.
Variation: This drill can also be done with players only touching one knee to the ice at a time while skating.
3.15.2 Snow Queen
Equipment: None required.
Description: Players start on the goal line and skate forward the length of the ice. At the first blue line, they dive forward under control and slide on their stomach (with their stick directly out in front - if carrying one). Then they get up as quickly as possible.
Variation: Same as above, except while sliding on the ice, players roll like a log, keeping control of their body (and stick) and then get up again as quickly as possible.

3.15.3 Hop the Stick
Equipment: One stick for every two players is needed.
Description: In pairs in their own space on the ice, one partner is the sweeper and the other is the hopper. The sweeper is on two knees holding the stick pointing outward in one or two hands. With the stick on the ice, the sweeper moves it back and forth like a windshield wiper. The hopper has to jump over the stick one foot at a time (like skipping), while trying to keep the head up and eyes straight ahead. Partners then switch roles and repeat the drill.
3.15.4 Mirror Drill
Equipment: None required.
Description: In partners, the two face each other. One is the leader and the other the follower. The leader moves forward, backward, side to side, jumps, falls to knees, to stomach, rolls over, etc. Any combination of these can be used while the follower mimics each of the moves. Then the partners switch roles and continue the drill.
Variation: This drill can also be done as a large group, with the instructor as the leader. Using signals, the leader stands facing the players who are spread out in their own space, and points to what the players are to do.
3.15.5 Wide Crossovers
Equipment: None required.
Description: While skating either the length of the ice or around the rink, players lift one leg high to the side, then cross it over the other leg. When that leg touches down on the ice, the other leg is lifted and repeats the movement of the first leg. This is a continuous movement. The intent is to use the outside edges of the skate blades as much as possible.
Variation: This drill can also be done skating backwards.
3.15.6 Skiing
Equipment: None required.
Description: While moving from one end to the other or around the ice, players keep both feet together and cut the ice pushing with their heels on one side then the other in a parallel skiing motion. Both feet stay on the ice at all times.
Variation: Once proficient in skiing, moguls can be added so that after each cut the player does a two foot hop before cutting the other way. This is a difficult movement requiring good leg strength.

3.15.7 Inside Edges
Equipment: None required.
Description: While moving from one end to the other or around the ice, players first push once with their left foot and glide on the inside edge of their right foot in a semi-circle to the left. When they get back to the middle, they push once with their right foot and then glide on the inside edge of their left foot in a semi-circle to the right, and repeat the drill. This is a continuous movement.
Variation: This drill can be done backwards as well.
3.15.8 Outside Edges
Equipment: None required.
Description: While moving from one end to the other or around the ice, players first push once with their right foot and glide on their left foot outside edge in a semi-circle to the left. Then when they get back to the middle, they push once with their left foot and glide on the outside edge of their right foot in a semi-circle to the right. Then the drill is repeated in a continuous motion.
Variation: This drill can be done backwards as well.
3.15.9 Single Leg Snaking
Equipment: None required.
Description: While skating forward, players lift one leg off the ice. The supporting leg, well flexed, continues to push, alternating from inside to outside edge, in a snaking motion. The other leg can help with momentum by swinging it in the direction of travel.
Variation: Once proficient, this drill can be done backwards.

Drill #3
Race to ring
Pylons as indicated
2 lines – at ringette line-X1 against X2
Sticks on ice touching boards
On whistle, skate pull circle and then out around pylon at blue line dot, then race for ring
First one to get it is offence – other plays defence
Variation: 2 players in each line leave as partners – whoever gets ring needs to pass to partner
Drill #4
Coach’s call
All players at centre ice
Coach calls out a number for the number of players to come in for a shot – between 1 and 3
After shot coach tells which player or players to stay and play defence
Vary how many against how many
For example: 1on1, then 2 on 2, then 3 on 3, then 1 on 3
If ring carrier is outnumbered, isolate a defender and fake (all times)!
Drill #5 Trivia – get open over blue line
2 lines beside coach at red line
X1 versus X2
Coach asks a question (e.g. 6+6)
Whoever answers correctly, first gets ring passes over blue line from coach – other player defends
X2 X X X
X1 X X X
G
C