practice cs time & expense entry...
TRANSCRIPT

PRACTICE CS
Time & Expense Entry WalkThrough
Version 2014.x.x

TL 27573a (01/16/2015) Copyright Information Text copyright 2004-2015 by Thomson Reuters. All rights reserved. Video display images copyright 2004-2015 by Thomson Reuters. All rights reserved. Thomson Reuters hereby grants licensee of CS Professional Suite software the right to reprint this document solely for their internal use. Trademark Information The trademarks used herein are trademarks and registered trademarks used under license. All other brand and product names mentioned in this guide are trademarks or registered trademarks of their respective holders .

Practice CS Time & Expense Entry WalkThrough iii
Contents Introduction............................................................................................................... 1
Opening the sample database ............................................................................................ 1 Backing up the sample database ........................................................................................ 2
Walkthrough Exercises ............................................................................................ 5 Setting up your preferences ................................................................................................ 5
Firm preferences ............................................................................................................ 5 User preferences ............................................................................................................ 6
Entering time ....................................................................................................................... 9 Entering time for individual staff ..................................................................................... 9
Editing information during time and expense entry .................................................. 12 Using the Timer(s) ................................................................................................... 14 Using the Desktop Timer ......................................................................................... 15 Entering negative WIP ............................................................................................. 16
Entering time for multiple staff members ...................................................................... 16 Filtering and sorting the timesheet grid ......................................................................... 17 Editing multiple time and expense entries .................................................................... 20
Reviewing and approving timesheets ................................................................................ 21 Approving and posting timesheet entries ...................................................................... 22
Restoring the sample database......................................................................................... 24
Remote Entry .......................................................................................................... 25 Allowing Remote Entry for your firm .................................................................................. 25 Enabling Remote Entry on your laptop .............................................................................. 26 Setting up Remote Entry ................................................................................................... 27
Creating a remote entry firm ......................................................................................... 27 Updating a remote entry firm ........................................................................................ 29 Opening a remote entry data firm ................................................................................. 29 Exporting remote entry data ......................................................................................... 30 Importing remote entry data ......................................................................................... 32
Entering data remotely ...................................................................................................... 33 Accepting remote entries .................................................................................................. 35

Contents
iv Practice CS Time & Expense Entry WalkThrough

Practice CS Time & Expense Entry WalkThrough 1
Introduction This walkthrough introduces you to the process of entering time and expenses in Practice CS. After you have completed the walkthrough, you will have a good understanding of the basic features of Practice CS time and expense entry. You will also learn about features that can help you enter your time and expenses with greater efficiency.
Note: This walkthrough assumes you are familiar with using Practice CS or that you have read chapter 3, Program Overview, in the Practice CS Getting Started guide.
Opening the sample database To perform the exercises in this walkthrough, you will start Practice CS and log in to the Sample database as staff member CAT (Cindy Turner).
1. Start Practice CS.
2. In the Login dialog, select Sample in the Open Firm field.
3. In the Staff ID field, select CAT.
Notes
If you have previously enabled security for the Sample firm, enter your password in the Password field. This field is available only if security is enabled.
You can mark the Remember login information checkbox if you want to bypass this dialog each time you start Practice CS.

Introduction
2 Practice CS Time & Expense Entry WalkThrough
4. Click OK.
Backing up the sample database Data that you enter while performing the exercises in this walkthrough will affect the Sample database. Therefore, we recommend that you make a backup of the Sample database before you begin so that it is available for use in other Practice CS walkthroughs.
Note: If you are running Practice CS through the Virtual Office CS® module, the Backup menu command is not available. We recommend that you install a local copy of Practice CS so that you can back up the sample database. For instructions on installing the program, please see chapter 2, Installation Instructions, in the Practice CS Getting Started guide.
To back up the Sample database, follow these steps.
1. In Practice CS, choose File > Backup.
2. In the Backup File field, enter the path and file name for the backup file, or click the button to navigate to the backup file location. The backup file will have a file extension of BDF.
Note: The backup file will be created on the computer where the data resides. The path specified here must be a valid path on that computer.

Introduction
Practice CS Time & Expense Entry WalkThrough 3
3. Click OK.
4. When prompted that the backup is complete, click OK.
Note: After you complete this walkthrough, you can restore the sample database. For instructions, see “Restoring the sample database” on page 24.

Introduction
4 Practice CS Time & Expense Entry WalkThrough

Practice CS Time & Expense Entry WalkThrough 5
Walkthrough Exercises Practice CS lets you track billable time, costs, and expenses incurred while providing services to clients. Time and expense entry is designed so that you can track time and expenses according to which staff performs the work and what type of work it is so that you can bill accordingly. Using the Time & Expense Entry screen, you can enter time and expenses for one staff at a time or for multiple staff. Your firm also has the option to require that time and expense entries are approved before they are posted.
Setting up your preferences Before you begin using Time & Expense Entry, you can set up some firm-wide preferences and individual user preferences. These can be changed later, if necessary.
Firm preferences If your firm wants time and expense entries to be approved before they are posted, you can choose this option in the Firm setup screen.
1. From the Setup menu, choose Firm.
2. In the Firm screen, click the Preferences tab.

Walkthrough Exercises
6 Practice CS Time & Expense Entry WalkThrough
3. Under Approval/Posting process, mark the Required for Time & Expense Entry checkbox.
4. Click the Enter button.
User preferences User preferences are user-specific options that let you choose how certain controls and areas of the program function. User preferences let each staff member customize the program for their needs.
1. From the Setup menu, choose User Preferences.
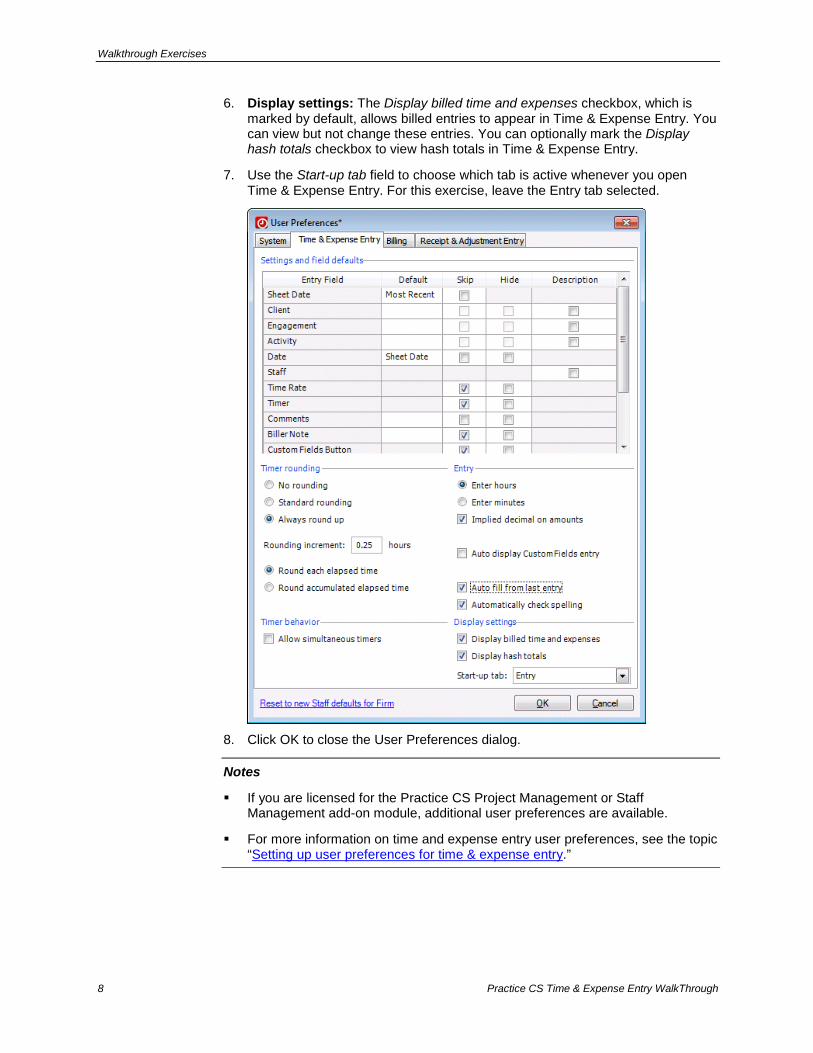
2. In the User Preferences dialog, click the Time & Expense Entry tab.
3. Settings and field defaults: To help speed up data entry, you can choose default values for certain time entry fields, and whether to skip or hide that field. If you want to display the description for the Client, Engagement, Project, or Activity field in time entry, mark the checkbox in the Description column. You can also choose a default sheet date and entry date.

Walkthrough Exercises
Practice CS Time & Expense Entry WalkThrough 7
For this exercise, unmark the Skip checkbox for the Sheet Date and Date fields. Leave the other default settings.
4. Timer rounding: The Time & Expense Entry screen has timer buttons that you
can use to have the program automatically track time. Click the Always round up option to have Practice CS round recorded time up to the specified increment. The default rounding increment is 0.25 hours.
You can also choose when to round elapsed time recorded with the timer:
Round each elapsed time: Rounds recorded time each time you stop the timer.
Round accumulated elapsed time: Rounds only the accumulated time, regardless of how many times the timer was started and stopped.
Click the Round accumulated elapsed time option.
5. Entry:
Mark the Implied decimal on amounts checkbox. If you enter your time in hours, the program will automatically enter .00 after the number you enter. For example, if you enter 8 in the Hours column in time entry, the program will add the decimal point and zeros (8.00).
Mark the Auto fill from last entry checkbox. This feature automatically populates most of the fields in a time or expense transaction from the previous transaction, which helps to speed up data entry.
Walkthrough Exercises
8 Practice CS Time & Expense Entry WalkThrough
6. Display settings: The Display billed time and expenses checkbox, which is marked by default, allows billed entries to appear in Time & Expense Entry. You can view but not change these entries. You can optionally mark the Display hash totals checkbox to view hash totals in Time & Expense Entry.
7. Use the Start-up tab field to choose which tab is active whenever you open Time & Expense Entry. For this exercise, leave the Entry tab selected.
8. Click OK to close the User Preferences dialog.
Notes
If you are licensed for the Practice CS Project Management or Staff Management add-on module, additional user preferences are available.
For more information on time and expense entry user preferences, see the topic “Setting up user preferences for time & expense entry.”

Walkthrough Exercises
Practice CS Time & Expense Entry WalkThrough 9
Entering time In Practice CS, you can enter time and expenses for one staff at a time or for multiple staff. The Entry tab is designed for staff who typically enter their own time and expenses. The Overview tab allows you to enter time and expenses for multiple staff at a time. You can also enter time remotely. For more information on remote entry, see “Remote Entry” on page 25.
Entering time for individual staff To enter your own time, follow these steps.
1. From the Actions menu, choose Time & Expense Entry.
Note: You can also press CTRL+T to open Time & Expense Entry.
2. Verify that staff CAT (Turner, Cindy) is selected in the Staff field.
3. In the Sheet date field, click the button and select 4/1/2014 from the drop-down calendar.
Note: Dates in red on the calendar indicate that time and expense entries have been entered on those dates. If you pause your mouse pointer over a date, you can see the number of hours and units entered for that day.
4. In the bottom row of the Time subtab, click the Client field.
Note: The Client field is a user-defined terminology field. If your firm uses a term other than Client, you can change it in the Firm setup screen (Setup > Firm > Terminology tab). The other user-defined fields in this data entry grid are Engagement, and Activity, and (if you are licensed for the Project Management module) Project and Task.

Walkthrough Exercises
10 Practice CS Time & Expense Entry WalkThrough
5. Click the button and select AAC (Advanced Advertising Consultants) from the drop-down list.
Note: To improve performance in Practice CS wherever large lists of items are displayed, results are limited to a pre-determined maximum size. When a drop-down list displays results that are limited, the message "Results limited" appears at the end of the list.
If the data you are looking for is not included in the limited results, refine your sort order, search criteria, and/or filter to narrow down the data displayed in the list. To display more items in the drop-down list, click the Get More Items button.
6. Complete the rest of the row as follows.
Field Entry Engagement AUDIT
Audit Services
Activity PREPARATION Preparation
Date 4/1/2014
Hours 3
7. Press the TAB key until you reach the end of the line. Note that the program automatically inserts the decimal point in the Hours field, and the Rate and Amount fields are completed automatically.

Walkthrough Exercises
Practice CS Time & Expense Entry WalkThrough 11
Notes
Practice CS allows staff with the proper security privileges to edit WIP amounts in Time & Expense Entry. The ability to override the Amount field allows you to easily and accurately enter beginning balances for time and expenses. Amounts that have been overridden will appear in red.
Any amount that you override cannot be recalculated by the program. For example, even if you change the number of hours for an entry that has been overridden, the amount will remain the same. The only ways to change an amount that has been overridden are to change it manually or to right-click the amount and choose Delete Override.
8. Click the Expense subtab and make the following entries.
Field Entry Client AAC
Engagement AUDIT Audit Services
Activity LODGING Lodging Expense
Date 4/1/2014
Units 1
Unit Price 189.0000
9. Press the TAB key until you reach the end of the line. Note that the Amount field is completed automatically.

Walkthrough Exercises
12 Practice CS Time & Expense Entry WalkThrough
Editing information during time and expense entry If you have security privileges to do so, you can right-click certain fields in the grid to add, edit, or delete information during time and expense entry. For example, if you are entering time for a client and need to select an item that hasn’t been assigned to the client yet, you can add that item. In the following exercise, you will add an engagement for the client during time entry.
1. Click the Time subtab.
2. In the bottom row of the time entry grid, select client AAC.
3. In the Engagement field, you need to select the CONSULTING engagement, but it is not set up for this client. Right-click the Engagement field and choose Add Engagement.
Note: Other commands in the context menu allow you to edit and delete items in the drop-down lists, print the data entry grid, and spell check. You can also edit multiple sheet entries at once with the Edit Selected Time & Expense Entries command (see page 20 for more on editing multiple entries).
4. In the Client Engagements dialog, click the button in the ID field and select CONSULTING.
5. In the Biller field, select staff CAT (Cindy Turner).

Walkthrough Exercises
Practice CS Time & Expense Entry WalkThrough 13
6. In the Manager field, select JPW (Jeff Wilson).
7. Click the Enter button to save the new engagement for the client.
8. Click the Done button to return to Time & Expense Entry.
9. Complete the time entry with the following information.
Field Entry Activity CLIENTMEET
Client Meetings & Discussions
Date 4/1/2014
Hours 1.5

Walkthrough Exercises
14 Practice CS Time & Expense Entry WalkThrough
Note: You can search or apply filters in drop-down fields to narrow the list. Enter a search term or click the button to apply or add a filter. See Filtering your data in the Help & How-To Center for step-by-step instructions on creating and using filters.
Using the Timer(s) You can use the timer buttons to automatically record time. To start the timer, click the green button in the row for which you want to start a timer. When you want to stop the timer, click the red button. Elapsed time is shown on the right side of the Entry Information tab.
Notes
You can start a timer before you begin a time entry.
You can run multiple timers in a timesheet if you set up your user preferences to allow it. Choose Setup > User Preferences and mark the Allow simultaneous timers checkbox. When running multiple timers, you can pause one and start another, or you can run them simultaneously.

Walkthrough Exercises
Practice CS Time & Expense Entry WalkThrough 15
Using the Desktop Timer The Desktop Timer, a smaller version of the timer available in Time & Expense Entry, provides another way to track time for a client’s engagement. The time that you record with the Desktop Timer can later be transferred to Time & Expense Entry when needed. The following exercise illustrates how to use the Desktop Timer.
1. To open the Desktop Timer, right-click the Practice CS icon in your computer's system tray and choose Desktop Timer.
2. The Desktop Timer opens in minimized mode. You can use your mouse to
click and drag the timer to any location on your desktop.
3. Select client AAC from the drop-down list on the left side of the timer.
4. Click the green button to start the timer.
5. After some time has elapsed, click the red button to stop the timer.
Note: The timer can be restarted, if necessary.
6. Click the maximize button to maximize the Desktop Timer.
Note: In maximized mode, the timer provides a Sheet date field, which defaults to the sheet date you selected in User Preferences. In this case, our default is Most Recent.
7. To transfer the recorded time from the Desktop Timer to Time & Expense Entry, click the post button to the right of the Elapsed field.
8. Close the Desktop Timer.

Walkthrough Exercises
16 Practice CS Time & Expense Entry WalkThrough
9. In the Time & Expense Entry screen, you will need to complete the entry for client AAC with information not included on the Desktop Timer.
Field Entry Engagement CONSULTING
Activity COMMUNICATIONS Client Communications
Date 4/1/2014
Entering negative WIP Practice CS allows you to enter negative WIP on the Time & Expense Entry screen to address special circumstances. For example, your firm may want to allocate WIP entered in a previous period to a different client. In such a case, you could enter negative WIP for the original client and balance that by entering a new WIP item for the other client.
Entering time for multiple staff members The Overview tab provides firms that have staff who enter time and expenses for other employees a single screen to easily enter multiple staff's time and expense transactions. You can use this tab to work with both time and expenses in the same grid, for multiple staff members and sheet dates.
1. In the Time & Expense Entry screen, click the Overview tab.
2. Scroll to the first incomplete row at the bottom of the grid.
3. In the Staff field, select CAT.
4. Complete the sheet entry as follows.
Field Entry Sheet Date 4/1/2014
Client AAC
Engagement AUDIT
Activity PREPARATION
Date 4/1/2014
Hours/Units 2
Note: You can optionally enter a comment and a biller note. Text that you enter in the Comment field can appear on invoices, if you select that option for your custom format, and on reports. The Biller Note field, for internal use only, lets you enter instructions or notes about the entry for the biller.

Walkthrough Exercises
Practice CS Time & Expense Entry WalkThrough 17
Filtering and sorting the timesheet grid Note: To improve performance in Practice CS wherever large lists of items are displayed, results are limited to a pre-determined maximum size. When a screen displays results that are limited, the message "Results Limited" appears above the list.
If the data you are looking for is not included in the limited results, refine your sort order, search criteria, and/or filter to narrow down the data displayed in the list. The Results Limited message will appear until all results from your filter and / or search criteria can be displayed. You can also click the Get More Items button, but this may degrade the performance of the program.
See the topic Filtering your data in the Help & How-To Center for more information on creating your own filters.
If you want to narrow down the information that appears in the Overview tab, use the Filter field to limit the number of entries that appear. For example, suppose that you only want to see entries for staff CAT.
Note: If there are any filters already applied, click the button to remove them.
1. Click the button in the Filter field and select Staff Name from the drop-down list.
2. In the Method field, click the button and select is from the drop-down list.
3. Click the button in the drop-down list that appears and select Turner, Cindy.

Walkthrough Exercises
18 Practice CS Time & Expense Entry WalkThrough
4. The data entry grid now contains sheet entries for only Cindy Turner.
5. You can sort the entries on the Overview tab by clicking any column header.
For example, to sort the list by sheet date in ascending order, click the Sheet Date column heading. Click it again to sort the list in descending order. The arrow in the column header indicates whether the sort is ascending or descending.
Note: Clicking the heading a third time will remove the sort and show the entries in the order they were entered.

Walkthrough Exercises
Practice CS Time & Expense Entry WalkThrough 19
You can also group and summarize entries by clicking a column header, holding down the left mouse button, and dragging the column header to the box containing the text Drag a column header here to group by that column.
6. For example, suppose that you want to group the data entry grid by sheet date. Click the Sheet Date column heading and drag it to the box.
7. Next, click the Client column heading and drag it to the box.
8. The Overview tab is now grouped by Sheet Date and Client. Click the button next to the first row to expand it.
9. To undo the summary grouping, click the Client heading, hold down the left
mouse button, and drag the heading back to the row containing the column headings.
10. Click the Sheet Date heading and drag it back to the row containing the column headings.
Walkthrough Exercises
20 Practice CS Time & Expense Entry WalkThrough
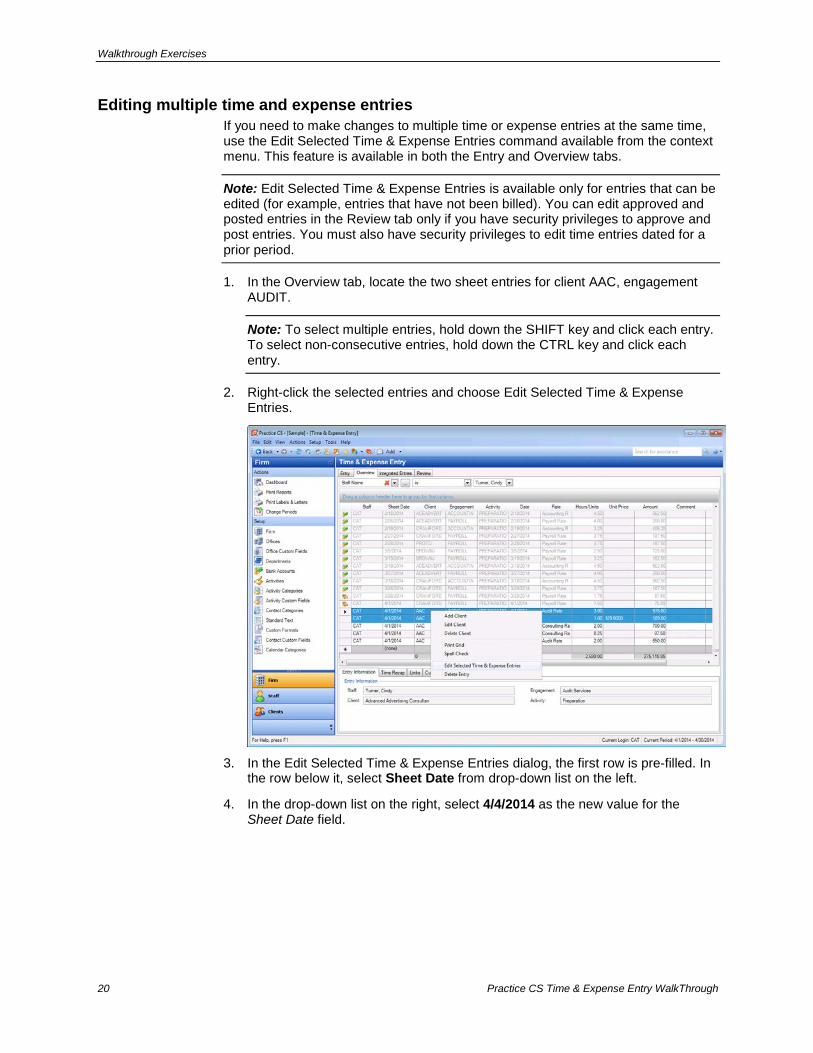
Editing multiple time and expense entries If you need to make changes to multiple time or expense entries at the same time, use the Edit Selected Time & Expense Entries command available from the context menu. This feature is available in both the Entry and Overview tabs.
Note: Edit Selected Time & Expense Entries is available only for entries that can be edited (for example, entries that have not been billed). You can edit approved and posted entries in the Review tab only if you have security privileges to approve and post entries. You must also have security privileges to edit time entries dated for a prior period.
1. In the Overview tab, locate the two sheet entries for client AAC, engagement AUDIT.
Note: To select multiple entries, hold down the SHIFT key and click each entry. To select non-consecutive entries, hold down the CTRL key and click each entry.
2. Right-click the selected entries and choose Edit Selected Time & Expense Entries.
3. In the Edit Selected Time & Expense Entries dialog, the first row is pre-filled. In
the row below it, select Sheet Date from drop-down list on the left.
4. In the drop-down list on the right, select 4/4/2014 as the new value for the Sheet Date field.

Walkthrough Exercises
Practice CS Time & Expense Entry WalkThrough 21
5. Click OK.
6. At the prompt, click Yes to confirm.
7. Note the new sheet date for the selected entries.
Reviewing and approving timesheets Staff with the appropriate security privileges can use the Review tab of the Time & Expense Entry screen to review staff timesheets and approve their entries before posting. The Review tab provides a grid view of all entered timesheets. Time and expenses are available for approval and posting as soon as they are entered.
Note: The Review tab is available only if your firm is using the approval process for time and expense entry. To require approval and posting for time and expense entry, choose Setup > Firm > Preferences tab and mark the Required for Time & Expense Entry checkbox.

Walkthrough Exercises
22 Practice CS Time & Expense Entry WalkThrough
Approving and posting timesheet entries 1. In the Time & Expense Entry screen, click the Review tab. Each row shows the
totals for each sheet date for each staff.
Notes
In this illustration, each timesheet is for one day, but your firm could also use weekly or monthly timesheets.
The Review tab is view only; you cannot edit timesheet entries here.
2. Click the button for the 4/4/2014 sheet date to see the detailed entries.
3. To approve this timesheet, mark the checkbox next to staff ID CAT, and then
click the Approve Selected button.
Note: After you approve a timesheet, you cannot change entries on the sheet unless you unapprove the sheet first.
4. Clear the Unapproved only checkbox in the upper right corner.
5. To post the timesheet and make it available for billing, mark the checkbox next to staff ID CAT and click the Post Selected button.
Note: Clicking Post Selected both approves and posts the entry at once.
6. To see the entry that you just posted, clear the Unposted only checkbox.
Note: If necessary, click the Sheet Date column heading to sort by descending date so that most recent sheet dates are at the top of the list.

Walkthrough Exercises
Practice CS Time & Expense Entry WalkThrough 23
7. Click the button to expand the item from 4/4/2014 for staff member CAT. Note that the Approved By and Posted By fields for the AUDIT item show the ID of the staff member (CAT) who approved and posted the entry.
Notes
To unapprove or unpost an entry, right-click and choose Unapprove Selected or Unpost Selected.
Staff with security privileges to approve and post time and expense entries can edit approved and posted entries on the Review tab.
You can also use the context menu in the Review tab to select or deselect all timesheets, and print the grid.

Walkthrough Exercises
24 Practice CS Time & Expense Entry WalkThrough
Restoring the sample database After you have completed this walkthrough, you should restore the sample database that you backed up (see “Backing up the sample database” on page 2). Use the restored sample database to complete other Practice CS walkthroughs.
1. From the File menu, choose Restore.
2. In the Restore dialog, enter the path to the backup file that you want to restore, or click the button to navigate to the Data folder (usually a subfolder of X:\Program Files\Microsoft SQL Server, where X: is the drive on the computer where the data resides).
3. In the Restore File Location dialog, click the backup file that you want to restore, and click OK.
4. In the Restore dialog, enter a new name for the database in the New Firm name field.
Note: When you restore the Sample database, you must give it a different name. The restore process in Practice CS does not overwrite an existing database, and Practice CS does not allow firm databases with duplicate names. Therefore, you will need to give the database a different name when you restore it (for example, Sample1). The name may contain only alphanumeric characters.

Practice CS Time & Expense Entry WalkThrough 25
Remote Entry Practice CS includes a Remote Entry feature that enables you to enter time and expenses on your laptop when you are away from the office, and transmit those entries back to the office over the internet.
To take advantage of Remote Entry, you must allow Remote Entry to be enabled for your staff. This should be done during the installation of a new version of the program or a program update to the database server, but can be done at any time.
Your staff will have the option to enable Remote Entry on their computers during the desktop installation.
Note: Remote Entry can also be used by a remote employee who is rarely, if ever, in the office. In such a case, the employee would install Practice CS and import a Remote Entry data file sent by you via email or other means. For more information, see “Exporting remote entry data” on page 30 and “Importing remote entry data” on page 32.
Allowing Remote Entry for your firm The first step in setting up Remote Entry is to activate the feature for your firm during the server installation.
1. Perform a server installation as directed by the Installation Instructions document or by the Practice CS Getting Started guide. During server installation, you will be prompted to allow Remote Entry.

Remote Entry
26 Practice CS Time & Expense Entry WalkThrough
2. Click the Allow Remote Entry to be enabled on other computers option and then click Next.
Notes
If you choose not to allow Remote Entry during the server installation, the feature will be unavailable to your firm’s staff.
If you choose to allow Remote Entry, staff members who use the feature will be prompted to install Microsoft® SQL Server® 2008 R2 Express Edition SP2 on their workstations.
3. Complete the server installation as detailed in the Installation Instructions document or in the Practice CS Getting Started guide.
Enabling Remote Entry on your laptop If you want to enter time and expenses remotely on your laptop or on another computer away from the office, you will need to perform a desktop installation of Practice CS on that computer and enable Remote Entry.
1. Install a desktop installation of Practice CS as directed in the Practice CS Getting Started guide or the Installation Instructions document.
2. At the prompt, mark the option to enable Remote Entry, and click Next.

Remote Entry
Practice CS Time & Expense Entry WalkThrough 27
If you do not have a supported version of SQL Server Express installed on your computer, you will be prompted to install it.
3. Click the Install a new instance of Microsoft SQL Server 2008 R2 Express
Edition SP2 option, then click Next to continue the installation.
Setting up Remote Entry After you have enabled Remote Entry on your laptop, the next step is to create a remote entry firm that you will use when away from the office.
Creating a remote entry firm When your laptop is connected to the firm network, use this procedure to create a remote entry firm database.
1. Open your firm’s database in Practice CS.
2. Choose Setup > System Configuration > Remote Entry.
3. In the Remote Entry dialog, mark the Enable Remote Entry checkbox.

Remote Entry
28 Practice CS Time & Expense Entry WalkThrough
4. Choose an existing filter from the Practice CS Client data to store field, or click the button to create a new filter. For this walkthrough, click the button to add a new filter.
Note: If you do not choose a filter, data for all clients is stored in the Remote Entry Database.
5. In the Client Filters dialog, click the Add button.
6. In the Filter Name field, enter Cindy’s clients.
7. In the first Filter by field, select Partner ID.
8. In the Method field, select is.
9. In the Selected field, select Specified Staff.
10. In the last field, select CAT.
11. Click Enter to save the filter.
12. Click Done to close the Client Filters dialog and return to the Remote Entry dialog.
13. In the Practice CS Client data to store field, select the Cindy’s clients filter.
14. Click OK.

Remote Entry
Practice CS Time & Expense Entry WalkThrough 29
15. If prompted to verify that all entries have been transmitted, click Yes.
16. Click OK to dismiss the warning.
17. Click OK to dismiss the confirmation dialog.
Updating a remote entry firm Once you have created a remote entry firm, you do not need to repeat the procedure to create one, unless you want to change the selection of clients.
To update an existing remote entry firm, verify that all remotely entered time
and expenses have been transmitted, then click the button on the toolbar, dismissing the subsequent warnings.
Opening a remote entry data firm 1. Choose File > Open Firm.

Remote Entry
30 Practice CS Time & Expense Entry WalkThrough
2. The remote entry firm appears in your list of firms with (Remote Entry) in the firm name. For this walkthrough, select the database Sample (Remote Entry).
Note: If your firm uses Practice CS security, you must use your password to access your remote entry firm database.
3. Click OK.
4. If prompted to update the remote entry firm, click Yes.
Exporting remote entry data If you need to send remote entry data to a staff member who is away from the office, use the following procedure.
1. Open your firm’s database.
2. Choose File > Export > Remote Entry Data.
3. Click the button next to the Export to Remote Entry data file field.

Remote Entry
Practice CS Time & Expense Entry WalkThrough 31
4. Navigate to the folder where you want to create the export file, then enter a name for the XML file that you will export. For this walkthrough, name the file test_export.xml and save it to your computer’s desktop.
5. You can filter the list of clients to export. For this walkthrough, select the custom
filter Cindy’s clients from the drop-down list. The list of clients is narrowed accordingly.
6. Right-click in the grid and choose Select All.
7. Click the Export Selected button to export the file.

Remote Entry
32 Practice CS Time & Expense Entry WalkThrough
8. Click OK to close the confirmation dialog.
You can now send the exported XML file to a remote employee by attaching it to an email message, or by other means.
Importing remote entry data A staff member who is away from the office can import the exported XML file to create (or update) the remote entry firm on a laptop or other computer with Practice CS installed.
To import remote entry data, follow these steps.
1. Save the XML file that was exported at the office to a local folder or network.
2. Start Practice CS and log in to your remote entry firm.
3. Choose File > Import > Remote Entry Data.
4. In the Import Remote Entry Data dialog, click the button and navigate to the location where you saved the exported XML file.
5. Click Open.
6. Click OK.
7. Click Yes to confirm that all time and expense entries have been transmitted.

Remote Entry
Practice CS Time & Expense Entry WalkThrough 33
8. Click OK to dismiss the warning.
Note: If you entered time or expenses in a previous session but have not yet transmitted those entries back to the office, you need to transmit those entries before importing the updated remote entry firm XML file. Any existing entries will be deleted during the import process.
Entering data remotely After you have successfully prepared for remote entry, either by creating a remote entry firm directly or by importing the XML data file, you are ready to enter time and expenses in Practice CS.
Note: Transmission of entries to your firm’s database requires a connection to the internet or to your firm’s network.
1. Open your firm’s Remote Entry database.
2. Choose Actions > Time & Expense Entry.

Remote Entry
34 Practice CS Time & Expense Entry WalkThrough
The Remote Entry interface is a stripped-down version of the normal Practice CS interface, providing only certain staff-related features such as time and expense entry, staff calendar, user preferences, and integration with Microsoft® Outlook® mail, calendar, contacts, and tasks.
3. In the Entry tab, select sheet date 4/1/2014.
Enter time and expenses as you normally would using the firm database at the office. The remote entry data that you created or imported earlier provides the lists from which you can select clients, engagements, and activities. If your firm is licensed for the Project Management module, project and task information can also be selected for the available clients
4. Enter the following item.
Client Engagement Activity Date Hours MANSFIELD INDIVAX PREPARATION 4/1/2014 2
Note: If your firm is licensed for the Project Management module, you can select projects and tasks in Remote Entry, but you cannot modify them.
5. Click the Transmit Entries tab.

Remote Entry
Practice CS Time & Expense Entry WalkThrough 35
6. Mark the checkbox for the entry you want to transmit.
7. Click the Transmit Selected button.
8. Click OK.
9. Choose File > Close Firm.
Accepting remote entries For remotely entered time and expense items to be added to your firm’s database, you must accept them in the Time & Expense Entry screen.
1. Open Practice CS and log in to the main Sample database as staff CAT.
2. Choose Actions > Time & Expense Entry.

Remote Entry
36 Practice CS Time & Expense Entry WalkThrough
3. Click the Integrated Entries tab.
4. Mark the checkbox next to the sheet entry.
5. Click the Accept Selected button. The entries are moved into the firm database.
6. At the confirmation, click OK.
Notes
If you reject entries, they will be permanently deleted.
You can correct invalid or incorrect information on the Integrated Entries tab before accepting the entries.