practical truetype hinting
TRANSCRIPT
8/14/2019 Practical TrueType Hinting
http://slidepdf.com/reader/full/practical-truetype-hinting 1/17
Practical TrueType HintingFor use on low-resolution displays at small point sizes, the font rasterizer needs hints toproduce a pleasing result. Low-resolution devices are monitors and printers with a resolutionbelow 600 dpi in the eyes of fontographers. The combination of low resolution and smallpoint size results in a small number of pixels per character. Since the size of the character gridis called Em, the size of the character is expressed in ppm (Pixels Per eM) when we set up thehinting in a font.
TrueType and Type1The two main types of fonts Type1 and TrueType both use a diV erent kind of hintingmechanism. In this article well take a look at TrueType hinting from a practical point of view.The reason for this choice is that TrueType hinting is far more complex than Type1 hinting andTrueType fonts are most of the time used in web pages and as display fonts. With the arrival of embedded font tools (such as the free weft by Microsoft), the use of other fonts than Arial,Verdana, Comic Sans, etc. has become much easier for the web designer. Other fonts however,often lack hinting programs needed to produce legible results in web pages.
The toolsFontographer 4+ and Fontlab 3+ supply the tools needed to produce hinting programs.Surprisingly the tools available in these programs are quite diV erent. Both have the usual alignand link tools in their repertoire. Fontographer includes tools for making serif hints anddiagonal hints, and Fontlab has chosen to include several other links and various delta-hintingtools. The reason is simply that TrueType hinting consists of a rather low-level language. The
font editors include a set of higher level, visual hinting tools and produce the actual hintingprogram from the tools that the user applied to the glyphs.There is also a visual hinting program available from Microsoft for free to those who apply forthis tool.In this tutorial well start by taking a look at the tools of Fontlab 3.1, simply because the delta-hinting plays a vital part in producing legible text in small sizes. The name Fontlab isabbreviated in the text as fl.
Theory On the Microsoft website the TrueType standard and several articles about hinting instructions
are available. This article will take you through the steps to produce a hinted font withoutexplaining too much about the theory behind it.A few abbreviations and terms from the typographers lingo are used in the text. While mostusers of font designer programs are familiar with these words a small glossary of terms isincluded at the end of the tutorial.
Hinting is a programHints in TrueType fonts are implemented as interpreted programs. The programs are executedon the three levels mentioned in the next paragraph and the results are cached on each level.The language contains quite a collection of instructions, including instructions to access
constants and variables, conditional jumps, etc. There are a dozen or so professional hinters in
8/14/2019 Practical TrueType Hinting
http://slidepdf.com/reader/full/practical-truetype-hinting 2/17
the world who actually write hinting-programs using the instructions of the language. Luckilythe visual tools that are available supply us with a nice collection of high level instructions.Hinting is also called grid-Wtting, because what we do is actually telling the font rasterizer howit should Wt the outlines to the pixel grid. People often wonder why the rasterizer doesnt knowhow to do this. The reason is simply that the rasterizer doesnt see stems, bowls and shapes in
general, but only a collection of points and how these points must be connected. Furthermore,displaying a glyph at a small size automatically leads to trade-oV s between size, shape andproportion. The resulting bitmap should be legible, but also have the look and feel of theoriginal shape. The TrueType rasterizer simply turns on the pixels that are inside the outlineafter scaling it down to the desired size. Hinting programs allow us to change this shape undercertain circumstances and thus inXuence the resulting bitmap.
Top to bottomTrueType hinting is active on three levels: global for the entire font in all ppm sizes, glyph perglyph for all ppm sizes, and delta for one glyph in one (or a range of) ppm size(s).
Lets take a look the tools that are available and start with the highest level the global hintingtools.
Global hintingIn this area of hinting there are two tools available. These tools apply to all glyphs at all sizes.
Alignment zones
Alignment zones deWne the areas in which an overshoot or undershoot glyph can snap to thegridline of a non-overshoot (or non-undershoot) character. In many fonts the bottom of the ois a bit below the bottom of the x and the top of the o is a bit above the top of the x. This
way the size of the o appears to be equal to the size of the x. At low ppm sizes the overshootcan become exaggerated. Alignment zones can correct this by e.g. snapping the overshoot to thetop of the x when it comes within the alignment zone.Primary alignment zones can hold one bottom alignment zone (baseline zone) and up to sixtop alignment zones. Secondary alignment zones can hold up to Wve bottom alignment zones.Fontlab can automatically calculate the primary alignment zones by looking at several glyphpairs; e.g. o versus x, O versus H and p versus g. If the preview of the font still showsexaggerated undershoots in several characters, one can easily add secondary alignment zones ona trial and error basis.
Standard stem widths
Many fonts show at some point sizes the eV ect that stems of certain characters are one pixelwide and stem of other characters are two pixels wide. This is due to rounding problems.If for example one stem is 152 units (on a tt grid of 2048 upm (Units Per eM)) and anotherstem is 156 units wide, displaying the font at 20 ppm would result in the Wrst stem being 1 pixel(1.48) wide and the second stem being 2 pixels (1.52) wide. The diV erence of 1% resulted in100% on the display.In the stem widths dialog (File, Font Info, Alignment ) you can enter one standard stem width andup to ten snap values for both the vertical and horizontal stems. TrueType hinting only uses thestandard stem widths. The glyph hints that are discussed in the next chapter can be linked to thesestem widths. This way we can make all vertical stems appear to be the same width, even thoughthe outline tells us diV erent.Note: the automatic calculation of stem width in Fontlab 3.1 with a tt font does not work. See Stem widths for instructions on how to manually set these values.
8/14/2019 Practical TrueType Hinting
http://slidepdf.com/reader/full/practical-truetype-hinting 3/17
Glyph hintsAfter running the global hinting program, the rasterizer star ts to work on individual glyphs.Although the hints in this category are applied to a single point, they tend to aV ect the entireoutline the point belongs to; mostly because of links that are formed with other points by
other hints on this level.The align- and link commands in this category either work horizontally or vertically. You canhowever apply both a horizontal and a vertical command to the same point.
Align commands
The align-button in the toolbar has actually two functions. If the point is within the top orbottom alignment zone it will apply the AlignTop or AlignBottom command to that point(unless you use the shift-key while clicking the point). These are useful for characters thatjump above the x-height or below the baseline for example.In all other cases the alignment is to a nearby gridline. The following commands are availablefrom the option panel:
· Round to closest grid line (code 0). Appears as a double headed arrow with the arrowspointing outward and a green mark at the end of the arrow. This will align the point withthe nearest grid line.
· Round to left or bottom line (code 1). Appears as a single headed arrow, arrow pointedoutward and a green mark and the end.
· Round to right or top grid line (code 2). Appears as code 1.
· Round to centre (code 3). Appears as a double headed arrow with arrows pointing inwardand a green mark at both ends. Aligns the point with the gridline closest to the centre of the pixel.
The commands appear in the program panel as AlignV 5 [1]; Align<direction> <pointnumber> <code>. You can change rounding code and convert an AlignV/H command toAlignTop/Bottom (if the point is inside or close to an alignment zone) in the context menu of the point.These align commands are useful if a glyph is always or often higher or lower than the otherglyphs in the font. You can now correct the glyph in a lot of ppm sizes at the same time. If oneor two sizes do not work correctly, use the Middle Delta commands well discuss later.
Single link
The single link will keep the linked point at the same distance from the base point. You applythe single link by clicking the single link button and then dragging the base point to the linkedpoint. The single link will either work horizontally or vertically.
But things get complicated and ugly here:· Links may be attached to a stem width from the stem width table (which we deWned
globally). Then the width of the link will be made equal to the stem width value itsattached to. If the link is not attached to a stem width it may or may not be rounded to thegrid, depending on whether the Round distance option was activated (the option isrecommended to be on and is on by default).
· The base point can/should be aligned by an align command. The linked point will thenmove with the base point. This is actually the point of having single links: link a point onthe outside of the top of the o to the point on the inside and align the top of the o withthe top alignment zone. This way the inside of the character will move together with theoutside.
fl considers a link whose base point is not aligned or linked as an error and displays a redarrow near the link to indicate this.
8/14/2019 Practical TrueType Hinting
http://slidepdf.com/reader/full/practical-truetype-hinting 4/17
· Normally the linked point cannot be aligned anymore, except when the single link is analigned single link. By selecting the Round destination option and a link type (see section above on
Align commands) you can make an aligned single link.Links appear in the program panel as SingleLinkH 1 -> 23 [0] 2; SingleLink<direction><base point> -> <linked point> [<stemnumber>|ns] <aligncode>|na.
Double link
This link will control only the distance between two points. It may be attached to a stem width,so the distance will be equal to the stem width. You cannot control in which direction thelinked points are moved.The use of this link is limited to stems of which the position does not matter. Using one of the points of a double link as the destination point of a single link will cause fl to display ared arrow as in indication of an error. You can however use one or both points of a double linkas the base point for single links.Double links appear in the program panel as DoubleLinkV 2 <-> 12 [1];DoubleLink<direction> <point#> <-> <point#> [<stem#>|ns].
Interpolation
Some areas in glyph one point should be in the middle of two other points (in some fonts inthe v, w, 3, B, etc.). The interpolation command can link that point to the other two points.Simply drag the Wrst base point to the linked point and then drag the linked point to thesecond base point.The linked point can also be aligned to the grid by selecting the Round destination option andselecting an align type (see Single Link).
Delta links
Delta links apply to one glyph and one ppm size only. They are useful for the little changes thatneed to be made to make the bitmap perfect. Again there are two types of delta hints.
Middle Delta commands
These are inserted in the hinting program and will often aV ect more than one point. But sincethey only work in one ppm size, the eV ect is limited. The commands are useful to correct theresults of links and align commands for only a few sizes.Simply activate the Middle Delta button and drag the point in the direction you want. Draggingthe point again in a diV erent direction easily changes the command. The command works insteps of À of a pixel. fl automatically combines similar delta instructions for diV erent ppm
sizes into one single command. fl also splits a non-orthogonal delta hint in two separate hints.TIP: To remove a combined delta instruction for one size, simply change thedistance for this size and then the combined instructions are automatically split.Then the delta command can be removed from the program panel.
The command appears in the program panel as MDeltaH 12 <9> 9-10; MDelta<direction><point#> <<distance>> <ppm0>-<ppm1>.Note: Sometimes fl3.1 does not seem to split the combined delta hints (same hint for more than one ppm size) if youwant to change them. Deleting the delta hint results in the deletion of the entire command (thus deleting the hint for more than one ppm size). If the combined hint was part of a non-orthogonal hint, only the hint for one direction(either horizontal or vertical) is deleted. The solution seems to be to write down the direction, length and ppm size(s)
for that hint, delete it, apply the correct hint for the current size and then re-apply the hint for the other size(s).

8/14/2019 Practical TrueType Hinting
http://slidepdf.com/reader/full/practical-truetype-hinting 5/17
Final Delta command
After the Wnal interpolation of all untouched points the Wnal delta instructions kick in. Theyonly aV ect one single point of the interpolated outline. After achieving the best possible resultwith the middle delta instructions you can do the last pixel moving with the Wnal deltainstructions.The Wnal delta instructions have a similar appearance in the program panel.
What shall we do with all these hinting tools? Use a practical approach! Work from global settings to Wne detail. SoIn the Font Info dialog fl can easily calculate the alignment zones by itself. Simply click on the
Auto zones button.
Stem widthsStrangely enough the automatic stem width calculation does not work with TrueType fonts. We
have to do a little manual labour. Enter the measure mode of fl and note the widths (andheights) of vertical stems, horizontal stems and the horizontal and vertical size of the diagonalstems (in glyphs such as aksvwxyzAKSVWXYZ). In File, Font Info, Alignment you can simplyadd these numbers. Start with the standard width of the vertical and horizontal stems.
In the illustration fl calculated the alignment zones by hitting the Auto zones button. Aftermeasuring the stem widths the widths for vertical and horizontal stems (87) and the width fordiagonal stems (94) were added to the list. Simply click on the Add button and type the numberin the text box on the left of this button. Click on Add again to enter another stem size. fl (andwe) will use these values to attach links to; this will take care of the problem of certain stemslooking thicker than others at certain sizes.
8/14/2019 Practical TrueType Hinting
http://slidepdf.com/reader/full/practical-truetype-hinting 6/17
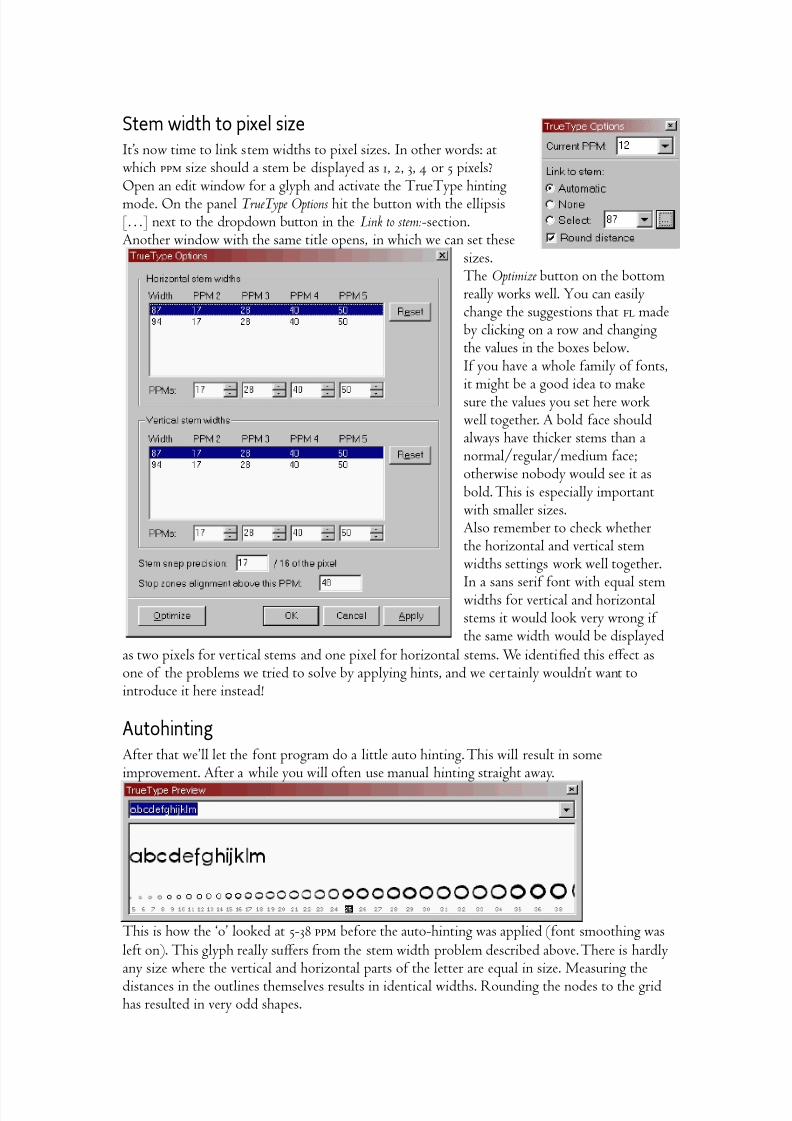
Stem width to pixel sizeIts now time to link stem widths to pixel sizes. In other words: atwhich ppm size should a stem be displayed as 1, 2, 3, 4 or 5 pixels?Open an edit window for a glyph and activate the TrueType hintingmode. On the panel TrueType Options hit the button with the ellipsis[] next to the dropdown button in the Link to stem:-section.Another window with the same title opens, in which we can set these
sizes.The Optimize button on the bottomreally works well. You can easilychange the suggestions that fl madeby clicking on a row and changingthe values in the boxes below.If you have a whole family of fonts,it might be a good idea to makesure the values you set here workwell together. A bold face shouldalways have thicker stems than anormal/regular/medium face;otherwise nobody would see it asbold. This is especially importantwith smaller sizes.Also remember to check whetherthe horizontal and vertical stemwidths settings work well together.
In a sans serif font with equal stemwidths for vertical and horizontalstems it would look very wrong if the same width would be displayed
as two pixels for vertical stems and one pixel for horizontal stems. We identiWed this eV ect asone of the problems we tried to solve by applying hints, and we certainly wouldnt want tointroduce it here instead!
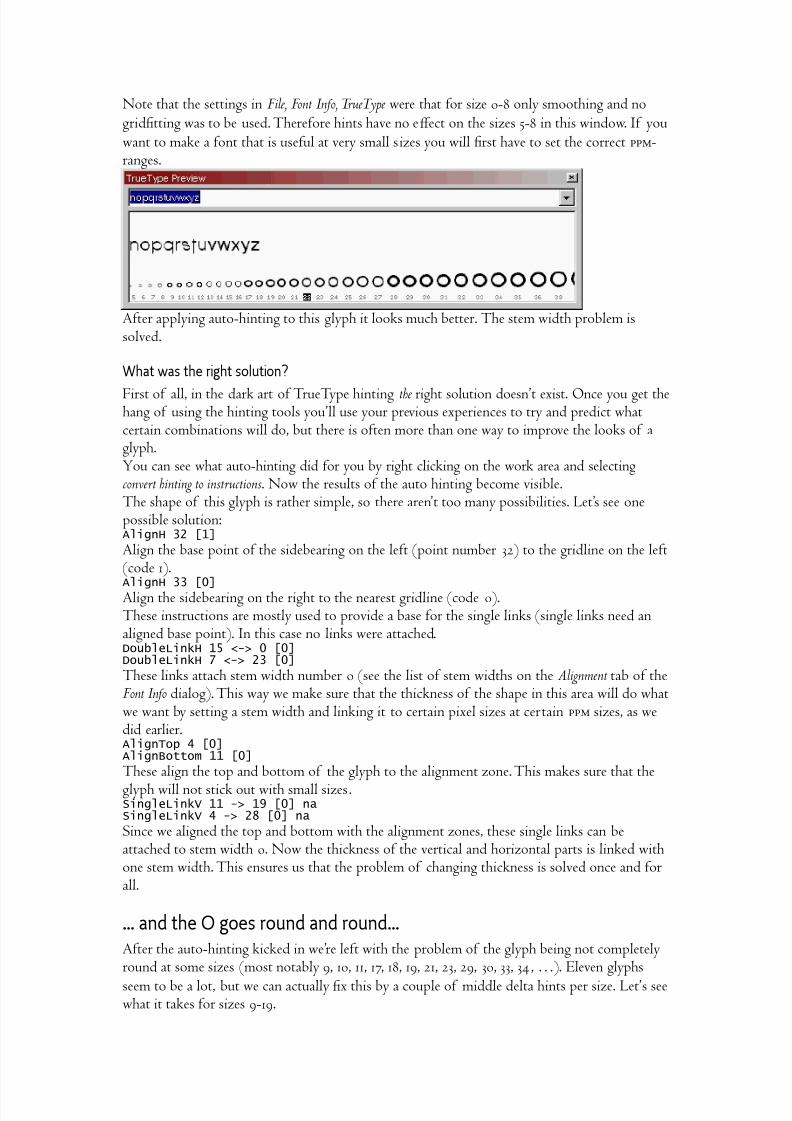
AutohintingAfter that well let the font program do a little auto hinting. This will result in someimprovement. After a while you will often use manual hinting straight away.
This is how the o looked at 5-38 ppm before the auto-hinting was applied (font smoothing wasleft on). This glyph really suV ers from the stem width problem described above. There is hardlyany size where the vertical and horizontal parts of the letter are equal in size. Measuring the
distances in the outlines themselves results in identical widths. Rounding the nodes to the gridhas resulted in very odd shapes.
8/14/2019 Practical TrueType Hinting
http://slidepdf.com/reader/full/practical-truetype-hinting 7/17
Note that the settings in File, Font Info, TrueType were that for size 0-8 only smoothing and nogridWtting was to be used. Therefore hints have no eV ect on the sizes 5-8 in this window. If youwant to make a font that is useful at very small sizes you will Wrst have to set the correct ppm-ranges.
After applying auto-hinting to this glyph it looks much better. The stem width problem issolved.
What was the right solution?
First of all, in the dark art of TrueType hinting the right solution doesnt exist. Once you get thehang of using the hinting tools youll use your previous experiences to try and predict whatcertain combinations will do, but there is often more than one way to improve the looks of aglyph.You can see what auto-hinting did for you by right clicking on the work area and selectingconvert hinting to instructions . Now the results of the auto hinting become visible.The shape of this glyph is rather simple, so there arent too many possibilities. Lets see onepossible solution:AlignH 32 [1]
Align the base point of the sidebearing on the left (point number 32) to the gridline on the left(code 1).AlignH 33 [0]
Align the sidebearing on the right to the nearest gridline (code 0).These instructions are mostly used to provide a base for the single links (single links need analigned base point). In this case no links were attached.DoubleLinkH 15 <-> 0 [0]DoubleLinkH 7 <-> 23 [0]
These links attach stem width number 0 (see the list of stem widths on the Alignment tab of theFont Info dialog). This way we make sure that the thickness of the shape in this area will do whatwe want by setting a stem width and linking it to certain pixel sizes at certain ppm sizes, as wedid earlier.AlignTop 4 [0]AlignBottom 11 [0]
These align the top and bottom of the glyph to the alignment zone. This makes sure that the
glyph will not stick out with small sizes.SingleLinkV 11 -> 19 [0] naSingleLinkV 4 -> 28 [0] na
Since we aligned the top and bottom with the alignment zones, these single links can beattached to stem width 0. Now the thickness of the vertical and horizontal parts is linked withone stem width. This ensures us that the problem of changing thickness is solved once and forall.
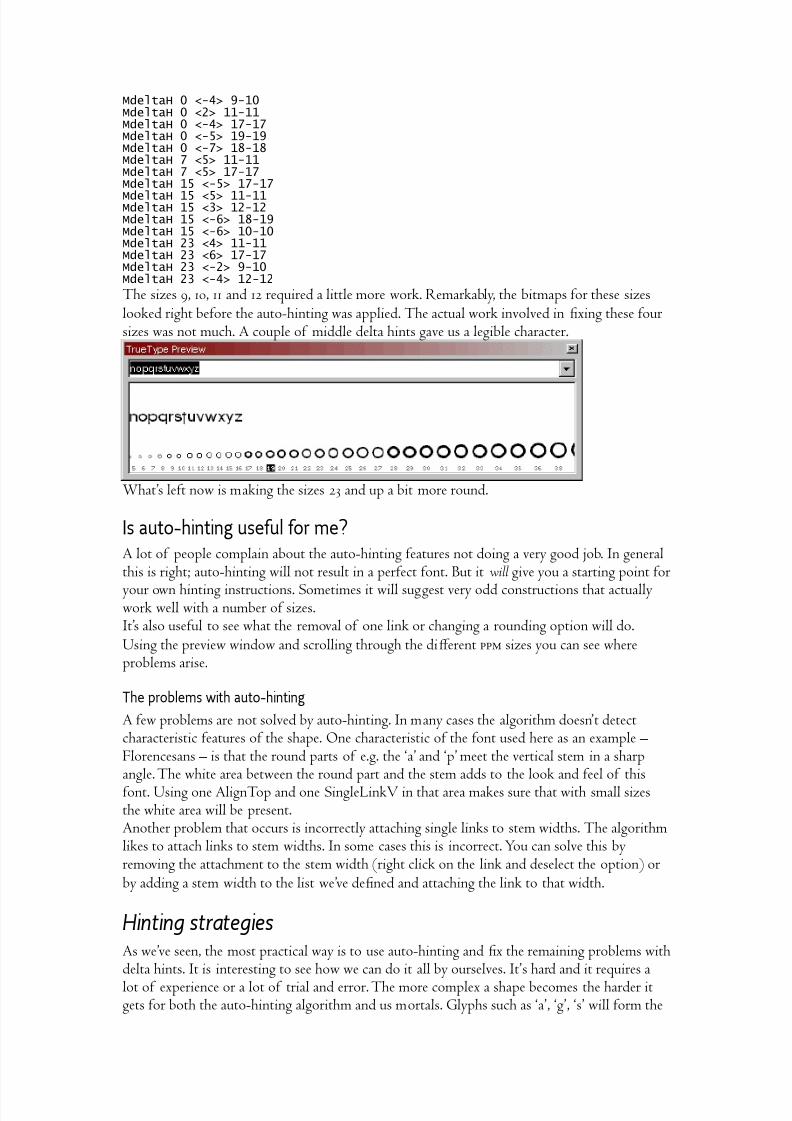
… and the O goes round and round…After the auto-hinting kicked in were left with the problem of the glyph being not completelyround at some sizes (most notably 9, 10, 11, 17, 18, 19, 21, 23, 29, 30, 33, 34, ). Eleven glyphs
seem to be a lot, but we can actually Wx this by a couple of middle delta hints per size. Lets seewhat it takes for sizes 9-19.
8/14/2019 Practical TrueType Hinting
http://slidepdf.com/reader/full/practical-truetype-hinting 8/17
MdeltaH 0 <-4> 9-10MdeltaH 0 <2> 11-11MdeltaH 0 <-4> 17-17MdeltaH 0 <-5> 19-19MdeltaH 0 <-7> 18-18MdeltaH 7 <5> 11-11MdeltaH 7 <5> 17-17MdeltaH 15 <-5> 17-17
MdeltaH 15 <5> 11-11MdeltaH 15 <3> 12-12MdeltaH 15 <-6> 18-19MdeltaH 15 <-6> 10-10MdeltaH 23 <4> 11-11MdeltaH 23 <6> 17-17MdeltaH 23 <-2> 9-10MdeltaH 23 <-4> 12-12
The sizes 9, 10, 11 and 12 required a little more work. Remarkably, the bitmaps for these sizeslooked right before the auto-hinting was applied. The actual work involved in Wxing these foursizes was not much. A couple of middle delta hints gave us a legible character.
Whats left now is making the sizes 23 and up a bit more round.
Is auto-hinting useful for me?A lot of people complain about the auto-hinting features not doing a very good job. In generalthis is right; auto-hinting will not result in a perfect font. But it will give you a starting point for
your own hinting instructions. Sometimes it will suggest very odd constructions that actuallywork well with a number of sizes.Its also useful to see what the removal of one link or changing a rounding option will do.Using the preview window and scrolling through the diV erent ppm sizes you can see whereproblems arise.
The problems with auto-hinting
A few problems are not solved by auto-hinting. In many cases the algorithm doesnt detectcharacteristic features of the shape. One characteristic of the font used here as an example Florencesans is that the round parts of e.g. the a and p meet the vertical stem in a sharpangle. The white area between the round part and the stem adds to the look and feel of thisfont. Using one AlignTop and one SingleLinkV in that area makes sure that with small sizesthe white area will be present.Another problem that occurs is incorrectly attaching single links to stem widths. The algorithmlikes to attach links to stem widths. In some cases this is incorrect. You can solve this byremoving the attachment to the stem width (right click on the link and deselect the option) orby adding a stem width to the list weve deWned and attaching the link to that width.
Hinting strategiesAs weve seen, the most practical way is to use auto-hinting and Wx the remaining problems withdelta hints. It is interesting to see how we can do it all by ourselves. Its hard and it requires a
lot of experience or a lot of trial and error. The more complex a shape becomes the harder itgets for both the auto-hinting algorithm and us mortals. Glyphs such as a, g, s will form the
8/14/2019 Practical TrueType Hinting
http://slidepdf.com/reader/full/practical-truetype-hinting 9/17
biggest problem in sans serif fonts. Also the x, B, E will provide you with the challenge of placing the middle part at various ppm sizes.
Trading off between size and proportionMost of the time we have to decide between the absolute size of a part of the glyph and therelative size (compared to the entire glyph and to other parts of the glyph). The serifs of manycharacters are a good example. Serifs are an important part of the look and feel. If the outlineis scaled down the serifs are often so small that you should remove them completely. Thischanges the character of the font too much, so we decide to make them a lot larger.The same decision must be made for characters such as the E. If the entire glyph is an evennumber of pixels high the horizontal stem in the middle cannot be placed in the centre. Usingalignments and links you can decide whether it should be above or below the centre. Anotherexample of this dilemma is the m. If you link all the vertical stems and the spaces betweenthem from left to right you will end up with the correct proportions. At small sizes the totalwidth of the character will most likely be larger than intended. You decide what to do.
The rasterizer is stupidThis is an important thing to remember. If you place a link between the outside and the insideof a B to Wx the vertical stem, you have to place two links: one to the upper and one to thelower hole. The rasterizer does not see shapes; everything is a collection of points.Even worse: it can easily ruin the thickness of the cups of the B in this case. It simply movedthe two holes to make the vertical stem right. You also have to apply links to Wx the thicknessof the two cups.
Identify key points
The rasterizer will move unaV ected points to approximate the original shape and proportionsof an outline as good as possible. Your eV orts should be focused on aligning and linking theextreme points and other important points.So, start by aligning the right and left sidebearing and the top and bottom points of the outlineto the alignment zones. This will give you enough points as base points for single links.After that decide where the white space in the grid has to come. Rounding can completelyremove white space. Applying enough single links can even make the bitmap wider than thewidth of the glyph. One single link (not attached to a stem width!) can Wx the white space.Next we provide links to correct the stems and distances that should be the size of a stemwidth.The last things to do will be the serifs (size and shape!), interpolation (in sans serif W, the
middle stem of the B, etc.) and Wxing other things that dont look good with a large number of sizes.Remember its better to apply a few hints that will solve things in 80% of the sizes than to tryand Wx everything with delta hints.
Which sizes should be hinted? In the Font Info dialog, the TrueType tab lets you set which font sizes should be displayed usingwhat algorithms. The settings S(moothing) and G(ridWtting) are available here. The TrueTypestandard recommends that smoothing is set for sizes 0-8, gridWtting for sizes 9-17, and bothsmoothing and gridWtting for sizes 18 and larger. This means that sizes 9-17 will not be
smoothed. This results in more legible fonts if they are well hinted although customersseems to expect that turning font smoothing on results in smoothed fonts at all point sizes.
8/14/2019 Practical TrueType Hinting
http://slidepdf.com/reader/full/practical-truetype-hinting 10/17
If these standard settings are used you should concentrate your eV orts with delta hinting onsizes 9-17.Also keep in mind that hints only make a diV erence of one pixel. Changing the height of acharacter with one pixel has more impact on small font sizes and less on larger font sizes. Youwill use more delta hinting at smaller sizes and let the links, etc. do the work at larger sizes.
Turn of font smoothing in Windows to see the results of hinting in larger font sizes. If thenon-smoothed character looks good, the smoothed version will be good also. Its easier to seeproblems in non-smoothed characters however.Note: The Visual TrueType tool from Microsoft includes the possibility to have separate hinting for smoothed text and
for non-smoothed text.
The limitationsFontlab provides us with a useful, but limited set of high level hinting tools. This takes awaythe problems of combining delta hints, setting the right order, combining the instructions intouseful tools, etc. On the other hand, a lot of the power has disappeared. TrueType hinting
allows the font to make decisions based on various conditions, including the ppm size, etc. Anexample is a font with ornamented caps where the ornaments are removed for small sizes.In most cases you can dramatically improve the quality of the font for use on screen by using arather limited number of hints.
Real world examplesLets take a look at a few glyphs. Well start with a couple of easy ones, and as we learn welltake on the challenge of more complex situations. Always remember that these examples seemedto work for me in this particular font. Others may have found better solutions or more elegantways.
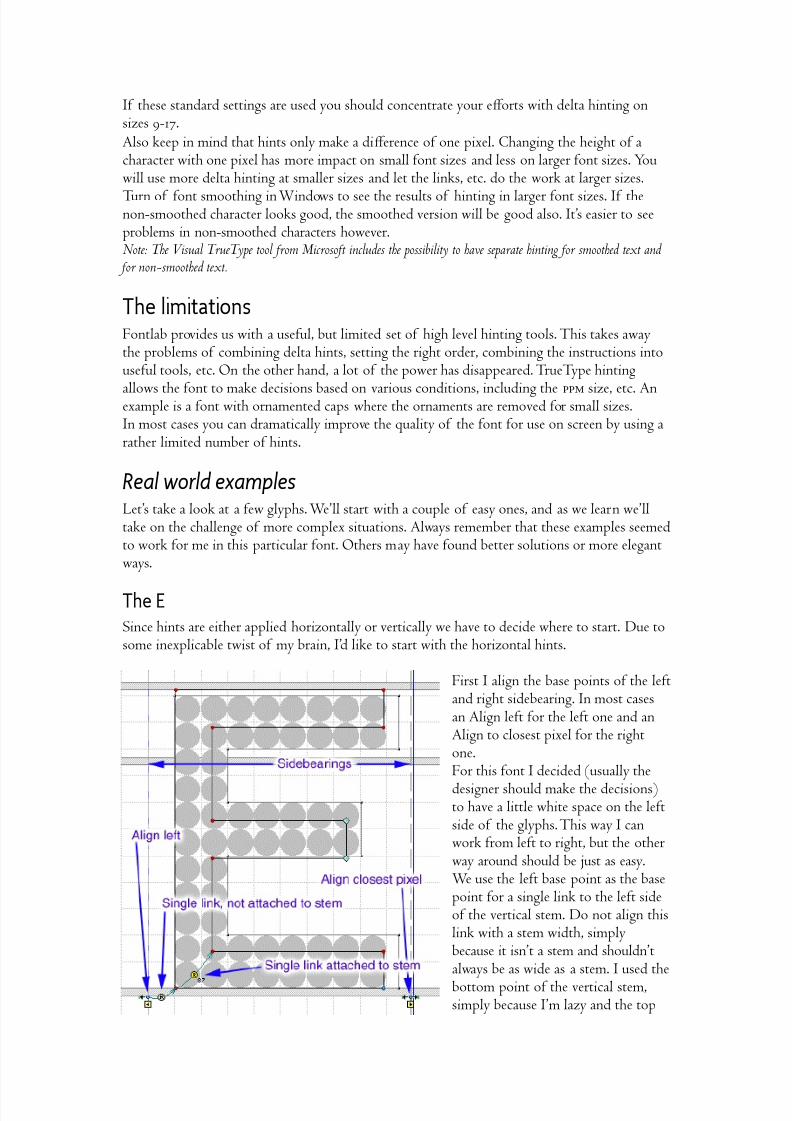
The ESince hints are either applied horizontally or vertically we have to decide where to start. Due tosome inexplicable twist of my brain, Id like to start with the horizontal hints.
First I align the base points of the leftand right sidebearing. In most casesan Align left for the left one and anAlign to closest pixel for the rightone.For this font I decided (usually the
designer should make the decisions)to have a little white space on the leftside of the glyphs. This way I canwork from left to right, but the otherway around should be just as easy.We use the left base point as the basepoint for a single link to the left sideof the vertical stem. Do not align thislink with a stem width, simplybecause it isnt a stem and shouldntalways be as wide as a stem. I used the
bottom point of the vertical stem,simply because Im lazy and the top
8/14/2019 Practical TrueType Hinting
http://slidepdf.com/reader/full/practical-truetype-hinting 11/17
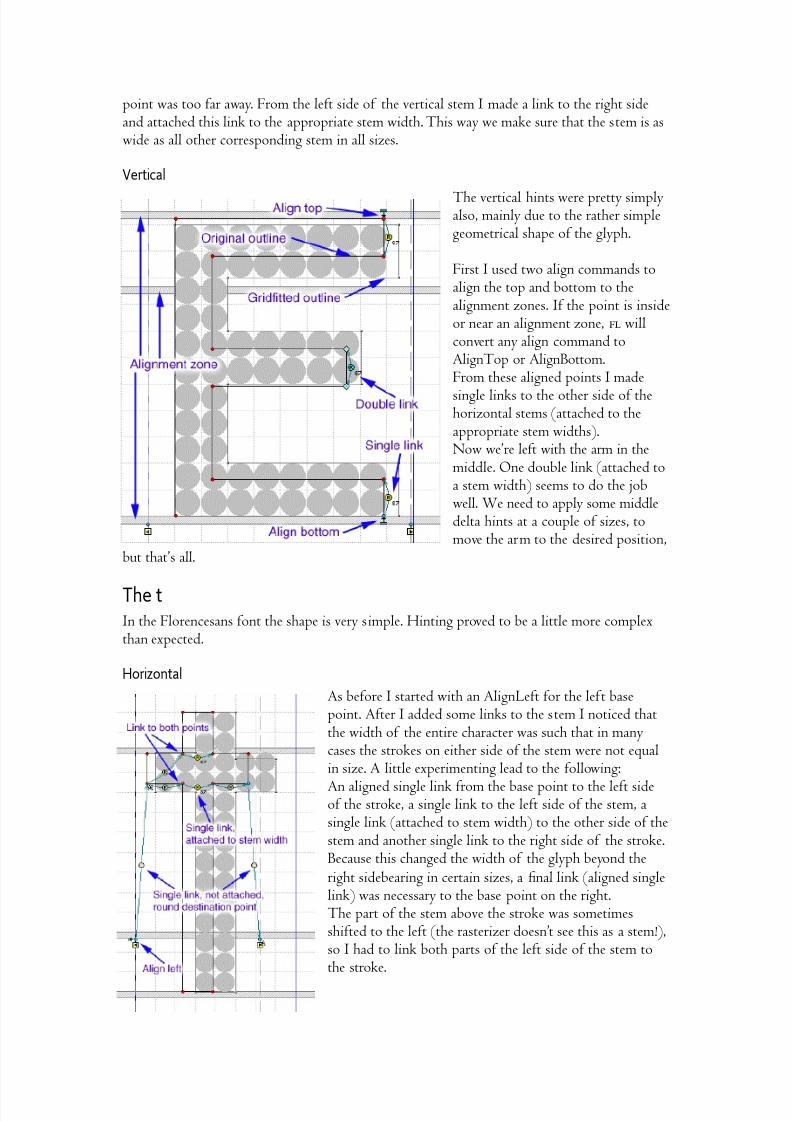
point was too far away. From the left side of the vertical stem I made a link to the right sideand attached this link to the appropriate stem width. This way we make sure that the stem is aswide as all other corresponding stem in all sizes.
Vertical
The vertical hints were pretty simplyalso, mainly due to the rather simplegeometrical shape of the glyph.
First I used two align commands toalign the top and bottom to thealignment zones. If the point is insideor near an alignment zone, fl willconvert any align command toAlignTop or AlignBottom.From these aligned points I made
single links to the other side of thehorizontal stems (attached to theappropriate stem widths).Now were left with the arm in themiddle. One double link (attached toa stem width) seems to do the jobwell. We need to apply some middledelta hints at a couple of sizes, tomove the arm to the desired position,
but thats all.
The tIn the Florencesans font the shape is very simple. Hinting proved to be a little more complexthan expected.
Horizontal
As before I started with an AlignLeft for the left basepoint. After I added some links to the stem I noticed thatthe width of the entire character was such that in manycases the strokes on either side of the stem were not equalin size. A little experimenting lead to the following:
An aligned single link from the base point to the left sideof the stroke, a single link to the left side of the stem, asingle link (attached to stem width) to the other side of thestem and another single link to the right side of the stroke.Because this changed the width of the glyph beyond theright sidebearing in certain sizes, a Wnal link (aligned singlelink) was necessary to the base point on the right.The part of the stem above the stroke was sometimesshifted to the left (the rasterizer doesnt see this as a stem!),so I had to link both parts of the left side of the stem tothe stroke.
8/14/2019 Practical TrueType Hinting
http://slidepdf.com/reader/full/practical-truetype-hinting 12/17
Vertical
Luckily the vertical hinting was very simple as you can see.Align the top of the stroke with the alignment zone and use it asthe base point for the single links to the other side of the stroke
(to attach this to the stem width) and to the top of the verticalstem (not attached).The last bit was to align the bottom of the letter to the alignmentzone for descenders.
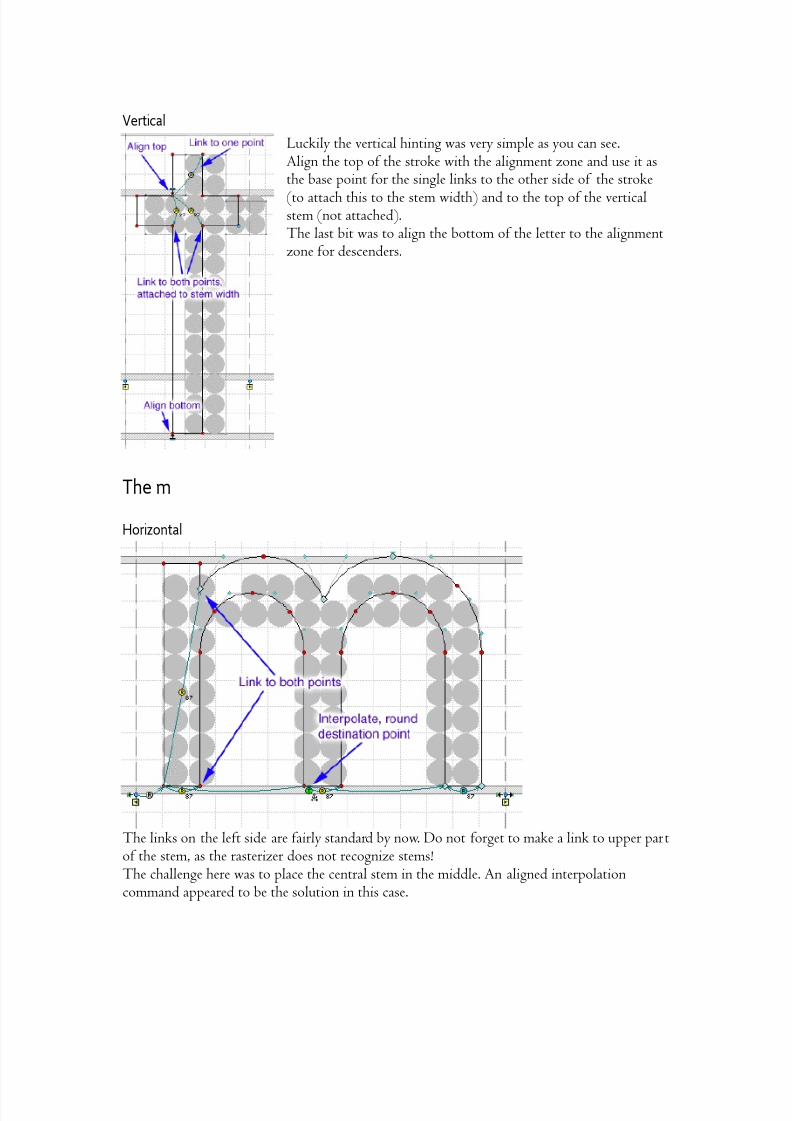
The m
Horizontal
The links on the left side are fairly standard by now. Do not forget to make a link to upper partof the stem, as the rasterizer does not recognize stems!The challenge here was to place the central stem in the middle. An aligned interpolationcommand appeared to be the solution in this case.
8/14/2019 Practical TrueType Hinting
http://slidepdf.com/reader/full/practical-truetype-hinting 13/17
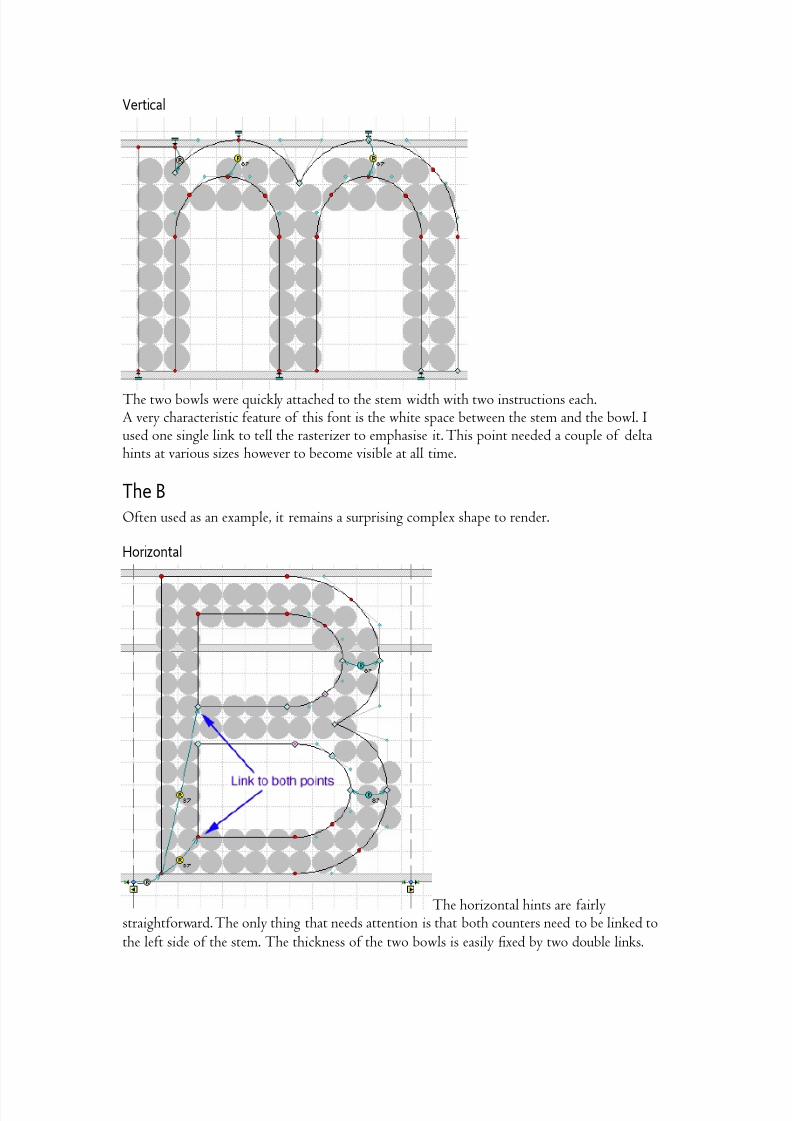
Vertical
The two bowls were quickly attached to the stem width with two instructions each.A very characteristic feature of this font is the white space between the stem and the bowl. Iused one single link to tell the rasterizer to emphasise it. This point needed a couple of deltahints at various sizes however to become visible at all time.
The BOften used as an example, it remains a surprising complex shape to render.
Horizontal
The horizontal hints are fairlystraightforward. The only thing that needs attention is that both counters need to be linked tothe left side of the stem. The thickness of the two bowls is easily Wxed by two double links.
8/14/2019 Practical TrueType Hinting
http://slidepdf.com/reader/full/practical-truetype-hinting 14/17
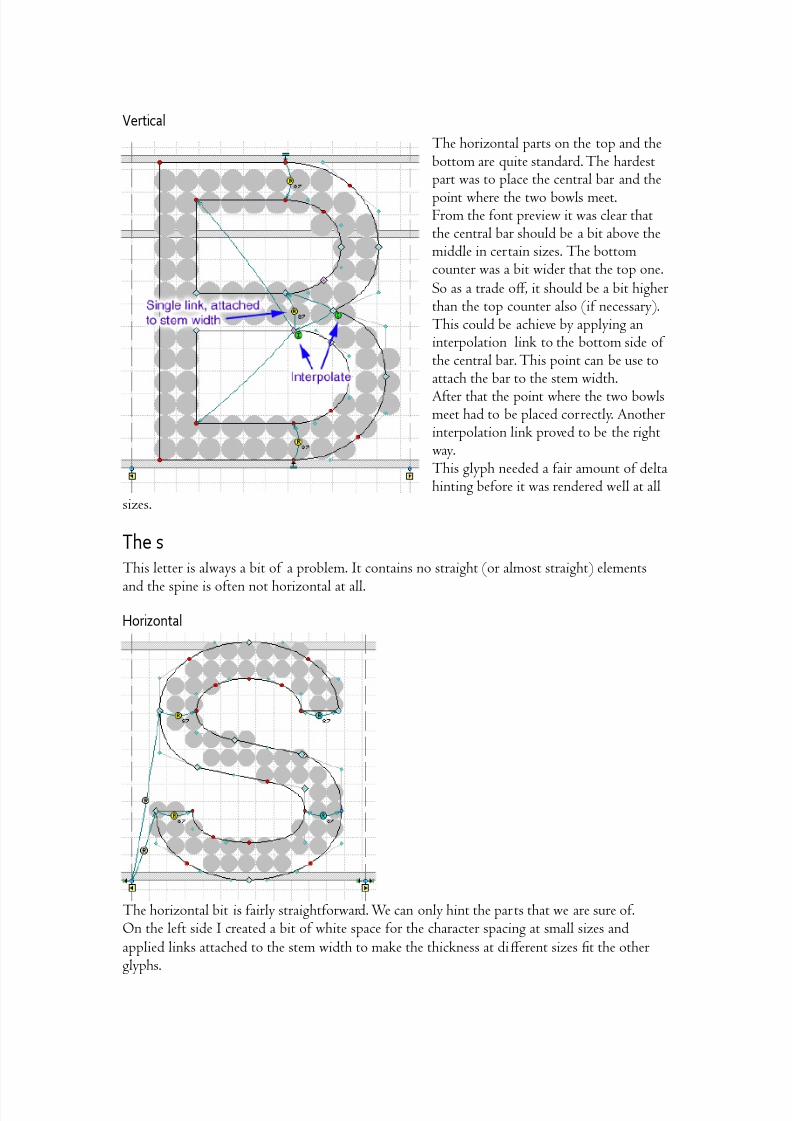
Vertical
The horizontal parts on the top and thebottom are quite standard. The hardestpart was to place the central bar and the
point where the two bowls meet.From the font preview it was clear thatthe central bar should be a bit above themiddle in certain sizes. The bottomcounter was a bit wider that the top one.So as a trade oV , it should be a bit higherthan the top counter also (if necessary).This could be achieve by applying aninterpolation link to the bottom side of the central bar. This point can be use toattach the bar to the stem width.
After that the point where the two bowlsmeet had to be placed correctly. Anotherinterpolation link proved to be the rightway.This glyph needed a fair amount of deltahinting before it was rendered well at all
sizes.
The sThis letter is always a bit of a problem. It contains no straight (or almost straight) elements
and the spine is often not horizontal at all.
Horizontal
The horizontal bit is fairly straightforward. We can only hint the parts that we are sure of.On the left side I created a bit of white space for the character spacing at small sizes andapplied links attached to the stem width to make the thickness at diV erent sizes Wt the otherglyphs.
8/14/2019 Practical TrueType Hinting
http://slidepdf.com/reader/full/practical-truetype-hinting 15/17
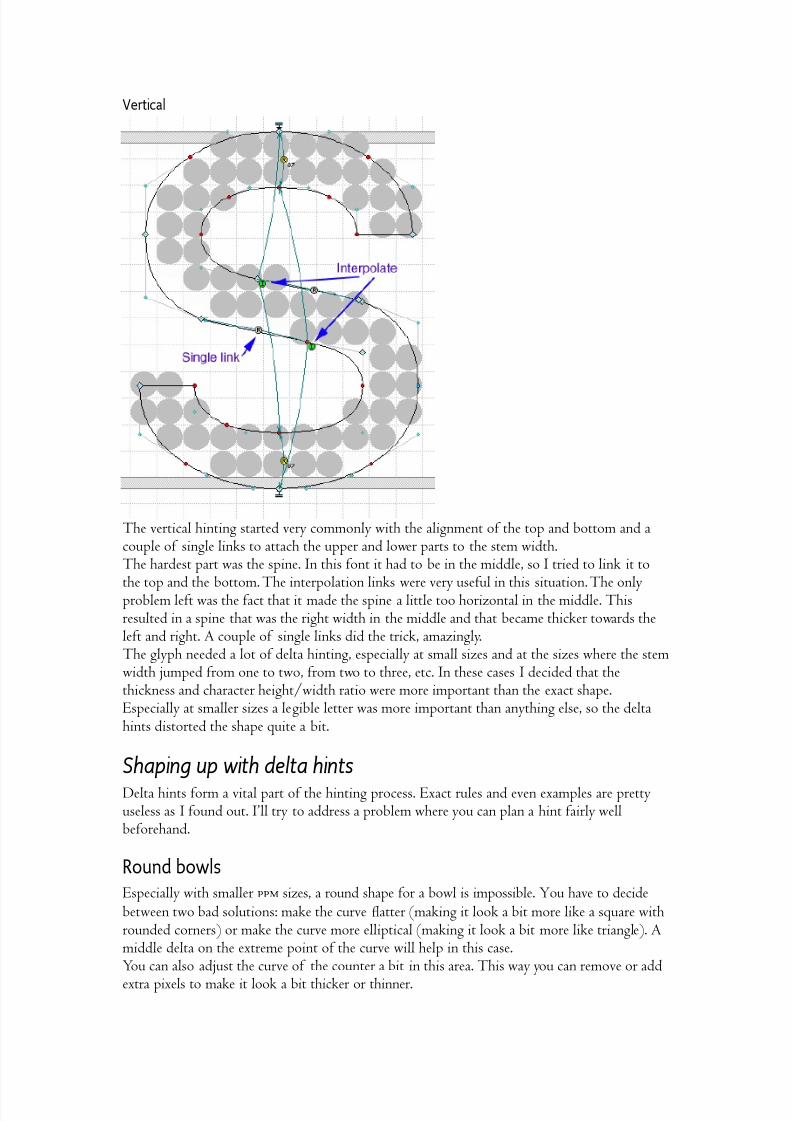
Vertical
The vertical hinting started very commonly with the alignment of the top and bottom and acouple of single links to attach the upper and lower parts to the stem width.The hardest part was the spine. In this font it had to be in the middle, so I tried to link it to
the top and the bottom. The interpolation links were very useful in this situation. The onlyproblem left was the fact that it made the spine a little too horizontal in the middle. Thisresulted in a spine that was the right width in the middle and that became thicker towards theleft and right. A couple of single links did the trick, amazingly.The glyph needed a lot of delta hinting, especially at small sizes and at the sizes where the stemwidth jumped from one to two, from two to three, etc. In these cases I decided that thethickness and character height/width ratio were more important than the exact shape.Especially at smaller sizes a legible letter was more important than anything else, so the deltahints distorted the shape quite a bit.
Shaping up with delta hintsDelta hints form a vital part of the hinting process. Exact rules and even examples are prettyuseless as I found out. Ill try to address a problem where you can plan a hint fairly wellbeforehand.
Round bowlsEspecially with smaller ppm sizes, a round shape for a bowl is impossible. You have to decidebetween two bad solutions: make the curve Xatter (making it look a bit more like a square withrounded corners) or make the curve more elliptical (making it look a bit more like triangle). Amiddle delta on the extreme point of the curve will help in this case.You can also adjust the curve of the counter a bit in this area. This way you can remove or add
extra pixels to make it look a bit thicker or thinner.

8/14/2019 Practical TrueType Hinting
http://slidepdf.com/reader/full/practical-truetype-hinting 16/17
If the problem is that only one single pixel must be removed, its often easier to move thenearest point with a single Wnal delta hint. Although the outline becomes very oddly shaped,the resulting bitmap should be what you focus on.
Positioning arms and strokesAlthough it would be nice if you applied few hints that help position the arms (of e.g. the E,F) and cross strokes (of the t, f , etc.), there will be situations where the rasterizer decides toput an arm or cross stroke in slightly the wrong place. Middle deltas are the obvious choice,because the other points of the shape are also moved accordingly. It is often necessary to applyhints to both sides of the arm (the upper and lower side)
Loose endsIn some letters (9, a, e, etc.) the end of a curved part may get very close to another part of the glyph. At small sizes it may even come in contact with it, making it look like a closed shape.In this situation delta hints (either a Wnal delta if only one pixel is involved or a middle delta)
can move the end a bit away from the rest of the shape.
StrokesBecause fl has no tools to hint diagonal parts of the glyph, strokes are very hard to hint. Youcan try to measure the horizontal and vertical sizes, set extra stem widths with those values andattach a link to that stem width, but in most cases this is very hard too. The problem is that youmust set ppm sizes at which the stem width will be displayed as 1, 2, 3, etc. pixels wide. Theproblem is that these sizes would not be the same as those for the standard stem width. Youcould try to set these values by trial and error, but delta hints will probably be necessary in thiscase.
Rendering a stroke may result in very ugly patterns. In this case a few delta hints may produce amore regular shape for the bitmap.
Glossary of terms Apex The top part of the A Arm Horizontal parts of a glyph that have one free side (the three horizontal arms of an E). Ascender Part of some letters that is above the x-height.Baseline The horizontal line where bottom of most characters in a font seems to rest (exceptfor the descenders).Beak Similar to a spur, but larger, sits on the end of the arms of the L, E and T in serif
fonts.Bowl Curved part of a letter (the B has two bowls).Bracket The connection between the serif and the stem or stroke.Capline The horizontal line through the tops of most capital letters.Counter The empty space inside a (partially) enclosed area.Crossbar Horizontal parts that connect two stems (the horizontal bar in the H).Cross stroke A horizontal element that intersects with a vertical element (the horizontal bar inthe f )Descender The part of a lowercase letter that hangs below the baseline.
Ear The decoration on the upper right side of the g Em The size of the grid that contains the glyphs.
Eye The counter in the eGlyph the shape of a character (a letter, number, signs, letters with accents, etc.)
8/14/2019 Practical TrueType Hinting
http://slidepdf.com/reader/full/practical-truetype-hinting 17/17
Hairline The thinnest line of a typeface that consist of lines with varying widths.Leg The stroke on the bottom right part of the k.Link The part between the loop and the bowl in the g; a hint between two points that keepsthose points at the same distance (see Single link and Double link)Loop The curved part on the bottom of the g
Meanline Runs through the top of the body of most lowercase letters (excepting those withascenders).PPM Pixels Per eM.Serif Decorations on the ends of strokes and stems to improve readability.Spine The curve in the middle of the S and s that runs from left to right.Spur Decoration at the end of the curve (the end of the C, s)Stem The most important (almost) vertical bar of many letters.Stroke The most important diagonal part of a letter.Tail The stroke at the end of letters such as Q and R.Terminal The end of a stem or stroke without a serif.UPM Units Per eM.
x-height distance between the baseline and the meanline; mostly the height of characters suchas the x.
ColofonText and illustrations by Jigal van Hemert.Fontlab is a trademark of Fontlab Ltd.Example font is Florencesans by Derek Vogelpohl available at Apostrophic Lab.This Wle may be distributed and copied, provided that no money is charged for it.