pprreelliimmiinnaarryy · pdf filepprreelliimmiinnaarryy eexxeerrcciisseess ffoorr hhaatthhaa...
TRANSCRIPT

PPRREELLIIMMIINNAARRYY
EEXXEERRCCIISSEESS
FFOORR HHAATTHHAA YYOOGGAA
AASSAANNAASS
By John Guthrie
Yoga Teaching Diploma International Yoga Teaching
Association (N.Z.)

1

2
Table of Contents
Page 4 Acknowledgments Page 7 Conscious Breathing Page 11 Preliminary Exercises Page 11 Mountain Pose Page 12 Extended Mountain Pose Page 14 Backward and Forward Bend Page 17 Squat, Buttocks to Heels Page 19 Dynamic Forward Bend Page 22. Back Stretch Page 24 Cat Stretch Page 26 Rotation of the Spine Page 30 Thigh Stretch Page 34 Vertebrae Stretch Page 37 Cycling Page 40 Loin Stretch Page 44 Butterfly Page 46 Half Butterfly Page 48 Yoga Mudra Page 51 Spinal Twist Page 53 Exploring your Breath Page 60 Conclusion Page 62 Bibliography

3

4
AAcckknnoowwlleeddggmmeennttss
There is nothing in this manual that is really new. Rather, I have endeavoured to present a practical manual to follow, for people who are new to yoga or have been practising for some time but need to bring a focus on synchronising breath and movement. These preliminary exercises were taught to me by my teacher at the Institute of Yogic Culture in Trivandrum, Kerala, South India. B. Padmanabha Pillai was the director and founder of the Institute. I received this authentic teaching at the end of 1977. Guruji, as we all called B.P. Pillai, placed a strong emphasis on breathing. He used to tell his students that the postures of Yoga could not be truly called asanas unless the breath was consciously involved. Under the guidance of his own teacher (Swami Sivananda of Kerala), Guruji was also a proficient Siddha (Ayurvedic) medicine practitioner, an expert in the Keralan martial art called Kalaripayattu and he had

5
adapted the massage techniques used for this martial art to create a rejuvenating massage for the lay person. Whilst the manner in which I now teach his preliminary exercises varies somewhat from the original, the source remains valid and I am indebted to my teacher for having taught me. At the Institute, great importance was also placed on the practice of Kriyas, for cleansing the digestive and respiratory systems. These were considered to be the initial practice of a morning Hatha yoga session, even before the preliminary exercises. The reason they are not included in this manual is that I have found most Western people need to understand movement and breath first to feel comfortable in their body, before they can be at ease sitting still for a given period of time. Thanks must also go to Jan Rooke and to my wife Dominique Davaux-Guthrie for their careful and patient editing.

6
Primary colours merging painting Nature’s glory
shadows of time always moving
John Guthrie

7
CCoonnsscciioouuss BBrreeaatthhiinngg Sit in the position which suits you: Cross legged in
easy pose (on a cushion) or on your heels. If these
postures are difficult you can use a chair.
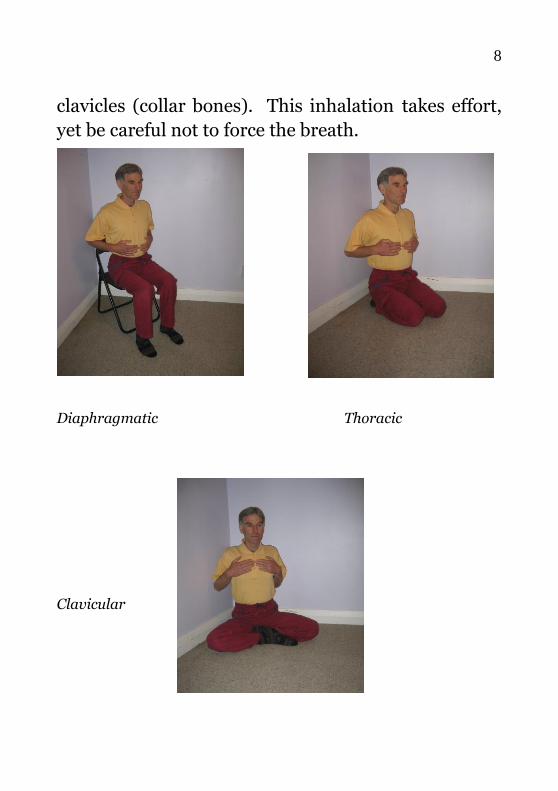
The photos on the opposite page show the different
phases of the breath. The position of the hands helps
you to be more aware of the three areas of a full yoga
breath.
Breathe through the nostrils at all times. A full yoga
breath involves the expansion of the upper abdomen
(diaphragmatic), the thoracic chest and finally the
clavicular chest.
Note that the expansion of the abdomen is the result
of the diaphragm contracting as it flattens
downwards. This is what creates the space for an
increase in lung capacity. You do not actually use the
abdominal muscles to inhale.
As you begin to inhale, sense the diaphragm moving
down and the upper abdomen expanding. As the
inhalation continues, allow the thoracic chest to fully
expand, finally taking this expansion up to the
8
clavicles (collar bones). This inhalation takes effort,
yet be careful not to force the breath.
Diaphragmatic Thoracic
Clavicular

9
On exhalation, the diaphragm releases first,
thus causing the abdominal wall to contract in. As the
diaphragm relaxes up into the chest cavity, the
thoracic chest contracts also as the intercostal
muscles relax. As you keep the exhalation moving out
for as long as possible, the upper chest (clavicle
region) will relax as well. One can consciously
contract the lower abdominal region below the navel
to assist this final stage of exhalation.
Continue to breathe in a natural easy rhythm,
being aware that the inhalation brings in the oxygen
to purify the blood and nourish the cells. The
exhalation thoroughly eliminates carbon dioxide.
Remember that the shoulders are not used to
assist the breath, they need to remain relaxed. The
jaws also need to remain relaxed. In most yoga
postures and exercises, breathing is normally at the
abdominal and thoracic level unless stated otherwise.
The full or complete yoga breath is usually a practice
in its own right.
Once the technique is understood you can
enhance the depth of inhalation and breath control by
10
a partial closure of the vocal cords. By gently
contracting the larynx region you will create what is
known as a throaty sound and feel the breath in the
back of your throat.
The exhalation remains nasal without the
partial closure of the larynx. You are now practising a
simple form of Ujjayi breathing (or throaty
breathing).
This is an introduction to the structure of yoga
breathing. Indeed the breath and the physiology of
breathing are much more complex. But knowing how
to breathe properly is not complex and, at most,
requires a correction of poor habits. The primary step
is to understand the importance of the diaphragm and
to work with the natural movement of this muscle to
encourage good breathing habits.
Some people may notice that the abdomen
draws in on inhalation and the shoulders lift up. This
is called paradoxical breathing. If this is your case it
is recommended that you practise the breathing
exercises noted at the end of this booklet.
The following preliminary exercises will assist
in creating good breathing habits.

11
PPrreelliimmiinnaarryy EEExxxeeerrrccciiissseeesss
Exercise 1: Mountain Pose Method: i. Stand upright with the feet hip width apart and straight. Make sure your feet are parallel. Spread the weight on the two big toes and the centre of the heels. Keep the hands by the side of the thighs with the arms straight and the palms facing the sides of the body.
ii. Look straight ahead and concentrate on an object at eye level.
iii. Take five full yoga breaths.

12
Exercise 2: Extended Mountain Pose
Method: i. Stand in alignment as in Exercise 1, but with the hands placed on the front of the thighs.
ii. Inhaling, simultaneously raise the arms straight up above the head and rise up onto the toes. Keep the arms shoulder width apart, towards your ears.
iii. Exhaling, simultaneously lower the arms and the heels.
iv. Repeat five times. NB: Initially, rising up onto the toes could prove to be
a challenge. If balance is too difficult, then raise and lower the arms without going onto your toes. With regular practice, you will soon gain a sense of balance and can then focus on the simultaneous movement of the arms and heels and the breath. As with any balance posture, have a sense of humour.

13

14
Exercise 3: Backward and Forward Bend Method: i. Find your alignment as for the previous
poses with the arms on the front of the thighs.
ii. Inhaling, raise the arms up above the head,
but keep the feet on the ground. Exhale, and allow
the legs to release away from the hips.
iii. Inhaling, lift the ribs and bend backward
from the hips keeping the arms close to the ears.
iv. Exhaling, bend forward from the hips,
keeping the arms close to the ears until the back is as
close as possible to being parallel to the floor.
Accept where your body will bend to, being
more focused on alignment rather than the end result.
The back and arms need to remain in a straight line.
Bend the knees to help maintain alignment.
v. Inhaling, drop the sitting bones and move the
hips forward to come up to an upright position. There
will be little or no use of the back muscles to do this.
vi. Exhaling, lower the arms.
vii Repeat five times.
NB. With practice, one can bend backwards and forwards for the number of times required, without lowering the arms as in “vi”.

15

16
17
Exercise 4: Squat, Buttocks to Heels
Method: i. Stand in Mountain Pose with the hands on the front of the thighs. ii. Inhaling, raise the arms to shoulder height. Exhale and hold the position. Inhaling again, rise up onto the toes.
NB. Alternatively, inhale and raise the arms
while simultaneously rising up onto the toes. iii. Exhaling, relax the hips and go down into a
squat, bringing the buttocks to the heels or as close as possible. Keep the back straight, and the knees parallel, aligned to the feet.
iv. Inhaling, rise up. v. Exhaling, lower the heels. vi. Repeat five times. On the last time, lower
the arms and heels together.

18

19
Exercise 5: Dynamic Forward Bend
Method: i. Stand in Mountain Pose with the hands on
the front of the thighs.
ii. Inhaling, raise the arms above the head,
keeping them close to the ears.
iii. Exhaling, bend forward from the hips, going
down as far as possible towards the floor.
iv. Inhale up and exhale down 10 to 20 times
while moving up and down from the hips,
approximately two inches or fifty centimetres each
time. Breathe powerfully with a quick rhythm
through the nose. This is a small movement with
powerful but not forceful breathing. Remember to
inhale when rising and to exhale when moving down.
v. Inhaling, drop the sitting bones and begin to
move up very slowly, keeping the arms extended,
until reaching an upright position.
vi. Exhaling, lower the arms and take three
complete yoga breaths. NB. Do not practise this exercise if you suffer from vertigo or have a back problem such as sciatica or slipped disc.

20

21

22
Exercise 6: Back Stretch Method: i. Kneel on the floor, then go onto all fours
with the hands under the shoulders and the knees
under the hips. The hands should be shoulder width
apart and the knees should be hip width apart. The
feet are extended back, the top of the foot on the floor.
ii. Inhaling, move forward, without bending the
arms and keeping the back straight.
iii. Exhaling, move backwards until the buttocks
touch the heels or as near as possible.
NB. Consciously relax the lower back towards the end of exhalation.
iv. Repeat the above movement 5 to 10 times.

23

24
Exercise 7: Cat Stretch
Method: i. Remain in the same base position as for
exercise 6.
ii. Inhaling, raise the buttock muscles up so that
the lower back will move down and the upper back
incline upwards with the head moving away from the
shoulders.
iii. Exhaling, pull the buttock muscles down so
that the lower back moves up again and the upper
back tends to incline down, with the chin drawn into
the notch between the collarbone. The abdomen will
be lifted up as a matter of course during exhalation.
To deepen the massaging effect to the abdominal
organs, near the end of exhalation, contract the
abdominal muscles strongly up towards the spine
(except for ladies during menstruation).
Repeat 5 to 10 times.
NB. Emphasis can also be given to opening the chest on inhalation by projecting the sternum forward.

25

26
Exercise 8: Rotation of the Spine
Method: i. Sit in easy pose, or on the heels or on a
chair. If sitting on the heels or a chair, have the knees
about two feet (sixty centimetres) apart. Throughout
the exercise keep the buttocks on the floor (or heels or
chair). Sit in an upright posture, with the spine
lengthened, yet maintaining the natural curves.
ii. Have a sense that the movement is being
directed from the sacrum. Begin with a small
clockwise rotation from left to right on exhalation and
from right to left on inhalation. Try to maintain
relaxed pelvic joints.
iii. Gradually increase the circumference of the
rotation, the length of the breath increasing as well
with the increase of the circumference.
Rotate up to twenty times.
iv. On completion of the final rotation, have a
brief pause and then rotate in the opposite direction
i.e. counter clockwise. Begin with the same wide
circumference with which you finished the clockwise

27
rotations. Gradually decrease the circumference of
the rotation.
Rotate the same number of times as clockwise v. On the final rotation, find a central alignment
through the spine and be still. Focus on the top of the
head and lengthen up through the crown, keeping the
chin parallel to the floor. Have a sense that the spine
is finding its natural height, creating the experience
that the torso is lifted and space exists between it and
the pelvis.
NB. If you wish, you can practise for several rounds.

28

29

30
Exercise 9: Thigh Stretch
Stage One
Method: i. Lie in semi-supine with a firm support
under the head.
ii. Place the feet outside the line of the hips
(approximately two feet or 60cms apart).
iii. With the arms outstretched, touch the back
of the heels with the fingers, or as near as possible.
iv. Exhaling, lower the right leg, moving the
knee across the midline of the body and down
towards the left foot. Keep the left leg still. The
shoulders should remain on the floor and the right
hip should rise as little as possible.
iv. Inhaling, raise the right leg to its original
position and repeat the movement done in number iv
with the left leg. This will complete one round.
Practise five rounds.

31

32
Thigh Stretch -- Stage Two Method: i. In this second stage of the thigh stretch,
the hands hold the ankles. Raise the feet off the floor
to take a hold of the ankles more easily. This brings
the feet close towards the outside of the buttocks and
closer to each other. The feet remain outside the hip
line.
ii. Repeat as for stage one, remembering to keep
the shoulders and hips down as much as possible.
Practise five rounds.
NB. This is a much stronger and deeper stretch of the
thigh. If you have very tight quadriceps (the group of
muscles we call the thighs), then do not force the
stretch.
If it is not possible to hold the ankles, then repeat
stage one.

33

34
Exercise 10: Vertebrae Stretch Method: i. After completing the Thigh Stretch, roll
over slowly onto the left side of the body. Bend the
left arm and support the head on the folded arm.
Make sure your chin is slightly tucked in. The right
arm is placed along the right hip and thigh. It is
important not to raise the head during the practice.
ii. Inhaling, slowly swing the right arm forward
and up above the head, while simultaneously moving
the right leg back. Keep the arm and leg as straight as
possible and parallel to the floor. Stretch at the end of
the movement, touching the ground with both the
hand and the foot, if possible.
iii. Exhaling, slowly swing the right arm
backwards and move the right leg forwards. Again
keep the arm and leg parallel to the floor. Stretch at
the end of the movement, touching the ground if
possible.
iv. Repeat 10 times.
v. Roll over and repeat the exercise lying on the right side.

35
NB. You can repeat the practice again at a faster rate.
Alternatively, once established in the rhythm of the exercise,
you can build up the pace beyond the ten rounds.

36

37
Exercise 11: Cycling Stage One Method. i. After completing exercise 10, roll onto the
back in semi-supine. Place the hands on the pelvic
bones so that the shoulders are not engaged in the
practice.
ii. Raise the feet off the floor and begin to cycle
at a height which is suitable for your lower back, i.e.
make sure your lumbar vertebraes keep contact with
the floor. Cycle slowly to begin with and then build
up the speed. After approximately one minute,
reduce the speed to slow motion, then rest.
The closer your legs are to the floor when you cycle,
the stronger the abdominal muscles will work. But at
the same time, it is important to keep the lower back
pushing down into the floor. Keep the breathing in
rhythm with the movement. Work with the
maximum range of extension, keeping the toes
pointed away.
iii. Bring the legs together and lower the feet to
the floor (on inhalation) to be in semi-supine. Rest.

38
Stage Two Method. i. Repeat as above, except this time cycle backwards for approximately the same length of time.
Stage Three Method. i. Cycle forwards with both legs together, up to 10 times. Repeat backwards for the same count. NB. Only practise Stage 3 if the abdominal muscles can adequately support the back.

39

40
Practise 12: Loin Stretch Stage One
Method. i. After completing the previous practice,
lengthen the legs out and slip the hands under the
lower back. Take a long slow inhalation and on the
exhalation bring the chin into the notch of the collar
bone and simultaneously push down on the hands
and forearms and move the back into an upright
position.
ii. Sitting erect with the legs outstretched and
the back straight, you are now in the Staff pose: the
hands flat on the floor on either side of the hips;
fingers pointing forward; the feet hip width apart with
the toes drawn towards you. You are now ready to do
the loin stretch.
iii. Raise the arms just below shoulder level.
The palms face one another with the hands shoulder
width apart. Inhaling, lean back as far as possible,
maintaining balance and a straight back.
iv. Exhaling, stretch forward as far as possible,
maintaining a straight back.
v. Stretch backwards and forwards 10 times.
Begin slowly at first and then build up the pace but
make sure that your alignment is maintained.

41
NB. This is a movement that needs to come from the hips.
Keep the neck long and avoid leading with the chin and
rounding the back. You can sit on a firm cushion or folded
blanket. This will usually allow a greater ease of movement
from the hips. Be focused on the actual movement rather than
trying to over-extend yourself.

42
Loin Stretch -- Stage Two
Method. i. Sitting in the same pose as for Stage One,
raise the left knee up and bring the foot up along the
inside of the right leg as near as possible to the groin.
Slowly lower the knee to the floor or place a support
under the knee if this is not possible: a folded blanket
or firm cushion, though a yoga block may be
sufficient.
ii. Move backwards and forwards 10 times in
the same manner as in stage one. When finished, lift
the left knee up with the hand so that the sole of the
foot is on the floor again, then slowly lengthen out the
left leg.
iii. Raise the right knee up and bring the foot
along the inside of the left leg as near as possible to
the groin. Repeat the practice as described above.
NB. The hips easily loose their square alignment in Stage
Two. Once the bent leg is in position, slowly ease the hip of
the straight leg backwards, while simultaneously bringing the
hip of the bent leg forward.

43
With the knee supported

44
Exercise 13: Butterfly
(Preliminary for easy pose and lotus) Method. i. Sitting upright with the legs extended, first
raise both knees up so that the soles of the feet are on
the floor. Bring the soles of the feet together so that
the knees move out and down and place the hands on
the floor, behind the back.
The hands could be rested on yoga blocks.
ii. Move the shoulder blades in towards the
spine and open the chest. Working from the root of
the thigh, raise the knees slowly up on inhalation and
down on exhalation. Move a little faster, if
appropriate, but keep the breath in the same rhythm
as the movement. Practise for 30 to 60 seconds.
iii. Push down on the hands, lift the buttocks off
the floor and move them as close as possible to the
heels. Bring the hands directly behind the back. With
the same rhythmic breath as above, raise the knees up
and down for 30 to 60 seconds.
iv. Bring the hands to the front and clasp
around the feet. Draw the heels as close as possible to
the root of the thigh. Using this clasp around the feet

45
as a lever, lengthen as much as possible through the
back. With the same rhythmic breath as before, raise
the knees up and down for 30 to 60 seconds.
iv. You can continue to hold the pose while you
breathe consciously and release any point of pain or
tension.

46
Exercise 14: Half Butterfly
Method. i. Sitting on the floor with the left leg
extended, bring the right leg up into position. With
the right hand on the outside of the knee and the left
hand around the outside of the ankle, place the right
foot as high up on the left thigh as possible.
ii. With the right hand now under the knee and
the left hand supporting the ankle, move the knee up
and down with rhythmic breathing like in Exercise 13
(Butterfly). Inhalation up, exhalation down. Practise
this for 30 to 60 seconds.
iii. You can hold the supported leg motionless
for some time while you breathe consciously and
release any pain or tension.
iv. Repeat with the left leg for the same length
of time, as illustrated on the photos.

47

48
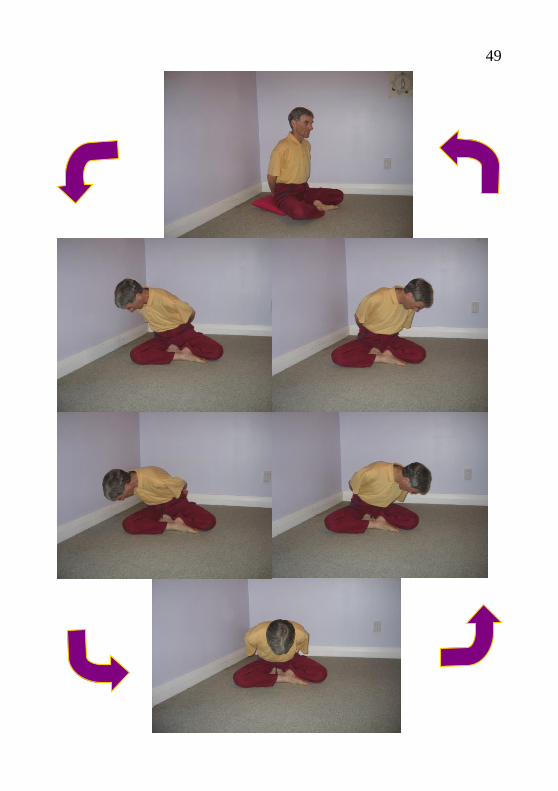
Exercise 15: Yoga Mudra Preliminary Method. i. Sit in easy pose, or on the heels or on a
chair. If sitting on the heels or on a chair, have the
knees about two feet apart (60 centimetres).
ii. Place the arms behind the back and clasp one
hand around the wrist of the other. Pull the arms
straight down so that the chest will expand and the
shoulders will move back and down.
iii. Keep the chin in a neutral position so that
the neck maintains its natural length. Turn the torso
slightly to be aligned with the right knee.
iv. Exhaling, move from the hips bringing the
chin down towards the right knee.
v. Inhaling, raise the torso slightly then on
exhalation, lower the torso and swing across to the
left knee. Inhaling, raise the torso slightly, ready to
swing back to the right side.
vi. Continue to move from side to side in the
same manner as above, for 30 to 60 seconds.
NB: The movements in this exercise are from the
hips. Avoid using the upper back to do the
movement. The torso moves as a whole.
49

50
The photos below illustrate the Yoga Mudra
preliminary done sitting on a chair or on the heels.
The movement is exactly the same as pictured on the
previous page and according to the written directions

51
Exercise 16: Spinal Twist Method. i. Continue to sit in the same posture as the
previous exercise. Bring length into the spine. Place
the right hand behind the back as close to the left side
of the waist as possible. The left hand holds the
outside of the right knee.
ii. Inhaling, ensure that the spine has
maintained its length and then, exhaling, twist the
torso to the right, without straining. Hold for several
breaths. Inhale and come back to centre.
iii. Repeat on the left side.

52

53
EExxpplloorriinngg YYoouurr BBrreeaatthh
This manual began with a focus on conscious
breathing. The following exercises will enable you to
explore your breath in such a way that your
diaphragm is going to function as effortlessly as
possible in the correct way.
Practice 1: Awareness of the breath flow
You can lie down in semi-supine (page 59 fig.1)
or in a full supine position (page 59 fig.2) with a head
support. If you choose to lie down in a full supine
position, then you may find it more comfortable for
your back if you place a rolled up blanket under your
knees.
Allow the breath to be natural, trying not to
control it in any way. Observe the breath as it moves
in and out of the nostrils. To maintain this awareness
of your breath you can mentally repeat the words “in”
as you inhale and “out” as you exhale. Maintain this

54
focus for several minutes but don’t be overly
concerned with time.
After some time (when it feels right for you)
shift your awareness to the navel and observe the
breath rising and falling. To maintain this awareness
of your breath you can mentally repeat the words
“rising” as you inhale and “falling” as you exhale.
Maintain this focus for several minutes, but don’t be
overly concerned with time.
After some time (when it feels right for you)
shift your awareness to the lower ribs and observe the
breath expanding and contracting. To maintain this
awareness of your breath you can mentally repeat the
words “expanding” as you inhale and “contracting” as
you exhale. Maintain this focus for several minutes
but don’t be overly concerned with time.
Finally, be aware of the whole flow of your
breath. Observe the natural breath as it moves in,
rises and expands and then as it moves out, falls and
contracts. After some time become aware of the floor beneath you and of your presence in the room
and sit up.

55
Practice 2: Sectional breathing i Diaphragmatic breathing
Diaphragmatic breathing is sometimes called
abdominal breathing in different texts. Remember
that the movement of the abdomen is the result of the
diaphragm contracting, then relaxing. In either
position adopted for the previous practice, place the
little finger of your right hand on the navel and the
thumb of your left hand below it (as indicated on page
59 fig.3).
Which hand goes above or below does not really
matter and you could even change around from time
to time and see if your experience is any different.
Focusing on the area between the navel and
lower point of the sternum (the area beneath the right
hand) begin to expand the breath into this region.
The rising and expansion of the upper abdominal
region will become obvious. In learning to breathe
correctly you need to take care not to use the
abdominal muscles to draw the breath in. At the end of the inhalation, release the
diaphragm. Observe that the abdominal muscles

56
relax as the diaphragm moves back into the chest
cavity.
Practise this deep diaphragmatic breathing for 3 to 5 minutes.
It is important to note that whilst yoga breathing practices require effort and awareness, they are never forced. Work to your own capacity.
ii Thoracic breathing This is also called mid chest breathing.
Staying in your chosen position, place the hands
on the lower ribs just below the breast (as on page 59
fig.4). Breathe into your hands so that you feel the
expansion and contraction of the rib cage. Increase
the length of the inhalations gradually to allow the
ribcage to expand fully, taking care not to force the
breath in any way. Let the exhalations move out as
long as possible so that a maximum contraction
occurs in the thoracic region of the rib cage.
Practise for 3 to 5 minutes.
There will still be movement in the abdominal
area as the diaphragm moves. Be aware of this but
emphasise the thoracic breath.

57
iii Clavicular breathing This is also called upper chest breathing.
Staying in your chosen position, place the hands
on the upper chest (as on page 59 fig. 5). Breathe into
your hands now, making sure that you do not move
the shoulders.
Exhale and relax the clavicles feeling the
contraction of the upper chest under the hands.
Practise for 1 minute only.
Focus on deepening the breath into the upper
chest. You will still notice the movement of the
breath in the abdominal and thoracic regions.
However keep the focus on working the breath into
the upper chest.
Clavicular breathing is not encouraged as a
breathing practice on its own; rather it is a
part of a full yoga breath (sometimes called
complete rib cage breathing). Many yoga
breathing practices (pranayama) involve
only diaphragmatic and thoracic breathing.

58
Practice 3: Full Yoga Breath
Lying down (as on page 58 fig1 or 2) bring your
awareness to your navel and start to bring the
inhalation into its diaphragmatic stage, noting the
expansion of the upper abdominal wall. Gradually
expand your breath into the thoracic chest. Finally,
move the breath into the clavicular chest.
If possible allow a small pause after inhalation
to bring your awareness back to the navel. Begin to
exhale, releasing the breath first at the diaphragmatic
region (upper abdominal wall) and then moving the
contraction into the thoracic chest as exhalation
continues. To encourage complete exhalation and to
move the contraction into the clavicular chest, you
may draw the lower abdominal wall in. This moves
the diaphragm further into the chest cavity. If
possible allow a small pause after the exhalation to
bring awareness back to the navel before the next
inhalation begins.
Practise for 5 to 10 minutes.

59
Fig 1
Fig 2
Fig 3 Fig 4
Fig 5

60
CCoonncclluussiioonn
We can only write about an ancient practice
with the language and understanding of our times.
The asanas (like the other seven limbs of yoga) are
perennial. The understanding and practice of the
asanas is by nature a personal inquiry into one’s own
psycho-physical nature. Such an inquiry encourages
the practitioner to take responsibility for their own
well-being.
Teachers are necessary to guide, instruct and
encourage us on the journey. But we do not practise
yoga to mimic the teacher. We practise to enhance
our own unique identity and discover who we really
are.
There are many forms of Hatha Yoga that have
developed over the years, each with a newly chosen
name. A perusal in any bookshop will unearth a great
variety of books on the topic All are valid if they
honour the spirit of yoga and work for you.

61
Ultimately, there is only yoga as defined by the
essence of its meaning: union. In Hatha Yoga, each
individual person needs to discover his/her own path
by listening to his/her own body. You can follow the
pathway of various teachers and this is indeed often
necessary and needs respect. We can be grateful for
the teachings of the masters and those who have
deeply explored yoga and offer us their insights.
These are men and women who offer a genuine way of
practising and inspire us beyond our limitations.
With the right guidance, the journey into Hatha
Yoga enables us to decide our own pathway to create
inner and outer harmony. This and that labelling of
yoga fades away and there is only YOGA.
“…..yoga exercises, though being physical, are not
designed solely for the benefit of the body. They take
the total being into consideration and are just a part
of an integral psycho-physical system designed to
raise man (men and women) to the highest possible
level of being.”
B.Padmanabha Pillai “Yoga: A Way of Life” pg 2

62
BBiibblliiooggrraapphhyy PILLAI B Padmanabha (M.A.).- Yoga A Way Of Life.- Published by Indirabai P., Pankaj Bhavan, Vazhuthacaud, Trivandrum-14, Kerala, India.- 1979. RAMA Swami, BALLENTINE Rudolf (M.D.), HYMES Alan, (M.D.).- Science OF Breath, A Practical Guide.- Published by The Himalayan International Institute of Yoga Science And Philosophy, Honesdale, Pennsylvania, U.S.A.- 1979.

63
SSuuggggeesstteedd RReeaaddiinngg
DESIKACHAR T.K.V. The Heart Of Yoga, Developing a Personal Practice.- Published by Inner Traditions International, Rochester Vermont U.S.A.- 1995 NIRANJANANANDA Saraswati, Swami.- Prana Pranayama Prana Vidya.- Published by the Bihar School of Yoga, Ganga Darshan, Munger, Bihar, India.- 1998 SATYANANDA Saraswati, Swami.- Asana Pranayama Mudra Bandha.- Published by the Bihar Yoga Bharati, Munger, Bihar, India.- 1996

64
VAN LYSEBETH André.- Yoga Self Taught.- Weiser Books, Boston, MA / York Beach, ME, U.S.A.- 1999