powerpoint slides to accompany copyright © 2013 by nelson education ltd
TRANSCRIPT

PowerPoint Slides to accompany
Copyright © 2013 by Nelson Education Ltd.

Setting Up aNew Company
Premium 2012

Steps in the Startup Process 3Steps in the Startup Process 31. Create company files. 42. Set User Preferences. 63. Change System Defaults. 74. Change Printer Settings. 85. Set up G/L accounts. 9
• - Account Types 10• - Account Numbering System 12• - General Ledger 13• - Displaying the Chart of Accounts 16• - Inserting a New Account 17
6. Link modules and accounts. 187. Enter G/L accounts opening balances
(history). 208. Set up tax information. 219. Set up vendor and customer subledgers and
enter opening balances (historical transactions). 23
10. Add credit card information. 2611. Set modules to READY. 27
Contents
Slideshow 4

The Startup ProcessThe Startup Process
The startup process in Sage Simply Accounting are the same whether you are starting a new company or going through a conversion process. Conversion refers to changing the accounting system from a manual system to a computerized system or from one accounting software to a new software (e.g., from QuickBooks to Sage Simply Accounting).
At the right are the steps in setting up a company in Sage Simply Accounting. Study them carefully.
Click.
Each step will be explained in the slides that follow.
The procedures shown here are to prepare the COMPANY, RECEIVABLES and PAYABLES modules and set them to READY. You will learn how to set the PAYROLL and INVENTORY modules to READY later.
Click to continue.
Steps in Setting Up a Steps in Setting Up a Company in Simply Company in Simply Accounting:Accounting:
1. Create company files.
2. Set User Preferences Defaults.
3. Change System defaults.
4. Change Printer Settings.
5. Set up Chart of Accounts.
6. Link Modules/Accounts.
7. Enter Opening G/L Account Balances.
8. Set up Tax Classes, Codes, Rates & Customization.
9. Set Up PAYABLES and RECEIVABLES Ledgers.
10. Add Credit Card Information.
11. Set modules to ReadyReady.

Step 1: Create Step 1: Create company files.company files.
This procedure involves setting up the “skeleton” of the company’s accounting system. Simply provides a wizard to walk you through the setup process. Study each screen as you go through it.
To start a new company, you would select Create a new company after you start Simply.
Click OK.
Study the INTRODUCTION page.
Click the steps of the company setup at the left panel from top to bottom on the Introduction page. Start from NAME & ADDRESS.
Continue to click the next steps. Study each screen very carefully.
Read the explanation
for each date entry.
The textbook will give you step-by-step instructions on how to build a chart of accounts from scratch by using the last option.
Sage Simply Accounting comes with a predefined set of accounts for various types of companies. You may use one of these company templates.
After setting up a company account template, you may still need to add some new accounts, change or rename others, or delete the ones you will not be using.
Click.
If you decide to use a Sage Simply Accounting template, you can specify your company ownership structure. By choosing one of the Industry or Company types, you will be given a typical chart of accounts for the specified industry or company which you can revise as desired.
Click File Name next, above at the left panel.
By using the BROWSE button, you can specify the location where the new company file will be stored.
Click FINISH.
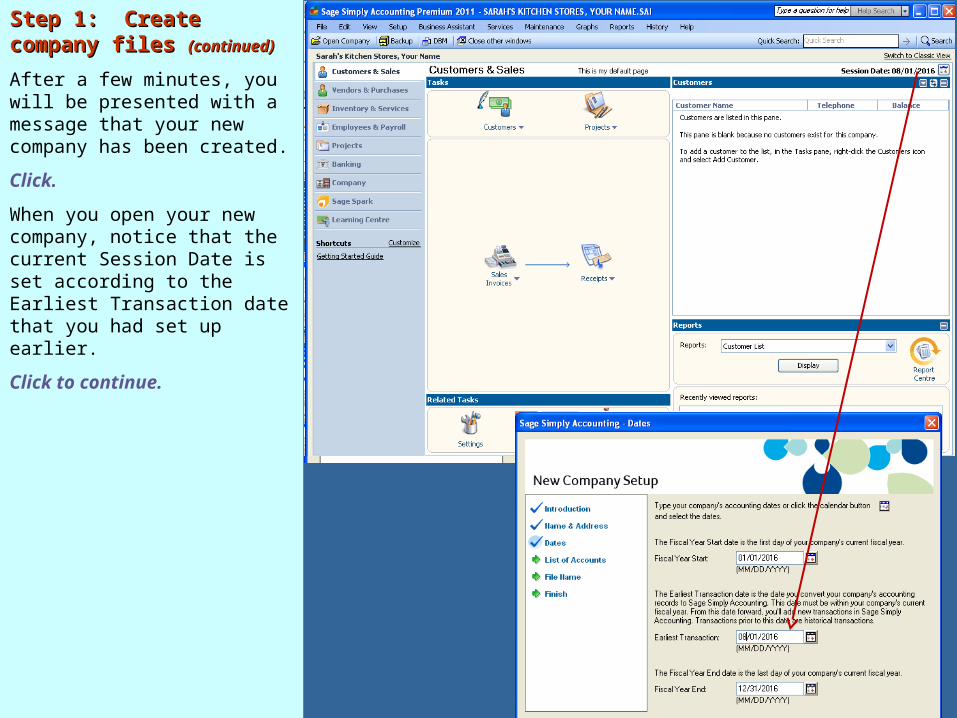
Step 1: Create Step 1: Create company files company files (continued)(continued)
After a few minutes, you will be presented with a message that your new company has been created.
Click.
When you open your new company, notice that the current Session Date is set according to the Earliest Transaction date that you had set up earlier.
Click to continue.

Step 2: Set User Step 2: Set User Preferences DefaultsPreferences Defaults
A default is a pre-set option that is stored in the Simply system. You may choose to accept the default or amend it either by selecting from a drop-down list provided for the particular field or inputting your own.
Access User Preferences from the SETUP menu.
Click USER PREFERENCES.
The VIEW page allows you to choose the modules for your company (under PAGES). You may start with the basic modules and add more modules later.
You can also choose your language and terminology options, the way windows open from the Home window, and an automatic save option for records (see bottom left). You can also select options to include List buttons in transaction windows, as well as select the behaviour of the Print button.
Click to continue.
Accounts Receivable
Accounts Payable
Allows you to perform banking functions in the various modules.
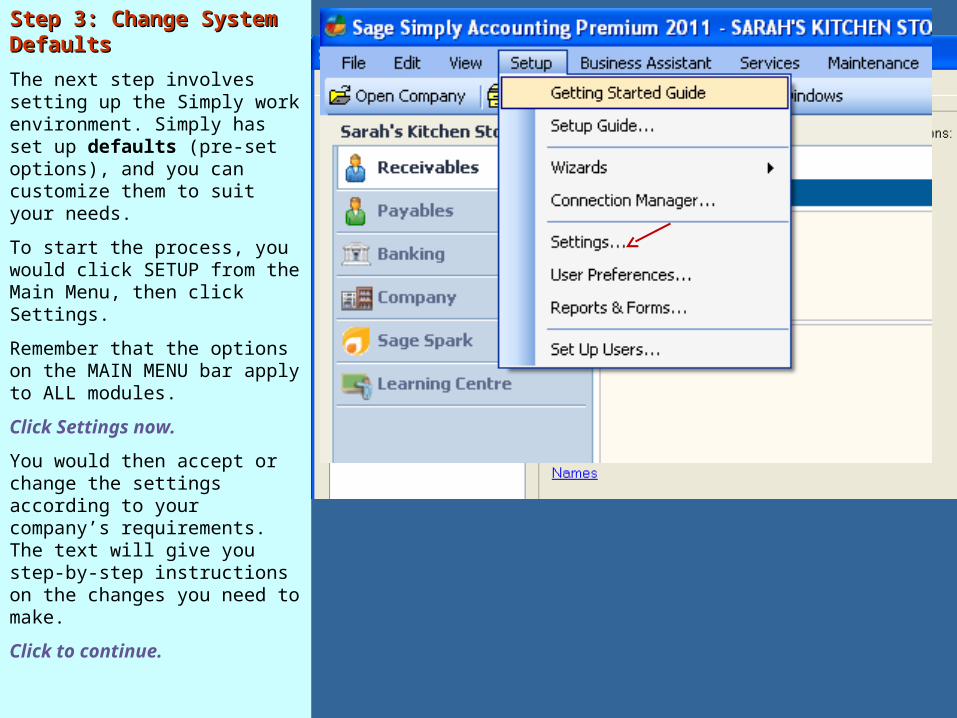
Step 3: Change System Step 3: Change System DefaultsDefaults
The next step involves setting up the Simply work environment. Simply has set up defaults (pre-set options), and you can customize them to suit your needs.
To start the process, you would click SETUP from the Main Menu, then click Settings.
Remember that the options on the MAIN MENU bar apply to ALL modules.
Click Settings now.
You would then accept or change the settings according to your company’s requirements. The text will give you step-by-step instructions on the changes you need to make.
Click to continue.

Step 4: Change Printer Step 4: Change Printer SettingsSettings
Depending on your computer lab setup, you may or may not be able to change printer settings. Review this section for information if it pertains to you.
You can view the current printer settings by clicking REPORTS & FORMS from Setup.
Click REPORTS & FORMS now.
At the left panel of the REPORT & FORM OPTIONS window in Simply (see arrow above right), you will find the various documents that can be printed in Simply. You can change the printer settings for each of those documents, if required.
Click.
Click each of the Report Sections from top to bottom starting from Report Header and study the example on the Income Statement below.
Click to continue.
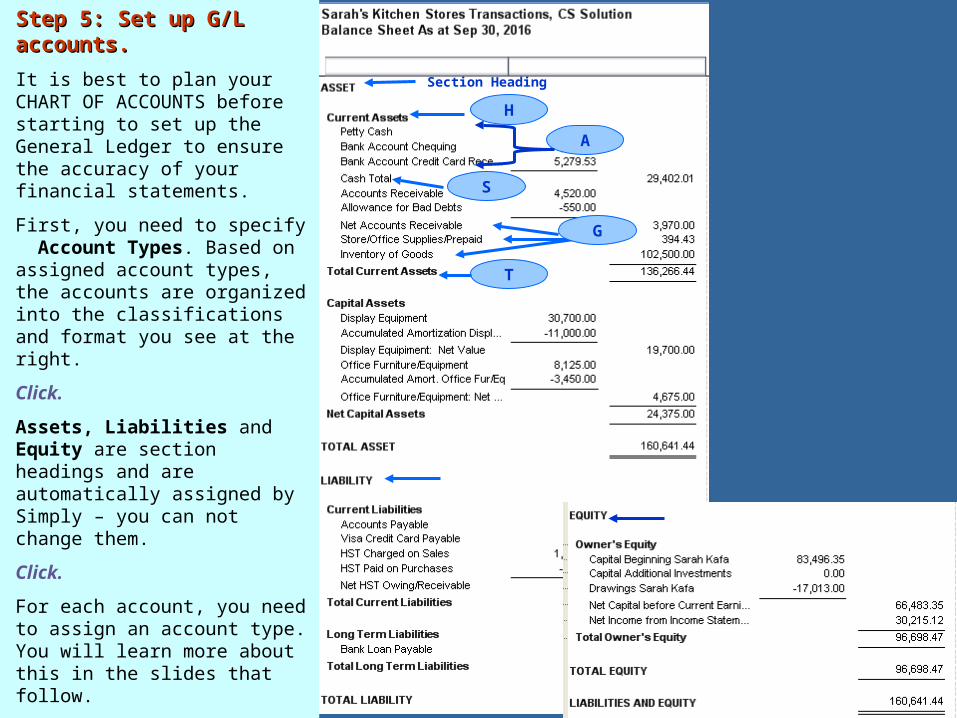
Step 5: Set up G/L Step 5: Set up G/L accounts.accounts.
It is best to plan your CHART OF ACCOUNTS before starting to set up the General Ledger to ensure the accuracy of your financial statements.
First, you need to specify Account Types. Based on assigned account types, the accounts are organized into the classifications and format you see at the right.
Click.
Assets, Liabilities and Equity are section headings and are automatically assigned by Simply – you can not change them.
Click.
For each account, you need to assign an account type. You will learn more about this in the slides that follow.
S
T
H
Section Heading
G
A

Step 4: Set up G/L accounts.Step 4: Set up G/L accounts.
Account Types Account Types (continued)(continued)
When determining account types, identify postable (P) and non-postable (NP) accounts.
Click.
H (Heading) – (NP) starts each section, providing a description of the section.
Click.
A (Accumulate) – (P) individual accounts that need to be totaled. See balance of each account at the middle column.
Click.
S (Subtotal) - (NP) The subtotal of all A accounts is shown at the right column. A accounts are always followed by S accounts. Note the A accounts that correspond to each S account at the right (colour coded).
Click.
G (Group) – (P) accounts that don’t need to be totaled. Balances are placed at the right.
Click to continue.
H
H
H
HG
G
S
S
S
S
S
A
A
A
AA
A
AA
AA
AA

Step 4: Set up G/L Step 4: Set up G/L accounts.accounts.Account Types Account Types (continued)(continued)
T (Total) – (NP) accumulates all the G and S accounts in the section above it. See right (colour coded). A T account should always be preceded by a Heading (see arrowhead).
Click.
Section Totals are automatically supplied by Simply – you can not change them. They automatically accumulate all T accounts in the corresponding section.
Click.
A Section Total is always preceded by its corresponding Section Heading (also automatically supplied by Simply).
Notice that section headings and section totals are in ALL CAPITALS.
Click to continue.
T
T
T
S
G
S
S
GG
S
G
S
Section Total
T
T
T
T
Section Total

Step 4: Set up G/L accounts.Step 4: Set up G/L accounts.
Account Numbering Account Numbering SystemSystem
Sage Simply Accounting has pre-defined numbering for each account type.
Account numbers can range from 4 to 8 digits in length. Study the account range and the normal balance for each type of account on the right. Regardless of the account number length, the first digit represents the Account Type; e.g., 1 for Assets, 2 for Liabilities, etc.
It is important for accounts to be numbered correctly as Simply will manage input and financial statement presentation by account type. For example, a positive number will be treated as a debit for an asset account and will be treated as a credit for a liability account.
Click to continue.
Simply Numbering SystemSimply Numbering System
Account Type Account No. Range Normal Balance
Assets 1000 – 1999 Debit
Liabilities 2000 – 2999 Credit
Equity 3000 – 3999 Credit
Revenue 4000 – 4999 Credit
Expense* 5000 – 5999 Debit

Step 5: Set up G/L accounts.Step 5: Set up G/L accounts.
General LedgerGeneral Ledger
To create the Chart of Accounts, add a new account or revise an existing account, click the CHART OF ACCOUNTS drop-down arrow on the COMPANY Home window, and then select ADD ACCOUNT (see right)
Click to continue.

Step 5: Set up G/L accounts.Step 5: Set up G/L accounts.
General Ledger General Ledger (continued)(continued)
The GENERAL LEDGER window will appear.
If you are adding a new account, you would enter the account number and the account name (see arrow). These are required fields.
Click.
You would then select the account TYPE. This example is a GROUP (G) account.
Click.
Read the explanation for GIFI Code (see right). GIFI (General Index of Financial Information) is an index of items generally found on balance sheets, income statements, and statements of retained earnings (for corporations).
Click the CLASS OPTIONS tab.
This field is used for electronic filing of corporate tax returns. The Canada Revenue Agency (CRA) uses GIFI Codes to support their electronic filing and T2 processing system. As of the year 2000, all corporations (except for insurance corporations) must report financial statement information using the GIFI code.

Step 5: Set up G/L accounts.Step 5: Set up G/L accounts.
General Ledger General Ledger (continued)(continued)
You would then select the ACCOUNT CLASS from the drop-down list.
There are no Class Options for Group Heading, Subgroup Total, Group Total, and most linked accounts.
Click the other tabs from left to right starting from ADDITIONAL INFO and read the explanation for each.
Click to continue.
You can add up to 5 additional lines of description about the specific account on this page.
You can add notes that you want to display/print on financial statements.
You would normally skip this page when setting up the Chart of Accounts. You will learn about Reconciliation & Deposit later in this text..
You would also skip this page when creating the Chart of Accounts. This information is created when you start a new fiscal year from previous year’s ending balances.

Displaying the CHART OF Displaying the CHART OF ACCOUNTSACCOUNTS
To view the Chart of Accounts after you have created the G/L accounts, you would click VIEW ACCOUNTS on the Company window.
Click.
To print the Chart of Accounts, select Display Chart of Accounts, select the Current Year in the Modify Report window, then click OK.
Click OK now.
Study the resulting report.
Click to continue.

Inserting a New AccountInserting a New Account
To insert a new account, be sure to remember Simply’s numbering system (see insert right).
Click.
Also remember that the account should be between the heading (H) and the T of its account class; otherwise, if your numbering is not in logical order, you will not be able to print financial statements.
Click.
For example, if you are inserting PREPAID INSURANCE, you would make sure that it is numbered between 1001 and 1298. More correctly, in view of the Order of Liquidity, it should be between 1220 and 1298. Liquidity refers to the expectation that the item can be converted to cash at least close to its current value within one year. Accounts are listed in descending order of liquidity within their accounting types, with CASH at the top.
Click to continue.

Step 6: Link modules and Step 6: Link modules and accounts.accounts.
You have learned earlier that Simply is an integrated software. This means that when you process a transaction in one module, all other related modules are automatically updated.
For example, when you make a sale, Simply will increase the amount your customer owes you in the corresponding subsidiary ledger and record the sale, any sales taxes, freight charges, and sales discounts, if applicable, in the general ledger.
When setting up a new company, specify which accounts should be “talking” to each other. This procedure is referred to as linking. If you have used a template, Simply would have set up the links, but you still need to review them and make sure they are correct.
Study the linked accounts in the GENERAL (Accounts) when you click the SETTINGS icon. Read the captions in blue at the top of the bottom window. You may change the account no./ names, but not account categories.
Click to continue.
Account Categories Account No./Names

Step 6: Link modules Step 6: Link modules and accounts. and accounts. (continued)(continued)
Study the linked accounts in the RECEIVABLES and PAYABLES modules. Read the corresponding notation at the top of each screen (see arrows).
Click to continue.
Receivables Linked Accounts
Payables Linked Accounts

Step 7: Enter G/L Step 7: Enter G/L accounts opening accounts opening balances (history).balances (history).
Until you finish entering history, you can continue to add, modify, or delete any items you have set up.
You would enter the number shown in CURRENT BALANCE (see right) as the opening balance in the Chart of Accounts Records page.
Click to continue.

Step 8: Set up tax Step 8: Set up tax information.information.
The Sales Tax Information window allows you to record a list of applicable taxes. You would set up tax information in the Company Settings window (see red arrow).
Click TAXES at the right panel now.
Notice that for HST (Harmonized Sales Tax), there is an account to track HST paid on purchases and a different account to track HST charged on sales.
Click.
Entering YES in the Report on Taxes column will accumulate the HST to be included in an HST Report.
At the top right, click Tax Codes.

Insurance is partially tax-exempt and is charged only 8% HST. In this example, the tax code HI is applied. Simply automatically enters HI under TAX and calculates the 8% HST applicable.
When the customer name is selected, the tax code specified in the customer subledger is automatically entered and applicable tax is calculated.
Set Up Tax Information Set Up Tax Information (continued)(continued)
Set up tax codes, Set up tax codes, classes and rates. classes and rates.
Tax codes allow you to quickly apply all required taxes at once (see right). You would then enter the appropriate tax code in each vendor and customer subledger.
Simply automatically fills in the tax codes associated with a specific customer or vendor on Purchase and Sales invoices. This avoids errors and saves time.
Click and study the Purchase invoice.
Click and study the Sales invoice.
If more than one tax code are associated with some of your customers or vendors; you need to choose the applicable tax code in the purchase/sales invoice.
Simply prints the codes on invoices so you or the customers can tell what tax(es) has been charged.
Click to continue.

Step 9A: Set up Step 9A: Set up vendor and customer vendor and customer subledgers and enter subledgers and enter opening balances opening balances (history).(history).
A vital part of the conversion process is to create vendors and customers subledgers, then enter unpaid invoices. Because the invoices may be paid individually, it is best to enter every unpaid invoice instead of entering the total balance for the customer or vendor. This procedure is discussed in the next slide.
You have learned how to create customer subledgers (referred to as Receivables Ledger) in Chapter 2A and vendor subledgers (Payables Ledger) in Chapter 3A. You would use the same technique for a new company.
Click to continue.

Step 9A: Set up vendor and Step 9A: Set up vendor and customer subledgers and enter customer subledgers and enter opening balances (history):opening balances (history):
Historical InvoicesHistorical Invoices
You would enter all the vendor information on the Vendor Ledger by selecting Add Vendor (see right).
Click.
You would then click the Historical Transactions tab then the INVOICES button (see arrows).
Click .
The Historical Invoices window will appear, ready for you to enter the specific invoice details, one invoice at a time. You would use the same procedure for sales invoices.
Although it is possible to enter all sales and purchase invoices (paid and unpaid), it would be less time-consuming and less confusing if you enter only unpaid invoices into the new accounting system, one invoice at a time.
Click to continue.

Step 9A: Set up vendor and Step 9A: Set up vendor and customer subledgers and enter customer subledgers and enter opening balances (history):opening balances (history):
Verifying Total Verifying Total Opening BalancesOpening Balances
After inputting individual vendor and customer account balances, it is important to ensure that subsidiary ledger totals match their corresponding control account totals on the Trial Balance.
Click.
You can check this by comparing the total on your Vendor Aged report with the ACCOUNTS PAYABLE balance on your Trial Balance.
Click.
Similarly, the total of the Customer Aged report has to be equal to the ACCOUNTS RECEIVABLE balance in the Trial Balance.
Click to continue.

Step 10: Add credit card Step 10: Add credit card information.information.
To be able to process credit card transactions you would set up information for the specific card company.
Click.
For Credit Cards Used, you need to enter the payable account under Expense Acct to which the purchase amount you owe the credit card company and the expense account to which the credit card charges should be recorded.
Click.
On the Credit Cards Accepted page, you would enter the percentage of Discount Fee. Remember, as a seller, you would pay the credit card company a fee for processing credit card payments you receive. You also have to define the expense account to which the discount fee should be charged and the asset account to which payment should be debited.
Click to continue.

Step 11: Set modules to Step 11: Set modules to READY.READY.
After you have entered your records and their historical information (invoices, payments, etc.), and have set up the linked accounts for the modules you plan to use, you would select Finish Entering History from the History menu (see right). If an error exists,
Click.
a window will appear to inform you of the error. Simply will not proceed until the error is corrected.
It is important to back up before turning the system to READY mode because once you do, you cannot go back and enter any other historical records. In the event that you realize historical information is not correct, you can easily restore from the backup, update the file and move back into READY mode without having to start from the beginning.
You would then be ready to process transactions for your new company.
Click to continue.

EXIT
More…More…
Go back to your text and proceed from where you have left off.
Review this slideshow when you finish the chapter to better prepare yourself for the next chapter.
Press ESC now, then click the EXIT button.