powerpoint 2010 - campus bruxelles | centre de … powerpoint 2010 user’s guide (ver 1.0) ©2011...
TRANSCRIPT

Microsoft PowerPoint 2010 User’s Guide (ver 1.0)
©2011 JL Gestion SA Avenue de l’indépendance Belge 58 – B 1081 Bruxelles
Tel : 02/412 04 10 Fax : 02/412 0419 – Gsm 0477/78 94 45 – [email protected]
PowerPoint 2010
User’s Manual

Microsoft PowerPoint 2010 User’s Guide (ver 1.0)
©2011 JL Gestion SA Avenue de l’indépendance Belge 58 – B 1081 Bruxelles
Tel : 02/412 04 10 Fax : 02/412 0419 – Gsm 0477/78 94 45 – [email protected]
Contents Menu/Ribbon .......................................................................................................................................... 1
Home Menu ............................................................................................................................................ 2
Inserting a New Slide .......................................................................................................................... 2
Changing Slide Layout ......................................................................................................................... 2
Insert Menu ............................................................................................................................................. 2
Insert a Screenshot ............................................................................................................................. 2
Insert a Screen Clipping ...................................................................................................................... 3
Insert a Hyperlink to a Slide ................................................................................................................ 3
Insert Text Box, Header and Footer, Word Art, Date & Time and Object .......................................... 4
Slide Show Menu .................................................................................................................................... 4
Broadcast a Presentation .................................................................................................................... 4
Review Menu .......................................................................................................................................... 5
Inserting, Edit, Delete and Navigate between comments. ................................................................. 5
Compare two Presentations and Merge the content ......................................................................... 6
View Menu .............................................................................................................................................. 7
Slide Master ........................................................................................................................................ 7
To apply a Company logo onto the first slide on the Presentation. ................................................... 7
To apply a company an image or logo onto the slides 2 till the last slide of your presentation
excluding the slide 1. .......................................................................................................................... 8
Using Notes Pages to add notes to Slides ............................................................................................... 8
To add Notes on a presentation ......................................................................................................... 8
Printing a Presentation using Printing options ....................................................................................... 9
Printing Notes Pages ........................................................................................................................... 9
Printing Slide Handouts ....................................................................................................................... 9
Microsoft PowerPoint 2010 User’s Guide (ver 1.0)
1 ©2011 JL Gestion SA Avenue de l’indépendance Belge 58 – B 1081 Bruxelles
Tel : 02/412 04 10 Fax : 02/412 0419 – Gsm 0477/78 94 45 – [email protected]
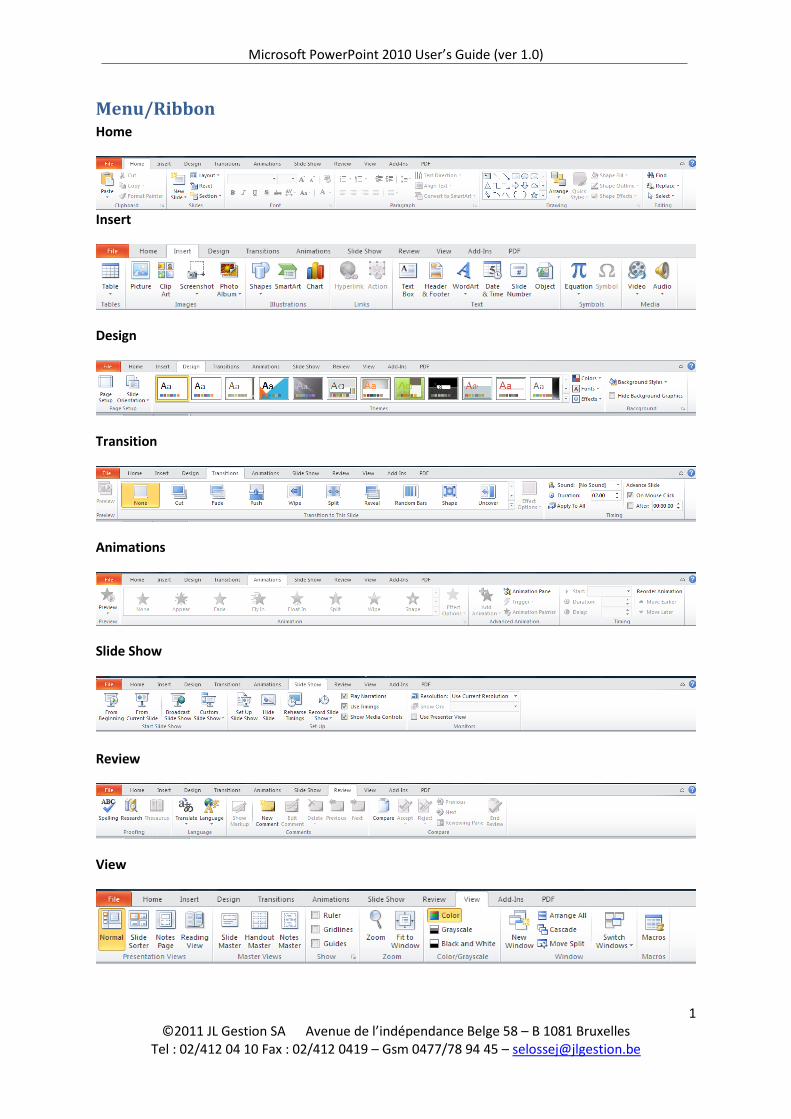
Menu/Ribbon Home
Insert
Design
Transition
Animations
Slide Show
Review
View
Microsoft PowerPoint 2010 User’s Guide (ver 1.0)
2 ©2011 JL Gestion SA Avenue de l’indépendance Belge 58 – B 1081 Bruxelles
Tel : 02/412 04 10 Fax : 02/412 0419 – Gsm 0477/78 94 45 – [email protected]
Home Menu
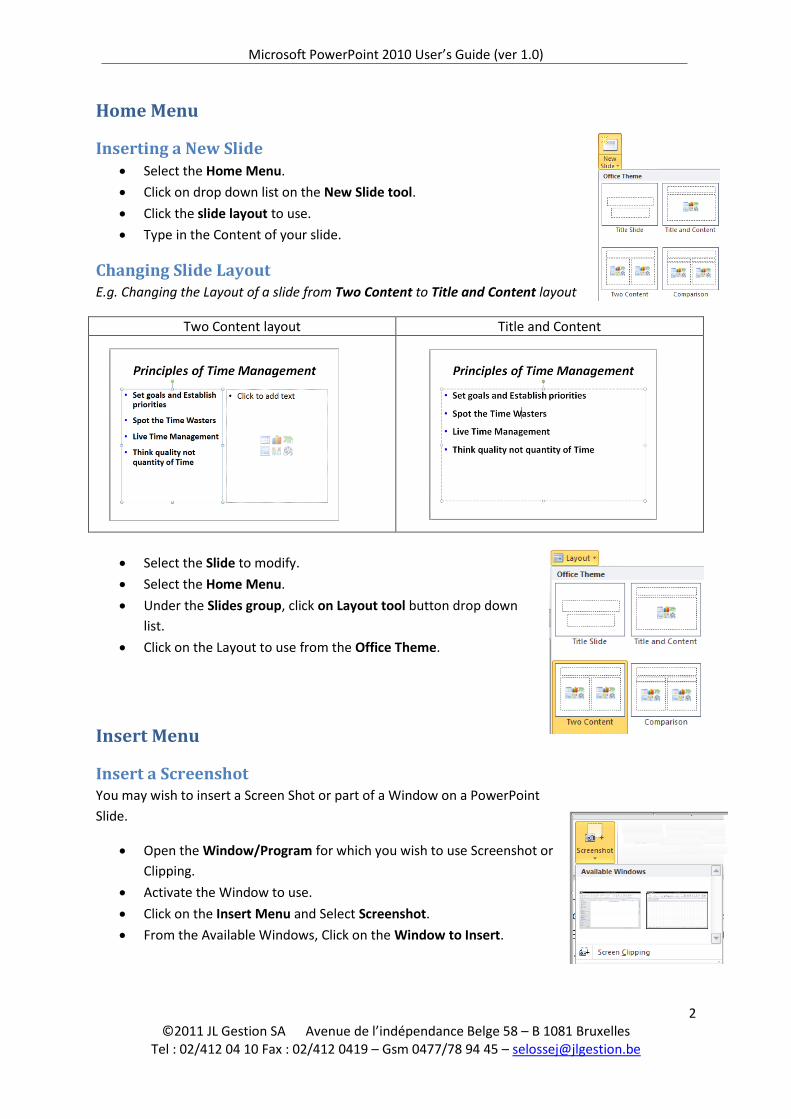
Inserting a New Slide Select the Home Menu.
Click on drop down list on the New Slide tool.
Click the slide layout to use.
Type in the Content of your slide.
Changing Slide Layout E.g. Changing the Layout of a slide from Two Content to Title and Content layout
Two Content layout Title and Content
Select the Slide to modify.
Select the Home Menu.
Under the Slides group, click on Layout tool button drop down
list.
Click on the Layout to use from the Office Theme.
Insert Menu
Insert a Screenshot You may wish to insert a Screen Shot or part of a Window on a PowerPoint
Slide.
Open the Window/Program for which you wish to use Screenshot or
Clipping.
Activate the Window to use.
Click on the Insert Menu and Select Screenshot.
From the Available Windows, Click on the Window to Insert.
Microsoft PowerPoint 2010 User’s Guide (ver 1.0)
3 ©2011 JL Gestion SA Avenue de l’indépendance Belge 58 – B 1081 Bruxelles
Tel : 02/412 04 10 Fax : 02/412 0419 – Gsm 0477/78 94 45 – [email protected]
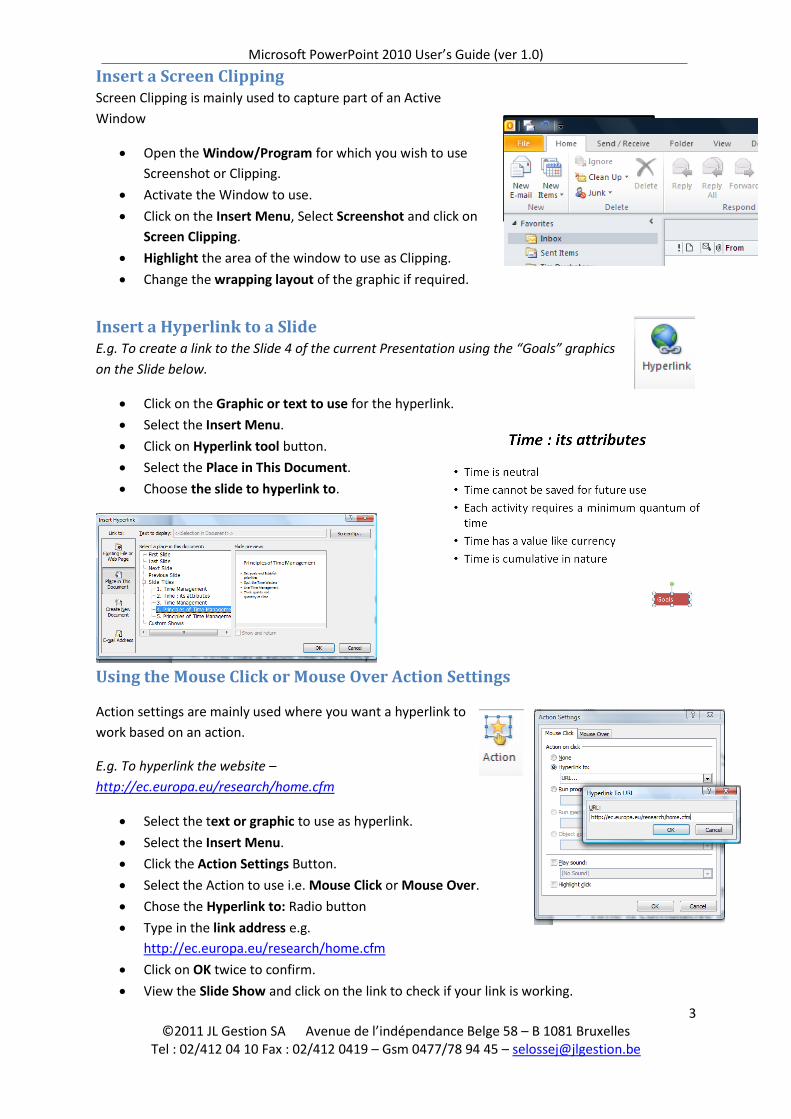
Insert a Screen Clipping Screen Clipping is mainly used to capture part of an Active
Window
Open the Window/Program for which you wish to use
Screenshot or Clipping.
Activate the Window to use.
Click on the Insert Menu, Select Screenshot and click on
Screen Clipping.
Highlight the area of the window to use as Clipping.
Change the wrapping layout of the graphic if required.
Insert a Hyperlink to a Slide E.g. To create a link to the Slide 4 of the current Presentation using the “Goals” graphics
on the Slide below.
Click on the Graphic or text to use for the hyperlink.
Select the Insert Menu.
Click on Hyperlink tool button.
Select the Place in This Document.
Choose the slide to hyperlink to.
Using the Mouse Click or Mouse Over Action Settings
Action settings are mainly used where you want a hyperlink to
work based on an action.
E.g. To hyperlink the website –
http://ec.europa.eu/research/home.cfm
Select the text or graphic to use as hyperlink.
Select the Insert Menu.
Click the Action Settings Button.
Select the Action to use i.e. Mouse Click or Mouse Over.
Chose the Hyperlink to: Radio button
Type in the link address e.g.
http://ec.europa.eu/research/home.cfm
Click on OK twice to confirm.
View the Slide Show and click on the link to check if your link is working.

Microsoft PowerPoint 2010 User’s Guide (ver 1.0)
4 ©2011 JL Gestion SA Avenue de l’indépendance Belge 58 – B 1081 Bruxelles
Tel : 02/412 04 10 Fax : 02/412 0419 – Gsm 0477/78 94 45 – [email protected]
Insert Text Box, Header and Footer, Word Art, Date & Time and Object To insert any of the above content on a slide, select the Slide Menu.
Click on the relevant option to use under the Text group.
Slide Show Menu
Broadcast a Presentation Using the Broadcast Slide show option, you can broadcast a presentation via the PowerPoint
Broadcast service.
When you navigate your slide show onto your computer, the slide show will also change on the
broadcast.
Select the Slide Show Menu.
Click on Broadcast Slide Show tool button.
You will be prompted to login with your
Windows Live ID to use the Broadcast
service.
Click on Start Broadcast, type in your Windows Live ID. (1)
Send the Link displayed by Email to the other viewers of the
slide show.
The other users can click on the link to view the
presentation. (2)
If the User end the presentation, the screen will display the
broadcast is over. (3)
http://sn1-pptbroadcast.officeapps.live.com/p/PowerPointBroadcast.aspx?pptbid=e6f0be1d-87c5-
44f6-9d0e-b3ee87c3c8f1
\
1
2 3

Microsoft PowerPoint 2010 User’s Guide (ver 1.0)
5 ©2011 JL Gestion SA Avenue de l’indépendance Belge 58 – B 1081 Bruxelles
Tel : 02/412 04 10 Fax : 02/412 0419 – Gsm 0477/78 94 45 – [email protected]
Review Menu
Inserting, Edit, Delete and Navigate between comments.
Position cursor where to place the New Comment.
Click on Review menu and select click on New Comment tool button.
Type in the required comment.
You can delete Edit and go to previous or next comments using the tools under the
Comments group.
If your comment is not displayed, you will need to click on Show Markup tool button.

Microsoft PowerPoint 2010 User’s Guide (ver 1.0)
6 ©2011 JL Gestion SA Avenue de l’indépendance Belge 58 – B 1081 Bruxelles
Tel : 02/412 04 10 Fax : 02/412 0419 – Gsm 0477/78 94 45 – [email protected]
Compare two Presentations and Merge the content E.g. To compare the Time Management Presentation to Time Management Principles Presentation
Open the Time Management Presentation.
Select the Review Menu.
Click on Compare tool button.
Select the Time Management Principles Presentation.
Click on Accept tool button and select Accept All Changes to
the Presentation.
Microsoft PowerPoint 2010 User’s Guide (ver 1.0)
7 ©2011 JL Gestion SA Avenue de l’indépendance Belge 58 – B 1081 Bruxelles
Tel : 02/412 04 10 Fax : 02/412 0419 – Gsm 0477/78 94 45 – [email protected]
View Menu
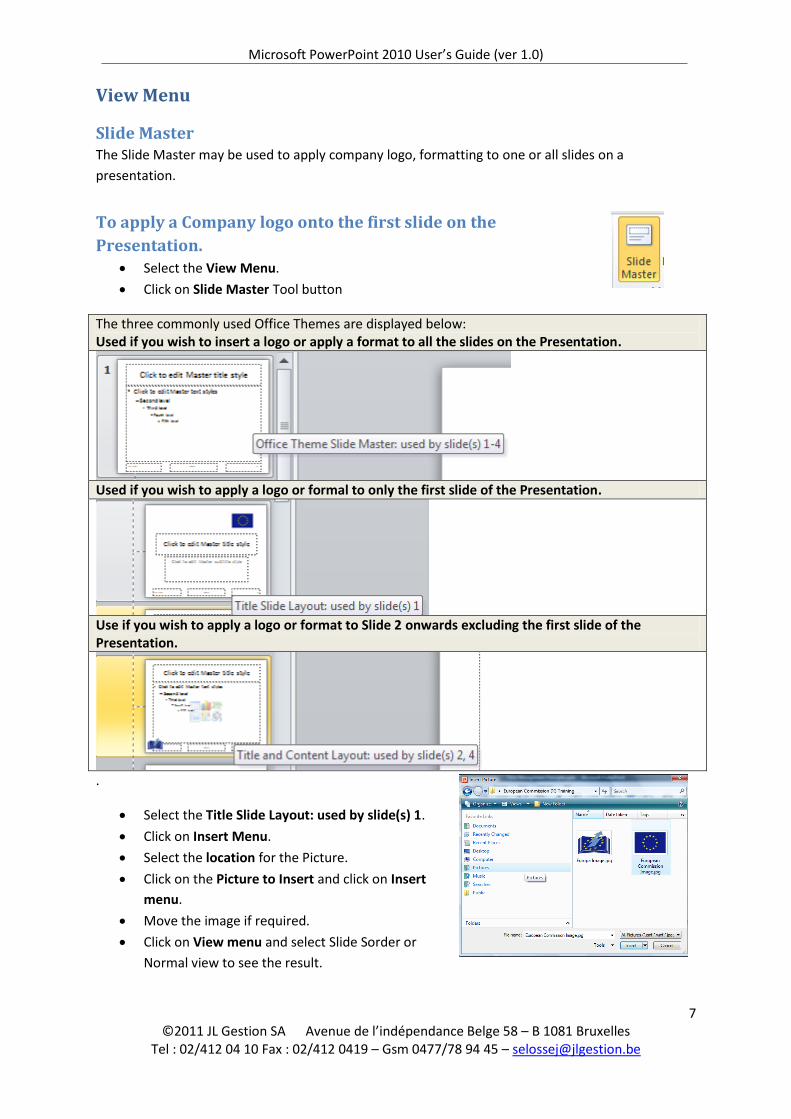
Slide Master The Slide Master may be used to apply company logo, formatting to one or all slides on a
presentation.
To apply a Company logo onto the first slide on the
Presentation.
Select the View Menu.
Click on Slide Master Tool button
The three commonly used Office Themes are displayed below: Used if you wish to insert a logo or apply a format to all the slides on the Presentation.
Used if you wish to apply a logo or formal to only the first slide of the Presentation.
Use if you wish to apply a logo or format to Slide 2 onwards excluding the first slide of the Presentation.
.
Select the Title Slide Layout: used by slide(s) 1.
Click on Insert Menu.
Select the location for the Picture.
Click on the Picture to Insert and click on Insert
menu.
Move the image if required.
Click on View menu and select Slide Sorder or
Normal view to see the result.

Microsoft PowerPoint 2010 User’s Guide (ver 1.0)
8 ©2011 JL Gestion SA Avenue de l’indépendance Belge 58 – B 1081 Bruxelles
Tel : 02/412 04 10 Fax : 02/412 0419 – Gsm 0477/78 94 45 – [email protected]
To apply a company an image or logo onto the slides 2 till the last slide of
your presentation excluding the slide 1. Select the view Menu.
Click on the Slide Master tool.
Select Title and Content Slide layout: Used by slide 2-4
Select the Insert Menu, click on Picture.
Choose the location and the picture to use.
Click on Insert to confirm.
Using Notes Pages to add notes to Slides Notes added onto slides will not appear when viewing the presentation slide show view.
To add Notes on a presentation Select the slide to apply the presentation.
Select the View Menu and click on Normal.
Click on the Notes area and type the relevant notes for the slide.
Microsoft PowerPoint 2010 User’s Guide (ver 1.0)
9 ©2011 JL Gestion SA Avenue de l’indépendance Belge 58 – B 1081 Bruxelles
Tel : 02/412 04 10 Fax : 02/412 0419 – Gsm 0477/78 94 45 – [email protected]
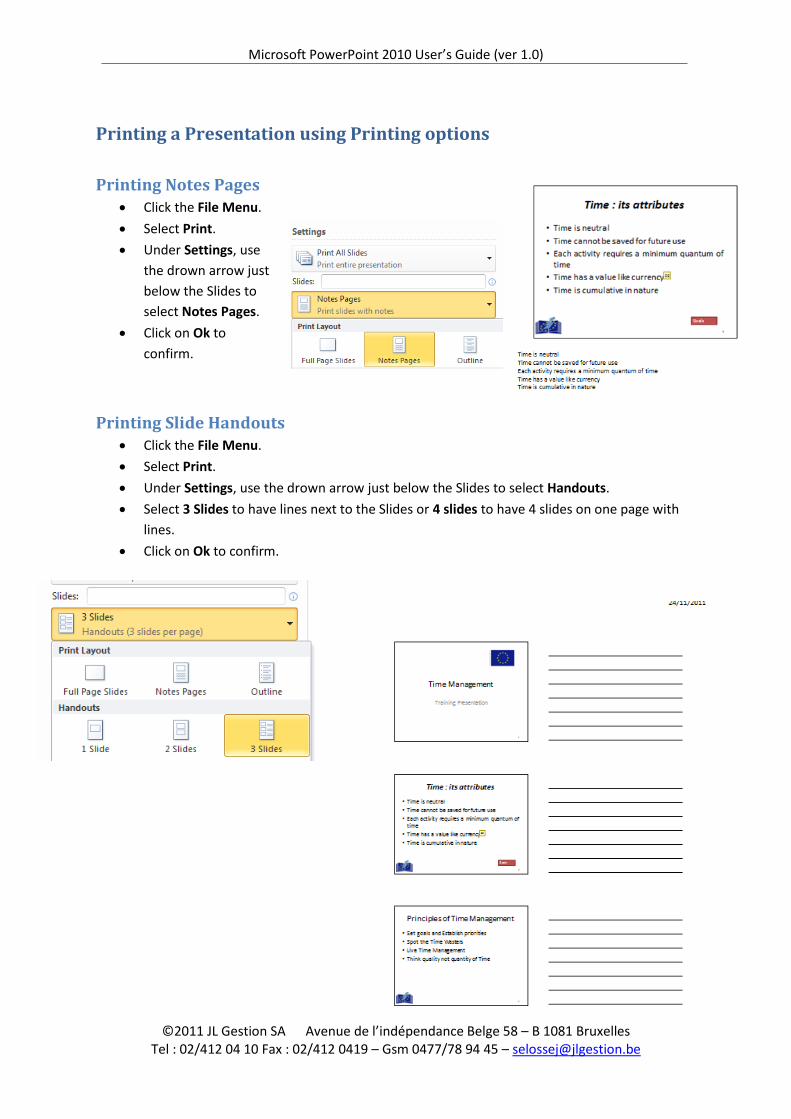
Printing a Presentation using Printing options
Printing Notes Pages Click the File Menu.
Select Print.
Under Settings, use
the drown arrow just
below the Slides to
select Notes Pages.
Click on Ok to
confirm.
Printing Slide Handouts Click the File Menu.
Select Print.
Under Settings, use the drown arrow just below the Slides to select Handouts.
Select 3 Slides to have lines next to the Slides or 4 slides to have 4 slides on one page with
lines.
Click on Ok to confirm.