powerpoint 2007 - university of exeter · powerpoint 2007 module 2 . 2 table of contents creating...
TRANSCRIPT

PowerPoint 2007 Module 2

2
Table of Contents Creating Charts ................................................................................................................... 4
Entering and Editing Chart ................................................................................................. 6
To Edit the Chart Data ........................................................................................................ 6
To Re-Edit the Chart Data .................................................................................................. 7
To Resize the Data Range ................................................................................................... 7
To Exit and Return to PowerPoint ...................................................................................... 7
Formatting the Chart .......................................................................................................... 8
To Change the Chart Type .................................................................................................. 8
To Change the Chart Layout ............................................................................................... 8
To Change the Chart Style .................................................................................................. 9
To Add Labels ..................................................................................................................... 9
To Add Lines to a Chart .................................................................................................... 10
To Resize a Chart .............................................................................................................. 10
SmartArt ........................................................................................................................... 11
Creating a SmartArt Graphic ............................................................................................ 11
To Insert SmartArt ............................................................................................................ 12
To Add Text to a SmartArt ................................................................................................ 14
To Show/Hide the Text Pane ............................................................................................ 14
Customising your SmartArt Graphic ................................................................................ 15
To Add Extra SmartArt Shapes ......................................................................................... 15
To Change the SmartArt Layout ....................................................................................... 15
To Change the SmartArt Style .......................................................................................... 16
To Change the SmartArt Colours...................................................................................... 16
To Rest the SmartArt Graphic .......................................................................................... 16
Customising SmartArt Shapes .......................................................................................... 17
To change a SmartArt Shape ............................................................................................ 17
To Make the SmartArt Shape Larger/Smaller .................................................................. 17
To Change a SmartArt Shape Style ................................................................................... 18
To Change a SmartArt Shape Fill Colour .......................................................................... 18
To Change a SmartArt Shape Outline .............................................................................. 18
To Change a SmartArt Shape Effect ................................................................................. 19
To Change a SmartArt WordArt Style .............................................................................. 19
Templates and Themes .................................................................................................... 20
Custom Themes ................................................................................................................ 20
To Customise Theme Colours ........................................................................................... 20
3
To Customise Theme Fonts .............................................................................................. 22
To Save a Custom Theme ................................................................................................. 23
The Master Slide ............................................................................................................... 25
To Edit the Slide Master ................................................................................................... 26
Custom Layouts ................................................................................................................ 29
To Create a Custom Layout .............................................................................................. 29
Recording Narration ......................................................................................................... 31
Before You Record ........................................................................................................... 31
To Start Narration ............................................................................................................ 31
To Remove a Narration .................................................................................................... 32
Playing Directly from a CD ................................................................................................ 33
Insert a Sound Clip ........................................................................................................... 34
Some Useful Sound Options ............................................................................................. 35
To check if a sound file is Linked or Embedded ............................................................... 36
To Increase or decrease the size of the embedded sound file ........................................ 36
Insert a Video Clip ............................................................................................................ 37
PowerPoint Keyboard Shortcuts ...................................................................................... 39

4
Creating Charts You can create charts of different types including pie, column, line and area charts. These can be created directly in PowerPoint or imported from Excel.
To create a chart in PowerPoint
To Create a Chart Using the Ribbon:
1. Choose a Title Only (or Blank Layout)
2. Click the Insert tab
3. In the Illustrations group, click Chart
The chart dialogue box appears:
3. Select the required chart and click OK
Your chart is now inserted

5
Using the Mouse: 1. Insert a new Slide
2. In the centre of the new slide, click the chart icon
The Chart dialogue box opens 3. Select the required chart and click OK Your chart is now inserted
Note: When a chart inserted, Excel also opens and is used to edit the data that makes up the chart.
6
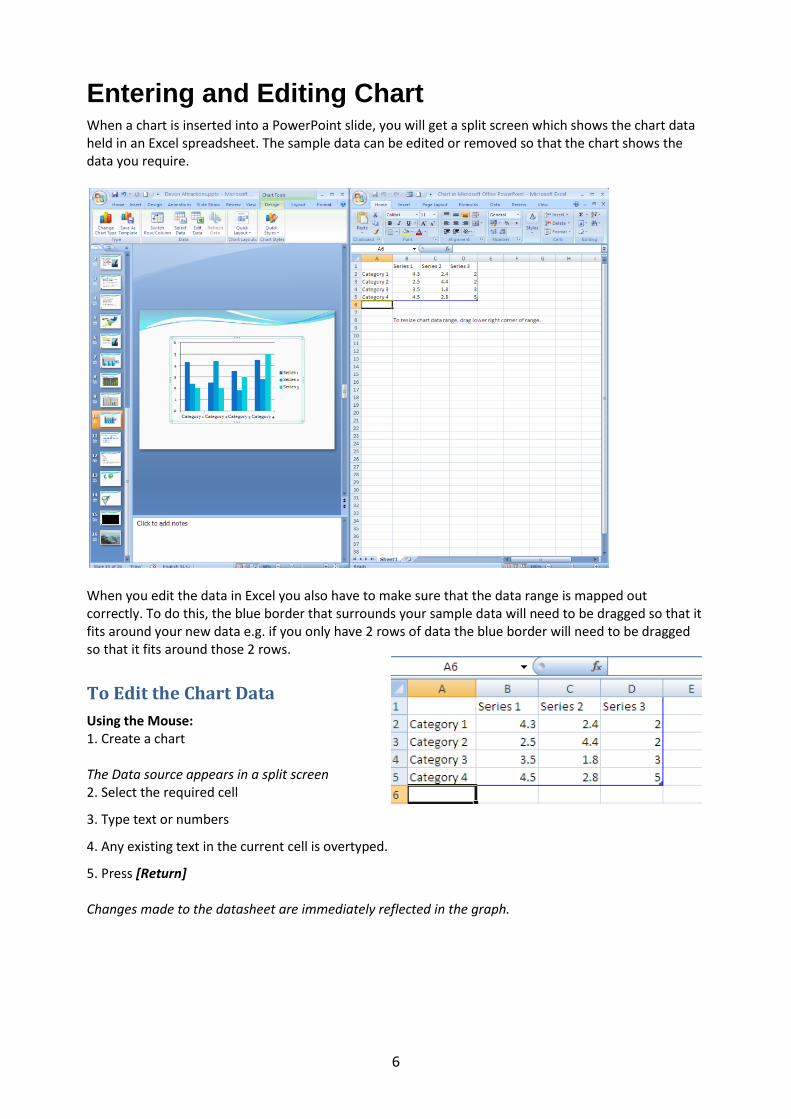
Entering and Editing Chart When a chart is inserted into a PowerPoint slide, you will get a split screen which shows the chart data held in an Excel spreadsheet. The sample data can be edited or removed so that the chart shows the data you require.
When you edit the data in Excel you also have to make sure that the data range is mapped out correctly. To do this, the blue border that surrounds your sample data will need to be dragged so that it fits around your new data e.g. if you only have 2 rows of data the blue border will need to be dragged so that it fits around those 2 rows.
To Edit the Chart Data
Using the Mouse: 1. Create a chart The Data source appears in a split screen 2. Select the required cell
3. Type text or numbers
4. Any existing text in the current cell is overtyped.
5. Press [Return] Changes made to the datasheet are immediately reflected in the graph.
7
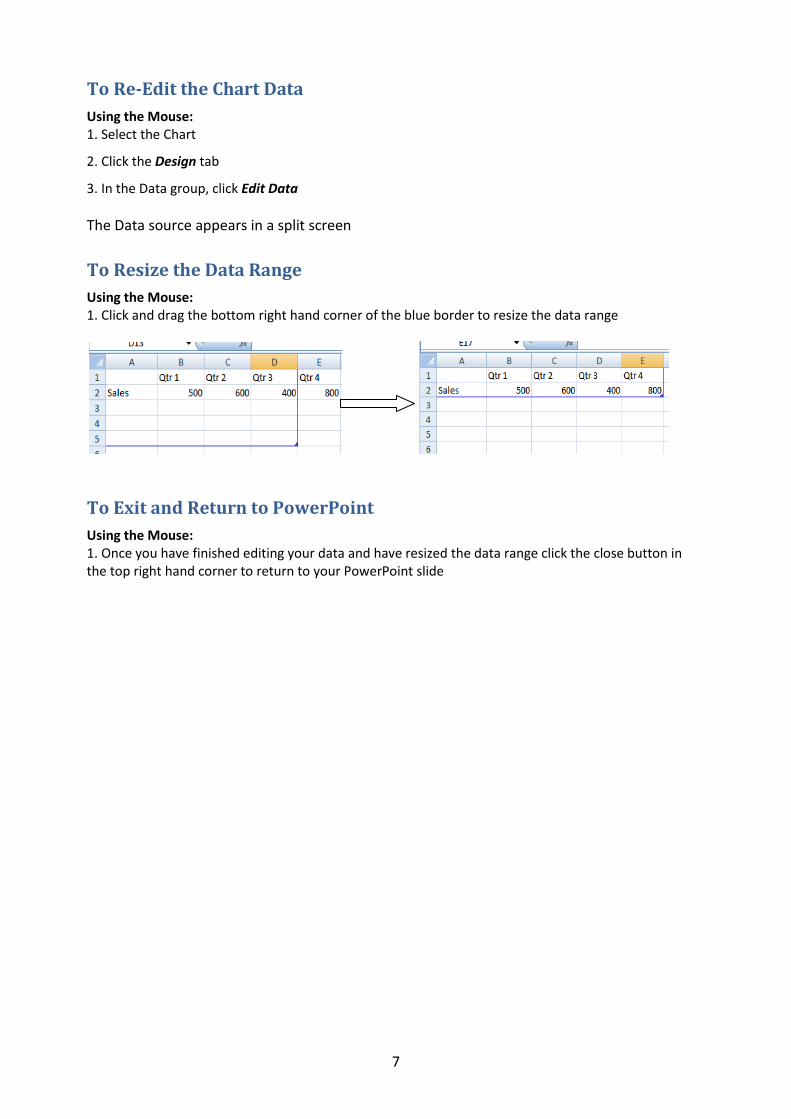
To Re-Edit the Chart Data
Using the Mouse: 1. Select the Chart
2. Click the Design tab
3. In the Data group, click Edit Data
The Data source appears in a split screen
To Resize the Data Range
Using the Mouse: 1. Click and drag the bottom right hand corner of the blue border to resize the data range
To Exit and Return to PowerPoint
Using the Mouse: 1. Once you have finished editing your data and have resized the data range click the close button in the top right hand corner to return to your PowerPoint slide

8
Formatting the Chart When formatting a chart you can change the chart style, attach features such as a legend, titles, gridlines and change the appearance of any part of the graph.
To Change the Chart Type
Using the Ribbon: 1. Select your chart
2. On the Ribbon, click the Design tab
3. In the Type group, click Change Chart type
4. Choose the new chart type and click OK Your Chart has now changed
To Change the Chart Layout
Using the Ribbon: 1. Select your chart
2. On the Ribbon, click the Design tab
3. Within the chart layout group, select the required layout. Choose the More button to see the complete list of layouts:

9
To Change the Chart Style
Using the Ribbon: 1. Select your chart
2. On the Ribbon, click the Design tab
3. Within the Chart Style group, select the required Style. Choose the More button to see the complete list of layouts:
To Add Labels
Using the Ribbon: 1. Select your chart
2. Click the Layout tab
3. In the Labels group, click the Label button required e.g. Data Labels
4. Choose the required label position Your label will now be inserted
10
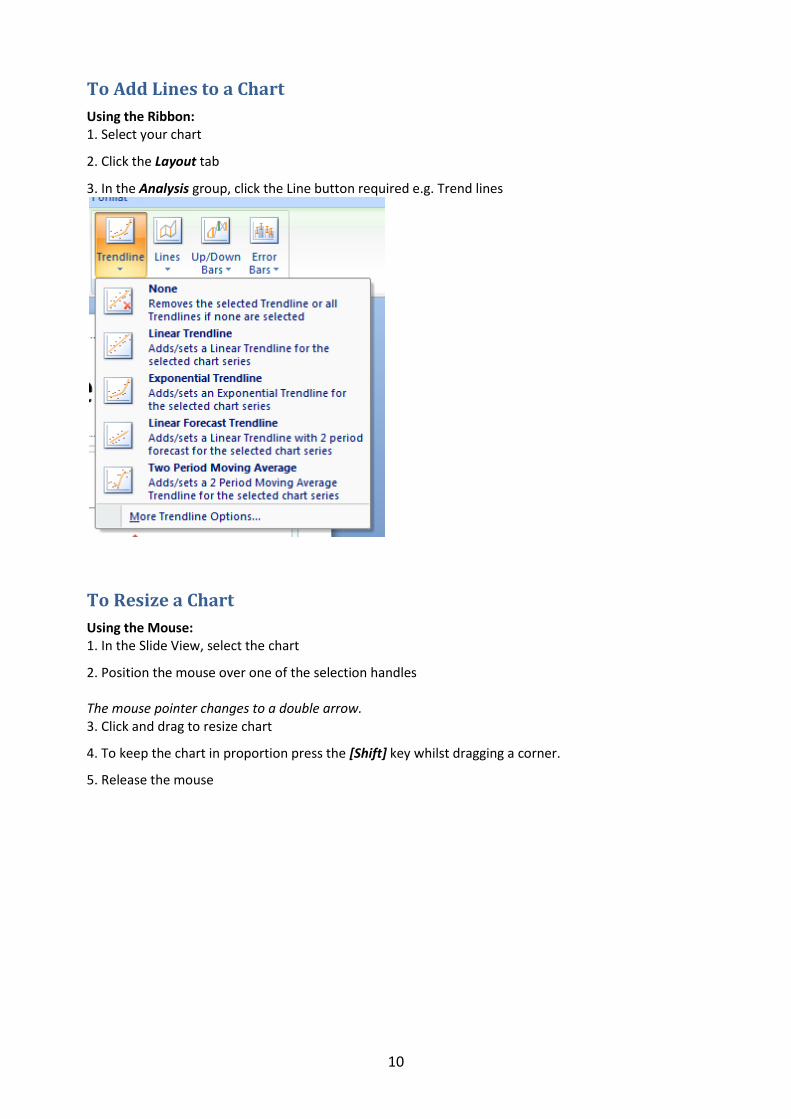
To Add Lines to a Chart
Using the Ribbon: 1. Select your chart
2. Click the Layout tab
3. In the Analysis group, click the Line button required e.g. Trend lines
To Resize a Chart
Using the Mouse: 1. In the Slide View, select the chart
2. Position the mouse over one of the selection handles The mouse pointer changes to a double arrow. 3. Click and drag to resize chart
4. To keep the chart in proportion press the [Shift] key whilst dragging a corner.
5. Release the mouse

11
SmartArt
Creating a SmartArt Graphic
A SmartArt graphic is a visual representation of your information that you can quickly and easily create, choosing from among many different layouts, to effectively communicate your message or ideas. In earlier versions of PowerPoint, it could be quite time consuming getting shapes to be the same size and to be aligned properly, getting your text to look right. This could leave less time to get the content right. With the new 2007 Office feature called SmartArt graphics, and other new features such as themes, you can create professional looking illustrations very easily.
When you create a SmartArt graphic, you are prompted to choose a type of graphic, such as Process, Hierarchy, Cycle, or Relationship. Each type contains several different layouts. After you choose a layout, it is easy to change the layout for your SmartArt graphic. Most of your text and other content, colours, styles, effects, and text formatting are automatically carried over to the new layout.
Before you create your SmartArt graphic, it is helpful to think about what type of layout would be best for displaying your information. What do you want to convey with your SmartArt graphic? Do you want a certain look? A useful feature of SmartArt is the ability to switch between layouts meaning you can try out different layouts until you find the right one. The table below is a quick guide and is intended to help you get started and is not an exhaustive list.
Purpose of graphic Graphic type
Show non-sequential information List
Show steps in a process or timeline Process
Show a continual process Cycle
Show a decision tree Hierarchy
Create an organisation chart Hierarchy
Illustrate connections Relationship
Show how parts relate to a whole Matrix
Show proportional relationships with the largest component on the top or bottom
Pyramid

12
To Insert SmartArt
Using the Ribbon: 1. Choose the Insert tab
2. In the Illustrations tab, click SmartArt
The SmartArt category box appears:
Select the required category (type) on the left A list of subtypes appear on the right 4. Click on a SmartArt to see a preview and description on the right
5. Once you have selected the required SmartArt, click OK Your SmartArt is now inserted

13
Adding Text to SmartArt When you insert a SmartArt graphic, a text pane appears. This text pane allows you to enter/edit text within your SmartArt graphic without typing directly into any shapes.
When you create a SmartArt graphic, the graphic and its Text pane are populated with placeholder text that you can edit and replace with your own. At the top of the Text pane, you can edit the text that will appear in your SmartArt graphic.
Although you cannot drag text onto the Text pane, you can copy and paste within the Text pane. You can also copy and paste between the Text pane and any 2007 Microsoft Office document. As you complete your content in the Text pane, you can try different layouts and customise your SmartArt graphic. In general, SmartArt graphics work best with shorter amounts of text. Large amounts of text might distract from the visual appeal of the SmartArt graphic and make it harder to convey your message visually. In certain SmartArt graphics, only some of the text in the Text pane appears, because the SmartArt graphic contains a fixed number of shapes. Text, pictures, or other content that is not displayed is identified in the Text pane with a red X. Content that is not displayed is still available if you switch to another layout, but if you keep and close this same layout, the information is not saved (to protect your privacy).

14
To Add Text to a SmartArt
Using the Ribbon: 1. Insert a SmartArt graphic The text pane should appear. 2. Click into the text block you wish to edit and type the required text As you type the SmartArt graphic should update automatically
To Show/Hide the Text Pane
Using the Ribbon: 1. Click into your SmartArt
2. Type the new text, then click away
3. In the Create Graphic group, click Text Pane to show/hide the Text Pane Using the Mouse: 1. Click into your SmartArt
2. Click the Text Pane marker on the left hand side of the SmartArt graphic The text pane should appear

15
Customising your SmartArt Graphic Once you have inserted your SmartArt graphic, you can customise it by adding extra shapes, changing the layout, and applying Smart Art Styles. A SmartArt Style is a combination of various effects, such as line style, bevel, or 3-D, that you can apply to the shapes in your SmartArt graphic to create a unique and professionally designed look.
When your SmartArt is selected you have access to two tabs on the ribbon: the Design tab and the Format tab. The Design tab allows you make changes to the whole SmartArt graphic.
To Add Extra SmartArt Shapes
Using the Ribbon: 1. Click into your SmartArt graphic
2. Select the Design tab
3. In the Create Graphic group, click Add Shape
A new shape will be added to your SmartArt graphic (add text if required)
To Change the SmartArt Layout
Using the Ribbon: 1. Click into your SmartArt graphic
2. Select the Design tab
3. In the Layouts group, select the require SmartArt layout

16
To Change the SmartArt Style
Using the Ribbon: 1. Click into your SmartArt graphic
2. Select the Design tab
3. In the SmartArt Styles group, select the require SmartArt Style
To Change the SmartArt Colours
Using the Ribbon: 1. Click into your SmartArt graphic
2. Select the Design tab
3. In the SmartArt Styles group, click Change Colours
To Rest the SmartArt Graphic
Using the Ribbon: 1. Click into your SmartArt graphic
2. Select the Design tab
3. In the reset group, click Reset Graphic

17
Customising SmartArt Shapes If you want to make changes to individual shapes within your SmartArt graphic, you can use the Format tab when your SmartArt graphic is selected. You can format one shape at a time or select multiple shapes to format them simultaneously. To select multiple shapes, hold down the [SHIFT] key and click each shape to select them. In most cases you can click the frame in which the SmartArt is within to select all shapes.
To change a SmartArt Shape
Using the Ribbon: 1. Select the SmartArt Shape you wish to change
2. Select the Format tab
3. In the Shapes group, select Change Shape
4. Select the require Shape
To Make the SmartArt Shape Larger/Smaller
Using the Ribbon: 1. Select the SmartArt Shape you wish to change
2. Select the Format tab
3. In the Shapes group, select Larger/Smaller

18
To Change a SmartArt Shape Style
Using the Ribbon: 1. Select the SmartArt Shape you wish to change
2. Select the Format tab
3. In the Shape Styles group, select the required shape style
To Change a SmartArt Shape Fill Colour
Using the Ribbon: 1. Select the SmartArt Shape you wish to change
2. Select the Format tab
3. In the Shape Styles group, select Shape Fill
To Change a SmartArt Shape Outline
Using the Ribbon: 1. Select the SmartArt Shape you wish to change
2. Select the Format tab
3. In the Shape Styles group, select Shape Outline
4. Select the required outline style

19
To Change a SmartArt Shape Effect
Using the Ribbon: 1. Select the SmartArt Shape you wish to change
2. Select the Format tab
3. In the Shape Styles group, select Shape Effects
To Change a SmartArt WordArt Style
Using the Ribbon: 1. Select the SmartArt Shape you wish to change
2. Select the Format tab
3. In the WordArt Styles group, select the required WordArt style
To Change a SmartArt Text Fill/Outline/Effect
Using the Ribbon: 1. Select the SmartArt Shape you wish to change
2. Select the Format tab
3. In the WordArt Styles group, select the Text Fill/Text Outline/Text Effect button
4. Choose the required formats
20
Templates and Themes
Custom Themes
You can quickly and easily format an entire presentation to give it a professional and modern look by applying a theme. A theme is a set of formatting choices that include a set of theme colours, a set of theme fonts (including heading and body text fonts), and a set of theme effects (including lines and fill effects).
PowerPoint 2007 provides several predefined themes, but you can also create your own by customising an existing theme and then saving it as a custom document theme.
You can share PowerPoint themes with Word 2007, Excel 2007, and other Office programs to give your Office documents a uniform look. However, unlike Word and Excel, PowerPoint includes background style customisation options.
To customise a theme, you start by changing the colours, the fonts, or the line and fill effects that are used.
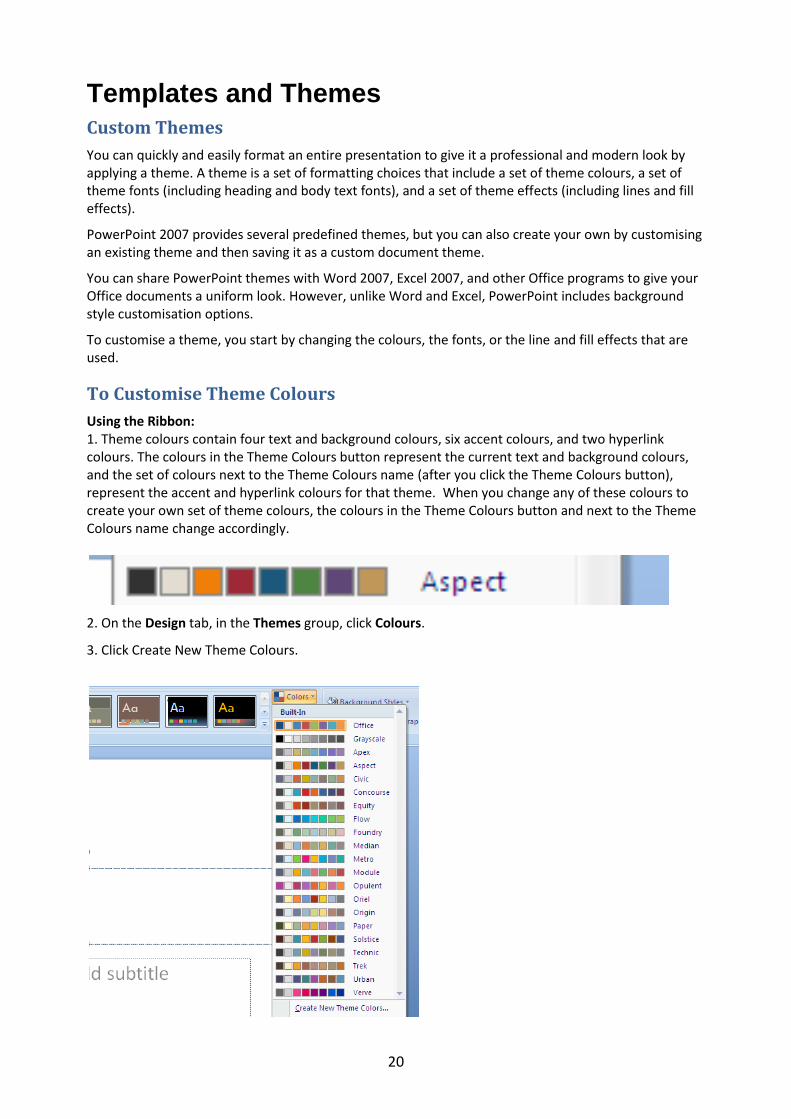
To Customise Theme Colours
Using the Ribbon: 1. Theme colours contain four text and background colours, six accent colours, and two hyperlink colours. The colours in the Theme Colours button represent the current text and background colours, and the set of colours next to the Theme Colours name (after you click the Theme Colours button), represent the accent and hyperlink colours for that theme. When you change any of these colours to create your own set of theme colours, the colours in the Theme Colours button and next to the Theme Colours name change accordingly.
2. On the Design tab, in the Themes group, click Colours.
3. Click Create New Theme Colours.

21
The Create New Theme Colors dialogue box appears:
4. Under Theme colors, click the button next to the name of the theme colour element that you want to change and choose a colour
5. Repeat for all of the theme colour elements that you want to change. Under Sample, you can see the effect of the changes that you make. 6. In the Name box, type an appropriate name for the new theme colours, and then click Save.

22
To Customise Theme Fonts
Using the Ribbon: 1. Theme fonts contain a heading font and a body text font. When you click the Theme Fonts button, you see the name of the heading and body text fonts used for each theme font below the Theme Fonts name. You can change both of these fonts to create your own set of theme fonts.
2. On the Design tab, in the Themes group, click Theme Fonts.
The create new theme font dialogue box appears:
3. In the Heading font and Body font boxes, select the fonts that you want to use. Under Sample, you can see sample text in the font style that you select. 4. In the Name box, type an appropriate name for the new theme font .
5. Click Save.

23
To Customise Theme Effects
Using the Ribbon: 1. Theme effects are sets of lines and fill effects. When you click the Theme Effects button, you see the lines and fill effects used for each set of theme effects in the graphic displayed with the Theme Effects name. Although you cannot create your own set of theme effects, you can choose the one that you want to use in your own document theme.
2. On the Design tab, in the Themes group, click Theme Effects.
3. Click the effect that you want to use.
To Save a Custom Theme
Using the Ribbon: 1. You can save any changes that you make to the colours, fonts, or line and fill effects of a theme as a custom theme that you can apply to other documents or presentations.
2. On the Design tab, in the Themes group, click the More button.
3. Click Save Current Theme.
24
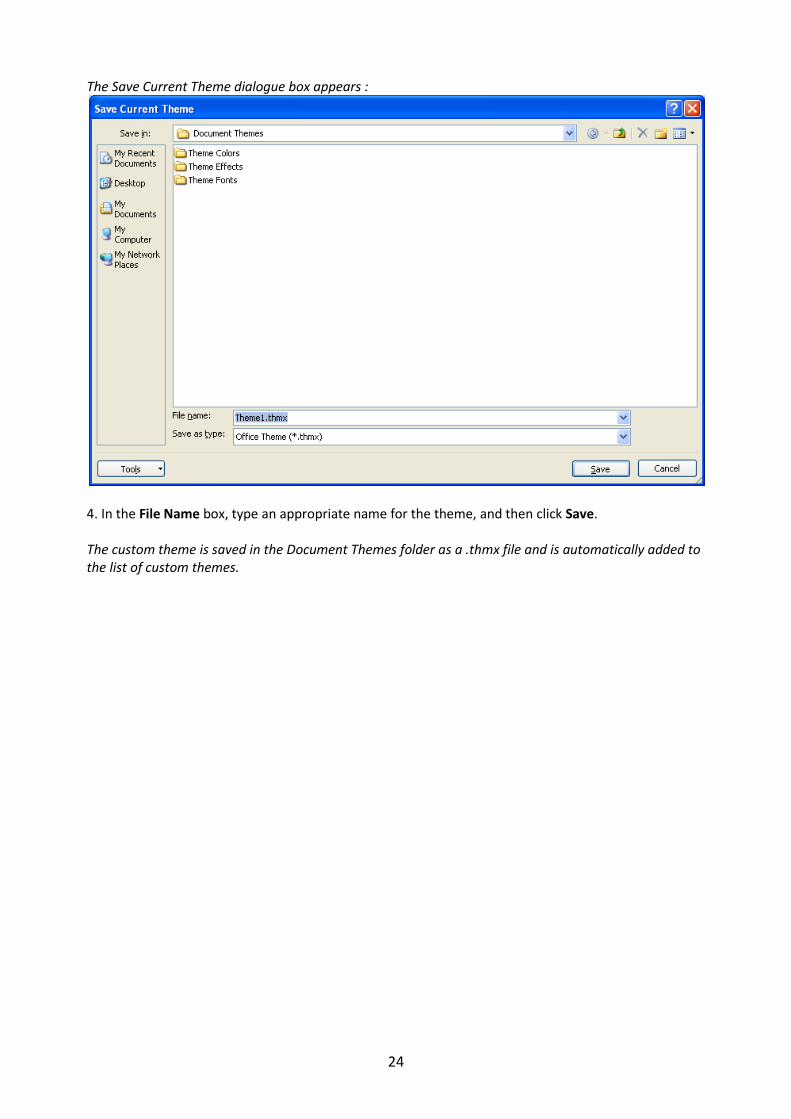
The Save Current Theme dialogue box appears :
4. In the File Name box, type an appropriate name for the theme, and then click Save. The custom theme is saved in the Document Themes folder as a .thmx file and is automatically added to the list of custom themes.

25
The Master Slide A slide master is the top slide in a hierarchy of slides that stores information about the theme and slide layouts of a presentation, including the background, colour, fonts, effects, placeholder sizes, and positioning. Every presentation contains at least one slide master. The key benefit to using slide masters is that you can make universal style changes to every slide in your presentation, including ones added later to the presentation. When you use a slide master, you save time because you don't have to type the same information or apply the same formatting features, to more than one slide.
When you modify one or more of the layouts beneath a slide master, you are essentially modifying the slide master. Each slide layout, is set up differently, yet all layouts that are associated with a given slide master contain the same theme (colour scheme, fonts, and effects). The following image shows a single slide master with the Flow theme applied, and two (different) supporting layouts. Notice how each of the two layouts shown portray a different version of the Flow theme — using the same colour scheme, but in a different arrangement. Also, each layout provides text boxes and footers in different locations on the slide, and different font sizes in the various text boxes.

26
When you go to Slide Master View, you'll see that there are several default layouts associated with any given slide master. Most likely, you will not use all of the layouts provided. You choose from the available layouts, the ones that work best to display your information.
You can create a presentation that contains one or more slide masters, and then save it as a PowerPoint Template (.potx or .pot) file and then use it to create other presentations. This file includes everything a slide master contains, and more.
Note: It is a good idea to create a slide master before you start to build individual slides, rather than after. When you create the slide master first, all of the slides that you add to your presentation are based on that slide master and the associated layouts. When you start making changes, make them on the slide master.
Also, if you create a slide master after you build individual slides, some of the items on the slides may not conform to the slide master design. You can override some of the slide master customisations on individual slides by using the background and text formatting features, but others (such as footers and logos) can be modified only in Slide Master View.
To Edit the Slide Master
Using the Ribbon: 1. Choose the View tab
2. Choose Slide Master
You will then be in Slide Master View
4. The Title Slide Layout will be selected by default. Select the layout you wish to edit
Each thumbnail represents the different layouts you can use in your presentation.
In this example you would be editing the Title Slide Layout only and so would affect only those slides in your presentation which use this layout.

27
To apply changes to formatting or to add a logo which appears on every slide in your presentation, select the top thumbnail - this is used by all slides:
5. Select the area to change, e.g. Select the Title placeholder to change the font colour/size for all headings in your presentation.
Select this layout to edit if you want to ensure that changes or additions apply to all slides in your presentation

28
6. Make changes required, e.g. change text colour.
7. Repeat steps to edit the required elements of your slide. 8. Choose Close Master View to return to normal view.
Note: Text, graphics and clip art can be added to the slide master in the same way as they are added to a normal slide.

29
Custom Layouts If you do not find a standard layout (e.g. the arrangement of elements, such as title and subtitle text, lists, pictures, tables, charts, AutoShapes, and movies on a slide) that meets your needs, you can create a custom layout that perfectly suits your slide content.
In Slide Master View, locate the 'Blank Layout' in the thumbnail list of layouts below the slide master. You can customise that layout by adding text-specific and object-specific placeholders
To Create a Custom Layout
Using the Ribbon: 1. On the View tab, in the Presentation Views group, click Slide Master.
2. In the pane that contains the slide masters and layouts, locate and click the Blank Layout in the list of thumbnail layouts below the slide master:
3. To modify the layout, do one or more of the following:
4. To remove unwanted, default placeholders such as headers, footers, or the date and time, click the border of the placeholder, and then press [DELETE].
5. To add a placeholder, in the Master Layout group, click Insert Placeholder, and then select a placeholder type from the list.

30
6. Click a location on the layout, and then drag to draw the placeholder.
7. In the thumbnail list of layouts, right-click the Blank Layout and then click Rename Layout:
8. In the Rename Layout dialog box, type a new name that describes the new layout you've just customised, and then click Rename.
9. Choose Close Master View to return to normal view
The layout that you added and customised now appears in the list of standard, built-in layouts in Normal view, located on the Home tab, in the Slides group. 10. To apply and use the layout, navigate to the slide which requires the new custom layout
11. Click the Layout button and select your custom layout
31
Recording Narration Narration is one of PowerPoint's least used and most misunderstood aspects. Many people try narration within PowerPoint only to get frustrated and give up. Surprisingly, most PowerPoint narration problems stem from outside PowerPoint - from incompatible sound cards to loose microphone cables or messed up Multimedia properties in the Windows Control Panel.
Before You Record
To record narrations from within PowerPoint, you will need a sound card and a decent microphone. But before you do anything, even before you launch PowerPoint, open the Windows Sound Recorder (usually found under Start, Programs, Accessories, Entertainment) and try recording something - the most common problem faced by many is that their microphone settings are not optimal - if Sound Recorder is able to record your voice, then you should not have any problems recording your narrations in PowerPoint.
If Sound Recorder fails to record, you may need to open your Play/Record Control Properties - you can achieve this by double-clicking on the small yellow speaker icon to the right of your Windows taskbar - this will open your Play Control settings - choose Options - Properties from the menu - select the 'Recording' radio button and select OK - if your resultant Microphone option is too low, click and drag the slider up.
If that does not help, check if your microphone cable is properly connected to the back of your sound card.
If this does not work as well, you may not have the ability to record sound. Contact the IT helpdesk to confirm and get assistance.
To Start Narration
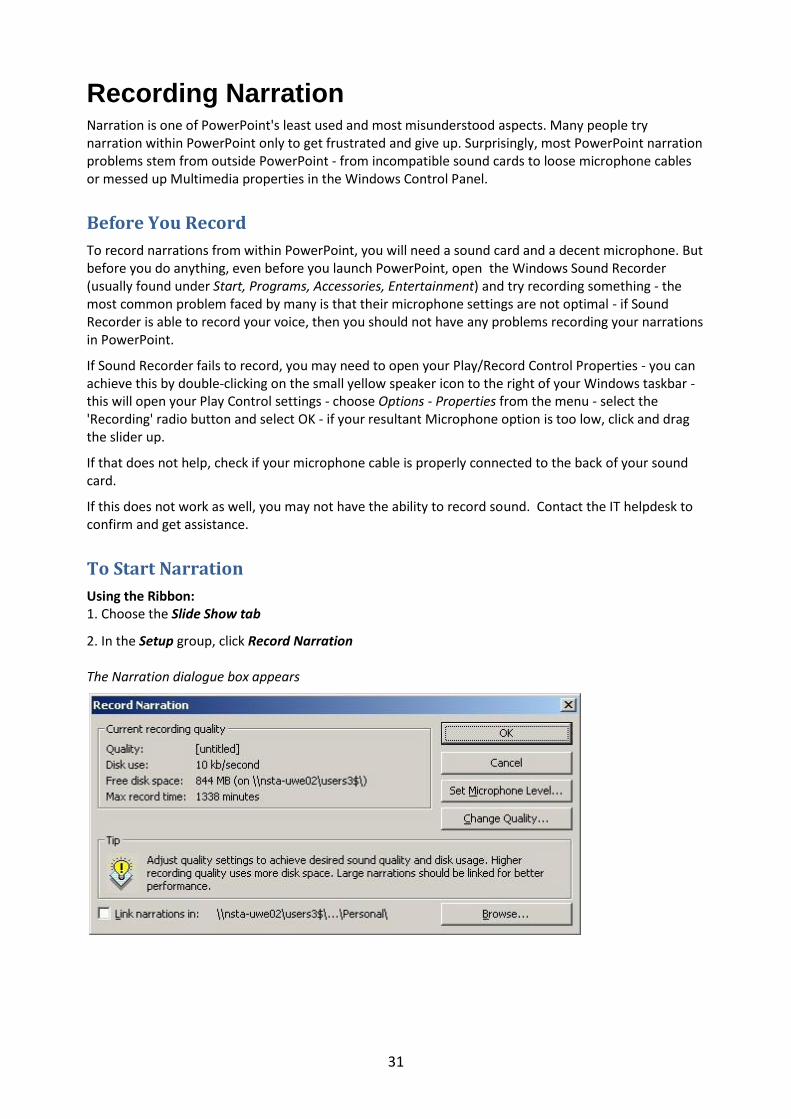
Using the Ribbon: 1. Choose the Slide Show tab
2. In the Setup group, click Record Narration The Narration dialogue box appears
32
Option Description Set Microphone Level
This is to ensure that your microphone is working properly. Click the 'Set Microphone Level' button and you should be presented with a 'Microphone Check' dialogue box.
Change Quality
Another option which allows you to change the quality of the sound recorded - the best quality uses the maximum hard disk space as also system resources when running the presentation. The three preset options starting from the Best Quality are CD, Radio and Telephone. Using Radio Quality provides the best balance.
Link Narrations
Check this box if you would like to link your sound files rather than embed. Use the browse button to select where you want to sound files to be saved. This option also allows you to later directly open the recorded sound files and edit them in a sound editor. Although it means you have to remember that if you transfer the presentation to another place e.g. floppy disk, you must transfer the sound files as well.
3. Click the OK button.
4. Narrate as per your script (if you have created one).
5. To go to the next slide, click your Mouse button or press the [spacebar] on your keyboard.
6. Complete the narration for all your slides.
7. PowerPoint will ask you if you want to save the timing with each slide. Click Yes to accept.
To Remove a Narration
Using the Keyboard: 1. When a Narration has been made, a speaker symbol appears on each slide
2. Click the symbol to select it
3. Press [Delete]
4. Repeat for each slide you want to delete the file from Note: If you want to run the presentation without the narration but you do not want to delete the narration, on the Ribbon go to the Slide Show tab, click Set Up Slide Show, and then select the Show without narration check box. If you used linked narrations, do not forget to delete the sound files you no longer need.
33
Using Multimedia Learning to insert digital video & audio clips into your slide shows allows you to begin get the best out of the PowerPoint program. It is important to remember that if implemented correctly and with purpose, these features will allow you to create professional looking slide shows. Done unnecessarily and you could end up with a long, sluggish and error prone slide show.
Playing Directly from a CD
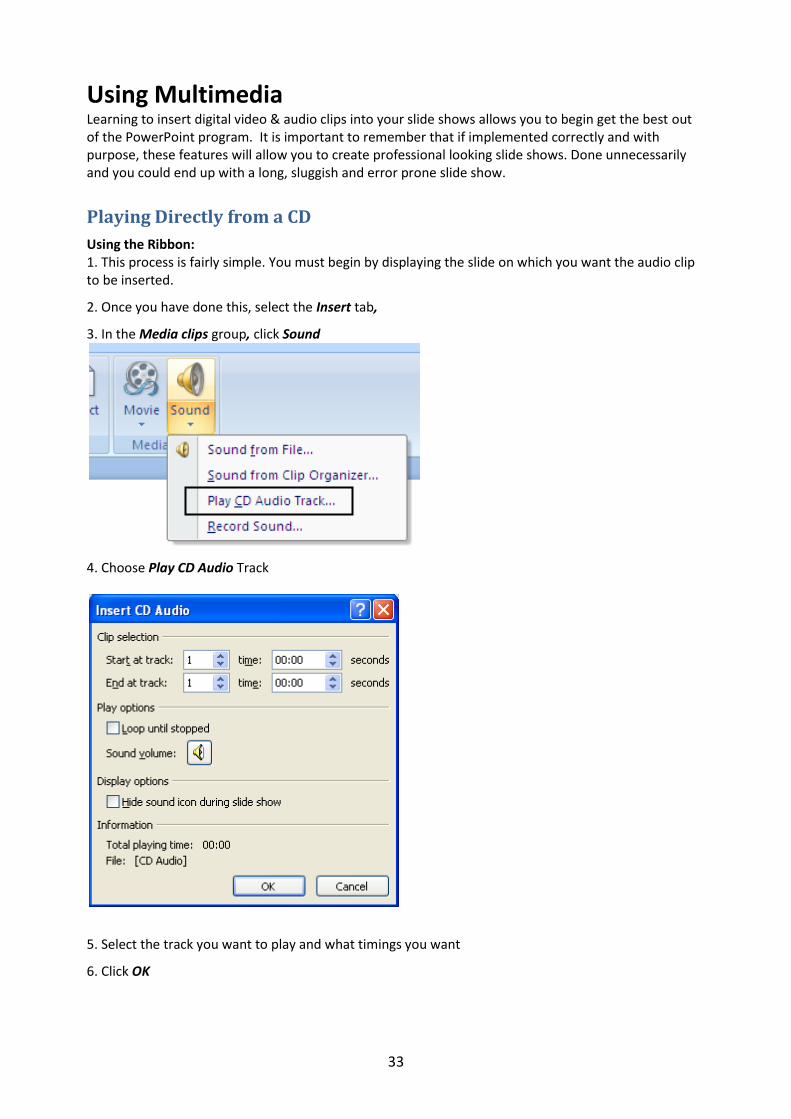
Using the Ribbon: 1. This process is fairly simple. You must begin by displaying the slide on which you want the audio clip to be inserted.
2. Once you have done this, select the Insert tab,
3. In the Media clips group, click Sound
4. Choose Play CD Audio Track
5. Select the track you want to play and what timings you want
6. Click OK

34
After clicking on the OK button your slide will contain a CD icon.
This icon is your cue that music has been added to your slide show. To improve the appearance of the slide, make the icon smaller and move it to the corner of the slide.
Note: This is the easiest way to insert audio and the one that will cause the fewest problems. The down side is that you must have the CD in place to play the audio. This can be especially problematic if you are planning to distribute the show to students, or if you will need to play the slide show on a computer that you are unfamiliar with.
Insert a Sound Clip
Using the Ribbon: 1. Begin by displaying the slide on which you want the audio clip to be inserted.
2. Once you have done this, select the Insert tab,
3. In the Media clips group, click Sound
4. Choose Sounds from File At this point you will see a dialog box asking you the name of the file you wish to insert.
5. After selecting the file and clicking OK, you will get the following prompt:
6. Choose whether you want the sound to play on slide appearance in slide show, or when clicked
35
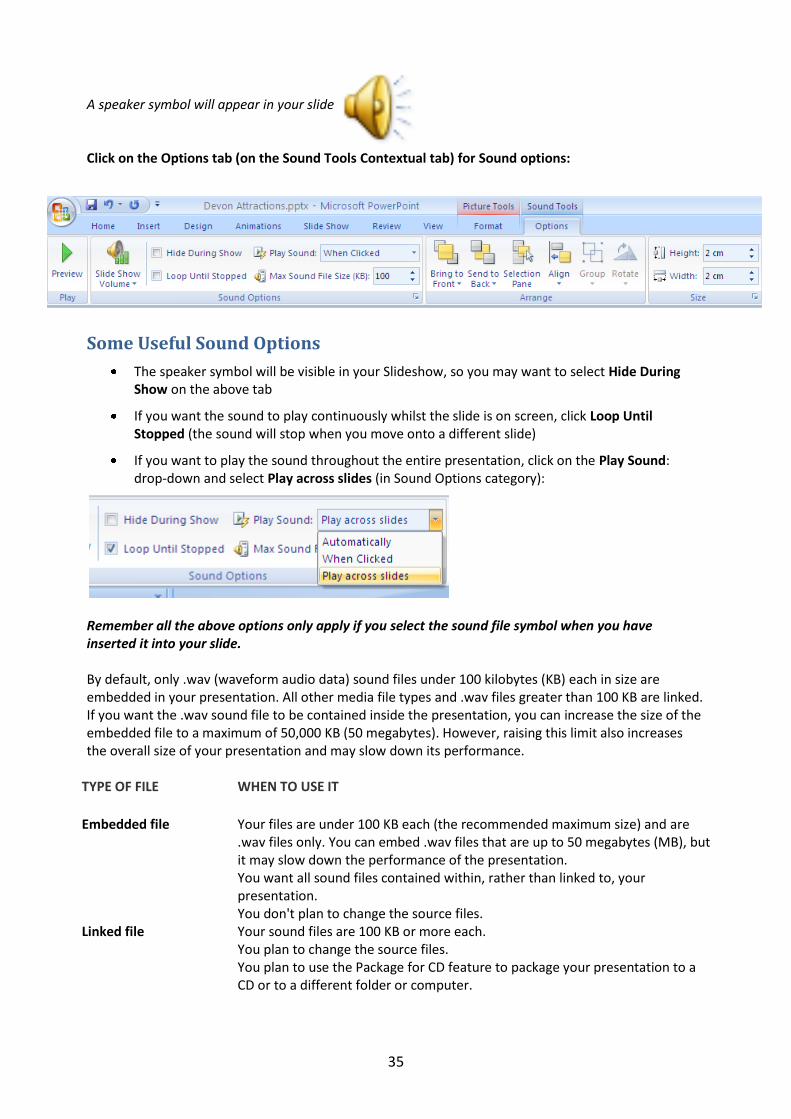
A speaker symbol will appear in your slide Click on the Options tab (on the Sound Tools Contextual tab) for Sound options:
Some Useful Sound Options
The speaker symbol will be visible in your Slideshow, so you may want to select Hide During Show on the above tab
If you want the sound to play continuously whilst the slide is on screen, click Loop Until Stopped (the sound will stop when you move onto a different slide)
If you want to play the sound throughout the entire presentation, click on the Play Sound: drop-down and select Play across slides (in Sound Options category):
Remember all the above options only apply if you select the sound file symbol when you have inserted it into your slide. By default, only .wav (waveform audio data) sound files under 100 kilobytes (KB) each in size are embedded in your presentation. All other media file types and .wav files greater than 100 KB are linked. If you want the .wav sound file to be contained inside the presentation, you can increase the size of the embedded file to a maximum of 50,000 KB (50 megabytes). However, raising this limit also increases the overall size of your presentation and may slow down its performance.
TYPE OF FILE WHEN TO USE IT
Embedded file Your files are under 100 KB each (the recommended maximum size) and are .wav files only. You can embed .wav files that are up to 50 megabytes (MB), but it may slow down the performance of the presentation.
You want all sound files contained within, rather than linked to, your presentation.
You don't plan to change the source files. Linked file Your sound files are 100 KB or more each.
You plan to change the source files. You plan to use the Package for CD feature to package your presentation to a
CD or to a different folder or computer.

36
To check if a sound file is Linked or Embedded
Click the embedded sound icon . Under Sound Tools, on the Options tab, in the Sound Options group, click the Dialog Box Launcher
Under Information, next to File, you see either [Contained in presentation] (meaning that the sound is embedded) or the path to the sound (meaning that the sound is linked).
In the above example, the sound file is linked.
To Increase or decrease the size of the embedded sound file
1. Click the embedded sound icon
2. Under Sound Tools, on the Options tab, in the Sound Options group, increase the maximum sound file size by entering a number in the Max Sound File Size (KB) box. You can increase it to as much as 50 MB or decrease it to as little as 1 KB.
NB: If you increase the maximum sound file size and the file was previously linked, you will need to delete and then re-insert the file to embed it into your presentation. Conversely, any embedded files will need to be deleted and re-inserted if you decrease the maximum file size and you want them to be linked.

37
Inserting Video Video insertion can be just as simple as inserting audio, however since video is a bit more complex, there is more that can go wrong. There are three major types of video that you can encounter. MPEG (.MPG), Video for Windows (.AVI) and QuickTime (.MOV). There are others but these are the most common. Just as with audio clips these files can be obtained in a variety of ways. They can be downloaded, digitized from your own video tape, or purchased just like you buy clipart. Unfortunately, depending on the format of your video clip, it may affect the way in which you have to insert the clip into a PowerPoint slide show.
Insert a Video Clip
Using the Ribbon: 1. Begin by displaying the slide on which you want the video clip to be inserted.
2. Once you have done this, select the Insert tab,
3. In the Media clips group, click Movie
4. Choose Movie from file The Insert Movie dialogue box appears
5. Select the movie you want to insert and click OK

38
You will receive the following prompt:
6. Choose whether you want to video to start automatically when the slide appears, or when you click on the video icon.
7. The video clip will appear as a static image and won’t play until the slide show is run. The video can be resized like a picture (using the sizing handles when it is selected). However, depending on the quality of the image, you may find that if you make the video size too big it will become distorted.
Note: Video files are NOT embedded into the slideshow. This means the Video you see on the slide is a link to the video file stored on your pc. If you plan to transfer your slide show to another location e.g. memory stick, ensure you also transfer your video file as well. It is best to have the presentation and video file in the same folder.

39
PowerPoint Keyboard Shortcuts
Running a Slide Show Misc
Description Shortcut Key Description Shortcut Key
Start Show [F5] Insert date and Time [ALT]+[SHIFT]+[D]
Previous Slide (Any of the three keys)
[PageUp]
[P]
[Backspace]
Insert date and Time [ALT]+[SHIFT]+[T]
Next Slide (Any of the three keys)
[PageDown]
[N]
[Space Bar]
Inserts Page No [Alt]+[Shift]+P]
End Slideshow [Esc] Group Objects [Ctrl]+[Shift]+[G]
Display Black Screen [B] Ungroup Objects [Ctrl]+[Shift]+[T]
Display White Screen [W] File Procedures
Hides Arrow [A] New Presentation [Ctrl]+[N]
Erase on Screen Annotation
[E] Open Presentation [Ctrl]+O]
Change Arrow to Pen [Ctrl]+[P] Close Presentation [Ctrl]+[W]
Change Pen to Arrow [Ctrl]+[A] Save Presentation [Ctrl]+[S]
Return to First Slide [1]+[enter] Print Presentation [Ctrl]+[P]
Go to a Slide No Type in slide no eg: 12 and press [Enter]
Insert a New Slide [Ctrl]+[M]