power point_2007
DESCRIPTION
how to create pptTRANSCRIPT

M O
D U
L E
1
DASH DESIGNS CONSULTING
Technology Training and Consulting Services
Microsoft Microsoft
PowerPoint 2007PowerPoint 2007
Efficient Presentation Efficient Presentation
TechniquesTechniques
For For

PowerPoint 2007 Efficient Techniques For The Haas School of Business, UC Berkeley - Dash Designs Consulting

Microsoft PowerPoint 2007
Efficient Presentation Techniques
For
The Haas School of Business,
University of California
Copyrights and Trademarks
2007, Dash Designs Consulting, Jerry Maletsky
San Rafael, CA 94903
email: [email protected]
web site: www.dashdesignsconsulting.com fax (415) 491-1490
Any mention or use of Microsoft®, University of California, or any
third party products is hereby acknowledged by Dash Designs
Consulting to be for the sole purpose of editorial and educational use of this training manual and for the benefit of the mentioned
Dash Designs Consulting gives permission to the Haas School of
Business of the University of California at Berkeley to reprint this
training manual for internal use only. No re-sale of this material or renunciation of copyrights are granted by this author.
Revised: July 18, 2007
PowerPoint 2007 Efficient Techniques For The Haas School of Business, UC Berkeley - Dash Designs Consulting

Table of Contents
Overview of PowerPoint 2007 ................................... 2
Creating a Presentation
Starting a Presentation .................................... 12
Adding New Slides .......................................... 14
Inserting Images ............................................ 20
Applying Design Themes .................................. 24
Exploring PowerPoint 2007 Views
Normal View .................................................. 28
Notes Pages ................................................... 30
Slide Sorter.................................................... 32
Outline View .................................................. 34
Working With Text In PowerPoint 2007
Formatting Text .............................................. 38
Customizing Bullet Lists ................................... 42
Applying Line Spacing ..................................... 50
Copy and Paste Techniques .............................. 52
Use Find and Replace ...................................... 51
Proofing The Presentation ................................ 56
Creating Tables in PowerPoint 2007 ................... 60
Printing Presentations ................................... 62
Addendum ........................................................... 74
PowerPoint 2007 Efficient Techniques For The Haas School of Business, UC Berkeley - Dash Designs Consulting
Reference Presentation: UC PowerPoint 2007-New Products Division.pptx

C H
A P
T E
R
PowerPoint 2007 Efficient Techniques For The Haas School of Business, UC Berkeley - Dash Designs Consulting 1
1 MMICROSOFTICROSOFT
PPOWEROWERPPOINTOINT 2007 2007
EEFFICIENTFFICIENT PPRESENTATIONRESENTATION
TTECHNIQUESECHNIQUES
FFOROR
Jerry Maletsky
Dash Designs Consulting
Technology Training And Consulting

C H
A P
T E
R
PowerPoint 2007 Efficient Techniques For The Haas School of Business, UC Berkeley - Dash Designs Consulting 2
POWERPOINT 2007 INTERFACE
Normal View
Microsoft Office Button
View Buttons and Zoom Slider
Ruler
Ribbon Commands
1 Overview Of PowerPoint 2007
Overview Of PowerPoint 2007
Quick Access Toolbar

C H
A P
T E
R
PowerPoint 2007 Efficient Techniques For The Haas School of Business, UC Berkeley - Dash Designs Consulting 3
1 Overview Of PowerPoint 2007
OFFICE 2007 QUICK ACCESS TOOLBAR
Quick Access Toolbar
Quick Access Customize Button
More Commands—Additional Commands That Can Be Added to the Quick Access toolbar
Customize Quick Access Toolbar Dialog Box

C H
A P
T E
R
PowerPoint 2007 Efficient Techniques For The Haas School of Business, UC Berkeley - Dash Designs Consulting 4
1
POWERPOINT 2007 COMMAND RIBBONS
Home Tab
Insert Tab
Design Tab
Animations Tab
Overview Of PowerPoint 2007

C H
A P
T E
R
PowerPoint 2007 Efficient Techniques For The Haas School of Business, UC Berkeley - Dash Designs Consulting 5
1
POWERPOINT 2007 COMMAND RIBBONS
Slide Show Tab
Review Tab
View Tab
Overview Of PowerPoint 2007
C H
A P
T E
R
PowerPoint 2007 Efficient Techniques For The Haas School of Business, UC Berkeley - Dash Designs Consulting 6
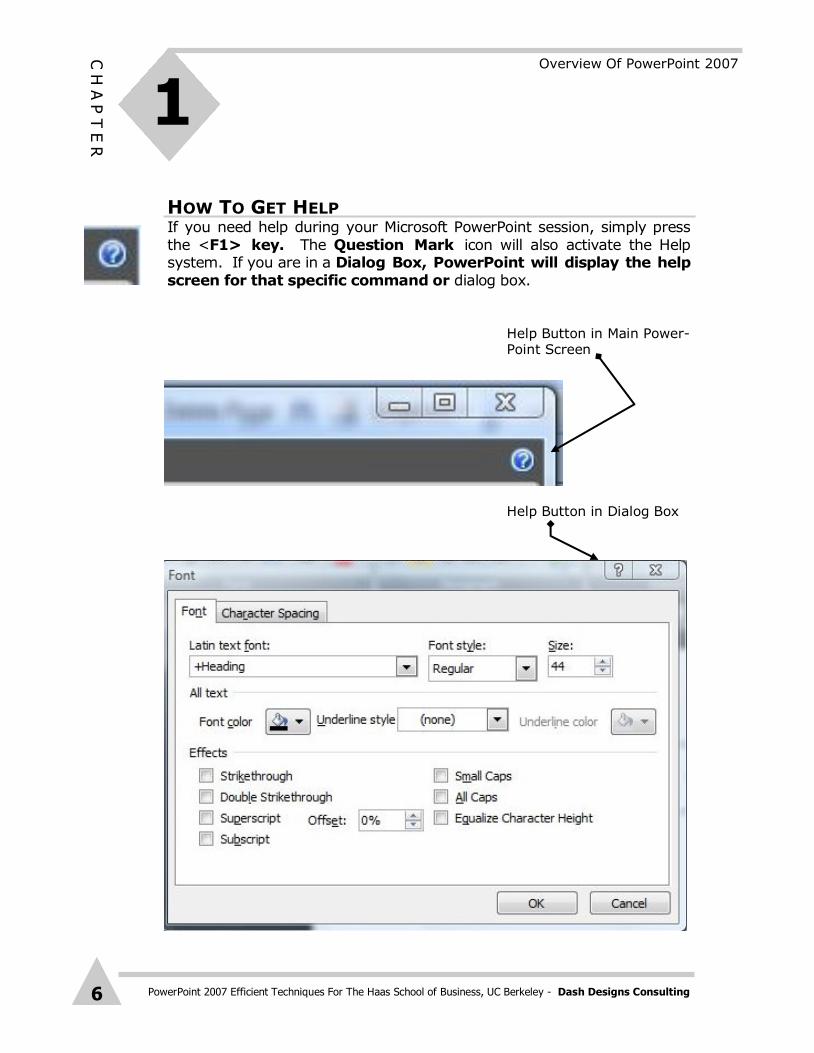
HOW TO GET HELP If you need help during your Microsoft PowerPoint session, simply press
the <F1> key. The Question Mark icon will also activate the Help system. If you are in a Dialog Box, PowerPoint will display the help
screen for that specific command or dialog box.
1
Help Button in Main Power-Point Screen
Help Button in Dialog Box
Overview Of PowerPoint 2007

C H
A P
T E
R
PowerPoint 2007 Efficient Techniques For The Haas School of Business, UC Berkeley - Dash Designs Consulting 7
Microsoft PowerPoint Help System
1
HOW TO GET HELP
Overview Of PowerPoint 2007
C H
A P
T E
R
PowerPoint 2007 Efficient Techniques For The Haas School of Business, UC Berkeley - Dash Designs Consulting 8
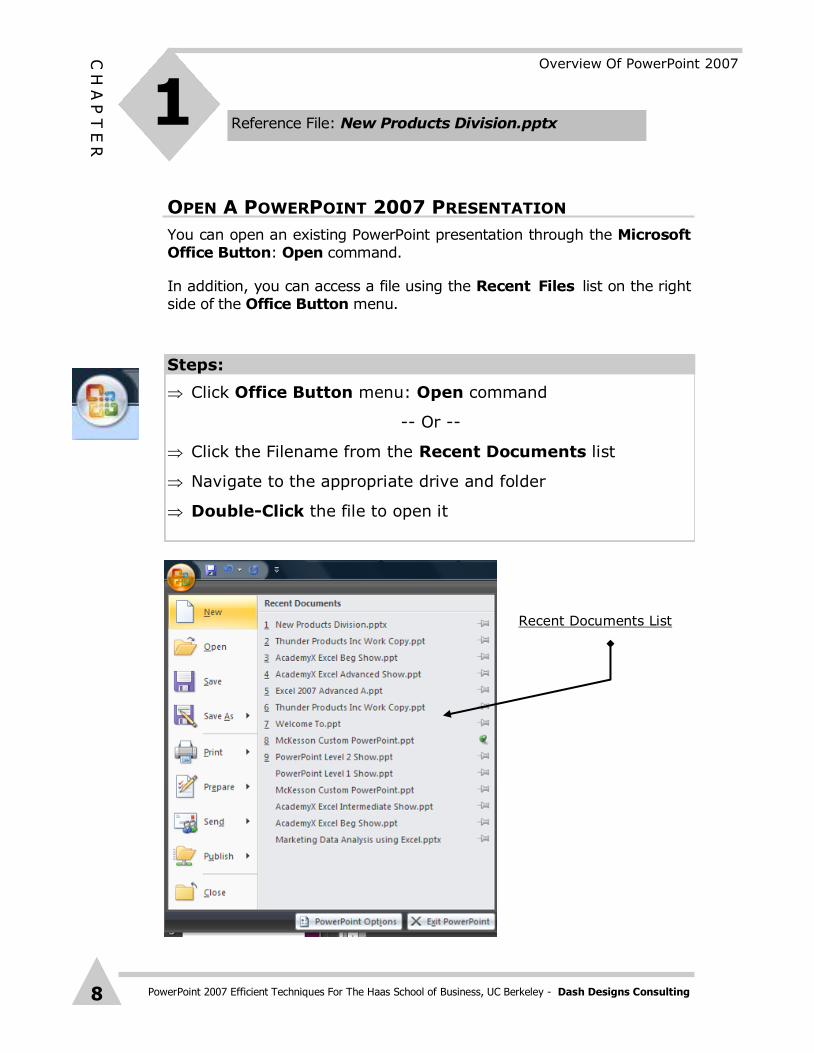
OPEN A POWERPOINT 2007 PRESENTATION
You can open an existing PowerPoint presentation through the Microsoft
Office Button: Open command.
In addition, you can access a file using the Recent Files list on the right
side of the Office Button menu.
Steps:
Click Office Button menu: Open command
-- Or --
Click the Filename from the Recent Documents list
Navigate to the appropriate drive and folder
Double-Click the file to open it
1 Reference File: New Products Division.pptx
Recent Documents List
Overview Of PowerPoint 2007

C H
A P
T E
R
PowerPoint 2007 Efficient Techniques For The Haas School of Business, UC Berkeley - Dash Designs Consulting 9
OPEN A POWERPOINT PRESENTATION
1
Open File Dialog Box
Overview Of PowerPoint 2007

C H
A P
T E
R
PowerPoint 2007 Efficient Techniques For The Haas School of Business, UC Berkeley - Dash Designs Consulting 10
NAVIGATING A POWERPOINT PRESENTATION
You can navigate a PowerPoint presentation using a variety of different
mouse and keyboard methods.
Method Action
Ctrl+Home Moves to the First Slide
Ctrl+End Moves to the Last Slide
Page Down Moves to the Next Slide
Page Up Moves to the Previous Slide
Keyboard Methods
Previous Slide
Next Slide
Drag Scroll Box To Change Slides
Lower Right of Screen
Mouse Methods
1 Overview Of PowerPoint 2007

C H
A P
T E
R
PowerPoint 2007 Efficient Techniques For The Haas School of Business, UC Berkeley - Dash Designs Consulting 11
NAVIGATING A POWERPOINT PRESENTATION
You can also use the Slides tab to navigate to a specific slide
1 Overview Of PowerPoint 2007

C H
A P
T E
R
PowerPoint 2007 Efficient Techniques For The Haas School of Business, UC Berkeley - Dash Designs Consulting 12
Creating A Presentation 2
STARTING A PRESENTATION IN POWERPOINT 2007
You can start a new presentation through the Office Button: New
command.
You can start with a Blank Presentation, Installed Templates,
Installed Themes, or Templates From Microsoft Online. Design
Themes apply color and graphics to a presentation. They give your
presentation a consistent and professional look.
Choosing New From Existing... opens a copy of an existing presentation.
Changes made to this new presentation do not effect the original file.
Steps:
Click Office Button: New command
Click an option under Templates
Blank And Recent
Installed Templates
My Templates
New From Existing
Microsoft Office Online
Reference File: Start New Blank Presentation

C H
A P
T E
R
PowerPoint 2007 Efficient Techniques For The Haas School of Business, UC Berkeley - Dash Designs Consulting 13
2 Creating A Presentation
STARTING A PRESENTATION IN POWERPOINT 2007
Microsoft Office Online Templates in the New Presentation Dialog Box

C H
A P
T E
R
PowerPoint 2007 Efficient Techniques For The Haas School of Business, UC Berkeley - Dash Designs Consulting 14
ADDING NEW SLIDES
Every slide you create is based on a slide layout. There are a variety of
slide layouts that contain text or graphics and combinations of both.
A slide layout is a “template” for a slide with placeholders to place text,
charts, and graphics on a slide. It’s important to remember that a slide
layout, although it contains specific placeholders, can be customized to fit
your specific needs. That is, placeholders can be moved, sized, as well as deleted from a particular slide.
When you start a presentation, the default starting slide is the Title
layout. The Slide Layout Task Pane allows you to select the layout you want to use. You can change the layout of a slide at any time.
2 Creating A Presentation
Steps:
On the Home Tab, do one of the following:
Click the Top of the New Slide command
(This will insert a new slide automatically)
Click the Bottom of the New Slide command (This will
open a gallery of slide layout
choices)
Click in the proper placeholder and
fill in your content
-Or-

C H
A P
T E
R
PowerPoint 2007 Efficient Techniques For The Haas School of Business, UC Berkeley - Dash Designs Consulting 15
ADDING NEW SLIDES
Types of PowerPoint 2007 Slide Layouts
2 Creating A Presentation
Slide Layout Contains
Title Slide Placeholders to enter a Title and Subtitle
Title and Content Placeholders to enter a Title and either Text
(i.e. bullet items) or Graphic Content (i.e. Charts, Images)
Section Header Placeholders to enter a Title and Text for a
different area of the presentation
Two Content Placeholders to enter a Title and Two
Content Areas such as a Bullet List and a Chart
Comparison Similar to Two Content Layout but with place-
holders for Subtitles for each content area
Title Only Placeholder for Title only
Blank A Slide layout without any placeholders
Content With Caption 3 Placeholders… Title, Subtitle, Text, and
Content
Picture With Caption Placeholders for Graphic Content and Caption
text box

C H
A P
T E
R
PowerPoint 2007 Efficient Techniques For The Haas School of Business, UC Berkeley - Dash Designs Consulting 16
ADDING NEW SLIDES
2 Creating A Presentation
New Slide Layout Gallery

C H
A P
T E
R
PowerPoint 2007 Efficient Techniques For The Haas School of Business, UC Berkeley - Dash Designs Consulting 17
ADDING NEW SLIDES
Examples of PowerPoint 2007 Slide Layouts
2 Creating A Presentation
Two Content Slide Layout Title and Content Slide Layout
Content With Caption Slide Layout Section Header Slide Layout

C H
A P
T E
R
PowerPoint 2007 Efficient Techniques For The Haas School of Business, UC Berkeley - Dash Designs Consulting 18
USING THE AUTOFIT SMART TAG Microsoft Office uses a variety of icons called Smart Tags. They offer
additional options as you work in all the Office programs. One of the PowerPoint smart tags is the AutoFit tag. It “pops up” automatically
when you enter text into a placeholder (i.e., a Sub-Title) and the text is
larger than the boundary of that placeholder. By default, PowerPoint
will shrink the text to fit the boundary. PowerPoint does offer you an option to revert back to the original text size in the AutoFit Smart Tag.
The Control AutoCorrect Options command opens a dialog box that allows you to permanently turn off the AutoFit option. Just uncheck either of both of the AutoFit check boxes.
2 Creating A Presentation
C H
A P
T E
R
PowerPoint 2007 Efficient Techniques For The Haas School of Business, UC Berkeley - Dash Designs Consulting 19
2 Creating A Presentation
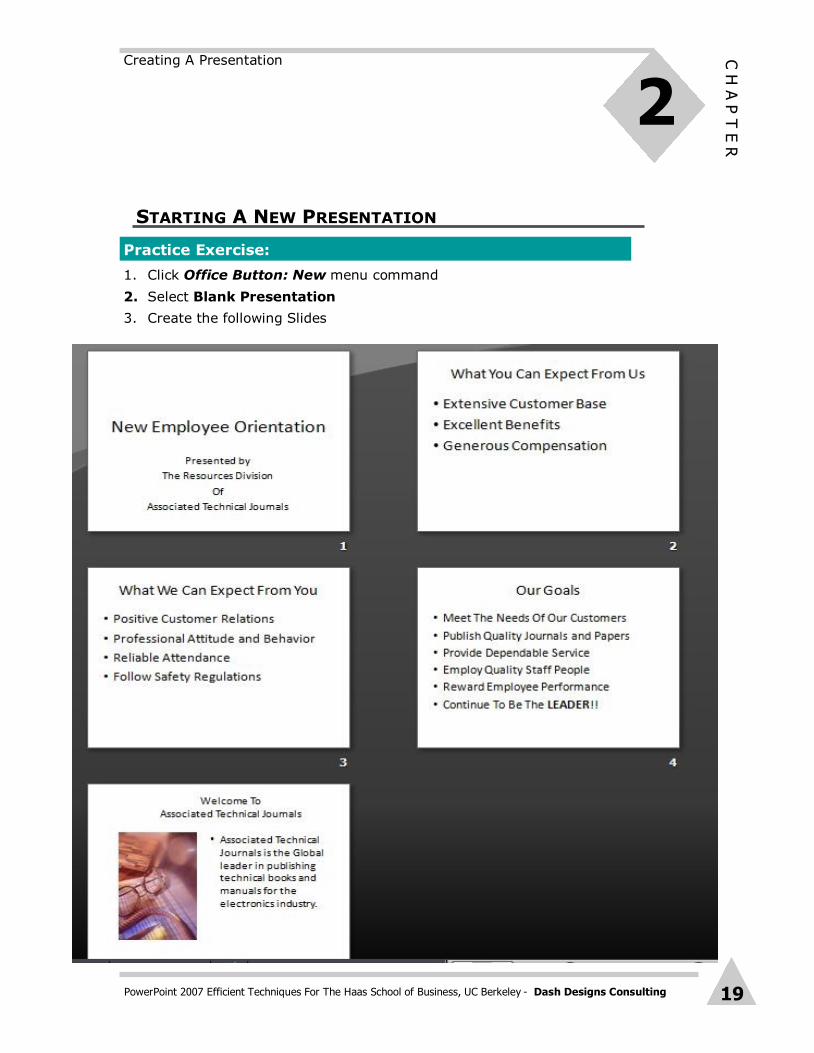
Practice Exercise:
1. Click Office Button: New menu command
2. Select Blank Presentation
3. Create the following Slides
STARTING A NEW PRESENTATION

C H
A P
T E
R
PowerPoint 2007 Efficient Techniques For The Haas School of Business, UC Berkeley - Dash Designs Consulting 20
INSERTING IMAGES
You can insert photos as well as clipart images onto a slide. You can use a
pre-defined slide layout such as the Title And Content layout. You can also insert images onto any slide with or without a “content” placeholder.
Steps:
Click the Picture or ClipArt icon in the “Content” place-
holder
— OR —
Click Insert Tab: Picture: (or ClipArt) command
Browse to the folder that contains the picture
Select the Picture or ClipArt
Click OK
2 Creating A Presentation
Picture Button ClipArt Button

C H
A P
T E
R
PowerPoint 2007 Efficient Techniques For The Haas School of Business, UC Berkeley - Dash Designs Consulting 21
Insert Tab: Picture dialog box
Picture inserted onto a slide
2 Creating A Presentation
INSERTING IMAGES

C H
A P
T E
R
PowerPoint 2007 Efficient Techniques For The Haas School of Business, UC Berkeley - Dash Designs Consulting 22
Picture Tools, Format Tab, Picture Style
Gallery
POWERPOINT 2007 IMAGE FORMATTING GALLERY
PowerPoint 2007 includes several new image formatting tools. These include the
Picture Styles gallery in the Picture Tools group. This gallery provides some high quality image presentation formatting such as beveled edges, rotation, and
shadows. As with other Office 2007 programs, additional command ribbons
(such as Picture Tools) display when that type of object is selected.
2 Creating A Presentation

C H
A P
T E
R
PowerPoint 2007 Efficient Techniques For The Haas School of Business, UC Berkeley - Dash Designs Consulting 23
Before Applying Picture Style
POWERPOINT 2007 IMAGE FORMATTING GALLERY
2 Creating A Presentation
After Applying
Picture Style

C H
A P
T E
R
PowerPoint 2007 Efficient Techniques For The Haas School of Business, UC Berkeley - Dash Designs Consulting 24
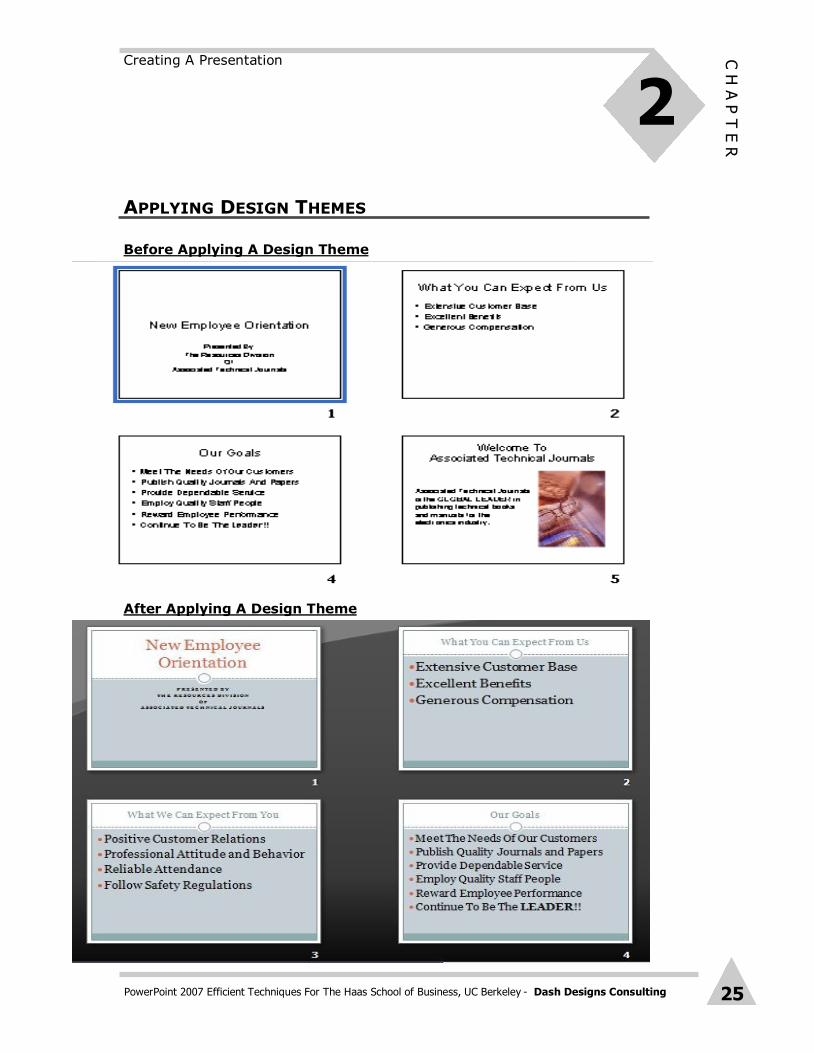
APPLYING DESIGN THEMES
PowerPoint includes a group of design templates, called Themes, that can
be used to automatically format a presentation with background graphics and colors, coordinated fonts, text colors and sizes, fill colors, as well as
customized bullets and master slides. Themes are applied from the
Themes Gallery in the Design Tab. Themes can be applied to all slides
or selected slides only. This makes for a very efficient method of customizing presentations. Design Themes can also be applied from
existing presentations so that if you or a colleague have created a
presentation, it can be used as the basis for the formatting of a new presentation.
Steps:
Click Design Tab
Click to Open the Theme Gallery
Select one of the Themes to apply
2 Creating A Presentation
Themes Gallery
C H
A P
T E
R
PowerPoint 2007 Efficient Techniques For The Haas School of Business, UC Berkeley - Dash Designs Consulting 25
APPLYING DESIGN THEMES
Before Applying A Design Theme
After Applying A Design Theme
2 Creating A Presentation

C H
A P
T E
R
PowerPoint 2007 Efficient Techniques For The Haas School of Business, UC Berkeley - Dash Designs Consulting 26
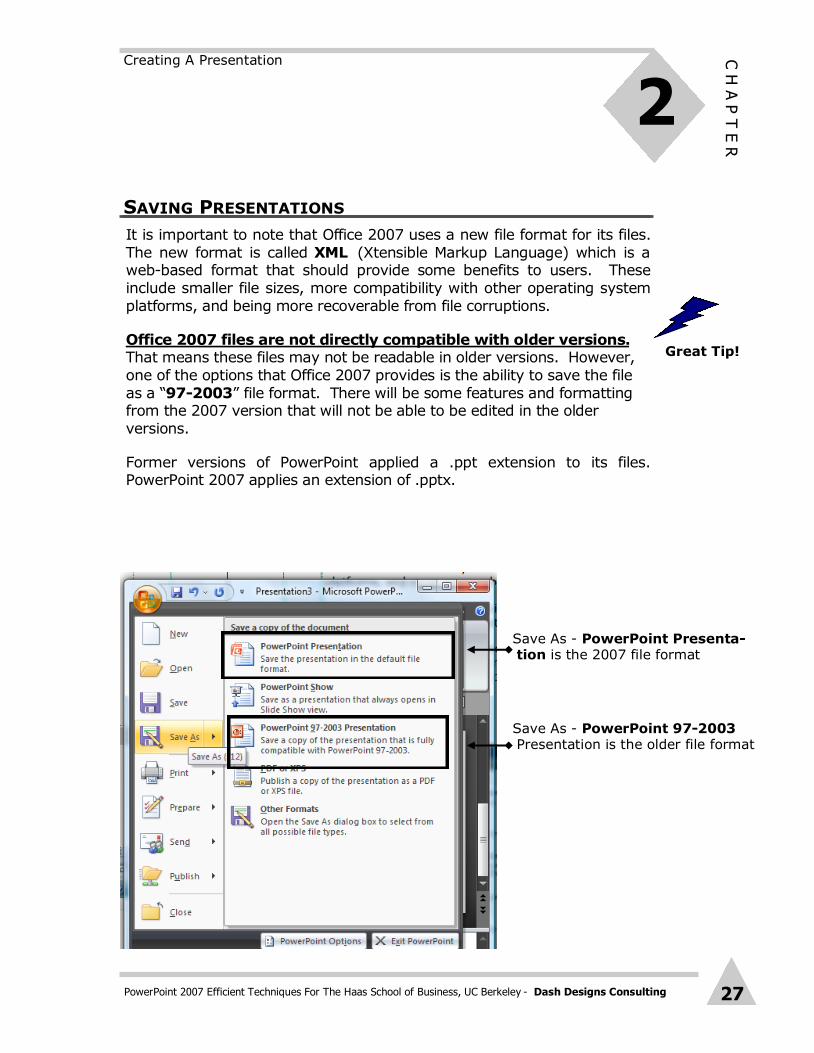
SAVING PRESENTATIONS
Just as with all programs, the first time you save your presentation, you
can use the Save or the Save As commands. After the file has been saved, future updates can be accomplished efficiently with the Save
command.
It is important to note that, as do all the Microsoft Office programs,
PowerPoint 2007 has a feature called AutoRecover that saves your presentation automatically. It is set to activate every 10 minutes. This
will help prevent accidental loss of a majority of your work. It is just as
important to remember to save your presentation as often as you can.
Remember: Save Early! Save Often!
Steps:
Click Office Button: Save (or Save As) command
Type the appropriate filename
Navigate to the appropriate drive and folder (if necessary)
Click Save
2 Creating A Presentation
C H
A P
T E
R
PowerPoint 2007 Efficient Techniques For The Haas School of Business, UC Berkeley - Dash Designs Consulting 27
2 Creating A Presentation
Great Tip!
SAVING PRESENTATIONS
It is important to note that Office 2007 uses a new file format for its files.
The new format is called XML (Xtensible Markup Language) which is a web-based format that should provide some benefits to users. These
include smaller file sizes, more compatibility with other operating system
platforms, and being more recoverable from file corruptions.
Office 2007 files are not directly compatible with older versions. That means these files may not be readable in older versions. However,
one of the options that Office 2007 provides is the ability to save the file
as a “97-2003” file format. There will be some features and formatting from the 2007 version that will not be able to be edited in the older
versions.
Former versions of PowerPoint applied a .ppt extension to its files. PowerPoint 2007 applies an extension of .pptx.
Save As - PowerPoint Presenta-tion is the 2007 file format
Save As - PowerPoint 97-2003 Presentation is the older file format

C H
A P
T E
R
PowerPoint 2007 Efficient Techniques For The Haas School of Business, UC Berkeley - Dash Designs Consulting 28
Exploring PowerPoint 2007 Views
NORMAL VIEW There are several views in which to work in PowerPoint. Each view allows
you to perform some specific work. The primary view in PowerPoint is the Normal View. It actually contains several views but its primary purpose
is to allow you to create and work on the detail of a slide.
The Normal View allows you to access the Notes Pages view as well as
the Outline view and the Slide Tab view. As discussed previously, the Slide Tab view provides an efficient method of navigating between slides.
Each pane can be adjusted in size by dragging the edge of the pane
window with your mouse.
Other views such as Slide Sorter view and Slide Show view can be
accessed through the View menu or by clicking the View Buttons on the
bottom left of the screen. All these views are discussed in upcoming pages.
The Outline and Slides tabs change to display an
icon when the pane becomes narrow, and, if you only want to see the current slide in the window as you edit, you can close the tabs with a Close box in the right corner.
Great Tip!
PowerPoint View Tab
Adjust area with your
3 Reference File: New Employee Orientation.pptx

C H
A P
T E
R
PowerPoint 2007 Efficient Techniques For The Haas School of Business, UC Berkeley - Dash Designs Consulting 29
Exploring PowerPoint 2007 Views
Normal View Slide Sorter View
Slide Show View
NORMAL VIEW
Area can be adjusted by dragging the splitter bars that border the panes.
3

C H
A P
T E
R
PowerPoint 2007 Efficient Techniques For The Haas School of Business, UC Berkeley - Dash Designs Consulting 30
NOTES PAGES VIEW Notes Pages View, also known as Speaker Notes, allows you to add
notes that can be used by the presenter during the presentation. This is an excellent method to remind the presenter of important items to discuss
during the presentation that are not displayed on the slides. They can
also be used as handouts to the audience, if preferred.
You can format the text in Note Pages view just as you would text in the slide. PowerPoint also allows you to print the slides with their notes. It is
important to note that you can only view the actual formatted text
when you print or preview your presentation.
In addition, you can display the notes during the slide show.
Exploring PowerPoint 2007 Views
Steps:
Click into the Notes Pages pane
Adjust the size of the Notes Pages pane as needed using the
Splitter Bar
Type the preferred content
Select the text and format as preferred (i.e., font size, bul-
lets, etc.)
3

C H
A P
T E
R
PowerPoint 2007 Efficient Techniques For The Haas School of Business, UC Berkeley - Dash Designs Consulting 31
Notes Pages Area in Normal View
Notes Pages Printed
You will not see
the actual formatting (font,
bullets, etc.) of
the notes until
you print or preview the slide.
They will display
in the Notes Pages window as
plain text.
If you wish to see the actual
formatting switch
the screen to
View menu: Notes Pages
Great Tip!
Exploring PowerPoint 2007 Views
NOTES PAGES VIEW
Adjust the size of the Notes Pages pane with
the Splitter Bar
View Tab: Notes Pages
3

C H
A P
T E
R
PowerPoint 2007 Efficient Techniques For The Haas School of Business, UC Berkeley - Dash Designs Consulting 32
SLIDE SORTER VIEW Slide Sorter view provides some key “file management” options that you can’t
perform in the other views as efficiently.
They include:
Re-Arrange Slides
Duplicate Slides
Delete Slides
Hide Slides (Hidden Slides do not show in a Slide Show or Print)
Copy Slides From Other Presentations
Set Slide Show Effects
Time Your Presentation
Exploring PowerPoint 2007 Views
3

C H
A P
T E
R
PowerPoint 2007 Efficient Techniques For The Haas School of Business, UC Berkeley - Dash Designs Consulting 33
Steps:
To Re-Arrange the Order of the Slides
Drag Slides to new location between slides
To Duplicate Slides
Click on the slide
Press <Ctrl+D> (shortcut key to duplicate a slide)
To Delete Slides (You can undo the deletion of a slide)
Click on the slide
Press the <Del> key
To Hide Slides (Same command to Un-Hide Slides)
Click on the slide
Click the Slide Show Tab: Hide Slide command
To Copy Slides From Another Presentation
Open the other presentation and switch to Slide Sorter View
Select the Slides you want to copy
(use the Shift key or the Control key for multiple slides)
Click Edit menu: Copy (or the Copy toolbar button)
Switch to the original presentation and
Click where you want to place the slide(s)
Click Edit menu: Paste (or the Paste toolbar button)
To Set Slide Show Effects
Select the Slide(s)
Click the Animations Tab: Transitions To This
Slide command
Select the transition you prefer
To Time Your Presentation
Click the Slide Show Tab: Rehearse Timings command
The Slide Show will begin to run
As you practice your presentation, PowerPoint will record how much
time each slide was on the screen
At end of presentation the timings can be assigned to the slides
You can then run the slide show automatically from those timings
Exploring PowerPoint 2007 Views
3
SLIDE SORTER VIEW

C H
A P
T E
R
PowerPoint 2007 Efficient Techniques For The Haas School of Business, UC Berkeley - Dash Designs Consulting 34
OUTLINE VIEW Outline View allows you to edit the text of the presentation in a “text
only” environment. Without the graphics of the slide, it provides a more efficient method of editing the text. The Outline View is an excellent
method to create your presentation.
In addition, you can print the Outline View of your presentation.
Exploring PowerPoint 2007 Views
3 Reference File: New Employee Orientation.ppt

C H
A P
T E
R
PowerPoint 2007 Efficient Techniques For The Haas School of Business, UC Berkeley - Dash Designs Consulting 35
Exploring PowerPoint 2007 Views
OUTLINE VIEW
Steps:
To Demote or Promote A Bullet
Click on the line in the Outline panel
Click Decrease or Increase List Level Buttons on Home Tab
Right-Click on the line and select Demote or Promote command
To Re-Arrange the Order of the Bullets On A Slide
Click on the line in the Outline panel you want to move
Right-Click on the line and select Move Up or Move Down
To Hide or Show the Detail of a Slide
Click on the title of a slide in the Outline View panel
Right-Click on the line and select Collapse or Expand
To Hide or Show the Detail of All the Slides
Click on the title of a slide in the Outline View panel
Right-Click on the line and select Collapse All or Expand All
3
-Or -
Right-Click Menu In Outline View

C H
A P
T E
R
PowerPoint 2007 Efficient Techniques For The Haas School of Business, UC Berkeley - Dash Designs Consulting 36
Steps:
Click into the Outline View panel
Type your text
Press the <Enter> key
If the next line needs to be Promoted, press <Shift+Tab>
key
If the next line needs to be Demoted, press <Tab> key
If a new slide is preferred, press <Control+Enter>
Repeat the previous 3 steps as needed
Great Tip!
CREATING A PRESENTATION IN OUTLINE VIEW
Exploring PowerPoint 2007 Views
3 Reference File: New Employee Orientation.ppt
One of the more efficient methods of creating a presentation is by using
the Outline View. In this view, the user can enter the text content of the presentation without have to interact with the mouse. As the user types
the text it appears on the slide as well as in the Outline View. Just by us-
ing the keyboard, new lines can be created, demoting and promoting of
bullets can be performed, and new slides can be started.
It is important to note that any or all of the text and levels can be
changed at any time in the future.
Outline View Keystrokes Purpose
Enter Creates New Line
Control + Enter Creates New Slide
Tab Demotes Line 1 Level
Shift + Tab Promotes Line 1 Level

C H
A P
T E
R
PowerPoint 2007 Efficient Techniques For The Haas School of Business, UC Berkeley - Dash Designs Consulting 37
Exploring PowerPoint 2007 Views
OUTLINE VIEW
3

C H
A P
T E
R
PowerPoint 2007 Efficient Techniques For The Haas School of Business, UC Berkeley - Dash Designs Consulting 38
Working With Text in PowerPoint 2007 4
FORMATTING TEXT AND PARAGRAPHS
PowerPoint 2007 includes a variety of ways to quickly and professionally
format text in a presentation. There are formatting options on the Home Tab including font, size, font style, shadowing, embossing, text color,
bullets, alignment, line spacing, indenting, and setting tabs.
The Format Tab under the Drawing Group contain commands for
applying formatting styles to text and paragraphs. These commands include Shape Styles and WordArt Styles.
Reference File: New Employee Orientation.pptx

C H
A P
T E
R
PowerPoint 2007 Efficient Techniques For The Haas School of Business, UC Berkeley - Dash Designs Consulting 39
4 Working With Text in PowerPoint 2007
SELECTING TEXT IN “TEXT MODE” OR “GRAPHIC MODE”
In PowerPoint, all elements are considered graphic objects. Text
however, can be formatted in Text mode or Graphic mode. In “Text mode,” just the text you have selected will be effected by the formatting
you apply. In “Graphic mode,” all the text within the placeholder will be
effected by the formatting you apply.
In “Text mode,” you will see a text cursor (blinking bar) within the placeholder you have activated. The border of the placeholder will appear
as dashed lines.
In “Graphic mode,” no cursor will be visible. The border of the placeholder will appear as a solid border.
One method to enter the Graphics mode in a text placeholder is to click
into it and press the <Esc> key.
Placeholder in Text Mode
Placeholder in Graphic Mode
Text Mode: Border is made
up of dashes. Cursor is visible in placeholder. Only the selected text will be effected by formatting changes.
Graphic Mode: Border is solid.
Cursor is not visible in placeholder. All the text will be effected by formatting changes.
C H
A P
T E
R
PowerPoint 2007 Efficient Techniques For The Haas School of Business, UC Berkeley - Dash Designs Consulting 40
Font Group :Dialog Box
Steps:
Select the text (or Select the Placeholder in Graphic mode)
Click Home Tab: Font Group dialog box launcher
(or click the appropriate button in the Font Group)
Select the appropriate options
Click OK
FORMATTING TEXT The Home Tab: Font Group contains text attribute options. These
include Font, Style, Size, Effects, and Color.
You can also set font attributes by using the dialog box options. The
dialog box can be opened by clicking the bottom right corner of the group.
Remember if you want to apply the formatting to the entire text placeholder, you must select the placeholder in graphic mode.
Great Tip!
Working With Text in PowerPoint 2007
4
Dialog Box Launcher

C H
A P
T E
R
PowerPoint 2007 Efficient Techniques For The Haas School of Business, UC Berkeley - Dash Designs Consulting 41
CHANGING CASE OF TEXT Text can be displayed in UPPERCASE or lowercase. Sometimes while
entering text on to a slide, you might accidentally mistype the case. Instead of deleting and re-typing the text, the Home Tab: Font Group:
Change Case command provides you with options to change the case to
one that you prefer. These include the following:
Case Result
Sentence case This is text in sentence case
UPPERCASE THIS IS TEXT IN UPPERCASE
lowercase this is text in lowercase
Capitalize Each Word This Is Text In Title Case
Steps:
Select the text (or Select the Placeholder in Graphic mode)
Click Home Tab: Font Group: Change Case command
Select the appropriate option
Click OK
Microsoft Word has the same command!
Great Tip!
Working With Text in PowerPoint 2007
4

C H
A P
T E
R
PowerPoint 2007 Efficient Techniques For The Haas School of Business, UC Berkeley - Dash Designs Consulting 42
Great Tip!
FORMATTING BULLETS / NUMBERING Each Design Theme decides what bullets are displayed on a slide. You
can turn bullets on or off with the Bullets command button.
You can change bullets by using the Home Tab: Bullets (or Numbering)
command. Within the dialog box you can use the Picture button to use ClipArt images or the Customize button to use graphic bullets based
on fonts (i.e., Wingdings) as bullets.
Remember if you want to apply the formatting to the entire text placeholder, you must select the placeholder
in graphic mode.
Great Tip!
4
Note:
If you want to change the bullets for the entire presentation, you need to do
so in the Master View.
Working With Text in PowerPoint 2007

C H
A P
T E
R
PowerPoint 2007 Efficient Techniques For The Haas School of Business, UC Berkeley - Dash Designs Consulting 43
FORMATTING BULLETS / NUMBERING
Bullets Picture dialog
box. ClipArt images that can be used as bullets.
Bullet Customize dialog box. Bullets are based on Fonts such as Wingdings.
4 Working With Text in PowerPoint 2007
C H
A P
T E
R
PowerPoint 2007 Efficient Techniques For The Haas School of Business, UC Berkeley - Dash Designs Consulting 44
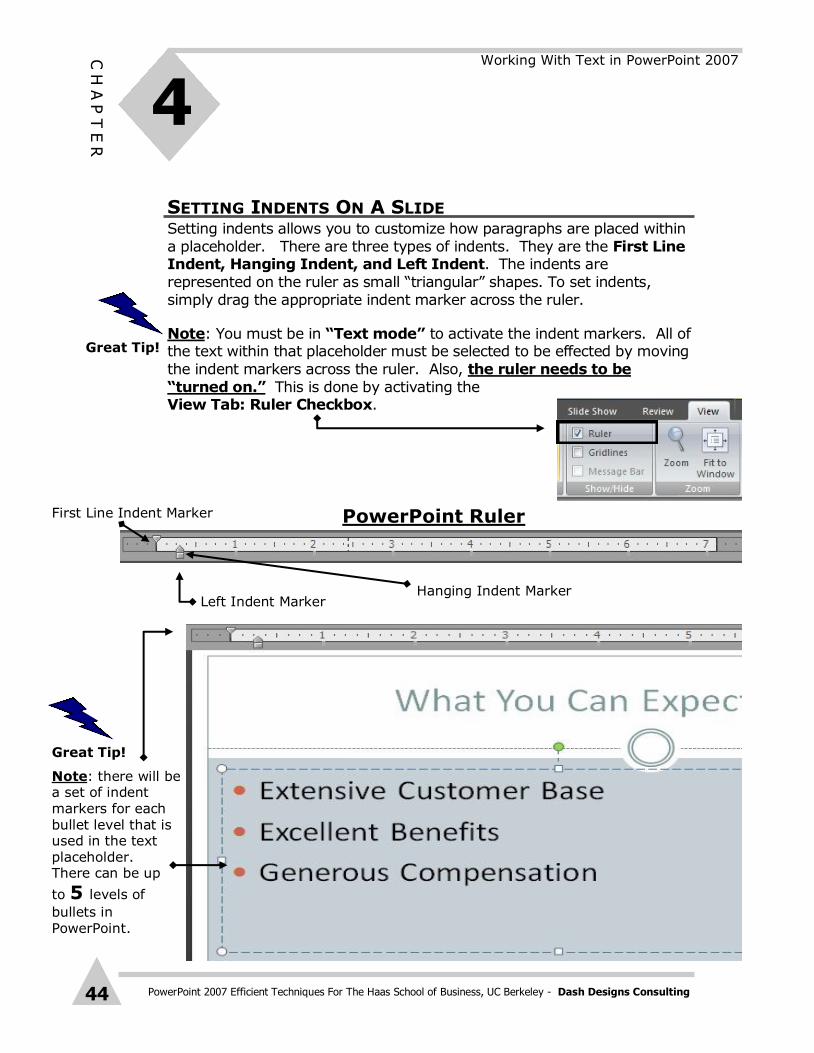
SETTING INDENTS ON A SLIDE Setting indents allows you to customize how paragraphs are placed within
a placeholder. There are three types of indents. They are the First Line Indent, Hanging Indent, and Left Indent. The indents are
represented on the ruler as small “triangular” shapes. To set indents,
simply drag the appropriate indent marker across the ruler.
Note: You must be in “Text mode” to activate the indent markers. All of the text within that placeholder must be selected to be effected by moving
the indent markers across the ruler. Also, the ruler needs to be
“turned on.” This is done by activating the View Tab: Ruler Checkbox.
PowerPoint Ruler First Line Indent Marker
Hanging Indent Marker Left Indent Marker
Great Tip!
Note: there will be a set of indent
markers for each bullet level that is used in the text placeholder. There can be up
to 5 levels of
bullets in PowerPoint.
Great Tip!
4 Working With Text in PowerPoint 2007

C H
A P
T E
R
PowerPoint 2007 Efficient Techniques For The Haas School of Business, UC Berkeley - Dash Designs Consulting 45
Indent Marker Results
Now is the time for all good
paragraphs to be indented.
Now is the time for all
good paragraphs to be
indented.
Now is the time for all good
paragraphs to be
indented.
Now is the time for all
good paragraphs to be
indented.
Now is the time for all
good paragraphs to be
indented.
SETTING INDENTS ON A SLIDE
Steps:
Click into the text placeholder
Click and Drag the appropriate indent marker to the loca-
tion on the ruler
1st Line Indent
Hanging Indent
Full Left Indent
No Indent
4 Working With Text in PowerPoint 2007

C H
A P
T E
R
PowerPoint 2007 Efficient Techniques For The Haas School of Business, UC Berkeley - Dash Designs Consulting 46
APPLYING TABS ON A SLIDE Setting tabs allows you to create custom spaced lists on a slide. There
are four types of tabs. They are the Left Aligned, Right Aligned, Centered Aligned, and Decimal tabs. The tabs are placed from the
Tab box at the far left of the ruler.
Note: You must be in “Text mode” to activate the indent markers. All of
the text within that placeholder must be selected to be effected by moving
the indent markers across the ruler. Also, the ruler needs to be
“turned on.” This is done by activating the View Tab: Ruler Checkbox.
Tabs Set On A PowerPoint Slide
Great Tip!
4 Working With Text in PowerPoint 2007

C H
A P
T E
R
PowerPoint 2007 Efficient Techniques For The Haas School of Business, UC Berkeley - Dash Designs Consulting 47
Steps:
Click into the text placeholder
Click into the Tab Box until the preferred tab is visible
Click onto the Ruler at the measurement in which you want to
place that tab
Repeat the process until all the tabs are placed
APPLYING TABS ON A SLIDE
Steps:
Click onto the tab you want to move
Drag the tab horizontally across the ruler to move the location setting
To Change the Location of a Tab
Steps:
Click onto the tab you want to delete
Drag the tab vertically down from the ruler to delete it
To Delete a Tab
To Place a Tab
Examples of Tab Settings
Cat Cat Cat 123.45
Dog Dog Dog 1025.65
Horse Horse Horse 1.85
Left Right Center
Decimal
4 Working With Text in PowerPoint 2007

C H
A P
T E
R
PowerPoint 2007 Efficient Techniques For The Haas School of Business, UC Berkeley - Dash Designs Consulting 48
ALIGNING TEXT The Home Tab: Paragraph Group: Alignment command contains
attributes to align paragraphs. These include Align Left, Center, Align Right, and Justify.
Alignment Command Buttons in the Paragraph Group
Steps:
Select the text (or Select the placeholder in Graphics mode)
Click Home Tab: Paragraph Group: Alignment command
Select the appropriate option
4 Working With Text in PowerPoint 2007
Paragraph Group Dialog Box
Paragraph Dialog Box Launcher

C H
A P
T E
R
PowerPoint 2007 Efficient Techniques For The Haas School of Business, UC Berkeley - Dash Designs Consulting 49
REPLACING PRESENTATION FONTS
The Home Tab: Editing Group: Clear command: Replace Fonts
option allows you to “globally” change the fonts in the presentation.
Steps:
Click on any slide in the presentation
Click Home Tab: Editing Group: Replace: Replace Fonts
Select the current font (if necessary) you want to replace
Select the new font you want to display in your presentation
Click Replace
4 Working With Text in PowerPoint 2007

C H
A P
T E
R
PowerPoint 2007 Efficient Techniques For The Haas School of Business, UC Berkeley - Dash Designs Consulting 50
CHANGING THE LINE SPACING An important aspect of designing presentations is to have enough
balanced “empty space” in your presentation. This aids the viewers in reading the content on the screen. PowerPoint provides you with Line
Spacing options.
The options include Line Spacing, Before Paragraph, and After
Paragraph.
Steps:
Click into the text placeholder (or Select the placeholder in
Graphics mode)
Click Home Tab: Paragraph Group: Line Spacing button
Select the appropriate options from list or click line Spacing
Options
Click OK
4 Working With Text in PowerPoint 2007

C H
A P
T E
R
PowerPoint 2007 Efficient Techniques For The Haas School of Business, UC Berkeley - Dash Designs Consulting 51
Line Spacing Option Result
Line Spacing Now is the time for all good
paragraphs to have line spacing so
that text becomes easier to view.
Before Paragraph Now is the time for all good
paragraphs to have line spacing so that text becomes easier to view.
Now is the time for all good
paragraphs to have line spacing so
that text becomes easier to view.
After Paragraph Now is the time for all good
paragraphs to have line spacing so that text becomes easier to view.
Now is the time for all good
paragraphs to have line spacing so
that text becomes easier to view.
CHANGING THE LINE SPACING
(Extra spacing appears between each line in a paragraph)
(Extra spacing appears at the top of each paragraph)
(Extra spacing appears at the end of each paragraph)
4 Working With Text in PowerPoint 2007
C H
A P
T E
R
PowerPoint 2007 Efficient Techniques For The Haas School of Business, UC Berkeley - Dash Designs Consulting 52
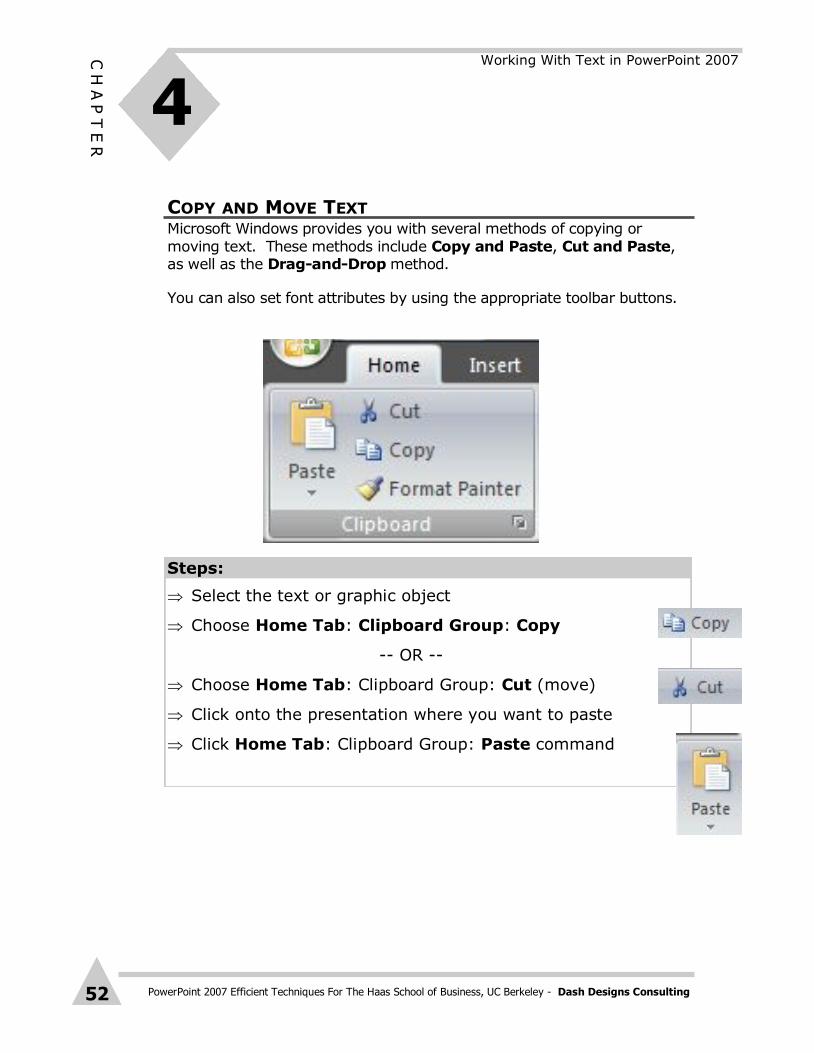
COPY AND MOVE TEXT Microsoft Windows provides you with several methods of copying or
moving text. These methods include Copy and Paste, Cut and Paste, as well as the Drag-and-Drop method.
You can also set font attributes by using the appropriate toolbar buttons.
Steps:
Select the text or graphic object
Choose Home Tab: Clipboard Group: Copy
-- OR --
Choose Home Tab: Clipboard Group: Cut (move)
Click onto the presentation where you want to paste
Click Home Tab: Clipboard Group: Paste command
4 Working With Text in PowerPoint 2007

C H
A P
T E
R
PowerPoint 2007 Efficient Techniques For The Haas School of Business, UC Berkeley - Dash Designs Consulting 53
4 Working With Text in PowerPoint 2007
Dragging text to move to another location
USING DRAG-AND-DROP TO COPY OR MOVE TEXT
A shortcut to copying or moving text is to “drag” the selection to a new
location on the slide.
Drag-And-Drop is very efficient when moving or copying text to another
location on the same slide. When copying or moving text to another slide,
the Copy or Cut command is preferable.
Moving the selection is accomplished simply by dragging it. Copying the selection is done by holding the Control key and dragging . Remember,
when you are holding a key down while “mousing,” always
release the mouse first and then the keyboard.
Steps:
Select the text or graphic object
To Move the selection, drag to another location on the
slide
-- OR --
To Copy the selection, hold the <Ctrl> key and drag to an-
other location on the slide
Ctrl+Dragging text to copy to another location
Great Tip!

C H
A P
T E
R
PowerPoint 2007 Efficient Techniques For The Haas School of Business, UC Berkeley - Dash Designs Consulting 54
FINDING AND REPLACING TEXT
If you need to find and/or replace text in a presentation, the most efficient
method could be the Home Tab: Editing Group: Find Command or Replace command. In this way, you could replace several occurrences of
text in a presentation at one time.
Home Tab: Editing Group: Find Command
4 Working With Text in PowerPoint 2007
Home Tab: Editing Group: Replace Command
C H
A P
T E
R
PowerPoint 2007 Efficient Techniques For The Haas School of Business, UC Berkeley - Dash Designs Consulting 55
4 Working With Text in PowerPoint 2007
Great Tip!
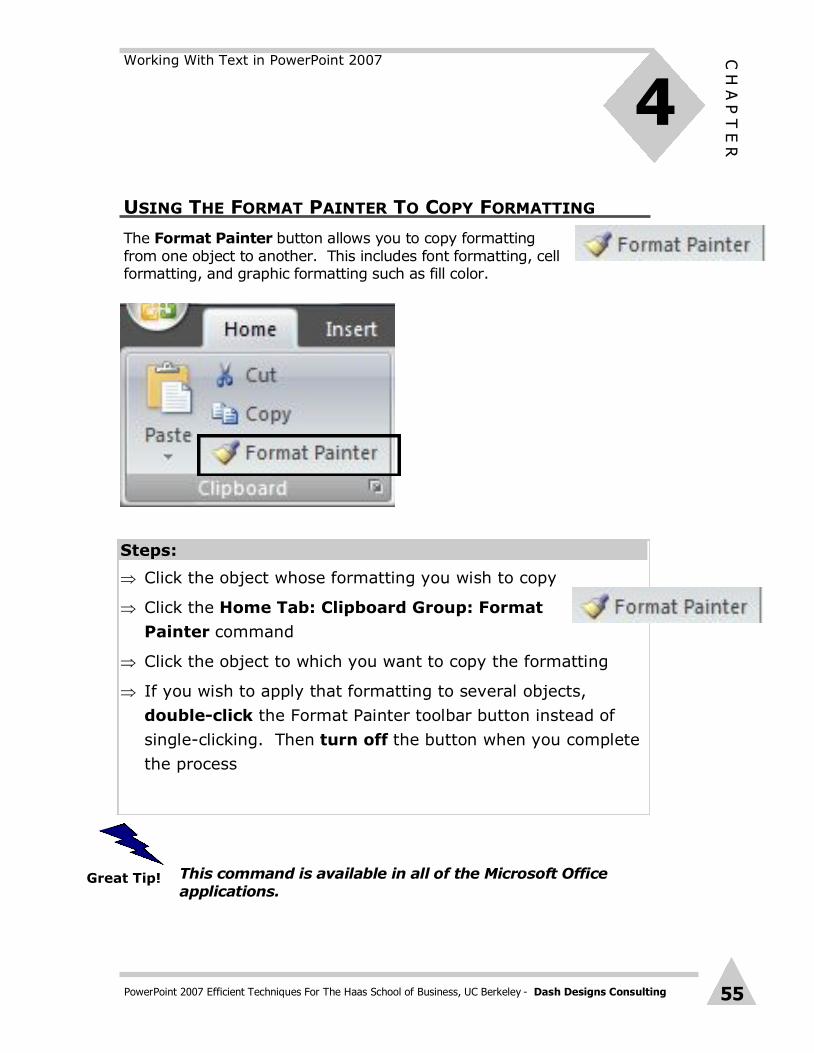
USING THE FORMAT PAINTER TO COPY FORMATTING
The Format Painter button allows you to copy formatting
from one object to another. This includes font formatting, cell formatting, and graphic formatting such as fill color.
Steps:
Click the object whose formatting you wish to copy
Click the Home Tab: Clipboard Group: Format
Painter command
Click the object to which you want to copy the formatting
If you wish to apply that formatting to several objects,
double-click the Format Painter toolbar button instead of
single-clicking. Then turn off the button when you complete
the process
This command is available in all of the Microsoft Office
applications.

C H
A P
T E
R
PowerPoint 2007 Efficient Techniques For The Haas School of Business, UC Berkeley - Dash Designs Consulting 56
CHECKING THE SPELLING OF A PRESENTATION
All Microsoft Office products, including PowerPoint, check your spelling as
you work, by default. When a word is not recognized or misspelled, a red wavy line will appear below the text. You can spell check the text right
then by right-clicking on the selection and using the spell checking menu
that appears.
You can also spell check your entire presentation by using the Spell Check command that can be found on Review Tab: Proofing
Group.
Wavy-Lined misspelled word on a slide
4 Working With Text in PowerPoint 2007
Spell Check Dialog Box

C H
A P
T E
R
PowerPoint 2007 Efficient Techniques For The Haas School of Business, UC Berkeley - Dash Designs Consulting 57
Steps:
Click anywhere in the presentation
Click the Review Tab: Proofing Group: Spell Check command
Click the appropriate button...
Ignore Ignore this occurrence or the word and leave as is Ignore All Ignore all occurrences and leave as is Change Change this occurrence to one of the suggested corrections Change All Change all occurrences to one of the suggested corrections Add Leave this occurrence and add the word to the dictionary
Suggest Suggest some words to replace selection (this option is on by default) AutoCorrect Add this word to the AutoCorrect options list
Repeat the process until the Spell Check is complete
To Spell Check the entire presentation
CHECKING THE SPELLING OF A PRESENTATION
Steps:
Right-Click the Red-Wavy lined word
In the short-cut menu, click the appropriate option
Suggestions Choose one of the suggested corrections Ignore All Ignore all occurrences and leave as is
Add Leave this occurrence and add the word to the dictionary Spelling Activate the Spell Check dialog box
Repeat the process until the Spell Check is complete
To Spell Check As You Type
4 Working With Text in PowerPoint 2007

C H
A P
T E
R
PowerPoint 2007 Efficient Techniques For The Haas School of Business, UC Berkeley - Dash Designs Consulting 58
USING AUTOCORRECT IN PRESENTATIONS
PowerPoint automatically fixes commonly misspelled words as you type.
Each time you press the Space Bar, the AutoCorrect feature checks the entered text in its list and fixes the “typo” instantly.
You can enter additional words to the AutoCorrect list. The AutoCorrect
feature is also an excellent method to insert repetitive text entries while
only having to type few characters.
The Office Button menu: PowerPoint Options button displays the
options dialog box. In the Proofing Category is AutoCorrect Options.
Steps:
Click Office Button menu: PowerPoint Options button
Click the Proofing Category (on the left side)
Click the AutoCorrect Options button (on the right side)
Click into the Replace Box and enter the “typo” or “shortcut”
Click into the With Box and enter the properly spelled word(s)
Click the Add button, and then click the OK button
Great Tip!
4 Working With Text in PowerPoint 2007

C H
A P
T E
R
PowerPoint 2007 Efficient Techniques For The Haas School of Business, UC Berkeley - Dash Designs Consulting 59
4 Working With Text in PowerPoint 2007
USING AUTOCORRECT IN PRESENTATIONS
LOOKING FOR SYNONYMS IN PRESENTATIONS
Right-click on preferred text Select Synonyms Choose an option or click The-
saurus to see more options

C H
A P
T E
R
PowerPoint 2007 Efficient Techniques For The Haas School of Business, UC Berkeley - Dash Designs Consulting 60
5 Creating Tables in PowerPoint 2007
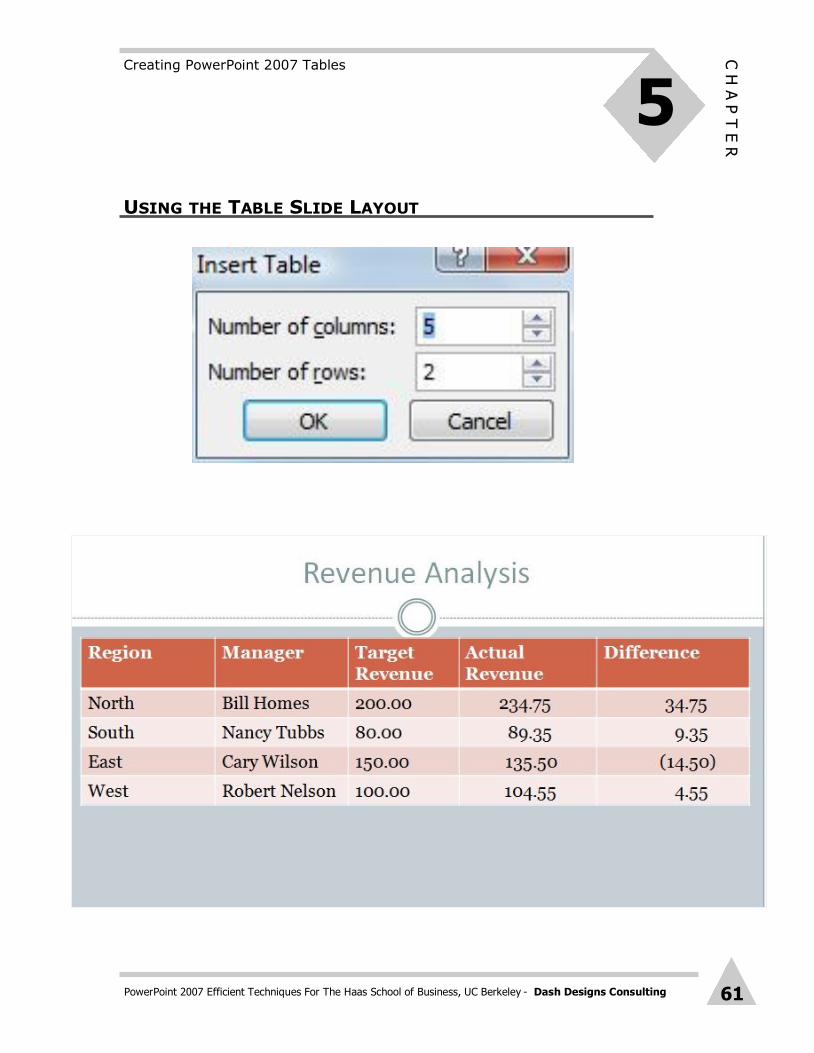
CREATING POWERPOINT 2007 TABLES
In PowerPoint 2007, tables allow the presentation of data in an organized
and professional format. Any of the Content type slide layouts can be used to create a table.
Steps:
Click the Home Tab: Slides Group: New Slide button
Select the preferred layout from the gallery
To start the table, click the icon representing a Table
In the Insert Table box, enter the number of columns and rows
you with which you want to start the table
Enter your content into each cell, pressing Tab to move to the next
cell
If you press Tab in the last cell of the table, a new row will
appear
Reference File: New Employee Orientation.ppt
Insert Table button
C H
A P
T E
R
PowerPoint 2007 Efficient Techniques For The Haas School of Business, UC Berkeley - Dash Designs Consulting 61
5 Creating PowerPoint 2007 Tables
USING THE TABLE SLIDE LAYOUT

C H
A P
T E
R
PowerPoint 2007 Efficient Techniques For The Haas School of Business, UC Berkeley - Dash Designs Consulting 62
Printing in PowerPoint 2007
PRINTING OPTIONS IN POWERPOINT 2007 PowerPoint provides a variety of options when printing your presentation.
These options include different printing in a specific view, framing slides, black and white, and the number of copies. The print command resides in
the Microsoft Office Button.
PowerPoint provides a Print Preview screen as well as a Page Setup
dialog box to make some custom settings to your presentation. In addition, you can create Footers on your slides in the Header and Footer
dialog box.
The different views include:
Slide
Note Pages
Handouts
Outline
PAGE SETUP DIALOG BOX
Options Include:
Slides Sized For (setting the overall size of the page)
Width and Height (setting the margin area)
Number Slides From (setting the starting page number)
Orientation (setting the orientation of the available print options)
6 Reference File: New Employee Orientation.ppt

C H
A P
T E
R
PowerPoint 2007 Efficient Techniques For The Haas School of Business, UC Berkeley - Dash Designs Consulting 63
Printing in PowerPoint 2007
PRINTING OPTIONS IN POWERPOINT 2007
6

C H
A P
T E
R
PowerPoint 2007 Efficient Techniques For The Haas School of Business, UC Berkeley - Dash Designs Consulting 64
Printing in PowerPoint 2007
6 Reference File: New Employee Orientation.ppt
PREVIEWING SLIDES IN POWERPOINT 2007

C H
A P
T E
R
PowerPoint 2007 Efficient Techniques For The Haas School of Business, UC Berkeley - Dash Designs Consulting 65
Printing in PowerPoint 2007
6
PREVIEWING SLIDES IN POWERPOINT 2007
Options Button in Print Preview
Print What Options in Print Preview

C H
A P
T E
R
PowerPoint 2007 Efficient Techniques For The Haas School of Business, UC Berkeley - Dash Designs Consulting 66
6 Printing in PowerPoint 2007
COLOR/GRAYSCALE VIEW The Color/Grayscale view provides a way to control how your
presentation will print in black and white. In this view, you can preview how your presentation will print from a black and white printer, as well as
customize the “grayscale” level of the presentation.
The Color/Grayscale Setting menu provides a list of options to choose
the level of grayscale applied to the presentation.
It’s important to note that not every option will be effective in the
presentation. Some options will not have any effect, while some might
not have an effective result.
Great Tip!

C H
A P
T E
R
PowerPoint 2007 Efficient Techniques For The Haas School of Business, UC Berkeley - Dash Designs Consulting 67
Printing in PowerPoint 2007
6
COLOR/GRAYSCALE VIEW
Slide In Normal Color
Slide In Pure Black and White View
Slide In Color/
Grayscale View With Light
C H
A P
T E
R
PowerPoint 2007 Efficient Techniques For The Haas School of Business, UC Berkeley - Dash Designs Consulting 68
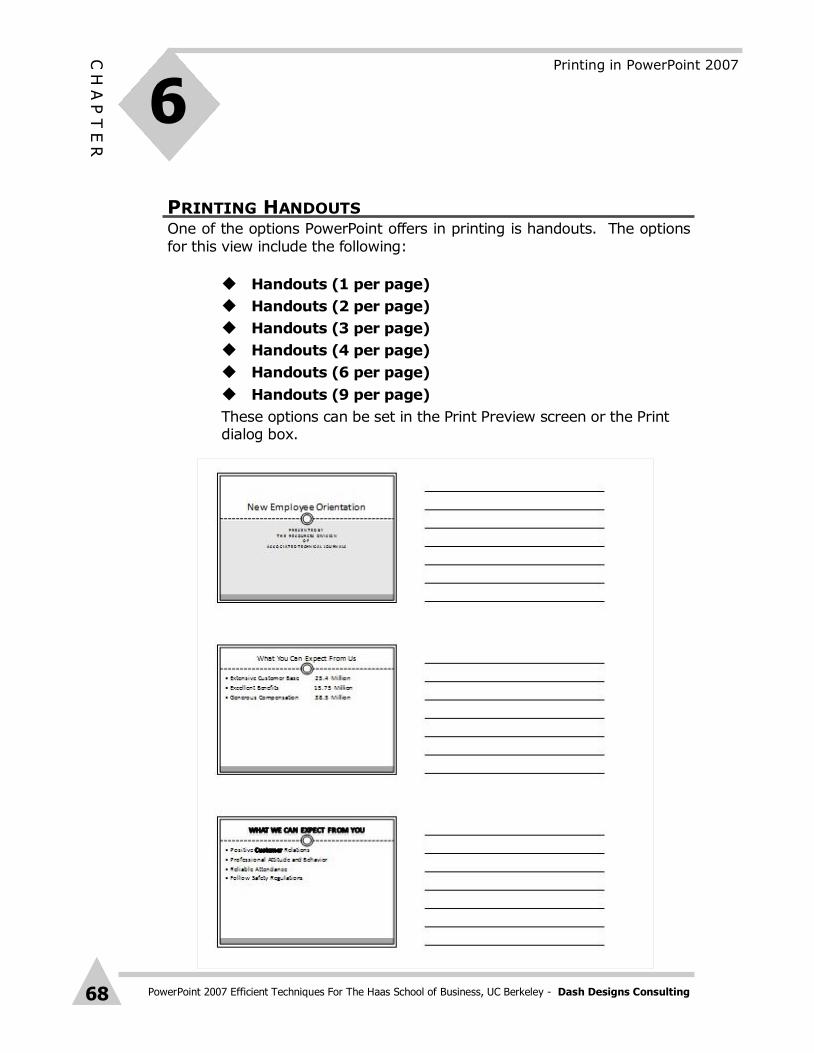
PRINTING HANDOUTS One of the options PowerPoint offers in printing is handouts. The options
for this view include the following:
Handouts (1 per page)
Handouts (2 per page)
Handouts (3 per page)
Handouts (4 per page)
Handouts (6 per page)
Handouts (9 per page)
These options can be set in the Print Preview screen or the Print dialog box.
6 Printing in PowerPoint 2007

C H
A P
T E
R
PowerPoint 2007 Efficient Techniques For The Haas School of Business, UC Berkeley - Dash Designs Consulting 69
INSERT HEADERS AND FOOTERS You can create Footers for the slides in the View menu: Header and
Footer command. PowerPoint does not allow for Headers in a presentation. The Footer can include the Date, the Slide Number,
and some Custom Text. Use the Master View if you want to
format the Footer.
You can also add both Headers and Footers to the Notes Pages, Handouts, and Outline views for printing.
Printing in PowerPoint 2007
6

C H
A P
T E
R
PowerPoint 2007 Efficient Techniques For The Haas School of Business, UC Berkeley - Dash Designs Consulting 70
6 Printing in PowerPoint 2007
PRINTING NOTES PAGES

C H
A P
T E
R
PowerPoint 2007 Efficient Techniques For The Haas School of Business, UC Berkeley - Dash Designs Consulting 71
Printing in PowerPoint 2007
6
PRINTING OUTLINE PAGES

C H
A P
T E
R
PowerPoint 2007 Efficient Techniques For The Haas School of Business, UC Berkeley - Dash Designs Consulting 72
6 Printing in PowerPoint 2007
INSERT HEADERS AND FOOTERS
Slide With Footer

C H
A P
T E
R
PowerPoint 2007 Efficient Techniques For The Haas School of Business, UC Berkeley - Dash Designs Consulting 73
POWERPOINT PRINT DIALOG BOX
File menu: Print Dialog box
Printing in PowerPoint 2007
6

C H
A P
T E
R
PowerPoint 2007 Efficient Techniques For The Haas School of Business, UC Berkeley - Dash Designs Consulting 74
7
POWERPOINT GLOSSARY
PowerPoint Term
Description
Presentation PowerPoint file
Slide PowerPoint page
Layout The makeup of a slide. Every slide is based on a
layout.
Placeholder A pre-set boundary to contain Titles, Text, or
Graphic objects. Placeholders can be moved, sized, and formatted.
Design Template PowerPoint file that contains color, formatting, and
graphics. Design Templates give a presentation a consistent and professional look.
Slide Show The animated part of PowerPoint. Slides are
displayed in their full size on the screen. Special effects (animations) can be added to the slides and/
or elements on a slide.
Slide Master The slide master is an element of the design
template that stores information about the template, including font styles, placeholder sizes and positions,
background design, and color schemes
The slide master's purpose is to let you make a
global change — such as replacing the font style — and have that change reflected on all the slides in
your presentation.
Office Clipboard The Microsoft Office Clipboard allows you to collect
up to 24 text and graphic items from any Office documents or other programs and then paste them
Drag-And-Drop Windows shortcut process to move or copy text or
graphics. This is accomplished by selecting the item and dragging it with your mouse. The Control key
Addendum

C H
A P
T E
R
PowerPoint 2007 Efficient Techniques For The Haas School of Business, UC Berkeley - Dash Designs Consulting 75
Addendum
7
POWERPOINT USES
Visual Presentation
Printed Report
Report Cover
Graphs
Handouts
Speaker Notes
35mm Slides
POWERPOINT VIEWS
Normal
Outline
Slide Sorter
Notes Pages
Slide Show
Master
Color/Grayscale
C H
A P
T E
R
PowerPoint 2007 Efficient Techniques For The Haas School of Business, UC Berkeley - Dash Designs Consulting 76
7
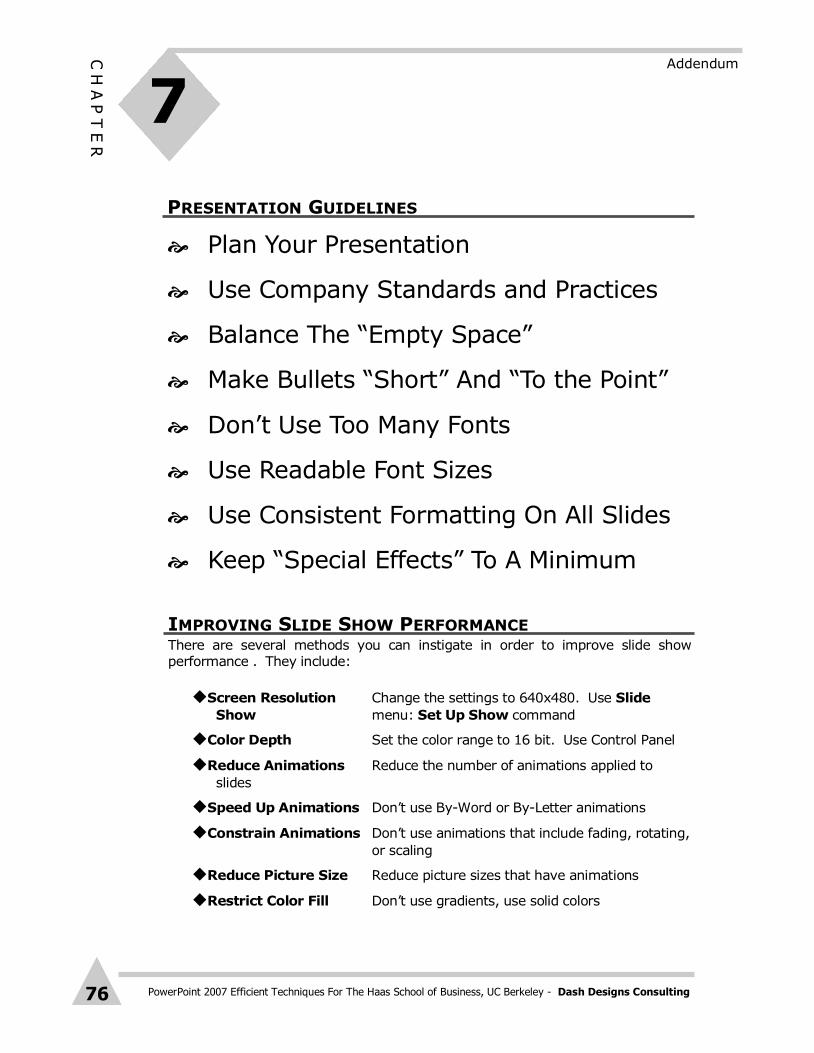
IMPROVING SLIDE SHOW PERFORMANCE There are several methods you can instigate in order to improve slide show performance . They include:
Screen Resolution Change the settings to 640x480. Use Slide
Show menu: Set Up Show command
Color Depth Set the color range to 16 bit. Use Control Panel
Reduce Animations Reduce the number of animations applied to
slides
Speed Up Animations Don’t use By-Word or By-Letter animations
Constrain Animations Don’t use animations that include fading, rotating,
or scaling
Reduce Picture Size Reduce picture sizes that have animations
Restrict Color Fill Don’t use gradients, use solid colors
Plan Your Presentation
Use Company Standards and Practices
Balance The “Empty Space”
Make Bullets “Short” And “To the Point”
Don’t Use Too Many Fonts
Use Readable Font Sizes
Use Consistent Formatting On All Slides
Keep “Special Effects” To A Minimum
PRESENTATION GUIDELINES
Addendum
C H
A P
T E
R
PowerPoint 2007 Efficient Techniques For The Haas School of Business, UC Berkeley - Dash Designs Consulting 77
Addendum
7