power meter user's manual - accuenergy · 1. bacnet overview the building automation and...
TRANSCRIPT
BACnet for Acuvim II Series Power MeterUser's Manual

Copyright © 2018 V2.00
This manual may not be altered or reproduced in whole or in part by any means without the expressed written consent of Accuenergy.

www.accuenergy.com
V: 2.0 Revised: June 2018 1
The information contained in this document is believed to be accurate at the time of publica-tion, however, Accuenergy assumes no responsibility for any errors which may appear here and reserves the right to make changes without notice. Please ask the local representative for latest product specifications before ordering.
Please read this manual carefully before installation, operation and maintenance of the AcuRev 1310 series meter. The following symbols in this manual are used to provide warning of danger or risk during the installation and operation of the meters.
Electric Shock Symbol: Carries information about procedures which must be followed to reduce the risk of electric shock and danger to personal health.
Safety Alert Symbol: Carries information about circumstances which if not considered may result in injury or death.
Prior to maintenance and repair, the equipment must be de-energized and grounded. All main-tenance work must be performed by qualified, competent accredited professionals who have received formal training and have experience with high voltage and current devices. Accuenergy shall not be responsible or liable for any damages or injuries caused by improper meter installa-tion and/or operation.

www.accuenergy.com
V: 2.0 Revised: June 20182
Contents
Chapter 1: BACnet Overview ………………………………………………3
Chapter 2: Introduction ………………………………………………………3
Chapter 3: About BACnet Protocol …………………………………………3
Chapter 4: Using the Acuvim II Series Power Meter’s BACnet Protocol ………………………………………… 4
Chapter 5: Using The BACnet Module (AXM-BACnet) ………………… 55.1 Installation Method ………………………………………………………………………5 5.2 Definition of RJ45 Interface and 485 Interface………………………………………… 6 5.3 Initializing The BACnet Modules …………………………………………………………7
5.3.1 BACnet/IP module (AXM-BIP) ………………………………………………………75.3.2 BACnet MS/TP module (AXM-BMS)………………………………………………7
Chapter 6: BACnet Objects …………………………………………………146.1 AXM-BIP Reading Objects …………………………………………………………………146.2 AXM-BMS Reading Objects…………………………………………………………………19
Chapter 7: AXM-BIP through the web server …………………………………20
7.1 Configuring the BACnet-IP settings …………………………………………………20 7.2 BACnet Protocol Implementation Conformity Statement ………………………24

www.accuenergy.com3V: 2.0 Revised: June 2018
BACnet for Acuvim II Series Power Meter
1. BACnet Overview
The Building Automation and Control Network (BACnet), described in the ANSI/ASHRAE Standard 135-1995, is one of the most widely used building management systems protocols. BACnet was designed to allow communication of building automation and control systems for applications such as heating, ventilating, and air-conditioning control, lighting control, access control, and fire detection systems and their associated equipment. The BACnet protocol provides mechanisms for computerized building automation devices to exchange information, regardless of the particular building service they perform.
2. Introduction
The Acuvim II Series Power Meter supports BACnet communication using BACnet IP communication and also BACnet MS/TP communication. It communicates in native BACnet IP over Ethernet to seamlessly integrate with most building automation/control systems, and communicates with the BACnet MS/TP via the RS485. The Acuvim II Series Power Meter's BACnet MS/TP protocol supports has 56 predefined BACnet objects that lets you track up to 56 measurements whiles the BACnet IP protocol supports 106 objects which lets you track up 78 measurements and 28 IO parameters.
The Acuvim II Series Power Meter supports native BACnet/IP that lets it act as a BACnet server in any BACnet application. The Acuvim II Series Power Meter’s BACnet IP also comes with a Web interface that allows users to configure the BACnet related parameters and read measurements by using a standard browser.
3. About BACnet Protocol
The BACnet protocol operates in a client-server environment. A client machine sends a service request (message) to a server machine; once the service is performed the results are reported back to the client machine. BACnet defines 5 groups (or classes) of 35 message types. For example, one class contains messages for retrieving and manipulating the object properties described above. An example of a common service request in this class is "ReadProperty." When the server machine receives this message from a client machine, it locates the requested property of the requested object and sends the value to the client.

BACnet for Acuvim II Series Power Meter
www.accuenergy.com
V: 2.0 Revised: June 20184
The BACnet protocol consists of Objects that contain different kinds of information. Each Object has properties that contain data related to it.
Below is the example from the AXM-BMS(BACnet MSTP protocol) of an Object for Total Watts:
Object_Name, P_rmsObject_Type, AnalogValueObject_Instance, 17Present_Value, watt, tot (value in watts)
For more detailed information, visit the BACnet website at www.bacnet.org.
4. Using the Acuvim II Series Power Meter’s BACnet Protocol
Serial and Ethernet Versions
There are different serial and Ethernet based-versions of BACnet. The most common serial version is called BACnet MS/TP while the dominant Ethernet version is BACnet/IP.
BACnet/IP has been developed to allow the BACnet protocol to use TCP/IP networks. You could say that BACnet/IP is a way of hooking BACnet up to the Internet and communicating with different Local Area Networks (LANs). This enables system owners, facility managers, or even external suppliers to access BACnet networks and manage their devices and systems remotely.
Table 4-1
BACnet/IP CharacteristicsNetwork Type Ethernet based network using UDP for data
transfer.Topology Line or star topology (Standard Ethernet to-
pology)Installation Ethernet twisted pair cables with RJ45 con-
nectorsSpeed 10/100 Mbit/s full duplexMax. Station No network limitation of number of nodes.Data Up to 1476 bytes per frame

www.accuenergy.com
V: 2.0 Revised: June 2018
Chapter 5: Using The BACnet Module
5
Table 4-2BACnet/MSTP CharacteristicsNetwork Type Serial RS-485 with a Master/Slave Token
Passing protocolTopology Serial RS-485 with a Master/Slave Token
Passing protocolInstallation Any cable with at least 3 conductors can be
used. Distance between nodes depends on baud rate.
Speed 9600 kbit/s,19200 kbit/s, 38400 kbit/s and 76800 kbit/s
Max. Station 127 MS/TP mastersData Up to 480 bytes per telegram frame
5. Using The BACnet Module (AXM-BACnet)
5.1 Installation Method
Figure 5-1
BACnet for Acuvim II Series Power Meter
www.accuenergy.com
V: 2.0 Revised: June 20186
The BACnet module is linked to the Acuvim II meter by a communication plug. It can also be linked to other extended modules like IO modules.
1. Insert the installation clips to the counterpart of the meter, and then press the BACnet module lightly, so linking is established.
2. Tighten the installation screws.
Note:
• Install BACnet Module carefully to avoid damage;
• Under no circumstances should any installation be done with the meter powered on. Failure to do so may result in injury or death.
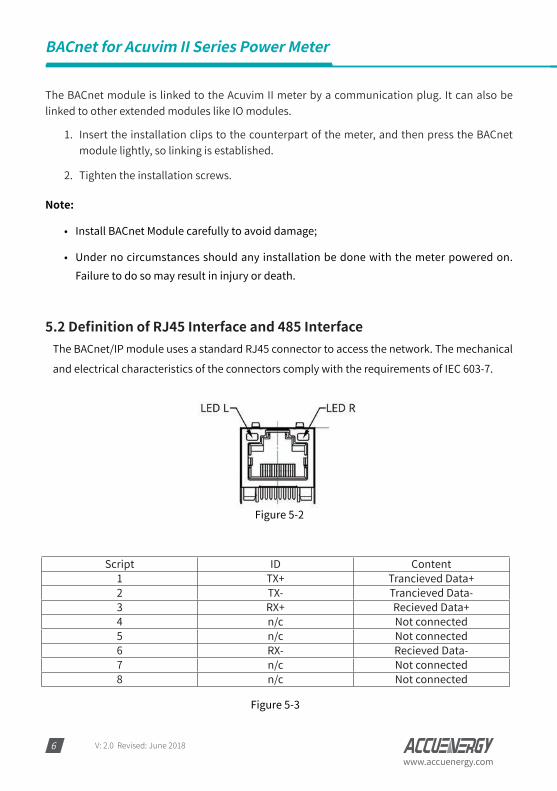
5.2 Definition of RJ45 Interface and 485 InterfaceThe BACnet/IP module uses a standard RJ45 connector to access the network. The mechanical
and electrical characteristics of the connectors comply with the requirements of IEC 603-7.
Script ID Content1 TX+ Trancieved Data+2 TX- Trancieved Data-3 RX+ Recieved Data+4 n/c Not connected5 n/c Not connected6 RX- Recieved Data-7 n/c Not connected8 n/c Not connected
Figure 5-3
Figure 5-2
www.accuenergy.com
V: 2.0 Revised: June 2018
Chapter 5: Using The BACnet Module
7
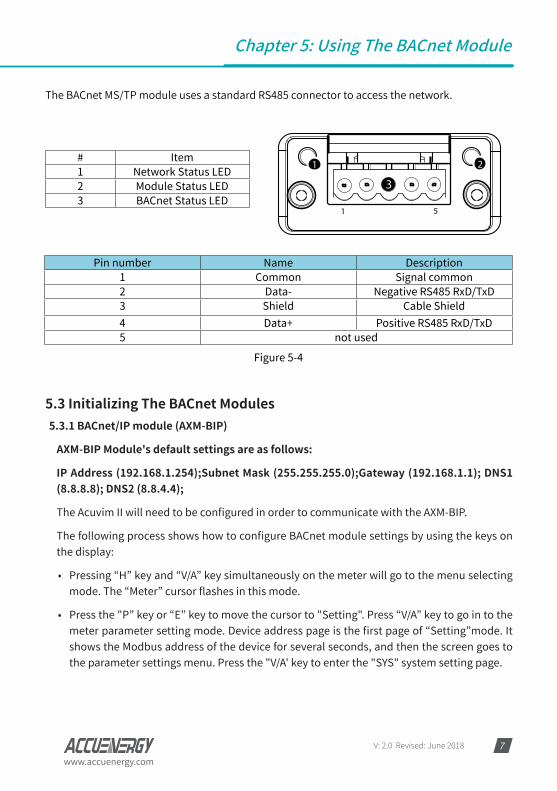
The BACnet MS/TP module uses a standard RS485 connector to access the network.
3
1 2
1 5
# Item1 Network Status LED2 Module Status LED3 BACnet Status LED
Pin number Name Description1 Common Signal common2 Data- Negative RS485 RxD/TxD3 Shield Cable Shield4 Data+ Positive RS485 RxD/TxD5 not used
5.3 Initializing The BACnet Modules5.3.1 BACnet/IP module (AXM-BIP)
AXM-BIP Module's default settings are as follows:
IP Address (192.168.1.254);Subnet Mask (255.255.255.0);Gateway (192.168.1.1); DNS1 (8.8.8.8); DNS2 (8.8.4.4);
The Acuvim II will need to be configured in order to communicate with the AXM-BIP.
The following process shows how to configure BACnet module settings by using the keys on the display:
• Pressing “H” key and “V/A” key simultaneously on the meter will go to the menu selecting mode. The “Meter” cursor flashes in this mode.
• Press the "P” key or “E” key to move the cursor to "Setting". Press “V/A” key to go in to the meter parameter setting mode. Device address page is the first page of “Setting”mode. It shows the Modbus address of the device for several seconds, and then the screen goes to the parameter settings menu. Press the "V/A' key to enter the "SYS" system setting page.
Figure 5-4

www.accuenergy.com
V: 2.0 Revised: June 20188
BACnet for Acuvim II Series Power Meter
• Once in the system settings menu, the initial page is S01 ADDR, the meters RS485 address page. Press the "P" key to go to the S03 BPS2 page. The baud rate should be at 38400.
• Press the "V/A" key to enter edit mode to configure the desired baud rate using the "P" or "E" key. Select 38400. Press the "V/A" key to confirm.
• Press the "P” key or “E” key to move to page S31 Parity2 page. Press the "V/A" key to enter edit mode.
• Press the "P” key or “E” key to change the setting to "1NO" and press the "V/A" key to con-firm the setting.
• Press the "P” key or “E” key to move to page S34 PROTOCOL 2 page. Press the "V/A" key to enter edit mode.
• Press the "P” key or “E” key to change the setting to "Other" and press the "V/A" key to con-firm the setting
Figure 5-5
Figure 5-6

www.accuenergy.com
V: 2.0 Revised: June 2018
Chapter 5: Using The BACnet Module
9
• Press the "H" key to back out of the system settings and press the "E" key to move the cursor to "NET"
• Press"V/A" key to enter the BACnet module settings page to configure the IP address of the AXM-BIP.
• Press the "P” key to move to N02 IP page. If you would like to change it, press the "V/A" key to enter edit mode.
Press ‘V/A’ to modify; the first digit will begin to flash.
Press ‘P’ or ‘E’ to change the number of the flashing digit
Press ‘H’ to switch the flashing digit
Press ‘V/A’ to confirm the setting.
• Press the "P” key to move to N03 SUBMASK page. If you would like to change it, press the "V/A" key to enter edit mode and follow the procedure for changing the IP address above.
• Press the "P” key to move to N04 GATEWAY page. If you would like to change it, press the "V/A" key to enter edit mode and follow the procedure for chang-ing the IP address above.
• Press the "P” key to move to N05 DNS1 page. If you would like to change it, press the "V/A" key to enter edit mode and follow the procedure for changing the IP address above.
• Press the "P” key to move to N06 DNS2 page. If you would like to change it, press the "V/A" key to enter edit mode and follow the procedure for changing the IP address above.
After making any changes to the settings above, the AXM-BIP will require a reset in order for the setting to take effect.
• Press the "P” key to move to N09 NET REST page.
• Press "V/A" key to modify; ‘NO’ should begin to flash
• Press "P" key to change ‘NO’ to ‘RESET’.
• Press "V/A" key to reset the module. ‘NO’ will be displayed on the screen and the AXM-BIP module settings should now take effect.
www.accuenergy.com
V: 2.0 Revised: June 201810
BACnet for Acuvim II Series Power Meter
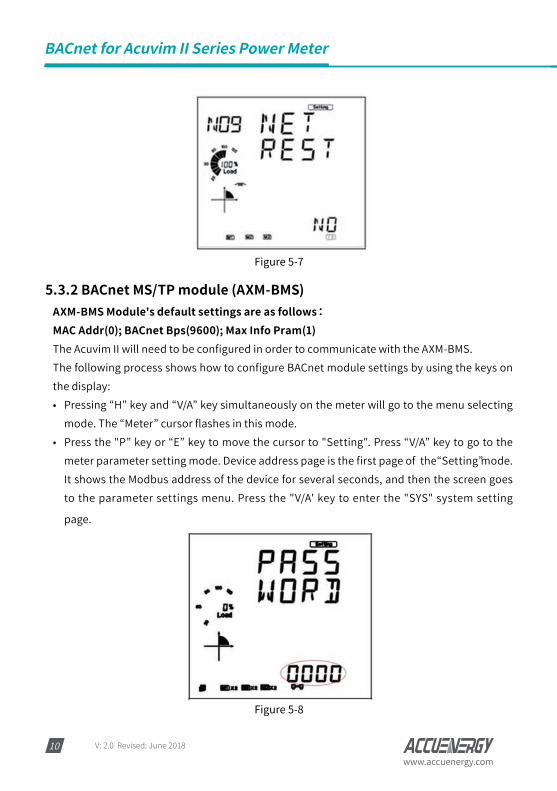
5.3.2 BACnet MS/TP module (AXM-BMS) AXM-BMS Module's default settings are as follows:MAC Addr(0); BACnet Bps(9600); Max Info Pram(1)The Acuvim II will need to be configured in order to communicate with the AXM-BMS.The following process shows how to configure BACnet module settings by using the keys on the display:• Pressing “H” key and “V/A” key simultaneously on the meter will go to the menu selecting
mode. The “Meter” cursor flashes in this mode.• Press the "P” key or “E” key to move the cursor to "Setting". Press “V/A” key to go to the
meter parameter setting mode. Device address page is the first page of the “Setting”mode. It shows the Modbus address of the device for several seconds, and then the screen goes to the parameter settings menu. Press the "V/A' key to enter the "SYS" system setting
page.
Figure 5-7
Figure 5-8

www.accuenergy.com
V: 2.0 Revised: June 2018
Chapter 5: Using The BACnet Module
11
• Once in the system settings menu, the initial page is S01 Addr, the meters RS485 address page. Press the "P” key or “E” key to move to page S34 PROTOCOL 2 page. Press the "V/A" key to enter edit mode.
• Press the "P” key or “E” key to change the setting to "BACNET" and press the "V/A" key to confirm the setting.
• Press the "H" key to back out of the system settings and press the "E" key to move the cursor to "NET"
• Press"V/A" key to enter the BACnet module settings page.
The first page of the BACnet related settings is the BACnet MSTP address, which is defaulted to 0. Users can define the range of the address from 0-127.
After setting the BACnet MSTP address, press the "V/A" key to confirm the setting.
Figure 5-9
Figure 5-10
www.accuenergy.com
V: 2.0 Revised: June 201812
BACnet for Acuvim II Series Power Meter
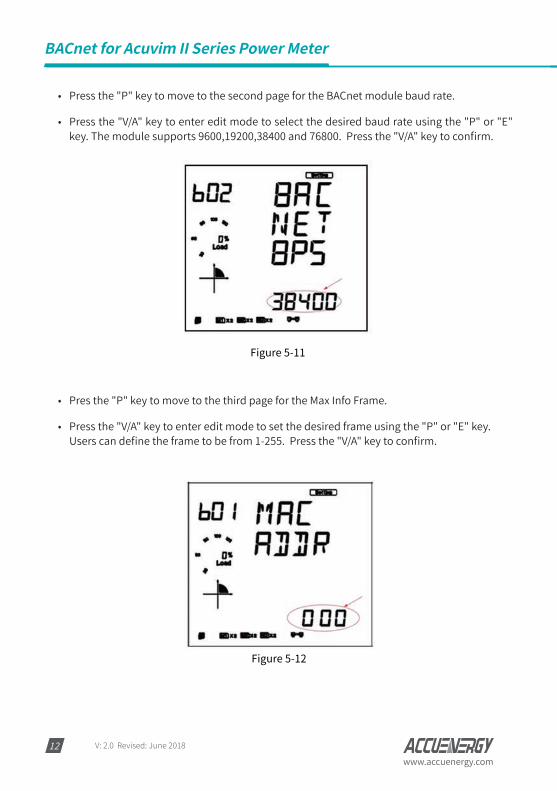
• Press the "P" key to move to the second page for the BACnet module baud rate.
• Press the "V/A" key to enter edit mode to select the desired baud rate using the "P" or "E" key. The module supports 9600,19200,38400 and 76800. Press the "V/A" key to confirm.
Figure 5-11
• Pres the "P" key to move to the third page for the Max Info Frame.
• Press the "V/A" key to enter edit mode to set the desired frame using the "P" or "E" key. Users can define the frame to be from 1-255. Press the "V/A" key to confirm.
Figure 5-12
www.accuenergy.com
V: 2.0 Revised: June 2018
Chapter 5: Using The BACnet Module
13
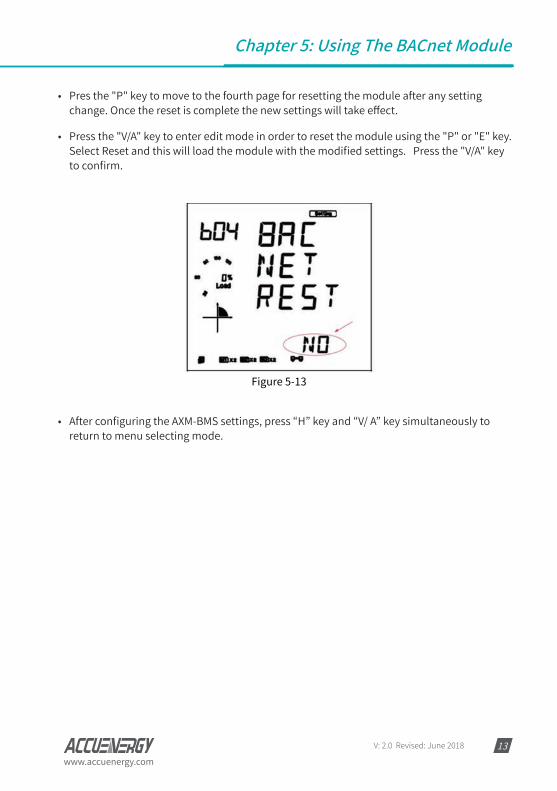
• Pres the "P" key to move to the fourth page for resetting the module after any setting change. Once the reset is complete the new settings will take effect.
• Press the "V/A" key to enter edit mode in order to reset the module using the "P" or "E" key. Select Reset and this will load the module with the modified settings. Press the "V/A" key to confirm.
Figure 5-13
• After configuring the AXM-BMS settings, press “H” key and “V/ A” key simultaneously to return to menu selecting mode.

www.accuenergy.com
V: 2.0 Revised: June 201814
BACnet for Acuvim II Series Power Meter
6. BACnet Objects6.1 AXM-BIP Reading Objects
The AXM-BIP module for the Acuvim II series power meter supports 78 predefined objects based on the meters real-time measurement parameters. There is no programming or map-ping necessary to use the BACnet objects. The object's name easily identifies the measure-ment they contain.
The following objects have the object type as Analog Inputs. The table below lists each of the objects with their instance number and the units of measurement.
Table 6-1- Analog Inputs
Instance Object Type Name Object Data Type Units1 Analog Input Frequency Float Hz2 Analog Input Phase A Voltage Float V3 Analog Input Phase B Voltage Float V4 Analog Input Phase C Voltage Float V5 Analog Input Average Line Voltage Float V6 Analog Input Line Voltage AB Float V7 Analog Input Line Voltage BC Float V8 Analog Input Line Voltage CA Float V9 Analog Input Average Line Voltage Float V
10 Analog Input Phase A Current Float A11 Analog Input Phase B Current Float A12 Analog Input Phase C Current Float A13 Analog Input Average Current Float A14 Analog Input Neutral Current Float A15 Analog Input Phase A Active Power Float kW16 Analog Input Phase B Active Power Float kW17 Analog Input Phase C Active Power Float kW18 Analog Input Total Active Power Float kW19 Analog Input Phase A Reactive Power Float kvar20 Analog Input Phase B Reactive Power Float kvar21 Analog Input Phase C Reactive Power Float kvar22 Analog Input Total Reactive Power Float kvar23 Analog Input Phase A Apparent Power Float kVA24 Analog Input Phase B Apparent Power Float kVA

www.accuenergy.com
V: 2.0 Revised: June 2018
Chapter 6: BACnet Objects
15
Instance Object Type Name Object Data Type Units
25 Analog Input Phase C Apparent Power Float kVA
26 Analog Input Total Apparent Power Float kVA
27 Analog Input Phase A Power Factor Float
28 Analog Input Phase B Power Factor Float
29 Analog Input Phase C Power Factor Float
30 Analog Input Total Power Factor Float
31 Analog Input Voltage Unbalance Factor Float %
32 Analog Input Current Unbalance Factor Float %
33 Analog Input Load Type Float
34 Analog Input Active Power Demand Float kW
35 Analog Input Reactive Power Demand Float kvar
36 Analog Input Apparent Power Demand Float kVA
37 Analog Input Phase A Current Demand Float A
38 Analog Input Phase B Current Demand Float A
39 Analog Input Phase C Current Demand Float A
40 Analog Input Import Active Energy Float kWh
41 Analog Input Export Active Energy Float kWh
42 Analog Input Import Reactive Energy Float kWh
43 Analog Input Export Reactive Energy Float kWh
44 Analog Input Energy Total Float kWh
45 Analog Input Energy Net Float kWh
46 Analog Input Reactive Energy Total Float kvarh
47 Analog Input Reactive Energy Net Float kvarh
48 Analog Input Apparent Energy Float kVAh
49 Analog Input Phase A Import Active Energy Float kWh
50 Analog Input Phase A Export Active Energy Float kWh
51 Analog Input Phase B Export Active Energy Float kWh
52 Analog Input Phase B Export Active Energy Float kWh
53 Analog Input Phase C Import Active Energy Float kWh
www.accuenergy.com
V: 2.0 Revised: June 201816
BACnet for Acuvim II Series Power Meter
Instance Object Type Name Object Data Type Units
54 Analog Input Phase C Export Active Energy Float kWh
55 Analog Input Phase A Import Reactive Energy Float kvarh
56 Analog Input Phase A Export Reactive Energy Float kvarh
57 Analog Input Phase B Import Reactive Energy Float kvarh
58 Analog Input Phase B Export Reactive Energy Float kvarh
59 Analog Input Phase C Import Reactive Energy Float kvarh
60 Analog Input Phase C Export Reactive Energy Float kvarh
61 Analog Input Phase A Apparent Energy Float kVAh
62 Analog Input Phase B Apparent Energy Float kVAh
63 Analog Input Phase C Apparent Energy Float kVAh
64 Analog Input Phase A Voltage THD Float %
65 Analog Input Phase B Voltage THD Float %
66 Analog Input Phase C Voltage THD Float %
67 Analog Input Average Voltage THD Float %
68 Analog Input Phase A Current THD Float %
69 Analog Input Phase B Current THD Float %
70 Analog Input Phase C Current THD Float %
71 Analog Input Average Current THD Float %
Table 6-2-Binary Inputs
Instance Object Type Name Object Data Type1 Binary Input IO11-DI1 Bit2 Binary Input IO11-DI2 Bit3 Binary Input IO11-DI3 Bit4 Binary Input IO11-DI4 Bit5 Binary Input IO11-DI5 Bit6 Binary Input IO11-DI6 Bit7 Binary Input IO21-DI1 Bit8 Binary Input IO21-DI2 Bit

www.accuenergy.com
V: 2.0 Revised: June 2018
Chapter 6: BACnet Objects
17
Instance Object Type Name Object Data Type9 Binary Input IO21-DI3 Bit
10 Binary Input IO21-DI4 Bit
11 Binary Input IO31-DI1 Bit
12 Binary Input IO31-DI2 Bit
13 Binary Input IO31-DI3 Bit
14 Binary Input IO31-DI4 Bit
15 Binary Input IO12-DI1 Bit
16 Binary Input IO12-D2 Bit
17 Binary Input IO12-DI3 Bit
18 Binary Input IO12-DI4 Bit
19 Binary Input IO12-DI5 Bit
20 Binary Input IO12-DI6 Bit
21 Binary Input IO22-DI1 Bit
22 Binary Input IO22-DI2 Bit
23 Binary Input IO22-DI3 Bit
24 Binary Input IO22-DI4 Bit
25 Binary Input IO32-DI1 Bit
26 Binary Input IO32-DI2 Bit
27 Binary Input IO32-DI3 Bit
28 Binary Input IO32-DI4 Bit
Table 6-3- Analog Inputs: IO Module
Instance Object Type Name Object Data Type Units
1001 Analog Input IO21-AI1 Float mA/Volts
1002 Analog Input IO21-AI2 Float mA/Volts
1003 Analog Input IO22-AI3 Float mA/Volts
1004 Analog Input IO22-AI4 Float mA/Volts
1005 Analog Input IO31-AI1 Float mA/Volts
1006 Analog Input IO31-AI2 Float mA/Volts
1007 Analog Input IO32-AI3 Float mA/Volts
1008 Analog Input IO32-AI4 Float mA/Volts
www.accuenergy.com
V: 2.0 Revised: June 201818
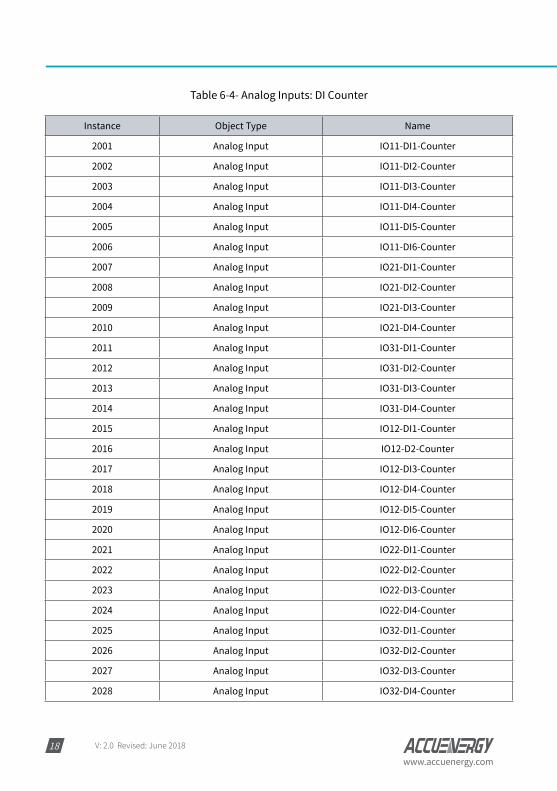
Table 6-4- Analog Inputs: DI Counter
Instance Object Type Name
2001 Analog Input IO11-DI1-Counter
2002 Analog Input IO11-DI2-Counter
2003 Analog Input IO11-DI3-Counter
2004 Analog Input IO11-DI4-Counter
2005 Analog Input IO11-DI5-Counter
2006 Analog Input IO11-DI6-Counter
2007 Analog Input IO21-DI1-Counter
2008 Analog Input IO21-DI2-Counter
2009 Analog Input IO21-DI3-Counter
2010 Analog Input IO21-DI4-Counter
2011 Analog Input IO31-DI1-Counter
2012 Analog Input IO31-DI2-Counter
2013 Analog Input IO31-DI3-Counter
2014 Analog Input IO31-DI4-Counter
2015 Analog Input IO12-DI1-Counter
2016 Analog Input IO12-D2-Counter
2017 Analog Input IO12-DI3-Counter
2018 Analog Input IO12-DI4-Counter
2019 Analog Input IO12-DI5-Counter
2020 Analog Input IO12-DI6-Counter
2021 Analog Input IO22-DI1-Counter
2022 Analog Input IO22-DI2-Counter
2023 Analog Input IO22-DI3-Counter
2024 Analog Input IO22-DI4-Counter
2025 Analog Input IO32-DI1-Counter
2026 Analog Input IO32-DI2-Counter
2027 Analog Input IO32-DI3-Counter
2028 Analog Input IO32-DI4-Counter

www.accuenergy.com
V: 2.0 Revised: June 2018
Chapter 6: BACnet Objects
19
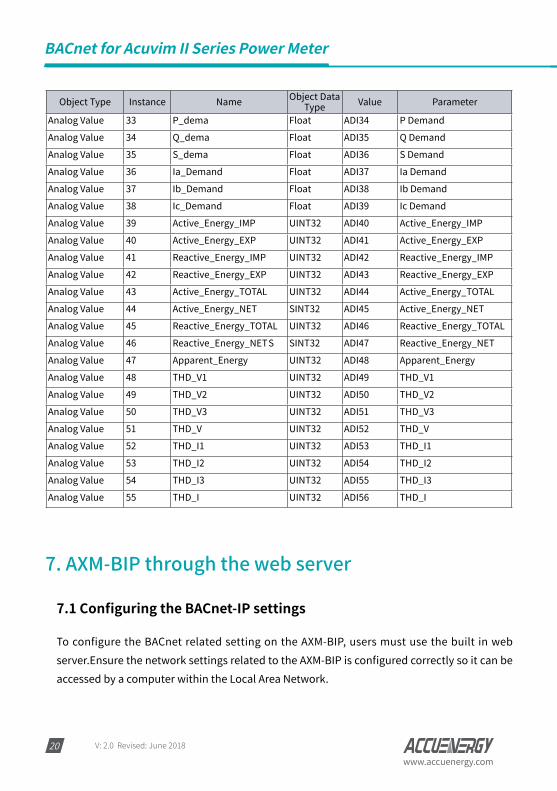
6.2 AXM-BMS Reading Objects
The AXM-BMS on the Acuvim II Series Power Meter's BACnet IP has 56 predefined objects of electrical measurements. No programming or mapping is necessary to use the BACnet objects. The object’s names easily identify the measurements they contain. All of the objects, with the exception of Modbus Meter and POLL_DELAY are AI (analog input) Object type. The following table lists each of the objects with their units of measurement and description.
Table 6-5
Object Type Instance Name Object Data Type Value Parameter
Analog Value 0 Freq_rms Float ADI1 FrequencyAnalog Value 1 Ua_rms Float ADI2 Voltage AAnalog Value 2 Ub_rms Float ADI3 Voltage BAnalog Value 3 Uc_rms Float ADI4 Voltage CAnalog Value 4 Uvag_rms Float ADI5 Average Phase VoltageAnalog Value 5 Uab_rms Float ADI6 Voltage A-BAnalog Value 6 Ubc_rms Float ADI7 Voltage B-CAnalog Value 7 Uca_rms Float ADI8 Voltage C-AAnalog Value 8 Ulavg_rms Float ADI9 Average Line VoltageAnalog Value 9 Ia_rms Float ADI10 Current AAnalog Value 10 Ib_rms Float ADI11 Current BAnalog Value 11 Ic_rms Float ADI12 Current CAnalog Value 12 Iavg_rms Float ADI13 Average CurrentAnalog Value 13 In_rms Float ADI14 Neutral CurrentAnalog Value 14 Pa_rms Float ADI15 PaAnalog Value 15 Pb_rms Float ADI16 PbAnalog Value 16 Pc_rms Float ADI17 PcAnalog Value 17 P_rms Float ADI18 Total Active PowerAnalog Value 18 Qa_rms Float ADI19 QaAnalog Value 19 Qb_rms Float ADI20 QbAnalog Value 20 Qc_rms Float ADI21 QcAnalog Value 21 Q_rms Float ADI22 Total Reactive PowerAnalog Value 22 Sa_rms Float ADI23 SaAnalog Value 23 Sb_rms Float ADI24 SbAnalog Value 24 Sc_rms Float ADI25 ScAnalog Value 25 S_rms Float ADI26 Total Apparent PowerAnalog Value 26 PFa_rms Float ADI27 PFaAnalog Value 27 PFb_rms Float ADI28 PFbAnalog Value 28 PFc_rms Float ADI29 PFcAnalog Value 29 PF_rms Float ADI30 Total Power FactorAnalog Value 30 Unbl_u2 Float ADI31 Voltage ImbalanceAnalog Value 31 Unbl_i2 Float ADI32 Current ImbalanceAnalog Value 32 Rlc_val Float ADI33 Load Characteristics
www.accuenergy.com
V: 2.0 Revised: June 201820
BACnet for Acuvim II Series Power Meter
Object Type Instance Name Object Data Type Value Parameter
Analog Value 33 P_dema Float ADI34 P Demand
Analog Value 34 Q_dema Float ADI35 Q Demand
Analog Value 35 S_dema Float ADI36 S Demand
Analog Value 36 Ia_Demand Float ADI37 Ia Demand
Analog Value 37 Ib_Demand Float ADI38 Ib Demand
Analog Value 38 Ic_Demand Float ADI39 Ic Demand
Analog Value 39 Active_Energy_IMP UINT32 ADI40 Active_Energy_IMP
Analog Value 40 Active_Energy_EXP UINT32 ADI41 Active_Energy_EXP
Analog Value 41 Reactive_Energy_IMP UINT32 ADI42 Reactive_Energy_IMP
Analog Value 42 Reactive_Energy_EXP UINT32 ADI43 Reactive_Energy_EXP
Analog Value 43 Active_Energy_TOTAL UINT32 ADI44 Active_Energy_TOTAL
Analog Value 44 Active_Energy_NET SINT32 ADI45 Active_Energy_NET
Analog Value 45 Reactive_Energy_TOTAL UINT32 ADI46 Reactive_Energy_TOTAL
Analog Value 46 Reactive_Energy_NET S SINT32 ADI47 Reactive_Energy_NET
Analog Value 47 Apparent_Energy UINT32 ADI48 Apparent_Energy
Analog Value 48 THD_V1 UINT32 ADI49 THD_V1
Analog Value 49 THD_V2 UINT32 ADI50 THD_V2
Analog Value 50 THD_V3 UINT32 ADI51 THD_V3
Analog Value 51 THD_V UINT32 ADI52 THD_V
Analog Value 52 THD_I1 UINT32 ADI53 THD_I1
Analog Value 53 THD_I2 UINT32 ADI54 THD_I2
Analog Value 54 THD_I3 UINT32 ADI55 THD_I3
Analog Value 55 THD_I UINT32 ADI56 THD_I
7. AXM-BIP through the web server
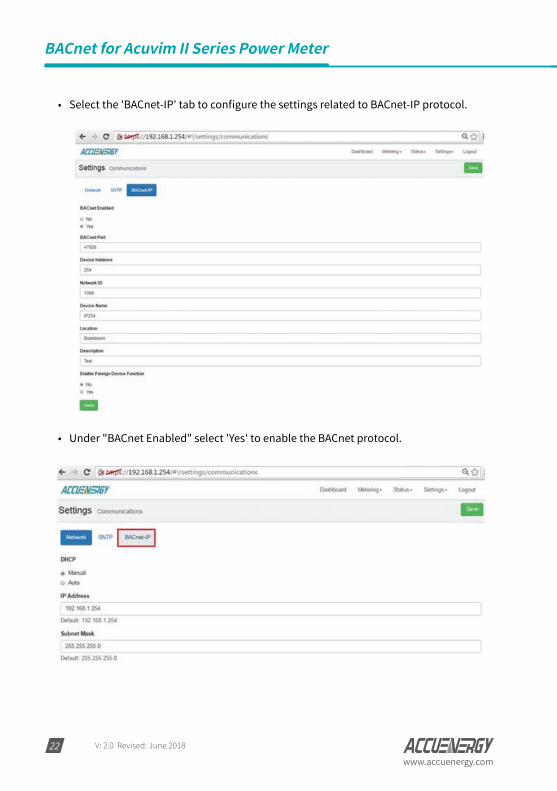
7.1 Configuring the BACnet-IP settings
To configure the BACnet related setting on the AXM-BIP, users must use the built in web server.Ensure the network settings related to the AXM-BIP is configured correctly so it can be accessed by a computer within the Local Area Network.

www.accuenergy.com
V: 2.0 Revised: June 2018
Chapter 7: AXM-BIP through the web server
21
• Login in with 'Admin' access.
NOTE: The default password for the Admin user access is 'admin'.
• Click on 'Settings' and select 'Communications'.
• Open an Internet browser and enter the IP address of the meter.
www.accuenergy.com
V: 2.0 Revised: June 201822
BACnet for Acuvim II Series Power Meter
• Under "BACnet Enabled" select 'Yes' to enable the BACnet protocol.
• Select the 'BACnet-IP' tab to configure the settings related to BACnet-IP protocol.
www.accuenergy.com
V: 2.0 Revised: June 2018
Chapter 7: AXM-BIP through the web server
23
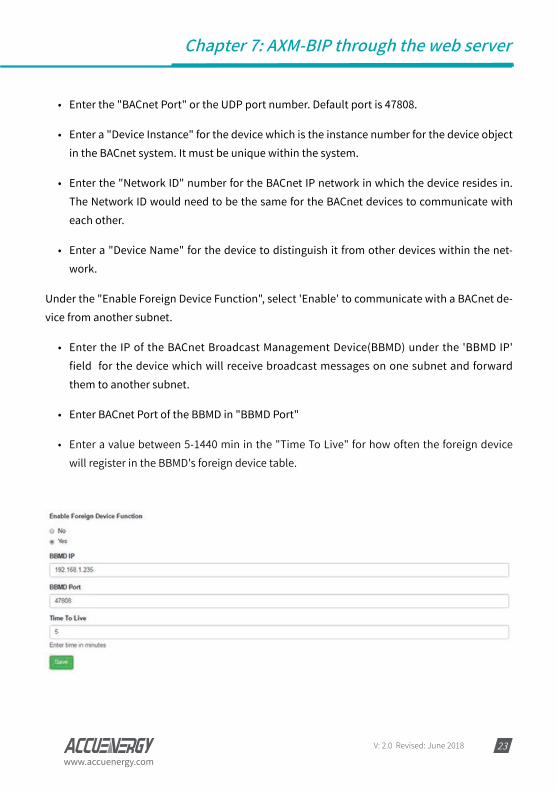
• Enter the "BACnet Port" or the UDP port number. Default port is 47808.
• Enter a "Device Instance" for the device which is the instance number for the device object in the BACnet system. It must be unique within the system.
• Enter the "Network ID" number for the BACnet IP network in which the device resides in. The Network ID would need to be the same for the BACnet devices to communicate with each other.
• Enter a "Device Name" for the device to distinguish it from other devices within the net-work.
Under the "Enable Foreign Device Function", select 'Enable' to communicate with a BACnet de-vice from another subnet.
• Enter the IP of the BACnet Broadcast Management Device(BBMD) under the 'BBMD IP' field for the device which will receive broadcast messages on one subnet and forward them to another subnet.
• Enter BACnet Port of the BBMD in "BBMD Port"
• Enter a value between 5-1440 min in the "Time To Live" for how often the foreign device will register in the BBMD's foreign device table.
www.accuenergy.com
V: 2.0 Revised: June 201824
BACnet for Acuvim II Series Power Meter
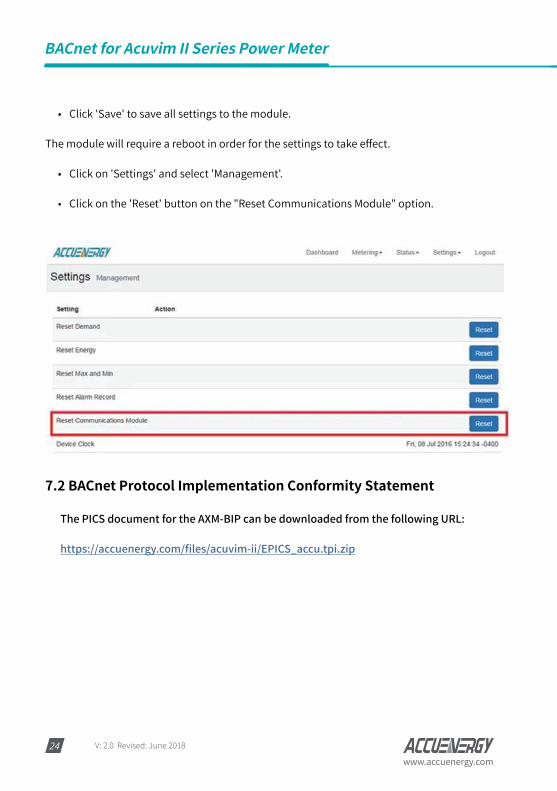
• Click 'Save' to save all settings to the module.
The module will require a reboot in order for the settings to take effect.
• Click on 'Settings' and select 'Management'.
• Click on the 'Reset' button on the "Reset Communications Module" option.
7.2 BACnet Protocol Implementation Conformity Statement
The PICS document for the AXM-BIP can be downloaded from the following URL:
https://accuenergy.com/files/acuvim-ii/EPICS_accu.tpi.zip

TF: 1-877-721-8908INT: +1-416-497-4100FAX: +1-416-497-4130E: [email protected]
ACCUENERGY (CANADA) INC.
2 Lansing Square, Suite 700Toronto, ON M2J 4P8, Canada Re
visi
on D
ate:
Jun
e 20
18 D
ocum
ent #
104
0E21
02
MAKE ENERGY USAGE SMARTER