postage accounting module user guide - window book,...
TRANSCRIPT

Postage Accounting Module User Guide

ii
Table Of Contents INTRODUCTION ..................................................................................................1
ACCOUNTING PRINCIPLES............................................................................1 Access Postage Accounting..............................................................................2 LOGGING IN AND SECURITY .........................................................................2 SETTING THE INTERACTION BETWEEN POSTAGE ACCOUNTING AND POSTAGE STATEMENTS................................................................................3
Implementation .....................................................................................................5 ENTERING BEGINNING BALANCES...............................................................5
Concepts and Assumptions ..................................................................................7 CONCEPTS: Please read. These are extremely important in understanding this program...................................................................................................7 ASSUMPTIONS.............................................................................................9
Typical Job Cycle................................................................................................10 Accounting Set Up ..............................................................................................12
Logging In .......................................................................................................12 General Tab ....................................................................................................13 Checking Tab ..................................................................................................14 Terms Tab.......................................................................................................15
Creating Jobs......................................................................................................17 INVOICES FOR ESTIMATED POSTAGE (Optional) ......................................18 Importing Postage Statement Detail into Estimated Postage Invoice..............19 Printing Invoices ..............................................................................................21
Receipts and Disbursements ..............................................................................22 Statements..........................................................................................................27 Inquiries and Reports..........................................................................................29
Reports............................................................................................................30 Postage Inventory ...............................................................................................32
TRANSFERS...................................................................................................33 Closing Jobs .......................................................................................................35
JOB SETTLEMENT .....................................................................................36 JOB TO JOB TRANSFER............................................................................38 REFUND OVERPAYMENT .........................................................................39 CLOSING THE JOB ....................................................................................40 IF METER/STAMP INVENTORY CONTROL IS DISABLED .......................44 Disbursement for Meter and Stamp Purchase.............................................45 IF METER / STAMP INVENTORY CONTROL IS ENABLED ......................46 METER/STAMP FUNDING CHECK ............................................................48 CLOSED JOB PROPERTIES......................................................................50 REOPENING A JOB....................................................................................50
Other Monthly Procedures ..................................................................................52 DELETING AND PURGING STATEMENT DATA...........................................52
Postage Accounting FAQs..................................................................................53 EFI ......................................................................................................................56
Job Settlement Requirements: A Job cannot be settled unless…...................56

Table Of Contents
iii
Job Close Requirements: A Job cannot be closed unless… ...........................59 Usage and Spoilage Records..........................................................................62
Index ...................................................................................................................63


1
INTRODUCTION Window Book’s Postage Accounting program dramatically simplifies the management of postage funds in a lettershop environment. It assists mailers in dealing with permit escrow accounts, receiving and managing postage funds from clients, dealing with postage purchases and reconciling the postage used during the course of a job. At the end of a job the postage under or overpayment can be rolled into another job, refunded to the client or transferred to the mailer’s billing system for final disposition. The Window Book Postage Accounting program can track job, client and permit balances. If desired, meter and stamp inventories and balances can also be maintained. For those mailers who use meter and stamp postage, the Postage Accounting module can be used in conjunction with our Meter and Stamp Manager Module as well, for a COMPLETE Postage Accounting Management System. Other features designed specifically for “lettershops” are:
Ability to do ‘Estimated Postage Invoice” at the beginning of a job. Ability to properly account for funds received from clients in one step,
whether the check is made payable to the mailer or the USPS. A “Credit Alert Report” which informs the mailer of which jobs that are
about to mail have not had their postage paid yet. Interaction with the Post Master and DAT-MAIL™ statement printing
programs which will alert the user when printing statements, that the client has not advanced enough money to cover the postage.
Job and Client Job Billing Reports specifically designed to be presented to clients to document the mailing and payment activity for a client or job.
Ability close a job and transfer overpayment to the mailer’s billing system so that the postage does not have to be refunded by check, though that is also an option at the end of the job.
Other features of interest to all users would include: Ability to print postage purchase checks on popular laser and impact
printed check formats. Ability to track accumulated meter and stamp spoilage and USPS
reimbursements. Support for multiple checking accounts. The ability to suppress reporting on completed jobs without purging them.
ACCOUNTING PRINCIPLES

Postage Accounting Module User Guide
2
Good accounting programs do not allow deletions or changes. They use the age-old accounting principal of “writing in ink”. The problem with that strategy is that if you need to make corrections, you must make offsetting entries which can clutter up the reports and inquiries and this activity is usually printed at the end of the job and given to the client. It does not look good to see a jumble of adjusting entries. What Window Book's Postage Accounting does is that it allows changes, but not deletions of receipts and disbursements. If a transaction was made in error, it is voided and the user who did the void is logged into an audit file. Changes are allowed but also logged in the audit file. If a statement is deleted, the accounting entry is not deleted but voided.
Access Postage Accounting DAT-MAIL™ USERS: If you are registered to use Postage Accounting, you will have access via the Postage Reports icon, as well as from the main menu of DAT-MAIL™ Statements.. T POST MASTER USERS: If you are registered to use Post Master, the Postage Accounting features can be accessed from the Accounting menu along the top of the screen.
What is the difference between Post Master and DAT-MAIL™? Post Master requires users to manually enter their postage statement information. DAT-MAIL™ allows users to manually enter this information or import it from industry standard Mail.dat™ files which are generated by popular presort programs.
LOGGING IN AND SECURITY The program is shipped with a login record with the login name of “SUP” . The password for the default supervisor login is available from your Window Book sales or support representative. This login has supervisor security privileges which allow the user to setup logins, passwords and security privileges for other users. To gain access to Postage Accounting, the user must have a password. There are three access levels other than NONE:
Supervisor – Allows user to setup logins and passwords for other users and have full access to the program.

Introduction
3
Manager – Allows full access to the program but user can not set up a new login or password. Clerical – Access to the program is restricted to viewing transactions and running reports. Users with this level can “look but not touch”.
Once you have established at least one other user with Supervisor privileges, you can delete the supervisor from the employee file.
WHAT IF THE SUPERVISOR (LOGIN) IS NOT PRESENT? If you have had the program a while you may have deleted the supervisor login without realizing its significance. You can add the supervisor login by running a special utility, located in the Program Statements Data folder. Open Windows Explorer and run ADDSUP.EXE which is in your program path. This program takes only a second to run (invisible, in the background) and when done, your supervisor login will be added back to the employee file.
SETTING THE INTERACTION BETWEEN POSTAGE ACCOUNTING AND POSTAGE STATEMENTS In most mailing operations, the people who do the statements are not the same as the people who manage the postage. To give the latter group control over the former group, we allow the two parts of the program to interact. If a customer or job is placed on credit hold in the Job Maintenance menu, the user creating statements will get a warning to contact the accounting department before mailing the job. To enable this feature, run a program called PMWPB.EXE in your program path. Here you can setup “statement blocking options” which will prevent statements from being printed if there is a credit hold, an inadequate job balance to mail the job or both. You must have supervisor privileges to set these options. If a user is blocked from printing a statement, the statement can not be printed without an override password generated by PMWPB.EXE. This password is only

Postage Accounting Module User Guide
4
good to use on that job for that day. You can setup shortcuts to this program for all the people in the accounting department and they can generate this password if they login to this program with Manager’s privileges.

5
Implementation We recommend that you go through the process of entering transactions for a few sample jobs from beginning to end to become familiar with how the program works. When you are ready to go “LIVE” with the program, you can run the PWPRG.EXE utility from Windows Explorer to clean out your practice data. The supervisor password is required to run this utility which is a separate program from the Postage Accounting program. There are two ways to implement the program: Gradually – This approach would allow you to enter new jobs as they come in. This way you don’t have to worry about determining and entering beginning balances. When all of the old jobs that are were not tracked through the Postage Accounting Program have been completed, you would be fully implemented. Note: You would also continue to work with your existing system until all old jobs are complete or to the end of the first accounting period in which all jobs were handled by Window Book’s Postage Accounting program. All at Once – You can make a fast transition to the Postage Accounting program by coming up with a ‘switch over date’ and determining the balances for each job, client, permit, meter and stamp type as of the end of that date. You would then enter these as beginning balances in the Postage Accounting program as described below and only work with the Postage Accounting System. Doing the transition gradually is easier since you do not have to perform the opening balance step and users can become comfortable with the system over a longer transition period. It also allows you to run parallel with your old system without doubling all the work. If you made the “All at Once” transition, running parallel would be double the work since all job entries would have to be made on both systems.
ENTERING BEGINNING BALANCES 1. Create a Checking Account called “Opening Balances” by selecting the “Checking Account” option of the Checking Account Menu program. This will display a list of checking accounts. Press the INSERT key to add one. 2. Determine the balance for each active job for the switchover date. Create a receipt selecting the new “Opening Balances” checking account. Then select the client and create a distribution line item for each job including the balance for

Postage Accounting Module User Guide
6
each job. You will need to create a separate receipt for each client. 3. Determine the balance of each permit, stamp type and meter number on the switchover date and create a disbursement from the “Opening Balances” checking account for each permit, meter and stamp type. You can actually do this as one big disbursement if you would like. If somehow the balance of a permit is negative meaning you owe the USPS for postage, use a minus sign instead of an ENTER key or Tab key to end data entry of the amount. 4. Determine the balance of the postage checking account on the switchover date then create a “Miscellaneous Entry” for the postage checking account for that amount. If the balance is negative, you can put in a negative dollar amount. You will now have all of your opening balances in the system and you can always find out how these opening balances were determined by running reports off the “Opening Balances” checking account. All postage statements, receipts, disbursements and “applied postage” should be entered as they take place for all dates starting with the “switchover” date.
IMPORTANT NOTE: You may see beginning balances listed in the permit and job files. We recommend you DO NOT use these balances since you will soon loose the audit trail of where these balances came from.

7
Concepts and Assumptions To simplify data entry procedures and make the program more flexible, there are some concepts you should understand and some assumptions you should be aware of in the design of this program.
CONCEPTS: Please read. These are extremely important in understanding this program
“DO NOT TRACK” PERMITS: When you add a permit, you can mark it as ‘Do Not Track’. This is for client permits that are funded directly by the client without the money ever passing through the hands of the mailer. A good example is when the client pays for their own permit postage via CAPS. When a permit is marked “Do Not Track”, any statements made on that permit will not show in most accounting reports or be taken into consideration when closing a job. This will make your reports much more accurate and save you time when closing jobs since you will not have to account for any permit postage paid directly to the USPS by your client. JOB CLOSE METHOD: In your Client and Job file maintenance screens you will see the ‘Job Close Method’. This allows you to preset what you will do with any postage overpayment or underpayment at the end of the job. You can set this in the client file and that value will automatically be used when creating a new job but can be overridden so the predetermined job close method can be different for each job, even for a single client. The options are to refund the postage overpayment, transfer it to another job or ‘roll it into billing’ meaning we will transfer the balance to your services billing system (on paper). You can also indicate that postage will not be tracked at all with the Payment by CAPS option or that you are going to advance all postage funds so there will be no advance postage payment required: Advance Postage for Client. SPECIAL CLIENT AND JOB “ACCOUNTS” FOR HOUSE: When making purchases of meter postage, mailers often do not know who is going to be using the postage when the purchase is made. Postage Accounting makes use of a Job record named “HOUSE” and a client record named “HOUSE” for charging such purchases to. When the amount of postage used for a job is known, the mailer will transfer this postage from the “House” job and client to the job and client that actually used the postage. The job close process can do this for you if you do not do it sooner. SPECIAL CLIENT AND JOB “ACCOUNTS” FOR SPOILAGE: Postage Accounting can compare the postage documented on a postage statement for a

Postage Accounting Module User Guide
8
job and compare it to the postage actually affixed to the same job. The difference is usually spoilage. A client is setup with a code of SPOIL and a job record is setup with the job number of SPOILAGE. When postage reimbursements come in, they are posted as receipts to the same “Spoilage” Account. CREATING JOBS TO DEAL WITH POSTAGE THAT IS NOT APPLIED TO A SPECIFIC JOB: There are times where a check may come in for postage not earmarked for any particular job and times where at the end of the job, you wish to close the job and transfer the funds “to the client” to be used in a future job. What we recommend to handle both these situations is creating a Job record in the Job file that bears the Client’s Code and use this job as a ‘contra-account’ for holding these funds. You can also use the convention of create a job zero for each client for this purpose though we feel it is better to use the client code to avoid mistakes when transferring funds. BILL-TO vs MAILED FOR CLIENTS: When creating statements, WBI assumes the client whose name appears on the statement is the party responsible for postage payment. When the parties are different, such as in the case of an advertising agency, you can select a different ‘Bill-to’ client. In Postage Accounting the ‘client’ is the same as the ‘bill-to’ client on the statement and the accounting program’s ‘mailed-for’ client refers to the client whose name appears on the statement. The terminology is different because those creating statements are more concerned with the information that is to be printed by the statement and those in the accounting department are more concerned with who is paying the postage. The emphasis is different and so is our terminology to make this situation easier to handle in both departments. THE DIFFERENCE BETWEEN THE TWO BALANCES YOU SEE ON AN INQUIRY OR REPORT: Inquiries and Reports show two balances, the balance the way your client sees it (Client Payments less Postage Mailed) and the “available funds” which represents Client Payments less Postage Mailed less meter and stamp postage purchased but not used yet. This latter balance will only be of significance for metered and stamped jobs. CHECKING ACCOUNT “99”: A special checking account number is created by the Postage Accounting program to allow you to enter postage payments made by clients made payable to the USPS (Postmaster). The program must know about these receipts but they must not go into your checking account. Selecting checking account 99 in the receipts program keeps these funds out of your checking account and also forces you to indicate how the funds were used when the check was turned over to the USPS. The ability to both record the receipt and the use of the funds to buy permit, meter and/or stamp postage in the same step saves time and makes the Window Book Postage Accounting program a more efficient and effective way of managing this type of postage than generic accounting programs.

Concepts and Assumptions
9
VERIFIED POSTAGE STATEMENTS: There is a process available in Post Master and DAT-MAIL™ that lets you indicate whether the postage for a statement is final after you receive the round stamped statement back from the USPS. You can use the ‘blue check mark’ on the toolbar to check off non-consolidated statements or a ‘Verify’ button on the Consolidated Statement list to verify statements. We strongly recommend you do this since you do not want to close a job when its postage is not yet final. A subsequent correction to a statement will force you to re-open the job and redo the Job Settle and Close process.
ASSUMPTIONS
1. You will be entering postage statement data for all mailings on a timely basis. 2. You will be purchasing meter and stamp postage for a job or transferring it from the house to the job BEFORE you create your Postage Statement. If you create your Postage Statement first, the “available job balance” will not be correct since it has not reflected the postage purchase. If that balance is negative, just ignore it. It will be balanced when the job is closed. If you are able to buy postage for specific jobs or transfer it to the appropriate job when the postage is physically affixed, the second balance on the inquiries and reports will provide useful information on the ‘work in progress’
10
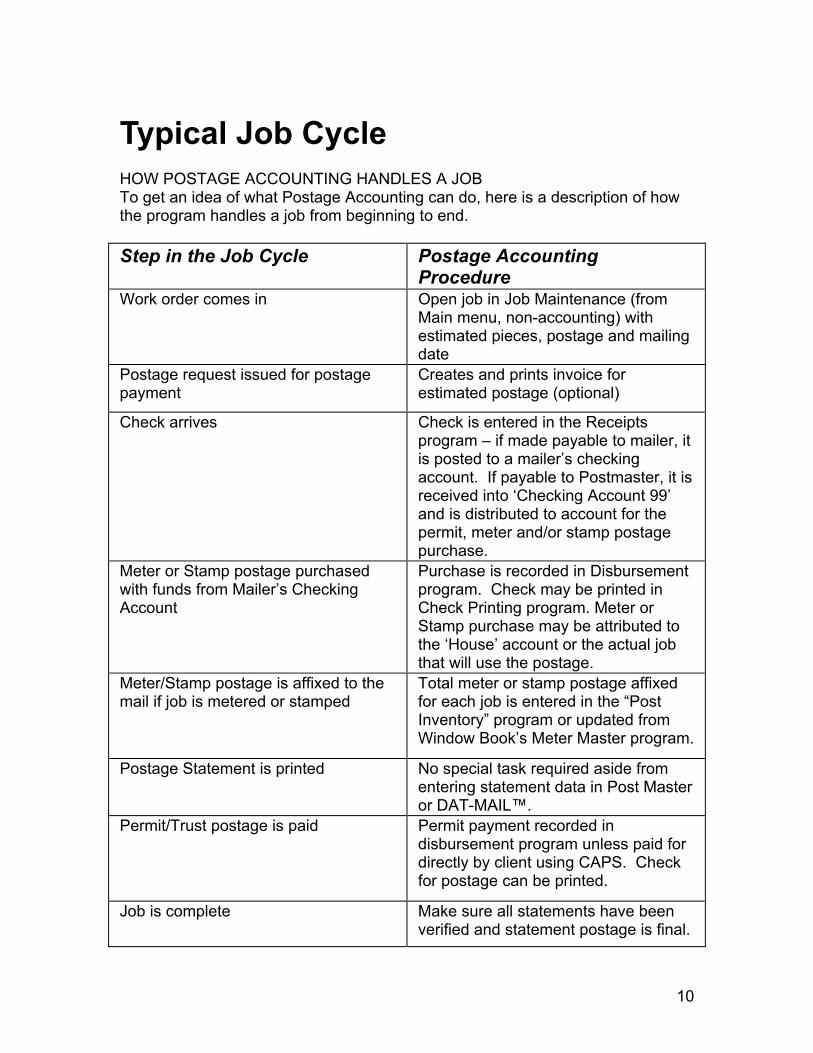
Typical Job Cycle HOW POSTAGE ACCOUNTING HANDLES A JOB To get an idea of what Postage Accounting can do, here is a description of how the program handles a job from beginning to end. Step in the Job Cycle Postage Accounting
Procedure Work order comes in Open job in Job Maintenance (from
Main menu, non-accounting) with estimated pieces, postage and mailing date
Postage request issued for postage payment
Creates and prints invoice for estimated postage (optional)
Check arrives Check is entered in the Receipts program – if made payable to mailer, it is posted to a mailer’s checking account. If payable to Postmaster, it is received into ‘Checking Account 99’ and is distributed to account for the permit, meter and/or stamp postage purchase.
Meter or Stamp postage purchased with funds from Mailer’s Checking Account
Purchase is recorded in Disbursement program. Check may be printed in Check Printing program. Meter or Stamp purchase may be attributed to the ‘House’ account or the actual job that will use the postage.
Meter/Stamp postage is affixed to the mail if job is metered or stamped
Total meter or stamp postage affixed for each job is entered in the “Post Inventory” program or updated from Window Book’s Meter Master program.
Postage Statement is printed No special task required aside from entering statement data in Post Master or DAT-MAIL™.
Permit/Trust postage is paid Permit payment recorded in disbursement program unless paid for directly by client using CAPS. Check for postage can be printed.
Job is complete Make sure all statements have been verified and statement postage is final.

Typical Job Cycle
11
Run the Job Billing History report for the client unless you plan to create settlement invoices/credit memos which will have this information on them. Run the Settle and Close Job program located on the Job Maintenance menu of the Accounting program. It will step you through all steps to reconcile the job. If you are tracking meter and stamp inventory, it will balance that too. Transactions can include transferring balances from one job to another, refunding over-payments or creating settlement invoices/credit memos which will be applied to the client’s services balance. Run the Master Reconciliation Report in the Job Report Menu to confirm successful closure.

12
Accounting Set Up Logging In The first time you login, you should do so as the SUPERVISOR (SUP is the login and password) after being sure all other windows are closed. You should be especially careful that the statement list is not open when you first login.
Upon logging into Postage Accounting for the first time, you will notice the following prompt:
Click the Next button to see your options shown below:

Accounting Set Up
13
Use the Insert button to define your Accounting Periods or, click the Close button to perform this action at a later time. You should then go immediately to the Postage Accounting Setup option at the bottom of the Accounting Menu. You will see a screen with three tabs:
General Tab
Postage Accounting Module User Guide
14
Log In at Startup: We recommend you select “Login at Startup”. This will force all Post Master or DAT-MAIL™ users to immediate login when the program is started. This only will force login at startup for Post Master users at the present time. Track Meter/Stamp Inventory: you must decide whether to track meter and stamp inventory by specific meters and stamp denominations. If you answer yes, you will be able to determine how much inventory is on hand for each meter and stamp type but you will have to post the usage of meter and stamp postage through a separate part of the program each day adding one extra step to your procedures. If you do NOT enable meter and stamp inventory control, we can tell you approximately the total value of all meter postage and stamp postage on hand. We recommend enabling meter and stamp postage tracking if metered or stamped postage exceeds 20% of the total amount of the postage you purchase. If this postage comprises 25% or greater, you should also look at the Window Book Meter Master program as a more efficient way of tracking your meter and stamp machine counts and updating the Postage Accounting files with the usage and spoilage data. Accounting Start Date: Set this date to the first date you wish to start using the Postage Accounting system. Statements created for prior dates will not get updated to the Postage Accounting system. This is very handy since you can create statements with a ‘Zero’ date for estimates or future mailings that will not show up in the accounting system until you change the date to a real date. It also prevents the editing of old statements from affecting any balances. Use Manual Settle and Close Process: This will force you to create all closing transactions manually instead of being guided through the process. It is highly recommended you should not check this off and use the assisted process instead.
Checking Tab Create and Select a Default Checking Account: There you must select a default checking account which should be your normal postage checking account (also referred to as an escrow or trust account). To do this:
A. Press the button next to the “Default Checking Account” field which will display a list of checking accounts. If you ever hold ANY of your client’s postage money in your own checking account, you must create the checking account for these funds.
Accounting Set Up
15
B. Press the Insert Button and enter descriptive information on your postage checking account. You do not need to put in account number, just the description like “Postage Checking”. Press OK to save C. Select your new checking account (usually 1) as your default unless your clients always make their checks payable to the USPS Postmaster in which case, select account 99 as your default.
Select a Check Format for Check Printing: You can then choose the check format you would like to use if you will have the Window Book Postage Accounting program print checks for you. If your current computer checks are of a format we do not support, send us a voided check and we will add support for this check in the next update. Select a Check Printer: If you use a dedicated check printer, or a dedicated tray in a printer for checks, select the Windows driver that has been setup to support check printing by pressing the Check Printer button and selecting that driver. If you do not make this selection, the checks will print on the Windows default printer for the workstation.
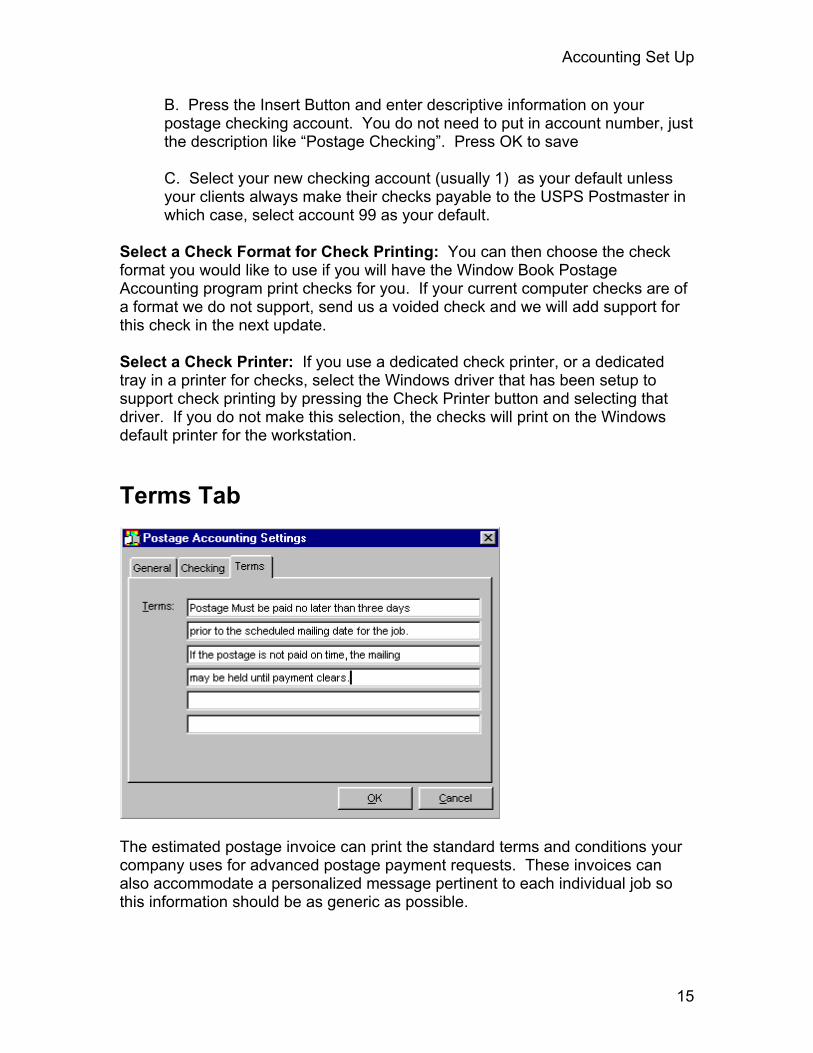
Terms Tab
The estimated postage invoice can print the standard terms and conditions your company uses for advanced postage payment requests. These invoices can also accommodate a personalized message pertinent to each individual job so this information should be as generic as possible.

Postage Accounting Module User Guide
16
Lastly, press the OK button to save and exit this screen after you have made all of your entries

17
Creating Jobs As soon as your salesperson or CSR receives an order, someone needs to setup the job in Post Master or DAT-MAIL™ as soon as possible. Not only does the information in the job record affect Postage Accounting but the creation of statements as well. To do this, go to the Postage Statements or Main Post Master File Menu and select the Job List. To add a new job, press the INSERT key and fill in the form that appears with the job number, client, job description, mailer (mailing agent) and bill-to client if different from mailing client. If you know estimated postage, pieces and estimated mailing date you may want to enter it. You also have an additional tab to set up any Statement Information, if known. You do not have to fill in any other information. Just press the OK button to save.
Once the job is setup, it will appear in the Credit Alert report which will let you know which jobs that are about to be mailed have not been paid yet. You can also determine in advance, you this job will be closed: Refund overpayment, Transfer to another job or ‘roll into billing’. You can also indicate if postage for this job will be funded directly by the client via CAPS or whether you plan to advance all the postage for this job without require advanced postage payment.

Postage Accounting Module User Guide
18
INVOICES FOR ESTIMATED POSTAGE (Optional) If your client needs an invoice to pay postage with, you can easily generate one with the invoicing option. Go to the Accounting; Invoices; Invoice Maintenance. The Client List will come up, Select or Insert a Client for this invoice. Next the Invoice Listing comes up:
Press Insert to add a new invoice. You can fill in the information on the Invoice tab, enter comments on the Comments tab then finally enter the estimated postage on the Detail tab.

Creating Jobs
19
You can describe the postage as a total by entering pieces and postage (skipping the rate) on the Detail tab and entering “Estimated Postage” as the description. If you wish to breakout the detail of the postage, enter the rate and the postage total will be calculated. In this case you would be more specific in the description like “BMC 3 Digit Automation Postage”. The comments area lets you enter up to half a page of comments and notes which will print on the invoice.
Importing Postage Statement Detail into Estimated Postage Invoice If statements have been created for the job you want to create estimated postage invoices for, you can easily import the information from one or more statements right into your invoice! Go to the Detail tab of the invoice tab and press the ‘Import Statements’ button.
You will be able to select whether you want to view regular, non-consolidated statements, consolidated statements or all statements. If you don’t know what

Postage Accounting Module User Guide
20
kind of statements you have for this job, select ‘all’.
You can highlight a regular or consolidated statement and press the select button to bring the postage into your invoice. If you select a consolidated statement, the totals for each rate are copied to the invoice. You will not get a breakout by entry point as this will be too long for the invoice. After you make your selection you will return to the invoice detail tab where the totals will be displayed:

Creating Jobs
21
Press OK to save invoice.
Printing Invoices Printing invoices can be done as a batch either by invoice number range, invoice date or job number. You can mail these invoices in standard double window envelopes. You must indicate whether you would like to print ‘settlement invoices’, ‘estimated postage invoices’ or both.

22
Receipts and Disbursements Receipts When you receive checks from clients either made payable to you or the USPS, post them in this program. You do not have to indicate a purchase type and permit number if the check was made payable to the mailer. Go to the receipts menu and select Receipts option. Press the Checking Account button to select the checking account you will be depositing the funds to. If the check was made payable to the USPS Postmaster, select checking account #99.
Enter the date, client’s check number and client at the top of the form and then press the Insert key to distribute the check amount to one or more jobs. You will get a form which will allow you to select a job that is being run for the client you had previously selected and enter an amount of the receipt. If the check is paying for postage for multiple jobs, you can create an entry for each job until the total of the check is distributed. When entering receipts for checks made payable to the mailer, you do not indicate how that postage will be used later to buy postage (ie. Meter, stamps or permit). You will later create a disbursement to purchase that postage.

Reciepts and Disbursments
23
If the client’s check is for payment to a job that has not yet been setup or to be kept on account for multiple jobs, you should apply it to a job setup for each client to hold client balances that are not applied to specific jobs. We recommend naming that job after the client code you use. Postmaster Checks: If the check is payable to ‘Postmaster’ and you are going to take it to the post office to make a postage purchase, you select checking account ‘99’ when entering the receipt. When you enter the detail information you will be asked to select whether you are buying meter, stamp or permit postage. If you are buying permit postage you will also be asked to select a permit. If you are tracking your Meter and Stamp Postage Inventory, you will be asked to select a meter or stamp type for your purchase.

Postage Accounting Module User Guide
24
Receipts Reports: We recommend printing the Receipt Journal Detail report each day you enter receipts in the system and filing as a hard copy audit trail of what you have entered.
DISBURSEMENTS If the mailing for this job is to be metered or stamped, you will likely need to purchase meter or stamp postage prior to the mailing of the job. If the customer has paid money into the mailer’s postage account, you would disburse this money through the Disbursement program. You would also use this part of the program to pay indicia (permit) postage for permit mailings or for the “upgrade” or “additional” postage required by metered and stamped mailings for which money was due. The good news is that the Disbursement program works a lot like the Receipts program.
Enter the disbursement date Select the check type: postage purchase or refund Enter the check number unless you would like the Postage Accounting program to print the check for you. If you will be using the Postage Accounting module to print the check, leave the check number blank.

Reciepts and Disbursments
25
If you have chosen to do a postage overpayment refund, you must select the client to whom the refund will be made (not shown above). Press the Insert Key to add a distribution line. You should select the job and indicate what kind of postage you are buying unless this is a postage refund. If it is a refund you are doing, you only have to select the job and enter the amount of the refund.
If you are buying permit postage, you must select a permit. If you are buying meter and stamp postage and have postage inventory tracking enabled, you must select a meter number or stamp type for your purchase. If you are purchasing multiple postage instrument types with this check you can add other distribution lines on the check until you have accounted for everything you are purchasing. Note on ‘Mailed for’: Each job is linked to two clients: The client who is paying the postage which is called ‘Client’ and who the client whose information appears on the statement which is called ‘Mailed for’. Most of the time they are the same but in some cases, like with advertising agencies they are different. Using the ‘House’ Account to buy Meter and Stamp Postage: Many mailers when they fund meters or purchase stamps don’t know who is going to be using this postage. If that is your situation, you should select the ‘House’ Job and Client when purchasing this postage. Later on, when you enter your physical usage (if meter/stamp inventory tracking is turned on) or when you close the job, the postage will be transferred from the ‘House’ account to the job that used the postage.

Postage Accounting Module User Guide
26
Printing Checks: If you want to print checks, go to the check writing menu option of the Disbursement Menu and print the check register. Next select the Print Checks option and enter the starting check number of the checks you have placed in the printer. You an also override the default check format you had indicated in the program setup. Reprinting Checks: If some of your checks get jammed or damaged, they can be reprinted by selecting the Reprint Check option. You would have to enter the beginning and ending check numbers you want to reprint then enter the new beginning check number. Other Disbursement Reports: We recommend printing the Disbursements Detail Report every day you enter receipts and filing it as a hard copy audit trail of the disbursements entered that day.
Other Disbursement Reports: We recommend printing the Disbursements Detail Report every day you enter receipts and filing it as a hard copy audit trail of the disbursements entered that day.

27
Statements You must enter your statement postage in the Postage Accounting program. This is the postage that is used to charge clients and can differ from actual postage if the mailer is marking up the postage. It is also used for reducing permit balances. You can enter statement postage two ways: creating postage statements in either DAT MAIL or Post Master or making an entry in the Miscellaneous Postage Entries program
The Miscellaneous Postage Entries program allows you to quickly identify the job and client, then put in the pieces and postage mailed without having to break it out by rate. You should accurately indicate how the postage is being paid. If you are creating Miscellaneous Postage Entries for a 3602-PR or 3600-P which was paid for with meter and stamp postage, you will have to create two miscellaneous entries to document this: one for the applied postage (meter or stamp postage affixed) and a second entry for the postage due. You should only enter the pieces in one of these statements and the total postage from the two entries should add up to the total postage. You may find it easier and more accurate to recreate the postage statement.

Postage Accounting Module User Guide
28
Permit postage paid never shows up on your client or job inquiries or reports since we assume that it will be the same as the permit postage documented by your statements. The disbursements you make for permit postage are used to add postage to the permit however and can be viewed in the Permit balance and activity reports.

29
Inquiries and Reports OK, you have entered receipts from your clients, purchase postage and entered statement postage. You should now be able to see what your client and job balances are. The easiest way to do this is to use the inquiries. You can go to the Job or Client Inquiry to see the activity of a client or job. Inquiries will show all transactions no matter their date or if they are made on a ‘do not track permit’. Reports will only show you detail for a defined date range and will usually omit any statement that was made on a ‘Do Not Track’ permit. Some reports can also be run so they only include verified statements as well. Inquiries do not make such distinctions.
There are two balances displayed at the bottom of the job and client inquiries. The balance on the left represents receipts vs. mailings which is the true balance as your client sees it. The balance on the right takes into consideration the ‘work in progress’ that is displayed in the meter/stamps column when you are mailing the job with metered or stamped postage. This is what we call the ‘available’ balance which subtracts any unmailed meter or stamp postage purchased for the client or job from the first balance. This can help answer the question of what funds are still available for postage purchase or mailing taking your meter and stamp purchases into consideration if they were made to the job or client or transferred from the ‘House’ account early in the job. When you do your Job Settle and Close, the two balances will end up being the same once inventory is accounted for.

Postage Accounting Module User Guide
30
Reports Another way to monitor a job is to print out a report and there are many to choose from. There are different categories of reports to choose from. Some of the reports will allow you to indicate that only ‘verified’ postage statements are to be included in any postage totals. A verified statement is one that has been ‘round stamped’ by the USPS and checked off as being final by the mailer. Most reports will omit postage statements paid for by permits marked ‘Do Not Track’. Here is a rundown of some of the reports and how they are used: Client Balance Report: (Client Report Menu) Lists all of your clients with an open balance and breaks this balance out by job. It could also be called a “Mailer’s Liability Report” since the balances displayed are liabilities until the mailings take place. You have two options when running this report. One will omit a breakout of each open job for each client, making this report very short and concise. The other will allow you to only include Verified Postage Statements. Job or Client Activity Reports: (Job and Client Report Menus) Lets you pick a single client or job and present a date range for which detailed activity will be displayed. All transactions prior to the starting date are summarized as starting balances. All transactions after the ending date are skipped as are statements made on Do Not Track Permits. Job or Client Period Reports: (Job and Client Report Menus) Similar to activity reports but prints for all clients or jobs. This can skip statements that are made on ‘Do Not Track’ permits but these reports will be rather long though they function as excellent audit trails for the period. Billing History Report: (Job and Client Report Menus) There are two versions of this report, one for a single job and another for all jobs that belong to a selected client. This report is similar to the activity report but contains only information that your client would be interested in. You can print this at the end of ta job and send it to your client. You also have the option to print statement detail (number of pieces mailed at each rate). Master Reconciliation Report: (Job Report Menu) This report allows you to reconcile all aspects of a job in one report. You can run it after the Settle and Close Job process see confirm the job has closed correctly. Invoicing Report: (Invoice Report Menu) This report lets you look at the invoices for a job vs. the payments received. If you use the invoicing program for estimated postage, it allows you to sort of run a limited receivables system from

Inquiries and Reports
31
the invoices billed. Settlement Journal: (Invoice Report Menu) This report will allow you to print a list of all settlement invoices for a given date range. A settlement invoice or credit memo is a document that transfers a job balance to a mailer’s billing system at the end of the job. This process is currently a paper one and this report is the easiest way to accomplish this. You can also just key in the settlement invoices/credit memos into your billing system as they are produced. The format of the settlement invoice/credit memo includes all of the mailing and payment activity for the job so it makes a good document to give your client. Spoilage Report – (Misc. Report Menu) This report is run for a date range and shows all meter and stamp spoilage entries vs. receipts on the spoilage account. The difference for the period is an expense. General Ledger Summary (Misc. Report Menu) – This report will accumulate the postage accounting transactions by what most mailers would track for G/L reporting purposes.

32
Postage Inventory If you have elected to track meter and stamp inventory, you have one more step to perform before the job is done. You must post the exact amount of postage used by your meters and stamp applicators for each job. This will be used to take down the meter and stamp inventory. We do NOT use postage statement postage for this purpose since it almost never will be exactly the same as what you have applied. The difference is spoilage. If you have elected to track meter and stamp inventory, you have one more step to perform before the job is done. You must post the exact amount of postage used by your meters and stamp applicators for each job. This will be used to take down the meter and stamp inventory. We do NOT use postage statement postage for this purpose since it almost never will be exactly the same as what you have applied. The difference is spoilage.
To post the meter and stamp postage used, go to the Inventory Menu, select Postage Usage. You must select a job and it will display a list of previous postage usage records for that job. Press the Insert key to add a new record and enter the date, select a meter or stamp type then enter the pieces and postage. If you are applying stamps, you can enter the quantity used and the denomination and the postage total will calculate automatically. If you purchased the meter or stamp postage being recorded as used with the house account, check the “Transfer from house Account” checkbox. If you check this, not only will the inventory be reduced but we will AUTOMATICALLY create a transfer of the postage from the house account to the job. NOTE: Mailers that do a lot of metering and stamping can use WBI’s METER MASTER to post the postage usage by job and meter or stamp machine based on meter counts. This program replaces the spreadsheets typically used by most mailers to reconcile meter and stamp postage and can post the summarized

Postage
33
information into the Postage Accounting files automatically.
TRANSFERS The transfer program allows you to transfer receipts, disbursements or applied postage from one job or client to another. The most common uses for this feature are:
1. Transferring the balance of a job from a completed job to a new job instead of refunding the postage over payment or crediting it in the client’s services invoice. (Transfer a Receipt) 2. Transferring permit postage from one permit to another when you fund a client permit from a house permit (Transfer a Disbursement) 3. Transfer unused meter and stamp inventory that was purchased for a specific job back to the “house” account. (Transfer a Disbursement) 4. Transfer meter and stamp inventory that was purchased for the house account to the job that used it. (Transfer a Disbursement)
Nearly all of these transfers can be created for you automatically during the Job Settle and Close. Doing the transfer is easy once you understand the type of transfer you are making. If the transfer affects the client balance, it is a Receipt Transfer. If it affects a meter, stamp or permit balance, it usually involves a Disbursement Transfer. Applied postage transfers are rare and they will only affect inventory but not the funds used to buy that inventory. These adjustments have no affect on the client and job balances.
Postage Accounting Module User Guide
34
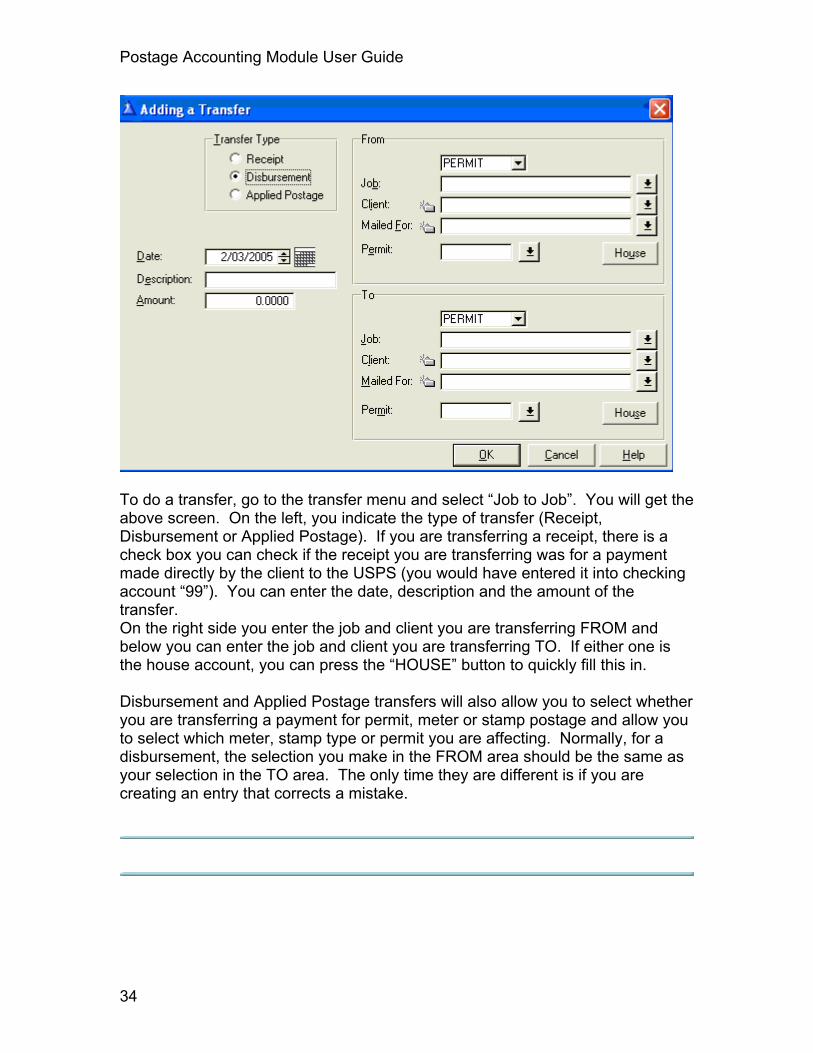
To do a transfer, go to the transfer menu and select “Job to Job”. You will get the above screen. On the left, you indicate the type of transfer (Receipt, Disbursement or Applied Postage). If you are transferring a receipt, there is a check box you can check if the receipt you are transferring was for a payment made directly by the client to the USPS (you would have entered it into checking account “99”). You can enter the date, description and the amount of the transfer. On the right side you enter the job and client you are transferring FROM and below you can enter the job and client you are transferring TO. If either one is the house account, you can press the “HOUSE” button to quickly fill this in. Disbursement and Applied Postage transfers will also allow you to select whether you are transferring a payment for permit, meter or stamp postage and allow you to select which meter, stamp type or permit you are affecting. Normally, for a disbursement, the selection you make in the FROM area should be the same as your selection in the TO area. The only time they are different is if you are creating an entry that corrects a mistake.

35
Closing Jobs You have now mailed the job, you must zero its balances in order to close it. The Settle and Close process will first settle the job by zeroing the customer balance (Receipts less Mailing Statement Postage). If there was an overpayment of postage you can transfer it to another job, refund it to the client with a disbursement or create a Settlement invoice or credit memo with the “Roll into Billing” option. After settlement, all postage purchases are reconciled to mailing statement postage and physical inventory. If you are tracking meter/stamp inventory and more inventory was used than mailed, a spoilage transfer is made as well. Before you Settle and Close the job by selecting the Settle and Close Job option from the Job Maintenance Menu, we recommend you have verified all statements for the job. If you have not done this you will get a warning when you run the Settle and Close Job program but we do allow you to continue. When all mailings for a job are complete, you must run a process that closes the job. If you engage in the process of verifying that each postage statement is correct from round stamped statements returned by the USPS, you should make sure that all of your statements are verified before proceeding with a Job Settlement and Close. There are two distinct stages in this process:
1. Settlement – involves zeroing the balance between client postage payments to the mailer or USPS and mailing statements you have created. 2. Close – involves accounting for all postage purchased and physically used. If you have elected to track meter and stamp postage inventory this process is more involved than if you are not tracking postage inventory.
In prior releases of the Postage Accounting program, the Settlement and Close processes were separate. In the current release of DAT-MAIL™, these processes are launched from a single screen and consist of a series of ‘tests’ which will drive a number of actions. You can press the CANCEL button on any transaction dialog to stop this process if you wish to create transactions manually. When you press Settle and Close button again, the tests are repeated and when all tests pass, the job will close. Here are the tests that are performed and possible actions: Settlement – looks at receipts vs. mailing statement postage. Depending on the Job Close Method specified in the Job file, you can create a disbursement to refund an overpayment, transfer funds to/from another job or create a settlement

Postage Accounting Module User Guide
36
invoice (or credit memo) to transfer the balance to your billing system. Permit Funding – examines whether all of the permit postage mailed has been paid for. Statements paid for by permits marked ‘Do Not Track’ (usually client permits directly funded by the client) in the permit file are ignored. If not all postage is accounted for, you will be prompted to create a disbursement to purchase permit postage. Physical Postage Usage – determines if all meter and stamp postage that has been mailed been accounted for in terms of physical postage usage*. If not enough postage usage has been entered, you are prompted to record physical postage usage. Spoilage – if more postage was physically used than mailed, a spoilage transfer is made*. This will allow you to view accumulated spoilage and receipts of spoilage recovery payments in a new report. Meter/Stamp Funding – has all meter/stamp postage (including spoilage if applicable) been purchased or transferred in from the House account.
* Meter /Stamp inventory control must be enabled if for these tests to run.
In each case, the program will pop up a screen to allow you to create the appropriate transactions all while in the Job Settle and Close process.
JOB SETTLEMENT
When the program calculates a job balance it looks at all payments received from clients for that Job, whether payable to the mailer or payable to the USPS and all statements mailed on permits that are NOT marked ‘Do Not Track’. If all the statements for a job were done on a client permit that was marked do not track and no advanced postage payments have been received, the job will automatically be settled and closed when you press the Settle and Close button. If jobs involved mailings using permits that are not marked ‘Do not Track’ or involve any meter or stamp postage, adjustments or other transactions are usually needed to settle and close a job. There are three ways to bring the job balance to zero at the end of a job:
1. Refund the postage overpayment to the client 2. Transfer a postage over or under payment to/from another job

Closing Jobs
37
3. Transferring the over/underpayment to your billing system to become part of your services Accounts Receivable.
You can pre-define which of these you will be able to do at the end of the job in your Job File Maintenance Screen. You can also setup defaults for each client so when you create a new job it will use these defaults which you can override on a job by job basis. If you do not choose to make a selection, the Refund, Transfer and ‘Roll into Billing’ options will all be available to you when you Settle and Close a job. When you press the button to Settle and Close a job, you will be able to pick whichever option you have pre-selected and if you did not pre-select a job close method, you will have all applicable options. If the client owes you money, you will not be able to do a refund. When you press the Settle and Close button on the Settle and Close Job browse, if the postage mailed is not equal to the postage received, you will be able to indicate how the left over funds (or funds still due) will be dealt with. In this example, the Job Close Method in the Job file was set to ‘Roll into Billing’ which forces the creation of a settlement invoice. All you would need to do is indicate the date you want on this invoice and press the OK button.

Postage Accounting Module User Guide
38
Settlement Invoice: A settlement invoice can also be a credit memo if the client paid more postage than was mailed. You can print the settlement invoice from the Invoicing Section of the Invoice menu. This invoice also included a complete accounting of all funds used in the mailing. Since the passing of this data to a different A/R system is not currently an electronic process, the settlement invoices or credit memos would have to be rekeyed into your billing system so they can affect your A/R balances and show up on statements. You can also print the Settlement Invoice Journal by date range to get a report of all Settlement Invoices produced for any date range, sorted by client. This will make the re-entry of this information into your billing system easier.
JOB TO JOB TRANSFER
If your client runs a lot of jobs, you can transfer any funds left over into another job. If the client pays you an amount that is not specifically earmarked for a job, you can create a job to hold such unapplied funds and receive money to that job. At the end of the job you would transfer money from this holding account to the job that used the funds. The Job Close Method of “Transfer to Another Job” will

Closing Jobs
39
force this transfer but you can do this during the Job Settle and Close process without going to the Transfer program. You will see this dialog appear if you are going to do a transfer: All you would need to do is to confirm the transfer date and select the job you wish tot transfer the funds to. If a job is done for multiple clients, be sure to select the job that is associated with the correct client.
If there was more postage mailed than received, you will see the dollar amount as a negative amount and the transaction will move funds from the job selected below to this job.
REFUND OVERPAYMENT

Postage Accounting Module User Guide
40
If you the mailer has not used all the funds received to perform mailings and no other Job Close Methods were pre-defined, you can create a disbursement for the overpayment right in the Job Settle/Close screen. You should select a checking account and enter the check number for this disbursement, if known. If you leave the check number blank, you can use the Check Writing feature in the Disbursements Menu to print the check.
CLOSING THE JOB
At this point, the settlement phase of the Job Close process would be completed, no matter if you created a settlement invoice, did a job transfer or refunded an overpayment. It is time to move onto the process of accounting for your disbursements and to make sure that every cent of postage mailed has been accounted for. If you cancel out of the next screen, you will noticed the job status has gone from Active to Settled. CHECKING TO MAKE SURE THAT ALL PERMIT POSTAGE USED HAS BEEN PAID.
Closing Jobs
41
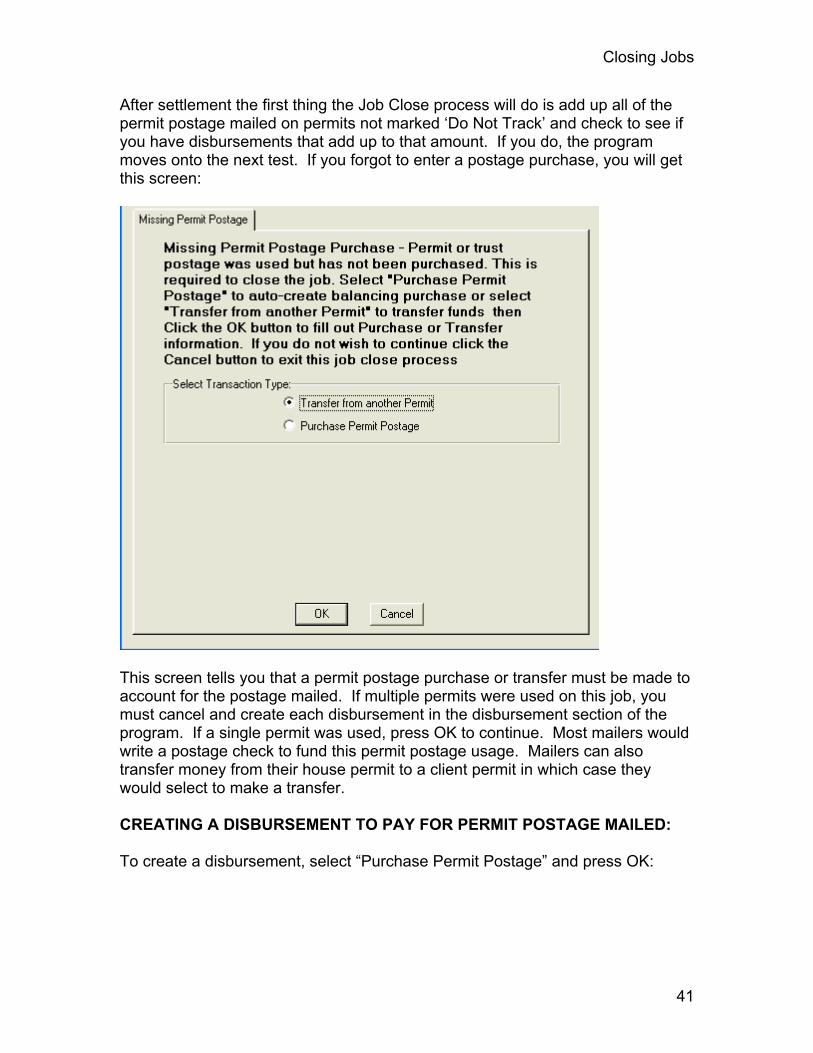
After settlement the first thing the Job Close process will do is add up all of the permit postage mailed on permits not marked ‘Do Not Track’ and check to see if you have disbursements that add up to that amount. If you do, the program moves onto the next test. If you forgot to enter a postage purchase, you will get this screen:
This screen tells you that a permit postage purchase or transfer must be made to account for the postage mailed. If multiple permits were used on this job, you must cancel and create each disbursement in the disbursement section of the program. If a single permit was used, press OK to continue. Most mailers would write a postage check to fund this permit postage usage. Mailers can also transfer money from their house permit to a client permit in which case they would select to make a transfer. CREATING A DISBURSEMENT TO PAY FOR PERMIT POSTAGE MAILED: To create a disbursement, select “Purchase Permit Postage” and press OK:

Postage Accounting Module User Guide
42
To create the disbursement, confirm the date and checking account number and enter a check number if you are not going to print the check from the Disbursements Check Writing menu. TRANSFERRING MONEY FROM ONE PERMIT TO ANOTHER TO FUND A MAILING: To transfer funds to the permit from another permit, select ”Transfer from Another Permit” and press OK. You will get this transfer screen:
Choose the permit you wish to transfer the money from. If it is a house permit, leave the job and client as “House” but if the permit belongs to a client, you should select a job that belongs to that client or use the ‘Holding Job’ that was setup for that client.

Closing Jobs
43
PERMIT OVERPAYMENTS: If you put too much money into either a house or client permit, you will get this message:
Press the OK button at the bottom of the message to get the transfer screen
If the permit was a house permit you should transfer the ‘ownership’ of the postage inventory you have overpaid from the job back to the ‘House’ Account. The from and to permit numbers of the transfer would be the same so the actual permit balance would not be affected by this transfer. If the permit belongs to a client and the funding of the permit was done directly by the client and entered as a ‘post master check’, you might want to transfer the funds to the ‘holding job’ for unapplied funds that you setup for that client. You could then use them for the next mailing.

Postage Accounting Module User Guide
44
If you paid put money on a client’s permit or transferred money from your permit and did not use all of this postage in the mailing, you may get an authorization letter from your client to transfer these funds back to your house permit. If so, you can transfer the money, not only to the house job, but to your house permit as well by selecting it in the ‘Transfer To’ section.
IF METER/STAMP INVENTORY CONTROL IS DISABLED
METER/STAMP FUNDING CHECK After we account for the permit postage mailed and purchased, we must do the same for meter and stamp postage. If no purchases of meter or stamp postage have been found, the program will prompt you to either create a disbursement to buy this postage or transfer it in from the ‘house’ account. When many mailers buy meter postage, they don’t know who it is for so they charge it to the house account. If this is what you do, you should select to do a transfer from the house account: Transfers You need to simply confirm the transfer date and press OK. .

Closing Jobs
45
Disbursement for Meter and Stamp Purchase
If no postage purchase was ever recorded for this job and you wish to create a disbursement, just select to “Purchase Meter (or Stamp) Postage

Postage Accounting Module User Guide
46
You would confirm the amount, enter the check number (unless you want to use the program’s check writing capabilities to print the check) and make sure the checking account selection is correct, then press OK. Your job will then be closed. Please see the notes at the end of this section to discuss what happens with a closed job.
IF METER / STAMP INVENTORY CONTROL IS ENABLED
If meter/stamp inventory control is enabled, the program will make sure that all meter and stamp postage mailed is accounted for by physical usage entries. If physical usage entries have already been made, we will balance them to the statements and create spoilage adjustments to account for the difference between the meter and stamp usage physically used for a job and what meter and stamp postage actually appears on the statements.

Closing Jobs
47
In this case, we had 178.03 of meter postage mailed but no corresponding physical usage posted. You would confirm the date it was metered or stamped, select the meter or stamp number from the pull-down and confirm the amount that was physically used. In many cases, more postage may have been physically used than mailed so you can change the amount to reflect this. This would then trigger a spoilage adjustment. You will get a chance to confirm the spoilage adjustments if there is more postage physically used than mailed:

Postage Accounting Module User Guide
48
METER/STAMP FUNDING CHECK
After we have accounted for the physical usage we need to account for the purchase of this postage. If no purchases of meter or stamp postage have been found, the program will prompt you to either create a disbursement to buy this postage or transfer it in from the ‘house’ account. When many mailers buy meter postage, they don’t know who it is for so they charge it to the house account. If this is what you do, you should select to do a transfer from the house account: Transfers You need to simply confirm the transfer date, select the meter or stamp type to transfer funds to and the amount. The amount displayed would be the total for all meters and stamps for the job so if you need to do a number of individual transfers, you would change the amount and repeat the process.

Closing Jobs
49
Meter/Stamp Purchases You would select the meter number or stamp type you are purchasing postage for, confirm the purchase date, enter a check number if known (if you don’t want to print the check from the Postage Accounting program), confirm the purchase amount and checking account number, then press OK to create the transactions.

Postage Accounting Module User Guide
50
CLOSED JOB PROPERTIES
Your Job should now be closed. Closed jobs will not be listed on Client or Job Activity reports that show all jobs. You can confirm your job is in balance by running the Job Master Reconciliation Report. Closed jobs can not be selected to create new statements or accounting transactions. If you need to do so, you must ‘Un-close’ the job from the Job Maintenance Menu and must run the Settle and Close process again to re-close the job. Running the Master Reconciliation Report for the Job To verify your job closed correctly, go to the Reports Menu of the Accounting program and select the Job reports. This report will display all transactions for this job and show you what transactions you may have omitted. In particular, be sure that your disbursements list all meter and stamp postage purchases AND permit postage purchases. Since permit postage purchases do not show up on other job reports or the job inquiries, it is possible to forget to record these postage purchases. The settle and close process should have detected such a condition and prompted you to make a disbursement or transfer to account for that postage. If these purchases are recorded correctly and you have meter or stamp postage associated with this job, this report will show you what your spoilage should be and what meter or stamp inventory transfers will need to take place.
REOPENING A JOB

Closing Jobs
51
If for some reason a mistake was detected in any transaction after a job is closed, you can re-open this job and make any adjustments you want then repeat the Job Settle and Close process as long as you have not purged the job.
This report indicates we must make a $2.00 Applied Postage transfer from Job BAL039 to “SPOILAGE” and a $52.00 Disbursement Transfer from Job BAL039 to House to set unposted spoilage and unused inventory to zero. This must be done before the job is closed.

52
Other Monthly Procedures General Ledger Report: This summarizes the financial transactions that would affect the General Ledger. Accounts are named and not numbered at the present time though in the future this report will have a much different format. Entering Miscellaneous Charges in Checking Account Maintenance: If there are charges appearing in your bank statements other than postage transactions, they should be entered in the Miscellaneous Entries in the Check Maintenance menu.
Checking Account Detail Report – run on checking account 98 will tell you what transactions need to be transferred from this Postage Accounting System to the mailer’s normal billing system for any date range selected.
DELETING AND PURGING STATEMENT DATA If you want to remove old postage statements, do not delete them since it will affect the accounting system. Instead you can go into the Post Master Utility Menu and Purge them. The Statement Purge program does not affect the accounting information.
53
Postage Accounting FAQs
On Job Recap report a voided statement that was re-entered manually did not deduct from the customers account but did show on the recap job 48970
Voided statements should show up on these reports with a zero postage amount. If you recreated the statement, you should see that there as well but with the correct postage amount. If that is not what you are seeing we will need more information to investigate this problem.
How can a client's account be corrected when a statement has been generated and posted?
It all depends on what needs to be corrected. If it was a statement, you could 'unverify' the statement, make the change, and re-verify to repost. If you do that, the original posting date (the same as the verification date) will be changed to a new date, so this could affect your new activity reports when we make them sensitive to posting date by moving the statement from one posting period to another. We have a feature planned that will let you easily set the verification (posting date) when verifying statements. In any case, you can always see the original posting date on the Containers tab of the statement, since you must delete the verification date and press backspace, then tab, in order to wipe it out, as part of the process to 'unverify' the statement.
When a client mails a job with full rate (1st class) and stamps for meter usage has been posted why doesn't job recap report show this?
If it is not showing, it is because nobody has create either a 3600, 3606 or 'Misc' Statement entry with the correct job and client.

Postage Accounting Module User Guide
54
When a job mails under the house permit why doesn't the usage show up on the Master Reconciliation. Report?
The Master Reconciliation report only lists transactions for a single client and job. If you have not done the Job Reconcile and Close, you probably never funded the permit for that job, either by making the disbursement to purchase the postage (which can be done by the Settle and close process). If you funded the house permit under another job (like "house"), you would have to do a disbursement transfer to fund the permit for that job. There Job Settle and Close process also does not deal with permit-permit transfers which you would have to make by doing a disbursement transfer as well. Support for both of these scenarios is being added to Job Settle and Close this week. For now you will need to do a manual transfer using the transfer option of the menu.
When jobs are setup why doesn't certain information fill in automatically on the statements?
Job info will automatically appear on the statements including Job, Job description and client information. You should see this on the Statement Generation screen in DAT-MAIL™. If you do not, chances are the job number in the Mail.dat file does not match the job number that has been setup in advance, or that the job has NOT been setup in advance at all. If you press the job lookup button and find the proper job, you can retrieve that data which will be used to populate the statement when it is generated.
Why does postage get pulled from client account by statement as they are generated and why does a job that stamps/meter the additional postage get pulled also and which statement gets posted. Also, why does it generate an additional statement?
The Postage Accounting program considers the balance to be Funds Received by the mailer (or paid directly to the USPS by client) LESS postage statement postage. Purchases and physical usage get balanced to statement postage. The Settle and Close process takes care of most and soon all calculations and adjustments that would have to be made to do this 4 way

Postage Accounting FAQs
55
reconciliation (receipts, mailed postage, postage instrument usage, disbursements). The additional statement is produced per USPS regulation on non-consolidated metered and stamped statements whose balance are paid for by an ordinary permit. If you are using a dedicated permit that is just used for this purpose, you should indicate that the payment method for the additional postage is TRUST, not Permit. In this case you will not have to create the additional statement and different rounding rules will apply per USPS Accounting Procedure Handbook regulations (postage due rounded up to the nearest cent).

56
EFI
Job Settlement Requirements: A Job cannot be settled unless… Sum of all Payments to Mailer and USPS (All par:rec_status = 4 and par:rec_status = 5)
Equals The Sum of all Statements for the Job (par:rec_status = 7)
If Not EQUAL Possible Solutions are… If all Job Payments to Mailer
and USPS > Job Statements (Over funded JOB, Mailer owes money to Client)
Available Options To Fix depend upon the Job Close Method selected for the JOB…
Close Method is not set 1. Transfer Balance TO
another JOB 2. Issue Client Refund
disbursement 3. Create negative
(money due client) Invoice
Close Method is Refund Overpayment
1. Issue Client Refund disbursement
Close Method is Transfer to Another Job
1. Transfer Balance TO another JOB
Close Method is Roll into Billing
1. Create negative (money due client) Invoice
Close Method is Advance Postage for Client
1. Create negative (money due client) Invoice
Close Method is Payment

EFI
57
By Client CAPS 1. No options available
Job will be settled anyway regardless of the unbalance
If all Job Payments to Mailer
and USPS < Job Statements (under funded JOB, money is owed for JOB )
Available Options To Fix depend upon the Job Close Method selected for the JOB…
Close Method is not set 1. Transfer Balance
FROM another JOB 2. Create positive
(money due for Job) Invoice
Close Method is Refund Overpayment
1. Create positive (money due for Job) Invoice
Close Method is Transfer to Another Job
1. Transfer Balance FROM another JOB
Close Method is Roll into Billing
1. Create positive (money due for Job) Invoice
Close Method is Advance Postage for Client
1. Create positive (money due for Job) Invoice
Close Method is Payment By Client CAPS
1. No options available Job will be settled anyway regardless of the unbalance

Postage Accounting Module User Guide
58
Note: Although this is not offered in the auto settlement process the following done before settlement will solve the problem as well: Generate a “Receipt for a Check paid to USPS (use Checking account 99)” or a “Receipt for a Check paid to Mailer” In the amount of the unbalance

EFI
59
Job Close Requirements: A Job cannot be closed unless…
PERMIT Statements not balanced The Sum of all Permit Statements par:rec_status = 7 and (par:TRANS_TYPE = 'P')
Equal The sum of all Permit Postage Purchased and all Checks paid to USPS for Permit (par:rec_status = 6 and par:rec_status = 5) and (par:TRANS_TYPE = 'P')
If Not EQUAL Possible Solutions are…
If Permit Statements > Permit Payments (under funded Permit)
To Fix… (Generate a Disbursement for a Postage Purchase or Generate a Receipt for a Check paid to USPS) to a Permit for the unpaid balance
If Permit Statements < Permit Payments (over funded Permit)
To Fix… Transfer the over funded Permit balance to another Job/Permit or HOUSE/Permit
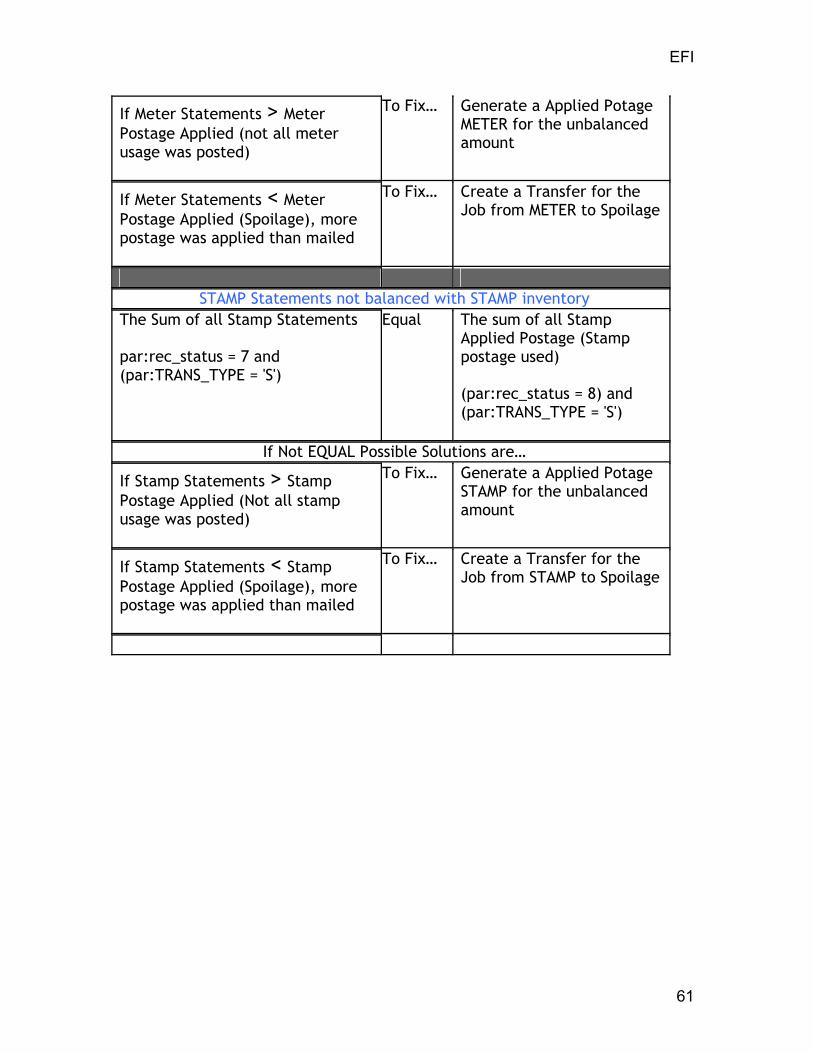
METER Statements not balanced
The Sum of all Meter Statements par:rec_status = 7 and (par:TRANS_TYPE = 'M')
Equal The sum of all Meter Postage Purchased and all Checks paid to USPS for Meter (par:rec_status = 6 and par:rec_status = 5) and (par:TRANS_TYPE = 'M')
If Not EQUAL Possible Solutions are…
If Meter Statements > Meter Postage Purchased (under funded Meter)
To Fix… (Generate a Disbursement for a Postage Purchase or Generate a Receipt for a Check paid to USPS) to a METER for the unpaid balance or Transfer from

Postage Accounting Module User Guide
60
HOUSE to the under funded METER
If Meter Statements < Meter Postage Purchased (Over funded Meter)
To Fix… Transfer the over funded METER balance to another Job/METER or HOUSE/METER
STAMP Statements not balanced
The Sum of all Stamp Statements par:rec_status = 7 and (par:TRANS_TYPE = 'S')
Equal The sum of all Stamp Postage Purchased and all Checks paid to USPS for Stamps (par:rec_status = 6 and par:rec_status = 5) and (par:TRANS_TYPE = 'S')
If Not EQUAL Possible Solutions are…
If Stamp Statements > Stamp Postage Purchased (under funded Stamp)
To Fix… (Generate a Disbursement for a Postage Purchase or Generate a Receipt for a Check paid to USPS) to a STAMP for the unpaid balance or Transfer from HOUSE to the under funded STAMP
If Stamp Statements < Stamp Postage Purchased (Over funded Stamp)
To Fix… Transfer the over funded METER balance to another Job/STAMP or HOUSE/STAMP
NOTE the following Rules only apply when stamp/meter inventory tracking is turned ON
METER Statements not balanced with METER inventory The Sum of all Meter Statements par:rec_status = 7 and (par:TRANS_TYPE = 'M')
Equal The sum of all Meter Applied Postage (Meter postage used) (par:rec_status = 8) and (par:TRANS_TYPE = 'M')
If Not EQUAL Possible Solutions are…
EFI
61
If Meter Statements > Meter Postage Applied (not all meter usage was posted)
To Fix… Generate a Applied Potage METER for the unbalanced amount
If Meter Statements < Meter Postage Applied (Spoilage), more postage was applied than mailed
To Fix… Create a Transfer for the Job from METER to Spoilage
STAMP Statements not balanced with STAMP inventory
The Sum of all Stamp Statements par:rec_status = 7 and (par:TRANS_TYPE = 'S')
Equal The sum of all Stamp Applied Postage (Stamp postage used) (par:rec_status = 8) and (par:TRANS_TYPE = 'S')
If Not EQUAL Possible Solutions are…
If Stamp Statements > Stamp Postage Applied (Not all stamp usage was posted)
To Fix… Generate a Applied Potage STAMP for the unbalanced amount
If Stamp Statements < Stamp Postage Applied (Spoilage), more postage was applied than mailed
To Fix… Create a Transfer for the Job from STAMP to Spoilage

Postage Accounting Module User Guide
62
Usage and Spoilage Records How to Create Usage records for a job: Step 1: Under Post Master Accounting Setup you must a have inventory control turned on. This will activate the Meter/Stamp inventory-> Applied Postage menu Step 2: Add Applied Postage Usage Records (Meter/Stamp inventory-> Applied Postage menu) for Meter and/or Stamps for a job (This creates PAR rec_status = 8 Applied Postage/Usage Records)
How to create spoilage: Step 1: Under Post Master Accounting Setup you must a have inventory control turned on. This will activate the Meter/Stamp inventory-> Applied Postage menu Step 2: Create a statement(s) for a job for X $’s Step 3: Add Applied Postage Usage Records (Meter/Stamp inventory-> Applied Postage menu) for Meter and/or Stamps for the same Job for an amount > the sum of the statements for that job Spoilage = Total Mailing Statements –(Total M/S Usage applied + Total Permit Statements)

63
Index A Accounting
Set Up ....................................... 12 Accounts Receivable .................... 35 C Check Printing............................... 12 Check Writing................................ 35 CHECKING TO MAKE SURE THAT
ALL PERMIT POSTAGE USED HAS BEEN PAID....................... 35
Close Job...................................... 35 CLOSED JOB PROPERTIES ....... 35 CLOSING THE JOB...................... 35 D Default Checking Account............. 12 Disbursement.......................... 32, 35 Disbursement Transfer ........... 32, 35 Disbursements Check Writing menu
.................................................. 35 Disbursements Menu .................... 35 I IF METER/STAMP INVENTORY
CONTROL IS DISABLED.......... 35 Inventory Menu ............................. 32 J Job Close Method......................... 35 Job File Maintenance Screen ....... 35
Job Master Reconciliation Report .35 Job Settle ......................................35 Job Settle/Close ............................35 L Log In ............................................12 M Master Reconciliation Report ........35 O Over/underpayment.......................35 P Permit Funding..............................35 Postage Usage........................32, 35 R Receipt Transfer............................32 Receipt, Disbursement ..................32 REFUND OVERPAYMENT...........35 REOPENING.................................35 S Settle .............................................35 Settlement .....................................35 Settlement Invoice.........................35 Settlement Invoice Journal ............35 T Terms Tab.....................................12 Transfer.........................................32 TRANSFERS ................................32