post graduate course in - clixplatform.tiss.edu
TRANSCRIPT

This coursebook belongs to:
Name: ............................................................................................................
Class: ..............................................................................................................
Section: .........................................................................................................
Reflective Teaching with ICT
S03 Interactive Science Teaching
Post Graduate Course in
Teacher Coursebook(Basic Astronomy)
CLIx subject teamPrayas SutarRafikh ShaikhShamin PadalkarSheetal ChopdeShrey Pareek
Academic mentorJayashree Ramadas
Academic supportArchana CorreaJaya MahaleJayashree AnandScot OsterweilJudith Perry
Copy editorsAparna Tulpule
EditorsShamin Padalkar
TranslatorsAshutosh BhakuniDr. K. SharmaDr. Srinivas ChennuriPreeti MishraRavi KantSheetal Chopde
Production teamJaya MahaleJayashree AnandSheetal Suresh
Video development supportGitanjali SomanathanShiva Thorat
Platform developmentBrandon MuramatsuCole ShawHarshit AgarwalJeff MerrimanKathleen McMahonKedar AitawdekarKeerthi K.R.DKirky DeLongMrunal NachankarNagarjuna G.Padmini SampathPrachi BhatiaRachana KatkamRamjee SwaminathanSadaqat MullaSatej ShendeSumegh Paltiwale Saurabh Bharswadkar
Tool developmentAshutosh MestSadaqat MullaTanvi Domadia Vinaya Tripathi
Platform content authoring Archana Correa
Publication teamRachna Ramesh KumarSunita Badrinarayan Usha Iyengar
Cover design and formattingRamesh Khade
Special Thanks
Samir Dhurde, Sonal Thorve, Maharudra Mate, Ashok Rupner, Anish Mokashi, Glenda Stump, O. P. Sinha and studentsfrom Kendriya Vidyalaya, Southern Command, Pune.To the students and teachers of all the schools where we piloted our modules.To all the teachers, copyeditors and Rajasthan and Telangana team for their time and effort in the revalidation of content.
A Note for Teachers
Of the many familiar everyday natural phenomena, the motion of celestial bodies across the sky is perhaps the grandest and most significant to human life. The widespread interest of young people in popular astronomy makes it a particularly promising topic for school education. Yet problems in students’ and adults’ knowledge of basic astronomy are also well documented. Research shows that the heliocentric model of solar system is a difficult notion for students as well as for adults all over the world even after relevant instruction. Explaining even simple daily phenomena using an appropriate part of this model can be a challenging task. Various studies report that proposing faulty explanations for occurrence of day and night, seasons, phases of moon, eclipses, etc. is common among school students and among adults. The basic astronomy module helps students to construct correct mental models and explain phenomena based on them. It closely follows the syllabus from most textbooks at Grade 8 or 9.
This document is prepared with the objective of supporting you, the teacher, in your journey through the Basic Astronomy module. This module has three units, each unit has a number of lessons, and each lesson has activities. There are 12 lessons in all, of which 3 are digital lessons (to be conducted in a computer lab) and 9 are classroom lessons. The classroom lessons are offered as a part of the student module for the sake of completeness, but you will be conducting those lessons in the classroom. So the material in those lessons is actually meant for you. Students only need to access digital activities in the computer lab. It is absolutely essential that you are thoroughly familiar with the student module and know a little more than what is covered in this handbook.
For each lesson in the student module, there is a corresponding lesson for teachers in this document. It consists of videos of the activity and a few notes for you. The videos will help you to understand how to conduct the activities in the lesson and the notes provide justification of the activities and help you to acquire deeper understanding of astronomy. Immediately after reviewing a lesson in the student module, please read the corresponding lesson in the teacher module.
Section 1 of this document provides some basic information (structure of the module, timeline and requirement from you). Overall pedagogic approach and some notes about the digital activities in this module are provided in Section 2. Sections 3, 4 and 5 are dedicated to Units 1, 2 and 3 of the student module.


Table of Contents
Basic Astronomy 1Section 1: Basic Module Information 1Section 2: Pedagogic Approach 4Section 3: Notes for Implementing Student Module Unit 1 - The Earth 8
3.1 Lesson 1: The Spherical Earth 83.2 Lesson 2: Rotation of the Earth 103.3 Lesson 3: Digital Activity 1 123.4 Lesson 4: Revolution of the Earth 12
Section 4: Notes for Implementing Student Module Unit 2 - The Moon 144.1 Lesson 1: Motion of the Moon 144.2 Lesson 2: Phases of the Moon and Eclipses 144.3 Lesson 3: Digital Activity 2 164.4 Lesson 4: Moonrise and Month 17
Section 5: Notes for Implementing Student Module Unit 3 - The Solar System and Beyond 18
5.1 Lesson 1: The Solar System 185.2 Lesson 2: Scaling the Solar System 185.3 Lesson 3: Digital Activity 3 205.4 Lesson 4: Introduction to the Universe 20


1
Basic AstronomyTeachers’ Handbook
Section 1: Basic Module Information
1.1 Prior KnowledgeThese are the things your students must know before you start teaching this module.Maths
1. Concept of unit2. Measurement (km, m, kg, g, s)3. Ratio
Geometry1. Angle2. Circle (radius, diameter, curvature, tangent)3. Basics of coordinate geometry (For example, there are three orthogonal axes.)
Astronomy1. Basics of gravitation2. The Earth (north and south poles, equator, northern and southern hemispheres, tropics of cancer and capricorn)
Science1. Chemical elements2. Basic optics (For example, light travels in a straight line.)
1.2 Structure of the ModuleUnit 01: The Earth Pre-Assessment Lesson 1: The Spherical Earth 1.1 Introduction: The Earth and the Globe 1.2 Activity : Positioning a Human Being on the Globe (model) 1.3 Cardinal Directions 1.4 The Horizon
Lesson 2: Rotation of the Earth 2.1 Activity 1: Geosynchron 2.2 Activity 2: Apparent motion of the Sun (Role Play) 2.3 Activity 3: Apparent Motion of the Stars (Role Play) 2.4 Activity 4: Stationary Position of the Pole Star (Role Play)
Lesson 3: Digital Activity 1 3.1 Animation: Rotation of Earth 3.2 Activity : AstRoamer: What's the Time?
Lesson 4: Revolution of the Earth 4.1 Activity 1: Revolution of the Earth Around the Sun (Role Play) 4.2 Activity 2: Change in Path of the Sun over the Year (Gesture) 4.3 Activity 3: Changes in the night sky over the year (Role Play) Glossary
Unit 02: The Moon Lesson 1 : Motion of the Moon 1.1 Introduction: Characteristics of the Moon 1.2 Activity 1: Motion of the Moon Around the Earth (Role Play) 1.3 Activity 2: The Sun-Earth-Moon System (Role Play)
2
Lesson 2: Phases of the Moon and Eclipses 2.1 Introduction 2.2 Activity 1: Phases of the Moon 2.3 Activity 2: Inclined Orbit of the Moon (Gesture) 2.4 Food For Thought
Lesson 3: Digital Activity 2 3.1 Animation: Motions of the Moon and the Earth 3.2 Activity: AstRoamer: Moon Track 3.3 Phases of the Earth
Lesson 4: Moonrise and Month 4.1 Introduction 4.2 Activity 1: Changes in the Time of Moonrise (Role play) 4.3 Activity 2: Motion of the Moon with respect to Stars (Role play) Glossary
Unit 03: The Solar System and Beyond Lesson 1: The Solar System 1.1 The Sun 1.2 The Planet 1.3 Activity : Revolution of planets (role play)
Lesson 2: Scaling the Solar System 2.1 Activity : Relative sizes of planets and distances in solar system (model) 2.2 Minor Planets 2.3 Satellites 2.4 Asteroids 2.5 Comets
Lesson 3: Digital Activity 3 3.1 Animation: Solar System 3.2 Activity : AstRoamer: Planet Trek
Lesson 4: Introduction to the Universe 4.1 Stars 4.2 Activity : Parallax (gesture) 4.3 Galaxies 4.4 Think! Glossary
Student Feedback Survey Post-Assessment Credits
1.3 Expected timelineTwelve hours of digital activity, nine hours of self-study and fifteen hours of implementation are assigned for this module.
1. 1 week: Observations2. 2 weeks: Observations + Student Module + Teacher Module3. 3 weeks: Implementation in the Classroom4. 1 week: Assignment5. 1 week: Feedback
Thus, the entire module is planned for eight weeks.

3
RequirementsPlease make sure the following material is available:
1. Assign a notebook (which we will call a journal) for this module. Assign one page to make notes for every day.
2. You should have access to a computer that has USB port, audio and video player and an internet connection.3. You should have a smartphone to receive the Telegram message you will get every day.4. You will need the following material:
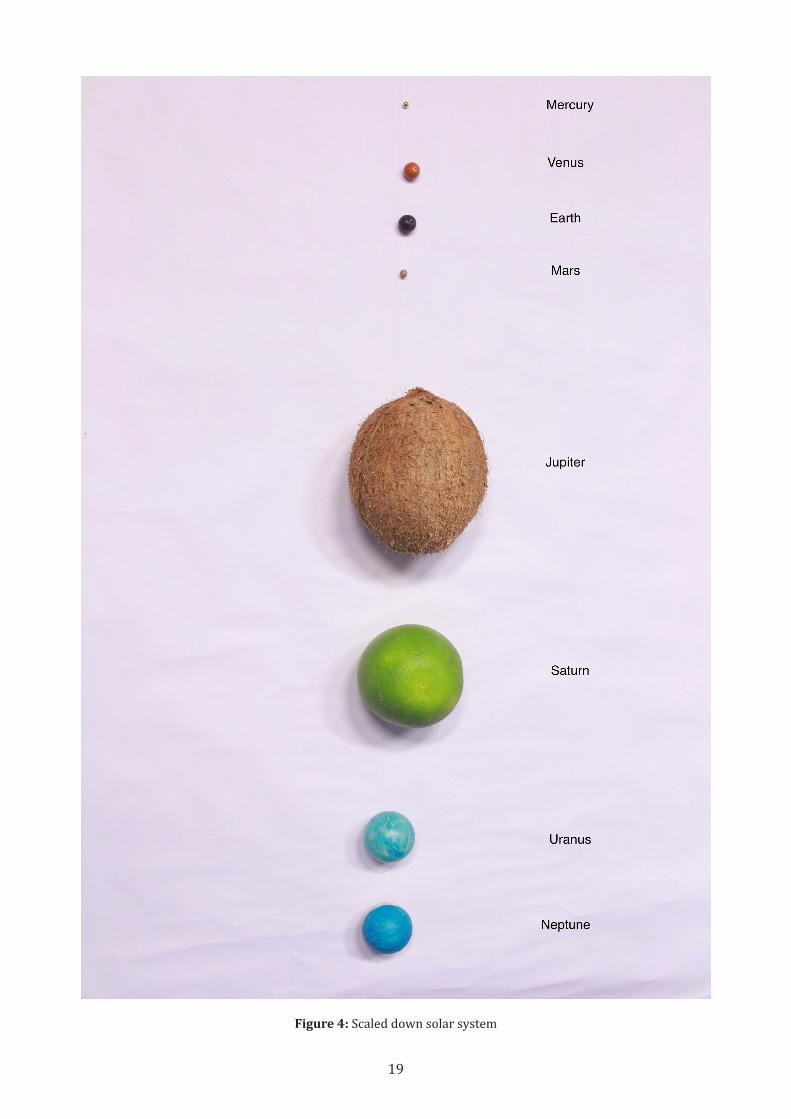
a. A Globe, kneaded dough and few match sticksb. A lemon, a stiff stick or a cycle spoke and light torch/bulbc. A measuring tape, a chalk, a small bead (diameter ~ 0.4 cm), two marbles (diameter ~
1cm), a small bead (diameter ~ 0.5 cm), a coconut (diameter 11 cm), a big orange (diameter ~ 9 to 10 cm), two table tennis balls (diameter ~ 4 cm).

4
Section 2: Pedagogic Approach
2.1 Pedagogic PillarsThis module is designed by keeping the three pedagogic pillars in mind.
1. Collaboration: You might notice that most activities in the student module are to be done in pairs or groups. We expect that two students will use one computer when they are in the computer lab for the digital lessons. We have deliberately designed the first part of the digital game (AstRoamer: What Is the Time?) for two students to answer alternately in the hope that it will set the trend for the rest of the activities. Do encourage your students to carry out activities collaboratively and discuss among themselves.Interestingly, collaboration is inherent in astronomy because astronomy requires observations from different locations on earth and at different times over a long period of time. A single person cannot make all the observations. This is why telescopes are placed all over the world and observations from all of them lead to discoveries. You might know that the 2017 Nobel Prize for physics went to the discovery of gravitational waves (which is an area in astronomy). Although the prize was given to three people who came up with the idea of building a certain kind of observatory1, the winners acknowledged the contribution of a thousand scientists all over the world who collaborated in this project!Of course, collaboration is not unique to astronomy. One of the central practices in science, intended to ensure the validity of new discoveries, is peer review and replications of an experiment. Fields other than natural sciences also use different forms of collaboration. So, it is important to teach students to work in groups of different sizes. They should be able to contribute to the group and at the same time, gain from the experience of working in the group.
2. Learning from mistakes: The core of the scientific method consists of proposing a theory, making predictions and testing them against observations. If the prediction does not match the observations, changes are proposed in the theory and again the cycle is repeated. Knowledge is being formed only because there are some mistakes in prediction.If a student learns the correct answers, takes pains to memorise them and correctly reproduces them in the exam, there is certainly some value to it. This student has learned some facts of science. But, a student has learned essence of science when she comes across a question, tries to find out the answer by observation or experimentation, takes a risk to express it (because she doesn’t know whether her answer is correct), exposes her ideas to the criticism of her peers, recognises the shortcomings of her answer pointed out by others and keeps pondering it. Making our own mistakes is a better way to learn science than memorising the correct answers given by someone else.
Most activities in the Astronomy module do not require students to write anything. If they make mistakes during role-play activities or discussions, they can revise it. We hope that this will make theenvironment more open to exploration and less threatening. In the digital game, students get twochances to answer. They get feedback if the first attempt is incorrect. This helps them to revise their answer the second time. More importantly, if they do not get it correct the second time, they are given an explanation of the correct answer. They can play the game multiple times and eventually learn!
3 Authentic learning: In basic astronomy we help students understand the explanations of commonplace astronomical phenomena such as occurrence of day-night, seasons, phases of the moon and so on. These explanations constitute scientific literacy. Many of us, as a child, have wondered why do days get shorter around November-December or why does moon’s shape change? Students first need to do careful observations and understand the pattern in these phenomena (e.g. seasonal changes through year or phase cycle), which is why at primary grades it is important to encourage draw and write about what they observe and students to keep systematic notes. Most school syllabus introduce the heliocentric model of the solar system and explanations of the astronomical phenomena based on it during high-school grades. From different experiments it is known that Grade 8-9 students are capable of understanding the basic explanations (one of the difficult areas is great distances and masses in
1 LIGO: Laser Interferometer Gravitational-Wave Observatory. Two such observatories were in the USA at first. Similar observatories with different names have been built in different parts of the world. One such observatory is proposed in India to increase the accuracy of observations.

5
astronomy). These explanations in the school must be related to student’s experiences in life. In India, there are many references to astronomical phenomena in our lives. Several festivals are related to astronomical phenomena (e.g. Makar Sankranti, Eid, Budhha Pornima). Farmers in many parts often mark start of the monsoon with starting of Mrigashīrsha Nakshatra and fishermen can predict the tides based on the phase of the moon. We need to help students to connect this indigenous knowledge to what they learn in the school (We have tried to do this in Part 2 of the game - AstRoamer: Moon track). Unfortunately, indigenous knowledge also constitutes astrology. In the module we have have made a couple of attempts to communicate the scientific reason to a certain astronomical phenomena, and challenged the astrological claims regarding them. But in the classroom, you may come across astrological beliefs more often than that. Do encourage your students to spell out them instead of ignoring them. And then ask students to think about them scientifically and make an informed decision about whether they want to believe it or not! We trust your discretion in such situation!
2.2 Classroom ActivitiesSuppose you are planning a family trip or school trip of about 2–3 days to a place where you have not been earlier. What do you do? You read about the place, decide which spots to visit, study the map, plan the order of visiting the selected spots, enquire about modes of travel, find out the precautions you need to take, book the tickets, pack your bags and so on. When you consult a map and plan your trip, you are visualising an unknown space (i. e., the place you plan to visit) with the help of a visual tool (a map) and thinking about it. Similarly, when you pack your bag, you take a bag of appropriate size and arrange your things in a such a way that the most things fit in the available space. In both these cases, you are applying ‘visuospatial thinking’.
Visuospatial thinking is an ability found in everybody, and we need it to carry out many of our routine activities, such as using appropriate pots to cook or driving or arranging our tables or cupboards or rooms. Many fields such as painting, sculpting, architecture, fashion designing and sports heavily rely on visuospatial thinking. Recent research has shown that visuospatial thinking plays a crucial role in science and engineering. A chemist must know how atoms are arranged in a particular molecule; surgeon must know how the internal organs are arranged in the human body to perform a surgery; an automobile engineer must know how gears are interlocked in a vehicle; a geologist must know the structure of the earth; an astronomer must know the model of the solar system and galaxy; and so on.
When students learn a simple thing such as that the earth is spherical and that human beings live on its surface, they need to apply visualisation. They cannot see the earth as spherical because all that the human eye can see is flat. We can show students a globe (which is a visual tool just like a map), but that is not enough, because the globe is not same as the earth. Students need to imagine the real earth, with oceans and atmosphere and all other things on it. They need to add properties such as gravitation and magnetic forces to create a mental model of the earth.
Visuospatial thinking can be supported through various tools. Concrete models (such as a globe) are one of them. The other common tools are photographs or diagrams. But diagrams are two dimensional and static. They are also abstract in the sense that some details are left out and some conceptual information is added. For example, in a diagram of the earth, we leave out all the irregularities on the surface, the colours, etc. but add the axis of rotation, the equator, etc. This poses difficulty in comprehending diagrams. Imagine the leap of imagination required to visualise a huge three-dimensional sphere rotating around its axis and the consequences of the rotation such as the occurrence of day and night from seeing a small circle on a diagram with a line indicating an axis and an arrow indicating movement!
In this module, we have used yet other tools to promote students’ understanding: gestures and role-play activities. You may have noticed that while giving directions to a particular location, people often use gestures with phrases such as ‘take a left’, ‘turn a little to the right’ (indicating the angle by hand), ‘cross the roundabout’ and so on. Interestingly, people use these gestures even when they are talking on the phone when the listener cannot see them, which means that they are using gestures to aid their own thinking as much as to communicate. Thus, gestures are useful in spatial thinking. We have used selected gestures

6
such as tracing the path of the sun across the sky in different seasons or using the right-hand thumb rule to remember the direction of rotation of the earth. Please encourage your students to use gestures. They might provide a clue to what the students are thinking. For example, if a student indicates the shape of the earth by moving a pointing finger in a circular manner, that student is probably thinking in two dimensions. But if the student uses a hand as if holding a ball, then she is definitely thinking in three dimensions.
Astronomy poses a particular challenge in visuospatial thinking. We learn the models (e.g. of the earth or the solar system) as if we were outside the model, but we experience the phenomena we attempt to explain (such as the occurrence of day and night). The frame of reference for the model and the phenomenon is not the same. This problem can be addressed using role play. For example, if you ask a student to rotate around herself, she would notice how objects in her field of view appear to move from one side to another. Here, she is enacting the model but observing a phenomenon. There are several such role plays in the module. (Videos for all of them are included in this unit.) Some role plays aim at only mimicking the model and not explaining any phenomenon. They too are useful in understanding simultaneous motions of various celestial bodies, the dynamic aspect of which is difficult to convey through diagrams. We strongly encourage you to get all students to participate in the activities instead of demonstrating them. The understanding students gain by doing the activities is far more robust than by learning through any other kind. You may have to make extra efforts such as taking students to an empty lobby or on the playground, setting some self-discipline rules such as not talking or making noise and not laughing if someone makes a mistake. But it is possible to do all the activities and it is very satisfying to get students to do them.
Finally, students are asked to draw what they have learned. We have given the exemplar diagrams in the module for your reference. But avoid giving readymade diagrams to students. Ask them to draw what they have learned. For example, while explaining the seasons, you can draw the earth on the board, then ask students to take turns to draw different parts of the diagram (sun rays, the axis, the equator, the angle of the rays falling near the equator and so on). If one student makes a mistake, ask another student to correct it. Please pay more attention to the conceptual understanding reflected in the diagram than to the neatness of the diagram. Don’t bother to use a compass to draw a circle every time. Ask students to draw it freehand, and you will notice that they will draw a very good circle after a little practice. Ask them to draw diagrams at every opportunity, ask them to draw diagrams as homework. It is a great success in learning if your students can express themselves through diagrams.
2.3 Digital ActivitiesThere are three digital lessons in the module. Each lesson consists of two parts. The first part has animations that students are supposed to watch carefully, and the second part has an interactive game. Here are the details in brief.Unit 1: The EarthLesson 3
a. Animation of the rotation of the earth viewed from different angles. This will help students to reinforce the mental model of the rotation of three-dimensional earth.
b. AstRoamer: What ss the Time? This first level of the game is based on the rotation of the earth.Unit 2: The MoonLesson 7
a. Animations of the sun-earth, earth-moon and sun-earth-moon systems. You might find the actual orbit of the moon quite interesting!
b. AstRoamer: Moon Track: This is the second level of the game designed to explain the phases of the moon.
Unit 3: The Solar SystemLesson 11
a. Interactive animation of the solar systemb. AstRoamer: Planet Trek: This is the third level of the game designed to familiarise students with
the properties of different planets.

7
It is important that students themselves play the game, make mistakes and learn. Again, you will have to make extra efforts to make batches, take students to the computer lab and help them use computers whenever necessary. But you will see the value in it, and students will enjoy playing the game!
2.4 Some Important Notes
Assessment: Unit 1 starts with pre-assessment. Please ask your students to take this test on the computer individually. This will help you to identify how much our students already know. That should be the starting point of your instruction. You need to hand-hold your students while they take the tour in space (i.e. go through this module). A similar test is given as a post-assessment in Unit 3. It will help you to identify how much our students learnt. It will also help us to gauge the success of our module. So please ask your students to be honest and respond with their true answers. These marks do not count anywhere and are not a judgement of their (or your) ability.
Glossary (list of difficult words and their meanings) is given at the end of every lesson. A link is also provided on the top of each page. Students can click on it and check the meanings of difficult words. The words are arranged alphabetically (like dictionary). Clickable letters are provided on the top of the glossary page. Students can click on any letter and go to the page of that letter directly.
Useful digital tools: There are several computer software programmes and mobile device applications for amateur astronomers. They typically give the names and positions of stars and celestial objects at a given time and sometimes include information about them. The following two digital tools are very useful (and they are free of any charge).
1. SkyView: This mobile app gives the name of any celestial object you point your phone at. It can even give the names and positions of the objects in the sky during daytime; you just have to allow it to use your location.
2. Stellarium: This computer software can show the sky as seen at any time and from anywhere in the world. If you click on one of the celestial objects, it also gives information about that object. You can download it from here: http://stellarium.org
Both of these tools are fun to play. Check them out.
The banner image of Unit 3 is a photograph of a part of the Saraswati Supercluster, which was identified by Indian scientists in July 2017. The Saraswati Supercluster is one of the oldest and largest cosmic structures known to us. It has at least 43 clusters of galaxies and is 250,000 light years away. It is called Sarawsati after the extinct river mentioned in ancient Indian texts. For more information, please visit: https://en.wikipedia.org/wiki/Saraswati_Supercluster
This web image is selected to honour the Indian astronomers who made this important discovery. We also thought that students will be motivated to learn astronomy if they knew that Indian scientists too contribute to important discoveries in this field and students could aim at such a position in the future!

8
Section 3: Notes for Implementing Student Module Unit 1 - The Earth
Learning Objectives: Students should be able to1. Explain the occurrence of day-night and the apparent motion of the sun and the stars from east
to west in relation to the rotation of the earth.2. Understand that the earth is spherical, that it rotates around itself and revolves around the sun.3. Explain the occurrence of the seasons and changes in the night sky over the year.
In Unit 1, we mainly revise some of the basic concepts such as the shape and motion of the earth. In Lesson 1, we discuss the spherical shape of the earth and its consequences such as that different parts of the sky are visible from different parts of the earth. In Lesson 2, we elaborate on the rotation of the earth and how as a consequence, all celestial bodies appear to move across the sky from the east to the west. Lesson 3 is a digital lesson. In Lesson 4 we discuss the revolution of the earth around the sun and its consequences such as the occurrence of the seasons and the changes in the night sky.
3.1 Lesson 1: The Spherical Earth
Learning Objectives: Students should be able to1. Determine directions (up, down, north, south, east and west) at a given location on the earth.2. Integrate gravity into the spherical model of the earth.3. Understand that different parts of the sky are visible from different locations on earth and draw
the horizon as seen at a given location.
Many research studies have shown that students come to class with preconceptions about the natural world. One common preconception is that the earth is flat, or like a disc. This is because that is how the surface of the earth looks at most places on earth. Sometimes, even adults do not believe that the earth is spherical and human beings live all over the surface of the earth. They feel that human beings will fall off the earth and that the water in the oceans will spill. They think this because gravity is not integrated into their mental model of the earth.
When students are exposed to the scientific model of spherical earth (without reference to gravity), they integrate their pre-conceptions with this information and form new models such as that the earth is spherical but we live inside that sphere. Some students think that the earth could be partially flat from upper side (like a puri) where people live. These are called ‘synthetic models’.
It is important that our students construct the correct mental model of earth if they are to understand the rest of basic astronomy. So, even if some part of the content in Unit 1 is covered in lower grades, we encourage you to implement it in the classroom. It will be good revision for your students and an opportunity for correction to those students who may have alternative conceptions.
Introduction: The Earth and the Globe
Learning Objectives: Students should be able to1. Understand that the earth is spherical.2. Understand the differences between the earth and the globe.
The globe is a model of the earth and not the earth itself, just as the matchstick figure is not a human being but a model of a human being. Many a times, students think that a model is a replica of reality, just the scale is different. This can generate misconceptions among students. For example, the globe is usually hollow, so students who think that it is a faithful replica of the earth may think that the earth too is hollow.Students must understand that any representation is an abstract version and represents only some aspects of the original. A model has strengths and limitations. A concrete model is typically three-dimen-sional and can be made realistic, but it is difficult to transform and hence difficult to use to solve prob-lems. On the other hand, a diagram can be suitable to solve a problem but it is two-dimensional and static,

9
which poses difficulty for students in visualising the three-dimensional, dynamic earth.Activity 1: Positioning a Human Being on the Globe (model)Video: https://youtu.be/8EwKm3R06LU
Learning Objectives: Students should be able to1. Determine up and down at any given location on the earth.2. Understand that there is no absolute up and down in space, so the globe need not be held at any particular orientation. (The axis need not be inclined, and the north pole need not be up.)3. Erect human beings on the earth.
Students often see the globe on a stand with its axis inclined by 23.5. They need to understand that the globe is positioned with an inclined axis assuming that the sun is in the horizontal plane. It is just a convention to position the globe with the north pole up and the south pole down. There is no inherent up and down direction in space. We can just as well hold the axis horizontal if we consider the sun to be above the earth (as shown in Figure 1). I find this orientation much easier to imagine.
Figure 1: Representation of the Earth where its axis is horizontal
Cardinal DirectionsLearning ObjectivesStudents should be able to identify cardinal directions at a given location on earth.
Cardinal directions play the role of an axis in determining positions and trajectories of astronomical objects. In the horizontal coordinate system, the position of a star is usually described by altitude and azimuth. The angle above the horizon is called ‘altitude’. And horizontal angle from North is called azimuth (North is considered ‘0o’).

10
The HorizonLearning Objectives: Students should be able to
1. Know that the sunrays falling on the earth can be considered parallel2. Draw horizon at a given location of the earth
Even if the sun emits light in all directions, sunrays falling on the earth can be considered parallel. We often see the sun and sometimes we see beams of rays coming from clouds which do not appear parallel. So it is hard to believe that sun rays falling on the earth can be parallel. But, because the Sun is very far away as compared to diameter of the earth, the angle subtended by any two rays falling on the Earth is very small (Figure 2). So they can be considered parallel. That is why, at a given point of time, on a flat ground, shadows created by sun rays fall in same direction (are parallel). However, direction of shadows change over large distances because of curvature of the earth.
We make similar assumptions for rays coming from other stars as well, because they are even farther away than the sun. It is one of the most important piece in explaining many astronomical phenomena and it can never be stressed enough. Please find games of optics where your students can verify that the sun rays are parallel.
The horizon is an imaginary boundary between the sky and the earth. At any time, we can see only the sky above the horizon, so it is a frame of reference for all astronomical observations made from the earth. Since diagrams are two dimensional, we draw a line to show the horizon. In reality, it is a ring. The horizon is a very important concept but is missing in most textbooks. Please help your students to understand the horizon.
Figure 2: Diameter of the Earth is small as compared to the Sun-Earth distance. The angle between sun rays falling on the Earth is very small, so they can be considered parallel.
3.2 Lesson 2: Rotation of the Earth
Learning Objectives: Students should be able to1. Explain the apparent daily motion of the sun, stars etc from east to west.2. Understand the rotational motion of the earth.
Rotation is one of the important spatial operations. Although it seems easy, ‘mental rotation’ is known to be difficult, especially when the objects to be rotated are of irregular shapes. Students sometimes confuse spatial operations ‘rotation’ and ‘reflection’. Moreover, students often confuse the axis of rotation with the axis of symmetry, which need not coincide. For example, in a clock, the hands rotate around an axis which is at one of their ends. It is an interesting exercise to ask students to figure out the axes of rotation of different rotating bodies (a fan, a door etc.) or of parts of our body that can rotate (neck, hands etc.)
Activity 1: GeosynchronVideo: https://youtu.be/p_lHLqTWf48
Learning Objectives: Students should be able to1. Determine approximate local time at any location on earth given the direction of sunrays.2. Understand that at any time, half of the earth is lit and half of it is dark.3. Determine the direction of earth’s rotation (which is anticlockwise as seen from above the north pole).
A geosynchron is a globe with its axis parallel to the earth’s axis. You know that the earth’s axis points towards the pole star. So, the axis of the globe must also be in the north-south direction and pointing

11
towards the pole star. At any given location on earth, the pole star is seen at an angle equal to the latitude of that location. (Please measure the angle of the pole star and check this!) The geosynchron remains parallel to the earth as the earth rotates on its axis and revolves around the sun. Hence, day and night, the direction of shadows and the seasons are the same on the real earth and on this “parallel earth”.
Activity 2: Apparent Motion of the Sun (Role Play)Video: https://youtu.be/XqLhZxlb9Lo
Learning Objectives: Students should be able to 1. Determine approximate local time (midnight, sunrise, noon and sunset) at a given location on earth.2. Explain apparent motion of the sun.
When asked to explain day and night, students sometimes say that they occur because the earth revolves around the sun. So, it is better not to refer to revolution at this point. If you do, please make sure that students understand that rotation, and not revolution, is responsible for the occurrence of day and night.
For many students, this will be the first time they will engage in role play. This is a simple role-play activity, but as we proceed through the module, the complexity will increase. Make sure you make some rules right in the beginning to maintain discipline in the class. For example, tell students not to make noise or cross-talk and to follow the instructions carefully. If a particular student misbehaves, have that student sit out one activity. Tell students that if they do not exercise self-discipline, you will not be able to continue the activities.
Activity 3: Apparent Motion of the Stars (Role Play)Video: https://youtu.be/NtXQbyFr_N8
Learning Objectives: Students should be able to 1. Explain the apparent motion of the stars from east to west as seen from earth.2. Understand that the stars are present in the sky during the day but are not visible due to the brightness of the sun.
Students often fail to notice that stars appear to move from the east to the west during the night. If possible, ask students to verify this by doing an observation. Ask them to identify a bright star towards the east in the evening and ask them to observe its position every two hours. Since all the stars rotate from east to west, it appears as if the entire dome of the sky is slowly rotating, which is very interesting to watch. Amateur astronomers can often tell the time at night just by looking at the positions of stars, just as we can tell the time during the day by looking at the position of the sun in the sky.
Activity 4: Stationary Position of the Pole star (Role Play)Video: https://youtu.be/3KdXldXF9hI
Learning Objective: Students should be able to explain why the pole star appears to be at a fixed position.
Please make this observation yourself and encourage your students to do this observation. Identify Polaris using the SkyView app in the evening. Observe its position every two hours and try to determine whether it appears to move.
The star Polaris, which is 433 light years away from earth, currently lies almost on the line of the earth’s axis. (Actually, it is less than 10 away from the axis, so it traces a small circle in 24 hours. But this change in position is almost unnoticeable.) This is why this comparatively faint star is of great importance to human civilisation. Sailors and travellers have been using it to determine directions since ancient times. (I am sure you are aware of the mythological story of Dhruva.)The direction of the earth’s axis changes over a long period of time. This is called the 'precession' of the earth. One of the bright stars, Vega will be the pole star after about 13000 AD.

12
3.3 Lesson 3: Digital Activity 1
Animation: Rotation of EarthLearning Objectives: Students should be able to
1. Construct a three-dimensional model of the rotating earth.2. Identify the direction of rotation of the earth.
This lesson contains four animations. The first animation shows the rotating earth from different angles. This will help reinforce the students’ mental model of rotation of the three-dimensional earth. It indicates that when seen from above the north pole, the direction of earth’s rotation is anticlockwise but if seen from above the south pole, the direction of rotation is clockwise. The other three animations show the same animation from three different perspectives (from above the north pole, south pole and equator). In these animations, the realistic earth morphs into a simple diagram often seen in textbooks. When students next see that diagram, they would remember the animation and treat the earth as a three-dimensional, dynamic object.
Activity: AstRoamer: What's the Time? Learning Objectives: Students should be able to
1. Explain why the time at different locations on the earth is different.2. Predict the time at a given location on the earth when the direction of sunrays is known.
The clues in this game are the location (name of a country) of a certain element and the time (noon, midnight, sunrise or sunset) when it will be found at that location. The elements included in the game are actually found in those countries. The earth can be rotated by hovering the mouse cursor over an arrow near the pole. If students can rotate the earth so as to position the country at the prescribed time, they get the element. There are two chances for each clue. The game is to be played in pairs (one player in the northern hemisphere and the other in the southern hemisphere).
3.4 Lesson 4: Revolution of the EarthLearning Objectives: Students should be able to
1. Understand the revolution of the earth.2. Explain the occurrence of seasons.3. Explain the changes in the night sky over the year.
Activity 1: Revolution of the Earth Around the Sun (Role Play)Video: https://youtu.be/_Evd0p7T00w
Learning Objectives: Students should be able to1. Determine the direction of the revolution of the earth around the sun (anticlockwise if seen from above the north pole).2. Describe the earth’s orbit around the sun (almost circular but is often drawn elliptical because the diagram is drawn as an oblique view).
Activity 2: Change in the Path of the Sun over the Year (Gesture)Video: https://youtu.be/PXeG_i_b3JU
Learning Objectives: Students should be able to1. Explain the occurrence of the seasons with help of a diagram.2. Know the meaning of solstice and equinox.
Sometimes, students think that the earth is tilted in one direction for 6 months of the year and in the other direction for the other 6 months. This is not true. The earth is always tilted in the same direction. Since the earth revolves around the sun, the earth’s axis is sometimes tilted towards the sun and sometimes tilted away from it. However, in reality, the tilt of the axis always remains the same.

13
Another common alternative conception is that the earth experiences seasons because of its elliptical orbit. That is, when the earth is closer to the sun, we experience summer and when it is further away from the sun, we experience winter. Students must learn that this is not true. Remind them that when it is summer in the northern hemisphere, it is winter in the southern hemisphere and vice versa. We have seen that the earth’s orbit is almost circular and not elliptical. Thus, an elliptical orbit is not the reason for experiencing seasons on earth.
Activity 3: Changes in the night sky over the year (Role Play)Video: https://youtu.be/fKoerxDH-vs
Learning Objective: Students should be able to explain why we see different parts of the sky at different time of the year.
It was mentioned that most students fail to notice that stars appear to move from the east to the west every night. It is even harder to notice that their positions at a certain time change slightly from day to day. If possible, plan night sky observations spread over the year (every 3 to 4 months) so that your students notice that different stars are visible at the same time of the night after a few months. Otherwise, you can show this using computer software like Stellarium. The lesson explains the reason in detail.

14
Section 4: Notes for Implementing Student Module Unit 2 - The Moon
In Unit 2, the moon is introduced into the earth-sun system. We begin with a description of the motion of the moon due to the earth’s influence (Lesson 1). Next, we explain in detail various phenomena like the phases of the moon and eclipses (Lesson 2). The digital activity on Lesson 3 is based on motion of the moon and how it results in phases of the moon. Finally, in Lesson 4 we look at how the position of the moon in the night sky changes over a period of time and its scientific and cultural consequences.
4.1 Lesson 1: Motion of the MoonLearning Objectives: Students should be able to
1. Know basic information about the moon.2. Understand the motion of the moon.
Introduction: Characteristics of the MoonLearning Objective: To recall some basic facts about the moon.
The introduction helps students to recall most of the facts about the moon they learned in earlier grades. It also addresses some common misconceptions about the moon such as surface of the moon would be white or lighter than the earth. Take some time and help students imagine how it would feel on the moon. This will ignite their interest.
Activity 1: Motion of the Moon Around the Earth (Role Play)Video: https://youtu.be/OzvYA6lJvGY
Learning Objective: Students should be able to mimic the motion of the moon around the stationary earth.
The motion of the moon is one of the simplest yet most confusing motions to understand. If students know that we see only one face of the moon, they often take it to mean that the moon only revolves around the earth and does not rotate around its axis. Role play should help in understanding the correct motion.
(Advance knowledge for teachers: The moon and earth orbit around a common centre of mass. But the mass of the earth is much larger so the centre of the mass of the earth-moon system is very near to the centre of the earth, making it appear as if the moon’s orbit is centred on the earth.)
Activity 2: The Sun-Earth-Moon System (Role Play)Video: https://youtu.be/7urhrHT16us
Learning Objective: Students should be able to construct a dynamic model of the sun-earth-moon system.
This complex motion can be understood using role play. The corresponding animation is given in Unit 2, Lesson 3, Activity 3.1 (Title: Motions of the Moon and the Earth). Encourage students to draw the diagram for this system before they see an animation.)
4.2 Lesson 2: Phases of the Moon and EclipsesLearning Objectives: Students should be able to
1. Explain the phases of the moon.2. Explain solar and lunar eclipses.3. Connect cultural or indigenous knowledge to observational astronomy.
IntroductionLearning ObjectiveStudents should be able to review the phases of the moon students observed.
The phases of the moon is one of the most commonly observed astronomical phenomenon; however, students often cannot draw the exact shapes of all the phases. (They often cannot draw the gibbous shape

15
and end up drawing something like the one shown in Figure 3).
Figure 3: Incorrect shape of gibbous moon drawn by a student
Many students do not notice the moon in daytime and think that the moon is visible only at night. (Actually, the moon is visible during the day as much as at night.) Encourage students to observe the moon carefully and note their observations. Help them to notice the relation between the time of the day and the position of a particular phase. For example, the full moon rises at the time of sunset, the waxing half-moon rises at noon, the waning half-moon rises at midnight and so on.
Activity 1: Phases of the MoonVideo (Model): https://youtu.be/zAUY5vSrBp8Video (Role Play): https://youtu.be/lb4GpaEd084
Learning Objective: Students should be able to explain the phases of the moon.
One of the most common misconceptions among students, and even adults, is that the phases of the moon occur because the shadow of the earth falls on the moon. Students should understand that the shadow of the earth falls on the moon only during the lunar eclipse. Phases of the moon depend on how much of the lit moon is visible from the earth.
(Advance information for teachers: If you look closely, the round shape of the moon is visible even when it is not completely lit due to the light reflected from the earth falling on the moon. This phenomenon is called ‘earthshine’.)
Activity 2: Inclined Orbit of the Moon (Gesture)Video: https://youtu.be/znFniCe2leE
Learning Objective: Students should be able to explain lunar and solar eclipses.
An inclined orbit is difficult to understand through a diagram. We strongly recommend that you ask students to mimic the gesture.
Always warn students not to observe the sun or the solar eclipse with the naked eye.
Food for Thought
Learning objectives:1. The questions are posed to students so that they gain more clarity on the explanation of phases of the moon.2. Challenge students’ visuospatial thinking
There are a few questions under this activity. Please do not give the answers to the students. Let them think. Here are the answers for your reference:Here are the answers to the questions:
1. Can all people on earth see the same phase of the moon on any given day?Answer: Yes. The moon does move a little ahead in its orbit during 24 hours so that the phase

16
changes slightly during one day, but this change is very small.
2. Do people in the southern hemisphere see the same phase of the moon as those in the northern hemisphere?
Answer: Yes.
3. Imagine that you are on the moon. How would the earth appear from the moon? As we know, the apparent size of the sun and the moon is almost the same when viewed from the earth. Would the size of the sun and the earth appear the same from the moon? If not, would the earth appear smaller or bigger than the sun? Would you be able to see the phases of the earth?
Answer: The radius of the earth is almost four times bigger than that of the moon. So, the size of the earth seen from the moon is four times bigger than that of the moon as seen from the earth. The distance between the sun and the earth is almost same as that between the sun and the moon. So, the apparent size of the sun would be same from the earth and the moon. Thus, in the moon’s sky, the earth will appear four times bigger than the sun.The earth will not be visible from half of the surface of the moon (the part which is not visible from the earth). The position of the earth would remain same from any particular location of the moon from which the earth is visible. The earth will not appear to be moving.The sun will appear to move slowly and complete one revolution around the moon once a month. Thus, one day on the moon is equivalent to about 29 days on earth.
a. How would the earth appear from the moon when we see the full moon from the earth?Answer: The dark part of the earth would be visible, so it will be new earth from the moon.
b. How would the earth appear from the moon when we see the new moon from the earth?Answer: The lit part of the earth would be visible, so it will be full earth from the moon.
c. How would the earth appear from the moon when we see the half-moon from the earth?Answer: Half-earth will be visible from the moon when we see half-moon from the earth.
d. When we see a lunar eclipse from the earth, what would you see from the moon?Answer: If seen from the moon during a lunar eclipse, the earth will block the sun. So, a solar eclipse will visible from the moon.
4.3 Lesson 3: Digital Activity 2Activity 1: Animation: Motions of the Moon and the EarthLearning Objectives: Students should be able to
1. Construct a dynamic model of the sun-earth-moon system.2. Recognise that the orbits of the earth and the moon are not exactly circular.3. Estimate how the orbit of the moon will look when the motion of the earth is taken into account.4. Develop an understanding of the durations of revolutions of the moon and the earth.
There are three sets (sun-earth, earth-moon and sun-earth-moon system) of animations in this activity. Each set contains three animations. The first shows only the motion of the celestial body (most realistic). In the second animation, the moving body traces its orbit (an abstraction that is present in diagrams is added to the first animation). In the last animation, the orbit is traced against a grid to show the slight ellipticity present in the orbits. All animations include a day counter in a corner of the screen.
Activity 2: AstRoamer: Moon TrackLearning Objectives: Students should be able to
1. Identify the position of the moon in its orbit for a given phase.2. Connect cultural experiences (festivals) with observational astronomy (phases of the moon).
The clue in the game is information of the phase of the moon (the festival celebrated in that phase or its position at a certain time). Students are asked to identify the position of the moon in its orbit. If they identify the correct position, they get two points, and a picture of the moon as seen from the earth as feedback. If their answer is incorrect, they get the feedback about how the moon will look from the

17
position they have chosen and another chance to answer. If they give the correct answer on the second attempt, they get one point.
You might notice that the surface of the moon in this activity does not look like the familiar one. Here is the reason: The diagram shows the earth-moon system from above the north pole, which is why the orbit of the moon is circular instead of elliptical. To keep the view consistent, we have used the photograph of the moon from above its north pole.
Activity 3: Phases of the EarthLearning Objective: Exposing students to views from different perspectives in space and challenge their spatial cognition.
Just as the phases of the moon are seen from the earth, phases of the earth can be seen from the moon. Two photographs (one of the full earth and another of the gibbous earth) are given in this activity.
4.4 Lesson 4: Moonrise and MonthThe content in this lesson is not included in most Indian textbooks. However, we have included it here because the phenomena explained in this lesson are commonly observed, are referred commonly in our sociocultural life (e.g. starting of a nakshatra, the time of moonrise) and are fairly easy to explain. They are also great exercises to sharpen visuospatial thinking. If you are short of time, you can skip this lesson, but we encourage you to incorporate it if possible.
IntroductionLearning Objective: To remind students that moonrise and moonset time changes over the year.
Students often notice the moon at different positions at different times. For example, they might notice a half-moon right at the zenith around sunset. However, because they do not keep systematic notes, they often fail to realise that the moon rises a little late (about 50 minutes) every day than the previous day. Encourage students to find the pattern in the rising and setting time of the moon. You can use a calendar or a local newspaper to find out the time for moonrise for the entire month and help students to see the pattern.
Activity 1: Changes in the Time of Moonrise (Role Play)Video: https://youtu.be/D51_8jG0uus
Learning Objective: Students should be able to explain changes in the time of moonrise and moonset in over a month.
Here, one has to consider two simultaneous motions: rotation of the earth and revolution of the moon around the earth. These motions might be difficult to express in a diagram, so we strongly encourage you to engage your students in role play.
Activity 2: Motion of the Moon with Respect to the Stars (Role Play)Learning Objective: Students should be able to explain the motion of the moon with respect to background stars.
Here again, one has to consider two simultaneous motions: revolution of the earth around the sun and revolution of the moon around the earth. These motions might be difficult to express in a diagram, so we strongly encourage you to engage your students in role play.

18
Section 5: Notes for Implementing Student Module Unit 3 - The Solar System and Beyond
In this unit we will study the Solar system (Lessons 1 & 2). Lesson 3 is a digital lesson on solar system. In Lesson 4 we will briefly introduce the stars and the galaxies.
5.1 Lesson 1: The Solar SystemLearning Objective: Students should be able to appreciate the sun (and the planets) as objects of scientific study.
The SunLearning Objective: Students should be able to recall basic facts about the sun.
Advance information for teachers: The sun emits electromagnetic waves of different wavelengths. Visible light is only one of them. Electromagnetic radiations are given different names such as:
1. Radio waves (wavelength: 1 mm to 105 km, corresponding frequency: 300 GHz2 to 20 KHz)2. Microwaves (wavelength: 1 mm to 100 cm, corresponding frequency: 300 GHz to 300 MHz)3. Infrared (wavelength: 700 nanometres to 1 mm, corresponding frequency: 430 THz3 to 300 GHz)4. Visible light (wavelength: 400 to 700 nanometres, frequency: 430–750 THz)5. Ultraviolet (wavelength: 10 to 400 nanometres, corresponding frequency: 750 THz to 3×10¹⁶ Hz)6. X-rays (wavelength: 0.01 to 10 nanometres, corresponding frequency: 3×10¹⁶ Hz to 3×10¹⁹ Hz) and7. Gamma rays (wavelength: less than 10 picometers4, corresponding frequency: 1019 Hz).
The PlanetsLearning Objective: Students should know basic facts about the planets (biggest and smallest planet, planet closest to the sun and farthest away from the sun, the revolution time increases as the distance of a planet from the sun increases).
There are certain notations used in this lesson. Please explain them to your students. Such notations are commonly used at the advanced level of study. Prepare your students for that. But allow enough time for students to familiarise themselves with these notations.
Activity 1: The Revolution of Planets (Role Play)Video: https://youtu.be/1cjdKeMdXIE
Learning Objectives: Students should be able to1. Mimic the orbital motion of planets around the sun2. Know the meaning of the terms inner planets, outer planets and transit.
5.2 Lesson 2: Scaling the Solar SystemLearning Objective: Students should know about the major components of the solar system.
Activity 1: Relative Sizes of Planets and Distances in Solar System (Model)Learning Objective: Students should be able to develop a rough idea of the sizes and distances of planets in the solar system.
In this lesson, we give a table of smaller objects which maintain the same ratio as the planets. Please encourage your students to calculate some ratios themselves (e.g. ratio of radii of the earth and Jupiter). They will remember them much better!
2 1GHz = 109 Hz; Giga means 109
3 1THz = 1012 Hz; Tera means 1012
4 1 picometer = 10−11 m
19
Figure 4: Scaled down solar system

20
Satellites, Minor Planets, Asteroids, CometsLearning Objectives: Exposing students to interesting information about the solar system.
These four sections give some detailed information about smaller objects in the solar system. Please do not expect students to memorise this information. It is given because students often find these details interesting and they develop an implicit understanding of science and astronomy from such details. For example, they notice that our country has a thriving space programme and astronomy research and they can take it up as a career. They might also infer that comets are just rocks and there cannot be any harm in watching them.
5.3 Lesson 3: Digital Activity 3Activity 1: Animation: Solar SystemLearning Objectives: Students should be able to
1. Construct a three- dimensional, dynamic model of the solar system2. Develop a rough idea about the relative orbital speeds of planets.3. Develop a rough idea about the relative sizes of planets.4. Develop a rough idea about the relative distances between the planets and the sun.
Description: This interactive animation contains the following options:1. Choice of views (top and oblique)2. Choice of frame (sun at the centre or at one side)3. Speed (true to relative speeds of the planets)4. Size (true to relative sizes of the planets)5. Distance (true to relative distances of the planets from the sun)
You can click on the name of the planet from the list at the bottom and its details will appear near the planet.
Activity 2: AstRoamer: Planet trekLearning Objective: Students should be able to identify a planet by its physical properties and chemical composition.
In this game, students need to collect certain chemical compounds (or elements) by going to the planet where they are found. The clue includes the compound to be found and information about the planet. If students click on the correct planet, they get the compound. If not, they get another chance, with some additional information about the planet.
The interactive game includes instructions and the first two levels of the game also include a demo.To increase the difficulty level of the game, we have included two clues for planet Venus. Also, we have included a clue for Pluto even though it is a minor planet. Thus, there are total 10 clues.
5.4 Lesson 4: Introduction to the UniverseLearning objectives: Students should know that
1. Our solar system is situated in a galaxy.2. There are a large number of galaxies in the universe.
As noted earlier, please do not expect students to memorise the facts in this lesson. Expose them to the information and pose some questions for them to ponder.StarsLearning Objective Students should be able to develop an understanding of astronomical distances.
Activity 1: Parallax (Gesture)Video: https://youtu.be/uiRQ7HIUm54

21
People wonder how we know how big the sun is or how far it is. Astronomers use many clever methods to find out this and other such information. Parallax is one of them. Ask your students to estimate the distance, say, of the flagpole in the school ground from a certain place using parallax. Ask them about the different ways of estimating distances on earth, such as, using a tape, pacing, pedometer, odometer, SONAR, RADAR, and so on.
GalaxiesLearning Objectives: Students should be able to
1. Recall that galaxies are formed of a large number of stars.2. Recall that the sun is far from the centre of the Milky Way.
By learning about stars and galaxies, one feels a sense of awe about the universe. Let your students experience it! Let them know that there are many things we still don’t know. But there are many interesting things such as pulsars, blackholes, exoplanets, nebulae out there. Encourage them to read about these things. If you can excite them about astronomy (or science in general) your job is done! They will do the rest!
