portlog™ user’s guide - weather instruments by ...€¦ · user’s guide rev date: 7/08/14 . 2...
TRANSCRIPT
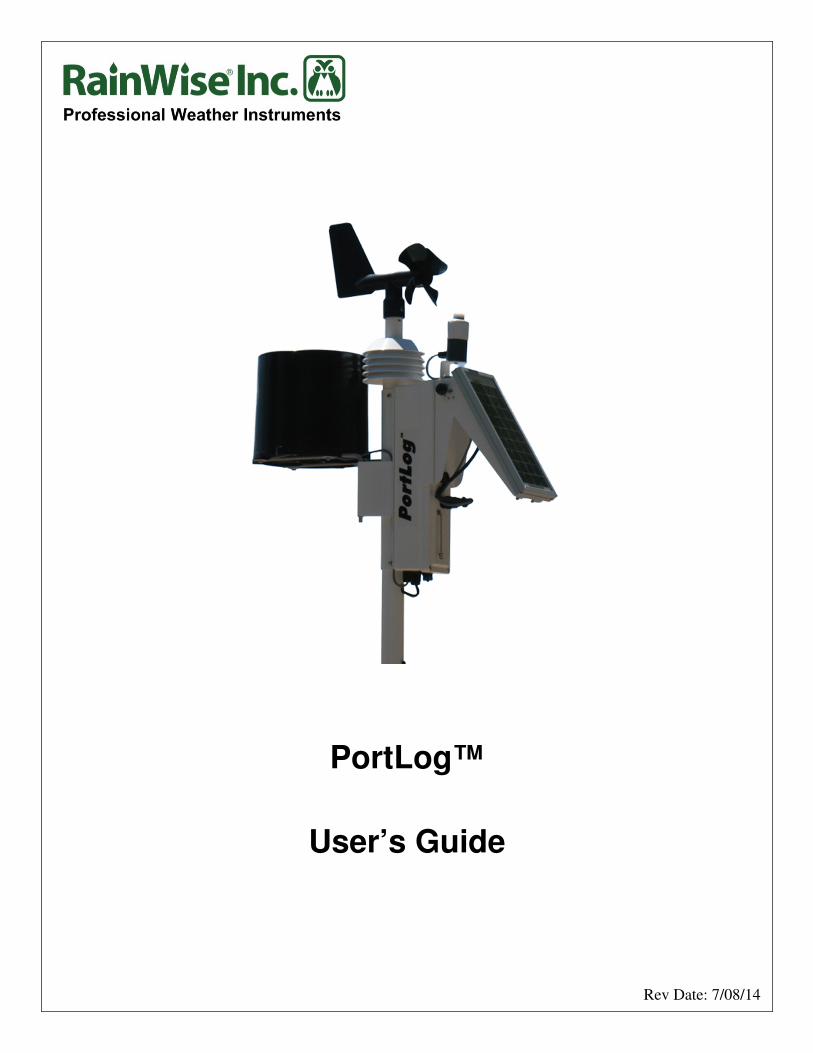
PortLog™
User’s Guide
Rev Date: 7/08/14

2
RainWise PortLog Users Guide
2014 Revision
Copyright © 2014 by RainWise, Inc.
All rights reserved. No part of this work may be reproduced in any form except by written
permission of the publisher. All rights of translation are reserved.
PortLog™ is a trademark of RainWise, Inc.
.

3
RainWise PortLog Users Guide
2014 Revision
Table of Contents
1) Introduction ........................................................................................................................... 5
2) Getting Started ...................................................................................................................... 6
3) Physical Setup........................................................................................................................ 8
3.1) Quick Guide ................................................................................................................ 8
3.2) Detailed Setup ............................................................................................................. 9
3.21) Site Selection ...................................................................................................... 9
3.22) Tripod Setup........................................................................................................ 9
3.23) Leveling PortLog ................................................................................................ 9
3.24) Solar Panel and Solar Radiation Sensor Assembly Setup ................................ 10
3.25) Solar Panel Latitude Adjustment ...................................................................... 11
4) Software Setup .................................................................................................................... 13
4.1) Initial Logger Setup .................................................................................................. 13
4.2) Setting the Barometer ............................................................................................... 14
5) Verification of Deployment ................................................................................................ 15
6) WLcom Data Retrieval Software Overview ..................................................................... 16
6.1) Installation................................................................................................................. 16
6.2) Starting the Program ................................................................................................. 16
6.3) Editing the Item Descriptions ................................................................................... 16
6.4) Command Mode Window ......................................................................................... 16
7) Using Weather Station Data Files with other PC Software ............................................ 17
7.1) Opening a data file in Excel ...................................................................................... 17
8) Data Format Sheet .............................................................................................................. 18
8.1) Data ........................................................................................................................... 19
8.2) RAM Capacity .......................................................................................................... 19

4
RainWise PortLog Users Guide
2014 Revision
8.3) Serial Command Format test .................................................................................... 20
9) Product Support .................................................................................................................. 23
10) Contact Information ........................................................................................................... 23
11) Warranty ............................................................................................................................. 24
5
RainWise PortLog Users Guide
2014 Revision
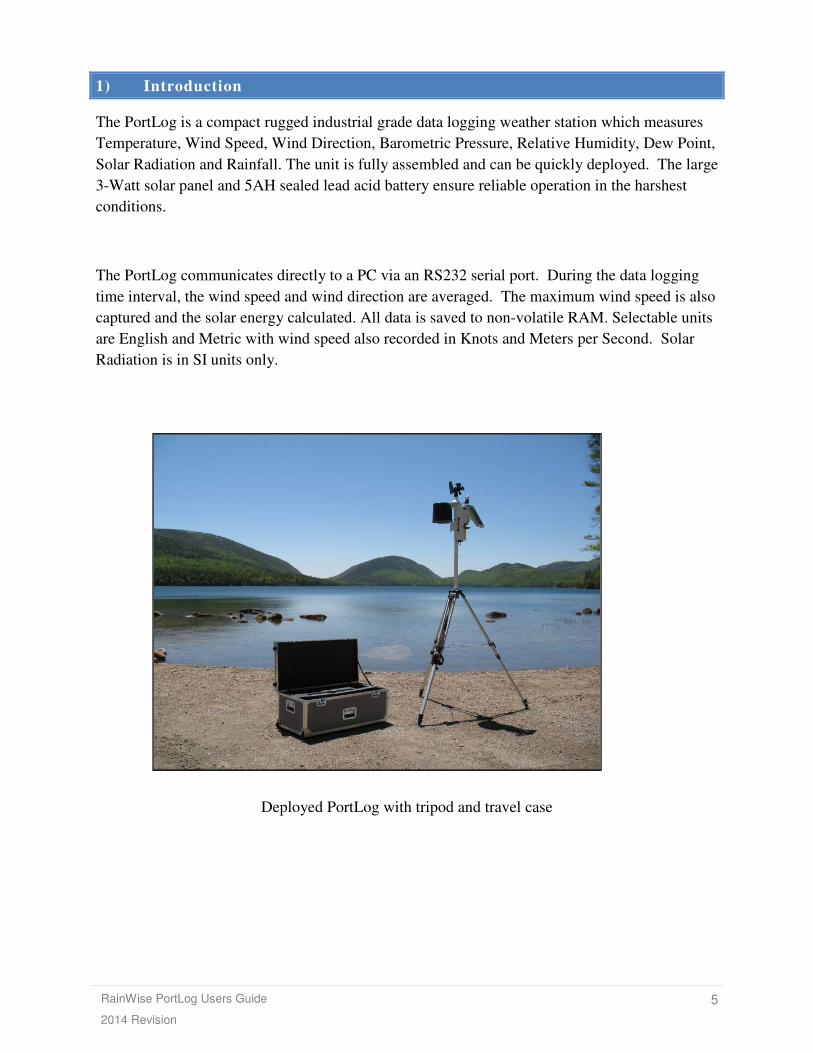
1) Introduction
The PortLog is a compact rugged industrial grade data logging weather station which measures
Temperature, Wind Speed, Wind Direction, Barometric Pressure, Relative Humidity, Dew Point,
Solar Radiation and Rainfall. The unit is fully assembled and can be quickly deployed. The large
3-Watt solar panel and 5AH sealed lead acid battery ensure reliable operation in the harshest
conditions.
The PortLog communicates directly to a PC via an RS232 serial port. During the data logging
time interval, the wind speed and wind direction are averaged. The maximum wind speed is also
captured and the solar energy calculated. All data is saved to non-volatile RAM. Selectable units
are English and Metric with wind speed also recorded in Knots and Meters per Second. Solar
Radiation is in SI units only.
Deployed PortLog with tripod and travel case
6
RainWise PortLog Users Guide
2014 Revision
2) Getting Started
Every PortLog comes with the standard package listed below. Additional options are also
available to the standard package.
The itemized lists should be consulted after opening the PortLog to verify if any equipment is
missing or damaged. If equipment is missing or damaged, contact RainWise Inc. at (207) 288-
5169 immediately.
Standard:
• PortLog Data Logger Assembly
• Solar Assembly
• Serial Cable
• WLcom Software Disk
• Battery Charger
• Instruction Manual
• Tripod Mount Mast
Optional: (Tripod Kit & Compass)
• Tripod Assembly
• Three Tripod Mounting Feet
• Tripod Anchor Kit
· Hammer
· 3 Nails
• Compass
Optional:
• Travel Case

7
RainWise PortLog Users Guide
2014 Revision
Standard unit in travel case
• “SP/SR: solar panel/solar radiation sensor
• “Mtf”: tripod mounting feet (included with tripod purchase)
Tripod in travel case
The PortLog is stored under the tripod and foam. The other accessories are located in the well.
The top is cushioned to support the items when the cover is closed.

8
RainWise PortLog Users Guide
2014 Revision
3) Physical Setup
The physical setup is important for functionality of your PortLog.
3.1) Quick Guide
1. Select suitable location to set up
2. Unpack the tripod (if purchased)
3. Attach tripod mounting feet
4. Layout the tripod, do not extend the tripods legs
5. Level the tripod
6. Attach mounting pole into tripod
7. Attach PortLog to mounting pole
8. Attach Solar Panel and Solar Radiation Assembly to the PortLog
9. Connect the Solar Panel and Solar Radiation Cable to the PortLog
10. Set the angle of the solar panel
11. Fully extend the tripods legs
12. Face the solar panel in the correct compass bearing for your location (refer to Section
3.25)
13. Secure the tripod to the ground
14. Level tripod
15. Turn PortLog ON

9
RainWise PortLog Users Guide
2014 Revision
3.2) Detailed Setup
A few different aspects are important to consider when setting up the PortLog.
3.21) Site Selection
Select an open site for the PortLog. The site should be located where temperature and humidity
won’t be affected by heat and water sources. Nearby obstructions can affect the wind, rainfall
and solar radiation sensors. The World Meteorological Organization (WMO) defines open
terrain as an area where the distance between the anemometer and any obstruction is at least ten
times the height of the obstruction. RainWise recommends this guideline to be used as minimum
for selecting a site.
3.22) Tripod Setup
1. Remove the tripod from its travel case
2. Install the tripod mounting feet. To mount the feet, pull the pin and slide the mounting
foot over the tripod leg. Put pin back through hole of mounting foot.
3. Unfold the tripod legs to the extent of the chain. Do not fully extend the tripods legs yet.
The tripod legs will extend to approximately twice the in case length. Be sure to secure the
extension lock on the side of each of the tripods legs. The holes in the tripod mounting foot are
for securing the tripod mount kit.
3.23) Leveling PortLog
If the PortLog has not been downgraded, the tripod will be used to level it. There is a bubble
level attached to the base of the tripod. The tripod base should be leveled so that the bubble on
the level is within the circle. Push down and rotate until the support mast engages the base
alignment pin. The tripod’s mounting mast has a small screw that should be now facing South.

10
RainWise PortLog Users Guide
2014 Revision
3.24) Solar Panel and Solar Radiation Sensor Assembly Setup
1. Slide the solar panel and solar radiation sensor assembly over the front cover. The
assembly slides down over the cover and stops just above the receptacle.
2. Plug the black twist lock connector into the receptacle. Be sure to twist the connector
collar until it locks into place. The thumbscrew attaches the solar panel assembly ball
chain to the logger housing.
This Figure shows the assembled PortLog on the tripod mount, with the chain fully extended.
The insert shows the Solar Panel Solar Radiation Sensor connector and the tie down chain.
Remove the thumb screw to install the chain.
With temperature above 20 °C and the logger in sleep mode, the battery will operate the logger
for at least 60 days without sun. Also note that battery capacity diminishes with lower
temperatures. RainWise recommends the battery be charged overnight before the logger is
deployed. For cold temperatures and/or long deployment, correct solar panel adjustment is
important.
In the Northern Hemisphere, face the solar panel south. For Southern Hemisphere
deployment, face the solar panel north. There is a software command {“H”} to set the wind
direction for southern hemisphere deployment. (Refer to Section 8.3)
11
RainWise PortLog Users Guide
2014 Revision
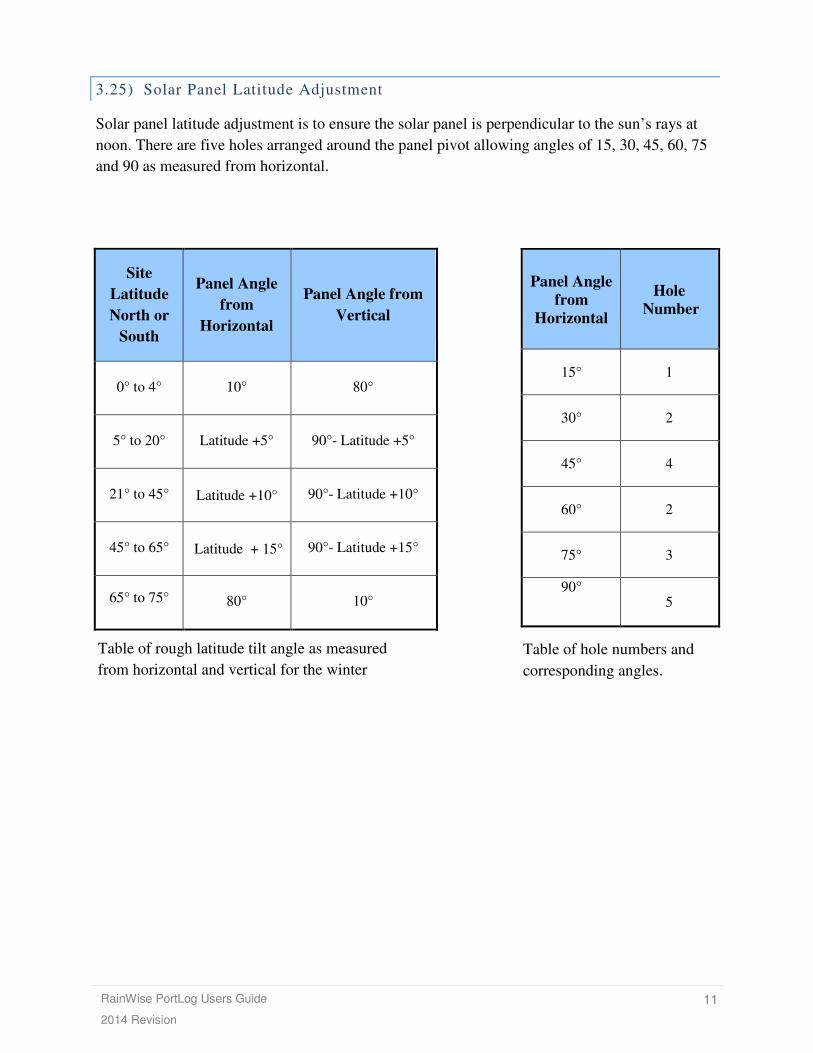
3.25) Solar Panel Latitude Adjustment
Solar panel latitude adjustment is to ensure the solar panel is perpendicular to the sun’s rays at
noon. There are five holes arranged around the panel pivot allowing angles of 15, 30, 45, 60, 75
and 90 as measured from horizontal.
Site
Latitude
North or
South
Panel Angle
from
Horizontal
Panel Angle from
Vertical
0° to 4° 10° 80°
5° to 20° Latitude +5° 90°- Latitude +5°
21° to 45° Latitude +10° 90°- Latitude +10°
45° to 65° Latitude + 15° 90°- Latitude +15°
65° to 75° 80° 10°
Panel Angle
from
Horizontal
Hole
Number
15° 1
30° 2
45° 4
60° 2
75° 3
90° 5
Table of rough latitude tilt angle as measured
from horizontal and vertical for the winter
season.
Table of hole numbers and
corresponding angles.
12
RainWise PortLog Users Guide
2014 Revision
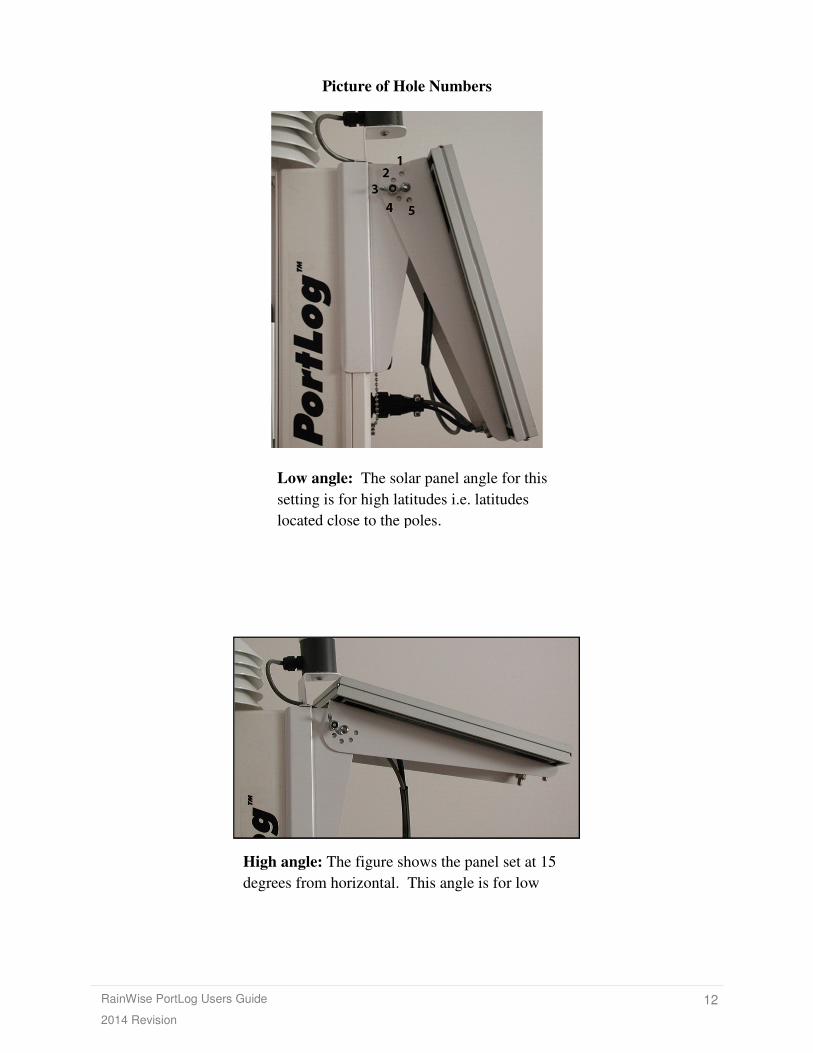
Picture of Hole Numbers
Low angle: The solar panel angle for this
setting is for high latitudes i.e. latitudes
located close to the poles.
High angle: The figure shows the panel set at 15
degrees from horizontal. This angle is for low
13
RainWise PortLog Users Guide
2014 Revision
4) Software Setup
4.1) Initial Logger Setup
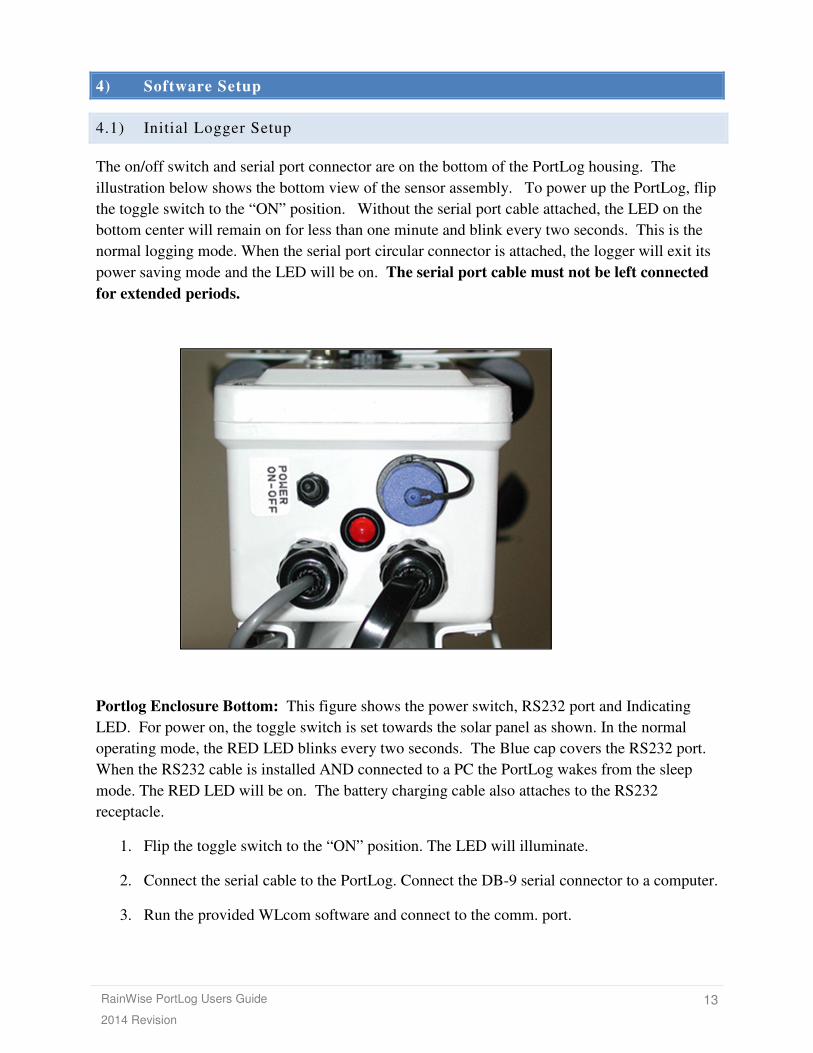
The on/off switch and serial port connector are on the bottom of the PortLog housing. The
illustration below shows the bottom view of the sensor assembly. To power up the PortLog, flip
the toggle switch to the “ON” position. Without the serial port cable attached, the LED on the
bottom center will remain on for less than one minute and blink every two seconds. This is the
normal logging mode. When the serial port circular connector is attached, the logger will exit its
power saving mode and the LED will be on. The serial port cable must not be left connected
for extended periods.
Portlog Enclosure Bottom: This figure shows the power switch, RS232 port and Indicating
LED. For power on, the toggle switch is set towards the solar panel as shown. In the normal
operating mode, the RED LED blinks every two seconds. The Blue cap covers the RS232 port.
When the RS232 cable is installed AND connected to a PC the PortLog wakes from the sleep
mode. The RED LED will be on. The battery charging cable also attaches to the RS232
receptacle.
1. Flip the toggle switch to the “ON” position. The LED will illuminate.
2. Connect the serial cable to the PortLog. Connect the DB-9 serial connector to a computer.
3. Run the provided WLcom software and connect to the comm. port.
14
RainWise PortLog Users Guide
2014 Revision
4. The clock and logging interval can be set and the RAM cleared. Refer to Section 8.2 for
the relationship between the logging interval and number of logging days.
5. The PortLog should always be deployed with a fully charged battery. Verify that the
battery voltage is higher than 6V. The battery voltage can be viewed using the WLcom
software (Section 6.0). An excessively low battery could result in data loss.
6. Disconnect the serial cable from the PortLog.
4.2) Setting the Barometer
The barometer in the PortLog reports absolute pressure. The readings can be adjusted to
compensate for elevation if necessary.
1. Using the Wlcom Data Retrieval Software, open the Command Mode Window.
2. Type a “ : ” followed by a “ B” and the current corrected pressure.
a. For PortLog with measurement units set to metric, the pressure is entered in
millibars to the nearest tenth, for example “:B1000.0”. The decimal point is
included.
b. For PortLog set to English units enter the current pressure in inches of Mercury,
for example “:B30.00”.
c. Setting the pressure to zero in either unit system, removes the offset and the
Portlog reports absolute pressure.

15
RainWise PortLog Users Guide
2014 Revision
5) Verification of Deployment
The PortLog has an RS-232 serial port for direct connection to a computer. The data may be
accessed by use of the WLcom program provided with the unit, or any terminal program can be
used.
The PortLog transmits data at 9600 baud, with 8 data bits, 1 stop bit, and no parity. A 6 foot data
cable is provided that will connect the PortLog to a standard DB-9 male PC serial port.
1. Connect the serial cable from the serial plug receptacle on the bottom of the PortLog to a
serial port on the computer. Within two seconds, the LED will be on.
2. The PortLog is ready to communicate with the PC. The PC must assert the DTR RS232
signal in order for the PortLog to awaken.
The same receptacle is used for battery charging with the supplied cable and charger.

6) WLcom Data Retrieval Software Overview
WLcom is a Windows compatible software program that automates the process of transferring
data from the remote unit to a computer. This software will link to the remote unit via a direct
cable, telephone modem, or radio modem, depending on the system configuration.
6.1) Installation
The WLcom program is provided on a CD.
1. To install the software on a PC run “setup.exe” on the disk. This is done by selecting
“Run..” from the “Start” button.
2. Enter the following string “A:\setup.exe” assuming the drive is designated as the “A”
drive. Follow the on screen instructions to complete the installation.
By default the program will be installed in the following folder “Programs/Rainwise/Wlcom”.
6.2) Starting the Program
1. Connect the serial cable to a free port on the PC and start the WLcom program.
2. Click the “Auto Detect” button and the system will scan all the ports until it finds the
weather station.
3. Once the station is found the real-time data will be displayed.
6.3) Editing the Item Descriptions
1. To edit item descriptions select “Edit Descriptions” from the “Edit Menu”. All the items
can be edited.
2. If the weather station has a wind sensor then the wind rose can be enabled by selecting
enable and entering the item numbers for wind speed and direction.
6.4) Command Mode Window
The command mode window is an ASCII Terminal. Commands can be sent to the device by
typing the appropriate commands– refer to SERIAL COMMAND FORMAT. The window
shows both sent and received data.
To see the current data type ‘:’ followed by ‘D’ the unit will respond with a string giving current
conditions.
Setting the logging interval must be done in the Command Mode Window.

17
RainWise PortLog Users Guide
2014 Revision
7) Using Weather Station Data Files with other PC Software
The data collected by RainWise loggers can be imported into most spreadsheet, graphing, and
data base programs for analysis and formatted output. The RainWise data is saved as a comma
delimited ASCII file (.csv). This basic format is acceptable by the import function of many
programs.
Comma Delimited Files (*.csv) are directly supported by Microsoft Excel.
7.1) Opening a data file in Excel
1. Start Excel and select File Open from the main menu.
2. Select "Text Files (*.prn;*.txt;*csv)" in the types of files drop down list in the Open
dialog window.
3. Select the data file and click open. Comma Delimited files do not support formatting or
graphs, so it is advised that you save changes in Excel format (*.xls);
Note: All programs mentioned are copyright by or are registered trademarks of their respective
developers.

18
RainWise PortLog Users Guide
2014 Revision
8) Data Format Sheet
This data sheet describes the order and format of data that will be supplied from your system.
The data is saved in ASCII text format. The time and date items are in quotation marks, items
are separated by commas, and each data record ends with a carriage-return and line-feed
character. This format can be directly imported by most spreadsheet and data base programs.
Order of Data Items:
• Date (Month/Day/Year, in quotation marks)
• Time (Hour:Minute in quotation marks)
• Temperature (degrees F, degrees C)
• Humidity (percent)
• Barometer (inches of Hg., mb (hPa))
• Wind Direction (Compass Degrees)
• Wind Speed (miles per hour, kilometers per hour, Knots, meters per sec. )
• Wind Speed Maximum (miles per hour, kilometers per hour, Knots, meters per sec. )
• Solar Radiation (Watts/m2)
• Solar Energy (J/m2)
• Rainfall (inches, millimeters)
• Battery Status (1=ok, 0= supply volts less than 4.75)
• Units (0=English & mph, 1=English & knts, 2=metric & mps, 3=metric & kph, 4=metric
& knts)
• Checksum (An exclamation point(!) followed by three digits, 000 to 255)
Header and sample for RAM data:
DATE,TIME,T_AIR,HUM,DEW,BARO,WDIR,WSPD,WS_MAX,SRAD,SR_SUM,RAINF,B
ATT,UNITS,
CKSUM <cr><lf>
"04/05/94","16:17",078,029,043,29.92,270,010,015,0760,1.066E04,1.50,1,0.!xxx <cr><lf>
19
RainWise PortLog Users Guide
2014 Revision
8.1) Data
The temperature, barometer, humidity and solar radiation data are sampled at the data save
interval. The wind direction and speed are sampled every two seconds and averaged over the
data save interval. The rainfall and wind speed max data are captured during the data save
interval and reset after saving. When the battery voltage is less than 5.05 volts, the logger will
NOT save to RAM.
Battery Life: The battery alone with no solar panel connected will operate the PortLog for over
25 days. About 1 hour at 160 milliamperes is required to replace the energy removed for one
day of operation. The Solar Panel is configured to charge the battery when the PortLog is not
powered up. In addition, a separate Battery charger is provided. The charger and the serial
cable connect at the same connector and may not be used at the same time. The real time
clock uses a capacitor for backup and will operate for 8 days without power.
8.2) RAM Capacity
The PortLog has 5 different options of RAM which will hold the logged records. You can find
what size of RAM that was installed on your PortLog by using any communications or terminal
emulator software that uses ASCII characters. The communications protocol is described in
Section 8.3: “Serial Command Format”, a command “.V” will give you the size of RAM.
The table below shows the maximum amount of time the PortLog can log data before its RAM
will fill up.
Size of RAM Maximum number of Records
128k 4672
256k 9344
512k 18688
1M 37376
2M 74752
20
RainWise PortLog Users Guide
2014 Revision
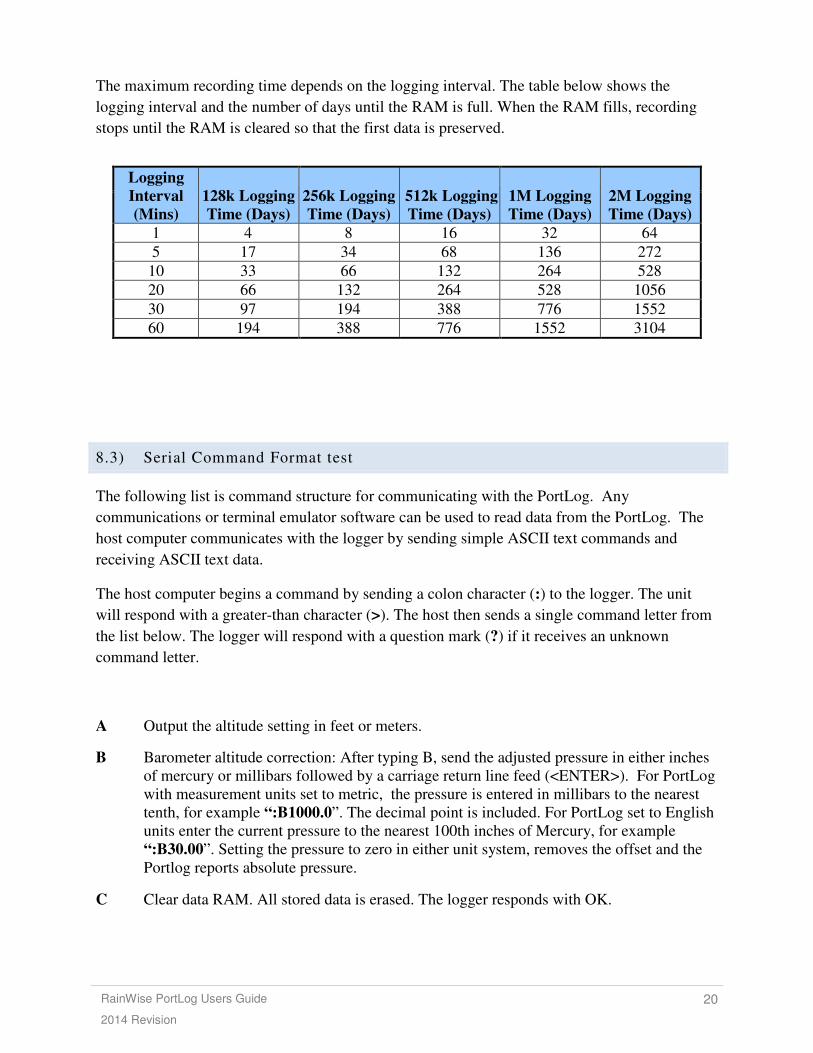
The maximum recording time depends on the logging interval. The table below shows the
logging interval and the number of days until the RAM is full. When the RAM fills, recording
stops until the RAM is cleared so that the first data is preserved.
8.3) Serial Command Format test
The following list is command structure for communicating with the PortLog. Any
communications or terminal emulator software can be used to read data from the PortLog. The
host computer communicates with the logger by sending simple ASCII text commands and
receiving ASCII text data.
The host computer begins a command by sending a colon character (:) to the logger. The unit
will respond with a greater-than character (>). The host then sends a single command letter from
the list below. The logger will respond with a question mark (?) if it receives an unknown
command letter.
A Output the altitude setting in feet or meters.
B Barometer altitude correction: After typing B, send the adjusted pressure in either inches
of mercury or millibars followed by a carriage return line feed (<ENTER>). For PortLog
with measurement units set to metric, the pressure is entered in millibars to the nearest
tenth, for example “:B1000.0”. The decimal point is included. For PortLog set to English
units enter the current pressure to the nearest 100th inches of Mercury, for example
“:B30.00”. Setting the pressure to zero in either unit system, removes the offset and the
Portlog reports absolute pressure.
C Clear data RAM. All stored data is erased. The logger responds with OK.
Logging
Interval
(Mins)
128k Logging
Time (Days)
256k Logging
Time (Days)
512k Logging
Time (Days)
1M Logging
Time (Days)
2M Logging
Time (Days)
1 4 8 16 32 64
5 17 34 68 136 272
10 33 66 132 264 528
20 66 132 264 528 1056
30 97 194 388 776 1552
60 194 388 776 1552 3104
21
RainWise PortLog Users Guide
2014 Revision
D Dump current data. The PortLog responds with the a single line of data as shown in the
“Header and Sample for RAM data” plus the battery voltage and a number which
indicates the selected units.
H Selects the current hemisphere. The command returns either a N or a S to indicate which
hemisphere is currently selected. The value will alternate each time the command is
issued.
I Increment the RAM recording interval. The logger selects the next interval and outputs it.
K Set the data logger’s clock. After the K, send the date and time to the logger as
YYMMDDhhmm<cr>. For example, :K0406031534<Enter> sets the logger’s clock for
June 3, 2004, at 3:34 PM. The logger will respond “OK” if it receives 10 digits after the
K, or “Clock not set.” if any other character is received. Use the :D command to verify
that the time and date were set properly.
L Output RAM recording interval. The logger responds with the logging interval in
minutes.
O Output stored data. The output begins with a text header, and then is one record of data
per line. The output ends with "OK". Each data line has the format shown on the “Data
Format Sheet”
Q Query RAM. The data logger responds with the number of records stored.
U Outputs the current units.
V Changes the current unit setting and outputs the current units.
.V Outputs version information and RAM size
@ Toggle memory wrapping, if wrapping is enabled then the PortLog will begin to
overwrite old records once the memory is full. When turned off logging will stop when
the memory is full. By default wrapping is not enabled.
! In the case of a bad record count error during download from the PortLog, you can dump
the memory and the software will sort the memory packets that are good. After you enter
the command, it will say “Next download will dump memory”. You may now close the
window and select download to initiate the process.

22
RainWise PortLog Users Guide
2014 Revision
For Computers equipped with Windows, “HyperTerminal” can be used with this
command set from Section 8.3) Serial Command Format
1. To begin select “HyperTerminal” under the accessories menu.
2. Click on “hypertrm.exe”.
3. Enter name for the connection.
4. Enter phone number.
5. In the last entry on this screen, select “Direct to Com1, or Com2.” A screen for Com1 (or
Com2) settings should be set as 9600 bits per sec, 8 data bits , no parity , 1 stop bit, no
flow control.
6. Click on “Apply”. Commands can be directly entered on the screen.
7. To save data from the PortLog, click on “Transfer” and then on “Capture Text”. Type in
the same of the file, and the “:” followed by the “O” command after the “>” character is
sent.
8. When the data stops appearing access the screen, click on “Transfer” and then “Stop”.
This forces the buffer to be emptied and sent to the file. The data is now read to be
imported into a spread sheet.

23
RainWise PortLog Users Guide
2014 Revision
9) Product Support
Product support can be found on Rainwise.com at the bottom of your products web page.
Documents are available here along with frequently asked questions. If your support inquiry is
not resolved by troubleshooting or our product support, you may wish to contact RainWise.
10) Contact Information
RainWise Inc.
18 River Field Road, Trenton, ME 04605 USA
Phone: (207) 288-5169
Toll Free: (800) 762-5723
Online: http://www.rainwise.com/
Contact Form: http://www.rainwise.com/about/contact
24
RainWise PortLog Users Guide
2014 Revision
11) Warranty
RainWise, Inc. warrants RainWise, Inc. manufactured PortLog products against defects in
materials and/or workmanship for a period of 5 years from the date of purchase and agrees to
repair or replace any defective product without charge. Equipment supplied by RainWise but not
manufactured by RainWise is covered by the particular warranty of that manufacturer.
IMPORTANT: This warranty does not cover damages resulting from accident, misuse or
abuse, lack of reasonable care, the fixing of any attachment not provided with the product or
damage due to a lightning strike. RainWise, Inc. will not reimburse for take-down or installation
charges. RainWise, Inc. will not pay for warranty service performed by a non-authorized repair
service and will not reimburse the consumer for damage resulting from warranty service
performed by a non-authorized repair service. No responsibility is assumed for any special,
incidental or consequential damages.
To return a unit under this warranty, call (800)762-5723 within the continental US or (207)288-
5169. The service department will document the need for repair/replacement and arrange such.
Shipping costs from the customer to RainWise are borne by the customer, RainWise will cover
return shipment. It is the customer's responsibility to see that the unit is properly packed,
preferably in the original box, because damage occurring during return shipment is not covered
by this warranty.
NOTE: No other warranty, written or oral, is authorized by RainWise, Inc. This warranty gives
you specific legal rights, and you may also have other rights, which vary from state to state.
Some states do not allow the exclusion of limitation of incidental or consequential damages, so
the above exclusion and limitations may not apply to you.