portable generator owner’s manual - arkansas outdoor power
TRANSCRIPT

10000EXL
Model No. 9801–6 (10,000 Watt AC Generator) Manual No. 186686 Revision 1 (4/6/2001)
Visit our Generac website: www.generac–portables.com
Problems?Questions?Before taking your unit
back to the store,
call the generator helpline at
1-800-270-1408M–F 8–5 CT
Portable Generator Owner’s Manual
This is the safety alert symbol. It is used to alert you to potential personal injury hazards.Obey all safety messages that follow this symbol to avoid possible injury or death.

Generac Portable Products 10,000EXL Generator
2
EQUIPMENTDESCRIPTION
This generator is an engine–driven, revolving field,alternating current (AC) generator. It was designed tosupply electrical power for operating compatible electricallighting, appliance, tool and motor loads. This manualcontains information for a generator that operates120 and/or 240 Volt, single phase, 60Hz devices thatrequire up to 10,000 watts (10 kW) of power that pull upto 83.3 Amps at 120 Volts or 41.7 Amps at 240 Volts.
CAUTION! Do Not exceed the generator’swattage/amperage capacity. Add up the rated watts of alldevices you are connecting to generator receptacles at onetime. This total should not be greater than 10,000 wattsfor this generator. In most cases rated watts of theelectrical device can be found on the device nameplate. Ifthe device nameplate gives only volts and amps, multiplyvolts times amps to obtain watts (volts x amps = watts).
The generator’s revolving field is driven at about 3,600 rpmby a twin–cylinder engine.
Every effort has been expended to make sure that theinformation in this manual is both accurate and current.However, Generac reserves the right to change, alter orotherwise improve the product at any time without priornotice.
CAUTION! Do Not tamper with enginegoverned speed. High operating speeds aredangerous and increase the risk of personal injuryor damage to equipment. The generator suppliescorrectly rated frequency and voltage only whenrunning at proper governed speed. Incorrectfrequency and/or voltage can damage someconnected electrical loads. Operating at excessivelylow speeds imposes a heavy load and, whenadequate engine power is not available, may shortenengine life.
SAFETY RULESThis generator set was designed and manufactured forspecific applications. Do Not attempt to modify the unitor use it for any application it was not designed for. If youhave any questions about your generator’s application, askyour dealer/distributor or consult the factory.
The manufacturer could not possibly anticipate everycircumstance that might involve a hazard. For that reasonwarnings in the manual and warnings on tags or decalsaffixed to the unit are not all–inclusive. If you intend tohandle, operate or service the unit by a procedure ormethod not specifically recommended by the manufacturer,first make sure that such a procedure or method will notrender this equipment unsafe or pose a threat to you andothers.
Read this manual carefully and become familiarwith your generator set. Know its applications, itslimitations and any hazards involved.
WARNING! You must isolate the generatorfrom the electric utility by opening the electricalsystem’s main circuit breaker or main switch if thisunit is used for backup power. Failure to isolatethe generator from the power utility mayresult in injury or death to electric utilityworkers and damage to the generator due toa backfeed of electrical energy. Whenever unit isproviding backup power, the electric utility must benotified.
DANGER! Generator exhaust gases containDEADLY carbon monoxide gas. Carbonmonoxide, if breathed in sufficientconcentrations, can cause unconsciousness ordeath. Operate this equipment outdoors whereadequate ventilation is available.
The Emission Control System for this generator iswarranted for standards set by theEnvironmentalProtection Agency. For warranty information refer to theengine owner’s manual.
The engine exhaust from this product containschemicals known to the State of California to
cause cancer, birth defects, or otherreproductive harm.
WARNING:

Generac Portable Products 10,000EXL Generator
3
• The generator produces a very powerful voltage that cancause serious injury or death by electrocution. Nevertouch bare wires or receptacles. Never permit a childor any unqualified person to operate the generator.
• Never handle any kind of electrical cord or device whilestanding in water, while barefoot or while hands or feetare wet. Death or serious injury from electrocution mayresult.
• Use a ground fault circuit interrupter (GFCI) in any dampor highly conductive area (such as metal decking or steelwork).
• Never use worn, bare, frayed or otherwise damagedelectrical cords with the generator. Death, serious injuryand property damage from electrical shock may result.
• Gasoline is highly FLAMMABLE and its vapors areEXPLOSIVE. Never allow smoking, open flames,sparks or heat in the vicinity while handlinggasoline. Avoid spilling gasoline on a hot engine.Comply with all laws regulating storage and handling ofgasoline.
• Do Not overfill the fuel tank. Always allow room forfuel expansion. If tank is overfilled, fuel can overflowonto a hot engine and cause a FIRE or anEXPLOSION.
• Never store a generator with fuel in the tank wheregasoline vapors might reach an open flame, spark or pilotlight (as on a furnace, water heater, clothes dryer). FIREor an EXPLOSION may result.
• The unit requires an adequate flow of cooling air for itscontinued proper operation. Never operate the unitinside any room or enclosure where the free flow ofcooling air into and out of the unit might be obstructed.Allow at least 2 feet of clearance on all sides of generator,even while operating unit outdoors, or you could damagethe unit.
• Never start, or stop the unit with electrical loadsconnected to receptacles with the connected devicesturned ON. Start the engine and let it stabilize beforeconnecting any electrical loads. Disconnect all electricalloads before shutting down the generator.
• Do Not insert any object through cooling slots of theengine. You could damage the unit or injure yourself.
• Never operate the generator:in rain; in any enclosed compartment; when connectedelectrical devices overheat; if electrical output is lost; ifengine or generator sparks; if flame or smoke isobserved while unit is running; if unit vibrates excessively.
GROUNDING THEGENERATOR
The National Electric Code requires the frame andexternal electrically conductive parts of the generator beproperly connected to approved earth ground. Localelectrical codes may also require proper grounding of theunit. For this purpose, a ground lug (Figure 1) is providedon the cradle.
Generally, connecting a No. 12 AWG (American WireGauge) stranded copper wire to the ground lug screw andto an earth–driven copper or brass grounding rod(electrode) provides adequate protection against electricalshock. However, local codes may vary widely. Consult witha local electrician for grounding requirements in your area.Be sure to keep the ground wire attached while youconnect the electrode.
Properly grounding the generator helps prevent electricalshock if ground fault conditions exists in the generator orin connected electrical devices. Proper grounding also helpsdissipate static electricity, which often builds up inungrounded devices.
Ground Lug
Figure 1 — Location of Ground Lug

Generac Portable Products 10,000EXL Generator
4
Your generator requires some assembly and is ready foruse after it has been properly serviced with therecommended oil and fuel.
IMPORTANT: Any attempt to run the engine before ithas been serviced with the recommended oil will result inan engine failure.
TO REMOVE GENERATORFROM CARTON
• Set the palleted carton on a rigid flat surface.
• Carefully cut bands around the shipping carton.
• Lift carton off the generator.
• Remove all packing material, carton fillers, etc.
• Remove the generator from the shipping pallet.
CARTON CONTENTSCheck all contents. If any parts are missing or damaged, callthe generator helpline at 1–800–270–1408. Contentsinclude:
• The main unit
• Owner’s and engine manuals
• 2 bottles engine oil
• 125 Volt, 30 Amp plug
• 125 Volt, 20 Amp plug
• 120/240 Volt, 30 Amp plug
• Battery charge cable
• Wheel kit
ASSEMBLE WHEEL KITIf you have any problems with the assembly of yourgenerator, please call the generator helpline at1–800–270–1408.
IMPORTANT: This wheel kit is not intended forover–the–road use.
To install your wheel kit you need the following tool:
• 13 mm box, open end, or socket wrench
Install Wheel Kit as follows:
1. Place temporary blocks on a flat, even surface andplace the bottom of the generator cradle on theblocks.
2. Slide axle through both axle mounting brackets oncradle frame, as shown in Figure 2.
3. Slide a wheel spacer over each end of the axle.
4. Install a wheel on an axle and slide a flat washer overthe axle. Secure the wheel with retaining pin.
NOTE: Be sure to install each wheel with the airpressure valve on the outboard side.
5. Install the other wheel in the same manner.
6. Secure the vibration mount to the support leg with alock nut, a flat washer and a 30 mm long capscrew.
7. Secure the support leg assembly to the cradle with20 mm long capscrews, flat washers, and lock washers.
8 Position the handle on the cradle end opposite thecontrol panel. Secure the handle with 45 mm longcapscrews and lock nuts.
9. Tighten all lock nuts with the 13 mm wrench to ensureall components are secure.

Generac Portable Products 10,000EXL Generator
5
CHECK BATTERY / ATTACHNEGATIVE BATTERYWIRE
The battery on the generator is fully charged, sealed andpre–installed except for the negative (black) battery cable.
To install:• Cut off tie wrap on negative (black) cable attached to the
battery hold down.
• Remove nut on the negative battery terminal.
• Slide the negative battery cable over the screw on thenegative terminal (Figure 3).
• Reattach nut and tighten.
• Verify that the connections to the battery and generatorare tight and secure.
Figure 2 — Assemble Wheel Kit
Figure 3 — Negative Battery Connection
Handle
30 mmCapscrew
VibrationMount
Locknut
Flat washer
WheelSpacer
Wheel Retaining Pin
20 mm Capscrew
Lock washer
Flat washer
Support Leg
Locknut
45 mm Capscrew
Axle Flatwasher

Generac Portable Products 10,000EXL Generator
6
KNOW YOUR GENERATORRead this owner’s manual and safety rules before operating your generator.Compare the illustrations with your generator to familiarize yourself with the locations of various controls andadjustments. Save this manual for future reference.
12 Volt DC Receptacle — Use this receptacle withbattery charge cables to charge a 12 Volt battery.120 Volt AC, 20 Amp Duplex Receptacle — May beused to supply electrical power for the operation of120 Volt AC, single phase, 60 Hz, AC electrical lighting,appliance, tool and motor loads.120 Volt AC, 20 Amp Locking Receptacle — May beused to supply electrical power for the operation of120 Volt AC, 20 Amp, single phase, 60 Hz electrical lighting,appliance, tool and motor loads.120 Volt AC, 30 Amp Locking Receptacle — May beused to supply electrical power for the operation of120 Volt AC, 30 Amp, single phase, 60 Hz electrical lighting,appliance, tool and motor loads.120/240 Volt AC, 30 Amp Locking Receptacle —May be used to supply electrical power for the operationof 120 and/or 240 Volt AC, 30 Amp, single phase, 60 Hzelectrical lighting, appliance, tool and motor loads.120/240 Volt AC, 50 Amp Receptacle — May be usedto supply electrical power for the operation of120/240 Volt AC, 50 Amp, single phase, 60 Hz electricalloads.
Air Cleaner — Used to limit the amount of dirt and dustthat gets in the engine.Choke Lever — Used when starting a cold engine.Circuit Breakers (AC) — Each receptacle is providedwith a push to reset circuit breaker to protect thegenerator against electrical overload.Grounding Lug — Use this connection to properlyground the generator. See “Grounding the Generator” onpage 3.Idle Control Switch — The idle control runs the engineat normal (high) speeds when there is a load present andruns the engine at idle (low) speeds when a load is notpresent. This feature greatly improves fuel economy,extends the life of the engine, and reduces engine noise.Ignition Switch — Must be set to the On (–) position tostart generator. To turn off generator, set switch to theStop (o) position.Spark Arrestor Muffler — Exhaust muffler lowersengine noise and is equipped with a spark arrestor screen.Start Button — When pressed, cranks engine to start.
120 Volt AC, 20 AmpDuplex Receptacle
Idle Control Switch
Ignition SwitchChoke Lever
120 Volt AC, 30 AmpLocking Receptacle
120 Volt AC, 20 AmpLocking Receptacle
120/240 Volt AC,50 Amp Receptacle
Circuit Breakers (AC)
120/240 Volt AC, 30 AmpLocking Receptacle
12 Volt DC Receptacle
Air Cleaner
Start Button
Grounding Lug
Spark ArrestorMuffler

Generac Portable Products 10,000EXL Generator
7
BEFORE STARTING THEENGINE
Add Engine Oil
CAUTION! Any attempt to crank or start the enginebefore it has been properly serviced with therecommended oil results in an engine failure.
• Make sure unit is on a level surface.
• Follow the oil recommendations and oil fill instructionsgiven in the engine owner’s manual.
NOTE: The generator’s revolving field rides on apre–lubricated and sealed ball bearing that requires noadditional lubrication for the life of the bearing.
Add Gasoline
WARNING! Never fill fuel tank indoors. Neverfill fuel tank when engine is running or hot. Do Notlight a cigarette or smoke when filling the fuel tank.
WARNING! Do Not overfill the fuel tank.Always leave room for expansion.
• Use regular UNLEADED gasoline in the generator.Do Not use premium gasoline. Do Not mix oil withgasoline. Do Not overfill the gas tank.
• Clean area around fuel fill cap; remove cap.
• Fill fuel tank with clean, fresh, unleaded gasoline. Becareful not to overfill. Allow 1/2" of tank space for fuelexpansion, as shown in Figure 4.
• Install fuel cap and wipe up any spilled gasoline.
IMPORTANT: It is important to prevent gum depositsfrom forming in essential fuel system parts such as thecarburetor, fuel filter, fuel hose or tank during storage.Also, experience indicates that alcohol–blended fuels(called gasohol, ethanol or methanol) can attract moisture,which leads to separation and formation of acids duringstorage. Acidic gas can damage the fuel system of an enginewhile in storage. To avoid engine problems, the fuel systemshould be emptied before storage of 30 days or longer. See“Storage”. Never use engine or carburetor cleanerproducts in the fuel tank or permanent damage may occur.
IMPORTANT: When running your unit in cold weatherbe sure to shelter the unit from the wind.
OPERATING THEGENERATOR
CAUTION! Never start or stop the unit withelectrical loads connected AND with the connecteddevices turned on.
Starting the Engine• Disconnect all electrical loads from the generator.
• Make sure the Idle Control switch is turned OFF.
• Open the fuel shut–off valve.
• Set the Ignition switch to the On (–) position.
• Pull choke control out to close choke.
NOTE: If engine is warm, you may not need as muchchoke.
For Electric Start:
• Press the Run/Stop switch to the “RUN” position, Pressthe electric start button, located on the generator cradleopposite the control panel, until engine cranks.
• Use short starting cycles (15 sec. per min.) to prolongstarter life. Extended cranking can damage starter motor.
CAUTION! If starting the engine with the electricstarter, always operate the engine with the batteryconnected. This ensures that the battery will be recharged.
Figure 4 — Fuel Level

Generac Portable Products 10,000EXL Generator
8
• When the engine starts, open the choke gradually asengine warms up up by pushing in on the choke handle.
• Set the Idle Control On/Off switch to the “On”position.
For Manual Start:
• Grasp starter grip handle and pull slowly until you feelsome resistance. Then pull cord out with rapid full armstroke. Let rope return slowly. Do Not let rope “snapback” against starter. Repeat, if necessary, with chokeopened slightly.
• When engine starts, open the choke gradually as theengine warms up by pushing in on the choke handle.
• Set the Idle Control On/Off switch to the “On”position.
Applying Electrical Loads• Let engine stabilize and warm up for about three minutes
after starting.
• Plug in the desired 120 or 240 Volt AC, single phase,60 Hertz electrical loads.
DO NOT OVERLOAD THE GENERATOR. Add upthe rated watts (or Amps) of all loads to be connectedat one time. This total should not be greater than therated wattage/amperage capacity of the generator. See“Don’t Overload the Generator” on page 12 for details.
Stopping the Engine• Disconnect all electrical loads.
• Turn “Off” Idle Control switch.
• Run engine at no–load for three minutes.
• Set the Ignition switch to the “Stop” position.
• Close the fuel shut–off valve.
Operating Automatic Idle ControlThis switch is designed to greatly improve fuel economy.When this switch is turned ON, the engine will only run atits normal high governed engine speed when an electrical
load is connected. The engine will run at a reduced speedwhen no load is present. With the switch OFF, the enginewill run constantly at the normal high engine speed.Always have the switch OFF when starting andstopping the engine.
Charging a BatteryYour generator has the capability of recharging a discharged12 Volt automotive or utility style storage battery. Do Notuse the unit to charge any 6 Volt batteries. Do Not usethe unit to crank an engine having a discharged battery.
WARNING! Storage batteries give off explosivehydrogen gas while recharging. An explosive mixturewill remain around the battery for a long time afterit has been charged. The slightest spark can ignitethe hydrogen and cause an explosion. Such anexplosion can shatter the battery and causeblindness or other serious injury.
WARNING! Do Not permit smoking, openflame, sparks or any other source of heat around abattery. Wear protective goggles, rubber apron andrubber gloves when working around a battery.Battery electrolyte fluid is an extremely causticsulfuric acid solution that can cause severe burns. Ifspill occurs, flush area with clear water immediately.
To recharge 12 Volt batteries, proceed as follows:
• Check fluid level in all battery cells. If necessary, addONLY distilled water to cover separators in batterycells. Do Not use tap water.
• If the battery is equipped with vent caps, make sure theyare installed and are tight.
• If necessary, clean battery terminals.
• Connect battery charge cable connector plug to panelreceptacle identified by the words “12–VOLTS D.C.”.
• Connect battery charge cable clamp with red handle tothe positive (+) battery terminal (Figure 5).

Generac Portable Products 10,000EXL Generator
9
• Connect battery charge cable clamp attached to theblack lead to the negative (–) battery terminal(Figure 5).
• Start engine. Let the engine run while battery recharges.
• When battery has charged, shut down engine.
NOTE: Use an automotive hydrometer to test batterystate of charge and condition. Follow the hydrometermanufacturer’s instructions carefully. Generally, a battery isconsidered to be at 100% state of charge when specificgravity of its fluid (as measured by hydrometer) is 1.260 orhigher.
RECEPTACLESThis generator is equipped with the following receptacles:
120 Volt, 20 Amp, DuplexReceptacle
Each of these outlets is protected against overload by20 Amp push–to–reset circuit breakers. Use each outlet tooperate 120 Volt, 60 Hz, single phase loads requiring2,400 (2.4 kW) watts at 20 Amps of current (Figure 6).
Figure 5 — Connect Battery Charge Cables
Black lead
Figure 6 — 120 Volt, 20 Amp Duplex Receptacle
Generac Portable Products 10,000EXL Generator
10
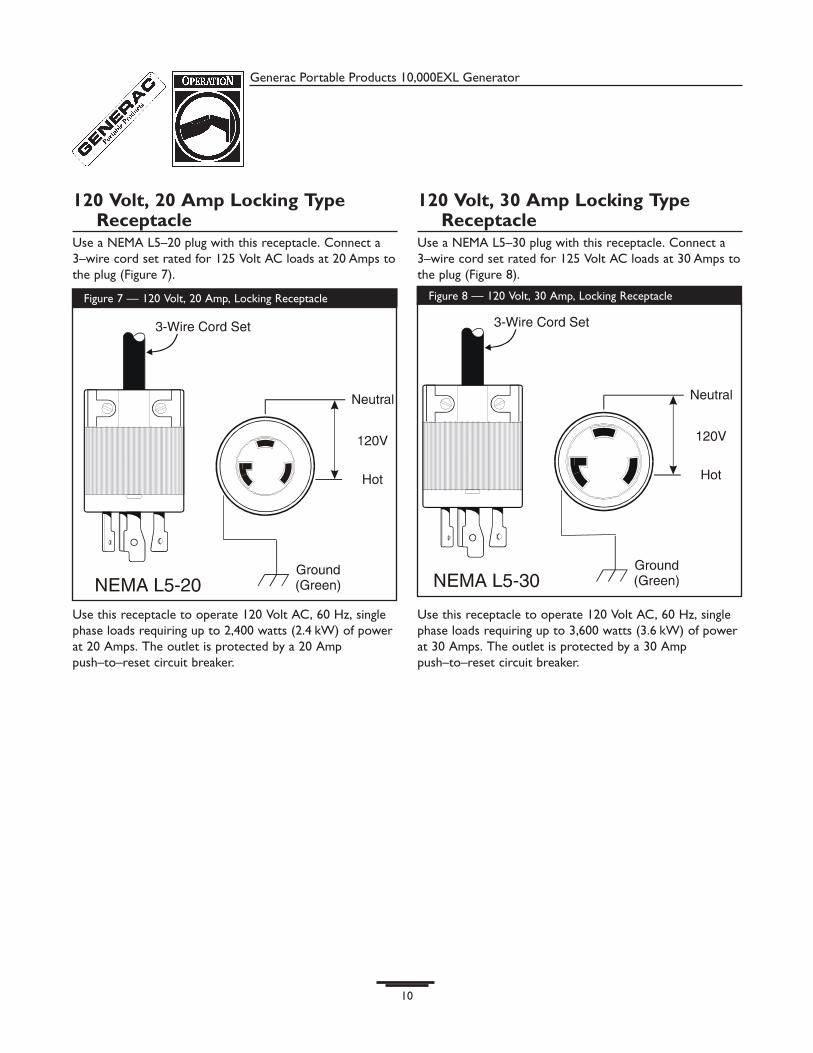
120 Volt, 20 Amp Locking TypeReceptacle
Use a NEMA L5–20 plug with this receptacle. Connect a3–wire cord set rated for 125 Volt AC loads at 20 Amps tothe plug (Figure 7).
Use this receptacle to operate 120 Volt AC, 60 Hz, singlephase loads requiring up to 2,400 watts (2.4 kW) of powerat 20 Amps. The outlet is protected by a 20 Amppush–to–reset circuit breaker.
120 Volt, 30 Amp Locking TypeReceptacle
Use a NEMA L5–30 plug with this receptacle. Connect a3–wire cord set rated for 125 Volt AC loads at 30 Amps tothe plug (Figure 8).
Use this receptacle to operate 120 Volt AC, 60 Hz, singlephase loads requiring up to 3,600 watts (3.6 kW) of powerat 30 Amps. The outlet is protected by a 30 Amppush–to–reset circuit breaker.
Figure 8 — 120 Volt, 30 Amp, Locking ReceptacleFigure 7 — 120 Volt, 20 Amp, Locking Receptacle

Generac Portable Products 10,000EXL Generator
11
120/240 Volt, 30 Amp Locking TypeReceptacle
Use a NEMA L14–30 plug with this receptacle. Connect a4–wire cord set rated for 250 Volt AC loads at 30 Amps(or greater) (Figure 9). You can use the same 4–wire cordif you plan to run a 120 Volt load.
This receptacle powers 120/240 Volt AC, 60 Hz, singlephase loads requiring up to 3,600 watts of power (3.6 kW)at 30 Amps for 120 Volts AC; 7,200 watts of power(7.2 kW) at 30 Amps for 240 Volts AC. The outlet isprotected by a 30 Amp push–to–reset circuit breaker.
240 Volt, 50 Amp ReceptacleUse a NEMA 14–50 plug with this receptacle. Connect a4–wire cord set rated for 250 Volt AC loads at 50 Amps tothe plug (Figure 10).
Use this receptacle to operate 240 Volt AC, 60 Hz, singlephase loads requiring up to 10,000 watts (10.0 kW) ofpower.
CAUTION! Although this outlet states it has a240 Volt 50 Amp rating (up to 12,500 watts), thegenerator is only rated for 10,000 watts. Poweringloads that exceed the wattage/ amperage capacity ofthe generator can damage it or cause seriousinjuries.
Figure 9 — 120/240 Volt, 30 Amp, Locking Receptacle
Figure 10 — 120/240 Volt, 50 Amp, Receptacle

Generac Portable Products 10,000EXL Generator
12
DON’T OVERLOAD THEGENERATOR
Overloading a generator in excess of its rated wattagecapacity can result in damage to generator and toconnected electrical devices. Observe the following, toprevent overloading the unit:
• Add up the total wattage of all electrical devices to beconnected at one time. This total should NOT begreater than the generator’s wattage capacity.
• The rated wattage of lights can be taken from light bulbs.The rated wattage of tools, appliances and motors canusually be found on a data plate or decal affixed to thedevice.
• If the appliance, tool or motor does not give wattage,multiply Volts times ampere rating to determine watts(volts x amps = watts).
• Some electric motors, such as induction types, requireabout three times more watts of power for starting thanfor running. This surge of power lasts for only a fewseconds when starting such motors. Be sure you allowfor this high starting wattage when selecting electricaldevices to connect to your generator. First figure thewatts needed to start the largest motor. Add to thatfigure the running watts of all other connected loads.
• Items in Figure 11 below are provided to help you todetermine how many items the generator can operate atone time.
Recreational/Home UsesTool/Appliance..................................................WattsAM/FM clock radio ..................................................................50Light bulb .................................................................................100Fan .............................................................................................20020" color TV............................................................................400*Deep freezer .........................................................................500Personal computer and 15" monitor.................................800*1/3 hp furnace fan blower ..................................................800Microwave oven......................................................................800*18 cu ft refrigerator.............................................................800Sump pump ...........................................................................1000Electric skillet........................................................................1250*½ hp water well pump .....................................................1400*12,000 Btu window air conditioner...............................1400Space heater..........................................................................1800Electric water heater ..........................................................4000
Professional/Contractor UsesTool/Appliance..................................................Watts*1/3 hp airless sprayer ..........................................................6003/8" hammer drill ...................................................................600Variable speed Sawzall® .......................................................960½" power drill ......................................................................1000Quartz-halogen work light ................................................1000Belt sander ............................................................................12007 ¼" circular saw .................................................................15007 ¼" worm drive saw .........................................................1600*1½ hp air compressor ......................................................1800*10" power miter saw.........................................................18006" bench grinder ..................................................................1800*6" table planer.....................................................................1800*10" table/radial arm saw...................................................2000Wire feed welder.................................................................2400
*=allow 3 times listed watts for starting surge
Figure 11 — Wattage Reference Guide

Generac Portable Products 10,000EXL Generator
13
GENERAL MAINTENANCERECOMMENDATIONS
The owner/operator is responsible for making sure that allperiodic maintenance tasks are completed on a timelybasis; that all discrepancies are corrected; and that the unitis kept clean and properly stored. Never operate adamaged or defective generator.
Engine MaintenanceSee your engine owner’s manual for information needed tomaintain and service the engine.
Generator MaintenanceGenerator maintenance consists of keeping the unit cleanand dry. Operate and store the unit in a clean dryenvironment where it will not be exposed to excessivedust, dirt, moisture or any corrosive vapors. Make sure thecooling air slots in the generator do not become cloggedwith snow, leaves or other foreign material.
Check cleanliness of the generator frequently and cleanwhen dust, dirt, oil, moisture or other foreign substancesare visible on its exterior surface.
NOTE: Do Not use a garden hose to clean generator.Water can enter the engine fuel system and causeproblems. In addition, if water enters the generatorthrough the cooling air slots, some water will be retainedin the voids and cracks of the rotor and stator windinginsulation. Water and dirt buildup on the generator internalwindings will eventually decrease the insulation resistanceof these windings.
To Clean the Generator• Use a damp cloth to wipe exterior surfaces clean.
• Soft, bristle brush may be used to loosen caked on dirtor oil.
• A vacuum cleaner may be used to pick up loose dirt anddebris.
• Low pressure air (not to exceed 25 psi) may be used toblow away dirt. Inspect cooling air slots and opening ongenerator. These openings must be kept clean andunobstructed.
STORAGE INSTRUCTIONSThe generator should be started at least once every sevendays and allowed to run at least 30 minutes. If this cannotbe done and you must store the unit for more than30 days, use the following guidelines to prepare it forstorage.
Generator Storage• Clean the generator as outlined in “To Clean the
Generator.”
• Check that the cooling air slots and openings on thegenerator are open and unobstructed.
• Change engine oil.
• Drain fuel and run engine until the fuel system is empty.
• Remove spark plugs and pour about 1 ounce of cleanengine oil into spark plug holes. Crank engine overslowly several times, to distribute oil. Install and tightenspark plugs.
• Remove the negative battery cable from the battery toprevent the battery from being depleted.
• Store the unit in a clean dry place.
CAUTION! Storage covers can be flammable.Do Not place a storage cover over a hotgenerator. Let the unit cool for 5 minutes beforeplacing cover on the unit.
SPECIFICATIONSRated Maximum Continuous
AC Power Output .................................. 10,000 watts (10 kW)
Rated Maximum SurgeAC Power Output .................................. 12,000 watts
(12 kW)Rated Voltage............................................... 120/240 VoltsRated Maximum AC Current
at 240 Volts .............................................. 41.7 Amperesat 120 Volts .............................................. 83.3 Amperes
Phase.............................................................. 1Rated AC Frequency.................................. 60 HertzNumber of Rotor Poles ............................ 2

Generac Portable Products 10,000EXL Generator
14
NOTES

Generac Portable Products 10,000EXL Generator
15
TROUBLESHOOTINGProblem Cause Correction
Engine is running, but noAC output is available.
1.� One of the circuit breakers is open.2.� Fault in generator.3.� Poor connection or defective cord set.4.� Connected device is bad.
1.� Reset circuit breaker.2.� Contact Generac service facility.3.� Check and repair.4.� Connect another device that is in good
condition.
Engine runs good at no-load but “bogs down"when loads areconnected.
1.� Short circuit in a connected load.2.� Engine speed is too slow.
3.� Generator is overloaded.
4.� Shorted generator circuit.
1.� Disconnect shorted electrical load.2.� Contact Briggs & Stratton service
facility.3.� See “Don't Overload the Generator”
on page 12.4.� Contact Generac service facility.
Engine will not start; orstarts and runs rough.
1.� Run/Stop Switch set to “STOP”.2.� Dirty air cleaner.3.� Out of gasoline.4.� Stale gasoline.5.� Spark plug wire not connected to
spark plug.6.� Bad spark plug.7.� Water in gasoline.8.� Overchoking.9.� Excessively rich fuel mixture.
10� Intake valve stuck open or closed.
11� Engine compression lost.
12� Failed battery.
1.� Set switch to “RUN”.2.� Clean or replace air cleaner.3.� Fill fuel tank.4.� Drain gas tank; fill with fresh fuel.5.� Connect wire to spark plug.
6.� Replace spark plug.7.� Drain gas tank; fill with fresh fuel.8.� Open choke fully and crank engine.9.� Contact Briggs & Stratton service
facility.10� Contact Briggs & Stratton service
facility.11� Contact Briggs & Stratton service
facility.12� Replace battery.
Engine shuts down duringoperation.
1.� Out of gasoline.2.� Low oil level.
1.� Fill fuel tank.2.� Fill crankcase to proper level.
Engine lacks power.1.� Load is too high.
2.� Dirty air filter.
1.� See “Don't Overload the Generator”on page 12.
2.� Replace air filter.
Generac Portable Products 10,000EXL Generator
16
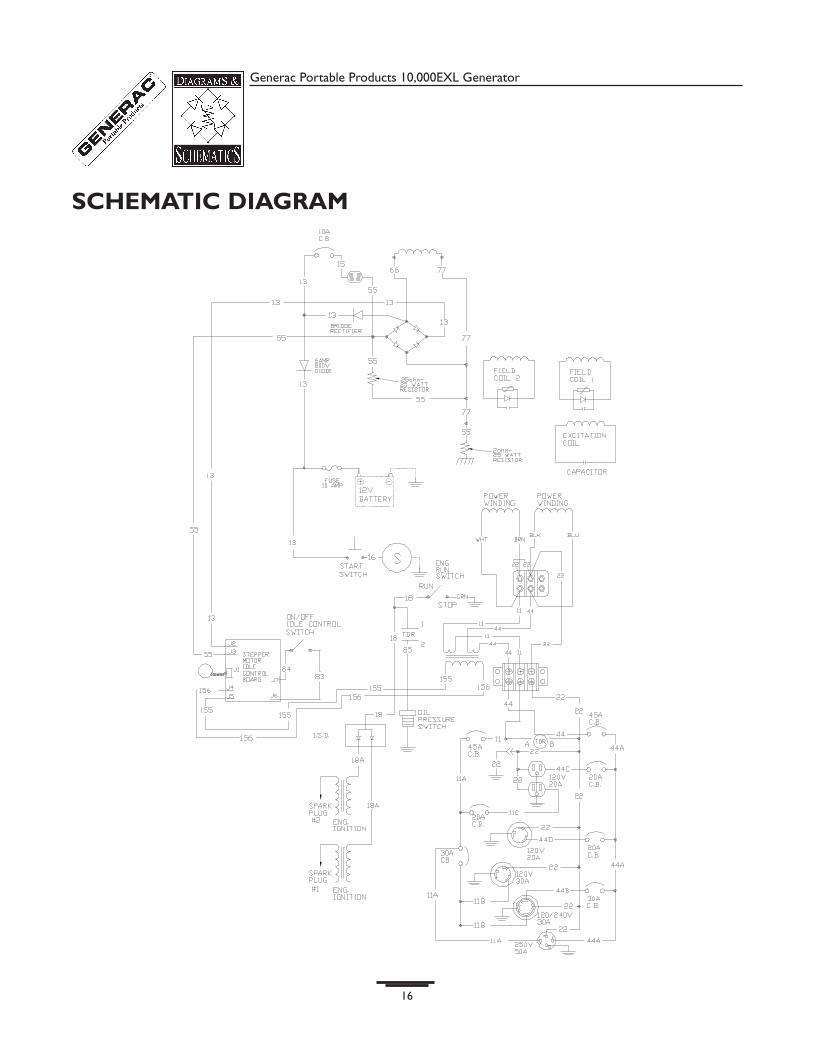
SCHEMATIC DIAGRAM

Generac Portable Products 10,000EXL Generator
17
WIRING DIAGRAM

Generac Portable Products 10,000EXL Generator
18
GENERATOR EXPLODED VIEW

Generac Portable Products 10,000EXL Generator
19
Item Part # Qty Description1 NSP 1 ENGINE2 BB4509A 1 SHIELD, Heat3 A77304 2 SUPPORT, Engine4 BB5567 1 SHIELD, Heat5 80270 1 VALVE, Fuel Shut-Off6 78299 1 BUSHING, Fuel Valve7 B4325 1 CAP, Fuel Tank8 38353 6 MOUNTS, Vibration9 78831B 4 CAPSCREW, M6-1.0 x 60mm10 B1997 1 TANK, Fuel 10 Gal11 AB4426 1 CRADLE12 83465 4 GROMMET, Fuel Tank Mounting13 87680 1 WING NUT, M6 - 1.014 23152 6 CAPSCREW, 3/8-16 x 3/4"15 22237 16 WASHER, 3/8" Lock16 22241 6 NUT, 3/8"-16 Hex 17 77816 2 DECAL, Caution Hot Muffler18 22131 2 WASHER, 3/8" Flat19 B93074 1 SHIELD, Heat20 186076 1 ASSEMBLY, Control Panel21 19553621 1 WIRE ASSEMBLY, Ground22 45757 1 HHCS, M6 - 1.0 x 2523 75246 4 SELF TAPPING, 3/8"-16 x 1-1/4"24 22145 2 WASHER, M8 Flat25 26850 3 WASHER, M6 Shakeproof26 20566 1 DECAL, 1-80027 B4986 1 DECAL, Ground28 92982 1 DECAL, Danger29 B5021 1 DECAL, Side Panel30 B5020 1 DECAL, Control Panel31 52857 1 NUT, Locking M6 - 1.032 22287 2 CAPSCREW, 1/4"33 93826 1 DECAL, Start Instructions34 78289 1 BRACKET, Starter Switch 35 B2153 19 SCREW, #12 Self Driller36 73054 1 DECAL, Fuel Shut-Off37 B4268 1 ALTERNATOR, 10KW38 77282 1 SWITCH, Starter39 22097 4 WASHER, 1/4" Lock40 B4489 1 BATTERY41 22127 4 NUT, 1/4" - 20 Hex42 198-53621 1 WIRE ASSEMBLY, Starter43 A96925 1 BRACKET, Battery Tie Down44 96924 2 J-BOLT, M8 - 1.2545 19953621 1 CABLE, Battery Positive46 19753621 1 CABLE, Battery Negative47 52618 2 HHCS, M5 - 0.8 x 1248 49226 1 WASHER, M5 Lock49 52856 2 NUT, M5 Flange Lock
Item Part # Qty Description50 49820 2 NUT, Nylok M8 - 1.2551 42907 1 CAPSCREW, M8 - 1.25 x 2052 49813 1 NUT, Hex M6 - 1.054 27482 1 WASHER, 5/16" Shakeproof55 47411 4 CAPSCREW, M6 - 1.0 X 1656 22473 1 WASHER, Flat M657 55934T 1 CLAMP, Hose58 55934G 2 CLAMP, Hose59 22511 4 CAPSCREW, 3/8 x 1-1/4"60 96832 1 CLAMP, Hose61 52618 1 HHCS, M5 - 0.8 x 1262 B4794 1 GROMMET, Generator Cover63 23897 2 WASHER, M5 Lock64 30340 1 HOSE, 1/4" I.D., 21"65 48031C 2 CLAMP, Hose 1/2"66 62265 1 GROMMET, Rubber67 95349 1 PLATE, Adjust68 96717 1 SPRING69 95921 1 LINKAGE, Bell Crank to
Throttle70 75477 2 SCREW, M5-0.8 x 20 Phillips Hd.71 96716 3 WASHER, Nylon72 95348 1 BELL, Crank73 96378 1 SPACER74 51713 1 WASHER, M5 Flat75 49226 1 WASHER, M5 Lock76 95920 1 LINKAGE, Stepper Motor to
Bell Crank77 33141 1 CAPSCREW, #10-32 x 3/4" Hex
Hd.78 22129 2 WASHER, M8 - Lock79 39253 2 CAPSCREW, M8 - 1.25 x 1680 96867 1 ASSEMBLY, Stepper Motor81 A5850 1 U-CHANNEL, .09" Groove, 4"82 76040 1 SCREW, M5-0.8 x 16 Phillips
Head
Items Not Shown186686 1 Owner’s Manual37806 1 125V 30A Plug43438 1 120/240V 30A Plug65787 1 Battery Charge Cable93568 1 125V 20A PlugBB3061 2 Oil Bottle (28oz)
Available AccessoriesB4767 Storage Cover84883 Cord Wrap
GENERATOR PARTS LIST

Generac Portable Products 10,000EXL Generator
20
CONTROL PANEL EXPLODED VIEW

Generac Portable Products 10,000EXL Generator
21
Item Part # Qty Description1 AB4432 1 PANEL, Control2 B95906 1 BOX, Control3 43437 1 OUTLET, 120/240V, 30A Locking4 68759 1 OUTLET, 120V, 20A Duplex5 68868 1 OUTLET, 120V, 30A Locking6 B5112 1 ASM, Diode7 186102 1 ASSEMBLY, Engine Harness8 90576 1 GROMMET, Rubber9 B4262 1 OUTLET, 120/240V 50 Amp10 87962 1 CIRCUIT BREAKER11 93929 4 STAND OFF, 1/2" Hex12 51715 12 NUT, M4 - 0.7 Hex13 22264 16 LOCK WASHER, #8 M414 43181 10 SCREW, M3 - .05 x 10mm16 38150 20 FLAT WASHER, #817 23365 12 WASHER, #8 Shakeproof18 90418 1 OUTLET, 12V DC Snap19 43182 10 LOCK WASHER, M320 75207A 2 CIRCUIT BREAKER, 30 Amp21 78653 1 SWITCH, Run - Stop22 93986 8 SCREW, M3 - 0.5 x 20mm23 91526 4 SCREW, M5 - .08 x 12mm24 49226 5 LOCK WASHER, M525 23897 5 FLAT WASHER, M5 26 75207 3 CIRCUIT BREAKER, 20 Amp27 74190 1 OUTLET, 120V/20A28 92953 1 BLOCK, 50 Amp, 3 - Terminal29 80077 4 SCREW, M4 x 20mm30 94117 1 BOARD, Idle Control31 84028 1 TRANSFORMER, Idle Control32 65795 1 RECTIFIER, Battery Charge33 84135 1 GROMMET, Rubber34 79224 1 SCREW, M5 - 0.8 x 30mm35 186200 1 RESISTOR, .25 OHM, 25W36 B4893 4 STAND OFF37 82538 1 SWITCH, On - Off38 51714 4 NUT, Hex, M3 - 0.539 51716 1 HEXNUT, M5 - 0.840 B4445 2 CIRCUIT BREAKER, 45 Amp41 B4894 1 RECTIFIER, Battery Charge42 77314 1 RELAY, 3A Thermal43 B4892 1 RESISTOR, 2 OHM. 25 Watt44 27565 1 TAPE, Glass Insulation x 1.5"
CONTROL PANEL PARTS LIST

Generac Portable Products 10,000EXL Generator
22
Item Part # Qty Description1 B4906 1 SHIELD, Front2 B4907 2 GRID, Front3 B4908 1 BOLT, Shaft Stay4 B4909 4 STAY BOLT, M8 x 305 B4910 1 ASSEMBLY, Housing6 B4911 1 CAP7 B4912 1 COVER, Blind End8 B4913 1 COVER, Top Black9 B4914 2 CAPACITOR, 25mF 450V10 B4915 1 BEARING, 62052RS C311 B4916 1 CAPACITOR, Diode + Varistor + EMC12 B4917 1 ROTOR, (Includes Item 13)13 B4918 1 FAN14 B4919 2 SCREW, M6 - 1.0 x 10mm15 B4920 8 SCREW, M5 - 0.8 x 10mm16 49820 1 LOCK NUT, M8 - 1.25
ALTERNATOR EXPLODED VIEW AND PARTS LIST

Generac Portable Products 10,000EXL Generator
23
Item Part # Qty Description1 B93393B 1 HANDLE2 39287 4 HHCS, M8 - 1.25 x 453 52858 5 NUT, Locking M8 - 1.254 B93394 1 LEG, Mounting Support5 27007 1 MOUNT, Vibration6 22145 3 FLAT WASHER, 5/16 - M87 42909 1 HHCS, M8 - 1.25 x 308 39253 2 HHCS, M8 - 1.25 x 209 93693B 1 AXLE10 89635 2 SPACER, Wheel11 89742 2 WHEEL12 22247 2 WASHER, Wheel13 87005 2 PIN, Retaining14 22129 2 WASHER, M8 Lock
WHEEL KIT EXPLODED VIEW AND PARTS LIST

LIMITED WARRANTYFOR OVERHEAD VALVE V-TWIN ENGINE-DRIVEN PORTABLE GENERATORS
GENERAC PORTABLE PRODUCTS (hereafter referred to as the COMPANY) warrants to the original purchaser that allcomponents originally equipped with the generator, excluding the engine, for its portable generator will be free fromdefects in materials or workmanship for the items and period set forth below from the date of original purchase. Thiswarranty is not transferable and applies only to portable generators driven by an overhead valve V-Twin engine.
Consumer* Commercial*Alternator 2 years (2nd year parts only) 1 yearEngine Warranted solely by the engine manufacturer
With the exception of European Community Countries, all units bound for export shall be warranted forOne (1) Year in Consumer applications, and 90 days in Commercial applications as defined below.
*NOTE: For the purpose of this warranty "consumer use" means personal residential household use byoriginal purchaser. This warranty does not apply to units used for Prime Power in place of utility."Commercial Use" means all other uses, including rental, construction, commercial and income producingpurposes. Once a generator has experienced commercial use, it shall thereafter be considered acommercial use generator for the purposes of this warranty.
During said warranty period, the COMPANY will, at is option, repair or replace any part which, upon examination by theCOMPANY, is found to be defective under normal use and service**. Starting batteries are not warranted by theCOMPANY. All transportation costs under warranty, including return to the factory if necessary, are to be borne by thepurchaser and prepaid by the purchaser. This warranty does not cover normal maintenance and service and does not applyto a generator set, alternator, or parts which have been subjected to improper or unauthorized installation or alteration,misuse, negligence, accident, overloading, overspeeding, improper maintenance, repair or storage so as, in the COMPANY’sjudgement, to adversely affect its performance and reliability.
**NORMAL WEAR: As with all mechanical devices, the generator needs periodic parts service andreplacement to perform well. This warranty will not cover repair when normal use has exhausted the life ofa part or generator.
THERE IS NO OTHER EXPRESS WARRANTY. THE COMPANY HEREBY DISCLAIMS ANY AND ALLIMPLIED WARRANTIES, INCLUDING BUT NOT LIMITED TO THOSE OF MERCHANTABILITY ANDFITNESS FOR A PARTICULAR PURPOSE TO THE EXTENT PERMITTED BY LAW. THE DURATION OFANY IMPLIED WARRANTIES WHICH CANNOT BE DISCLAIMED IS LIMITED TO THE TIME PERIOD ASSPECIFIED IN THE EXPRESS WARRANTY. LIABILITY FOR CONSEQUENTIAL, INCIDENTAL OR SPECIALDAMAGES UNDER ANY AND ALL WARRANTIES IS EXCLUDED. THE COMPANY ALSO DISCLAIMSANY RESPONSIBILITY FOR INCIDENTAL OR CONSEQUENTIAL DAMAGES, SUCH AS THE LOSS OFTIME OR THE USE OF THE POWER EQUIPMENT, OR ANY COMMERCIAL LOSS DUE TO THE FAILUREOF THE EQUIPMENT: AND ANY IMPLIED WARRANTIES ARE LIMITED TO THE DURATION OF THISWRITTEN WARRANTY.
Some states do not allow limitations on how long an implied warranty lasts, or the exclusion or limitation of incidental orconsequential damages, so the above limitations or exclusions may not apply to you. This warranty gives you specific legalrights and you may also have other rights, which vary from state to state.
For service, see your nearest COMPANY authorized warranty service facility or call 1-877-544-0982. Warranty service canbe performed only by a COMPANY authorized service facility. This warranty will not apply to service at any other facility.At the time of requesting warranty service, evidence of original purchase date must be presented.
GENERAC PORTABLE PRODUCTSJefferson, Wisconsin 53549