porsche 951 bosch “044” - refresh951 l porsche 944 l ... 044 upgrade procedure.pdf · porsche...
TRANSCRIPT

Porsche 951 Bosch “044” Fuel Pump Upgrade Procedure
Disclaimer: By no means attempt this project without the proper knowledge of how to service a
vehicle with open gas lines. It is very easy to not only burn your car and house down to the ground, it
is also possible to be seriously injured or even die. Having the proper size and type fire extinguisher
readily available near the vehicle is a must and of course; disconnect the battery prior to
disconnecting any fuel lines. Be extremely careful at all times around the fuel that will be spilled or
dripped during this procedure, remembering at all times it is the fumes not the gas that is extremely
combustible. Don’t use anything that will generate a spark, including any kind of electrical device
such as a drill motor. Perform this procedure in a well ventilated area, not in a sealed up garage in the
winter time with a gas water heater nearby! I will accept no responsibility for any damages or
injuries which occur while following this procedure. Perform this at your own risk!
First of all I am going to provide a list of all the parts I used and their prices. Feel free to substitute for
different brands if you wish, but if you order these items I can vouch for everything fitting and
working properly. I ordered most items from Jegs or Summit. For some of the smaller or
miscellaneous items I don’t have part numbers and prices.
Item # Description Part Number Qty. Price Ea. Sub Total
1 Bosch 044 Fuel Pump 580254044 1 $175.00 $175.00 $175.00
2 Fuel Pressure Gauge 0-60 psi Liquid Filled 555-41042 1 $14.99 $14.99 $14.99
3 6 AN Fuel Press. Gauge Adaptor 555-100526 1 $11.99 $11.99 $11.99
4 Fuel Lab 40 Micron Fuel Filter Check Valve Combo 083-84811-3 1 $183.60 $183.60 $183.60
5 40 Amp 12VDC SPDT Realy w/ socket assembly ??? 1 $9.99 $9.99 $9.99
6 6 AN Female-Female Union EAR-915106ERL 2 $6.97 $6.97 $13.94
7 Female 8 AN Super Stock Hose to 120 degree elbow EAR-712009ERL 1 $24.99 $24.99 $24.99
8 12 X 1.5mm to 6 AN Banjo Bolt Adaptor EAR-807692ERL 1 $19.99 $19.99 $19.99
9 18 X 1.5mm to 8 AN Straight Adaptor EAR-9919EFKERL 1 $11.97 $11.97 $11.97
10 3' Hose Braided Nylon 6 AN (only need 1 foot) SUM-240603B 1 $15.97 $15.97 $15.97
11 Hose end Swivel Seal 6 AN to Female 6 AN, Straight EAR-800106ERL 1 $6.97 $6.97 $6.97
12 Hose end Swivel Seal 6 AN 90 degree Elbow EAR-809106ERL 1 $18.97 $18.97 $18.97
13 14 X 1.5mm to 6 AN Adaptor Fitting EAR-9894DBH 1 $10.95 $10.95 $10.95
14 2-Pin male and female weather pack connector (I bought kit from E-bay) 1 ? ? ?
15 12 AWG 2-conductor shielded cable 15' (I found at work) 15 ? ? ?
16 1/4" eye lug (I found at work) 2 $1.00 $2.00 $2.00
17 #8 eye lug (I found at work) 1 $1.00 $1.00 $1.00
18 Heat Shrink (Various Sizes) (I found at work) ? ? $10.00 $10.00
19 High-temp Thread Sealant, Permatex 59214 1 $4.77 $4.77 $4.77
20 4-Pin male and female Weather Pack Connector (I bought kit from E-bay) 1 ? ? ?
21 Fuel tank mesh prefilter (Lindsey Racing) 928-201-081-04 1 $44.95 $44.95 $44.95
Grand Total $582.04
Bosch 044 Fuel Pump Upgrade Parts list

Now that all of the safety preaching is over with let’s get started! Hopefully, you have been thinking
about this project for a while and have run down your tank to almost empty. If you haven’t, it will
make this project quite difficult as you need to drain your fuel tank. If you are on or near empty, the
task is very simple and will help to make this project much safer. Before performing the following
procedure, back the car onto a set of car ramps. You will not be able to do this after draining all of the
gas. If you are going to use jack stands, this is not necessary. I learned the following trick from
Shawn and have posted to Rennlist, but will repeat here as I think this is the fastest and most
convenient way to remove the remaining fuel in the tank. Before removing any lines you need to
prepare a long hose and adaptor to get the gas from the fuel rail into an appropriate container. I
chose to use the fuel regulator line because it only requires a 1/4'” to ¼” brass union adaptor from
Home Depot (see picture below) with the appropriate size and length of hose to attach to the opposite
end of the union along with a hose clamp.
I don’t feel fuel line is necessary, but pick something that will hold up to the fuel for the 5-10 minutes
needed to drain your tank. If you need faster flow you may use the dampener line instead, but this
will require an adaptor fitting. You will need the hose to be long enough to place into a 5 gallon
portable gas can or you could also insert into your other vehicles fuel tank if you have a spare car. I
would think 15 feet would be enough for every situation. Preassemble the hose to the brass barbed
union fitting and place the other end of the hose in the gas can or fuel tank of another car. OK, now I
am going to instruct you to do something which I have previously told you never to do, so PLEASE be
careful here and pay attention to what you are doing!!! Place rags under the fuel line connection to
the fuel regulator. Remove the fuel line going to your fuel regulator on the fuel rail. It is just a hose
clamp fitting and easy to remove. If the car has been sitting overnight or for several hours almost no
fuel will come out. If it does, clean up immediately and generate no sparks in the area. With the hose
off, now immediately connect it to the brass hose barb fitting and secure with the hose clamp. Next
remove the cover to your fuse/relay panel. Remove the DME relay and simultaneously jump three
female connectors where the relay previously plugged in. If you make up a three way jumper ahead of
time (which you should have on hand for any 944 in your glove box) it will make things easier. You
will need about a foot of 16-18 awg wire and three male spade solderless connectors (see picture
below).

Cut the wire into three 4” lengths, strip off ¼” of insulation from each end and place two leads into
one of the male spade connectors and crimp, then crimp the remaining two spade connectors to the
other two leads forming a “Y”. Using the “Y” you just made, jump terminal 30 to 87 & 87B. The fuel
pump will immediately come on and you will hear it running. Gas will start to flow through the tubing
into your container. You will also “Hear” when the tank is empty as the noise coming from the pump
will increase 2-3 times. When this happens disconnect the jumper and replace your DME relay. The
tank is now empty. The time required will of course depend on how much fuel you had in the tank,
but on my vehicle it removed 5 gallons in about 5 minutes. Make sure you have sufficient storage
space or you will have a dangerous flammable mess!!!
Now that the gas has been removed, we can begin the process of removing the original fuel pump and
filter. I am going to cover exactly what I did, some of these features are optional and can be omitted
depending on your particular tastes. You may also make changes to your liking, but I am covering the
process I chose after some considerable planning. Having “preassembles” will make this upgrade
much easier to perform. If you are going to “make as you go”; plan on a full day or more like a
weekend. There are two things which will make this task much easier if acquired ahead of time. A
spare original fuel pump condom/coozie and an original fuel hard line adaptor fitting. Both
candidates are readily available from your local Porsche junkyard or even better can most likely be
ordered from Lart, always good to support a fellow Rennlister. The original fuel hard line adaptor
must be taken to a machine shop and have about .200” removed from the threads. It is too long to
seat correctly on the –AN adaptor and will bottom out (see pictures below).

The pictures above show the original hard line adaptor fitting and the Earl’s -6AN adaptor. The
original Porsche fitting’s threads are too long and must be cut down .20” in order to not bottom out in
the Earl’s piece. The Earl’s piece is a 14 X 1.5 mm to -6AN adaptor fitting part number 9894DBH. I
used a new copper crush washer.
The other difficult and time consuming item is installing the Bosch 044 fuel pump into the original
factory fuel pump condom/coozie. First, start by removing the coozie from the original fuel pump by
making a clean circular cut around the circumference near the top of the coozie on the end with the
circular hole. Note: I do not have a picture of the coozie installed on the factory pump, but you can
see in the picture below where the cut needs to be made. This is all ready installed onto the Bosch
044. The “blue” line is where I made the cut and resealed with Super Blue ATV, I was out of black and
did not want to go to the store, you can use black and it will look better.

After making the cut around the circumference, you can remove the coozie from the stock pump. You
will then need to increase the circumference of the hole in the top of the coozie in order for it to fit
over the end of the Bosch 044 as shown above. I used several new razor blades on one of those long
blade break off cutters from Home Depot. I suppose this could also be achieved with the proper size
hole saw if you have one. The next part is installing the Bosch 044 into the coozie which is much
easier said than done. It is a very tight fit! I used a rubber mallet, 30mm deep well socket, WD-
40(lots), and a spare cross member to achieve this, but a press is definitely the way to accomplish this
task properly. Do not damage the electrical connectors during this process. Take extra care they are
not in contact with anything during this process. See my pictures below, but again, I highly suggest
using a press and thus why I recommend getting all of this done ahead of time. If you own a lathe and
a press then you are golden!
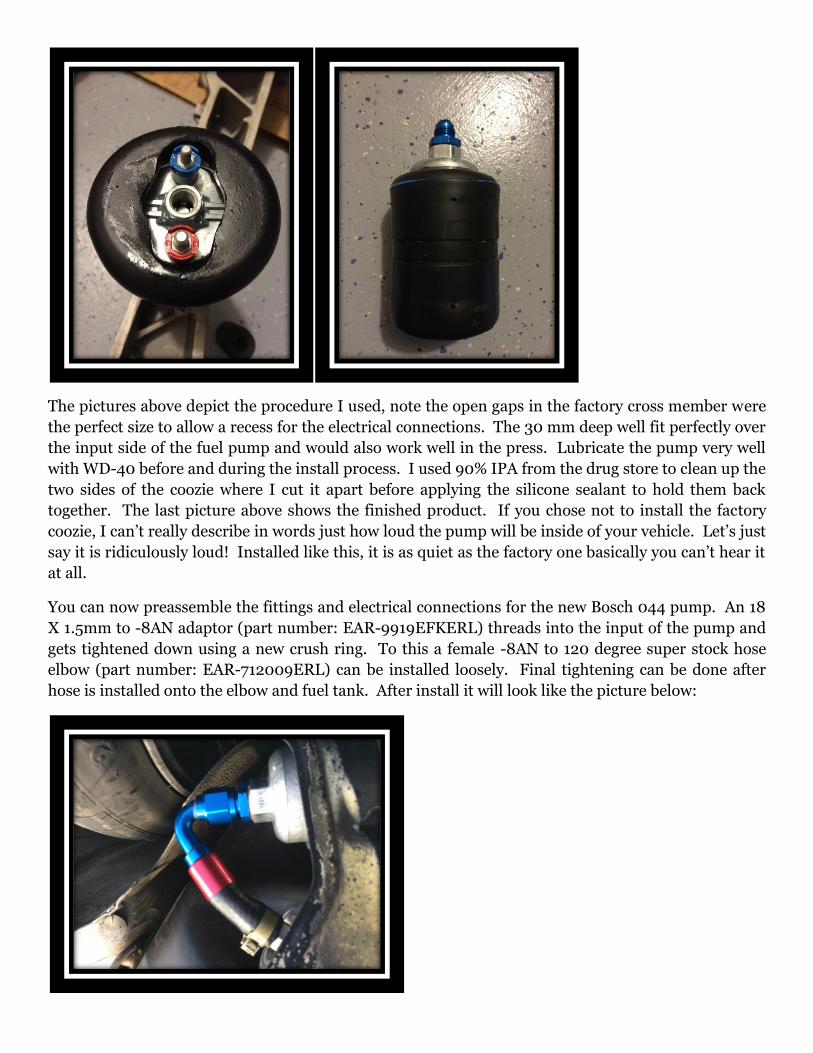
The pictures above depict the procedure I used, note the open gaps in the factory cross member were
the perfect size to allow a recess for the electrical connections. The 30 mm deep well fit perfectly over
the input side of the fuel pump and would also work well in the press. Lubricate the pump very well
with WD-40 before and during the install process. I used 90% IPA from the drug store to clean up the
two sides of the coozie where I cut it apart before applying the silicone sealant to hold them back
together. The last picture above shows the finished product. If you chose not to install the factory
coozie, I can’t really describe in words just how loud the pump will be inside of your vehicle. Let’s just
say it is ridiculously loud! Installed like this, it is as quiet as the factory one basically you can’t hear it
at all.
You can now preassemble the fittings and electrical connections for the new Bosch 044 pump. An 18
X 1.5mm to -8AN adaptor (part number: EAR-9919EFKERL) threads into the input of the pump and
gets tightened down using a new crush ring. To this a female -8AN to 120 degree super stock hose
elbow (part number: EAR-712009ERL) can be installed loosely. Final tightening can be done after
hose is installed onto the elbow and fuel tank. After install it will look like the picture below:

I made a one foot long “pigtail” electrical connection. I used a 2-pin weather pack connector on one
end and two different solderless ring lug terminals on the other end along with some heat shrink. I
used 12 AWG shielded cable. The red positive wire gets the ¼” ring lug terminal and the black
negative wire gets the #8 ring lug terminal. Note: The black wire goes to the blue pump connector,
but it is clearly marked negative. There is no need for shielded cable but I like the appearance.
Afterwards, the factory rubber protective boots can be installed for a factory look. See picture below.
Note: The picture above shows the connection before I knew how loud the pump was without the
factory coozie. Do not use the above isolation method for mounting your fuel pump!
Next you will make the fuel pump outlet hose connection. This is slightly difficult if your first time
working with AN fittings, but not too bad once you have done it. It is critical that the hose is the
proper length. I had to use trial and error, but you will not. You will use about 130mm of the -6AN
nylon braided E-85 approved flex line, the -6AN banjo bolt adaptor (part number EAR-807692ERL),
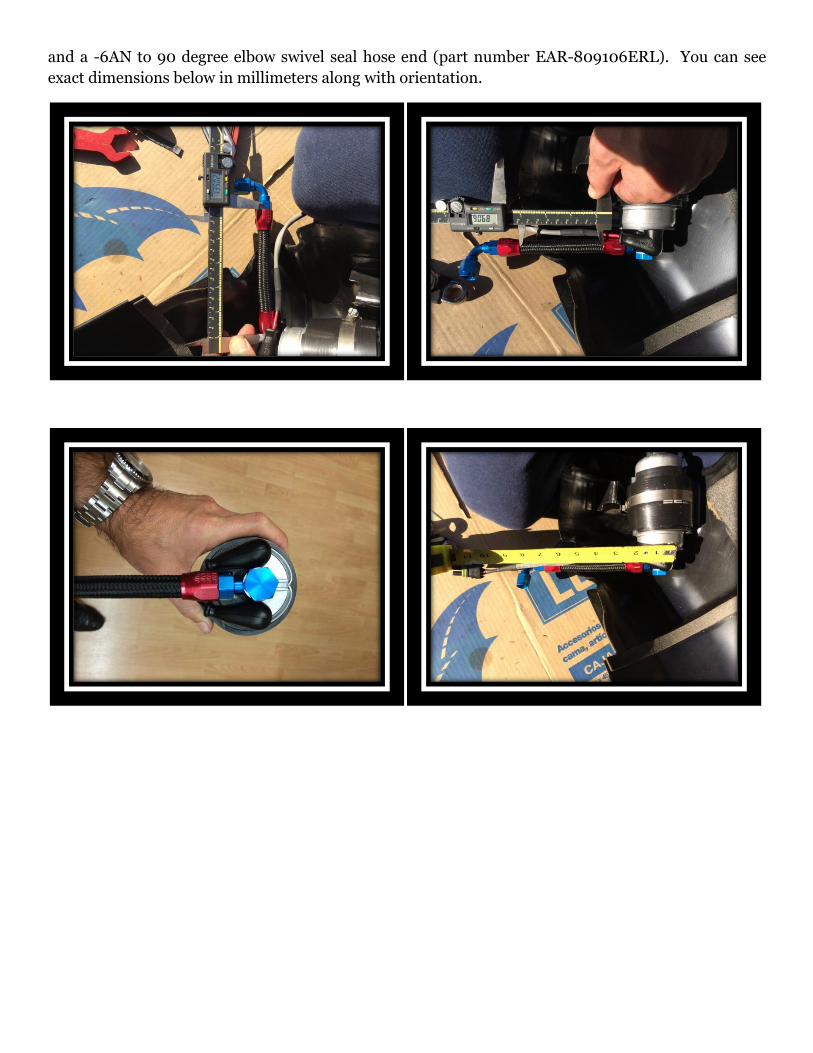
and a -6AN to 90 degree elbow swivel seal hose end (part number EAR-809106ERL). You can see
exact dimensions below in millimeters along with orientation.

The final picture above shows the final version with the factory coozie installed and mounted to the
fuel pump cover. Follow the many online procedures for making the actual AN flex line connections.
I used the proper Earl’s lube but I am sure any light weight oil would be fine. Either place electrical
tape on your adjustable wrench or buy the correct aluminum AN wrenches or you will mar your pretty
fittings. See some pictures below:
You can also preassemble the Fuel Lab filer check valve combo ahead of time. I also incorporated a
mechanical pressure gauge. This is optional, but a nice feature for about $25. See picture below
which shows the final assembly. You will need a new SS clamp and piece of appropriate diameter
silicone hose as a vibration dampener and scratch preventer. Sorry, I did not measure this diameter.
Also the gauge is on the input side and I would have much preferred it to be on the outlet side.
However, it simply will not fit on the outlet side without a considerable amount of modifications.

Pictures below show some of the assembly installed in the car.
The new clamp goes through the factory bracket for the factory fuel filter. The original filter is much
larger in diameter, so a new smaller SS hose clamp is required.
Preassemblies are now done and it is time to start assembly on the car and complete the wiring for the
new fuel pump relay. This is probably the most time consuming item. If well thought out, you can
knock this out in an hour. Now is the time to remove the negative terminal to your battery and secure
it out of the way. I chose to mount my relay in the left rear cubby as I had a large +12VDC power
source all ready pulled to this location for a stereo amplifier. Most people will have to pull a new large
gauge fused +12 VDC wire from the battery. You will need a standard 40 amp 12VDC car relay. This
along with the harness can be ordered from Amazon very cheaply, about $10. Terminals 85 and 86
are the coil leads and you will open and close the relay with the original factory wiring which was
going to the factory fuel pump. There are two wires going to the factory fuel pump. One is brown and
the other is green with a black stripe. There is a factory connector mounted above and to the front of

the fuel tank, see pictures below with penny. The two wires then go up into the cabin just behind
where the rear seat folds down on the right hand side. The cable then runs over to the left and goes
back down through a grommet. I cut the factory connector off so that I could only pull the two wires
up through the grommet. They are plenty long to reach over to the left rear cubby area. The ground is
the brown wire and the hot is the green with black stripe. I ran the brown to 86 and the hot to 85, but
it will work in either direction. I also incorporated another 4-pin weather pack connector close to the
relay. You will run a fused +12VDC line to pin 30 and a new 12 gauge lead (red) from pin 87 to the
pump. Pins 30 & 87 are normally open when no voltage is applied to pins 85 & 86, but “close” when
voltage is applied. I used a long piece of the 12 AWG shielded cable and carefully stripped back the
insulation for about two feet so that I had a separate red and black cable two feet long forming a “Y”.
The black goes directly to MP1, which is the factory ground point near the left rear tail light assembly
and just to the left of the spare tire well. You will need a ¼” solderless ring terminal. You can see
pictures below. This will be the ground for the fuel pump. The red wire will go to pin 87 of the new
relay. Then run the insulated portion over to the factory grommet and push through the grommet
and down to the fuel pump area. Use some WD-40 for lubrication. Again see, pictures for routing.
When at proper length allowing for a service loop, cut the cable and install the proper mating 2-pin
weather pack connector to plug into the new fuel pump pigtail.


With the wiring now complete, the rest is very simple with preassemblies completed. Remove the
access cover from below the car and attached to the fuel pump cover with two small Phillips head
screws. See picture below:
Next remove the fuel pump cover via the support strap which is held in place with a single 13mm head
bolt. It is way up in there and hard to see without a flashlight. You will need a long extension. After
removing the bolt, the strap will swing down and can be removed. The opposite end of the strap has a
bar on it that fits into a slotted device. It is hard to explain, but you will figure it out quickly. With the
strap removed and out of the way, the cover along with the fuel pump comes down where you can get
to all the connections. If you have not done so before, verify battery is disconnected. You can now
remove the original fuel pump and fuel filter. Some fuel will still be present but not much. Continue
to be careful around fuel! The original fuel filter can be removed from the cover via the large hose

clamp. The new assembly can be now put into place paying close attention to orientation and clamp
position. If it sticks too far out it will interfere with inspection cover. 2.5” from the hose clamp to
where the crush ring is located is about perfect. See pictures below:
Remove the factory hard line adaptor and install the one with the -6AN connector in which you
previous built up using a new crush washer. The next step is optional, but should be done while you
are in there. You can remove the internal mesh fuel prefilter with a 17mm deep well socket. Simply
unscrew it and replace with a new filter and gasket. LR sells them and they are also available at many
other places. Lubricate new gasket with some molybdenum grease prior to assembly. You can now
install the 2” long piece of -8AN super stock hose. One end simply pushes into place using some lube
and don’t forget red sleeve. The other end fits on the newly installed screen filter and clamps into
place. See pictures below:

The Fuel Lab filter check valve assembly can now be installed via the hose clamp in the original
location for the factory fuel filter. I would leave it loose at first until everything is settled. At this
point the fuel pump and cover can be lifted into place and everything connected. An extra set of
hands is very helpful now, but not required. You can do it by yourself, but much easier with two
people. The AN connectors need to be pretty tight, but not cranked farmer tight. You will need to
check for leaks after everything is installed and tight. The cable for the fuel pump can be connected
and tied up tidy with some cable ties. If all spilt fuel has evaporated, now is a good time to reconnect
the battery and start the car to make sure there are no leaks. Use a flashlight and look carefully.
Again, this task is easier with two people, so if you have a leak he/she can shut off the engine quickly.
If there are no leaks, replace the factory strap for the fuel pump cover and finally the inspection port
cover. I would do this prior to installing the strap as it makes the job much easier. The cover can be
difficult to install with the strap in place. Congratulations you are now finished.