pond waterfront improvement guide€¦ · web view2016-07-20 · executive summary ... this...
TRANSCRIPT
Pond Waterfront Improvement Guide
Prepared by AmeriCorps Member Ben Howard
and
Gwen Pelletier, Jan McGann, & John Keithof the Brewster Ponds Coalition
7/20/2016

1
Index
Executive Summary……………………………………………………………………….. 2
Introduction ……………………………………………………………………………….. 3
Approval Requirements…………………………………………………………………… 3
Community Rain Garden Timeline……………………………………………………….. 4
Rain Garden Outline ……………………………………………………………………… 5
Rain Garden Design Criteria……………………………………………………………... 8
Rain Garden Design Requirements………………………………………………………. 8
Navigating the RDA Process……………………………………………………………… 12
20 Steps to a Rain Garden and Improved Water Quality near Wetlands……………. 13
Sources and Additional Resources……………………………………………………….. 23
Appendix A. List of Acceptable Plants in Buffer Zones for the Town of Brewster….. 24
Appendix B. Note on transforming your lawn ………………………………………….. 29
Last Updated 7/20/2016

2
Executive Summary
Many ponds on Cape Cod suffer from threats to their environmental conditions, many of which are due to human development within the surrounding area, such as wastewater from septic systems (which reach the pond via groundwater), fertilizers, and storm runoff. The following document aims to encourage residents to undertake the important work of installing rain gardens as a means to address these contributors to pond water quality degradation.
The document first details the challenges to the water quality in ponds and describes how rain gardens can be part of a solution. To that end, the process to successfully install a rain garden is thoroughly outlined. The process is not complicated, but does require planning. Prior to installation of a rain garden, it is sometimes required that approval be granted from the Town Conservation Commission. Again, this process is not complicated, but to those unfamiliar with the process, it can appear daunting. This guide aims to make the process more navigable by providing all the necessary information in one location, organized in an orderly fashion, and communicated in plain language. This is done carefully through the provided step-by-step guide to the Request for Determination of Applicability.
To further facilitate this process, a number of visual representations are included, such as a timeline of the rain garden installation process, a 20 step checklist, and images of rain garden design. Furthermore, a list of sources and other helpful resources is provided. These resources should help equip any citizen to improve water quality in a pond of his or her community.
This document is the product of a collaborative effort by AmeriCorps Cape Cod and the Brewster Ponds Coalition. We are very grateful for the guidance and support from Noelle Bramer (the Brewster Conservation Agent) and the Brewster Conservation Commission. We hope this guide helps citizens and neighbors to more fully enjoy their ponds.
Last Updated 7/20/2016

3
Introduction
As mentioned above, many of the threats to environmental conditions of Cape Cod ponds are due to human development within the surrounding area. Of particular concern is the release of nutrients, notably phosphorus, to ponds, as this can lead to algae blooms. The major sources of human-caused pollution to ponds are generally wastewater from septic systems (which reach the pond via groundwater), fertilizers, and storm runoff.
Storm runoff refers to water that originates during precipitation and runs over land surfaces. While most rainfall landing on vegetated areas soaks into the ground, most rainfall landing on impervious surfaces such as roads, paved driveways and roofs becomes runoff. Some portion of rainfall landing on vegetated or bare ground may also become runoff - typically 5% to 10%, and more during heavy, prolonged rains. Runoff picks up various pollutants such as silt, road salts, fertilizers, pet wastes, and oils, carrying them into lakes, rivers, ponds, and oceans. These pollutant sources can contain significant amounts of nutrients, notably phosphates, as well as suspended solids.
In order to reverse the trend of increasing suspended solids, increasing phosphorus concentrations, and related increasing nuisance aquatic plants and the risk of algae blooms, the amount of stormwater entering the ponds needs to be reduced. This can be accomplished by installing a rain garden to trap sediment and capture nutrients from runoff before they reach a pond.
Approval Requirements
To install a rain garden, approval may be needed from the Town of Brewster. The approval process is through filing a “Notice of Intent” for the work and obtaining approval from the town Conservation Commission. However, based on discussion with the town conservation agent, approval should be obtainable through the Town’s Notice of Intent / Request for Determination (RDA) variance process because the project is small and is an entirely beneficial project.
Below follows a template that serves to outline how to prepare a Notice of Intent (NOI) / RDA variance application for a beneficial project. In discussion with various homeowners and community associations by the Brewster Ponds Coalition, it has become apparent that a fair number of potentially beneficial projects are not attempted because the NOI process is intimidating to the layperson, leading them to think that a professional is needed for its preparation, at significant cost. This template aims to simplify the process and includes guidelines, so that homeowners and local associations could prepare their own NOI/ RDA variance applications for other projects. The hope is that this will promote or allow more beneficial projects to proceed. However, before the NOI process can begin there are some crucial initial steps to the broader rain garden installation process that should be followed. These steps are outlined below first in a timeline and then in greater detail.
Last Updated 7/20/2016

4
Community Rain Garden Timeline
Last Updated 7/20/2016
Define a problem
area, e.g. a eutrophied
pond
Contact your Town
Conservation Agent and
discuss your interest in
improving the area
6 months outOrganize a garden teamDefine location and date for plantingGet approval and support from communityNote necessary resources and who is responsibleInvite other organizations to partner
4 months outHold your initial design meeting
3 months outRevisit and revise your designSubmit RDA applicationDefine a staging area for planting daySet goal for # of volunteersBegin recruiting volunteers and securing toolsAssign partners firm roles for planting dayIdentify a contractor or other plans to prepare the garden bedIdentify and begin ordering plants
2 months outBegin making delivery arrangementsContinue recruiting volunteers and securing resources
1 month outAssign planting day jobs that have been assigned yetTake pictures before you dig
1 week leftDouble check the arrangements you have made
1 day leftOrganize the toolsDo any necessary set up
Planting dayArrive early. Make sure everyone has a task. Thank volunteers every chance you get.Make sure everyone signs in and signs a waiverMake sure snacks and water are out for the volunteersEducate the volunteers on the purpose and benefits of the project
After planting dayEnter all the data from the sign in sheet and waiversShow appreciationCelebrate successes, recoganize challenges

5
Installing a Community Rain Garden (Outline content largely from: Bridging the Gap)
Six months out1. Define a problem area
a. Consider the following Brewster bylaw regarding tree removal and other alterations to the land
when selecting an area to seek to improve:
Tree removal policies
§ 172-1. Purpose. [Amended 10-19-1987 STM, Art. 29] The purpose of this chapter is to protect the wetlands, related water resources and adjoining land areas in the Town by prior review and control of activities deemed by the Conservation Commission to have or be likely to have an effect or cumulative effect upon wetland values, including but not limited to the following: public water supply, private water supply, groundwater and groundwater quality, water quality in the numerous ponds of the Town, flood control, erosion and sedimentation control, storm damage prevention, prevention of water pollution, fisheries, shellfish, wildlife and wildlife habitat, aesthetics and historic values (collectively, the "interests protected by this chapter"). This chapter is further intended to provide a means for review and correction of activities performed by any person in violation of any provision contained herein.
§ 172-2. Applicability. [Amended 10-19-1987 STM, Art. 29] A. Except as permitted by the Conservation Commission or as provided in this chapter, no person shall remove, fill, dredge, alter or build upon or within any of the following resource areas: (1) On or within 100 feet of any bank, beach, dune or flat. (2) On or within 100 feet of any freshwater wetland, coastal wetland, marsh, meadow, bog or swamp. (3) Upon or within 100 feet of any lake, pond, river, stream, estuary or the ocean. (4) Upon any land under said waters. (5) Upon or within 100 feet of any land subject to flooding or inundation by groundwater or surface water. (6) Upon any land subject to flooding or inundation by tidal action or coastal storm flowage. B. Any activity proposed or undertaken outside any area specified above shall be subject to regulation under this chapter if, in the judgment of the Conservation Commission or its agent, said activity may result or has resulted in the removing, filling, altering or building upon any area specified above.
§ 172-9. Definitions. The following definitions shall apply in the interpretation and implementation of this chapter. ALTER -- Includes, without limitation, the following actions when undertaken in resource areas subject to this chapter: A. Removal, excavation or dredging of soil, sand, gravel or aggregate materials of any kind. B. Changing of preexisting drainage characteristics, flushing characteristics, salinity distribution, sedimentation patterns, flow patterns or flood retention characteristics. C. Drainage or other disturbance of water level or water table. D. Dumping, discharging or filling with any material. E. Placing of fill or removal of material. F. Driving of piles, erection of buildings or structures of any kind. G. Placing of obstructions or objects in water. H. Destruction of plant life, including cutting of trees.
Last Updated 7/20/2016

6
2. Contact your Town Conservation Agent
3. Organize a garden team
a. Talk to people in your community about the garden, so they can help out, too
b. Be clear about the things needed to be done, but allow different community members to contribute
with each of their talents, so it is fulfilling for them, too
4. Define a location and target date for the day of planting
a. Decide on a location for the rain garden collaboratively, so that there is a sense of ownership
among the whole team
b. Identify a target planting date early on, so there is something to work towards. Also, identify a rain
date.
5. Work to get site approval and the support of the broader community
a. Ask members of your garden team to go canvassing, educating the neighborhood, and getting
feedback. Write a script for canvassers. Send canvassers in teams of two for increased safety and
effectiveness.
b. Perform an infiltration test on the site
i. Find simple instructions at the link below:
1. http://www.phillywatersheds.org/whats_in_it_for_you/residents/infiltration-test
c. Obtain a signed memorandum of understanding (MOU) with the property owner that clearly states:
i. The owner of the property
ii. The group responsible for the project (i.e. neighborhood association, school PTA)
iii. What you are going to install
iv. The duration of the arrangement
v. Any restrictive terms
vi. Who will be responsible for maintenance
vii. A regular interval to revisit your partnership
viii. Length of notice to be given before partnership is terminated
d. Check with your town planning and zoning board to ensure that there are not other plans for the
site, so that your efforts won’t be in vain.
6. Note what resources you need and who is responsible for securing them
a. Brainstorm supplies and services necessary for the project
b. Share this list at neighborhood meetings and provide opportunities for individuals to help secure
these resources for the project
Last Updated 7/20/2016
7
7. Invite other organizations to partner with you
a. Local gardening or conservation organizations
b. Local university extension programs
c. County extension programs
d. Draft a letter to local businesses asking for support
i. Hardware or garden stores
1. May provide plants or gloves for volunteers
ii. Grocery stores
1. May provide food for volunteers
iii. Other
1. May provide printing or other services
2. May provide volunteer time
Four months out1. Hold your initial design meeting
a. Involve various stakeholders to develop a functional and appealing design for your rain garden.
b. Follow-up with neighbors from canvassing to invite them to the design meeting
i. Especially, those who live near the site, because they can be very helpful in reporting any
problems with plants or infiltration
Last Updated 7/20/2016

8
Rain Garden Design CriteriaA stormwater management construction must contain several elements to be effective. These elements fall under the categories of:
Feasibility in terms of cost, space and hydrology (land slope and water flow) Conveyance – a method to get the runoff to and into the management construction Treatment – measures to capture and remove silt and nutrients, and/or allow for the runoff to seep into
groundwater rather than surface water (the pond) Landscaping – making the construction pleasant to look at and use of hardy (presumably indigenous) plants
to limit maintenance requirements Maintenance – maintaining plantings; assuring proper runoff flow by removing leaves, branches or other
materials that inhibit flow; removing captured sediments and assuring good groundwater infiltration; and correcting any erosion problems.
Rain Garden Design RequirementsPer pages 23-35 of Volume 2 Chapter 2: Structural BMP Specifications for the Massachusetts Stormwater Handbook (http://www.mass.gov/eea/docs/dep/water/laws/i-thru-z/v2c2.pdf):
Pretreatment zone of 12 inches of pea gravel, 24 inches deep and then a 4 foot grass sod strip, as per alternatives on page 25 of the Best Management Practice (BMP).
Retention volume needed as per the BMP, based on sandy, high permeability soil. Volume = drainage area x 0.6 in rainfall/12.
Desired surface area as per the BMP is 5 to 7 % of drainage area if possible. Desired set back from pond as per the BMP is 50 ft from normal high water, or if not possible, as far away as
possible. Desired elevation of bottom above high ground water level as per the BMP is 2 ft. Slope desired for the grass pre-treatment strip is 2 to 4% as per the BMP, and flat in rain garden area. Low point overflow with erosion protection included as per the BMP Soil in the rain garden and berm will meet the BMP requirement given below, using natural soils to the
extent possible and purchased topsoil as needed. The BMP suggests soils be used as follows:Mixture of ~40 % sand, 20-30% topsoil, and 30-40% compostSoil mixed uniformly – intent is to promote hardy growth of grass and plants
Plants - one shrub for every 50 ft2 of bio-retention area as per the BMP, using at least 3 native species.
Features to remember:
Manage the inlet flow so that it will not cause erosion. This is accomplished by the pretreatment zone of pea gravel and the grass strip. They help the flow to steadily and evenly spread out into the garden, and to capture silt before it enters the garden.
Provide an overflow channel should rains lead to more input than the garden can handle. Delineate berm heights and locations, if needed. Unless a rain garden is in a natural depression, berms are
needed to hold the rain water flow so it can soak into the garden rather than run off.
Three months outLast Updated 7/20/2016

9
1. Revisit and revise your design
a. Present your formal design that resulted from the initial collaborative forum
b. Explain concerns and ideas regarding the design
c. Accept feedback
d. Make revisions as necessary, until adequate agreement is reached on the design
2. Submit Request for Determination of applicability
3. Now that your date and location are finalized, secure a staging area where volunteers can assemble and
pick up tools for the project. Community centers, schools, or churches make great options that have
restrooms available throughout the workday.
4. Set your volunteer goal based on the size of the project and how much work you will do yourself.
5. Begin recruiting volunteers and securing tools
a. Ask recruits if they have any tools that they can bring with them to help with the project
6. Make sure that partners are assigned firm roles on planting day
a. Someone must be responsible for identifying and laying out the plants to be planted and directing
the volunteers accordingly
7. Identify a contractor or alternative plans to prepare the garden bed
a. Take time to clearly explain the grading and depth needed for the rain garden to your contractor.
Make arrangements to prepare the bed three to five days before the planting date.
b. If you plan to dig the bed yourself, it will require a number of strong and highly dedicated
volunteers. For safety, make sure to call the town before you dig to mark any subsurface features to
avoid. Prepare the bed with ample time before planting day, because you may run into rocks or
other difficulties that slow down this process.
8. Identify and begin ordering your plants, because some may be difficult to secure
a. Please use the list of suitable plants provided in Appendix A. The plants that are highlighted in blue
will do well in a rain garden as they are moist soil tolerant.
Two months out1. Begin making your delivery arrangements
a. If soil and mulch are going to be delivered to the site, make arrangements now, such as who will be
there to receive the delivery and where the soil and mulch will be dropped on site.
2. Continue recruiting volunteers and gathering resources
One month out
Last Updated 7/20/2016

10
1. Assign any important planting day jobs that have not been assigned
a. Who will…
i. Write and send the press release
ii. Manage the sign-in table
iii. Organize and manage the tool collection and lending process
iv. Set up the site
v. Greet volunteers
vi. Take pictures
b. Follow up with individuals with key resources to the project to confirm their commitment for
planting day.
2. Take pictures before you dig
One week left1. Double check all the arrangements that you have made
a. Call and confirm all deliveries
b. Contact volunteers with a reminder of what to bring and where to meet
c. Print sign-in sheets and volunteer waivers for your registration table
d. Print and hang signs that tell volunteers where to park, sign in, get water and use the restrooms.
e. Send out media advisories about the event.
f. Work with your contractor to prepare your bed or finish preparation yourself. Do not prepare the
bed with heavy equipment if it has rained recently as this will leave tire tracks and do damage that
you will have to spend time and resources to fix.
g. Watch the weather!
i. Communicate any contingency plans to volunteers and deliveries in case of rain.
h. Put together a planting day schedule so that lead volunteers are informed.
i. Also, include a map that shows where the restrooms are
i. Meet with your lead volunteers.
i. Make sure they know where to be, when, and what is expected of them. They are key to the
event going smoothly
The day beforeLast Updated 7/20/2016

11
1. Organize your tools.
2. Do any set up that is required on site.
Planting day1. Get there early and make sure everyone has something to do and is having fun. Thank your volunteers
every chance that you get.
2. Make sure that everyone signs in and fills out a volunteer waiver
3. Make sure that snacks and water are where they are supposed to be. Encourage volunteers to take
advantage of them.
4. Let people know the purpose of the project and how it will benefit the community
a. Educate volunteers as they are working (how to tease roots, depth to plant, plant names, design
considerations)
b. Leverage your lead volunteers and put people to work as soon as they are equipped.
c. Take lots of pictures
d. Do quality control. It is easier to educate and fix mistakes in the moment than it is to address after
the fact.
e. Dispose of any trash, leftover soil and rubble properly.
f. Congratulate and thank everyone for a successful event.
g. Invite volunteers to join for a maintenance event.
After planting day1. Enter all of the data from sign in sheets and waivers
2. Show appreciation
a. Send thank you notes to all volunteers and donors. Include a picture of the completed project if
possible.
3. Celebrate successes, recognize challenges
a. Hold a debriefing meeting with the garden team. Congratulate them. Share stories and pictures
from the event.
b. Record what worked well and what could be improved for next time.
c. Begin planning maintenance.
Navigating the Request for Determination of Applicability
Last Updated 7/20/2016

12
According to Massachusetts General Law chapter 131, § 40, there are necessary procedures to be followed prior to the removal, fill, dredging or altering of land bordering waters. The Code of Massachusetts Regulations (CMR) in chapter 310: Wetlands Protection defines in greater detail these procedures, namely a Notice of Intent. A Notice of Intent serves to provide the town’s Conservation Commission and the Massachusetts Department of Environmental Protection with a complete and accurate description of the:
Site: including the type and boundaries of resource areas under the Wetlands Protection Act, and Proposed work: including all measures and designs proposed to meet the performance standards described
in the Wetlands Protection Act Regulations, 310 Code of Massachusetts Regulations (CMR) 10.00, for each applicable resource area.
A Notice of Intent (NOI) is generally filed when the proposed work will alter a wetland resource area, or when the project involves major new construction, such as a new house or commercial building. Generally, a Notice of Intent is necessary when machinery will be used in the project, destruction of vegetation is involved, or the project takes place in a resource area, such as bordering a vegetated wetland. Often when those factors are not part of a project, a viable alternative to the Notice of Intent is the Request for Determination of Applicability (RDA). A Request for Determination of Applicability is often appropriate for minor projects in the 100-foot Buffer Zone on already developed lots. However, which filing is appropriate varies project to project and according to the policies of the local municipality.
The following flow chart seeks to help citizens and pond coalitions to navigate all the necessary steps in order to improve lands bordering freshwater ponds with the aim to improve water quality through installations such as rain gardens within the 100-foot Buffer Zone.
This shall serve as a guide; however, there may be some inconsistencies when compared to the policies of one’s own town. It is, therefore, necessary for the applicant to carefully follow the RDA application process of his or her town. The following guide uses the RDA application of the Town of Brewster to illustrate the steps involved. Note - the following link cannot be clicked; it must be copied into the search bar of your web browser (http://brewster-ma.gov/documents-a-archives/forms-a-documents/conservation-commission-1/351-request-for-determination-of-applicability-package/file).
Last Updated 7/20/2016

13
20 Steps to a Rain Garden and Improved Water Quality near Wetlands
Last Updated 7/20/2016

14
Last Updated 7/20/2016
1Define a problem area and contact your Town Conservation Agent
2Secure Abutters List and Assessors Map
3Mail Form Letter Notice to Abutters & Save Mail Receipts
4Complete Massachusetts Request for Determination of Applicability Application
5Catalogue plants on project site and complete wetland area delineation form
6Download and print appropriate USGS Map online
7Write descriptive narrative of the project
8Produce a scale drawing of the proposed project
9Include a completed Notice to Abutters form
10If site is not easy to identify, reference distance to nearest telphone pole to facilitate site identification
11Write one check for payment of town RDA fee, advertising, and processing
12Fold each plan with title visible from the right and paper clip to each application
13Include completed Site Access Authorization form
14Clearly stake and flag the project area
15Sign the RDA Filing Checklist and submit it with 12 copies of all aforementioned paperwork
16After approval, there are 30 days for abutters to appeal if they wish, but assuming you have garnered their support, you may proceed
17Notify town of commencement of work on rain garden
18Build rain garden
19Notify town of completion of work on rain garden
20Upon final inspection of rain garden, enjoy your rain garden

15
Step 1Contact the Town Conservation Agent to discuss the project and decide on the best way forward with the project. The Conservation Agent will be able to help describe the level of analysis necessary before a project can move forward. In limited circumstances, neither an RDA nor an NOI are required as detailed in the Brewster Administrative Review Policy below. However, most projects will require at least a basic RDA to be filed. Ask if the Commission has an RDA or NOI on file for the property in question, because there may already be a vegetative assessment on file that you can resubmit with your project.
Step 2 Obtain a Certified Abutters List from the Town Assessor’s Office, e.g. The Brewster Town Assessor, Telephone (508) 896-3701 ext. 1237.
Print the Town Assessor’s Map of the property for inclusion in filing of RDA. Make an X on the site of the project to indicate more specifically where the project will take place.
Please follow the link below as this file is too large to
embed in this word document
http://www.brewster-ma.gov/maps/mapbook.pdf
Submit the Certified Abutters List and the Assessor’s Map as part of the application
Notes and keys to success
Mark the site with an X on the assessor map.
Step 3Notify all abutters on the list of your proposed project on the RDA “Notice to Abutters” form letter, by Certified, Return Receipt mail or hand delivery before or on the day of filing, and submit the Certified Mail receipts (Form 3800) as part of the filing.
Keep Certified Mail receipts for inclusion in filing of RDA to demonstrate that you have informed all appropriate neighbors of the proposed plan.
Last Updated 7/20/2016

16
Submit the US Postal Service Form 3811 at the hearing.
Certified Mail receipts (Form 3800) Photo, USPS.com US Postal Service Form 3811 Photo, USPS.com
Notes and keys to success
Contact all abutters on the certified list.Save mail receipts as proof of notification.
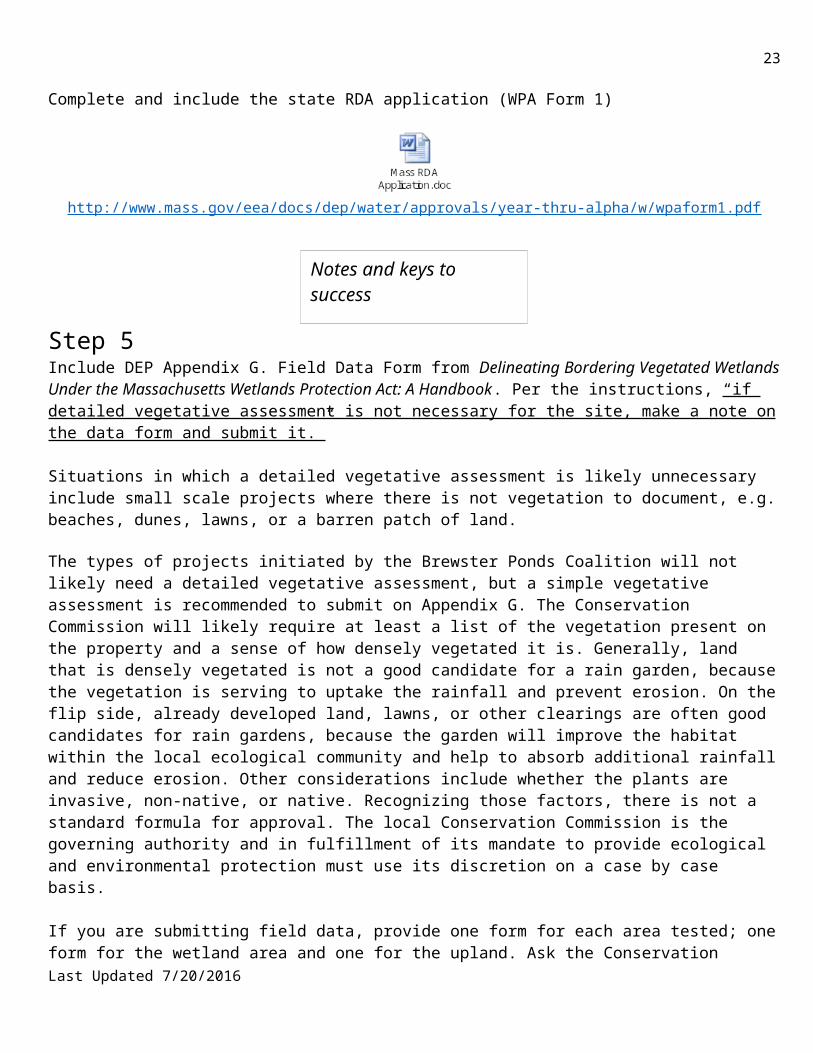
Step 4Complete and include the state RDA application (WPA Form 1)
http://www.mass.gov/eea/docs/dep/water/approvals/year-thru-alpha/w/wpaform1.pdf
Notes and keys to success
Follow instructions.
Step 5Include DEP Appendix G. Field Data Form from Delineating Bordering Vegetated Wetlands Under the Massachusetts Wetlands Protection Act: A Handbook. Per the instructions, “if detailed vegetative assessment is not necessary for the site, make a note on the data form and submit it.”
Situations in which a detailed vegetative assessment is likely unnecessary include small scale projects where there is not vegetation to document, e.g. beaches, dunes, lawns, or a barren patch of land. The types of projects initiated by the Brewster Ponds Coalition will not likely need a detailed vegetative assessment, but a simple vegetative assessment is recommended to submit on Appendix G. The Conservation Commission will likely require at least a list of the vegetation present on the property and a sense of how densely vegetated it is. Generally, land that is densely vegetated is not a good candidate for a rain garden, because the vegetation is serving to uptake the rainfall and prevent erosion. On the flip side, already developed land, lawns, or other clearings are often good candidates for rain gardens, because the garden will improve the habitat within the local ecological community and help to absorb additional rainfall and reduce erosion. Other considerations include Last Updated 7/20/2016

17
whether the plants are invasive, non-native, or native. Recognizing those factors, there is not a standard formula for approval. The local Conservation Commission is the governing authority and in fulfillment of its mandate to provide ecological and environmental protection must use its discretion on a case by case basis.
If you are submitting field data, provide one form for each area tested; one form for the wetland area and one for the upland. Ask the Conservation Commission about this. The required level of analysis is largely according to the type of project and the guidance of the local Conservation Commission.
http://www.mass.gov/eea/docs/dep/water/laws/a-thru-h/bvwmanua.pdf
This form serves to delineate the bordering vegetated wetlands of the project. In the vast majority of cases this can be accomplished simply by cataloguing the vegetation that is present (Section I of Appendix G). Plants present on the lot should be listed in the following layers: ground cover, shrubs, saplings, climbing woody vines, and trees as well as the percent cover, the percent dominance, the dominant plants and any wetland indicator plants should be identified. Once the plants on site have been identified, check the National Wetland Plant List (NWPL) at the link below and mark on your list the plants both present on your site and on the NWPL.
Please follow the link below as this file is too large to
embed in this word document
http://rsgisias.crrel.usace.army.mil/nwpl_static/data/DOC/lists_2016/National/National_2016v2.pdf
In certain situations, vegetation alone is not sufficient and hydrologic observations must be made (Section II of Appendix G). Per pages 20 and 21 of Delineating Bordering Vegetated Wetlands Under the Massachusetts Wetlands Protection Act: A Handbook, the table below lists the rules for the level of analysis necessary for delineation. It should be noted that any submitted indicators of wetland hydrology must be evaluated for accuracy and used by the issuing authority to establish the Bordering Vegetated Wetlands (BVW) boundary. Therefore, in the spirit of simplicity and expediency, it is best to submit no more information than is required for delineation.
http://www.mass.gov/eea/docs/dep/water/laws/a-thru-h/bvwmanua.pdf
Last Updated 7/20/2016

18
The wetlands protection regulations presume that the delineation of BVWs based on vegetation alone is accurate under any one of the following circumstances:1. All dominant species in the vegetative community have an indicator category ofOBL, FACW+, FACW or FACW- and the slope is distinct or abrupt betweenthe upland plant community and the wetland plant community.2. The area where the work will occur is clearly limited to the buffer zone.3. The issuing authority (conservation commission or DEP) determines that sole reliance on wetland indicator plants will yield an accurate delineation.
When the BVW boundary based on vegetation alone is not presumed accurate, or to overcome the presumption, vegetation and hydrology should both be used to establish the BVW boundary. This generally will occur when:1. the wetland area is not dominated by plants with an indicator category ofFACW- or wetter,2. the BVW boundary is not abrupt or discrete, or3. the plant community has been altered
*The above state-provided guidance is based on an earlier edition of the National Wetland Plant List. However, the National Wetland Plant List has since been updated and the designations have changed slightly. For more details, please consult the Federal Register, Vol. 77, No. 90, Wednesday, May 9, 2012 (https://www.gpo.gov/fdsys/pkg/FR-2012-05-09/pdf/2012-11176.pdf).
Notes and keys to success
Many projects undertaken and/or encouraged by the Brewster Ponds Coalition may not require a vegetative assessment. Be in communication with your local Conservation Commission to understand the necessary level of assessment.
Follow Instructions.
Step 6Include a photocopy of an 8” by 10” section of the appropriate United States Geological Survey (USGS) Quadrangle Map clearly showing the location of the project. If you are submitting in the Town of Brewster, the Conservation Agent is happy to provide you this map. Please contact the Conservation Agent directly and move on to Step 7. If you are submitting in another community, please continue with the rest of Step 6.
Find the site of your project on the map here (http://store.usgs.gov/b2c_usgs/usgs/maplocator/%28ctype=areaDetails&xcm=r3standardpitrex_prd&carea=%24ROOT&layout=6_1_61_48&uiarea=2%29/.do). Add a marker in the general area, then click it to download the appropriate 7.5 minute x 7.5 minute USGS topographic map. Once downloaded, print the map and make an X on the approximate site of the project. This will serve to inform the state generally where the project will take place.
Last Updated 7/20/2016

19
Notes and keys to success
Print the 7.5 minute by 7.5 minute USGS topographic map on an 8.5” x 11” sheet of letter size paper. The precise size of the map is not of concern. On personal computers there is often an option to print the image at 8” x 10.” That is the best option. The map must show the correct area and effectively show in context where the project will take place.
Step 7Include a clear narrative, describing all aspects of the project, namely: 1) how many plants, 2) which species of plants, and 3) the size and location of the plants and rain garden.
Notes and keys to success
Be thorough.
Provide context.
Describe current situation and problems observed. Describe expected results if no action is taken. Describe expected results / benefits if project is undertaken.
Step 8Include a professional site plan in accordance with the enclosed Brewster Conservation Commission “Policy for Plans Used for Wetland Permitting.” If the project will take place entirely within the 50 ft. buffer zone, please disregard directions concerning the blue, red, and green lines below.
Designate buffer zones and wetlands in color:Blue line = 100 feetRed line = 50 feetGreen line = wetland
The scale of the drawing must be 1” = 20’, unless prior approval has been granted.
The drawing can be hand-drawn or computer generated. In either case, the drawing should make for easy identification of various features, it should be to scale, and it should include dimension lines. A program that meets these criteria is the Garden Planner (http://www.smallblueprinter.com/garden/planner.html). The software is available free to non-profits and schools and a trial version is available free to everyone, while a full version can be purchased for $34. The examples below were created with the Garden Planner software.
See the examples below:Cross Section
Last Updated 7/20/2016

20
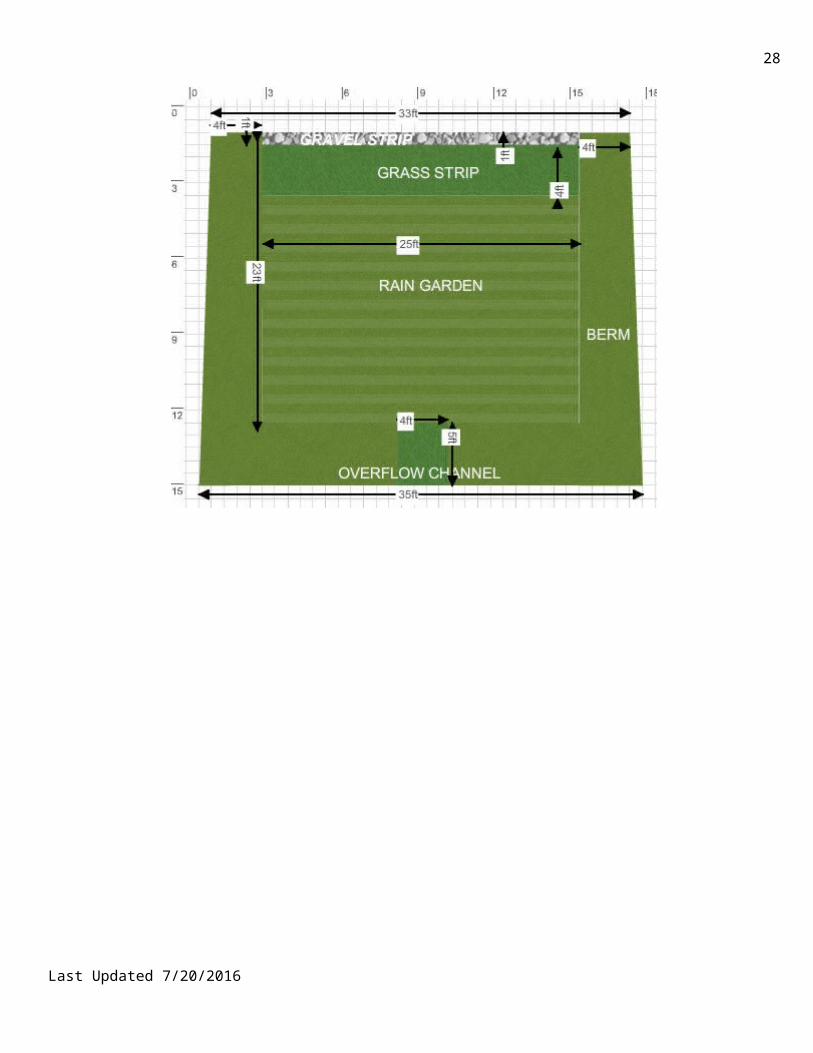
Birdseye view
Last Updated 7/20/2016
Grass Strip

21
Planting Plan
LegendGarden Shrubs
Winterberry Holly
Sweet pepper bush
Pussy Willow
Highbush or Lowbush Blueberry
Berm Shrubs
Oakleaf Hydrangea
Common Elderberry
Groundcover
Ostrich Fern and Sensitive FernGrass
Creeping Bent Grass
Last Updated 7/20/2016

22
Notes and Keys to Success
Don’t be intimidated by the word “professional.”
Seek prior approval to submit drawings at a scale of ¼” = 1’.Make a neat scale drawing either by hand or via a computer aided drawing program.
Seek to give the town and state an informed picture of the plan.Clearly label different elements.
Most projects undertaken by the Brewster Ponds Coalition will be within the buffer zone and will accordingly not feature the blue, red, and green lines prescribed by the Conservation Commission.
Step 9 Include a copy of your completed RDA “Notice to Abutters” form letter.
Step 10If the lot is an undeveloped, secluded, or otherwise unidentifiable area, identify the lot on the plan by the number of the nearest telephone pole or the nearest road intersection. If there is no pole on the lot, describe the lot’s proximity to the nearest; for example, “The lot is twelve feet east of telephone pole no.167”
Step 11The town filing fee for a Request for Determination of Applicability is $75.00, with an advertising fee of $15.00 and a $20.00 fee for processing and mailing. Include this as one check for $110.00 payable to the Town of Brewster, with the application. The state does not assess a fee for an RDA.
Step 12Fold each plan separately, right side out with the title visible, and paper clip it to each copy of the application.
Step 13Include a signed Site Access Authorization Form.
Last Updated 7/20/2016
23
Step 14Properly stake and flag the project site to identify all portions of the project, prior to the day of filing.
Clearly stake all boundaries and limits of work. Clearly identify all stakes and flags in the field, showing the 100 foot and 50 foot buffer zones
and wetland areas. Designate each wetland type on the flag as “BVW” (bordering vegetated wetland), “TOB” (top
of bank), “LSF” (land subject to flooding), etc.
Department staff and Conservation Commissioners will inspect the site. Unless a holiday interferes, the filing deadline for applications is noon on the Friday at least ten (10) business days before the hearing. The hearing must be advertised in a local newspaper (at the time, the Cape Codder newspaper) no less than five business days before a hearing. When a holiday interferes with the Friday production, the newspaper will notify the town of its earlier submittal deadline.
Step 15Sign the Brewster Request for Determination of Applicability (RDA) checklist and submit it with 12 copies of the complete RDA application. The filing deadline for applications is noon on the Friday at least ten (10) business days before the Conservation Commission hearing.
Step 16At the Conservation Commission hearing, the RDA will either be found to be ‘positive’ or ‘negative.’ If the RDA is found to be ‘negative,’ then the project is approved and can proceed the day after the hearing. However, there are 30 days for abutters to appeal if they wish, but assuming you have garnered their support, you may proceed with the project. An approved RDA is valid for 3 years, allowing ample time to complete the project. If the RDA is found to be ‘positive,’ then the Conservation Commission has determined that the project requires more careful consideration and that a Notification of Intent must be filed before the project can proceed.
Step 17Notify town of commencement of work on rain garden.
Step 18Build rain garden.
Step 19Notify town of completion of work on rain garden.
Step 20Upon final inspection of rain garden, enjoy your new rain garden.
Last Updated 7/20/2016

24
Sources and Additional Resources
Government Filing Links:StateRequest for Determination of Applicability (http://www.mass.gov/eea/docs/dep/water/approvals/year-thru-alpha/w/wpaform1.pdf)LocalNotice of Intent (http://www.brewster-ma.gov/documents-a-archives/forms-a-documents/conservation-commission-1/352-notice-of-intent-package/file)
Request for Determination of Applicability (http://brewster-ma.gov/documents-a-archives/forms-a-documents/conservation-commission-1/351-request-for-determination-of-applicability-package/file)
Cited Sources:
Brewster Assessor’s Map (http://www.brewster-ma.gov/maps/mapbook.pdf)
Brewster Approved Plants for Sensitive Resource Areas (http://brewster-ma.gov/files/lndscp1.pdf)
Bridging the Gap - Guide to Organizing a Community Rain Garden (https://www.bridgingthegap.org/wp-content/uploads/2011/09/A1-Rain-Garden-SOS-Manual.pdf)
Federal Register – explanation of changes in National Wetland Plant List (https://www.gpo.gov/fdsys/pkg/FR-2012-05-09/pdf/2012-11176.pdf)
Garden Planner –software for garden design (http://www.smallblueprinter.com/garden/planner.html)
Massachusetts Department of Environmental Protection – details for preforming vegetative assessment (http://www.mass.gov/eea/docs/dep/water/laws/a-thru-h/bvwmanua.pdf)
U.S. Army Corps of Engineers – National Wetland Plant List (http://rsgisias.crrel.usace.army.mil/nwpl_static/data/DOC/lists_2016/National/National_2016v2.pdf)
U.S. Geological Survey – site to download quadrangle map (http://store.usgs.gov/b2c_usgs/usgs/maplocator/%28ctype=areaDetails&xcm=r3standardpitrex_prd&carea=%24ROOT&layout=6_1_61_48&uiarea=2%29/.do)
Barnstable County Residential Rain Garden Guidance
This publication describes what rain gardens are, how to build them, and how to maintain them.
Links to additional rain garden resources from around the country:
http://clean-water.uwex.edu/pubs/pdf/gardens.pdfhttps://tinkerscreek.org/wp-content/uploads/2016/05/RGManual.pdfhttps://www.bridgingthegap.org/wp-content/uploads/2011/09/A1-Rain-Garden-SOS-Manual.pdf
Last Updated 7/20/2016

25
http://www.fairfaxcounty.gov/nvswcd/raingardenbk.pdf
Last Updated 7/20/2016

26
Appendix A. Suitable Rain Garden Plants
TREES
StabilizeSteep
Embankments
Provide Windbreaks/
Screening
Tolerates Strong Wind/
Salt Spray
Tolerates Moist Soils
Tolerates Shade
Thrives in Full
Sun
Tolerates Dry
ConditionsAcer rubrum Red Maple x x x x xBetula papyrifera White Birch x xBetula nirga River Birch x xCornus alternifolia Pagoda Dogwood x x xCornus florida Flowering Dogwood x x xFagus grandifolia American Beech x x x x
Ilex opaca American Holly x x
Juniperus virginiana Red Cedar x x x x x xNyssa sylvatica Black Gum x x xOstrya virginiana Hop Hornbeam x x x x xPinus strobus White Pine x x x x x xPopulus grandidenta or tremuloides Aspen
x xPrunus pennsylvanica Pin Cherry x x x xPrunus serotina Black Cherry x x x x xPrunus virginia Chokecherry x x x x xQuercus alba White Oak x xQuercus bicolor Swamp White Oak x x x x x xQuercus rubra Red Oak x x x xQuercus velutina Black Oak x x x x xRhus typhina or Rhus glabra Sumac x x x x
Tsuga Canadensis Eastern Hemlock x x x x
Last Updated 7/20/2016

27
SHRUBS, part 1
Stabilize Steep Embankments
Provide Windbreak
s/ Screening
Tolerates Strong Wind/ Salt
Spray
Tolerates Moist Soils
Tolerates Shade
Thrives in Full
Sun
Tolerates Dry
Conditions
Amelanchiar canadensis Shadbush x x x x xAronia arbutifolia Red Chokeberry x x x x xAronia melanocarpa Black Chokeberry x x x x xCephalanthus occidentalis Buttonbush x xChionanthus virginicus White Fringe Tree x x
Last Updated 7/20/2016
28
Clethra Alnifolia Sweet Pepper Bush x x x xComptonia peregrina Sweet Fern x x x xCornus amomum Silky Dogwood x xCornus sericea Redosier Dogwood x xHydrangea quercifolia Oakleaf Hydrangea x x x
Ilex glabra Inkberry x x x x xIlex verticillata Winterberry Holly x x xJuniperus Communis Common Juniper x x x xKalmia latifolia Mountain Laurel x x xLindera benzoin Common Spicebush x xMyrica pensylvanica Bayberry x x x x xPotentialla fruticosa Bush Cinquefoil x x x xPrunus maritima Beach Plum x x xRhododendron nudiflorum Pink Azalea x x xRhododendron roseum Mountain Azalea x x x xRosa virginiana/carolina Virginia or Carolina Rose x x x x
Rubus occidentalis or strigosus Raspberry x x x x
SHRUBS, part 2
Stabilize Steep Embankments
Provide Windbreak
s/ Screening
Tolerates Strong Wind/ Salt
Spray
Tolerates Moist Soils
Tolerates Shade
Thrives in Full
Sun
Tolerates Dry
Conditions
Salix discolor Pussy Willow x x xSambucus canadensis Common Elderberry x x x x
Spirea latifolia Meadowsweet x x xSpirea tomentosa Steeplebush x xVaccinium corymbossum Highbush x x x x x
Last Updated 7/20/2016

29
BlueberryViburnum acerfolium Mapleleaf Viburnum x x x
Viburnum dentatum Northern Arrowwood x x x x x
Viburnum lentago Nannyberry x x xViburnum prunifolium Blackhaw Viburnum x x x
Viburnum trilobum American Cranberrybush x x x
GROUNDCOVERS
Stabilize Steep
Embankments
Provide Windbreaks/ Screening
Tolerates Strong
Wind/ Salt Spray
Tolerates Moist Soils
Tolerates Shade
Thrives in Full
Sun
Tolerates Dry
Conditions
Arctostaphylos Uva-Ursi Bearberry x x x x xJuniperus conferta Shore juniper x x x xVaccinium augustifolium Lowbush blueberry
x x x x xDennstaedtia punctilobula Hay Scented Fern
x x xJuncus effusus Soft Rush x xChamaecrista fasciculata Partridge Pea
x x xMatteuccia struthiopteris Ostrich Fern
x xOnolea sensibilis Sensitive Fern x x x
GRASSES
Stabilize Steep
Embankments
Provide Windbreak
s/ Screening
Tolerates Strong Wind/ Salt
Spray
Tolerates Moist Soils
Tolerates Shade
Thrives in Full
Sun
Tolerates Dry
Conditions
Agrostis stolonifera Creeping Bent Grass x x
Ammophila breviligulata Amer. Beach Grass
x x x x
Last Updated 7/20/2016

30
Festuca rubra Creeping Red Fescue x x x xElymus virginicus Virginia Wild Rye x x x xElymus canadensis Canada Wild-Rye x x x xElymus villosus Silky Wild-Rye x x x xPanicum clandestinum Deertongue x x x xPanicum virgatum Switchgrass x x x xPoa palustris Fowl Bluegrass x x x xDeschampsia flexulosa Crinkled Hair Grass
x x x xAndropogon gerardii Big Bluestem x x xSchizachyrium scoparius Little Bluestem x x xSorghastrum nutans Indiangrass x x xSporobolus cryptandrus Sand Dropseed x x xPanicum virgatum Shelter Switchgrass x x x xAgrostis alba Red Top x x x x
WILDFLOWERS
Stabilize Steep
Embankments
Provide Windbreak
s/ Screening
Tolerates Strong Wind/ Salt
Tolerates Moist Soils
Tolerates Shade
Thrives in Full
Sun
Tolerates Dry
Conditions
Aster umbellatus Flat-top Aster x x xEupatorium fistulosum Joe-Pye Weed x xEupatorium perfoliatum Boneset x x xVerbena hastata Blue Vervain x xBidens cernua Nodding Bur-Marigold x x x
Last Updated 7/20/2016

31
Solidago canadensis Canada Goldenrod x x xSolidago graminifolia Grass-leaved Goldenrod
x x xHelianthus annuus Annual Sunflower x xDesmodium canadense Showy Tick-trefoil
x xAsclepias syriaca Common Milkweed x x xAster lateriflorus Calico Aster x x xAster nova-angliae New England Aster x x xAster novi-belgii New York Aster x x xAster laevis Smooth Aster x x xPenstemon digitalis Beard Tongue x x xLespedeza capitata Bush Clover x x xAsclepias tuberosa Butterfly Milkweed x x xLupinus perennis Wild Blue Lupine x x
Last Updated 7/20/2016

32
Appendix B
In lieu of a full rain garden, residents can often pursue installing native vegetation in place of lawn through an even more abbreviated process. Please contact your town’s Conservation Agent for more information. This will clearly not be as effective as a rain garden in capturing runoff, but is still beneficial for the local eco-system.
Last Updated 7/20/2016