polycom realpresence content sharing suitesupportdocs.polycom.com/.../products/network/css_ad… ·...
TRANSCRIPT

i
ADMINISTRATORS’ GUIDE
Polycom® RealPresence® Content Sharing Suite
Version 1.1.1 | 3725-03260-001 Rev.D | July 2013
ii
Polycom® RealPresence® Content Sharing Suite Administrators’ Guide Copyright ©2013, Polycom, Inc. All rights reserved. 6001 America Center Drive San Jose, CA 95002 USA No part of this document may be reproduced or transmitted in any form or by any means, electronic or mechanical, for any purpose, without the express written permission of Polycom, Inc. Under the law, reproducing includes translating into another language or format. As between the parties, Polycom, Inc., retains title to and ownership of all proprietary rights with respect to the software contained within its products. The software is protected by United States copyright laws and international treaty provision. Therefore, you must treat the software like any other copyrighted material (e.g., a book or sound recording). Every effort has been made to ensure that the information in this manual is accurate. Polycom, Inc., is not responsible for printing or clerical errors. Information in this document is subject to change without notice.
Trademarks POLYCOM®, the Polycom logo and the names and marks associated with Polycom products are trademarks and/or service marks of Polycom, Inc. and are registered and/or common law marks in the United States and various other countries. All other trademarks are property of their respective owners. No portion hereof may be reproduced or transmitted in any form or by any means, for any purpose other than the recipient's personal use, without the express written permission of Polycom.
Disclaimer While Polycom uses reasonable efforts to include accurate and up-to-date information in this document, Polycom makes no warranties or representations as to its accuracy. Polycom assumes no liability or responsibility for any typographical or other errors or omissions in the content of this document.
Limitation of Liability Polycom and/or its respective suppliers make no representations about the suitability of the information contained in this document for any purpose. Information is provided “as is” without warranty of any kind and is subject to change without notice. The entire risk arising out of its use remains with the recipient. In no event shall Polycom and/or its respective suppliers be liable for any direct, consequential, incidental, special, punitive or other damages whatsoever (including without limitation, damages for loss of business profits, business interruption, or loss of business information), even if Polycom has been advised of the possibility of such damages.
Customer Feedback We are striving to improve our documentation quality and we appreciate your feedback. Email your opinions and comments to [email protected].
Visit Polycom Support for software downloads, product documents, product licenses, troubleshooting tips, service requests, and more.
iii
Contents
About This Guide ........................................................................................................ vii
Conventions Used in this Guide .........................................................................................vii Information Elements ......................................................................................................... vii Typographic Conventions ................................................................................................. viii
What’s in This Guide? ........................................................................................................ viii Changes to this Guide ..........................................................................................................ix
Chapter 1: Getting Started ............................................................................................ 1
Assumptions ......................................................................................................................... 1 Limitations ............................................................................................................................ 2 Before You Begin ................................................................................................................. 2 Frequently Asked Questions ............................................................................................... 3 Getting Help and Support Resources ................................................................................. 5
Chapter 2: Introducing the Polycom RealPresence Content Sharing Suite ............. 7
Why Is a Content Sharing Suite Required? ........................................................................ 7 What is the Content Sharing Suite? .................................................................................... 9 How Many Users and Calls Does the RealPresence Content Sharing Server Support? 10
Chapter 3: The Content Sharing Suite Big Picture ................................................... 13
Solution Components .........................................................................................................13 Solution Architecture ..........................................................................................................15 About the Content Sharing Process ..................................................................................15
Starting Up the Content Sharing Process ...........................................................................16 Pushing Content from the Lync Client ................................................................................16 Viewing Content from the Lync Client ................................................................................17
About Content Sharing Over the Web ................................................................................17
Chapter 4: Setting Up Your Environment .................................................................. 19
Your Existing Environment .................................................................................................19 Required Pre-Requisite Components .................................................................................19 Optional Pre-Requisite Components ..................................................................................22
Required CSS Product Components ..................................................................................22
Chapter 5: Installing Product Components .............................................................. 25
Installing the RealPresence Content Sharing Server Components .................................26
Polycom® RealPresence® Content Sharing Suite Administrators’ Guide
iv
Installing the OVF-Formatted Installation Package on VMware vSphere ............................26 Installing the VHD-Formatted Installation Package in a Hyper-V Environment ...................34
Installing Lync Client Machine Components .....................................................................42 Installing and Deploying the Microsoft .NET Framework 4 Client Profile ............................42 Installing the Polycom RealPresence Content Add-on for Lync ..........................................43
Using the .msi file ...........................................................................................................43 Using the .exe file ...........................................................................................................45 Verifying that the Content Add-on for Lync Installed Successfully ..................................49
Setting Up a High Availability (Hot Standby) Environment ..............................................49
Chapter 6: Configuring Solution Components ......................................................... 53
Configuring Lync Clients to Auto-Discover the Content Sharing Server Address .........54 Configuring RealPresence Collaboration Server (RMX) for CSS .....................................56 Configuring DMA for CSS ...................................................................................................61 Configuring Session Border Controllers for CSS .............................................................62
Configuring RPAD for CSS ................................................................................................62 Configuring Acme Packet® Net-Net Enterprise Session Director (ESD) for CSS ...............64
Distinguishing HTTPS Traffic Using Different Service Ports ...........................................65 Distinguishing HTTPS Traffic Using Different Service IPs ..............................................68
Configuring the Content Sharing Server ...........................................................................71 Accessing the Content Sharing Server Web Configuration Tool ........................................71 About the Content Sharing Server Web Configuration Tool ...............................................75 Configuring the Content Sharing Server Using the Content Sharing Server Web Configuration Tool .............................................................................................................76
Configuring SIP Server Information ................................................................................76 Configuring RealPresence Access Director Settings ......................................................77 Configuring Active Directory Settings .............................................................................79 Configuring Provisioning Information ..............................................................................81
Configuring an Optional Load Balancer ............................................................................83 Deploying CSS with an F5 BIG-IP LTM Load Balancer ......................................................83
Chapter 7: Administration and Maintenance Tasks ................................................. 93
Content Sharing Server Tasks ............................................................................................93 Activating the Content Sharing Server License ..................................................................94 Managing Users .................................................................................................................98 Managing System Events and Logs ...................................................................................99 Managing Administrators ................................................................................................. 101 Managing the Database ................................................................................................... 102 Configuring a Mail Server for Administrators .................................................................... 103 Managing Licenses, Serial Numbers, and Activation Keys ............................................... 108 Enabling High Availability (Hot Standby) .......................................................................... 110 Updating Network Settings............................................................................................... 112 Upgrading the Content Sharing Server ............................................................................ 113
v
Updating the Client Package ............................................................................................ 114 Restarting the System ...................................................................................................... 115 Shutting Down the System ............................................................................................... 115
CSS Client Tasks ............................................................................................................... 116 Upgrading the RealPresence Content Add-on for Lync .................................................... 116 Accessing CSS Client Logs ............................................................................................. 116
Chapter 8: Viewing and Sharing Content ................................................................ 119
Using Microsoft Lync to Share and View Content .......................................................... 119 Starting a VMR Call ......................................................................................................... 121 Viewing Content ............................................................................................................... 122 Sharing Content ............................................................................................................... 125
Viewing and Sharing Content over the Web .................................................................... 129
Chapter 9: Getting Help ............................................................................................ 135
Polycom and Partner Resources ...................................................................................... 135 The Polycom Community .................................................................................................. 136
Chapter 10: Troubleshooting ................................................................................... 137
Troubleshooting the Content Sharing Server.................................................................. 138 Troubleshooting the CSS Client ....................................................................................... 139 Troubleshooting the Web Client ....................................................................................... 144
Chapter 11: Open Source Attributions and Licenses ............................................ 145

vii
About This Guide
This guide uses several conventions that help you to understand information and perform tasks.
Conventions Used in this Guide This guide contains terms, graphical elements, and a few typographic conventions. Familiarizing yourself with these terms, elements, and conventions will help you perform the tasks described in this guide.
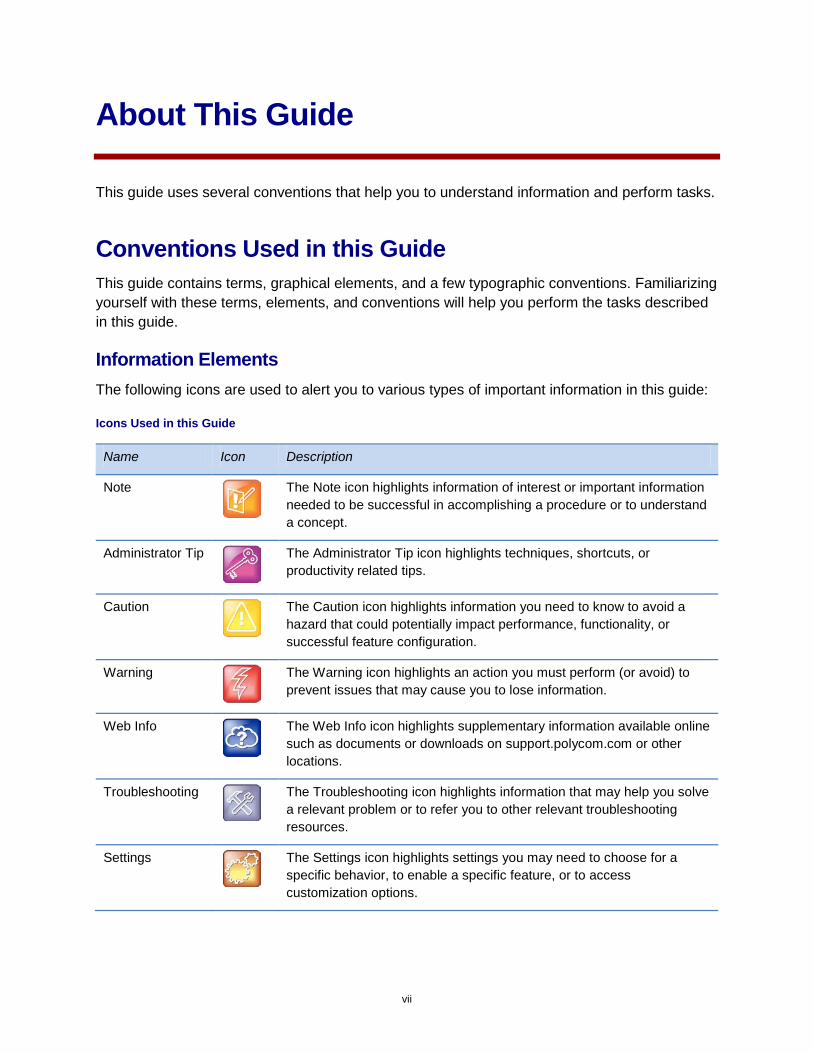
Information Elements The following icons are used to alert you to various types of important information in this guide:
Icons Used in this Guide
Name Icon Description
Note
The Note icon highlights information of interest or important information needed to be successful in accomplishing a procedure or to understand a concept.
Administrator Tip
The Administrator Tip icon highlights techniques, shortcuts, or productivity related tips.
Caution
The Caution icon highlights information you need to know to avoid a hazard that could potentially impact performance, functionality, or successful feature configuration.
Warning
The Warning icon highlights an action you must perform (or avoid) to prevent issues that may cause you to lose information.
Web Info
The Web Info icon highlights supplementary information available online such as documents or downloads on support.polycom.com or other locations.
Troubleshooting
The Troubleshooting icon highlights information that may help you solve a relevant problem or to refer you to other relevant troubleshooting resources.
Settings
The Settings icon highlights settings you may need to choose for a specific behavior, to enable a specific feature, or to access customization options.
Polycom® RealPresence® Content Sharing Suite Administrators’ Guide
viii
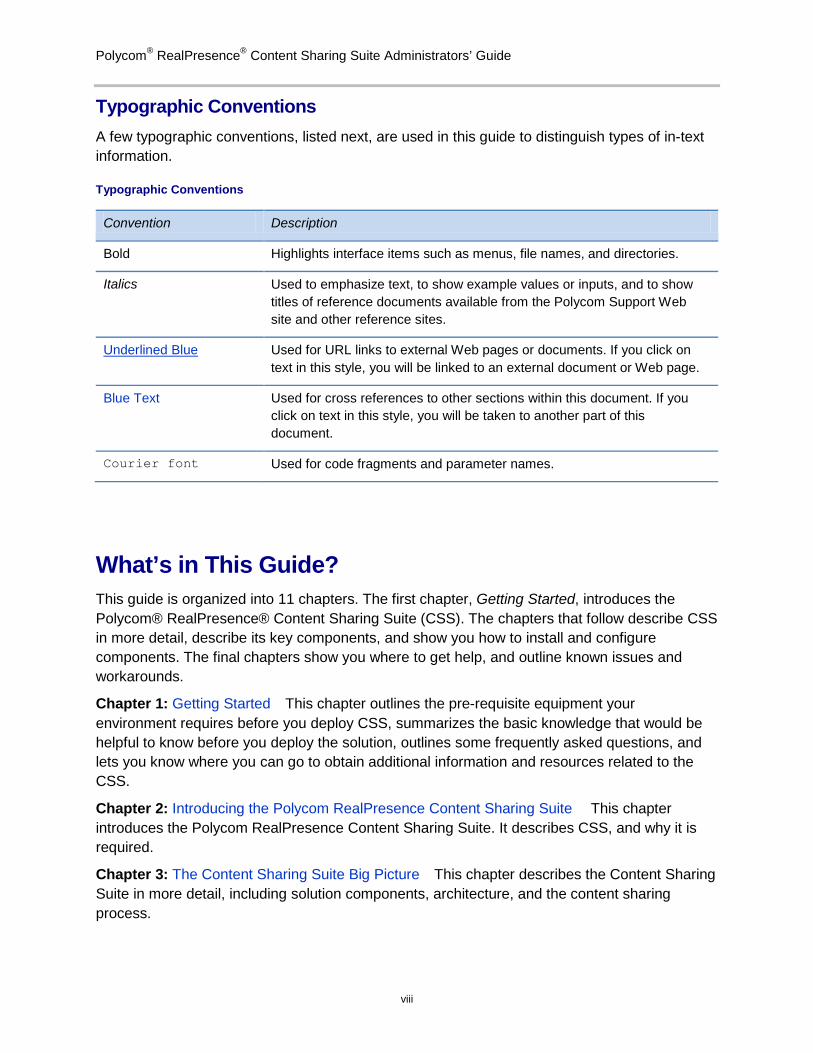
Typographic Conventions A few typographic conventions, listed next, are used in this guide to distinguish types of in-text information.
Typographic Conventions
Convention Description
Bold Highlights interface items such as menus, file names, and directories.
Italics Used to emphasize text, to show example values or inputs, and to show titles of reference documents available from the Polycom Support Web site and other reference sites.
Underlined Blue Used for URL links to external Web pages or documents. If you click on text in this style, you will be linked to an external document or Web page.
Blue Text Used for cross references to other sections within this document. If you click on text in this style, you will be taken to another part of this document.
Courier font Used for code fragments and parameter names.
What’s in This Guide? This guide is organized into 11 chapters. The first chapter, Getting Started, introduces the Polycom® RealPresence® Content Sharing Suite (CSS). The chapters that follow describe CSS in more detail, describe its key components, and show you how to install and configure components. The final chapters show you where to get help, and outline known issues and workarounds.
Chapter 1: Getting Started This chapter outlines the pre-requisite equipment your environment requires before you deploy CSS, summarizes the basic knowledge that would be helpful to know before you deploy the solution, outlines some frequently asked questions, and lets you know where you can go to obtain additional information and resources related to the CSS.
Chapter 2: Introducing the Polycom RealPresence Content Sharing Suite This chapter introduces the Polycom RealPresence Content Sharing Suite. It describes CSS, and why it is required.
Chapter 3: The Content Sharing Suite Big Picture This chapter describes the Content Sharing Suite in more detail, including solution components, architecture, and the content sharing process.
ix
Chapter 4: Setting Up Your Environment In this chapter, you’ll learn which components your environment requires to deploy CSS, and what components are optional, but supported by CSS.
Chapter 5: Installing Product Components This chapter describes how to install CSS product components, including how to install the Polycom RealPresence Content Sharing Server components and the Polycom RealPresence Content Add-on for Lync. It also describes how to set up a High Availability (Hot Standby) environment.
Chapter 6: Configuring Solution Components In this chapter, you’ll learn how to set up the Lync Client to find the RealPresence Content Sharing Server address, and how to configure Polycom® RealPresence® Collaboration Server (RMX) and Polycom® RealPresence® Distributed Media Application (DMA). You’ll also learn how to configure optional components—Polycom® RealPresence® Access Director (RPAD), Acme Packet® Net-Net Enterprise Session Director (ESD), and a load balancer—and how to use the Content Sharing Server Web Configuration Tool to configure the Content Sharing Server.
Chapter 7: Administration and Maintenance Tasks You can perform several Content Sharing Server maintenance and administrative tasks using the Content Sharing Server Web Configuration Tool. This chapter describes how to perform these tasks using the tool.
Chapter 8: Viewing and Sharing Content This chapter describes how to view and share content when the Content Sharing Suite is deployed. After reading this chapter, you’ll understand how to use Microsoft Lync (both 2010 and 2013) to view and share content from the Lync Client. You’ll also learn how to view and share content over the Web.
Chapter 9: Getting Help In this chapter, you’ll find links to Polycom, partner, and third-party documents and web sites. In particular, you’ll find links to the Polycom Community, which contains a number of discussion forums you can use to share ideas with your colleagues.
Chapter 10: Troubleshooting This chapter lists issues you may encounter when you deploy and use CSS, and possible solutions.
Chapter 11: Open Source Attributions and Licenses The Polycom RealPresence Content Sharing Suite includes components subject to various open source licenses. This chapter describes how to receive the source code for particular components, and how to obtain the Polycom RealPresence Content Sharing Suite Open Source Licenses and Notices document, which contains a full list of open source licenses and notices.
Changes to this Guide The following information has been added to this edition: Support for Hyper-V deployment. You can deploy CSS server on Hyper-V build in Windows Server 2012. The Hyper role enables you to create and manage a virtualized computing environment by using virtualization technology that is built in to Windows Server 2012.

1
Chapter 1: Getting Started
Welcome to the Polycom® RealPresence® Content Sharing Suite (CSS)—a solution that aims to dramatically enhance the conferencing experience between Microsoft® Lync™ and video endpoints that receive content from RealPresence Collaboration Server (RMX).
After you read this document, you’ll have an understanding of what CSS is, and how you can deploy it for use in your organization. Specifically, you’ll learn about the CSS architecture, how you can use the solution in your organization, and how to install, configure, administer, use, and troubleshoot it.
Before you learn the details of the solution, take a moment to read the basic information in this chapter. This chapter outlines the pre-requisite equipment your environment requires before you deploy CSS, summarizes the basic knowledge that would be helpful to know before you deploy the solution, outlines assumptions, limitations, and frequently asked questions, and lets you know where you can go to obtain additional information and resources related to CSS.
Assumptions This document describes a conferencing solution for Microsoft Lync and video endpoints that receive content from RealPresence Collaboration Server (RMX). For the purpose of this document, “video endpoints” refer only to those video endpoints that receive content from RealPresence Collaboration Server (RMX).
Before you deploy CSS, it is assumed that you have the following required pre-requisite equipment already installed and set up in your environment:
• RealPresence Collaboration Server (RMX)
• RealPresence Distributed Media Application (DMA)
• Microsoft Active Directory Server
• Microsoft Lync Server
• Microsoft Lync Client
• Video endpoints that receive content from RealPresence Collaboration Server (RMX)
If your CSS deployment also uses optional products supported by CSS (for example, RPAD, Acme Packet Net-Net Enterprise Session Director (ESD), Polycom® RSS™, and a load balancer), they should also be installed and set up in your environment before you install CSS software. For detailed information on pre-requisite equipment, see Your Existing Environment.
This document does not describe how to install or set up the above components for a typical, non-CSS deployment. This document assumes that the pre-requisite components described above (and described in detail in Your Existing Environment), are set up for a typical deployment, and configured to work in a Microsoft Lync environment.
Polycom® RealPresence® Content Sharing Suite Administrators’ Guide
2
Web Info: Installing and Configuring Polycom Products
To configure Polycom products to work within a Lync environment, see the Polycom Unified Communications Deployment Guide for Microsoft Environments. To review general configuration information for Polycom products, refer to the relevant product Support pages on the Polycom Support site (see Getting Help for specific product links).
This document does provide detailed instructions on how to install CSS product components, and—if a solution component requires special configuration to work with CSS—how to perform CSS-specific product configuration. Note that if a solution component does not require special configuration to work with CSS, configuration information for that component is not addressed.
Limitations As you deploy the CSS solution, be aware of the following limitations in CSS v1.1.1:
• The RealPresence Content Add-on for Lync supports the English version of Lync only. The Add-on may experience issues if it works with another language version.
• The CSS solution does not support an AVC/SVC mixed conference on RMX.
• Downgrading the Content Sharing Server is not supported.
• The RealPresence Content Add-on for Lync won’t launch if both Lync 2010 and 2013 are installed on the same Client machine.
• If you sign into your computer using multiple accounts simultaneously, the RealPresence Content Add-on for Lync may not run in one of the accounts, because it’s still running in the other account. The issue arises when you do the following:
1 Log onto your computer with Account A.
2 Successfully sign into the Lync Client and RealPresence Content Add-on for Lync.
3 Switch from Account A to Account B.
4 Sign into the Lync Client again.
If the above steps take place, the RealPresence Content Add-on for Lync will continue to run on Account A, and won’t run on Account B.
Before You Begin Before you read this document, it would be helpful if you had knowledge of Unified Communications and network administration, and are familiar with Microsoft Lync 2010 or 2013. Because CSS requires the use of several Polycom products, previous knowledge of Polycom hardware and software would be useful. For additional resources, including links to specific product Support pages and documents, see Getting Help.
Chapter 1: Getting Started
3
Frequently Asked Questions Refer to the frequently asked questions (FAQs) to help answer questions you may have about the solution before you begin.
Q: What are the new features in version 1.1.1? A: CSS version 1.1.1 introduces support for: Hyper-V deployement. You can deploy CSS
server on Hyper-V build in Windows Server 2012.
Q: How do I obtain CSS software? A: To obtain CSS software and other CSS-related components, contact your sales support
team.
Q: What endpoints does the Content Sharing Suite apply to?
A: The solution applies to video endpoints that receive content from RealPresence Collaboration Server (RMX), and to Microsoft Lync clients that have the Polycom RealPresence Content Add-on for Lync installed on their computer. For a detailed list of all supported components, see Chapter 4, Setting Up Your Environment.
Q: What Operating System will the RealPresence Content Add-on for Lync work with?
A: Microsoft Windows 8 (32-bit and 64-bit); Microsoft Windows 7 (32-bit and 64-bit); and Microsoft Windows XP (32-bit) with SP3 or later.
Q: What types of content-sharing does CSS support?
A: You can share your desktop or a program. For this release of CSS, you are unable to share whiteboards or create polls.
Q: What does my environment require before I deploy CSS?
A: There are several required pre-requisite components that you need to install and set up before you deploy CSS. These components include Microsoft Active Directory Server, Lync Server, Lync Client, RealPresence Distributed Media Application (DMA), RealPresence Collaboration Server (RMX), and video endpoints (one or more). There are also optional components that, if used, also need to be installed and set up before you install CSS software. Optional pre-requisite components include RPAD, Acme Packet Net-Net Enterprise Session Director (ESD), RSS, and a load balancer. For more information on optional and required pre-requisite components, see Your Existing Environment.
Polycom® RealPresence® Content Sharing Suite Administrators’ Guide
4
Q: What else do I require to deploy the solution?
A: Before you deploy the Content Sharing Suite, your existing environment requires several components, as outlined in Your Existing Environment. To deploy CSS, you also require several CSS product components, including RealPresence Content Sharing Server (with VMware or Hyper-V installed on it), an OVF-formatted virtual appliance software installation package or a VHD-formatted virtual appliance software installation package for Hyper-V, and a Polycom RealPresence Content Add-on for Lync installation file (to install on the Lync Client PC). For more information on CSS product components, see Required CSS Product Components.
Q: How many users does this solution support? A: The Content Sharing Server supports a deployment of 20,000 users. To support more
than 20,000 users, you can deploy multiple Content Sharing Servers with “unlimited” licenses using an optional load balancer. For more information on deploying an optional load balancer, see Configuring an Optional Load Balancer.
Q: What version of Microsoft Lync Client is required? A: CSS version 1.1 and later supports Microsoft Lync 2010 and Microsoft Lync 2013.
Q: Does this solution apply to Lync and video endpoints in point-to-point calls? A: The solution only applies to conference participants who meet in a RealPresence
Collaboration Server (RMX)/RealPresence Distributed Media Application (DMA) Virtual Meeting Room (VMR). Point-to-point calls between Lync and other endpoints can’t share content.
Q: Does this solution work between users in different enterprises? A: The solution only supports users within an enterprise (including remote enterprise
users); the solution doesn’t support federation between enterprises.
Chapter 1: Getting Started
5
Q: I have several users calling into meetings from outside the company firewall. Can these users benefit from CSS?
A: Yes, the CSS solution works with users calling from inside and outside the company firewall. However, to accommodate these users, you need to install, set up, and configure an optional, CSS-supported firewall traversal product, such as RPAD or Acme Packet Net-Net Enterprise Session Director (ESD). For supported products, see Optional Pre-Requisite Components.
Q: Where can I find more information about CSS? A: For more information about CSS, see the Polycom® RealPresence Content Sharing
Suite Support page. For more information about installing, configuring, and administering Polycom products, refer to Polycom Support.
Getting Help and Support Resources This solution guide includes a Getting Help chapter where you can find links to Polycom product and support sites. You can also find information about The Polycom Community, which provides access to discussion forums you can use to discuss hardware, software, and partner solution topics with your colleagues. To register with the Polycom Community, you will need to create a Polycom online account.
The Polycom Community includes access to Polycom support personnel, as well as user-generated hardware, software, and partner solutions topics. You can view top blog posts and participate in threads on any number of recent topics.

7
Chapter 2: Introducing the Polycom RealPresence Content Sharing Suite
This chapter introduces the Polycom RealPresence Content Sharing Suite (CSS), and explains how the solution benefits users.
The topics include:
• Why Is a Content Sharing Suite Required?
• What is the Content Sharing Suite?
• How Many Users and Calls Does the RealPrese nce Content Sharing Server Support?
Why Is a Content Sharing Suite Required? Video conferencing today is highly collaborative—employing content from various sources: computer desktops, applications, virtual whiteboards, and presentations. While sharing content is highly productive, the content sharing experience between Microsoft Lync and video endpoints is sub-optimal (or non-existent), since Microsoft Lync and video endpoints use different mechanisms—BFCP or H.239 for video endpoints, and Microsoft RDP (Microsoft’s proprietary protocol) for Microsoft Lync endpoints—to stream content. As a result of this difference, content displays as a ‘participant’ in Lync’s video area, rather than on Lync’s content stage. When content displays as a ‘participant,’ content size is small and hard to see, and other participants’ video becomes even smaller and harder to see. When Lync shares content, the other endpoint doesn’t see any content at all.
Polycom® RealPresence® Content Sharing Suite Administrators’ Guide
8
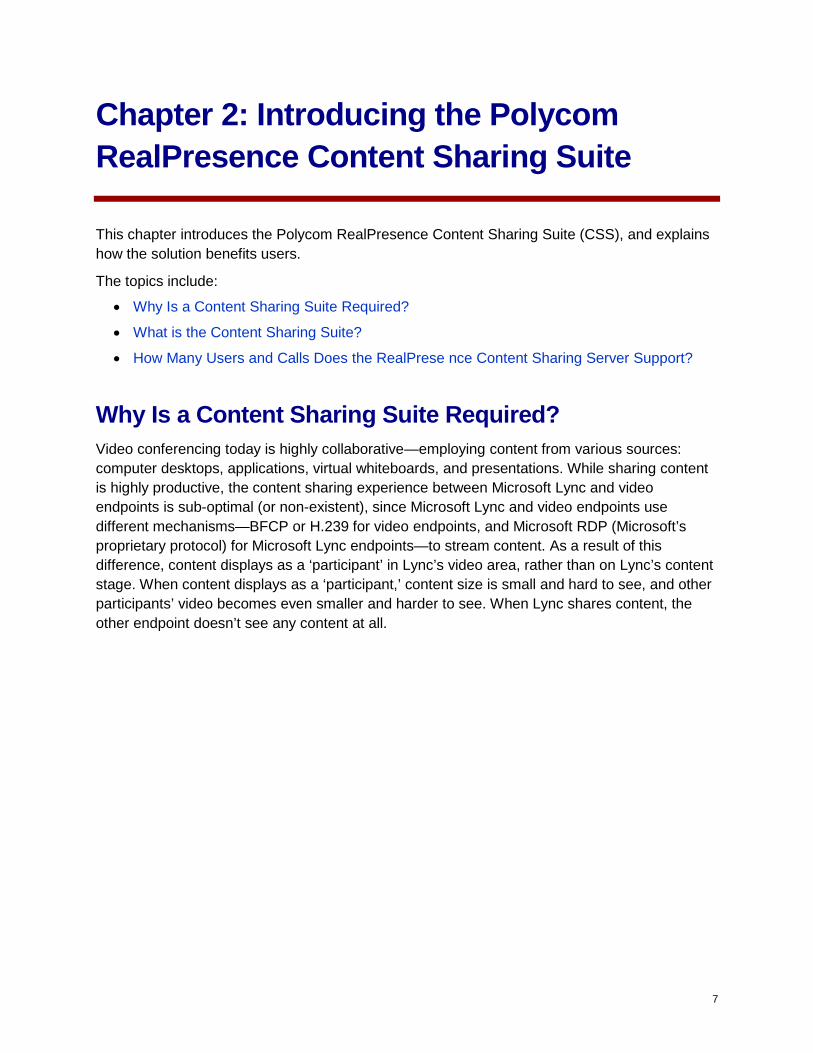
The figure below shows a video endpoint that receives content from RealPresence Collaboration Server (RMX) sharing content with a Lync endpoint. The content displays as a video stream in Lync’s video area, as if the content was a ‘participant.’ The content doesn’t display in Lync’s content stage because Lync is using a proprietary protocol for sharing content.
Chapter 2: Introducing the Polycom RealPresence Content Sharing Suite
9
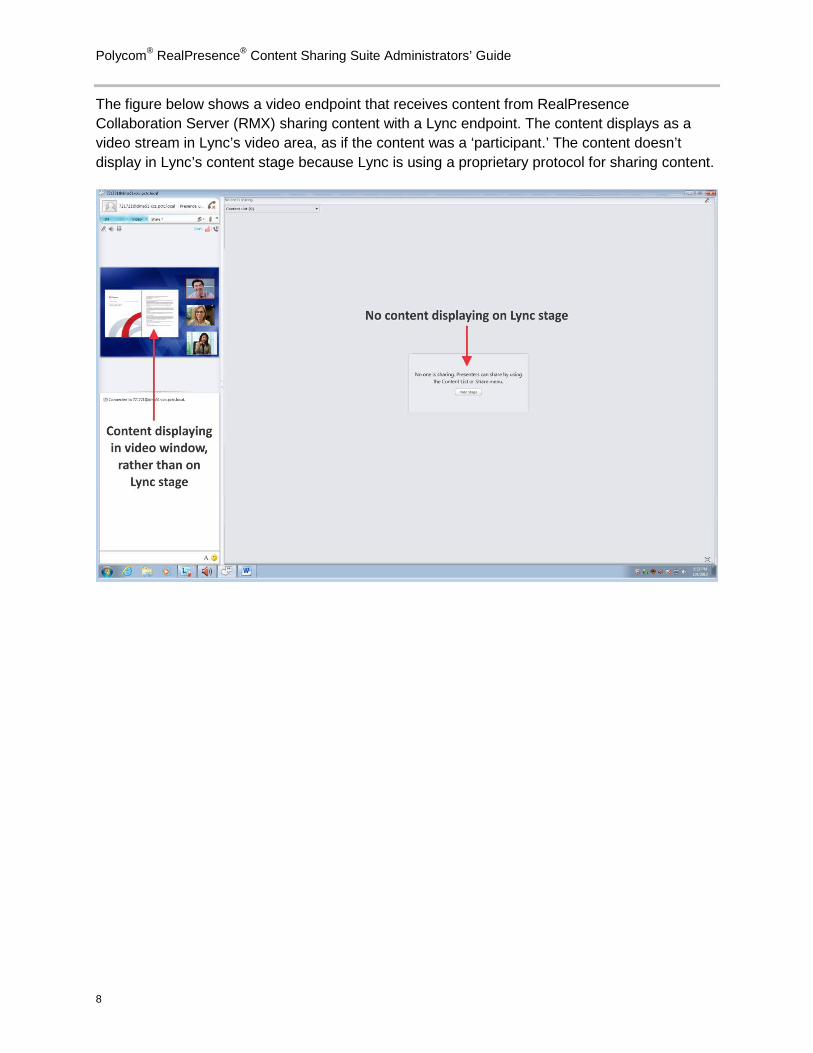
The Content Sharing Suite solves this issue by enriching collaboration between video endpoints and Lync endpoints. This enables video endpoints to display Lync content, and Lync users to see content on the Lync content stage (as shown below).
What is the Content Sharing Suite? The Content Sharing Suite enables content sharing between video endpoints that receive content from RealPresence Collaboration Server (RMX) and Microsoft Lync endpoints. The solution applies to conference participants who meet in a Polycom RealPresence Collaboration Server (RMX)/RealPresence Distributed Media Application (DMA) Virtual Meeting Room (VMR); CSS doesn’t support point-to-point calls between Lync and other endpoints, or content sharing between enterprises.
The Content Sharing Suite enables the following:
• Microsoft Lync users to share applications or their computer desktop with other conference participants calling from video endpoints that receive content from RealPresence Collaboration Server (RMX).
• Conference participants calling from video endpoints that receive content from RealPresence Collaboration Server (RMX) to share programs or their computer desktop with conference participants that use Microsoft Lync.
Polycom® RealPresence® Content Sharing Suite Administrators’ Guide
10
Essentially, the Content Sharing Suite enables Microsoft Lync endpoints to use BFCP—rather than Microsoft RDP—to stream content. By enabling Microsoft Lync endpoints to use the same video content channel that video endpoints use, all conference participants can enjoy a high-quality content-sharing experience.
The Content Sharing Suite is comprised of several hardware and software components. Key CSS software components are installed on a server running VMware or Hyper-V, and on the Lync Client’s server. Other required hardware components include Polycom RealPresence Collaboration Server (RMX), Polycom RealPresence Distributed Media Application (DMA), and—if firewall traversal is required—Polycom RealPresence Access Director (RPAD) or Acme Packet® Net-Net Enterprise Session Director (ESD).
Note: Viewing and Sharing Content Over the Web
Instead of viewing and sharing content using Lync, you can view and share content over the Web by entering a VMR “content URL” in a Web browser. For more information, see Viewing and Sharing Content over the Web.
How Many Users and Calls Does the RealPresence Content Sharing Server Support? For CSS version 1.1, the Content Sharing Server supports:
• 20,000 signed-in users
To support more than 20,000 users, you can deploy multiple Content Sharing Servers with “unlimited” licenses using an optional load balancer. For more information, see Configuring an Optional Load Balancer.
• 300 concurrent calls per second
CSS version 1.1 and later supports a call-based license. This license model specifies the maximum number of concurrent CSS calls that can take place—per Content Sharing Server—at one time. You need to activate a CSS Concurrent Session license for your Content Sharing Server. For more information on activating your Content Sharing Server license, see Activating the Content Sharing Server License.
Chapter 2: Introducing the Polycom RealPresence Content Sharing Suite
11
Note: Activating Licenses in High Availability (Hot Standby) or Multi-Server Environments
If your setup operates in a High Availability (Hot Standby) environment, you need to activate two Content Sharing Server licenses: one for the master server, and one for the slave server. For the master server, you need to purchase a CSS Concurrent Session license. For the slave server, you need to purchase a CSS Redundant Server Activation license. If your setup requires multiple Content Sharing Servers, you need to purchase one CSS Concurrent Session license, plus a CSS Extra Server Activation license for each additional Content Sharing Server. For example, if your setup has six Content Sharing Servers, you would purchase one CSS Concurrent Session license, plus five CSS Extra Server Activation licenses.

13
Chapter 3: The Content Sharing Suite Big Picture
This chapter describes the Content Sharing Suite in more detail, including solution components, architecture, and the content sharing process.
The topics include:
• Solution Components
• Solution Architecture
• About the Content Sharing Process
This chapter also describes Web-based access. Instead of using Microsoft Lync to view and share content, you can access and share content over the Web. For more information about this feature, see About Content Sharing Over the Web.
Solution Components The Polycom RealPresence Content Sharing Suite solution comprises the following components:
• Content Sharing Server—authenticates all the Lync Add-on clients, and provides provisioning data to the clients. A Content Sharing Server Web Configuration Tool allows you to set up, configure, and manage the Content Sharing Server.
• Content Add-on for Lync—provides the native BFCP support for the Lync endpoint to enable Lync and video endpoints to share content. An administrator or end user installs the Content Add-on for Lync on the Lync client’s machine. The content Add-on finds the Content Sharing Server automatically, logs on to the server, and obtains provisioning data for the user—such as DMA’s address, and the content rate to use. When a Lync user makes a call to a VMR meeting, the Content Add-on detects and connects to the VMR using SIP as well, and encodes and decodes content streams. A plug-in—the BFCP Content-Only Client Plug-in—is embedded in the Content Add-on for Lync. The Plug-in places a separate SIP call to the VMR, controls the content sharing using BFCP, and encodes and decodes content streams.
• Polycom RealPresence Distributed Media Application (DMA)—a network-based virtualization application for managing and distributing calls across collaboration networks. The DMA call processing software engine allows users to connect regardless of protocol standard, device, network, or location. DMA allows you to interact with Polycom RealPresence Collaboration Server (RMX). For more information about DMA, see the Polycom Distributed Media Application Support page.
Polycom® RealPresence® Content Sharing Suite Administrators’ Guide
14
• Polycom RealPresence Collaboration Server (RMX)—software for multiparty video, voice, and content collaboration. For more information about RealPresence Collaboration Server (RMX), navigate to your system’s Support page from the Collaboration & Conferencing Platforms Support page.
• Microsoft Active Directory Server—a server (provided by the customer) that is used by the Content Sharing Server as an ‘authentication provider’ to authenticate client connections. For more information about Active Directory, see the Microsoft TechNet Website.
• Microsoft Lync Server—software that provides a unified communications infrastructure for instant messaging (IM), voice and video calling, and conferencing. For more information about Lync Server, see the Microsoft TechNet Website.
• Microsoft Lync Client—the instant messaging, voice and video calling, and conferencing client for Lync Server. Lync client is installed on individual user machines. For more information about Lync client, see the Microsoft TechNet Website.
• Video endpoints that receive content from RealPresence Collaboration Server (RMX)—CSS supports content sharing between Microsoft Lync and several endpoints in the same VMR.
• (Optional) Polycom RealPresence Access Director (RPAD)—an optional CSS component that allows users outside the corporate network to join meetings with users inside the corporate network. For more information about RPAD, see the Polycom RealPresence Access Director Support page.
• (Optional) Acme Packet Net-Net Enterprise Session Director (ESD)—an optional CSS component that allows users outside the corporate network to join meetings with users inside the corporate network. For more information about Acme Packet Net-Net Enterprise Session Director (ESD), see the Acme Packet documentation online at https://support.acmepacket.com/documentation.asp.
Note: Remote Access
To support remote access, your setup requires either RPAD or Acme Packet Net-Net Enterprise Session Director (ESD).
• (Optional) Polycom RSS—a network server that enables users to easily record, stream and archive media content. For more information about RSS, navigate to your system’s Support page from the Video Recording, Streaming and Content Management Solutions Support page.
• (Optional) Load Balancer—an optional CSS component to increase efficiency and network performance. For more information, see Configuring an Optional Load Balancer.
Chapter 3: The Content Sharing Suite Big Picture
15
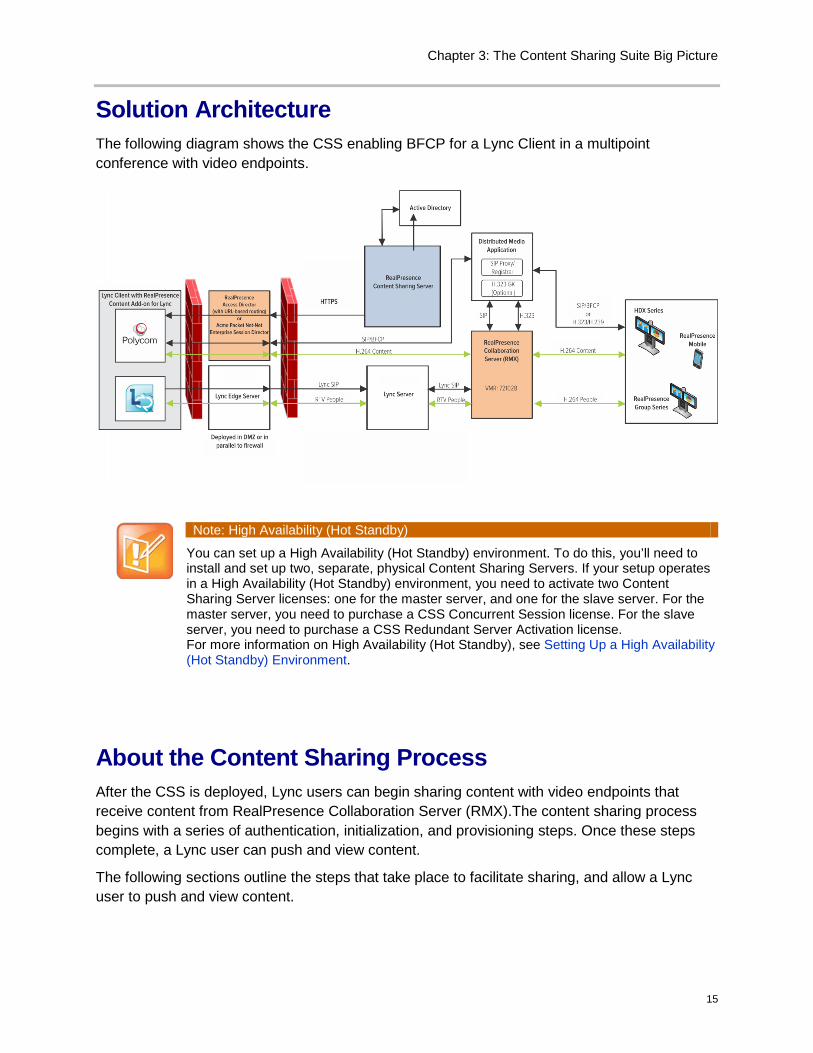
Solution Architecture The following diagram shows the CSS enabling BFCP for a Lync Client in a multipoint conference with video endpoints.
Note: High Availability (Hot Standby)
You can set up a High Availability (Hot Standby) environment. To do this, you’ll need to install and set up two, separate, physical Content Sharing Servers. If your setup operates in a High Availability (Hot Standby) environment, you need to activate two Content Sharing Server licenses: one for the master server, and one for the slave server. For the master server, you need to purchase a CSS Concurrent Session license. For the slave server, you need to purchase a CSS Redundant Server Activation license. For more information on High Availability (Hot Standby), see Setting Up a High Availability (Hot Standby) Environment.
About the Content Sharing Process After the CSS is deployed, Lync users can begin sharing content with video endpoints that receive content from RealPresence Collaboration Server (RMX).The content sharing process begins with a series of authentication, initialization, and provisioning steps. Once these steps complete, a Lync user can push and view content.
The following sections outline the steps that take place to facilitate sharing, and allow a Lync user to push and view content.
Polycom® RealPresence® Content Sharing Suite Administrators’ Guide
16
Starting Up the Content Sharing Process Before a Lync user can start pushing and viewing content, the Content Add-on for Lync, Content Sharing Server, and BFCP Content-Only Client Plug-in must work together to facilitate sharing. The following steps describe this process.
How the Content Sharing Process Starts Up:
1 Microsoft Lync starts, prompting the Polycom RealPresence Content Add-on for Lync to automatically start.
2 After Lync signs into the Lync server, the Content Add-on for Lync establishes a connection to the Content Sharing Server. This connection requires authentication.
3 The Content Add-on for Lync authenticates to the Content Sharing Server. This prompts the add-on to determine the Windows login associated with the currently logged in Lync user. The add-on uses the Windows credentials store to provide the appropriate credentials to the Content Sharing Server. If the add-on is unable to determine the user or access the user’s credentials, the add-on will query the user for them.
4 The Content Add-on for Lync requests provisioning information from the Content Sharing Server.
5 The Content Add-on for Lync receives the provisioning information from the Content Sharing Server, and the add-on gives the information to the BFCP Content-Only Client Plug-in.
6 If the SIP server is outside the firewall, the provisioning information will provide the RPAD or Acme Packet Net-Net Enterprise Session Director (ESD) address. If the SIP server is inside the firewall, the provisioning information will provide the DMA address.
7 The Lync client can now share content.
Pushing Content from the Lync Client After authentication, initialization, and provisioning takes place, the Lync client can push content. To start pushing content, a Lync conversation window must be open and the Lync user must be in an active VMR call. The BFCP Content-Only Client Plug-in uses standard BFCP-based SIP signaling to send content over H.264/RTP.
How Lync Client Pushes Content:
1 The Content Add-on for Lync detects that the Lync client is in a call with a VMR, and invokes the BFCP Content-Only Client Plug-in to call into the same conference.
2 The BFCP Content-Only Client Plug-in transparently dials a SIP call into the VMR.
3 The Content Add-on for Lync’s ‘Share’ menu replaces the Lync ‘Share’ menu. At this point, the Content Add-on’s content sharing stage is hidden, since no content is currently being shared.
Chapter 3: The Content Sharing Suite Big Picture
17
4 The Lync user selects the ‘Share’ menu, and selects a sharing mode (for example, their desktop or a program).
5 The Content Add-on for Lync’s sharing stage displays. The content sharing tool bar displays, which you can use to stop sharing.
6 The Content Add-on starts sending H.264 content streams to the VMR.
Viewing Content from the Lync Client The Lync Client can display content that other endpoints share. To view content, a Lync conversation window must be open and the Lync user must be in an active VMR call.
How Lync Client Displays Content:
1 The Content Add-on for Lync detects that the Lync client is in a call with a VMR, and invokes the BFCP Content-Only Client Plug-in to call to the same conference.
2 The BFCP Content-Only Client Plug-in transparently dials a SIP call into the VMR.
3 The Content Add-on for Lync’s ‘Share’ menu replaces the Lync ‘Share’ menu. At this point, the Content Add-on’s content sharing stage is disabled, since no content is currently being shared.
4 A far-end presenter chooses to send content.
5 The BFCP Content-Only Client Plug-in receives SIP/BFCP messages, informing the plug-in that the far end is sending content. This causes the content sharing stage to open, in preparation for rendering the received content. This is not the actual Lync stage, but will be very similar in position and appearance.
6 The BFCP Content-Only Client Plug-in starts to receive H.264-encoded content over RTP. The plug-in renders the content in its frame and displays it in the content sharing stage.
About Content Sharing Over the Web If you don’t have access to Lync, you can access CSS content over the Web. To access content, you need to enter a URL—contained in the meeting request—in a Web browser. After you enter the URL in a Web browser, you will be prompted to install or upgrade (if required) the BFCP Content-Only Client Plug-in on your machine so you can view and share content.
You can access Web-based content from X86/Windows machines running Windows XP (SP3+), Windows 7 (SP1+), and Windows 8 with Internet Explorer 8, Internet Explorer 9, Internet Explorer 10 (Metro), Google Chrome (26), or Mozilla Firefox (18).
For information on how to share and view content over the Web, see Viewing and Sharing Content over the Web.

19
Chapter 4: Setting Up Your Environment
To deploy CSS, your environment requires several components. There are also several optional components that CSS supports that you can set up in your environment. This chapter divides these components into two categories: your existing environment—which describes optional and required pre-requisite components—and required components, which are included in the CSS product.
After reading this chapter, you’ll understand what components your environment requires to deploy CSS, and what components are optional, but supported by CSS.
The topics include:
• Your Existing Environment
• Required CSS Product Components
Your Existing Environment Your existing environment requires several components that must be installed and set up before you deploy CSS. CSS also supports several optional components that, if used for the CSS solution, must also be set up and installed before you deploy CSS.
The following sections describe required an optional pre-requisite components.
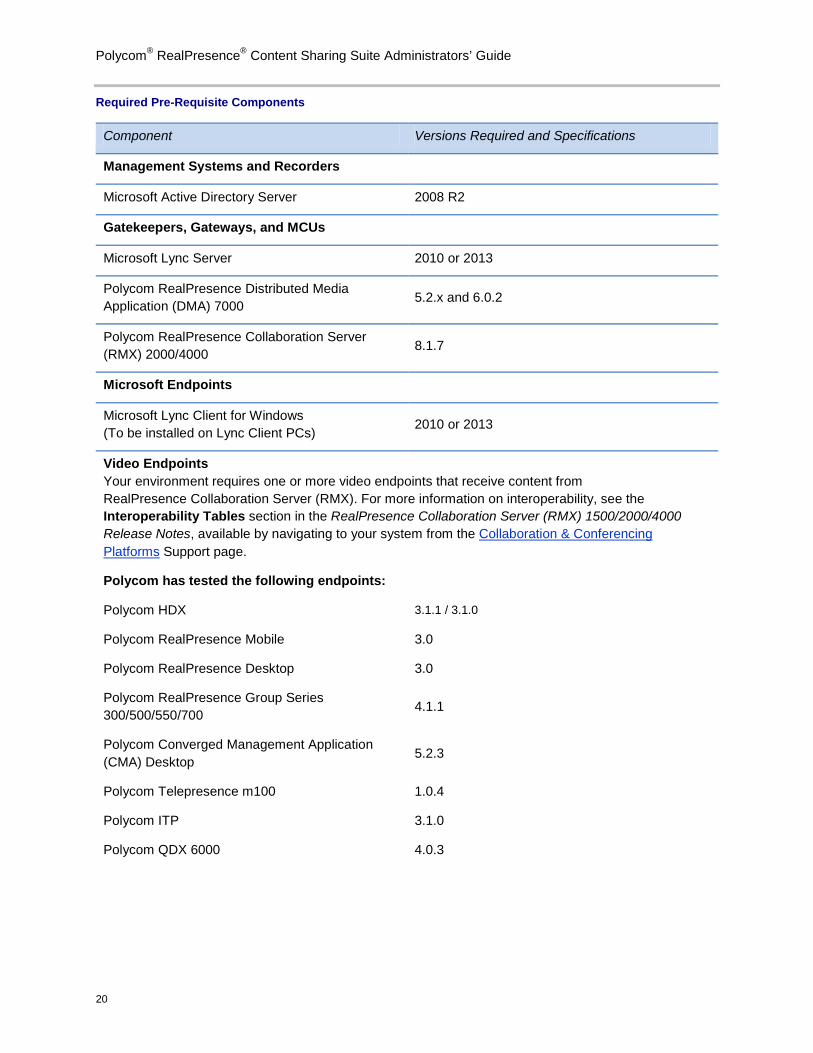
Required Pre-Requisite Components The following table lists required components—and their supported versions—that must be set up in your environment before you deploy CSS.
Note: Required Components
Your environment also requires VMware 5.0 or later, or Hyper-V build in Windows Server 2012 or later. For more information, see Required CSS Product Components.
Polycom® RealPresence® Content Sharing Suite Administrators’ Guide
20
Required Pre-Requisite Components
Component Versions Required and Specifications
Management Systems and Recorders
Microsoft Active Directory Server 2008 R2
Gatekeepers, Gateways, and MCUs
Microsoft Lync Server 2010 or 2013
Polycom RealPresence Distributed Media Application (DMA) 7000 5.2.x and 6.0.2
Polycom RealPresence Collaboration Server (RMX) 2000/4000 8.1.7
Microsoft Endpoints
Microsoft Lync Client for Windows (To be installed on Lync Client PCs) 2010 or 2013
Video Endpoints Your environment requires one or more video endpoints that receive content from RealPresence Collaboration Server (RMX). For more information on interoperability, see the Interoperability Tables section in the RealPresence Collaboration Server (RMX) 1500/2000/4000 Release Notes, available by navigating to your system from the Collaboration & Conferencing Platforms Support page.
Polycom has tested the following endpoints:
Polycom HDX 3.1.1 / 3.1.0
Polycom RealPresence Mobile 3.0
Polycom RealPresence Desktop 3.0
Polycom RealPresence Group Series 300/500/550/700 4.1.1
Polycom Converged Management Application (CMA) Desktop 5.2.3
Polycom Telepresence m100 1.0.4
Polycom ITP 3.1.0
Polycom QDX 6000 4.0.3
Chapter 4: Setting Up Your Environment
21
Component Versions Required and Specifications
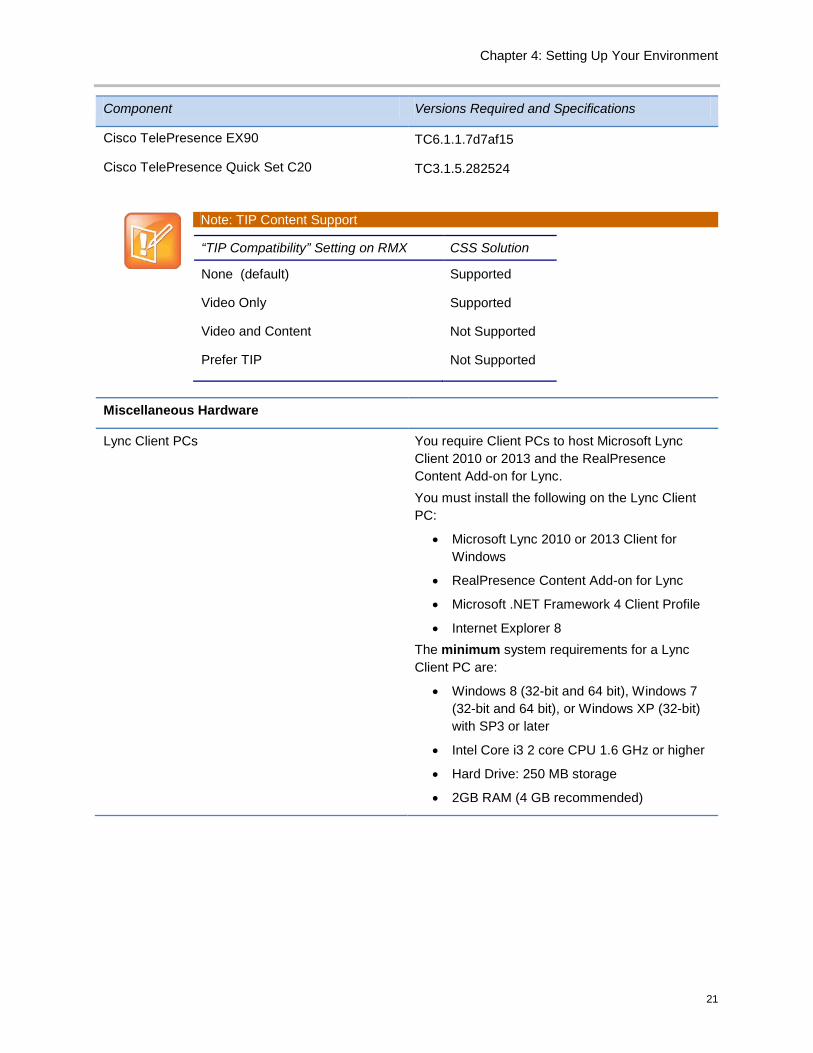
Cisco TelePresence EX90 TC6.1.1.7d7af15
Cisco TelePresence Quick Set C20 TC3.1.5.282524
Note: TIP Content Support
“TIP Compatibility” Setting on RMX CSS Solution
None (default) Supported
Video Only Supported
Video and Content Not Supported
Prefer TIP Not Supported
Miscellaneous Hardware
Lync Client PCs You require Client PCs to host Microsoft Lync Client 2010 or 2013 and the RealPresence Content Add-on for Lync. You must install the following on the Lync Client PC:
• Microsoft Lync 2010 or 2013 Client for Windows
• RealPresence Content Add-on for Lync
• Microsoft .NET Framework 4 Client Profile
• Internet Explorer 8 The minimum system requirements for a Lync Client PC are:
• Windows 8 (32-bit and 64 bit), Windows 7 (32-bit and 64 bit), or Windows XP (32-bit) with SP3 or later
• Intel Core i3 2 core CPU 1.6 GHz or higher
• Hard Drive: 250 MB storage
• 2GB RAM (4 GB recommended)
Polycom® RealPresence® Content Sharing Suite Administrators’ Guide
22
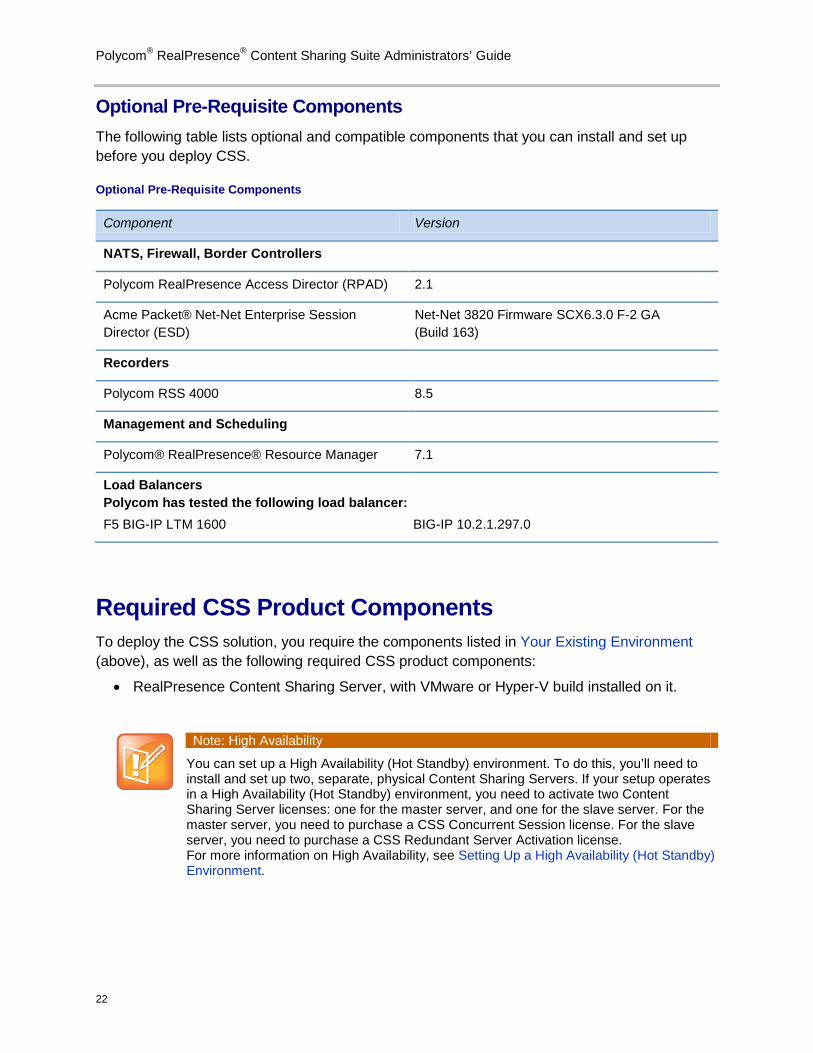
Optional Pre-Requisite Components The following table lists optional and compatible components that you can install and set up before you deploy CSS.
Optional Pre-Requisite Components
Component Version
NATS, Firewall, Border Controllers
Polycom RealPresence Access Director (RPAD) 2.1
Acme Packet® Net-Net Enterprise Session Director (ESD)
Net-Net 3820 Firmware SCX6.3.0 F-2 GA (Build 163)
Recorders
Polycom RSS 4000 8.5
Management and Scheduling
Polycom® RealPresence® Resource Manager 7.1
Load Balancers Polycom has tested the following load balancer: F5 BIG-IP LTM 1600 BIG-IP 10.2.1.297.0
Required CSS Product Components To deploy the CSS solution, you require the components listed in Your Existing Environment (above), as well as the following required CSS product components:
• RealPresence Content Sharing Server, with VMware or Hyper-V build installed on it.
Note: High Availability
You can set up a High Availability (Hot Standby) environment. To do this, you’ll need to install and set up two, separate, physical Content Sharing Servers. If your setup operates in a High Availability (Hot Standby) environment, you need to activate two Content Sharing Server licenses: one for the master server, and one for the slave server. For the master server, you need to purchase a CSS Concurrent Session license. For the slave server, you need to purchase a CSS Redundant Server Activation license. For more information on High Availability, see Setting Up a High Availability (Hot Standby) Environment.
Chapter 4: Setting Up Your Environment
23
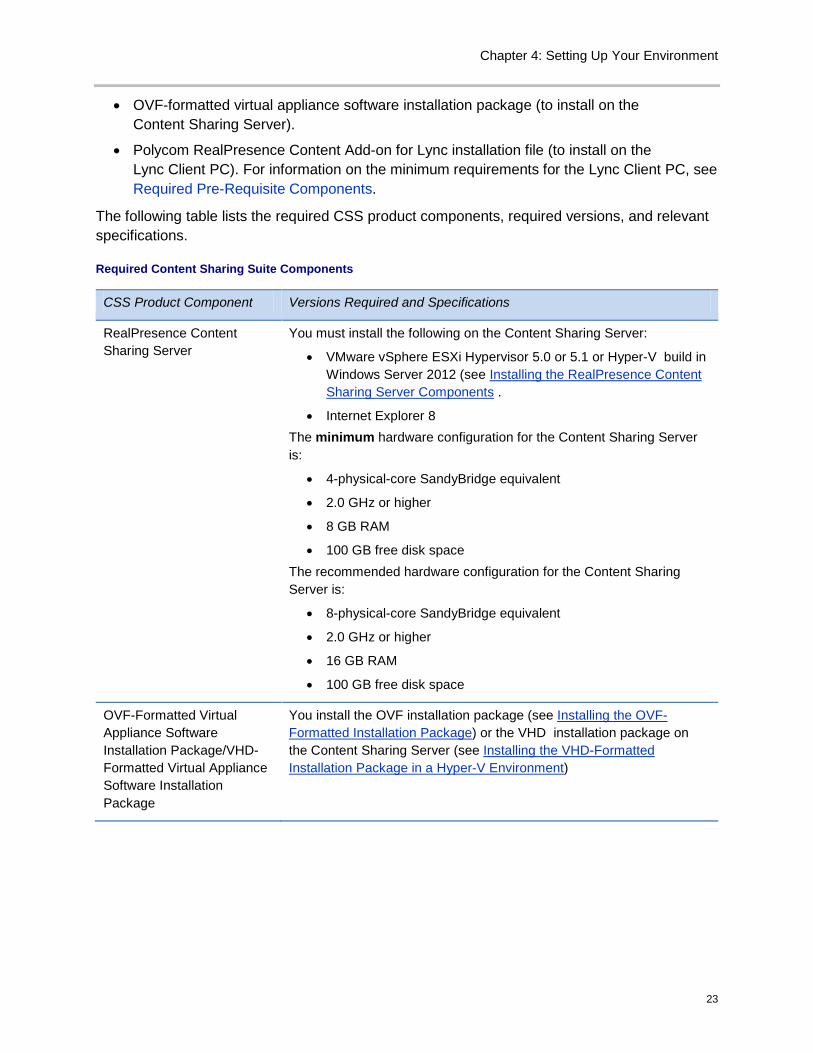
• OVF-formatted virtual appliance software installation package (to install on the Content Sharing Server).
• Polycom RealPresence Content Add-on for Lync installation file (to install on the Lync Client PC). For information on the minimum requirements for the Lync Client PC, see Required Pre-Requisite Components.
The following table lists the required CSS product components, required versions, and relevant specifications.
Required Content Sharing Suite Components
CSS Product Component Versions Required and Specifications
RealPresence Content Sharing Server
You must install the following on the Content Sharing Server:
• VMware vSphere ESXi Hypervisor 5.0 or 5.1 or Hyper-V build in Windows Server 2012 (see Installing the RealPresence Content Sharing Server Components .
• Internet Explorer 8 The minimum hardware configuration for the Content Sharing Server is:
• 4-physical-core SandyBridge equivalent
• 2.0 GHz or higher
• 8 GB RAM
• 100 GB free disk space The recommended hardware configuration for the Content Sharing Server is:
• 8-physical-core SandyBridge equivalent
• 2.0 GHz or higher
• 16 GB RAM
• 100 GB free disk space
OVF-Formatted Virtual Appliance Software Installation Package/VHD-Formatted Virtual Appliance Software Installation Package
You install the OVF installation package (see Installing the OVF-Formatted Installation Package) or the VHD installation package on the Content Sharing Server (see Installing the VHD-Formatted Installation Package in a Hyper-V Environment)
Polycom® RealPresence® Content Sharing Suite Administrators’ Guide
24
CSS Product Component Versions Required and Specifications
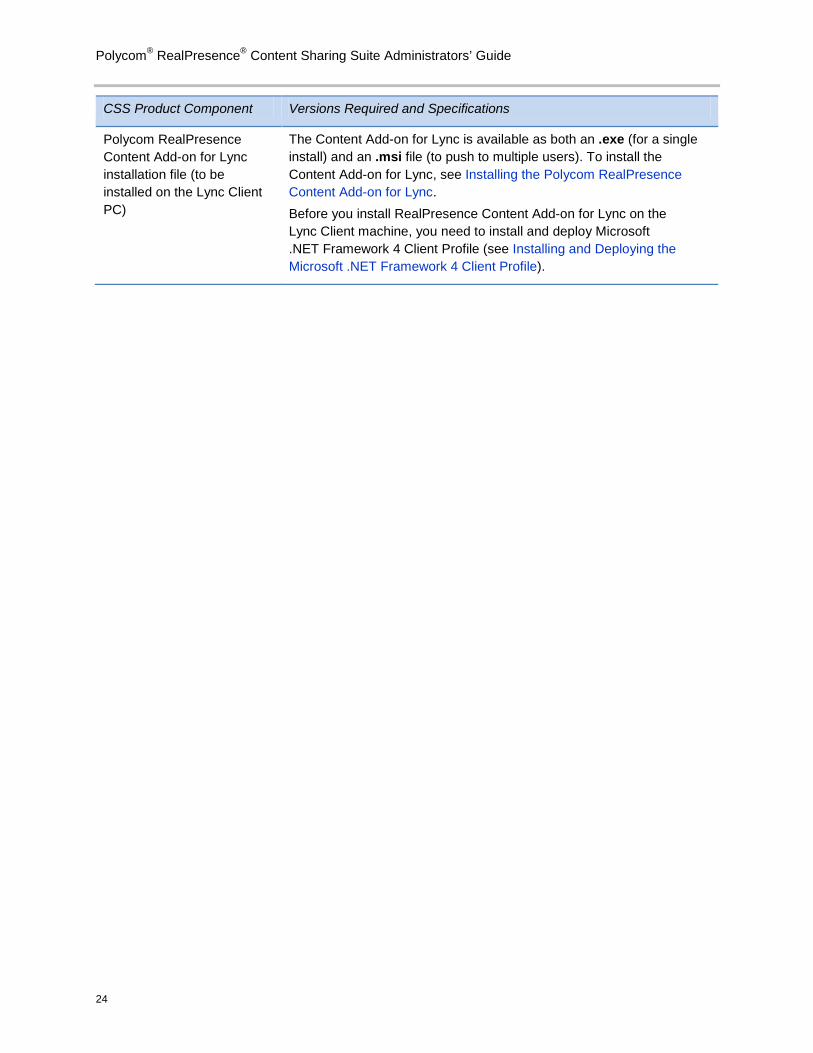
Polycom RealPresence Content Add-on for Lync installation file (to be installed on the Lync Client PC)
The Content Add-on for Lync is available as both an .exe (for a single install) and an .msi file (to push to multiple users). To install the Content Add-on for Lync, see Installing the Polycom RealPresence Content Add-on for Lync. Before you install RealPresence Content Add-on for Lync on the Lync Client machine, you need to install and deploy Microsoft .NET Framework 4 Client Profile (see Installing and Deploying the Microsoft .NET Framework 4 Client Profile).
25
Chapter 5: Installing Product Components
This chapter describes how to install CSS product components, as well as other components—VMware or Hyper-V build and Microsoft .NET Framework 4 Client Profile—that you need to install in order to deploy the CSS solution. You’ll also learn about setting up a High Availability (Hot Standby) environment. The topics include:
• How to install the RealPresence Content Sharing Server components—VMware (or Hyper-V build) and the OVF-formatted (or VHD-formatted) virtual appliance package.
• How to install Lync Client Machine Components—the Microsoft .NET Framework 4 Client Profile and the RealPresence Content Add-on for Lync.
• Setting up a High Availability environment
In the next chapter, you’ll learn how to configure all solution components, including how to use the Content Sharing Server Web Configuration Tool to configure the server.
Note: Installing Required and Optional Pre-Requisite Components
This document assumes that the pre-requisite components, as described in Your Existing Environment, are already installed in your environment. To install RealPresence Collaboration Server (RMX) and RealPresence Distributed Media Application (DMA) (required components), as well as RPAD, Acme Packet Net-Net Enterprise Session Director (ESD), and RSS (optional components) refer to the following Support pages:
• RealPresence Collaboration Server (RMX)—For detailed information on installing RMX, navigate to your RMX system’s Support page from the Collaboration & Conferencing Platforms Support page.
• RealPresence Distributed Media Application (DMA)—For detailed information on installing DMA, see the Polycom Distributed Media Application Support page.
• RPAD (optional)—For detailed information on installing RPAD, see the Polycom RealPresence Access Director Support page.
• Acme Packet Net-Net Enterprise Session Director (ESD) (optional)—For detailed information on installing Acme Packet Net-Net ESD, refer to the Acme Packet documentation online at https://support.acmepacket.com/documentation.asp.
• RSS (optional)—For detailed information on installing RSS, navigate to your system’s Support page from the Video Recording, Streaming and Content Management Solutions Support page.
Polycom® RealPresence® Content Sharing Suite Administrators’ Guide
26
Troubleshooting: Installing Solution Components
When you install solution components, make sure you install the same versions of the Content Sharing Server and the RealPresence Content Add-on for Lync. For example, if you install version 1.1.1 of the Polycom RealPresence Content Sharing Server pre-configured VHD installation package, you need to install version 1.1.1 of the Polycom RealPresence Content Add-on for Lync on each Lync Client machine. If the Content Sharing Server and RealPresence Content Add-on for Lync have different versions, your CSS solution won't work properly.
Installing the RealPresence Content Sharing Server Components Once your Content Sharing Server is installed and set up with the minimum system server requirements (see Required CSS Product Components), install the following server components:
• OVF-Formatted Virtual Appliance Installation Package on VMware vSphere
• VHD-Formatted Virtual Appliance Installation Package on Hyper-V
Installing the OVF-Formatted Installation Package on VMware vSphere For information on installing VMware, refer to the VMware Website. For VMware vSphere documentation, refer to the VMware vSphere Support page.
Ensure your server meets the VMware Server specifications. In addition, make sure to edit the BIOS of your server to enable ‘Virtualization’ of the CPUs.
Admin Tip: Supported VMware Versions
CSS supports VMware 5.0 and later.
To install the Content Sharing Server, you need the Open Virtualization Format (OVF) installation package. The package contains three files. Download these files to a location on your computer, so you can navigate to them during the install.
Chapter 5: Installing Product Components
27
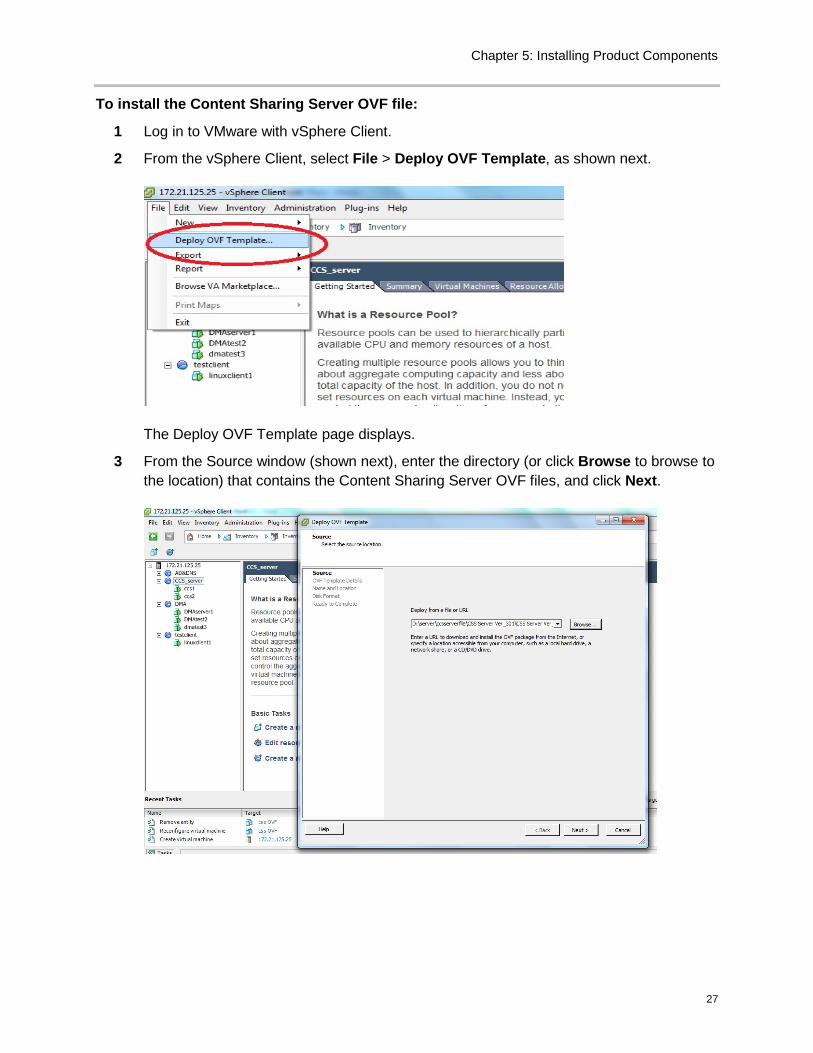
To install the Content Sharing Server OVF file:
1 Log in to VMware with vSphere Client.
2 From the vSphere Client, select File > Deploy OVF Template, as shown next.
The Deploy OVF Template page displays.
3 From the Source window (shown next), enter the directory (or click Browse to browse to the location) that contains the Content Sharing Server OVF files, and click Next.
Polycom® RealPresence® Content Sharing Suite Administrators’ Guide
28
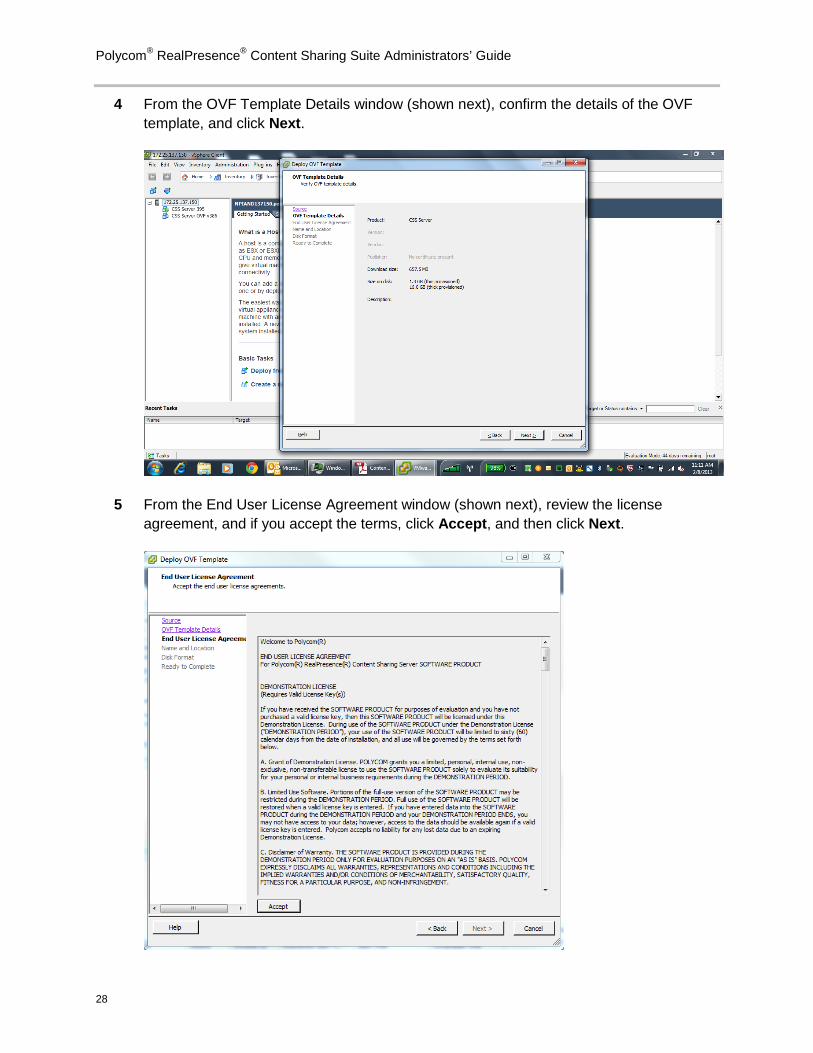
4 From the OVF Template Details window (shown next), confirm the details of the OVF template, and click Next.
5 From the End User License Agreement window (shown next), review the license agreement, and if you accept the terms, click Accept, and then click Next.
Chapter 5: Installing Product Components
29
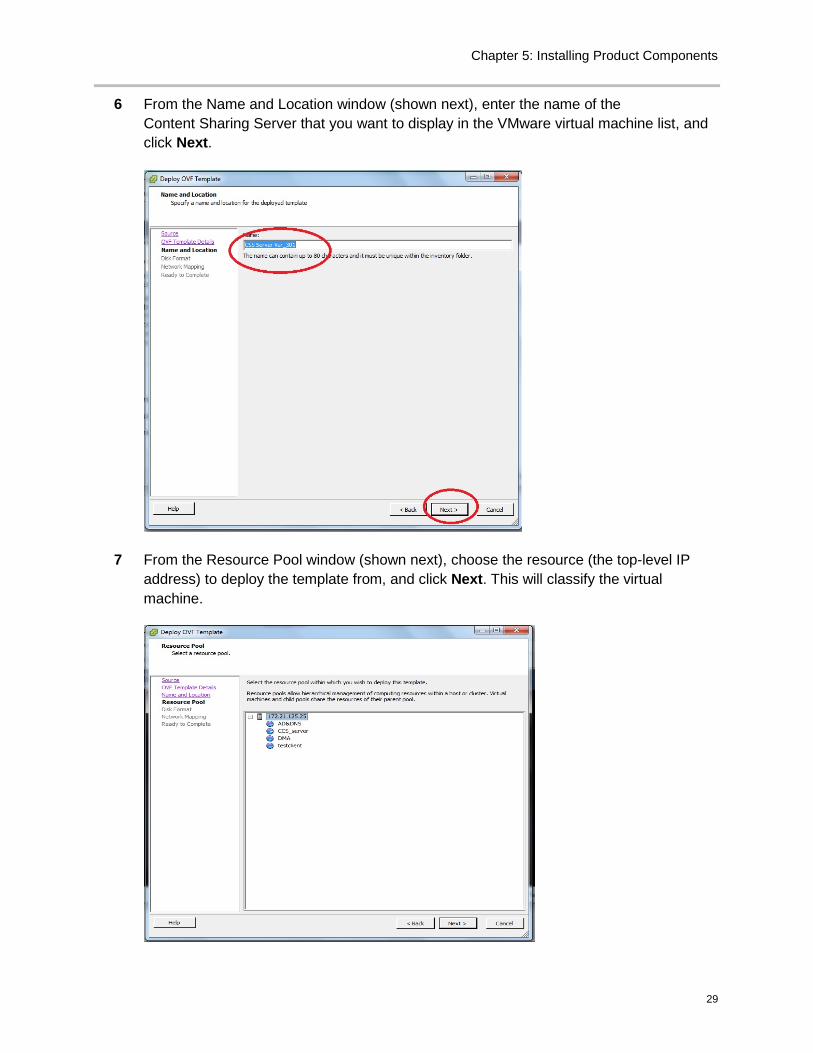
6 From the Name and Location window (shown next), enter the name of the Content Sharing Server that you want to display in the VMware virtual machine list, and click Next.
7 From the Resource Pool window (shown next), choose the resource (the top-level IP address) to deploy the template from, and click Next. This will classify the virtual machine.
Polycom® RealPresence® Content Sharing Suite Administrators’ Guide
30
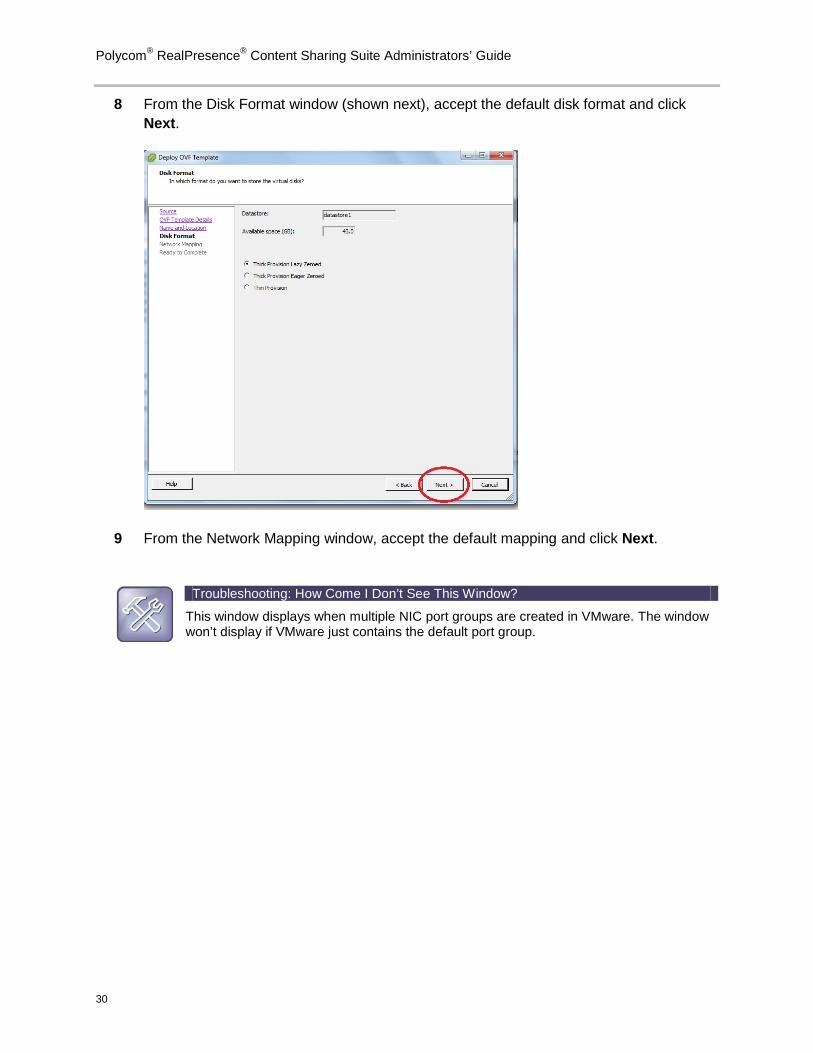
8 From the Disk Format window (shown next), accept the default disk format and click Next.
9 From the Network Mapping window, accept the default mapping and click Next.
Troubleshooting: How Come I Don’t See This Window?
This window displays when multiple NIC port groups are created in VMware. The window won’t display if VMware just contains the default port group.
Chapter 5: Installing Product Components
31
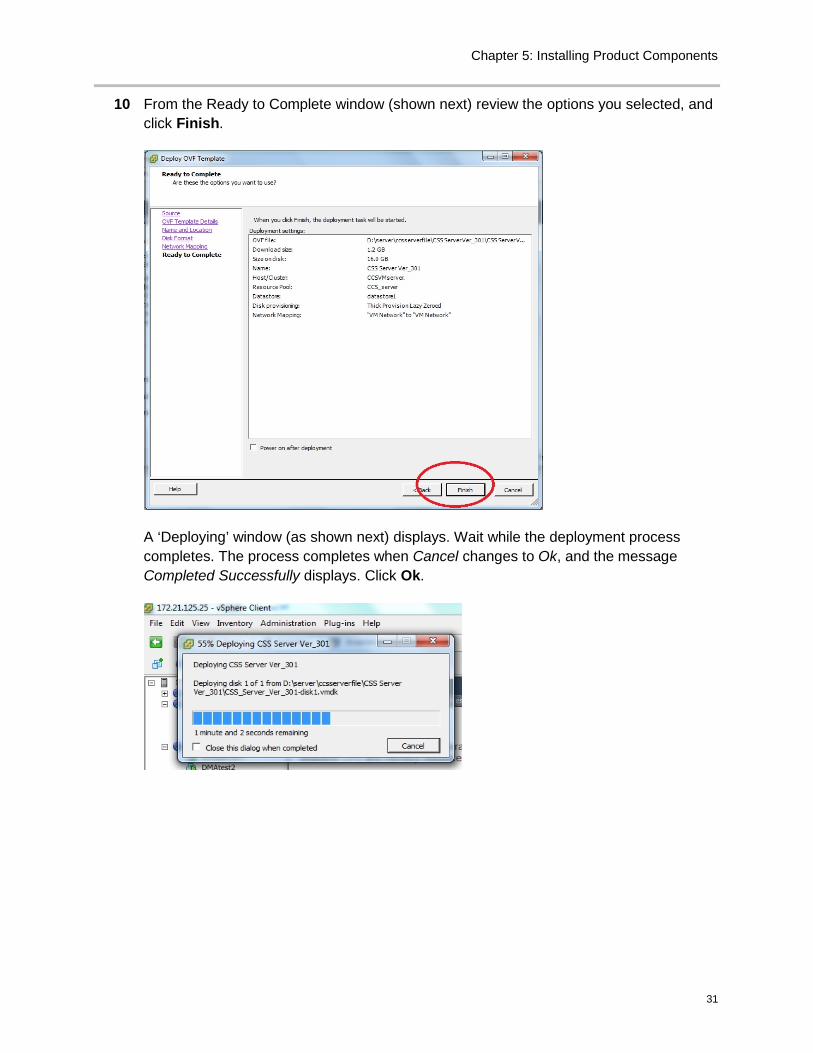
10 From the Ready to Complete window (shown next) review the options you selected, and click Finish.
A ‘Deploying’ window (as shown next) displays. Wait while the deployment process completes. The process completes when Cancel changes to Ok, and the message Completed Successfully displays. Click Ok.
Polycom® RealPresence® Content Sharing Suite Administrators’ Guide
32
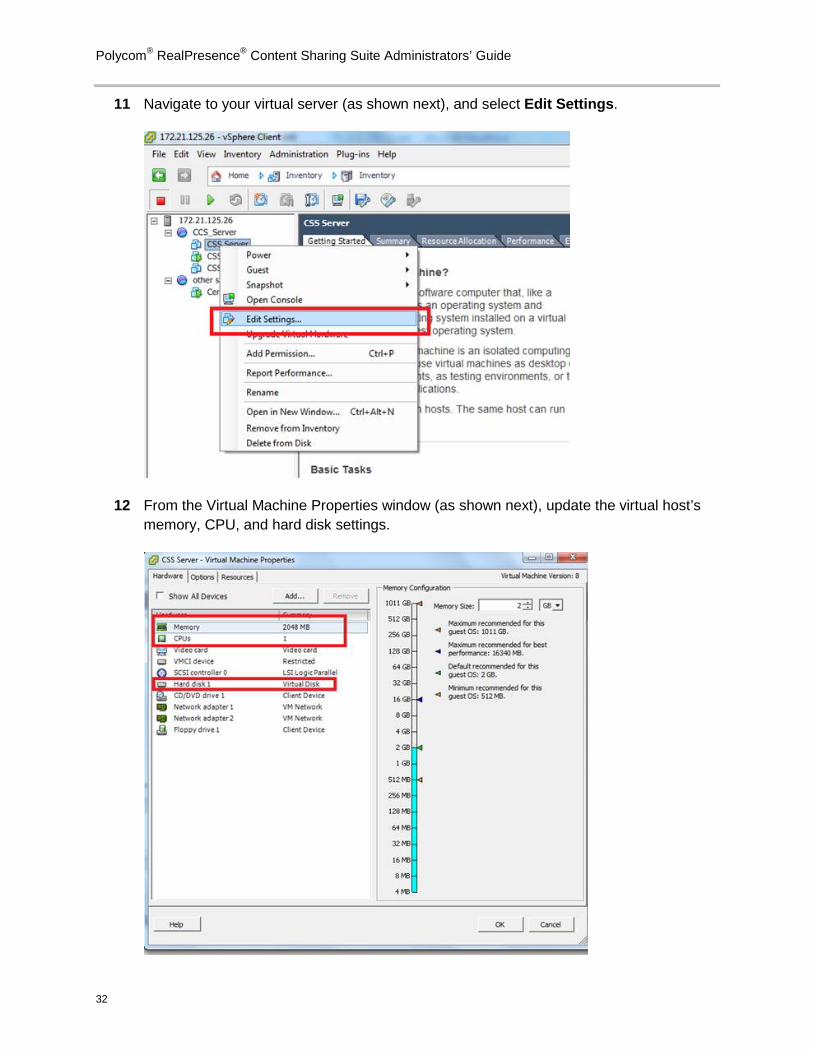
11 Navigate to your virtual server (as shown next), and select Edit Settings.
12 From the Virtual Machine Properties window (as shown next), update the virtual host’s memory, CPU, and hard disk settings.
Chapter 5: Installing Product Components
33
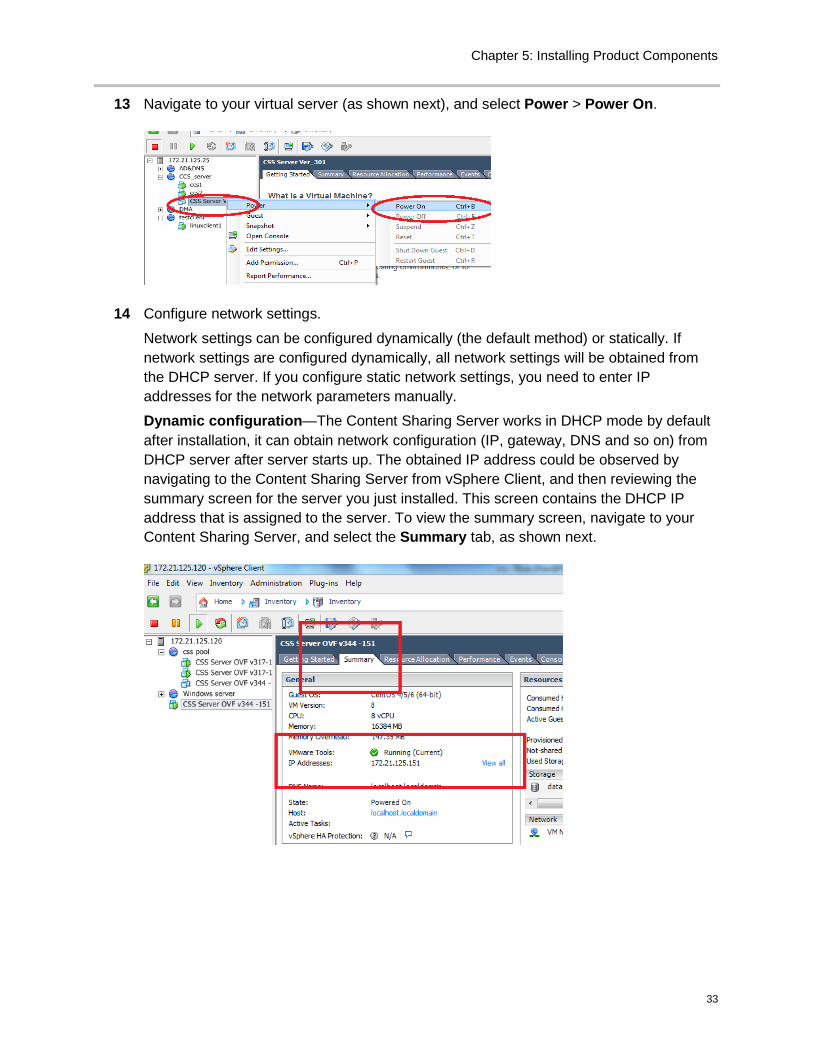
13 Navigate to your virtual server (as shown next), and select Power > Power On.
14 Configure network settings.
Network settings can be configured dynamically (the default method) or statically. If network settings are configured dynamically, all network settings will be obtained from the DHCP server. If you configure static network settings, you need to enter IP addresses for the network parameters manually. Dynamic configuration—The Content Sharing Server works in DHCP mode by default after installation, it can obtain network configuration (IP, gateway, DNS and so on) from DHCP server after server starts up. The obtained IP address could be observed by navigating to the Content Sharing Server from vSphere Client, and then reviewing the summary screen for the server you just installed. This screen contains the DHCP IP address that is assigned to the server. To view the summary screen, navigate to your Content Sharing Server, and select the Summary tab, as shown next.
Polycom® RealPresence® Content Sharing Suite Administrators’ Guide
34
Static configuration—If you need to configure network settings statically, manually configure the network settings. From vSphere client, open a console window and press Enter to obtain a prompt. Enter cssadmin and CssNET*76 for your user name and password, and then run the following commands:
SetHostNameAndGateway <para-hostname para-gateway>
SetDNS <para-primaryDNS> <para-secondDNS>
SetNetworkInterface <para-interfacename para-ipaddress para-netmask>
rebootserver
For example:
SetHostNameAndGateway cssserver 172.21.115.254
SetDNS 172.21.104.106 172.21.5.204
SetNetworkInterface eth0 172.21.115.134 255.255.252.0
rebootserver
The RealPresence Content Sharing Server is installed. You can now access the Content Sharing Server Web Configuration Tool and configure the server. To access the tool, enter http://<your server ip address>/admin in your Browser’s address bar. For more information on the RealPresence Content Sharing Server Web Configuration Tool, and how to use the tool to configure the Content Sharing Server, see Configuring the Content Sharing Server.
Installing the VHD-Formatted Installation Package in a Hyper-V Environment For information on installing the Hyper-V Role on Windows Server, refer to the Hyper-V Role Website.
Ensure your server meets the Hyper-V Role specifications. In addition, make sure to edit the BIOS of your server to enable ‘Virtualization’ of the CPUs.
To install the Content Sharing Server, you need the pre-configured VHD installation package. Download these files to a location on your computer, so you can navigate to them during the install.
Chapter 5: Installing Product Components
35
To install the Content Sharing Server in a Hyper-V Environment:
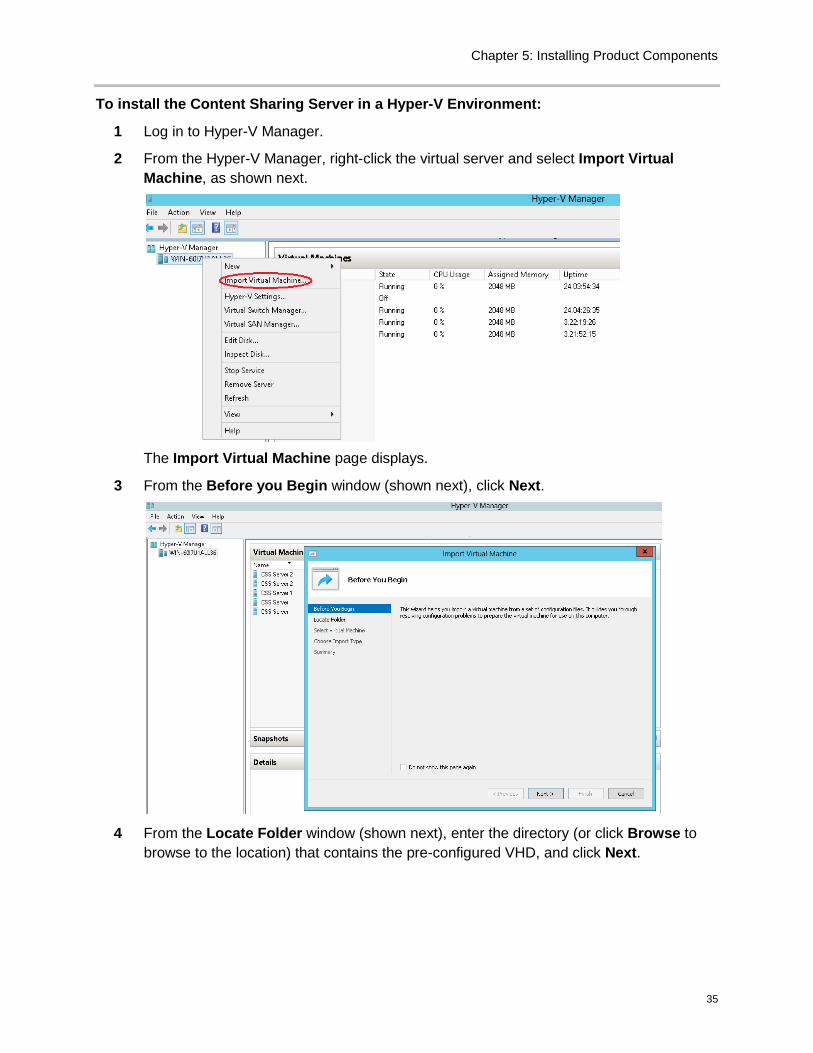
1 Log in to Hyper-V Manager.
2 From the Hyper-V Manager, right-click the virtual server and select Import Virtual Machine, as shown next.
The Import Virtual Machine page displays.
3 From the Before you Begin window (shown next), click Next.
4 From the Locate Folder window (shown next), enter the directory (or click Browse to
browse to the location) that contains the pre-configured VHD, and click Next.
Polycom® RealPresence® Content Sharing Suite Administrators’ Guide
36
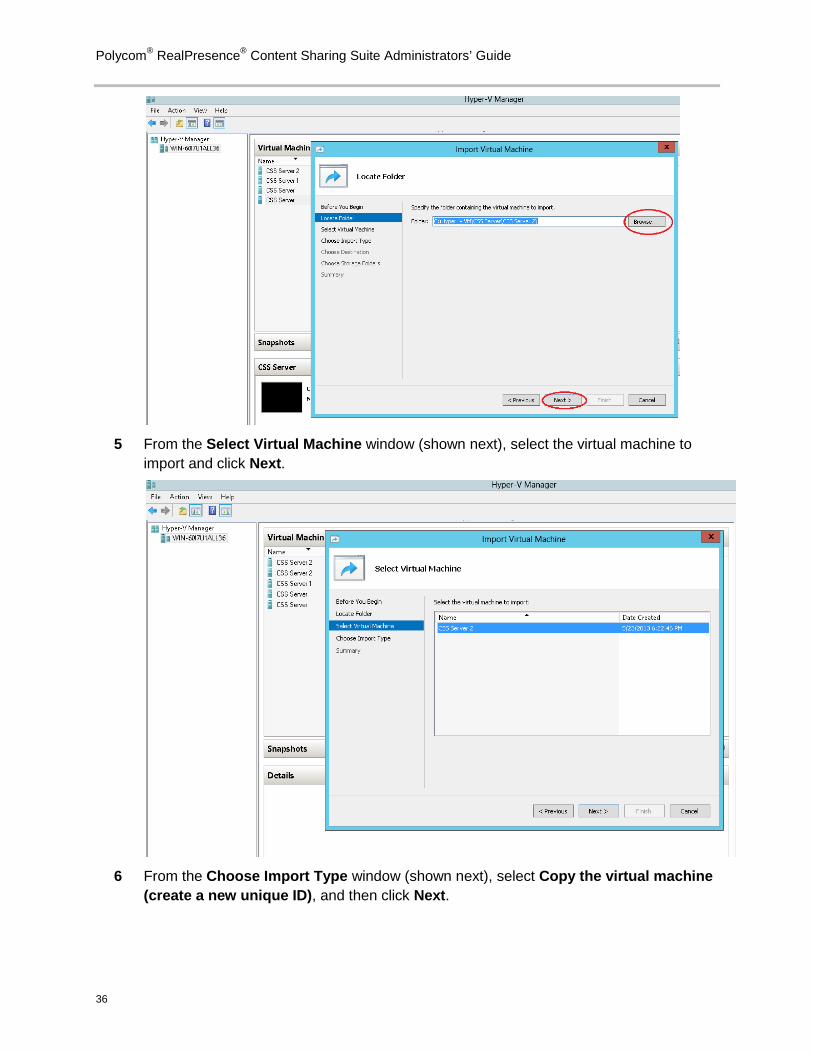
5 From the Select Virtual Machine window (shown next), select the virtual machine to
import and click Next.
6 From the Choose Import Type window (shown next), select Copy the virtual machine
(create a new unique ID), and then click Next.
Chapter 5: Installing Product Components
37
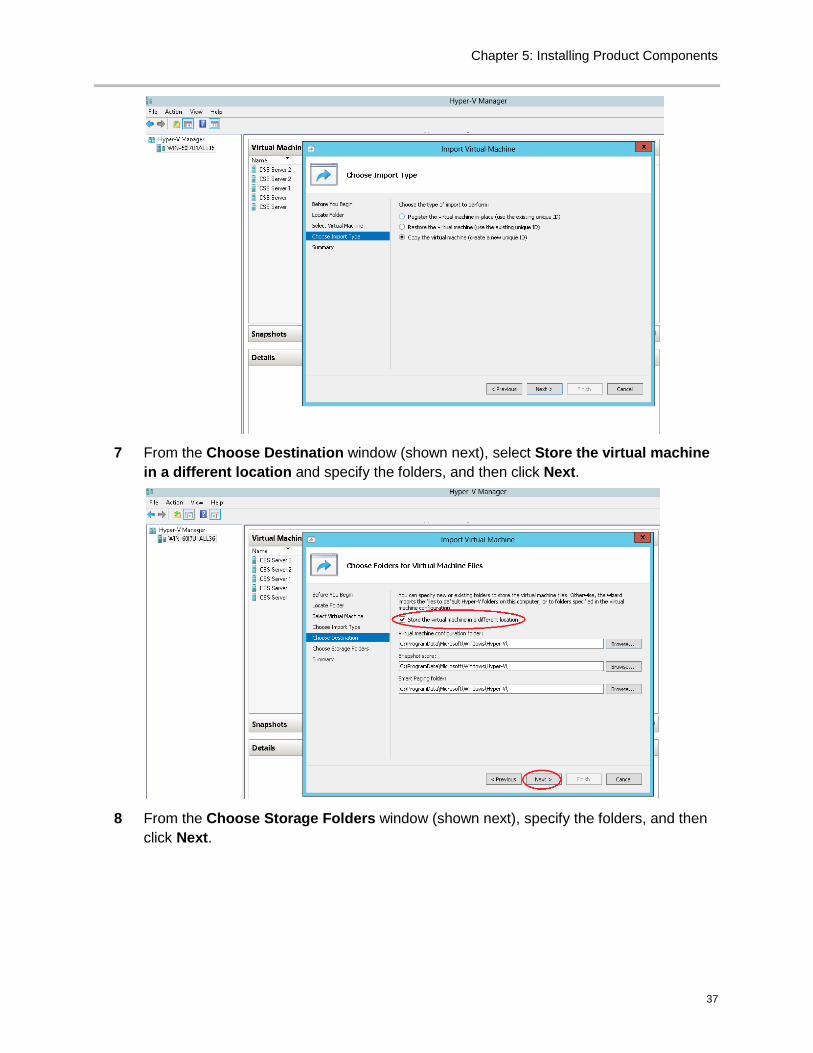
7 From the Choose Destination window (shown next), select Store the virtual machine
in a different location and specify the folders, and then click Next.
8 From the Choose Storage Folders window (shown next), specify the folders, and then
click Next.
Polycom® RealPresence® Content Sharing Suite Administrators’ Guide
38
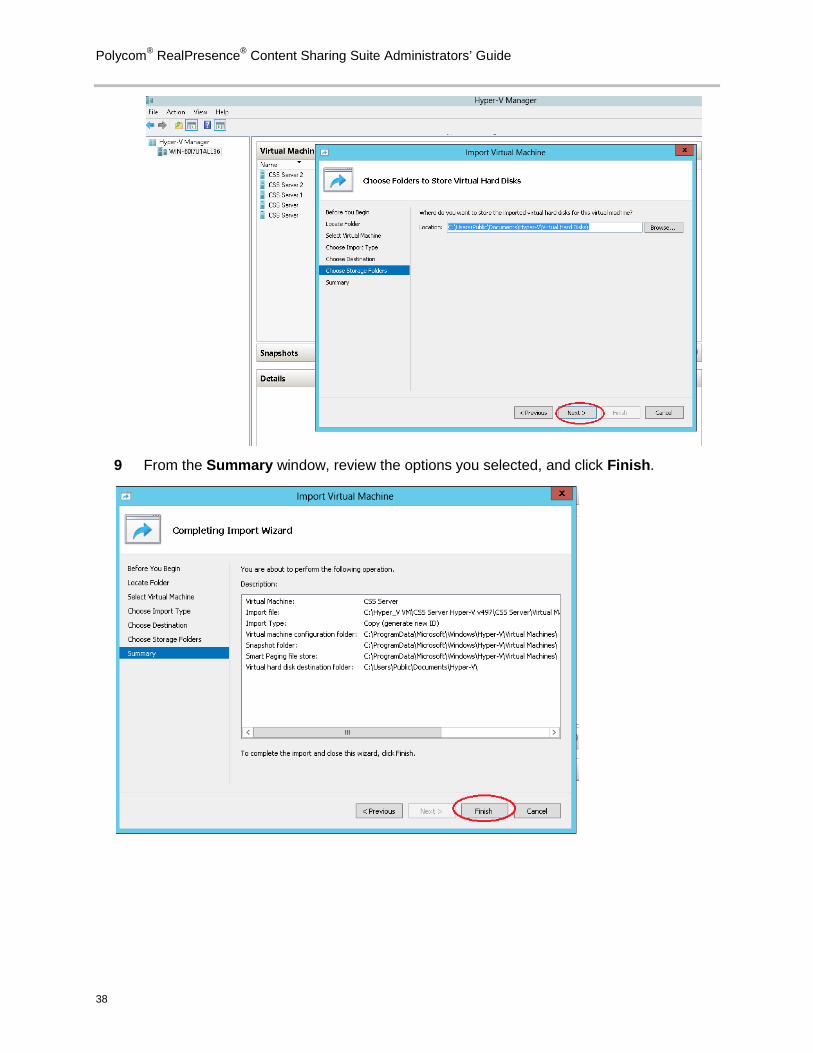
9 From the Summary window, review the options you selected, and click Finish.
Chapter 5: Installing Product Components
39
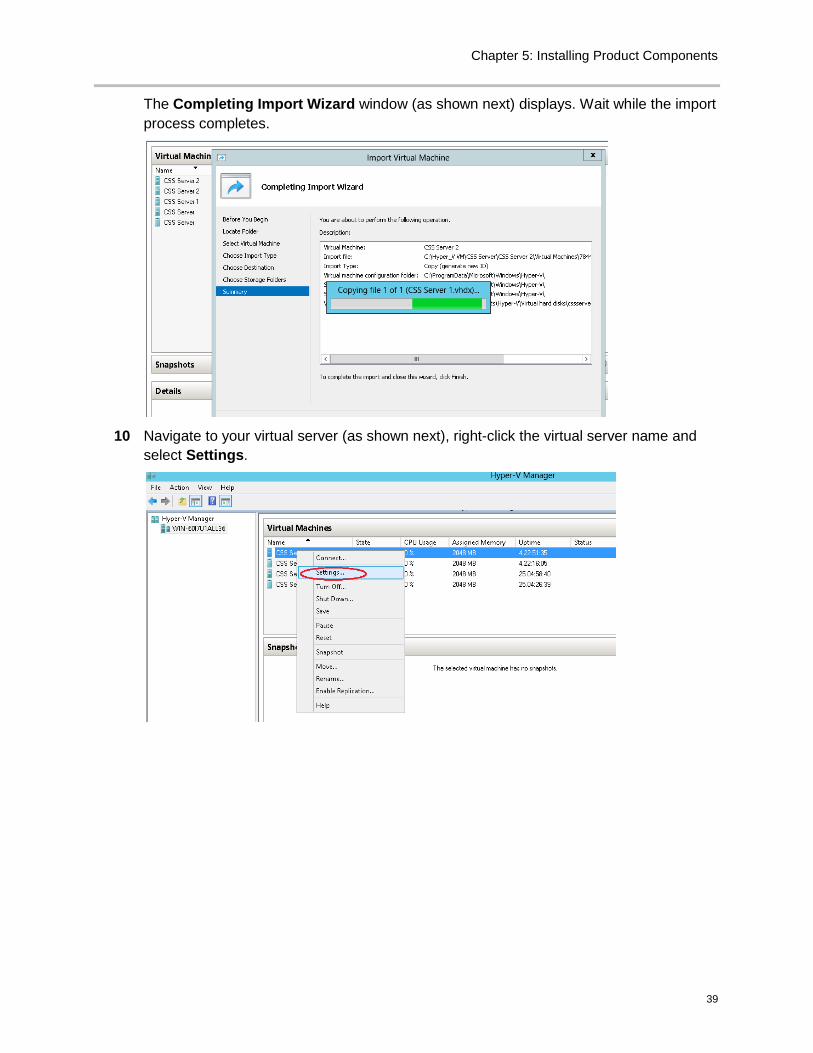
The Completing Import Wizard window (as shown next) displays. Wait while the import process completes.
10 Navigate to your virtual server (as shown next), right-click the virtual server name and
select Settings.
Polycom® RealPresence® Content Sharing Suite Administrators’ Guide
40
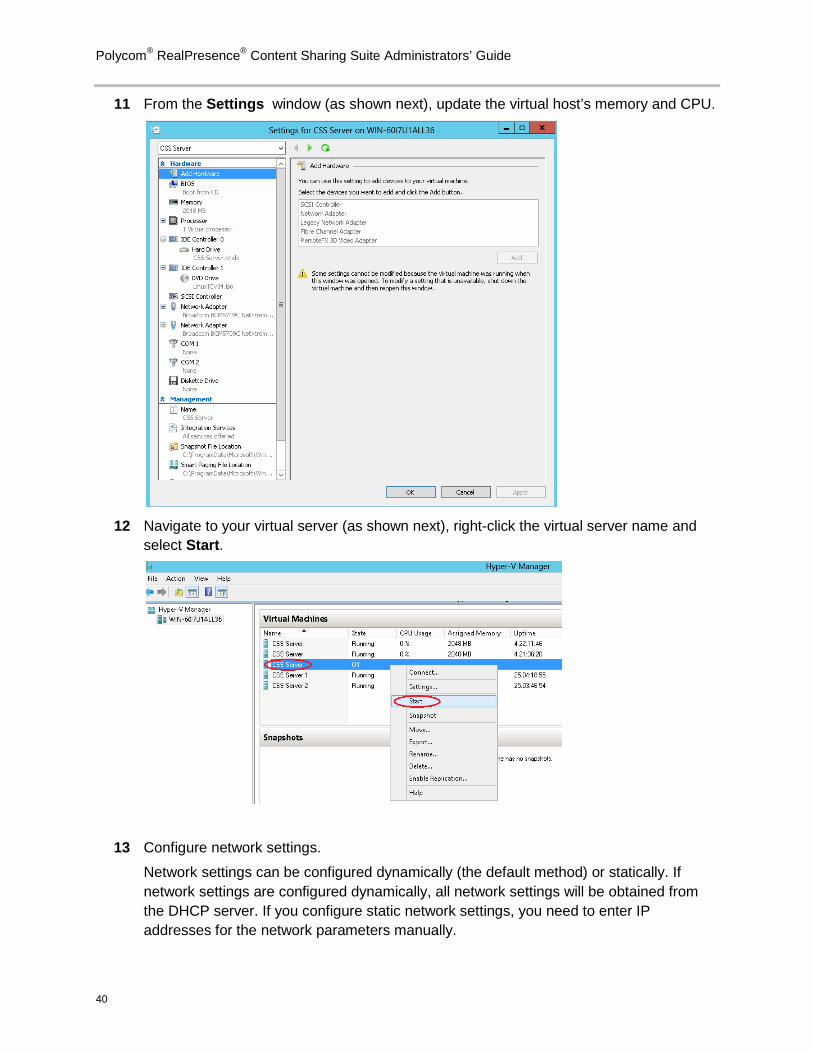
11 From the Settings window (as shown next), update the virtual host’s memory and CPU.
12 Navigate to your virtual server (as shown next), right-click the virtual server name and
select Start.
13 Configure network settings.
Network settings can be configured dynamically (the default method) or statically. If network settings are configured dynamically, all network settings will be obtained from the DHCP server. If you configure static network settings, you need to enter IP addresses for the network parameters manually.
Chapter 5: Installing Product Components
41
Dynamic configuration—If you installed the Content Sharing Server using DHCP mode, you can obtain the Content Sharing Server’s IP address by navigating to the Content Sharing Server from Hyper-V Manager, and then open a console. Enter cssadmin and CssNET*76 for your user name and password, and then run “ifconfig” commands.
Static configuration—If you need to configure network settings statically, manually configure the network settings. From Hyper-V Manager, open a console window and press Enter to obtain a prompt. Enter cssadmin and CssNET*76 for your user name and password, and then run the following commands:
SetHostNameAndGateway <para-hostname para-gateway>
SetDNS <para-primaryDNS> <para-secondDNS>
SetNetworkInterface <para-interfacename para-ipaddress para-netmask>
rebootserver
For example:
SetHostNameAndGateway cssserver 172.21.115.254
SetDNS 172.21.104.106 172.21.5.204
SetNetworkInterface eth0 172.21.115.134 255.255.252.0
rebootserver
The RealPresence Content Sharing Server is installed. You can now access the Content Sharing Server Web Configuration Tool and configure the server. To access the tool, enter http://<your server ip address>/admin in your Browser’s address bar. For more information on the RealPresence Content Sharing Server Web Configuration Tool, and how to use the tool to configure the Content Sharing Server, see Configuring the Content Sharing Server.
Admin Tip: Remotely Logging In to the Content Sharing Server by Console
After you install the Content Sharing Server, to statically do network configuration, you need to log in to it remotely by console using PuTTY or another SSH Client tool.
To log in remotely by console:
1 Enter the following basic options: • For the Host Name (or IP address), enter the Content Sharing Server’s
IP address. • For the Port, enter 22. • For the Connection type, select SSH.
2 Click Open.
3 Enter your username and password: • For you username, enter cssadmin • For your password, enter CssNET*76
Polycom® RealPresence® Content Sharing Suite Administrators’ Guide
42
Settings: Updating Network Settings
You can update the Content Sharing Server’s network settings using the RealPresence Content Sharing Server Web Configuration Tool. For more information, see Updating Network Settings.
Admin Tip: CSS Only Supports Two NICs
CSS only supports the first two NICs on the server (called eth0 and eth1). Even though the server can handle four NICs, CSS only uses the first two.
Installing Lync Client Machine Components You need to install the following two components on each Lync Client machine:
• Microsoft .NET Framework 4 Client Profile
• Polycom RealPresence Content Add-on for Lync
Microsoft .NET Framework 4 Client Profile must be installed on the Lync client machine before you install RealPresence Content Add-on for Lync.
Installing and Deploying the Microsoft .NET Framework 4 Client Profile You need to install and deploy the Microsoft .NET Framework 4 Client Profile on each Lync client machine before you can install the RealPresence Content Add-on for Lync.
Check to see if Microsoft .NET Framework 4 Client Profile is already installed on your machine. If it is, you are ready to install the RealPresence Content Add-on for Lync. Note that Microsoft .NET Framework 4 Client Profile is a default component of Windows 7. However, it is not a default component of Windows XP, so you’ll need to check if Lync client machines running Windows XP have the Microsoft .NET Framework 4 Client Profile.
To install and deploy the Microsoft .NET Framework 4 Client Profile:
1 Download the Microsoft .NET Framework 4 Client Profile installation package (dotNetFx40_Client_x86_x64.exe) from http://www.microsoft.com/en-us/download/details.aspx?id=24872.
2 Install and deploy the Microsoft .NET Framework 4 Client Profile on the Lync Client machine. To do this, see the .NET Framework Deployment Guide for Administrators, available from http://msdn.microsoft.com/en-us/library/ee390831(v=vs.100).aspx.
Chapter 5: Installing Product Components
43
Note: Deploying a Silent Installation
You can silently install the Microsoft .NET Framework 4 Client Profile to Lync Client machines. To do this, use the following command: dotNetFx40_Client_x86_x64.exe /q
Installing the Polycom RealPresence Content Add-on for Lync If the Microsoft .NET Framework 4 Client Profile is installed on the Lync client’s machine, you can install the Content Add-on for Lync on the Lync client’s machine. The Content Add-on for Lync installation file is provided in two different formats, .exe and .msi.
An administrator can push the Content Add-on for Lync to multiple users (using the .msi file), or an end user can install the add-on on their computer (using the .exe file).
After you install the Content Add-on for Lync, verify that it installed successfully. To verify the installation, see Verifying that the Content Add-on for Lync Installed Successfully.
Using the .msi file
The .msi file is intended for use by experienced Windows administrators to support ‘pushed’ and ‘silent’ installations. These procedures use mechanisms such as GroupPolicy Objects. You should already be familiar with these mechanisms to use the .msi installation file.
Note: Local Standalone Installations
The .msi file cannot be used for local standalone installation by simply running it in a non-silent way (such as double clicking it), because some of the components cannot be installed successfully in this way.
Note: Before You Execute Commands
Before you execute any of the commands described in this section, right click cmd (within Windows 7) and select Run as Administrator. If you don’t do this, the commands won’t run.
For example:
Build a desktop management or group policy object as follows:
• Write the .msi installation file to a directory (for example, c:\temp) on the user's local system.
• Use msiexec to install the program.
○ The following is an example of using the installer from the directory where the Content Add-On for Lync .msi file resides (make sure you’re at the c: prompt before running this command):
Polycom® RealPresence® Content Sharing Suite Administrators’ Guide
44
msiexec /qn /l* CSS_install.txt /i "RealPresenceContentAddonForLync.msi"
○ When running the installation from a directory other than the directory where the executable resides, include the full path in the command. For example:
msiexec /qn /l* CSS_install.txt /i "c:\temp\RealPresenceContentAddonForLync.msi"
To verify that the software is installed, see Verifying that the Content Add-on for Lync Installed Successfully.
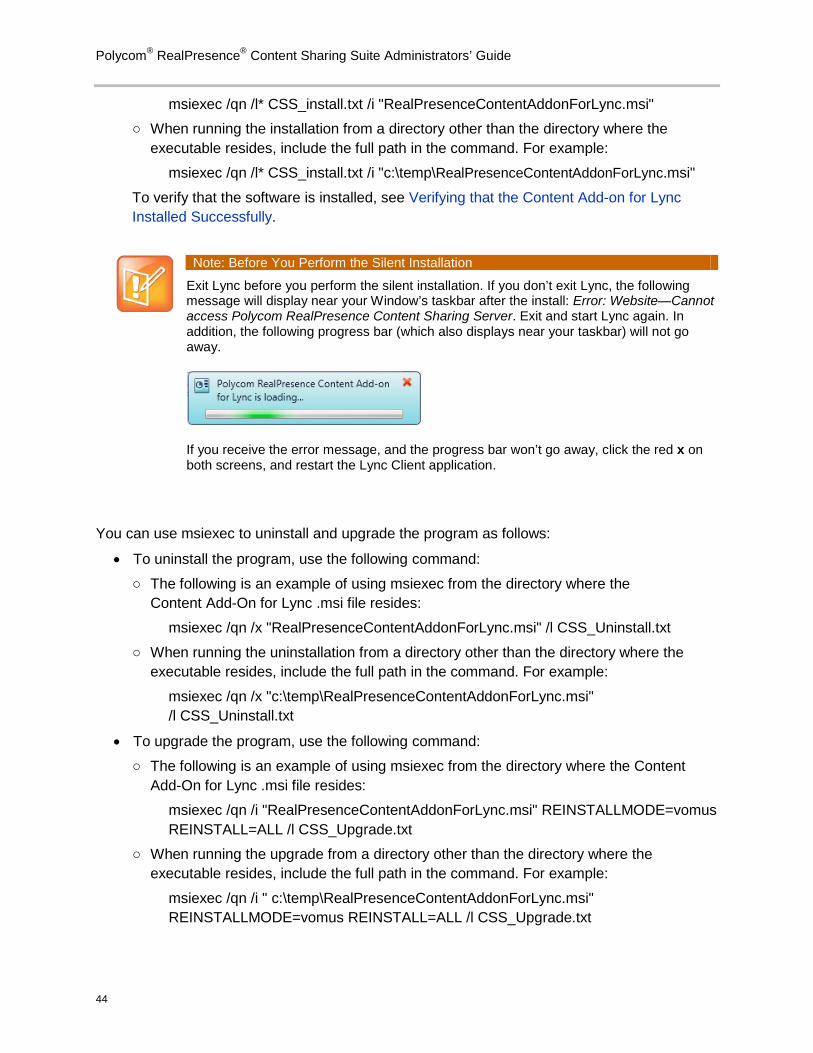
Note: Before You Perform the Silent Installation
Exit Lync before you perform the silent installation. If you don’t exit Lync, the following message will display near your Window’s taskbar after the install: Error: Website—Cannot access Polycom RealPresence Content Sharing Server. Exit and start Lync again. In addition, the following progress bar (which also displays near your taskbar) will not go away.
If you receive the error message, and the progress bar won’t go away, click the red x on both screens, and restart the Lync Client application.
You can use msiexec to uninstall and upgrade the program as follows:
• To uninstall the program, use the following command:
○ The following is an example of using msiexec from the directory where the Content Add-On for Lync .msi file resides:
msiexec /qn /x "RealPresenceContentAddonForLync.msi" /l CSS_Uninstall.txt
○ When running the uninstallation from a directory other than the directory where the executable resides, include the full path in the command. For example:
msiexec /qn /x "c:\temp\RealPresenceContentAddonForLync.msi" /l CSS_Uninstall.txt
• To upgrade the program, use the following command:
○ The following is an example of using msiexec from the directory where the Content Add-On for Lync .msi file resides:
msiexec /qn /i "RealPresenceContentAddonForLync.msi" REINSTALLMODE=vomus REINSTALL=ALL /l CSS_Upgrade.txt
○ When running the upgrade from a directory other than the directory where the executable resides, include the full path in the command. For example:
msiexec /qn /i " c:\temp\RealPresenceContentAddonForLync.msi" REINSTALLMODE=vomus REINSTALL=ALL /l CSS_Upgrade.txt

Chapter 5: Installing Product Components
45
Using the .exe file The Content Add-On for Lync .exe file is intended for easy, interactive installations by end users who do not require extensive customization.
To install by using the .exe file:
1 Exit Lync.
2 Download the RealPresence Content Add-on for Lync .exe file to your computer.
3 Double-click the .exe file, and wait while the Content Add-on for Lync prepares the InstallShield Wizard (shown next).
4 The InstallShield Wizard opens, as shown next. Click Next.
5 From the License Agreement window, review the license terms, and if you accept them, click Next.
Polycom® RealPresence® Content Sharing Suite Administrators’ Guide
46
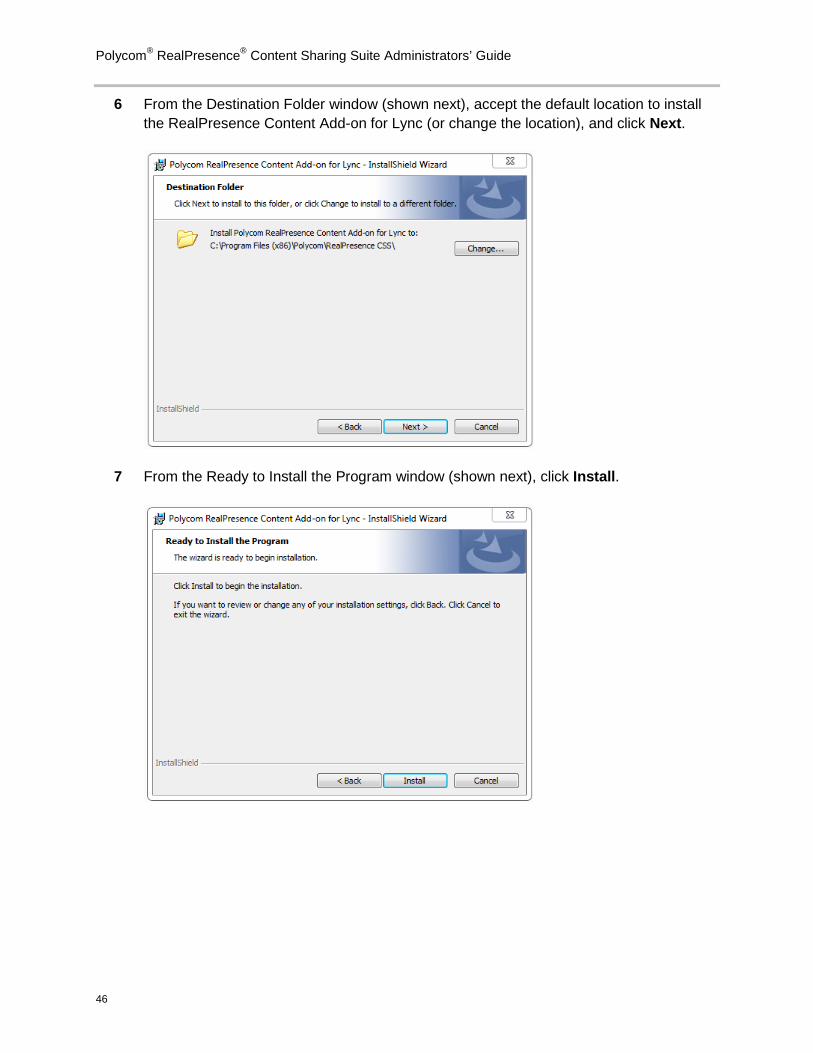
6 From the Destination Folder window (shown next), accept the default location to install the RealPresence Content Add-on for Lync (or change the location), and click Next.
7 From the Ready to Install the Program window (shown next), click Install.
Chapter 5: Installing Product Components
47
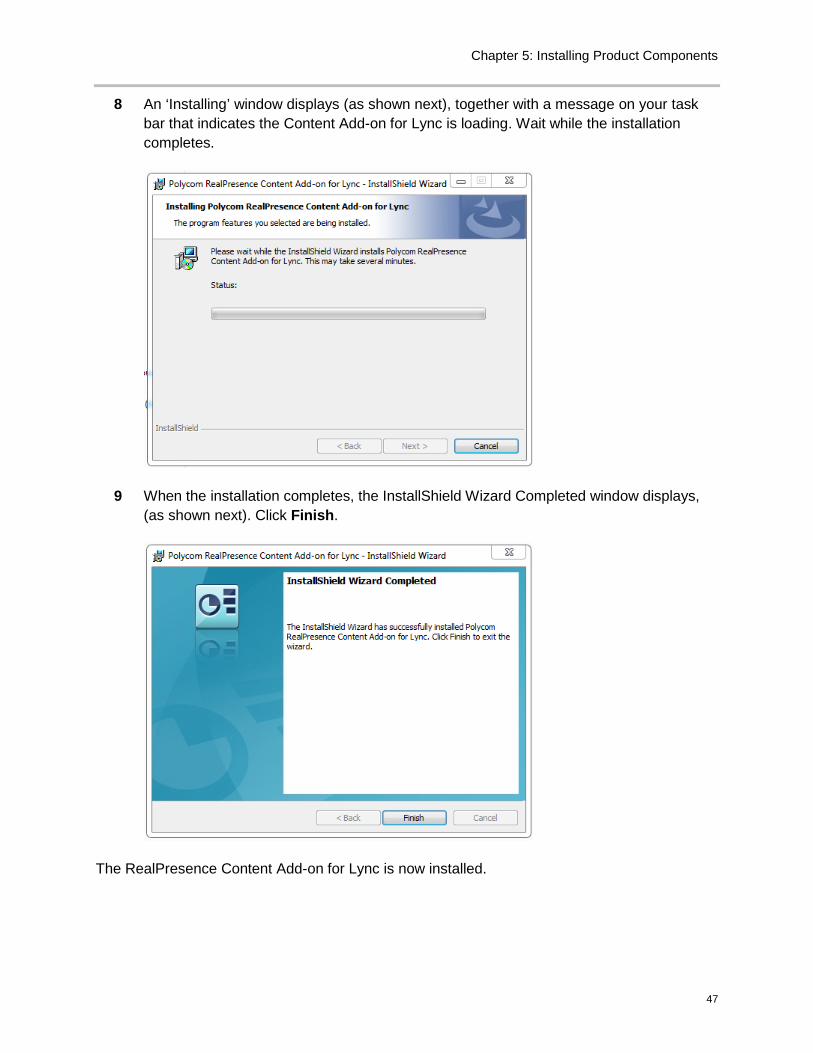
8 An ‘Installing’ window displays (as shown next), together with a message on your task bar that indicates the Content Add-on for Lync is loading. Wait while the installation completes.
9 When the installation completes, the InstallShield Wizard Completed window displays, (as shown next). Click Finish.
The RealPresence Content Add-on for Lync is now installed.
Polycom® RealPresence® Content Sharing Suite Administrators’ Guide
48
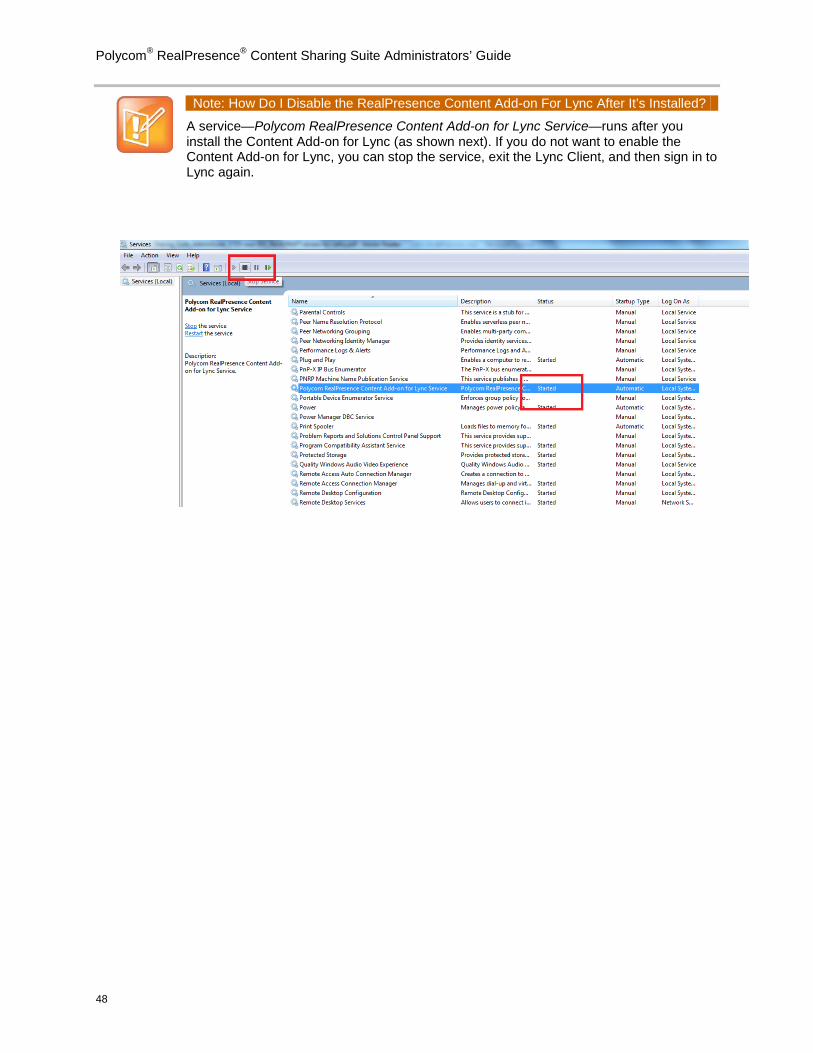
Note: How Do I Disable the RealPresence Content Add-on For Lync After It’s Installed?
A service—Polycom RealPresence Content Add-on for Lync Service—runs after you install the Content Add-on for Lync (as shown next). If you do not want to enable the Content Add-on for Lync, you can stop the service, exit the Lync Client, and then sign in to Lync again.
Chapter 5: Installing Product Components
49
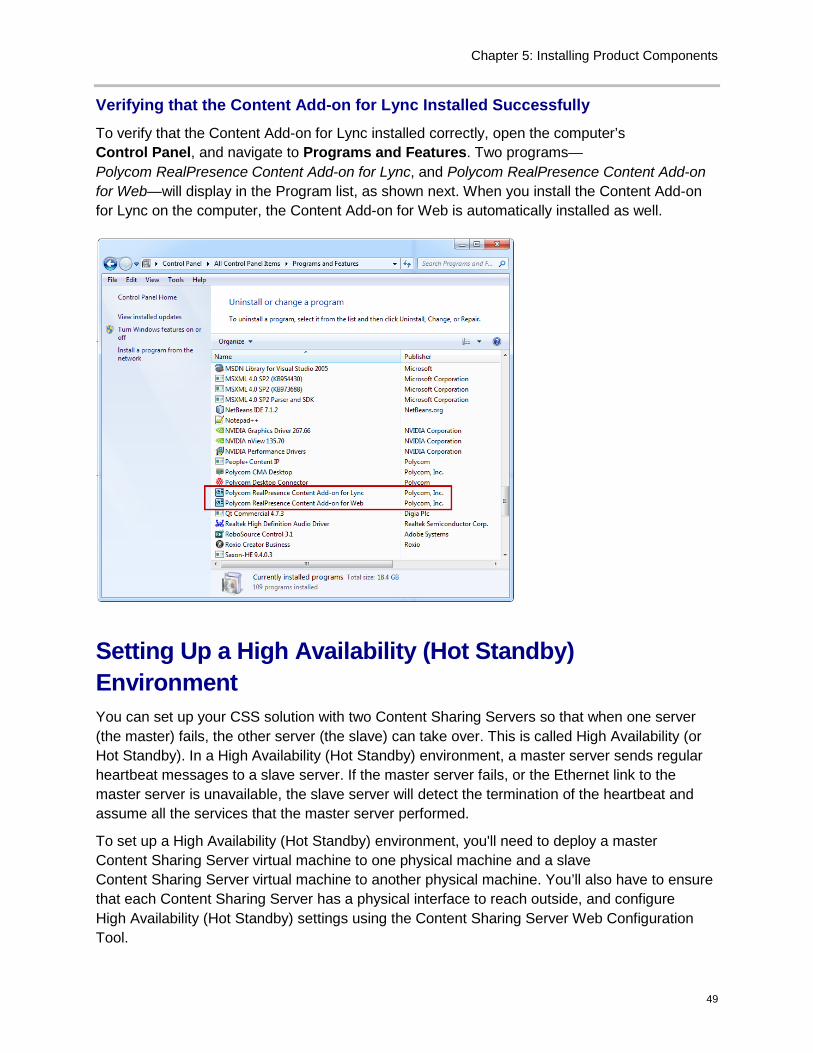
Verifying that the Content Add-on for Lync Installed Successfully To verify that the Content Add-on for Lync installed correctly, open the computer’s Control Panel, and navigate to Programs and Features. Two programs—Polycom RealPresence Content Add-on for Lync, and Polycom RealPresence Content Add-on for Web—will display in the Program list, as shown next. When you install the Content Add-on for Lync on the computer, the Content Add-on for Web is automatically installed as well.
Setting Up a High Availability (Hot Standby) Environment You can set up your CSS solution with two Content Sharing Servers so that when one server (the master) fails, the other server (the slave) can take over. This is called High Availability (or Hot Standby). In a High Availability (Hot Standby) environment, a master server sends regular heartbeat messages to a slave server. If the master server fails, or the Ethernet link to the master server is unavailable, the slave server will detect the termination of the heartbeat and assume all the services that the master server performed.
To set up a High Availability (Hot Standby) environment, you'll need to deploy a master Content Sharing Server virtual machine to one physical machine and a slave Content Sharing Server virtual machine to another physical machine. You’ll also have to ensure that each Content Sharing Server has a physical interface to reach outside, and configure High Availability (Hot Standby) settings using the Content Sharing Server Web Configuration Tool.
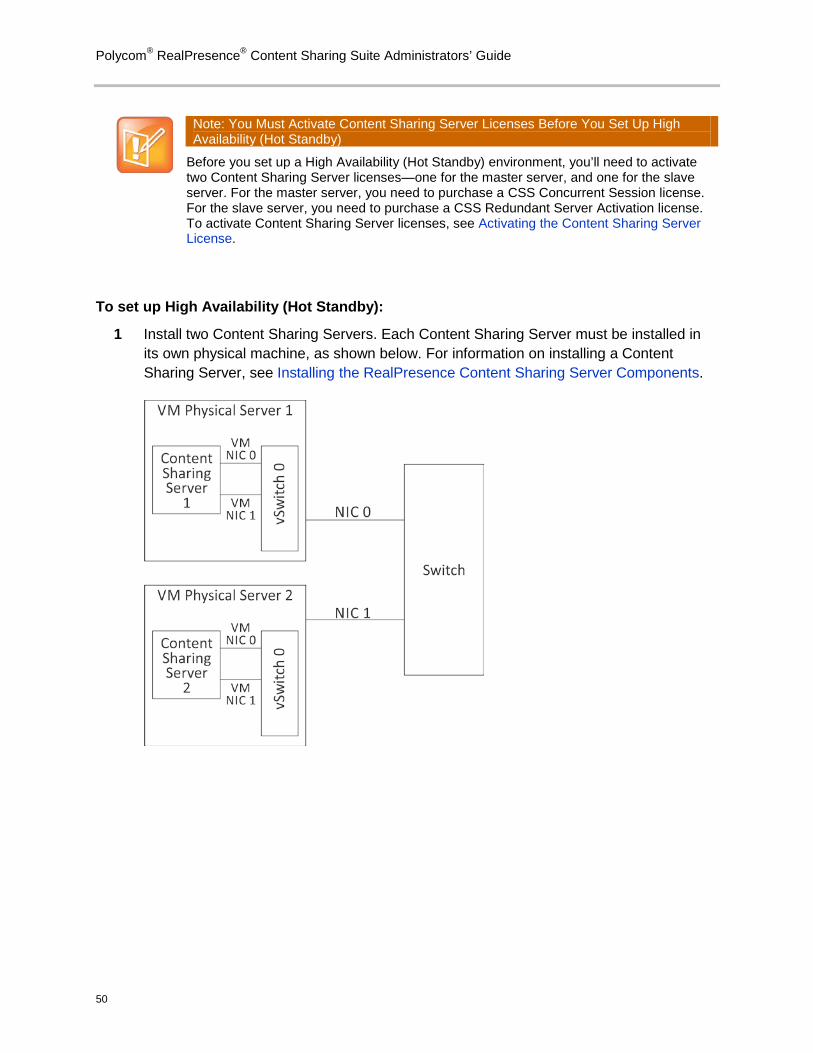
Polycom® RealPresence® Content Sharing Suite Administrators’ Guide
50
Note: You Must Activate Content Sharing Server Licenses Before You Set Up High Availability (Hot Standby)
Before you set up a High Availability (Hot Standby) environment, you’ll need to activate two Content Sharing Server licenses—one for the master server, and one for the slave server. For the master server, you need to purchase a CSS Concurrent Session license. For the slave server, you need to purchase a CSS Redundant Server Activation license. To activate Content Sharing Server licenses, see Activating the Content Sharing Server License.
To set up High Availability (Hot Standby):
1 Install two Content Sharing Servers. Each Content Sharing Server must be installed in its own physical machine, as shown below. For information on installing a Content Sharing Server, see Installing the RealPresence Content Sharing Server Components.
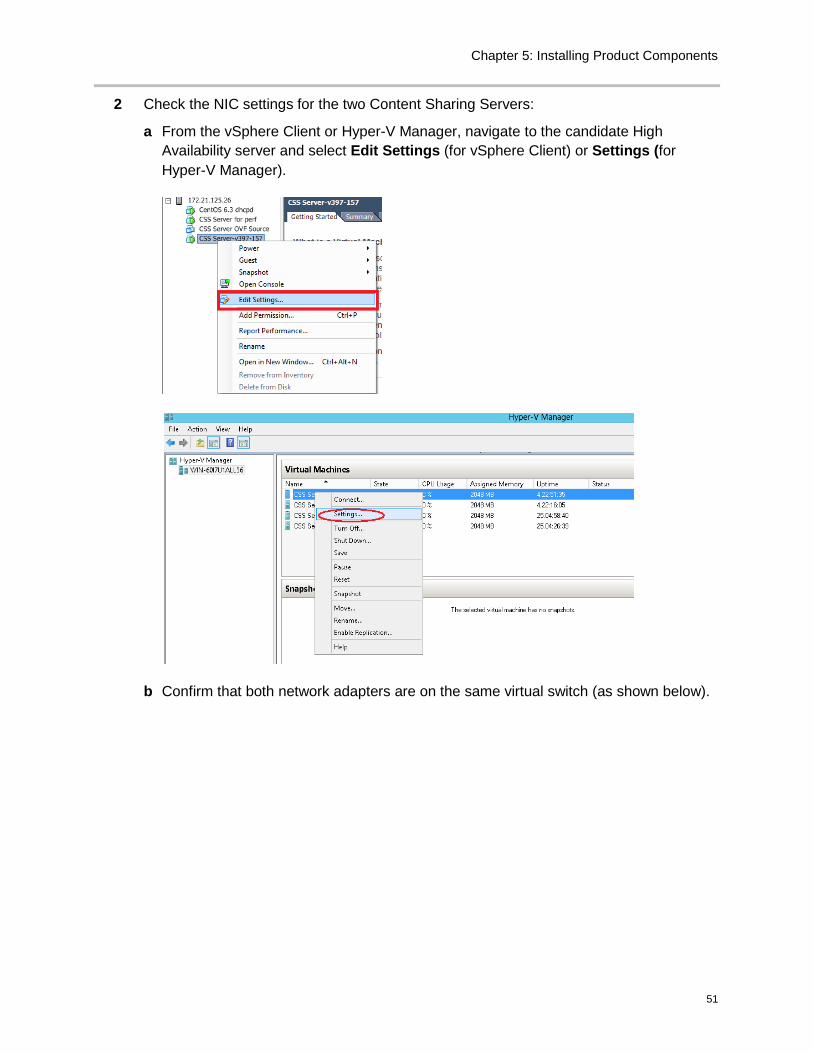
Chapter 5: Installing Product Components
51
2 Check the NIC settings for the two Content Sharing Servers:
a From the vSphere Client or Hyper-V Manager, navigate to the candidate High Availability server and select Edit Settings (for vSphere Client) or Settings (for Hyper-V Manager).
b Confirm that both network adapters are on the same virtual switch (as shown below).
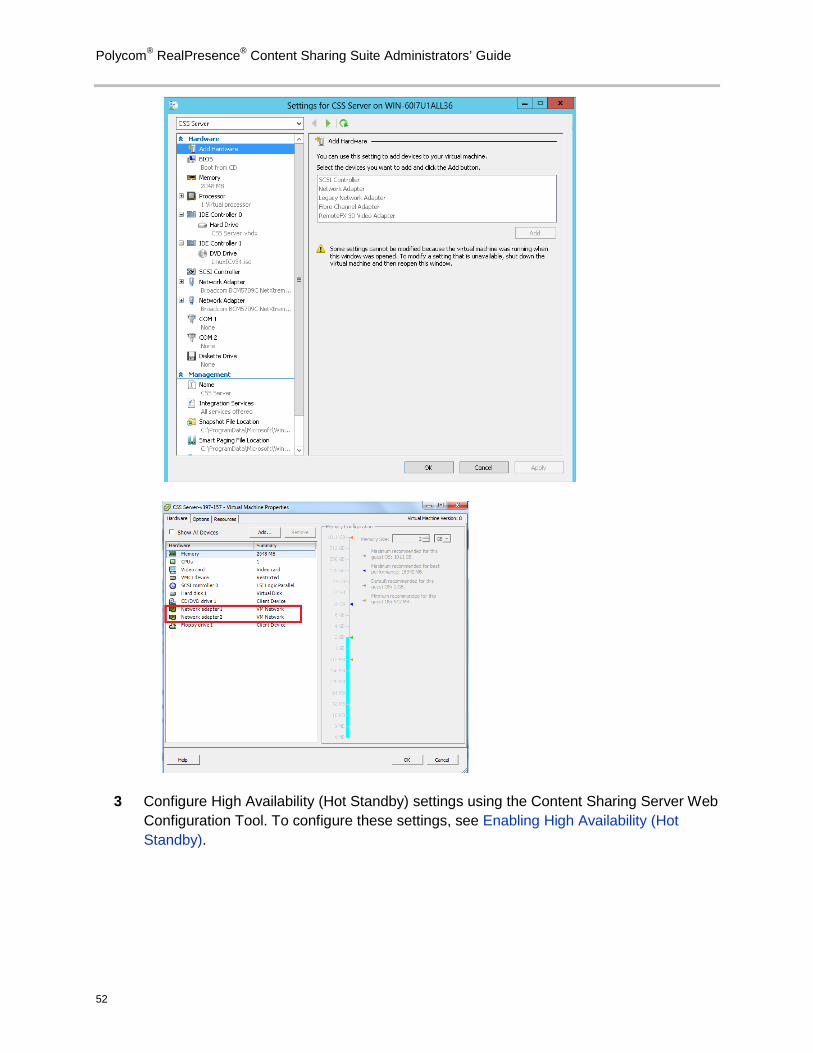
Polycom® RealPresence® Content Sharing Suite Administrators’ Guide
52
3 Configure High Availability (Hot Standby) settings using the Content Sharing Server Web Configuration Tool. To configure these settings, see Enabling High Availability (Hot Standby).
53
Chapter 6: Configuring Solution Components
This chapter shows you how to configure CSS solution components so the solution will work properly. If a solution component does not require special configuration to work with CSS, it is not addressed.
In this chapter, you’ll learn how to set up the Lync client to find the Content Sharing Server address, and how to configure RealPresence Collaboration Server (RMX) and DMA. You’ll also learn how to configure optional components—RPAD, Acme Packet® Net-Net Enterprise Session Director (ESD), and a load balancer—and how to use the RealPresence Content Sharing Server Web Configuration Tool to configure the Content Sharing Server.
The topics include:
• Configuring Lync Clients to Auto-Discover the Content Sharing Server Address
• Configuring RealPresence Collaboration Server (RMX) for CSS
• Configuring DMA for CSS
• Configuring Session Border Controllers for CSS
• Configuring the Content Sharing Server
• Configuring an Optional Load Balancer

Polycom® RealPresence® Content Sharing Suite Administrators’ Guide
54
Note: Configuring Solution Components
This document assumes that the pre-requisite components, as described in Your Existing Environment, are already set up for a typical deployment, and configured to work in a Microsoft Lync environment. To configure Polycom products to work within a Lync environment, see the Polycom Unified Communications Deployment Guide for Microsoft Environments. To review general configuration information for Polycom products, refer to the relevant documentation on the Polycom Support site:
• RealPresence Collaboration Server (RMX)—For detailed information on installing RealPresence Collaboration Server (RMX), navigate to your system’s Support page from the Collaboration & Conferencing Platforms Support page.
• RealPresence Distributed Media Application (DMA)—For detailed information on installing DMA, see the Polycom Distributed Media Application Support page.
• RPAD—For detailed information on installing RPAD, see the Polycom RealPresence Access Director Support page.
• RSS—For detailed information on installing RSS, navigate to your system’s Support page from the Video Recording, Streaming and Content Management Solutions Support page.
• RealPresence Resource Manager—For detailed information on installing RealPresence Resource Manager, see the Polycom RealPresence Resource Manager Support page.
Configuring Lync Clients to Auto-Discover the Content Sharing Server Address You must configure the Lync 2010 or Lync 2013 client to auto-discover the Content Sharing Server address. To do this, you must configure the DNS server, so that it can resolve CSS queries by the Content Sharing Server’s host name or IP address. Polycom recommends that you configure the DNS server to find the Content Sharing Server by its fully qualified domain name (FQDN). This ensures that the Lync client can access the Content Sharing Server. The DNS should also have entries for your Active Directory server (if different from the DNS.)
A Lync client must be able to automatically discover the address for the Content Sharing Server. This means you must add the DNS service record (SRV record) for the Content Sharing Server. The lookup key for this service record is _css._tcp. So the record will resemble this:
_css._tcp.customerdomain.com 86400 IN SRV 0 0 443 css.customerdomain.com
For more information about DNS, DNS records, and how DNS works, see the Microsoft Technet (http://technet.microsoft.com/en-us/library/cc772774(WS.10).aspx).
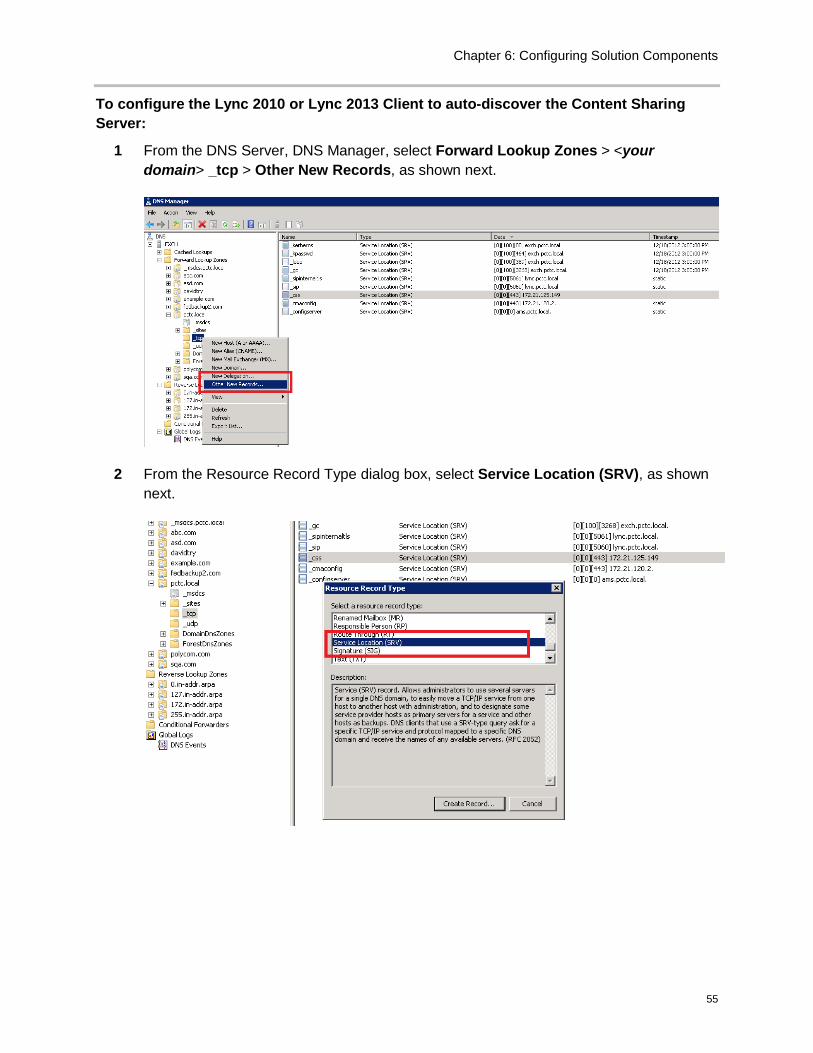
Chapter 6: Configuring Solution Components
55
To configure the Lync 2010 or Lync 2013 Client to auto-discover the Content Sharing Server:
1 From the DNS Server, DNS Manager, select Forward Lookup Zones > <your domain> _tcp > Other New Records, as shown next.
2 From the Resource Record Type dialog box, select Service Location (SRV), as shown next.
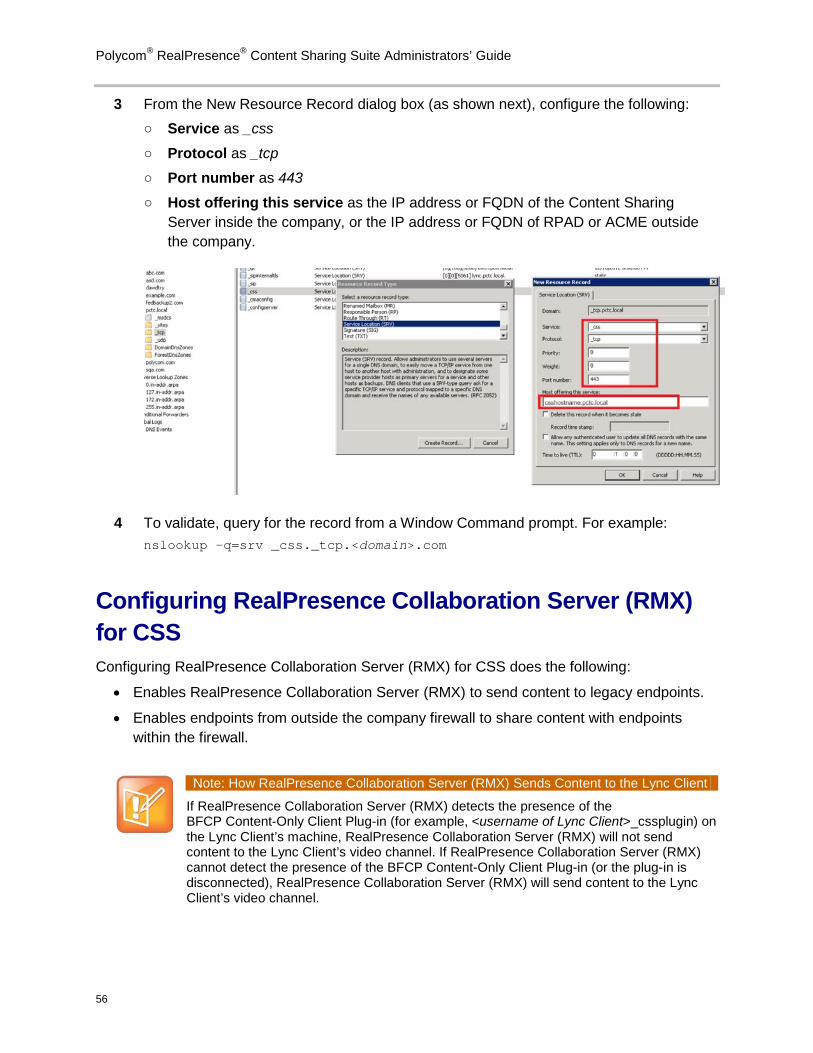
Polycom® RealPresence® Content Sharing Suite Administrators’ Guide
56
3 From the New Resource Record dialog box (as shown next), configure the following: ○ Service as _css
○ Protocol as _tcp
○ Port number as 443
○ Host offering this service as the IP address or FQDN of the Content Sharing Server inside the company, or the IP address or FQDN of RPAD or ACME outside the company.
4 To validate, query for the record from a Window Command prompt. For example: nslookup -q=srv _css._tcp.<domain>.com
Configuring RealPresence Collaboration Server (RMX) for CSS Configuring RealPresence Collaboration Server (RMX) for CSS does the following:
• Enables RealPresence Collaboration Server (RMX) to send content to legacy endpoints.
• Enables endpoints from outside the company firewall to share content with endpoints within the firewall.
Note: How RealPresence Collaboration Server (RMX) Sends Content to the Lync Client
If RealPresence Collaboration Server (RMX) detects the presence of the BFCP Content-Only Client Plug-in (for example, <username of Lync Client>_cssplugin) on the Lync Client’s machine, RealPresence Collaboration Server (RMX) will not send content to the Lync Client’s video channel. If RealPresence Collaboration Server (RMX) cannot detect the presence of the BFCP Content-Only Client Plug-in (or the plug-in is disconnected), RealPresence Collaboration Server (RMX) will send content to the Lync Client’s video channel.
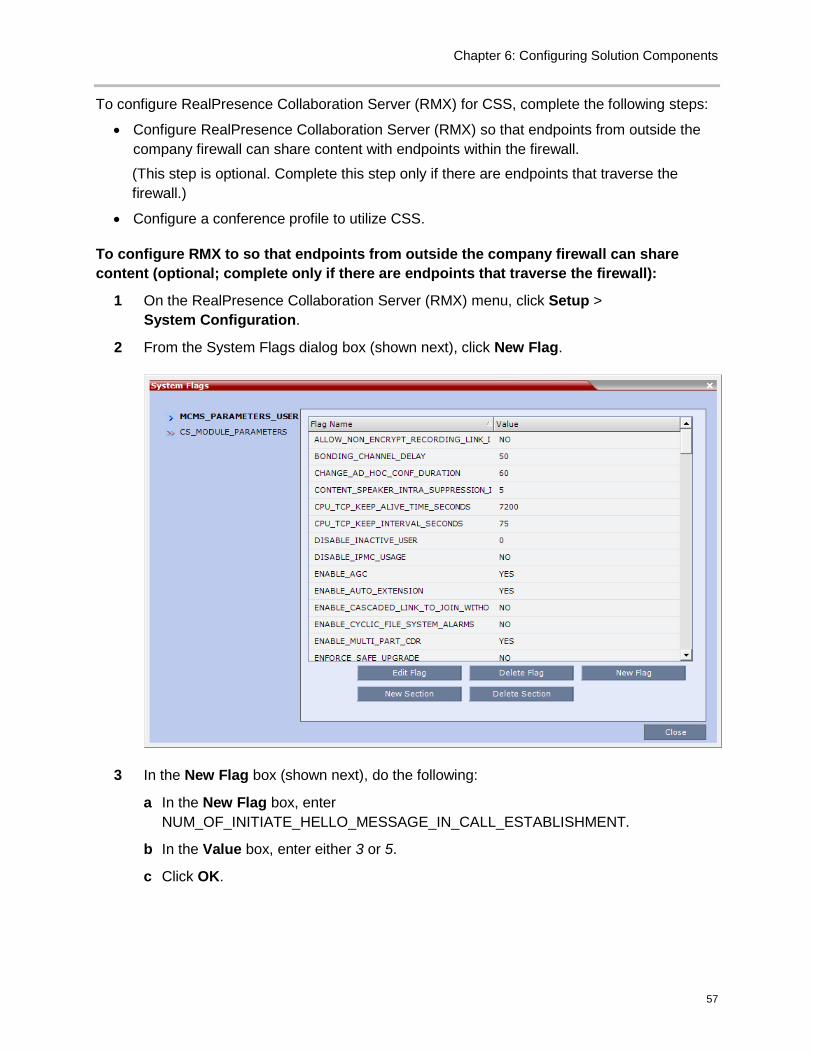
Chapter 6: Configuring Solution Components
57
To configure RealPresence Collaboration Server (RMX) for CSS, complete the following steps:
• Configure RealPresence Collaboration Server (RMX) so that endpoints from outside the company firewall can share content with endpoints within the firewall.
(This step is optional. Complete this step only if there are endpoints that traverse the firewall.)
• Configure a conference profile to utilize CSS.
To configure RMX to so that endpoints from outside the company firewall can share content (optional; complete only if there are endpoints that traverse the firewall):
1 On the RealPresence Collaboration Server (RMX) menu, click Setup > System Configuration.
2 From the System Flags dialog box (shown next), click New Flag.
3 In the New Flag box (shown next), do the following:
a In the New Flag box, enter NUM_OF_INITIATE_HELLO_MESSAGE_IN_CALL_ESTABLISHMENT.
b In the Value box, enter either 3 or 5.
c Click OK.
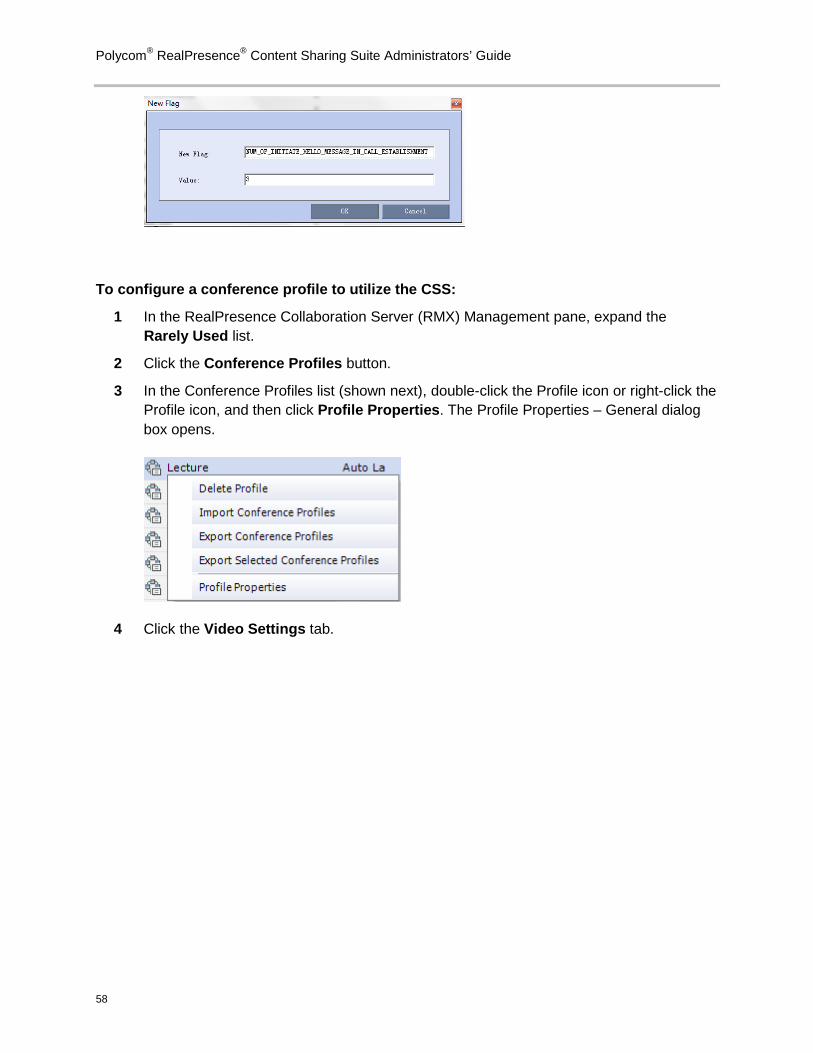
Polycom® RealPresence® Content Sharing Suite Administrators’ Guide
58
To configure a conference profile to utilize the CSS:
1 In the RealPresence Collaboration Server (RMX) Management pane, expand the Rarely Used list.
2 Click the Conference Profiles button.
3 In the Conference Profiles list (shown next), double-click the Profile icon or right-click the Profile icon, and then click Profile Properties. The Profile Properties – General dialog box opens.
4 Click the Video Settings tab.
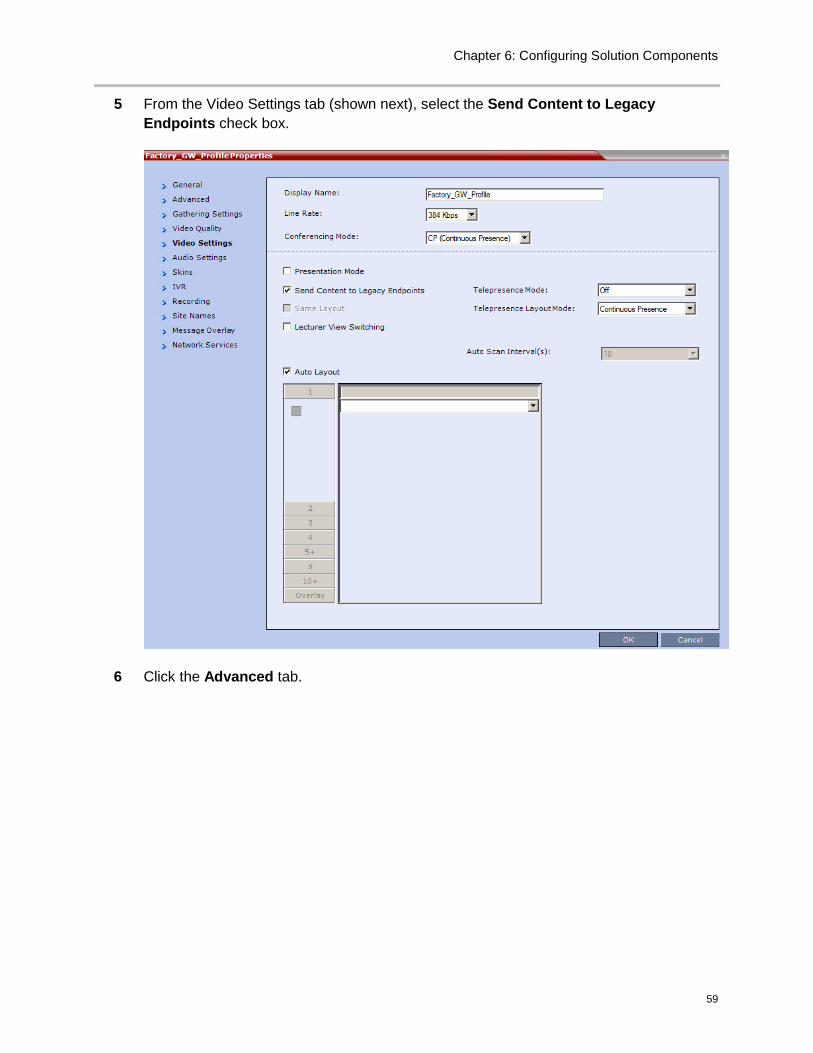
Chapter 6: Configuring Solution Components
59
5 From the Video Settings tab (shown next), select the Send Content to Legacy Endpoints check box.
6 Click the Advanced tab.
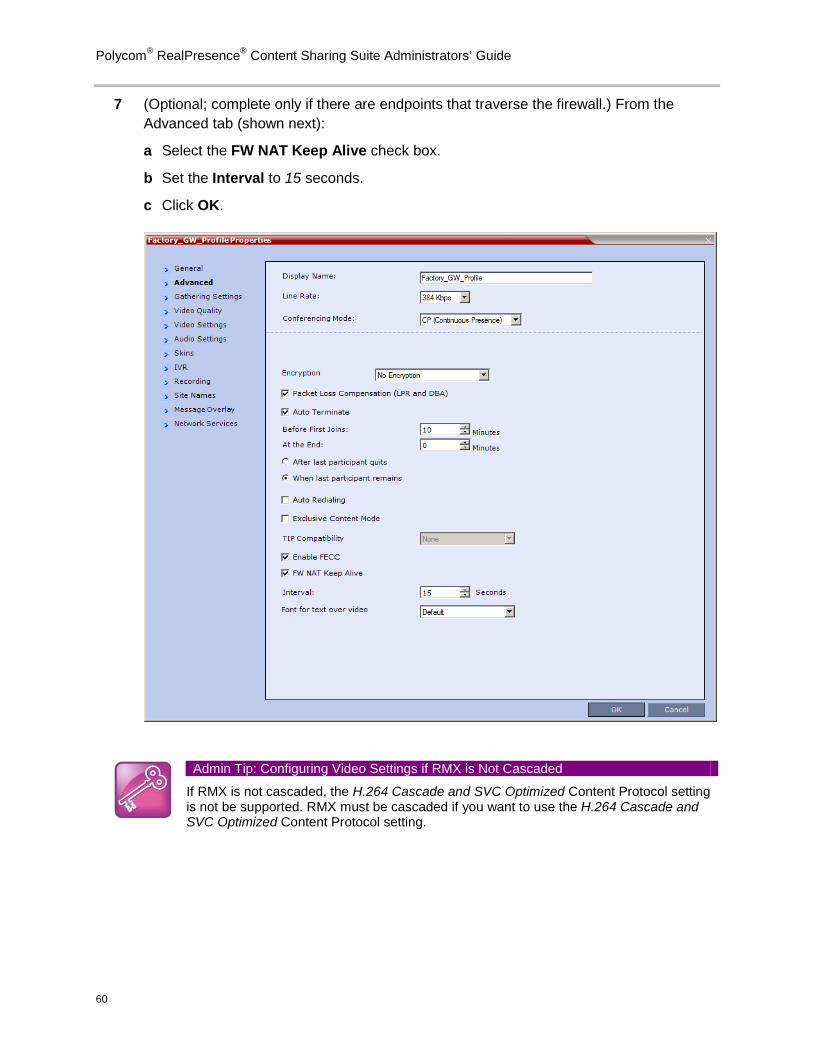
Polycom® RealPresence® Content Sharing Suite Administrators’ Guide
60
7 (Optional; complete only if there are endpoints that traverse the firewall.) From the Advanced tab (shown next):
a Select the FW NAT Keep Alive check box.
b Set the Interval to 15 seconds.
c Click OK.
Admin Tip: Configuring Video Settings if RMX is Not Cascaded
If RMX is not cascaded, the H.264 Cascade and SVC Optimized Content Protocol setting is not be supported. RMX must be cascaded if you want to use the H.264 Cascade and SVC Optimized Content Protocol setting.
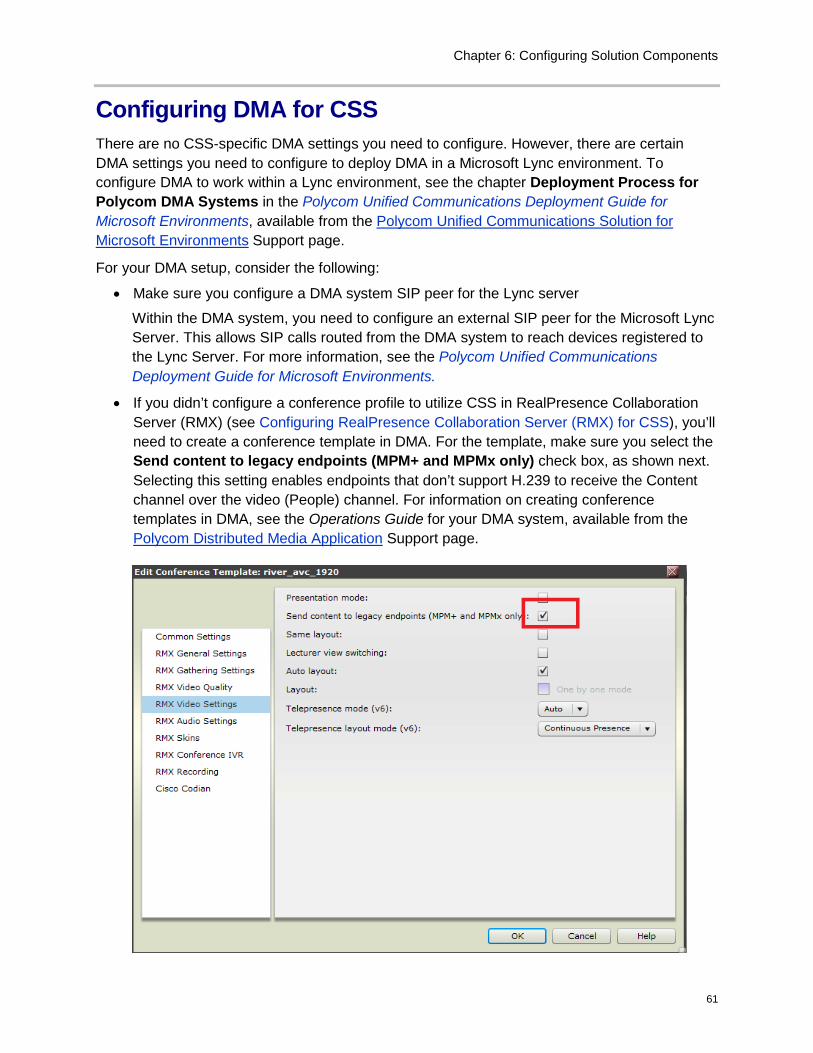
Chapter 6: Configuring Solution Components
61
Configuring DMA for CSS There are no CSS-specific DMA settings you need to configure. However, there are certain DMA settings you need to configure to deploy DMA in a Microsoft Lync environment. To configure DMA to work within a Lync environment, see the chapter Deployment Process for Polycom DMA Systems in the Polycom Unified Communications Deployment Guide for Microsoft Environments, available from the Polycom Unified Communications Solution for Microsoft Environments Support page.
For your DMA setup, consider the following:
• Make sure you configure a DMA system SIP peer for the Lync server
Within the DMA system, you need to configure an external SIP peer for the Microsoft Lync Server. This allows SIP calls routed from the DMA system to reach devices registered to the Lync Server. For more information, see the Polycom Unified Communications Deployment Guide for Microsoft Environments.
• If you didn’t configure a conference profile to utilize CSS in RealPresence Collaboration Server (RMX) (see Configuring RealPresence Collaboration Server (RMX) for CSS), you’ll need to create a conference template in DMA. For the template, make sure you select the Send content to legacy endpoints (MPM+ and MPMx only) check box, as shown next. Selecting this setting enables endpoints that don’t support H.239 to receive the Content channel over the video (People) channel. For information on creating conference templates in DMA, see the Operations Guide for your DMA system, available from the Polycom Distributed Media Application Support page.

Polycom® RealPresence® Content Sharing Suite Administrators’ Guide
62
Configuring Session Border Controllers for CSS If your CSS solution deploys the Content Sharing Server behind a firewall, you need to install and configure either RPAD or an Acme Packet system. In this section, you’ll learn how to configure your RPAD and Acme Packet system for CSS.
If you deploy the Content Sharing Server behind a firewall, it is helpful to know which ports that the Content Sharing Server requires that need to be open on the firewall. The following table lists the ports the Content Sharing Server requires.
Port Type Direction Port Number Usage
TCP Inbound/Outbound 5060/5061 SIP signal
UDP Inbound/Outbound 5060/5061 SIP signal
TCP Inbound/Outbound 80 Provision
TCP Inbound/Outbound 443 Provision
UDP Inbound/Outbound 10000–10010 Media traffic
TCP Inbound/Outbound 135/137/139/445 AD traffic
Configuring RPAD for CSS To configure RPAD for CSS, you need to enable the following:
• Configure HTTPS settings
• Configure SIP settings
To configure RPAD for CSS:
1 Log in to RPAD.
2 Select Configuration > Access Proxy Settings.
3 Select HTTPS.
4 Under Actions, click Edit.
5 Select or clear the Verify certificate from internal server check box. The default is selected.
When selected, Access Proxy verifies the certificate from the internal server (the Content Sharing Server). If the check box is selected, you must install the Server SSL certificate and trusted CA certificates on the RealPresence Access Director system. If you do not want to do this, clear the check box.
6 Under Actions, click Edit.
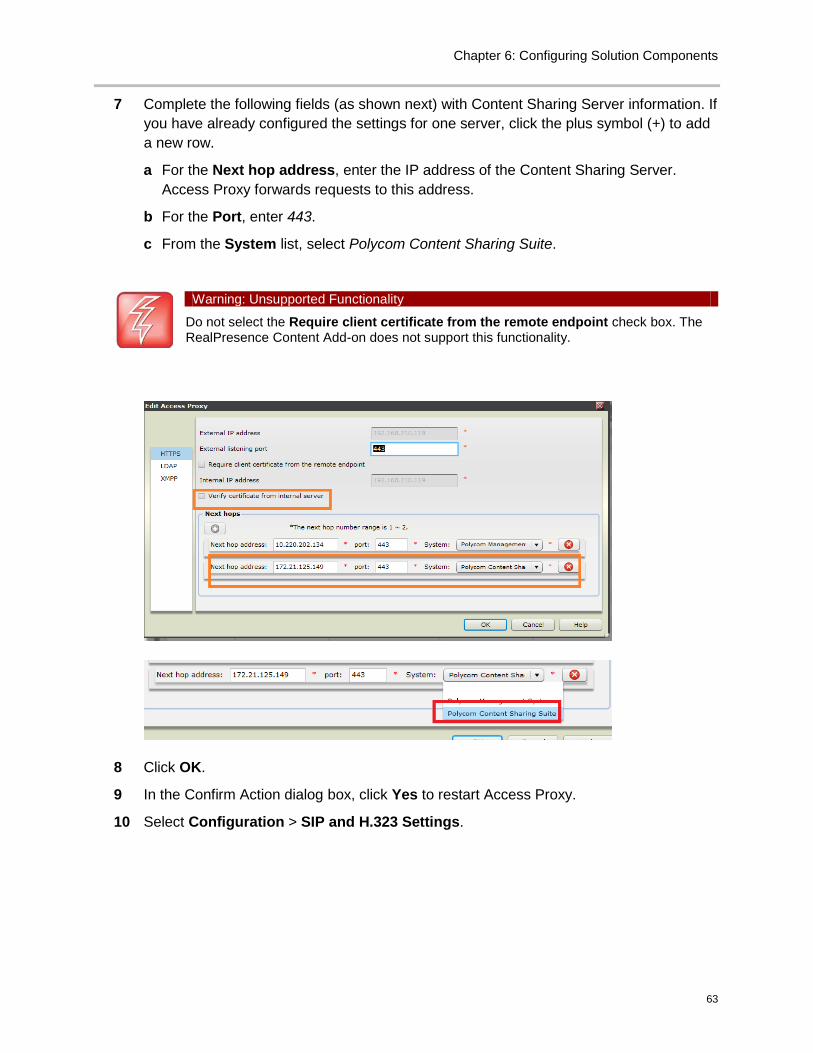
Chapter 6: Configuring Solution Components
63
7 Complete the following fields (as shown next) with Content Sharing Server information. If you have already configured the settings for one server, click the plus symbol (+) to add a new row.
a For the Next hop address, enter the IP address of the Content Sharing Server. Access Proxy forwards requests to this address.
b For the Port, enter 443.
c From the System list, select Polycom Content Sharing Suite.
Warning: Unsupported Functionality
Do not select the Require client certificate from the remote endpoint check box. The RealPresence Content Add-on does not support this functionality.
8 Click OK.
9 In the Confirm Action dialog box, click Yes to restart Access Proxy.
10 Select Configuration > SIP and H.323 Settings.
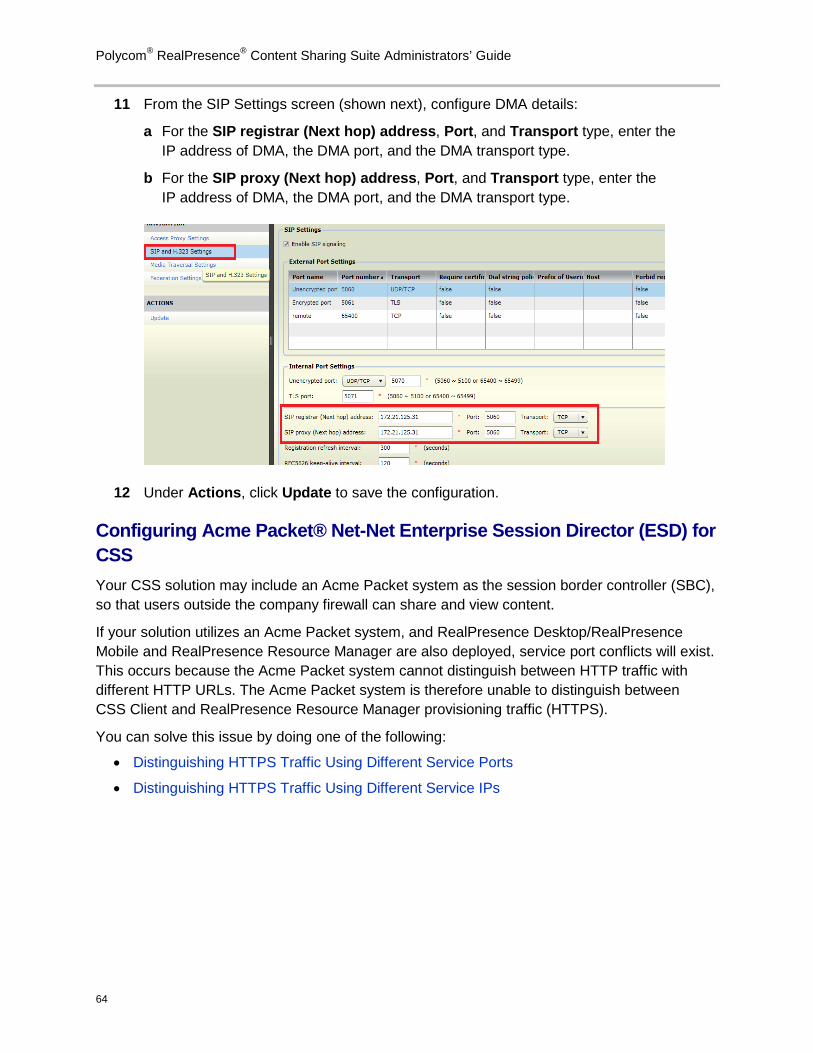
Polycom® RealPresence® Content Sharing Suite Administrators’ Guide
64
11 From the SIP Settings screen (shown next), configure DMA details:
a For the SIP registrar (Next hop) address, Port, and Transport type, enter the IP address of DMA, the DMA port, and the DMA transport type.
b For the SIP proxy (Next hop) address, Port, and Transport type, enter the IP address of DMA, the DMA port, and the DMA transport type.
12 Under Actions, click Update to save the configuration.
Configuring Acme Packet® Net-Net Enterprise Session Director (ESD) for CSS Your CSS solution may include an Acme Packet system as the session border controller (SBC), so that users outside the company firewall can share and view content.
If your solution utilizes an Acme Packet system, and RealPresence Desktop/RealPresence Mobile and RealPresence Resource Manager are also deployed, service port conflicts will exist. This occurs because the Acme Packet system cannot distinguish between HTTP traffic with different HTTP URLs. The Acme Packet system is therefore unable to distinguish between CSS Client and RealPresence Resource Manager provisioning traffic (HTTPS).
You can solve this issue by doing one of the following:
• Distinguishing HTTPS Traffic Using Different Service Ports
• Distinguishing HTTPS Traffic Using Different Service IPs
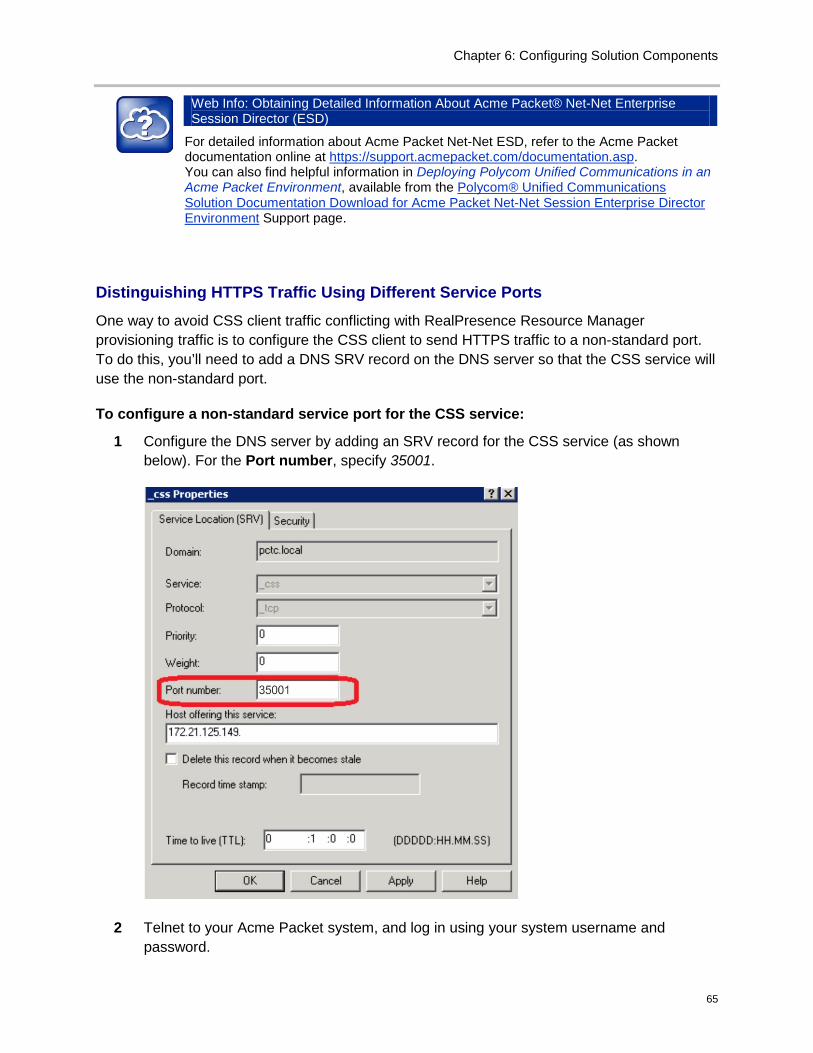
Chapter 6: Configuring Solution Components
65
Web Info: Obtaining Detailed Information About Acme Packet® Net-Net Enterprise Session Director (ESD)
For detailed information about Acme Packet Net-Net ESD, refer to the Acme Packet documentation online at https://support.acmepacket.com/documentation.asp. You can also find helpful information in Deploying Polycom Unified Communications in an Acme Packet Environment, available from the Polycom® Unified Communications Solution Documentation Download for Acme Packet Net-Net Session Enterprise Director Environment Support page.
Distinguishing HTTPS Traffic Using Different Service Ports
One way to avoid CSS client traffic conflicting with RealPresence Resource Manager provisioning traffic is to configure the CSS client to send HTTPS traffic to a non-standard port. To do this, you’ll need to add a DNS SRV record on the DNS server so that the CSS service will use the non-standard port.
To configure a non-standard service port for the CSS service:
1 Configure the DNS server by adding an SRV record for the CSS service (as shown below). For the Port number, specify 35001.
2 Telnet to your Acme Packet system, and log in using your system username and password.
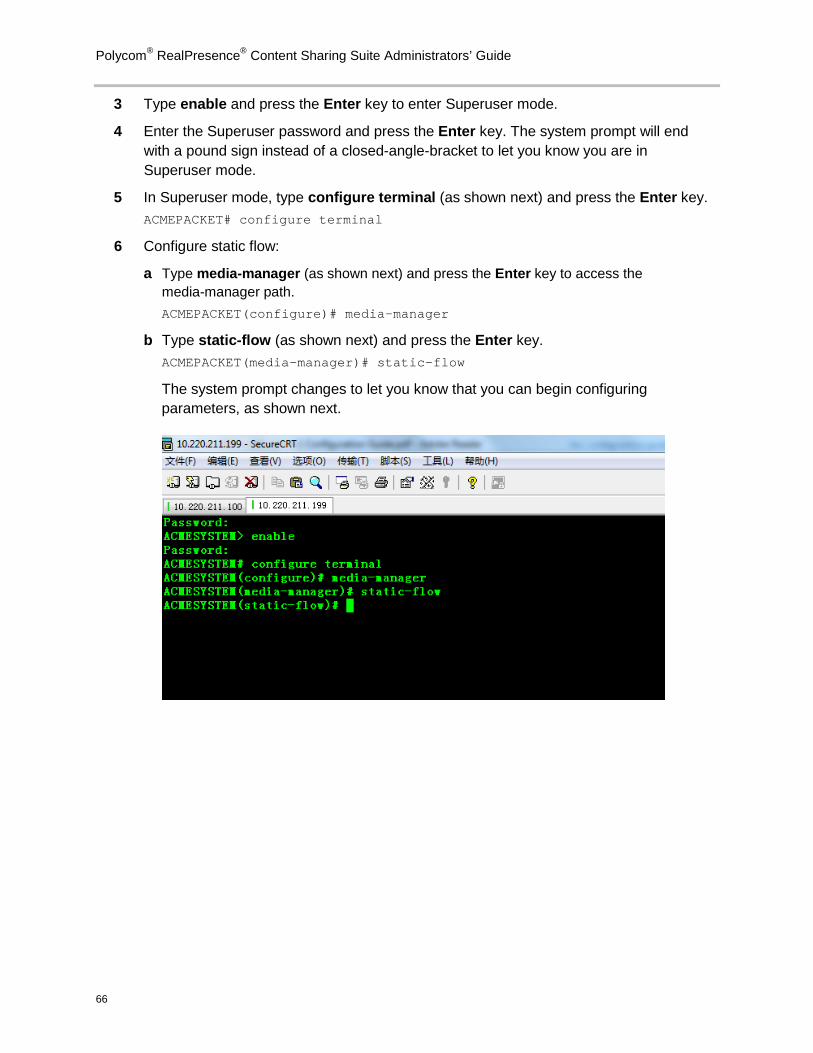
Polycom® RealPresence® Content Sharing Suite Administrators’ Guide
66
3 Type enable and press the Enter key to enter Superuser mode.
4 Enter the Superuser password and press the Enter key. The system prompt will end with a pound sign instead of a closed-angle-bracket to let you know you are in Superuser mode.
5 In Superuser mode, type configure terminal (as shown next) and press the Enter key. ACMEPACKET# configure terminal
6 Configure static flow:
a Type media-manager (as shown next) and press the Enter key to access the media-manager path. ACMEPACKET(configure)# media-manager
b Type static-flow (as shown next) and press the Enter key. ACMEPACKET(media-manager)# static-flow
The system prompt changes to let you know that you can begin configuring parameters, as shown next.
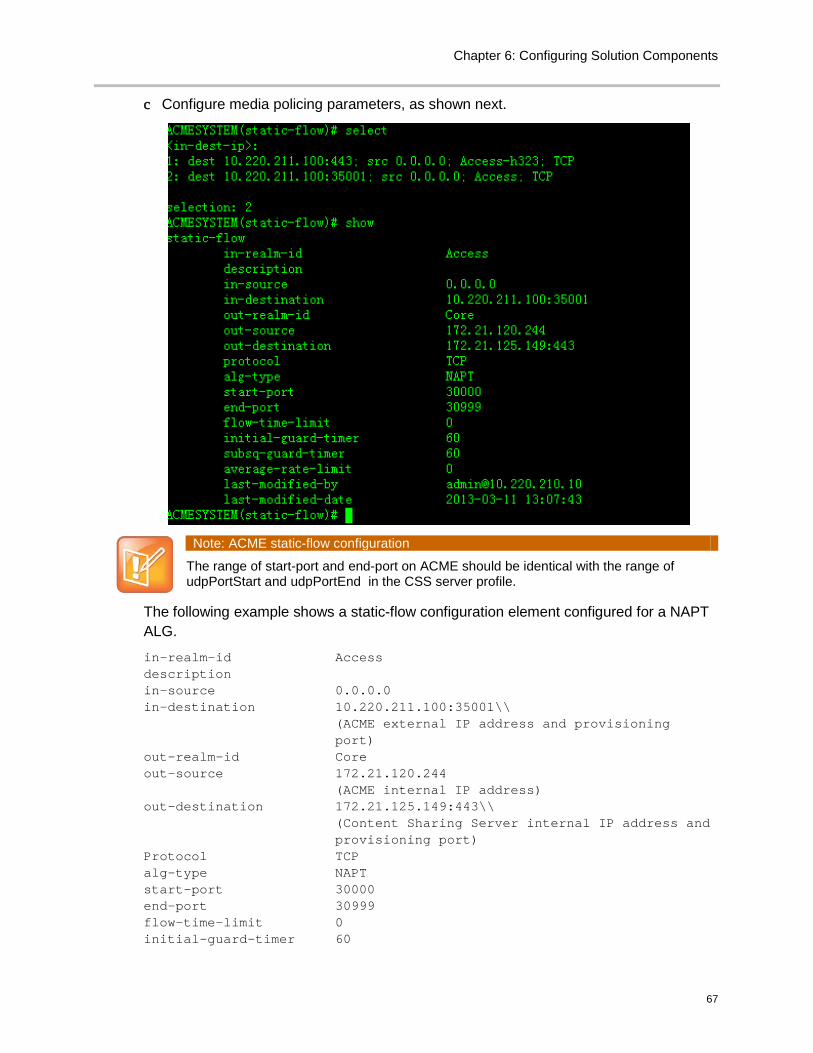
Chapter 6: Configuring Solution Components
67
c Configure media policing parameters, as shown next.
Note: ACME static-flow configuration
The range of start-port and end-port on ACME should be identical with the range of udpPortStart and udpPortEnd in the CSS server profile.
The following example shows a static-flow configuration element configured for a NAPT ALG.
in-realm-id Access description in-source 0.0.0.0 in-destination 10.220.211.100:35001\\ (ACME external IP address and provisioning port) out-realm-id Core out-source 172.21.120.244 (ACME internal IP address) out-destination 172.21.125.149:443\\ (Content Sharing Server internal IP address and provisioning port) Protocol TCP alg-type NAPT start-port 30000 end-port 30999 flow-time-limit 0 initial-guard-timer 60
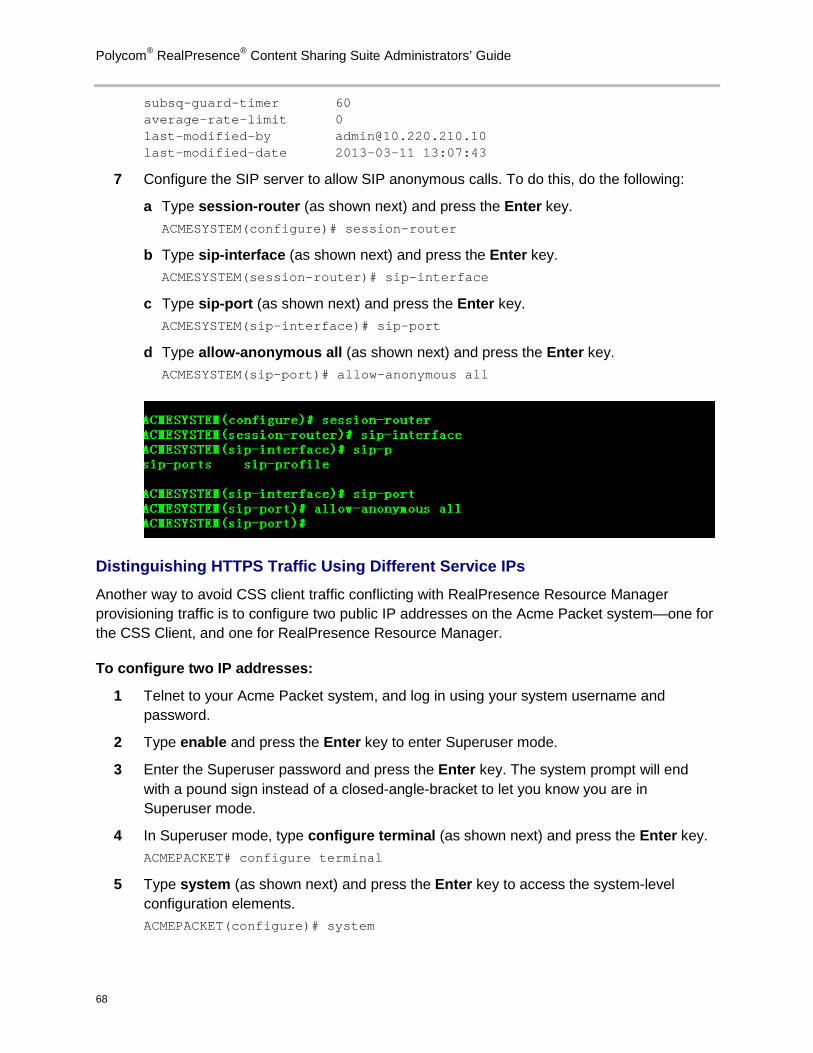
Polycom® RealPresence® Content Sharing Suite Administrators’ Guide
68
subsq-guard-timer 60 average-rate-limit 0 last-modified-by [email protected] last-modified-date 2013-03-11 13:07:43
7 Configure the SIP server to allow SIP anonymous calls. To do this, do the following:
a Type session-router (as shown next) and press the Enter key. ACMESYSTEM(configure)# session-router
b Type sip-interface (as shown next) and press the Enter key. ACMESYSTEM(session-router)# sip-interface
c Type sip-port (as shown next) and press the Enter key. ACMESYSTEM(sip-interface)# sip-port
d Type allow-anonymous all (as shown next) and press the Enter key. ACMESYSTEM(sip-port)# allow-anonymous all
Distinguishing HTTPS Traffic Using Different Service IPs Another way to avoid CSS client traffic conflicting with RealPresence Resource Manager provisioning traffic is to configure two public IP addresses on the Acme Packet system—one for the CSS Client, and one for RealPresence Resource Manager.
To configure two IP addresses:
1 Telnet to your Acme Packet system, and log in using your system username and password.
2 Type enable and press the Enter key to enter Superuser mode.
3 Enter the Superuser password and press the Enter key. The system prompt will end with a pound sign instead of a closed-angle-bracket to let you know you are in Superuser mode.
4 In Superuser mode, type configure terminal (as shown next) and press the Enter key. ACMEPACKET# configure terminal
5 Type system (as shown next) and press the Enter key to access the system-level configuration elements. ACMEPACKET(configure)# system
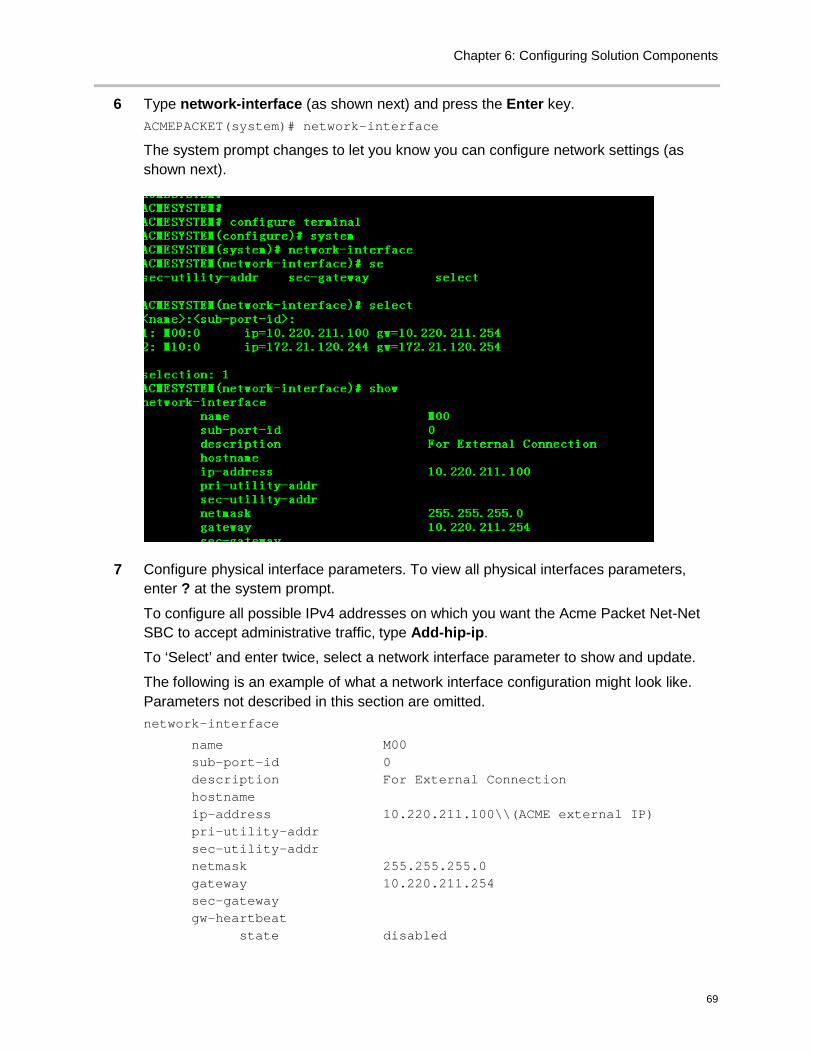
Chapter 6: Configuring Solution Components
69
6 Type network-interface (as shown next) and press the Enter key. ACMEPACKET(system)# network-interface
The system prompt changes to let you know you can configure network settings (as shown next).
7 Configure physical interface parameters. To view all physical interfaces parameters, enter ? at the system prompt.
To configure all possible IPv4 addresses on which you want the Acme Packet Net-Net SBC to accept administrative traffic, type Add-hip-ip.
To ‘Select’ and enter twice, select a network interface parameter to show and update.
The following is an example of what a network interface configuration might look like. Parameters not described in this section are omitted. network-interface
name M00 sub-port-id 0 description For External Connection hostname ip-address 10.220.211.100\\(ACME external IP) pri-utility-addr sec-utility-addr netmask 255.255.255.0 gateway 10.220.211.254 sec-gateway gw-heartbeat state disabled
Polycom® RealPresence® Content Sharing Suite Administrators’ Guide
70
heartbeat 0 retry-count 0 retry-timeout 1 health-score 0 dns-ip-primary dns-ip-backup1 dns-ip-backup2 dns-domain dns-timeout 11 hip-ip-list 10.220.211.100\\(ACME 1st external IP) 10.220.211.99\\(ACME 2nd external IP) ftp-address 10.220.211.100 icmp-address 10.220.211.100 10.220.211.99 snmp-address telnet-address 10.220.211.100 ssh-address signaling-mtu 0
8 Update the static flow for the second ACME IP address as shown below.
The following example shows a static-flow configuration element configured for a NAPT ALG.
in-realm-id Access description in-source 0.0.0.0 in-destination 10.220.211.99:443\\(ACME 2nd external IP address and provisioning port) out-realm-id Core out-source 172.21.120.244\\(ACME internal IP address) out-destination 172.21.125.149:443\\(Content Sharing Server internal IP address and provisioning port) Protocol TCP alg-type NAPT start-port 30000 end-port 30999 flow-time-limit 0 initial-guard-timer 60 subsq-guard-timer 60 average-rate-limit 0 last-modified-by [email protected] last-modified-date 2013-03-11 13:07:43
9 Configure the SIP server to allow SIP anonymous calls. To do this, do the following:
a Type session-router (as shown next) and press the Enter key. ACMESYSTEM(configure)# session-router
b Type sip-interface (as shown next) and press the Enter key. ACMESYSTEM(session-router)# sip-interface
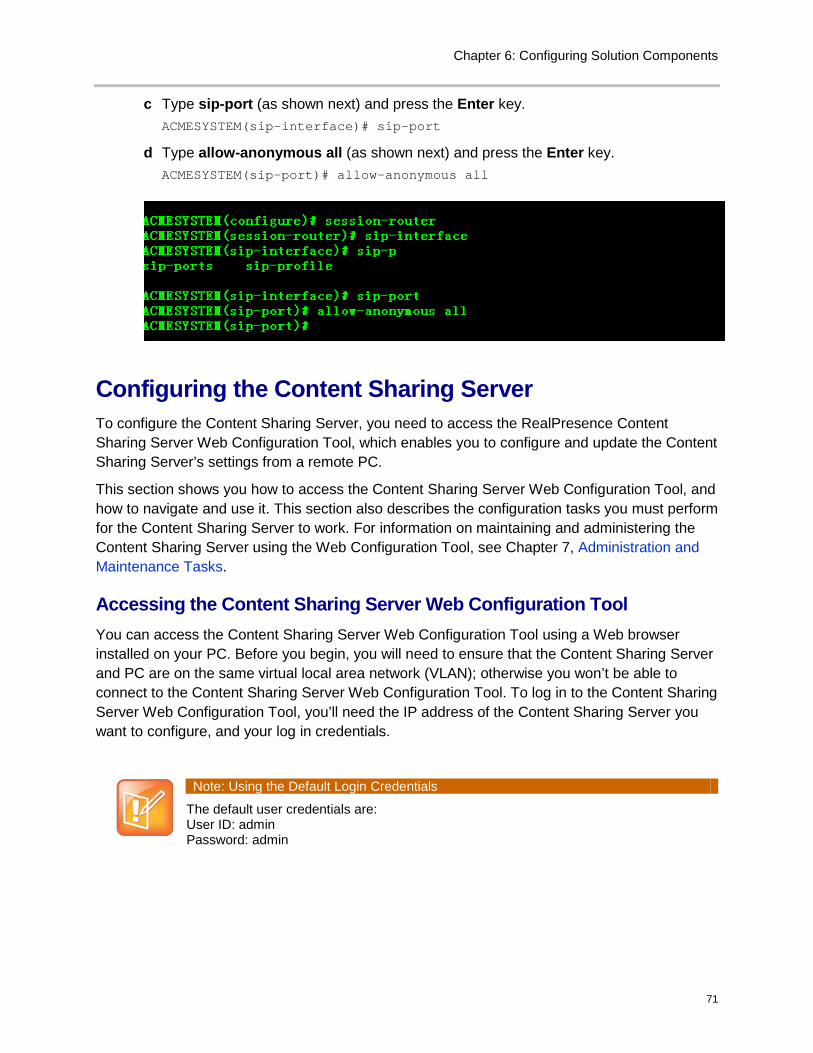
Chapter 6: Configuring Solution Components
71
c Type sip-port (as shown next) and press the Enter key. ACMESYSTEM(sip-interface)# sip-port
d Type allow-anonymous all (as shown next) and press the Enter key. ACMESYSTEM(sip-port)# allow-anonymous all
Configuring the Content Sharing Server To configure the Content Sharing Server, you need to access the RealPresence Content Sharing Server Web Configuration Tool, which enables you to configure and update the Content Sharing Server’s settings from a remote PC.
This section shows you how to access the Content Sharing Server Web Configuration Tool, and how to navigate and use it. This section also describes the configuration tasks you must perform for the Content Sharing Server to work. For information on maintaining and administering the Content Sharing Server using the Web Configuration Tool, see Chapter 7, Administration and Maintenance Tasks.
Accessing the Content Sharing Server Web Configuration Tool You can access the Content Sharing Server Web Configuration Tool using a Web browser installed on your PC. Before you begin, you will need to ensure that the Content Sharing Server and PC are on the same virtual local area network (VLAN); otherwise you won’t be able to connect to the Content Sharing Server Web Configuration Tool. To log in to the Content Sharing Server Web Configuration Tool, you’ll need the IP address of the Content Sharing Server you want to configure, and your log in credentials.
Note: Using the Default Login Credentials
The default user credentials are: User ID: admin Password: admin
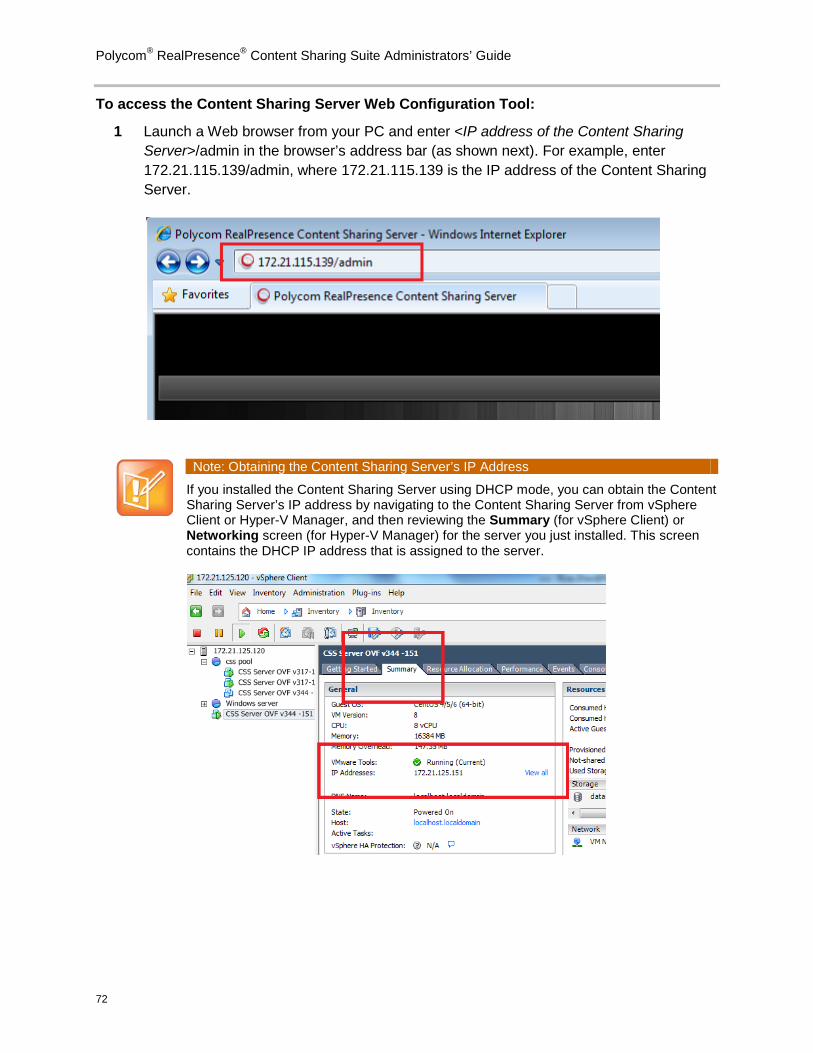
Polycom® RealPresence® Content Sharing Suite Administrators’ Guide
72
To access the Content Sharing Server Web Configuration Tool:
1 Launch a Web browser from your PC and enter <IP address of the Content Sharing Server>/admin in the browser’s address bar (as shown next). For example, enter 172.21.115.139/admin, where 172.21.115.139 is the IP address of the Content Sharing Server.
Note: Obtaining the Content Sharing Server’s IP Address
If you installed the Content Sharing Server using DHCP mode, you can obtain the Content Sharing Server’s IP address by navigating to the Content Sharing Server from vSphere Client or Hyper-V Manager, and then reviewing the Summary (for vSphere Client) or Networking screen (for Hyper-V Manager) for the server you just installed. This screen contains the DHCP IP address that is assigned to the server.
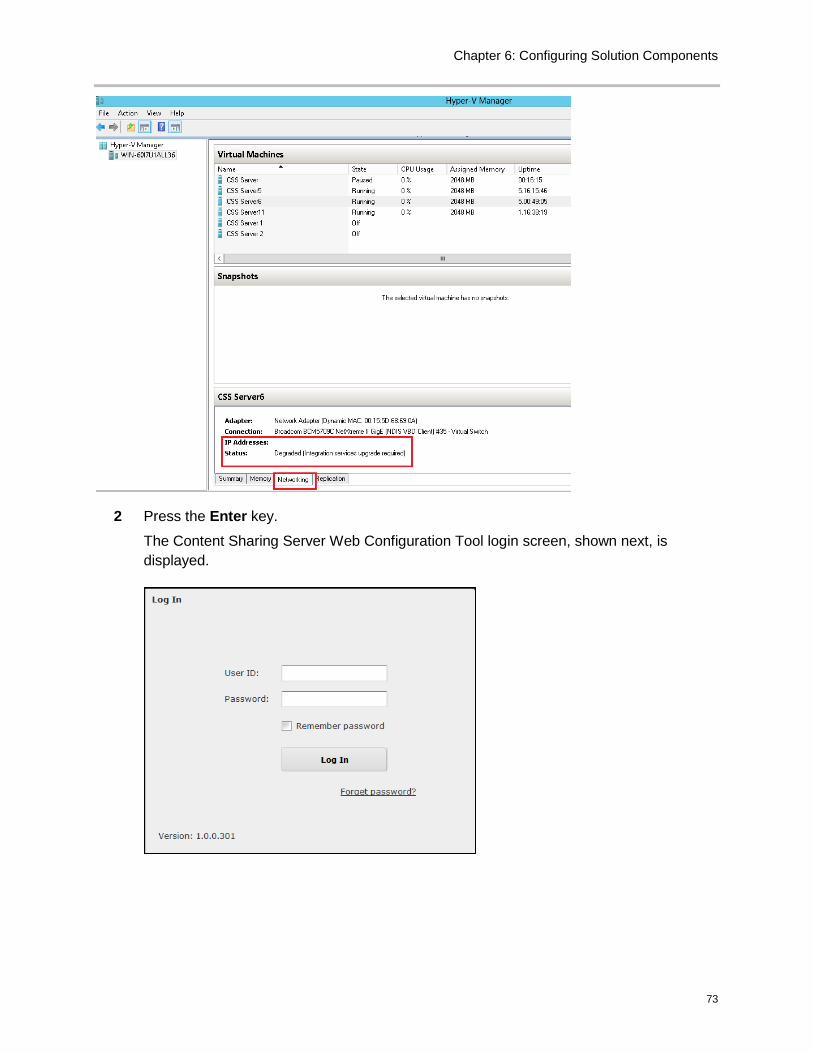
Chapter 6: Configuring Solution Components
73
2 Press the Enter key.
The Content Sharing Server Web Configuration Tool login screen, shown next, is displayed.
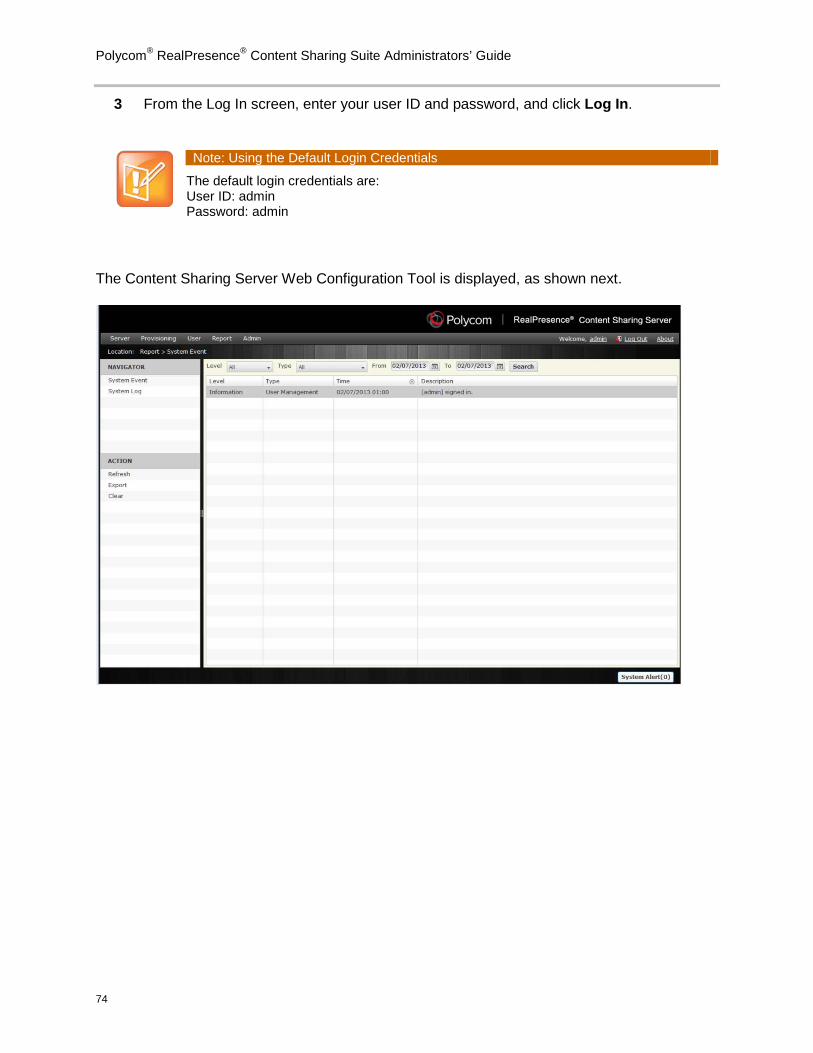
Polycom® RealPresence® Content Sharing Suite Administrators’ Guide
74
3 From the Log In screen, enter your user ID and password, and click Log In.
Note: Using the Default Login Credentials
The default login credentials are: User ID: admin Password: admin
The Content Sharing Server Web Configuration Tool is displayed, as shown next.
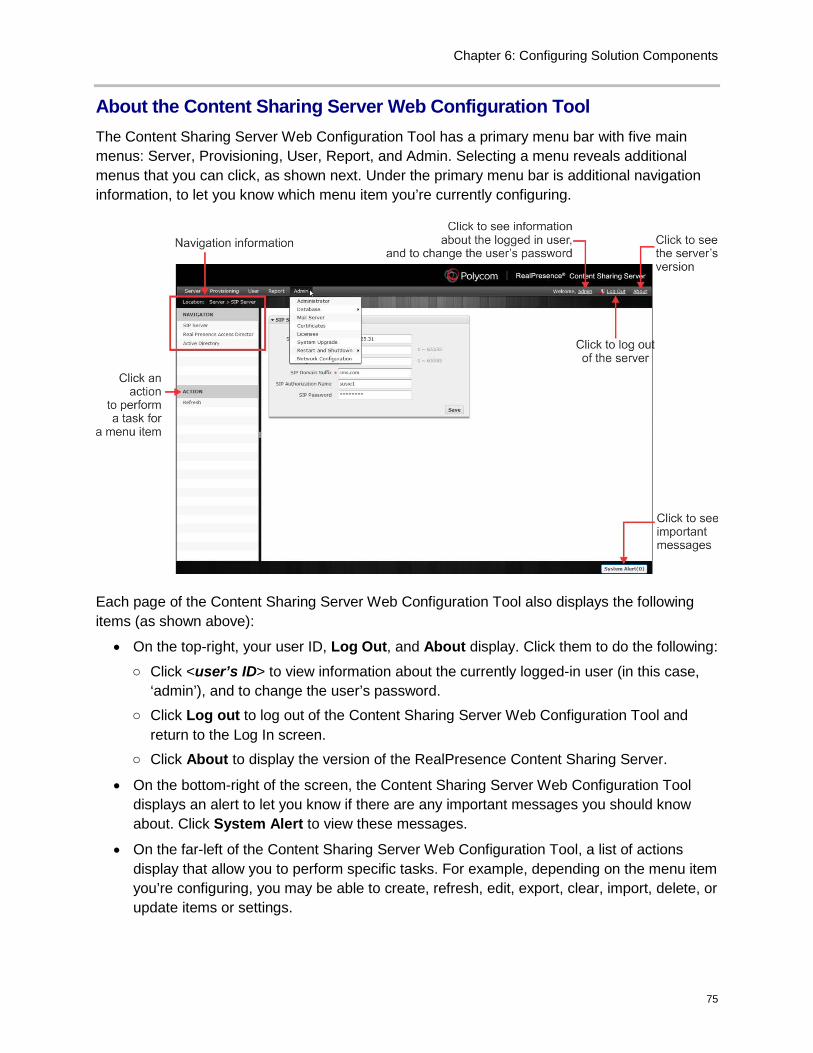
Chapter 6: Configuring Solution Components
75
About the Content Sharing Server Web Configuration Tool The Content Sharing Server Web Configuration Tool has a primary menu bar with five main menus: Server, Provisioning, User, Report, and Admin. Selecting a menu reveals additional menus that you can click, as shown next. Under the primary menu bar is additional navigation information, to let you know which menu item you’re currently configuring.
Each page of the Content Sharing Server Web Configuration Tool also displays the following items (as shown above):
• On the top-right, your user ID, Log Out, and About display. Click them to do the following:
○ Click <user’s ID> to view information about the currently logged-in user (in this case, ‘admin’), and to change the user’s password.
○ Click Log out to log out of the Content Sharing Server Web Configuration Tool and return to the Log In screen.
○ Click About to display the version of the RealPresence Content Sharing Server.
• On the bottom-right of the screen, the Content Sharing Server Web Configuration Tool displays an alert to let you know if there are any important messages you should know about. Click System Alert to view these messages.
• On the far-left of the Content Sharing Server Web Configuration Tool, a list of actions display that allow you to perform specific tasks. For example, depending on the menu item you’re configuring, you may be able to create, refresh, edit, export, clear, import, delete, or update items or settings.
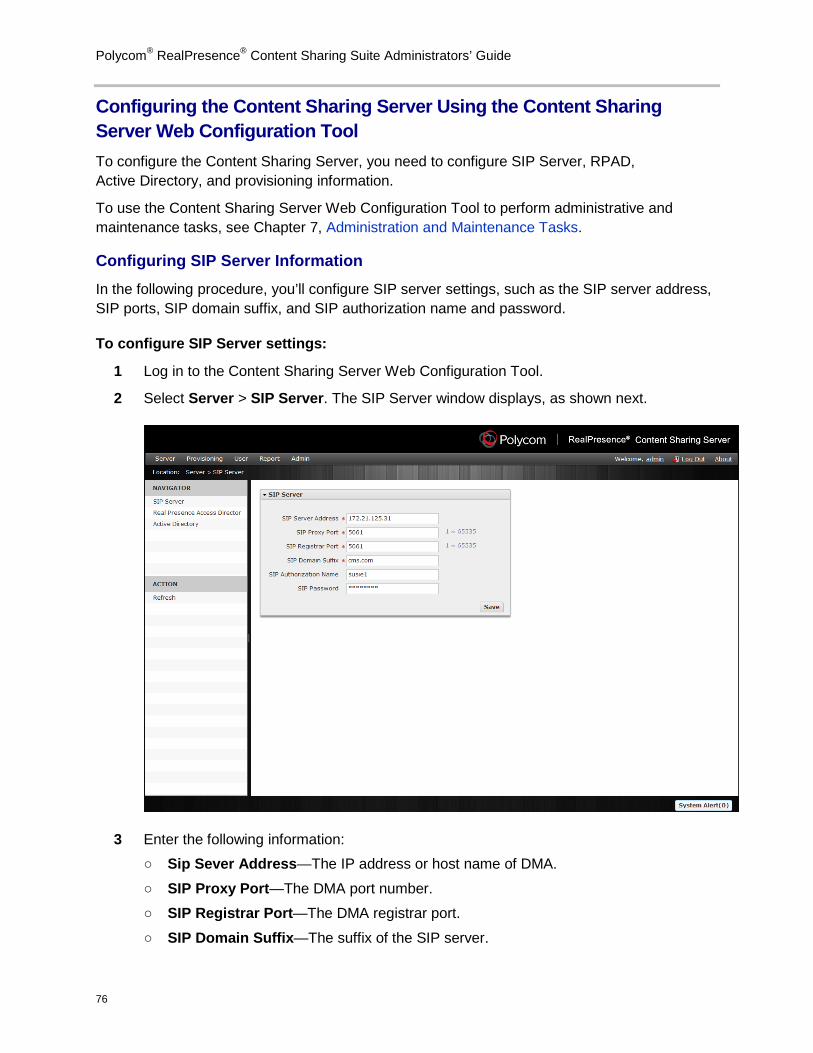
Polycom® RealPresence® Content Sharing Suite Administrators’ Guide
76
Configuring the Content Sharing Server Using the Content Sharing Server Web Configuration Tool To configure the Content Sharing Server, you need to configure SIP Server, RPAD, Active Directory, and provisioning information.
To use the Content Sharing Server Web Configuration Tool to perform administrative and maintenance tasks, see Chapter 7, Administration and Maintenance Tasks.
Configuring SIP Server Information
In the following procedure, you’ll configure SIP server settings, such as the SIP server address, SIP ports, SIP domain suffix, and SIP authorization name and password.
To configure SIP Server settings:
1 Log in to the Content Sharing Server Web Configuration Tool.
2 Select Server > SIP Server. The SIP Server window displays, as shown next.
3 Enter the following information: ○ Sip Sever Address—The IP address or host name of DMA.
○ SIP Proxy Port—The DMA port number.
○ SIP Registrar Port—The DMA registrar port.
○ SIP Domain Suffix—The suffix of the SIP server.
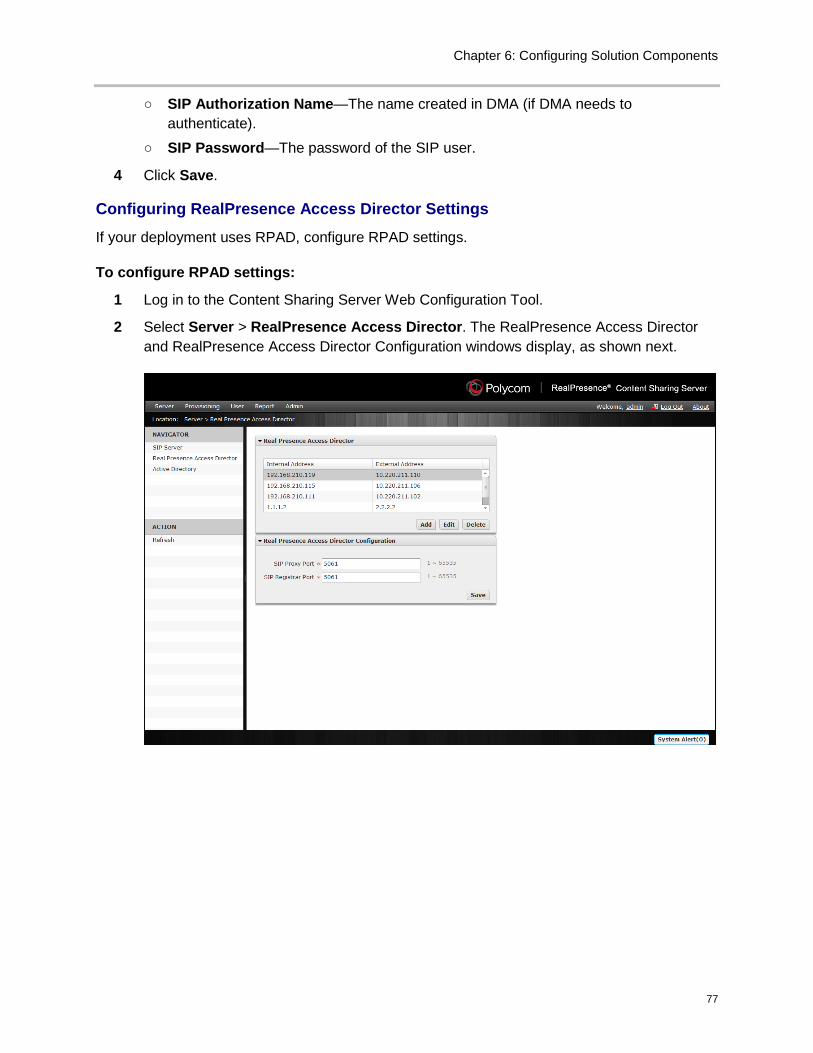
Chapter 6: Configuring Solution Components
77
○ SIP Authorization Name—The name created in DMA (if DMA needs to authenticate).
○ SIP Password—The password of the SIP user.
4 Click Save.
Configuring RealPresence Access Director Settings
If your deployment uses RPAD, configure RPAD settings.
To configure RPAD settings:
1 Log in to the Content Sharing Server Web Configuration Tool.
2 Select Server > RealPresence Access Director. The RealPresence Access Director and RealPresence Access Director Configuration windows display, as shown next.
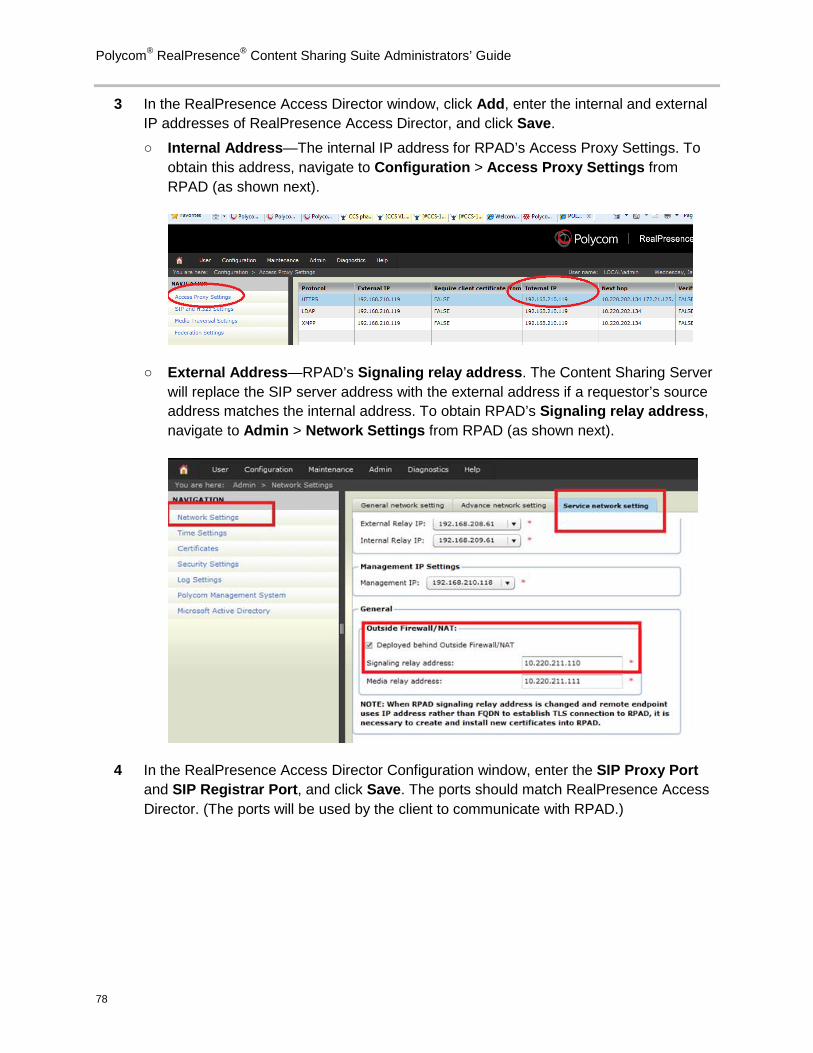
Polycom® RealPresence® Content Sharing Suite Administrators’ Guide
78
3 In the RealPresence Access Director window, click Add, enter the internal and external IP addresses of RealPresence Access Director, and click Save.
○ Internal Address—The internal IP address for RPAD’s Access Proxy Settings. To obtain this address, navigate to Configuration > Access Proxy Settings from RPAD (as shown next).
○ External Address—RPAD’s Signaling relay address. The Content Sharing Server will replace the SIP server address with the external address if a requestor’s source address matches the internal address. To obtain RPAD’s Signaling relay address, navigate to Admin > Network Settings from RPAD (as shown next).
4 In the RealPresence Access Director Configuration window, enter the SIP Proxy Port and SIP Registrar Port, and click Save. The ports should match RealPresence Access Director. (The ports will be used by the client to communicate with RPAD.)
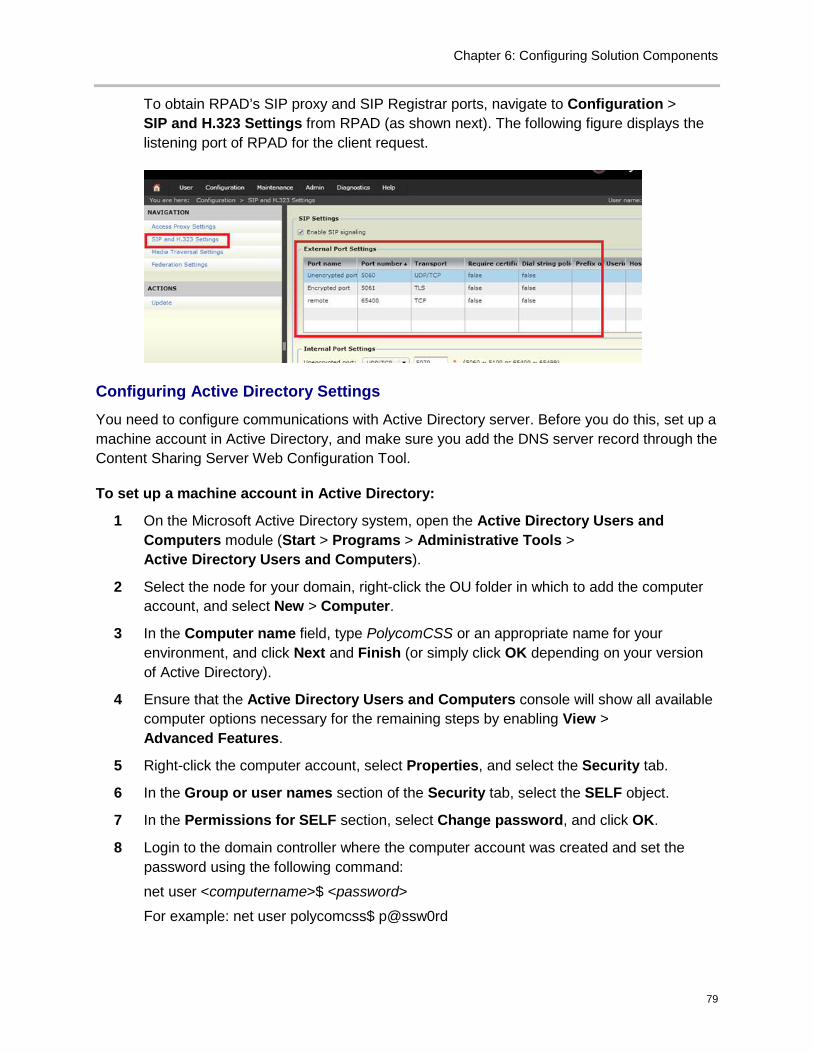
Chapter 6: Configuring Solution Components
79
To obtain RPAD’s SIP proxy and SIP Registrar ports, navigate to Configuration > SIP and H.323 Settings from RPAD (as shown next). The following figure displays the listening port of RPAD for the client request.
Configuring Active Directory Settings You need to configure communications with Active Directory server. Before you do this, set up a machine account in Active Directory, and make sure you add the DNS server record through the Content Sharing Server Web Configuration Tool.
To set up a machine account in Active Directory:
1 On the Microsoft Active Directory system, open the Active Directory Users and Computers module (Start > Programs > Administrative Tools > Active Directory Users and Computers).
2 Select the node for your domain, right-click the OU folder in which to add the computer account, and select New > Computer.
3 In the Computer name field, type PolycomCSS or an appropriate name for your environment, and click Next and Finish (or simply click OK depending on your version of Active Directory).
4 Ensure that the Active Directory Users and Computers console will show all available computer options necessary for the remaining steps by enabling View > Advanced Features.
5 Right-click the computer account, select Properties, and select the Security tab.
6 In the Group or user names section of the Security tab, select the SELF object.
7 In the Permissions for SELF section, select Change password, and click OK.
8 Login to the domain controller where the computer account was created and set the password using the following command:
net user <computername>$ <password>
For example: net user polycomcss$ p@ssw0rd
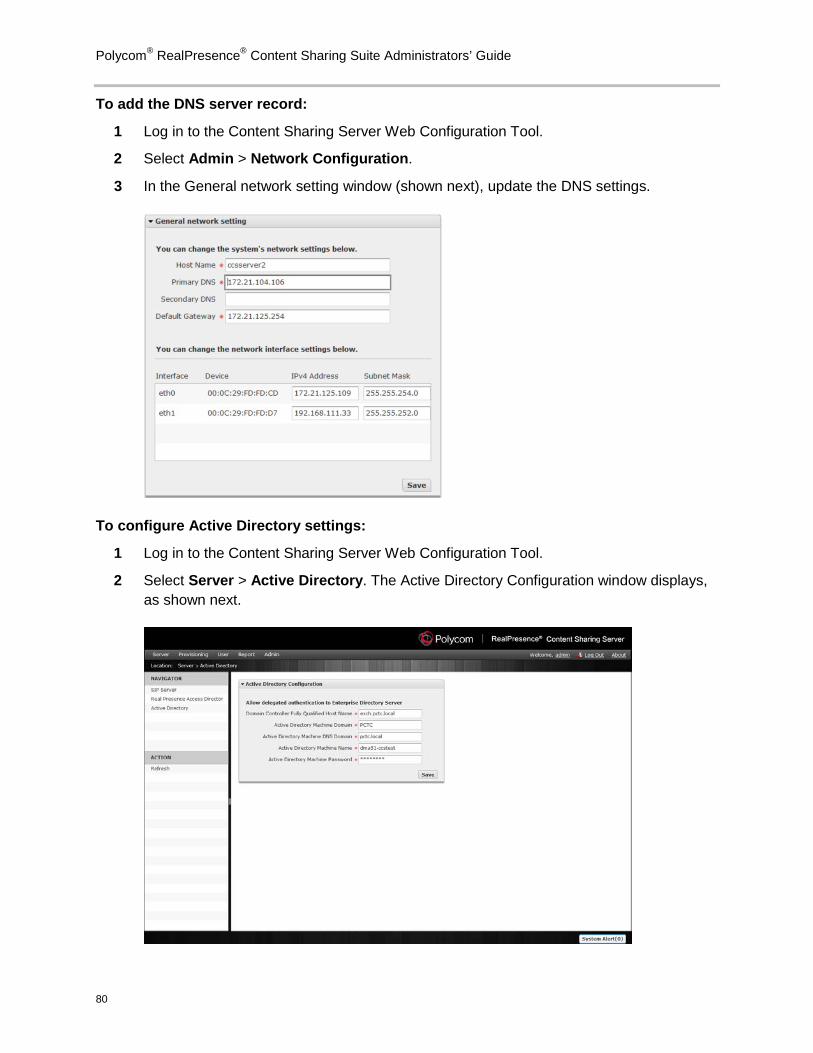
Polycom® RealPresence® Content Sharing Suite Administrators’ Guide
80
To add the DNS server record:
1 Log in to the Content Sharing Server Web Configuration Tool.
2 Select Admin > Network Configuration.
3 In the General network setting window (shown next), update the DNS settings.
To configure Active Directory settings:
1 Log in to the Content Sharing Server Web Configuration Tool.
2 Select Server > Active Directory. The Active Directory Configuration window displays, as shown next.
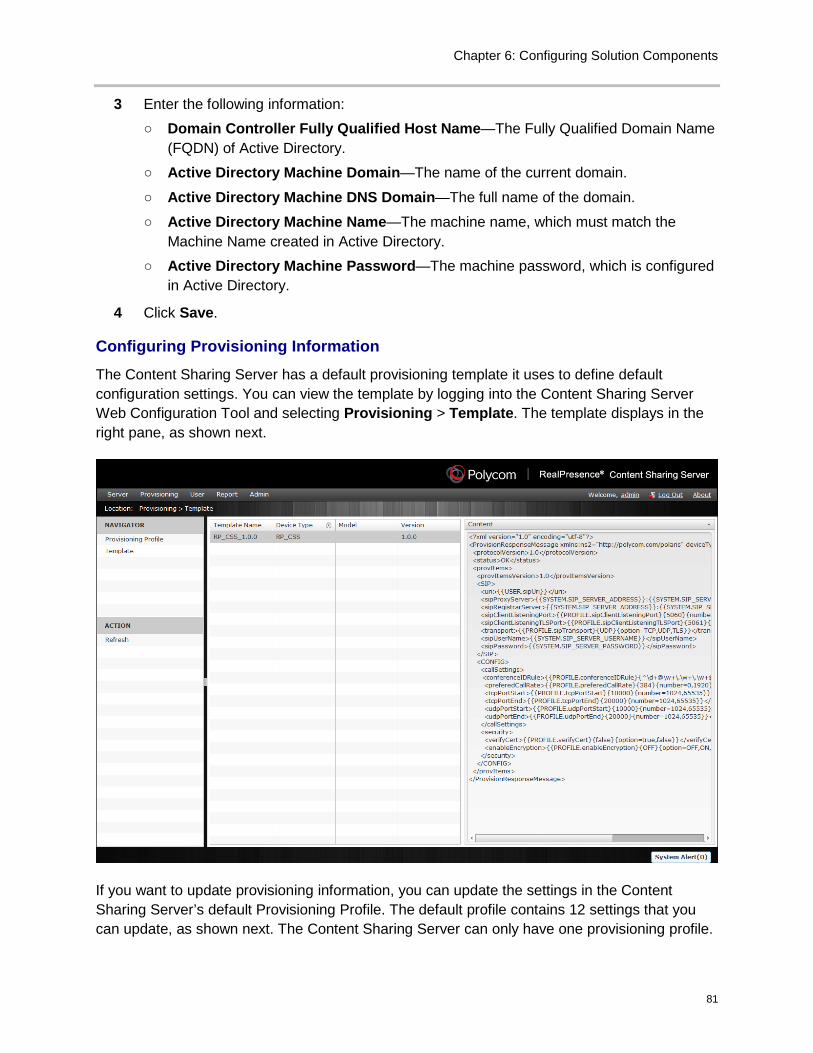
Chapter 6: Configuring Solution Components
81
3 Enter the following information: ○ Domain Controller Fully Qualified Host Name—The Fully Qualified Domain Name
(FQDN) of Active Directory. ○ Active Directory Machine Domain—The name of the current domain.
○ Active Directory Machine DNS Domain—The full name of the domain.
○ Active Directory Machine Name—The machine name, which must match the Machine Name created in Active Directory.
○ Active Directory Machine Password—The machine password, which is configured in Active Directory.
4 Click Save.
Configuring Provisioning Information The Content Sharing Server has a default provisioning template it uses to define default configuration settings. You can view the template by logging into the Content Sharing Server Web Configuration Tool and selecting Provisioning > Template. The template displays in the right pane, as shown next.
If you want to update provisioning information, you can update the settings in the Content Sharing Server’s default Provisioning Profile. The default profile contains 12 settings that you can update, as shown next. The Content Sharing Server can only have one provisioning profile.
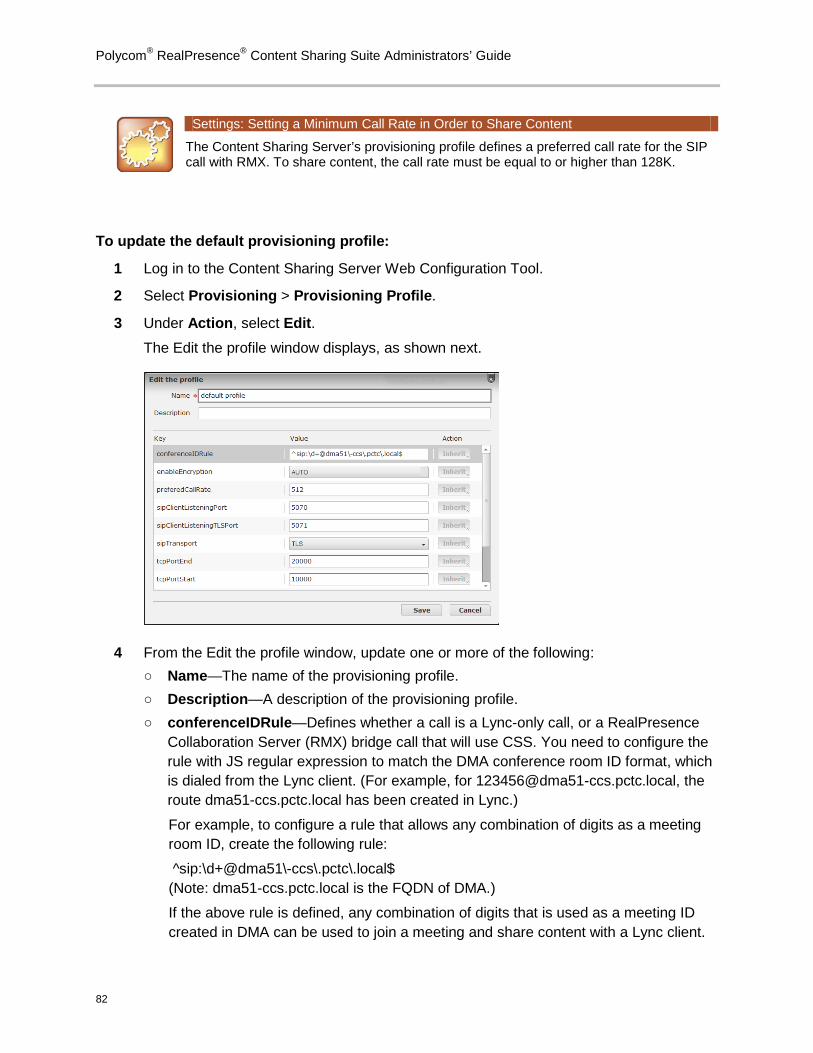
Polycom® RealPresence® Content Sharing Suite Administrators’ Guide
82
Settings: Setting a Minimum Call Rate in Order to Share Content
The Content Sharing Server’s provisioning profile defines a preferred call rate for the SIP call with RMX. To share content, the call rate must be equal to or higher than 128K.
To update the default provisioning profile:
1 Log in to the Content Sharing Server Web Configuration Tool.
2 Select Provisioning > Provisioning Profile.
3 Under Action, select Edit. The Edit the profile window displays, as shown next.
4 From the Edit the profile window, update one or more of the following: ○ Name—The name of the provisioning profile. ○ Description—A description of the provisioning profile. ○ conferenceIDRule—Defines whether a call is a Lync-only call, or a RealPresence
Collaboration Server (RMX) bridge call that will use CSS. You need to configure the rule with JS regular expression to match the DMA conference room ID format, which is dialed from the Lync client. (For example, for [email protected], the route dma51-ccs.pctc.local has been created in Lync.)
For example, to configure a rule that allows any combination of digits as a meeting room ID, create the following rule:
^sip:\d+@dma51\-ccs\.pctc\.local$ (Note: dma51-ccs.pctc.local is the FQDN of DMA.)
If the above rule is defined, any combination of digits that is used as a meeting ID created in DMA can be used to join a meeting and share content with a Lync client.
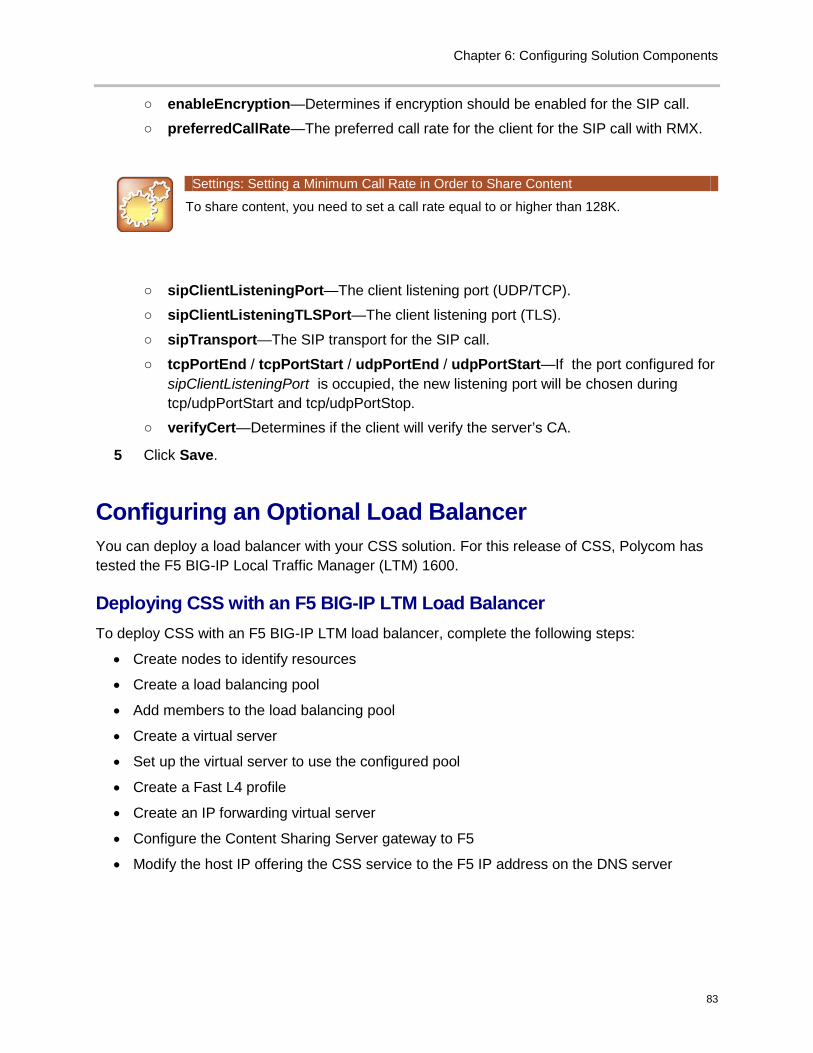
Chapter 6: Configuring Solution Components
83
○ enableEncryption—Determines if encryption should be enabled for the SIP call.
○ preferredCallRate—The preferred call rate for the client for the SIP call with RMX.
Settings: Setting a Minimum Call Rate in Order to Share Content
To share content, you need to set a call rate equal to or higher than 128K.
○ sipClientListeningPort—The client listening port (UDP/TCP).
○ sipClientListeningTLSPort—The client listening port (TLS).
○ sipTransport—The SIP transport for the SIP call.
○ tcpPortEnd / tcpPortStart / udpPortEnd / udpPortStart—If the port configured for sipClientListeningPort is occupied, the new listening port will be chosen during tcp/udpPortStart and tcp/udpPortStop.
○ verifyCert—Determines if the client will verify the server’s CA.
5 Click Save.
Configuring an Optional Load Balancer You can deploy a load balancer with your CSS solution. For this release of CSS, Polycom has tested the F5 BIG-IP Local Traffic Manager (LTM) 1600.
Deploying CSS with an F5 BIG-IP LTM Load Balancer To deploy CSS with an F5 BIG-IP LTM load balancer, complete the following steps:
• Create nodes to identify resources
• Create a load balancing pool
• Add members to the load balancing pool
• Create a virtual server
• Set up the virtual server to use the configured pool
• Create a Fast L4 profile
• Create an IP forwarding virtual server
• Configure the Content Sharing Server gateway to F5
• Modify the host IP offering the CSS service to the F5 IP address on the DNS server
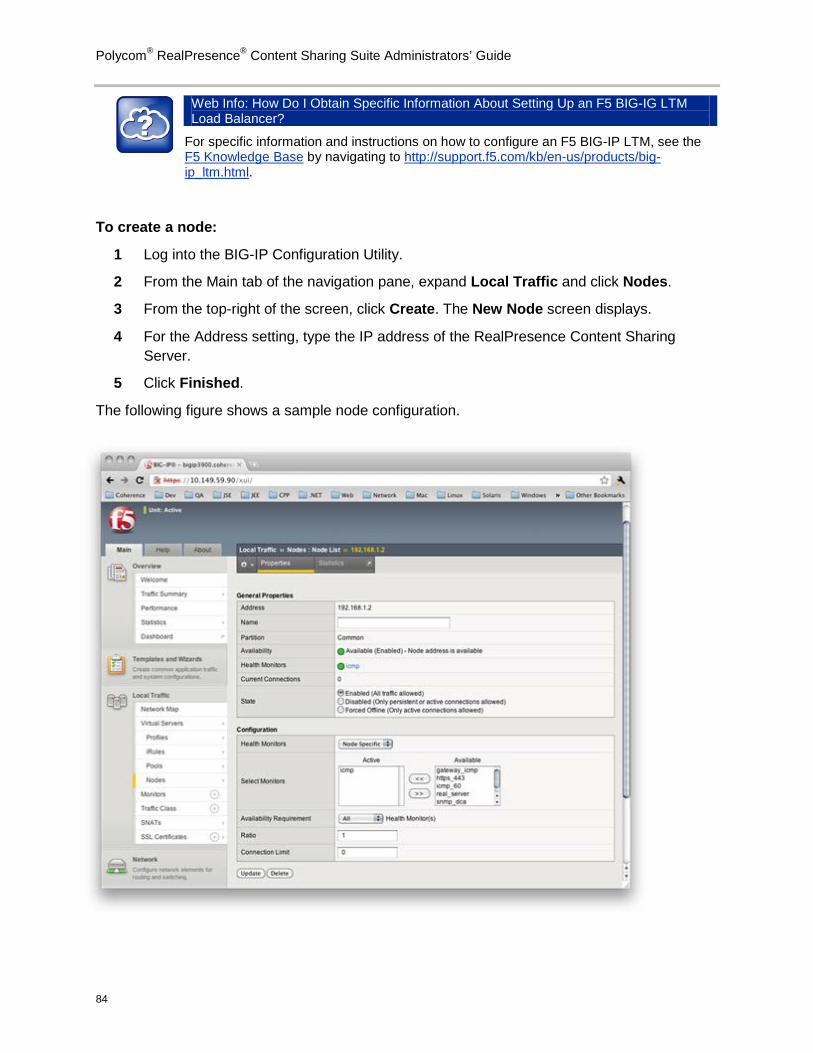
Polycom® RealPresence® Content Sharing Suite Administrators’ Guide
84
Web Info: How Do I Obtain Specific Information About Setting Up an F5 BIG-IG LTM Load Balancer?
For specific information and instructions on how to configure an F5 BIG-IP LTM, see the F5 Knowledge Base by navigating to http://support.f5.com/kb/en-us/products/big-ip_ltm.html.
To create a node:
1 Log into the BIG-IP Configuration Utility.
2 From the Main tab of the navigation pane, expand Local Traffic and click Nodes.
3 From the top-right of the screen, click Create. The New Node screen displays.
4 For the Address setting, type the IP address of the RealPresence Content Sharing Server.
5 Click Finished.
The following figure shows a sample node configuration.
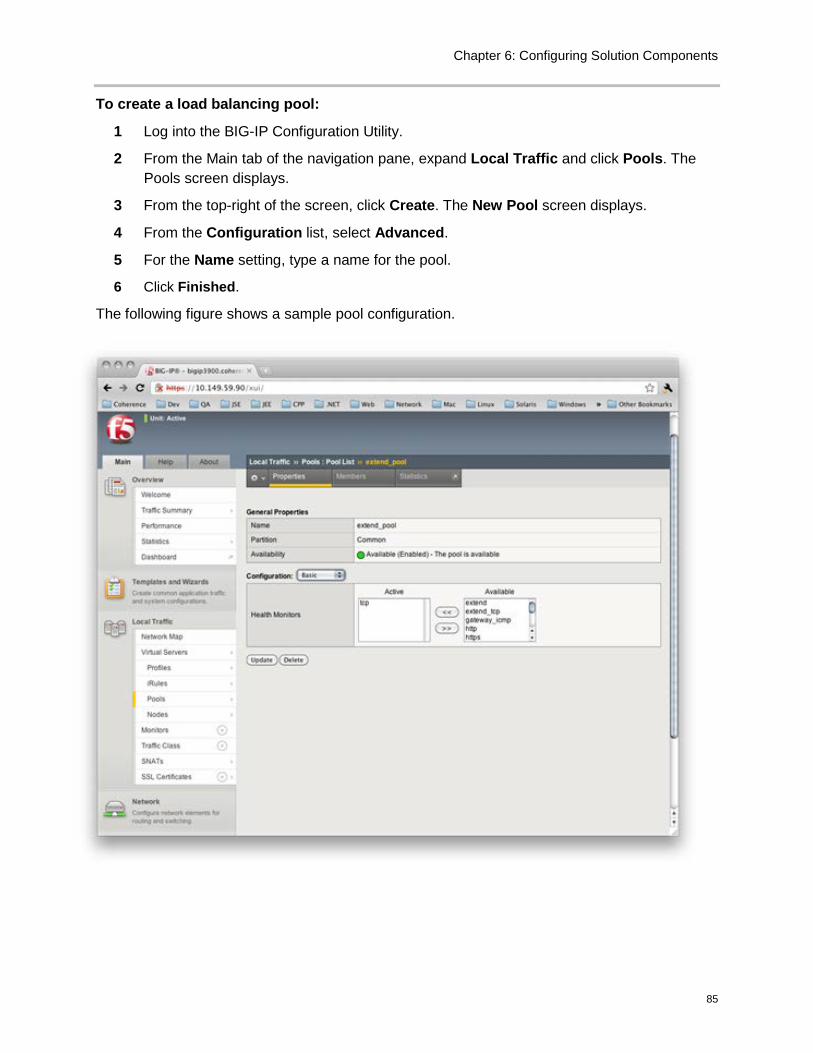
Chapter 6: Configuring Solution Components
85
To create a load balancing pool:
1 Log into the BIG-IP Configuration Utility.
2 From the Main tab of the navigation pane, expand Local Traffic and click Pools. The Pools screen displays.
3 From the top-right of the screen, click Create. The New Pool screen displays.
4 From the Configuration list, select Advanced.
5 For the Name setting, type a name for the pool.
6 Click Finished.
The following figure shows a sample pool configuration.
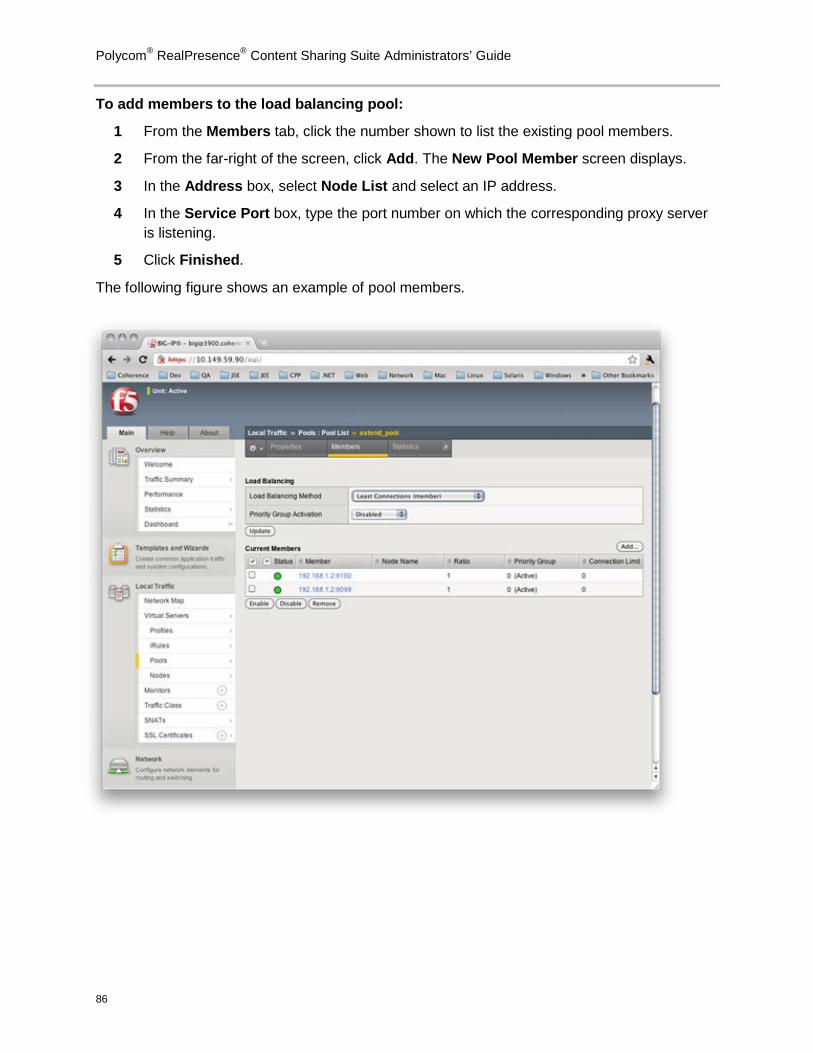
Polycom® RealPresence® Content Sharing Suite Administrators’ Guide
86
To add members to the load balancing pool:
1 From the Members tab, click the number shown to list the existing pool members.
2 From the far-right of the screen, click Add. The New Pool Member screen displays.
3 In the Address box, select Node List and select an IP address.
4 In the Service Port box, type the port number on which the corresponding proxy server is listening.
5 Click Finished.
The following figure shows an example of pool members.
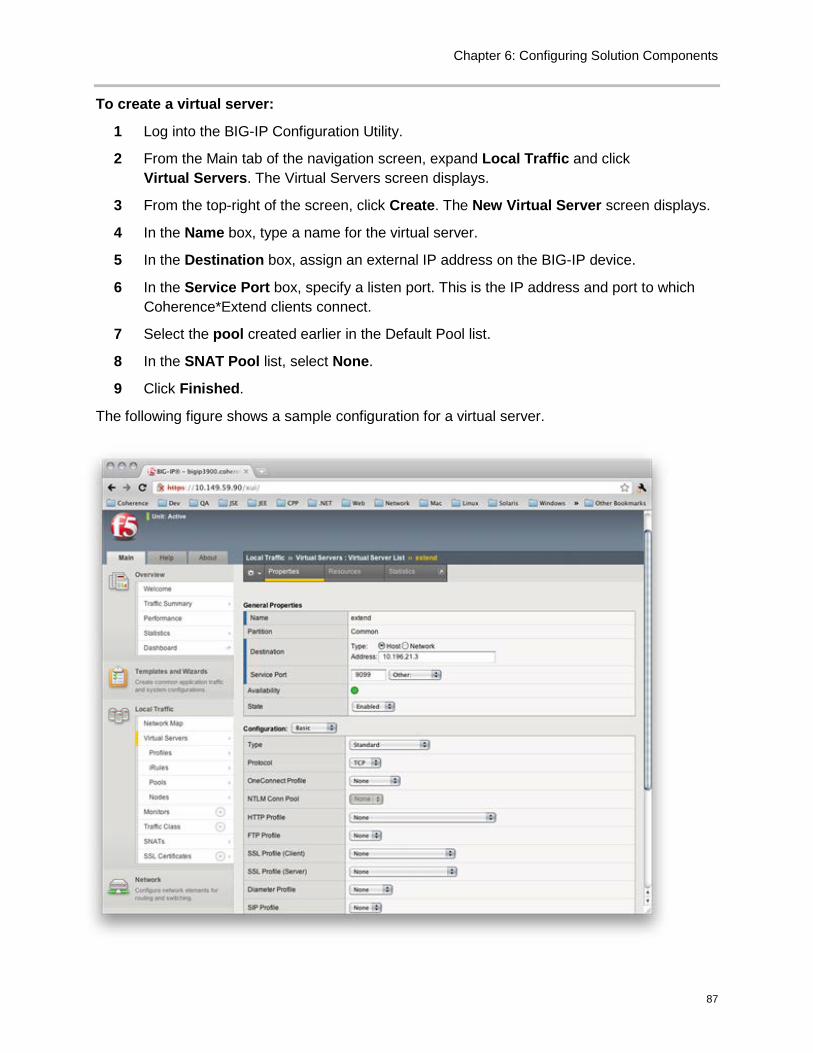
Chapter 6: Configuring Solution Components
87
To create a virtual server:
1 Log into the BIG-IP Configuration Utility.
2 From the Main tab of the navigation screen, expand Local Traffic and click Virtual Servers. The Virtual Servers screen displays.
3 From the top-right of the screen, click Create. The New Virtual Server screen displays.
4 In the Name box, type a name for the virtual server.
5 In the Destination box, assign an external IP address on the BIG-IP device.
6 In the Service Port box, specify a listen port. This is the IP address and port to which Coherence*Extend clients connect.
7 Select the pool created earlier in the Default Pool list.
8 In the SNAT Pool list, select None.
9 Click Finished.
The following figure shows a sample configuration for a virtual server.
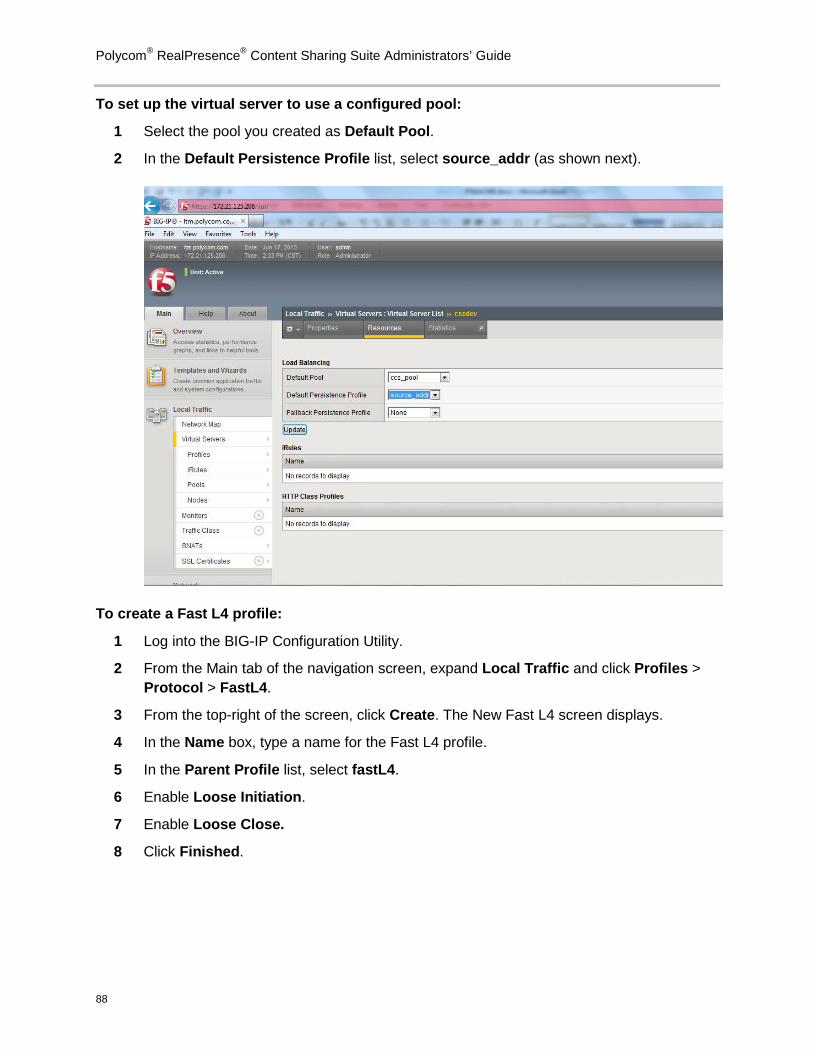
Polycom® RealPresence® Content Sharing Suite Administrators’ Guide
88
To set up the virtual server to use a configured pool:
1 Select the pool you created as Default Pool.
2 In the Default Persistence Profile list, select source_addr (as shown next).
To create a Fast L4 profile:
1 Log into the BIG-IP Configuration Utility.
2 From the Main tab of the navigation screen, expand Local Traffic and click Profiles > Protocol > FastL4.
3 From the top-right of the screen, click Create. The New Fast L4 screen displays.
4 In the Name box, type a name for the Fast L4 profile.
5 In the Parent Profile list, select fastL4.
6 Enable Loose Initiation.
7 Enable Loose Close.
8 Click Finished.
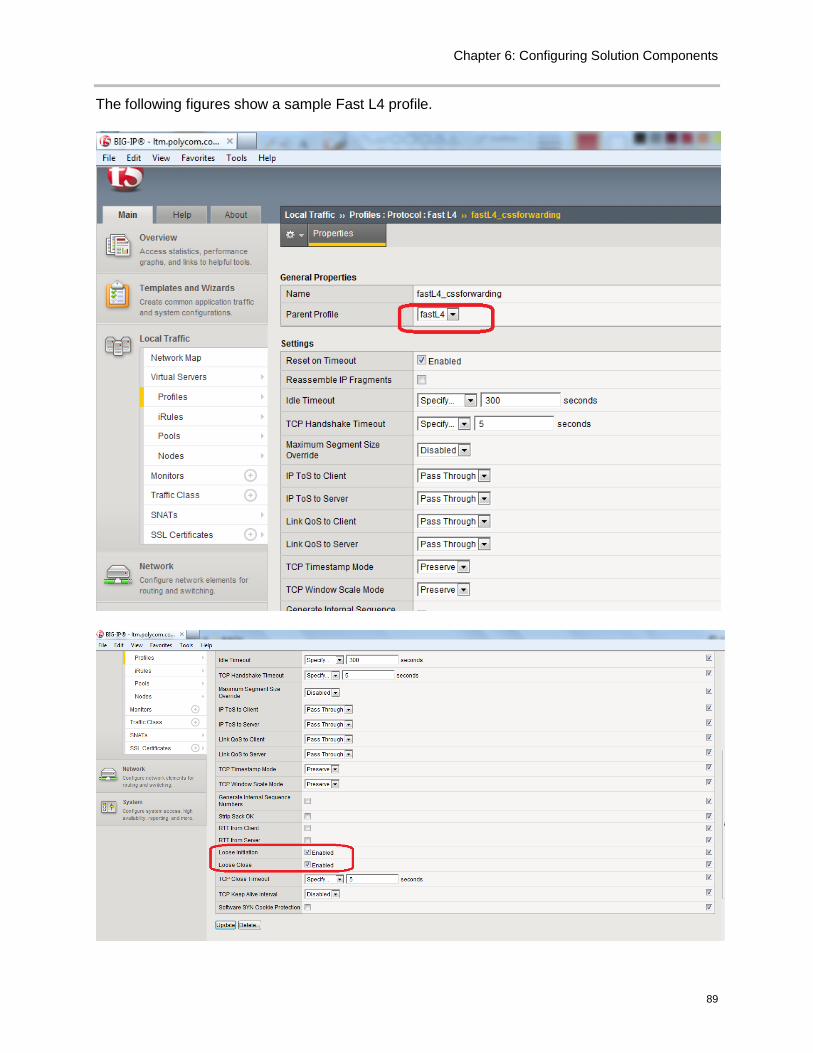
Chapter 6: Configuring Solution Components
89
The following figures show a sample Fast L4 profile.
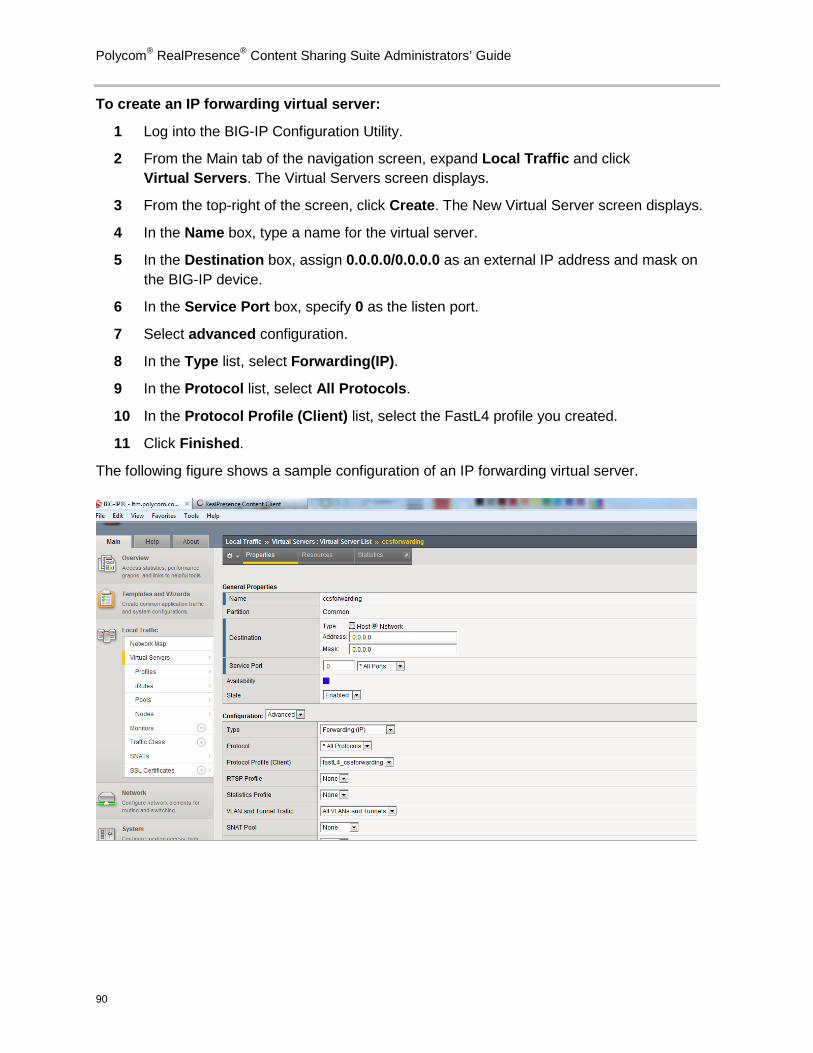
Polycom® RealPresence® Content Sharing Suite Administrators’ Guide
90
To create an IP forwarding virtual server:
1 Log into the BIG-IP Configuration Utility.
2 From the Main tab of the navigation screen, expand Local Traffic and click Virtual Servers. The Virtual Servers screen displays.
3 From the top-right of the screen, click Create. The New Virtual Server screen displays.
4 In the Name box, type a name for the virtual server.
5 In the Destination box, assign 0.0.0.0/0.0.0.0 as an external IP address and mask on the BIG-IP device.
6 In the Service Port box, specify 0 as the listen port.
7 Select advanced configuration.
8 In the Type list, select Forwarding(IP).
9 In the Protocol list, select All Protocols.
10 In the Protocol Profile (Client) list, select the FastL4 profile you created.
11 Click Finished.
The following figure shows a sample configuration of an IP forwarding virtual server.
Chapter 6: Configuring Solution Components
91
To configure the gateway of the Content Sharing Server gateway to F5:
• To configure the Content Sharing Server gateway to F5, see Updating Network Settings.
To modify the host IP offering the CSS service to the F5 IP address on the DNS server:
• To modify the CSS service DNS records on the DNS server, see Configuring Active Directory Settings.

93
Chapter 7: Administration and Maintenance Tasks
In this chapter, you’ll learn about administration and maintenance tasks you can perform for the Content Sharing Server and for the CSS Client.
Tasks for the Content Sharing Server include managing users and administrators, upgrading, restarting, and shutting down the system, enabling Hot Standby, and activating the Content Sharing Server license. For the CSS Client, you can access a tool that collects and packages log files so you can diagnose CSS Client issues.
The topics include:
• Content Sharing Server Tasks
• CSS Client Tasks
Content Sharing Server Tasks You can perform several Content Sharing Server maintenance and administrative tasks from the Content Sharing Server Web Configuration Tool, including:
• Activating the Content Sharing Server License
• Managing Users
• Managing System Events and Logs
• Managing Administrators
• Managing the Database
• Configuring a Mail Server for Administrators
• Managing Certificates
• Managing Licenses, Serial Numbers, and Activation Keys
• Updating Network Settings
• Enabling High Availability (Hot Standby)
• Upgrading the Content Sharing Server
• Updating the Client Package
• Restarting the System
• Shutting Down the System
Polycom® RealPresence® Content Sharing Suite Administrators’ Guide
94
Activating the Content Sharing Server License CSS version 1.1 supports a call-based license. This license model specifies the maximum number of concurrent CSS calls that can take place—per Content Sharing Server—at one time. If the maximum number of concurrent calls supported by the Content Sharing Server reaches the maximum number, the CSS Client cannot complete a call.
You can activate and review your Content Sharing Server license details from the RealPresence Content Sharing Server Web Configuration Tool. From the tool’s Active License page, you can view the license status, concurrent call status, and when the license expires. Alerts also display that indicate:
• If the license is about to expire.
• If the license is activated.
Note: Activating Licenses in High Availability (Hot Standby) or Multi-Server Environments
• If your CSS setup runs in a High Availability (Hot Standby) environment, you’ll need to activate two Content Sharing Server licenses—one for the master server, and one for the slave server. For the master server, you need to purchase a CSS Concurrent Session license. For the slave server, you need to purchase a CSS Redundant Server Activation license.
• If your CSS setup has multiple Content Sharing Servers, you need to activate licenses for each Content Sharing Server.
To activate the Content Sharing Server license, you’ll need the following items:
• Content Sharing Server serial number—A Content Sharing Server serial number is an auto-generated number that is connected to a particular machine. The serial number cannot be transferred to other Content Sharing Server installations on other machines. You access the Content Sharing Server serial number from the RealPresence Content Sharing Server Web Configuration Tool. You’ll need the serial number to obtain an activation key from Polycom Support.
• Polycom Software License code—You received a Polycom Software License code when you purchased your CSS software license. Refer to your software license for the code. You’ll need the code to obtain an activation key from Polycom Support.
• Activation key—An activation key is generated by Polycom Support. The activation key code contains the maximum number of concurrent calls the Content Sharing Server supports. To obtain the activation key, you need to enter your Content Sharing Server serial number and Polycom Software License code through the Polycom Support portal. Then, you can enter the activation key into the RealPresence Content Sharing Server Web Configuration Tool, which will activate the CSS license.
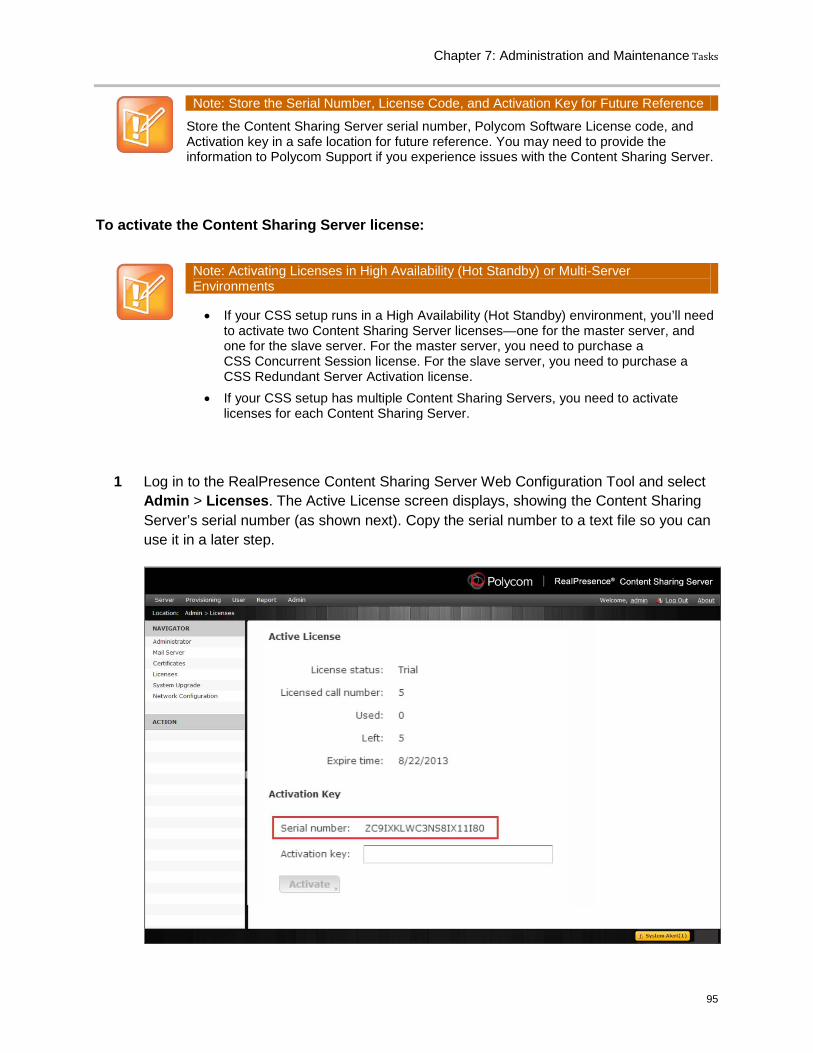
Chapter 7: Administration and Maintenance Tasks
95
Note: Store the Serial Number, License Code, and Activation Key for Future Reference
Store the Content Sharing Server serial number, Polycom Software License code, and Activation key in a safe location for future reference. You may need to provide the information to Polycom Support if you experience issues with the Content Sharing Server.
To activate the Content Sharing Server license:
Note: Activating Licenses in High Availability (Hot Standby) or Multi-Server Environments
• If your CSS setup runs in a High Availability (Hot Standby) environment, you’ll need to activate two Content Sharing Server licenses—one for the master server, and one for the slave server. For the master server, you need to purchase a CSS Concurrent Session license. For the slave server, you need to purchase a CSS Redundant Server Activation license.
• If your CSS setup has multiple Content Sharing Servers, you need to activate licenses for each Content Sharing Server.
1 Log in to the RealPresence Content Sharing Server Web Configuration Tool and select Admin > Licenses. The Active License screen displays, showing the Content Sharing Server’s serial number (as shown next). Copy the serial number to a text file so you can use it in a later step.
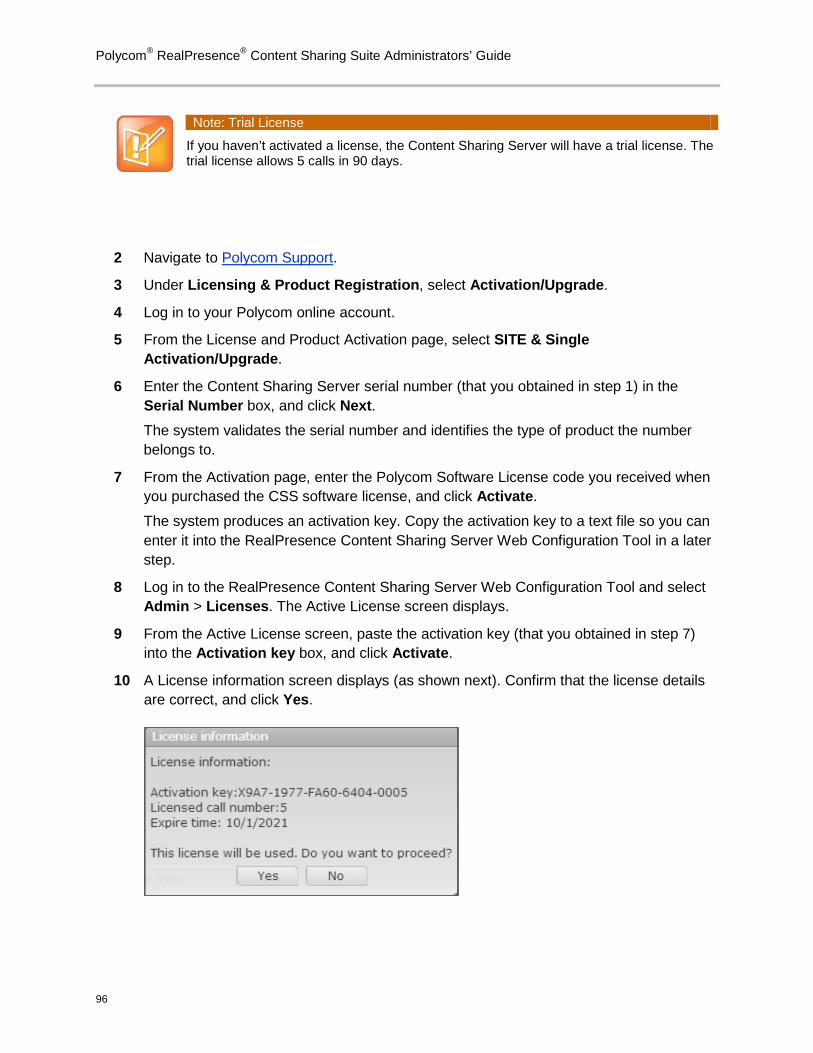
Polycom® RealPresence® Content Sharing Suite Administrators’ Guide
96
Note: Trial License
If you haven’t activated a license, the Content Sharing Server will have a trial license. The trial license allows 5 calls in 90 days.
2 Navigate to Polycom Support.
3 Under Licensing & Product Registration, select Activation/Upgrade.
4 Log in to your Polycom online account.
5 From the License and Product Activation page, select SITE & Single Activation/Upgrade.
6 Enter the Content Sharing Server serial number (that you obtained in step 1) in the Serial Number box, and click Next. The system validates the serial number and identifies the type of product the number belongs to.
7 From the Activation page, enter the Polycom Software License code you received when you purchased the CSS software license, and click Activate.
The system produces an activation key. Copy the activation key to a text file so you can enter it into the RealPresence Content Sharing Server Web Configuration Tool in a later step.
8 Log in to the RealPresence Content Sharing Server Web Configuration Tool and select Admin > Licenses. The Active License screen displays.
9 From the Active License screen, paste the activation key (that you obtained in step 7) into the Activation key box, and click Activate.
10 A License information screen displays (as shown next). Confirm that the license details are correct, and click Yes.
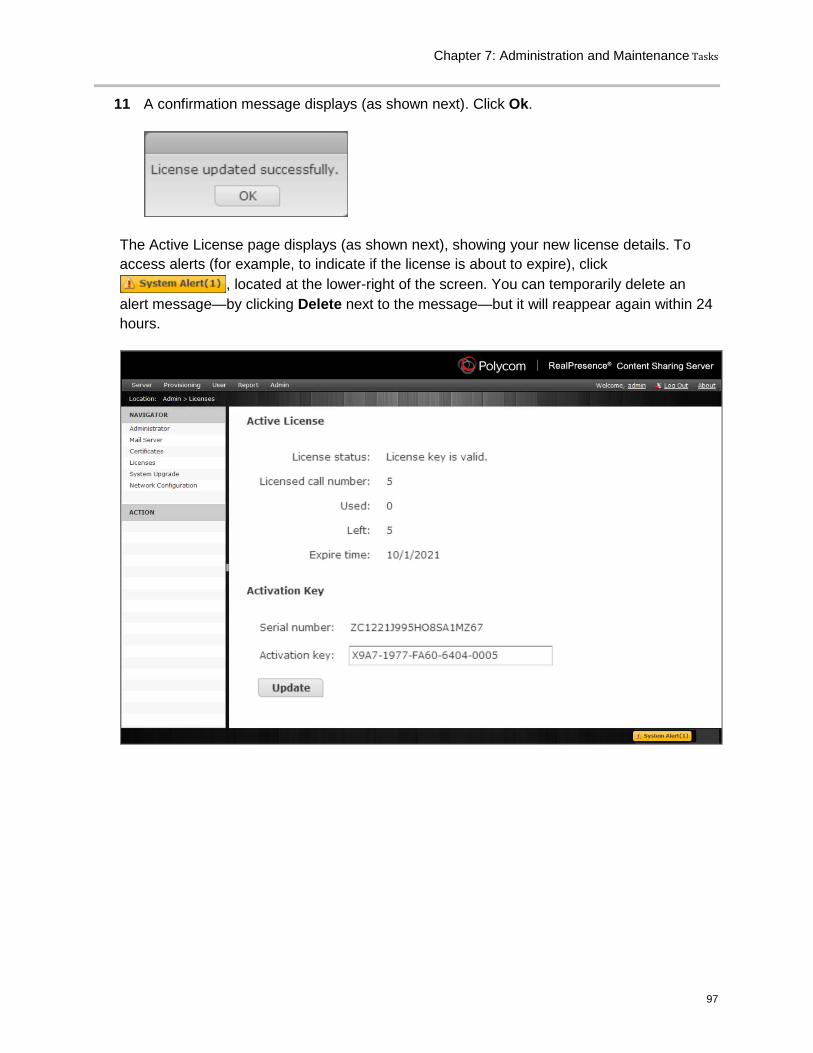
Chapter 7: Administration and Maintenance Tasks
97
11 A confirmation message displays (as shown next). Click Ok.
The Active License page displays (as shown next), showing your new license details. To access alerts (for example, to indicate if the license is about to expire), click
, located at the lower-right of the screen. You can temporarily delete an alert message—by clicking Delete next to the message—but it will reappear again within 24 hours.
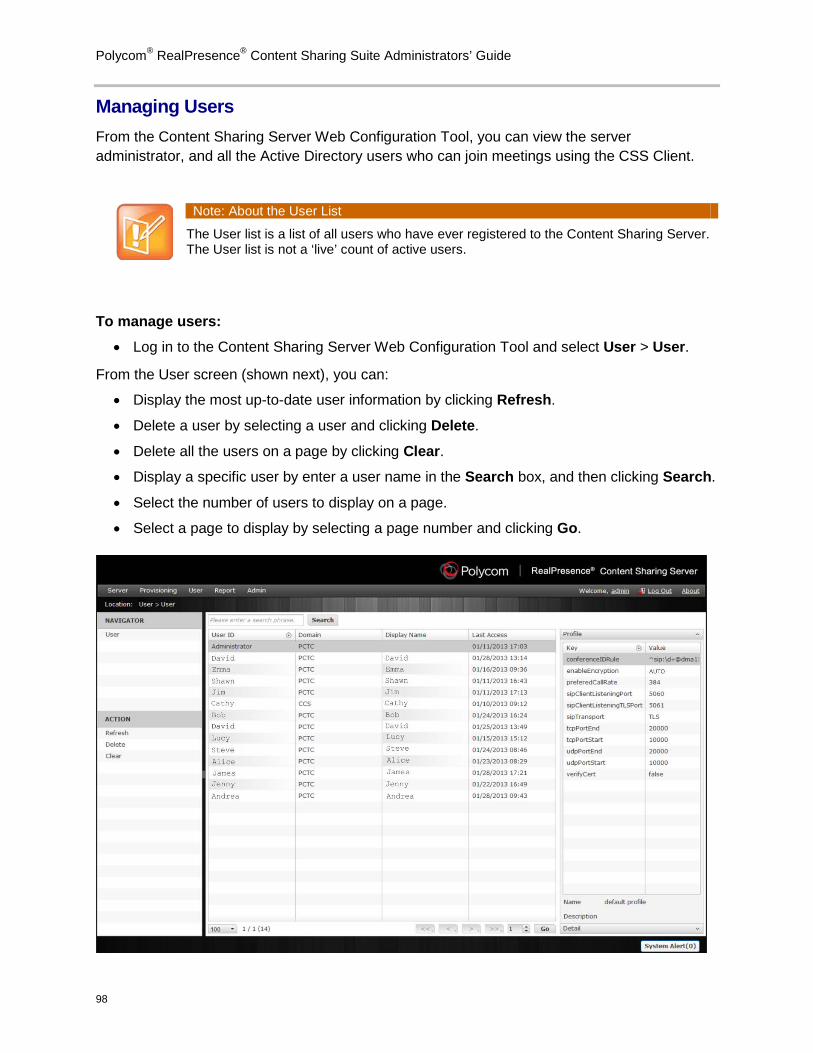
Polycom® RealPresence® Content Sharing Suite Administrators’ Guide
98
Managing Users From the Content Sharing Server Web Configuration Tool, you can view the server administrator, and all the Active Directory users who can join meetings using the CSS Client.
Note: About the User List
The User list is a list of all users who have ever registered to the Content Sharing Server. The User list is not a ‘live’ count of active users.
To manage users: • Log in to the Content Sharing Server Web Configuration Tool and select User > User.
From the User screen (shown next), you can:
• Display the most up-to-date user information by clicking Refresh.
• Delete a user by selecting a user and clicking Delete.
• Delete all the users on a page by clicking Clear. • Display a specific user by enter a user name in the Search box, and then clicking Search.
• Select the number of users to display on a page.
• Select a page to display by selecting a page number and clicking Go.
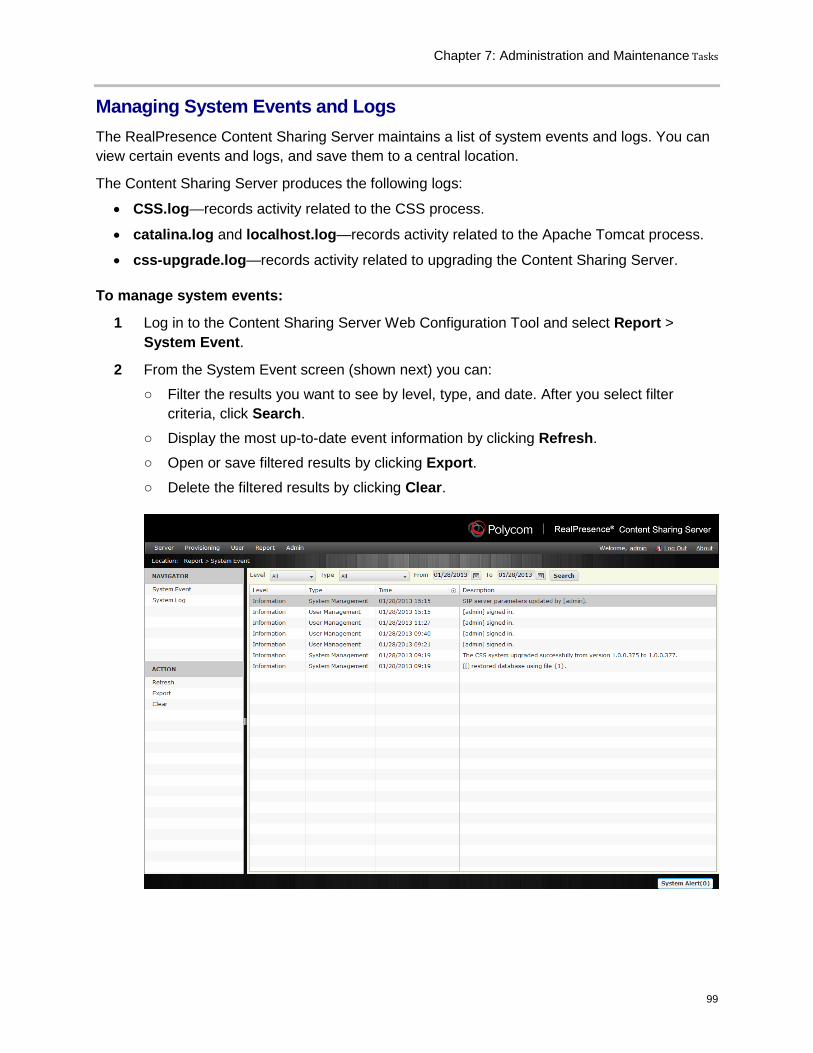
Chapter 7: Administration and Maintenance Tasks
99
Managing System Events and Logs The RealPresence Content Sharing Server maintains a list of system events and logs. You can view certain events and logs, and save them to a central location.
The Content Sharing Server produces the following logs:
• CSS.log—records activity related to the CSS process.
• catalina.log and localhost.log—records activity related to the Apache Tomcat process.
• css-upgrade.log—records activity related to upgrading the Content Sharing Server.
To manage system events:
1 Log in to the Content Sharing Server Web Configuration Tool and select Report > System Event.
2 From the System Event screen (shown next) you can:
○ Filter the results you want to see by level, type, and date. After you select filter criteria, click Search.
○ Display the most up-to-date event information by clicking Refresh.
○ Open or save filtered results by clicking Export. ○ Delete the filtered results by clicking Clear.
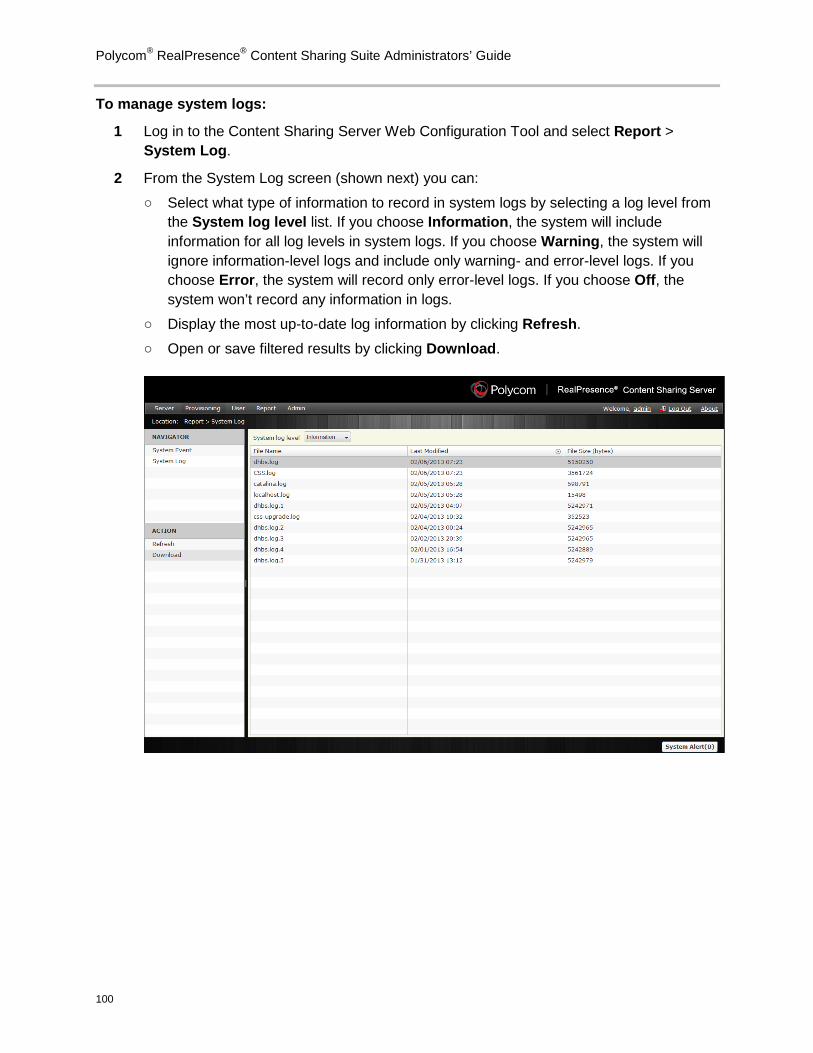
Polycom® RealPresence® Content Sharing Suite Administrators’ Guide
100
To manage system logs:
1 Log in to the Content Sharing Server Web Configuration Tool and select Report > System Log.
2 From the System Log screen (shown next) you can:
○ Select what type of information to record in system logs by selecting a log level from the System log level list. If you choose Information, the system will include information for all log levels in system logs. If you choose Warning, the system will ignore information-level logs and include only warning- and error-level logs. If you choose Error, the system will record only error-level logs. If you choose Off, the system won’t record any information in logs.
○ Display the most up-to-date log information by clicking Refresh.
○ Open or save filtered results by clicking Download.
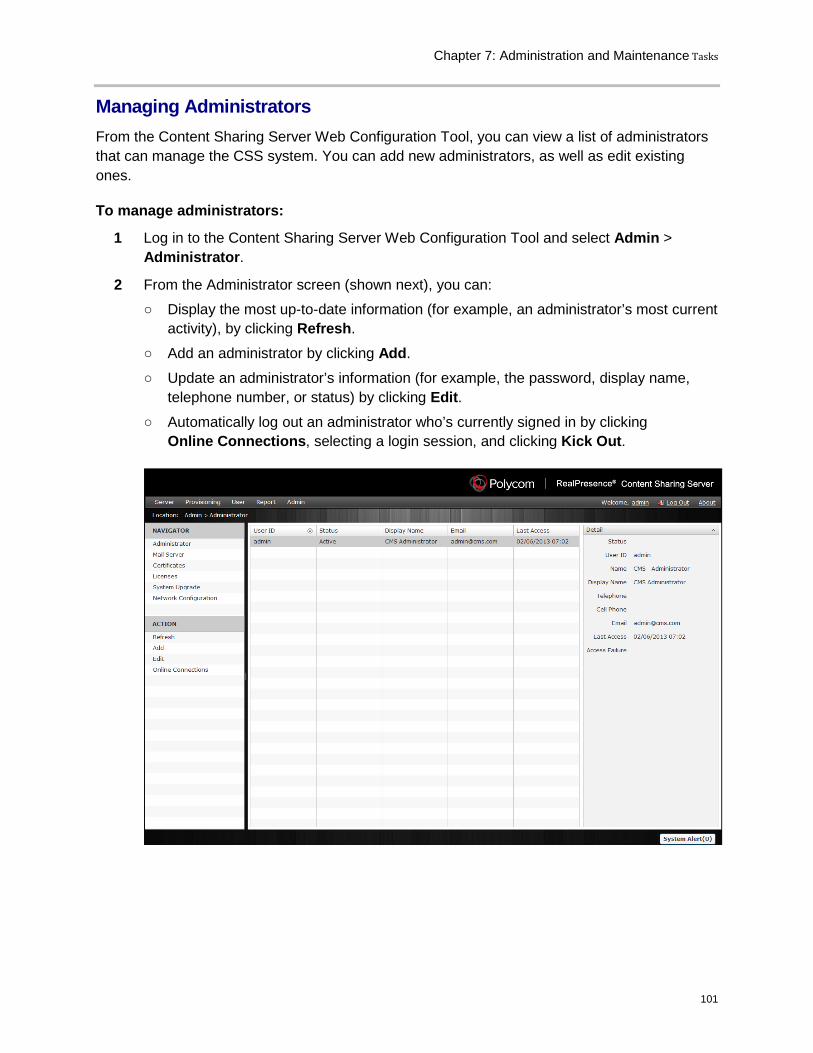
Chapter 7: Administration and Maintenance Tasks
101
Managing Administrators From the Content Sharing Server Web Configuration Tool, you can view a list of administrators that can manage the CSS system. You can add new administrators, as well as edit existing ones.
To manage administrators:
1 Log in to the Content Sharing Server Web Configuration Tool and select Admin > Administrator.
2 From the Administrator screen (shown next), you can:
○ Display the most up-to-date information (for example, an administrator’s most current activity), by clicking Refresh.
○ Add an administrator by clicking Add.
○ Update an administrator’s information (for example, the password, display name, telephone number, or status) by clicking Edit.
○ Automatically log out an administrator who’s currently signed in by clicking Online Connections, selecting a login session, and clicking Kick Out.
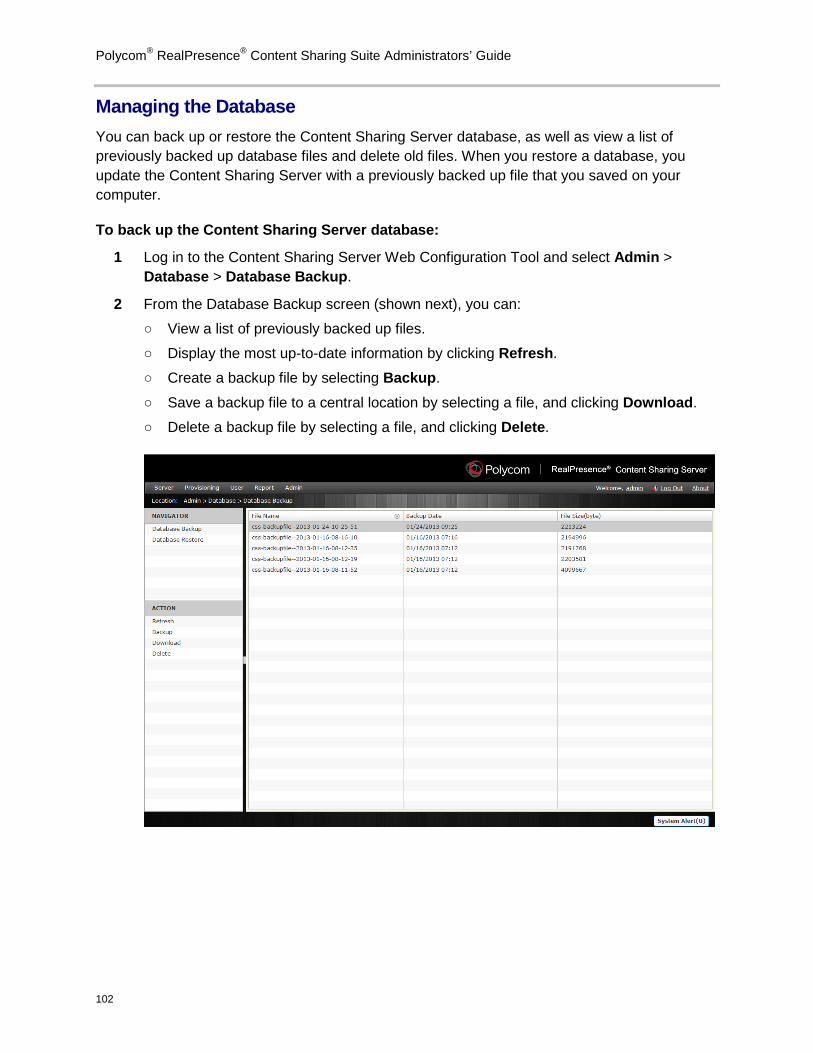
Polycom® RealPresence® Content Sharing Suite Administrators’ Guide
102
Managing the Database You can back up or restore the Content Sharing Server database, as well as view a list of previously backed up database files and delete old files. When you restore a database, you update the Content Sharing Server with a previously backed up file that you saved on your computer.
To back up the Content Sharing Server database:
1 Log in to the Content Sharing Server Web Configuration Tool and select Admin > Database > Database Backup.
2 From the Database Backup screen (shown next), you can:
○ View a list of previously backed up files.
○ Display the most up-to-date information by clicking Refresh.
○ Create a backup file by selecting Backup.
○ Save a backup file to a central location by selecting a file, and clicking Download.
○ Delete a backup file by selecting a file, and clicking Delete.
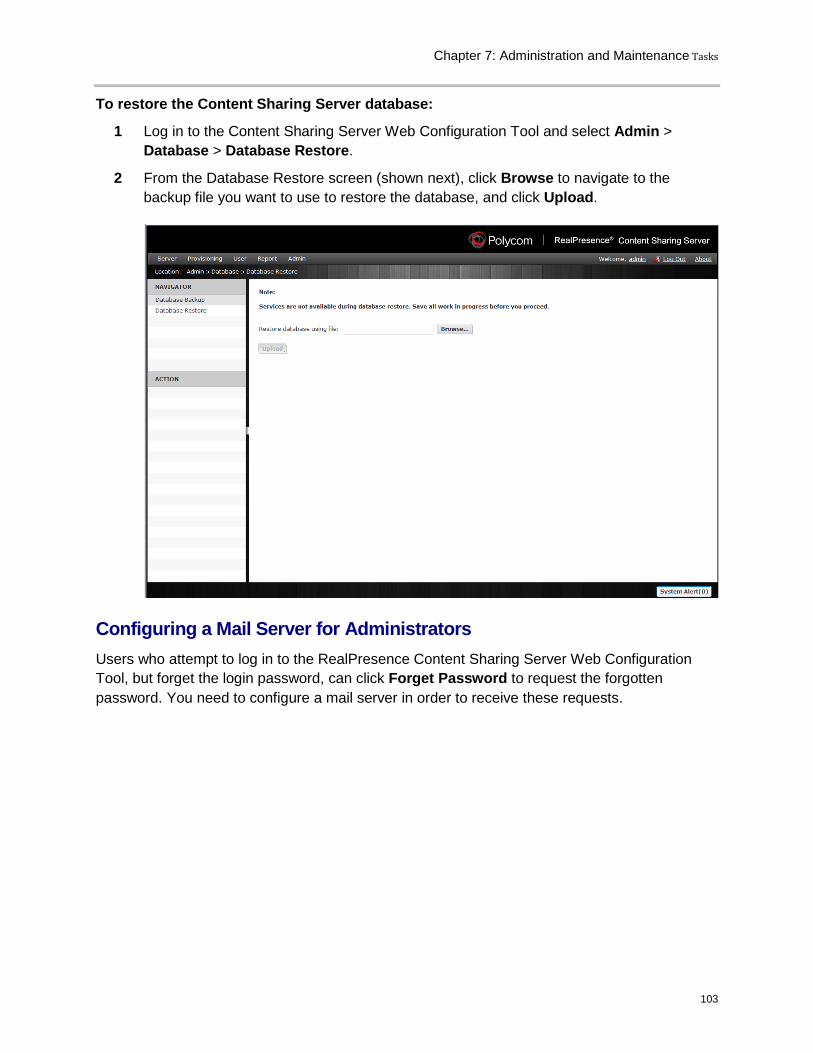
Chapter 7: Administration and Maintenance Tasks
103
To restore the Content Sharing Server database:
1 Log in to the Content Sharing Server Web Configuration Tool and select Admin > Database > Database Restore.
2 From the Database Restore screen (shown next), click Browse to navigate to the backup file you want to use to restore the database, and click Upload.
Configuring a Mail Server for Administrators Users who attempt to log in to the RealPresence Content Sharing Server Web Configuration Tool, but forget the login password, can click Forget Password to request the forgotten password. You need to configure a mail server in order to receive these requests.
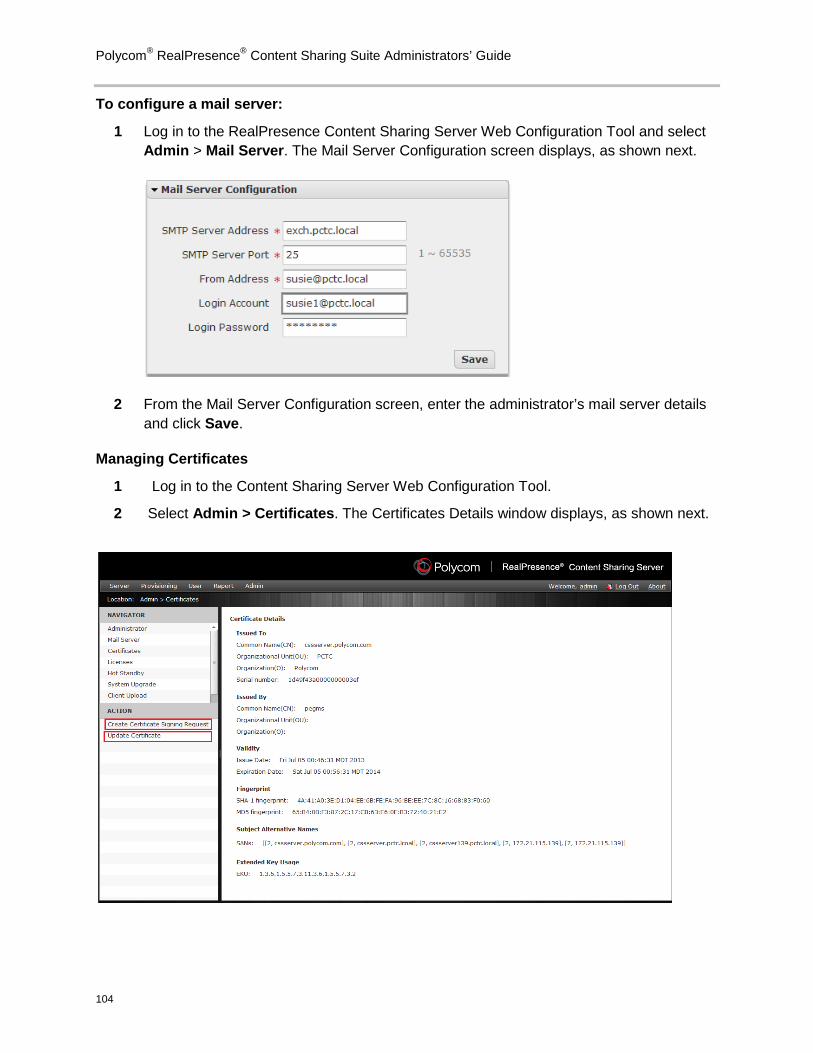
Polycom® RealPresence® Content Sharing Suite Administrators’ Guide
104
To configure a mail server:
1 Log in to the RealPresence Content Sharing Server Web Configuration Tool and select Admin > Mail Server. The Mail Server Configuration screen displays, as shown next.
2 From the Mail Server Configuration screen, enter the administrator’s mail server details and click Save.
Managing Certificates
1 Log in to the Content Sharing Server Web Configuration Tool.
2 Select Admin > Certificates. The Certificates Details window displays, as shown next.
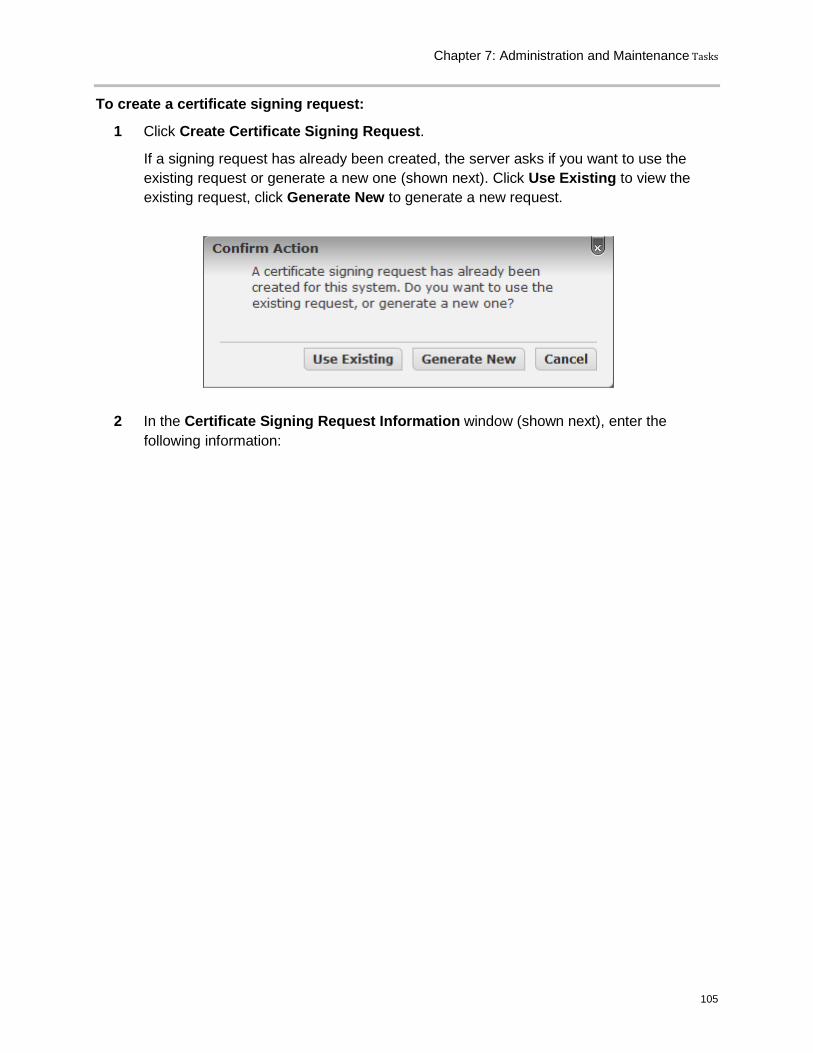
Chapter 7: Administration and Maintenance Tasks
105
To create a certificate signing request:
1 Click Create Certificate Signing Request.
If a signing request has already been created, the server asks if you want to use the existing request or generate a new one (shown next). Click Use Existing to view the existing request, click Generate New to generate a new request.
2 In the Certificate Signing Request Information window (shown next), enter the following information:
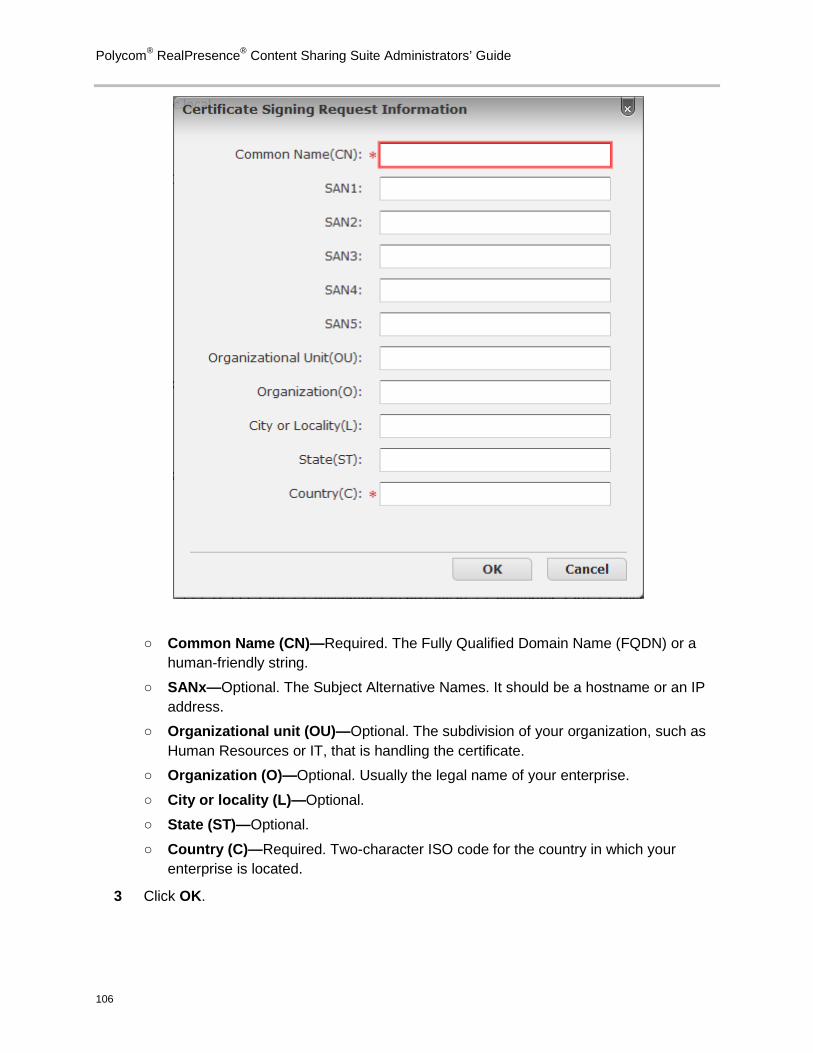
Polycom® RealPresence® Content Sharing Suite Administrators’ Guide
106
○ Common Name (CN)—Required. The Fully Qualified Domain Name (FQDN) or a human-friendly string.
○ SANx—Optional. The Subject Alternative Names. It should be a hostname or an IP address.
○ Organizational unit (OU)—Optional. The subdivision of your organization, such as Human Resources or IT, that is handling the certificate.
○ Organization (O)—Optional. Usually the legal name of your enterprise.
○ City or locality (L)—Optional.
○ State (ST)—Optional.
○ Country (C)—Required. Two-character ISO code for the country in which your enterprise is located.
3 Click OK.
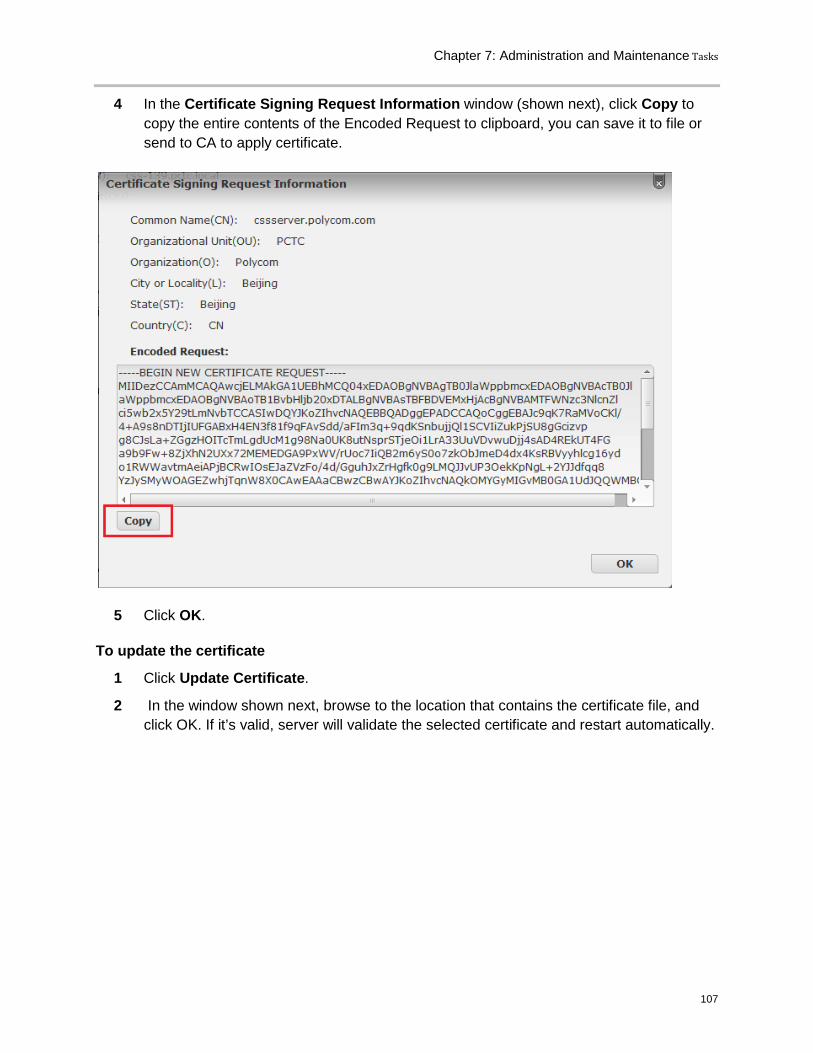
Chapter 7: Administration and Maintenance Tasks
107
4 In the Certificate Signing Request Information window (shown next), click Copy to copy the entire contents of the Encoded Request to clipboard, you can save it to file or send to CA to apply certificate.
5 Click OK.
To update the certificate
1 Click Update Certificate.
2 In the window shown next, browse to the location that contains the certificate file, and click OK. If it’s valid, server will validate the selected certificate and restart automatically.

Polycom® RealPresence® Content Sharing Suite Administrators’ Guide
108
3 When the server restarts, log in and navigate to Certificate page, the new certificate details will display.
Managing Licenses, Serial Numbers, and Activation Keys You can view the status of your system’s active license, as well as the system’s serial number and activation key.
If you upgrade your system, you’ll need to enter the activation key that the system was using before the upgrade. Write down your activation key (or copy and paste it into a text file on your desktop) so you’ll have the information for future upgrades.
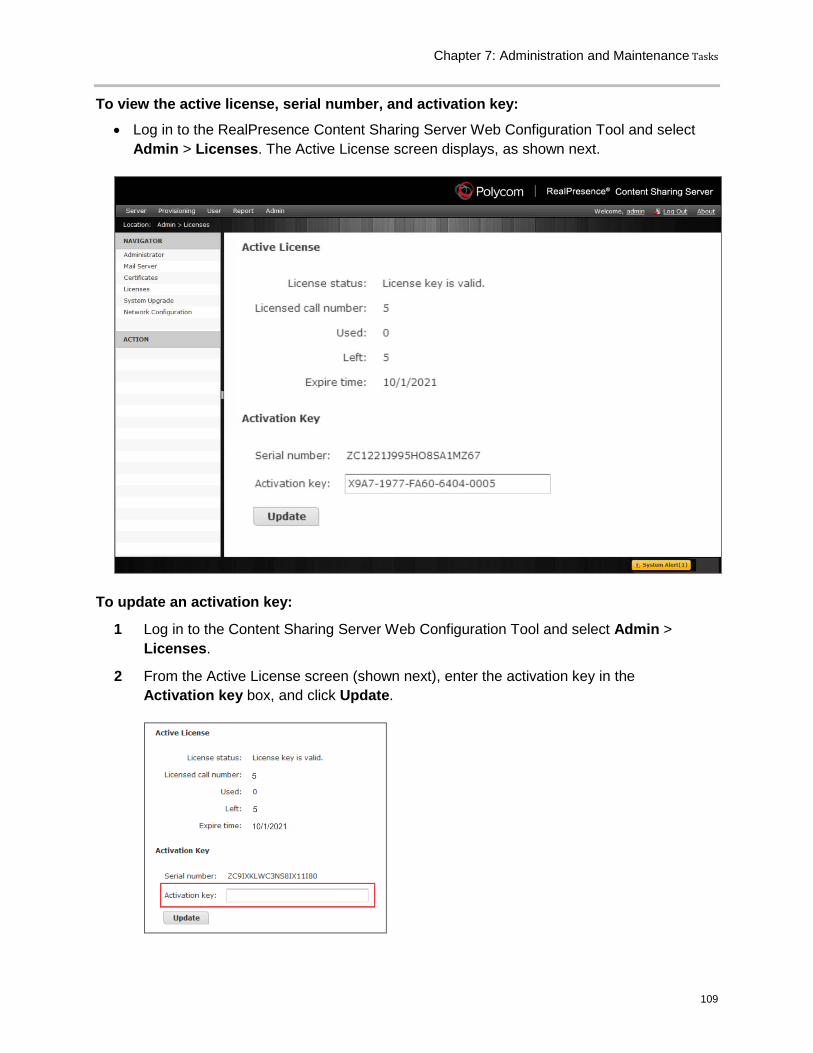
Chapter 7: Administration and Maintenance Tasks
109
To view the active license, serial number, and activation key:
• Log in to the RealPresence Content Sharing Server Web Configuration Tool and select Admin > Licenses. The Active License screen displays, as shown next.
To update an activation key:
1 Log in to the Content Sharing Server Web Configuration Tool and select Admin > Licenses.
2 From the Active License screen (shown next), enter the activation key in the Activation key box, and click Update.
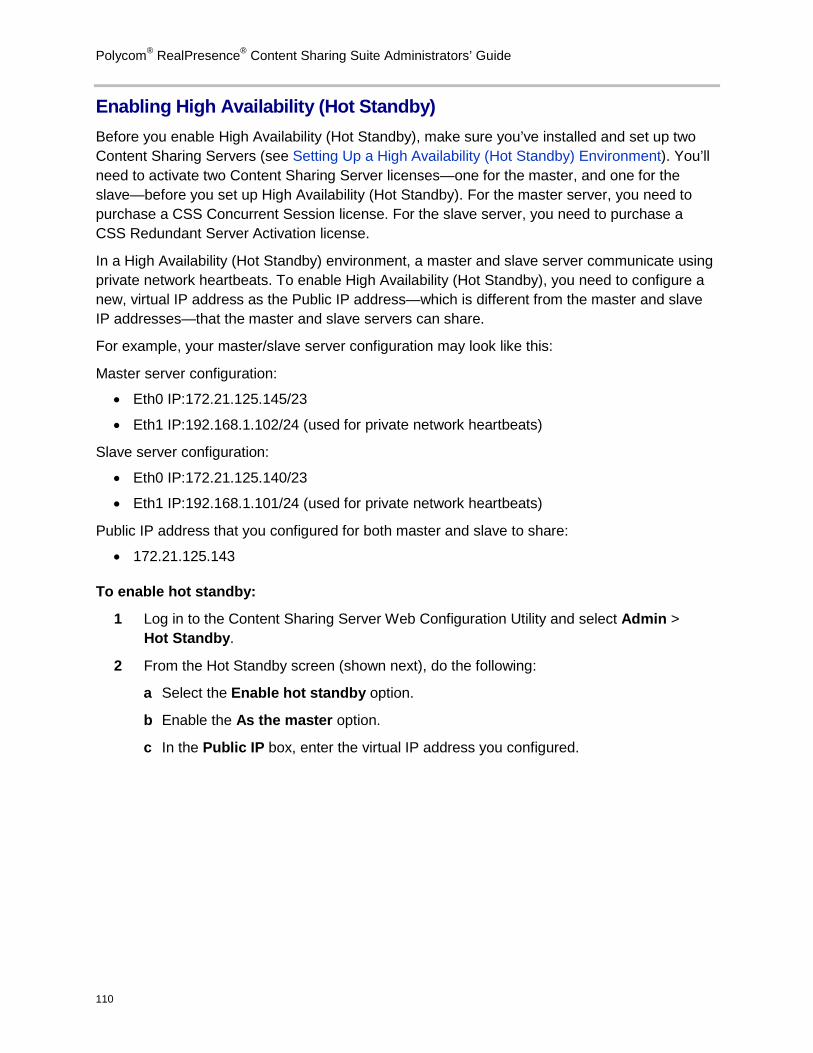
Polycom® RealPresence® Content Sharing Suite Administrators’ Guide
110
Enabling High Availability (Hot Standby) Before you enable High Availability (Hot Standby), make sure you’ve installed and set up two Content Sharing Servers (see Setting Up a High Availability (Hot Standby) Environment). You’ll need to activate two Content Sharing Server licenses—one for the master, and one for the slave—before you set up High Availability (Hot Standby). For the master server, you need to purchase a CSS Concurrent Session license. For the slave server, you need to purchase a CSS Redundant Server Activation license.
In a High Availability (Hot Standby) environment, a master and slave server communicate using private network heartbeats. To enable High Availability (Hot Standby), you need to configure a new, virtual IP address as the Public IP address—which is different from the master and slave IP addresses—that the master and slave servers can share.
For example, your master/slave server configuration may look like this:
Master server configuration:
• Eth0 IP:172.21.125.145/23
• Eth1 IP:192.168.1.102/24 (used for private network heartbeats)
Slave server configuration:
• Eth0 IP:172.21.125.140/23
• Eth1 IP:192.168.1.101/24 (used for private network heartbeats)
Public IP address that you configured for both master and slave to share:
• 172.21.125.143
To enable hot standby:
1 Log in to the Content Sharing Server Web Configuration Utility and select Admin > Hot Standby.
2 From the Hot Standby screen (shown next), do the following:
a Select the Enable hot standby option.
b Enable the As the master option.
c In the Public IP box, enter the virtual IP address you configured.
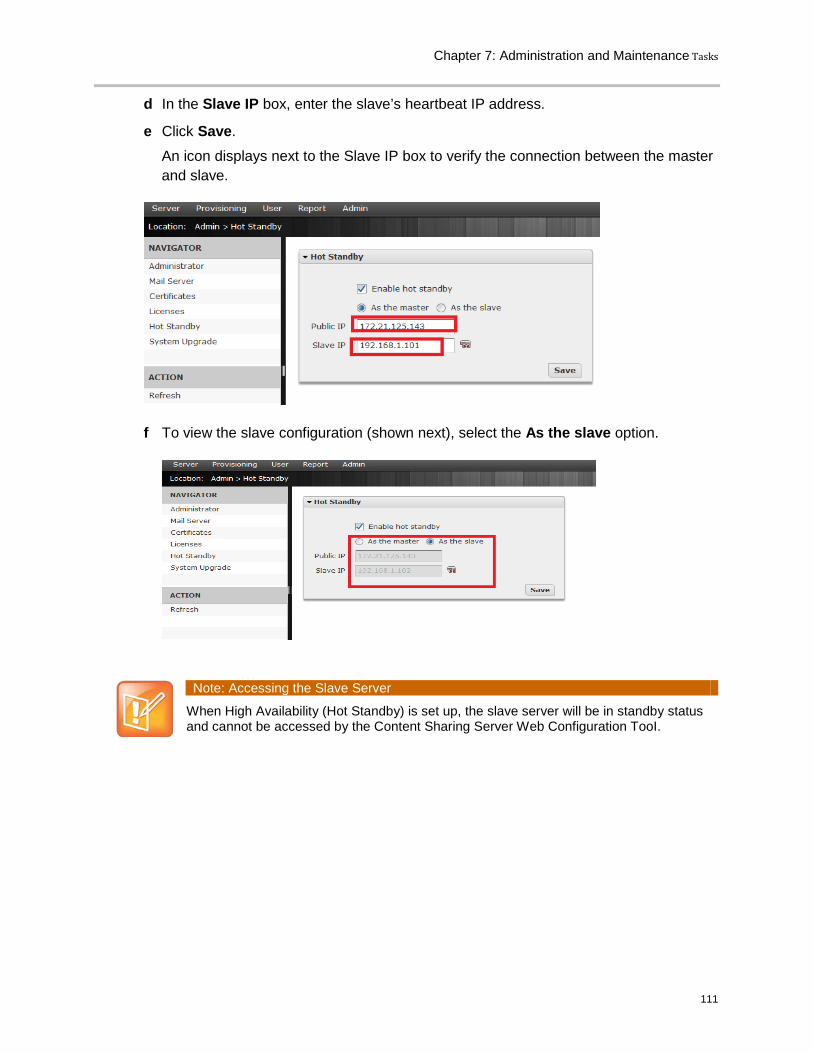
Chapter 7: Administration and Maintenance Tasks
111
d In the Slave IP box, enter the slave’s heartbeat IP address.
e Click Save.
An icon displays next to the Slave IP box to verify the connection between the master and slave.
f To view the slave configuration (shown next), select the As the slave option.
Note: Accessing the Slave Server
When High Availability (Hot Standby) is set up, the slave server will be in standby status and cannot be accessed by the Content Sharing Server Web Configuration TooI.
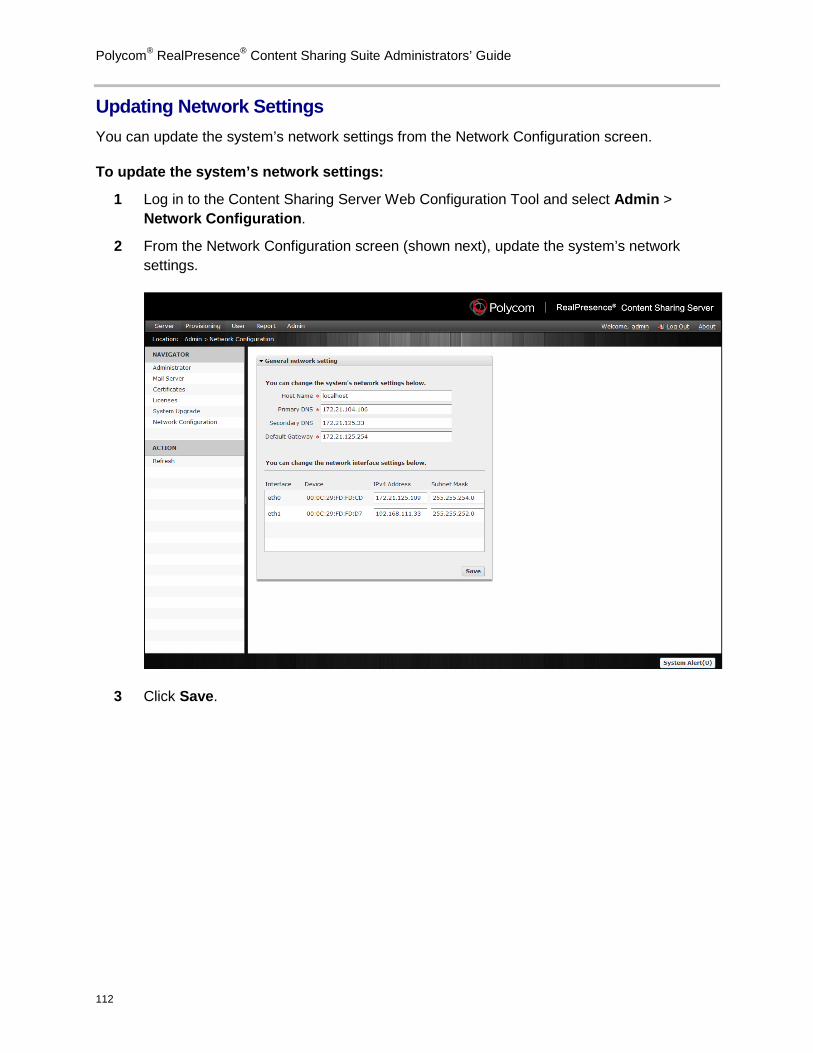
Polycom® RealPresence® Content Sharing Suite Administrators’ Guide
112
Updating Network Settings You can update the system’s network settings from the Network Configuration screen.
To update the system’s network settings:
1 Log in to the Content Sharing Server Web Configuration Tool and select Admin > Network Configuration.
2 From the Network Configuration screen (shown next), update the system’s network settings.
3 Click Save.
Chapter 7: Administration and Maintenance Tasks
113
Upgrading the Content Sharing Server Before you can upgrade the Content Sharing Server, you need to know the file path to the upgrade file.
Troubleshooting: Upgrading Solution Components
When you upgrade CSS, make sure you upgrade both the Content Sharing Server and the RealPresence Content Add-on for Lync to the same version. For example, if you install version 1.1.1 of the Polycom RealPresence Content Sharing Server pre-configured VHD installation package, you need to install version 1.1.1 of the Polycom RealPresence Content Add-on for Lync on each Lync Client machine. If the Content Sharing Server and RealPresence Content Add-on for Lync have different versions, your CSS solution won't work properly.
To check the version of the Content Sharing Server: • Log in to the Content Sharing Server Web Configuration Tool and select Admin >
System Upgrade. From the System Upgrade screen, the current system version displays.
To check the version of the Content Add-on for Lync: • Open the Lync Client computer’s Control Panel, navigate to Programs and Features,
and scroll to Polycom RealPresence Content Add-on for Lync. The version displays in the Content Add-on for Lync row.
To upgrade the system:
1 Save the upgrade file to a location on the computer.
2 Log in to the Content Sharing Server Web Configuration Tool and select Admin > System Upgrade.
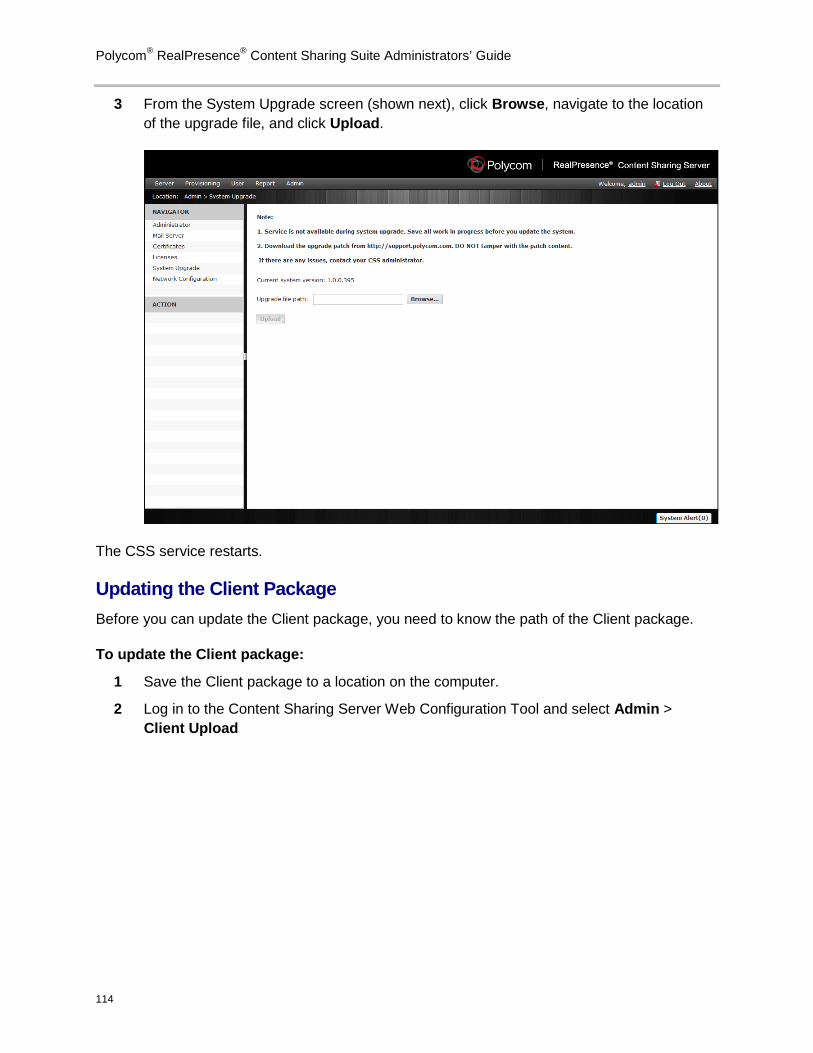
Polycom® RealPresence® Content Sharing Suite Administrators’ Guide
114
3 From the System Upgrade screen (shown next), click Browse, navigate to the location of the upgrade file, and click Upload.
The CSS service restarts.
Updating the Client Package Before you can update the Client package, you need to know the path of the Client package.
To update the Client package:
1 Save the Client package to a location on the computer.
2 Log in to the Content Sharing Server Web Configuration Tool and select Admin > Client Upload
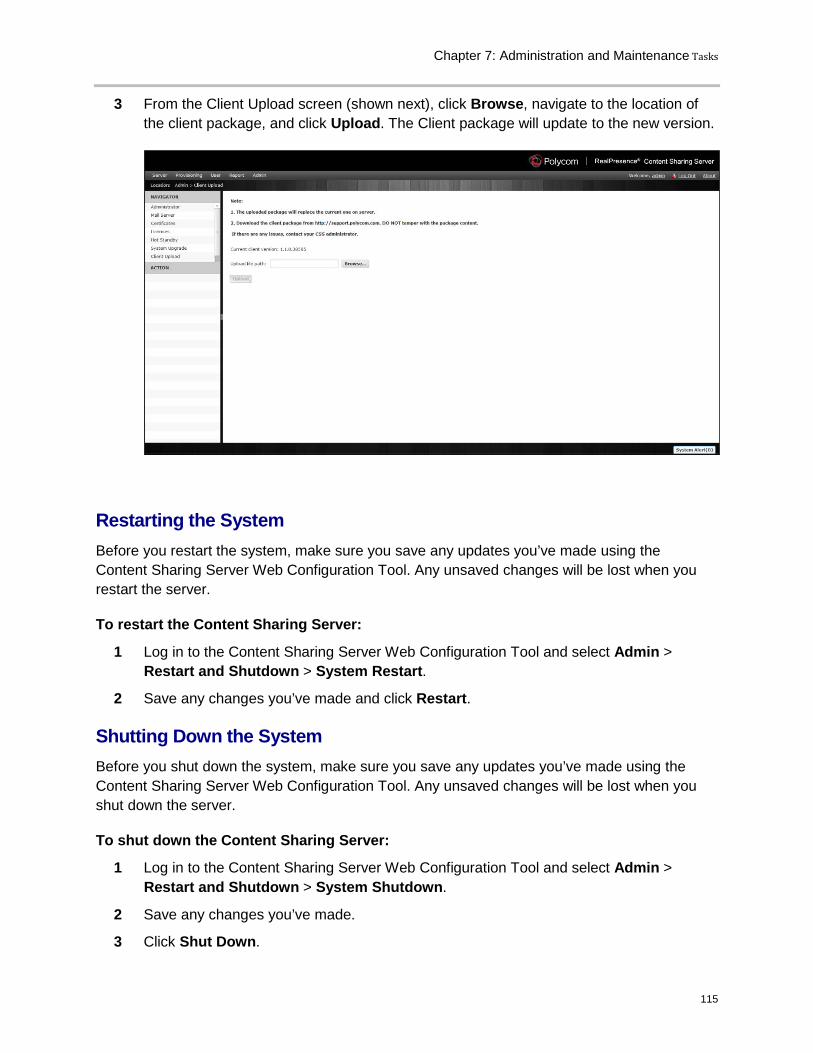
Chapter 7: Administration and Maintenance Tasks
115
3 From the Client Upload screen (shown next), click Browse, navigate to the location of the client package, and click Upload. The Client package will update to the new version.
Restarting the System Before you restart the system, make sure you save any updates you’ve made using the Content Sharing Server Web Configuration Tool. Any unsaved changes will be lost when you restart the server.
To restart the Content Sharing Server:
1 Log in to the Content Sharing Server Web Configuration Tool and select Admin > Restart and Shutdown > System Restart.
2 Save any changes you’ve made and click Restart.
Shutting Down the System Before you shut down the system, make sure you save any updates you’ve made using the Content Sharing Server Web Configuration Tool. Any unsaved changes will be lost when you shut down the server.
To shut down the Content Sharing Server:
1 Log in to the Content Sharing Server Web Configuration Tool and select Admin > Restart and Shutdown > System Shutdown.
2 Save any changes you’ve made.
3 Click Shut Down.
Polycom® RealPresence® Content Sharing Suite Administrators’ Guide
116
CSS Client Tasks CSS Client tasks include upgrading the RealPresence Content Add-on for Lync on the Lync Client’s machine, and accessing a tool—the CSS Log Collector—that automatically packages CSS Client log files.
Upgrading the RealPresence Content Add-on for Lync When you upgrade CSS, make sure you upgrade both the Content Sharing Server and the RealPresence Content Add-on for Lync to the same version. For example, if you install version 1.1 of the Polycom RealPresence Content Sharing Server OVF installation package, you need to install version 1.1 of the Polycom RealPresence Content Add-on for Lync on each Lync Client machine. If the Content Sharing Server and RealPresence Content Add-on for Lync have different versions, your CSS solution won't work properly.
To check the version of the Content Sharing Server: • Log in to the Content Sharing Server Web Configuration Tool and select Admin > System
Upgrade. From the System Upgrade screen, the current system version displays.
To check the version of the Content Add-on for Lync: • Open the Lync Client computer’s Control Panel, navigate to Programs and Features, and
scroll to Polycom RealPresence Content Add-on for Lync. The version displays in the Content Add-on for Lync row.
Accessing CSS Client Logs When you access the CSS Log Collector, log files are automatically packaged for your convenience. You can then enter an email address to send the packaged log files to.
To package CSS Client logs:
1 Close any open email applications, such as Outlook. (If you don’t do this, the Log Collector may not be able to email the logs to the specified email address.)
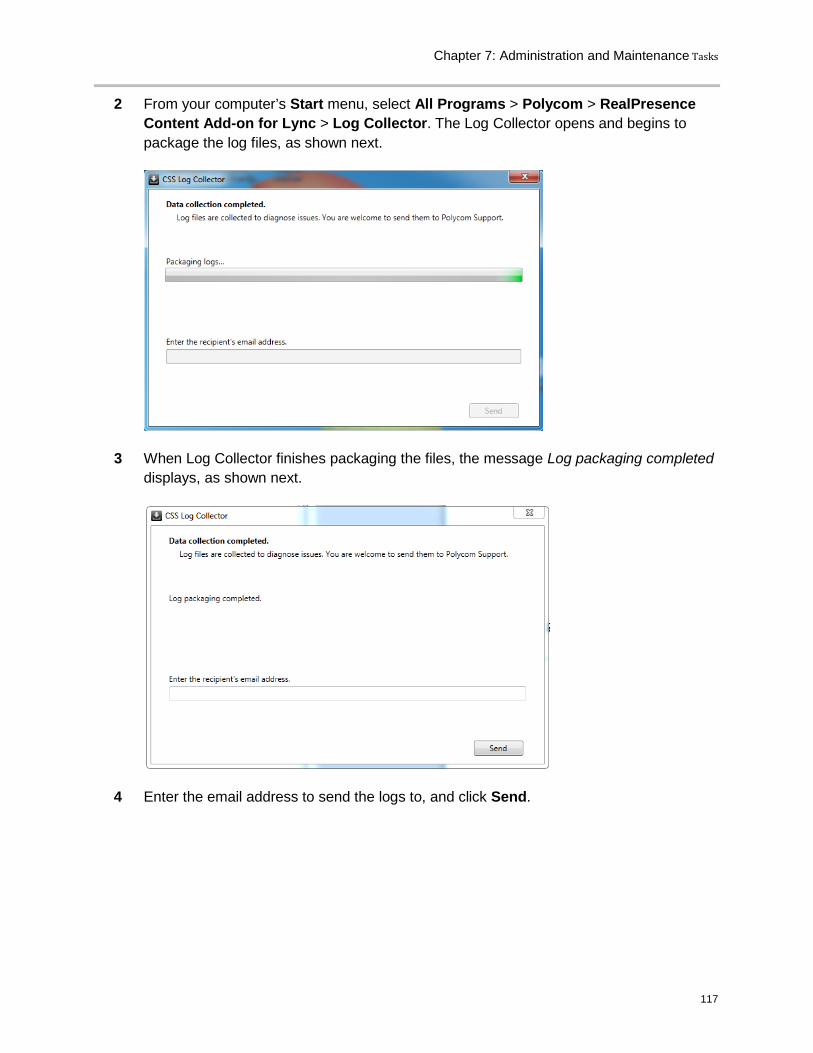
Chapter 7: Administration and Maintenance Tasks
117
2 From your computer’s Start menu, select All Programs > Polycom > RealPresence Content Add-on for Lync > Log Collector. The Log Collector opens and begins to package the log files, as shown next.
3 When Log Collector finishes packaging the files, the message Log packaging completed displays, as shown next.
4 Enter the email address to send the logs to, and click Send.

119
Chapter 8: Viewing and Sharing Content
This chapter describes how to share and view content when the Content Sharing Suite is deployed. You can choose to share and view content from Microsoft Lync, or by entering a URL in your browser and accessing content over the Web. In this chapter, you’ll learn about:
• Using Microsoft Lync to Share and View Content
• Viewing and Sharing Content over the Web
Using Microsoft Lync to Share and View Content This section describes how to use Microsoft Lync when the Content Sharing Suite is deployed. After reading this section, you’ll understand how to use Lync to view and share content from your Lync client.
You can share your desktop or a program with other Lync endpoints, and video endpoints that receive content from RealPresence Collaboration Server (RMX). For this release of CSS, you are unable to share whiteboards or create polls.
To view and share content with other endpoints, you must be in a RealPresence Collaboration Server (RMX)/DMA VMR call with endpoints that use H.239 or BFCP.
The topics include:
• Starting a VMR Call
• Viewing Content
• Sharing Content
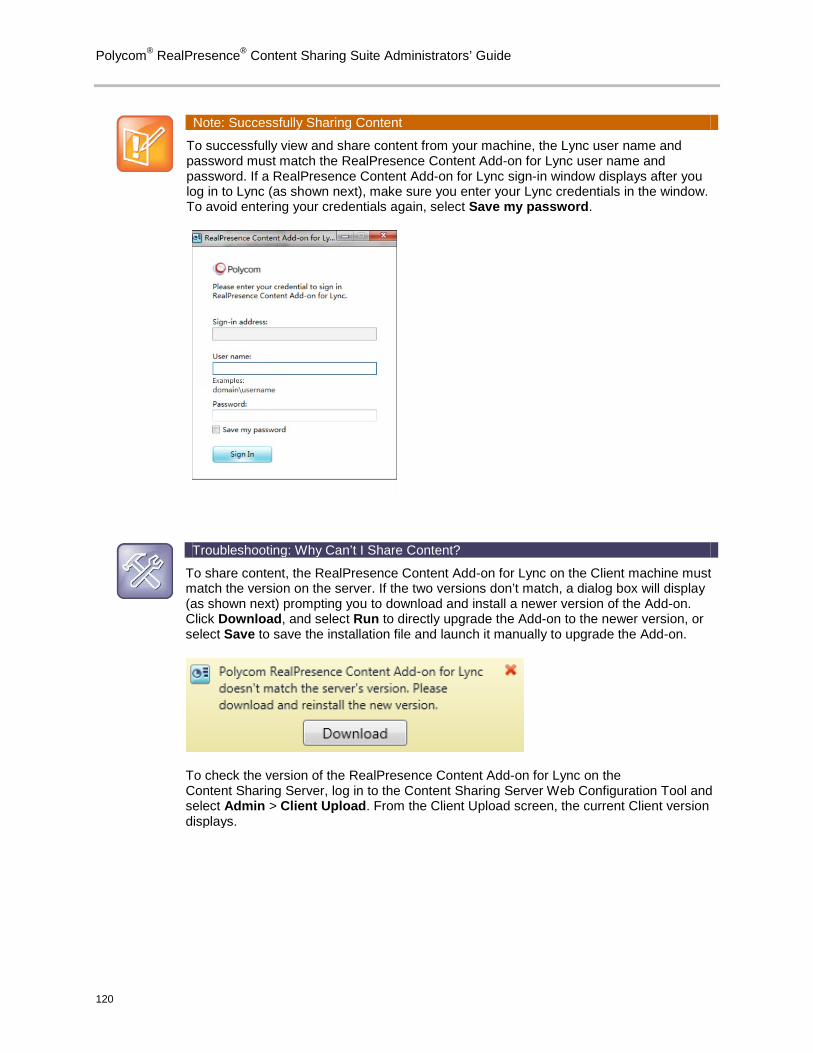
Polycom® RealPresence® Content Sharing Suite Administrators’ Guide
120
Note: Successfully Sharing Content
To successfully view and share content from your machine, the Lync user name and password must match the RealPresence Content Add-on for Lync user name and password. If a RealPresence Content Add-on for Lync sign-in window displays after you log in to Lync (as shown next), make sure you enter your Lync credentials in the window. To avoid entering your credentials again, select Save my password.
Troubleshooting: Why Can’t I Share Content?
To share content, the RealPresence Content Add-on for Lync on the Client machine must match the version on the server. If the two versions don’t match, a dialog box will display (as shown next) prompting you to download and install a newer version of the Add-on. Click Download, and select Run to directly upgrade the Add-on to the newer version, or select Save to save the installation file and launch it manually to upgrade the Add-on.
To check the version of the RealPresence Content Add-on for Lync on the Content Sharing Server, log in to the Content Sharing Server Web Configuration Tool and select Admin > Client Upload. From the Client Upload screen, the current Client version displays.
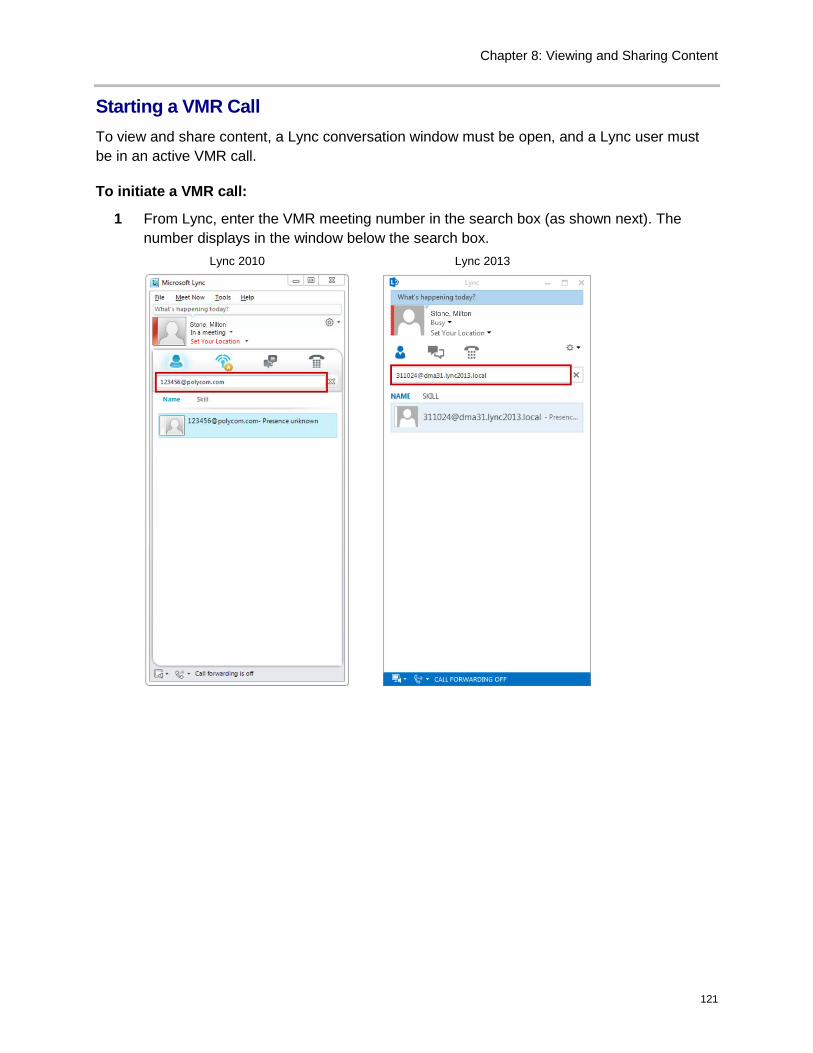
Chapter 8: Viewing and Sharing Content
121
Starting a VMR Call To view and share content, a Lync conversation window must be open, and a Lync user must be in an active VMR call.
To initiate a VMR call:
1 From Lync, enter the VMR meeting number in the search box (as shown next). The number displays in the window below the search box.
Lync 2010 Lync 2013
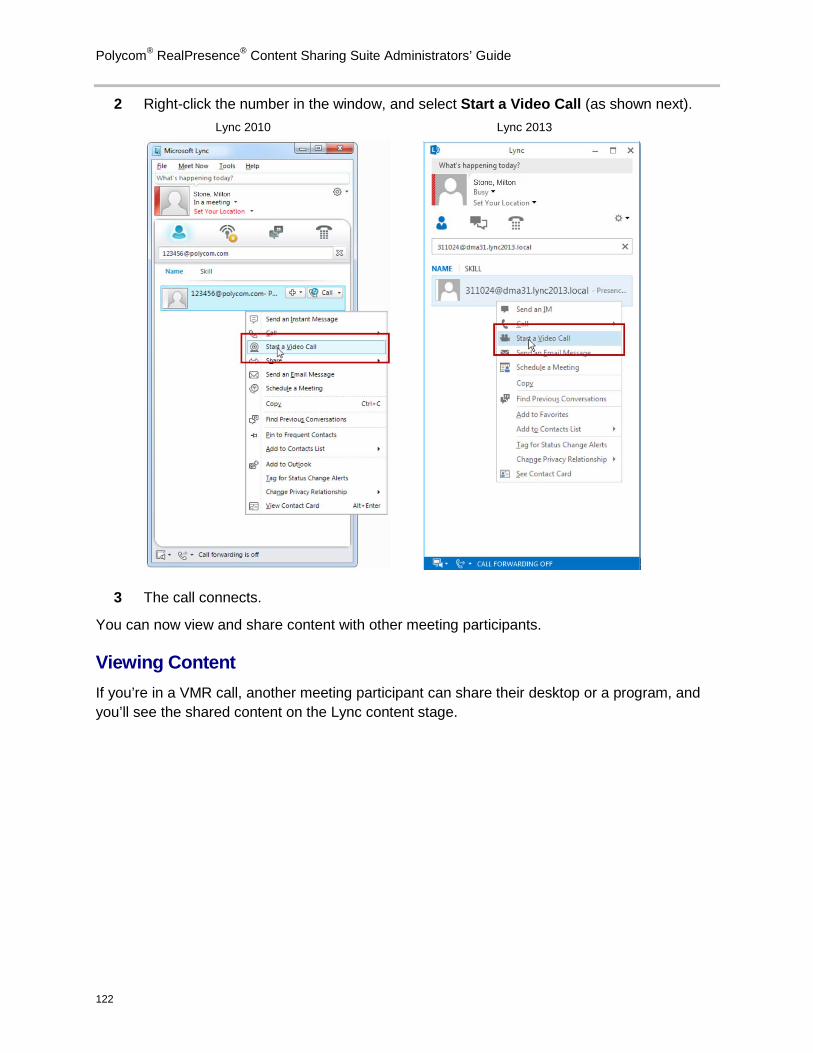
Polycom® RealPresence® Content Sharing Suite Administrators’ Guide
122
2 Right-click the number in the window, and select Start a Video Call (as shown next). Lync 2010 Lync 2013
3 The call connects.
You can now view and share content with other meeting participants.
Viewing Content If you’re in a VMR call, another meeting participant can share their desktop or a program, and you’ll see the shared content on the Lync content stage.
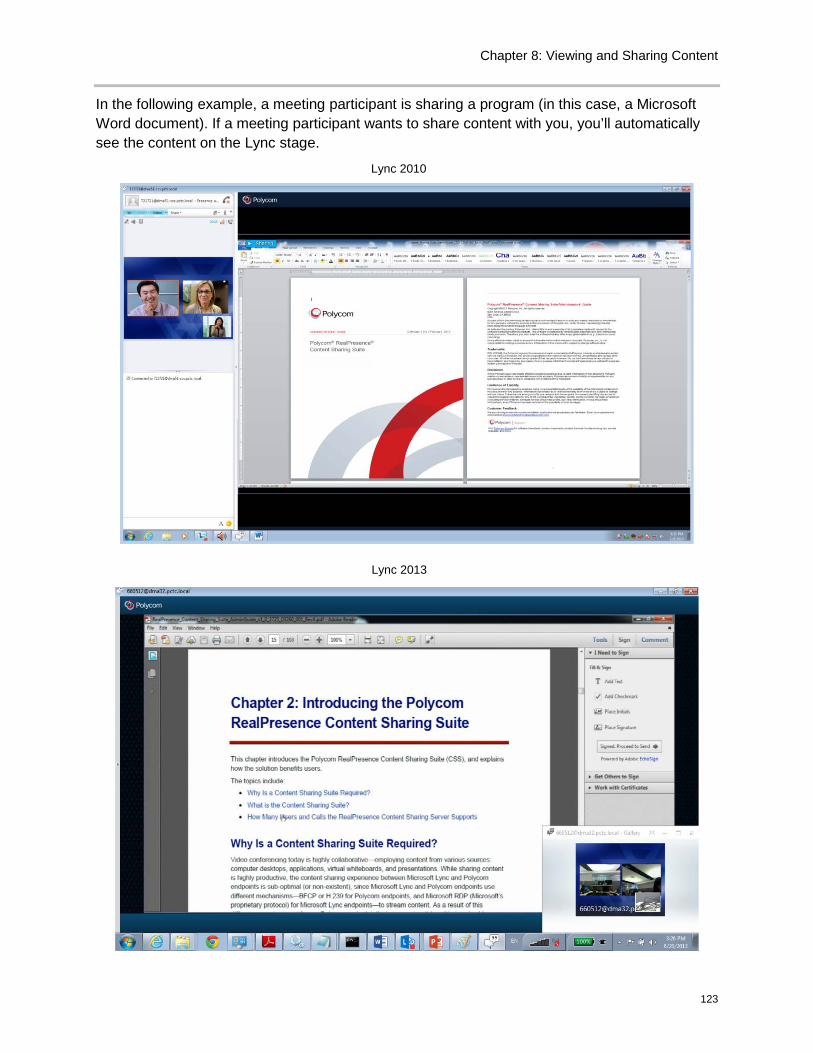
Chapter 8: Viewing and Sharing Content
123
In the following example, a meeting participant is sharing a program (in this case, a Microsoft Word document). If a meeting participant wants to share content with you, you’ll automatically see the content on the Lync stage.
Lync 2010
Lync 2013
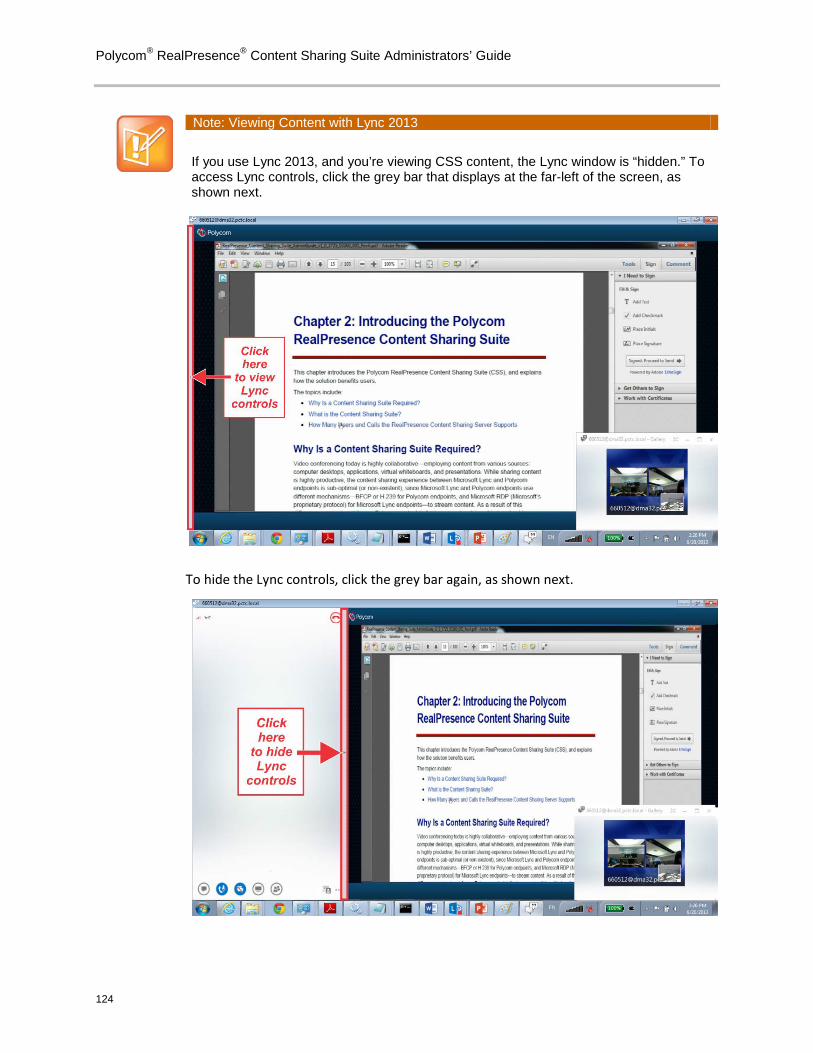
Polycom® RealPresence® Content Sharing Suite Administrators’ Guide
124
Note: Viewing Content with Lync 2013
If you use Lync 2013, and you’re viewing CSS content, the Lync window is “hidden.” To access Lync controls, click the grey bar that displays at the far-left of the screen, as shown next.
To hide the Lync controls, click the grey bar again, as shown next.
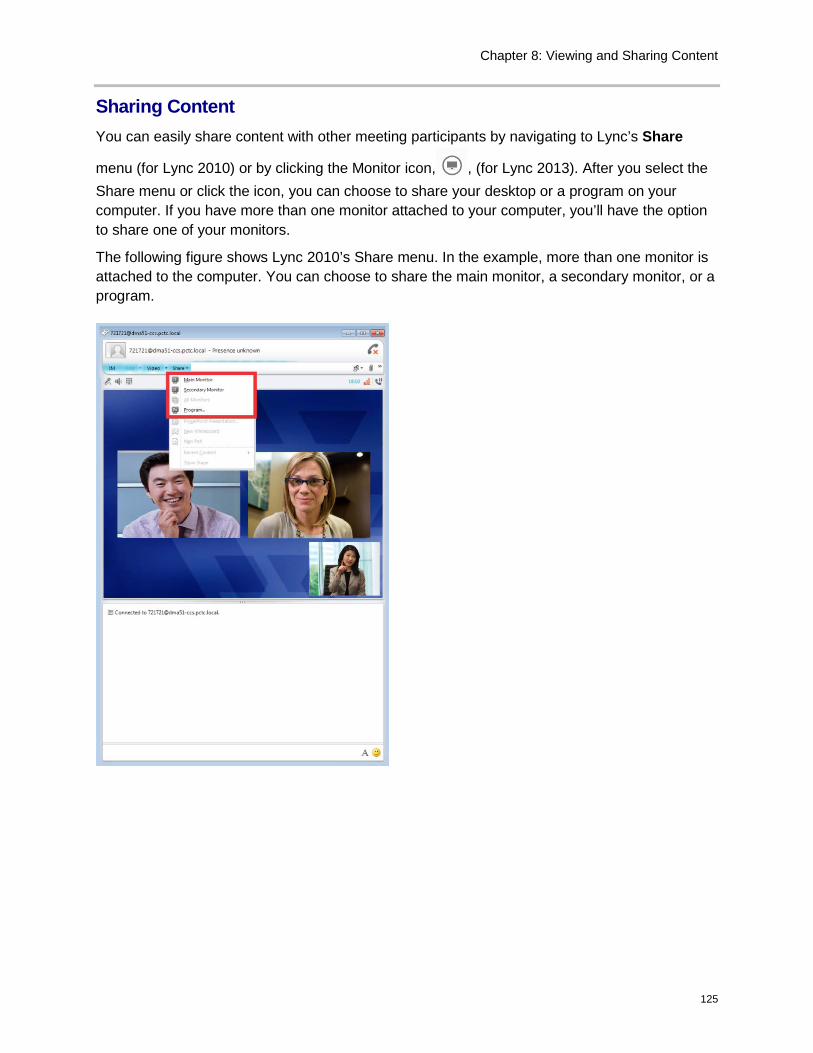
Chapter 8: Viewing and Sharing Content
125
Sharing Content You can easily share content with other meeting participants by navigating to Lync’s Share
menu (for Lync 2010) or by clicking the Monitor icon, , (for Lync 2013). After you select the Share menu or click the icon, you can choose to share your desktop or a program on your computer. If you have more than one monitor attached to your computer, you’ll have the option to share one of your monitors.
The following figure shows Lync 2010’s Share menu. In the example, more than one monitor is attached to the computer. You can choose to share the main monitor, a secondary monitor, or a program.
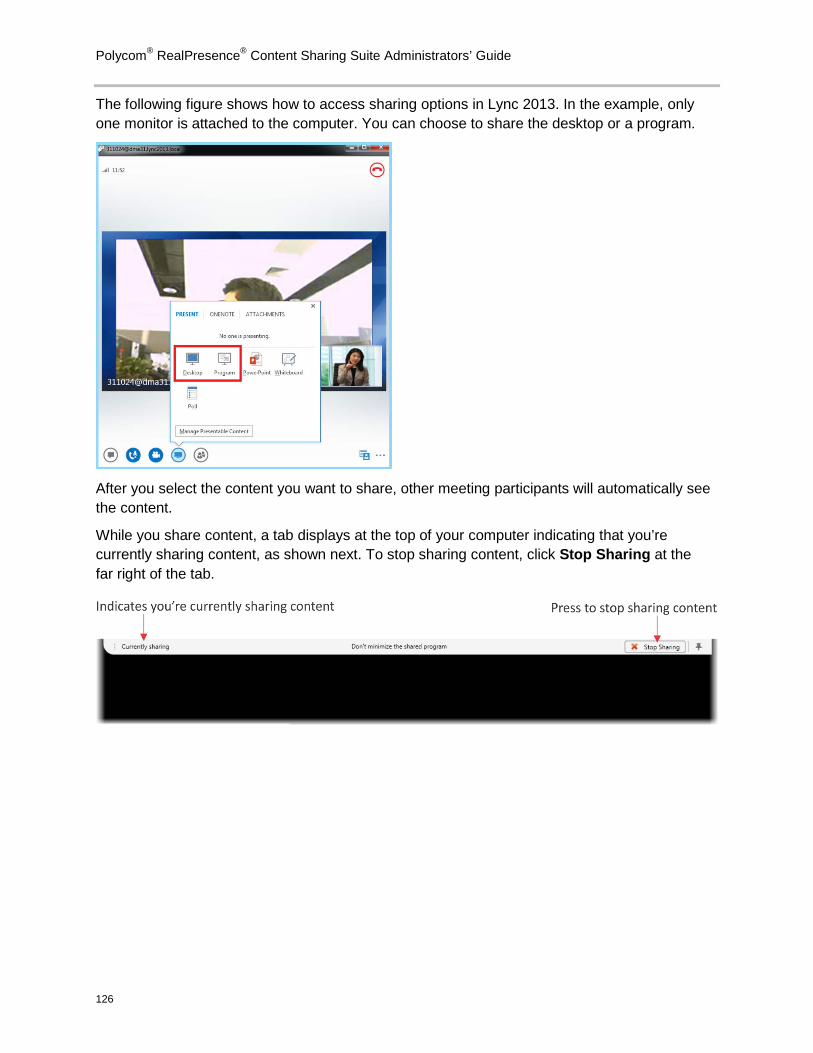
Polycom® RealPresence® Content Sharing Suite Administrators’ Guide
126
The following figure shows how to access sharing options in Lync 2013. In the example, only one monitor is attached to the computer. You can choose to share the desktop or a program.
After you select the content you want to share, other meeting participants will automatically see the content.
While you share content, a tab displays at the top of your computer indicating that you’re currently sharing content, as shown next. To stop sharing content, click Stop Sharing at the far right of the tab.
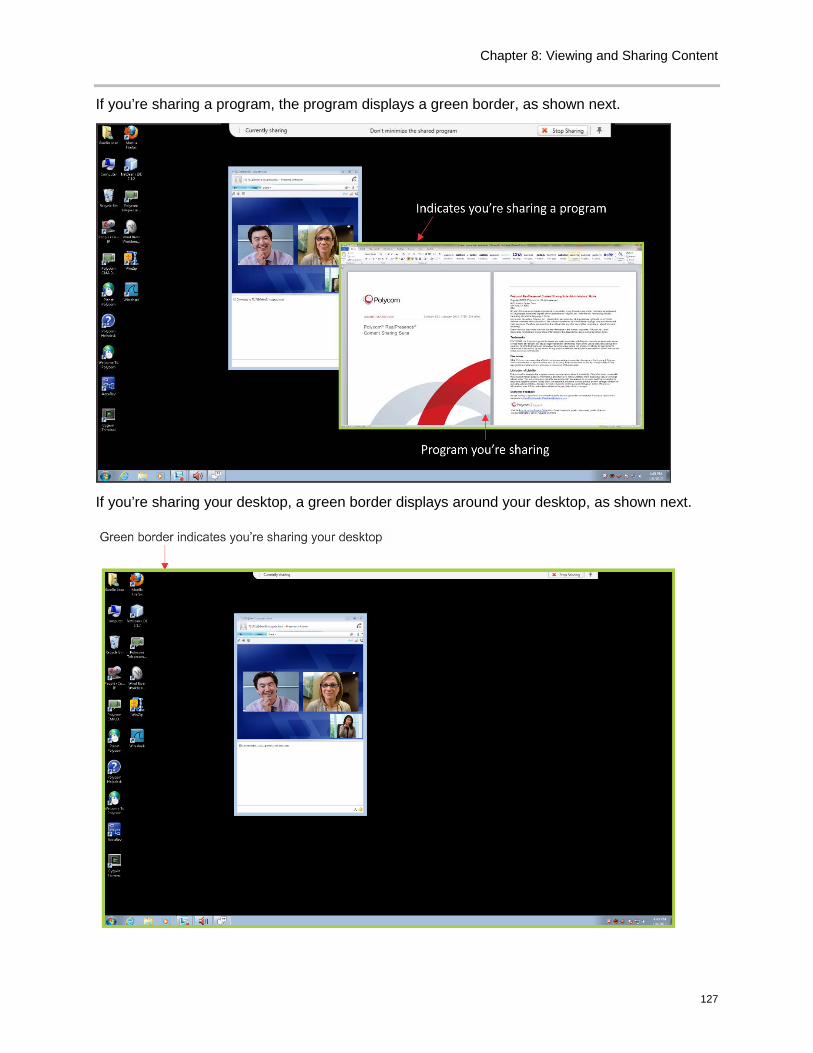
Chapter 8: Viewing and Sharing Content
127
If you’re sharing a program, the program displays a green border, as shown next.
If you’re sharing your desktop, a green border displays around your desktop, as shown next.

Polycom® RealPresence® Content Sharing Suite Administrators’ Guide
128
To share your desktop:
• If you have Lync 2010, select Share > Desktop. Or, if you have Lync 2013, click , and then select Desktop. If you have more than one monitor attached to your computer, choose Main Monitor or Secondary Monitor instead.
A green border displays around your desktop. Other meeting participants will automatically see your desktop.
To share a program:
1 Open the program you want to share.
2 If you have Lync 2010, select Share > Program. Or, if you have Lync 2013, click , and select Program.
3 From the Share Programs window, shown next, select the program you want to share, and click Share.
The program you want to share displays on your desktop, outlined in bright green. Other meeting participants will automatically see the program.
Note: Minimizing Shared Programs
If you minimize a program you’re sharing to your taskbar, the people you’re sharing the program with will see a black screen. Make sure the program you want to share is maximized and in front of other open programs.
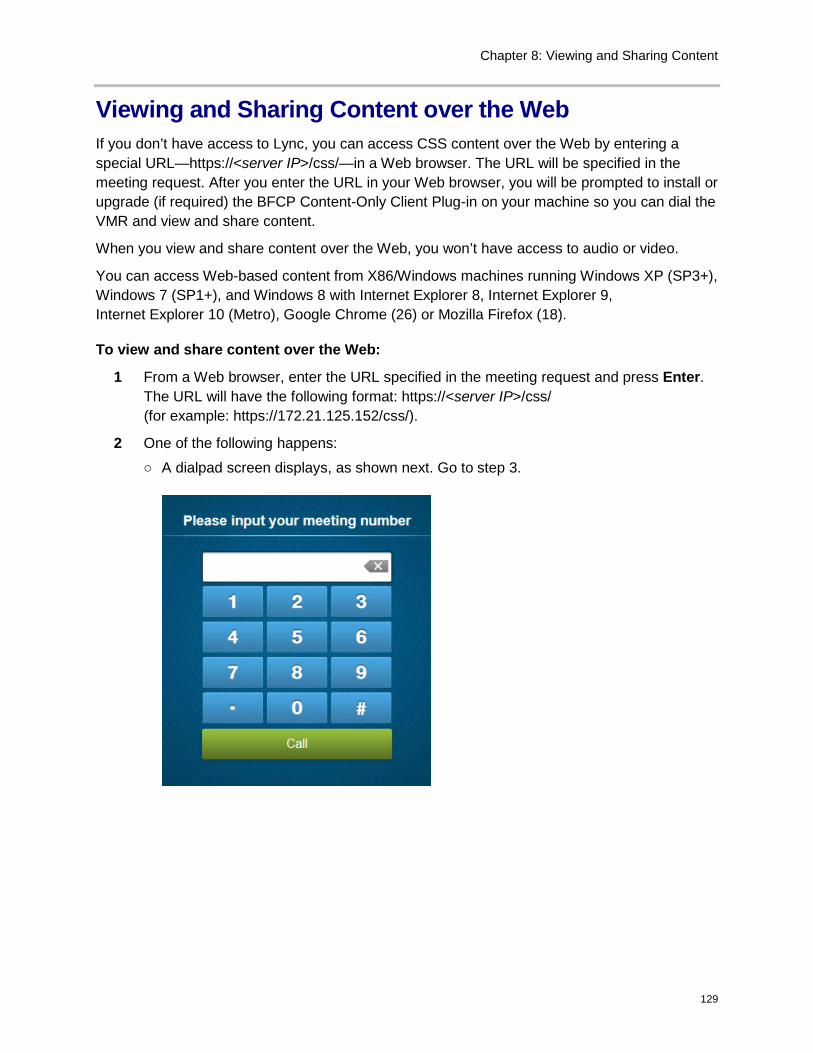
Chapter 8: Viewing and Sharing Content
129
Viewing and Sharing Content over the Web If you don’t have access to Lync, you can access CSS content over the Web by entering a special URL—https://<server IP>/css/—in a Web browser. The URL will be specified in the meeting request. After you enter the URL in your Web browser, you will be prompted to install or upgrade (if required) the BFCP Content-Only Client Plug-in on your machine so you can dial the VMR and view and share content.
When you view and share content over the Web, you won’t have access to audio or video.
You can access Web-based content from X86/Windows machines running Windows XP (SP3+), Windows 7 (SP1+), and Windows 8 with Internet Explorer 8, Internet Explorer 9, Internet Explorer 10 (Metro), Google Chrome (26) or Mozilla Firefox (18).
To view and share content over the Web:
1 From a Web browser, enter the URL specified in the meeting request and press Enter. The URL will have the following format: https://<server IP>/css/ (for example: https://172.21.125.152/css/).
2 One of the following happens:
○ A dialpad screen displays, as shown next. Go to step 3.
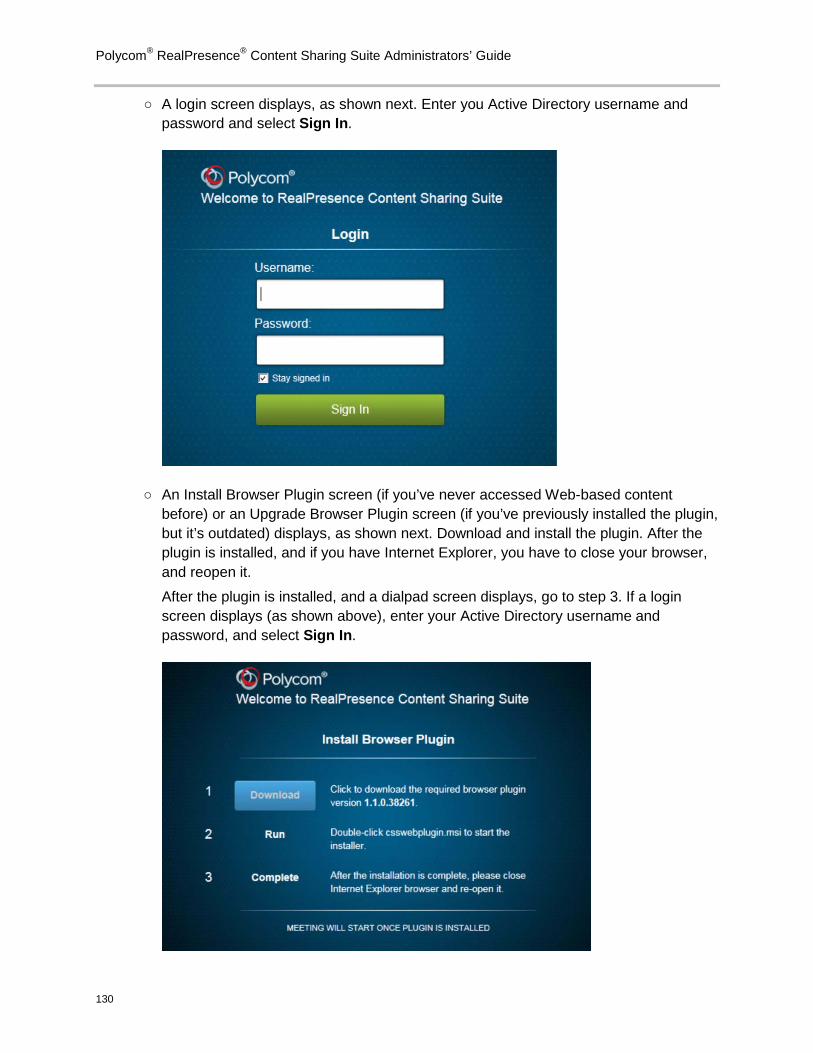
Polycom® RealPresence® Content Sharing Suite Administrators’ Guide
130
○ A login screen displays, as shown next. Enter you Active Directory username and password and select Sign In.
○ An Install Browser Plugin screen (if you’ve never accessed Web-based content before) or an Upgrade Browser Plugin screen (if you’ve previously installed the plugin, but it’s outdated) displays, as shown next. Download and install the plugin. After the plugin is installed, and if you have Internet Explorer, you have to close your browser, and reopen it.
After the plugin is installed, and a dialpad screen displays, go to step 3. If a login screen displays (as shown above), enter your Active Directory username and password, and select Sign In.
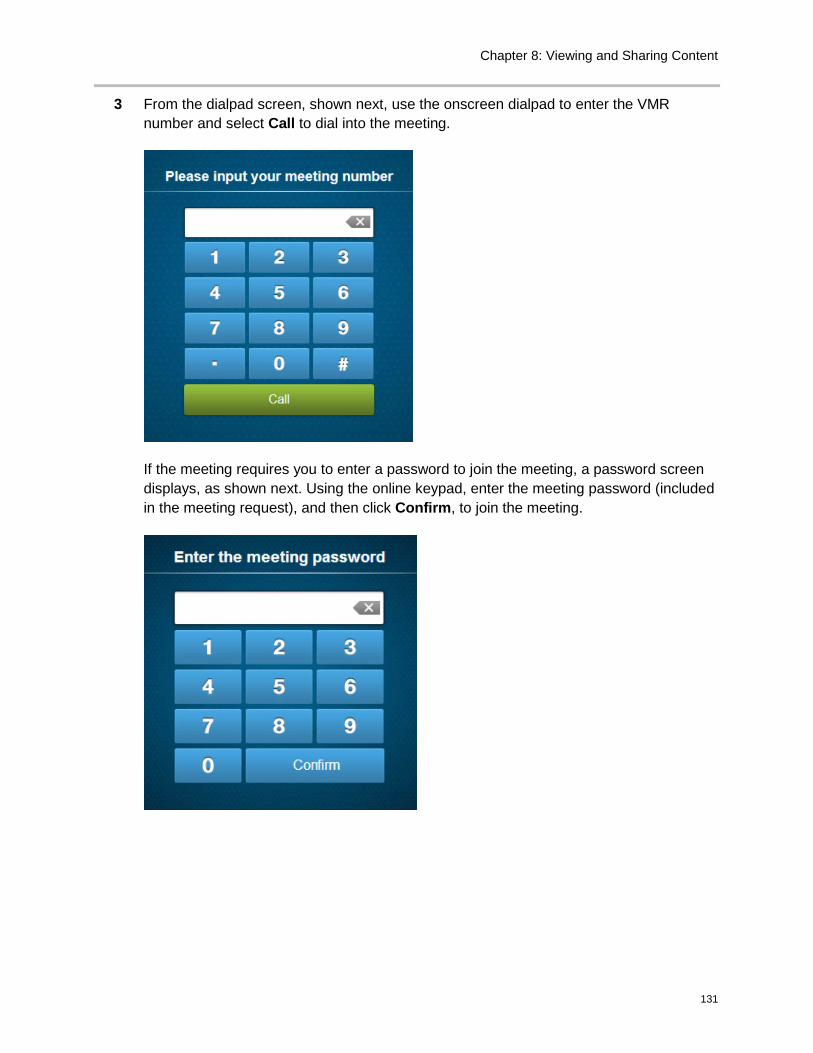
Chapter 8: Viewing and Sharing Content
131
3 From the dialpad screen, shown next, use the onscreen dialpad to enter the VMR number and select Call to dial into the meeting.
If the meeting requires you to enter a password to join the meeting, a password screen displays, as shown next. Using the online keypad, enter the meeting password (included in the meeting request), and then click Confirm, to join the meeting.
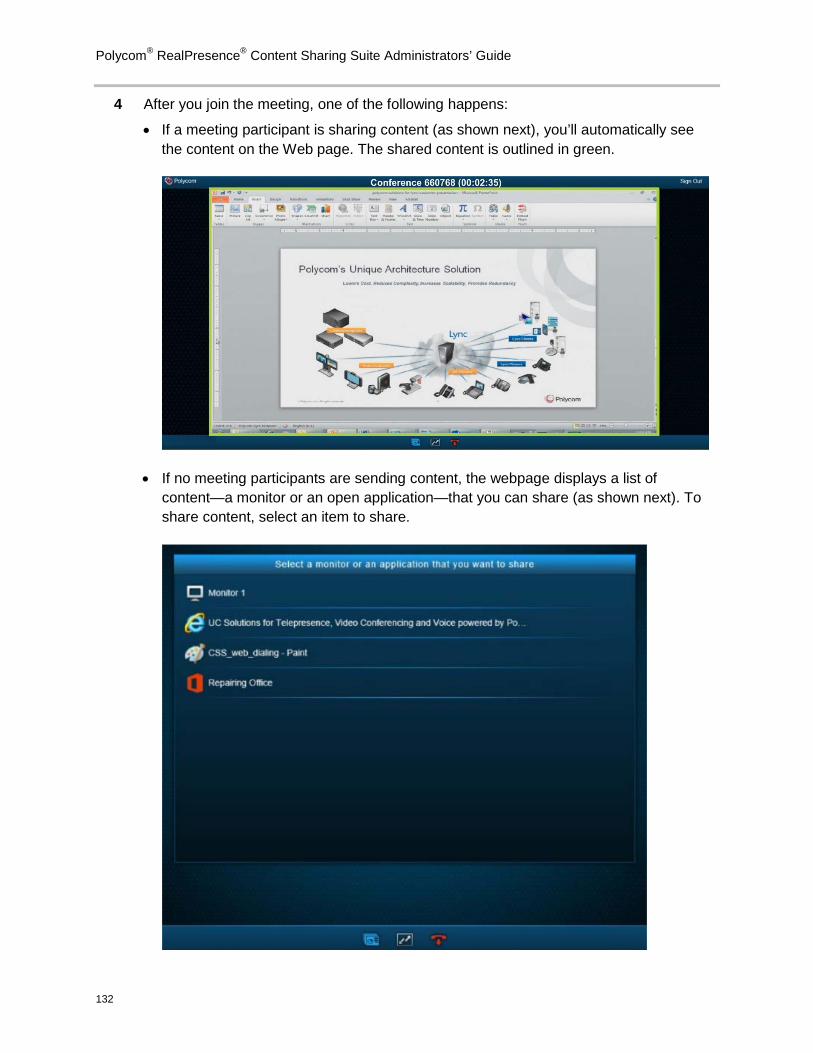
Polycom® RealPresence® Content Sharing Suite Administrators’ Guide
132
4 After you join the meeting, one of the following happens:
• If a meeting participant is sharing content (as shown next), you’ll automatically see the content on the Web page. The shared content is outlined in green.
• If no meeting participants are sending content, the webpage displays a list of content—a monitor or an open application—that you can share (as shown next). To share content, select an item to share.
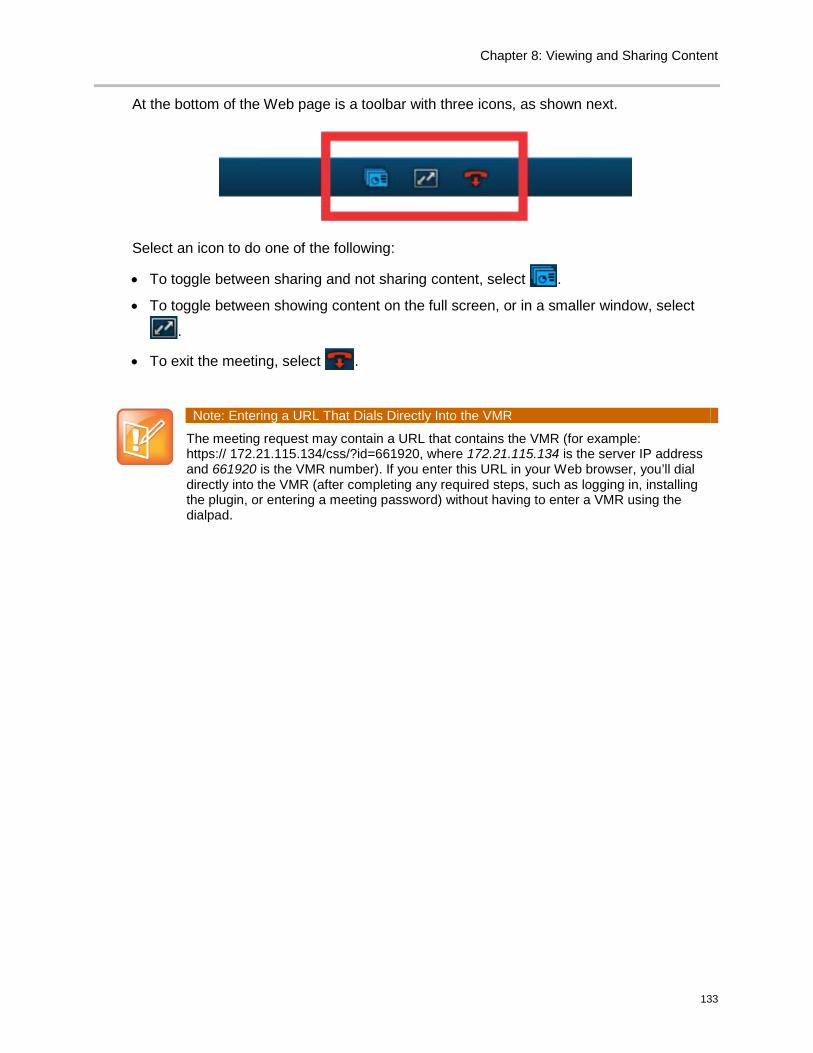
Chapter 8: Viewing and Sharing Content
133
At the bottom of the Web page is a toolbar with three icons, as shown next.
Select an icon to do one of the following:
• To toggle between sharing and not sharing content, select .
• To toggle between showing content on the full screen, or in a smaller window, select
.
• To exit the meeting, select .
Note: Entering a URL That Dials Directly Into the VMR
The meeting request may contain a URL that contains the VMR (for example: https:// 172.21.115.134/css/?id=661920, where 172.21.115.134 is the server IP address and 661920 is the VMR number). If you enter this URL in your Web browser, you’ll dial directly into the VMR (after completing any required steps, such as logging in, installing the plugin, or entering a meeting password) without having to enter a VMR using the dialpad.

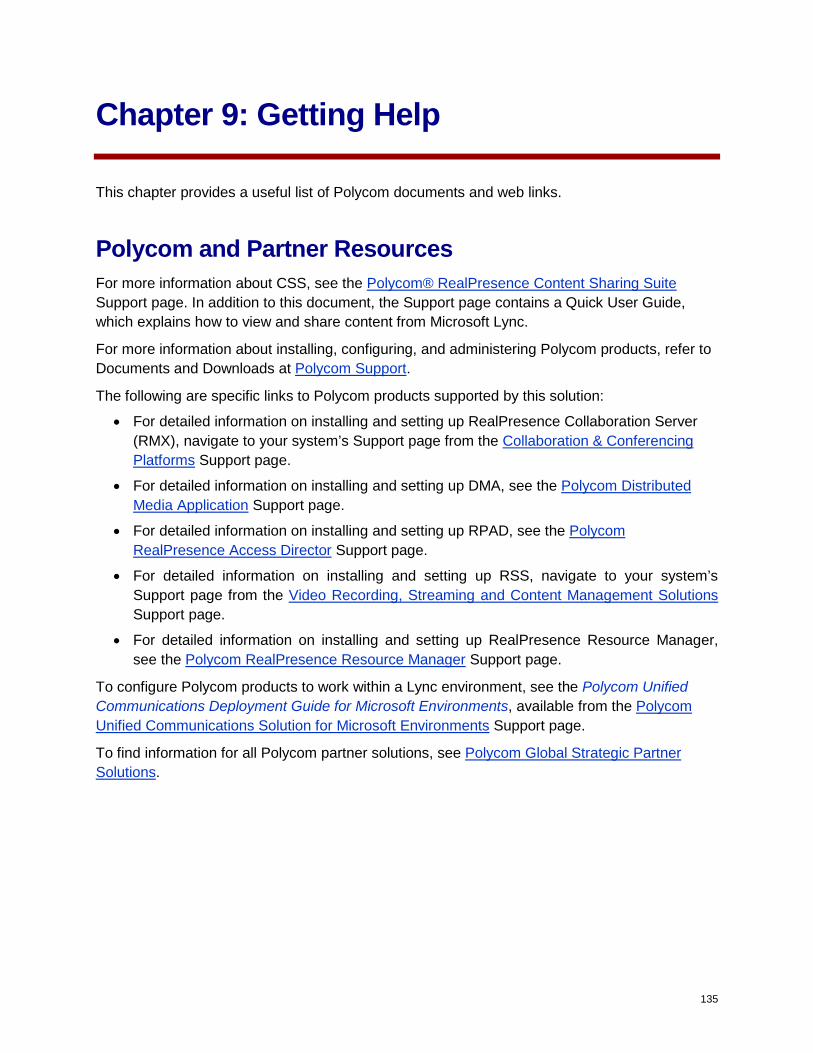
135
Chapter 9: Getting Help
This chapter provides a useful list of Polycom documents and web links.
Polycom and Partner Resources For more information about CSS, see the Polycom® RealPresence Content Sharing Suite Support page. In addition to this document, the Support page contains a Quick User Guide, which explains how to view and share content from Microsoft Lync.
For more information about installing, configuring, and administering Polycom products, refer to Documents and Downloads at Polycom Support.
The following are specific links to Polycom products supported by this solution:
• For detailed information on installing and setting up RealPresence Collaboration Server (RMX), navigate to your system’s Support page from the Collaboration & Conferencing Platforms Support page.
• For detailed information on installing and setting up DMA, see the Polycom Distributed Media Application Support page.
• For detailed information on installing and setting up RPAD, see the Polycom RealPresence Access Director Support page.
• For detailed information on installing and setting up RSS, navigate to your system’s Support page from the Video Recording, Streaming and Content Management Solutions Support page.
• For detailed information on installing and setting up RealPresence Resource Manager, see the Polycom RealPresence Resource Manager Support page.
To configure Polycom products to work within a Lync environment, see the Polycom Unified Communications Deployment Guide for Microsoft Environments, available from the Polycom Unified Communications Solution for Microsoft Environments Support page.
To find information for all Polycom partner solutions, see Polycom Global Strategic Partner Solutions.

Polycom® RealPresence® Content Sharing Suite Administrators’ Guide
136
The Polycom Community The Polycom Community gives you access to the latest developer and support information. Participate in discussion forums to share ideas and solve problems with your colleagues. To register with the Polycom Community, simply create a Polycom online account. When logged in, you can access Polycom support personnel and participate in developer and support forums to find the latest information on hardware, software, and partner solutions topics.
137
Chapter 10: Troubleshooting
Use the following tables as a guide to resolve issues, problems, or common difficulties you may encounter while deploying the RealPresence Content Sharing Suite. This chapter includes the following topics:
• Troubleshooting the Content Sharing Server
• Troubleshooting the CSS Client
• Troubleshooting the Web Client
Troubleshooting: System Logs
• If you encounter issues with the Content Sharing Server, refer to the Content Sharing Server’s system logs. To access the logs, see Managing System Events and Logs.
• If you encounter issues with the CSS Client, refer to the CSS Client logs. To access the logs, see CSS Client Tasks.
Troubleshooting: Installing and Upgrading Solution Components
When you install CSS components, make sure you install the same versions of the Content Sharing Server and the RealPresence Content Add-on for Lync. Or, if you’re upgrading CSS, make sure you upgrade the Content Sharing Server and the RealPresence Content Add-on for Lync to the same version. For example, if you install version 1.1.1 of the Polycom RealPresence Content Sharing Server pre-configured VHD installation package, you need to install version 1.1.1 of the Polycom RealPresence Content Add-on for Lync on each Lync Client machine. If the Content Sharing Server and RealPresence Content Add-on for Lync have different versions, your CSS solution won't work properly.
To check the version of the Content Sharing Server: • Log in to the Content Sharing Server Web Configuration Tool and select Admin >
System Upgrade. From the System Upgrade screen, the current system version displays.
To check the version of the Content Add-on for Lync: • Open the Lync Client computer’s Control Panel, navigate to Programs and Features,
and scroll to Polycom RealPresence Content Add-on for Lync. The version displays in the Content Add-on for Lync row.
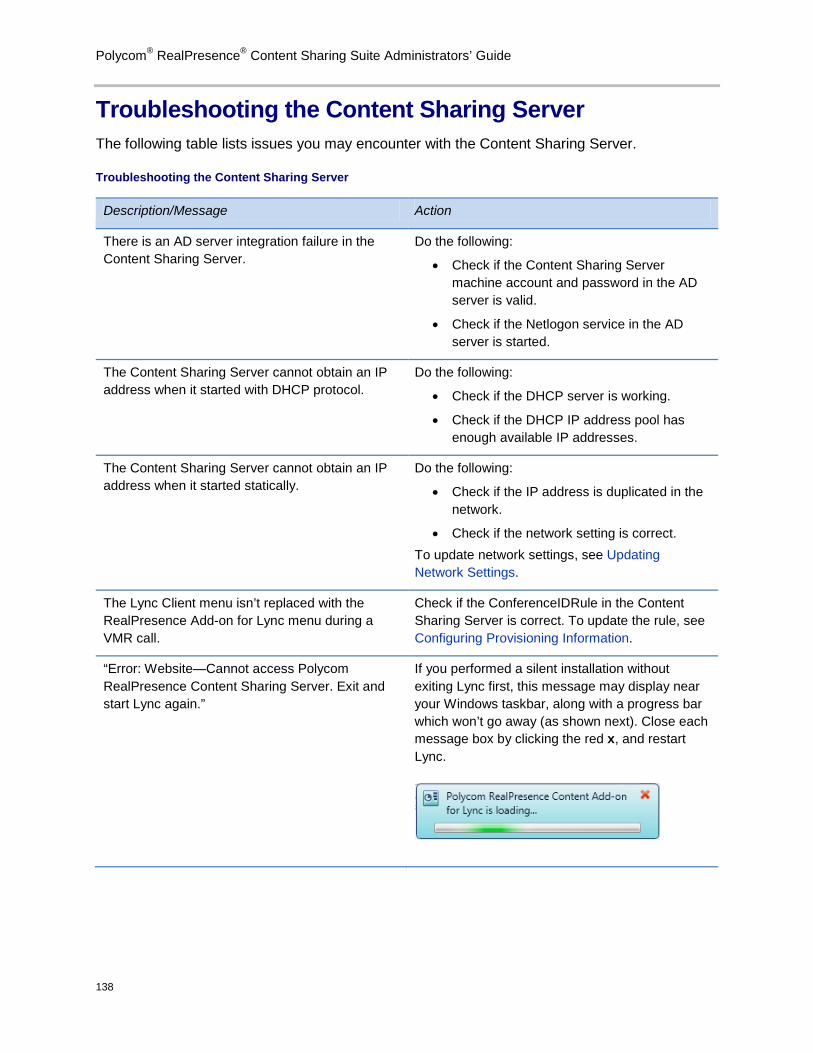
Polycom® RealPresence® Content Sharing Suite Administrators’ Guide
138
Troubleshooting the Content Sharing Server The following table lists issues you may encounter with the Content Sharing Server.
Troubleshooting the Content Sharing Server
Description/Message Action
There is an AD server integration failure in the Content Sharing Server.
Do the following:
• Check if the Content Sharing Server machine account and password in the AD server is valid.
• Check if the Netlogon service in the AD server is started.
The Content Sharing Server cannot obtain an IP address when it started with DHCP protocol.
Do the following:
• Check if the DHCP server is working.
• Check if the DHCP IP address pool has enough available IP addresses.
The Content Sharing Server cannot obtain an IP address when it started statically.
Do the following:
• Check if the IP address is duplicated in the network.
• Check if the network setting is correct. To update network settings, see Updating Network Settings.
The Lync Client menu isn’t replaced with the RealPresence Add-on for Lync menu during a VMR call.
Check if the ConferenceIDRule in the Content Sharing Server is correct. To update the rule, see Configuring Provisioning Information.
“Error: Website—Cannot access Polycom RealPresence Content Sharing Server. Exit and start Lync again.”
If you performed a silent installation without exiting Lync first, this message may display near your Windows taskbar, along with a progress bar which won’t go away (as shown next). Close each message box by clicking the red x, and restart Lync.
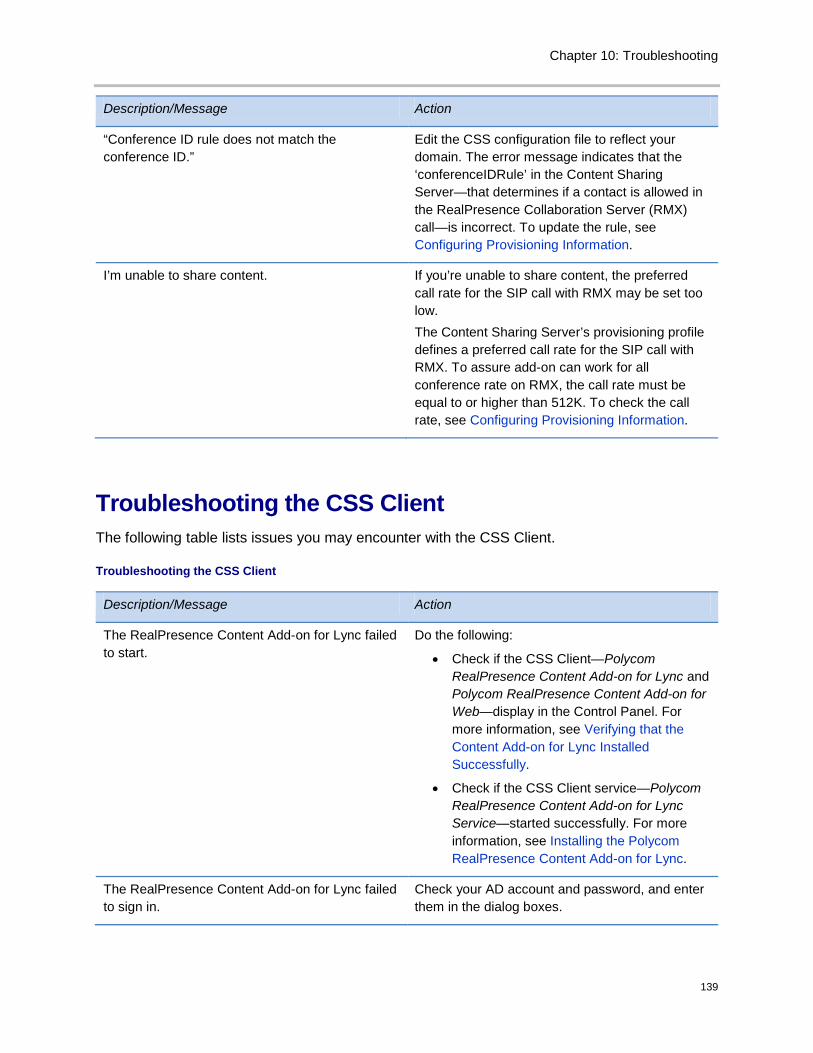
Chapter 10: Troubleshooting
139
Description/Message Action
“Conference ID rule does not match the conference ID.”
Edit the CSS configuration file to reflect your domain. The error message indicates that the ‘conferenceIDRule’ in the Content Sharing Server—that determines if a contact is allowed in the RealPresence Collaboration Server (RMX) call—is incorrect. To update the rule, see Configuring Provisioning Information.
I’m unable to share content. If you’re unable to share content, the preferred call rate for the SIP call with RMX may be set too low. The Content Sharing Server’s provisioning profile defines a preferred call rate for the SIP call with RMX. To assure add-on can work for all conference rate on RMX, the call rate must be equal to or higher than 512K. To check the call rate, see Configuring Provisioning Information.
Troubleshooting the CSS Client The following table lists issues you may encounter with the CSS Client.
Troubleshooting the CSS Client
Description/Message Action
The RealPresence Content Add-on for Lync failed to start.
Do the following:
• Check if the CSS Client—Polycom RealPresence Content Add-on for Lync and Polycom RealPresence Content Add-on for Web—display in the Control Panel. For more information, see Verifying that the Content Add-on for Lync Installed Successfully.
• Check if the CSS Client service—Polycom RealPresence Content Add-on for Lync Service—started successfully. For more information, see Installing the Polycom RealPresence Content Add-on for Lync.
The RealPresence Content Add-on for Lync failed to sign in.
Check your AD account and password, and enter them in the dialog boxes.
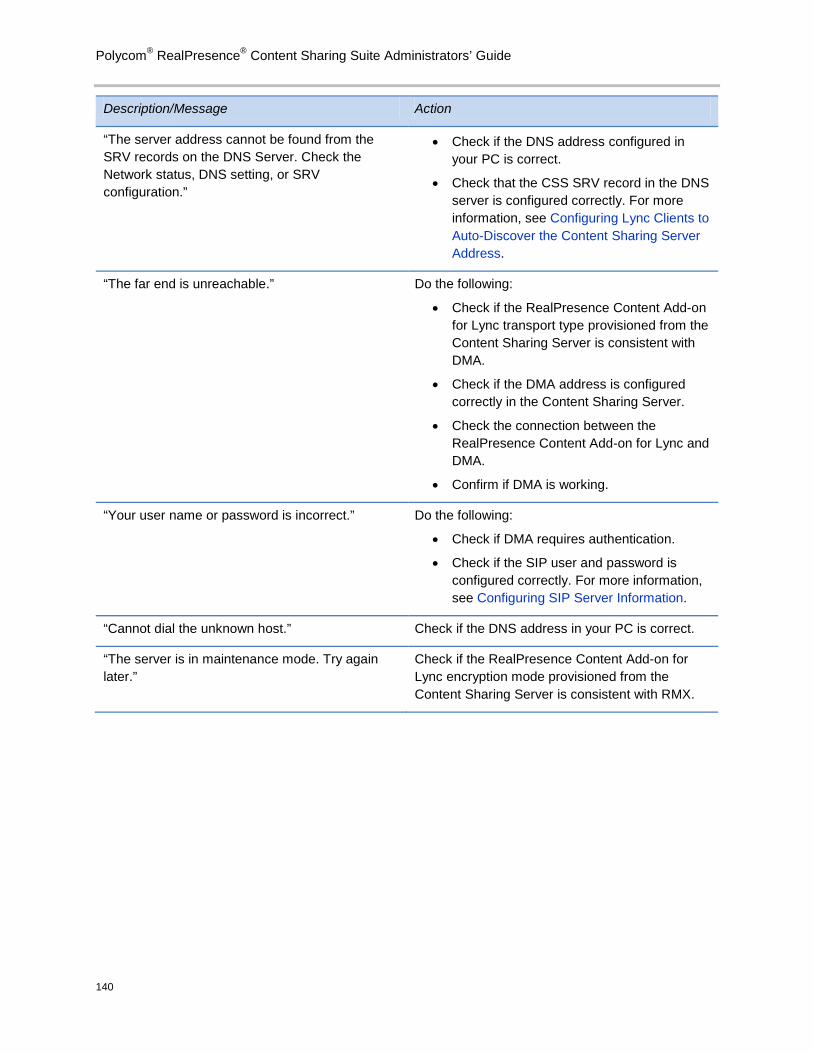
Polycom® RealPresence® Content Sharing Suite Administrators’ Guide
140
Description/Message Action
“The server address cannot be found from the SRV records on the DNS Server. Check the Network status, DNS setting, or SRV configuration.”
• Check if the DNS address configured in your PC is correct.
• Check that the CSS SRV record in the DNS server is configured correctly. For more information, see Configuring Lync Clients to Auto-Discover the Content Sharing Server Address.
“The far end is unreachable.” Do the following:
• Check if the RealPresence Content Add-on for Lync transport type provisioned from the Content Sharing Server is consistent with DMA.
• Check if the DMA address is configured correctly in the Content Sharing Server.
• Check the connection between the RealPresence Content Add-on for Lync and DMA.
• Confirm if DMA is working.
“Your user name or password is incorrect.” Do the following:
• Check if DMA requires authentication.
• Check if the SIP user and password is configured correctly. For more information, see Configuring SIP Server Information.
“Cannot dial the unknown host.” Check if the DNS address in your PC is correct.
“The server is in maintenance mode. Try again later.”
Check if the RealPresence Content Add-on for Lync encryption mode provisioned from the Content Sharing Server is consistent with RMX.
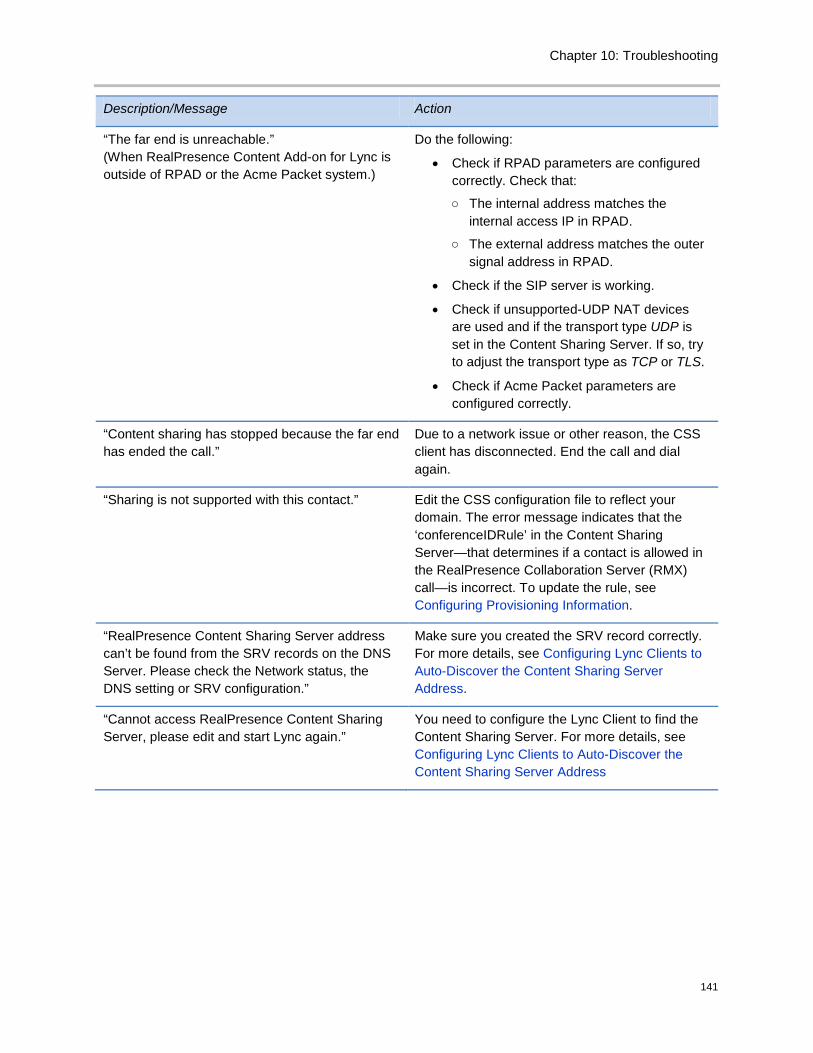
Chapter 10: Troubleshooting
141
Description/Message Action
“The far end is unreachable.” (When RealPresence Content Add-on for Lync is outside of RPAD or the Acme Packet system.)
Do the following:
• Check if RPAD parameters are configured correctly. Check that:
○ The internal address matches the internal access IP in RPAD.
○ The external address matches the outer signal address in RPAD.
• Check if the SIP server is working.
• Check if unsupported-UDP NAT devices are used and if the transport type UDP is set in the Content Sharing Server. If so, try to adjust the transport type as TCP or TLS.
• Check if Acme Packet parameters are configured correctly.
“Content sharing has stopped because the far end has ended the call.”
Due to a network issue or other reason, the CSS client has disconnected. End the call and dial again.
“Sharing is not supported with this contact.” Edit the CSS configuration file to reflect your domain. The error message indicates that the ‘conferenceIDRule’ in the Content Sharing Server—that determines if a contact is allowed in the RealPresence Collaboration Server (RMX) call—is incorrect. To update the rule, see Configuring Provisioning Information.
“RealPresence Content Sharing Server address can’t be found from the SRV records on the DNS Server. Please check the Network status, the DNS setting or SRV configuration.”
Make sure you created the SRV record correctly. For more details, see Configuring Lync Clients to Auto-Discover the Content Sharing Server Address.
“Cannot access RealPresence Content Sharing Server, please edit and start Lync again.”
You need to configure the Lync Client to find the Content Sharing Server. For more details, see Configuring Lync Clients to Auto-Discover the Content Sharing Server Address
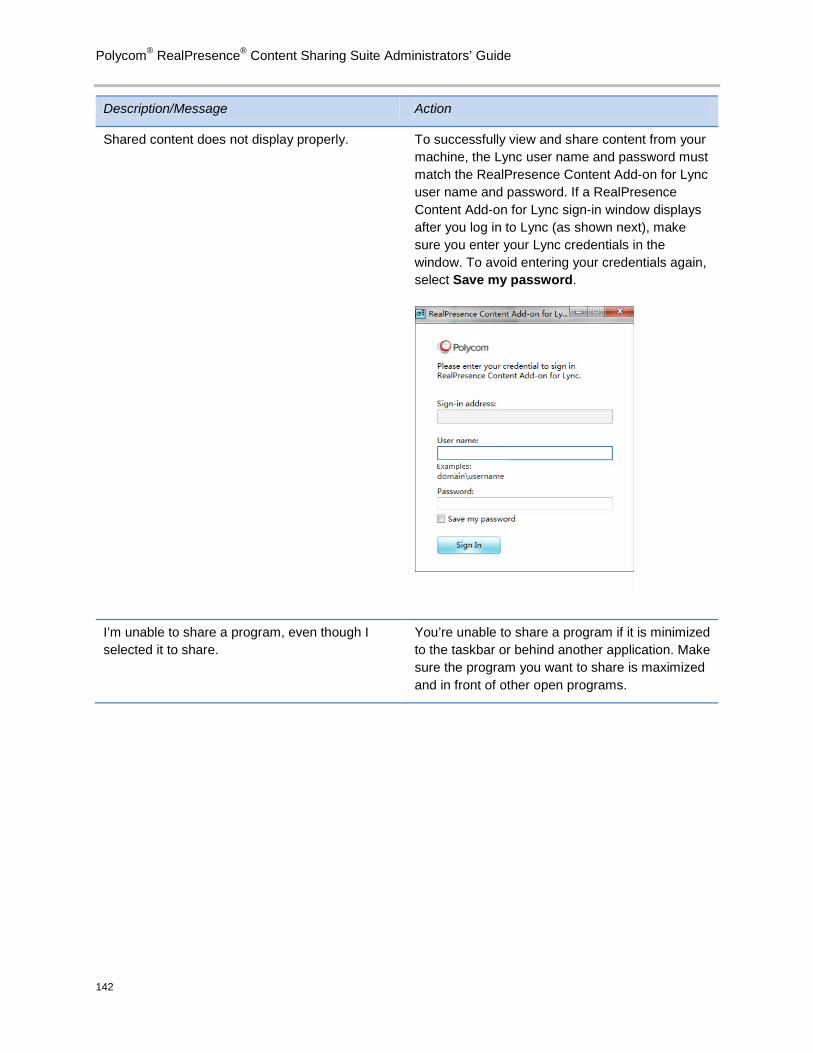
Polycom® RealPresence® Content Sharing Suite Administrators’ Guide
142
Description/Message Action
Shared content does not display properly. To successfully view and share content from your machine, the Lync user name and password must match the RealPresence Content Add-on for Lync user name and password. If a RealPresence Content Add-on for Lync sign-in window displays after you log in to Lync (as shown next), make sure you enter your Lync credentials in the window. To avoid entering your credentials again, select Save my password.
I’m unable to share a program, even though I selected it to share.
You’re unable to share a program if it is minimized to the taskbar or behind another application. Make sure the program you want to share is maximized and in front of other open programs.
Chapter 10: Troubleshooting
143
Description/Message Action
“Error: WebPlugin—Polycom RealPresence Content Add-on for Lync doesn't match the server's version. Contact your administrator.”
If the Content Sharing Server and RealPresence Content Add-on for Lync have different versions, your CSS solution won't work properly. Make sure the Content Sharing Server and RealPresence Content Add-on for Lync have the same version.
To check the version of the Content Sharing Server:
• Log in to the Content Sharing Server Web Configuration Tool and select Admin > System Upgrade. From the System Upgrade screen, the current system version displays.
To check the version of the RealPresence Content Add-on for Lync:
• Open the Lync Client computer’s Control Panel, navigate to Programs and Features, and scroll to Polycom RealPresence Content Add-on for Lync. The version displays in the Content Add-on for Lync row.
The RealPresence Content Add-on for Lync won’t start.
Check to make sure that your computer has only Lync 2010 or 2013. The RealPresence Content Add-on for Lync won’t start if both Lync 2010 and 2013 are installed on the same machine.
The far end is sending content, but I’m not receiving it.
Ask the far end to check if the firewall is blocking the content stream related to the RealPresence Content Add-on for Lync process.
The RealPresence Content Add-on for Lync won’t start automatically after an install or upgrade.
Try to manually start the Polycom RealPresence Content Add-on for Lync Service. To manually start the service, open your computer’s Control Panel, double-click Administrative Tools, and double-click Services. Right-click Polycom RealPresence Content Add-on for Lync Service, and select Start.
“Call InstallHook() from ShareHook64.dll failed after three times. Reboot or contact your administrator.”
Restart the computer.
Polycom® RealPresence® Content Sharing Suite Administrators’ Guide
144
Description/Message Action
The RealPresence Content Add-on for Lync won’t start.
Make sure you haven’t signed into your computer using multiple accounts simultaneously. If you sign into your computer using multiple accounts simultaneously, the RealPresence Content Add-on for Lync may not run in one of the accounts, because it’s still running in the other account.
The RealPresence Content Add-on for Lync is installed, but I can’t receive or share content.
There may be an issue with the size of the text that displays on your computer screen. Open your computer’s Control Panel, navigate to the Display settings, and make sure the size of text and other items on your screen is set to 100%.
Troubleshooting the Web Client The following table lists issues you may encounter with the Web Client.
Troubleshooting the Web Client
Description/Message Action
I don’t see a green border when I share an application using Internet Explorer.
Try the following:
• Disable Internet Explorer Protected Mode.
• Add the IP address to the list of Trusted Sites in Internet Explorer.
145
Chapter 11: Open Source Attributions and Licenses
The Polycom RealPresence Content Sharing Suite includes components subject to various open source licenses. Some of these licenses give you the right to request the source code for the components to which they apply. If you wish to receive the source code for particular components that are subject to such a license, please make a specific request to the following email address: [email protected].
For a complete list of open source attributions and licenses, see the Polycom RealPresence Content Sharing Suite Open Source Licenses and Notices document, available from the Polycom® RealPresence® Content Sharing Suite Support page.