poly clay decorated pen projects - penn state industries (blooming daisy), #mcm-kp11 (wild flower),...
TRANSCRIPT
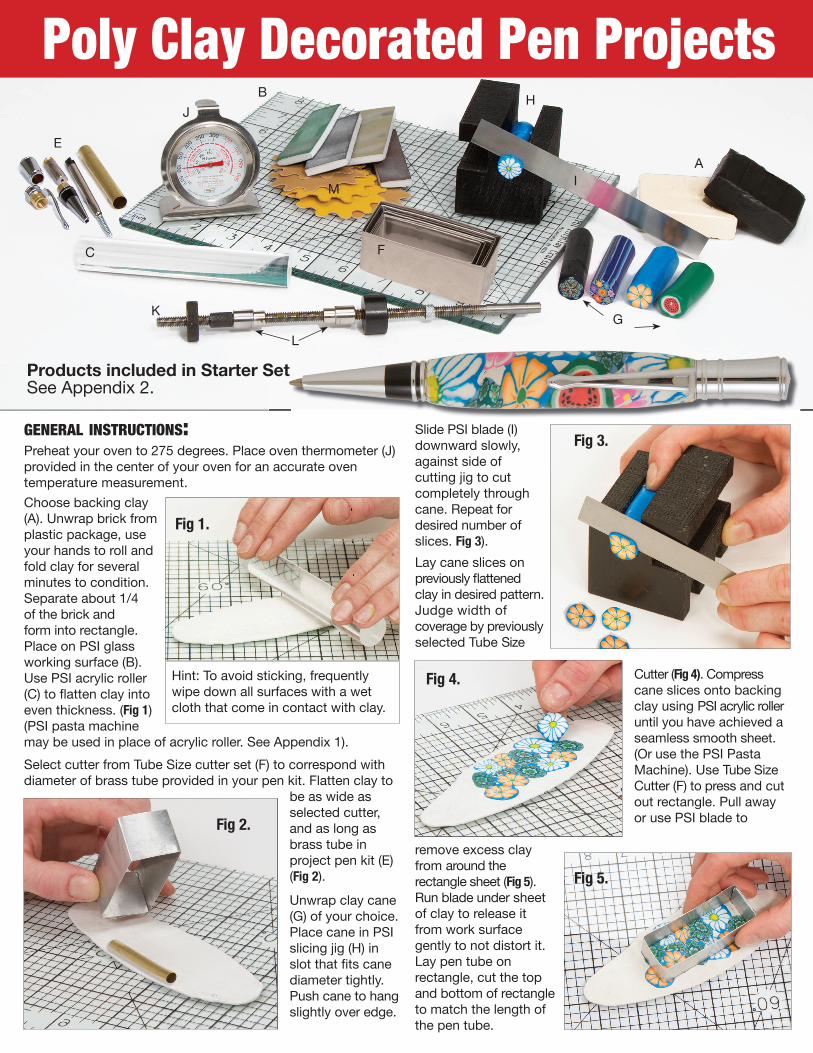
GENERAL INSTRUCTIONS:Preheat your oven to 275 degrees. Place oven thermometer (J) provided in the center of your oven for an accurate oven temperature measurement.Choose backing clay
(A). Unwrap brick from plastic package, use your hands to roll and fold clay for several minutes to condition. Separate about 1/4 of the brick and form into rectangle. Place on PSI glass working surface (B). Use PSI acrylic roller (C) to fl atten clay into even thickness. (Fig 1) (PSI pasta machine may be used in place of acrylic roller. See Appendix 1).Select cutter from Tube Size cutter set (F) to correspond with diameter of brass tube provided in your pen kit. Flatten clay to
be as wide as selected cutter, and as long as brass tube in project pen kit (E) (Fig 2).
Unwrap clay cane (G) of your choice. Place cane in PSI slicing jig (H) in slot that fi ts cane diameter tightly. Push cane to hang slightly over edge.
Slide PSI blade (I) downward slowly, against side of cutting jig to cut completely through cane. Repeat for desired number of slices. Fig 3).Lay cane slices on previously fl attened clay in desired pattern. Judge width of coverage by previously selected Tube Size
Cutter (Fig 4). Compress cane slices onto backing clay using PSI acrylic roller until you have achieved a seamless smooth sheet.(Or use the PSI Pasta Machine). Use Tube Size Cutter (F) to press and cut out rectangle. Pull away or use PSI blade to
remove excess clay from around the rectangle sheet (Fig 5). Run blade under sheet of clay to release it from work surface gently to not distort it. Lay pen tube on rectangle, cut the top and bottom of rectangle to match the length of the pen tube.
Poly Clay Decorated Pen Projects B
M
C
E
F
G
H
I
K
Fig 1.
Fig 2.
Fig 3.
Fig 4.
Fig 5.
A
L
J
Hint: To avoid sticking, frequently wipe down all surfaces with a wet cloth that come in contact with clay.
Products included in Starter Set See Appendix 2.
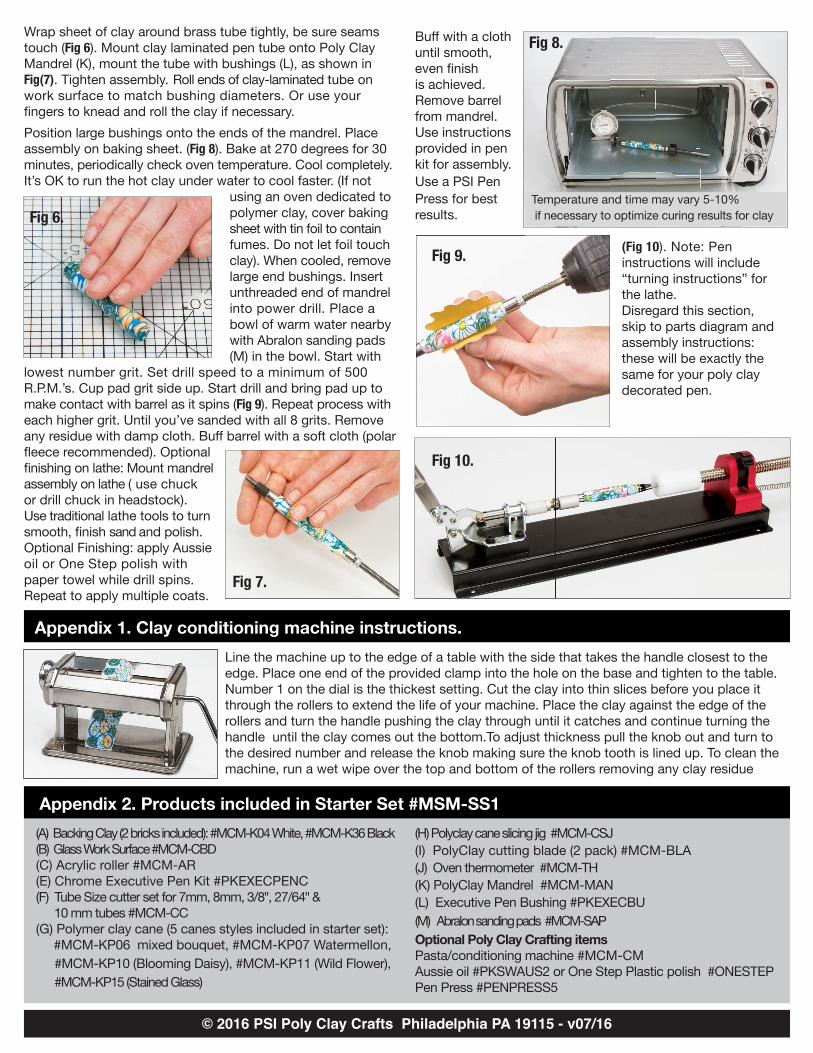
Wrap sheet of clay around brass tube tightly, be sure seams touch (Fig 6). Mount clay laminated pen tube onto Poly Clay Mandrel (K), mount the tube with bushings (L), as shown in Fig(7). Tighten assembly. Roll ends of clay-laminated tube on work surface to match bushing diameters. Or use your fi ngers to knead and roll the clay if necessary.Position large bushings onto the ends of the mandrel. Place assembly on baking sheet. (Fig 8). Bake at 270 degrees for 30 minutes, periodically check oven temperature. Cool completely. It’s OK to run the hot clay under water to cool faster. (If not
using an oven dedicated to polymer clay, cover baking sheet with tin foil to contain fumes. Do not let foil touch clay). When cooled, remove large end bushings. Insert unthreaded end of mandrel into power drill. Place abowl of warm water nearby with Abralon sanding pads (M) in the bowl. Start with
lowest number grit. Set drill speed to a minimum of 500 R.P.M.’s. Cup pad grit side up. Start drill and bring pad up to make contact with barrel as it spins (Fig 9). Repeat process with each higher grit. Until you’ve sanded with all 8 grits. Remove any residue with damp cloth. Buff barrel with a soft cloth (polar fl eece recommended). Optional fi nishing on lathe: Mount mandrel assembly on lathe ( use chuck or drill chuck in headstock). Use traditional lathe tools to turn smooth, fi nish sand and polish. Optional Finishing: apply Aussie oil or One Step polish with paper towel while drill spins. Repeat to apply multiple coats.
Buff with a cloth until smooth, even fi nish is achieved. Remove barrel from mandrel. Use instructions provided in pen kit for assembly.Use a PSI Pen Press for best results.
(Fig 10). Note: Pen instructions will include “turning instructions” for the lathe. Disregard this section, skip to parts diagram and assembly instructions: these will be exactly the same for your poly clay decorated pen.
(A) Backing Clay (2 bricks included): #MCM-K04 White, #MCM-K36 Black(B) Glass Work Surface #MCM-CBD (C) Acrylic roller #MCM-AR(E) Chrome Executive Pen Kit #PKEXECPENC(F) Tube Size cutter set for 7mm, 8mm, 3/8", 27/64" & 10 mm tubes #MCM-CC(G) Polymer clay cane (5 canes styles included in starter set): #MCM-KP06 mixed bouquet, #MCM-KP07 Watermellon, #MCM-KP10 (Blooming Daisy), #MCM-KP11 (Wild Flower), #MCM-KP15 (Stained Glass)
(H) Polyclay cane slicing jig #MCM-CSJ(I) PolyClay cutting blade (2 pack) #MCM-BLA (J) Oven thermometer #MCM-TH (K) PolyClay Mandrel #MCM-MAN(L) Executive Pen Bushing #PKEXECBU(M) Abralon sanding pads #MCM-SAPOptional Poly Clay Crafting itemsPasta/conditioning machine #MCM-CMAussie oil #PKSWAUS2 or One Step Plastic polish #ONESTEPPen Press #PENPRESS5
Appendix 2. Products included in Starter Set #MSM-SS1
© 2016 PSI Poly Clay Crafts Philadelphia PA 19115 - v07/16
Line the machine up to the edge of a table with the side that takes the handle closest to the edge. Place one end of the provided clamp into the hole on the base and tighten to the table. Number 1 on the dial is the thickest setting. Cut the clay into thin slices before you place it through the rollers to extend the life of your machine. Place the clay against the edge of the rollers and turn the handle pushing the clay through until it catches and continue turning the handle until the clay comes out the bottom.To adjust thickness pull the knob out and turn to the desired number and release the knob making sure the knob tooth is lined up. To clean the machine, run a wet wipe over the top and bottom of the rollers removing any clay residue
Appendix 1. Clay conditioning machine instructions.
Fig 6.
Fig 7.
Fig 8.
Fig 9.
Fig 10.
Temperature and time may vary 5-10% if necessary to optimize curing results for clay