podcasting how-to manual - will...soundcloud account script some assumptions about this manual:...
TRANSCRIPT

1
Podcasting How-To Manual
Prepared for Stratton Academy of
the Arts: MicroSociety & Leadership Magnet
by Kimberlie Kranich Illinois Public Media
2014

2
Equipment Needed:
Gmail accounts for students
Chromebook and Chrome browser
Headsets with microphones (USB connection preferred but you can use headsets with 1/8” mini plugs.)
Mouse
Internet access
TwistedWave online audio editing software
SoundCloud account
Script Some assumptions about this manual:
Students are using Chromebooks at school
Whatever audio is to be uploaded and shared in the podcast has already been scripted by either a teacher or students.
This was written for teachers who teach 3-5th grade students.
It is basic. There are many more bells and whistles in TwistedWave not listed here. If you follow these simple instructions, your students will be podcasters! (This manual has been tested on users).
The interface on TwistedWave, Google or SoundCloud may change without notice. Therefore, some of the pictures in this manual may look different. This is beyond our control.

3
1. Logging into TwistedWave (TW)
Plug your headset and mouse into the USB ports on the back of your Chromebook. If your headset does not have a USB connection, it will have two cables with 1/8” mini plugs. The student will need to plug the microphone plug into the Chromebook to record the audio. Once the audio is recorded, remove the microphone plug and insert the audio plug to listen and edit.
Users will log into Twisted Wave (TW) using the Gmail address associated with their Google account.
Open your Chrome browser.
Go to https://twistedwave.com/online/login and click the red box that says “Sign in with Google.”
Log in using your Gmail account by clicking this Box

4
2. Creating a new document (audio file) After you log into your TW account, the first screen should look like this:
Click once on the green “New document” button.
Click once on the green “New document” button

5
The screen that opens up should look like this:
You are ready to record yourself reading your podcast script.

6
TEACHERS: Check each students’ audio settings. Go the “Audio” section of the toolbar to reveal the pull-down menu. Make sure that there is not a checkmark next to “Move Cursor Back after Playing.” If there is, highlight it to deselect it.
If there is a checkmark next to this line, highlight the line to de-select it.

7
3. Recording Your Podcast.
You will need the following items to record your podcast: 1) Your script printed out on a piece of paper 2) Your headset with microphone 3) A mouse connected to your Chromebook
Click the red record button to start recording.
Click the red record
button
8
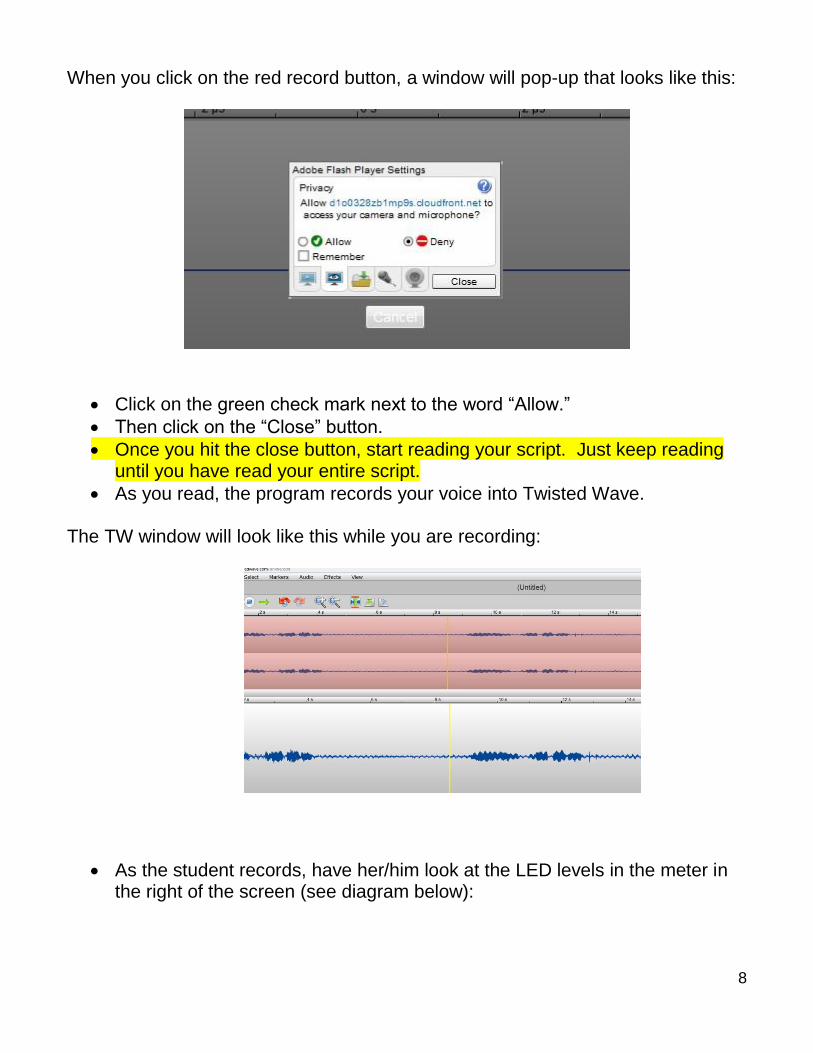
When you click on the red record button, a window will pop-up that looks like this:
Click on the green check mark next to the word “Allow.”
Then click on the “Close” button.
Once you hit the close button, start reading your script. Just keep reading until you have read your entire script.
As you read, the program records your voice into Twisted Wave.
The TW window will look like this while you are recording:
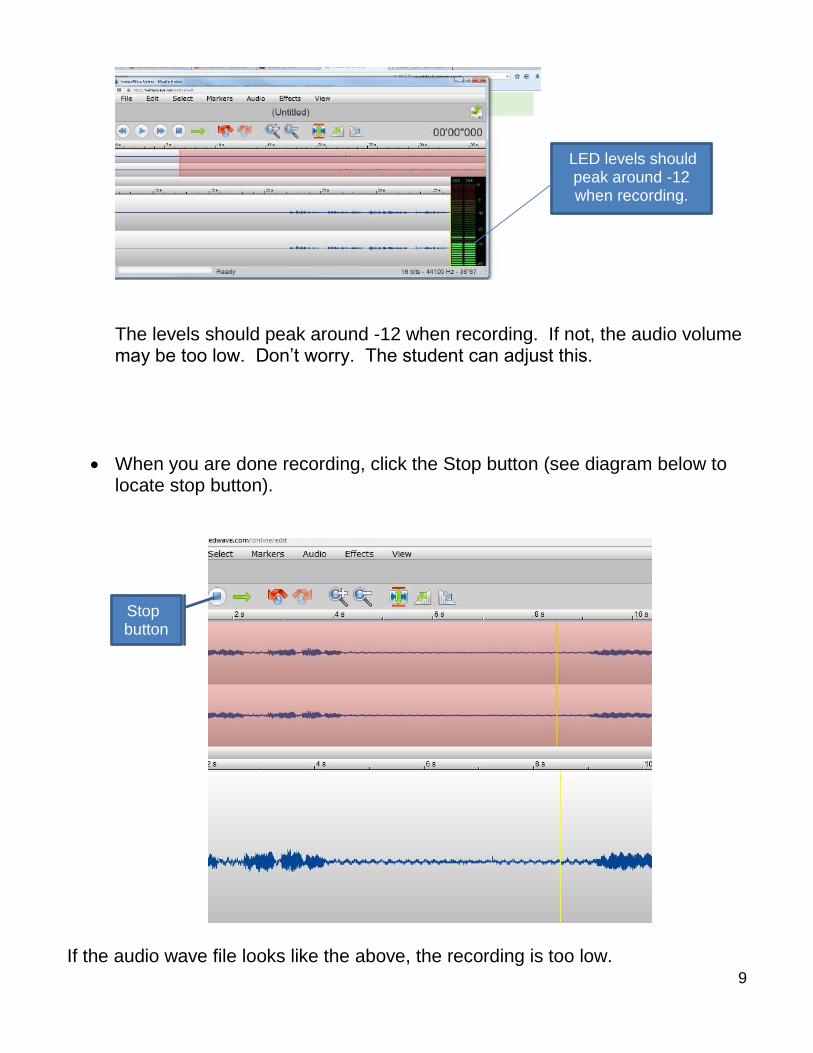
As the student records, have her/him look at the LED levels in the meter in the right of the screen (see diagram below):
9
The levels should peak around -12 when recording. If not, the audio volume may be too low. Don’t worry. The student can adjust this.
When you are done recording, click the Stop button (see diagram below to locate stop button).
If the audio wave file looks like the above, the recording is too low.
Stop button
LED levels should peak around -12 when recording.

10
4) Normalizing Your Recording Levels You will want to make sure that your audio levels are neither too loud nor too soft throughout your recording. To “normalize” them:
Click on the “Effects” tool in your tool bar
Effects tool

11
Click on the “Normalize” tool in your tool bar
Normalize selection

12
Once your file has been “normalized,” it will look bigger.
If the levels are still too low, you may “amplify” them. Go to the “Effects” pull-down menu and select “Amplify.”
Select “Amplify” from the Effects
Pull-down menu

13
Drag the blue button to the right to increase the gain or volume. Drag to the button to the left to decrease the gain or volume. Click on “Apply” when you are done.
The sound wave file is now bigger.
Drag the blue button to the right to increase the volume. Click “Apply” when finished.
The amplified sound wave is now bigger!
14
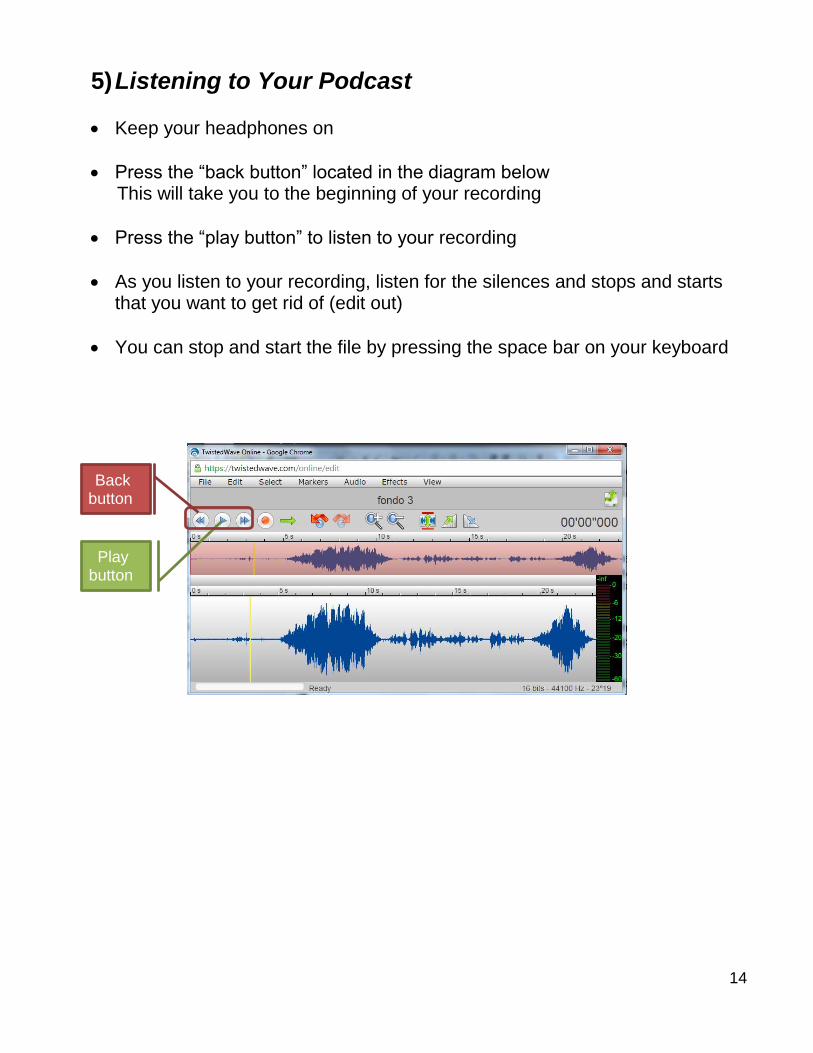
5) Listening to Your Podcast
Keep your headphones on
Press the “back button” located in the diagram below This will take you to the beginning of your recording
Press the “play button” to listen to your recording
As you listen to your recording, listen for the silences and stops and starts that you want to get rid of (edit out)
You can stop and start the file by pressing the space bar on your keyboard
Back button
Play button
15
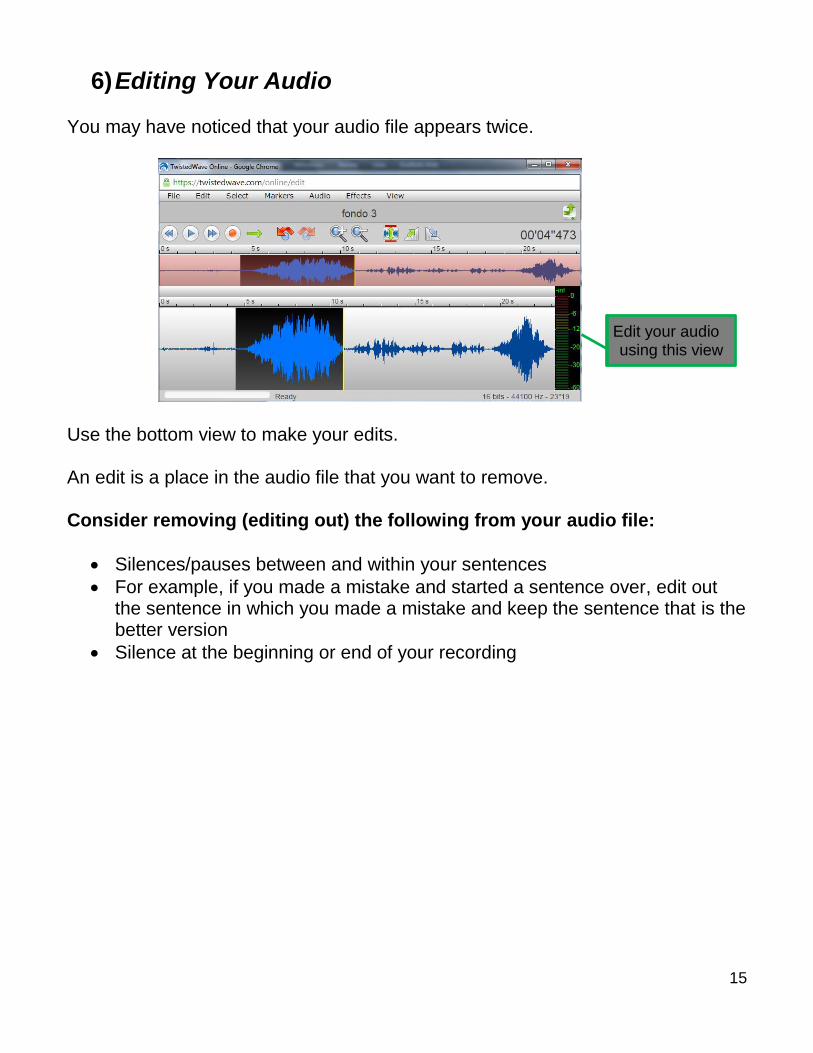
6) Editing Your Audio You may have noticed that your audio file appears twice.
Use the bottom view to make your edits.
An edit is a place in the audio file that you want to remove.
Consider removing (editing out) the following from your audio file:
Silences/pauses between and within your sentences
For example, if you made a mistake and started a sentence over, edit out the sentence in which you made a mistake and keep the sentence that is the better version
Silence at the beginning or end of your recording
Edit your audio using this view

16
Highlight the places in your audio file that you want to edit out or remove:
Press the “back button” to get to the start of your audio file
Press the “play button” to listen to your recording
When you hear something you want to remove from your file, click the play button again (or tap the space bar) and your audio file will stop playing
After it has stopped, a yellow vertical line will mark the place where you stopped the playback
Place a marker (red line) where the yellow line is by going to “Markers” in your tool bar and highlighting “Add Marker.”
Add Marker
Yellow line

17
You’re yellow line will now have a red line on top of it. This is Marker 1.
Click the play button (or tap the space bar) and watch as the yellow line moves again. When you find the end of the section you want to remove, click the pause button. Another yellow line appears.
Place a second red marker over the second yellow line by going to “Markers” in your tool bar and highlighting “Add Marker.”
Marker 1

18
You will now see two red lines for the two red markers
Left click on the first marker and drag your mouse to the second marker. The space between the markers will be highlighted as shown in the diagram below.
Marker 2
Marker 1
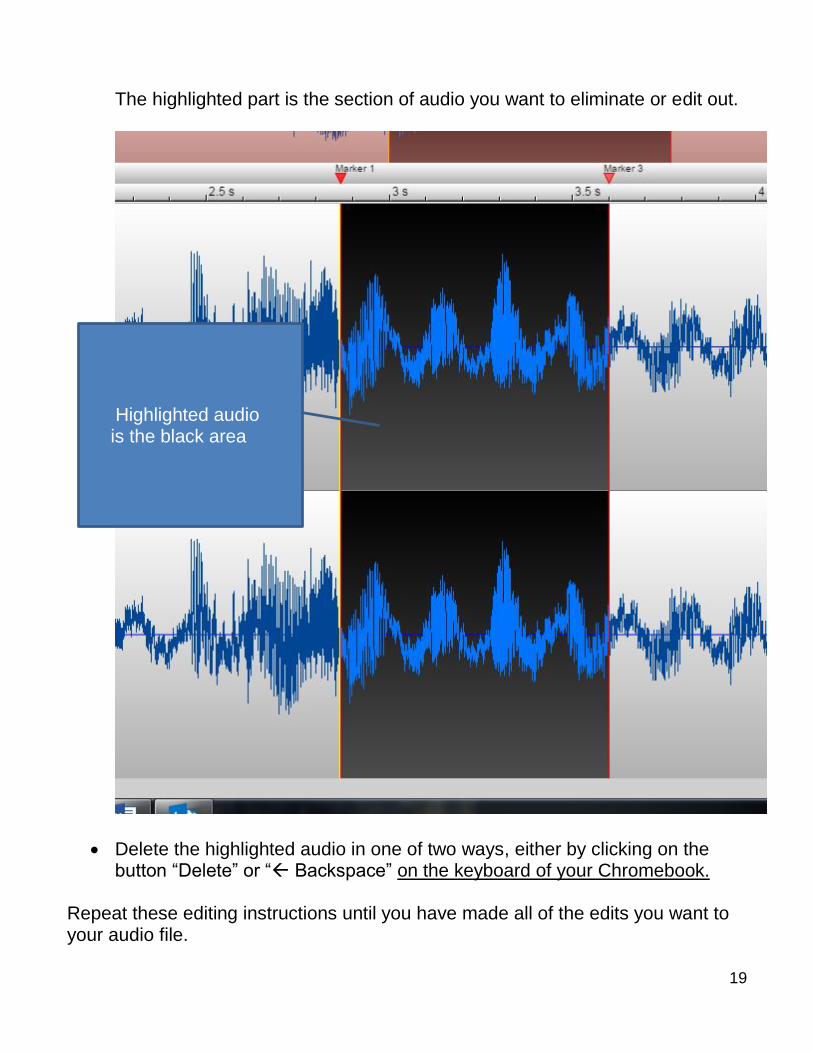
19
The highlighted part is the section of audio you want to eliminate or edit out.
Delete the highlighted audio in one of two ways, either by clicking on the button “Delete” or “ Backspace” on the keyboard of your Chromebook.
Repeat these editing instructions until you have made all of the edits you want to your audio file.
Highlighted audio is the black area

20
You are now ready to export your audio file.
7. Exporting Your File to Your Google Drive
You need to export your audio file from Twisted Wave and send it to your Google drive so you can upload it to your website.
Click on the “Export” button
This box with the green arrow in the upper right corner of your
tool bar is your “Export” button.
Click on it.

21
Click on Send to Google Drive:
You will see an export dialog box like the one below:
Choose the following settings for your file:
- File format should be MP3
- In the Title box, type a name for your podcast file
Send to Google Drive

22
- Encoding quality should be 2 Recommended
- Bitrate should be 128 kbps
After selecting all your settings, you are ready to click Send to Google Drive. You should see an Encoding icon while TW is exporting your file. When it finished, the dialog box closes itself automatically.
Send to Google Drive button
Encoding… icon
23
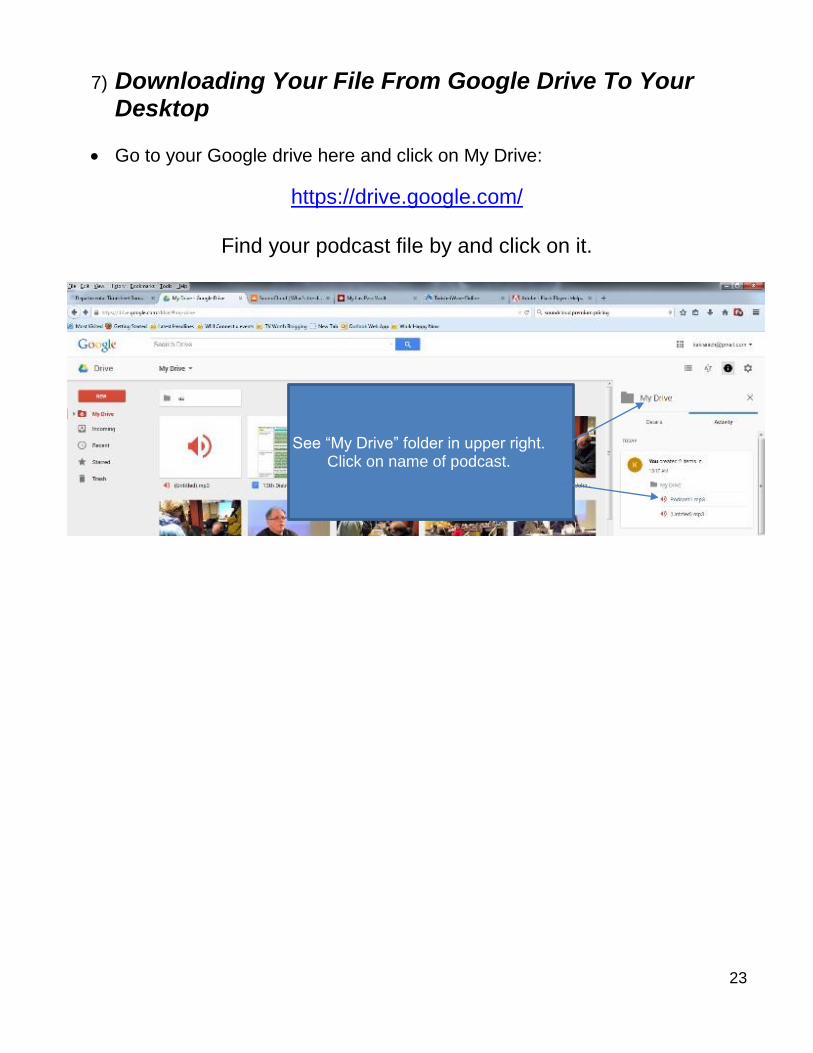
7) Downloading Your File From Google Drive To Your Desktop
Go to your Google drive here and click on My Drive:
https://drive.google.com/
Find your podcast file by and click on it.
See “My Drive” folder in upper right. Click on name of podcast.

24
Google Drive will take you to a black screen to preview your file. Google doesn’t have a player embedded so you will get a message that says there is no preview available. Ignore the warning and click on Download:
Depending on your browser configuration, Google Chrome might ask you where you want to place your downloaded MP3 file (Choose desktop so that you can find it easily). TEACHERS: If Chrome didn’t ask where to place the file, it is possible that it downloaded it directly to the Chrome download folder. In order to access it, you can:
Go back to your Chrome browser and click the Chrome menu located in the upper right hand corner and select “Downloads”
Or go back to your Chrome browser and Press Ctrl and the J key on your keyboard:
Click on Download

25
You will see a Chrome screen like the following:
Show in folder
Chrome menu
Select “Downloads”

26
Click on “Show in folder.”
Right click on the file name to copy it
Go back to your desktop and right click on your desktop and select “Paste” to copy the file to your desktop
Your podcast is now ready to be uploaded to SoundCloud

27
8) Uploading Your Podcast To SoundCloud
Go to: https://soundcloud.com/ and click on Sign in and enter the email and password for the school’s SoundCloud account.
Click on the “Upload” button.
Click the “Sign In” button
Click on the “Upload”
button

28
Click on the “Choose file to upload” button.
When uploading, the screen looks like this:
You must insert a Title for your podcast and some tags (key words that describe what your podcast is about). Then click on the “Save” button.
Click on Upload button
Add a title and some tags
then click Save
29
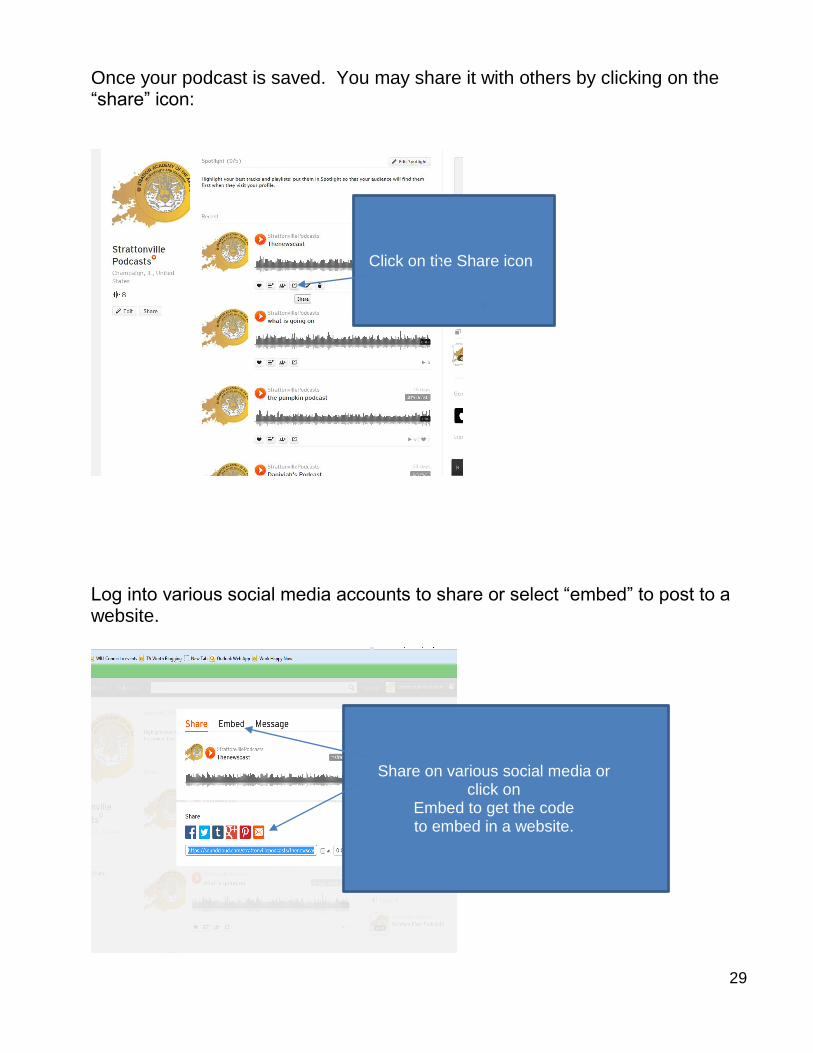
Once your podcast is saved. You may share it with others by clicking on the “share” icon:
Log into various social media accounts to share or select “embed” to post to a website.
Click on the Share icon
Share on various social media or click on
Embed to get the code to embed in a website.

30
9) Closing TwistedWave
Once you are finished with Twisted Wave for the day, close your audio file by:
Clicking on the word “File” in your tool bar
Clicking on the word “Close” from the pull-down menu
Twisted Wave automatically saves your file

31
10. Some Editing Tips
Increasing/decreasing the size of the audio file in Twisted Wave.
Click on the audio file in the bottom window view and move the wheel of your mouse forward to increase the size of the file.
Move the wheel towards your body to decrease the size of the file. Viewing Your File. There are three different ways to view your audio file: whole sound, center or cursor or zoom to selection.
As a beginner, it might be easiest to view the whole sound file to keep track of your work.
See diagram below of how to select your view:
View Tool