plugin az guide version 3.1.18
TRANSCRIPT

8/4/2019 Plugin AZ Guide Version 3.1.18
http://slidepdf.com/reader/full/plugin-az-guide-version-3118 1/56
This is an Az-Box User Guide: Put together with information by numerousAz-Box users.
1

8/4/2019 Plugin AZ Guide Version 3.1.18
http://slidepdf.com/reader/full/plugin-az-guide-version-3118 2/56
Table of contents:
Page: 3::-------AZ Box Quick Start Instructions
Page: 4::-------Setting up the az-box as a slaved receiver
Page: 5::-------Directions to bring box from PAL to NTSC format
Page: 6-11::--Setting up the Network / Formatting the Application Area
Page: 8-11::--Clock / Time & Internet Settings
Page:12-15:--FTP’ing to the Azbox using az-box editor programs
Page:16::------Deleting unwanted satellites instructions
Page: 17-20::How to North Americanize your Az-Box
Page:21::-----Hard Drives for the Azbox Recordings
Page:22-23::-Timed Recording with Azbox using MazEdit
Page:24::------How to change the Boot Logo on the azbox
Page:25::------Changing the order in how channels are stored
Page:26-30::--Questions & Answers from different users
Page:31-34::--Useful tips on the Az-Box
Page:35-36::--How to- completely clean your Azbox HD & Configuration settings
Page:37::------Western Satellite Chart from 5.0 °W to 85.0 °W
Page:38::------Western Satellite Chart from 87.0 °W to 139.0 °W
Page:39::----- ToolBox AzBox HD 2.0 Program info. Page:40::------What program are you using for your FTP Client?
Page:41::------To move your screen capture pictures from the Azbox to your pc
Page:42::------Transferring files from the Azbox to your pc
Page:43-48::- Secondary Tuners for the Azbox
Page:49-50::- How to Stream Video from the Azbox
Page:51:: ----- Installing New Firmware update using a USB stick
Page:52-53:: - Links to Azbox Editor Programs and Tools
Page:54:: ----- How to downgrade your Azbox firmware version
Page:55:: ----- You-Tube Update for Older firmware versions
The Azbox is a Linux based receiver: All Linux boxes require the owner to gain basic skills in operating.
This manual will give you those basic operating skills.
All the information contained in this user guide for the Azbox has come from many different people who are
actually using this receiver, It has been put together in one place by Stargaze with the help of Radar who
has given much information about this receiver. This was done since we enjoy this hobby and wanted to
share with others & help them as there is no real manual for this receiver.
January: 2011
2

8/4/2019 Plugin AZ Guide Version 3.1.18
http://slidepdf.com/reader/full/plugin-az-guide-version-3118 3/56
AZ BOX Quick Start Instructions Here are the basic steps to Scan in Channels. Press the HOME button and go to Settings. Press OK. Cursor down to TV Channel and press OK. Right Arrow to DVB-S andPress OK. Go to Antenna Setup and Press OK and pick the Satellite Name that youwant to use and Press OK. Set up your Satellite. LNB Freqency to 5150 for C-Band or to 10750 forStandard Ku-Band and set your DiSEqC Switch to match your setup.
Press the EXIT Button and cursor down to Sat/TP Edit and Press OK. Cursor down to the TP Frequency Line and then Press the GREEN Buttonon the Remote that says: TEXT, just above the up arrow. This will allow you to add a TP. You then add the Frequency, Symbol Rate,Polarity, Modulation, FEC and Pilot Setting. (Pilot Setting / 0 = Off / 1 = On.)Then Press OK to Save this addition. (Standard DVB-S feeds will notrequire you to input the FEC or Pilot Options.) Then Press EXIT Again and this will take you back to the Setup Menu. Cursor up 1 line to Advanced TP Scan and Press OK.
Cursor down to the Frequency line and Press OK and then go through theFrequencies to find the one that you just added and Press OK. Now see if you have Quality. If you don't, then you might need to changeyour FEC or Pilot setting, until you do have a lock and then go to TP Scanand Press OK. The Channel will scan in and then ask you to save it and say YES. Then exit all of the way out of the menu and when the bottom bar comesup, right arrow to TV and Press OK. Then you can select the TV Channeland view it.
≤
3

8/4/2019 Plugin AZ Guide Version 3.1.18
http://slidepdf.com/reader/full/plugin-az-guide-version-3118 4/56
The following has been tested on the AZ-ULTRA & AZ-PREMIUM PLUS
receivers.
Setting up the Azbox as a slaved receiverItems you should have…1) 2- high frequency splitters with power out only to one side.(I use Tru-Spec HFS-2/2150 : 900-2150Mhz splitters)2) 1- 4x1 switch: (I use a quail-tv NDS-7014)3) 1-HDMI cable4) extra cable line for the new connections5) optional**quick connectors for the end of your cable wiring**Run the C-Band line from the dish that is already in your home to the input of one of the splitters. The side the line going to the “OUT” on the splitter now connects toyour main dish moving receiver as this controls the dish and polarity settings.
The other side of the splitter without the line towards the “OUT” will go to the 4x1switch Line 1 for C-band.Now if you have ku on your dish do the same as you did above but now for ku, andrun it to the 4x1 switch Line 2.The line marked “Receiver” on the 4x1 switch goes to the Azbox. So you may needsome extra cable wiring to do this setup.Now mark your Tru-Spec HFS’s (C-for c-band & KU for ku-band)With this setup you now have one line going to the Azbox for C&ku and are notchanging out the lines whenever you want to view something on the different bands.==============================================Later you will need to make the following changes in the AzboxThe receiver will make the changes for you in the Settings menu under TV Channel-Tuner-Antenna setup under the “DiSEqC settings.LNB 1 for C-BandLNB 2 for KUNow that you have the dish connections set up your now ready to turn on the Azbox.=======================================
Let’s assume you have the latest firmware in your Azbox.This now relieves all the pressure on you for details you may not understand if you arenew to the Azbox.Hook up a HDMI cable from the Azbox to your monitor/tv set.Now you can Power on the Azbox.
The Azbox defaults to the PAL format when first booted up unless this setting has
already been changed for you so you need the following instructions:
≤
4

8/4/2019 Plugin AZ Guide Version 3.1.18
http://slidepdf.com/reader/full/plugin-az-guide-version-3118 5/56
Here are the directions for bringing the Azbox from Pal (default format) to NTSC.
If your receiver defaults to pal formatto changed the setting in the Menu from PAL, back to NTSC
You need to do the following steps using the remote keypad. 1) Reboot the receiver by the switch on the back of the unit.After it powers up and you see the menu rolling, follow these steps:
2) Down Arrow 6 Times
3) Press the OK button
4) Right Arrow 1 Time
5) Down Arrow 1 Time
6) Right Arrow 1 Time
You will now have changed the setting in the Menu from PAL, back to NTSC.
7) The receiver will ask you if you want to save your change and Press YES.
======================================================Now you’re in the NTSC mode and you should have a picture on your TV.You need to be careful while in these menu screens. If you make a change that you arenot aware of you can change the settings that will take affect after you power off thereceiver and will have to come back in and re-do the settings. Take your time!
≤
5

8/4/2019 Plugin AZ Guide Version 3.1.18
http://slidepdf.com/reader/full/plugin-az-guide-version-3118 6/56
Setting up the Network : The first items we must contend with are our Network Settings - setup parameters andaddressing. Go to the HOME button on your remote and select the SETTINGS area -Internet and take a look at what you have set up for IP addressing and all the other items.
If your in this area now write down all your settings as they will all be reset or erasedduring this process:
NETWORK: WiFi (Only on the Premium Azbox)IP SETTING: STATIC IP (recommended when using FTP)IP ADDRESS: 192.168.1.102 (assigned to your Azbox by you)SUBNET: 255.255.255.0GATEWAY: 192.168.1.1 (this is our router's base address)DNS1: xxx.xxx.xxx.xxx (fill this in from the information from your provider if you don'tknow it.DNS 2: 0.0.0.0 or just leave blank if you don't know it or if it does not apply.
This is all the information that you should have set up previously to get the WiFi or theWIRED NETWORK to connect. If nothing is recorded here (all zeros) then you haven'tset up your NETWORK yet and should do so.After this is set up you need to write down this info in case you need it later on.=========================================================Beginners should skip down now to #20 below =====================
Items 1 thru 19 should be for seasoned users only! Do these at your own risk!!!
Seasoned Users Here, we are simply starting with the basic instructions from loadinga new firmware via the USB, but we need to take a detour somewhere in the midst of theprocess. Let's start with the USB instructions that I mentioned earlier, and then I willbranch off when necessary.
1] Download the firmware to your PC (all Azbox’s use the same firmware). Create afolder for Azbox IMAGE FILES and individual folders within that main folder for eachfirmware. This is for archiving purposes, but not entirely necessary. You can save all thefirmware files simply for your own personal reasons.
2] Copy and paste the firmware you wish to update your Azbox with to a USB flashmemory stick and rename the file on that device as "patch". NOTE: You may need torename the file as patch.bin, but do not do so unless the Azbox does not recognize thepatch file when named simply "patch". The LINUX operating system is a little pickyabout the filename format, so be careful here. No harm will become of anything if yourename the firmware file incorrectly, it (the file) will simply not be recognized by theAzbox and nothing will happen - no harm and no foul.
3] Now that the firmware file is copied to the USB drive and renamed "patch", removethe USB drive from the PC and insert it into the USB port of the Azbox.
4] Press and hold the STB POWER button on the remote for the Azbox until it enters the
6

8/4/2019 Plugin AZ Guide Version 3.1.18
http://slidepdf.com/reader/full/plugin-az-guide-version-3118 7/56
REBOOT mode (4-5 seconds).
5] When the Azbox reboots, somewhere during the process, it will read the USB driveand should identify the new patch file automatically. If and when it does, the Azbox willpresent you with an option menu of what to do next. This menu will contain the
following five options:
1) USB2) NETWORK3) OTA4) Format Application Area5) Boot without updating
6] This time around, you will select option #4, Format Application Area. Select thatoption and press OK.
7] Position the cursor or arrow at option #4 (format the application area) and press OK.You will be prompted to press OK to confirm this selection, so press OK and theapplication area will be formatted.
8] Formatting the application area is fast and it is now complete, next you’re prompted topress the EXIT button to return to the previous menu. So press EXIT.
9] Now that you are back to the UPGRADE menu, you will see the same five options toselect from, now select option #1, upgrade via USB and continue from step #6.
10] You DO want to upgrade to the "patch" file found on the USB device, so press OK.
11] Your Azbox is now extracting all the features to install.
NOTE: DO NOT turn the power OFF during this process!If you do, you are on your own!
12] When the process is finished, you will be returned to the option menu. Now selectoption #5 (Boot without update).
13] This process (because of the formatting of the application area) will erase all youruser settings, so now you are starting entirely from scratch.
14] The first item you need to contend with is not having any display on the TV. This isbecause the system has reverted to factory defaults and unless your TV and entertainmentcenter matches these defaults, you will have no picture/video to view.
15] First step to recover from this is to reset our resolution settings. Observe the frontpanel display of the Azbox Premium Plus. It should say "SETTINGS".
7

8/4/2019 Plugin AZ Guide Version 3.1.18
http://slidepdf.com/reader/full/plugin-az-guide-version-3118 8/56
16] Press the remote button labeled "resolution" once. The FPD (front panel display) onthe Azbox Premium Plus should say COMPOSITE.
17] Press the < or > arrow buttons to navigate between the output video connections thatwill be used. Your choices are: COMPOSITE, COMPONENT, SCART and HDMI. Stop
on the option that you are going to use and press OK.
18] Once you have selected the output type in step #17 you will be prompted to selecteither PAL or NTSC. The display should default to PAL, but press the < or > buttons onthe remote and you may toggle between these two selections. Select the one that isappropriate for your setup and press OK.
19] Select NTSC and pressed OK. Now you have new options for your resolution.
Now for the Non-Seasoned user (beginners)----------------------------------------------------------------------Pressing “home” on the remote then left arrow 1 time (<) to settings then hit “OK” arrowdown to “display” and then hit “ok” to get to this screen.---------------------------------------------------------------------------------------------------20] 480p, 720p, 1080i and 1080p. Stop on 1080i if that fits your TV format and pressOK. Now the "settings" menu appears on your TV screen. Select what resolution isappropriate for your own equipment.
21] Now, you have a bunch of items to reset as all have been reset to factory defaultselections. Simply go down the list as it is presented.
22] Language/ Time: The language for all parameters default to ENGLISH, so you don'tneed to adjust them if you want English, but the time is incorrect.
23] TIME: use the > button to navigate over to the selection area and the up/down arrowbuttons to navigate to the selection you wish to adjust.
24] Highlight the DATE STYLE and change this to "AMERICAN".
25] Highlight the TIME STYLE and change it to "24 hour format". You select which youlike to use best.
26] Scroll down to TIME OFFSET and set it to GMT -6.00 hours (which will be correctfor central time zone). Set this to correctly reflect your time.
27] Scroll down to Daylight Saving Time" and select NO as this is now standard timehere and not DST. Again set this to reflect what is now current for you.
≤
8

8/4/2019 Plugin AZ Guide Version 3.1.18
http://slidepdf.com/reader/full/plugin-az-guide-version-3118 9/56
28] Now, you want to synchronize the time clock with the rest of the world, so scroll
UP to AUTO SYNCHRONIZE option and select INTERNET. When you select OK,
the Azbox will go to a specific URL and update the box's internal clock with the
internet clock from a specific URL. Press the GREEN button on the remote to select
or update/edit that URL if needed.
(If you are a beginner and set the internet up earlier you should be alright so
continue on at #30 below, the following is for other users)
29] Oh! Guess what! This feature failed! Why? You failed to set up your internetconnection after formatting the application area. The connection was reset and you haveto go back and restore it all.
≤
9

8/4/2019 Plugin AZ Guide Version 3.1.18
http://slidepdf.com/reader/full/plugin-az-guide-version-3118 10/56
Let’s try to restore the connection.
1] First you need to go to SETTINGS > INTERNET.
You will see that the system (Azbox) has defaulted to a WIRED NETWORK and
DYNAMIC (DHCP) protocol. You want to use STATIC and WiFi.
2] It is best if you start with a "WIRED" network connection first. Therefore, you aregoing to reconnect an Ethernet cable between the router and the Azbox.
3] It is recommended to utilize a STATIC IP ADDRESS if you intend to use FTP andTELNET
4] Now you are back at the INTERNET SETUP menu within your AZBOX. You aregoing to select WIRED NETWORK and STATIC IP. Next, you need to fill in the blanksonce again as they have all defaulted to 0.0.0.0
5] Earlier you were asked to record these addresses and now is when we need them. Enterthe information as necessary for IP address, SUBNET MASK, GATEWAY and DNS1.You may not require DNS2.
6] Once you have set all these addresses up, highlight SETUP and press OK.
7] It should connect just fine. If not, you will have to take a further discussion aboutNETWORKING on later.
8] Let us say that all went without a hitch in step #7 and continue.
9] Now, if you wish to use the WIFI connection for the Azbox Premium, you need toalter one setup parameter.
10] Simply remove the hard-wired Ethernet cable from the Azbox and in the INTERNETMENU, change the selection from WIRED to WIFI.
11] The moment you do this, my Azbox begins searching for "wireless connections" thatare available and in range.
12] It finds the wireless router and the Azbox knows that it is an encrypted connectionand displays, "This WIFI requires Security Encryption Key".
13] If you press the > button, it takes you to the identified encryption option.
14] If you press > once again, you will enter the field to type in the required encryptionkey.
15] Type in your encryption KEY and press OK. Now the button on the menu display
10

8/4/2019 Plugin AZ Guide Version 3.1.18
http://slidepdf.com/reader/full/plugin-az-guide-version-3118 11/56
"CONNECT" is highlighted. Now press OK to connect.
16] Now you are taken back to the menu screen for the internet setup. You still need tofully set up this internet connection.
17] Highlight the "SETUP button on the TV screen and press OK. This sometimesrequires a bit of time..... and possibly more than one try, but once connected, it willinform you that the connection is completed. Once it has connected it will inform you
that it has been successful.
xxxxxxxxxxxxxxxxxxxxxxxxxxxxxxxxxxxxxxxxxxxxxxxxxxxxxxxxxxxxxxxxxxxxxxx
Starting anew from step #29 we will continue.
30] Ok, let’s once again attempt to sync the clock within the Azbox with the real world.
31] This time it connects and establishes second by second accuracy for the clock.
The next thing you are going to notice is an error message that "CAN'T FINDCHANNEL LIST". Well, of course it cannot be found. It was deleted when youformatted the application area; you deleted everything and started from scratch. So now,you need to restore your channel list.
At the very beginning of all this, it was discussed how to backup certain files. Now iswhen you need to restore them.
The first thing you need to do now is access the HOME page of the Azbox and access theNETWORK service menu. Highlight all the applications in this menu and set them toENABLED. The ones you will actually need are SSHD, FTP Server and Telnet server.
File Server and Dynamic DNS require setup entries, but don't worry about them for thisapplication. They may even remain disabled and you should not need them in most cases.
Open the Filezilla application once again and connect to the Azbox. Locate the files thatwe said to backup earlier, in the first post...
Tap each one and send them to the transfer queue and then copy the transfer queue fromthe PC to the Azbox.
You are done and all items are completed! You may return to watching TV now.
Formatting the Application area is only necessary when things go really wrong - and
they generally don't. Otherwise, it is not normally required.
≤
11

8/4/2019 Plugin AZ Guide Version 3.1.18
http://slidepdf.com/reader/full/plugin-az-guide-version-3118 12/56
FTP’ing to the Azbox
------------------------------------
#1) Set up the Azbox first:Using your remote hit “HOME” (<) left arrow to “SETTINGS” Down arrow to
"NETWORK SERVICE":
SSHD: SEE NOTE 1 belowFTP SERVER: ENABLEDFILE SERVER: ENABLEDDYNAMIC DNS: SEE NOTE 2TELNET SERVER: ENABLED
NOTE 1: This item may be set to either enabled or disabled, you would need to be morefamiliar with LINUX systems than I am to be able to utilize it fully and properly.
Excerpt from wikipedia... Secure Shell or SSH is a network protocol that allows
data to be exchanged using a secure channel between two networked devices.[1] Thetwo major versions of the protocol are referred to as SSH1 or SSH-1 and SSH2 or
SSH-2. Used primarily on Linux and Unix based systems to access shell accounts,
SSH was designed as a replacement for Telnet and other insecure remote shells,
which send information, notably passwords, in plaintext, rendering them susceptible
to packet analysis.[2] The encryption used by SSH is intended to provide
confidentiality and integrity of data over an unsecured network, such as the
Internet.
NOTE 2: This item in the menu is not necessary for general use. If you select it to beENABLED, that is fine, but you don't need to set up the settings unless you are reallysavvy with networking devices and servers. This item is not required for the applicationsthat most of us would normally utilize.
Excerpt from Wikipedia: Dynamic DNS is a method / protocol / network service
that provides the capability for a networked device, such as a router or computer
system using the Internet Protocol Suite, to notify a Domain Name System (DNS)
name server to change, in real time, the active DNS configuration of its configured
hostnames, addresses or other information. A popular application of dynamic DNS
is to provide a residential user's Internet gateway that has a variable, often
changing, IP address with a well known hostname resolvable through standard DNS
queries. ===============================================================Personally, I’d set all the options in NETWORK SERVICE menu to ENABLED, whetheryou use them or not. You do not have to apply the setup for FILE SERVER andDYNAMIC DNS to be able to use the FTP or Telnet servers.
Remember the following for your FTP/Telnet Client server:
HOST = "IP address" of the Azbox
USER = root
12

8/4/2019 Plugin AZ Guide Version 3.1.18
http://slidepdf.com/reader/full/plugin-az-guide-version-3118 13/56
Password = azbox
FTP port = 21
TelNet port = 23
Remember these rules for your Azbox SETTINGS > "INTERNET":
NETWORK: WiFi or WIRED
IP SETTING: DYNAMIC (DHCP) or STATIC
IP ADDRESS: Azbox IP address selected and assigned by you (192.168.XXX.XXX)
SUBNET: 255.255.255.0
GATEWAY: ROUTER IP address
DNS1: Your internet providers gateway or "Dynamic Name Server" address
DNS2: Ignore this in most cases, just leave at default. It is used when you have
multiple internet service providers or accounts. ======================================================Set up the system to use STATIC IP addressing.
*Use FileZilla Client… not Filezilla server….Because of the way Filezilla client and MazEdit and other FTP clients operate, you wantto maintain the IP address of your Azbox as the same address and never changing it orletting it being reassigned. It just makes life a little easier. Otherwise, you have to keepchecking the IP address of your box to enter that into the FTP client setup or force yourrouter to go around that DHCP stuff somehow.
When doing so, you may want to set your router and your PC up to disable the DHCPfeature for both.On the system with DHCP enabled, you may find that the FTP Client server (FilezillaClient or MazEdit) frequently stop communicating with the Azbox when they are idle,without notice. When you want to resume the communication path, you have to tell theFTP Client to disconnect and then reconnect to re-establish the connection. It is not ahuge concern, but it can be annoying at times. The other system, with DHCP disabled,remains fully connected at all times, unless otherwise interrupted by you or by anotherprogram.
If you are well versed in networking systems, it is recommended that you set everythingup to use static IP addressing only (DHCP disabled). If you are just a common PC ownerand user, don’t bother with doing this unless you wish to learn more about networkingand routers and how everything works. It is a good experience for you, but not exactlynecessary.
Just a note, the system never disconnects the communication link while it is activelybeing used. That only occurs when the communication link has been idle for some time.Therefore, you do not need to fear that your work in progress will suddenly be cut short.It only disconnects the communication link during idle times.
≤
13

8/4/2019 Plugin AZ Guide Version 3.1.18
http://slidepdf.com/reader/full/plugin-az-guide-version-3118 14/56
The channel list backup feature that they offer in the System Information Menu does notinclude the entire antenna setting details.Only the channels themselves and the structure of the "favorite" groups are backed upand saved.
Using FileZilla Client and FTP to backup the following three files from the originalreceiver:
all_channels.dat,
DVBS.dat and
antenna_list.dat
and then selecting these three files to FTP them over to the new Azbox receiver was theonly way to restore the full channel list and the operation of the LNBF, switch settingsand motor settings as well.
It will be important to remember this, as merely backing up the channel list via the Azboxmenu and a USB memory device is NOT entirely complete. It only saves the channels.==========================================================
With MazEdit 3.0 you will find that it has a lot of really excellent perks that you can use.
It does not work well as a channel or satellite editor:
However, it works really slick to accomplish a few other things that you cannot do withother FTP or Telnet clients.
Setting up recording events / timers, capturing screen shots, downloading your channellists to view, transferring video, audio and photo files and things of this nature are reallygreat! Also, you can create and alter/edit file folders with it quite easily. It works superbfor this.
One word of caution, if you install MazEdit, do not create a short cut to the file on yourdesktop if you have windows vista. It won't always find the language library and comesup in Spanish only and cannot be altered. Install the exe file in your PROGRAM FILESdirectory with all the supporting library files and when you open the application, go to thePROGRAM FILES area to access it. For transferring files, like video/audio/photo files, either one of these applications work just fine.
≤
14
8/4/2019 Plugin AZ Guide Version 3.1.18
http://slidepdf.com/reader/full/plugin-az-guide-version-3118 15/56
You may use any FTP client server application to do this, FileZilla client or MazEdit orother, if you understand where the files are going to and what format you put the files in.
You need three files:
all_channel.datantenna_list.dat
DVBS.dat
First, your files must be converted to *.dat format before being downloaded to the Azboxand they must have the proper nomenclature. The LINUX system is highly critical of thecharacters and it is CASE sensitive as well, so every aspect of the filename has to beexact. Then, you have to know what directory to install them in; they reside in the filefolder /DISK2. There is a backup on file at /DISK1 for one or more of these files.
One thing about MazEdit, is that the program has to go out and seek several websites forextraneous information (like the latest firmware, plug-ins, channel creators i.e. Kingofsat- and news). These are not necessary and they seem to be geared more to the Europeanmarkets. These specialty site searches are part of what require MazEdit to take so long toload up and sometimes crash. If it cannot find the site, it wants to generate an error, or soit seems.
An option to retrieve the latest official or daily firmware would be nice, if it were simplyan optional menu that didn't run automatically when the program is opened.
When the satellite and channel list is opened / downloaded / uploaded, it should default tolisting the satellites by their orbital position (with an option to sort alphabetically byname if desired). Then, sort by TP frequency and polarity and then sort by channel bySID with the option to sort alphabetically by name.
Download the zip file folder and when you extracted all the files, extracted them to thePROGRAM FILES directory. Then, when you open the MazEdit application, you shouldgo straight to the PROGRAM FILES directory and open it from there, opposed to tryingto put up a shortcut on your desktop.
The most important thing I've learned after months of frustration with channel lists
is to never EVER add a satellite without also adding one transponder on it. The
Azbox firmware sees a satellite with no transponders as corruption, and "helpfully"
overwrites some or all of your satellites.
≤
15

8/4/2019 Plugin AZ Guide Version 3.1.18
http://slidepdf.com/reader/full/plugin-az-guide-version-3118 16/56
Deleting unwanted satellites: This is 1 Method of deleting unwanted satellites from the receiver ***
WARNING! These methods may not always work properly so it is done at your
OWN RISK! These different methods do take time to complete.
Always download a backup of your original list on your pc!
***Before deleting any satellites find 169.1°E Intelsat 2 and manually add onetransponder to this satellite.**** Read this entire section before trying it out! ------------------------------------------------------------------------------------------------Now, there are 3 methods I have used to edit the list.EACH METHOD IS TIME CONSUMING & THERE ARE NO EASY SHORTCUTS! #1 for beginners, its failsafe and proven and a starting point for everyone.navigate to TV Channel -> Tuners A. DVB-S -> Sat / TP Edit
the first sat should be 4.0E EUROBIRD 4, delete itnow delete the rest of the satellites but the last in the list.THIS IS VERY IMPORTANT (since the sat info resides in an indexed array)
when the last satellite is selected add the first one for your list before deleting that lastone.
now delete the last sat that was left before adding your first satellite and reboot
you should now have a satellite list with your first sat and no tp/diseqc info
this is a good point to backup your DVBS.dat file.(DVBS.dat1)
Create all needed positions now. You will only be able to use 11 character names withthe remote. Pay attention to the satellite degrees for ku if you intend to use usals.
#2 for those who can make it work.... generate a satellites.xml file and convert toDVBS.dat using Azbox editor. This Might not work all the time.
#3 if you don’t like your 11 character name’s, then open your DVBS.dat file with any hexeditor. Browse the data for satellite names and edit accordingly.
So now you have a satlist. (DVBS.dat2)if you never want to see the euro list again then copy this into a telnet window (maz hasone)
mount -o remount,rw -t ext3 /dev/hda1 /DISK1
and then ftp you new DVBS.dat file to DISK1/DISK2_backup
now you can enter your tp info and save. When your sure its all stable then again issuethe....
16

8/4/2019 Plugin AZ Guide Version 3.1.18
http://slidepdf.com/reader/full/plugin-az-guide-version-3118 17/56
mount -o remount,rw -t ext3 /dev/hda1 /DISK1
command in a telnet window an copy your DVBS.at file to DISK1/DISK2_backup andall your hard work will be forever remembered by your Azbox.
=============================================================MazEdit is a super little program for doing some neat things, but it is not useful and
not desired for many applications and especially not for editing sat or channel lists
===============================================================For nearly all other aspects (like backing up your *.dat files) I find FileZilla to be of greatimportance and highly reliable. There are other applications that would probably work equally as well or better, but I happen to like FileZilla.===============================================================Here is another; detailed, step by step, that a beginner should be able to do to delete
unwanted satellites and creating new ones that are not in the receiver. Tried and
tested using the Ultra & the Premium Plus Azbox. Read it entirely before doing this.
--------------------------------------------------------------------------------------------------------How To North Americanize Your AZBOX.
3 programs were used to do the task. All of them are in “Toolbox Azbox HD 1.2”
1) Maz3 was used to FTP the “all_channel.dat” file from the Azbox to the pc.2) Azbox Edit was used to do the actual editing3) Azbox control center ver 1.1(do a goggle search to download Toolbox Azbox HD by Xonic Team which has
all the programs loaded into 1 or go to page 52 in this manual for links to
porgrams)
Using Maz3Setup your Profile: Name = Azbox
IP: = 198.168.x.xxx (fill in the address to match your Azbox IP Address.)*IP set here to make it easier for most people*FTP Port = 21 Telnet Port = 23 Login = root Password = azbox
(login & password are case sensitive; all lower case)
Under OptionsStyle = Office 2003 Classic * again set for your preference* Language = English (or whatever you prefer)Now press the “Connect” button above the profile section.Then click on “Channel List” over on the left side & then press the Green down arrowbutton which is located above the word “Name”.Your channel list from the Azbox should now appear on the left side in the large box.Directly to the left of the green down arrow is the “SAVE” button.
17

8/4/2019 Plugin AZ Guide Version 3.1.18
http://slidepdf.com/reader/full/plugin-az-guide-version-3118 18/56
What you need to do is to save the channel list to your computer, where you know itis. There will be 3 files saved.all_channel.dat
antenna_list.dat DVBS.dat
Once this is saved to your pc, move on to the next step. Now, make a copy of the folder you downloaded the files to, and save it elsewhere on
your computer. This is your backup copy.
Now open AZ Edit (your going to edit the sat list and the unwanted tp’s)Once Azedit is open go to the “File” button and click on “OPEN”Now find the all_channel.dat file where you just saved it on your hard driveHighlight it so it appears on the lower part of the box and then press “ open”.Then click on “Organize Sat & TP”Do not worry if you get a box popping up saying "subscript out of range"
If you have to click on ok to make it go away then do so.The satellite list is now on the screen in the middle box.
Go all the way to the top using the side bar in the program and highlight the very topone which should be an Eastern Sat. You can tell by looking to the left side of thescreen next to the satellite name is the Degree. You do not want any that show “E”.Now move your mouse over to the delete button under the satellite list and keepdeleting. When you get to 169°E, STOP: Now save the file under the “File” menu.
Sometimes this program is very tricky and temperamental and crashes every time youreached this point.To get around it: Follow exactly what is written here, then re-open the file and nowinstead of deleting the very top satellite go to the 2nd on the list and delete it first, thendelete the top satellite name.Delete every satellite but the very last one.Once you have only 1 satellite left then add your first one. There is a satellite chart onpages 37,38 of this guide for a handy reference tool. Now after you have added onesatellite: remember to put in 1 tp for each satellite added using AzEdit., then deletethe old satellite from the original list. You have now cleaned out all the satellite infofrom the factory. If you want to separate your C & KU satellites it is recommended to start at
139°W and work your way to 5°W. Have a printed list handy of each satellite andits location: The ku satellites on pages 37-38 below are off from their c-bandcounterpart by (.01°). This is to keep the Azbox happy since the computer may notlike 2 satellites at the exact same location. Some have said this is not necessary tospace them apart and the Azbox is fine with 2 satellites having the same location. So now you’ve reached the point where you have only the western sats on your list.Saved it to your pc but just for caution make sure there is 1 TP on each satellite you have in your list. Why? Well we have found that deleting every TP causes thereceiver to go crazy and revert to the old files. Leaving one TP under each satellitesatisfied the receiver and it has always remained stable doing it this way
≤
18

8/4/2019 Plugin AZ Guide Version 3.1.18
http://slidepdf.com/reader/full/plugin-az-guide-version-3118 19/56
Using Azbox Edit worked fine for this. Pay attention to satellite settings here whenadding satellites or you have to do it on your remote for each satellite after youupload it to your Azbox. Remember to add 1 transponder to each satellite. You
must do this! Do NOT add any TP’s from the website in the program or you
may corrupt your new satellite list.For Satellite settings: using az-edit with a system slaved using a 4x1 switch:
LNB: Type = USER DEFINED :: LNB Freq.= 5150 c/band or 10750 ku::
Power = ON :: DiSEqc: >set to your specifics, my case was LNB-1 for C and LNB-2
for ku band satellites. When you have finished your satellite list, then open the program, ACC (Azbox
Control Center). Go to “Connection” (top right) click on it and set up yourconnection again using the same info you did for Maz3 near the top of this note.Add the profile or a new profile here so it will always be there for the future.There is also a Language setting here under Connections so set it up the first timearound here.
Now…. Open the Tools-2 button
Everything should be setup on this page so DO NOT UNCHECK ANYTHING
HERE! Now Stop for a second and make sure you have the Azbox turned on and connectedto your internet. Do not proceed until you have done this!After you have verified your Azbox is connected now on your pc:Look on the left side for a button called: send to Azbox and click on it. A box willappear asking where your file is so go to the folder you saved it in and upload theall_channel.dat file. The new channel maps are now being sent to your Azbox and the Azbox will rebooton its own, do not turn off your Azbox on your own, (manually). After the Azbox has rebooted go into your settings using your remote find…TV Channel:: Tuner A.DVB-S:: Antenna Setup.Now setup your LNB Frequency and DiSEqC settings if you have it set up on eachsatellite, when your done, FTP them back to your pc using Maz and your settings willbe backed up on your pc.I found that after I reset the Frequency settings on just a couple of satellites that werenot set proper before then after the edit I started over by downloading it to my pc andonce I was satisfied all the new changes were there I use the ACC program to re-sendit to the Azbox. Now the settings are set in both the backup files along with the onesin use. If the box wants to revert back now it is from this starting point.
The trick of all this is the Azbox control center program.Not only will it write the file to the Azbox and reboot, but it alsouploads all 3 files in disk 2 and additionally rewrites in disk1 \ disk2 backup file dvbs.datwhich the other channel editors do not do. The back up file is what causes all theproblems with the satellite list changing back to the factory default on Azbox users. Nowyour backup file is set for North America and if you done everything written above, you
19

8/4/2019 Plugin AZ Guide Version 3.1.18
http://slidepdf.com/reader/full/plugin-az-guide-version-3118 20/56
also deleted all those TP’s that are no good and now your blind scan should improvetime-wise. I am now doing a blind-scan on some satellites in under 7 minutes.
If you had scanned in some channels before, on your Azbox they may no longerwork, so you want to go in and Delete all channels. Click on Home>Settings> Data-Re-Set, enter password (0000) then press Delete All Channels.
Once you get re-setup and you have a channel list that is a good starting point for you,it is recommended you ftp it to your pc after all the settings have been made for yourset-up. If anything happens in the future you now have a solid starting point and onlyhave to use the Azbox control center program to upload your satellite and channellist.
This has been tried on firmware version 4890 & 5020 and on the Az-Ultra & the Az-Premium Plus receivers.
After playing around with the Azbox’s, using the above directions, I then used the
AzEdit program and re-named the channels I had in the Azbox, Now instead of showing a frequency I have the actual name. Once again, I downloaded it to my pcusing Maz3 and after editing uploading it using the ACC program.This will be overwritten if you do a blind-scan on that satellite in the future.There is no permanent way to re-name a channel and have it stay permanent.
The only potential pitfall I can foresee is what will happen if you install a newfirmware to the Azbox. You will have all those Eastern Sats back in if it is installedalong with new firmware updates, but if you have a folder on your pc with the lastchange you made using this procedure all you have to do then is to open ACC andupload the all_channel.dat file and your good to go once more.
Azbox HD Premium is a true High-end receiver, with two plug and play tunerslots (You can make combinations as You like it with DVB-S, DVB-T and DVB-C ).As this receiver is capable to receive all kind of signals, from satellite,terrestrial and cable networks, it is also complete Full HD 1080p media playercapable to preview all kind of media ( video, audio, pictures ) contents. Alsoit has integrated plug-ins which allows you to Browse internet, RSS Reader andYou Tube player. You can enjoy in this internet entertainment without connectionyour Azbox HD Premium to Your router with wired cable, because Azbox HD Premiumcomes with integrated Wi-Fi module. More info on the tuners can be found here on pages43-48.
≤
20

8/4/2019 Plugin AZ Guide Version 3.1.18
http://slidepdf.com/reader/full/plugin-az-guide-version-3118 21/56
Hard Drives for the Azbox Recordings
Use SATA drives! The “Green” Drives run cooler and are recommended for the Azbox.It is also recommended that you not use a larger HDD than 1.0 TB as I have read thatanything larger was not supposed to be compatible. It might be more akin to "we don't
guarantee the results", opposed to "it won't work". But, I have read this on the officialAzbox site. A 1 TB HDD will give you plenty of space.Two types known to work decently are these models…
Samsung HD103SI (p/n 61823-B741-B25GG) 1000GB/R54/32M
Western Digital -1 TB SATA HD WD10000CSRTL
Hook the connector wiring (already in the Azbox under the top panel) up to the driveand put the cover back on. Then go into the settings menu on the Azbox to Storage.The device should be recognized by the Azbox and then ask to format it. Press yes toformat the drive if it gives you this option.It takes less then 10 minutes to format a 1tb drive.
Follow the directions on the screen. Do not power off the receiver at anytime andleave the receiver reboot when it wants to do so.
You Can Not Rush This Process If You Want It Done Properly!
The az-box will not record a high bit-rate program without artifacts. This has been aknown issue for some time. I believe it should record ok up to 29.997, anything more itdoes stutter and breakup while playing the recording; but viewing the program whilerecording is fine. There is not a fix for this as of this writing.
Now try to record a program:
Use the menu button and highlight record then press enter.A Menu will appear on the TV screen with the time for the recording of the program. If you want to record this, press yes. The receiver should now be recording your program.To stop a recording you have the press the red record button again and a menu willappear asking if you want to stop recording. You may have to press this twice.
To delete a recorded program: Press the menu buttonArrow down 4 times to “Recorded program” press “ok”Your recorded programs should now appear in a box on your screen.Arrow to the program you want to delete and using the “check” button press ok anda check mark will now appear next to the ones you want to delete.Now press the “Menu” button and a box appears with…Play SelectionSelect AllCancel allDelete SelectionDelete all.Go to “Delete Selection” press ok.Another box will come up with…
21

8/4/2019 Plugin AZ Guide Version 3.1.18
http://slidepdf.com/reader/full/plugin-az-guide-version-3118 22/56
Information2 recorded file has been selectedwould you like to delete?Yes / No
The yes was already highlighted so press ok .
The 2 files are now gone leaving only one program left.The receiver will display the channel name under the programming and the date recordedso at this point that is all I have to go by.To change the name you go to settings > file manager > arrow to TV Recordput a check on the one you want to rename, then hit the ‘Menu” button which will nowhave the Rename option for the file.’===================================================Now if you want to do a timed recording using your remote:
Step 1) set up your time correctly in the Azbox……
After that is done now you want to do the following…Using the “Menu” button arrow down to” Reserve Record/Play “The top box will display the channel you are going to record from, make sure it is correct.The second box is “Part” set this to “Record”Repeat box is next, if you want to do a 1x recording set it to “ Once “Start Time:This is where I kept hitting the arrow key and found that is not correct.To change the am/pm use the “OK” button on your remote and this will toggle betweenam/pm. now > arrow over to the time.
(Be careful as the time may want to change back to AM when you go to the next line somake sure your time is set correctly before moving on)
To get the correct time you want to highlight the time and then enter it using your remoteor keyboard numbers. Now set the date in the receiver.Then set the time duration. Again these are preset so you have several choices to choosefrom using the > arrow key on the remote.The target on my receiver is HDD.The last line is “Program” this is where you can enter the name of what you arerecording.Now after this is set up arrow down to the Reservation button and press ok Another box comes up quickly asking if this is ok (Hit the “OK” on the remote quickly,and it is now in your reserved list of recordings.)
If you’re going to be out and do not want the receiver on all the time put it in the “Sleep”mode and your timed recording will go off properly. If you turn off the receiver it will not record the program and it may clear it out of the reserved list. At least it did it on mine when I powered off the receiver one time.≤
22

8/4/2019 Plugin AZ Guide Version 3.1.18
http://slidepdf.com/reader/full/plugin-az-guide-version-3118 23/56
While in a timed recording, if you had it in the sleep mode, you will not be able to see thepicture you are recording on your TV /monitor, while it is recording.========================================================
As for the recording on the Azbox I found that it will only do a timed recording in
increments of 10 minutes. I have not found a way yet to have a fixed recording for just 45
minutes or a specific start and end time using your remote. To have a fixed timed duration of your choosing you need to use MazEdit, the instructions are below.
Timed Recording with Azbox using MazEdit:
MazEdit 3.0 is the way to go here!Install the MazEdit 3.0 program on you pc. Go to the Maz configuration menu. Set it upwith the appropriate IP address for your Azbox, FTP port (21), TelNet port (23), login
(root) and password (Azbox) and background and language that you desire. Get it toconnect to the Azbox.
Click on CHANNEL LISTS and then the "DOWNLOAD" arrow to transport yourcurrent channel list from your Azbox to your PC.
Find the satellite that the channel is on, find the channel in the list and LEFT click on thechannel name. A sub menu will appear. Look for the option "SCHEDULERECORDING" and right click on it. A new menu box will open.
The CHANNEL box should now be fully filled out for you with the satellite, TP andchannel information required.
In the EVENT box, fill in the blanks as you wish to name the recording title, select the
destination device (HDD/USB1 or 2) and the start date. Then, you can select the starttime and the length or duration of the program. Then select the repetition of recording(one time, daily, which day, etc). Then click on ACCEPT.
Next, move over to the panel on the right side of the MazEdit's screen and click onRECORDING (RED SQUARE) and locate your newly created recording (reservedrecord) and either edit it if you wish or locate the upload arrow near the bottom of thatone panel to upload the changes to your Azbox. You will be prompted with a messagethat states that box will reboot after the upload for the changes to be installed. Click onapprove or continue or YES or whatever it says and your box will reboot and therecording session will be installed.
You may edit this recording event down to the minute of the start time, and adjust the endtime by fixing the DURATION time.
≤
23

8/4/2019 Plugin AZ Guide Version 3.1.18
http://slidepdf.com/reader/full/plugin-az-guide-version-3118 24/56
How to change boot logo in Azbox.
Connect your box via FTP client (WinSCP)go to directory / MMP/hd/program/image/startup-simple there you will find "boot_logo.png"
You can change it with one of your favorite pictures but don’t forget to make backup of the original one.
Picture must be in .png format, 24bit and size 960x540.
Just FYI, to clean the Azbox, first reset all data in the menu. Then using a USB stick withnothing on it but patch dot bin, (or a clean hard drive with only the firmware on it) youwill have an option to format the application area. Do that, and then reinstall the
firmware. Test it to make sure it works, and then reload your channel files. That way, if you have problems with your box, your channel list is not corrupt.
And don't forget the manual tells you NOT to reboot the box with an external USB
drive connected (an internal drive is OK).
≤
Some Questions & Answers are on the next few pages.
24

8/4/2019 Plugin AZ Guide Version 3.1.18
http://slidepdf.com/reader/full/plugin-az-guide-version-3118 25/56
AZbox Guide Stores Channels in Alphabetical Order,Can this Be Changed?
Scanned in 99.0°W in my DISEqC 1.2 setup and found my channel list really different.
At first I was confused but then I figured it out. It seems the Azbox arranges ALL theChannels in Alphabetical order! So all 363 channels I have scanned in are arranged inalphabetical order, that is 97.0°W's 274 channels are mixed in with 99.0°W's Channels.Since I didn't know where all the channels were, I found the Dish constantly driving Back and forth from 99.0°W to 97.0°W. That's okay but it was a bit annoying.
My question: Is there a way to have the AzBox store the Channels on the Guide in anumbered block via each new Satellite scanned in rather than arrange them inAlphabetical Order? The way I'm used to is say you scan in one Sat and get 200 channels,then the next Sat you scan in is from 201 to 250, so you know the 2nd Sat is from 201 to
250 but when its done alphabetically, all bets are off unless you know each channel verywell!
When viewing a program or have the az box on, hit the "OK" button.The channel guide comes on listing all your channels.While in this section; if you hit the Red button on your remote, (SUB-T) it will list all thechannels by alphabet.If you hit the green button on your remote (text) the channels will list by Frequency.If you hit the Yellow button on your remote (LANG) the listing returns to default.
Alphabet = Red
Frequency = GreenDefault = Orange.----------------------------------------------------------------------------------------------------------
Each time I hit the ok button I'm in the All Channel Menu screen, I can check the ones Iwant to move to FAV but how do I get to the FAV menu.The "ALL" is highlighted in blue and I have yet to figure how to move this designator tothe others on the top line there.
While in the channel screen hit the exit button once and it takes you to the top screen tomove between, ALL, Satellite. FAV. ect…
≤
25

8/4/2019 Plugin AZ Guide Version 3.1.18
http://slidepdf.com/reader/full/plugin-az-guide-version-3118 26/56
Some questions & answers: From other Azbox users:
How are you getting the Azbox to see your pc's hd?
Just go into the File Manager (on the Azbox), and select "Network", and it will pop upyour LAN, and list any directories that you have shared on your network (or your
computer if you only have the one computer). If you have a video file that the Azbox iscapable of playing, just highlight it, and hit the OK button, and it will play. Of courseyou'll need a network fast enough to play the files, but most people now have a 100Mbpshard wired LAN or a 54 Mbps wireless. I can play up to the ~20 Mbps Azbox recordinglimit via a wired lan, and can play SD and low to medium bitrate HD over my wireless.To me, it's much easier than transferring the files to the Azbox. Besides lots of programsI've recorded off sat that I have on my computers, I also have a bunch of old TV showsthat I bought the DVDs of, and have saved the episodes on my hard drive, and if nothingis on regular TV, I just go into the Azbox file manager, and pull up an old Get Smart,Mork & Mindy, Taxi, Bob Newhart, Gilligan's Island, Batman, etc, etc.In addition to the video programs, you can do the similar things with photos and music
files. If the Azbox HTTP channel thing worked better, you could stream liveprogramming from other tuners to the Azbox too, but the Azbox seems to choke if thebitrate is more than something around 10 Mbps. I can stream live programming at the~20 Mbps limit via UDP channels, but I don't have a very convenient way of doing that, Ihave to send the stream to VLC, and have it recode it as UDP, which is a pain.
Does anyone know how to change the blind scan parameters on the Ultra? I can changethe first number of the freq. and symbol rate but nothing happens when I try to enter thenext numbers?
…….. Use the del/back key on your remote.
Does the Azbox ultra have panel on top that comes off so you can install an internal harddrive in it?
… Yes the ultra has removable panel on top so you can install an internal hard drive.
What the password is for "Data Reset"?
…..… "0000" (four zeros)
≤
26

8/4/2019 Plugin AZ Guide Version 3.1.18
http://slidepdf.com/reader/full/plugin-az-guide-version-3118 27/56
Some questions & answers: From other Azbox users:
I can't get The CW Networks to lock at 91°W on the Azbox. How do you enter more thanone line of PIDS? The Azbox only displays one line
….…..you must add the sid info: 1, 2 & 3 .After entering the fist channel put the sid # as 1, then save it, and then press the textbutton on remote again to add another channel to the mux.
----------------------------------------------------------------------------------------------------
Will the Ultra record and play back from the internal hard drive ?
…….. Yes, It has door on top for easy drive access for installation of SATA drive.
Some channels I am watching have some strange line and bars across the top of thescreen, what is going on?
..… Under Settings-Display change the “screen Format” and/or the Display format.On my HDTV I have the screen set to 16:9 and the display set to Pan & Scan for this veryreason.
How do you add a west satellite to the Azbox Elite? It usually tries to show up as Eastand not West ?
….… Once you have typed in the orbital position (i.e 125.0) simply press the > buttonon the remote and it will adjust the E to W. Then press OK to save.
what is the downside to leaving hardware acceleration turned on?
…… The downside would be if you came a cross a feed that used some scheme that thedevelopers didn't write a method to pass through the GPU.
Just as an example that's highly unlikely:Let just say you run across a feed that is transmitted in VC1 (the default codec for Blu-
Ray/HD-DVD) instead of MPEG2 or MPEG4.And (in this example) the Azbox has no software telling how to accelerate this throughthe GPU.The system will bog down and stutter as the feed is fed to the GPU only to be rejectedand sent back to the CPU for processing. If you were to turn off hardware accelerationyou could get a watch able show.
Some questions & answers: From other Azbox users:
27

8/4/2019 Plugin AZ Guide Version 3.1.18
http://slidepdf.com/reader/full/plugin-az-guide-version-3118 28/56
Silly question but how do you know what TP's are not active to be able to delete them?
…… What you should do is to delete them all, active or not. Then go to blind scan and itwill scan them all and put the good ones back in.
Can I add a second tuner card to the Az-Elite receiver?
….. No. The Elite receivers do not allow you to add a second tuner card to them.
How do you make a screen capture picture?
…. Press the “check” button on your remote and a screen image will be made. You do
need either a hard drive or thumb drive installed to take a screen shot this way.
Otherwise you can use Maz to make a screen shot.
*a screen shot of the menus can not be done using the remote, you will need to use
Maz.
Can you turn off an Azbox via the remote?
What happens is if you hit the power button on the remote, it takes you to a menu thatgives the options of SLEEP, SHUTDOWN, REBOOT, CANCEL. SLEEP, REBOOT andCANCEL seem to work, however SHUTDOWN takes you into a screen that says it'sshutting down, then comes back to a page that says to shutdown now. Ie.. it seems like if you use that option, you still have to get up and manually turn off the switch in the back.I assume that it is just closing down any open files, and/or un-mounting any directories,etc, but I was under the impression that this isn't necessary with newer versions of firmware anyway, and I've never had any issues with using the switch without doing thisfirst. I believe that the "SHUTDOWN" via the remote only prepares the system to be
powered OFF from the rear switch (just like shutting down a PC), but whereas the PCactually does shut itself down, we still have to hit the power switch on the Azbox.
≤
28

8/4/2019 Plugin AZ Guide Version 3.1.18
http://slidepdf.com/reader/full/plugin-az-guide-version-3118 29/56
Some questions & answers: From other Azbox users:
Can you turn off an Azbox via the remote? (cont.)
Linux systems _CAN_ have a tendency to write to volatile memory, that doesn't go to
disk or non-volatile memory until the partitions are un mounted. With some other Linuxsystems, I have tried to do this manually when shutting down, but I don't really knowhow necessary it is, because like you, I have never seen a situation where not doing thisresulted in problems.With the Azbox, I seem to remember one of the firmware upgrades that said somethinglike “safe shutdown”. It does seem to gain us very little except for the "security blanket"feeling. I have never tried the "SLEEP" function from this menu. I had assumed that itmeant "STANDBY MODE" as opposed to a full shutdown. From your experience, itsounds a little quirky. I do use the "REBOOT" quite often (compared to all others listedin that menu). That works really nicely when loading the firmware.
Well, I just tried having both a telnet and ftp session open using the ACC and then was able to upload thelist. After searching the A-Z guide, I didn't see this procedure of having both a telnet AND FTP sessionopen in the A-Z pdf manual. Anyway, even though I uploaded (or thought I uploaded) a channel list of 10channels and 2 satellites, when I went into the Azbox setup menu, I got a box stating that there are 0 (zero)satellites. So, I tried a second time and had success. 2 satellites and 10 channels show up now. What ahassle but I'm glad that I got it figured out now. Now to add in all the other stuff I want. I suppose I can usethe Azbox to add sats and then blind scan them and then retrieve the new list with MazEdit and then sendthem back with ACC all will be well? **Not everyone has this problem***
I used Azbox edit and added all my satellites from that program. I do not trust the Azbox to add thesatellites and wanted to do this task just one time so the editor program made it easier for me.For my setup I always put in "user Defined" for the LNB type then made sure the LNB Freq was set up
(5150 for c-band:: 10750 for ku satellites) along with the DiSEqC settings if you use them.Just make sure you add one transponder to each satellite. I used a dummy like 3600000 25000 3/4 HDVB-S QPSK for each satellite then when doing a blind scan I just deleted my dummy transpondersettings.Do not forget to put in the degree settings. That is why there is a chart on page 37-38 to make it moresimplified.If you use Azbox edit or any other program start at one end and work your way to the other. I started from139.0°W all the way to 5.0°W.I also added a spare satellite at 99°W/97°W/89°W and kept the degree part in the AzEdit program off by.01°. The spacing was done so the az computer would not reject the satellite, (don't know if it would or not butwhy take the chance) and also since there are some frequencies that are part time at these locations that areeither so close or using the same freq. so I can add the extras on the spare and still keep the main ones on
the main sat.
≤
29

8/4/2019 Plugin AZ Guide Version 3.1.18
http://slidepdf.com/reader/full/plugin-az-guide-version-3118 30/56
I understand what you did, you didn't use the ACC program to send your files back to
the Azbox. This step is necessary because the ACC program can access the read-onlyDVBS backup sat file list stored in the DISK1 folder. The ACC program generates aTelNet command that temporarily allows this file to be written to, then writes your newfile to it and then sets it to be read only once again. If you do not use the ACC program,the original factory list is still residing in the DISK1 folder. In certain instances, thesystem accesses this file and when it does, it pulls some of the old data back out andreinstalls it. That is why you witnessed the old European and Asian sats reappearing.
Using the procedure to North Americanize your list and primarily using the ACCprogram to upload your lists to the Azbox prevents this as it overwites that backup filewith your data.
You will need to re-boot the receiver for this to go away.
≤
Arrow on Right Hand Side of AZbox Screen - Can it be Deleted?
pressing the resolution button I noticed the display was on the screen on the right Can this >arrow on the TV screen be removed or is it always there?
I was going through and aligning the arch on cband when I noticed that I was missing a bird. Iwent to go add the bird in via the remote and the azbox spazed out. Upon rebooting, I wassuccessfully able to read in the bird I was missing and I noticed that the sats I deleted (asianand european) appeared out of no- where in the channel list where they were not before.
30

8/4/2019 Plugin AZ Guide Version 3.1.18
http://slidepdf.com/reader/full/plugin-az-guide-version-3118 31/56
Tips:
When in the TV mode press the OK button twice for the channel guide to appear.--------------------------------------------------------------------------------------------------While viewing a program press the “Del/Back” button and a pop up box will appear onyour screen showing you the last few channels viewed. Use the arrow key to highlight
one and hit ok, takes you back to the previously viewed channel. Nice way to go back toa channel you wanted to watch earlier.--------------------------------------------------------------------------------------------------The Elite Azbox remote is identical to the Azbox Ultra.The Azbox Elite is no longer available, it was the basic model.-------------------------------------------------------------------------------------------------The Azbox Premium adds wireless networking, and internal Sata drive cable to Elite, buthas poor blind scan.-------------------------------------------------------------------------------------------------------The Azbox Premium Plus has hardware blind scan, wireless networking, room for anexpansion card ( but there are none available for North America, unless you get another
DVB-S/S2 card ). Room for internal Hard drive with SATA drive cable, (HD notincluded) Front panel display and key functions.-----------------------------------------------------------------------------------------------------The Azbox Ultra, which is actually more basic than the Premium Plus, and replaced theElite. It has true blind scan, external (USB2) hard drive attachment, no front paneldisplay, setup for wired ip.------------------------------------------------------------------------------------------------The Azbox won't store a new transponder's info if it is close in frequency to an
existing one in your list. ------------------------------------------------------------------------------------------------------For Faster Blind scan.First delete all the stored transponders on the satellite you're going to scan.You could keep the active ones but get rid of everything else. Remember…..The Azbox won't store a new transponder's info if it is close in frequency to an existingone in your list.If you are using a standard LNB, set the maximum scan frequency to 12200 then set thestep rate to 4000 KHz.Change the minimum SR to 2500 instead of 1000. This will dramatically reduce the timespent doing a blind scan.
You should now be able to blind scan on the Ultra in about 10-12 minutes instead of 20minutes. You might miss some really low SR feeds, but it is much faster then it was.
----------------------------------------------------------------------------------------------------- Azbox Premium Plus and firmware 0.9.4931.
Record a program from your favorite station. Then, during playback of the recording,press the numbered keys (0-9) on your remote keypad. This allows quick access tocertain chapter marks. Instead of using the |<< or the >>| button to fast forward or back up to a certain point in the program, you can use the numeric keys to go to a "set" chaptermark.
31

8/4/2019 Plugin AZ Guide Version 3.1.18
http://slidepdf.com/reader/full/plugin-az-guide-version-3118 32/56
Tips:
I have been playing with this new 3877 firmware. I do not notice if it has happened withthe earlier versions, but this one seems to try to default to PAL every chance it gets, soplease be aware of it. It happened once when I tried an AC restart, and just now againwhen I performed a Data Reset using the "Factory setting".
If you have a PAL capable display, no harm done. But for those of you with no PALcapability, you will not be able to see clearly enough to navigate the menus enough torecover to our NTSC standard. This would result in a rapid vertically rolling picture Torecover, you will be forced to resort to our old "blind man's bluff" method.
1.) Press the Home button if you are not already in the Setup menu.2.) Press left arrow once to get to the Setup menu if needed.3.) Press OK to bring up the menu. It takes about 2 or 3 seconds for the menu to change,so be patient.4.) Press down arrow six times to get to the Display choice.5.) Press OK and then right once to get to the Display menu.6.) Press down arrow once to get to the Video Format, and then right arrow once to getback into NTSC. You should now be able to temporarily see the menu, but within maybe10 seconds it will revert to PAL. Just toggle the change (PAL vs. NTSC), and then leftarrow once to save your choice.-------------------------------------------------------------------------------------------------------If your Azbox is connected directly to your internet router with a reasonably fastconnection, check out the following. There are 4 Russian channels viewable. This workswith the new 3877 version, I am not certain of the earlier versions since I have it onthose.
Press Home and then choose Setup.Go down to TV Channel and press OK.Right arrow to IP Channel.Press OK, and then set the Protocol line to HTTP using the right arrow key.Go down one line to the TV Type and then right arrow once from the Normal choice toinstead read kartina.tv. You do not need to type anything in here, it is appearing directlyon the menu by itself. The other fields such as Address, Buffer Size, Username andPassword are already set to default for this signal.Select Save and press OK when you are done. The receiver will connect to the internetand it indicate that 4 channels were found.Press the exit button twice and then right arrow once and then press OK to get back into
the TV section.This in effect adds you another "satellite". While in your normal viewing position; pressOK to bring up the "Channel Selection" screen. Press exit once and then move theheading to the SATELLITE setting. You should see your current programmed satellitesas before, but you should now have an additional one named "IP Channel". If you are notable to find this channel, you may need to perform an AC reset (toggle the rear panelpower switch off a few seconds and then back on). This is where I first had my first PALincident, so be aware.
32

8/4/2019 Plugin AZ Guide Version 3.1.18
http://slidepdf.com/reader/full/plugin-az-guide-version-3118 33/56
Tips:
Once you have an "IP Channel" satellite choice, you should see the 4 channels under thatsatellite. My four viewable channels did not appear until after I had performed a "FactoryReset", which again defaulted into PAL, but after getting back into NTSC mode I wasable to view the channels. If using a factory reset, you will loose all of your existing satsand channels. And after the master reset, I still had no IP_CHANNEL satellite, but afteran AC reset, it was then usable.
My internet access is not the fastest, so my video goes in and out, and sometimes doesnot view at all (black screen). But when it does, the video quality is surprisingly good.Patience is a virtue here.
-----------------------------------------------------------------------------------------------------
The IP address on an AZ is displayed in "Settings" "System Information" screen menuand also in the "Internet" menu. It will be a number like this: "192.168.0.xxx with the x’s
being assigned by your DHCP server. If you're doing an "adhoc" network deal then thosenumbers will be 169.254.0.xxx.
If you have a router that you are connecting your AZ to then it will automatically
assign an IP address to it that will appear in both those places.
-----------------------------------------------------------------------------------------------------
About IPTV; how about IPTV from satellite. I tried playing around with that the otherday with a known satellite IPTV business tv service but I didn't have any luck becausesome places to put some parameters were missing.
I've concluded for the AZBOX, IPTV only works with internet IPTV and lacks
enough data inputs to be able to take a satellite IPTV stream and display it.
-------------------------------------------------------------------------------------------------------
I understand that some people have specific expectations from any receiver they buy, andwon't be happy if a receiver won't do what they want, but other people have differentexpectations. ALL receivers have their good points and problem areas. Anyone lookingfor a receiver should consider both good and bad, and evaluate the importance of bothbased on the way they intend to use the receiver. Basically, I don't think that the Azboxdeserves the negative press it has received.Relative to the changing channel format and problems encountered when changingfirmware versions, I think that it is true that there has been ONE relatively recent changein format, however it never affected me. I think the error in the original scenario is goingforward and backward in firmware versions. I think it's really asking a LOT of anycomputerized device to go backwards in firmware, and expect it to understand changesmade in future versions. Generally when changes are made in computerized devices, thenew versions can be expected to understand old info, but it’s not reasonable to expect oldversions to understand new info.
33

8/4/2019 Plugin AZ Guide Version 3.1.18
http://slidepdf.com/reader/full/plugin-az-guide-version-3118 34/56
Tips:
So basically, if you revert to an older Azbox firmware, I would recommend re-formattingthe application area, and then put back the 3 .dat files you were using with that olderversion, and you won't have any problems. Going forward in firmware, you generallywon't have any problems, as long as you replace all three .dat files.
When problems DO occur, I have generally been able to get things working again byreplacing the DVBS.dat file. This is because the Azbox saves a backup copy of theDVBS.dat file, and if whenever it detects a problem, it runs home to it's backup copy, andthis backup is often not compatible with changes made to sat/channel/transponder lists.So I recommend making routine copies of the 3 .dat files, and if problems occur, first tryreplacing the DVBS.dat file. Nine out of ten times that will fix things.
I've upgraded my Azbox up through about 5 different versions of firmware, and am nowusing the most recent firmware version, and haven't encountered the many problems thatpeople are posting about, and I'm convinced that the problems are often caused by the jumping around from firmware to firmware, and/or having corrupted channel/sat data andmoving that corrupted data along with the firmware changes. I had all sorts of problemswhen I first got my Azbox, because it came with corrupted sat data. Once I was able topurge the corrupted sat data, and start over from scratch, I have had very few problems.
I really recommend manually deleting all but the sats you can see, add any that aremissing, then save that version of the DVBS.dat file, then go ahead and manually scan intransponders and channels. Anyway, keep an eye on the file size of the DVBS.dat file. If you have edited out all the extraneous sats, the size of that file should be down in the 50-100K range. If the Azbox has had a problem, and reverted to the backup file, the file sizewill be up around 1600-1700 K. If you see the big file in there, I immediately replace it,and reboot.
As a disclaimer, I do pretty much use my Azbox slaved. Some of the problems peoplehave reported involve some of the diseqC-1.2/USALS functions, which I don't use, so it'spossible that I wouldn't be quite so happy with my Az if I were controlling a coupledishes with it. However I've tried to reproduce some of the issues people have reported,and so far haven't been able to. So I really think that it is possible that many if not most of the problems people have reported, are due to the way people are using the receiver.
I'm not saying the Ultra's blind scan is perfect, but it IS better if you delete excess storedtransponders and tweak the scan settings. I have been scanning with the minimum SR set
to 2000 now and I'm still getting good (better) scan times of about 12-14mins. It reallydepends on the satellite. I've been testing 97W and 101W the most tonight. 105W forsome reason took longer like 17min. But this has been a big improvement over the 20-23mins I was getting before.
It is probably a combination of changing the minimum SR and deleting all the excesstransponders. My 20-23 min scans before already included setting the minimum freq to12200MHz. ≤
34

8/4/2019 Plugin AZ Guide Version 3.1.18
http://slidepdf.com/reader/full/plugin-az-guide-version-3118 35/56
This procedure will allow you to completely clean your Azbox Receiver. All configuration, plug-ins and firmware will be lost.
So use it with caution and follow it carefully.
When do you need to use this procedure?
- If you feel that your Azbox no longer works properly and behaves totally at random.- Problems with plug ins- If you have a bug that nobody else experience or can reproduce
Pre-requisite:
DO NOT SKIP THIS PART.
- Download the latest firmware with Firefox from http://fw.azupd.com - Check the MD5 signature
- Rename the file to patch.bin and nothing else (so azbox-0.9.5020-patch.bin is not avalid name it should be renamed to patch.bin, so suppress "azbox-0.9.5020-").- Format an USB key to FAT file system- Copy the file patch.bin to the newly formatted USB key- Power off your Azbox- Connect the USB key- Restart your Azbox- In the upgrade screen select 1 - upgrade USB (the firmware you copy on the USBshould be detected and installed).- This process should end normally during the countdown remove the USB key.- You Azbox will restart with the firmware you select.
Clean-up - Please DO NOT SKIP PRE-REQUISITE!!!
- Enable Telnet server on your Azbox (11. Setup - Network Services - Telnet server :Enabled).- Connect to your Azbox IP address with a telnet client- Type the following commandCode: [Select]mount -o remount,rw -t ext3 /dev/hda1 /MMP
rm -rf /PLUGINS
rm -rf /DISK2
rm -rf /MMPsync
You will probably read some error messages, don't care about this.
- Power off your Azbox (switch off) (if you press the power key on the RCU the endmenu will no longer appears since we just deleted it).
35

8/4/2019 Plugin AZ Guide Version 3.1.18
http://slidepdf.com/reader/full/plugin-az-guide-version-3118 36/56
- Put the USB key that we prepare in pre-requisite in the Azbox USB slot.- Power on your Azbox
On the upgrade screen select:4 - Format application Area
Followed by:1 - upgrade USB
Let the upgrade process run (DO NOT POWER OFF your Azbox during this process)and wait for the final countdown and remove the USB key.
If you miss the final countdown at the Azbox reboot select 5 - Continue without upgrade.
Your Azbox is now brand new with a fresh firmware without any old stuff on it.Then you will need to reconfigure all your Azbox like you first power it up.
Note: The azbox’s have their quirks about them; it is not a 100% full-proof receiver.
Keep this in mind when using them and remember it is just a hobby. Enjoy!
In my opinion, I have found the Azbox Premium Plus receiver the way to go for anyoneinterested in one. The Ultra receiver which is a step down and $100.00 cheaper, but inthe long run the Premium Plus is the way to go for the on screen display and wirelessinternet connection and you have a much nicer remote to work with than the Azbox Ultrareceiver. The Premium Plus is larger and seems more robust then the Ultra. Forrecording you can tell when it is, where as, the Ultra it is difficult at best to tell if you’restill recording on it. (When, you have installed a hard drive in the receivers).
≤
36
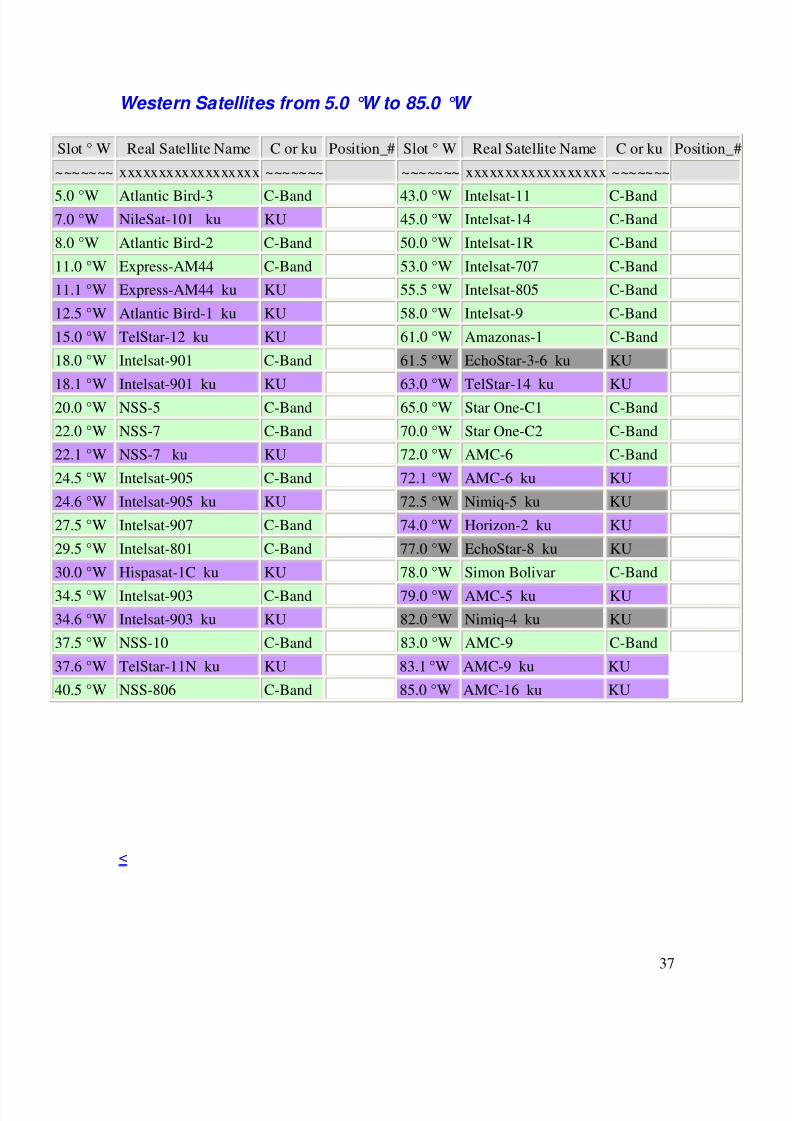
8/4/2019 Plugin AZ Guide Version 3.1.18
http://slidepdf.com/reader/full/plugin-az-guide-version-3118 37/56
Western Satellites from 5.0 °W to 85.0 °W
Slot ° W Real Satellite Name C or ku Position_# Slot ° W Real Satellite Name C or ku Position_#
~~~~~~~ xxxxxxxxxxxxxxxxxx ~~~~~~~ ~~~~~~~ xxxxxxxxxxxxxxxxxx ~~~~~~~
5.0 °W Atlantic Bird-3 C-Band 43.0 °W Intelsat-11 C-Band7.0 °W NileSat-101 ku KU 45.0 °W Intelsat-14 C-Band
8.0 °W Atlantic Bird-2 C-Band 50.0 °W Intelsat-1R C-Band
11.0 °W Express-AM44 C-Band 53.0 °W Intelsat-707 C-Band
11.1 °W Express-AM44 ku KU 55.5 °W Intelsat-805 C-Band
12.5 °W Atlantic Bird-1 ku KU 58.0 °W Intelsat-9 C-Band
15.0 °W TelStar-12 ku KU 61.0 °W Amazonas-1 C-Band
18.0 °W Intelsat-901 C-Band 61.5 °W EchoStar-3-6 ku KU
18.1 °W Intelsat-901 ku KU 63.0 °W TelStar-14 ku KU
20.0 °W NSS-5 C-Band 65.0 °W Star One-C1 C-Band
22.0 °W NSS-7 C-Band 70.0 °W Star One-C2 C-Band
22.1 °W NSS-7 ku KU 72.0 °W AMC-6 C-Band
24.5 °W Intelsat-905 C-Band 72.1 °W AMC-6 ku KU
24.6 °W Intelsat-905 ku KU 72.5 °W Nimiq-5 ku KU
27.5 °W Intelsat-907 C-Band 74.0 °W Horizon-2 ku KU
29.5 °W Intelsat-801 C-Band 77.0 °W EchoStar-8 ku KU
30.0 °W Hispasat-1C ku KU 78.0 °W Simon Bolivar C-Band
34.5 °W Intelsat-903 C-Band 79.0 °W AMC-5 ku KU
34.6 °W Intelsat-903 ku KU 82.0 °W Nimiq-4 ku KU
37.5 °W NSS-10 C-Band 83.0 °W AMC-9 C-Band
37.6 °W TelStar-11N ku KU 83.1 °W AMC-9 ku KU
40.5 °W NSS-806 C-Band 85.0 °W AMC-16 ku KU
≤
37

8/4/2019 Plugin AZ Guide Version 3.1.18
http://slidepdf.com/reader/full/plugin-az-guide-version-3118 38/56
Western Satellites from 87.0°W to 139.0°W
Slot ° W Real Satellite Name C or ku Position_# Slot ° W Real Satellite Name C or ku Position_#
~~~~~~~ xxxxxxxxxxxxxxxxxx ~~~~~~~ ~~~~~~~ xxxxxxxxxxxxxxxxxx ~~~~~~~
87.0 °W AMC-3 C-Band 110.0°W EchoStar-10-11 ku KU87.1 °W AMC-3 ku KU 111.1°W Anik-F2 C-Band
89.0 °W Galaxy-28 C-Band 111.2°W Anik-F2 ku KU
89.1 °W Galaxy-28 ku KU 113.0°W SatMex-6 C-Band
89.2 °W Spare-2 C-Band 113.1°W SatMex-6 ku KU
91.0 °W Galaxy-17 C-Band 116.8°W SatMex-5 C-Band
91.1 °W Galaxy-17 ku KU 116.9°W SatMex-5 ku KU
91.2 °W Nimiq-1 ku KU 118.7°W Anik-F3 C-Band
93.1 °W Galaxy-25 C-Band 118.8°W Anik-F3 ku KU
93.2 °W Galaxy-25 ku KU 119.0°W EchoStar-14 ku KU
95.0 °W Galaxy-3C C-band 121.0°W Galaxy-23 C-Band
95.1 °W Galaxy-3C ku KU 121.1°W EchoStar-9 ku KU
97.0 °W Galaxy-19 C-Band 123.0°W Galaxy-18 C-Band
97.1 °W Galaxy-19 ku KU 123.1°W Galaxy-18 ku KU
98.0 °W Spare-1 C-Band 125.0°W Galaxy-14 C-Band
99.0 °W Galaxy-16 C-Band 125.1°W AMC-21 ku KU
99.1 °W Galaxy-16 ku KU 127.0°W Galaxy-13 C-Band
101.0°W SES-1 C-Band 127.1°W Horizon-1 ku KU
101.1°W SES-1 ku KU 129.0°W Ciel-2 ku KU
103.0°W AMC-1 C-Band 131.0°W AMC-11 C-Band
103.1°W AMC-1 ku KU 133.0°W Galaxy-12 C-Band
105.0°W AMC-18 C-Band 135.0°W AMC-10 C-Band
105.1°W AMC-15 ku KU 137.0°W AMC-7 C-Band
107.3°W Anik F1R C-Band 139.0°W AMC-8 C-Band
107.4°W Anik F1R ku KU
≤
38

8/4/2019 Plugin AZ Guide Version 3.1.18
http://slidepdf.com/reader/full/plugin-az-guide-version-3118 39/56
Toolbox Azbox HD 2.0
The tool allows a single template from which to draw the required application.Once installed you will have the following applications:Azbox HD Remote Control v0.8.35 by J2K
Azbox Control Center v1.1 by TelesatAzbox HD Uploader Skin by @ kajganMaz Manager v3.0 by morserAzbox Edit v0.9.2880c by TelesatTune Azbox v3.0 by mpieroPix2AZBox v0.25 through pr2Generator xml files for iRadio, thanks to 1-mail
A big thanks goes to the authors of the related packages that help us every day to use thebest receiver.
A huge thanks to xonic for making the tool
Release Notes
Version 1.1:
Added the new version of Azbox Control Center 1.1
Version 1.2:
Added the new version 3.0 Tune Azbox
Version 2.0:
Added new version of Maz Manager by morser
NOTE Tune Azbox for any errors:
OLE error code 0x80040154: Class not registered.
* Go to a DOS window (as administrator): Start -> Run -> cmd* Go to the installation of the program eg cd c: \ tuneAzbox* Run: regsvr32 MSWINSCK.OCX
For users running Windows 7 and found it to issue from the software tools and AzboxEdit Azbox Control Center have been included automatically with the installation of thetool ocx missing.≤
39

8/4/2019 Plugin AZ Guide Version 3.1.18
http://slidepdf.com/reader/full/plugin-az-guide-version-3118 40/56
What program are you using for your FTP Client? I personally recommend FileZillaor MazEdit 3.0. Other applications can be used, but I am familiar with these two. If youuse another, then you will just have to modify what I say here to apply the appropriatenavigation routes.
Let's use FileZilla for the example.
Open the FileZilla application, connect to your Azbox using your Azbox IP address asHOST, use root as the USERNAME, azbox as the password and 21 as the FTP PORT.
In the panel to the right that is named "REMOTE SITE" (that’s your Azbox), left click onthe file folder with the "?" and it will open the directories so that you can view the DISK1and DISK2 folders and others.
Left click on the DISK2 folder and in the panel below named "FILENAME" you will beable to see your all_channel.dat, antenna_list.dat and DVBS.dat files, among others.
On FileZilla's left panel named "LOCAL SITE" (this is your PC) select the directorywhere you want to install the three files. In the "FILENAME" panel below that, selectand open the precise file you want to place them in.
CTRL + left click on the files you want to backup so that they are highlighted in the"FILENAME" panel below the "REMOTE SITE". Then right click to open a menu andfind "add files to queue". The files and their destination will be displayed at the bottom of the screen. You may transfer multiple files this way. If you prefer, you can just selecteach file, one at a time, and transfer them individually.
Now, click on the toolbar "TRANSFER" and select "PROCESS QUEUE". The files willbe transferred directly.
That's it. Now you have the three files saved on your PC for backup. To restore thesefiles, the process is virtually the same, in reverse order - move them from your PC to theAzbox in the same manner.
You don't need to go to the FTP CONNECTION on your Azbox.
If you have your wired or wireless communications set up in the SETTINGS menu underthe submenu of INTERNET and you have the FTP SERVER feature ENABLED in theSETTINGS menu under the submenu of NETWORK SERVICE, then that is all you needto do on the Azbox side of the fence.
On the PC side, using FileZilla, type the information in just as you stated for HOST,USERNAME, PASSWORD and FTP PORT and then just press ENTER (or carriagereturn). It should go directly to a connection with your Azbox. This should also store thatpath in your quick connect queue. ≤
40

8/4/2019 Plugin AZ Guide Version 3.1.18
http://slidepdf.com/reader/full/plugin-az-guide-version-3118 41/56
If you use the QUICK CONNECT queue feature of FileZilla, that is fine, but make surethat you select which "quick connect" path that you want to connect with. You can storeother devices in the quick connect library or queue. So if you have more than one entered,use the downward facing arrow to the right of the quick connect button to view all thedevice paths that you have stored there and select the appropriate one.
For instance, say you have three Azbox’s in your home. You might have one at IP192.168.1.102, one at 192.168.1.103 and one at 192.168.1.104. But, you might have a PCat 192.168.1.105. So, select or highlight the intended quick connect route before youclick on QUICK CONNECT.
The quick connect simply allows you to forego all the typing within the HOST,USERNAME, PASSWORD and PORT boxes. It records that path information so thatyou can retrieve it quickly later. It doesn't have anything to do with transferring the files(other than getting you connected to the box in the first place).
Once you are connected, you can manage and transfer your files by using theTRANSFER option in the TOOLBAR at the top and or the drag and drop method.Experiment with it a little bit and it will become apparent what you can do.
To move your screen capture pictures from the Azbox to your pc:
Remember the following for your FTP/Telnet Client server: HOST = "IP address" of the Azbox
USER = root
Password = azbox
FTP port = 21
TelNet port = 23
Open up your FileZilla program.Across the top of the program you will find the boxes to enter the host, user, passwordand port. The post they want here is the FTP port since you are going to FTP the files tothe pc. After you enter the info press “Quick Connect”.Now once connected you should have 4 boxes on your screen. Two boxes on the left,upper and lower box and two on the right, upper and lower.On the top left box, (local site) click on the folder you want to store the files at.It will appear on the bottom left side.Go to the lower box on the right (remote site) and double click on “Data”. Then doubleclick on “Picture”, the screen shots you took earlier will be here.One quick way to transfer them to your pc is to highlight them one by one or hold downon the “CTRL” key on your keyboard and click on however many you want to transfer,the ones you are going to transfer will be highlighted. Now using your mouse drag themover from the right side, (remote site/Azbox) to the left (PC). Your screen shots are nowsaved in your pc and are still on the Azbox. ≤
41

8/4/2019 Plugin AZ Guide Version 3.1.18
http://slidepdf.com/reader/full/plugin-az-guide-version-3118 42/56
Another scenario for downloading screen shot images from the Azbox to your pc.
Using Maz Edit:Connect using Maz to your Azbox.Now use the FTP feature in Maz… go to
/DATA/hdb1/picture/Your screen images you took using your remote on the Azbox will now be in the box onthe left.The box to the right is where you are going to send them so if you have your folder madeup already highlight the pictures you want to go to your pc and then use the Green rightarrow > to FTP the files to your pc.
Let's use FileZilla for another example to transfer files from the Azbox to your pc.
Open the FileZilla application; connect to your Azbox using your Azbox IP address asHOST, use root as the USERNAME, Azbox as the password and 21 as the FTP PORT.
In the panel to the right that is named "REMOTE SITE" (that’s your Azbox), left click onthe file folder with the "?" and it will open the directories so that you can view the DISK1and DISK2 folders and others.
Left click on the DISK2 folder and in the panel below named "FILENAME" you will beable to see your all_channel.dat, antenna_list.dat and DVBS.dat files, among others.
On FileZilla's left panel named "LOCAL SITE" (this is your PC) select the directorywhere you want to install the three files. In the "FILENAME" panel below that, selectand open the precise file you want to place them in.
CTRL + left click on the files you want to backup so that they are highlighted in the"FILENAME" panel below the "REMOTE SITE". Then right click to open a menu andfind "add files to queue". The files and their destination will be displayed at the bottom of the screen. You may transfer multiple files this way. If you prefer, you can just selecteach file, one at a time, and transfer them individually.
Now, click on the toolbar "TRANSFER" and select "PROCESS QUEUE". The files willbe transferred directly.
That's it. Now you have the three files saved on your PC for backup. To restore thesefiles, the process is virtually the same, in reverse order - move them from your PC to theAzbox in the same manner.
≤
42

8/4/2019 Plugin AZ Guide Version 3.1.18
http://slidepdf.com/reader/full/plugin-az-guide-version-3118 43/56
Azbox Tuners
The Azbox Premium Plus does NOT come equipped with TWO tuners. It just has theoption to INSTALL a second tuner of your choice, if you can acquire that tuner. Theproblem being is in the acquisition of that second tuner.
Just found that "axboxusa" has secondary DVB-S2 tuners to fit the Azbox premium plusreceivers in stock!
The second tuner works as expected in my premium plus. It wasn't too difficult to installhopefully you feel comfortable doing it. It’s similar to installing another circuit board in acomputer. Just remember to follow basic electronic common sense eg. turn the Azbox off before installing the board. The 2nd tuner fit well and secure into the second slot.
Quick Overview
TUNER AZBOX DVBS2 DVB-S2 FOR AZBOX HD+ PLUS SPECIAL DESING
BRASIL AND SOUTH AMERICA"
Are the S2 tuners the same in all Azbox's.Would a S2 tuner in Azbox Elite work in Azbox Premium +?
I don't think a DVB-S/DVB-S2 tuner card is specifically designed just (or only) for"BRASIL AND SOUTH AMERICA". It may work there also but S2 tuner cards work quite well in North America. I believe what has happened is their web designer did a cutand paste from another tuner card (the ISDB-T perhaps?) and forgot to remove thewrong/confusing info. Or maybe they don't know the difference.
I do not believe the Elite and Premium models tuner are able to be used in the PremiumPlus model. I looked at the OpenSat Azbox official website Set Top Boxes, MediaCenter: High Definition | AZBOX under the products/accessories/tuner area they have thedifferent model tuners available. The S2 tuners are listed as "Tuner DVB-S2 (E&P)" and"Tuner DVB-S2 (P+)". Focus on the info inside the brackets. (E&P) I believe means Eliteand Premium models. (P+) I believe means the Premium Plus model. So to summarizethe Elite and Premium models use the same tuner but the Premium Plus model isdifferent. Another clue that the Premium Plus model is different is the picture of the card.The Premium Plus model tuner looks longer and thinner than Elite and Premium model inthe pictures. The Premium Plus model tuner has the connectors for the circuit board in adifferent spot also. So make absolutely sure what model receiver you have before youorder a card. I think AZ used to sell an "Ultra" model also. Maybe some of the other sitemembers that have an Ultra could tell you if their cards look like the (E&P) model or the(P+) model. Hope that info helps and doesn't confuse the issue further.≤
43

8/4/2019 Plugin AZ Guide Version 3.1.18
http://slidepdf.com/reader/full/plugin-az-guide-version-3118 44/56
DVB-C QAM is not compatible with USA ATSC based QAM and the demodulatorwould need to be compatible with the USA unique modulation schemes. USA digitalcable is normally QAM 256 and can often also QAM 64 on the same distribution system.Many cable systems offer channels in the clear only as analog channels for analog cable-ready TVs and the digital QAM channels may all be encrypted.
I don't know this as fact, but my educated guess is that your cable receiver is most likelybased on the DVB-C standard and will not receive you cable system's digital channels.Before investing in a QAM device, be sure that your cable system offers the QAM digitalchannels in the clear. Many originally offered basic tier channels in the clear, but mostare now turning on the encryption on all but the local broadcast and local origination / public access channels.
------------------------------------------------------------------------------------------
You can not add a secondary tuner to the Az Elite Receiver. That tuner is not a plug and
play tuner. The elite model receiver’s tuner is connected by a ribbon cable that is attachedto the mother board.
The Premium Plus tuner is a standard plug in type.
The Azbox HD Premium Plus allows you to configure your TWIN DVB-S2 tuners into 3modes.To change the mode press the Home button, select:11. Settings > TV Channel >Tuner A. DVB-Sand press the left or right arrow to change mode.
Mode 1: Separated (default mode)
In this configuration both tuners are completely separated, meaning that you manually
need to configure and scan for each tuner.You typically need to use this configuration, when you receive totally different satelliteson each tuner.Your channel list will clearly mention Tuner-A and Tuner-B close to the differentchannel names.
44

8/4/2019 Plugin AZ Guide Version 3.1.18
http://slidepdf.com/reader/full/plugin-az-guide-version-3118 45/56
Mode 2: TWIN
In this configuration you receive exactly the same satellites with the same antennasconfiguration but on 2 separated cables. For example you have a Monoblock LNB withmultiple exits, or you have an external DiSEqC switch with multiple exits.In this setup the Azbox automatically handles the switch from tuner-A to tuner-B whenneeded. For example you start recording a TV program you can zap and the Azbox willswitch to tuner-B for you. It is transparent for you.
Mode 3: Loop through
In this configuration you have only one cable that come from your LNB (Antenna) toyour Azbox and you loop through both tuner (Out of tuner-A is connected to In of Tuner-B). In this setup, the Azbox handles both tuners (so you don’t have to care abouttuner-A or B) but it has disadvantages.
The LNB way of working can be summarize in the table below:
Vertical Horizontal
Low Bandwidth V/Low H/Low
High Bandwidth V/High H/High
With the loop through mode you are stuck into one of the cell of the table above.For example if you look at a channel in High Bandwidth on Vertical polarity you canonly watch channels with the same characteristic on the same satellite.So this method is quite restrictive but most of the TV providers (packages) try to keepall their channels in the same, bandwidth/polarity to allow you to use the loop throughmode.Azbox will show you to which channels you can zap by keeping the icon highlighted,otherwise the satellite icon will be grayed out:
45

8/4/2019 Plugin AZ Guide Version 3.1.18
http://slidepdf.com/reader/full/plugin-az-guide-version-3118 46/56
Product Description
ORIGINAL TUNER REPLACE PREMIUM PLUS ORIGINALDigital Video Broadcasting Satellite Second Generation (DVB-S2) is designed as asuccessor for the popular DVB-S digital television broadcast standard, and wasdeveloped in 2003 and ratified by ETSI (EN 302307) in March 2005. It is based on DVB-
S and the electronic news-gathering (or Digital Satellite News Gathering) standard, usedby mobile units for sending sounds and images from remote locations world-wide back totheir home television stations.
DVB-S2 is envisaged for broadcast services including standard and HDTV, interactiveservices including Internet access, and (professional) data content distribution. Thedevelopment of DVB-S2 coincided with the introduction of HDTV and H.264 (MPEG-4AVC) video codecs.
Two new key features that were added compared to the DVB-S standard are:
A powerful coding scheme based on a modern LDPC code.VCM (Variable Coding and Modulation) and ACM (Adaptive Coding and Modulation)modes, which allow optimizing bandwidth utilization by dynamically changingtransmission parameters.Other features include enhanced modulation schemes up to 32APSK, additional coderates, and the introduction of a generic transport mechanism for IP packet data includingMPEG-4 audio–video streams, while supporting backward compatibility with existingMPEG-2 TS based transmission.
The standard document claims that the DVB-S2 performance gain over DVB-S is around30% at the same satellite transponder bandwidth and emitted signal power. When the
contribution of improvements in video compression is added, an (MPEG-4 AVC) HDTVservice can now be delivered in the same capacity that supported an early DVB-S basedMPEG-2 SDTV service only a decade before.
Azbox HD Premium Plus DVB-S2 HDTV Tuner
46

8/4/2019 Plugin AZ Guide Version 3.1.18
http://slidepdf.com/reader/full/plugin-az-guide-version-3118 47/56
Modular tuners:
The Azbox Elite HD and Azbox Premium HD come standard with one DVB-S2(satellite) tuner.You will have one free tuner slot, so you can add to your default DVB-S2 receiver aDVB-C (Cable) or DVB-T (Terrestrial) tuner to turn it into a Combo receiver
(you cannot use the two tuner at the same time) and you cannot add a second DVB-S2tuner.If you want a HD STB receiver able to handle 2 tuners at the same time, you should gofor the Azbox Premium HD+.It is equipped by default with a DVB-S2 tuner and you can add a second DVB-S2 tuner.There is no DVB-C or DVB-T tuner available for the Azbox Premium HD+
Azbox Premium HD is equipped with two tuner sockets. This allow you to use it with all
desired combination between one or two, DVB-T, DVB-C, DVB-S2, ATSC and ISDB-T(Brazilian format) tuners.Premium model is also equipped with a WI-FI wireless internet PCI module, and alsohave socket for internal S-ATA HDD up to 1000GB.
Azbox HD Premium is equipped with a high range of connectors: 2 USB connectors (One on Front side, second on Rear side, that allow users to connect portable media orexternal USB HDD, for use USB like internal HDD for PVR / time shift and mediacenter functions. Internally you have also a SATA socket for internal HDD (you canconnect a SATA disk up to 1000 GB).Also is equipped with HDMI (High-definition multimedia interface) output to enjoy thebest picture and audio quality in Full HD 1080p.However to keep the possible to be used at all screens Azbox is also equipped with digitaloptical audio output, Composite video (YPBPR), Video and stereo audio RCA and onescart connector.
One of or top hardware features is that the tuners can be easily switched so you can easytransfer you DVB-S2 receiver at one combo receiver. You have all freedom to pick u anydesired combination that more adjusts to your needs (Available tuners: DVB-T, DVB-C,DVB-S2, ATSC and ISDB-T (Brazilian format).
47
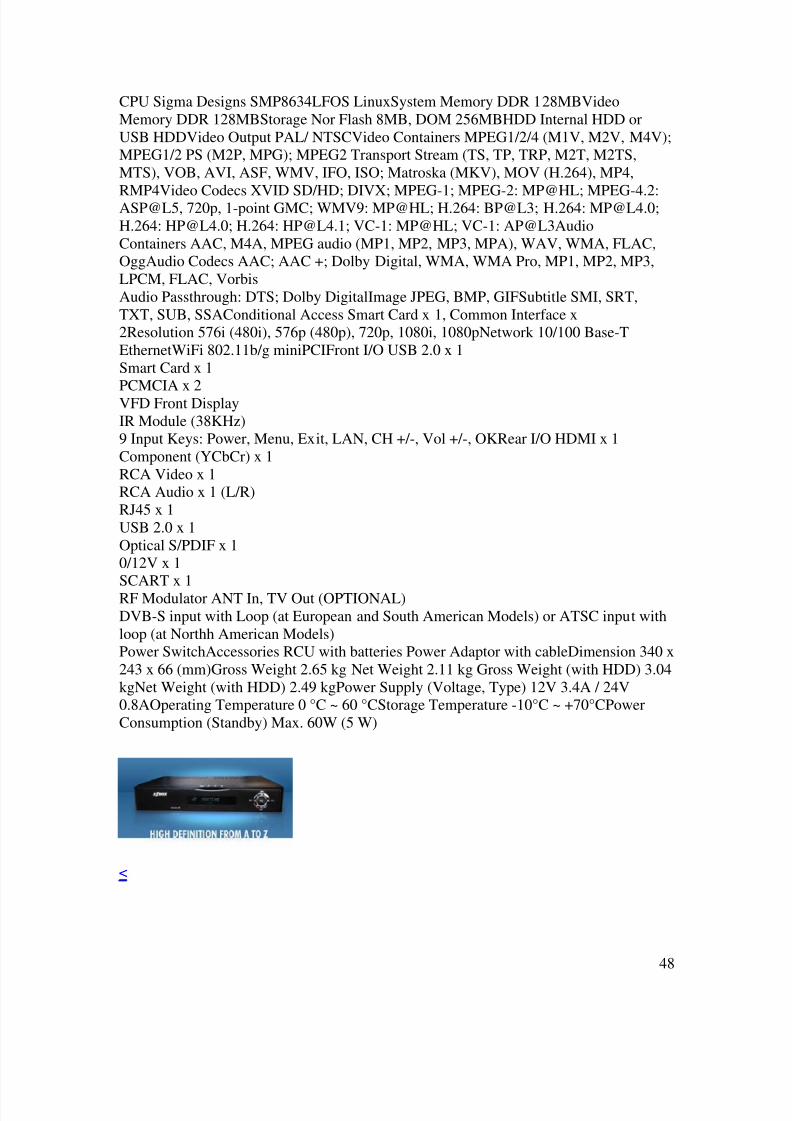
8/4/2019 Plugin AZ Guide Version 3.1.18
http://slidepdf.com/reader/full/plugin-az-guide-version-3118 48/56
CPU Sigma Designs SMP8634LFOS LinuxSystem Memory DDR 128MBVideoMemory DDR 128MBStorage Nor Flash 8MB, DOM 256MBHDD Internal HDD orUSB HDDVideo Output PAL/ NTSCVideo Containers MPEG1/2/4 (M1V, M2V, M4V);MPEG1/2 PS (M2P, MPG); MPEG2 Transport Stream (TS, TP, TRP, M2T, M2TS,MTS), VOB, AVI, ASF, WMV, IFO, ISO; Matroska (MKV), MOV (H.264), MP4,
RMP4Video Codecs XVID SD/HD; DIVX; MPEG-1; MPEG-2: MP@HL; MPEG-4.2:ASP@L5, 720p, 1-point GMC; WMV9: MP@HL; H.264: BP@L3; H.264: [email protected];H.264: [email protected]; H.264: [email protected]; VC-1: MP@HL; VC-1: AP@L3AudioContainers AAC, M4A, MPEG audio (MP1, MP2, MP3, MPA), WAV, WMA, FLAC,OggAudio Codecs AAC; AAC +; Dolby Digital, WMA, WMA Pro, MP1, MP2, MP3,LPCM, FLAC, VorbisAudio Passthrough: DTS; Dolby DigitalImage JPEG, BMP, GIFSubtitle SMI, SRT,TXT, SUB, SSAConditional Access Smart Card x 1, Common Interface x2Resolution 576i (480i), 576p (480p), 720p, 1080i, 1080pNetwork 10/100 Base-TEthernetWiFi 802.11b/g miniPCIFront I/O USB 2.0 x 1Smart Card x 1
PCMCIA x 2VFD Front DisplayIR Module (38KHz)9 Input Keys: Power, Menu, Exit, LAN, CH +/-, Vol +/-, OKRear I/O HDMI x 1Component (YCbCr) x 1RCA Video x 1RCA Audio x 1 (L/R)RJ45 x 1USB 2.0 x 1Optical S/PDIF x 10/12V x 1SCART x 1RF Modulator ANT In, TV Out (OPTIONAL)DVB-S input with Loop (at European and South American Models) or ATSC input withloop (at Northh American Models)Power SwitchAccessories RCU with batteries Power Adaptor with cableDimension 340 x243 x 66 (mm)Gross Weight 2.65 kg Net Weight 2.11 kg Gross Weight (with HDD) 3.04kgNet Weight (with HDD) 2.49 kgPower Supply (Voltage, Type) 12V 3.4A / 24V0.8AOperating Temperature 0 °C ~ 60 °CStorage Temperature -10°C ~ +70°CPowerConsumption (Standby) Max. 60W (5 W)
≤
48

8/4/2019 Plugin AZ Guide Version 3.1.18
http://slidepdf.com/reader/full/plugin-az-guide-version-3118 49/56
How to stream video from the Azbox to your PC via WiFi connection
This procedure is only applicable for streaming the received satellite signal and does notprovide a means for streaming any of the files on your HDD (including programs thatyou have previously recorded from the satellite).
There are two operational steps involved here.1] Starting the streaming broadcast from the Azbox.2] Starting the streaming reception on your PC
1] STARTING THE STREAMING BROADCAST FROM THE AZBOX
In the TV mode (viewing a satellite channel) press the MENU button on the remote.Scroll down the list of options to highlight STREAMING and press OK. You will nowbe prompted to enter an IP address, a PORT number and a time DURATION for thebroadcast.
IP address: Enter the IP address of your PC PORT: Enter 9000
DURATION: Select NOT DEFINE for continuous streaming with no time to end.Note: You may select any duration from 1 minute to 24 hours here if desired.
After these entries have been made, scroll down to highlight START and press OK.An LED on your Azbox will illuminate and the streaming broadcast should be inprocess. (On the Premium Plus, the RED LED will turn on.)
2] STARTING THE STREAMING RECEPTION ON YOUR PC
You will need the application file VLC MEDIA PLAYER installed on your PC. Thereare differences in how the versions of VLC operate, so you will have to adjust your setupin this process to compensate for these differences. Tested versions of VLC here were1.0.5 and 1.1.5. We will discuss how to modify your steps for each version.
VLC VERSION 1.0.5
Open your VLC application program and in the media player’s toolbar, select MEDIA.From the drop-down list, select OPEN NETWORK STREAM. The new page that openswill set up the media stream selections.
If you have an older version of VLC, such as 1.0.5, you will see a box for entering theprotocol language for the streaming technique. If you click on the drop down arrow, youwill see the selections. Locate, highlight and select the UDP (User Datagram Protocol)option.
49

8/4/2019 Plugin AZ Guide Version 3.1.18
http://slidepdf.com/reader/full/plugin-az-guide-version-3118 50/56
You will then be prompted to enter an IP address in the next box. Here, you can entereither your computer’s IP address or the universal streaming address which is224.1.1.100
The next box to the right of the IP address entry requires a port address to be entered.
Enter 9000 for this selection.
Quickie example shown below.
[PROTOCOL] [IP ADDRESS] [PORT]i.e. [UDP] [192.168.1.101] [9000]
After these boxes have been filled out, you can then navigate to and click on the PLAYbutton at the bottom of the screen and the streaming video should begin.
VLC 1.1.5 VERSION
In the more recent, updated versions of VLC, such as 1.1.5, you willnot be prompted for or allowed to select the UDP protocol, but it is still required. TheUDP protocol and the selected port number will now be required to be entered all in onestring, in one box. It is assumed that you understand the background information andknow how to enter the string appropriately.
Open your VLC media player application. Click on MEDIA and from the drop downmenu, select OPEN NETWORK STREAM, just like you do with the other versions.
The display will be entirely different and there isn’t any specific or dedicated boxes toenter your information in. There is only one box that prompts you to enter a network URL.
In this box, you must enter the protocol type, IP address and the port number in itsentirety as a whole address, examples shown below:
udp://@(my pc’s IP address):9000 Example: udp://@198.162.1.101:9000
or
udp://@224.1.1.100:9000
You can take the entire address just above, udp://@224.1.1.100:9000 , copy and paste itinto your VLC’s address bar and then click on PLAY and it will open the stream rightoff. If you type it in manually, remember to include the “@” symbol in the address whenusing this version of VLC.
This information should get you to the basics required. You will have to adapt to anyvariations that may present themselves within your own system. ≤
50

8/4/2019 Plugin AZ Guide Version 3.1.18
http://slidepdf.com/reader/full/plugin-az-guide-version-3118 51/56
Updating your Azbox using a USB Stick.
There are a few occasions where installing a firmware update will revert all yoursatellites back to factory default but each update is different and not all of them will dothis. However, any settings you have made to your Azbox with your fonts and start up
logo if you changed them from factory defaults will revert back to factory default.
First download the upgrade file from the internet to your computer.The file name should have the extension of ‘patch.bin’Now load the file to your USB Stick. (the USB stick should be formatted using the“FAT” file system. I formatted my stick using FAT32) Turn on your Azbox and go to any channel that you can receive programming on.Then insert the USB stick into the receiver.Now hit the ‘Home’ button on your remote and go to settings:: system info,:: firmwareupgrade:: then arrowed from Internet to ‘USB’.Press ‘OK’ to start the upgrade.
If the Azbox says failed try pressing ‘OK’ again.I had to do this twice but on the third time the Azbox saw the file and I pressed ok againand the upgrade menu did come on my Azbox.The picture may go completely blank for about 15-20 seconds before a blue upgradescreen appears.While you are in the upgrade screen DO NOT power off the receiver.The receiver will / should reboot on it's own after the upgrade is completed.When it completes the reboot process the Azbox should come on to the last channel youwere on.After the TV comes on remove the USB stick from the Azbox.
I did notice that my channel's were grayed out but all I needed to do was to go to mychannel screen and since I was using the satellite menu of that screen highlighted thesatellite I was on and all my channels then came back in white not gray.I did check and since I had North Americanized my list that did not change and all mysettings were the same as before the upgrade.
Now when you go into Settings>System Information, the firmware should show the newfirmware number.If you have changed your Fonts or Boot Logo screen these settings will be undone andyour Azbox will return these settings to factory default.
It is strongly advised to disable Hardware Acceleration before upgrading your
Azbox. Hardware Acceleration is the main reason why some Azbox HD goes to the
Booting... (forever) problem.
≤
51

8/4/2019 Plugin AZ Guide Version 3.1.18
http://slidepdf.com/reader/full/plugin-az-guide-version-3118 52/56
Here are some links for programs and editors to use with the Azbox. Many havetried downloading from places where they have said there were viruses attachedto them so I have uploaded my own programs in zipped folders that have passedthe tests and are clean and these programs have worked on 3 differentcomputers here with no problems.I could not upload the entire toolbox program due to the size restrictions so
instead I have hunted out the individual programs that will do the same job.
Links
Acc_version-1: az control center 1st version stand-alone program.
https://sites.google.com/site/azboxeditors/acc_version1
Acc_version1.1:: this is the 2nd version of the az control center.
https://sites.google.com/site/accversion11/acc_version1-1
Maz2.3: This will most likely update to the latest version once installed, and is a
useful tool for the Azbox.
https://sites.google.com/site/mazeditor/maz2-3 Azedit: another useful editor for the Azbox.
https://sites.google.com/site/azboxedit92880a/azedit
Az_guide : useful guide and explanation of many things about the Azbox that was
left out of the original manual.
https://sites.google.com/site/azuserguide/azuserguide
File-zilla: great tool for use with the ftp feature with the Azbox.
https://sites.google.com/site/zillafile334/filezilla
Streaming: a nifty very small tool used in conjunction with vlc program for
streaming the Azbox. See user guide for more details.
https://sites.google.com/site/azstreaming/streaming
Complete Western satellite & channel list loaded for Azbox, setup for slaved az
using 4x1 DiSEqC switch using line 1 for c & line 2 for ku.
https://sites.google.com/site/azchannellist/completesatlist-1
How To Recover an Azbox that only displays “BOOTING” pdf file.
https://sites.google.com/site/recoverybootingazbox/recoverybootingazbox
Original Azbox manual from Manufacturer
https://sites.google.com/site/manualazboxoriginal/origmanual
52

8/4/2019 Plugin AZ Guide Version 3.1.18
http://slidepdf.com/reader/full/plugin-az-guide-version-3118 53/56
All items should be used at your discretion: use guide info for moreanswers to questions. Files are posted here since there has beensome difficulty in locating decent programs elsewhere. All programs
have worked for me.All programs have worked for me using Win.-XP & Win.-7.
≤
53

8/4/2019 Plugin AZ Guide Version 3.1.18
http://slidepdf.com/reader/full/plugin-az-guide-version-3118 54/56
Taking the receiver to a lower firmware upgrade number:
It has been noted between using the Ultra and Premium Plus receivers that if you had
performed the procedure to North Americanize your Azbox properly that you willnot have those Eastern satellites come back in your receivers. From firmware updates
0.9.4890 to 0.9.5209 going forward and backwards and using firmware numbers in-between these the Eastern Satellites have not appeared in either receiver. The one thingthat was noticed was that going backwards may affect your channel list. Having a backupavailable and using the ACC program should fix this but there was one rare case this wasnot happening to one of the testers. But if you go to a lower firmware update the receiversalways came up with, “Cannot Find Channel List”. Pressing the ‘HOME’, ‘Settings’,‘TV Channel’, ‘Antenna Setup’ revealed that the Azbox always reverted to 177°W NSS5Satellite. This is one that appears to come with each firmware since it was not on theoriginal satellite list. Also going backwards does appear to change some settings thatwere made previously under the LNB Frequency menu. Not to worry, just remember toarrow back (while in the Antenna Setup) to the satellite you were on during the firmware
upgrade or in this case the firmware Downgrade. The TP info should still be in there sonow you want to go to ‘Advanced Scan’ and do a ‘TP Search’ of the last channel youwere on which you know works fine. Once done exit out and view that channel you justscanned in. Now use the ACC program and send your saved satellite/channel list to yourAzbox.Now after the receiver re-boots from sending your satellite/channel list you may noticethat the last channel you were on is not what is showing on your receiver, why? Theanswer is quite simple. When you last saved your channel list to your computer thechannel you were on at that time is the one that the receiver will boot up to.In the case of one tester their dish would always try moving to the Hispasat Satellite.Now if they make a newly saved satellite/channel list from another satellite in the middleof the arc that would be their starting point in the future when they send this list to theAzbox. This has been found to be true on most occasions.Simply going to your channel list you will now find the complete list is now back in yourreceiver.Again this is for taking the receiver to a lower firmware number. This does not appear tohappen with going to a higher firmware upgrade but it is possible that it could happen ona rare occasion. I would not venture to say it would never happen as this would bemisleading.Remember to make sure your ‘Hardware Acceleration’ is turned ‘OFF’.
≤
54

8/4/2019 Plugin AZ Guide Version 3.1.18
http://slidepdf.com/reader/full/plugin-az-guide-version-3118 55/56
Here are some instructions I was given to make any older firmware update work on you-tube. It came with 2 files and with some outside help I managed to get it working on thePremium Plus with firmware 0.9.4991. This will work on All Azbox’s with anyfirmware that is lower than 0.9.5209.
You tube Player Update for older patches.
Telnet:mount -o remount,rw -t ext3 /dev/hda1 /MMP
Then follow the readme.txt instructions in the archiveThis will update you-tube for later patches.
This is what was in the read me text file.
You-tube update for any patch
FTP the file "youtube_player" to /MMP/usr/bin/ and the file "IVMyoutube.so" to /MMP/usr/lib/ CHMOD to 755 and reboot.
Here are the simple directions to get You-Tube to work on older firmware updates usingMaz 3.0 editor.
Open MaZ, connect to the Azbox, open Telnet in the top toolbar you will see ToolsScripts open the drop down and click on ‘Enable Write in MMP’.
Now open FTP and send the file "youtube_player" to /MMP/usr/bin/.
Then send the file: "IVMyoutube.so" to /MMP/usr/lib/
Close Maz and reboot the Azbox.The You-Tube feature should now work on any firmware version on the Azbox lowerthan 0.9.5209.
The files you need are in a zipped file located here:https://sites.google.com/site/azboxplayerfix/you_tube_fixed
The read-me text file was changed to reflect using Maz to simplify this procedure. Theoriginal instructions are highlighted above in Orange and Green.
55

8/4/2019 Plugin AZ Guide Version 3.1.18
http://slidepdf.com/reader/full/plugin-az-guide-version-3118 56/56
.
All the information contained in this document comes from several different sources
on the internet and from around the world. Most of the information is from actual
Azbox users who are using these receivers and have taken the time to offer up their
experiences they have encountered. This information has been brought together in
one place so that everyone may be able to figure out certain things they may encounter
with their Azbox.Since this receiver was mainly designed for the European community it has been a
real journey to make it just right for the North American community. Many of the
programs used to edit and send the Azbox files are from other countries and several
people have reported their frustrations in getting these programs to work on their
computers and in getting around language barriers. Others installed the programs
and had them work properly at the first try. I believe this is a user issue that the end
user needs to find a work-around for, as the programs listed in this document have
worked fine.
Part of the experience of this hobby is the experimentation and being able to perform
these tasks.
Some have told me that if you use the utility programs for the Az-Box that you should notcreate a desktop shortcut to the program.Once installed go to the program folder itself and always open the program from that folder.It appears that when some of the programs were developed (in Europe), the programmers mayhave used some .dll file on their system that was not included with the program after it lefttheir system, and his has caused some people to find that the programs may not always work on their computer system if you create a desktop short cut.