pledge enrollment for apache tomcat - kc.mcafee.com€¦ · nsd1173 pledge enrollment for apache...
TRANSCRIPT

NSD1173 Pledge Enrollment for Apache Tomcat
Fact
● Nordic Edge One Time Password Server
● Nordic Edge Pledge Client
● Nordic Edge Pledge Enrollment
● Revision History
Situation
This article describes the two different scenarios for enrolling users into the Pledge system:
● Self Service
● Centralized Administration, typically an IT-service desk
Self service and centralized administration can be configured for single profile or multiple profiles.
When is it necessary to enable multiple profile support?
When end users have more than one device, multiple profile support should be enabled.
For example, when a person has two different cellular phones or when using Pledge on a cellular and Pledge on a
PC.
Multiple profile support is available from OTP Server version 3 and later.
Prerequisites
● Pledge Client (available at http://www.nordicedge.com/pledge)
● Nordic Edge One Time Password Server, configured for Pledge Enrollment (NSD1172)
● Tomcat 6.0 or later, installed with Java JDK (not JRE) 1.6 or later
● A Nordic Edge Pledge Web Services account and password
● Download PledgeEnrollment.war (ver1.4)
To Install and Configure the Pledge Enrollment Web Application on Tomcat

● Start Tomcat
● Copy the file PledgeEnrollment.war into the tomcat/webapps directory
Figure: PledgeEnrollment.war copied into the webapps directory
Tomcat will deploy the web archive into a directory called PledgeEnrollment under the webapps
directory.
● Open the file ..\PledgeEnrollment\constants.jsp with a text editor (example below)
● Modify the string values to match your environment
/*----------------------Settings Section Start------------------------------------------------------------------*/
// OTP Server settings
String otpServerHostaddress = "localhost"; //The OTP Server IP address
String otpServerPortNumber = "3100"; //The OTP Server portnumber
String attributeContainingOATHKey = "carLicense"; //The attribute that contains the Pledge OATH key
in the user database
String addKeyPrefix = "0x"; //Use 0x for backwards compatible mode with older versions of the OTP
Server
String multipleProfileSupport ="false"; // True enables support for multiple profiles
String nativeClientName = ""; // Sets the native client name used by the OTP Server
//Nordic Edge Pledge Web Service
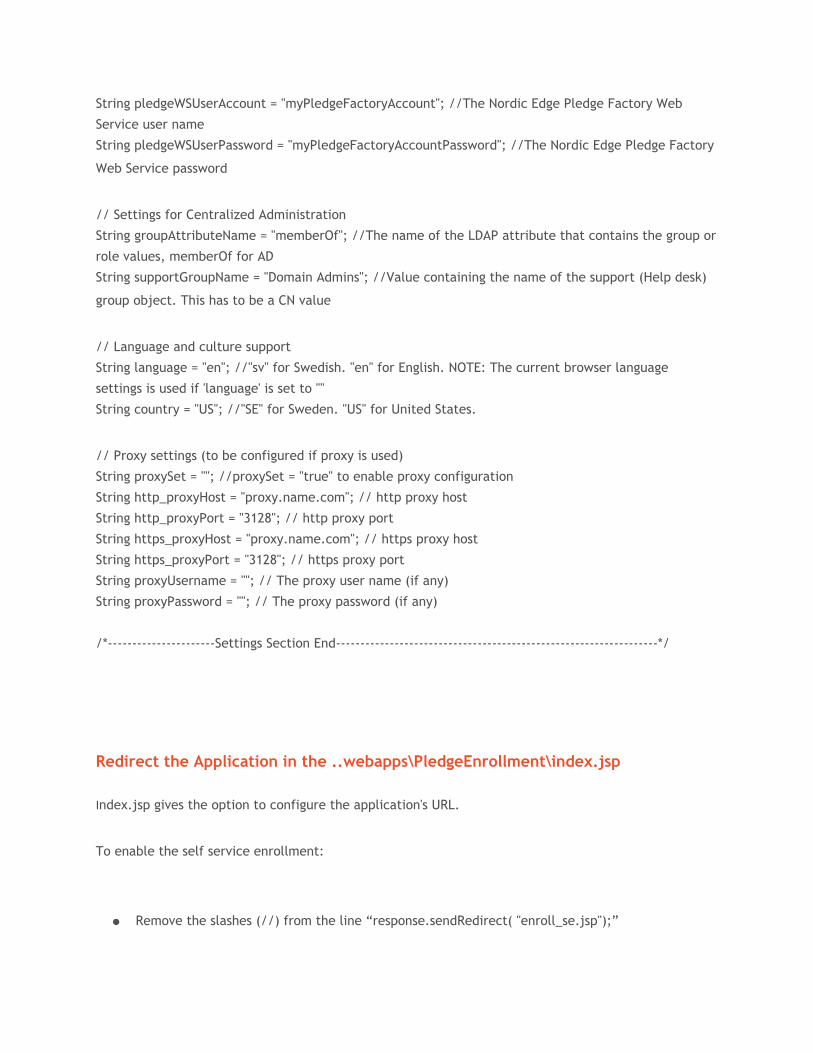
String pledgeWSUserAccount = "myPledgeFactoryAccount"; //The Nordic Edge Pledge Factory Web
Service user name
String pledgeWSUserPassword = "myPledgeFactoryAccountPassword"; //The Nordic Edge Pledge Factory
Web Service password
// Settings for Centralized Administration
String groupAttributeName = "memberOf"; //The name of the LDAP attribute that contains the group or
role values, memberOf for AD
String supportGroupName = "Domain Admins"; //Value containing the name of the support (Help desk)
group object. This has to be a CN value
// Language and culture support
String language = "en"; //"sv" for Swedish. "en" for English. NOTE: The current browser language
settings is used if 'language' is set to ""
String country = "US"; //"SE" for Sweden. "US" for United States.
// Proxy settings (to be configured if proxy is used)
String proxySet = ""; //proxySet = "true" to enable proxy configuration
String http_proxyHost = "proxy.name.com"; // http proxy host
String http_proxyPort = "3128"; // http proxy port
String https_proxyHost = "proxy.name.com"; // https proxy host
String https_proxyPort = "3128"; // https proxy port
String proxyUsername = ""; // The proxy user name (if any)
String proxyPassword = ""; // The proxy password (if any)
/*----------------------Settings Section End------------------------------------------------------------------*/
Redirect the Application in the ..webapps\PledgeEnrollment\index.jsp
Index.jsp gives the option to configure the application's URL.
To enable the self service enrollment:
● Remove the slashes (//) from the line “response.sendRedirect( "enroll_se.jsp");”

//Self service registration
response.sendRedirect("enroll.jsp");
To enable the centralized administration enrollment:
● Remove the slashes (//) from the line “response.sendRedirect( "supportEnroll.jsp");”
//For Central Administration (creating profiles for users)
response.sendRedirect("supportEnroll.jsp");
Running the Pledge Enrollment Web Application
1. Scenario 1 - Self Service Enrollment
● Open a browser, go to the Pledge Enrollment web page to enroll for a Pledge profile
● Enter user name and password and click on Enroll
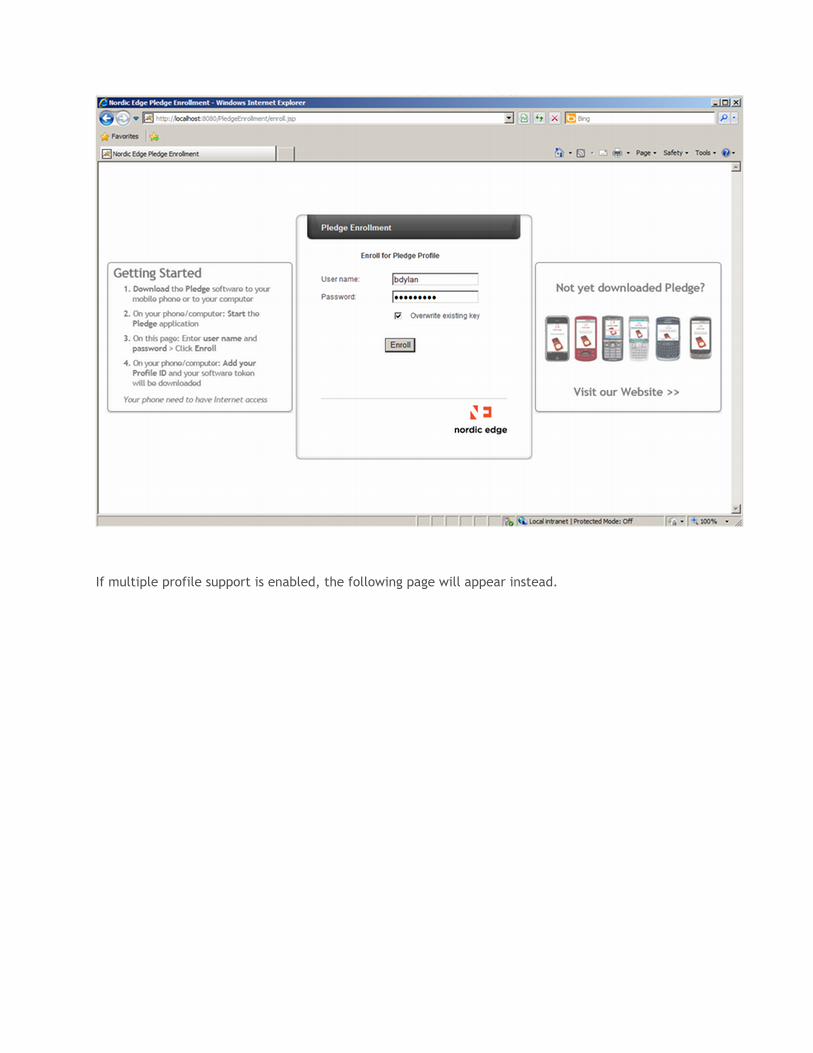
If multiple profile support is enabled, the following page will appear instead.
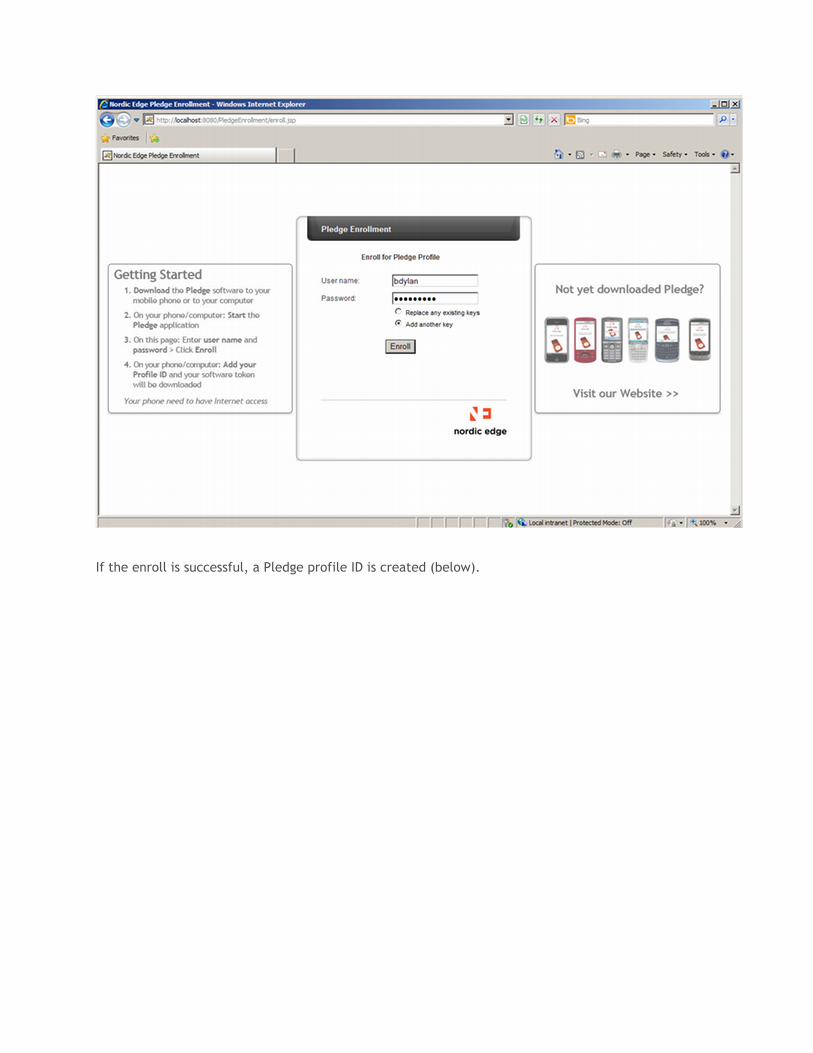
If the enroll is successful, a Pledge profile ID is created (below).

On the mobile device (Pledge cellular or Pledge Desktop):
● Open the Pledge client
● Click the + sign to add a new profile and enter the profile ID
● Enter PIN-code (verification needed)
After this is done the new profile is ready to use. Verification of the Pledge profile can be done on the
Test Pledge profile page (see below)
● Generate a One-Time Password from the Pledge client and then enter user name and OTP on
test page
● Click Verify

2. Scenario 2 - Centralized Administration
To enable this feature the last section of file constants.jsp must be modified://Settings for Centralized Administration
String groupAttributeName="memberOf"; //The LDAP attribute that
contains the group or role values (memberOf for AD)
String supportGroupName="Domain Admins"; //The value that contains the
support group. Must be the CN value
The attribute supportGroupName points to a group object.
Administrators must be member of this group to be able to enroll users into the Pledge system.
(The default value is “Domain Admins”)
● Enter the URL for the Centralized Administration page http://[server:port]/
PledgeEnrollment/supportEnroll.jsp
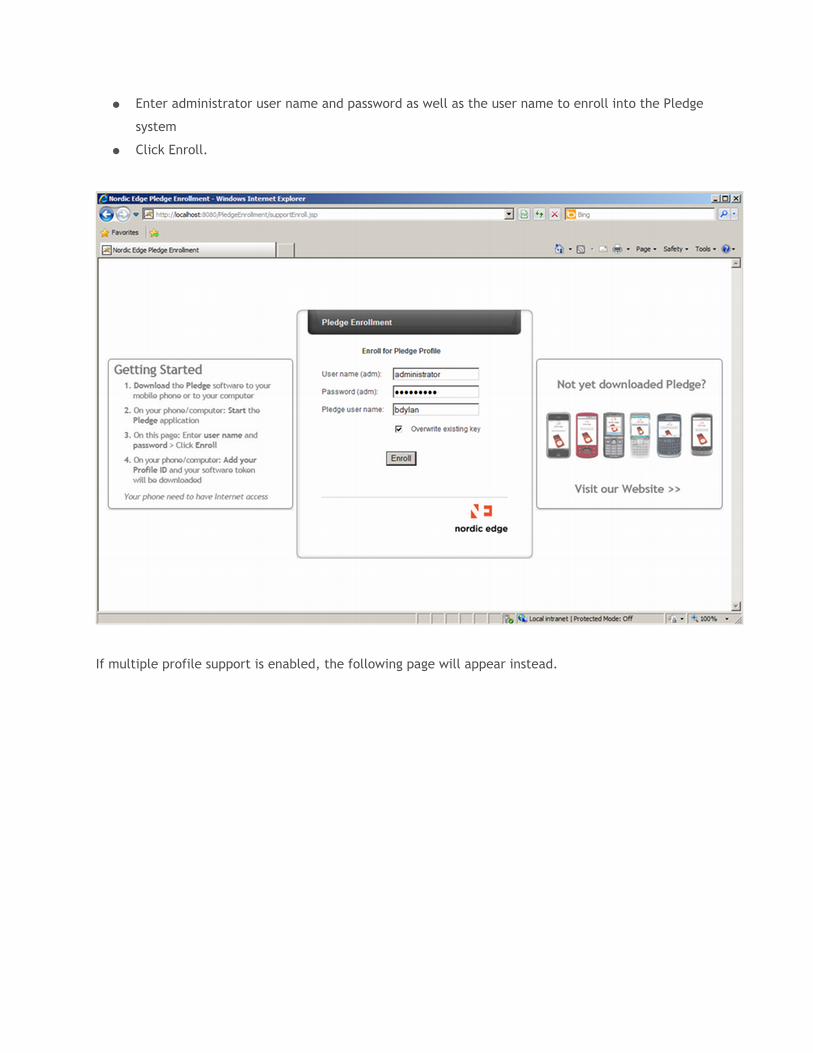
● Enter administrator user name and password as well as the user name to enroll into the Pledge
system
● Click Enroll.
If multiple profile support is enabled, the following page will appear instead.

If the logon is successful, a Pledge profile ID is created (below).
Note that a new link 'Create another Pledge profile' exists.
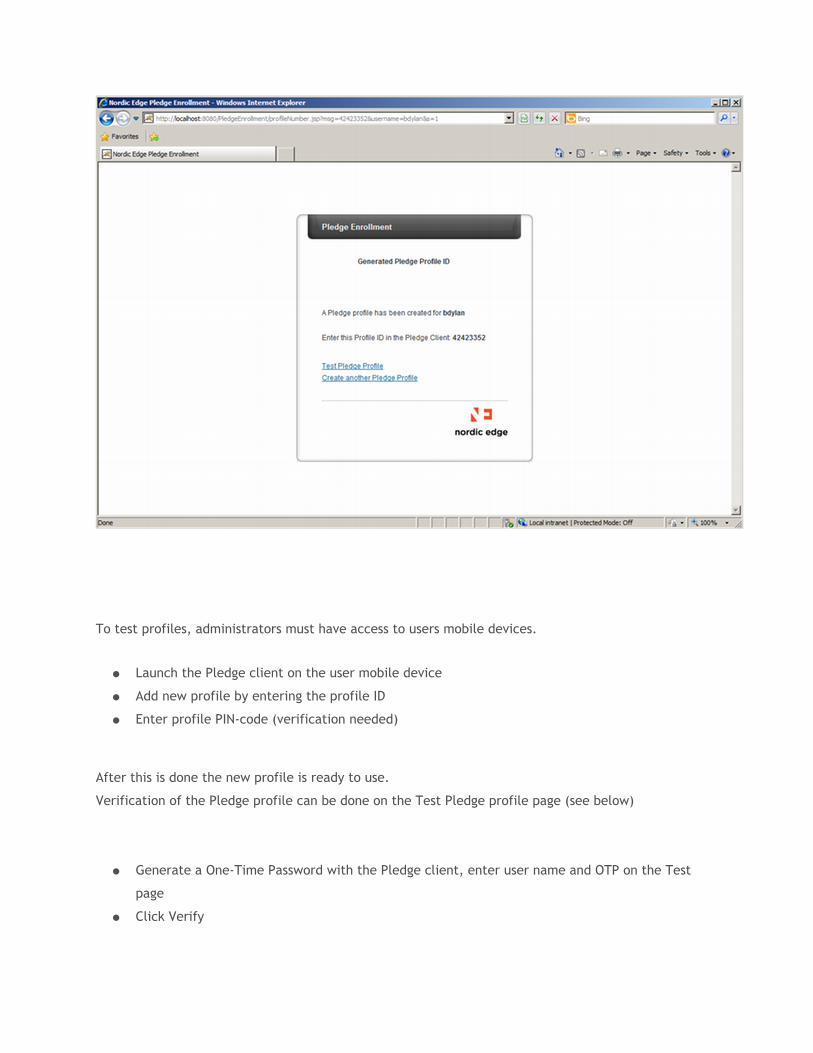
To test profiles, administrators must have access to users mobile devices.
● Launch the Pledge client on the user mobile device
● Add new profile by entering the profile ID
● Enter profile PIN-code (verification needed)
After this is done the new profile is ready to use.
Verification of the Pledge profile can be done on the Test Pledge profile page (see below)
● Generate a One-Time Password with the Pledge client, enter user name and OTP on the Test
page
● Click Verify

Related ArticlesNSD1172 Configuring One Time Password Server for Pledge Enrollment
Revision History
Pledge Enrollment 1.4, rev 4
11th januari 2011
- Images for the installation process was replaced
Pledge Enrollment 1.4, rev 3
23th december 2010
- Language and terminology corrections have been performed in the application and in
the solution document
Pledge Enrollment 1.4, rev 2
7th december 2010
- Added verifyUser.jsp. This page helps a service desk to confirm a user by phone. The user gives his
Pledge OTP that can be verified by the Service Desk
Pledge Enrollment 1.4 rev 1
4th november 2010
- Minor change: Improved error handling added.
Pledge Enrollment 1.4
20th august 2010
- Multikey support added
- New info images added
- Confirmation boxes added
- Added the option to set a native Client Name (for developers) in the constants.jsp
Pledge Enrollment 1.2
12th may 2010
- Added Proxy settings for Proxy user name and Proxy password
Pledge Enrollment 1.1
12th november 2009
- Proxy functionality added
- NSD1172 and NSD1173 rewritten and separated from each other
Pledge Enrollment 1.0
16th october 2009
- NSD 1173 rewritten

June 2009, initial edition