please read and save these instructionspdf.lowes.com/installationguides/750545102669_install.pdf•...
TRANSCRIPT

OWNER’S MANUAL
Digital Fan Heater
MODEL: HF-0063ITEM: 1068266
PLEASE READ AND SAVE THESE INSTRUCTIONS

IMPORTANT INSTRUCTIONS PLEASE READ AND SAVE THESE IMPORTANT SAFETY INSTRUCTIONS
When using electrical appliances, basic precautions should always be followed to reduce the risk of fire, electric shock, and injury to persons, including the following:
1. Read all instructions before using this heater. 2. This heater is hot when in use. To avoid burns, do not let bare skin touch hot
surfaces. If provided, use handles when moving this heater. Keep combustible materials, such as furniture, pillows, bedding, papers, clothes, and curtains at least 3 feet (0.9m) from the front of the heater and keep them away from the sides and rear.
3. Extreme caution is necessary when any heater is used by or near children or invalids and whenever the heater is left operating and unattended.
4. Always unplug heater when not in use. 5. Do not operate any heater with a damaged cord or plug or after the heater malfunctions, has been dropped or damaged in any manner. Discard heater or return heater to authorized service facility for examination, electrical or mechanical adjustment, or repair.6. Do not use outdoors. 7. This heater is not intended for use in bathrooms, laundry areas and similar
indoor locations. Never locate heater where it may fall into bathtub or other water container.
8. Do not run cord under carpeting. Do not cover cord with throw rugs, runners, or similar coverings. Do not route cord under furniture or appliances. Arrange cord away from traffic area and where it will not be tripped over.9. To disconnect heater, first turn controls to off, then remove plug from outlet. 10. Do not insert or allow foreign objects to enter any ventilation or exhaust
opening as this may cause an electric shock or fire, or damage the heater. 11. To prevent a possible fire, do not block air intakes or exhaust in any manner.
Do not use on soft surfaces, like a bed, where openings may become blocked. 12. A heater has hot and arcing or sparking parts inside. Do not use it in the areas
where gasoline, paint, or flammable liquids are used or stored. 13. Use this heater only as described in this manual. Any other use not
recommended by the manufacturer may cause fire, electric shock, or injury to persons.
14. Always plug heaters directly into a wall outlet/receptacle. Never use with an extension cord or relocatable power tap (outlet/power strip).15. This heater draws 12.5 amps during operation. To prevent overloading a circuit,
do not plug the heater into a circuit that already has other appliances working. 16. It is normal for the plug to feel warm to the touch; however, a loose fit between
the AC outlet (receptacle) and plug may cause overheating and distortion of the plug. Contact a qualified electrician to replace loose or worn outlet.
17. The output of this heater may vary and its temperature may become intense enough to burn exposed skin. Use of this heater is not recommended for persons with reduced sensitivity to heat or an inability to react to avoid burns.
1

18.CAUTION: To prevent electric shock, match wide blade of plug to wide slot and fully inser.
19 “SAVE THESE INSTRUCTIONS”
ASSEMBLY This heater is pre-assembled in factory.
ELECTRICAL RATINGS
This product is rated 12.5 amps (1500W) at 120V, 60 Hz.
FEATURES
POWERSetting Button
TIMERSetting Button OSCILLATING
Setting Button
OPERATING INSTRUCTIONS
IMPORTANT
Your heater is equipped with a polarized alternating current line plug (a plug having one blade wider than the other). This plug will fit into the power outlet only one way. This is a safety feature. If you are unable to insert the plug fully into the outlet, try reversing the plug. If the plug should still fail to fit, contact your electrician to replace your outlet. DO NOT defeat the safety purpose of the polarized plug.
2

Place the heater on a firm level surface free from obstructions, and at least 3 ft. away from any wall and any other objects such as furniture, curtains, plants or combustible material.
• Plug the heater into a grounded 120V outlet. The buzzer sounds, after pressing thepower but ton, the Digital Screen indicates current temperature.
• Press the Power button repeatedly to the desired setting. The cycle is as follows: • High: Heater operates at a higher wattage, around 1500 Watts. • Low: Heater operates at a lower wattage, around 900 Watts. • Fan: The fan circulates room air only. The heating elements are “OFF”
Turning the Unit Off
Press the POWER button to cycle through the functions until none of them are lit (High, Low, Fan).
After the unit is turned off, the fan will continue to run for 15 seconds to cool down, the digital screen will display the process from 15 backward to 1. After the display turns off, unplug the heater from the electrical outlet.
Set the desired temperature
• In order to set the thermostat the unit has to be on High or Low. • When the unit is on, press the ▲ or ▼ button, the buzzer sounds and the setting
temperature flash on the digital screen. • At this time you can press the ▲ or ▼ key to the temperature desired. (40F-95F). • Wait for around 5 seconds until the digital screen displays the current temperature
again. If the current temperature is higher than the set temperature (95F is original set temperature), the unit will stop heating.
Setting timer
• Press UP or DOWN button repeatedly to set the auto-on time within 12 hours.
Setting the heater to turn off automatically• In order to set the unit to turn off, the unit must be on (High or Low). • Press the Timer button, the timer setting pilot will illuminate. • You can see “0” flashes on the digital screen.
Press UP or DOWN button repeatedly to set the auto-off time within 12 hours.
Setting the heater to turn on automatically• In order to set the unit to turn on, the unit must be off. • Press the Timer button, the timer setting pilot will illuminate, and you can see “0”
flashes on the digital screen.
•
The timer indicator will appear on the digital screen after the timer is set. You can check the remaining time of timer by pressing the TIMER button.
3

4
UNPLUG UNIT WAIT COOLING DOWN

CLEANING AND STORAGE We recommend that the heater be cleaned at least once a month and before off-season storage.
Turn the heater OFF and unplug it. Allow it to cool. Use a dry cloth to clean the external surfaces of the heater.
DO NOT USE WATER, WAX, POLISH OR ANY CHEMICAL SOLUTION. Clean your heater using the above-mentioned steps, then pack the heater in its original container and store it in a cool dry place. This heater does not disassemble. The motor is factory lubricated for life, and will require no further lubrication.
SPECIFICATIONS
Model NO. HF-0063
Voltage 120V Frequency 60Hz Output Power (W) 1500W Electric Current (A) 12.5A
SERVICE & SUPPORT
DATE OF PURCHASE:_____________________________________________________________ PLACE OF PURCHASE:____________________________________________________________
(STAPLE SALES RECEIPT HERE)
NOTE: PROOF OF PURCHASE IS REQUIRED FOR
ALL WARRANTY CLAIMS
In the event of a warranty claim or if service is required for this heater, please contact us at thefollowing:
Tel: 866 646 4332Email us at: [email protected]
For questions or comments, please write to:Midea America Corporation Customer Care Center
11411 NW 107th Street, Suite 12Miami, FL 33178
For your records, staple your sales receipt to this manual and record the following:
5

6
Digital Fan Heater
Digital Fan Heater

MANUAL DEL USUARIO
Calentador De Ventilador Digital
MODELO: HF-0063ARTÍCULO: 1068266
POR FAVOR LEA Y GUARDE ESTAS INSTRUCCIONES

INSTRUCCIONES IMPORTANTES
POR FAVOR LEA Y GUARDE ESTAS INSTRUCCIONES IMPORTANTES DE SEGURIDAD Cuando se utilizan electrodomésticos, se deben seguir siempre ciertas precauciones básicas para reducir el riesgo de incendio, descarga eléctrica y lesiones personales, incluyendo las siguientes: 1. Lea todas las instrucciones antes de utilizar este calentador. 2. Este calentador se calienta cuando se utiliza. Para evitar quemaduras, no deje
que la piel entre en contacto con las superficies calientes. Si el calentador tiene agarraderas, utilice los mismos para moverlo. Mantenga los materiales combustibles, como muebles, almohadas, ropa de cama, papeles, ropa y cortinas al menos a 3 pies (0.9 m.) del frente del calentador y manténgalos alejados de los costados y la parte posterior.
3. Es necesario tener extrema precaución cuando se utilice cualquier calentador cerca de niños o personas inválidas y siempre que el calentador se deje en funcionamiento sin supervisión.
4. Desconecta siempre el calefactor cuando no se encuentre en uso. 5. No utilices el calefactor con un cable o enchufe dañado, o después de que el calefactor falle, o haya sufrido caídas o daños de cualquier tipo. Desecha o devuelve el calefactor al centro de mantenimiento autorizado para revisarlo, realizar cualquier ajuste eléctrico o mecánico, o repararlo. 6. No lo utilice en exteriores. 7. Este calentador no fue diseñado para su utilización en baños, áreas de lavado y
lugares similares de interiores. Nunca coloque el calentador en un lugar desde donde pueda caerse en una bañera u otro recipiente con agua.
8. No pases el cable debajo de alfombras. No cubras el cable con tapetes, alfombras de pasillo o cubiertas similares. No coloques los cables debajo de muebles o electrodomésticos. Coloca el cable lejos de las zonas de alto tráfico, donde alguien pueda enredarse con él y caer.9. Para desconectar el calentador, primero coloque los controles en la posición de
apagado y luego retire el enchufe del tomacorriente. 10. No inserte o permita que objetos externos entren en ninguna ventilación o salida
de ventilación ya que esto puede causar una descarga eléctrica o incendio, o daños al calentador.
11. Para prevenir un posible incendio, no bloquee las entradas y salidas de aire de ninguna manera. No lo utilice en superficies suaves, como una cama, donde las aperturas se pueden bloquear.
12. Un calentador contiene partes calientes y con chispas o un arco eléctrico. No lo utilice en áreas donde se usa o se guarda gasolina, pintura o líquidos inflamables.
13. Utilice este calentador sólo de la manera que se describe en este manual. Cualquier otro uso no recomendado por el fabricante puede causar fuego, descarga eléctrica o lesiones a personas.
14. Siempre conecta los calefactores directamente a un tomacorriente/receptáculo de pared. Nunca uses con una extensión eléctrica o tomacorriente móvil (tomacorriente/contacto múltiple).
7
15. Este calentador consume 12.5 amperes durante su funcionamiento. Para prevenir sobrecargar un circuito, no enchufe el calentador en un circuito que ya tenga otros electrodomésticos en funcionamiento.
16. Es normal que el enchufe esté tibio al tacto; sin embargo, un encaje flojo entre el tomacorriente AC (receptáculo) y el enchufe pueden causar sobrecalentamiento y distorsión del enchufe. Póngase en contacto con un electricista calificado para reemplazar el tomacorriente flojo o gastado.
17.
18.Nota: Para evitar la electrocución, se debe ajustar el tapón de ancho a la ranura y a todo el interior.
El calor producido por este calentador puede variar y su temperatura se puede volver lo suficientemente intensa como para quemar la piel expuesta. No se recomienda la utilización de este calentador a personas con sensibilidad reducida al calor o con inhabilidad para reaccionar o evitar quemaduras.
“GUARDE ESTAS INSTRUCCIONES”
MONTAJE
Este calentador se ha armado previamente en fabrica.
ÍNDICES ELÉCTRICOS
Este producto funciona bajo de 12.5 amps (1500W) en 120V, 60 Hz.
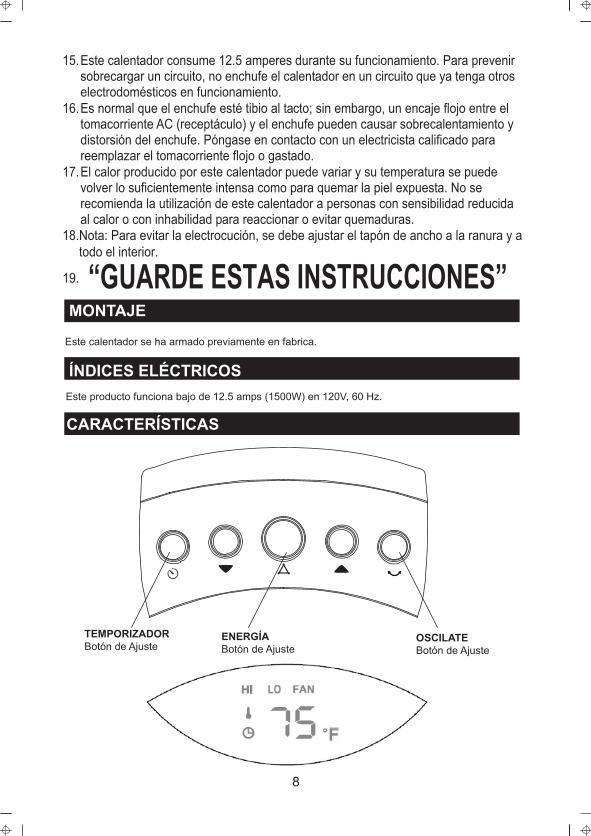
CARACTERÍSTICAS
ENERGÍABotón de Ajuste
TEMPORIZADORBotón de Ajuste
OSCILATEBotón de Ajuste
8
19.

INSTRUCCIONES DE FUNCIONAMIENTO
IMPORTANTE! Su calentador está equipado con un enchufe polarizado de corriente alterna (una de las partes del enchufe es más ancha que la otra). Este enchufe sólo se puede colocar en el tomacorriente de una manera. Ésta es una característica de seguridad. Si no puede insertar el enchufe totalmente en el tomacorriente, intente girando el enchufe. Si siguiera sin poder insertar el enchufe, póngase en contacto con su electricista para que reemplace el tomacorriente. NO desactive esta medida de seguridad del enchufe polarizado.
Ponga el calentador en una superficie nivelada firme y sin obstrucciones, y por lo menos 3 pies de distancia de cualquier pared y cualquier otro objeto por ejemplo muebles, cortinas, plantas o materiales combustible. Conecte el calentador en un enchufe o conector de 120V . El zumbido que ejerce de la pantalla digital indica la temperatura actual. Pulse el botón de ENERGÍA repetidamente a la escena deseada. El ciclo es como siguiente:
Alto: El calentador opera a una potencia en voltios más alta, alrededor de 1500 voltios. Bajo: El calentador opera a una más baja potencia en vatios, alrededor de 900 voltios. Ventilador: El ventilador sólo circula el aire del ambiente, Los elementos caloríficos son "APAGADO". Poner la unidad apagado
Pulse el botón de ENERGÍA hasta ninguno de ellos se enciende (Alto, Bajo, Ventilador).
Después de apagar la unidad, el ventilador continúa funcionando durante 15 segundos para enfriarse, la pantalla digital muestra el proceso en retroceso de 15 a 1. Después de que se apague la pantalla, desenchufe el calentador del tomacorriente.
Ponga la temperatura deseada
• Para poner el termostato la unidad tiene que estar en Alto o Bajo. • Cuando la unidad es encendido, pulse el botón ▲ o ▼, el zumbador sueña y ajuste
temperatura destella en la pantalla digital. • Mientra puede pulsar el botón ▲ o ▼ hasta obtener la temperatura deseada.• Espere alrededor de 5 segundos hasta la pantalla digital visualiza la temperatura actual
otra vez. Si la temperatura actual es más alta que la temperatura ajuste(9 F es la temperatura
ajuste original), la unidad parará de calentar.
Ajuste de Temporizador Ajuste de calentador para apagar automaticamente
Para poner la unidad a apagar, la unidad debe ser encendido (Alto o Bajo). Pulse el botón de temporizador, el ajuste piloto de temporizador iluminará. Y puede ver “0” destella en la pantalla digital. Presione varias veces el botón UP o DOWN para ajustar el tiempo de apagado automático en un período de 12 horas.
(40°F-95°F).
5°
9
Cancelar el ajuste Cuando el indicador del temporizador se enciende, apriete el botón de ENERGÍA puede cancelar la escena del temporizador. Función de oscilante Para poner el calentador a oscilar, el calentador debe ser encendido (Alto, Bajo, Ventilador).Pulse el botón OSC una vez para activar la función, pulse el botón OSC más tiempo para desactivar la función oscilante.
INSTRUCCIONES RESTABLEZCA Este calentador está equipado con un Interruptor Interno del Alto Límite para detener la unidad que no exeda las temperaturas normales. SI LA UNIDAD DEJA DE FUNCIONAR 1) APAGUE LA UNIDAD 2) DESENCHUFE LA UNIDAD Y ESPERE ENFRIARSE3) ENCHUFE Y ENCIENDE SI SU CALENTADOR NO OPERA:
Esté seguro que el calentador este conectado y el enchufe eléctrico este trabajando. Verifique cualquier obstrucción. Si usted encuentra obstrucción apage el calentador. Desenchufe el calentador y espere por lo menos diez minutos para que se enfrie. Cuidadosamente quite la obstrucción, conecte el calentador y reinicíelo según escrito en las intrucciones. Si usted todavía nota el mismo defecto antedicho, quita el enchufe y use el aparato sólo reparado por el personal servicio autorizado. Cheque la temperatura de ajuste no bajo que la temperatura del ambiente actual. Ponga la temperatura deseada superior que la temperatura actual para reiniciar el calentador.
DIAGNÓSTICO DE AVERÍAS
Si su calentador no funciona, por favor siga estas instrucciones: Asegúrese de que su interruptor de circuito o fusible esté funcionando adecuadamente. Asegúrese de que el calentador esté enchufado y el tomacorriente esté funcionando adecuadamente. Verifique que no haya ninguna obstrucción. Si encuentra alguna obstrucción, coloque el calentador en la posición “OFF”. Desenchufe el calentador y espere unos minutos hasta que se enfríe. Retire cuidadosamente la obstrucción. Enchufe el calentador y enciéndalo otra vez consultando las INSTRUCCIONES DE FUNCIONAMIENTO.
NOTA: SI TIENE UN PROBLEMA CON SU CALENTADOR, POR FAVOR VEA LA INFORMACIÓN DE LA GARANTÍA PARA INSTRUCCIONES. POR FAVOR NO INTENTE ABRIR O REPARAR EL CALENTADOR USTED MISMO. EL HACERLO PUEDE ANULAR LA GARANTÍA Y PUEDE CAUSAR DAÑOS O LESIONES PERSONALES. SI EL PROBLEMA TODAVÍA PERSISTE, POR FAVOR PÓNGASE EN CONTACTO CON NOSOTROS REFIRIÉNDOSE A LA INFORMACIÓN DE SERVICIO Y SOPORTE EN LA SIGUIENTE PÁGINA.
Ajuste el calentador para el encendido automáticamente Para ajuste la unidad encendido, la unidad debe ser apagado. Pulse el botón de temporizador, el ajuste piloto de temporizador iluminará y puede ver “0” destella en la pantalla digital. Presione varias veces el botón UP o DOWN para ajustar el tiempo de encendido automático en un período de 12 horas.
El indicador con símbolo de temporizador se iluminará en la pantalla digital después de ajustar el temporizador. Puede verificar el tiempo restante del temporizador al presionar el botón TIMER.
10

LIMPIA Y ALMACEN
Nosotros recomendamos que el calentador se limpie por lo menos una vez por mes y antes del almacenamiento del fuera de temporada.
Apague el calentador y desenchúfelo. Permíta que se enfrie. Use una tela seca para limpiar las superficies externas del calentador.
NO USE AGUA, CEDA, OREGÓN POLACO O CUALQUIER SOLUCIÓN QUÍMICA. Limpie su calentador según pasos antedichos y despues empaque el calentador en su recipiente original y guárdelo en un lugar seco fresco. Este calentador no se desmonta.
El motor esta lubricado de por vida y no necesita más lubricación.
ESPECIFICACIONES
No. Modelo HF-0063Voltaje 120V Frecuencia 60Hz Salida (W) 1500W Corriente (A) 12.5A
SERVICIO AL CLIENTE
FECHA DE COMPRA: _____________________________________________________________ LUGAR DE COMPRA: _____________________________________________________________
(ENGRAPE EL RECIBO DE VENTA AQUÍ)
NOTA: SE REQUIERE UNA PRUEBA DE COMPRA PARA TODOS LOS RECLAMOS DE
GARANTÍA
En caso de reclamos de garantía o si se necesita servicio para este calentador, por favor,póngase en contacto con nosotros a los siguientes números:
Gratis: 866 646 4332Envíenos un mensaje de correo electrónico a: [email protected]
Para preguntas o comentarios, por favor escriba a:Midea America CorporationCustomer Care Center
11411 NW 107th Street, Suite 12Miami, FL 33178
Para su registro, engrape su recibo de compra a este manual y registre lo siguiente:
11

12
calentador de ventilador digital Pelonis
calentador de ventilador digital Pelonis