plazmic theme builder user guide
TRANSCRIPT

Plazmic Theme Builder for BlackBerry SmartphonesVersion: 4.7
User Guide

SWD-628621-0227012043-001

Contents1 Plazmic Theme Builder overview............................................................................................................................................... 6
Configuring the Plazmic Theme Builder....................................................................................................................................... 6
Specify startup preferences................................................................................................................................................... 6
Specify summary information for a theme.......................................................................................................................... 7
Specify application preferences............................................................................................................................................ 7
Specify transparency preferences........................................................................................................................................ 8
Change the faceplate............................................................................................................................................................. 8
Hide the faceplate.................................................................................................................................................................. 8
Show or hide the inspector.................................................................................................................................................... 8
Show or hide the catalog....................................................................................................................................................... 8
Show or hide the alignment tools......................................................................................................................................... 9
Using the workspace...................................................................................................................................................................... 9
The project window................................................................................................................................................................ 9
The Plazmic Theme Builder Inspector.......................................................................................................................................... 10
2 Creating and changing theme projects................................................................................................................................... 12
Theme types..................................................................................................................................................................................... 12
Create a theme project................................................................................................................................................................... 12
Open a theme project.................................................................................................................................................................... 13
Update a theme project created with an earlier version of the Plazmic Theme Builder........................................................ 13
Save a theme project...................................................................................................................................................................... 13
Best practice: Naming a theme project............................................................................................................................... 14
Changing theme types and screen sizes...................................................................................................................................... 14
Change the theme type......................................................................................................................................................... 14
Adapt a theme to a different screen size............................................................................................................................. 14
3 Using fonts................................................................................................................................................................................... 16
Font settings.................................................................................................................................................................................... 16
Set the base font for BlackBerry device screens......................................................................................................................... 17
Change text settings for an element............................................................................................................................................ 17
Best practice: Using fonts effectively in themes......................................................................................................................... 17
4 Creating and using images........................................................................................................................................................ 19
Working with images...................................................................................................................................................................... 19

Add an image.......................................................................................................................................................................... 19
Edit an image.......................................................................................................................................................................... 19
View the name and dimensions for an image..................................................................................................................... 19
Creating background images for dynamically sized screen elements...................................................................................... 19
Creating images with multiple states........................................................................................................................................... 21
Images with multiple states.................................................................................................................................................. 21
5 Using colors.................................................................................................................................................................................. 26
Specify a color................................................................................................................................................................................. 26
Apply a color to a theme element................................................................................................................................................. 27
6 Designing banners...................................................................................................................................................................... 28
Change the background image for a banner............................................................................................................................... 28
Add or remove banner icons.......................................................................................................................................................... 28
Change the size of a banner.......................................................................................................................................................... 28
Reposition the banner elements................................................................................................................................................... 29
Change the underlay image for the Profiles application........................................................................................................... 29
Change the text settings for banner elements............................................................................................................................ 29
Change the image for the battery power indicator.................................................................................................................... 30
Change the image for the wireless coverage indicator.............................................................................................................. 30
Change the image for the alarm indicator................................................................................................................................... 30
Change the image for the Wi-Fi coverage indicator................................................................................................................... 30
Change the image for the new item indicator............................................................................................................................ 31
Change the image for banner icons............................................................................................................................................. 31
7 Customizing the Home screen.................................................................................................................................................. 32
Customizing a Zen theme Home screen...................................................................................................................................... 32
Specify the applications that appear on the Zen Home screen........................................................................................ 32
Specify fonts for Zen Home screen text............................................................................................................................... 32
Specify images for a Zen Home screen................................................................................................................................ 32
Customizing a Today theme Home screen.................................................................................................................................. 33
Specify the applications that appear on the Today Home screen.................................................................................... 33
Specify fonts for Today Home screen text........................................................................................................................... 33
Specify images for a Today Home screen............................................................................................................................ 33
Designing a custom Home screen................................................................................................................................................ 34
Specify the Home screen background................................................................................................................................. 34

Customize the Home screen with an SVG file.................................................................................................................... 34
Layer the Home screen over the banner............................................................................................................................. 34
Specify the icon used for the Application Menu................................................................................................................. 34
Reposition the Home screen application icons.................................................................................................................. 34
Specify Status text for a custom Home screen................................................................................................................... 35
Customize the cursor navigation path on a custom Home screen................................................................................... 35
Specify Today items to appear on the Home screen.......................................................................................................... 35
Specify Zen items to appear on the Home screen.............................................................................................................. 36
Customizing the Application Icons screen................................................................................................................................... 37
Specify fonts for Application Icon text................................................................................................................................. 37
Specify the background image for the Application Icons screen..................................................................................... 37
Specify the overlay image for the new item indicator....................................................................................................... 37
Specify the image for the move icon.................................................................................................................................... 37
Specify the underlay image for icons on the application grid.......................................................................................... 37
Specify the image to use for highlighting the selected application icon........................................................................ 38
Specify new icons for the BlackBerry device applications................................................................................................. 38
Change multiple BlackBerry Application icons at once..................................................................................................... 38
Organize applications in the application grid.................................................................................................................... 39
Add a web link as an application.......................................................................................................................................... 39
Change the inbox configuration................................................................................................................................................... 39
Customizing touch screens............................................................................................................................................................ 40
Customizing the Shortcut bar............................................................................................................................................... 40
Change device orientation.................................................................................................................................................... 40
Customizing external flip screens................................................................................................................................................. 41
Customize the external Home screen.................................................................................................................................. 41
Customize the external phone screen.................................................................................................................................. 41
Customize indicators on the external screen...................................................................................................................... 41
8 Customizing BlackBerry Application screens.......................................................................................................................... 42
Customizing the messages application screen........................................................................................................................... 42
Specify the font for the date text.......................................................................................................................................... 42
Specify a tiled image as the background for the message list date bar.......................................................................... 42
Change the message list icons............................................................................................................................................. 42
Specify the color for alternating rows in lists...................................................................................................................... 43
Specify a color for priority items in lists............................................................................................................................... 43

Customizing the phone application screens................................................................................................................................ 43
Specify the text color for the dialed number or the BlackBerry device number............................................................. 43
Customizing the Active Call screen...................................................................................................................................... 43
Customizing the Incoming Call screen................................................................................................................................ 45
Customizing the Lock screen......................................................................................................................................................... 46
Set fonts for Lock screen text................................................................................................................................................ 46
Set an image as the Lock screen background..................................................................................................................... 46
Set the Lock screen icon........................................................................................................................................................ 46
Customize the Lock screen with an SVG file....................................................................................................................... 46
Arrange the Lock screen elements....................................................................................................................................... 46
Layer the Lock screen over the banner................................................................................................................................ 47
9 Customizing UI elements........................................................................................................................................................... 48
Customizing dialog boxes and dialog box buttons..................................................................................................................... 48
Show or hide the dialog box preview................................................................................................................................... 48
Specify dialog box fonts......................................................................................................................................................... 48
Specify a tiled image for a dialog box background............................................................................................................ 48
Specify a solid color for a dialog box background.............................................................................................................. 48
Specify the icons used on dialog boxes............................................................................................................................... 49
Specify fonts for dialog box buttons..................................................................................................................................... 49
Customizing menus........................................................................................................................................................................ 49
Show or hide the menu preview........................................................................................................................................... 49
Specify fonts for menu items................................................................................................................................................. 49
Specify a tiled image as the background for menus.......................................................................................................... 49
Specify a solid color as the background for menus............................................................................................................ 50
Specify the color of the cursor to underlay a selected menu item................................................................................... 50
Customizing title bars..................................................................................................................................................................... 50
Show or hide the title bar preview........................................................................................................................................ 50
Specify the title bar font........................................................................................................................................................ 50
Specify a tiled image as the background for title bars...................................................................................................... 50
Specify a solid color as the background for title bars........................................................................................................ 51
Specify the color for the cursor in the title bar................................................................................................................... 51
Customizing application lists......................................................................................................................................................... 51
Specify fonts for application lists.......................................................................................................................................... 51
Specify the text color for a selected list item...................................................................................................................... 51

Specify the color that displays underneath the selected list item.................................................................................... 52
Specify the color that displays underneath multiple selected list items......................................................................... 52
Customizing global UI elements and icons................................................................................................................................. 52
Specify images for the radio activity indicators.................................................................................................................. 52
Specify images for key modifiers.......................................................................................................................................... 52
Specify images for the up and down navigation icons...................................................................................................... 52
Specify an hourglass image.................................................................................................................................................. 53
Specify progress bar colors................................................................................................................................................... 53
Specify the default color for application backgrounds...................................................................................................... 53
10 Managing theme images and colors........................................................................................................................................ 54
Create a catalog.............................................................................................................................................................................. 54
Add items to a catalog.................................................................................................................................................................... 54
Reuse resources from a catalog.................................................................................................................................................... 54
Delete items from a catalog.......................................................................................................................................................... 55
Open a catalog................................................................................................................................................................................ 55
Edit a catalog................................................................................................................................................................................... 55
Delete a catalog.............................................................................................................................................................................. 55
Best practice: Controlling resource size....................................................................................................................................... 55
Best practice: Creating effective resources................................................................................................................................. 60
11 Using the BlackBerry Smartphone Simulator to test your theme........................................................................................ 62
Download and install the BlackBerry Smartphone Simulator................................................................................................... 62
Configure the BlackBerry Smartphone Simulator....................................................................................................................... 62
View the theme in the BlackBerry Smartphone Simulator........................................................................................................ 62
12 Making themes available to BlackBerry device users............................................................................................................ 64
Export considerations..................................................................................................................................................................... 64
Exporting a theme........................................................................................................................................................................... 65
Export types............................................................................................................................................................................. 65
Export a theme........................................................................................................................................................................ 66
Making a theme available to BlackBerry device users............................................................................................................... 67
Distribute a theme using the application loader................................................................................................................ 67
Distribute a theme over the wireless network.................................................................................................................... 67
13 Legal notice.................................................................................................................................................................................. 68
Plazmic Theme Builder overview 1
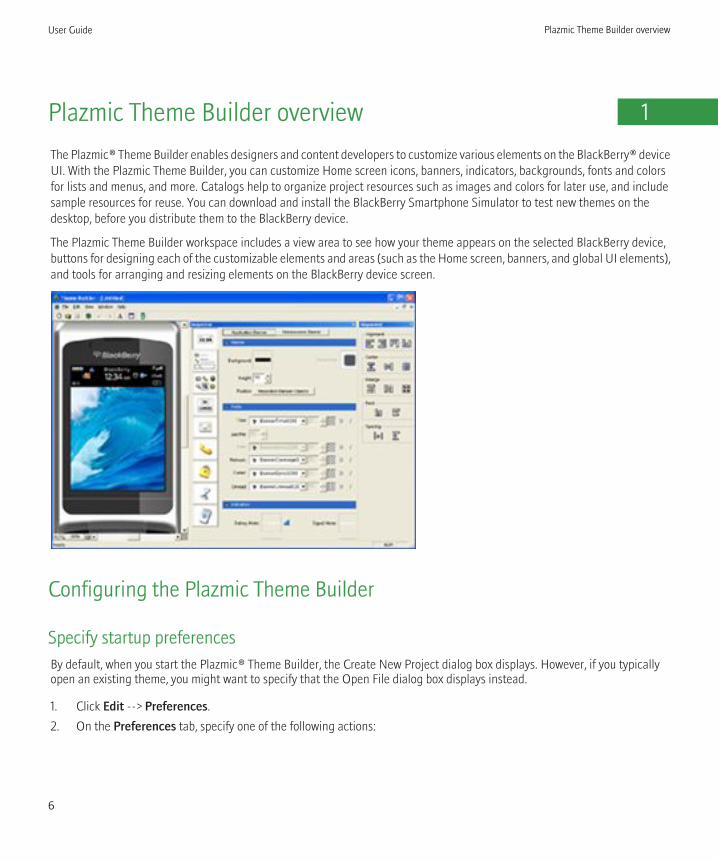
The Plazmic® Theme Builder enables designers and content developers to customize various elements on the BlackBerry® deviceUI. With the Plazmic Theme Builder, you can customize Home screen icons, banners, indicators, backgrounds, fonts and colorsfor lists and menus, and more. Catalogs help to organize project resources such as images and colors for later use, and includesample resources for reuse. You can download and install the BlackBerry Smartphone Simulator to test new themes on thedesktop, before you distribute them to the BlackBerry device.
The Plazmic Theme Builder workspace includes a view area to see how your theme appears on the selected BlackBerry device,buttons for designing each of the customizable elements and areas (such as the Home screen, banners, and global UI elements),and tools for arranging and resizing elements on the BlackBerry device screen.
Configuring the Plazmic Theme Builder
Specify startup preferencesBy default, when you start the Plazmic® Theme Builder, the Create New Project dialog box displays. However, if you typicallyopen an existing theme, you might want to specify that the Open File dialog box displays instead.
1. Click Edit --> Preferences.
2. On the Preferences tab, specify one of the following actions:
User Guide Plazmic Theme Builder overview
6

Option Description
Create New Document Displays the Create New Theme dialog box, so you canchoose the device type and theme type for a new themeproject.
Open File Dialog Displays the Open dialog box so you can select an existing project.
Do Nothing Displays no dialog box. You must click the File menu tocreate a new theme project or modify an existing one.
Specify summary information for a themeYou can add descriptive information about your theme. This information appears when the user views the theme’s properties ontheir BlackBerry® device.
1. Click Edit --> Preferences.
2. Click the Metadata tab.
3. Complete the fields of the Metadata tab as necessary:
Option Description
Vendor Identifies the creator and owner of the theme.
Copyright Specifies any copyright information you want to draw attention to.
Version Specifies versioning data for the theme. This field supportsonly numeric characters and decimal points. Alphabeticcharacters and symbols are invalid. The version must be acombination of numeric characters and at least one decimalpoint, for example, 1.12 or 4.2.6.
Description Specifies a brief description for the theme. You should limitthe description to one or two sentences.
Specify application preferencesSet application preferences to specify which applications to use as the default for working with selected file types.
1. Click Edit --> Preferences.
2. Click the Applications tab.
3. Click Browse and select the application to use for each file type.
User Guide Configuring the Plazmic Theme Builder
7
Option Description
SVG Specifies the application to use with .svg files. You cancompile .svg content to make it available for use in theBlackBerry® Browser. You can work with .svg files using thePlazmic® Composer.
Images Specifies the application to use for working with image files.
Specify transparency preferencesChange transparency preferences to make the transparency pattern easier to see on different backgrounds. For example, youcan use a lighter transparency pattern to indicate transparency over a darker background.
1. Click Edit Preferences.
2. Click the Transparency tab.
3. Click the drop-down list and select a shade for the transparency.
4. Click each color box and use the Color Picker to select a color for the transparency.
Change the faceplateThe preview pane shows how the BlackBerry® device screen will look with your theme design. By default, the Plazmic® ThemeBuilder also displays the BlackBerry device face plate in the preview pane. Viewing the face plate is useful, as the face platecoloring affects the perception of the colors you use in your theme.
1. To change the face plate, on the View menu, click Change Plastics.
2. Select the face plate you want to display.
Hide the faceplateIf you choose, you can change or hide the BlackBerry® device face plate that is displayed in the preview pane. The Change Plasticsdialog box displays face plates of BlackBerry devices that match the screen dimensions of the theme you are working on.
To hide or show the BlackBerry device face plate, on the View menu, click Show Plastics.
Show or hide the inspectorOn the Window menu, click Inspector.
Show or hide the catalogOn the Window menu, click Catalog.
User Guide Configuring the Plazmic Theme Builder
8

Show or hide the alignment toolsOn the Window menu, click Alignment.
Using the workspace
The project window
You view your Plazmic® Theme Builder projects in the preview pane. Each project opens in a separate pane. You can customizedifferent theme elements in the Inspector. The catalog stores images and colors for use in your themes. You can drag imagesand colors between the Inspector and the catalog. The alignment tool allows you to change the alignment of objects.
User Guide Using the workspace
9

The Plazmic Theme Builder InspectorYou can use the Plazmic® Theme Builder Inspector to customize the components of the BlackBerry® UI. You can click theappropriate button at the left of the Inspector pane to display the Inspector for each component. The Home screen for eachtheme type is unique, and is the primary difference between the theme types.
Inspector Button Description
Banner Use the Banner Inspector to change the
color scheme and the background image
that appears in the banner across the
top of many BlackBerry Applications.
You can also customize the Home screen
banner using the Banner Inspector.
Zen Home screen Use the Zen Home Screen Inspector to
specify the five applications to display
on the Home screen, and the images to
use for other Home screen elements.
Today Home screen Use the Today Home Screen Inspector
to specify the applications to display on
the Home screen, and the images to use
for other Home screen elements.
Custom Home screen Use the Custom Home Screen Inspector
to specify the applications to display on
the Home screen , their position on the
home screen, and the images to use for
other Home screen elements and
navigation.
Application Icons Use the Application Icons Inspector to
specify images to use and to define the
application hierarchy of the Icon Home
screen and the Application menu screen
for the Zen, Today, and Custom Home
screens.
User Guide The Plazmic Theme Builder Inspector
10
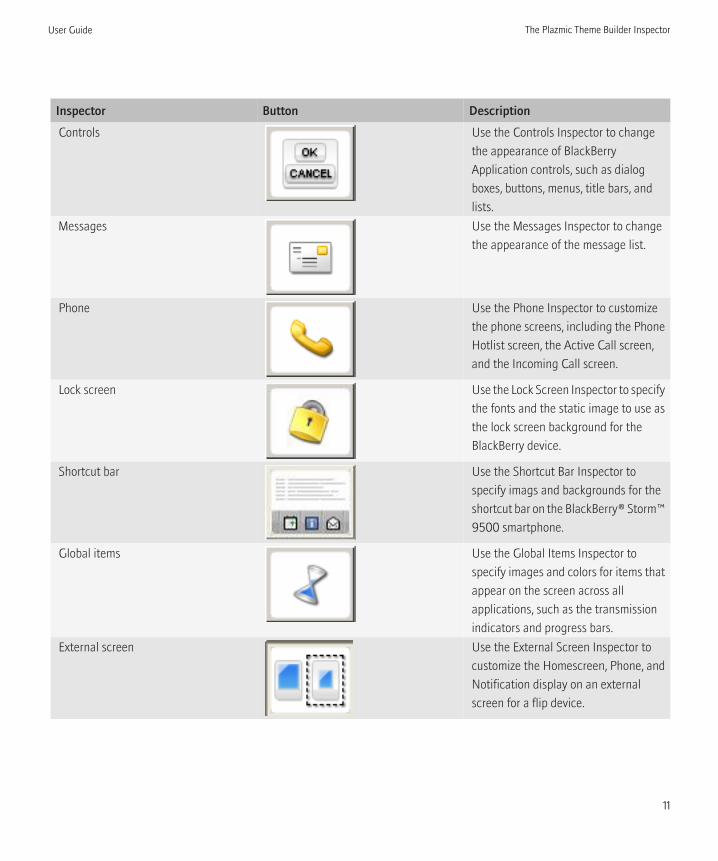
Inspector Button Description
Controls Use the Controls Inspector to change
the appearance of BlackBerry
Application controls, such as dialog
boxes, buttons, menus, title bars, and
lists.
Messages Use the Messages Inspector to change
the appearance of the message list.
Phone Use the Phone Inspector to customize
the phone screens, including the Phone
Hotlist screen, the Active Call screen,
and the Incoming Call screen.
Lock screen Use the Lock Screen Inspector to specify
the fonts and the static image to use as
the lock screen background for the
BlackBerry device.
Shortcut bar Use the Shortcut Bar Inspector to
specify imags and backgrounds for the
shortcut bar on the BlackBerry® Storm™
9500 smartphone.
Global items Use the Global Items Inspector to
specify images and colors for items that
appear on the screen across all
applications, such as the transmission
indicators and progress bars.
External screen Use the External Screen Inspector to
customize the Homescreen, Phone, and
Notification display on an external
screen for a flip device.
User Guide The Plazmic Theme Builder Inspector
11

Creating and changing theme projects 2
You create your new theme using the selected theme type as your starting point. You can change from one theme type to anotherat any time, however, any customizations you made to the Home screen will no longer apply in the new theme type. Changesmade elsewhere in the theme are preserved.
You must create a theme for the specific screen dimensions of a BlackBerry® device. The Plazmic® Theme Builder scales screenelements to fit the specified screen dimensions.
When you export, you choose the specific device to export the theme for. You cannot create a theme and export it for use onBlackBerry devices that have different screen dimensions.
For example, if you design a theme for a BlackBerry® Pearl™ 8100 Series smartphone (with screen dimensions of 240x260 pixels),users cannot download that theme to a BlackBerry® Curve™ 8300 Series smartphone (with screen dimensions of 320x240 pixels);they can, however, download that theme to a BlackBerry® 7100 Series smartphone, since it has the same screen dimensions(240x260 pixels) as the BlackBerry® Pearl™ smartphone.
You can save a theme project at any time and reopen it later to continue designing your theme.
Theme typesWhen you create a new theme project, you must first select a theme type. The theme type is a template for the layout of theHome screen. The Plazmic® Theme Builder includes the following theme types:
• Zen theme: This Home screen displays five application icons plus an icon that links to the application grid screen, fromwhich users can access all the applications on the BlackBerry® device.
• Today theme: This Home screen displays three application icons plus an icon that links to the application grid screen, fromwhich users can access all the applications on the BlackBerry device. By default, the message application, calendarapplication, and call log application icons display on this Home screen. The most recent entries are below each applicationicon.
• Custom theme: This Home screen displays a combination of Zen theme items (application icon) and Today theme items(application icon and the most recent entries). You can position these items anywhere on the screen. This screen includesa link to the application grid screen, from which users can access all the applications on the BlackBerry device.
• Icon theme: This Home screen displays application icons arranged in a grid layout. You can organize the application iconsinto a hierarchy of folders. This screen is also the secondary application grid screen for the Zen, Today, and Custom themetypes.
Create a theme project1. On the File menu, click New.
2. In the Create New Theme dialog box, in the Name field, type a name for your new theme project.
User Guide Creating and changing theme projects
12

3. In the Device drop-down list, click the target device:• 240x260: BlackBerry® 7100 Series and BlackBerry® Pearl™ smartphones• 240x320: BlackBerry® Pearl™ 8220 smartphones• 320x240: BlackBerry® 8700 Series, BlackBerry® 8800 Series, and BlackBerry® Curve™ smartphones• 480x360: BlackBerry® Curve™ 8900 smartphones• 480x320: BlackBerry® Bold™ 9000 smartphones• 360x480: BlackBerry® Storm™ 9500 smartphones
4. In the Type drop-down list, click the theme template you want to use as the basis for your new theme.
5. Click Create.
Open a theme project1. Click File --> Open, and navigate to the theme project (.thm) file.
2. Click Open.
Update a theme project created with an earlier version of the Plazmic ThemeBuilderBecause of changes in the theme reader, themes created using earlier versions of Plazmic® Theme Builder are not compatiblewith later versions of the BlackBerry® Device Software. However, instead of having to recreate these themes from scratch, youcan update the theme project by opening it in Plazmic Theme Builder version 4.7, and then exporting it to the desired version ofthe BlackBerry Device Software.
1. Click File --> Open.
2. Navigate to the theme project that was created with an older version of Plazmic Theme Builder.
3. Click Open. The Plazmic Theme Builder prompts you to upgrade the theme file to a newer version.
4. Click OK.
Save a theme project1. Click File --> Save.
2. To save the project with a new name, click File --> Save As.
3. Type the new theme project name and then navigate to the location you want to save it in. The file is saved in the PlazmicTheme Builder (.thm) format.
User Guide Open a theme project
13

Best practice: Naming a theme project
Consider the following when naming theme projects:
• You can save your theme project with any unique name. However, when you export your theme project and create the .codfile, the Plazmic® Theme Builder changes any special characters in the file name (for example, - , +, and &) to underscores(_). If two files have the same name, differentiated only by special characters, they will have identical names when they areexported to a .cod file.
This can be a problem if you choose the Overwrite Existing Files option in the Export dialog box. The Plazmic Theme Builderwill not warn you when it exports and overwrites an existing file with the same name in the same directory, even if theMicrosoft® Windows® file names for those two theme projects are unique.
You should give your theme projects names that are unique, and avoid using special characters.• Reader is a reserved name; you cannot use it as a theme name.
Changing theme types and screen sizesWhen you create a theme, you must select the theme type and the screen size that you want to target. However, if you wish tocreate a family of related themes that, for example, targets different screen sizes and present different Home screen layouts, thePlazmic® Theme Builder enables you to do so, without you having to create similar looking themes from scratch.
You can change from one theme type to another at any time. Changes you made to the Home screen are lost, since they will nolonger apply in the new theme. However, the Plazmic Theme Builder preserves changes elsewhere in the theme.
A single theme project cannot target multiple screen sizes. You must create a new theme to target a different screen size. However,you can leverage design work you’ve already done for another theme by importing it into your new theme.
When you import a theme that targets a different screen size, all modified theme elements are imported into your new theme.After the theme is imported, you may need to make some slight adjustments, for example, in the placement of banner elements,to achieve the desired results.
Change the theme type1. Click Edit --> Change Theme type.
2. Select the theme type you want to use.
Adapt a theme to a different screen size1. Click File --> New.
2. In the Create New Theme dialog box, complete the fields and select a screen size. You should also choose the same themetype as the theme that you plan to import, or Home screen customizations are not imported.
User Guide Changing theme types and screen sizes
14
3. Click Create.
4. When the new project is created, click File --> Import.
5. Navigate to the theme that you want to adapt to the new screen size.
User Guide Changing theme types and screen sizes
15

Using fonts 3You can set fonts throughout your theme. There are three types of fonts, each of which is identified by an icon adjacent to thefont name in the drop-down list. Different font types have different levels of customization:
Font type Description
BlackBerry® fonts You can change the fill color and specify the style (bold, italic,
and anti-alias). Define the font size for BlackBerry fonts in
pixels.
TrueType® fonts You can change the fill and stroke color, where applicable, and
specify the style (bold, italic, and anti-alias). If you select bold
or italic settings but a bold or italic version of the font is not
available on your computer, the Plazmic® Theme Builder uses
the plain version of the font and those settings have no effect.
Define the font size for TrueType fonts in pixels.
XFONT® fonts The amount of customization varies; in some cases, you cannot
customize any font settings, in others, you can customize some
or all font settings. You cannot adjust the size of XFONT fonts.
Font settings
Setting Description
Size The font size specifies the height of the text, in pixels.
Fill color You can apply a fill color to BlackBerry® system fonts and TrueType® fonts. To display the Color
Picker, click the fill swatch.
Bold The Bold font setting can be applied to any BlackBerry system or TrueType font. However, it you
apply the Bold style to a TrueType font, but no bold version of the selected font exists on your
computer, this setting will have no effect.
Italic The Italic font setting can be applied to any BlackBerry system or TrueType font. However, it you
apply the Italic style to a TrueType font, but no italic or oblique version of the selected font exists on
your computer, this setting will have no effect.
Anti-aliasing The Anti-alias setting smooths the edges of fonts, which typically improves the legibility of the text.
This setting can be applied to any BlackBerry system or TrueType font.
User Guide Using fonts
16

Setting Description
Stroke color The Stroke color defines the color of the outline of the text. This setting is only available for text
elements on the following Inspector panels: Banner, Home Screen, Icon grid, and Lock screen. When
it is available, you can apply it to any BlackBerry system font or TrueType font. The Bold Setting has
no effect on the thickness of the font stroke.
Highlight font The highlight font defines the font to use when menu items are selected or dialog boxes are displayed.
This setting is only available for menu items or dialog boxes.
Set the base font for BlackBerry device screensTo achieve a consistent look throughout your theme, use fonts from the same font family, and make minor adjustments to colorand size where appropriate.
You can specify the font to use for dialog boxes, buttons, lists, and the phone and message applications from a single location.You can use the Inspector to adjust the base font as necessary, or to choose a different font for a theme element.
The base font you choose is not applied to banner, Home screen, or Lock screen elements.
1. Click Edit --> Change Fonts.
2. In the Font drop-down list, click the font family to use as the base font for the theme.
3. Specify the font settings.
Change text settings for an elementNote that by default, the AM/PM element uses the same font family and font settings as the Time element. You can specify thesize for the AM/PM element only if you specify a TrueType® font for the Time element.
1. Click a button at the left of the Inspector pane.
2. In the corresponding area for the element, specify the text settings.
Best practice: Using fonts effectively in themes• Limit the number of fonts used: To achieve a consistent look throughout your theme, you should try to use fonts that are
from the same font family, and make minor adjustments to color and size, where appropriate. With the Plazmic® ThemeBuilder, you can set a default font for use across the theme, so you need only adjust font characteristics such as size andcolor. You then have to set the font family only in those cases where a different font style is appropriate.
• Be aware of the legibility of the text: Consider how the font properties affect the user’s ability to read the text. For mostfonts, you can set the following four properties:
User Guide Set the base font for BlackBerry device screens
17

• Color: As with images, you should use a limited color palette for fonts. Consider the background color as well; textbecomes illegible when displayed on a background of a similar color or brightness. Consider using the same color forhighlighted text on all controls.
• Bold: You should use bold text when text needs added emphasis, such as in a highlighted menu item.• Italics: Italicized text can interfere with readability; you should use it sparingly.• Anti-alias: Anti-aliasing smooths the font edges, typically improving the appearance and legibility of the font; however,
it also increases the size of the theme file. Note that with very small fonts, anti-aliasing can create a blurred effect,and can actually decrease the legibility of the font.
• Limit the number of TrueType fonts used: With the exception of BB Alpha fonts, the BlackBerry® device does not supportTrueType® fonts. The Plazmic Theme Builder converts all the glyphs in other TrueType font sets into a series of bitmaps.Any changes to the properties of a TrueType font requires its own complete set of bitmaps. For example, if you use the sameTrueType font in a menu but specify different colors for the highlighted and normal text, the Plazmic Theme Builder mustgenerate two complete sets of bitmaps.
User Guide Best practice: Using fonts effectively in themes
18

Creating and using images 4
Working with imagesWhen you add an image to a theme project, the Plazmic® Theme Builder converts the image from its original format to .pngformat and stores the converted image as part of the theme. If you change the source image, the Plazmic Theme Builder doesnot automatically update the image in the theme; you must reload the source image into the theme to update it. If you hadpreviously added the image to a catalog, you must remove it from the catalog and then add it to the catalog again.
Add an image1. In the Inspector, click the name of the changed image that you want to reload. A context menu appears.
2. On the context menu, click Reload Image.
Edit an imageYou can edit an image using the default application you specified in the tool preferences.
1. In the Inspector, click the name of the changed image that you want to edit. A context menu appears.
2. On the context menu, click Edit Image.
View the name and dimensions for an imageYou can view the name and dimensions of any image used in the theme.
To display the file name and dimensions of an image, place your pointer over the image in the Inspector.
Creating background images for dynamically sized screen elementsDesigning background images for dialog boxes, buttons, menus, and title bars presents a number of challenges for themedesigners, for two reasons:
• They are dynamic in size: Dialog boxes, buttons, and menus are scaled to fit the text that they contain. Because themedesigners do not know the size of the element, they cannot design background images to fit; images must be scalable toaccommodate any possible size.
• They are overlay elements: Dialog boxes, buttons, menus, and title bars should be separated from the screen content thatthey overlay so they stand out. Typically, most UIs use borders to separate elements from the screen content that theyoverlay, to create a three-dimensional layering effect.
User Guide Creating and using images
19
Since background images for dynamic elements require borders and are of an unknown size, static images are not sufficient.Creating an image that includes the border and background and then scaling it to fit does not work because the borders scaleas well, resulting in inconsistent border widths across similar elements. Creating separate images for the borders and backgroundis also not a satisfactory solution because the resulting number of resources required is impractical.
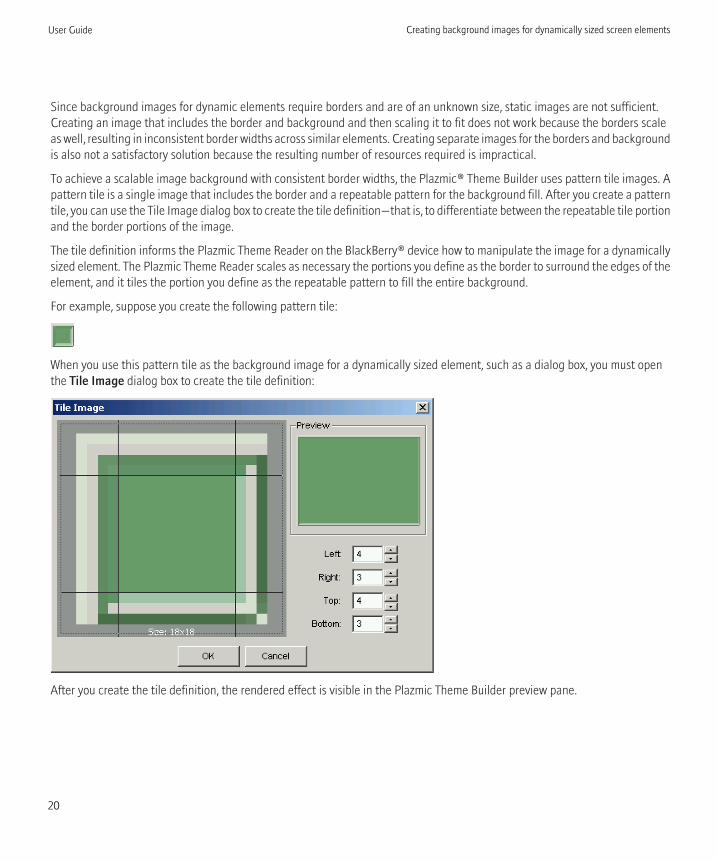
To achieve a scalable image background with consistent border widths, the Plazmic® Theme Builder uses pattern tile images. Apattern tile is a single image that includes the border and a repeatable pattern for the background fill. After you create a patterntile, you can use the Tile Image dialog box to create the tile definition—that is, to differentiate between the repeatable tile portionand the border portions of the image.
The tile definition informs the Plazmic Theme Reader on the BlackBerry® device how to manipulate the image for a dynamicallysized element. The Plazmic Theme Reader scales as necessary the portions you define as the border to surround the edges of theelement, and it tiles the portion you define as the repeatable pattern to fill the entire background.
For example, suppose you create the following pattern tile:
When you use this pattern tile as the background image for a dynamically sized element, such as a dialog box, you must openthe Tile Image dialog box to create the tile definition:
After you create the tile definition, the rendered effect is visible in the Plazmic Theme Builder preview pane.
User Guide Creating background images for dynamically sized screen elements
20

Creating images with multiple statesThe BlackBerry® themes contain several elements for which a single static image is not sufficient. Some images must visuallyrepresent different levels, or states. For example, the battery power indicator displays how much power remains in the battery;this indicator must visually convey the battery power level, from 100% to 0%. The image must also show the increase in thebattery power level as the battery charges. In addition, you must include an indicator for cases when the BlackBerry device isunable to determine the battery power level.
Instead of specifying a separate image for each state, the Plazmic® Theme Builder manages these elements by using compositeimages. Composite images are made up of a number of component images that depict every possible state for a given element.
Images with multiple statesComponent images can be of any dimension; however, each component image within these images must have the same heightand width. To determine the correct dimensions of each image, the Plazmic® Theme Builder takes the dimensions of the compositeimage and divides the width by the number of images per row, and the height by the number of rows. For example, the compositeimage for the wireless coverage indicator is made up of a single row of nine component images. Therefore, if the composite imageis 10x180 pixels, then the size of each component image is 10x20 pixels.
Element Location Component
images
Description
Battery power
indicator
Banner 24 Two rows of 12 equal-sized images. The component images include, from left
to right:
• Top row: 11 images representing the battery power level from 0% to 100%,
in 10% increments, and one image for unknown battery status.
• Bottom row: 11 images representing the battery power level from 0% to
100%, in 10% increments, and one image for unknown battery status, each
with a charging indicator.
User Guide Creating images with multiple states
21
Element Location Component
images
Description
For example:
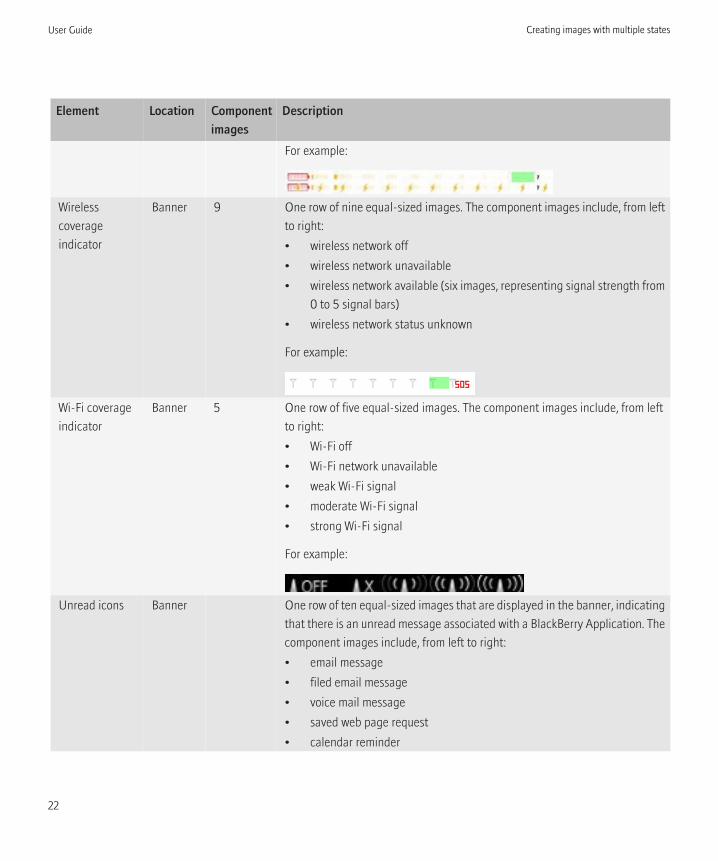
Wireless
coverage
indicator
Banner 9 One row of nine equal-sized images. The component images include, from left
to right:
• wireless network off
• wireless network unavailable
• wireless network available (six images, representing signal strength from
0 to 5 signal bars)
• wireless network status unknown
For example:
Wi-Fi coverage
indicator
Banner 5 One row of five equal-sized images. The component images include, from left
to right:
• Wi-Fi off
• Wi-Fi network unavailable
• weak Wi-Fi signal
• moderate Wi-Fi signal
• strong Wi-Fi signal
For example:
Unread icons Banner One row of ten equal-sized images that are displayed in the banner, indicating
that there is an unread message associated with a BlackBerry Application. The
component images include, from left to right:
• email message
• filed email message
• voice mail message
• saved web page request
• calendar reminder
User Guide Creating images with multiple states
22

Element Location Component
images
Description
• BlackBerry Messenger message
• SMS text message
• anonymous message
• task reminder
• push channel update
For example:
Message icons Message
list
96 Four rows of 24 equal-sized images, representing all possible message types
that can be displayed in the banner. The message list can contain messages of
three types: email messages, SMS (text) messages, and MMS (media) messages.
The component images include, from left to right:
• First Row: empty slot, three images for incoming email message (unread,
read, error), nine images for outgoing email message (composing,
compressing, encrypting, completing, sending, sent, delivered, read
acknowledged, transmission error), two images for filed email message
(unread, read), empty slot, empty slot, two images for incoming ringtone
(unplayed, played), two images for incoming pager message (unopened,
opened), two images for messages with attachments (unread, read), two
images for calendar reminders (unread, read), and one image for download
attachment
• Second row: empty slot, three images for incoming SMS message (unread,
read, error), nine images for outgoing SMS message (composing,
compressing, encrypting, completing, sending, sent, delivered, read
acknowledged, transmission error), two images for filed SMS message
(unread, read), followed by nine empty slots
• Third row: empty slot, two images for incoming security message (unread,
read), empty slot, two images for incoming signed read receipt (unread,
read), followed by 18 empty slots
User Guide Creating images with multiple states
23

Element Location Component
images
Description
• Fourth row: empty slot, three images for incoming MMS message (unread,
read, error), nine images for outgoing MMS message (composing,
compressing, encrypting, completing, sending, sent, delivered, read
acknowledged, transmission error), two images for filed MMS message
(unread, read), followed by nine empty slots
For example:
Web icons Message
list
5 One row of five equal-sized images, representing all the possible browser-
related messages than appear in the messages list. The component images
include, from left to right:
• page request sending
• page request pending
• page request returned and unviewed
• page request returned and viewed
• error receiving page request
For example:
Phone Phone
(Active
Call)
varied One row of images, representing, from left to right, the different phone states.
For example:
There are seven states on the following devices: BlackBerry® Bold™ 9000,
BlackBerry® 8800 Series, BlackBerry® 8700 Series, BlackBerry® Curve™ 8300
Series, BlackBerry® Pearl™ 8220, BlackBerry® Pearl™ 8100 Series, and
BlackBerry® 7100 Series devices.
User Guide Creating images with multiple states
24

Element Location Component
images
Description
BlackBerry® Curve™ 8900 devices have nine states, BlackBerry® Storm™ 9500
devices have 11 states, and BlackBerry® Curve™ 8350i devices have 13 states.
Phone volume Volume
(Active
Call)
9 One row of nine images, representing, from left to right, the different phone
volume states.
For example:
User Guide Creating images with multiple states
25

Using colors 5
You can use the Plazmic® Theme Builder Color Picker to specify the color of a theme element or to define and save a palette ofcustom colors. You can also save custom colors by dragging colors from the Plazmic Theme Builder Inspector to the catalog.
Specify a color1. To open the Color Picker, click a color swatch.
2. To specify a color, perform one of the following actions:
Option Description
Specify an RGB color. a. Click the RGB tab.
b. Move the Red, Green, and Blue color slide bars to adjust thecolor.
Specify an HSB color. a. Click the HSB tab.
b. Move the Hue, Saturation, and Brightness slide bars toadjust the color.
Select a color from the color wheel. a. Click the Wheel tab.
b. To adjust the luminosity, move the slide bar on the luminosityscale at the right.
c. Drag the pointer in the color wheel to the color you want.Each pixel in the wheel represents a different color.
Specify a CMYK color. a. Click the CMYK tab.
b. Move the Cyan, Magenta, Yellow, and Black color slide barsto adjust the color.
Select a web-safe color. a. Click the Web tab.
b. Click one of the web-safe color swatches.
Select a color sample from anywhere on the screen. a. Click the eyedropper button to change the cursor to theeyedropper tool.
b. Hold the pointer as you drag the eyedropper tool anywhereon the screen. The color selection box changes as you dragthe eyedropper tool.
c. To select a color, when the eyedropper tool is positioned overthe color you want, release the pointer.
User Guide Using colors
26
3. To convert the selected color to a web-safe color, click the Web safe setting. The Plazmic® Theme Builder converts the colorin the color selection box to the closest web-safe color.
4. To save a color to the custom color palette, click the color displayed in the color selection box and drag it to any color swatchon the custom color palette.
5. To apply the color to the theme element without closing the Color Picker, click Apply.
6. To apply the color and close the Color Picker, click OK.
Apply a color to a theme element1. Click a button at the left of the Inspector pane.
2. Select a color.
3. To convert the selected color to a web-safe color, click the Web safe setting. The Plazmic® Theme Builder converts the colorin the color selection box to the closest web-safe color.
4. To save a color to the custom color palette, click the color displayed in the color selection box and drag it to any color swatchon the custom color palette.
5. To apply the color to the theme element without closing the Color Picker, click Apply.
6. To apply the color and close the Color Picker, click OK.
User Guide Apply a color to a theme element
27
Designing banners 6
The device banners appear on the Homescreen and at the top or bottom of several BlackBerry® applications. The Homescreenbanner is used on the Home screen and Lock screen. The Application banner is used on the Message List, Active Call, PhoneHotlist, and Application menu screens. The banners display the date and time, network connectivity information, and notificationicons.
The Plazmic® Theme Builder enables you to completely customize the device banners; you can replace banner images andindicator images with your own, apply custom fonts, and customize the color scheme. You can also adjust the banner height andreposition elements within the banner.
Note that the Alarm, Unread Icons, and New Items overlay are shared between banners, and cannot be themed independently.Any changes made to these objects on either of the Homescreen or Application banners will appear on both.
Change the background image for a banner1. Click the Banner button at the left of the Inspector pane.
2. Click the Background thumbnail image.
3. Navigate to the image to use as the background image for the banner.
Add or remove banner icons1. Click the Banner button at the left of the Inspector pane.
2. In the Visibility section, elect or clear the check box for any of the following icons:
• Time• Date• Network• Profiles Icon• Alarm Icon• Unread Indicator Area• Battery Meter• Signal Meter
Change the size of a banner1. Click the Banner button at the left of the Inspector pane.
User Guide Designing banners
28
2. In the Banner section, in the Height field, specify the height of the banner in pixels. You can set the banner height to aminimum height of 20 pixels and a maximum of 120 pixels.
Reposition the banner elements1. Click the Banner button at the left of the Inspector pane.
2. In the Banner section, click Reposition Banner Objects. In the preview pane, movable bounding boxes appear aroundeach banner element.
3. Select a bounding box and drag it to the location you want, or select multiple boxes and use the Alignment Tools to repositionthem.
4. To resize an editing frame, drag a node on the edge or corner of the editing frame.
5. Repeat steps 2 and 3 to reposition and resize additional elements.
6. To hide the bounding boxes, click Reposition Banner Objects.
Change the underlay image for the Profiles application1. Click the Banner button at the left of the Inspector pane.
2. Click the Homescreen Banner tab.
3. In the Banner section, click the Focus Icon thumbnail image.
4. Navigate to the image that displays underneath the Profiles application icon when the Profiles application is selected.
Change the text settings for banner elements1. Click the Banner button at the left of the Inspector pane.
2. In the Fonts section, in the drop-down list beside each of the following text elements, click the font family to use:
• Time• Date• Network• Carrier• Unread
3. Specify the text settings.
4. If it is available, specify the font size for the AM/PM element.
By default, the AM/PM element uses the same font family and font settings as the Time element. You can specify the sizefor the AM/PM element only if you specify a TrueType® font for the Time element.
User Guide Reposition the banner elements
29

Change the image for the battery power indicatorThe image you select for the battery power indicator must be a composite image made up of two rows of 12 images, one imagefor each possible battery power level (12 images to indicate battery power levels, and 12 to indicate battery power levels whilecharging).
1. Click the Banner button at the left of the Inspector pane.
2. In the Indicators section, click the Battery Meter thumbnail image.
3. Navigate to the composite image to use as the battery power indicator.
4. To change which component image displays in the preview pane, click the Preview button to display the entire compositeimage, then click the image to display.
Change the image for the wireless coverage indicatorThe image you select for the wireless coverage indicator must be a composite image made up of one row of nine images (oneimage for each possible level of wireless coverage).
1. Click the Banner button at the left of the Inspector pane.
2. In the Indicators section, click the Signal Meter thumbnail image.
3. Navigate to the composite image to use as the wireless coverage indicator.
4. To change which component image displays in the preview pane, click the Preview button to display the entire compositeimage, then click the image to display.
Change the image for the alarm indicator1. Click the Banner button at the left of the Inspector pane.
2. In the Indicators section, click the Alarm Icon thumbnail image.
3. Navigate to the image to use as the overlay image for the alarm indicator in the banner.
Change the image for the Wi-Fi coverage indicatorThe image you select for the Wi-Fi® coverage indicator must be a composite image made up of one row of five images (one imagefor each possible level of Wi-Fi coverage).
1. Click the Banner button at the left of the Inspector pane.
2. In the Indicators section, click the Wi-Fi Signal Meter thumbnail image.
3. Navigate to the composite image to use as the Wi-Fi coverage indicator.
4. To change which component image displays in the preview pane, click the Preview button to display the entire compositeimage, then click the image to display.
User Guide Change the image for the battery power indicator
30
Change the image for the new item indicator1. Click the Banner button at the left of the Inspector pane.
2. In the Indicators section, click the New Items thumbnail image.
3. Navigate to the image to use as the overlay image for the new item indicator in the banner.
Change the image for banner iconsThe banner displays a number of notification icons, indicating that there is an unread message associated with a BlackBerry®Application. The unread icons that display in the banner are included in a single composite image. Icons must be arranged andsaved as a single image according to a specific layout.
1. Click the Banner button at the left of the Inspector pane.
2. In the Indicators section, click the Unread Icons thumbnail image.
3. Navigate to the composite image that contains all the unread icon images.
4. To change which component image displays in the preview pane, click the Preview button to display the entire compositeimage, then click the image to display.
User Guide Change the image for the new item indicator
31
Customizing the Home screen 7
The Home screen for each available base theme is unique, and is the primary difference between the base themes. You cancustomize different elements depending on the theme type you choose.
All theme types include the application icons screen; it is used as the Home screen layout for the Icon theme type, and as theApplication Menu screen for the Zen, Today and Custom theme types.
Customizing a Zen theme Home screen
Specify the applications that appear on the Zen Home screen1. Click the Home Screen button at the left of the Inspector pane.
2. In the list of BlackBerry® Applications, click an application and drag it to the Zen Applications list.
• To replace an application in the list, drag the new application directly over the old application.• To add an application to the list, drag the new application onto the separator between two applications. The last
application in the list is removed as the new application is added.
3. Repeat step 2 to add additional applications.
4. Reorder the applications as necessary:
• To move an application in the Zen Applications list, drag it up or down.• To switch the position of two applications, drag one application directly over the other.
Specify fonts for Zen Home screen text1. Click the Home Screen button at the left of the Inspector pane.
2. In the Status Font drop-down list, click the font family you want to use for text on the Home screen.
3. Specify font settings.
Specify images for a Zen Home screen1. Click the Home Screen button at the left of the Inspector pane.
2. Click one of the following thumbnail images:
Option Description
Background An image that displays in the background on the Home screen.
User Guide Customizing the Home screen
32

Tab An image that displays beneath the application icon on the Homescreen.
Tab Focus An image that displays beneath the application icon when it isselected.
3. Navigate to the image you want to use.
Customizing a Today theme Home screen
Specify the applications that appear on the Today Home screenThe Today theme displays three application icons on the Home screen, by default (Messages, Calendar, and Call Log). You canadd as many applications as you like to the Today Applications list; however, the Plazmic® Theme Builder only displays as manyas will fit on the screen.
1. Click the Home Screen button at the left of the Inspector pane.
2. In the list of BlackBerry® Applications, click an application and drag it to the Today Applications list.
• To replace an application in the list, drag the new application directly over the old application.• To add an application to the list, drag the new application onto the separator between two applications.
3. Repeat step 2 to add additional applications.
4. Reorder the applications as necessary.
• To move an application in the Today Applications list, drag it up or down.• To switch the position of two applications, drag one application directly over the other.• To remove an application from the Today Applications list, select the application and click the Trash icon.
Specify fonts for Today Home screen text1. Click the Home Screen button at the left of the Inspector pane.
2. In the Font drop-down list, click the font family to use for text on the Home screen.
3. Specify font settings.
Specify images for a Today Home screen1. Click the Today Home Screen button at the left of the Inspector pane.
2. Click one of the following thumbnail images:
Option Description
Background An image that displays in the background on the Home screen.
User Guide Customizing a Today theme Home screen
33
Caret An image that displays beneath the selected application on theHome screen.
App Menu An image that is added to Home screen and, when clicked by theuser, displays the Application Icons screen.
3. Navigate to the image you want to use.
Designing a custom Home screenBy selecting the custom theme type, you can design a custom Home screen. add Zen theme and Today theme items to the Homescreen. These application items can be positioned anywhere on the Home screen.
Specify the Home screen background1. Click the Home Screen button at the left of the Inspector pane.
2. In the Applications section, click the Background thumbnail image.
3. Navigate to the image to use as the background image for the Home screen.
Customize the Home screen with an SVG fileYou can use an SVG file created using Plazmic® Composer to create a fully customized Home screen.
1. Click the Home Screen button at the left of the Inspector pane.
2. In the Applications section, click the folder icon to the right of the SVG File field.
3. Specify an SVG file to use for the Home screen.
Layer the Home screen over the banner1. Click the Home Screen button at the left of the Inspector pane.
2. In the Applications section, check Render Home Screen Over Banner.
Specify the icon used for the Application Menu1. Click the Home Screen button at the left of the Inspector pane.
2. In the Applications section, click the Application Menu thumbnail image.
3. Navigate to the image to use as the Application Menu icon.
Reposition the Home screen application icons1. Click the Home Screen button at the left of the Inspector pane.
User Guide Designing a custom Home screen
34

2. In the Applications section, click Reposition Applications. In the preview pane, movable bounding boxes appear aroundeach application icon and associated text.
3. Select a bounding boxes and drag it to the location you want. You can select and move multiple bounding boxes at once.
4. Repeat steps 2 and 3 to reposition additional elements.
5. To turn off editing mode, click Reposition Applications.
Specify Status text for a custom Home screen1. Click the Home Screen button at the left of the Inspector pane.
2. In the Theme Extras section, click Status Text.
3. In the Status Text drop-down list, click the font family to use for Status text on the Home screen.
4. Specify text settings.
Customize the cursor navigation path on a custom Home screen1. Click the Home Screen button at the left of the Inspector pane.
2. In the Navigation section, click the center icon to choose an application.
3. Click each of the surrounding icons to determine cursor navigation order from that application to each of the otherapplications.
4. Specify one of the following navigation settings:
Option Description
Default Connections You can specify which direction to automatically createnavigation connections for additional applications. You canchoose to automatically create vertical or horizontalconnections. If you choose not to automatically createconnections, you must create them manually for applicationsyou want to add to the navigation.
Navigational History You can specify how much of the navigational history toretain. Set this option to retain a complete history, a singlestep, or no history at all.
Show Navigational Paths on the Preview Set this option to show the navigation paths in the Preview pane.
Specify Today items to appear on the Home screen1. Click the Home Screen button at the left of the Inspector pane.
2. In the Applications section, add applications to the Applications list using the Today button.
User Guide Designing a custom Home screen
35

3. In the Applications section, select an application slot to customize.
4. Open the Properties section of the Custom Home screen Inspector.
5. Click the Application ( ) button and choose the application to display in this slot on the Home screen.
6. In the Font drop-down list, click the font family to use for the main application text.
7. Specify the text settings.
8. In the Subentry drop-down list, click the font family to use for the subentry text.
9. Repeat step 6 to specify the text settings for the subentry text.
10. To specify the image to display beneath the application icon when it is selected, click the Focus thumbnail image, thennavigate to the new image.
11. If the selected application can have subentries (for example, the messages or calendar application), in the Subentries field,specify the number of subentries to display.
12. In the Theme Extras section, select the Today Area check box to display Today entries on the Home screen.
Specify Zen items to appear on the Home screen1. Click the Home Screen button at the left of the Inspector pane.
2. In the Applications section, add applications to the Applications list using the Zen button.
3. In the Applications section, select an application slot to customize.
4. Open the Properties section of the Custom Home screen Inspector.
5. Click the Application ( ) button and choose the application to display in this slot on the Home screen.
6. To specify the images to display beneath the application icon, click one of the following thumbnail images, then navigateto a new image.
Option Description
Tab An image that displays beneath the application icon on the Homescreen.
Tab Focus An image that displays beneath the application icon when it isselected.
Tab Flash An image that is animated if Icon Animation is set to Flash orGlow.
7. To order applications according to the default sort order on the device, select Use Device Application Order.
8. In the Icon Animation drop down, choose an animation style. The animation style defines how the application icon behaveswhen the application is selected.
9. To hide the text for the application icon, clear Show Text.
10. If you choose to show the text, in the Font drop-down list, click the font family you want to use, then specify the text settings.
User Guide Designing a custom Home screen
36
11. In the Text Animation drop-down list, choose an animation style. The animation style defines how the text behaves whenthe application is selected.
12. In the Margin field, specify the distance, in pixels, between the application icon and the associated text.
13. To right-align the text, in the Text Position drop-down list, select Right.
Customizing the Application Icons screenThe application icons screen is included with all theme types: it is the Home screen layout for the Icon theme type, and is theApplication Menu screen for the Zen, Today, and Custom theme types.
Specify fonts for Application Icon text1. Click the Application Icons button at the left of the Inspector pane.
2. In the Font drop-down list, click the font family to use for text on the Home screen.
3. Specify font settings.
Specify the background image for the Application Icons screen1. Click the Application Icons button at the left of the Inspector pane.
2. Click the Background thumbnail image.
3. Navigate to the image to use as the background image for the Home screen and application icons.
Specify the overlay image for the new item indicator1. Click the New Items thumbnail image.
2. Navigate to the image to use as the overlay image for the new item indicator.
Specify the image for the move icon1. Click the Application Icons button at the left of the Inspector pane.
2. Click the Move Icon thumbnail image.
3. Navigate to the image to use as the icon used to indicate an application is being moved.
Specify the underlay image for icons on the application grid1. Click the Application Icons button at the left of the Inspector pane.
2. Click the Underlay thumbnail image.
3. Navigate to the image that displays underneath icons in the application grid.
User Guide Customizing the Application Icons screen
37

Specify the image to use for highlighting the selected application iconThe BlackBerry® UI uses a separate image to highlight the selected icon. The highlight image is layered above (overlay) or below(underlay) the application icon. If you specify Overlay, use a semi-transparent image so that the icon is visible beneath it.
1. Click the Application Icons button at the left of the Inspector pane.
2. Click the Focus Icon thumbnail image.
3. Navigate to the image to use to highlight the selected icon on the Home screen.
4. To specify that the image appears in front of (overlay) or behind (underlay) the icon, click Overlay or Underlay.
Specify new icons for the BlackBerry device applicationsYou can customize any or all of the BlackBerry® Application icons. Each BlackBerry Application has two icons associated with it:• Normal state: Displayed when the icon is not selected. The image depicts the application icon in its normal state.• Focus state: Displayed when the icon is selected. This image depicts the application in a highlighted, or in-focus, state, and
is always displayed in conjunction with the highlighted underlay or overlay image.
You can use the same source image for both icons; however, you must still specify an image for each. When you export the theme,the Plazmic® Theme Builder creates an image file with a unique name for each icon, even if you use the same source image forboth.
1. Click the Application Icons button at the left of the Inspector pane.
2. In the Normal column of the Icon list, click an application icon.
3. Navigate to the image that represents the application icon when it is not selected.
4. In the Focus column of the Icon list, click the icon for the same application.
5. Navigate to the image that represents the application icon when it is selected.
6. Repeat steps 2 through 5 for each additional application you want to customize.
7. To use the default icon, right-click the icon, and then click Reset to Default.
8. To update an icon for which you have modified the source image, right-click the icon, and then click Reload Image.
9. To view image dimensions, right-click an icon, and then click Image Information.
Change multiple BlackBerry Application icons at onceYou can change some or all of the BlackBerry® Application icons at once. You must first create the new icon images with filenames identical to those you want to replace and store them in a single folder.
1. Click the Application Icons button at the left of the Inspector pane.
2. In the Icon list, right-click and click Change All Icons.
3. Navigate to the folder with the new icons, then click OK. The Plazmic® Theme Builder copies the files from the selectedfolder into the theme project file and overwrites any images with the same filename.
User Guide Customizing the Application Icons screen
38

4. To use the default icon for an application, right-click the icon, and then click Reset to Default.
5. To update an icon for which you have modified the source image, right-click the icon, and then click Reload Image.
6. To view image dimensions, right-click an icon, and then click Image Information.
Organize applications in the application grid1. Click the Application Icons button at the left of the Inspector pane.
2. Click Edit Application Hierarchy.
3. In the Application Hierarchy Editor, drag an application up or down in the applications list or into a folder.
4. To create a new folder, click the New Folder button, then rename the new folder.
5. To delete a folder, select the folder, and click the Delete button. Subfolders are also deleted. Any applications in the deletedfolder or subfolders are moved to the parent folder.
6. Click Save.
Add a web link as an applicationYou can provide a shortcut to a particular web page address by adding up to ten web links to the application icons screen. Whenthe user clicks a web link icon, the browser opens and displays the specified web page.
Only BlackBerry® devices running BlackBerry Device Software version 4.5 or higher support this feature. If a user loads a themeusing web links on a device running an earlier version of the BlackBerry Device Software , the BlackBerry device ignores it anddoes not display it on the application icons screen.
1. Click the Application Icons button at the left of the Inspector pane.
2. Open the Web Links section of the Application Icons screen Inspector.
3. Select Add Web Link.
4. In the Name field, type a name for the application. This name appears on the application icons screen, prepended with thephrase “Web Link:”.
5. In the Address field, type the web page address to display in the browser when the user clicks the application icon.
6. Click OK.
Change the inbox configurationThe BlackBerry® Device Software includes several message applications: email, SMS (text), and MMS (media). You can configurethese applications to send received messages to one inbox, three separate inboxes, or any combination in between. The BlackBerryuser can set the inbox configuration and override your configuration. However, by default, the theme controls this setting.
User Guide Change the inbox configuration
39

The inbox configuration affects the design of the Home screen; for example, if you plan to add separate icons for email messages,SMS messages and MMS messages, messages must be sent to separate inboxes. If an icon is added for an inbox that does notexist, the icon does not appear on the Home screen. However, the theme reader on the BlackBerry device does not shift theremaining icons are up to occupy the space; instead, it leaves the slot empty.
1. Click Edit --> Preferences.
2. Click the Messages tab.
3. Select the inbox configuration.
Customizing touch screensYou can customize BlackBerry® Storm™ Series smartphones using the same elements you use for other BlackBerry devices.However, you can access additional touch screen device elements from the Inspector and the tool bar, to customize additionalUI elements for portrait and landscape modes.
Customizing the Shortcut bar
The Shortcut bar appears only on BlackBerry® Storm™ 9500 smartphones.
Specify backgrounds for the Shortcut bar
1. Click the Shortcut Bar button at the left of the Inspector Pane.
2. Click the thumbnail image for a background.
3. Navigate to the image to use for the background.
Specify navigation images for the Shortcut bar
1. Click the Shortcut Bar button at the left of the Inspector Pane.
2. Click the thumbnail image for the up or down navigation.
3. Navigate to the image to use for the navigation icon.
Change device orientationYou can theme the banners, Application icons screen, Lock screen, and Shortcut bar screen separately for landscape and portraitmode on BlackBerry® touch screen devices.
1. On the tool bar, click Change Device Orientation ( ).
The screen orientation changes.
2. To link changes in both landscape and portrait mode, Link Portrait and Landscape Changes ( ).
User Guide Customizing touch screens
40

Changes you make in one mode are reflected in both portrait and landscape mode.
Customizing external flip screensYou can customize BlackBerry® Pearl™ 8220 smartphones using the same elements you use for other BlackBerry devices.However, you can access additional flip device elements from the Inspector to customize additional UI elements on the externalscreen.
Customize the external Home screen1. Click the Theme External Screen button at the left of the Inspector pane.
2. Click the External Homescreen tab.
3. To change text settings for network and unread items, specify the settings in Network and Unread respectively.
4. To change the background, lock icon, or indicators, click a thumbnail image and navigate to the new image you want to use.
Multistate items include a Preview button to the right of the image.
5. To reposition objects on the Home screen, click Reposition Homescreen objects.
Customize the external phone screen1. Click the Theme External Screen button at the left of the Inspector pane.
2. Click the Phone tab.
3. To change the background or phone icon and volume images, click a thumbnail image and navigate to the new image youwant to use.
Multistate items include a Preview button to the right of the image.
4. To change the font color for phone screen text, click the color swatch next to Font Color.
Customize indicators on the external screen1. Click the Theme External Screen button at the left of the Inspector pane.
2. Click the Notification tab.
3. To change the background or foreground image, click a thumbnail image and navigate to the new image you want to use.
4. To change the font color for notification text, click the color swatch next to Font Color.
5. To change the indicator images for notifiers, click the Show Notifiers radio button and click a thumbnail image for eachtype of notifier.
6. To change the indicator images for alerts, click the Show Alerts radio button and click a thumbnail image for each type ofalert.
User Guide Customizing external flip screens
41

Customizing BlackBerry Application screens 8
Customizing the messages application screen
Specify the font for the date text1. Click the Message List button at the left of the Inspector pane.
2. In the Date Font drop-down list, click the font family to use for the date text in the message list.
3. Specify the text settings.
Specify a tiled image as the background for the message list date bar1. Click the Message List button at the left of the Inspector pane.
2. Click the Background thumbnail image.
3. Navigate to the image to use as the background pattern for the messages list date bar.
4. To specify the tile and border portions of the image, click the Tile Image button.
5. To specify the limits of the central pattern tile, in the Tile Image dialog box, drag each of the border guides the appropriatedistance, or manually specify the thickness for the left, right, top, and bottom borders, in pixels, in the appropriate fields.
Change the message list iconsThe message list displays a number of icons that identify the type and status of the messages in the list. These icons includeimages for email and text messages, as well as browser messages (for example, for saved browser requests or pushed browsercontent).
The icons that display in the message list are included in two composite images: one for message-related icons; and one for thebrowser-related icons. You must create new icons and arrange them into composite images according to a specific layout.
1. Click the Message List button at the left of the Inspector pane.
2. Click the Icons thumbnail image.
3. Navigate to the composite image that contains all the message icon images.
4. Click the Web Icons thumbnail image.
5. Navigate to the composite image that contains all the web icon images.
6. To view a different icon in the preview pane, click the Preview button to display the entire composite image, then click theicon that you want to display.
User Guide Customizing BlackBerry Application screens
42

Specify the color for alternating rows in lists1. Click the Message List button at the left of the Inspector pane.
2. Click the List Stripe color swatch.
3. Use the Color Picker to select the color to display as the background for every other list item.
Specify a color for priority items in lists1. Click the Message List button at the left of the Inspector pane.
2. Click the Priority 1 color swatch.
3. Use the Color Picker to select the color to display for priority list items.
Customizing the phone application screens
Specify the text color for the dialed number or the BlackBerry device number1. Click the Phone Screens button at the left of the Inspector pane.
2. Click the Phone Hotlist tab.
3. Click the Calling Number or My Number color swatch to open the Color Picker.
4. Select a text color.
Customizing the Active Call screen
Specify the color of the Active Call screen text
1. Click the Phone Screens button at the left of the Inspector pane.
2. Click the Active Call tab.
3. On the Active Call tab, click the Font Color color swatch to open the Color Picker.
4. Select a text color.
Specify a composite image for the volume slide bar
The volume slide bar image you select must be a composite image made up of one row of 11 images, one image for each possiblevolume level.
1. Click the Phone Screens button at the left of the Inspector pane.
2. Click the Active Call tab.
User Guide Customizing the phone application screens
43
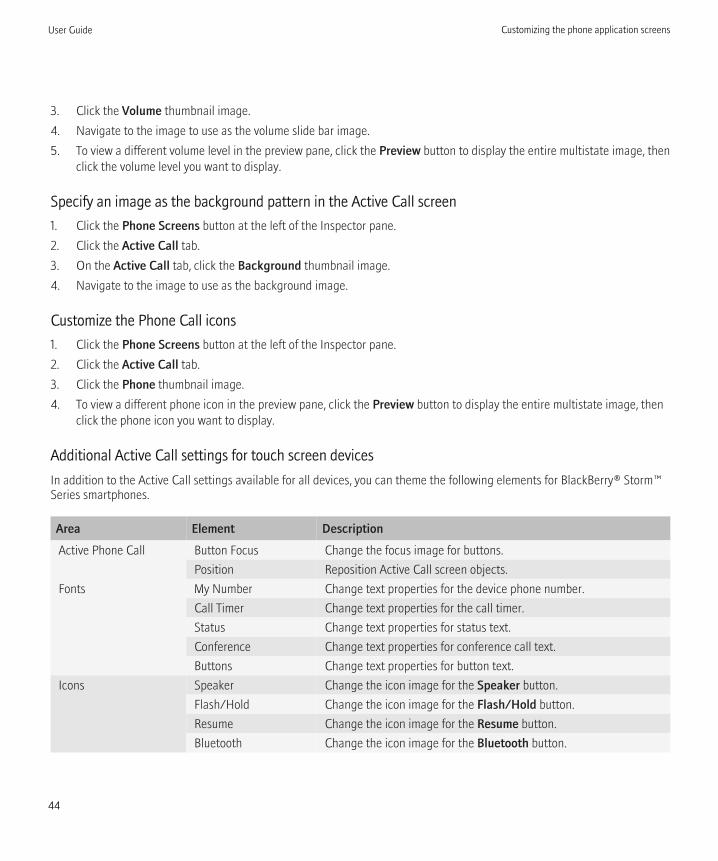
3. Click the Volume thumbnail image.
4. Navigate to the image to use as the volume slide bar image.
5. To view a different volume level in the preview pane, click the Preview button to display the entire multistate image, thenclick the volume level you want to display.
Specify an image as the background pattern in the Active Call screen
1. Click the Phone Screens button at the left of the Inspector pane.
2. Click the Active Call tab.
3. On the Active Call tab, click the Background thumbnail image.
4. Navigate to the image to use as the background image.
Customize the Phone Call icons
1. Click the Phone Screens button at the left of the Inspector pane.
2. Click the Active Call tab.
3. Click the Phone thumbnail image.
4. To view a different phone icon in the preview pane, click the Preview button to display the entire multistate image, thenclick the phone icon you want to display.
Additional Active Call settings for touch screen devices
In addition to the Active Call settings available for all devices, you can theme the following elements for BlackBerry® Storm™Series smartphones.
Area Element Description
Active Phone Call Button Focus Change the focus image for buttons.
Position Reposition Active Call screen objects.
Fonts My Number Change text properties for the device phone number.
Call Timer Change text properties for the call timer.
Status Change text properties for status text.
Conference Change text properties for conference call text.
Buttons Change text properties for button text.
Icons Speaker Change the icon image for the Speaker button.
Flash/Hold Change the icon image for the Flash/Hold button.
Resume Change the icon image for the Resume button.
Bluetooth Change the icon image for the Bluetooth button.
User Guide Customizing the phone application screens
44

Area Element Description
Mute Change the icon image for the Mute button.
Add Participant Change the icon image for the Add Participant button.
Join Change the icon image for the Join button.
Unmute Change the icon image for the Unmute button.
Customizing the Incoming Call screen
Specify the color of the Incoming Call screen text
1. Click the Phone Screens button at the left of the Inspector pane.
2. Click the Incoming Call tab.
3. On the Incoming Call tab, click the Text Color color swatch to open the Color Picker.
4. Select a text color.
Specify an image as the background pattern in the Incoming Call screen
1. Click the Phone Screens button at the left of the Inspector pane.
2. Click the Incoming Call tab.
3. On the Incoming Call tab, click the Background thumbnail image.
4. Navigate to the image to use as the background image.
Additional Incoming Call settings for touch screen devices
In addition to the Incoming Call settings available for all devices, you can theme the following elements for BlackBerry® Storm™Series smartphones.
Area Element Description
Incoming Phone Call Button Focus Change the focus image for buttons.
Position Reposition Active Call screen objects.
Fonts Call Text Change text properties for call text.
Caller Name Change text properties for the name of the caller.
Caller Number Change text properties for the incoming phone number.
Caller Info Change text properties for caller information.
Buttons Change text properties for button text.
User Guide
45

Customizing the Lock screen
Set fonts for Lock screen text1. Click the Lock Screen button at the left of the Inspector pane.
2. In the Font drop-down list, select the font family to use for the text on the lock screen.
3. Specify the text settings.
Set an image as the Lock screen background1. Click the Lock Screen button at the left of the Inspector pane.
2. Click the Background thumbnail image.
3. Navigate to the image to use as the lock screen background. If the image does not have the same dimensions as theBlackBerry® device screen, the Plazmic® Theme Builder scales the image to fit.
Set the Lock screen icon1. Click the Lock Screen button at the left of the Inspector pane.
2. Click the Lock Icon thumbnail image.
3. Navigate to the icon to display on the lock screen to indicated that the BlackBerry® device is locked.
Customize the Lock screen with an SVG file1. Click the Lock Screen button at the left of the Inspector pane.
2. Click the folder icon to the right of the Custom SVG field.
3. Navigate to the SVG file to use for the lock screen.
Arrange the Lock screen elements1. Click the Lock Screen button at the left of the Inspector pane.
2. Click Reposition Lock Screen Objects. In the preview pane, movable bounding boxes appear around each banner element.
3. Select a bounding box and drag it to the location you want, or select multiple boxes and use the Alignment Tools to repositionthem.
4. To resize an editing frame, drag a node on the edge or corner of the editing frame.
5. Repeat steps 2 and 3 to reposition and resize additional elements.
6. To hide the bounding boxes, click Reposition Lock Screen Objects.
User Guide Customizing the Lock screen
46

Layer the Lock screen over the banner1. Click the Lock Screen button at the left of the Inspector pane.
2. Check Render Lock Screen Over Banner.
User Guide Customizing the Lock screen
47
Customizing UI elements 9
Customizing dialog boxes and dialog box buttons
Show or hide the dialog box previewYou can configure the dialog box and dialog box button settings even when these elements do not display in the preview pane.For best results, you should preview the dialog box and dialog box buttons when you change their settings to ensure that theywork well with the theme elements that they overlay.
1. Click the Controls button at the left of the Inspector pane.
2. At the top of the Controls Inspector, select Show Dialog/Buttons.
Specify dialog box fonts1. Click the Controls button at the left of the Inspector pane.
2. Open the Dialog section of the Controls Inspector.
3. In the Font drop-down list, click the font family to use for text in the dialog boxes.
4. Specify text settings.
Specify a tiled image for a dialog box background1. Click the Controls button at the left of the Inspector pane.
2. Open the Dialog section of the Controls Inspector.
3. Click the Background thumbnail image.
4. Navigate to the image to use as the background for the dialog boxes or dialog box buttons.
5. To specify the tile and border portions of the image, click the Tile Image button.
6. To define the limits of the central pattern tile, in the Tile Image dialog box, drag each of the border guides the appropriatedistance, or manually specify the thickness for the left, right, top, and bottom borders, in pixels, in the appropriate fields.
Specify a solid color for a dialog box background1. Click the Controls button at the left of the Inspector pane.
2. Open the Dialog section of the Controls Inspector.
3. Click the Background color swatch to open the Color Picker.
4. Specify a background color. The Plazmic® Theme Builder automatically applies a white border with a width of one pixel.
User Guide Customizing UI elements
48

Specify the icons used on dialog boxes1. Click the Controls button at the left of the Inspector pane.
2. Open the Dialog section of the Controls Inspector.
3. For each dialog box icon, click the icon, and then navigate to the image to use.
Specify fonts for dialog box buttons1. Click the Controls button at the left of the Inspector pane.
2. Open the Buttons section of the Controls Inspector.
3. In the Font drop-down list, click the font family to use for the text on dialog box buttons.
4. Specify text settings.
5. In the Highlight Font drop-down list, click the font family to use when dialog box buttons are selected.
6. Repeat Step 4 to specify the text settings to use when dialog box buttons are selected.
Customizing menus
Show or hide the menu preview1. Click the Controls button at the left of the Inspector pane.
2. At the top of the Controls Inspector, click Show Menu.
Specify fonts for menu items1. Click the Controls button at the left of the Inspector pane.
2. Open the Menu section of the Controls Inspector.
3. In the Font drop-down list, click the font family to use for the text in menus.
4. Specify text settings.
5. In the Highlight Font drop-down list, click the font family to use when menu items are selected.
6. Repeat Step 4 to specify the text settings to use when menu items are selected.
Specify a tiled image as the background for menus1. Click the Controls button at the left of the Inspector pane.
2. Open the Menu section of the Controls Inspector.
User Guide Customizing menus
49
3. Click the Background thumbnail image.
4. Navigate to the image to use as the background for application menus.
5. To specify the tile and border portions of the image, click the Tile Image button.
6. To specify the limits of the central pattern tile, in the Tile Image dialog box, drag each of the border guides the appropriatedistance, or manually specify the thickness for the left, right, top, and bottom borders, in pixels, in the appropriate fields.
Specify a solid color as the background for menus1. Click the Controls button at the left of the Inspector pane.
2. Open the Menu section of the Controls Inspector.
3. Click the Background color swatch to open the Color Picker.
4. Select a background color. The Plazmic® Theme Builder applies a white border with a width of one pixel.
Specify the color of the cursor to underlay a selected menu item1. Click the Controls button at the left of the Inspector pane.
2. Open the Menu section of the Controls Inspector.
3. Click the Cursor color swatch to open the Color Picker.
4. Select a color for the menu cursor.
Customizing title bars
Show or hide the title bar preview1. Click the Controls button at the left of the Inspector pane.
2. At the top of the Controls Inspector, click Show titlebars.
Specify the title bar font1. Click the Controls button at the left of the Inspector pane.
2. Open the Titlebar section of the Controls Inspector.
3. In the Font drop-down list, click the font family to use for the text in application title bars.
4. Specify text settings.
Specify a tiled image as the background for title bars1. Click the Controls button at the left of the Inspector pane.
User Guide Customizing title bars
50

2. Open the Titlebar section of the Controls Inspector.
3. Click the Background thumbnail image.
4. Navigate to the image to use as the background for title bars.
5. To specify the tile and border portions of the image, click the Tile Image button.
6. To specify the limits of the central pattern tile, in the Tile Image dialog box, drag each of the border guides the appropriatedistance, or manually specify the thickness for the left, right, top, and bottom borders, in pixels, in the appropriate fields.
Specify a solid color as the background for title bars1. Click the Controls button at the left of the Inspector pane.
2. Open the Titlebar section of the Controls Inspector.
3. Click the Background color swatch to open the Color Picker.
4. Select a background color. The Plazmic® Theme Builder applies a white border with a width of one pixel.
Specify the color for the cursor in the title bar1. Click the Controls button at the left of the Inspector pane.
2. Open the Titlebar section of the Controls Inspector.
3. Click the Cursor color swatch to open the Color Picker.
4. Select a color for the cursor.
Customizing application lists
Specify fonts for application lists1. Click the Controls button at the left of the Inspector pane.
2. Open the List section of the Controls Inspector.
3. In the Font drop-down list, click the font family to use for the text in application lists.
4. Specify text settings.
Specify the text color for a selected list item1. Click the Controls button at the left of the Inspector pane.
2. Open the List section of the Controls Inspector.
3. Click the Highlight Font color swatch to open the Color Picker.
4. Select a text color.
User Guide Customizing application lists
51
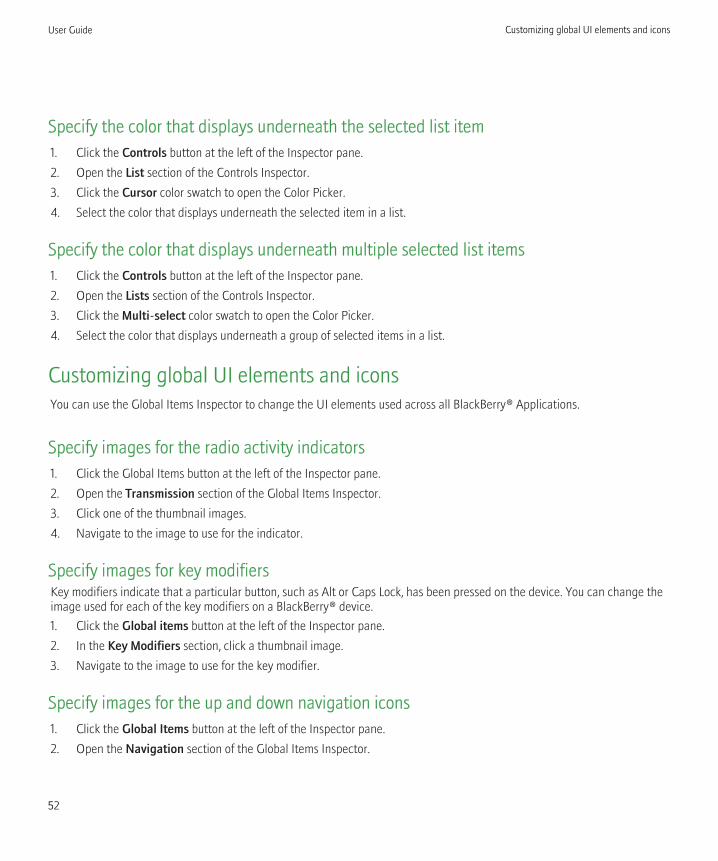
Specify the color that displays underneath the selected list item1. Click the Controls button at the left of the Inspector pane.
2. Open the List section of the Controls Inspector.
3. Click the Cursor color swatch to open the Color Picker.
4. Select the color that displays underneath the selected item in a list.
Specify the color that displays underneath multiple selected list items1. Click the Controls button at the left of the Inspector pane.
2. Open the Lists section of the Controls Inspector.
3. Click the Multi-select color swatch to open the Color Picker.
4. Select the color that displays underneath a group of selected items in a list.
Customizing global UI elements and iconsYou can use the Global Items Inspector to change the UI elements used across all BlackBerry® Applications.
Specify images for the radio activity indicators1. Click the Global Items button at the left of the Inspector pane.
2. Open the Transmission section of the Global Items Inspector.
3. Click one of the thumbnail images.
4. Navigate to the image to use for the indicator.
Specify images for key modifiersKey modifiers indicate that a particular button, such as Alt or Caps Lock, has been pressed on the device. You can change theimage used for each of the key modifiers on a BlackBerry® device.
1. Click the Global items button at the left of the Inspector pane.
2. In the Key Modifiers section, click a thumbnail image.
3. Navigate to the image to use for the key modifier.
Specify images for the up and down navigation icons1. Click the Global Items button at the left of the Inspector pane.
2. Open the Navigation section of the Global Items Inspector.
User Guide Customizing global UI elements and icons
52

3. Click the Up or Down thumbnail images.
4. Navigate to the image to use for the selected navigation.
Specify an hourglass image1. Click the Global Items button at the left of the Inspector pane.
2. Open the Cursor section of the Global Items Inspector.
3. Click the Hourglass thumbnail images.
4. Navigate to the image to use for the hourglass image.
Specify progress bar colors1. Click the Global Items button at the left of the Inspector pane.
2. Open the Progress Bar section of the Global Items Inspector.
3. Click any of the color swatches to open the Color Picker.
4. Select a color for the progress bar.
Specify the default color for application backgroundsAny changes to fonts or colors in application lists will override global settings for lists.
1. Click the Global Items button at the left of the Inspector pane.
2. Open the Application section of the Globals Inspector.
3. Click the Background color swatch to open the Color Picker.
4. Select a color to use as the standard background for BlackBerry® Applications.
User Guide Customizing global UI elements and icons
53

Managing theme images and colors 10
You can use the Plazmic® Theme Builder catalogs to save images and colors for later use. Adding items to the Catalog panelcreates a collection of resources that you can access at any time.
For example, if you want to create themes that are consistent in appearance across multiple BlackBerry® devices and you wantto use similar background images and colors, create the first theme, then drag resources from that theme into a catalog. Whenyou create a theme for a different BlackBerry device, you can select an item from the catalog and drag it to the appropriatelocation in the Inspector.
The Plazmic Theme Builder has the following default catalogs:• Tiled Images: stores images along with their border and tiling definitions• Images: stores static images• Colors: stores predefined colors• Scaled images for various screen sizes• Sample banner meters, hour glasses and volume meters
You can create additional catalogs and specify the types of items they can store.
Create a catalog1. Click the Catalog options icon, then click New.
2. In the Catalog Name field, type a unique name for the catalog.
3. Select the types of items that you can add to the catalog. Select any combination of tiled images, images, and colors, orselect All to permit all three.
Add items to a catalogIf you try to drag an item to a catalog that does not permit the selected type, the Plazmic® Theme Builder automatically addsthe item to the appropriate default catalog.
1. In the Plazmic Theme Builder Inspector, click any color swatch or thumbnail image.
2. Drag the item to the catalog.
Reuse resources from a catalogDrag the item from the catalog to the appropriate color swatch or thumbnail image in the Plazmic® Theme Builder Inspector.
User Guide Managing theme images and colors
54

Delete items from a catalog1. Select the item you want to delete.
2. Click the Delete icon.
Open a catalogIn the Catalog drop-down list, click a catalog.
Edit a catalog1. Click the Catalog options icon.
2. Click Edit.
3. Change the types of items that you can add to the catalog.
Delete a catalog1. Click the Catalog options icon.
2. Click Delete.
Best practice: Controlling resource sizeControlling resource size is important when you create content for BlackBerry® devices. Keep the size of your theme file as smallas possible to minimize the effects on the performance of the device.
To create images that are optimized for use on BlackBerry devices, consider the following guidelines:
• Create images as .png files: Images on the BlackBerry device must be in .png format. During the export process, thePlazmic® Theme Builder converts all images that are not already .png files into 32-bit dithered .png files; this conversionprocess, however, can add to the size of the resulting file. For best results, create images as 32-bit dithered .png files, sothat the Plazmic Theme Builder does not need to convert them.
• Create images that are the optimal size: Where necessary, the Plazmic Theme Builder scales an image that is too largeor too small, and then anti-aliases the resulting image to attain the best possible appearance; however, anti-aliasing animage significantly increases its file size.
For best results, when you create images for BlackBerry themes, design the image at the required height and width, wheneverpossible. The following table lists the optimal height and width for the theme-related images of the BlackBerry UI:
User Guide Delete items from a catalog
55

Inspector Component element Standard size (in pixels)
BlackBerry® 7100 Series,
BlackBerry® Pearl™ 8100
Series
BlackBerry® Curve™ 8300
Series, BlackBerry® 8700
Series, BlackBerry® 8800
Series
Banner background image 260 x 65 320 x 50
new item indicator image 14 x 14 14 x 14
focus icon image 48 x 36 48 x 36
battery meter image variable (multistate image) variable (multistate image)
signal meter image variable (multistate image) variable (multistate image)
Home screen (Icon theme) background, overlay mask
images
240 x 260 320 x 240
icons, focus icon images 60 x 55 53 x 48
new item indicator image 48 x 36 48 x 36
Home screen (Zen theme) background, overlay mask
images
240 x 260 320 x 240
tab, tab focus images 56 x 38 56 x 38
new item indicator image,
application menu image,
application icon images
48 x 36 48 x 36
Home screen (Today theme) background, overlay mask
images
240 x 260 320 x 240
caret image 240 x 28 320 x 28
new item indicator image 48 x 36 48 x 36
application menu image 32 x 24 32 x 24
application icon images 48 x 36 48 x 36
Controls dialog box icons 39 x 41 39 x 41
dialog box background,
dialog box buttons (all
states), menu background,
title bar background
variable (pattern tile image) variable (pattern tile image)
Message list background variable (pattern tile image) variable (pattern tile image)
Phone phone receiver images variable (multistate image) variable (multistate image)
User Guide Best practice: Controlling resource size
56
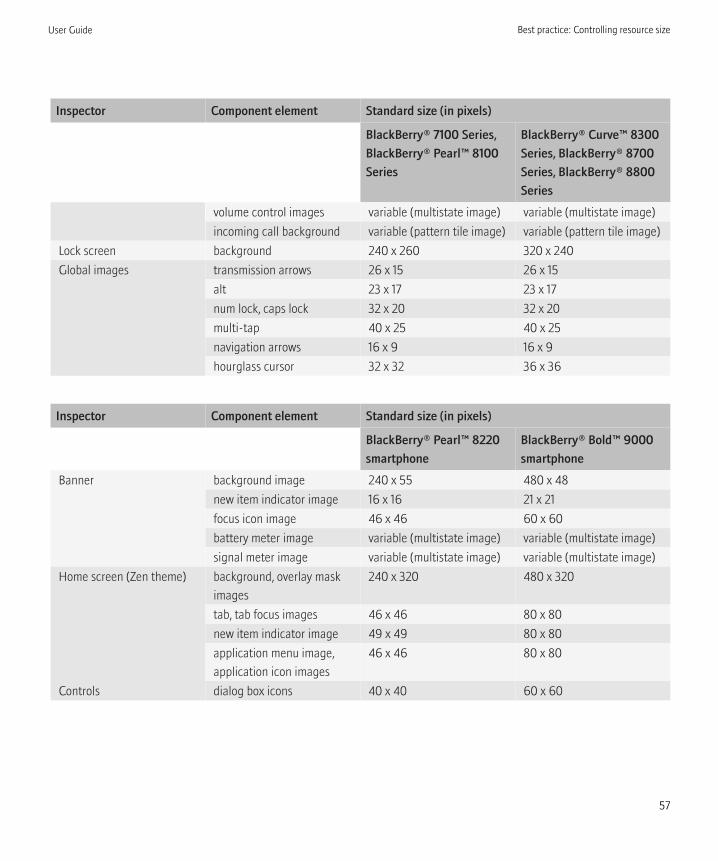
Inspector Component element Standard size (in pixels)
BlackBerry® 7100 Series,
BlackBerry® Pearl™ 8100
Series
BlackBerry® Curve™ 8300
Series, BlackBerry® 8700
Series, BlackBerry® 8800
Series
volume control images variable (multistate image) variable (multistate image)
incoming call background variable (pattern tile image) variable (pattern tile image)
Lock screen background 240 x 260 320 x 240
Global images transmission arrows 26 x 15 26 x 15
alt 23 x 17 23 x 17
num lock, caps lock 32 x 20 32 x 20
multi-tap 40 x 25 40 x 25
navigation arrows 16 x 9 16 x 9
hourglass cursor 32 x 32 36 x 36
Inspector Component element Standard size (in pixels)
BlackBerry® Pearl™ 8220
smartphone
BlackBerry® Bold™ 9000
smartphone
Banner background image 240 x 55 480 x 48
new item indicator image 16 x 16 21 x 21
focus icon image 46 x 46 60 x 60
battery meter image variable (multistate image) variable (multistate image)
signal meter image variable (multistate image) variable (multistate image)
Home screen (Zen theme) background, overlay mask
images
240 x 320 480 x 320
tab, tab focus images 46 x 46 80 x 80
new item indicator image 49 x 49 80 x 80
application menu image,
application icon images
46 x 46 80 x 80
Controls dialog box icons 40 x 40 60 x 60
User Guide Best practice: Controlling resource size
57
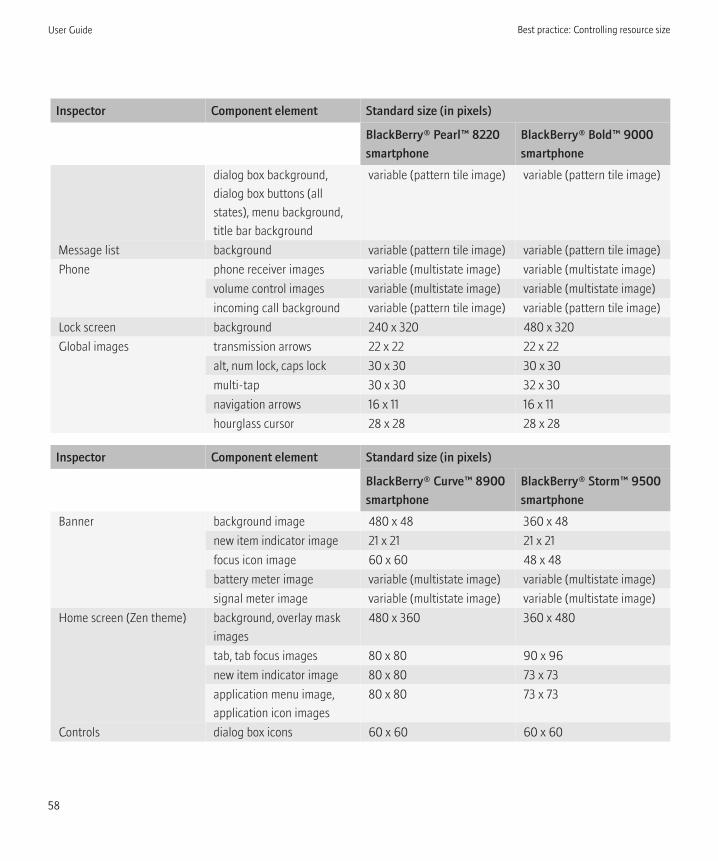
Inspector Component element Standard size (in pixels)
BlackBerry® Pearl™ 8220
smartphone
BlackBerry® Bold™ 9000
smartphone
dialog box background,
dialog box buttons (all
states), menu background,
title bar background
variable (pattern tile image) variable (pattern tile image)
Message list background variable (pattern tile image) variable (pattern tile image)
Phone phone receiver images variable (multistate image) variable (multistate image)
volume control images variable (multistate image) variable (multistate image)
incoming call background variable (pattern tile image) variable (pattern tile image)
Lock screen background 240 x 320 480 x 320
Global images transmission arrows 22 x 22 22 x 22
alt, num lock, caps lock 30 x 30 30 x 30
multi-tap 30 x 30 32 x 30
navigation arrows 16 x 11 16 x 11
hourglass cursor 28 x 28 28 x 28
Inspector Component element Standard size (in pixels)
BlackBerry® Curve™ 8900
smartphone
BlackBerry® Storm™ 9500
smartphone
Banner background image 480 x 48 360 x 48
new item indicator image 21 x 21 21 x 21
focus icon image 60 x 60 48 x 48
battery meter image variable (multistate image) variable (multistate image)
signal meter image variable (multistate image) variable (multistate image)
Home screen (Zen theme) background, overlay mask
images
480 x 360 360 x 480
tab, tab focus images 80 x 80 90 x 96
new item indicator image 80 x 80 73 x 73
application menu image,
application icon images
80 x 80 73 x 73
Controls dialog box icons 60 x 60 60 x 60
User Guide Best practice: Controlling resource size
58

Inspector Component element Standard size (in pixels)
BlackBerry® Curve™ 8900
smartphone
BlackBerry® Storm™ 9500
smartphone
dialog box background,
dialog box buttons (all
states), menu background,
title bar background
variable (pattern tile image) variable (pattern tile image)
Message list background variable (pattern tile image) variable (pattern tile image)
Phone phone receiver images variable (multistate image) variable (multistate image)
volume control images variable (multistate image) variable (multistate image)
incoming call background variable (pattern tile image) variable (pattern tile image)
Lock screen background 480 x 360 360 x 480
Global images transmission arrows 22 x 22 22 x 22
alt, num lock, caps lock 30 x 30 30 x 30
multi-tap 32 x 30 32 x 30
navigation arrows 16 x 11 16 x 11
hourglass cursor 28 x 28 28 x 28
Inspector Component element Standard size (in pixels)
BlackBerry® Curve™ 8350i
Banner background image 320 x 36
focus icon image 36 x 36
battery meter image variable (multistate image)
alarm icon 9 x 8
new item indicator image 14 x 14
signal meter image variable (multistate image)
wi-fi signal meter variable (multistate image)
unread icons variable (multistate image)
Home screen (Zen theme) background, overlay mask images 320 x 240
tab, tab focus images 52 x 52
new item indicator image 52 x 52
underlay image 52 x 52
move icon 52 x 52
User Guide Best practice: Controlling resource size
59

Inspector Component element Standard size (in pixels)
BlackBerry® Curve™ 8350i
Controls dialog box icons 40 x 40
dialog box background, dialog box buttons (all
states), menu background, title bar background
variable (pattern tile image)
Message list background variable (pattern tile image)
icons variable (multistate image)
web icons variable (multistate image)
Phone phone receiver images variable (multistate image)
volume control images variable (multistate image)
incoming call background 320 x 240
active call background 320 x 240
Lock screen background 320 x 240
lock icon 52 x 52
Global images transmission arrows 22 x 22
alt, num lock, caps lock, multi-tap 21 x 20
navigation arrows 10 x 7
hourglass cursor 19 x 19
The Plazmic Theme Reader scales pattern tile images to the size of the control in the BlackBerry device interface.
Best practice: Creating effective resourcesIn the BlackBerry® device UI, images are often layered upon one another. For example, the Home screen icons overlay abackground image, and the application menus and dialog boxes overlay the application backgrounds. You should consider howimages interact with one another in the UI so that they do not hinder the BlackBerry device user’s ability to navigate around theUI and use the device.
• Limit the number of colors on a screen: Too many colors on a screen can result in visual overload for a user, or negativelyaffect a user’s ability to read text or identify icons, and can hinder navigation.• Background images should be fairly uniform in color and patterns should be subtle so that they do not overpower the
text on controls such as menus, buttons, or dialog boxes.• On the Home screen, the background should not detract from the icons and text. Limit the use of bolder colors to the
icon and text elements, and make sure that the background has a lower color saturation.
• Use complementing colors: A simple color palette that contains colors that complement each other enhances the usersability to read and navigate the BlackBerry UI.
User Guide Best practice: Creating effective resources
60

• Define borders for control elements: Borders around control elements separate them from the screen content that theyoverlay.
User Guide Best practice: Creating effective resources
61

Using the BlackBerry Smartphone Simulator to test yourtheme
11
You can test your theme using the BlackBerry® Smartphone Simulator , which enables you to simulate the functionality of theBlackBerry device under a range of conditions.
The Plazmic® Content Developer’s Kit does not include the BlackBerry Smartphone Simulator as part of the installation. Youmust install the BlackBerry Smartphone Simulator separately. You can download and install simulators for each BlackBerrysmartphone available for a specified version of the BlackBerry Device Software for free.
The Plazmic Theme Builder only supports BlackBerry Smartphone Simulators running BlackBerry Device Software version 4.2.2or later. You cannot use earlier BlackBerry Smartphone Simulators to simulate Plazmic Theme Builder themes.
Download and install the BlackBerry Smartphone Simulator1. In your browser, visit http://www.blackberry.com/developers/downloads.
2. Follow the directions to download and install one or more BlackBerry® Smartphone Simulators. You can only install oneBlackBerry Smartphone Simulator at a time.
3. Once you install one or more BlackBerry Smartphone Simulators, you can specify the model and version of the BlackBerryDevice Software to simulate when testing your theme.
Configure the BlackBerry Smartphone SimulatorBefore you use the BlackBerry® Smartphone Simulator to test your theme, you must specify the resolution, model, and versionof the BlackBerry Device Software to simulate.
1. Click Edit --> Preferences.
2. Click the Simulator tab.
3. For each screen resolution, specify the following values:
a. Specify the resolution to simulate.
b. Specify the BlackBerry device to simulate. The Plazmic® Theme Builder populates this drop down list based on theBlackBerry Smartphone Simulators that are installed on your computer and the resolution you select.
c. Specify the version of the BlackBerry Device Software on the selected BlackBerry Smartphone Simulator .
View the theme in the BlackBerry Smartphone SimulatorOnce you specify the BlackBerry® smartphone and the version of the BlackBerry Device Software to simulate, you can open yourtheme in the BlackBerry Smartphone Simulator to test how it appears.
1. Click the Simulator button on the tool bar.
User Guide Using the BlackBerry Smartphone Simulator to test your theme
62

2. When the BlackBerry Smartphone Simulator opens and displays your theme, navigate through the UI to verify that images,colors and fonts appear as expected.
User Guide View the theme in the BlackBerry Smartphone Simulator
63
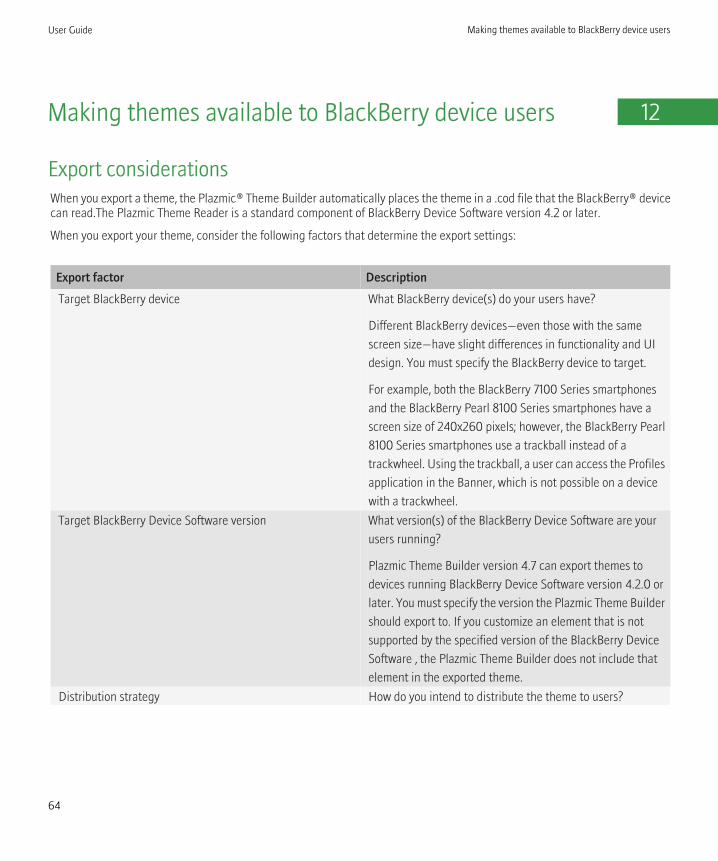
Making themes available to BlackBerry device users 12
Export considerationsWhen you export a theme, the Plazmic® Theme Builder automatically places the theme in a .cod file that the BlackBerry® devicecan read.The Plazmic Theme Reader is a standard component of BlackBerry Device Software version 4.2 or later.
When you export your theme, consider the following factors that determine the export settings:
Export factor Description
Target BlackBerry device What BlackBerry device(s) do your users have?
Different BlackBerry devices—even those with the same
screen size—have slight differences in functionality and UI
design. You must specify the BlackBerry device to target.
For example, both the BlackBerry 7100 Series smartphones
and the BlackBerry Pearl 8100 Series smartphones have a
screen size of 240x260 pixels; however, the BlackBerry Pearl
8100 Series smartphones use a trackball instead of a
trackwheel. Using the trackball, a user can access the Profiles
application in the Banner, which is not possible on a device
with a trackwheel.
Target BlackBerry Device Software version What version(s) of the BlackBerry Device Software are your
users running?
Plazmic Theme Builder version 4.7 can export themes to
devices running BlackBerry Device Software version 4.2.0 or
later. You must specify the version the Plazmic Theme Builder
should export to. If you customize an element that is not
supported by the specified version of the BlackBerry Device
Software , the Plazmic Theme Builder does not include that
element in the exported theme.
Distribution strategy How do you intend to distribute the theme to users?
User Guide Making themes available to BlackBerry device users
64
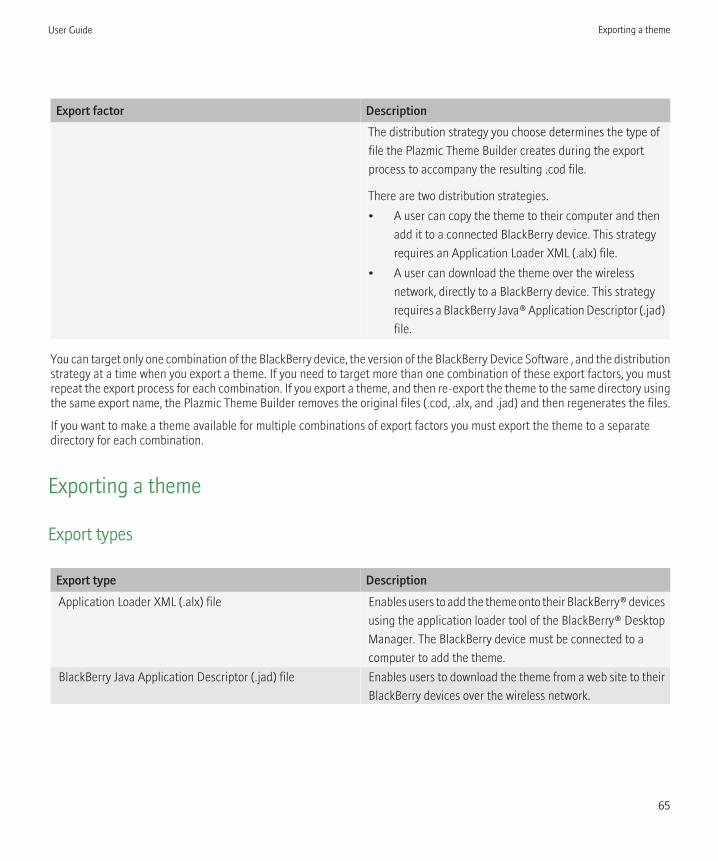
Export factor Description
The distribution strategy you choose determines the type of
file the Plazmic Theme Builder creates during the export
process to accompany the resulting .cod file.
There are two distribution strategies.
• A user can copy the theme to their computer and then
add it to a connected BlackBerry device. This strategy
requires an Application Loader XML (.alx) file.
• A user can download the theme over the wireless
network, directly to a BlackBerry device. This strategy
requires a BlackBerry Java® Application Descriptor (.jad)
file.
You can target only one combination of the BlackBerry device, the version of the BlackBerry Device Software , and the distributionstrategy at a time when you export a theme. If you need to target more than one combination of these export factors, you mustrepeat the export process for each combination. If you export a theme, and then re-export the theme to the same directory usingthe same export name, the Plazmic Theme Builder removes the original files (.cod, .alx, and .jad) and then regenerates the files.
If you want to make a theme available for multiple combinations of export factors you must export the theme to a separatedirectory for each combination.
Exporting a theme
Export types
Export type Description
Application Loader XML (.alx) file Enables users to add the theme onto their BlackBerry® devices
using the application loader tool of the BlackBerry® Desktop
Manager. The BlackBerry device must be connected to a
computer to add the theme.
BlackBerry Java Application Descriptor (.jad) file Enables users to download the theme from a web site to their
BlackBerry devices over the wireless network.
User Guide Exporting a theme
65

Export type Description
When you export a theme for distribution over the wireless
network, if the theme is too large for a single .cod file, the
Plazmic Theme Builder might produce multiple .cod files and
serialize them (for example,
com_plazmic_theme_myTheme.cod,
com_plazmic_theme_myTheme-1.cod, and so on).
Export a theme1. On the File menu, click Export.
2. Based on your distribution strategy, select either ALX or JAD.
3. In the Theme Name field, type the name for the theme.
Upon export, the Plazmic® Theme Builder appends the com_plazmic_theme_ prefix to the .cod and .jad filenames. Forexample, if you name your theme myTheme, the Plazmic Theme Builder produces a file namedcom_plazmic_theme_myTheme.cod.
4. In the Path field, specify the location in which to store the theme .cod file and the associated .jad or .alx files.
5. In the Handheld drop-down list, click the target device.
6. In the Target OS drop-down list, click the version of the BlackBerry® Device Software for which you are exporting the theme.
7. To automatically overwrite any existing files, select Overwrite existing files.
8. If you want to support the theme in languages other than English, select Include international characters. When youselect this option, the Plazmic Theme Builder exports all of the international characters (accented characters and symbols)that are available for each font included in the theme.
The Plazmic Theme Builder includes only the international characters that exist in the original font set. It does not exportinternational character sets (such as Chinese, Arabic, Cyrillic). If a font set specified in the theme does not contain a particularcharacter, the BlackBerry device uses a system font to display the character.
User Guide Exporting a theme
66
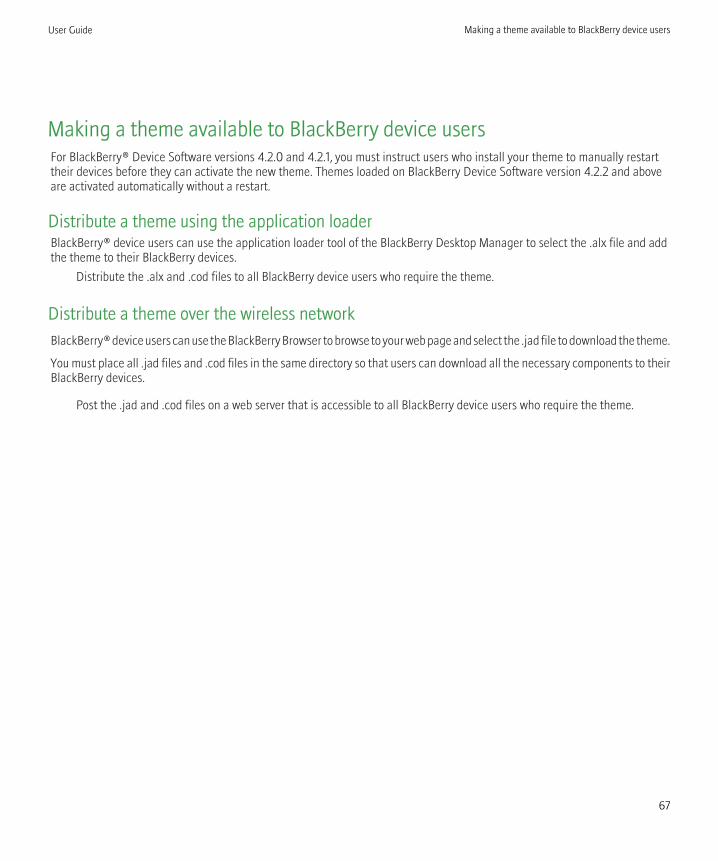
Making a theme available to BlackBerry device usersFor BlackBerry® Device Software versions 4.2.0 and 4.2.1, you must instruct users who install your theme to manually restarttheir devices before they can activate the new theme. Themes loaded on BlackBerry Device Software version 4.2.2 and aboveare activated automatically without a restart.
Distribute a theme using the application loaderBlackBerry® device users can use the application loader tool of the BlackBerry Desktop Manager to select the .alx file and addthe theme to their BlackBerry devices.
Distribute the .alx and .cod files to all BlackBerry device users who require the theme.
Distribute a theme over the wireless networkBlackBerry® device users can use the BlackBerry Browser to browse to your web page and select the .jad file to download the theme.
You must place all .jad files and .cod files in the same directory so that users can download all the necessary components to theirBlackBerry devices.
Post the .jad and .cod files on a web server that is accessible to all BlackBerry device users who require the theme.
User Guide Making a theme available to BlackBerry device users
67

Legal notice 13
©2009 Plazmic Inc. All Rights Reserved. Plazmic and related trademarks, names and logos are the property of Plazmic Inc. andare registered and/or used in the U.S. and countries around the world. BlackBerry®, RIM®, Research In Motion®, SureType®,SurePress™ and related trademarks, names and logos are the property of Research In Motion Limited and are registered and/orused in the U.S. and countries around the world. Used under license from Research In Motion Limited. Acrobat, Adobe, Flash,and Reader are trademarks of Adobe Systems Incorporated. Windows and Windows Vista are trademarks of Microsoft Corporation.Intel and Pentium are trademarks of Intel Corporation.All other trademarks are the property of their respective owners.
The BlackBerry smartphone and other devices and/or associated software are protected by copyright, international treaties, andvarious patents, including one or more of the following U.S. patents: 6,278,442; 6,271,605; 6,219,694; 6,075,470; 6,073,318;D445,428; D433,460; D416,256. Other patents are registered or pending in the U.S. and in various countries around the world.Visit www.rim.com/patents for a list of RIM (as hereinafter defined) patents.
This documentation including all documentation incorporated by reference herein such as those provided or made available byhyperlink is provided or made accessible "AS IS" and "AS AVAILABLE" and without condition, endorsement, guarantee,representation or warranty of any kind by Plazmic Inc., its parent, subsidiary and affiliated companies ("Plazmic") and Plazmicassumes no responsibility for any typographical, technical, or other inaccuracies, errors or omissions in this documentation. Inorder to protect Plazmic proprietary and confidential information and/or trade secrets, this documentation may describe someaspects of Plazmic technology in generalized terms. Plazmic reserves the right to periodically change information that is containedin this documentation; however, Plazmic makes no commitment to provide any such changes, updates, enhancements, or otheradditions to this documentation to you in a timely manner or at all. PLAZMIC MAKES NO REPRESENTATIONS, WARRANTIES,CONDITIONS, OR COVENANTS, EITHER EXPRESS OR IMPLIED (INCLUDING WITHOUT LIMITATION, ANY EXPRESS ORIMPLIED WARRANTIES OR CONDITIONS OF FITNESS FOR A PARTICULAR PURPOSE, NON-INFRINGEMENT,MERCHANTABILITY, DURABILITY, TITLE, OR RELATED TO THE PERFORMANCE OR NON-PERFORMANCE OF ANY SOFTWAREREFERENCED HEREIN OR PERFORMANCE OF ANY SERVICES REFERENCED HEREIN). IN CONNECTION WITH YOUR USE OFTHIS DOCUMENTATION, NEITHER PLAZMIC NOR ITS RESPECTIVE DIRECTORS, OFFICERS, EMPLOYEES, OR CONSULTANTSSHALL BE LIABLE TO YOU FOR ANY DAMAGES WHATSOEVER BE THEY DIRECT, ECONOMIC, COMMERCIAL, SPECIAL,CONSEQUENTIAL, INCIDENTAL, EXEMPLARY, OR INDIRECT DAMAGES, EVEN IF RIM HAS BEEN ADVISED OF THE POSSIBILITYOF SUCH DAMAGES, INCLUDING WITHOUT LIMITATION, LOSS OF BUSINESS REVENUE OR EARNINGS, LOST DATA,DAMAGES CAUSED BY DELAYS, LOST PROFITS, OR A FAILURE TO REALIZE EXPECTED SAVINGS.
This documentation might contain references to third-party sources of information, hardware or software, products or servicesincluding components and content such as content protected by copyright and/or third-party web sites (collectively the "ThirdParty Products and Services"). Plazmic does not control, and is not responsible for, any Third Party Products and Services including,without limitation the content, accuracy, copyright compliance, compatibility, performance, trustworthiness, legality, decency,links, or any other aspect of Third Party Products and Services. The inclusion of a reference to Third Party Products and Servicesin this documentation does not imply endorsement by Plazmic of the Third Party Products and Services or the third party in anyway.
User Guide Legal notice
68
EXCEPT TO THE EXTENT SPECIFICALLY PROHIBITED BY APPLICABLE LAW IN YOUR JURISDICTION, ALL CONDITIONS,ENDORSEMENTS, GUARANTEES, REPRESENTATIONS, OR WARRANTIES OF ANY KIND, EXPRESS OR IMPLIED, INCLUDINGWITHOUT LIMITATION, ANY CONDITIONS, ENDORSEMENTS, GUARANTEES, REPRESENTATIONS OR WARRANTIES OFDURABILITY, FITNESS FOR A PARTICULAR PURPOSE OR USE, MERCHANTABILITY, MERCHANTABLE QUALITY, NON-INFRINGEMENT, SATISFACTORY QUALITY, OR TITLE, OR ARISING FROM A STATUTE OR CUSTOM OR A COURSE OF DEALINGOR USAGE OF TRADE, OR RELATED TO THE documentation or its use, or PERFORMANCE OR NON-PERFORMANCE OF ANYSOFTWARE, HARDWARE, service, or any Third Party Products and Services REFERENCED HEREIN, ARE HEREBY EXCLUDED.You may also have other rights that vary by state or province. Some jurisdictions may not allow the exclusion or limitation ofimplied warranties and conditions. To the extent permitted by law, any implied warranties or conditions relating to thedocumentation to the extent they cannot be excluded as set out above, but can be limited, are hereby limited to ninety (90) daysfrom the date You first acquired the documentation OR THE ITEM THAT IS THE SUBJECT OF THE CLAIM.
TO THE MAXIMUM EXTENT PERMITTED BY APPLICABLE LAW IN YOUR JURISDICTION, IN NO EVENT SHALL RIM BE LIABLEFOR ANY TYPE OF DAMAGES RELATED TO THIS DOCUMENTATION OR ITS USE, or PERFORMANCE OR NON-PERFORMANCEOF ANY SOFTWARE, HARDWARE, service, or any Third Party Products and Services REFERENCED HEREIN INCLUDING WITHOUTLIMITATION ANY of the following DAMAGES: DIRECT, CONSEQUENTIAL, EXEMPLARY, INCIDENTAL, INDIRECT, SPECIAL,PUNITIVE, OR AGGRAVATED DAMAGES, DAMAGES FOR LOSS OF PROFITS OR REVENUES, FAILURE TO REALIZE ANYEXPECTED SAVINGS, BUSINESS INTERRUPTION, LOSS OF BUSINESS INFORMATION, LOSS OF BUSINESS OPPORTUNITY,OR CORRUPTION OR LOSS OF DATA, FAILURES TO TRANSMIT OR RECEIVE ANY DATA, PROBLEMS ASSOCIATED WITH ANYAPPLICATIONS USED IN CONJUNCTION WITH RIM PRODUCTS OR SERVICES, DOWNTIME COSTS, LOSS OF THE USE OFRIM PRODUCTS OR SERVICES OR ANY PORTION THEREOF OR OF ANY AIRTIME SERVICES, COST OF SUBSTITUTE GOODS,COSTS OF COVER, FACILITIES OR SERVICES, COST OF CAPITAL, OR OTHER SIMILAR PECUNIARY LOSSES ,WHETHER ORNOT SUCH DAMAGES WERE FORESEEN OR UNFORESEEN, AND EVEN IF RIM HAS BEEN ADVISED OF THE POSSIBILITY OFSUCH DAMAGES.
TO THE MAXIMUM EXTENT PERMITTED BY APPLICABLE LAW IN YOUR JURISDICTION, PLAZMIC SHALL HAVE NO OTHEROBLIGATION, DUTY, OR LIABILITY WHATSOEVER IN CONTRACT, TORT, OR OTHERWISE TO YOU INCLUDING ANY LIABILITYFOR NEGLIGENCE OR STRICT LIABILITY.
THE LIMITATIONS, EXCLUSIONS, AND DISCLAIMERS HEREIN SHALL APPLY: (A) IRRESPECTIVE OF THE NATURE OF THECAUSE OF ACTION, DEMAND, OR ACTION BY YOU INCLUDING BUT NOT LIMITED TO BREACH OF CONTRACT, NEGLIGENCE,TORT, STRICT LIABILITY OR ANY OTHER LEGAL THEORY AND SHALL SURVIVE A FUNDAMENTAL BREACH OR BREACHESOR THE FAILURE OF THE ESSENTIAL PURPOSE OF THIS AGREEMENT OR OF ANY REMEDY CONTAINED HEREIN; AND (B)TO PLAZMIC AND ITS AFFILIATED COMPANIES, THEIR SUCCESSORS, ASSIGNS, AGENTS, SUPPLIERS (INCLUDING AIRTIMESERVICE PROVIDERS), AUTHORIZED PLAZMIC DISTRIBUTORS (ALSO INCLUDING AIRTIME SERVICE PROVIDERS) AND THEIRRESPECTIVE DIRECTORS, EMPLOYEES AND INDEPENDENT CONTRACTORS.
IN ADDITION TO THE LIMITATIONS AND EXCLUSIONS SET OUT ABOVE, IN NO EVENT SHALL ANY DIRECTOR, EMPLOYEE,AGENT, DISTRIBUTOR, SUPPLIER, INDEPENDENT CONTRACTOR OF PLAZMIC OR ANY AFFILIATES OF PLAZMIC HAVE ANYLIABILITY ARISING FROM OR RELATED TO THE DOCUMENTATION.
Prior to subscribing for, installing or using any Third Party Products and Services it is your responsibility to ensure that yourairtime service provider has agreed to support all of their features. Installation or use of Third Party Products and Services withPlazmic's products and services may require one or more patent, trademark, copyright or other licenses in order to avoid
User Guide Legal notice
69

infringement or violation of third party rights. You are solely responsible for determining whether to use, Third Party Productsand Services and if any third party licenses are required to do so. If required you are responsible for acquiring them. You shouldnot install or use Third Party Products and Services until all necessary licenses have been acquired. Any Third Party Products andServices that are provided with Plazmic's products and services are provided as a convenience to you and are provided 'AS IS'with no express or implied conditions, endorsements, guarantees, representations or warranties of any kind by Plazmic andPlazmic assumes no liability whatsoever, in relation thereto. Your use of Third Party Products and Services shall be governed byand subject to you agreeing to the terms of separate licenses and other agreements applicable thereto with third parties, exceptto the extent expressly covered by a license or other agreement with Plazmic.
The terms of use of any Plazmic product or service are set out in a separate license or other agreement with Plazmic applicablethereto. NOTHING IN THIS DOCUMENTATION IS INTENDED TO SUPERSEDE ANY EXPRESS WRITTEN AGREEMENTS ORWARRANTIES PROVIDED BY PLAZMIC FOR PORTIONS OF any Plazmic product or service OTHER THAN THISDOCUMENTATION.
Plazmic Inc. 295 Phillip Street Waterloo ON N2L 3W8 Canada
Published in Canada
User Guide Legal notice
70