platinum series - dermamed solutions series 2 contents technical description of the megapeel ex 4...
TRANSCRIPT

Platinum Series
®

Platinum Series
2
CONTENTS
TECHNICAL DESCRIPTION OF THE MEGAPEEL EX 4MEGAPEEL EX PARTS AND SUPPLIES 5INTRODUCTION 9
Chapter 1ASSEMBLING THE MEGAPEEL EX 11
Chapter 2PERFORMING A MICRODERMABRASION TREATMENT 20MICRODERMABRASION TREATMENT GUIDELINE 22
Chapter 3INCORPORATING CHEMICAL PEELS WITH YOUR MICRODERMABRASIONPRECISION PEEL® TREATMENT 29
Chapter 4INCORPORATING CHEMICAL PEELS WITH YOUR MICRODERMABRASIONHYDRA BRIGHT FACIAL TREATMENT 31
Chapter 5TROUBLESHOOTING 34
MEGAPEEL EX® MICRODERMABRASION TREATMENT – CONSENT FORM 39SKINCARE QUESTIONNAIRE 40MEGAPEEL EX® TREATMENT NOTES 41
DM SKINCARE ROUTINE 43
BEFORE AND AFTER PHOTOS 48

3
Thank you for deciding to purchase the MegaPeel EX® Platinum
Series microdermabrasion system from DermaMed Solutions, LLC.
We realize that it is of the utmost importance that the quality of
our products and services to you match the high standards of
quality that you set for the rest of your business.
This manual will guide you in using the DermaMed system. We are
never more than a phone call away for any questions.
DermaMed Solutions, LLC610-358-4447
www.DermaMedSolutions.com

Platinum Series
4
Lid
Crystal Return
Vacuum Outtake
Crystal Control Knob
Power ButtonVacuum Control KnobHand-piece holster
Digital Gage
Platinum Series
®
Diamond Hand-piece & Tubing
Crystal Hand-piece & Tubing
TECHNICAL DESCRIPTION
Made in U.S.A.Patent # 6,432,113115 V. » 60 Hz 5A Fuse 8 Amp Type T230 V. » 50 Hz 2.5A Fuse IEC 6.3 AmpClass 1 Microdermabrasion Type B Applied partThis device conforms to the requirements of EN60601.1.2 for electromagnetic compatibility and will not cause or be effected by electrical noise.Transport and storage conditions: Max50C 80 percent relative humidityThis device must be serviced only by an authorized agent. If it is serviced by an unauthorized person, the warranty will be void.

5
MegaPeel EX® Parts and Supplies
CRYSTALS AND FILTERS
MegaPeel EX Backup Filter Sold in a box with 2 sets of eachAlways dispose and replace crystals & waste filters simultaneously. If you do not change your waste filter along with your crystals an overflow can occur. Be sure to depress rings before disconnecting your crystal & waste filter.
MegaPeel EX Platinum Crystals and Filters (CFP1000)Sold in a box with 2 sets of eachAlways dispose and replace crystals & waste filters simultaneously. If you do notchange your waste filter along with your crystals an overflow can occur. Be sure to depress rings before disconnecting your crystal & waste filter.
DISPOSABLE TIPS, HAND-PIECES AND TUBING
Blue Tip (BT1000) Does not come with system but available for purchase. Sold in a pack of 12DermaMed Solutions, LLC. advises MegaPeel EX technicians to dispose of treatment tips after each client to ensure the client’s safety. Before each treatment, make sure you inspect the tips for scratches or cracks. NEVER AUTOCLAVE YOUR TIPS!
Divided Clear Tip (CT1000)Sold in a pack of 12DermaMed Solutions, LLC. advises MegaPeel EX technicians to dispose of treatment tips after each client to ensure the client’s safety. Before each treatment, make sure you inspect the tips for scratches or cracks. NEVER AUTOCLAVE YOUR TIPS!
Gold Tip (GT1000)Sold in a pack of 12DermaMed Solutions, LLC. advises MegaPeel EX technicians to dispose of treatment tips after each client to ensure the client’s safety. Before each treatment, make sure you inspect the tips for scratches or cracks. NEVER AUTOCLAVE YOUR TIPS!

Platinum Series
6
DISPOSABLE TIPS, HAND-PIECES AND TUBING
Silver Hand-piece (HPS1000)Most frequently used hand-pieceThe clear tip with the silver hand-piece is our most frequently used combination. When using the silver hand-piece, the minimum KPA is 45. For tougher or less sensitive skin, increase the vacuum. To be replaced after 300 treatment peels.
Gold Hand-piece (HPG1000)Medical hand-piece for aggressive treatmentsThe gold tip with the gold hand-piece is ideal for body and more aggressive treatments later in the patient’s series. A kPa of 35 is very aggressive. The gold tip is the only tip to be used with the gold hand-piece. To be replaced after 300 treatment peels.
Tubing and Coupling (TC1000)Recommended to be changed every 9 monthsThe pink and blue tubes connect to the hand-piece. The blue tube is connected to the crystals and the pink tube is connected to the vacuum. It is important to change your tubing because it begins to wear overtime. You will know it is time to change your tubing when it becomes cloudy or the ends begin to yellow and keeps falling out of hand piece.
Spare Parts Kit (SPK1000)For troubleshooting your MegaPeelTo be used in case of problems with your MegaPeel. Call the technical support line at 610.358.4447 for instructions. The kit of spare parts includes: 6 red O-rings, 1 clear U-shaped tube, 1 fuse, 1 pin, 1 short blue tube.
DISPOSABLE MARKETING MATERIALS
MegaPeel Informational Brochure (DMS6002)Also available in Spanish & FrenchPromotional marketing material used to educates patients and clients about microdermabrasion. Sold individually
MegaPeel Gif t Certificates (DMS3003)When your customers can’t decide on the ‘’perfect gift’’ don’t give up the sale, be ready to offer them the option of gift certificates. These MegaPeel Gift Certificates are everything you need to supply and pro-mote your microdermabrasion program.

7
MegaPeel Poster (DMS2006)Effective way to advertise, inform your clients that you are now performing micro-dermabrasion.Color poster is printed on a glossy paper stock measures 17” x 24”
MegaPeel Promotional Postcard (DM3003)Promote your microdermabrasion business by mailing post cards to your clientel. Blank backside allows for personalization and an area for mailing sticker containing your information.
MegaPeel Counter Card & Display Stand (DMS6004-D)Displays the brochures in your waiting area, promoting your microdermabrasion business.
MegaPeel Manual (DMS2003-G)
MegaPeel Training DVD (DMTDVD)This all-in-one video teaches you how to operate the MegaPeel, shows a step-by step how to perform a microdermabrasion treatment, how to incorporate chemi-cal peels into a microdermabrasion treatment and shows step-by-step and how to troubleshoot your system.
MegaPeel Informative Loop DVD (DMLDVD)You already have the most desirable advertising situation in your waiting room: a captive audience with clients who already trust your reputation and expertise. So, take advantage of this opportunity to let them know about how you are offering microdermabrasion. In this looping promotional DVD for your waiting room, clients will learn all about microdermabrasion treatments and their benefits

Platinum Series
8
DIAMOND HAND-PIECE, TIPS AND TUBING
Diamond Hand-Piece and Tip Set (DTCFKIT)Offer clients who ask for crystal-free treatmentsDiamond hand-piece and tips are embedded with high-quality industrial diamonds. The tips are available in a variety of microns/grits for different skin conditions. The combination of different crystal-free tips allows you to provide effective exfoliation for most skin types, deeper abrasion for thicker skin areas, less aggressive exfoliation, yet effective results for sensitive, fragile skin. Each tip can be easily removed from the hand piece to clean.
Diamond Hand-piece (DTH1000)Additional hand-piece available for purchaseExtra hand-piece available for purchase
Diamond Hand-piece Tubing (DTT1000)Recommended to be changed every 3 – 9 months depending on usageThe pink tube connect to the hand-piece. It is important to change your tubing because it begins to wear overtime.
Diamond Tubing Connector (DTC1000)Connector used to connect Diamond Hand-pieceConnector can be replaced if necessary. Call the technical support line at 610.358.4447 for instructions.
Diamond Tip Cleaning Kit (EX-511)For cleaning the Diamond Tips and Hand-pieceTo be used to clean the Diamond Hand-pieces and Tips. Call the technical support line at 610.358.4447 for instructions.
Cavicide Disinfectant Spray (EX-903SCD)A convenient, ready-to-use, intermediate-level surface disinfectant for the Diamond Hand-piece and Diamond Tips.
NOTE Throughout the MegaPeel EX Manual you will notice microdermabrasion defined as mechanical exfoliation using crystals. Wherever this is stated, you may also use it to refer to microexfoliation which is done using the Diamond Hand-piece and tips.

9
INTRODUCTION
WHAT IS MICRODERMABRASION?
Microdermabrasion is a simple and effective form of exfoliation. It is a mechanical exfoliation that uses aluminum oxide crystals to remove the outer layer of dead or damaged skin cells, revealing a more youth-ful skin. Microdermabrasion is a non-invasive treatment designed to improve the overall texture, tone and clarity of the skin while restoring the skin’s elasticity.
HOW DOES MICRODERMABRASION WORK?
This type of exfoliation involves gently sandblasting the skin with a high-pressure flow of crystals de-signed to remove the outermost layers of the epidermis (stratum corneum), followed by a vacuum suction that removes the crystals from the skin While the crystals perform the exfoliation, the vacuum suction stimulates the lower layers of the skin. This repeated process stimulates the production of a new layer of skin cells, bringing with it an increased level of collagen and elastin, which further improves your skin’s appearance.
HOW MANY TREATMENTS ARE NEEDED?
We recommend that people undergo a series of 4 to 6 microdermabrasion treatments. The results are cu-mulative. Microdermabrasion is a progressive treatment. Although 1 microdermabrasion treatment yields fresher, smoother looking skin, generally results improve substantially after the 4th, 5th or 6th treatment. The number of necessary treatments depends on the condition of the skin and the needs of the client. Initially you can treat patients every 7 to 14 days. With further treatments, they can maintain the desired results.
WHAT TYPE OF SKIN CAN BENEFIT?
All skin types and skin colors can benefit from microdermabrasion. The process rejuvenates and refreshes aging, flaky, dry, thickened, blemished, dull and sun-damaged skin. Blotchiness, uneven skin tones and texture improve. Microdermabrasion reduces the appearance of fine lines, acne scars, hyperpigmenta-tion, chicken pox scars, brown/age spots, fine-lined wrinkles (rhytides), hyperkeratosis, large pores and other skin imperfections.

Platinum Series
10
WHEN SHOULD ONE USE MICRODERMABRASION?
Use MegaPeel EX Microdermabrasion to treat:�� Face, neck and décolletage.�� Shoulders and back.�� Hands.�� Elbows and knees.
WHAT SKIN CONDITIONS RESPOND FAVORABLY TO MICRODERMABRASION?
�� Acne/acne scarring.�� Dehydrated/dull skin.�� Fine lines/aging skin.�� Photo-aged skin/hyperpigmentation.�� Post inflammatory hyperpigmentation.�� Rosacea.
WHEN SHOULD ONE NOT USE MICRODERMABRASION?
Do not use microdermabrasion on people who have:�� Active acne.�� Cancer, including skin cancer.�� Eczema.�� Herpes simplex (cold sores) unless they take preventative medication before and after treatment�� Keloid scarring.�� Prescribed topical medications, such as Differin, Retin-A, Retin-A Micro, Tazorac�� Raised moles, warts, skin tags.�� Skin sensitivity.�� Sunburn.�� Uncontrolled diabetes.�� Untreated diabetes.�� Vitiligo.
Do not use microdermabrasion in:�� Areas of telangiectasias.�� Children under age 12.�� People taking Accutane within the last 6 months.�� People under the care of a physician.�� People who overuse exfoliants. �� Pregnant or nursing women.

11
CHAPTER 1
ASSEMBLING THE MEGAPEEL EX®
NOTE
�� Take the MegaPeel EX machine out of its shipping carton.�� Store the box and packaging materials in case you need to return them.�� Put the machine on a level surface.�� Plug one end of the electrical cord into the machine and the other into a
grounded, 3-pronged electrical outlet.
�� Remove the lid of the MegaPeel EX and put aside.�� Inside the machine, remove the blue tube in the pink connector
by pushing in on the pink ring and pull out blue tube at the same time.
CRYSTAL AND FILTER SET-UP
�� Open the white box of MegaPeel EX crystals and filters.�� Take out the smaller, heavier bottle containing crystals.�� Remove the cap on the crystal container.�� Attach the container to the metal grommet at the end of the blue tube. �� Gently put this container upside down in the smaller space in the machine, on the left side.
If you plan to operate a steamer in the same room as the MegaPeel EX, call us immediately to dis-cuss proper care. Steamers can cause crystals to clog in the MegaPeel EX.
Platinum Series
12
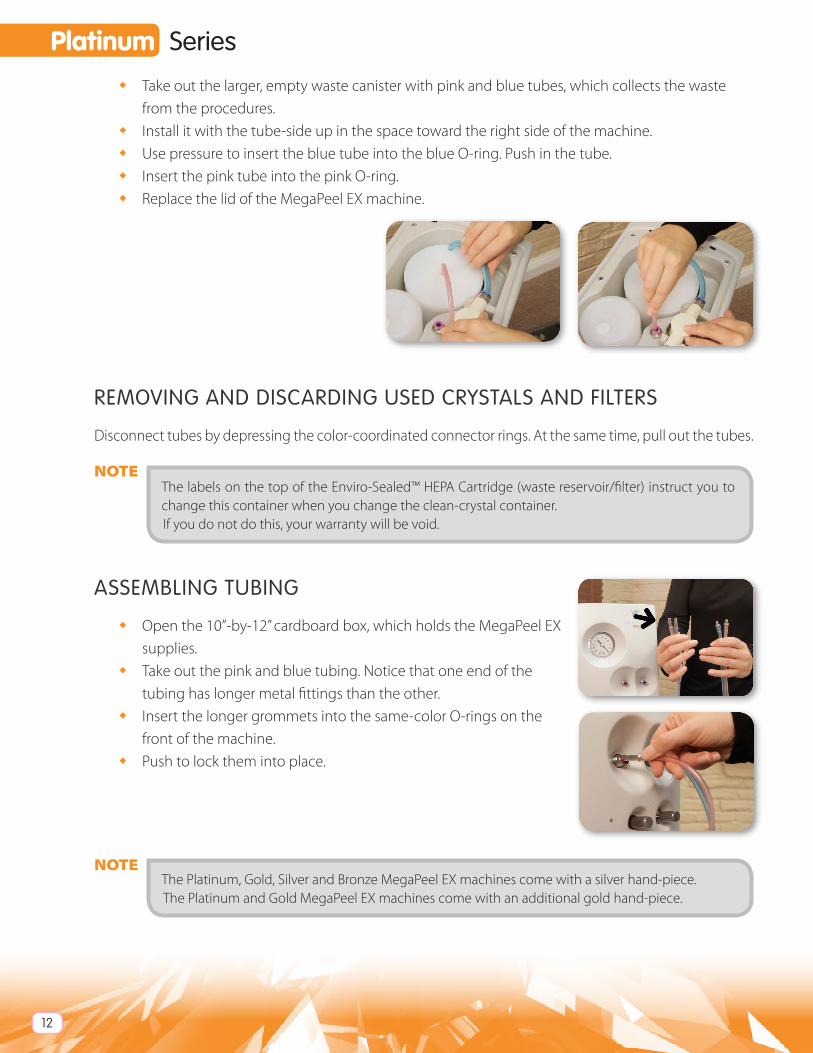
�� Take out the larger, empty waste canister with pink and blue tubes, which collects the waste from the procedures.
�� Install it with the tube-side up in the space toward the right side of the machine.�� Use pressure to insert the blue tube into the blue O-ring. Push in the tube. �� Insert the pink tube into the pink O-ring. �� Replace the lid of the MegaPeel EX machine.
REMOVING AND DISCARDING USED CRYSTALS AND FILTERS
Disconnect tubes by depressing the color-coordinated connector rings. At the same time, pull out the tubes.
NOTE
ASSEMBLING TUBING
�� Open the 10”-by-12” cardboard box, which holds the MegaPeel EX supplies.
�� Take out the pink and blue tubing. Notice that one end of the tubing has longer metal fittings than the other.
�� Insert the longer grommets into the same-color O-rings on the front of the machine.
�� Push to lock them into place.
NOTE
The labels on the top of the Enviro-Sealed™ HEPA Cartridge (waste reservoir/filter) instruct you to change this container when you change the clean-crystal container.If you do not do this, your warranty will be void.
The Platinum, Gold, Silver and Bronze MegaPeel EX machines come with a silver hand-piece.The Platinum and Gold MegaPeel EX machines come with an additional gold hand-piece.

13
ASSEMBLING THE HAND-PIECES
Assemble the silver and gold hand-pieces the same way.�� Connect the other side of the tubing to the hand-piece. �� Put the pink end into the larger hole.�� Put the blue end into the smaller hole.�� Twist the fitting on the tubing to seal the connections. Tug the
hand-piece to make sure that it is secure.
CLEANING THE HAND-PIECES
�� Ream out the hand-piece using the needle in the spare-parts kit.�� Thoroughly rinse out the crystals inside the openings of the hand-piece.�� Thoroughly wash the exterior of the hand-piece.�� After treating each patient, sterilize the hand-piece by using an autoclave or alcohol. �� Replace the hand-pieces after 300 uses.
NOTE
USING THE DISPOSABLE TIPS
From the same carton, remove the tip that you will use for treatment.The tips determine the depth of the treatment. Start with the shallowest and move deeper as treatments progress.Use the clear tip for most treatments, especially the first treatment. Adjust pressure to at least 45 kPa. Use the clear tip.
�� Notice 2 holes on the top of the hand-piece. �� Screw the clear tip into the hand-piece, placing the divider goes
between the 2 holes. �� Leave some space showing between the divider and the hand-
piece. �� CAUTION: Do not over-twist the tip. The gap needs to remain in
place. Use the gold tip for patients interested in more aggressive treatments. Start with pressure of at least 35 kPa with the gold tip, which excels for areas with tougher skin, such as the back, feet and scars.
�� Attach the tubing to the gold hand-piece the same way you attached it to the silver hand-piece.
�� WARNING: Because this tip is very powerful, start the pressure at no more than 35 kPa.
Change the tubing and the orange pressure-locking ring every 9 months.

Platinum Series
14
NOTE
You can purchase the blue tips separately. They are designed for those staff who are used to working at a 45 degree angle. The blue tips work for moderate to aggressive peels. Start the pressure at no less than 45 kPa.
�� Attach the blue tip, screwing it on just to the point that the thin black line on the hand-set lines up with the raised line on the blue tip.
SETTING THE VACUUM PRESSURE TO START MEGAPEEL EX TREATMENT
The vacuum pressure setting determines the power of the treatment. The vacuum control knob is the knob on the left-hand side. The pressure plus your chosen tip determine the depth of the treatment as well. The MegaPeel EX uses kPa (kilopascals) as to measure vacuum pressure.
�� For the 1st treatment for each patient, test the patient’s reaction and comfort level.�� Use the clear tip.�� Set the vacuum pressure up to 45 kPa.�� Increase the pressure slowly if you want a more aggressive peel.�� If you are using the gold tip for a more aggressive peel, start the pressure at 35 kPa.
SETTING THE CRYSTAL FLOW
�� On the outside of the machine, lower the crystal flow dial on the right by turning it to the left, counterclockwise, as far as you can without stopping it.
�� Use a minimal amount of crystals – just enough to abrade the skin – to achieve the best results.
NOTE
�� If you have questions, please visit our website or call us at 610-358-4447.
NOTE
Almost all patients treated with the gold tip will experience crusting from dried serum. Crusting, which is normal, indicates that you performed the procedure properly. The crusts clear on their own in 3 to 5 days after treatment. Tell patients that they can avoid crusting if they keep the skin moist after treatment. We recommend the use of dmSkincare’s argan boost serum™
The machine produces a little tornado of crystals in the top of the tip. Do not fill the whole side of the tip with crystals. If you have your crystals turned up too high, you will waste crystals. You will not, however, damage the machine.
When you place your last crystal and filter set in the system, please call and order a new box of supplies.

15
Diamond Hand-piece and Diamond Tips ASSEMBLING THE DIAMOND HAND-PIECE
When using the Diamond hand-piece and Diamond tips, make sure that no other tubing is plugged into the front of the MegaPeel EX system.
�� To use the Diamond hand-piece and tips, take the single pink tube and insert into the vacuum (pink) side on the front of the MegaPeel EX. The crystal (blue) side will be left without a tube.
�� Insert the other end of the tubing with the metal connector into the Diamond hand-piece, making sure it is secure.
�� Attach the desired Diamond tip to the end of the Diamond hand-piece. NOTE:
Before placing the Diamond tip to the hand-piece, make sure the black o-ring is in place on the handpiece.

Platinum Series
16
Daily Maintenance of Diamond Tips CLEANING AND STERILIZATION OF TIPS IMMEDIATELY AFTER USE
Proper cleaning of the Diamond tips is imperative to your patients’ health. Cleaning must be performed immediately after every treatment. It is not necessary to clean the Diamond hand-piece after each treat-ment.
�� Immediately after each use, remove the Diamond tip from the Diamond hand-piece and rinse under hot running water. Scrub the abrasive surface of the Diamond tip with a brush (located in the cleaning kit which comes with the Diamond Tips) to remove the protein material.
�� The Diamond tip should then be placed in the CaviCide1, using either a tray or an ultrasonic unit, making sure it is completely covered and let it soak in CaviCide1 for 3 minutes at room temperature (68°F/20°C).
STANDARD STEAM STERILIZATION OF TIPS
�� Standard steam sterilization is based on your autoclave’s maintenance parameters.�� Every sterilizer is different, please consult with your sterilizer’s operating manual for
recommended sterilization times and temperatures. �� Steam sterilization should always be used if the surface of the skin may be penetrated.
NOTE
COLD STEAM STERILIZATION
�� Most cold sterilization solutions render instruments only after a 10 hour immersion. If the instruments need to “disinfect” only, cold sterilization is ok as disinfection will take place in only 10 minutes.
�� Follow all cold sterilization/disinfection protocol as mandated by your facility. Use only a facility approved disinfectant.
NOTE
General Guidelines: 30 minutes: 250° Fahrenheit at 15psi or 121° Celsius at 1kg/CM2
General Guidelines: Soak tips in a facility approved disinfectant (such as DermaMed Solutions’ Cavicide Disinfectant Spray (Item # EX-903SCD - to order please call 610.358.4447)

17
Maintenance of Diamond Hand-piece CLEANING AND STERILIZATION OF HAND-PIECE
NOTE
�� To clean the Diamond hand-piece, first remove the Diamond hand-piece from the tubing attachment using the small screwdriver found in the Tip Box.
�� Carefully insert the end of the screwdriver into the space between the Diamond hand-piece and the metal connector attached to the pink tubing. Use the screwdriver to separate the 2 pieces.
�� The Diamond hand -piece should then be placed in the Cavicide1, using either a tray or an ultrasonic unit, making sure they are completely covered and let them soak in CaviCide for 3 minutes at room temperature (68°F/20°C).
STANDARD STEAM STERILIZATION OF HAND-PIECE
�� Standard steam sterilization is based on your autoclave’s maintenance parameters.�� Every sterilizer is different, please consult with your sterilizer’s operating manual for
recommended sterilization times and temperatures. �� Steam sterilization should always be used if the surface of the skin may be penetrated.
NOTE
It is not necessary to clean the Diamond hand-piece after each use
General Guidelines: 30 minutes: 250° Fahrenheit at 15psi or 121° Celsius at 1kg/CM2

Platinum Series
18
COLD STEAM STERILIZATION
�� Most cold sterilization solutions render instruments only after a 10 hour immersion. If the instruments need to “disinfect” only, cold sterilization is ok as disinfection will take place in only 10 minutes.
�� Follow all cold sterilization/disinfection protocol as mandated by your facility. Use only a facility approved disinfectant.
NOTE
Maintenance of Diamond Tubing CLEANING AND STERILIZATION OF CONNECTOR ON TUBING
NOTE
�� To clean the Diamond tubing connector, depress the connector ring located at the bottom of the tubing and at the same time, pull out the pink tube.
�� The tubing connector should then be placed in the Cavicide1, using either a tray or an ultrasonic unit, making sure they are completely covered and let them soak in CaviCide for 3 minutes at room temperature (68°F/20°C).
�� The tubing can also be placed in the CaviCide solution while still attached to the pink tubing.
Diamond Hand-piece Treatment Guidelines
VACUUM
�� The vacuum setting determines the amount of pressure between the skin and the abrasive surface.
�� Low vacuum setting, 35 kPa, applies a low force.�� High vacuum setting, 45 kPa, applies a high force between the skin and the abrasive.
NOTE
General Guidelines: Soak tips in a facility approved disinfectant (such as DermaMed Solutions’ Cavicide Disinfectant Spray (Item # EX-903SCD - to order please call 610.358.4447)
It is not necessary to clean the connector on tubing. The connector can NOT be autoclaved and only placed in CaviCide1
Never use vacuum around the eye area. Vacuum can cause redness and swelling in this sensitive area.

19
�� The vacuum setting can only be read when the tip end is covered. �� Cover the end of the wand and the gauge will show the current vacuum setting. �� Turning the vacuum knob clockwise will increase the vacuum pressure.
NUMBER OF PASSES
�� The wands should pass over the skin surface at least twice and the passes should be overlapping to achieve a uniform result.
�� The first pass is normally vertical and the second pass is horizontal. �� The speed which you move the wand is not critical.
NOTE
Diamond Tip GuideBonded on to the ends of the tips are natural diamonds. The diamond tips abrasiveness is measured in microns. The finer the abrasive, the less material is removed with each pass. Each tip has a number on the base which indicates the mesh. They vary anywhere from 75-200 mesh.
�� The tip with 75 mesh diamond abrasive is more aggressive. �� The medium tips have a diamond abrasive which read 100 and 150 mesh. �� The finer tip has a diamond abrasive of 200 mesh.
It is very important is to keep the abrasive surface clean and to make sure you remove all skin particles. Replace the tips if they become chipped or worn.
Refer to Chapter 2: PERFORMING A MICRODERMABRASION TREATMENT MICRODERMABRASION TREATMENT GUIDELINE in the MegaPeel EX Instructional Manual.

Platinum Series
20
CHAPTER 2
PERFORMING A MICRODERMABRASION TREATMENT
Microdermabrasion removes dead cells from the surface of the skin. It thickens the outer layer, or epider-mis, of the skin and increases the production of new skin cells, collagen and elastin. Microdermabrasion leaves the skin smooth and clean with mild redness (erythema). Complete at least 5 peels to achieve a lasting effect. The patient who follows a proper skin-care program will enjoy long-lasting improvement in the skin.
RECOMMENDED PROCEDURE:
PEEL # 1This peel should be a conservative peel if the skin technician does not know the patient’s skin and reac-tion to other irritants, such as glycolics, Retin-A, etc., although these products can be incorporated into a beneficial MegaPeel EX® program. Before the treatment, ask the patient if redness is acceptable and inform the patient that redness may last for a day (the pre-consultation should address this issue). Adjust setting lower if patient is apprehensive. The setting generally found to be most successful for the 1st peel is approximately 45 – 50 kPa using the clear divided tip.
PEEL # 2When the patient comes into the office for the 2nd treatment, find out how quickly he/she recovered from the 1st treatment. Usually, the patient will report quick healing time, and with the patient’s consent, the technician can be more aggressive with this peel. Increase the kPa and adjust according to the pa-tient’s tolerance. Make as many slow, even passes over the treatment area as necessary.
PEEL # 3 +After the 2nd peel, assess the patient’s recovery time. If you were aggressive, it may be necessary to space this peel 10 – 14 days after the 2nd peel. As you become more aggressive and incorporate more aggres-sive home care products, allow the skin to heal for up to two weeks before proceeding with another ag-gressive peel. The gold tip and hand-piece may be used at this point once the patient is interested in a more aggressive treatment.

21
CONTINUING PEELS
Follow the above guide for additional peels. All patients should have at least 5 peels, depending on the type of problems they want to address. In some cases, 10 peels are necessary for maximum results.
MAINTENANCE TREATMENTS
To maintain results and overall skin health, you should recommend that your patients return for 1-2 maintenance treatments every 3-6 months, depending on the severity of the skin challenges that were addressed in the initial treatment sessions.
POST TREATMENT PRODUCTS
As you get more aggressive with the vacuum pressure (kPa) and number of passes, you will see more erythema. As you treat the deeper layers of the epidermis, there is additional concern for hypersensitivity with some moisturizers and other skin care products. Hydrocortisone 1% (aloe cort 1% by dmSkincare) is the recommended soothing agent combined with a very non-sensitizing sunscreen (daily eclipse™ - oil free sunscreen with SPF 30 by dmSkincare).
If the patient is very irritated, use either cold compresses (excellent for calming the skin) or post-laser calming products. Continue this for two days. Do not apply any irritants, such as Retin-A or glycolics for 2 days after any peel, and use only a 1% hydrocortisone and a good moisturizing base (green tea vita-E moisturizer™ by dmSkincare).
DermaMed Solutions, LLC will be happy to recommend the proper post-skin care.

Platinum Series
22
STEP 3
Have the client turn their head to the side. When treating the temple area do not lock onto the skin (this is a thin skin area that tends to be sensitive). Perform downward passes over the skin staying clear of the eye area.
STEP 2
When half of the forehead is complete move back to the center of the forehead and repeat Step 1 on other side.
STEP 1
Begin the treatment in the center of the forehead. Pulling the skin very taut gently glide the hand piece slowly back and forth vertically from the hairline to the eyebrow moving outward toward the temples. Each pass should overlap the last without losing contact with the skin. Occasionally re-position the hands to pull the skin taut as you move along the treatment area.
MICRODERMABRASION TREATMENT GUIDELINE
→→
→
←←
←→
→→
←
←←
→→
→
←←
←
→→→
←←←
→→→
←←←
→→→
←←←
←←
←←
←←

23
STEP 6
Starting near the ear gently glide your hand piece back and forth vertically over the skin moving inward toward the nose. Remember to stay clear of the eye area; remain outside of the orbital bone. Make sure the skin is pulled very taut in the same direction the hand piece is moving.
Please note: You may divide this area into smaller sections if necessary.
STEP 5
Have the client turn their head to the side. When treating the temple area do not lock onto the skin (this is a thin skin area that tends to be sensitive). Perform downward passes over the skin staying clear of the eye area.
STEP 4
Starting near the ear gently glide your hand piece back and forth vertically over the skin moving inward toward the nose. Remember to stay clear of the eye area; remain outside of the orbital bone. Make sure the skin is pulled very taut in the same direction the hand piece is moving.
Please note: You may divide this area into smaller sections if necessary.
←←←←
→→→→
←←←←
→→→
←←
←←
←
←←
←
←←
←←
→→
→→
←
←←
←
→→
→
←←

Platinum Series
24
STEP 9
When half of the upper lip is complete; move back to the center of the upper lip and repeat Step 8 on other side.
Please note: You may treat along the vermilion border. DO NOT TREAT THE LIPS.
STEP 8
Before treating the upper lip politely ask the client to tighten up the lip by pressing their lips together firmly. Gently glide the hand piece from the center of the chin outward toward the ear.
Please note: You may treat along the vermilion border. DO NOT TREAT THE LIPS.
STEP 7
When treating the chin area politely ask the client to tighten up their chin by pressing their lips together firmly. Glide the hand piece vertically over the chin locking on if possible. Keep in mind that face shapes vary from person to person. If it is difficult to move vertically refer to Steps 16 &17 for moving the hand piece horizontally over the chin.
Please note: You may treat along the vermilion border. DO NOT TREAT THE LIPS.
→→
← →
←→→
→→→→
→→→→

25
STEP 12
Have the client turn their head to the side. When treating the temple area do not lock onto the skin (this is a thin skin area that tends to be sensitive). Perform downward passes over the skin staying clear of the eye area.
STEP 11
When half of the forehead is complete move back to the center of the forehead and repeat Step 10 on other side.
STEP 10
As in Step 1 begin at the forehead. Starting at the center of the forehead gently gliding the hand piece outward toward the temples and back again toward the center of the forehead, each pass slightly overlapping the last.
←←
←←
←←
→→→ ←←←→→→ ←←←
→→→ ←←←→→→ ←←←

Platinum Series
26
STEP 15
Starting slightly below the ear gently glide the hand piece along the jaw line toward the chin and back again moving up the side of the face. Each pass should slightly over lap the last. Stay clear of the eye area; remain outside of the orbital bone. Make sure the skin is pulled very taut in the same direction you are moving the hand piece.
Please note: You may divide this area into smaller sections if necessary.
STEP 14
Have the client turn their head to the side. When treating the temple area do not lock onto the skin (this is a thin skin area that tends to be sensitive). Perform downward passes over the skin staying clear of the eye area.
STEP 13
Starting slightly below the ear gently glide the hand piece along the jaw line toward the chin and back again moving up the side of the face. Each pass should slightly over lap the last. Stay clear of the eye area; remain outside of the orbital bone. Make sure the skin is pulled very taut in the same direction you are moving the hand piece.
Please note: You may divide this area into smaller sections if necessary.
→→ ←←←→→→ ←←←→→→ ←←←
→→ ←←←→→→ ←←←→→→ ←←←
←←
←
←←
←

27
STEP 18
Before treating the upper lip politely ask the client to tighten up the lip by pressing their lips together firmly. Gently glide the hand piece from the center of the chin outward toward the ear.
Please note: You may treat along the vermilion border. DO NOT TREAT THE LIPS.
STEP 17
When half of the chin is complete move back to the center of the chin and repeat Step 16 on other side.
Please note: You may treat along the vermilion border. DO NOT TREAT THE LIPS.
STEP 16
As in Step 7, have the client tighten up their chin by pressing their lips together firmly. Gently glide the hand piece from the center of the chin outward toward the ear.
Please note: You may treat along the vermilion border. DO NOT TREAT THE LIPS.
→→→→
→→→→→→
→→→→→→

Platinum Series
28
STEP 21
When treating the eyes adjust your KPA to 30 - 35 (Never go above 35 KPA when treating the eye area). This area is very fragile. It is extremely important that the skin is pulled taut and away from the eye. First, move to the side of the eye. Spread the skin taut and move vertically back and forth making a few passes Next move below the eye, pull the skin down and spread the skin taut. Ideally glid-ing the hand piece inward making a few passes.
Please note: DO NOT TREAT THE EYELIDS
STEP 20
The nose has thicker skin than the face. Slightly turn up the kPa (vacuum pressure). Gently glide the hand piece vertically and horizontally over the entire area making several passes in each direction. Include the area between the eyebrows.
STEP 19
When half of the upper lip is complete; move back to the center of the upper lip and repeat Step 18 on other side.
Please note: You may treat along the vermilion border. DO NOT TREAT THE LIPS.
→→→→
← →→ ←→
→←←
→←
→←
←← ←

29
CHAPTER 3
INCORPORATING CHEMICAL PEELS WITH YOUR MICRODERMABRASION PRECISION PEEL® TREATMENT
Chemical peels are highly effective and non-irritating treatments. Peels incorporate several chemical com-ponents and help rejuvenate the skin. You can perform peels independently or before microdermabrasion.
Precision Peel, a dmSkincare product, exfoliates dead skin cells, promotes cell renewal, stimulates circula-tion and promotes the growth of healthy, plump new cells. It minimizes the appearance of fine lines, scars, acne and environmental damage. Precision Peel lightens dark spots and evens skin tones. The combination of Precision Peel and MegaPeel EX microdermabrasion will provide measurable results for most skin types.
ITEMS YOU WILL NEED:
4x4 Gauze PadWaterbotana-gel cleanser™Peel Prepglycolic acid 30%treatment neutralizerretinyl enzyme treatmentvitA-clear serum™daily eclipse™ - oil free sunscreen SPF 30
PROCEDURE
1. Cleansing�� Apply botana-gel cleanser™ with green tea to the entire face. �� Massage gently to cleanse and remove makeup. �� Rinse with water and pat dry.
2. Peel Prep�� Apply the Peel Prep to a 4”-by- 4” gauze pad. �� Apply to the skin in a buffing motion, avoiding the eye area. �� Leave on for 2 to 3 minutes. �� Remove with a clean, dry gauze pad, buffing vigorously until the skin no longer feels tacky

Platinum Series
30
3. glycolic acid 30%�� Put glycolic acid 30 % on a 4”-by- 4” gauze pad. For patients with sensitive skin, substitute lactic
acid 30 %.�� Carefully apply to the skin, avoiding the eye area. �� Leave on for 2 to 3 minutes.
4. Neutralize�� Saturate a 4”-by- 4” gauze pad with treatment neutralizer. �� Generously apply to the face, avoiding the eye area. �� Rinse with water and pat dry.
5. MegaPeel EX Microdermabrasion Procedure – Refer to Chapter 2�� Dry the skin thoroughly prior to treatment. �� Make 2 passes over the skin. Treat the entire face vertically the first time, horizontally the second time. �� Pull the skin taut – in the same direction the hand-piece is moving – as you treat in that area. �� Slowly glide the hand-piece over the skin back and forth over the area. �� Dust any particles off the skin.
6. retinyl enzyme treatment �� Apply a thin layer of retinyl enzyme to a 4”-by- 4” gauze pad. For sensitive skin, substitute hydra-
repair mask.�� Wipe the product over the entire face, avoiding the eye area. �� Leave on for 5 minutes. �� Use a clean, wet 4”-by- 4” gauze pad to remove the chemical.�� Rinse. �� Repeat until the skin is no longer sticky. (Do this at least 3 times.)
7. vitA-clear serum™�� Apply 3 to 4 drops of vitA-Clear Serum™ to the face using hands, avoiding the eye area. For
sensitive skin, substitute green tea vita-E moisturizer.�� Do not massage the serum into the face. �� Allow to dry for 2 minutes.
8. Finish�� Apply daily eclipse™ - oil free sunscreen barrier protection to face and décolleté.
CONTRAINDICATIONS:
�� Accutane use within one or two years (assessment made by physician)�� Fitzpatrick skin types IV – VI (may create hyper-pigmentation)�� Anyone with a herpetic breakout (cold sores)�� Pregnancy or lactation�� Anyone with an infectious disease�� Open sores, suspicious lesions, or basal cell carcinoma (Always refer to a physician)�� Do not treat over semi-permanent make-up

31
CHAPTER 4
INCORPORATING CHEMICAL PEELS WITH YOUR MICRODERMABRASION HYDRA BRIGHT FACIAL TREATMENT
Hydra Bright Facial is a procedure that will add maximum hydration and oxygen to plump tissues and brighten appearances. It incorporates D20 Solution, a liquid infusion of botanical extracts blended with deuterium oxide (“heavy water”) for intense moisture. The oxygen cream is a skin brightening cream with multiple actives and applications, combining vitamin A and glycolic acid and accelerated by peroxide which provides water and oxygen at the cellular level. This cream acts as a delivery agent for vitamin serums and creates an immediate skin lifting and visible glow The oxygen serum uses silk amino acids and squalane to create a satiny finish on the skin and provide a super hydration and oxygenated environment to plump tissue and fill lines and wrinkles. This combination will provide measurable results for almost any skin type.
ITEMS YOU WILL NEED:
Waterbotana-gel cleanser™Steamer (optional)peel prepMegaPeel EX Microdermabrasion SystemD20 solutionoxygen serum oxygen cream daily eclipse™ - oil free sunscreen SPF 30
PROCEDURE
1. Cleansing�� Apply botana-gel cleanser™ with green tea to the entire face. �� Massage gently to cleanse and remove makeup. �� Rinse with water and pat dry.
2. Peel PrepOption 1:
�� Use a steamer to soften the sebum. �� Apply peel prep with a fan brush while under steam.

Platinum Series
32
�� Turn steam off.�� Aggressively buff the skin dry with open-weave gauze. �� Perform extractions, if appropriate.
NOTE
Option 2: �� Apply peel prep to a 4”-by- 4” gauze pad. �� Apply to the skin in a buffing motion, avoiding the eye area. �� Leave on for 2 to 3 minutes. �� Remove with a clean, dry 4”-by- 4” gauze pad in a vigorous buffing motion until the skin no
longer feels tacky. �� Rinse with water. �� Aggressively buff the skin dry with open-weave gauze.
3. MegaPeel EX Microdermabrasion Procedure – Refer to Chapter 2�� Dry the skin thoroughly prior to treatment. �� Make 2 passes over the skin. Treat the entire face vertically the first time, horizontally the second time. �� Pull the skin taut – in the same direction the hand-piece is moving – as you treat in that area. �� Slowly glide the hand-piece over the skin back and forth over the area. �� Dust any particles off the skin.
4. D20 solution�� Make compresses with D2O and soft, 3”-by-3” closed-weave gauze . �� Apply to the entire face, covering eyes. �� Do not cover nostrils. �� Allow the D20 to soak into the skin for 3 to 4 minutes. �� As an alternative, if oxygen tanks are available, diffuse the D2O through a spray with oxygen
onto skin.
5. oxygen serum�� While skin is still damp, apply a thin, even layer of oxygen serum to entire face, including under
eyes and on lips.
6. oxygen cream Mask�� Apply an even layer of oxygen cream. �� Leave it on for 5 minutes. The patient may notice temporary tingling and redness. �� Remove the residue by gently wiping with gauze dampened with D2O.
7. Hydrate�� Reapply oxygen serum, this time allowing it to absorb into the skin.
Remove the microdermabrasion system from the room before applying steam.

33
8. Finish�� Apply daily eclipse™ - oil free sunscreen to face and décolleté.
9. Home Care TreatmentAfter the treatment, advise the client to begin applying 3 products at home:
�� C-difference™ - vitamin C lotion.�� high potenC serum™. �� collagen renewal c’reme™ with epidermal growth factor.
CONTRAINDICATIONS
�� Accutane use within one or two years (assessment made by physician)�� Fitzpatrick skin types IV – VI (may create hyper-pigmentation)�� Anyone with a herpetic breakout (cold sores)�� Pregnancy or lactation�� Anyone with an infectious disease�� Open sores, suspicious lesions, or basal cell carcinoma (Always refer to a physician)�� Do not treat over semi-permanent make-up
Platinum Series
34
CHAPTER 5
TROUBLESHOOTING
We expect that your experiences with the MegaPeel EX product and process will always run smoothly. In case you run into problems, here’s a handful of suggestions.
WHAT IF THE MACHINE DOES NOT TURN ON?
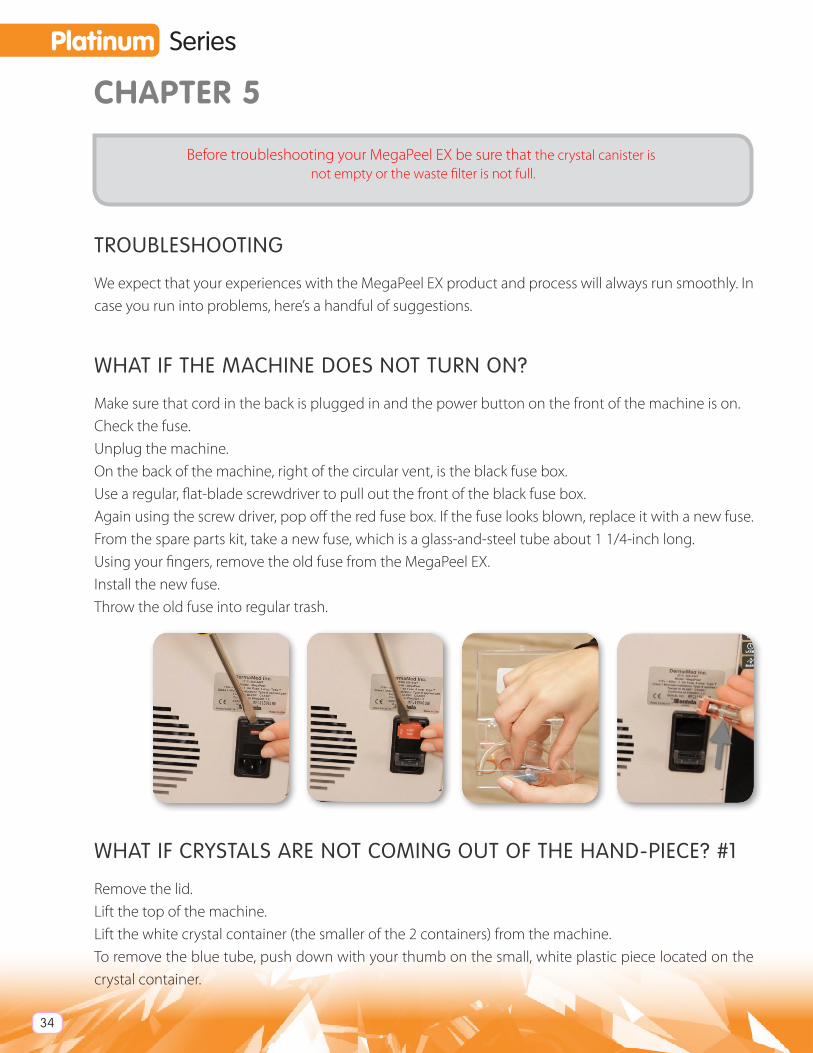
Make sure that cord in the back is plugged in and the power button on the front of the machine is on.Check the fuse.Unplug the machine.On the back of the machine, right of the circular vent, is the black fuse box.Use a regular, flat-blade screwdriver to pull out the front of the black fuse box.Again using the screw driver, pop off the red fuse box. If the fuse looks blown, replace it with a new fuse.From the spare parts kit, take a new fuse, which is a glass-and-steel tube about 1 1/4-inch long.Using your fingers, remove the old fuse from the MegaPeel EX. Install the new fuse. Throw the old fuse into regular trash.
WHAT IF CRYSTALS ARE NOT COMING OUT OF THE HAND-PIECE? #1
Remove the lid.Lift the top of the machine.Lift the white crystal container (the smaller of the 2 containers) from the machine.To remove the blue tube, push down with your thumb on the small, white plastic piece located on the crystal container.
Before troubleshooting your MegaPeel EX be sure that the crystal canister is not empty or the waste filter is not full.

35
Take the short blue tube from the spare parts kit.Attach it to the metal grommet at the end of the long, blue crystal tube.
Press on the pink O-ring to remove the pink tube attached to the waste container from the machine.Attach the pink tube from the waste filter to the other end of the short blue tube from the spare parts kit which is already connected to the blue tube coming out of the machine. Return to the front of the machine. Increase the vacuum pressure by turning the knob all the way to the right.
Turn on the machine. Let the machine run for one minute. When the machine stops, remove the short blue tube that you just installed. Return the short blue tube to the spare parts kit. Reconnect the long blue tube to the crystal containerReconnect the pink tube to the pink connector inside the machine. Run the machine. The MegaPeel EX should now be receiving crystals.
WHAT IF CRYSTALS ARE NOT COMING OUT OF THE HAND-PIECE? #2
Disconnect the pink and blue tubes from the front of the machine. Push down on their O-rings.

Platinum Series
36
Pull out the tubes.Take the clear, 5-inch, U-shaped tube from the spare parts kit and connect it to the O-rings on the front of the machine .The tube will look like a horseshoe in the front of the machine.Turn the vacuum knob all the way to the right so the vacuum is at its highest pressure.
Turn on the machine.If you see crystals going through the clear tube, turn the machine off.Remove the clear U-shaped tube.Replace all connections: pink tube, blue tube, hand-piece and tip.Turn the machine on.Occlude the tip 5 to 10 times. The MegaPeel EX should now be receiving crystals.
WHAT IF CRYSTALS ARE STILL NOT COMING OUT OF THE HAND-PIECE? #3
Remove the lid..Check the pink and blue tubing which you attach the hand-piece to and see if there is a clog.If you see a clog, replace the tubing.If you do not see a clog, disconnect the hand piece.Use the needle in the spare-parts kit to unclog the holes.Knock the hand piece forcefully against a hard surface. If you still do not see crystals in the tube, repeat the process with the short blue-tube as mentioned in Step #1 on page 25 Unplug the machine.Lift the top of the machine.Lift the white crystal container (the smaller of the 2 containers) from the machine.To remove the blue tube, push down with your thumb on the small, white plastic piece located on the crystal container.
Take the short blue tube from the spare parts kit.

37
Attach it to the metal grommet at the end of the long, blue crystal tube.Press on the pink O-ring to remove the pink tube attached to the waste container from the machine.
Attach the pink tube from the waste filter to the other end of the short blue tube from the spare parts kit which is already connected to the blue tube coming out of the machine. Return to the front of the machine. Increase the vacuum pressure by turning the knob all the way to the right.
Turn on the machine. Let the machine run for one minute. When the machine stops, remove the short blue tube that you just installed. Return the short blue tube to the spare parts kit. Reconnect the long blue tube to the crystal containerReconnect the pink tube to the waste-filter connection. Run the machine. The MegaPeel EX should now be receiving crystals.
IF YOU HAVE A STEAMER IN THE ROOM:
Steam can cause clogging problems. We do not recommend keeping your machine in the same room as a steamer, if you do not have a choice the following information can help you keep your system running smoothly:
�� Please do not store your crystals in the same room as a steamer.�� Keep the protective cap and recap your crystals at night. �� Store crystals in a dry place (not under the sink or in the same treatment room as the steamer).

Platinum Series
38
Remove the MegaPeel EX from the room when performing steam treatments. Steam remains in the air even after the steam treatment is complete
IF STEAM STILL SEEMS TO BE AN ISSUE:
After your last treatment of the day:
�� Take the short blue tube from the spare parts kit. �� Connect it to the blue crystal tube and to the pink tube on the waste filter �� Leave the blue tube connected overnight. �� Run the system for several minutes in the morning before replacing the crystal canister. This will
introduce dry air into the system.
If after doing all the above clearings and crystals are not coming out of the hand-piece, call DermaMed’s Technical Support line, 610.358-4447. We will help you make the machine work properly.

39
MegaPeel EX® Microdermabrasion Treatment
CONSENT FORM
Prior to receiving this treatment, I have been candid in revealing any condition that may have a bearing on this procedure, such as, pregnancy, recent facial peels or surgery, allergies, tendencies to cold sores and fever blisters, use of Retin-A, Accutane or Hormones.
I understand there may be some degree of minor discomfort, i.e., scratchiness, itchiness.
I understand there are no guarantees to this procedure.
I understand that to achieve maximum results, I will need several ongoing treatments and will need to use a daily product over a period of time.
I understand that the possibility of irritation and redness exists and that I should notify my skin care pro-fessional when irritation persists.
I will follow the home care program specifically designed for me without changing or adding any prod-ucts without consulting with my skin care professional.
I have read the enclosed consultation and understand the contents.
I agree to all of the above to have this treatment performed on me and will follow all prescribed directions regarding post peel care.
PRINT NAME: _______________________________________
ADDRESS: _______________________________________
_______________________________________
_______________________________________
SIGNATURE: _____________________________________________________ DATE: _______________

Platinum Series
40
Skin Care Questionnaire
Date: _______________
Name: _______________________________________________ Birthdate: _____________________
Address: _____________________________________________
City: __________________________ State: ____________ Zip: ___________________
Home Phone: ___________________ Work Phone: ___________________
Referred by: ________________________________________________________
PERSONAL DATA:
Smoker: (circle one) no yes Pregnant: (circle one) no yes
Cosmetic surgery: (circle one) no yes If yes, when: _____________
Define procedure(s): __________________________________________________________________
Medication: (circle one) no yes If yes, what kind(s)? ______________________________________
Any health problems? (circle one) no yes If yes, explain: ___________________________________
Any allergic reactions to medication? (circle one) no yes If yes, describe: ______________________
Do you have any allergies? (circle one) no yes
Do you suntan? (circle one) no yes
Do you use sunscreen? (circle one) no yes
Please name the brand of products you are currently using:
Cleanser: __________________________________ Toner: ___________________________________
Moisturizer: ________________________________ Scrub:____________________________________
Mask: ____________________________________ Buff Puff: _________________________________
Other: _____________________________________________________________________________
Have you ever used Retin-A? (circle one) no yes If yes, what strength? _____________
Have you ever been treated with Phenol or Trichloracetic acid? (circle one) no yes
Have you ever used Hydroquinone (skin lightener)? (circle one) no yes
Have you ever been on Accutane? (circle one) no yes If yes, when? __________________________
Have you ever had herpes, hives, cold sores, fever blisters, keloids? Circle all that apply
If yes, when? ________________________________________________________________________
How would you characterize your skin: (circle one) Sensitive Rough Dry Oily/Acne-prone
If you had one complaint about your skin, what would it be? ___________________________________
Describe your skin in three words: _______________________________________________________
Additional comments/concerns: ________________________________________________________

41
MegaPeel EX Treatment Notes
Today’s Date: __________ Treatment #: __________ Date of Last Treatment: ___________
Examined client’s skin and observed the following: _______________________________________________
________________________________________________________________________________________
Cleansed client’s skin with: ___________________________________________
Prepared the skin for microdermabrasion with: ____________________________
Pre-peel pad or solution
Allowed skin to: (circle one) Air dry Fan dry Cloth dry
Determined the hand-piece to be used: (circle one) Gold Silver
Determined the tip to be used: (circle one) Gold Blue Clear divided
Determined the vacuum power by occluding the tip – vacuum power used: ___________________________
Determined crystal flow by turning the crystal regulating knob ____ full revolutions down from full crystal flow
Tested vacuum power on client’s mid-forehead – results: __________________________________________
i.e. Slight redness, pin-point bleeding, excoriation, scratch
If above results were more or less than desired, re-adjustment of vacuum power and/or crystal flow were performed as follows: ________________________________________________________________________
Proceeded with microdermabrasion treatment (use facial chart to record vacuum power, crystal flow, hand piece and tip used) making two passes in opposite directions on the following areas (for face): Right forehead, Left forehead, Right temple area, Left temple area, Right cheek area, Left cheek area, nose, chin.
Turned the vacuum power down to: _______, to microdermabrade the right eye area, left eye area, right side of neck, mid-neck and left side of neck.
Incorporated a chemical peel/procedure: ______________________________________________________
Post microdermabrasion treatment:
�� Removed any excess crystal residue
�� Sprayed with mineral water or wiped with damp cotton
�� Cleansed with: ___________________________ (name of product)
�� Applied 1% Hydrocortisone (if skin appeared very irritated) yes no
�� Moisturized with: _________________________ (name of product)
�� Applied mineral sunscreen of at least 30 SPF: yes no
�� Handed client written, post treatment protocol
Attach copy of Post Treatment Protocol

Platinum Series
42
SKIN CONDITIONS:
____ Sun Damage
____ Hard bumps under skin
____ Dry Patches
____ Brown Spots
____ Milia: Red White
____ Broken Blood Vessels
____ Upper Lip Lines: Deep Fine Clogged Pores
____ Pimples: Often Sometimes
____ Freckles
____ Excessive Oiliness
____ Wrinkles
____ Acne
____ Blackheads
SKIN TYPE
Normal/Combination
Oily
Dry
Notes and Observations

43
HYDRATING ROUTINETREATMENT SCHEDULE
(Dry, Sensitive, and Mature Skin)
Name: _____________________________________________________________________________
DATE
TIME
RECOMMENDED PROGRAM:
�� MegaPeel EX® treatment every 7 to 14 days for a series of 6-8 treatments�� Maintenance treatments every 4 to 6 weeks�� Immediately after each treatment: daily eclipse sunscreen
HYDRATING ROUTINE:
In the morning, cleanse the face (recommended gentle cleansing bar). Allow skin to remain slightly damp, then apply a pea size of argan boost serum, smoothing over face and neck. The serum may be ap-plied to eye area, keeping away from lash line. Follow with C-difference -vitamin C lotion and sunscreen (recommended daily eclipse.)
At night, cleanse the face and apply a pea size of argan boost serum on damp skin. Follow with green tea vita-E moisturizer.
DO NOT SPEND TIME IN THE SUN IF YOU ARE USING RETINYL PRODUCTS

Platinum Series
44
ACNE ROUTINETREATMENT SCHEDULE
(Acne-Prone and Oily Skin)
Name: _____________________________________________________________________________
DATE
TIME
RECOMMENDED PROGRAM:
�� MegaPeel EX® treatment every 7 to 14 days for a series of 6-8 treatments�� Maintenance treatments every 4 to 6 weeks�� Immediately after each treatment: daily eclipse sunscreen
CLARIFYING ROUTINE:
In the morning, cleanse the face (recommended repair bar). After cleansing, apply green tea toner with a cotton pad. Keep out of eyes. Apply sunscreen (recommended daily eclipse).
At night, cleanse skin (recommended botana gel cleanser) and pat dry. Apply a pea-size amount of vitA-clear serum to the face. Keep out of eye area. Allow to dry for two (2) minutes before applying a dime-size amount of AHA salicylic solution to the face Keep out of eye area.
DO NOT SPEND TIME IN THE SUN IF YOU ARE USING RETINYL PRODUCTS

45
LIGHTENING ROUTINETREATMENT SCHEDULE
(Hyperpigmented and Uneven Toned Skin)
Name: _____________________________________________________________________________
DATE
TIME
RECOMMENDED PROGRAM:
�� MegaPeel EX® treatment every 7 to 14 days for a series of 6-8 treatments�� Maintenance treatments every 4 to 6 weeks�� Immediately after each treatment: daily eclipse sunscreen
LIGHTENING ROUTINE:
In the morning, cleanse the face (recommended botana-gel cleanser – with green tea). Apply a dime-size amount of C-difference and follow with sun protection (recommended daily eclipse).
At night apply pea size amount of clari-tone serum and allow to dry for two (2) minutes. Follow with a dime-size application of AHA salicylic solution to the entire area. Keep both products out of eye area.
DO NOT SPEND TIME IN THE SUN IF YOU ARE USING RETINYL PRODUCTS

Platinum Series
46
ANTI-AGING ROUTINETREATMENT SCHEDULE
(Mature/Aged Skin and Fine Lines)
Name: _____________________________________________________________________________
DATE
TIME
RECOMMENDED PROGRAM:
�� MegaPeel EX® treatment every 7 to 14 days for a series of 6-8 treatments�� Maintenance treatments every 4 to 6 weeks�� Immediately after each treatment: daily eclipse sunscreen
ANTI-AGING ROUTINE:
In the morning, cleanse the face (recommended botana-gel cleanser – with green tea). Apply a pea size amount of high potenC serum to face and another to neck area. Blend into skin before applying mois-ture products (recommend C-difference™ -vitamin C lotion or green tea vita-E moisturizer™) and sun-screen (recommended daily eclipse™). Do not apply high potenC serum™ to thin skin of upper eyelids.
At night, cleanse the face and apply dime-sized amount of collagen renewal C’reme for nighttime repair. Three times a week (or as directed by your skincare technician) apply a quarter-size amount of retinyl en-zyme treatment evenly to clean face and neck and leave on for (8-10) minutes, remove with warm water and gently rub with damp cloth. Repeat removal and rinse process three times. Pat skin dry and follow with your recommended serum or moisture products. Keep out of eye area.
DO NOT SPEND TIME IN THE SUN IF YOU ARE USING RETINYL PRODUCTS

47
POST TREATMENT/SENSITIVE ROUTINETREATMENT SCHEDULE
(Post Treatment, Irritated Skin & Rosacea)
Name: _____________________________________________________________________________
DATE
TIME
RECOMMENDED PROGRAM:
�� MegaPeel EX® treatment every 7 to 14 days for a series of 6-8 treatments�� Maintenance treatments every 4 to 6 weeks�� Immediately after each treatment: daily eclipse sunscreen
POST-TREATMENT ROUTINE:
In the morning cleanse the face using the gentle cleansing bar. Create a lather with water, then apply to skin and gently cleanse with fingertips. Rinse well. May also be used in evening. Apply a small amount of argan boost serum to skin, adding water and smooth over face, keeping out of tear ducts and away from lash line (may be used under eyes, on lips and throat). For temporary relief of itching, discomfort, inflam-mation and rashes that might be due to stimulating facial products or treatments apply liberal amount of derma renewal gel, as needed for soothing and moisture. Keep out of eye area.
DO NOT SPEND TIME IN THE SUN IF YOU ARE USING RETINYL PRODUCTS

Platinum Series
48
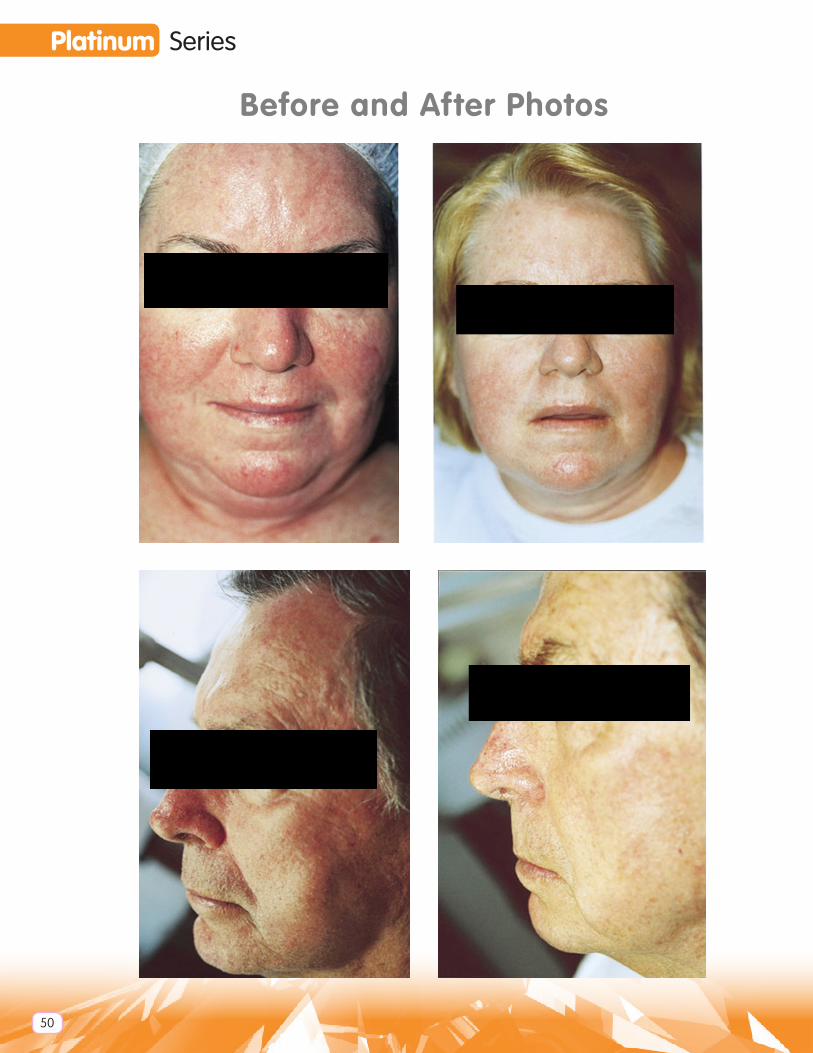
Before and After Photos

49
Before and After Photos
Platinum Series
50
Before and After Photos

51
Before and After Photos