plastic lattice - homedepot.com · 3 installing without mouldings: pre-drill oversized holes...
TRANSCRIPT

1
INSTALLATION INSTRUCTIONS
Plastic Lattice
VERANDA-WEB
Read all instructions prior to installing product.
Refer to manufacturers safety instructions when operating any tools.
To register your product, please visit:
veranda.barretteoutdoorliving.com
2
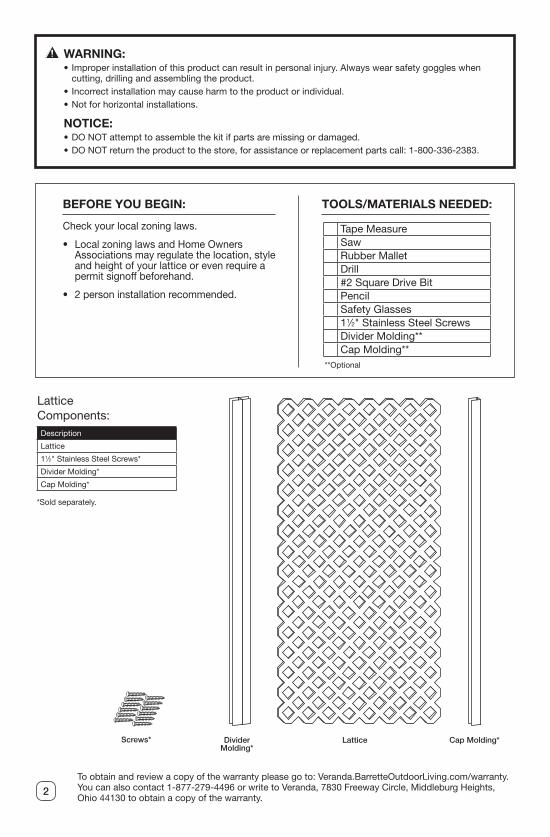
TOOLS/MATERIALS NEEDED:BEFORE YOU BEGIN:
WARNING:• Improper installation of this product can result in personal injury. Always wear safety goggles when
cutting, drilling and assembling the product.• Incorrect installation may cause harm to the product or individual.• Not for horizontal installations.
NOTICE:• DO NOT attempt to assemble the kit if parts are missing or damaged. • DO NOT return the product to the store, for assistance or replacement parts call: 1-800-336-2383.
LatticeComponents:Description
Lattice
11⁄2" Stainless Steel Screws*
Divider Molding*
Cap Molding*
Tape MeasureSawRubber MalletDrill#2 Square Drive BitPencilSafety Glasses11⁄2" Stainless Steel ScrewsDivider Molding**Cap Molding**
*Sold separately.
**Optional
LatticeDivider Molding*
Screws* Cap Molding*
Check your local zoning laws.
• Local zoning laws and Home Owners Associations may regulate the location, style and height of your lattice or even require a permit signoff beforehand.
• 2 person installation recommended.
To obtain and review a copy of the warranty please go to: Veranda.BarretteOutdoorLiving.com/warranty.You can also contact 1-877-279-4496 or write to Veranda, 7830 Freeway Circle, Middleburg Heights, Ohio 44130 to obtain a copy of the warranty.

3
INSTALLING WITHOUT MOULDINGS:
Pre-drill oversized holes through lattice (drill the largest hole that screw head will allow without fitting though) (Fig. 1). Center each screw in oversized holes and do not overtighten to allow for expansion and contraction of lattice (Fig. 2).
Hang the lattice with a screw every 24". Attach sides and bottom loosely. DO NOT tighten all the way (Fig. 3).
If using more than one panel, do not butt panels together (Fig. 4).
Leave 1⁄4" gap to allow for expansion and contraction
Cap Molding*
Fig. 1
Fig. 2
WoodLattice
1/4"
(6,3
5 m
m)
Fig. 3
Fig. 4
1
2
3

4
1/4" (6,35 mm) 1/4" (6,35 mm)
1/4"
(6,3
5 m
m) 1/
4" (6
,35
mm
)
INSTALLING WITH CAP & DIVIDER MOULDINGS:
Pre-drill oversized holes through lattice and moulding (drill the largest hole that screw head will allow without fitting though) (Fig. 1). Center each screw in oversized holes and do not overtighten to allow for expansion and contraction of lattice (Fig. 2).
Along the top, drill and fasten every 24". Drill holes and hang through both moulding and panel (Fig. 3).
Along the sides and bottom, drill holes and put screws through moulding only (Fig. 4).
Allow a 1⁄4" gap on all sides for expansion with cap and divider mouldings (Fig. 5).
Fig. 1
Fig. 2
WoodLatticeMolding
1/4" (6,35 mm)
1/4"
(6,3
5 m
m)
Fig. 3
1/4" (6,35 mm)
1/4"
(6,3
5 m
m)
Fig. 4
Fig. 5
1
2
3
4

5
IMPORTANT THINGS TO REMEMBER:
• If the lattice bows, loosen attaching screws, make sure you have allowed enough gap for expansion and contraction.
• Place screws 24" apart.
• DO NOT use for horizontal Installation.
24"